Genius PRO - Compressor Fini - Free user manual and instructions
Find the device manual for free Genius PRO Fini in PDF.

User questions about Genius PRO Fini
0 question about this device. Answer the ones you know or ask your own.
Ask a new question about this device
Download the instructions for your Compressor in PDF format for free! Find your manual Genius PRO - Fini and take your electronic device back in hand. On this page are published all the documents necessary for the use of your device. Genius PRO by Fini.
USER MANUAL Genius PRO Fini
GB Instruction manual for owner's use (Translation of the original instructions)
GB KEY TO PRODUCT SAFETY SIGNS
FR LEGENDE DES PICTOGRAMMES DE SECURITE FIGURANT SUR LES PRODUITS
NL VERKLARING WAARSCHUWINGSSYMBOLEN OP PRODUCTEN
DK SIGNATURFORKLARING TIL PRODUKTERNES SIKKERHEDSSKILTNING
SE FÖRKLARING TILL SÄKERHETSSYMBOLER PÅ PRODUKTERNA
GB Before use, read the handbook carefully
GB Warning, hot surfaces
GB Danger - automatic control (closed loop)
GB Hearing, sight and respiratory protection must be worn
GB Drain out the tank daily
GB Do not spray liquids near the compressor
1 - Manufacturer's data
2 - CE mark and WEEE symbol
3 - Type / Code / Serial Number
4 - Air displacement expressed in (l/min) and (cfm)
5 - Air delivered by the compressor expressed in (l/min) and (cfm)
6 - Maximum operating pressure (bar and PSI), tank capacity (l), rotations per minute (RPM), weight (kg)
7 - Guaranteed sound power level in dB(A); Measured sound power level in dB(A)
8 - Electric data: voltage (V), frequency (Hz), absorption (A), power in (kW) and (HP)
9 - Duty cycle
10 - Declaration of origin
11 - Year of production/manufacturing
FR Légende
natural_image
Illustration of various hand tools including a drill, gloves, screwdriver, and screwdriver (no text or symbols)(not included)

text_image
(included)2
natural_image
Line drawing of a person installing or adjusting a wall-mounted electronic device (no text or symbols visible)3
text_image
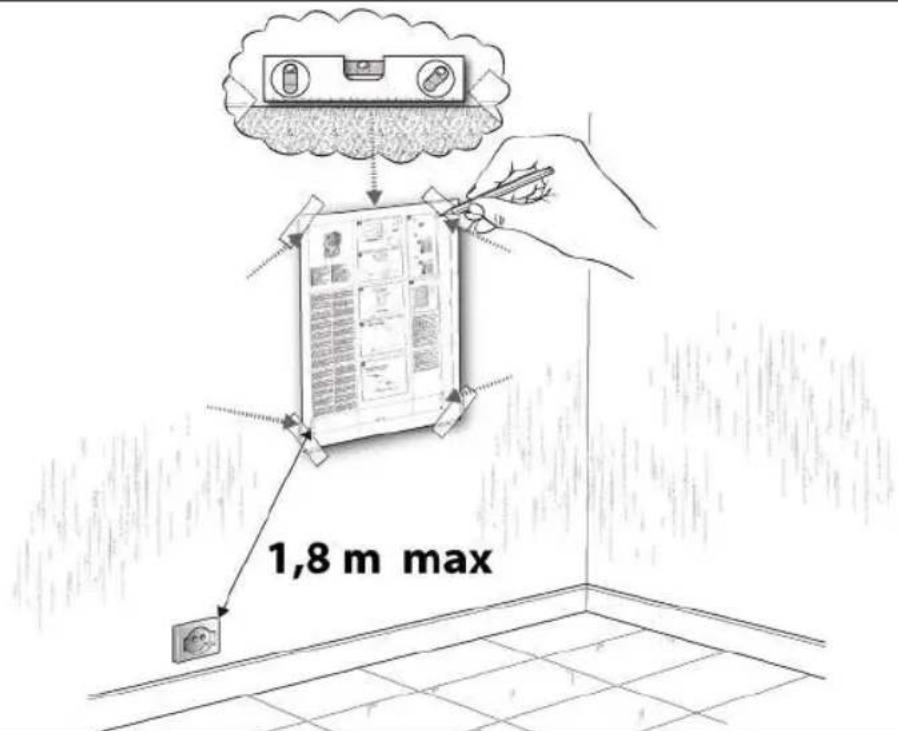
1,8 m max4
text_image
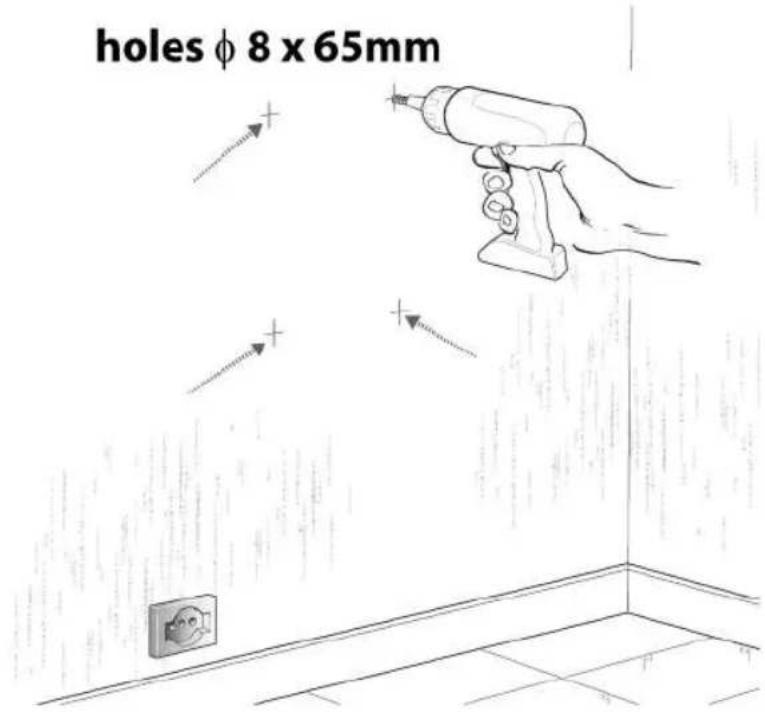
holes φ 8 x 65mm5
I) wall plug ∅ 8 x 40 mm
(8×50mm-8×60mm)
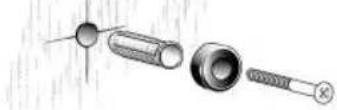
II)
screws 5 x 50 mm
text_image
Diagram of a mechanical component with labeled parts and text annotationsII)
natural_image
Technical illustration of a mechanical gear assembly (no text or symbols visible)III)

natural_image
Mechanical component diagram showing a rotating shaft and housing (no text or symbols)7
natural_image
Line drawing of a hand holding a handheld device next to an internal mechanical device (no text or symbols)8
text_image
Labeled diagram of an electric motor with numbered parts for identification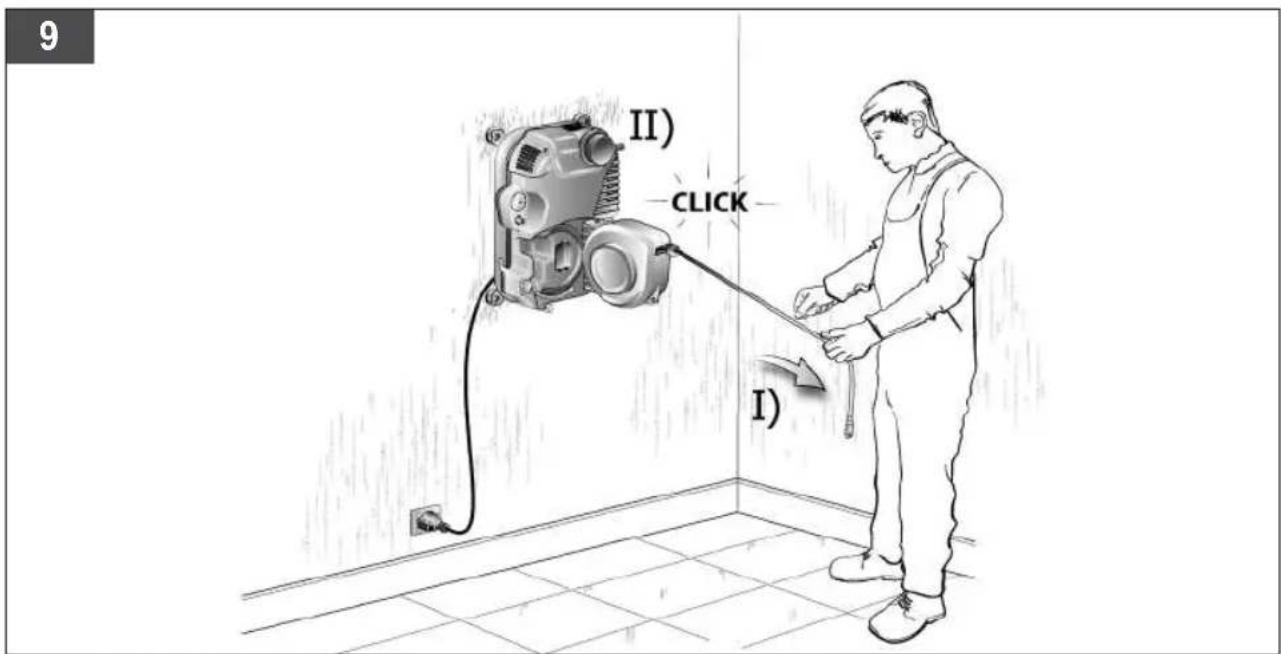
text_image
11 3 Open Closed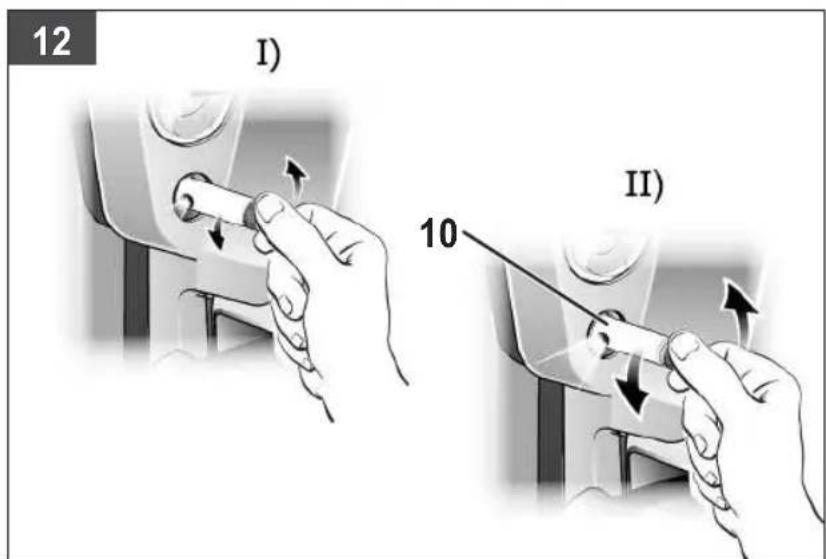
Preserve this handbook for future reference.
Before using the compressor, read the instructions for use carefully and comply with the following safety precautions. Consult this handbook if you have any doubts regarding functioning.
Preserve all the documentation so that anyone who uses the compressor can consult this beforehand.
1. PRECAUTIONS
An ACOUSTIC PRESSURE value of 4 m. corresponds to the ACOUSTIC POWER value stated on the label located on the compressor, minus 20 dB.

This symbol indicates warnings to be read more using the product so as to prevent injury to a user.

Warning!
Compressed air is a potentially dangerous form of energy; always take great care when using the compressor and its accessories.

Warning!
The compressor may restart when power is restored following a blackout.

THINGS TO DO
- The compressor must be used in a suitable environment (well ventilated with an ambient temperature of between +5°C and +40°C) and never in places affected by dust, acids, vapors, explosive or flammable gases.
- Keep the work area clear. Clear the work area of unnecessary tools.
- Always maintain a safety distance of at least 4 meters between the compressor and the work area.
- Insert the plug of the electric cable in a socket of suitable shape, voltage and frequency complying with current regulations.
- Use extension cables with a maximum length of 5 meters and of suitable cross-section.
- The use of extension cables of different length and also of adapters and multiple sockets should be avoided.
- If the supply cord is damaged, it must be replaced by the manufacturer, its service agent or similarly qualified persons in order to avoid a hazard.
• Always use the switch I/O to switch off the compressor. - When the compressor is not in use, act on the I/O switch and put it in the switched off position "O" (OFF), then remove the plug from the power socket.
- At the end of each use, rewind the hose completely, putting it in its housing; this way the reel will be protected of unnecessary and prolonged tension.

THINGS NOT TO DO
- Never direct the jet of air towards persons, animals or your body. (Always wear safety goggles to protect your eyes against flying objects that may be lifted by the jet of air).
- Never direct the jet of liquids sprayed by tools connected to the compressor towards the compressor.
- Never use the appliance with bare feet or wet hands or feet.
- Never pull the power cable to disconnect the plug from the socket or to move the compressor.
- Never leave the appliance exposed to adverse weather conditions.
- Never transport the compressor with the receiver under pressure.
- Do not weld or machine the receiver. In the case of faults or rusting, replace the entire receiver.
-
Never allow inexperienced persons to use the compressor. Keep children and animals at a distance from the work area.
-
This appliance is not intended for use by persons (including children) with reduced physical, sensory or mental capabilities, of lack of experience and knowledge, unless they have been given supervision or instruction concerning the use of the appliance by a person responsible for their safety.
- Children should be supervised to ensure that they do not play with the appliance.
- Do not position flammable or Nylon®/fabric objects closed to and/or on the compressor.
- Do not clean the machine with flammable liquids or solvents. Use only a slightly damp cloth, making sure to have disconnected the plug from the power socket.
- The compressor must be used only for air compression. Do not use the compressor for any other type of gas.
- The compressed air produced by the compressor cannot not be used for pharmaceutical, food or medical purposes except after particular treatments and cannot be used to fill the air bottles of scuba divers.
- Do not cover the air vents on the compressor.
- Pay attention to the work being carried out. Use common sense. Do not stand on the compressor. Do not allow the compressor to operate unattended.
- Do not use the compressor placed on the floor.
- Do not put weights and/or objects on the compressor (e.g. flower pots, etc.).

THINGS YOU SHOULD KNOW
- To avoid overheating of the electric motor, this compressor is designed for intermittent operation as indicated on the technical dataplate (for example,
S3 25 % means 2.5 minutes ON, 7.5 minutes OFF). In the case of overheating, the thermal cutout of the motor trips, automatically cutting off the power when the temperature is too high. The motor restarts automatically when normal temperature conditions are restored. - All the compressors are fitted with a safety valve that is tripped in the case of malfunctioning of the pressure switch in order to assure machine safety.
The safety valve is set to avoid over-pressurization of the air tanks. This valve is factory pre-set and will not function unless tank pressure reaches this pressure. Do not attempt to adjust or eliminate this safety device.
Any adjustments to this valve could cause serious injury. If this device requires service or maintenance, see an Authorized Service Center.
- The red notch on the pressure gauge refers to the maximum operating pressure of the tank. It does not refer to the adjusted pressure.
- When fitting a tool, the flow of air in output must be switched off.
- When using compressed air, you must know and comply with the safety precautions to be adopted for each type of application (inflation, blowing, pneumatic tools, etc.).
- Check that the air consumption and the maximum working pressure of the pneumatic tool and of the connecting hoses (with the compressor) to be used are compatible with the pressure set on the pressure regulator (not included) and with the quantity of air delivered by the compressor.
- The compressor's performance is guaranteed for operation between 0 and 1000 meters above the sea level.
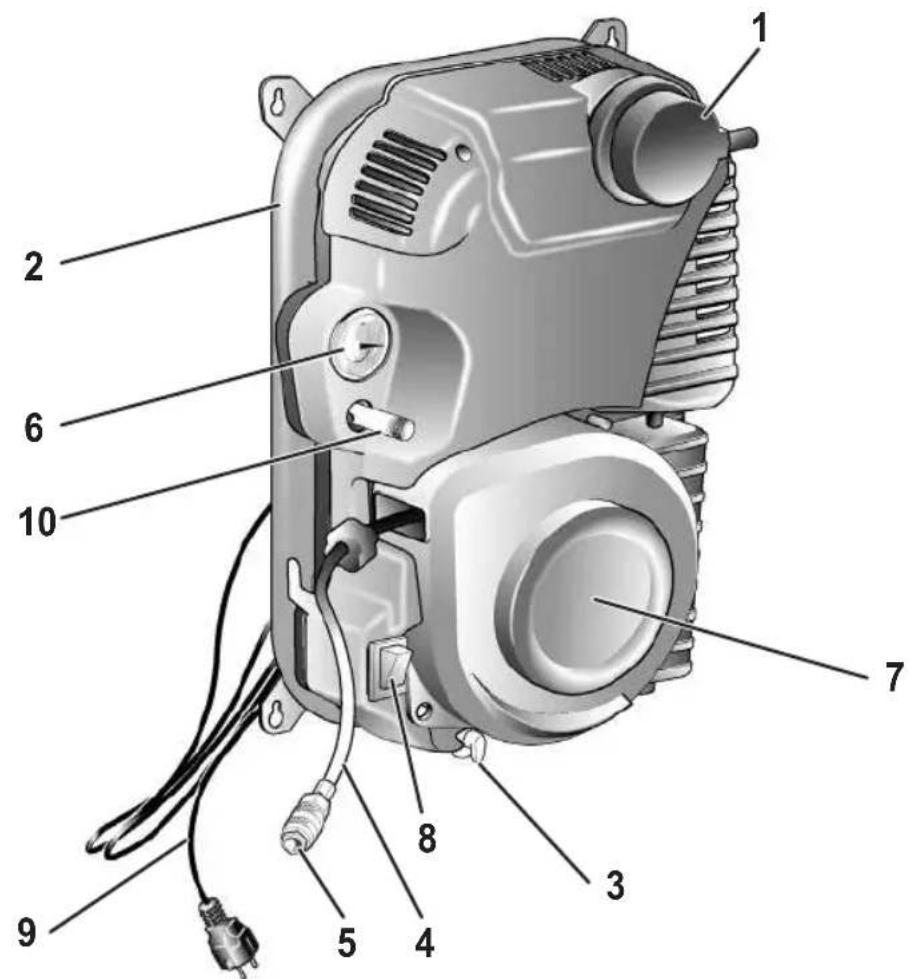
2. DESCRIPTION OF THE APPLIANCE (Fig. 8)
- Intake air filter
- Air receiver
- Tank condensate drain valve
- Air pipe
- Quick coupling
- Pressure gauge (indicates the tank pressure)
- Reel
- Switch I/O (ON/OFF)
- Power cord
- Safety valve
3. PACKAGING CONTENTS LIST
• Air compressor
• Assembly instruction sheet
• Rubber Spacers (4)
• Instruction manual and other documents
4. SCOPE OF USE
The compressor is designed for generating compressed air for tools operated by compressed air.
Please note that our equipment has not been designed for use in commercial, trade or industrial applications. Our warranty will be voided if the machine is used in commercial, trade or industrial businesses or for equivalent purposes.
The machine is to be used only for its prescribed purpose. Any other use is deemed to be a case of misuse. The user/operator and not the manufacturer will be liable for any damage or injuries of any kind caused as a result of this.
5. POINTS TO NOTE WHEN SETTING UP THE COMPRESSOR
- Examine the machine for signs of transit damage. Report any damage immediately to the company which delivered the compressor.
- The compressor should be set up near the working consumer.
- The use of extension cords is not recommended.
• Make sure the intake air is dry and dust-free. - Do not set up the compressor in damp or wet rooms.
- The compressor may only be used in suitable rooms (with good ventilation and an ambient temperature from +5°C to +40°C). There must be no dust, acids, vapors, explosive gases or inflammable gases in the room.
- The compressor is designed to be used in dry rooms. It is prohibited to use the compressor in areas where work is conducted with sprayed water.
Attention!
This compressor shall only be used fixed to a wall suitable to support its weight; it is forbidden to use the compressor in any other configuration.
6. INSTALLATION
After removing the compressor from the packaging and checking its integrity, make sure that all the components listed in the "packaging contents list" are present inside the packaging.
Before starting the installation of the compressor, it is necessary to obtain the materials and/or tools shown in figure 1 (NOT supplied), more precisely:
- Measuring tape,
- Adhesive tape,
- Scissors,
- Spirit level.
- Drill/screwdriver,
- Cross head screwdriver,
- Screws (4),
- Expansion plugs (4).
Warning!
For fixing on solid or concrete walls, use screws and expansion plugs. For fixing on any other surface (previously verify that the wall can support the weight of the compressor), purchase appropriate screws and plugs.
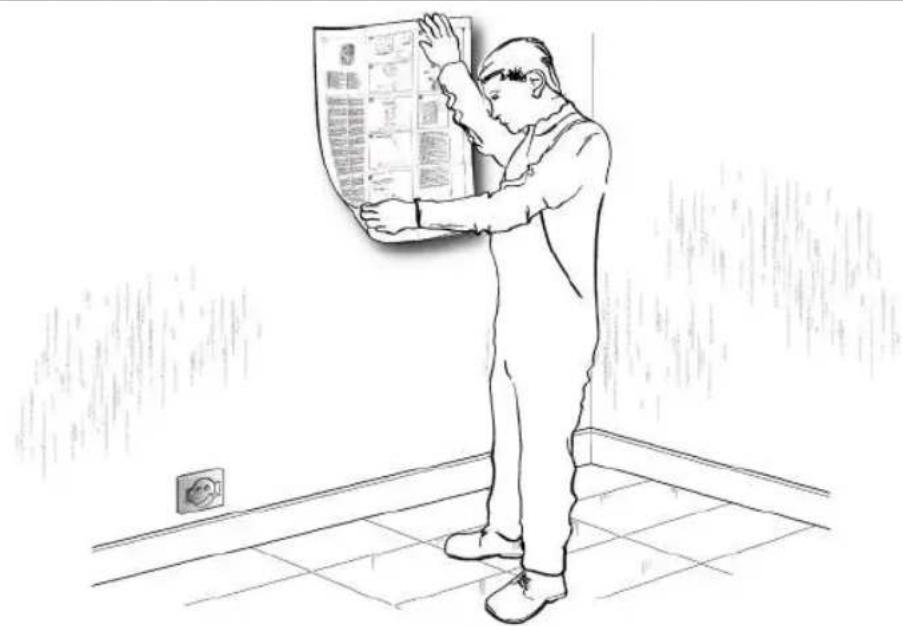
For fixing, it is recommended to use the help of a second person.
Choose the position where the compressor shall be mounted in a way that the appliance has enough space to rotate more than 170^ degrees and that the compressed air hose can be easily reached.
To obtain good ventilation and effective cooling, it is important that the compressor is at least 50 cm away from any wall and/or obstacle (fig.
2), with the exception of the wall itself where the compressor is fixed.
6.1 Wall fixing
Observe the specifications indicated in this manual (figures 3, 4 and 5).
- Use the instructions sheet (supplied) as a template to mark the points where to make the holes for fixing (fig. 3). Remove and keep the sheet for future consultation and/or reuse.
- With an 8 mm bit, drill four holes in the wall (fig. 4), and insert the expansion plugs (fig. 5).
- Insert the screws, taking care to previously insert the rubber spacers (fig. 5).
- Almost fully tighten the screws (fig. 6 - phase I).
- Place the compressor in correspondence with the four screws, then hang it taking care to insert each slot of the compressor frame onto the screws: as shown in fig. 6 - phase II.
- Gently lower the compressor, so that all four screws can be inserted into the narrow shape of the slot, as shown in fig. 6 - phase III.
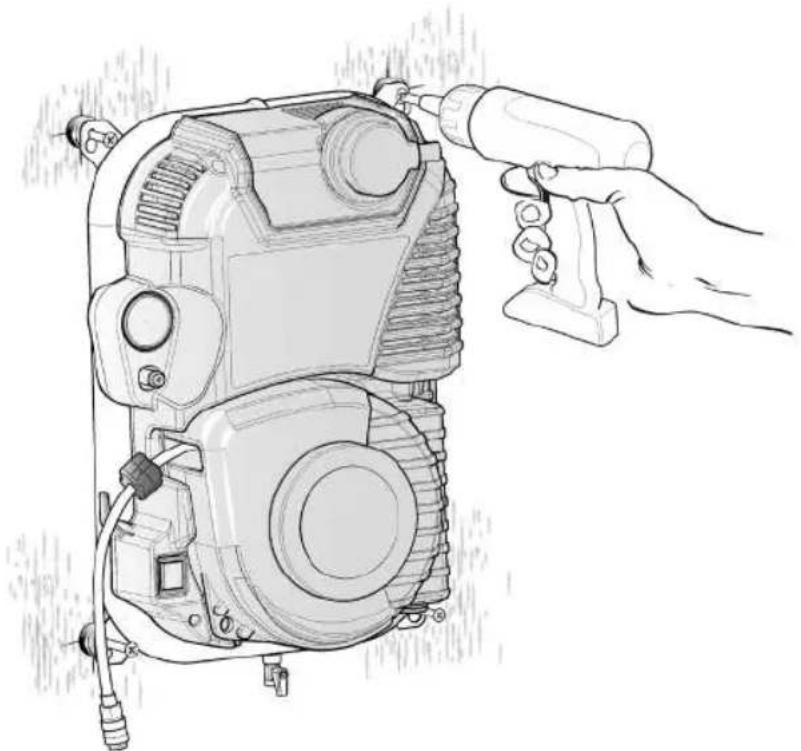
• Fully tighten the four screws (fig. 7).
7. SETTING
7.1 Connection to the network
The compressor is equipped with a power cord with shock-proof plug. Insert the plug of the power cord into a socket suitable regarding shape, voltage and frequency and compliant with current regulations.
Before commissioning, make sure that the mains voltage corresponds to the operating voltage indicated on the data plate of the appliance.
Make sure the ON/OFF switch is not in the I (ON) position. Power cords that are too long as well as extensions, cable reels, etc. cause a voltage drop and can prevent the engine from starting. At low temperatures below +5°C, starting the engine can be more difficult.
7.2 Start-up and use
Check the compliance of the compressor plate data with the real data of the electrical system; a voltage variation of ± 10% with respect to the nominal value is admitted.
- Connect the desired pneumatic tool to the quick coupling (ref. 5).
- The reel (ref. 7) is built with an automatic locking mechanism that allows the hose (ref. 4) to be stopped at the desired length.
Never let the hose rewind in an uncontrolled way.
- The locking system produces a metallic sound during unwinding and winding; it is not a sign of a defect.
If the noise changes after numerous applications and/or in case of problems with the mechanism, contact the service centre.
- Unwinding the hose: carefully remove the hose from the housing; after unwinding the necessary length of hose, loosen the grip slightly, in this way, when a "CLICK" is heard, the lock is inserted (fig. 9).
Ensure that the hose is locked before releasing the grip.
- Rewinding the hose: loosen the lock by pulling the extension hose outwards (fig. 10). Let the hose rewind in a controlled way, accompanying it until it completely returns to the reel.
- Insert the power cord plug into a suitable socket, making sure that the I/O switch on the compressor is in the switched off position "O" (OFF).
- At this point the compressor is ready for use.
- Use the I/O switch to start the compressor pumping air and putting it through the delivery hose into the tank.
- Once the upper calibration value has been reached (set by the manufacturer during the test phase) the compressor stops. Using air, the compressor restarts automatically when the lower calibration value is reached (2 bar between upper and lower value).
- The compressor continues to operate with this cycle automatically until acting on the I/O switch.
- If the compressor shall be used again, wait at least 10 seconds from the moment when it switches off before restarting it.
- Check that the air consumption and the maximum operating pressure of the pneumatic tool to be used are compatible with the pressure set on the pressure regulator (not included) and with the amount of air delivered by the compressor.
- At the end of the work:
– rewind the hose completely, putting it in its housing;
- stop the compressor by acting on the I/O switch, putting it to the switched off position "O" (OFF).
– disconnect the electrical plug;
– empty the tank.
8. CLEANING AND MAINTENANCE
Warning!
Pull the power plug before doing any cleaning and maintenance work on the appliance.
Warning!
Wait until the compressor has completely cooled down. Risk of burns!
Warning!
Always depressurize the tank before carrying out any cleaning and maintenance work.
8.1 Cleaning
- Keep the safety devices free of dirt and dust as far as possible.
Wipe the equipment with a clean cloth or blow it with compressed air at low pressure. - We recommend that you clean the appliance immediately after you use it.
- Do not use cleaning agents or solvents; these may be aggressive to the plastic parts in the appliance. Ensure that no water can get into the interior of the appliance.
- You must disconnect any pneumatic tools from the compressor before cleaning. Do not clean the compressor with water, solvents or the like.
- Keep the reel hose clean to allow proper sliding.
8.2 Condensation water (Fig. 11)
The condensation water must be drained off each day by opening the drain valve (ref. 3) (on the bottom of the pressure vessel).
Warning!
Dispose of the condensation water in an environmentally compatible manner at the appropriate collection point.
8.3 Safety valve (ref. 10)
The safety valve has been set for the highest permitted pressure of the pressure vessel.
It is prohibited to adjust the safety valve. Actuate the safety valve from time to time to ensure that it works when required. Turn the nut until you can hear the compressed air being released (Fig. 12). Then screw it back on.
Always keep the safety valve and the surrounding area clean and free of obstructions.
Always keep the safety valve and the surrounding area clean and free of obstructions.
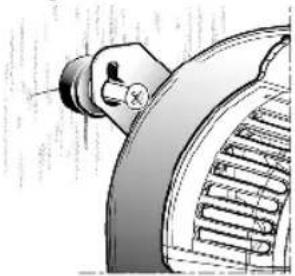
8.4 Cleaning the intake filter (ref. 1)
The intake filter prevents dust and dirt being drawn in. It is essential to clean this filter after at least every 100 hours in service. A clogged intake filter will decrease the compressor's performance dramatically. The body of the intake filter is irremovable, it MUST NEVER be removed. To clean or replace the filtering element, simply remove the cover. To remove the cover, unscrew counterclockwise.
Clean the filtering element by tapping it to remove the dirt, blast it down with low-pressure compressed air (approx. 3 bar) and re-insert it.
8.5 Storage
Warning!
Disconnect the plug from the socket, vent the appliance and tools connected to it and empty the condensate.
Switch off the compressor and make sure that it is secured in such a way that it cannot be started up again by any unauthorized person.
Warning!
Keep the compressor only in dry environment and not accessible to unauthorized persons.
Protect it with a cloth to prevent dust from settling on the internal mechanisms.
If the compressor remains inactive for long periods, check that it is working correctly before starting to use it again.
| MAINTENANCE RESUMPTIVE TABLE | ||
| FUNCTION AFTER THE FIRST 100 HOURS EVERY 100 HOURS | ||
| Cleaning of intake filter and/or substitution of filtering element | ● | ● |
| Draining tank condensate | Daily and at the end of work | |
9. DISPOSAL AND RECYCLING
Pursuant to Directive 2012/19/EU on waste I and electronic equipment (WEEE).
The symbol carrying a crossed-out refuse container depicted on any equipment or the relative packaging means that, at the end of its useful life, said product must be disposed of separately from other waste. The user must therefore take said equipment to the centres specialising in differentiated refuse collection of electric and electronic equipment or alternatively return it to the reseller when purchasing a new similar piece of equipment.
Thanks to differentiated refuse collection, discarded equipment can be sent to be recycled, treated and disposed of in an environmentally-friendly manner; this helps avoiding possible negative effects on the environment and on health and promotes the re-employment and/or recycling of the equipment's materials.
Any unauthorised disposal of the product by the user will result in the application of the fines provided for by the regulations in force.
10. POSSIBLE FAULTS AND RELATED PERMITTED REMEDIES
| Fault Cause Remedy | ||
| The compressor stops and restarts automatically after a few minutes. | Tripping of the thermal cutout due to overheating of the motor. | Allow the compressor to cool down. Ventilate the work area. |
| After a few attempts to restart, the compressor stops. | Tripping of the thermal cutout due to overheating of the motor (removal of the plug with the compressor running, low power voltage). | Activate the I/O switch (On/Off). Ventilate the work area. Wait a few minutes. The compressor will restart independently. |
| The compressor does not stop and the safety valve is tripped. | Irregular compressor operation or pressure switch malfunction. | Remove the plug and contact the Service Center. |
Any other type of operation must be carried out by authorized Service Centers, requesting original parts. Tampering with the machine may impair its safety and in any case make the warranty null and void.
Warranty and repair.
In the event of defective goods or requirements for spare parts, kindly contact the sales point where you made your purchase.