
DPV4605HB - Cooker DE DIETRICH - Free user manual and instructions
Find the device manual for free DPV4605HB DE DIETRICH in PDF.

User questions about DPV4605HB DE DIETRICH
0 question about this device. Answer the ones you know or ask your own.
Ask a new question about this device
Download the instructions for your Cooker in PDF format for free! Find your manual DPV4605HB - DE DIETRICH and take your electronic device back in hand. On this page are published all the documents necessary for the use of your device. DPV4605HB by DE DIETRICH.
USER MANUAL DPV4605HB DE DIETRICH
natural_image
Plated dish featuring a seafood fillet, green vegetables, and sauce in a white bowl (no text or symbols visible)
flowchart
graph TD
    A["Start"] --> B["Process Step"]
    B --> C["Intermediate Processing"]
    C --> D["Output"]
CHÈRE CLIENTE, CHER CLIENT
natural_image
Abstract geometric logo with a circular arrow inside a diamond shape (no text or symbols)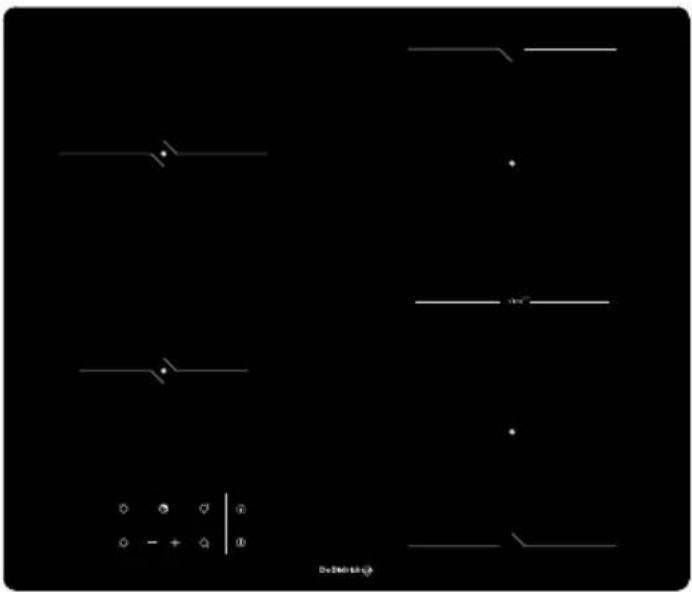
natural_image
Pure electrical circuit lines without any symbolsDPV4605HB
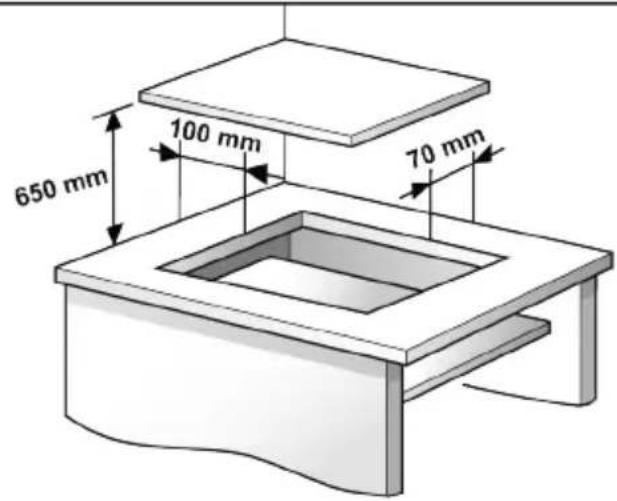
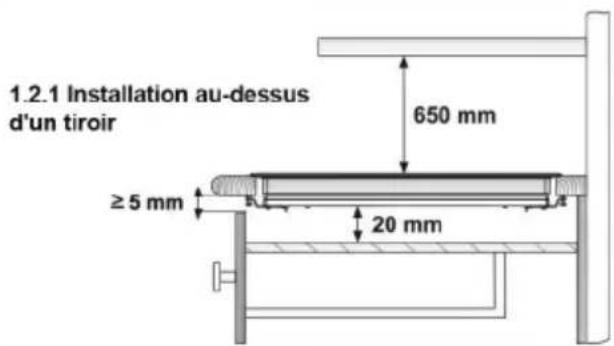
1.1 Dimensions
text_image
650 mm 100 mm 70 mm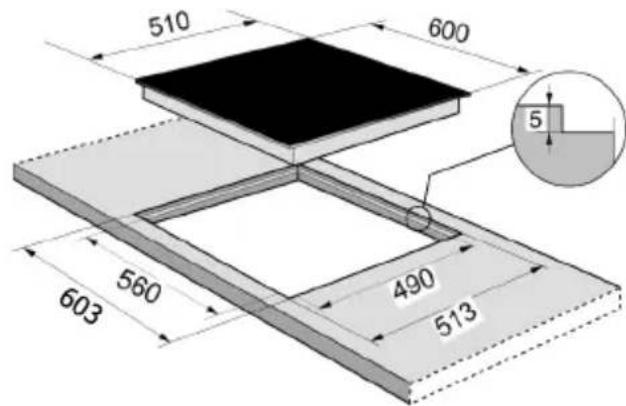
text_image
510 600 5 560 490 513 603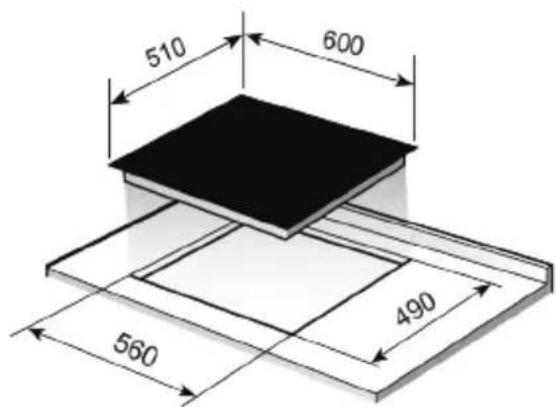
text_image
510 600 560 4901.2 Distances minimales / Minimum distances
text_image
1.2.1 Installation au-dessus d'un tiroir 650 mm ≥ 5 mm 20 mm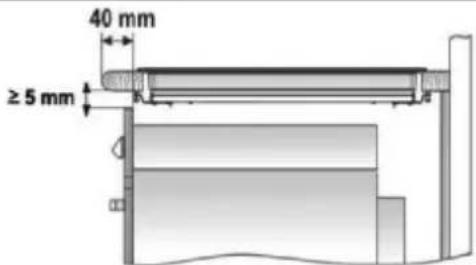
text_image
40 mm ≥ 5 mmnatural_image
Illustration of a hand using a tool to adjust or install a component, with a faucet symbol and a downward arrow indicating motion (no text or symbols present)
natural_image
Diagram of a mechanical device labeled 'A' with no visible text or symbols on the device itself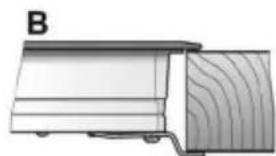
natural_image
Diagram of a wooden plank with visible grain and edge, labeled 'B' (no text or symbols on the diagram itself)flowchart
graph TD
    A["Input"] --> B["Process"]
    B --> C["Final Output"]
    subgraph Process
        D["EN"]
    end
DEAR CUSTOMER,
You have just purchased a De Dietrich appliance. This choice reflects your high standards as well as your taste for the French art of living.
With over 300 years of heritage, our creations embody the perfect blend of design, authenticity and technology at the service of the culinary arts.
De Dietrich cultivates a constant quest for excellence, perpetuating exceptional craftsmanship in the creation of impeccably finished products. These are made with the finest materials and finished to the highest standards.
We hope you find great satisfaction in using your new appliance and eagerly anticipate any suggestions or questions you may have. De Dietrich's Customer Service is available to address your inquiries and feedback, ensuring that we consistently meet your needs.
We are honored to become your new partner in your home and sincerely appreciate your trust.
Safety warnings:
⚠️ If the ceramic glass breaks or cracks, immediately unplug the hob to avoid electric shocks.
⚠ This appliance is not designed to work with an external timer (not built into the appliance) or a separate remote control system.
⚠ Do not steam clean this device.
⚠ The device and its accessible parts may heat up during operation. Avoid touching the heating elements. Children younger than 8 years old must stay away from the hob unless they are permanently supervised.
⚠ This device may solely be used by children 8 years old or older, people with impaired physical, sensory or mental abilities, or those who are lack of experience and knowledge, ONLY when supervised or if they have been given adequate instruction on the use of the device and understand the dangers its use involves. User cleaning and maintenance may not be done by unsupervised
children.
Children must not play with the device.
⚠ Precaution. It is dangerous to cook with fat or oil without being present, as these may catch fire. Never try to extinguish a fire with water! in this event disconnect the device and cover the flames with a lid, a plate or a blanket.
⚠ Do not put any object on the cooking areas of the hob. Prevent a possible fire hazard.
⚠ “If the mains cord is damaged, should be replaced by the manufacturer or its after sales service”
CAUTION: Use
only cooktop protectors appropriately designed by the household manufacturer or the protectors already used in this appliance. The use of inappropriate protectors could cause accidents.
Installation
Emplacement with cutlery drawer
If you wish to mount furniture or a drawer under the hob, a separation board must be fitted between the two. Accidental contact with the hot surface of the device housing is thus prevented.
The board must be fitted 20 mm under the bottom cover of the hob.
Electrical connection
Before you connect the hob to the
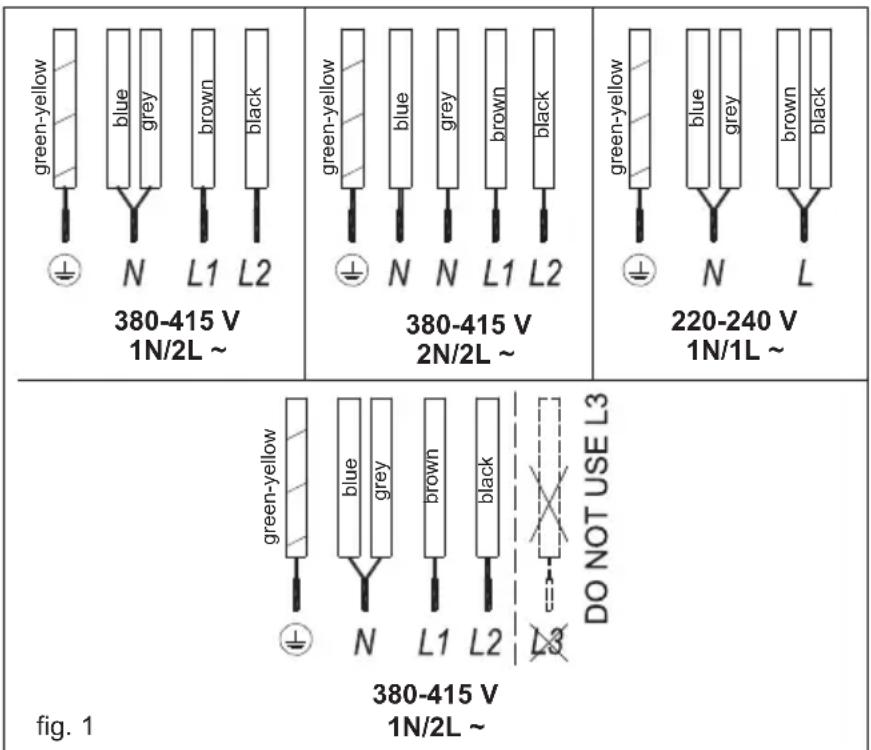
mains, check if the voltage and frequency match those specified on the hob label, which is placed under the hob or on the Guarantee card, or if applicable on the technical data sheet, which you must keep together with this manual throughout the product's service life.
The electrical connection will be via an all-pole circuit breaker or plug, whenever accessible, in accordance with the current and with a minimum 3 mm distance between contacts. This ensures disconnection in emergencies and allows hob cleaning.
Only the BRANDT official technical service can handle or repair the appliance, including replacement of the power cable.
Ensure that the inlet cable does not come into contact with the hob housing or the oven housing, if it is installed in the same unit.
Warning:

The electrical connection be properly grounded, wing current regulations, wise the hob may malfunction.

Unusual high power surges damage the control system with any electrical appliance).

Keep the Guarantee
Certificate or the technical data sheet together with the instructions manual throughout the product's service life. These contain important technical information.
Use and Maintenance
User instructions of the Touch Control
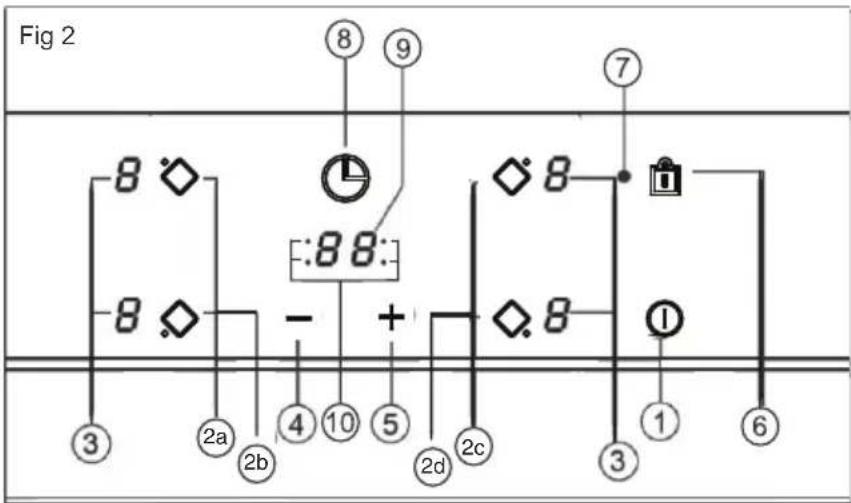
HANDLING ELEMENTS (fig. 2)
① On/off touch key.
② Hot plate selection touch keys.
③ **Power and/or residual heat displays.
④ "Decrease" power touch key.
⑤ "Increase" power touch key.
⑥ Locking touch key for the rest of touch keys.
⑦**Lock icon.
⑧ Timer touch key.
⑨ **Timer display
⑩ The timed cooking surface indicator
* Depending on model
** Only visible while running.
The manoeuvres are done by means of the touch keys. You do not need to exert force on the desired touch key, you only need to touch it with your fingertip to activate the required function.
Each action is notified by a beep.
SWITCHING ON THE DEVICE
When the hob is connected for the first time, it will be locked and the related pilot light (7) will be on. To unlock it, first touch the locking touch key (6) until the pilot light (7) switches off.
1 Touch the switching on touch key ① (1) for at least one second.
The Touch Control is activated and a 0 appears with 50% brightness on all the power displays (3).
If any zone has residual heat indication before switch on, the display continues showing "H" instead of 0.
If you do not take any action in the next 10 seconds the touch control will switch off automatically.
SWITCHING ON A HOT PLATE
Once the Touch Control has been activated by means of the touch key ① (1), the power indicators of the hot plates will display a 0 (3).
1 Press the touch key for the selected hot plate (2).
2 Using the touch key — or + (4/5), choose the desired power level.
The — and + touch keys are repetitive, so if you keep them pressed they increase or decrease with a 0.5 second interval.
Only one hot plate can be selected at the same time
Warning:
To operate a hot plate, it must be selected first. When you want to use a hot plate, check the brightness of the power indicator. After choosing the hot plate, brightness of the power indicator should increase.
Quick switch-on at maximum power: Once you have selected the hot plate, press the touch key — (4) once. The hot plate will be activated at full power.
SWITCHING OFF THE HOT PLATE
1 The hot plate must previously be selected.
2 Using the touch key — (4), lower the power level to 0.
flowchart
graph TD
    A["8"] --> B["◇"]
    C["8"] --> D["◇"]
    E["8"] --> F["-"]
    G["8"] --> H["+"]
    I["8"] --> J["◇"]
    K["8"] --> L["◇"]
    M["8"] --> N["◇"]
    O["8"] --> P["◇"]
    Q["8"] --> R["◇"]
    S["8"] --> T["◇"]
    U["8"] --> V["◇"]
    W["8"] --> X["◇"]
    Y["8"] --> Z["◇"]
    AA["8"] --> AB["◇"]
    AC["8"] --> AD["◇"]
    AE["8"] --> AF["◇"]
    AG["8"] --> AH["◇"]
    AI["8"] --> AJ["◇"]
    AK["8"] --> AL["◇"]
    AM["8"] --> AN["◇"]
    AO["8"] --> AP["◇"]
    AQ["8"] --> AR["◇"]
    AS["8"] --> AT["◇"]
    AU["8"] --> AV["◇"]
Quick switch-off alternatives :
i) If user keep finger on the selection sensor for 2 seconds, the related zone will be switched off.
ii) When you press touch keys — and + (4/5) simultaneously, the hot plate will switch off quickly.
RESIDUAL HEAT INDICATOR
The power indicator of the hot plate will display an H when the glass surface reaches a temperature that could cause burning.
When this risk disappears,
i) the display switches off (if the device is in stand by),
ii) or displays 0 (if the appliance is still running).

Warning:
In a first run, H indication may appear in a short time on the power display. This showing is related with setup operation and it does not mean the cooking zone is hot.

Warning:
H indication is used for the safety purposes in any case. Even if the power is cut off for a long time, after power on, H indication appears.
SWITCHING OFF THE DEVICE
The device can be switched off at any time by pressing the general on/off touch key ①(1). In standby mode an H will appear in the zones that are hot. The rest of the displays will not light up.
VitroTech Function
The VitroTech function makes it possible to pair two independent cooking zones to have a larger cooking area to accommodate all types of pans or pots.
SWITCHING ON Bridge Function
-
Press 2c and 2d at the same time min 2sec. When the VitroTech function will be activated, VitroTech zone indicators light on.
-
Select the desired power (from 1 to 9) using the touch + key - or (4/5).
SWITCHING OFF VitroTech Function
- Press 2c or 2d or 2c and 2d at the same time min 2sec. When the VitroTech function will be deactivated, VitroTech zone indicators light off.
Locking of the touch keys of the cooking hob
To prevent undesired manipulation you can lock the entire unit, except for the on/off touch key, using the locking touch key ⏻ (6). This function is useful for child safety. When the lock is activated, the lock indicator light (7) comes on.
However, even when the lock function is activated on the switched on hob, the on/off ① (1) touch key can be used to switch off the hob.
On the other hand, if the touch control is switched off, the lock function does not allow the on/off touch key ① (1) to be used.
To deactivate this function, press the locking touch key ⏻ (6) once again for at least 3 seconds. Then the lock indicator (7) lights off and the touch controls will be ready for use.
CHILD LOCK
The child lock is different and more complicated than key lock. User can activate key lock via one sensor. But child lock need a sensor sequence. The Child Lock is being used to prevent children from turning on the hob.
Activating Child Lock :
- The hob is switched on via ①(1) On/Off touch key,
- Any zone should not be selected. When any zone is not selected, touch simultaneously the increase power key + (5) and the decrease power key—(4) for 3 seconds. At the end of this period, a short buzzer sound will be heard.
- After buzzer signal, touch the locking touch key (there is no need to keep press for a long time) and a long buzzer sound is heard and the Child Lock will be activated and all power display shows "L".
During Child Lock, if user touch any sensor (Main sensor included), "L" will flash on display.
Warning : Child lock status is not being stored. If the energy of the hob is butted, child lock status could not be preserved.
Deactivating Child Lock :
To be able to deactivate Child Lock, the Child Lock should be activated before and all power display show "L"
- Touch simultaneously the increase power key + (5) and the decrease power key — (4) for 3 seconds until you hear a short buzzer sound.
- After the buzzer signal, touch the locking touch key (there is no need to keep press for a long time) and a short buzzer sound will be heard and the Child Lock will be deactivated and the indicator will be light off.
Preheat function
This function facilitates cooking as you do not need to be present while it is being done. The touch control pre-programmes the chosen hot plate at the maximum power and subsequently lowers it to the desired power level (which you have selected) after an approximate amount of time (see table 1).
Table 1
| Selected Power | Time of the preheat function (in minutes) |
| 0 | 0 |
| 1 | 1 |
| 2 | 3 |
| 3 | 5 |
| 4 | 7 |
| 5 | 9 |
| 6 | 3 |
| 7 | 4 |
| 8 | 5 |
| 9 | - |
PREHEAT FUNCTION
1 The hot plate must be selected.
2 Select power 9 with — / + (4/5) and then reduce it to the selected level of power (for example 6). When the automatic cook function starts "A" indication flashes with desired power level on the display.
SWITCHING THE PREHEAT FUNCTION OFF
After at least 10 seconds have elapsed since the beginning of the automatic cook start function:
1 The hot plate must be selected.
2 Press touch key + (5) till the indicator reaches level 9 and the automatic cook start function will be deactivated.
Timer Function
This function makes it easier to cook, as you do not need to be present throughout the process: the timed hot plate(s) will switch off automatically after the set time has lapsed. There is a separate timer for each hot plate, which allows all of the hot plates to be timed simultaneously.
With these models you can use the clock as a timer for the hotplates for times ranging from 1 to 99 minutes. All the cooking areas can be programmed individually and in a simultaneous manner.
TIMING ONE COOKING ZONE
1 The cooking zone to be timed must be selected.
2 Select a power level for the cooking zone from 1 to 9 using the touch keys or + /— (5/4).
3 Press the clock touch key Ⓤ (8). Timer indicator (9) will display 00. Depending on the model, the timed cooking surface indicator (10) will flash.
On the power indicator (3), will flash during the time set.
4 Immediately afterwards, enter a cooking time between 1 and 99 minutes, by using the touch keys or — + (4/5).
When the power indicator (3) stops flashing, it will start to count down the time automatically. The respective timed hotplate display (9) will continue flashing.
Or, when the countdown starts, the relevant power level and t will flash alternately on the power indicator (3) of the relevant heater area.
When the clock reaches 01, it will switch from counting down minutes to seconds.
Once the selected cooking time has elapsed, the heating zone being timed is turned off and the clock emits a series of beeps for several seconds. The timer indicator will display a flashing 00 beside the hotplate that has been disconnected.
If you wish to time another hotplate at the same time, repeat steps 3 and 4.
If the heating zone turned off is hot, its indicator displays an H or otherwise an 0. To turn off the audible signal touch any sensor.
CHANGING THE PROGRAMMED TIME
To change the programmed time, you must press the touch key of the timed hotplate (2) to select it and then the clock ⏻ (8). You may then read and change the time.
DISCONNECTION OF THE TIMER
If you want to stop the timer before the programmed time is up:
1 First select the hotplate and then press clock touch key (8).
2 Use the touch key — (4) to recede the time to 00. The clock is cancelled.
Alternative method :
After zone selection if the timer touch key is pressed for two seconds, the related timer will be cancelled.
Safety switch off function
If due to an error one or several hot plates do not switch off, the appliance will be automatically disconnected after a set amount of time (see table 2).
Table 2
| Selected power level | MAXIMUM OPERATION TIME (in hours) |
| 1 | 10 |
| 2 | 5 |
| 3 | 5 |
| 4 | 4 |
| 5 | 3 |
| 6 | 2 |
| 7 | 2 |
| 8 | 2 |
| 9 | 1 |
When the "safety switch off" function has been triggered, a 0 is displayed if the glass surface temperature is not dangerous for the user or an H if there is a burn risk.
To reconnect the appliance, switch it off by pressing the on/off key (1) and then switch it on again.

Keep the control panel of the g areas clean and dry at all times.

In case of operating problems, incidents not mentioned in this trial, disconnect the appliance contact the De Dietrich medical service.
Recommendation for the good use of vitroceramic hobs
* Use pots or pans with thick, completely flat bottoms.
* Pans with a smaller diameter than the shown heating area are not recommended.
* Do not slide pots and pans over the glass as they may scratch it.
* Although the glass can withstand knocks from large pots and pans without sharp edges, try not to knock it.
* To prevent damage to the ceramic
• 1 USE

glass induction surface, try not to slide the pots and pans over the glass, and keep the bottoms of the vessels clean and in good condition.

Try not to spill sugar or products containing sugar on the glass while the surface is hot as these could damage it.
Cleaning and maintenance
To keep the appliance in good condition, clean it using suitable products and implements once it has cooled down. This will make the job easier and avoid the build-up of dirt. Never use harsh cleaning products or tools that could scratch the surface, or steam-operated equipment.

A pot or pan may become stuck to the glass due to a product having melted between them. Do not try to lift the pot while the hot plate is cold! This could cause the glass break.

Do not step on the glass or lean on it as it could break and cause injury. Do not use the glass as a surface for putting objects.
De Dietrich reserves the right to make changes to its manuals that it deems necessary or useful, without affecting the product's essential features.
Environmental considerations

The symbol is the product or its packaging means that this product cannot be treated like ordinary household waste. This product must be taken to a recycling collection point for electrical and electronic appliances. By ensuring that this product is disposed of correctly, you will avoid harming the environment and public health, which could happen if this product is not handled properly. For more detailed information about recycling this product, please contact your local authority, household waste service or the store where you purchased the product.
The packaging materials used are environmentally-friendly and can be recycled completely. Plastic components are marked >PE<, LD<, >EPS<, etc. Dispose packaging materials, like household waste, in your local container.
If something does not work
Before calling the technical service, perform the verifications specified below.
The appliance does not work:
Ensure that the power cable is plugged in.
The pot sticks to the glass:
If there is molten material between the pot and the glass, set the hot plate to maximum power and try to separate them.
Single Sensor Error :
If any of the sensors is active more than 10 seconds, this error situation occurs and error code"F1" is showed. This error can be related with different roots. One of them is that there may be an object (fork, knife...) on the any of the sensor.
Make sure that there is no any object on the control unit, hob glass is wiped with a dry cloth. If error situation continue after this solution, please take the plug out or switch off the fuse switch for 10 seconds.
Plural Sensor Error:
If more than 2 sensors are sensed at same time, this error situation occurs and error code "F2" is displayed.
Potential root reasons of the problem :
- There may be an object (pot...) or water accumulation(overflow liquid from pot...) that cover more than 2 sensors
- Touch control location may exposure more heat or steam (from oven bottom of the hob...)
Please be sure that there is no any object on the sensors and switched off all steam and heat sources. Then, hob glass is wiped with a dry cloth. If error situation continue after this solution, please take the plug out or switch off the fuse switch for 10 seconds.
FC Error:
Fc message on the control and the hot plates switch off: Overheating in the electronics. Let thestove cool for a while.
After-sales service
Any maintenance on your equipment should be undertaken by:
- either your dealer,
- or another qualified mechanic who is an authorized agent for the brand appliances.
When making an appointment, state the full reference of your equipment (model, type and serial number).
This information appears on the manufacturer's nameplate attached to your equipment.
