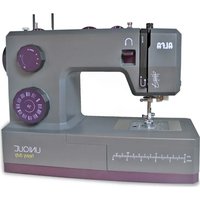
Unique Heavy Duty - Sewing machine ALFA - Free user manual and instructions
Find the device manual for free Unique Heavy Duty ALFA in PDF.


User questions about Unique Heavy Duty ALFA
0 question about this device. Answer the ones you know or ask your own.
Ask a new question about this device
Download the instructions for your Sewing machine in PDF format for free! Find your manual Unique Heavy Duty - ALFA and take your electronic device back in hand. On this page are published all the documents necessary for the use of your device. Unique Heavy Duty by ALFA.
USER MANUAL Unique Heavy Duty ALFA
natural_image
Technical line drawing of a sewing machine with no visible text or symbolses
Please, read the instruction manual before using the machine as it contains important operation and safety information. Keep the instruction manual accessible so that you may refer to it at anytime while operating the machine.
You can find the complete manual by going to the product page of your machine on our website: www.alfahogar.com/en
fr
Important safety instructions
When using an electrical appliance, basic safety should always be followed, including the following: Read all instructions before using this sewing machine.
DANGER - To reduce the risk of electric shock:
- An appliance should never be left unattended when plugged in.
- Always unplug this appliance from the electric outlet immediately after using and before cleaning.
WARNING - To reduce the risk of burns, fi re, electric shock, or injury to persons:
- Read the instruction carefully before you use the machine
- Keep the instructions at a suitable place close to the machine and hand it over if you give the machine to a third party.
- Use the machine only in dry locations.
- Never leave the machine unattended with children or elderly people as they may not be able to estimate the risk.
- This appliance can be used by children aged from 8 years and above and persons with reduced physical, sensory or mental capabilities or lack of experience and knowledge if they have been given supervision or instruction concerning use of the appliance in a safe way and understand the hazards involved.
- Children shall not play with the appliance.
- Cleaning and user maintenance shall not be made by children without supervision.
- Always switch off the machine if you carry out preparation for work (change the needle, feed the yarn through the machine, change the footer, etc.).
- Always unplug the machine if you leave it unattended, to avoid injury by expediently switch on the machine.
- Always unplug the machine if you carry out maintenance (oiling, cleaning).
- Don't use the machine if it's wet or in humid environment.
- Never pull at the cord, always unplug the machine by gripping the plug.
- If the LED lamp is damaged or broken, it must be replaced by the manufacturer or its service agent or a similarly qualified person, in order to avoid a hazard.
-
Never place anything on the pedal.
-
Never use the machine if the air vents are blocked, keep the air vents of the machine and the foot pedal free from dust, fusel and leftovers.
- The machine must only be used with designated foot controller, in order to avoid a hazard. If the foot controller is damaged or broken, it must be replaced by the manufacturer or its service agent or a similarly qualified person.
- The power cord of the foot controller can not be replaced. If the power cord is damaged the foot controller must be disposed of.
- The sound pressure level at normal operation is smaller than 80dB(A).
- Do not dispose of electrical appliances as unsorted municipal waste, use separate collection facilities.
- Contact your local government for information regarding the collection systems available.
- If electrical appliances are disposed of in landfills or dumps, hazardous substances can leak into the groundwater and get into the food chain, damaging your health and well-being.
- When replacing old appliances with new ones, the retailer is legally obligated to take back your old appliance for disposal at least for free of charge.
- The appliance is not to be used by persons (including children) with reduced physical, sensory or mental capabilities, or lack of experience and knowledge, unless they have been given supervision or instruction. (For outside Europe)
- Children being supervised not to play with the appliance. (For outside Europe)
Save these instructions
This sewing machine is intended for household use only.
Be sure to use the sewing machine in the temperature range from 5^ C to 40^ C. If the temperature is excessively low, the machine can fail to operate normally. To carry the sewing machine, hold the carrying handle with your hand, and support the sewing machine with the other hand.
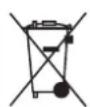
Do not dispose of electrical appliances as unsorted municipal waste, use separate collection facilities. Contact your local government for information regarding the collection systems available.
- Electrical appliances are disposed of in landfills or dumps, hazardous substances can leak into the groundwater and get into the food chain, damaging your health and well-being. When replacing old appliances with new ones, the retailer is legally obligated to take back your old appliance for disposal at least for free of charge.
Warranty Alfa
This product is backed by a legal guarantee in accordance with current legislation. To exercise your rights, please contact our official technical assistance services.
text_image
Technical diagram of a sewing machine with numbered parts and an inset close-up view of the internal structure.(1)
text_image
Technical diagram of a sewing machine with numbered parts and close-up views showing internal components like switch, power cord, and socket.(1)
text_image
(1) (2)(2)
text_image
Technical diagram of a sewing machine with labeled component A and directional arrow indicating rotation or movement(3)
natural_image
Technical line drawing of a mechanical assembly with rotating components and directional arrows (no text or symbols)(4)
text_image
A B C D E F G H I J K L M N O(5)
text_image
Technical diagram illustrating nine steps of a mechanical assembly or tooling procedure, labeled 1 through 9.(6)
text_image
1 2 3 4(7) (8)
text_image
Technical diagram of a sewing machine with numbered parts and corresponding mechanical assembly diagrams showing tool positioning and movement.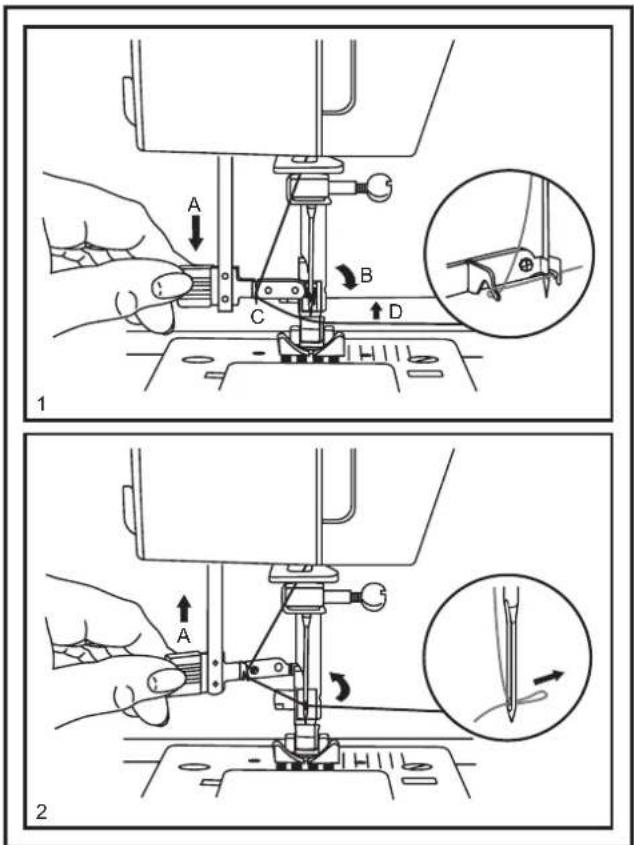
text_image
A B C D 1 A 2(9) (10)
text_image
Technical diagram showing three-step sewing process: step 1 of machine tool, step 2 with needle insertion, and step 3 with needle positioning.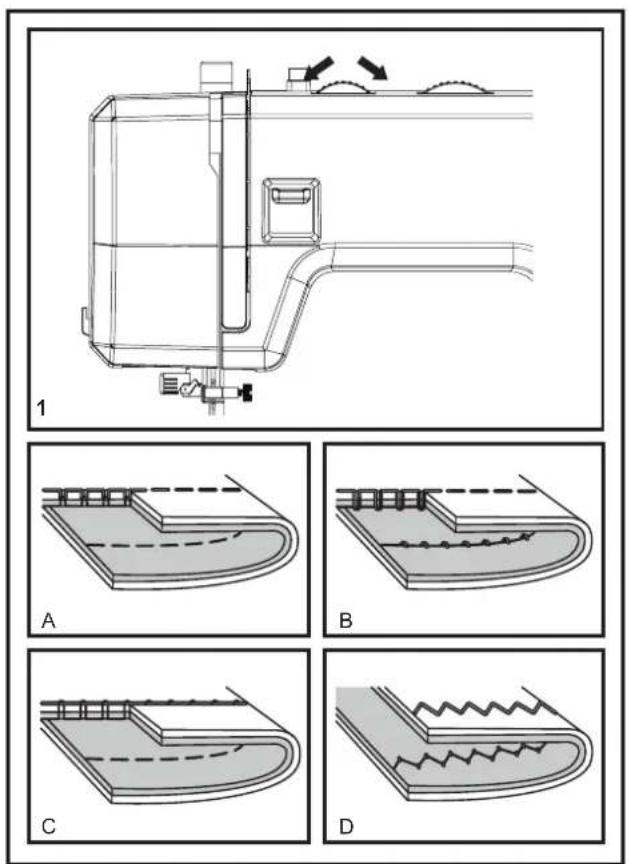
text_image
1 A B C D(11) (12)
text_image
a b c d e A B C D E F G H I J K A B C D E F G H I J K S1 A B C D E F G H I J K S2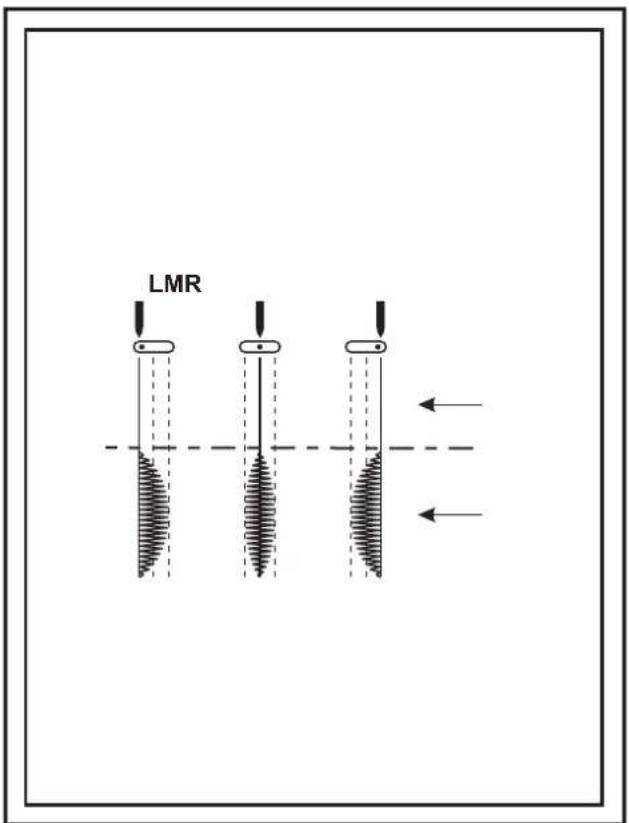
text_image
LMR(13) (14)
text_image
6 5 4 3 2 1 0 6 5 4 3 2 1 0 1 4 3 2 1 0.5 4 3 2 1 0 16 2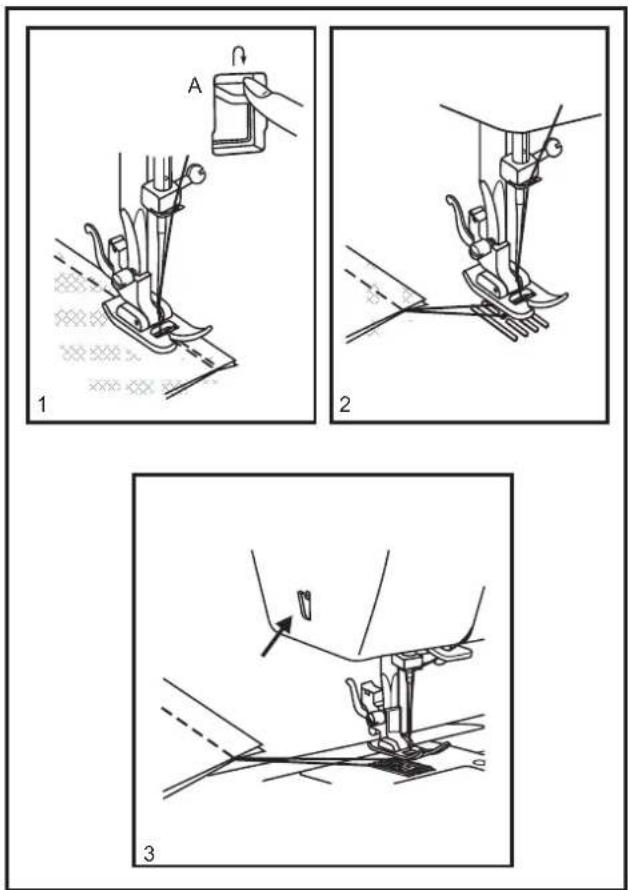
text_image
Technical diagram illustrating three different sewing techniques for fabric or sewing, labeled 1, 2, and 3.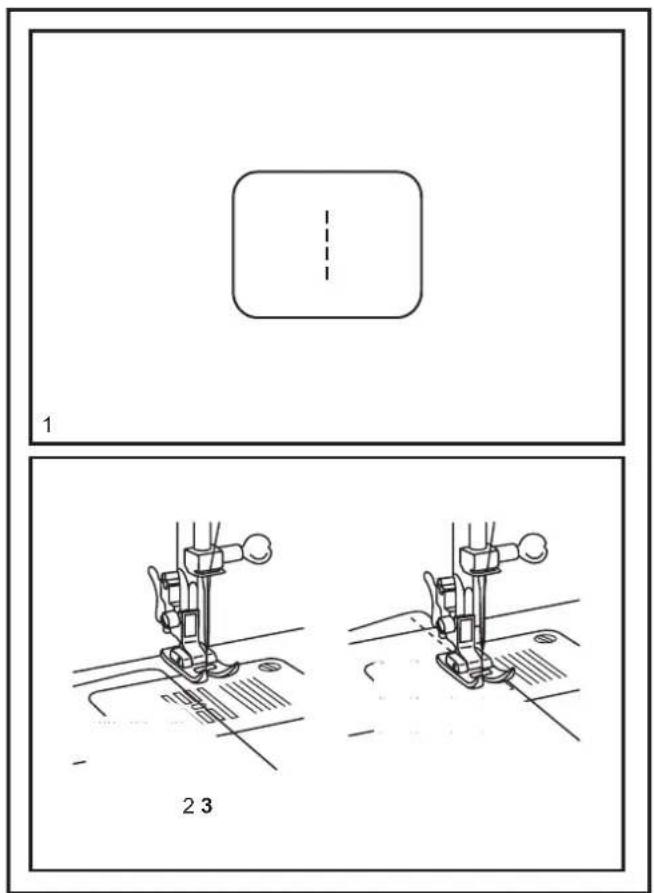
text_image
1 2 3(15) (16)
text_image
M 1 2(17)
text_image
M 6 5 4 3 2 1 0 4 3 2 1 0 1S 1 2(18)
text_image
Technical diagram illustrating mechanical assembly steps with labeled components and measurement scales(19) (20)
flowchart
graph TD
    A["Initial State"] --> B["Rotation Loop"]
    B --> C["Output Loop"]
    D["Component 1"] --> E["Rotation Loop"]
    E --> F["Output Loop"]
    G["Component 2"] --> H["Rotation Loop"]
    H --> I["Output Loop"]
text_image
L R 6 5 4 3 2 1 0 1 2 3 4 5 6 1 2 3 4 5 6 7 8 9 10 11 12 13 14 15 16 17 18 19 20 21 22 23 24 25 26 27 28 29 30 31 32 33 34 35 36 37 38 39 40 41 42 43 44 45 46 47 48 49 50 51 52 53 54 55 56 57 58 59 60 61 62 63 64 65 66 67 68 69 70 71 72 73 74 75 76 77 78 79 80 81 82 83 84 85 86 87 88 89 90 91 92 93 94 95 96 97 98 99 100(21) (22)
text_image
Technical diagram showing sewing machine operation with labeled steps and component views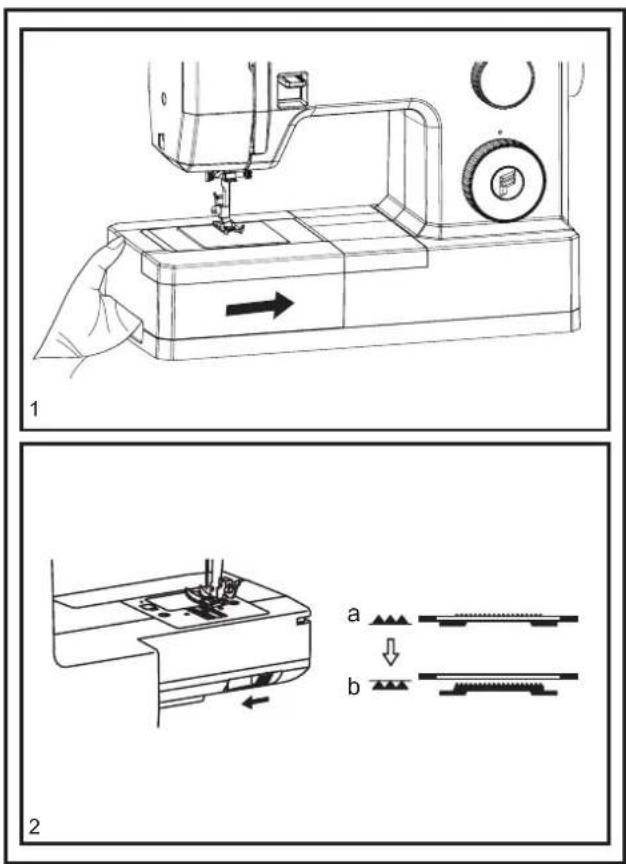
text_image
Technical diagram showing sewing process steps with labeled components and directional arrows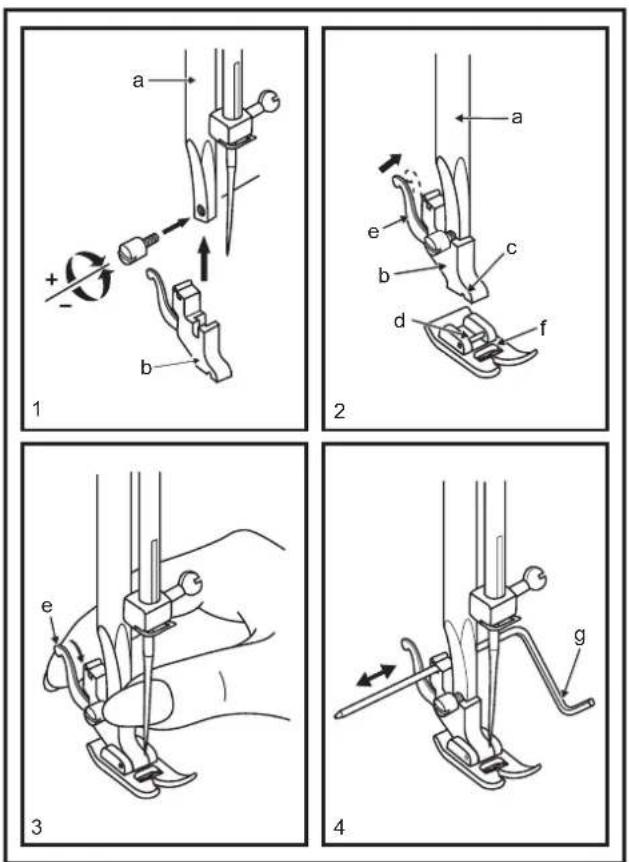
text_image
a + - b 1 a e b c d f 2 e 3 g 4(23) (24)
text_image
Scientific diagram illustrating a mechanical or fluidic process with labeled components and directional arrows, including schematic diagrams A, B, C, D.(25)
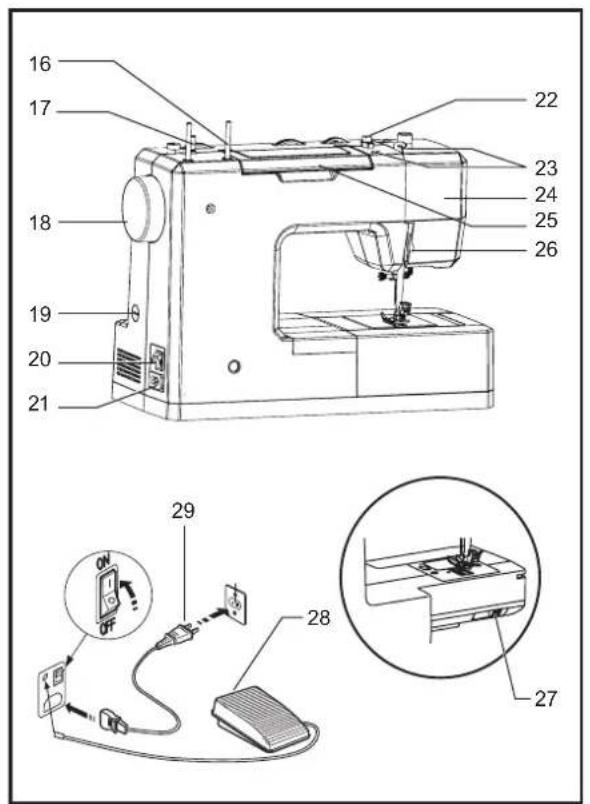
(1) Principal Parts of the Machine
- Thread tension dial
- Presser foot pressure adjustment
- Thread take-up lever
- Reverse sewing lever
- Thread cutter
- Presser foot
- Needle plate cover
- Accessory box
- Three needle position dial
- Bobbin stopper
- Stitch width dial
- Stitch length dial
- Pattern selector dial
- Automatic threader
- One-step buttonhole lever
- Horizontal spool pin
- Bobbin winding spindle
- Handwheel
- Power and light switch
- Main plug socket
- Bobbin thread guide
- Upper thread guide
- Face plate
- Handle
- Presser foot lifter
- Drop feed control
- Foot speed control
-
Power cord
-
Buttonhole stitch balance adjustment slot
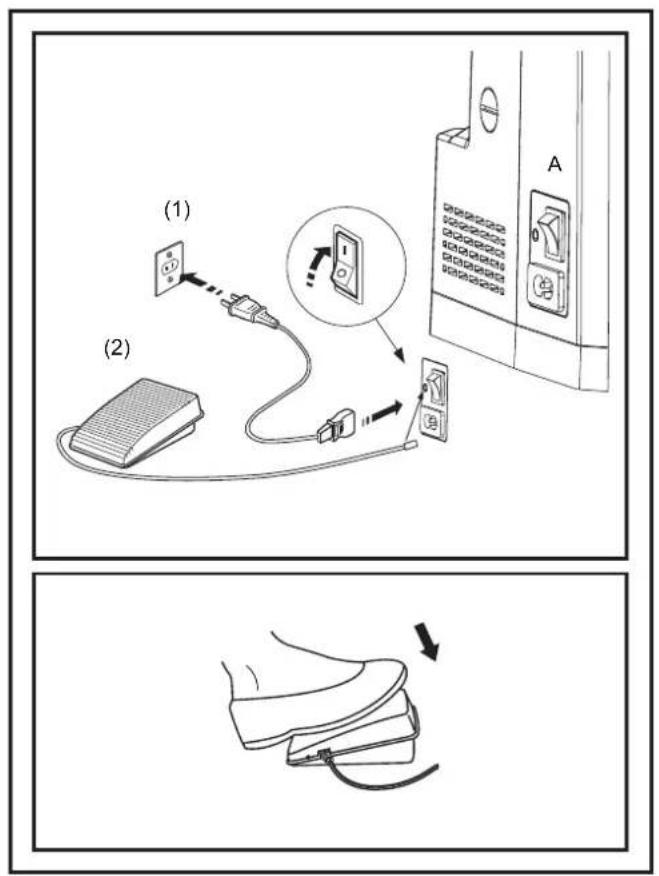
(2) Connecting Machine to Power Source
Connect the machine to a power source as illustrated.(1)
- Attention: Unplug power cord when machine is not in use.
Foot control: The foot control pedal regulates the sewing speed. (2)
- Attention: Consult a qualified electrician if in doubt of how to connect machine to power source. Unplug power cord when machine is not in use.
Sewing light: Press main switch (A) to "I" for power and light.
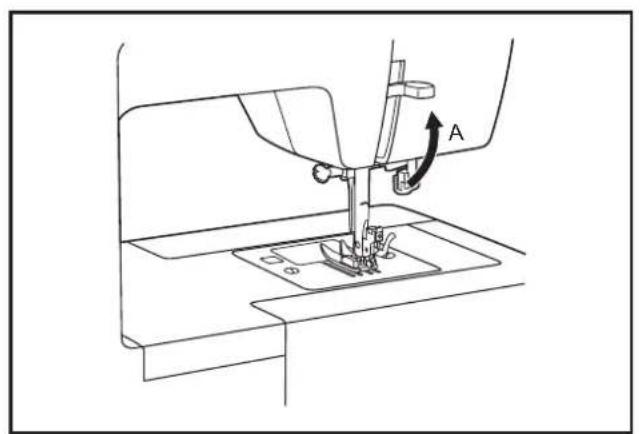
(3) Two Step Presser Foot Lifter
When sewing several layers or thick fabrics, the presser foot can be raised to a higher position for easy positioning of the work.(A)
(4) Adjusting Presser Foot Pressure
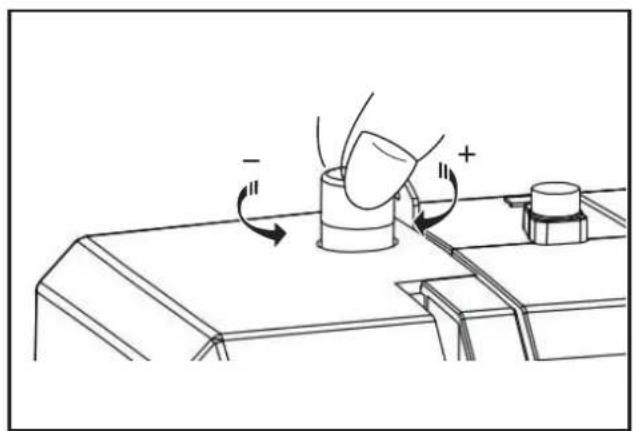
The presser foot pressure of the machine has been pre-set and requires no particular readjustment according to the type of fabric (light-or-heavy weight).
However, if you need to adjust the presser foot pressure, you may turn the presser adjusting screw.
For sewing very thin fabric, loosen the pressure by turning the screw counter counterclockwise, and for heavy fabric,tighten by turning it clockwise.
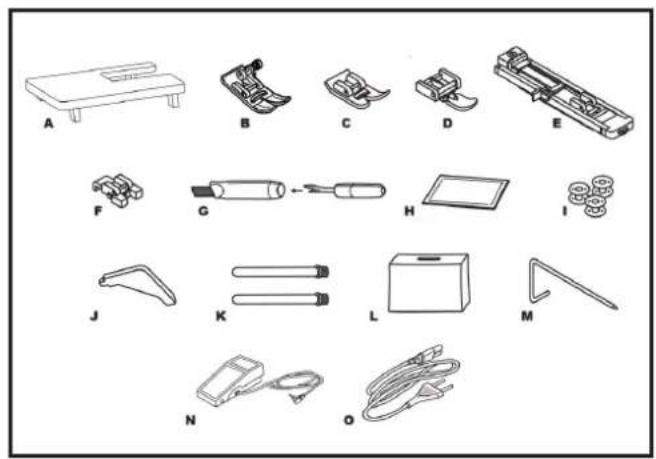
(5) Accessories
A. Extension table
B. All purpose foot with stopper
C. Teflon presser foot
D. Zipper foot
E. Buttonhole foot
F. Button sewing foot
G. Seam ripper/brush
H. Pack of needles
I. Bobbin(3x)
J. L-screwdriver
K. Auxiliary Spool Pin
L. Soft Cover
M. Quilting guide
N. Foot Control Pedal
O. Power cord
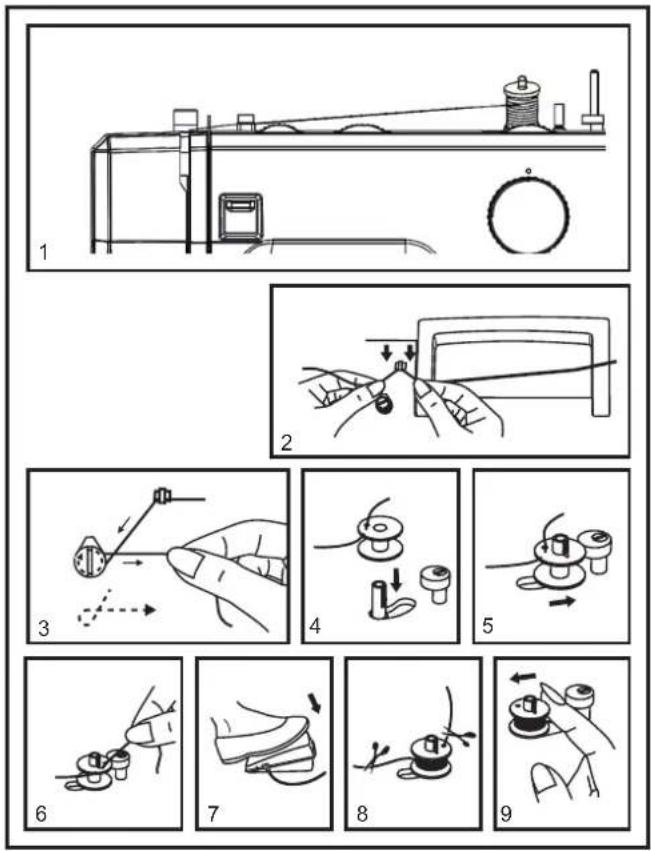
(6) Winding the Bobbin
- Place thread and corresponding spool holder on to spool pin.(1)
- Snap thread into thread guide.(2)
• Wind thread clockwise around bobbin winder tension discs. (3) - Thread bobbin as illustrated and place on spindle.(4)
• Push bobbin spindle to right.(5) - Hold thread end.(6)
• Step on foot control pedal.(7)
• Cut thread.(8) - Push bobbin spindle to left (9) and remove.
Please Note:
When the bobbin winder spindle is in "bobbin winding" position, the machine will not sew and the handwheel turn. To start sewing, push the bobbin winder spindle to the left (sewing positon).
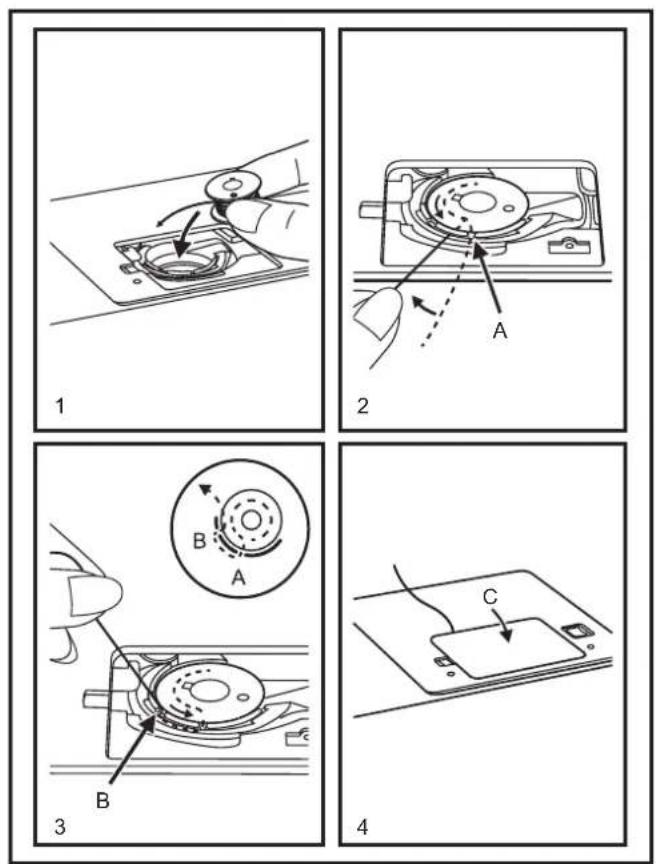
(7) Inserting the Bobbin
When inserting or removing the bobbin, the needle must be fully raised.
Turn power switch to of ("O") before inserting or removing the bobbin.
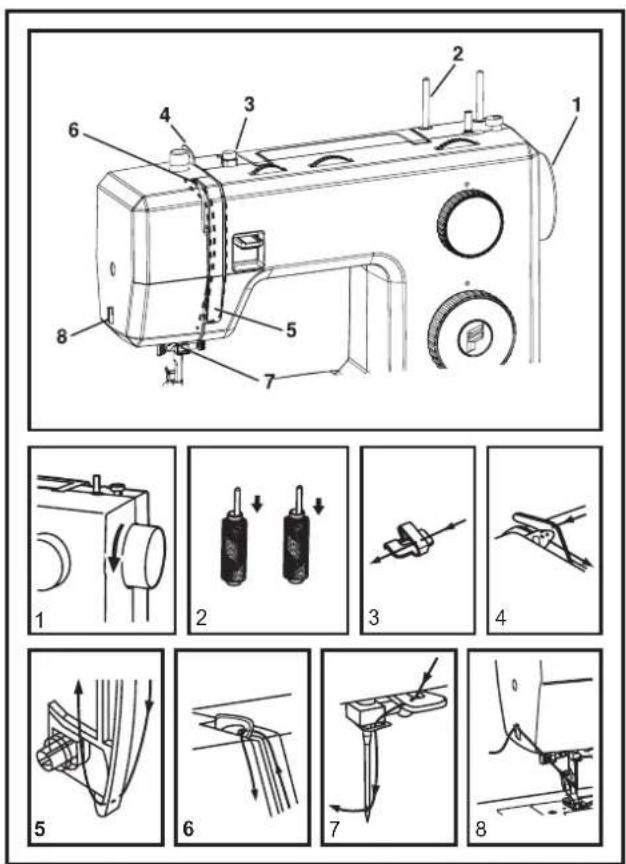
(8) Threading the Upper Thread
This is a simple operation but it is important to carry out correctly as by not doing so several sewing problems could result.
- Start by raising the needle to its highest point (1), and continue turning the handwheel counterclockwise until the needle just slightly begins to descend. Raise the presser foot to release the tension discs.
Note: For safety, it is strongly suggested you turn off the power before threading.
- Place the spool of thread on the spool pin. (2)
- Draw thread from spool through the upper thread guide(3) and pulling thread through pre-tension spring as illustrated.(4)
- Thread tension module by leading thread down right channel and up left channel. (5) During this process it is helpful to hold the thread between the spool and thread guide.
- At the top of this movement pass thread from right to left through the slotted eye of the take-up lever and then downwards again.(6)
- Now pass the thread behind the horizontal thread guide, and then behind the thin wire needle clamp guide (7) and then down to the needle which should be threaded from front to back.
- Pull about 6-8 inches of thread to the rear beyond the needle eye. Trim thread to length with built in thread cutter.(8)
(9) Automatic Needle Threader
- Raise the needle to its highest position.
- Press lever (A) down as far as it will go.
- The threader automatically swings to the threading position.(B)
• Pass thread around thread guide.(C) - Pass the thread in front of the needle around the hook(D) from bottom to top.
- Release lever (A).
- Pull the thread through the needle eye.
Attention:
Turn power switch to off("O")!
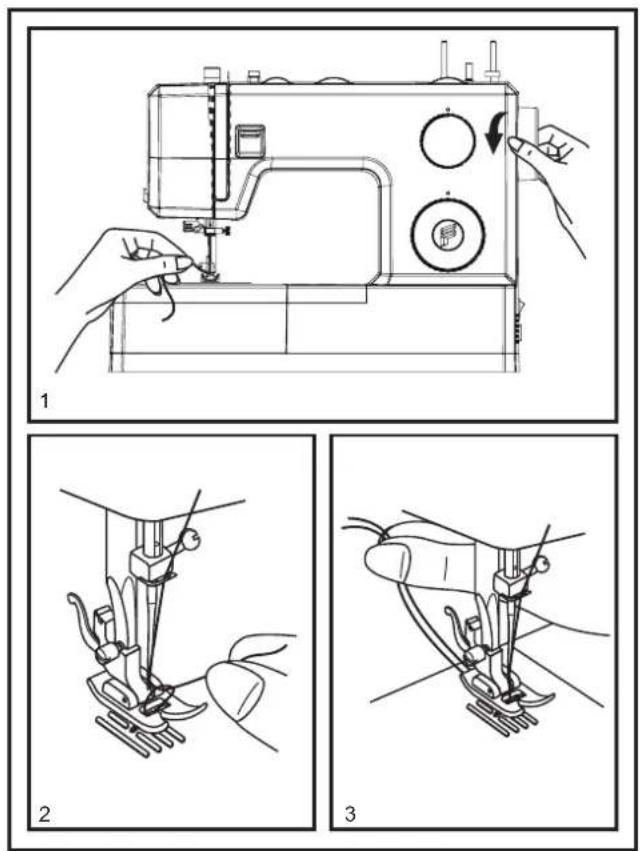
(10) Raising the Bobbin Thread
Hold the upper thread with the left hand. Turn the handwheel (1) towards you (counterclockwise) lowering, then raising needle.
Note: If it is difficult to raise the bobbin thread, check to make sure the thread is not trapped by the hinged cover or the Removable Extension Table.
Gently pull on the upper thread to bring the bobbin thread up through the needle plate hole.(2)
Lay both threads to the back under the presser foot.(3)
(11) Thread Tension
Upper thread tension
Basic thread tension setting: "4".(1)
To increase the tension, turn the dial to the next number up. To reduce the tension, turn the dial to the next number down.
A. Normal thread tension for straight stitch sewing.
B. Thread tension too loose for straight stitch sewing.
Turn dial to higher number.
C. Thread tension too tight for straight stitch sewing.
Turn dial to lower number.
D. Normal thread tension for zigzag and decorative sewing. Correct thread tension is when a small amount of the upper thread appears on the bottom side of fabric.
Lower thread tension
The bobbin tension has been set correctly at the factory, so you do not need to adjust it.
Please note:
- Proper tension setting is important for strong seams.
- There is no single tension setting appropriate for all stitch functions, thread or fabric.
- A balanced tension (identical stitches both top and bottom) is usually only desirable for straight stitch construction sewing.
- 90% of all sewing will be between "3" and "5".
- For zig zag and decorative sewing stitch functions, thread tension should generally be less than for straight stitch sewing.
- For all decorative sewing you will always obtain a nicer stitch and less fabric puckering when the upper thread appears on the bottom side of your fabric.
(12) How to Choose Your Pattern
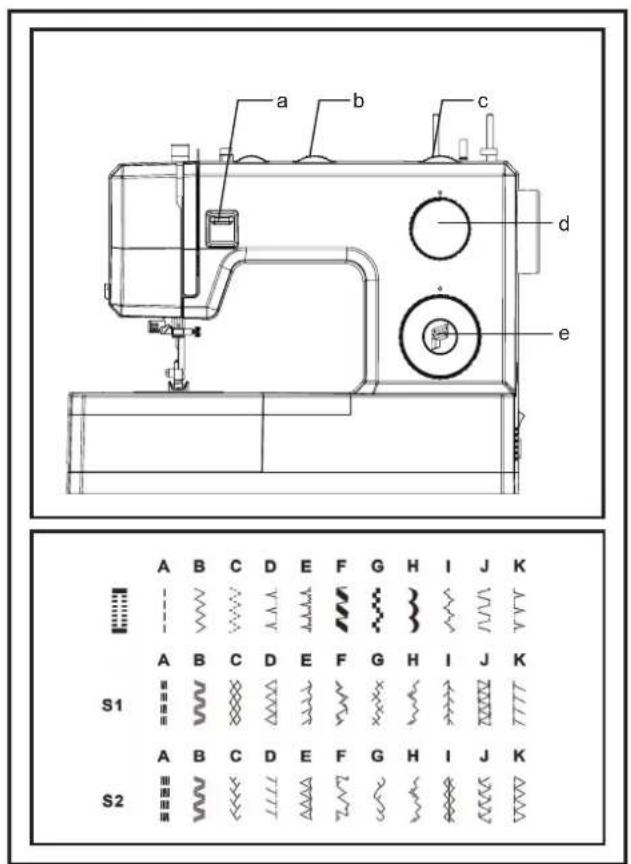
The diagram on this page displays the stitch patterns available on the machine.
Stitches in the first row black of the diagram are indicated on the Pattern Selector Dial in black. To select the patterns indicated with the black color, turn the Pattern Selector Dial. (e) Use the Stitch Length Dial (d) to adjust the stitch length as desired for the project. Use the Stitch Width Dial (c) to adjust the width of the stitch as desired.
Stitches S1 in the second row of the diagram are indicated on the Pattern Selector Dial in blue. The blue indicates that the stitch is a stretch stitch pattern, and information on how to sew these stretch patterns is on page 18.
The Pattern Selector Dial may be turned in either direction.
* *S2 pattern stitch added to model FY e370
a. Reverse Sewing Lever
b. Three Needle Position Dial
c. Stitch Width Dial
d. Stitch Length Dial
e. Pattern Selector Dial
(13) Three Needle Position Dial
The needle position can be altered with the "Three needle position dial". For normal work, the needle position is middle. For edge stitching or sewing parallel lines of top stitch, select needle position left or right. For twin needle stitching, needle position is middle.
a. Straight
b. Zig-zag
L. Left Needle Position
M. Middle Needle Position
R. Right Needle Position
(14) Stitch Width Dial & Stitch Length Dial
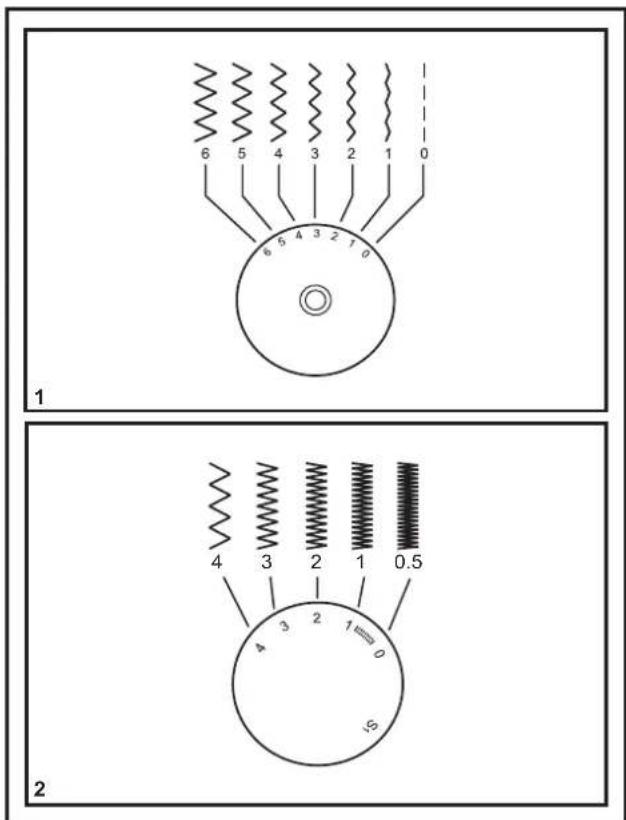
Function of stitch width dial
The maximum zigzag stitch width for zigzag stitching is 6mm; however, the width can be reduced on any patterns. The width increases as you move zigzag dial from "0 _i ±-"6".(1)
Function of stitch length dial while zig-zag stitching
Set the Pattern Selector Dial to zig-zag.
The density of zig-zag stitches increase as the setting of stitch
length dial approaches "0".
Standard zigzag stitches are usually achieved at "3" or below.(2)
Dense zig-zag stitches are called satin stitches. (2)
Function of stitch length dial for when straight stitching
For straight stitch sewing, turn the Pattern Selector Dial to the straight stitch setting. Turn the Stitch Length Dial, and the length of the individual stitches will decrease as the dial approaches "0". The length of the individual stitches will increase as the dial approaches "4". Generally speaking, use a longer stitch length when sewing heavier weight fabrics or when using a thicker needle or thread. Use a shorter stitch length when sewing lighter weight fabrics or when using a finer needle or thread.
(15) Sewing Straight Stitch
To begin sewing, set the machine for straight stitch.(1)
Place the fabric under the presser foot with the fabric edge lined up with the desired seam
guide line on the needle plate.(2)
Lower the presser foot lifter, and then step on the foot controller to start sewing. (3)
(16) Reverse Sewing
To secure the beginning and the end of a seam, press down the reverse sewing lever (A). Sew a few reverse stitches.
Release the lever and the machine will sew forward again.(1)
(16) Removing the Work
Turn the handwheel toward you (counterclockwise) to bring the thread take-up lever to its highest position, raise the presser foot and remove work behind the needle and presser foot.(2)
(16) Cutting the Thread
Pull the threads under and behind the presser foot. Guide the threads to the side of the face plate and into thread cutter (B). Pull threads down to cut.(3)
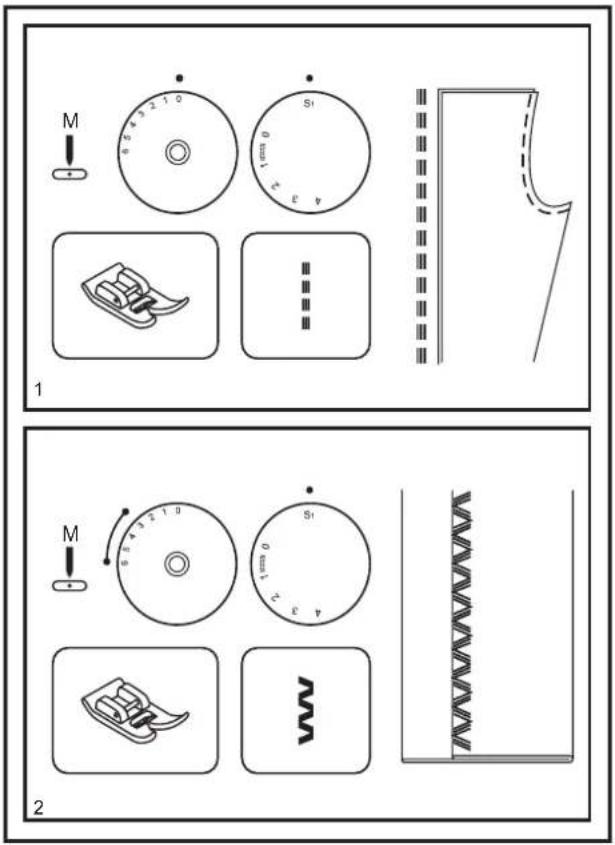
(17) Choosing Stretch Stitch Patterns
The Stretch Stitch Patterns are indicated with a blue color on the Pattern Selector Dial. To select these stitches, turn the Pattern Selector Dial to the desired pattern. Then, turn the Stitch Length Dial to the indicator marked "S1". Though there are several stretch patterns, here are two examples:
Straight Stretch Stitch(1)
Set the Pattern Selector Dial to "
Used to add triple reinforcement to stretch and hardwearing seams.
The machine sews two stitches forward and one stitch backwards.
Ric Rac(2)
Set the Pattern Selector Dial to “§”
Adjust the Stitch Width Dial to between "3" and "6"
Ric Rac Stitch is suitable for firm fabrics like denim,corduroy,poplin,duck,etc.
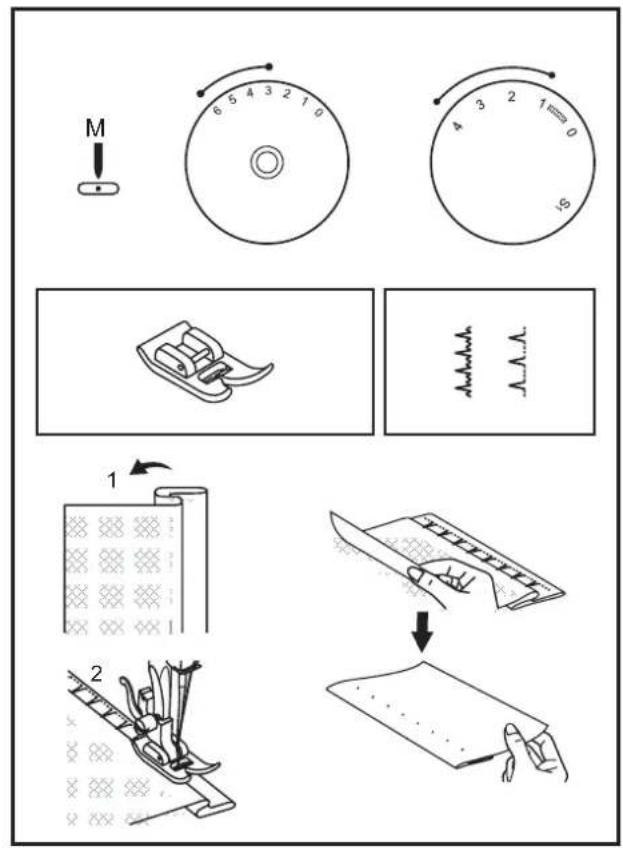
(18) Blind Hem
For hems on curtains, trousers, skirts, etc.
Blind hem for stretch fabrics.
Blind hem for firm fabrics.
Set the Stitch Length Dial with the range shown on the diagram at the right. Blind hems, however, are normally sewn with a longer stitch length setting. Set the Stitch Width Dial at a setting appropriate for the weight/type of fabric being sewn, within the range shown in the diagram on the right of the page. Generally, a narrower stitch is used for lighter weight fabrics, and a wider stitch is used for heavier weight fabrics. Sew a test first to make sure the machine settings are appropriate for the fabric.
Blind Hem:
Turn up the hem to the desired width and press. Fold back (as shown in Fig. 1) against the right side of the fabric with the top edge of the hem extending about 7 mm (1/4") to the right side of the folded fabric.
Start to sew slowly on the fold, making sure the needle touches slightly the folded top to catch one or two fabric threads.(2)
Unfold the fabric when hemming is completed and press.
Note:
To make blind hem sewing even easier, use a blind hem foot.
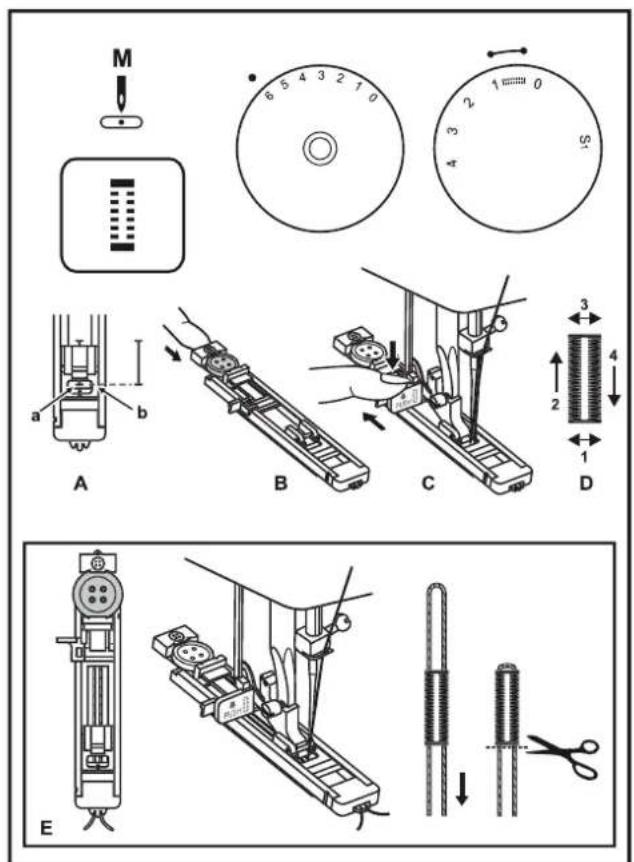
(19) Sew 1-step Buttonholes
Buttonhole sewing is a simple process that provides reliable results. However, it is strongly suggested to always make a practice buttonhole on a sample of your fabric and stabilizer.
Making a Buttonhole
- Using tailor's chalk, mark the position of the buttonhole on the fabric.
-
Attach the buttonhole foot and set the Pattern Selector Dial to "Set stitch length dial to "Set the stitch width at "6". The width however may need to be adjusted according to the project. Sew a test first to determine this.
-
Lower the presser foot aligning the marks on foot with the marks on the fabric (A). (The front bar tack will be sewn first.) (Align the mark on the fabric (a) with the mark on the foot(b).)
- Open the button plate and insert the button (B).
- Lower the buttonhole lever and gently push it back (C).
- While lightly holding the upper thread, start the machine.
- Buttonhole stitching is done in the order (D).
- Stop the machine when the buttonhole cycle has completed.
Making a Buttonhole on Stretch Fabrics(E)
When sewing buttonholes on stretch fabric, hook heavy thread or cord under the buttonhole foot. When the buttonhole is sewn the legs will overcast the cord.
- Mark the position of the buttonhole on the fabric with the tailor's chalk, attach the buttonhole foot, and set the pattern selector dial to “☐”. Set stitch length dial to “☐”.
- Hook the heavy thread onto the back end of the buttonhole foot, then bring the two heavy thread ends to the front of the foot, insert them into the grooves and temporarily tie them there.
- Lower the presser foot and start sewing.*Set the stitch width to match the diameter of the gimp thread.
- Once sewing is completed, gently pull the heavy thread to remove any slack, then trim off the excess.
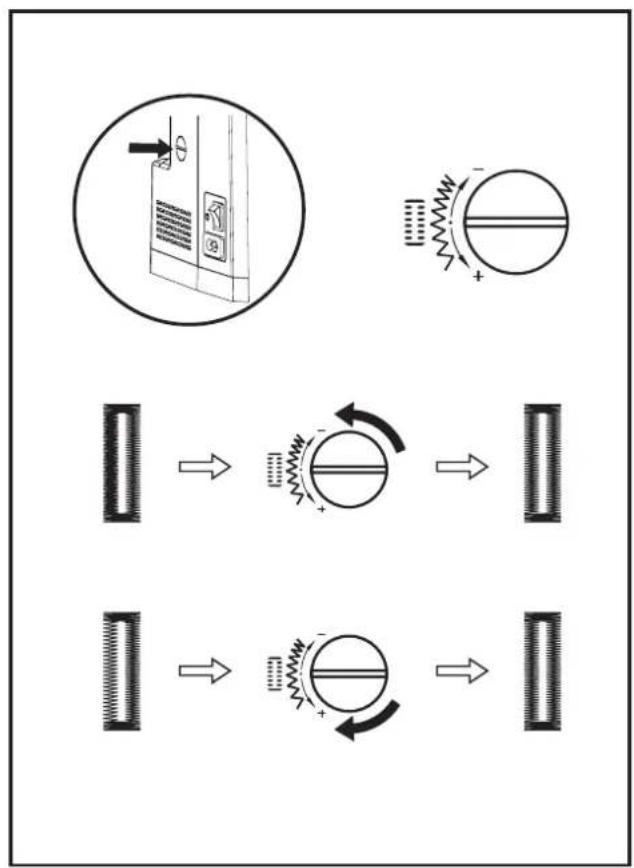
(20) Left and Right Side Balance for Buttonnole
Stitch density on right and left sides of buttonhole can be adjusted by buttonhole balance control dial.
This dial should usually be in a neutral position (between “+” and“-”)
If the stitches on the left side of buttonhole are too close together, turn the dial to the left(+). *Turning dial to the left opens left side.
If the stitches on the left side of the buttonhole are too open, turn the dial to the right(-). *Turning dial to right closes left side.
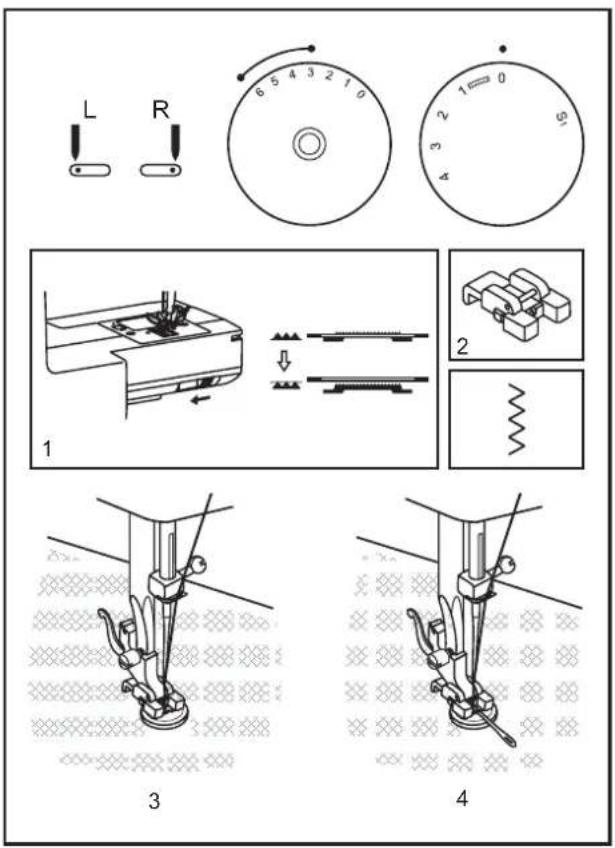
(21) Sewing on Buttons
Move the drop feed control to right side to lower the feed dogs.(1)
Change the all purpose foot to the button sewing foot. (2)
Set the stitch length to "0".
Place the button and fabric under the Button Sewing foot, as illustrated in (3). Set the machine for zig-zag stitch, then set the width to number "3" - "6". Turn the handwheel to check that the needle goes cleanly into the left and right holes of the button. Adjust the stitch width, as needed, according to the distance between the holes of the button. Slowly sew on the button with about 10 stitches.
Raise the needle out of the fabric. Set the machine for straight stitch again, then sew a few securing stitches to finish.
If a shank is required, place a darning needle on top of the button and sew. For buttons with 4 holes, sew through the front two holes first, push the work forward and then sew through the back two holes.
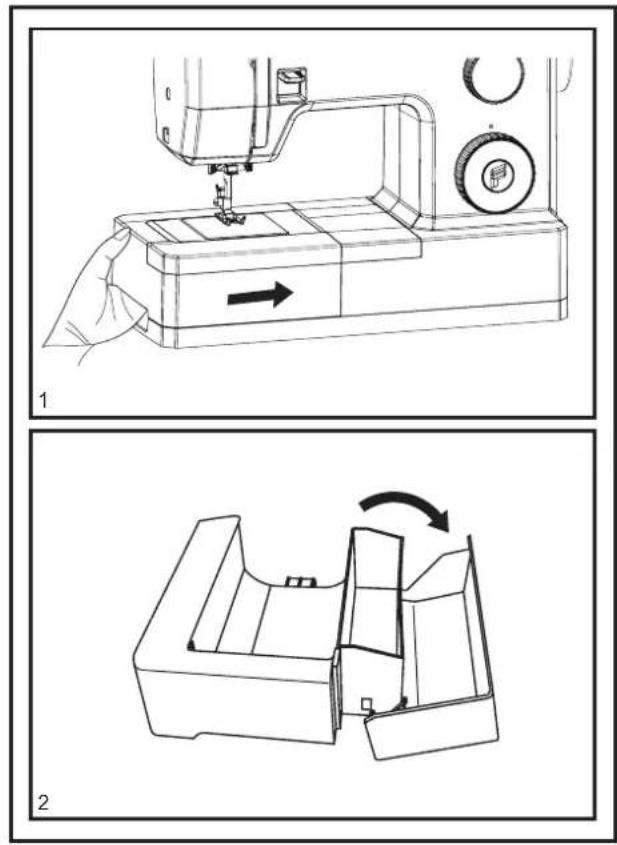
(22) Installing the Accessory box
Hold the accessory box horizontally, and push it in the direction of the arrow.(1)
To remove the accessory box, pull it toward the left.
To open the accessory box, flip cover down as shown.(2)
(23) Attaching the Presser Foot Shank
Raise the presser bar (a) with the presser foot lifter. Attach the presser foot shank (b) as illustrated.(1)
Attaching the presser foot
Lower the presser foot shank (b) using the presser foot lifter, until the cut-out (c) is directly above the pin (d). (2) The presser foot (f) will engage automatically.
Removing the presser foot
Raise the presser foot using the presser foot lifter.(3)
Raise the lever (e) and the foot disengages.
Attaching the edge/ quilting guide
Attach the edge/ quilting guide (g) in the slot as illustrated. Adjust as needed for hems, pleats, quilting, etc. (4)
Attention:
Turn power switch to off("O") when carrying out any of the above operations!
(23)
| NEEDLE SIZE | FABRICS | THREAD |
| 9(70)-11(80) | Lightweight fabrics-thin cottons, voile, silk, muslin, interlocks, cotton knits, tricots, jerseys, crepes, woven polyester, shirt & blouse fabrics | Light-duty thread in cotton,nylon,polyester or cotton wrapped polyester. |
| 11(80)-14(90) | Medium weight fabrics-cotton, satin, kettlecloth, sailcloth, double knits,lightweight woolens. | Most threads sold are medium size and suitable for these fabrics and needle sizes. Use polyester threads on synthetic materials and cotton on natural woven fabrics for best results. Always use the same thread on top and bottom. |
| 14(90) | Medium weight fabrics-cotton duck, woolen, heavier knits, terrycloth,denims. | |
| 16(100) | Heavy weight fabrics-canvas, woolens, outdoor tent and quilted fabrics, denims, upholstery material (light to medium). | |
| 18(110) | Heavy woolen, overcoat fabrics, upholstery fabrics,some leathers and vinyls. | Heavy duty thread,carpet thread |
IMPORTANT: Match needle size to thread size and weight of fabric.
(24) How To Drop Feed Dog
For ordinary sewing, keep the feed dog up, for freehand embroidery, sewing on buttons and darning, drop the feed dog. To raise (a) and lower (b) feed dog. (2)
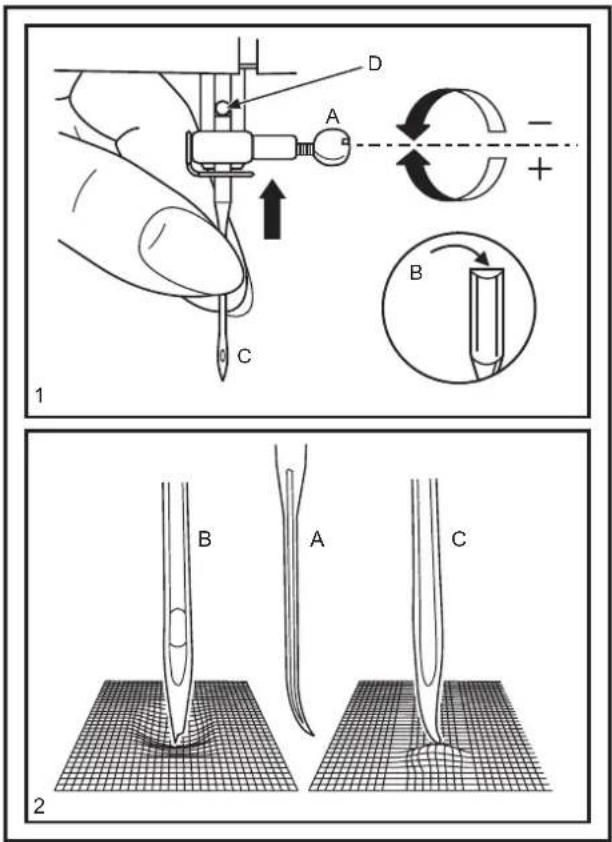
(25) Inserting & Changing Needles
Change the needle regularly, especially if it is showing signs of wear and causing problems. Insert the needle as illustrated as follows:
A. Loosen the needle clamp screw and tighten again after inserting the new needle.(1)
B. The flat side of the shaft should be towards the back.
C/D. Insert the needle as far up as it will go.
Attention:
Turn power switch to off ("O") before inserting or removing the needle.
Needles must be in perfect condition.(2)
Problems can occur with:
A. Bent needles
B. Damaged points
C. Blunt needles
Troubleshooting Guide
| PROBLEM | CAUSE CORRECTION | |
| Upper thread breaks | 1. The machine is not threaded correctly.2. The thread tension is too tight.3. The thread is too thick for the needle.4. The needle is not inserted correctly.5. The thread is wound around the spool holder pin.6. The needle is damaged. | 1. Rethread the machine.2. Reduce the thread tension.(lower number)3. Select a larger needle.4. Remove and reinsert the needle. (flat side towards the back)5. Remove the reel and wind thread onto reel.6. Replace the needle. |
| Lower thread breaks | The bobbin case is threaded wrong. | Remove bobbin from bobbin case. Reinsert and rethread bobbin correctly.Pull on the thread. The thread should pull easily. |
| Skipped stitches | 1. The needle is not inserted correctly.2. The needle is damaged.3. The wrong size needle has been used.4. The foot is not attached correctly. | 1. Remove and reinsert needle. (flat side towards the back)2. Insert a new needle.3. Choose a needle to suit the thread and fabric.4. Check and attach correctly. |
| Needle breaks | 1. The needle is damaged.2. The needle is not correctly inserted.3. Wrong needle size for the fabric.4. The wrong foot is attached. | 1. Insert a new needle.2. Insert the needle correctly. (flat side towards the back)3. Choose a needle to suit the thread and fabric.4. Select the correct foot. |
| Loose stitches | 1. The machine is not correctly threaded.2. The bobbin case is not correctly threaded.3. Neddle/fabric/thread combination is wrong.4. Thread tension wrong. | 1. Check the threading.2. Thread the bobbin case as illustrated.3. The needle size must suit the fabric and thread.4. Correct the thread tension. |
| Seams gather or pucker | 1. The needle is too thick for the fabric.2. The stitch length is adjusted wrong.3. The thread tension is too tight. | 1. Select a finer needle.2. Readjust the stitch length.3. Loosen the thread tension. |
| Uneven stitches, uneven feed | 1. Poor quality thread.2. The bobbin case is threaded wrong.3. Fabric has been pulled. | 1. Select a better quality thread.2. Remove bobbin from bobbin case. Reinsert and rethread bobbin correctly.3. Do not pull on the fabric while sewing. Let the feed dogs pull the fabric under the foot. |
| The machine is noisy | 1. Lint or oil have collected on the hook or needle bar.2. The needle is damaged. | 1. Clean the hook and feed dog as described.2. Replace the needle. |
| The machine jams | Thread is caught in the hook. | Remove the upper thread. Gently rock the handwheel backward and forward by hand and remove the thread from the bobbin area. Rethread the upper thread. |