V-Charger ECO 80 - Battery charger Reely - Free user manual and instructions
Find the device manual for free V-Charger ECO 80 Reely in PDF.


User questions about V-Charger ECO 80 Reely
0 question about this device. Answer the ones you know or ask your own.
Ask a new question about this device
Download the instructions for your Battery charger in PDF format for free! Find your manual V-Charger ECO 80 - Reely and take your electronic device back in hand. On this page are published all the documents necessary for the use of your device. V-Charger ECO 80 by Reely.
USER MANUAL V-Charger ECO 80 Reely
GB Operating Instructions
V - Charger ECO 80
Item No. 2523343 Page 49 - 94
F Notice d'emploi
Charger V ECO 80
text_image
Technical diagram of a vintage computer with numbered components for identificationBATTERY CHECK PLEASE WAIT...
LiPo BAL-CHG 3S C=3000mAh 3.0A
BATTERY CHECK PLEASE WAIT...
NiMH 2.0A 7.42V C>D 022:45 00890
MEMORY LiPo [01] BAL 3S 1.0A
BATT MEMORY SAVE LiPo Battery
LiPo BAL-CHG 3S C= 3000mAh 3.0A
MEMORY LiPo [01] BAL 3S 1.0A
MEMORY LiPo [01] BAL 3S 1.0A
LiPo BAL-CHG 3S C= 3000mAh 3.0A
Safety timer ON 240min
Key beep ON Buzzer ON
OUTPUT: 12.46V INPUT: 15.00V
Capacity Cut-off 5000mAh
Safety timer ON 200min
Temp. Cut-off ON 60C(140F)
LiPo/Lilon/LiFe/LiHv, 1 - 6 Zellen
- Introduction......51
- Explanation of Symbols 51
- Intended Use 52
- Scope of Delivery....52
- Safety Notes 53
a) General....53
b) Mains cable/mains voltage....53
c) Location for Installation....54
d) Operation....55
- Rechargeable Battery Notes......56
a) General....56
b) Additional Information about Lithium Batteries....57
- Usable Rechargeable Battery Types 59
- Operating Elements....60
- Commissioning....61
a) Connection to a Voltage/Current Supply 61
b) Connection of a Rechargeable Battery to the Charger....62
c) General Information on Operation of the Menus 64
- Main Menu....65
- Lithium Batteries (LiPo, Lilon, LiFe, LiHv) 66
a) General....66
b) Charging Batteries without Balancer Connection ("CHARGE").67
c) Charging Rechargeable Batteries with Balancer Connection ("BAL-CHG")....68
d) Discharging Rechargeable Batteries ("DCHG") 69
e) Storing Batteries ("STORAGE")....71
- NiMH and NiCd Rechargeable Batteries 72
a) General 72
b) Charging Rechargeable Batteries ("CHARGE Man") 72
c) Automatic Charge Mode ("CHARGE Aut") 74
d) Discharging Battery ("DISCHARGE")....74
e) Cycle Programme ("CYCLE")....75
Page
- Lead Batteries (Pb)....77
a) General....77
b) Charging Batteries ("CHARGE") 77
c) Discharging Battery ("DISCHARGE")....79
- Saving/Loading Rechargeable Battery Data....80
a) Saving Battery Data....80
b) Loading Battery Data....81
- System settings 82
- Fixed Voltage Output 86
- Voltage Display for Lithium Rechargeable Batteries....88
- Display of the internal resistance....89
- Warning Messages on the Display 90
- Information on the Charger 91
- Maintenance and Cleaning....92
- Disposal 93
a) Product....93
b) (Rechargeable) batteries....93
- Technical Data 94
1. Introduction
Dear Customer,
Thank you for purchasing this product.
This product complies with the statutory national and European requirements.
To maintain this status and to ensure safe operation, you as the user must observe these operating instructions!

These operating instructions are part of this product. They contain important notes on commissioning and handling. Also consider this if you pass on the product to any third party. Therefore, retain these operating instructions for reference!
If there are any technical questions, please contact:
www.conrad.com/contact
2. Explanation of Symbols

The symbol with the lightning in the triangle is used if there is a risk to your health, e.g. due to an electric shock.

The symbol with the exclamation mark in the triangle is used to indicate important information in these operating instructions. Always read this information carefully.

The arrow symbol indicates special information and advice on operation.

The product is intended for use in dry indoor rooms only; it must not become damp or wet.

This is a safety class II product.

Follow the operating instructions!
3. Intended Use
The charger is used to charge and discharge rechargeable batteries of the type NiMH/NiCd (1 - 15 cells), LiPo/Lilon/LiFe/LiHv (1 - 6 cells) and lead batteries (1 - 10 cells, 2 V - 20 V).
The charge current can be set between 0.1 A and 10.0 A (depending on the cell number/ rechargeable battery voltage). The maximum charging power is 80 W.
The discharge current can be set between 0.1 A and 2.0 A (depending on the cell number/ rechargeable battery voltage). The maximum discharging power is 5 W.
The charger is operated by four operating buttons and a two-line lit LC display.
The charger also offers a connection for an external temperature sensor (not enclosed, available as an accessory) for rechargeable battery monitoring. A balancer is integrated for multiple-cell lithium batteries. For connection of the rechargeable battery, a matching external XH adapter for rechargeable batteries with 2 - 6 cells is enclosed.
The charger has an integrated mains unit to permit operation on mains voltage (100 - 240 V/AC, 50/60 Hz). The charger may, however, also be alternatively operated on a stabilised direct voltage of 11 - 18 V/DC (e.g. via an external vehicle lead battery or a suitable mains adapter).
The safety notes and all other information in these operating instructions always have to be observed!
Read the operating instructions carefully and attentively, and keep them for later reference. Only pass the product on to any third parties together with the operating instructions.
Use other than that described above can lead to damage to the product and may involve additional risks such as, for example, short circuits, fire, electrical shock etc. The entire product must not be modified or converted, and the casing must not be opened!
This product complies with the statutory national and European requirements.
4. Scope of Delivery
- Multifunctional charger
- Mains cable
- XH adapter
- Connection cable with alligator clamps
- Operating instructions (on CD)
Current operating instructions
Download the latest operating instructions at www.conrad.com/downloads or scan the QR code shown. Follow the instructions on the website.
Read the operating instructions attentively and particularly observe the safety notes. If the safety notes and the information in these operating instructions regarding proper handling are not observed, we assume no liability for any resulting injury/property damage. In such cases, the warranty/guarantee will also lapse.
a) General
- The unauthorized conversion and/or modification of the product is inadmissible because of safety and approval reasons. Never dismantle the product!
- Maintenance, adjustment, or repair work must only be carried out by a specialist/a specialist workshop. The device contains no parts that require servicing or adjusting by you.
- The product is not a toy and must be kept out of reach of children!
The product must only be set up, used or stored in places that are not accessible to children. The same applies for rechargeable batteries.
Pay particular attention when children are present! Children may change the settings or short-circuit the rechargeable battery/batteries, which may lead to fire or explosion. Danger to life!
- In schools, training centres, hobby and self-help workshops, the use of the product must be supervised by responsible trained personnel.
- In commercial institutions, the accident prevention regulations of the Employer's Liability Insurance Association for Electrical Systems and Operating Materials are to be observed.
- Do not leave packaging material lying around carelessly. It may become a dangerous toy for children!
- Handle the product with care; impacts, shock or fall even from low heights will damage it.
- If you are not sure about the correct operation or if questions arise which are not covered by the operating instructions, please do not hesitate to contact us or another specialist.
b) Mains cable/mains voltage
- The product is set up in accordance with protection class II (double or increased output). Observe that the housing or mains line insulation is not damaged or destroyed.
- The mains socket to which the plug-in mains unit is connected must be easily accessible.
- Do not pull the mains plug from the mains socket by pulling the cable.
- If the mains cable or charger are damaged, do not touch it. Danger to life from electric shock!
First switch off the mains voltage for the mains socket to which the mains cable is connected (switch off the corresponding circuit breaker or take out the fuse, then switch off the fault interrupter protection switch (FI circuit breaker) so that the mains socket is separated from the mains voltage on all poles).
Only then unplug the mains unit from the mains socket.
If the charger is damaged, stop operating it. Take it to a specialised workshop or dispose of it in an environmentally friendly way.
If the mains cable is damaged, dispose of the damaged mains cable in an environmentally compatible way. Do not use it anymore. Replace it with a new mains cable of the same specifications.
c) Location for Installation
- The charger is intended for dry indoor use only. It must not become damp or wet. Never set it up near a bathtub, shower or similar!
If the charger is operated via the mains cable, there is danger to life from electric shock in case of moisture/wetness on the charger/mains cable!
- Avoid direct sun irradiation, strong heat or cold. Keep the charger away from dust and dirt. The same applies to any rechargeable battery that may be connected.
- Do not operate the charger inside of rooms or in bad ambient conditions where flammable gases, vapours or explosive dust may be or are present! There is a danger of explosion!
- Choose a solid, flat, clean and sufficiently large surface for the charger. Never place the charger on a flammable surface (e.g. carpet, tablecloth). Always use a suitable, non-flammable, heatproof surface.
- Keep the charger away from flammable or easily inflammable materials (e.g. curtains).
- Never cover the ventilation slits. There is a danger of overheating or fire. Never push any objects into the ventilation slots of the charger; There is a danger to life from electric shock! Never impair the function of the integrated fan.
- Do not place the charger on any valuable furniture surfaces without using a suitable protection. Otherwise, scratches, pressure points or discolourations are possible. The same applies to the rechargeable battery.
- Do not use the charger inside a vehicle.
- The charger must only be set up, used or stored in places that are not accessible to children. Children may change the settings or short-circuit the rechargeable battery/battery pack, which can lead to an explosion. Danger to life!
- Avoid setup in direct proximity of strong magnetic or electromagnetic fields, transmitter aerials or HF generators. This can affect the control electronics.
- Ensure that the cables are not crushed or damaged by sharp edges. Never place any objects on the cables.
- Do not place any containers filled with liquid, vases or plants, on or next to the charger/mains cable.
When these liquids get into the charger (or the plug connections of the mains cable), the charger will be destroyed and there is a most severe danger of potentially fatal electric shock or fire.
If the charger is operated via the mains cable, first switch off the mains voltage for the mains socket to which the mains cable is connected (switch off the corresponding circuit breaker or take out the fuse, then switch off the fault interrupter protection switch (FI circuit breaker) so that the mains socket is separated from the mains voltage on all poles). Only then unplug the mains plug of the mains cable from the mains socket.
If the charger is operated via the DC input (11 - 18 V/DC), disconnect the charger from the voltage/power supply.
Then disconnect the connected rechargeable battery from the charger. Do not use the charger again - bring it to a specialist workshop.
d) Operation
- The charger may be operated either via the mains voltage (100 - 240 V/AC, 50/60 Hz) or via a stabilised direct voltage of 11 - 18 V/DC (e.g. via an external vehicle lead battery or a suitable mains adapter).
Use only one of the two connection types, but never both at once. This may damage the charger. - Do not wear any metal or conductive materials, such as jewellery (necklaces, bracelets, rings, etc.) while you are working with the charger or batteries. A short-circuit at the rechargeable battery or charging cable poses a danger of burns and explosion.
- Do not operate the product unattended. Despite a considerable number of protective circuits, it is impossible to exclude the possibility of malfunctions or problems during the charging process.
- Ensure that there is sufficient ventilation during operation. Never cover up the charger. Leave enough of a distance (at least 20 cm) between charger and other objects. Overheating causes a danger of fire!
- The charger must only be used to charge (or discharge) rechargeable batteries of types NiMH, NiCd, Lilon/LiPo/LiFe/LiHv and lead batteries. Never charge any other rechargeable battery types or non-rechargeable batteries. There is great danger of fire or explosion!
- Always connect the charging cable to the charger first. Only then must the rechargeable battery be connected to the charging cable.
When disconnecting, proceed in reverse order - first disconnect the rechargeable battery from the charging cable, then the charging cable from the charger.
If the order is chosen incorrectly, there may be a short-circuit of the charger plugs; there is a danger of fire and explosion!
- Never connect several charges to each other.
- Never charge more than one rechargeable battery/battery pack at the same time. Always connect one single rechargeable battery/battery pack to the charger.
- Only operate the product in moderate climate, never in tropical climate. For more information on acceptable environmental conditions, see the chapter "Technical Data".
- Never operate the device immediately after it was taken from a cold room to a warm room. The resulting condensation may lead to malfunctions or damage!
Let the product reach room temperature before taking it into operation again. This may take several hours!
- Avoid operation in direct proximity of strong magnetic or electromagnetic fields, transmitter aerials or HF generators. This can affect the control electronics.
- If you have reason to believe that the device can no longer be operated safely, disconnect it immediately and make sure it is not operated unintentionally.
- Disconnect the charger from the voltage/current supply. Do not use the product any more after this, but take it to a specialised workshop or dispose of it in an environmentally compatible manner.
- It can be assumed that operation without danger is no longer possible if the device has any visible damage, the device no longer works, after extended storage under unsuitable conditions or after difficult transport conditions.
- Keep the entire product at a dry, cool, clean site that is not accessible to children.
6. Rechargeable Battery Notes

Although use of rechargeable batteries in everyday life is a matter of course today, there are many dangers and problems. In particular, with LiPo/Lilon/LiFe/LiHv rechargeable batteries with their high energy content (in comparison with conventional NiCd or NiMH rechargeable batteries), various regulations must be observed in order to avoid the danger of explosion and fire.
For this reason, always ensure that you have read and understood the following information and safety information when handling rechargeable batteries.
If the manufacturer of the rechargeable battery has provided any other information, read it carefully and observe it!
a) General
- Rechargeable batteries are no toys. Always keep batteries/rechargeable batteries out of the reach of children.
- Do not leave rechargeable batteries lying around openly. Children or pets may swallow them. If swallowed, consult a doctor immediately!
- Rechargeable batteries must not be short-circuited, taken apart or thrown into fire. There is a risk of fire and explosion!
- Leaking or damaged batteries/rechargeable batteries can cause chemical burns to skin when touched without the use of adequate protective gloves.
- Never recharge normal (non-rechargeable) batteries. There is a risk of fire and explosion!
Non-rechargeable batteries are meant to be used once only and must be disposed of properly when empty.
Only charge rechargeable batteries intended for this purpose. Use a suitable battery charger.
- Batteries must not get damp or wet.
- Place the charger and battery on a non-flammable, heat-resistant surface (e.g. stone tiles). Maintain enough distance from flammable objects. Leave enough distance between the charger and the rechargeable battery - never place the rechargeable battery on the charger.
- As both the charger and the battery heat up during the charge/discharge procedure, it is necessary to ensure sufficient ventilation. Never cover the charger or the rechargeable battery!
- Never use battery packs made up of different cells.
- Never leave the charging/discharging batteries unattended.
- Never recharge a battery directly in the model. Always remove the rechargeable battery from the model for recharging.
- Always observe correct polarity (plus/+ and minus/-) when connecting the rechargeable battery to your model or charger. Connecting the battery incorrectly will not only damage the model but also the rechargeable battery. There is a risk of fire and explosion!
This charger has a mechanism that protects against connecting the poles incorrectly. Nonetheless, it is possible that an incorrectly connected battery may lead to damage in certain situations.
- Never charge more than one rechargeable battery/battery pack at the same time. Always connect one single rechargeable battery/battery pack to the charger.
- If the product is not to be used for an extended period of time (e.g. storage), disconnect any connected rechargeable battery from the charger and disconnect the charger from the voltage/current supply.
The charger has no mains switch. If you operate the charger via the mains cable, pull the mains plug from the socket when you no longer need the charger. - Do not charge/discharge any battery that is still hot (e.g. caused by high discharging current from the model). Allow the rechargeable battery to cool down to room temperature before attempting to charge or discharge it.
- Never damage the exterior cover of a battery. There is a risk of fire and explosion!
- Never charge/discharge damaged, leaking or deformed batteries. This can result in a fire or explosion! Dispose of any unusable rechargeable batteries in an environmentally compatible fashion. Do not continue to use them.
- Remove the battery from the charger when it is fully charged.
- Recharge the rechargeable batteries about every 3 months. Otherwise, so-called deep discharge may result, rendering the rechargeable batteries useless.
- Keep rechargeable batteries in a suitable location. Use a smoke detector in the room. The risk of fire (or the occurrence of toxic smoke) cannot be excluded. Special rechargeable batteries for the model construction area are subject to great stress (e.g. high charging and discharging currents, vibrations, etc.).
b) Additional Information about Lithium Batteries
Modern batteries with lithium technology do not only have a clearly higher capacity than NiMH or NiCd rechargeable battery packs but they also have a considerably lower weight. This makes this type of rechargeable battery very interesting for application in model construction; so-called LiPo batteries (lithium-polymer) are often used here.
Rechargeable lithium batteries require special care when charging/discharging, as well as during operation and handling.
For this reason, we would like to provide you with some information in the sections below about the dangers and how you can avoid them, thus helping such batteries to maintain their performance for an extended period of time to come.
Additionally observe chapter 6. a).
- The outer shell of many rechargeable lithium batteries is only made of a thick foil and therefore very sensitive.
Never destroy or damage the battery, never let the battery fall and do not pierce the battery with any objects! Avoid any mechanical strain on the battery; never pull the connection cables of the battery! There is a risk of fire and explosion!
These guidelines must also be observed when the battery is inserted into the model or when it is removed from the model.
- Ensure that the battery does not overheat during usage, recharging, discharging, transport or storage. Do not place the battery next to sources of heat (e.g. speed controller, motor), keep the battery away from direct sunlight. There is a risk of fire and explosion if the battery overheats!
The battery must never heat up to more than +60 °C (observe any additional information from the manufacturer!).
- If the battery is damaged (e.g. after the crash of an aircraft or helicopter model) or the exterior cover is soaked/has expanded, do not use the battery. Do not charge it anymore. There is a risk of fire and explosion!
Handle the battery with care, use suitable protective gloves. Dispose of the rechargeable battery environmentally compatibly.
Never keep such rechargeable batteries in an apartment or a house/garage anymore. Damaged or bloated lithium rechargeable batteries may catch fire suddenly.
- Only use a suitable charger to charge lithium batteries or use the correct charging procedure. Due to a risk of fire and explosion, conventional chargers for NiCd, NiMH and lead batteries must not be used! Always choose the right charging procedure depending on rechargeable battery.
- When charging a lithium battery with more than one cell, always use a so-called balancer (one is already integrated into the supplied charger).
- Charge LiPo batteries with a max. charging current of 1C (if not indicated otherwise by the battery manufacturer!). This means that the charging current may not exceed the capacity value imprinted on the battery (e.g. battery capacity 1000mAh , max. charging current 1000mA = 1A ).
With LiFe, Lilon and LiHv batteries, you must observe the instructions of the battery manufacturer.
- The discharging current must not exceed the value printed on the battery.
For example, if a value of "20C" is printed on a LiPo battery, the max. discharging current is 20 times the battery's capacity (e.g. battery capacity 1000 mAh, max. discharging current 20C = 20 x 1000 mA = 20 A).
Otherwise, the battery will overheat, causing deformation/bloating of the battery or explosion and fire! The printed value (e.g "20C") does not generally refer to the constant current, but to the maximum current that the battery is capable of producing in the short-term. The constant current therefore should not be higher than one half of the given value.
- Observe that the individual cells of a lithium rechargeable battery must not be deep-discharged. A deep discharge of a lithium rechargeable battery will lead to permanent damage/destruction of the rechargeable battery.
If the model does not provide protection against total discharge or possess a visual display indicating a low battery, remember to switch off the model in time.
7. Usable Rechargeable Battery Types
| Rechargeable battery type LiPo Lilon Li | Fe LiHv NiCd NiMH Pb | ||||
| Rated voltage (V/cell) 3.7 3.6 | 3.3 3.8 1.2 1.2 2.0 | ||||
| Max. charging voltage (V/cell) | 4.2 4.1 3.6 4.35 1.6 1.6 2.45 | ||||
| Voltage for storage (V/cell) 3.85 3.75 3.3 3.85 --- | |||||
| Charging current for quick charge | <= 1C <= 1C <= 4C <= 1C <= 2C <= 2C <= 0.4C | ||||
| Min. voltage after discharge (V/cell) | >= 3.0 >= 3.0 >= 2.0 >= 3.0 >= 1.0 >= 1.0 >= 2.0 |

The voltages in the above table apply to a single cell.
The max. charging and discharging currents are indicated with the capacity value "C".
A charging current of 1C corresponds to the capacity value imprinted on the battery (e.g. indicated battery capacity 1000 mAh, max. charging current 1000 mA = 1 A).

Also observe the correct voltage setting for multi-cell battery packs. For example, the individual cells in a two-cell battery pack may be switched in parallel or in series.
If the maximum permissible charging current for the rechargeable battery is exceeded or a wrong cell number/voltage setting is chosen, there is a danger of destroying the rechargeable battery. There also is a danger of fire and explosion from the rechargeable battery!
Further notes on the max. charging current and the cell number/voltage can be taken from the data sheets or the labels of the rechargeable batteries; these data take precedence over the information in the above table.
Important!
- Never charge battery packs made up of different cells (or cells from different manufacturers).
- Never charge non-rechargeable batteries.
- Never charge rechargeable batteries not listed in the above table.
- Never charge rechargeable batteries with integrated electronics.
- Never charge rechargeable batteries that are still connected to other devices (e.g. a speed controller).
- Never charge any damaged or bloated rechargeable batteries.
8. Operating Elements
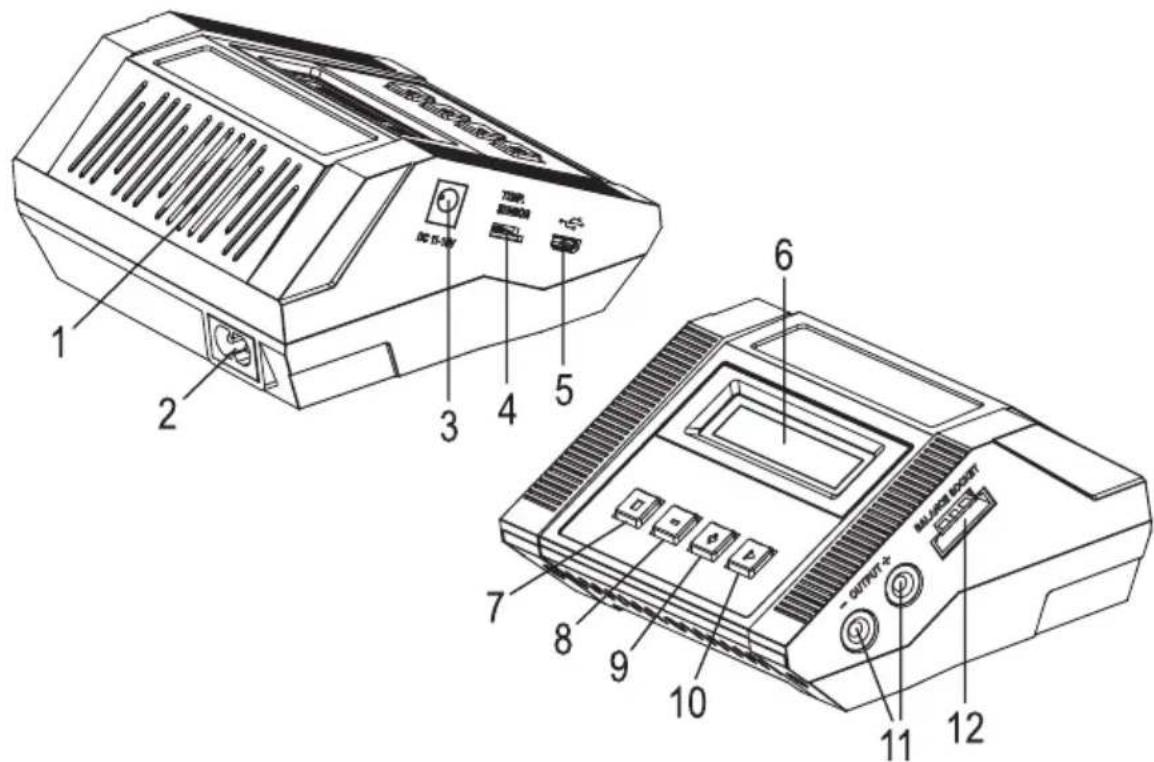
text_image
Technical diagram of a vintage computer with numbered components for identification1 Fan
2 Mains socket for connecting the charger to the mains voltage
3 Direct voltage input (11 - 18 V/DC, stabilised), e.g. to connect to an external vehicle lead battery
4 Socket for external temperature sensor (not enclosed, can be ordered separately)
5 MicroUSB socket (only for firmware upgrade by manufacturer)
6 Lighted LC display
7 "STOP" button: Selecting the rechargeable battery programme in the main menu, return from a submenu, stopping charging, cancelling
8 "-" button: Selecting the rechargeable battery programme in the main menu, value input (value reduction), menu selection (back), display of various data during charging/discharging
9 "+" button: Entering values (increasing value), menu selection (forward), displaying the voltage values of the individual cells when charging lithium batteries with a balancer connection
10 "START" button: Starting/continuing charging, confirmation of a setting/operating function
11 Round sockets (4 mm) for rechargeable battery connection (red = plus/+, black = minus/-)
12 Balancer port for connecting the enclosed balancer boards

Either operate the charger via the mains voltage connection (2) or the direct voltage input (3). Never use both inputs at the same time. This may damage the charger.
9. Commissioning
a) Connection to a Voltage/Current Supply

Attention!
Always connect the charger to the voltage/current supply first; only then must a rechargeable battery be connected to the charger.
The charger offers two different options for operation:
• Operation via the mains voltage (100 - 240 V/AC, 50/60 Hz)
- Operation via stabilised direct voltage (11 - 18 V/DC, e.g. via an external vehicle lead battery or a mains adapter)

Never use both operating modes at the same time. This may damage the charger. Loss of guarantee/warranty!
The charger has a maximum charging output of 80 W. If the charger is to be operated via the direct voltage input, the power supply strength must be chosen depending on how high the actually used charging output is (depending on the rechargeable battery type, cell number and the charging current set).
When fully using the maximum charging output of 80 W, the conversion loss increases power intake by about 20 - 30%.
If the charger is not to be operated at a 12 V vehicle lead battery, but via a fixed voltage mains unit, it must be able to supply a correspondingly high current (we recommend 10 A).
When using the direct current input, observe the correct polarity when connecting (plus/+ and minus/−). A suitable connection cable with alligator clamps is enclosed (red = plus/+, black = minus/−).
The charger will switch on automatically after connecting to the voltage/current supply. The display will light up; the start message will appear (see picture on the right) and the charger will emit a brief signal sound.
REELY
80ACDC
The charger is then in the main menu and ready for operation.
b) Connection of a Rechargeable Battery to the Charger
Please observe the following points before connecting or charging/recharging the battery:

- If you have not done so already, please read chapters 5, 6 and 7 completely and ensure that you have understood the information there.
- Do you know all of the information you need to know about your battery? Unknown or unlabelled batteries, the necessary values of which you do not know, must not be connected/charged/discharged!
- Have you selected the correct charging/discharging program for the type of battery you are using? Incorrect settings will damage the charger and the battery; there is a danger of fire and explosion!
- Did you set the correct charging or discharging current?
- Have you selected the correct voltage (e.g. for multiple-cell LiPo batteries)? A two-cell LiPo battery may be switched in parallel (3.7 V) or series (7.4 V).
- Are all connector cables and plugs undamaged, do the plugs stay firmly in the sockets? Worn plugs and damaged cables should be replaced.
- Connect only one rechargeable battery or a single battery pack to the charger output, but never several at once.
- When connecting a rechargeable battery to the charger, always connect the charging cable to the charger first. Only then must the charging cable be connected to the rechargeable battery. When disconnecting, proceed in reverse order (first disconnect the rechargeable battery from the charging cable, then the charging cable from the charger).
Failure to do so presents the danger of a short circuit. This can result in a fire or explosion of the rechargeable batteries! - If you wish to charge battery packs that you have manufactured yourself, the cells must be identical in their construction (same type, same capacity, same manufacturer).
The cells must also be charged to the same level (lithium batteries can be balanced out using the balancer. This is, however, not possible with other battery packs such as NiMH or NiCd). - Before connecting a rechargeable battery/battery pack to the charger, disconnect it completely, e.g. from a flight or speed controller.
Important when charging/discharging a lithium battery pack with balancer connection:
Multi-cell lithium battery packs usually always have a balancer connection. This permits the charger to monitor the voltage of every single cell separately at all times.
The charger adjusts the voltage of all cells to each other if there are deviations. The balancer prevents that one or several cells are over-charged or other cells not sufficiently fully charged by this. The balancer therefore protects both from over-charging (which may cause fire or explosion) and from deep discharge of a single cell, and thus ensures best performance of the battery pack in your model.
Procedure when connecting a battery pack to the charger:
- Connect the charger to the voltage/current supply.
- First connect the charging cable to the two 4 mm round sockets of the charging output. Ensure correct polarity (red cable = plus/+, black cable = minus/-).

The charging cable must not be connected to the rechargeable battery yet! There may be a short-circuit of the charger plugs; there is a danger of fire and explosion!
- If you want to connect a multiple-cell rechargeable lithium battery to the charger, plug the enclosed balancer board into the corresponding socket of the charger.
- Connect the charging cable to the rechargeable battery now. Ensure correct polarity (red cable = plus/+, black cable = minus/-).
- Connect the balancer plug of a multiple-cell rechargeable lithium battery to the corresponding connection of the balancer board. Do not use any force for plugging in! Ensure correct polarity.
The minus connection of the balancer plug of the rechargeable battery should usually be marked (e.g. black cable); the minus pole is marked on the balancer board as well (print "-").
If the balancer plug of the rechargeable battery does not match the shape of the socket on the XH adapter (it is intended for XH plugs), you need to use a suitable connection cable. It is available in accessory trade.
Proceed in the following steps when disconnecting a rechargeable battery:
- If you have connected a lithium rechargeable battery with a balancer cable to the charger, disconnect it from the charger.
- Then disconnect the charging cable from the rechargeable battery.
- Last disconnect the charging cable from the charger.

Always proceed in this order!
The rechargeable battery must always be disconnected from the charging cable (and from the balancer connection for lithium rechargeable batteries) first. Only then must the charging cable be disconnected from the charger.
Any other order poses danger of short circuit by the two round plugs of the charging cable connected to the rechargeable battery, as well as danger of fire and explosion!
- If no rechargeable battery is connected to the charger anymore, you can disconnect the charger from the voltage/current supply.
c) General Information on Operation of the Menus
- Select the desired submenu from the main menu using the "STOP" or the "-" button as described and confirm your selection with the button "START".
- In a submenu, you can call the different settings with the buttons "+" and "-"
- To modify a value, push the "START" button - the display then flashes. Modify the value flashing in the display using the "+" and "-" buttons. For quick adjustment of a value (e.g. the charging current), keep the respective button pushed for a longer time.
- Save the (modified) value with the "START" button.
- Exit each setting menu using the "STOP" button. The charger then returns to the main menu.
→ Various information is indicated on the display during a charge/discharge process by repeatedly pressing the button "−". If you do not push any button for a few seconds, the charger will return to the normal display.
If a Lithium rechargeable battery with balancer plug is connected to the charger, you can push the button "+" while charging/discharging to switch to the voltage display for the individual cells (for 5- or 6-cell rechargeable batteries, push the button again to switch between the displays for cells 1/2/3/4 and 5/6). Briefly push the "START" button so that the charger will return to the normal display (you can also wait for a few seconds without pushing any button).
10. Main Menu

flowchart
graph TD
    A["REELY 80ACDC"] --> B["PROGRAM SELECT LiPO Battery"]
    B --> C["PROGRAM SELECT LiIon Battery"]
    C --> D["PROGRAM SELECT LiFe Battery"]
    D --> E["PROGRAM SELECT LiHV Battery"]
    E --> F["PROGRAM SELECT NiMH Battery"]
    F --> G["PROGRAM SELECT NiCd Battery"]
    G --> H["PROGRAM SELECT Pb Battery"]
    H --> I["PROGRAM SELECT Digital Power"]
    I --> J["PROGRAM SELECT Memory Save"]
    J --> K["PROGRAM SELECT Memory Load"]
    K --> L["PROGRAM SELECT Battery Meter"]
    L --> M["PROGRAM SELECT Battery IR"]
    M --> N["PROGRAM SELECT User set =>"]
    B <-->|STOP/-| C
    C <-->|STOP/-| D
    D <-->|STOP/-| E
    E <-->|STOP/-| F
    F <-->|STOP/-| G
    G <-->|STOP/-| H
    H <-->|STOP/-| I
    I <-->|STOP/-| J
    J <-->|STOP/-| K
    K <-->|STOP/-| L
    L <-->|STOP/-| M
    M <-->|STOP/-| N
After connection to the voltage/power supply, the start message will appear briefly. Then the charger is in the main menu.
Rechargeable battery programmes for LiPo rechargeable batteries
Rechargeable battery programmes for Lilon rechargeable batteries
Rechargeable battery programmes for LiFe rechargeable batteries
Rechargeable battery programmes for LiHv rechargeable batteries
Rechargeable battery programmes for NiMH rechargeable batteries
Rechargeable battery programmes for NiCd rechargeable batteries
Rechargeable battery programmes for lead battery
4 mm output sockets are used for the voltage output. The output voltage is adjustable from 5.0 to 24.0 V/DC
Saving rechargeable battery data and rechargeable battery programme
Loading rechargeable battery data and rechargeable battery programme
Display of the voltages/cell voltages
Display of the internal resistance of the connected rechargeable battery
Setting menu for various functions
11. Lithium Batteries (LiPo, Lilon, LiFe, LiHv)
a) General
The rechargeable battery programmes for LiPo, Lilon, LiFe and LiHv rechargeable batteries generally differ only in the voltages and the permitted charging current, see table in chapter 7.
When charging a lithium battery, there are two different phases. First, the rechargeable battery is charged with a consistent current. When the rechargeable battery reaches its maximum voltage (at a LiPo rechargeable battery, e.g., 4.2 V), charging continues at constant voltage (the charging current drops). When the charging current drops below a certain threshold, charging is ended and the rechargeable battery is fully charged.

If the rechargeable battery has a balancer connection (usually this is the case in almost every lithium battery with more than one cell), the balancer connection must be connected to the charger as well as the rechargeable battery's cable for charging/discharging.
There are different types of balancer plug. Therefore, do not apply any force when the plug does not fit in the charger! The matching adapters for the balancer plugs are available as accessories.
There are also rare rechargeable batteries with more than one cell where the cell connections are separately routed out and that strictly speaking are not a "multiple-cell battery pack". Therefore, always observe the information of the rechargeable battery manufacturer on the build and rated voltage.
When using a balancer (integrated in the charger), all cells of a multi-cell battery pack have the same voltage after the charge process, which prevents the overcharging of individual cells (danger of fire and explosion) or a deep discharge of one of the cells (damage to the rechargeable battery).
The charging current to be set depends on the battery capacity and build (see chapter 7). Always observe the battery manufacturer's instructions.
Proceed as follows:
The charger must be in the main menu.
Select the rechargeable battery type matching the rechargeable battery used here with the button "STOP" or "-" (LiPo, Lilon, LiFe or LiHv), see figures on the right.
Confirm the selection by pressing the "START" button.
Then use the button "+" or "-" to select the different rechargeable battery programmes:
- "CHARGE": Charge lithium battery without balancer connection
- "BAL-CHG": Charge lithium battery with balancer connection
- "STORAGE": Charging/discharging rechargeable lithium battery at a set voltage value (e.g. for storage)
- "DCHG": Discharging the rechargeable lithium battery
PROGRAM SELECT LiPo Battery
PROGRAM SELECT Lilo Battery
PROGRAM SELECT LiFe Battery
PROGRAM SELECT LiHv Battery
b) Charging Batteries without Balancer Connection ("CHARGE")

Of course, you can also charge multiple-cell lithium rechargeable batteries with a balancer connection with the rechargeable battery programme "CHARGE".
However, the individual cell voltages are not reconciled here, so that one or several cells may be over-charged. There is a risk of fire and explosion!
Therefore, always charge multiple-cell lithium rechargeable batteries with balancer connection with the rechargeable battery programme "BAL-CHG", but never with the rechargeable battery programme "CHARGE"!
- First, choose the rechargeable battery type with the button "STOP" or "-" as described in chapter 11. a) (LiPo, Lilon, LiFe or LiHv) and push the button "START".
- Select the rechargeable battery programme "CHARGE" with the button "+" or "-"
LiPo CHARGE 3S C=5000mAh 2.0A
The previously selected rechargeable battery type is written in the upper left. The upper right shows the cell number ("3S" = 3-cell rechargeable battery), the lower left the rechargeable battery capacity, and the lower right the currently set charging current.
→ Use the button "+" or "-" to select a different rechargeable battery programme; use the button "STOP" to return to the main menu.
- If the values need to be changed, push the "START" button. The number of cells in the upper right of the display is flashing. Set the number of the cells with the buttons "+" and "-" . Keep the respective button pressed for quick adjustment.
Confirm the number of the cells by pressing the "START" button.
- The rechargeable battery's capacity flashes. Set the rechargeable battery's capacity with the buttons "+" and "−". Keep the respective button pressed for quick adjustment.
Confirm the rechargeable battery's capacity by pressing the "START" button.
- The charging current flashes. Change the charging current using the button "+" or "-" . Keep the respective button pressed for quick adjustment.
The maximum possible charging current depends on the battery type and number of cells. The maximum charging power is 80 W.
Confirm the charging current with the "START" button.
- When no display is flashing anymore, start charging by keeping the "START" button pushed (approx. 3 seconds).
- The charger now examines the connected rechargeable battery. In case of an error, a warning signal is output and the corresponding information is displayed. You can stop the warning signal by pressing the "STOP" button. You then return to the previous configuration menu.
BATTERY CHECK PLEASE WAIT...
- Charging begins. The display will show various information on the current charging progress.
Li3S 1.2A 12.3V CHG 022:43 00682
Example:
At the upper left, the rechargeable battery type and the cell number are displayed ("Li3S" = Lithium rechargeable battery with 3 cells); the charging current is shown in the upper middle and the current rechargeable battery voltage at the upper right.
The lower left shows the current rechargeable battery programme ("CHG" = "CHARGE"), in the middle the elapsed charging time and the charged capacity in mAh are displayed to the right of this.
→ Various information is indicated on the display during a charge/discharge process by repeatedly pressing the button "-" (see chapter 20). If you do not push any button for a few seconds, the charger will return to the normal display.
• After completion of charging, an audio signal is emitted (if it has not been turned off).
→ If you wish to cancel the charging process prematurely, push the button "STOP".
c) Charging Rechargeable Batteries with Balancer Connection ("BAL-CHG")
In contrast to the simple rechargeable battery programme "CHARGE" (see chapter 11. b), the rechargeable battery programme "BAL-CHG" monitors the voltage of every single cell of a multiple-cell lithium rechargeable battery and corrects it accordingly if there are any deviations.
LiPo BAL-CHG 3S C= 3000mAh 3.0A
Besides the two normal rechargeable battery connections (plus/+ and minus/-), the balancer connector for the battery must also be connected to the charger.
The balancer connection of the rechargeable battery must be connected to the charger via the enclosed balancer board (with XH connections). If your rechargeable battery has a different balancer plug, you need a suitable adapter cable (not enclosed, can be ordered separately).
→ If you use self-customised rechargeable batteries, the balancer plug must be correctly assigned.
The black cable is the minus pole of the first cell. The next connection pin is the plus pole of the first cell; the respective next connection pin is the plus pole of the second, third, fourth, fifth and sixth cell (depending on cell number).
The last connection pin of the balancer plug of the rechargeable battery therefore is the plus pole of the last cell. Therefore, the same voltage can be measured between the two outer pins of the balancer plug as at the two rechargeable battery connections directly.
The remaining procedure for charging is described in chapter 11. b).
If a lithium rechargeable battery with balancer plug is connected to the charger, you can switch to the display of the individual cell voltages by pushing the button "+" see figure on the right.
C1:3.83 C2:3.78 C3:3.80 C4:3.81
For 5- or 6-cell rechargeable batteries, push the button "+" again to switch between the displays of cells 1/2/3/4 and 5/6.
Briefly push the "+" button or the "START" button so that the charger will return to the normal display (you can also wait for a few seconds without pushing any button).

Important!
battery pack with exactly the same voltage for each cell provides the maximum performance and service life for a model airplane/vehicle.
Variations in the quality of the materials used and the internal structure of multiple-cell lithium battery packs mean that the cells may have different voltages once discharged.
Charging such a rechargeable lithium battery without balancer will quickly cause large differences of cell voltage. This not only shortens the operating life (as one cell may have a very low voltage), but also damages the rechargeable battery as a result of a total discharge.
When charging a rechargeable lithium battery with different cell voltages without a balancer, there is the risk of overcharging one cell, which can lead to an explosion.
Example:
A dual-cell LiPo battery pack charged without the use of a balancer appears to have a voltage of 8.4 V and thus appears to be fully charged. The individual cells, however, have a voltage of 4.5 V and 3.9 V (one cell is dangerously overcharged, the other half discharged).
A cell overcharged in this way may leak, expand or, in a worst case scenario, catch fire or explode!
If this LiPo rechargeable battery is inserted, e.g. in a model plane, the flying time will be very short, since the voltage of the half-charged cell will break down quickly and the rechargeable battery will not supply any current anymore.

If your rechargeable lithium battery has a balancer connection, it must be connected to the charger at all times in addition to the two regular rechargeable battery connections (plus/+ and minus/--) (either directly or via the balancer board); then use the charge programme "BALANCE".
d) Discharging Rechargeable Batteries ("DCHG")
Normally, it is not necessary to discharge lithium batteries (contrary to NiCd batteries) before charging. The battery can be charged immediately, independent of its current status. If you want to discharge a rechargeable lithium battery anyway, you can set the discharge current.

The maximum possible discharging current depends on the battery type, battery capacity and number of cells. The max. discharge output of the charger is 5 W. This limits the max. possible discharge current of rechargeable batteries with multiple cells.

Discharge a lithium rechargeable battery only to the minimum permitted voltage per cell (see table in chapter 7 or observe information of the rechargeable battery manufacturer). If the rechargeable battery is discharged any further, this deep discharge will permanently damage it and render it useless!
- First, choose the rechargeable battery type with the button "STOP" or "-" as described in chapter 11. a) (LiPo, Lilon, LiFe or LiHv) and push the button "START".
- Select the rechargeable battery programme "DCHG" with the button "+" or "-"
The upper left shows the rechargeable battery type, the upper right the discharge end voltage per cell. The lower left shows the currently set discharge current; the lower right shows the cell number ("3S") and the associated total rechargeable battery voltage after discharge (cell number x discharge end voltage per cell).
LiPo DCHG 3.0V 1.0A 9.0V(3S)

Use the button "+" or "-" to select a different rechargeable battery programme; use the button "STOP" to return to the main menu.
- If the values need to be changed, push the "START" button. The discharging end voltage per cell flashes. Set this voltage with the button "+" or "-" . Keep the respective button pressed for quick adjustment.
The discharge end voltage set here applies per cell. The total voltage of the connected rechargeable battery is automatically calculated after setting the cell number (see below) and displayed at the lower right of the display.
Confirm the discharging end voltage by pressing the "START" button.
- The discharge current at the lower left of the display flashes. Change the discharging current using the button "+" or "-" . Keep the respective button pressed for quick adjustment.
The maximum possible discharging current depends on the battery type and number of cells. The max. discharge output of the charger is 5 W and thus limits the discharging current.
Confirm the discharging current with the "START" button.
- The number of the cells in the lower right of the display flashes. Set the number of the cells with the button "+" or "-" . Keep the respective button pressed for quick adjustment.
→ Depending on the cell number and the discharge end voltage set per cell (see above), the total voltage of the connected rechargeable battery is calculated automatically (at the end of the discharge process) (for a two-cell Lithium rechargeable battery, e.g., 6.0 V).
Confirm the cell number with the "START" button; the display stops flashing.
- When no display is flashing anymore, keep the "START" button pushed (approx. 3 seconds), to start discharging.
- After starting the discharging process, various information about the current progress is shown in the display.
In the upper left, the rechargeable battery type and the cell number are displayed ("Li3S" = Lithium rechargeable battery with 3 cells); the discharging current is shown in the upper middle and the current rechargeable battery voltage in the upper right.
Li3S 1.0A 12.3V DSC 012:43 00252
The lower left shows the current rechargeable battery programme ("DSC" = discharging rechargeable battery), the middle the elapsed discharging time and the discharged capacity is mAh is displayed to the right of this.
A multiple-cell rechargeable battery must be connected to the charger with the balancer connection as well when discharging.
C1:3.83 C2:3.78 C3:3.80 C4:3.81
Here, you can switch between the normal display and the display of the cell voltage while discharging by pushing the "+" button several times.
For 5- or 6-cell rechargeable batteries, push the button "+" again to switch between the displays of cells 1/2/3/4 and 5/6.
• After completion of discharging, an audio signal is emitted (if it has not been turned off).
→ If you wish to cancel the discharging process prematurely, push the button "STOP".
e) Storing Batteries ("STORAGE")
This rechargeable battery programme can be used if you want to store the rechargeable battery for an extended period. Depending on the rechargeable battery type set, the rechargeable battery is charged or discharged to a specific voltage.
LiPo STORAGE 3S
C= 3200mAh 2.0A
→ Depending on the cell voltage, the battery is either charged or discharged. Of course, with a multi-cell battery pack, this is only wise if a balancer connection is available and connected to the charger.
At extended storage of a lithium rechargeable battery (e.g. when storing a flight battery over winter), the rechargeable battery should in any case be checked every 3 months and treated with the rechargeable battery programme "STORAGE" again to prevent harmful deep discharge.
The procedure when setting the cell number, battery capacity and current must be performed as in the rechargeable battery programme "CHARGE" (chapter 11. b) or "BAL-CHG" (chapter 11. c).
→ The set current is used for charging/discharging.
12. NiMH and NiCd Rechargeable Batteries
a) General
The rechargeable battery programmes for NiMH and NiCd rechargeable batteries generally differ only in the internally used charging procedures. The settings in the menus are the same.
The charger must be in the main menu.
Select the rechargeable battery type matching the rechargeable battery used here with the button "STOP" or "-" (NiMH or NiCd), see figures on the right.
Confirm the selection by pressing the "START" button.
Then use the button "+" or "-" to select the different rechargeable battery programmes:
PROGRAM SELECT NiMH Battery
PROGRAM SELECT NiCd Battery
- "CHARGE Man": Charge rechargeable battery, set charging current manually
- "CHARGE Aut": Charge rechargeable battery, automatically select charging current
- "DISCHARGE": Discharging the rechargeable battery
- "CYCLE": Multiple charging/discharging or discharging/charging cycles
→ Use the button "STOP" to return to the main menu.
b) Charging Rechargeable Batteries ("CHARGE Man")
The charging current to be set depends on the rechargeable battery's capacity and is usually 1C (also see chapter 7). High-quality rechargeable batteries also can stand a charging current up to 2C. However, you should always observe the battery manufacturer's instructions.
The value "1C" means that the charging current is equivalent to the battery's capacity. A charging current of 3 A therefore is required for a 3000 mAh-NiMH battery at 1C.
A value of 0.5C means that the charging current corresponds to half the capacity value. At a NiMH rechargeable battery with a capacity of 3000 mAh, 0.5C means that a charging current of 1.5 A must be set.
In general: The smaller the rechargeable battery (the individual cell), the lower the maximum charging current.
For example, conventional NiMH-mignon/AA-cells with a capacity of 2000 mAh permit a charging current of 1C (this corresponds to a charging current of 2 A). For quick charging of such cells (available, e.g., for receiver batteries), never set more than 0.5C (for a Mignon/AA-cell with 2000 mAh, this equals a charging current of 1 A).
Charge a NiMH or NiCd battery as follows:
- First, choose the rechargeable battery type with the button "STOP" or "-" as described in chapter 11. a) (NiMH or NiCd) and push the button "START".
- Select the rechargeable battery programme "CHARGE Man" with the button "+" or "-"
The value at the lower right represents the currently set charging current.
NiMH CHARGE Man CURRENT 0.1A
→ Use the button "+" or "-" to select a different rechargeable battery programme; use the button "STOP" to return to the main menu.
- If the value for the charging current must be changed, push the "START" button. The charging current flashes. Change the charging current using the button "+" or "-" . Keep the respective button pressed for quick adjustment.
The maximum possible charging current depends on the battery type and number of cells. The maximum charging power is 80 W.
Confirm the set charging current with the "START" button.
- When no display is flashing anymore, start charging by keeping the "START" button pushed (approx. 3 seconds).
- The charger now examines the connected rechargeable battery. In case of an error, a warning signal is output and the corresponding information is displayed. You can stop the warning signal by pressing the "STOP" button. You then return to the previous configuration menu.
BATTERY CHECK PLEASE WAIT...
If no error is found, e.g. the display shown on the right will appear.
The rechargeable battery type is shown in the upper left ("NiMH" = NiMH rechargeable battery), the upper middle shows the charging current and the upper right the current rechargeable battery voltage.
NiMH 1.2A 7.6V CHG 022:43 00682
The lower left shows the current rechargeable battery programme ("CHG" = "CHARGE"), in the middle the elapsed charging time and the charged capacity in mAh are displayed to the right of this.
• After completion of charging, an audio signal is emitted (if it has not been turned off).
→ If you wish to cancel the charging process prematurely, push the button "STOP".
c) Automatic Charge Mode ("CHARGE Aut")
In automatic charge mode, the charger checks the condition of the connected rechargeable battery (e.g. the inner resistance) and calculates the charging current from this. You need to set an upper limit for the charging current so that the rechargeable battery is not damaged by a too-high charging current.
NiMH CHARGE Aut CUR LIMIT 1.0A
Depending on the rechargeable battery and its inner resistance, shorter charging times may be achieved in the rechargeable battery programme "CHARGE Aut" than in the rechargeable battery programme "CHARGE Man" (chapter 12. b).
→ Proceed as in the rechargeable battery programme "CHARGE Man" for setting and operation (chapter 12. b).
The only difference is that you do not set the actual charging current, but the limit for the maximum charging current that the charger must not exceed for reasons of safety.
d) Discharging Battery ("DISCHARGE")
This rechargeable battery program can be used to put partially charged NiMH-/NiCd rechargeable batteries into a defined starting condition or to perform a measurement of the rechargeable battery capacity.
Specifically NiCd rechargeable batteries should not be recharged from a partially discharged condition, since the capacity may reduce by this (memory effect).
The maximum possible discharging current depends on the battery type, battery capacity and number of cells. The max. discharge output of the charger is 5 W. This limits the max. possible discharge current of rechargeable batteries with multiple cells.
Discharge a NiMH or NiCd battery as follows:
- Set the rechargeable battery type as described in chapter 12. a) (NiMH or NiCd) and select the rechargeable battery programme "DISCHARGE".
The set rechargeable battery type (NiMH or NiCd) is shown in the upper left of the display, and the rechargeable battery programme next to it.
NiMH DISCHARGE 0.5A 6.0V
The value in the lower left indicates the currently set discharging current; the value on the lower right represents the deactivation voltage at the end of the discharge process.
→ Use the buttons "+" or "-" to select a different rechargeable battery programme; use the button "STOP" to return to the main menu.
- To change the value for the discharging current and the deactivation voltage, briefly push the "START" button. The discharging current flashes.
- Set the discharging current with the buttons "+" and "-" . Keep the respective button pressed for quick adjustment.
The maximum possible discharging current depends on the battery type and number of cells. The max. discharging output of the charger is 5 W.
- Briefly push the "START" button; the deactivation voltage flashes.
- Set the deactivation voltage with the buttons "+" and "-" . Keep the respective button pressed for quick adjustment.
- Briefly push the "START" button to confirm the setting.
Proceed as described above to change the discharging current or the discharging voltage again if desired.
- When no display is flashing anymore, keep the "START" button pushed (approx. 3 seconds), to start discharging.
- The charger now examines the connected rechargeable battery. In case of an error, a warning signal is output and the corresponding information is displayed. You can stop the warning signal by pressing the "STOP" button. You then return to the previous configuration menu.
BATTERY CHECK PLEASE WAIT...
If no error is found, e.g. the display shown on the right will appear.
The rechargeable battery type is displayed in the upper left of the display, the upper middle shows the discharging current and the upper right the current rechargeable battery voltage.
NiMH 2.0A 7.4V DSC 022:45 00690
The lower left shows the current rechargeable battery programme, in the middle the elapsed charging time and the charged capacity in mAh are displayed to the right of this.
• After completion of discharging, an audio signal is emitted (if it has not been turned off).
→ If you wish to cancel the discharging process prematurely, push the button "STOP".
e) Cycle Programme ("CYCLE")
To test rechargeable batteries, form new rechargeable batteries or refresh older rechargeable batteries, you can perform up to 5 cycles in sequence automatically. The two possible combinations are "Charge/Discharge" and "Discharge/Charge".
Proceed as follows:
- Set the rechargeable battery type as described in chapter 12. a) (NiMH or NiCd) and select the rechargeable battery programme "CYCLE".
The set rechargeable battery type is shown in the upper left of the display, and the rechargeable battery programme in the middle.
NIMH CYCLE C>D C=1.0A D=1.0A 1
The display at the upper right represents the corresponding combination "Charge/discharge" ("C>D") or "Discharge/charge" ("D>C"). The charge current ("C") is shown in the lower left, the discharge current ("D") in the middle and the number of currently set cycles in the lower right.
→ Use the buttons "+" or "-" to select a different rechargeable battery programme; use the button "STOP" to return to the main menu.
- Push "START" to change the settings. The order for the cycle programme ("C>D" or "D>C") flashes.
- Use the buttons "+" or "-" to select the desired order ("C>D" = Charge + subsequent discharging; "D>C" = Discharge + subsequent charging).
- Briefly push the "START" button; the charging current flashes. Change the charging current using the buttons "+" or "-" . Keep the respective button pressed for quick adjustment.
- Briefly push the "START" button; the discharging current flashes. Change the discharging current using the buttons "+" or "-" . Keep the respective button pressed for quick adjustment.
-
Briefly push the button "START"; the number of cycles flashes (how often the currently set sequence of charging/discharging or discharging/charging is performed).
-
Set the cycle number with the buttons "+" and "-" (1 - 5 cycles are possible). Push the "START" button briefly then to confirm the setting. The display stops flashing.
- To start cycle programme, keep the "START" button pressed for longer (approx. 3 seconds).
- The charger now examines the connected rechargeable battery. In case of an error, a warning signal is output and the corresponding information is displayed. You can stop the warning signal by pressing the "STOP" button. You then return to the previous configuration menu.
BATTERY CHECK PLEASE WAIT...
If no error is found, e.g. the display shown on the right will appear.
The rechargeable battery type is shown in the upper left, the upper middle shows the charging or discharging current and the upper right the current rechargeable battery voltage.
NiMH 2.0A 7.42V C>D 022:45 00890
The lower left shows the selected cycle programme ("C>D" = Charge/discharge, "D>C" = Discharge/charge), the middle shows the elapsed charging or discharging duration and the right next to it the charged or discharged capacity in mAh.
• After completion of the cycle programme, an audio signal is emitted (if it has not been turned off).
→ To interrupt the cycle programme prematurely, push the button "STOP".
13. Lead Batteries (Pb)
a) General
Lead batteries are completely different from lithium, NiMH or NiCd batteries. Despite their high capacity they can only provide low currents. The charging process is also different.
The charging current for modern lead batteries must not exceed 0.4C; 1/10C is perfect for lead batteries.

A higher charging current is not permitted; it would overload the rechargeable battery! This not only causes danger of explosion and fire, but also danger of injury from the contained acid.
Also always observe the information printed on the battery or the information provided by the battery manufacturer on the permitted charging current.
The charger must be in the main menu.
Select the rechargeable battery type "Pb Battery" with the "STOP" or "-" button here, see figure on the right.
PROGRAM SELECT Pb Battery
Confirm the selection by pressing the "START" button.
Then use the buttons "+" and "-" to select the different rechargeable battery programmes:
- "CHARGE": Charge rechargeable battery
- "DISCHARGE": Discharging the rechargeable battery
b) Charging Batteries ("CHARGE")
The charging current to be set depends on the battery capacity and is usually 0.1C (also see chapter 7). High-quality lead batteries also can stand a charging current up to 0.4C. However, you should always observe the battery manufacturer's instructions.

The value "0.1C" means that the charging current is equivalent to one-tenth of the rechargeable battery's capacity. For a lead battery with a capacity of 5000 mAh (= 5 Ah) the charging current at 0.1C must be set to 0.5 A.
Proceed as follows to charge a lead battery:
- First, choose the rechargeable battery type with the buttons "STOP" and "-" as described in chapter 13. a) and push the button "START".
Select the rechargeable battery programme "CHARGE" with the buttons "+" or "-"
The set rechargeable battery type is shown in the upper left of the display, and the rechargeable battery programme next to it.
Pb CHARGE 1.0A 14.4V(6P)
The value on the lower left shows the currently set charging current, the value at the lower right shows the voltage or number of cells of the lead battery (in this example, a 6-cell lead battery (6 x 2.4 V = 14.4 V)).

Use the buttons "+" or "-" to select a different rechargeable battery programme; use the button "STOP" to return to the main menu.
- If the value for the charging current must be changed, push the "START" button. The charging current flashes. Change the charging current using the buttons "+" and "-" . Keep the respective button pressed for quick adjustment.
The maximum possible charging current depends on the battery type and number of cells. The maximum charging power is 80 W.
Confirm the set charging current with the "START" button.
- The number of the cells in the lower right of the display flashes. Set the number of the cells with the buttons "+" and "-" . Keep the respective button pressed for quick adjustment.
Confirm the number of the cells by pressing the "START" button.
- When no display is flashing anymore, start charging by keeping the "START" button pushed (approx. 3 seconds).
- The charger now examines the connected rechargeable battery. In case of an error, a warning signal is output and the corresponding information is displayed. You can stop the warning signal by pressing the "STOP" button. You then return to the previous configuration menu.
- Charging begins. The display will show various information on the current charging progress.
BATTERY CHECK PLEASE WAIT...
At the upper left, the rechargeable battery type and the cell number are displayed ("Pb6" = lead battery with 6 cells); the charging current is shown in the upper middle and the current rechargeable battery voltage at the upper right.
Pb6 1.0A 12.3V CHG 022:45 00690
The lower left shows the current rechargeable battery programme ("CHG" = "CHARGE"), in the middle the elapsed charging time and the charged capacity in mAh are displayed to the right of this.
→ Various information is indicated on the display during a charge/discharge process by repeatedly pressing the button "-" (see chapter 20). If you do not push any button for a few seconds, the charger will return to the normal display.
• After completion of charging, an audio signal is emitted (if it has not been turned off).
→ If you wish to cancel the charging process prematurely, push the button "STOP".
c) Discharging Battery ("DISCHARGE")
This rechargeable battery program can be used to put partially charged lead batteries into a defined starting condition or to perform a measurement of the rechargeable battery capacity.
The maximum possible discharging current depends on the battery type, battery capacity and number of cells. The max. discharge output of the charger is 5 W. This limits the max. possible discharge current of rechargeable batteries with multiple cells.
Proceed as follows to discharge a lead battery:
- Fist, choose the rechargeable battery type "Pb Battery" with the buttons "STOP" and "-" as described in chapter 13. a) and briefly push the button "START".
- Select the rechargeable battery programme "DISCHARGE" with the button "+" or "-"
Pb DISCHARGE 1.0A 12.0V(6P)
The set rechargeable battery type is shown in the upper left of the display, and the rechargeable battery programme next to it.
The value on the lower left shows the currently set discharging current, the value on the right shows the voltage or number of cells of the lead battery (in this example, a 6-cell lead battery (6 x 2.0 V = 12.0 V)).
→ Use the button "+" or "-" to select a different rechargeable battery programme; use the button "STOP" to return to the main menu.
- If the value for the discharging current must be changed, briefly push the "START" button. The discharging current flashes.
- Change the discharging current using the button "+" or "-" . Keep the respective button pressed for quick adjustment.
Briefly push the "START" button to confirm the set discharging current.
- When no display is flashing anymore, keep the "START" button pushed (approx. 3 seconds), to start discharging.
- The charger now examines the connected rechargeable battery. In case of an error, a warning signal is output and the corresponding information is displayed. You can stop the warning signal by pressing the "STOP" button. You then return to the previous configuration menu.
BATTERY CHECK PLEASE WAIT...
If no error is found, e.g. the display shown on the right will appear.
Pb6 1.0A 12.3V DSC 022:45 00690
The rechargeable battery type is shown in the upper left ("Pb6" = lead battery with 6 cells), the upper middle shows the discharging current and the upper right the current rechargeable battery voltage.
The lower left shows the current rechargeable battery programme, in the middle the elapsed charging time and the charged capacity in mAh are displayed to the right of this.
• After completion of discharging, an audio signal is emitted (if it has not been turned off).
→ If you wish to cancel the discharging process prematurely, push the button "STOP" briefly.
14. Saving/Loading Rechargeable Battery Data
The charger has 10 memory slots in which you can store often-used settings. For example, the data (cell number, charging procedures, charging current) for 3 different LiPo flight batteries can be saved there, so that you do not have to set them anew every time.
a) Saving Battery Data
- Select the function "Memory Save" in the main menu of the charger with the button "STOP" or "--".
- Confirm the selection by pressing the "START" button. The memory number flashes.
- Select one of the 10 memories (01....10) with the button "+" or "-"
→ When the memory is empty, "NULL" is displayed.
If there already are data in the memory, the display will alternate, e.g., the rechargeable battery type, rechargeable battery program, cell number, as well as the charging and discharging current.
- Briefly push the "START" button to start setting mode. The rechargeable battery type is displayed first; see example in the figure on the right.
→ Briefly pushing the "STOP" button will take you one step back or out of the setting mode.
PROGRAM SELECT Memory Save
MEMORY [01] NULL
MEMORY LiPo [01] BAL 3S 1.0A
BATT MEMORY SAVE LiPo Battery
- Select the rechargeable battery type (LiPo, Lilon, LiFe, LiHv, NiMH, NiCd, Pb) with the "+" or "-" button, then briefly push the "START" button.
The following display depends on the rechargeable battery type. A LiPo rechargeable battery has been selected in the first step in the figure on the right (see above).
LiPo BAL-CHG 3S C= 3000mAh 3.0A
- Briefly push the "START" button to switch between the respective available setting options. The respectively adjustable value flashes.
- Modify the value flashing using the "+" and "-" buttons. Keep the respective button pressed for quick adjustment.
- To save the settings, keep the button "START" pressed for 3 seconds. The display now shows the data of the memory and the memory slot number flashes.
MEMORY LiPo [01] BAL 3S 1.0A
- The "+" or "-" button selects another memory slot to programme it or change an existing programming.
→ Briefly pushing the "STOP" button leaves the setting mode. The charger is in the main menu again.
b) Loading Battery Data
- Select the function "Memory Load" in the main menu of the charger with the button "STOP" or "-"
- Con rm the selection by pressing the "START" button.
- Select one of the 10 memories (01....10) with the button "+" or "-"
The data stored in the memory are displayed, e.g. rechargeable battery type, rechargeable battery programme, cell number, charging and discharging current.
PROGRAM SELECT Memory Load
MEMORY LiPo [01] BAL 3S 1.0A
- Load the battery data from the selected memory by pushing the button "START" briefly.
- The charger is then in the corresponding rechargeable battery programme, and the associated data are displayed.
In the example on the right, the data for a LiPo rechargeable battery with 3 cells, a capacity of 3000 mAh and a charge current of 3.0 A have been transferred from the memory.
LiPo BAL-CHG 3S C= 3000mAh 3.0A
- The rechargeable battery programme can be started as usual by pushing the "START" button for 3 seconds.
Alternatively you can, of course, change the settings loaded from the memory, e.g. to increase or reduce the charging current.
Brie y push the "START" button several times; the respective chosen set value ashes.
Change the set value using the button "+" or "-" . Keep the respective button pressed for quick adjustment. Brie y push the "START" button to accept the setting.
When no display is ashing anymore, keep the "START" button pushed (approx. 3 seconds), to start the rechargeable battery programme.
15. System settings
The system settings of the charger summarise various basic settings. They are pre-applied with the most common values in the delivery condition.
Depending on the rechargeable batteries you want to charge or discharge, however, certain changes to the values are sensible.
Proceed as follows:
- Select the function "User Set" in the main menu of the charger with the button "STOP" or "-"
- Confirm the selection by pressing the "START" button.
- Use the button "+" or "-" to select the desired setting functions.
- If a setting is to be changed, briefly push the button "START". The respectively adjustable value flashes.
- Modify the value flashing using the "+" and "-" buttons. Keep the respective button pressed for quick adjustment.
- Complete the setting by briefly pushing the "START" button. The value stops flashing. Then you can select another setting function, see above.
- To return to the main menu, push the button "STOP".
PROGRAM SELECT
User Set =>
Observe the following information for description of the possible setting functions.
Switch the pre-charging function on/off and set the time for the pre-charging duration
It is not sensible to start charging with a high charging current in deep-discharged rechargeable batteries. The charger may determine an error and interrupt charging.
Precharge Time 1min
If you want to try to charge such rechargeable batteries, switch on the function and set a longer pre-charging duration.
The charger will then try to charge at reduced charging current for the set duration (1 to 10 minutes can be set), before starting normal charging.
If "OFF" is set instead of a time, the function is off.
Set pause duration between charging/discharging processes
When charging a rechargeable battery, it heats up (depending on the charging current).
Wait Time
CHG>DCHG 1min
In the cycle programme, the charger makes a break between charging and discharging so that the rechargeable battery cools off before discharging starts.
Set the desired break duration (1 to 60 minutes).
Set the voltage for Delta-U-recognition (for NiMH or NiCd only)
The charger uses the delta-U charging procedure for NiMH and NiCd rechargeable batteries to see if the rechargeable battery is fully charged.
NiMH Sensitivity
D.Peak Default
Instead of the internal default settings, the voltage value can be specified manually (in mV per cell).
NiCd Sensitivity
D.Peak Default
→ If the value is set too high, the charger may not recognise that the rechargeable battery is fully charged. The protection circuit for the charge duration or the maximum capacity usually trips here (if set correctly).
If the value is set too low, the charge will switch off too early and the rechargeable battery will not be fully charged.
Change the voltage in steps and check the charging process. Due to the many different rechargeable batteries, it is not possible to suggest a perfect value.
Maintenance charging current (for NiMH and NiCd only)
Set the maintenance charging current here. When a NiMH or NiCd rechargeable battery is fully charged, it will lose part of its capacity again by self-discharge.
NiMH/NiCd
Trickle OFF
The maintenance charging current (short charging impulses, no continuous charging current!) ensures that the rechargeable battery remains fully charged. Thus also prevents crystal formation in the rechargeable battery.
Switch the overtemperature protection on/off and set a temperature threshold
The charger offers a connection for a temperature sensor (not enclosed, can be ordered separately).
Temp. Cut-off
ON 60C(140F)
If the overtemperature protection is on ("ON"), the charger will interrupt charging and discharging.
Set the desired temperature at which the charger is supposed to switch off.
→ If no temperature sensor is connected, switch off the overtemperature protection ("OFF").
Automatic deactivation at specific charging capacity
This safety function of the charger terminates charging automatically when a certain capacity has been "loaded" into the battery.
Capacity Cut-Off
5000mAh
→ However, do not set a capacity which is too low; otherwise the rechargeable battery cannot be fully charged and charging will be interrupted early.
Switch the safety timer on/off and set the duration
If charging starts, the internal safety timer starts as well.
If the charger cannot detect whether the battery is fully charged for whatever reason (e.g. with delta-U detection), the charge process is terminated automatically after a set time if the safety timer is on. This protects the battery from overloading.
Safety timer
ON 240min
The safety timer can be switched on ("ON") or off ("OFF"); the time for the safety timer can also be changed.

Do not set the time too short, since the rechargeable battery cannot be fully charged then because the safety timer will cancel charging.
Some calculation examples for the duration:
Battery capacity Charging current Timer time
2000 mAh 2.0 A 2000 / 2.0 = 1000 / 11.9 = 84 minutes
3300 mAh 3.0 A 3300 / 3.0 = 1100 / 11.9 = 92 minutes
1000 mAh 1.2 A 1000 / 1.2 = 833 / 11.9 = 70 minutes

The factor 11.9 is used to permit charging 140% of the rechargeable battery capacity (the rechargeable battery is guaranteed to be fully charged then), before the safety timer trips.
Switching the key confirmation sounds/warning sounds on/off
With the option "Key beep", confirmation beep for each push of a button is switched on ("ON") or off ("OFF").
The function "Buzzer" switches the signal sound for various functions/warning messages on ("ON") or off ("OFF").
Key beep ON
Buzzer ON
Setting the backlighting brightness
In this function, you can set the brightness of the backlighting.
Back-light
80%
Max. cell voltage when charging
The maximum cell voltage can be set depending on the set rechargeable battery type (LiPo, Lilon, LiFe, LiHv and Pb).
The charger ends charging when all cells have reached the set voltage.
LiPo: 3.80 - 4.20 V/cell (basic setting 4.20 V)
Lilon: 3.80 - 4.10 V/cell (basic setting 4.10 V)
LiFe: 3.30 - 3.65 V/cell (basic setting 3.60 V)
LiHv: 4.00 - 4.40 V/cell (basic setting 4.35 V)
Pb: 2.10 - 2.50 V/cell (basic setting 2.40 V)
Battery end volt
LiPo 4.20V/C
Battery end volt
Lilo 4.10V/C
Battery end volt
LiFe 3.60V/C
Battery end volt
LiHV 4.35V/C
Battery end volt
Pb 2.40V/P
Loading factory settings (reset)
This recovers the factory settings (reset).
Keep the button "START" pressed for more than 2 seconds.
Then the charger starts again and will then be in the main menu again.
FACTORY RESET
PRESS ENTER >2S
Observe that all values set by you are then reset to factory settings; the 10 rechargeable battery memories (see chapter 14) are also deleted.
16. Fixed Voltage Output
The charger offers the option of using the charging output (the two 4 mm output sockets) like a conventional controllable mains unit.
In this case, the charger supplies a direct voltage to the output sockets; setting of 5.0 V/DC to 24.0 V/DC is possible. The output current can be set to between 0.1 A and 10.0 A. Observe that the maximum output current is not possible for the maximum current; the charger can only supply 80 W at most.

Caution, important!
If this function is used, never connect a rechargeable battery to the two output sockets of the charger.
Before you activate this function and set an output voltage and an output current, always disconnect any connected rechargeable battery from the charger.
There is a risk of fire and explosion!
Proceed as follows:
- Disconnect any connected rechargeable battery from the charger first (both from the 4 mm output sockets and the balancer connection).
- The charger must be in the main menu. Select the "Digital Power" function with the "STOP" or "-" button here, see figure on the right.
- Confirm the selection by pressing the "START" button.
- The display shows "POWER MODE". The set output current type is shown in the lower left of the display, and the output voltage to its right.
- To change the output current and the output voltage, briefly push the "START" button. The value of the output current starts to flash.
- Change the output current using the button "+" or "-" . Keep the respective button pressed for quick adjustment.
- Briefly push the "START" button; the output voltage flashes.
- Change the output voltage using the button "+" or "-" . Keep the respective button pressed for quick adjustment.
- Briefly push the button "START"; the display will stop flashing.
- Keep the "START" button depressed (approx. 3 seconds). The charger activates the fixed voltage output. A signal will be sounded (if it has not been switched off in the setting menu). The fan starts to run.
PROGRAM SELECT Digital Power
POWER MODE 1.0A 12.0V
The display shows the current intake ("CURRENT") and output voltage ("VOLTAGE") at the moment.

Slight fluctuations in the display of voltage/current are normal (measuring-technically caused). For this reason, a (low) output current will be displayed even when nothing is connected to the output as well.
CURRENT 0.52A VOLTAGE 12.0V
- To set the output current and the output voltage, briefly push the "START" button.

Caution, important!
A connected consumer can be damaged when changing the output voltage.
Therefore, disconnect the connected consumer from the output sockets of the charger before changing the output voltage.
The same applies, if applicable, when changing the output current.
The output current is now flashing in the display. Set it with the "+" or "-" button (keep the respective button pushed for quick adjustment).
- Briefly push the "START" button; the output voltage flashes. Set it with the button "+" or "-" (for quick adjustment, keep the respective button pushed).
- Briefly push the "START" button. The current power intake and the output voltage are displayed.
→ Briefly push the "STOP" button to end this function. The output is deactivated again.
Push the "STOP" button again briefly to return the charger to the main menu.
17. Voltage Display for Lithium Rechargeable Batteries
The charger can also display the current voltages of the cells of a lithium rechargeable battery.
→ For this, the rechargeable lithium battery must have a balancer connection that must be connected to the charger.
Proceed as follows:
- Select the function "Battery Meter" in the main menu of the charger with the buttons "STOP" or "-"
- Confirm the selection by pressing the "START" button.
- Then the voltage display appears.
-
Use the buttons "+" or "-" to switch between:
-
Individual voltages of cells 1 - 6
- Input voltage and voltage at the two rechargeable battery connections
- Internal temperature of the charger and temperature of the external sensor (not enclosed, can be ordered separately)
PROGRAM SELECT
Battery Meter
1:4.19 4.17 4.19
4:0.00 0.00 0.00
OUTPUT: 12.46V
INPUT : 15.00V
The individual voltage displays depending on the cell number, of course. The example figure may be a 3-cell LiPo rechargeable battery (or a multiple-cell LiPo rechargeable battery with defective cells or defective balancer connections).
If the charger is operated via the mains voltage, the input voltage is always displayed as 15 V/DC (this is the voltage of the internal mains unit).
Slight fluctuations of the voltage display are normal (measuring-technically caused).
For "OUTPUT", the voltage pending at the charging sockets is displayed (if a rechargeable battery is connected).
- You can return to the main menu as usual via the "STOP" button.
18. Display of the internal resistance
The charger can display the internal resistance of the connected rechargeable battery.
For multiple-cell Lithium rechargeable batteries, this is even possible separately per cell, provided that the rechargeable battery has a balancer plug that is connected to the charger (via the balancer board).
Proceed as follows:
- Select the function "Battery IR" in the main menu of the charger with the buttons "STOP" or "--".
- Confirm the selection by pressing the "START" button.
- Then the charger will measure the internal resistance of the connected rechargeable battery (the fan will briefly start up during measurement).
• After a brief time, the internal resistance will be displayed. - If a Lithium rechargeable battery is connected to the charger via the balancer connection, you can view the internal resistance of the individual cells. For this, briefly push the button "+".
PROGRAM SELECT Battery IR
MAIN OUT 10.8m

02.5 05.0 20.2m XX.X XX.X XX.Xm

The example figure on the right shows a 3-cell Lithium rechargeable battery (XX.X appears when no cell has been recognised).
- If the internal resistance of another rechargeable battery is to be measured, leave the measuring function with the button "STOP", so that the charger is back in the main menu. Then proceed again as described above.

When the internal resistance of the connected rechargeable battery is too high, measuring does not take place and no values are displayed. This can happen not only for too-old and defective rechargeable batteries, but also at too-high transfer resistances of the charging cable used by you (e.g. plugs/socket dirty or worn). In this case, try using a new charging cable.
19. Warning Messages on the Display
REVERSE POLARITY
CONNECTION BREAK
SHORT ERROR
INPUT VOL ERR
BATTERY CHECK LOW VOLTAGE
BATTERY CHECK HIGH VOLTAGE
BATTERY VOLTAGE CELL LOW VOL
BATTERY VOLTAGE CELL HIGH VOL
BATTERY VOL ERR CELL CONNECT
TEMP OVER ERR
The polarity of the rechargeable battery connections has been switched.
The connection to the rechargeable battery has been disrupted, e.g. if the battery has been disconnected during the charging process.
There is a short circuit at the output of the charger.
A problem has been identified at the direct voltage input of the charger.
The rechargeable battery voltage is too low. Check the setting of the rechargeable battery type and the cell number at the charger.
The rechargeable battery voltage is too high. Check the setting of the rechargeable battery type and the cell number at the charger.
The voltage of a cell of a connected lithium rechargeable battery is too low (a cell may be defective or deep-discharged).
The voltage of a cell of a connected lithium rechargeable battery is too high (possibly overloaded or balancer connection defective).
There is a problem with the balancer connection (balancer plug not connected or defective).
The inner temperature of the charger is too high. Let the charger cool off.
20. Information on the Charger
Various information is indicated on the display during a charge/discharge process by repeatedly pressing the button "-". If you do not push any button for a few seconds, the charger will return to the normal display.
→ The information that can be displayed depends on the connected rechargeable battery type.
Voltage of the battery at the end of charging/discharging
End Voltage 12.60V
Battery capacity for safety cut-off
Capacity Cut-off 5000mAh
Duration for safety timer
Safety timer ON 200min
Temperature limit for overtemperature protection
Temp. Cut-off ON 60C(140F)
Display of the temperature at the external and internal temperature sensor
Ext.Temp 0C Int.Temp 25C
If no external temperature sensor is connected (not enclosed, can be ordered separately), "0C" is displayed.
Input voltage
IN Power Voltage 14.93V
→ If the charger is operated via the mains voltage, the input voltage is always displayed as approx. 15 V/DC (this is the voltage of the internal mains unit).
21. Maintenance and Cleaning
The product does not require any maintenance. You should never take it apart. The product should only be maintained/repaired by a specialist or specialist workshop or it may be damaged.

Any rechargeable battery connected must be disconnected from the charger before cleaning.
zed voltage output is activated, disconnect any connected consumer from the charger.
Then disconnect the charger from the voltage/current supply.
Never use any aggressive cleaning agents, cleaning alcohol or other chemical solutions, since these may damage the casing or even impair function.
Use a dry, lint-free cloth for cleaning the product.
Dust can be removed using a clean, soft brush and a vacuum cleaner.
22. Disposal
a) Product
This symbol must appear on any electrical and electronic equipment placed on the EU market. This symbol indicates that this device should not be disposed of as unsorted municipal waste at the end of its service life.
Owners of WEEE shall dispose of it separately from unsorted municipal waste. Spent batteries and accumulators, which are not enclosed by the WEEE, as well as lamps that can be removed from the WEEE in a non-destructive manner, must be removed by end users from the WEEE in a non-destructive manner before it is handed over to a collection point.
Distributors of electrical and electronic equipment are legally obliged to provide free take-back of waste. Conrad provides the following return options free of charge (more details on our website):
in our Conrad offices
at the Conrad collection points
at the collection points of public waste management authorities or the collection points set up by manufacturers or distributors within the meaning of the ElektroG
End users are responsible for deleting personal data from the WEEE to be disposed of.
It should be noted that different obligations about the return or recycling of WEEE may apply in countries outside of Germany.
b) (Rechargeable) batteries
Remove batteries/rechargeable batteries, if any, and dispose of them separately from the product. According to the Battery Directive, end users are legally obliged to return all spent batteries/rechargeable batteries; they must not be disposed of in the normal household waste.
Batteries/rechargeable batteries containing hazardous substances are labelled with this symbol to indicate that disposal in household waste is forbidden. The abbreviations for heavy metals in batteries are: Cd = Cadmium, Hg = Mercury, Pb = Lead (name on (rechargeable) batteries, e.g. below the trash icon on the left).
Used (rechargeable) batteries can be returned to collection points in your municipality, our stores or wherever (rechargeable) batteries are sold. You thus fulfil your statutory obligations and contribute to environmental protection.
Batteries/rechargeable batteries that are disposed of should be protected against short circuit and their exposed terminals should be covered completely with insulating tape before disposal. Even empty batteries/rechargeable batteries can contain residual energy that may cause them to swell, burst, catch fire or explode in the event of a short circuit.
23. Technical Data
Operating voltage.... Mains voltage input: 100 - 240 V/AC, 50/60Hz
Direct voltage input: 11 - 18 V/DC

Never use both inputs at the same time. This may damage the charger. Loss of guarantee/warranty!
Charging/discharging channels 1
Charge current.... 0.1 - 10.0 A (depending on the cell number and rechargeable battery type)
Charging output......max. 80 W
Discharge current 0.1 - 2.0 A (depending on the cell number and rechargeable battery type)
Discharge output .... max. 5 W
Suitable rechargeable batteries......NiMH/NiCd, 1 - 15 cells
LiPo/Lilon/LiFe/LiHv, 1 - 6 cells
Pb, 1 - 10 cells (rated voltage 2 - 20 V)
Discharge current for balancer 400 mA per cell
Delta-U-recognition..... yes (for NiMH/NiCd, adjustable 5 - 20 mV/cell)
Maintenance charge current...... yes (for NiMH/NiCd, adjustable 50 - 200 mA, can be switched off)
Safety timer .... yes (10 - 720 minutes, can be switched off)
Fan integrated .... yes
Ambient conditions .... Temperature +10 °C to +40 °C; humidity 0% to 90% relative, non-condensing
Weight 396 g
Dimensions....130 x 115 x 61 mm (W x D x H)
Page
Cher client, chère cliente,
France (email): technique@conrad-france.fr
Suisse:
www.conrad.ch
2. Explication des symboles

text_image
Technical diagram of a two-inch computer with labeled ports and buttons, showing front and back views.LiPo BAL-CHG 3S C= 3000mAh 3.0A
BATTERY CHECK PLEASE WAIT...
NiMH 2.0A 7.4V DSC 022:45 00690
BATTERY CHECK PLEASE WAIT...
NiMH 2.0A 7.42V C>D 022:45 00890
BATTERY CHECK PLEASE WAIT...
Pb6 1.0A 12.3V CHG 022:45 00690
MEMORY LiPo [01] BAL 3S 1.0A
BATT MEMORY SAVE LiPo Battery
LiPo BAL-CHG 3S C= 3000mAh 3.0A
MEMORY LiPo [01] BAL 3S 1.0A
MEMORY LiPo [01] BAL 3S 1.0A
LiPo BAL-CHG 3S C= 3000mAh 3.0A
NiMH/NiCd Trickle OFF
Temp. Cut-off ON 60C(140F)
Safety timer ON 240min
2000 mAh 2,0 A 2000 / 2,0 = 1000 / 11,9 = 84 minutes
3300 mAh 3,0 A 3300 / 3,0 = 1100 / 11,9 = 92 minutes
1000 mAh 1,2 A 1000 / 1,2 = 833 / 11,9 = 70 minutes
Key beep ON Buzzer ON
Attention, important!
Attention, important!
Capacity Cut-off 5000mAh
Safety timer ON 200min
Temp. Cut-off ON 60C(140F)
- NiMH-en NiCd-accu's 166
a) Algemeen 166
b) Accu laden ("CHARGE Man") 166
c) Automatische laadmodus ("CHARGE Aut")......168
d) Accu ontladen ("DISCHARGE") 168
e) Cyclusprogramma ("CYCLE") 169
Pagina
- Loodaccu's (Pb)....171
a) Algemeen 171
b) Accu laden ("CHARGE") 171
c) Accu ontladen ("DISCHARGE") 173
- Accugegevens opslaan/laden....174
a) Accugegevens opslaan 174
b) Accugegevens laden 175
text_image
Technical diagram of a vintage computer with numbered components for identificationBATTERY CHECK PLEASE WAIT...
LiPo BAL-CHG 3S C= 3000mAh 3.0A
MEMORY LiPo [01] BAL 3S 1.0A
BATT MEMORY SAVE LiPo Battery
LiPo BAL-CHG 3S C= 3000mAh 3.0A
MEMORY LiPo [01] BAL 3S 1.0A
LiPo BAL-CHG 3S C= 3000mAh 3.0A
Safety timer ON 240min
2000 mAh 2,0 A 2000 / 2,0 = 1000 / 11,9 = 84 minuten
3300 mAh 3,0 A 3300 / 3,0 = 1100 / 11,9 = 92 minuten
1000 mAh 1,2 A 1000 / 1,2 = 833 / 11,9 = 70 minuten
Key beep ON Buzzer ON
OUTPUT: 12.46V INPUT: 15.00V
Capacity Cut-off 5000mAh
Safety timer ON 200min
Temp. Cut-off ON 60C(140F)
LiPo/Lilon/LiFe/LiHv, 1 - 6 cellen
Pb, 1 - 10 cellen (nominale spanning 2 - 20 V)
This is a publication by Conrad Electronic SE, Klaus-Conrad-Str. 1, D-92240 Hirschau (www.conrad.com).
All rights including translation reserved. Reproduction by any method, e.g. photocopy, microfilming, or the capture in electronic data processing systems require the prior written approval by the editor. Reprinting, also in part, is prohibited. This publication represents the technical status at the time of printing.
Copyright 2022 by Conrad Electronic SE.
Copyright 2022 by Conrad Electronic SE.
Copyright 2022 by Conrad Electronic SE.