MH-18-PCH-A - Heating Master - Free user manual and instructions
Find the device manual for free MH-18-PCH-A Master in PDF.

User questions about MH-18-PCH-A Master
0 question about this device. Answer the ones you know or ask your own.
Ask a new question about this device
Download the instructions for your Heating in PDF format for free! Find your manual MH-18-PCH-A - Master and take your electronic device back in hand. On this page are published all the documents necessary for the use of your device. MH-18-PCH-A by Master.
USER MANUAL MH-18-PCH-A Master
natural_image
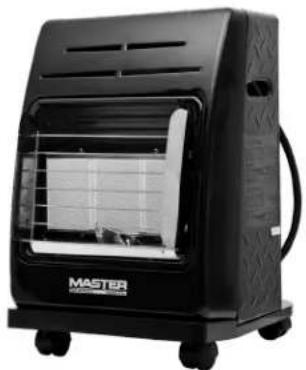
Black master-shaped portable heater with open vent and wheels (no visible text or symbols)Locating Your Serial Number:
Your serial number can be found on the heater's rating label. It will begin with the letters PGCV followed by 8 digits. For Example: PGCV12345678. Have your Serial Number ready before calling customer service at 1-800-641-6996.
⚠️ DANGER
GENERAL HAZARD WARNING:
FAILURE TO COMPLY WITH THE PRECAUTIONS AND INSTRUCTIONS PROVIDED WITH THIS HEATER, CAN RESULT IN DEATH,
SERIOUS BODILY INJURY AND PROPERTY LOSS OR DAMAGE FROM HAZARDS OF FIRE, EXPLOSION, BURN. ASPHYXIATION, CARBON MONOXIDE POISONING AND / OR ELECTRIC SHOCK.
ONLY PERSONS WHO CAN UNDERSTAND AND FOLLOW THE INSTRUCTIONS SHOULD USE OR SERVICE THIS HEATER. IF YOU NEED ASSISTANCE OR HEATER INFORMATION SUCH AS AN INSTRUCTIONS MANUAL, LABEL, ETC. CONTACT THE MANUFACTURER.
WARNING
FIRE, BURN, INHALATION, AND EXPLOSION HAZARD. KEEP SOLID COMBUSTIBLES, SUCH AS BUILDING MATERIALS, PA-
PER OR CARDBOARD, A SAFE DISTANCE AWAY FROM THE HEATER AS RECOMMENDED BY THESE INSTRUCTIONS. NEVER USE THE HEATER IN SPACES WHICH DO OR MAY CONTAIN VOLATILE OR AIRBORNE COMBUSTIBLES, OR PRODUCTS SUCH AS GASOLINE, SOLVENTS, PAINT THINNERS, DUST PARTICLES OR UNKNOWN CHEMICALS.
Factory ID: 515


PINNACLE
CLIMATE TECHNOLOGIES™
1 Industrial Blvd #101, Sauk Rapids, MN 56379 USA • Toll Free (800) 641-6996
Fax: 320-251-2922 • Web: www.masterindustrialproducts.com • Email: info@pinnacleclimate.com
TABLE OF CONTENTS
Safety Information....2-4
Specifications....4
Features......5
What's in the Box....5
Unpacking....5
Assembly....6
Operation....7-9
Ventilation....9
Storage and Maintenance....10
Troubleshooting Guide....11
Exploded View....12
Parts List....12
Warranty....13
SAFETY INFORMATION
Carbon Monoxide Hazard This heater produces carbon monoxide, which has no odor. Burning the heater in an enclosed space can kill you. Never use the heater in enclosed spaces such as a tent,
a camper, any vehicle or recreational vehicle (RV), enclosed shelter, or any other enclosed areas.
If the information in this manual is not followed exactly, a fire or explosion may result causing property damage, personal injury or loss of life.
Not for use in residential living areas or in non-adequately ventilated enclosed spaces. Never bring or store a propane cylinder indoors.
NOT FOR HOME OR RECREATIONAL VEHICLE USE.
DO NOT OPERATE THIS HEATER UNTIL YOU HAVE READ AND THOROUGHLY UNDERSTAND THESE SAFETY AND OPERATING INSTRUCTIONS.
Failure to comply with the precautions and instructions provided with this heater can result in death, serious bodily injury, property loss or damage from the hazards of fire, explosions, burns, asphyxiation or carbon monoxide poisoning. Only persons who can read and understand these instructions should use or service this heater.
This is an unvented portable heater. It uses air (oxygen) from the area in which it is used. Adequate combustion and ventilation air must be provided. Refer to VENTILATION on Page 9.
EXTREMELY HOT DURING OPERATION! Do Not touch any metal components while in operation. Keep gasoline and any other flammable liquids away from heater.
This product can expose you to chemicals, including lead, which are known to the State of California to cause cancer and birth defects or other reproductive harm. For more information go to www.P65Warnings.ca.gov.
⚠️ DANGER
⚠️DANGER
DANGER
WARNING
WARNING
WARNING
WARNING
WARNING
SAFETY INFORMATION (CONT.)
WARNING RISK OF INDOOR AIR POLLUTION!
The products described in this manual are propane direct-fired, forced air heaters. Propane forced air heaters are primarily intended for use for temporary heating of buildings under construction, alteration or repair. Direct-fired means that all of the combustion products of the heater enter the heated space. This appliance is rated at 98% combustion efficiency, but does produce small amounts of carbon monoxide.
Carbon monoxide is toxic. Humans can tolerate only small amounts of carbon monoxide and so precautions should be taken to provide proper ventilation. Failure to provide proper ventilation in accordance with the instructions in this manual can result in death.
CARBON MONOXIDE POISONING MAY LEAD TO DEATH!
People with breathing problems should consult a physician before using this heater.
Early signs of carbon monoxide poisoning re-semble the flu. Symptoms of improper ventilation / carbon monoxide poisoning are:
Headache · Dizziness · Nausea · Dry Mouth Sore Throat · Burning of Nose and Eyes
If you experience any of these symptoms: GET FRESH AIR AT ONCE! Have your heater serviced and check for proper ventilation. Some people are more affected by carbon monoxide than others. These include: pregnant women, those with heart or lung problems, anemia or those under the influence of alcohol or at high altitudes.
FOR OUTDOOR USE. INDOOR USE PERMITTED ONLY FOR: The temporary heating of adequately ventilated buildings or structures under construction, alteration or repair! Provide at least a three square foot (2,800 sq cm) opening of outside air for every 100,000 Btu / Hr heater rating. Refer to "Ventilation" on page 9 for further instructions.
WHAT TO DO IF THE SMELL OF GAS IS PRESENT:
-DO NOT attempt to light the heater.
-Extinguish any open flame.
-Shut off gas to heater.
-If odor continues, contact your local gas supplier or fire department.
-DO NOT touch or use any electric switch or any electric device that can cause a spark.
- Immediately call your gas supplier from a neighbors phone. Follow the gas suppliers instructions.
-If you can not reach your gas supplier, call the fire department.
-Service must be done by a qualified service agency.
WARNING
RISK OF BURNS, FIRE AND EXPLO- SION!
NEVER store or use gasoline or other flammable vapors and liquids in the vicinity of this heater.
NEVER store a propane (LP) cylinder not connected to this heater in the vicinity of this heater.
NEVER connect heater to an unregulated gas supply.
NEVER obstruct the flow of combustion and ventilation air.
NEVER use duct work in front or rear of heater.
NEVER modify this heater or operate a heater that has been modified.
NEVER service, move or handle heater while still hot or operating
Keep all combustible materials away from this heater.
Front Sides Top
72 in. 12 in. 24 in.
WARNING
CAUTION! HOT WHILE IN OPERATION. DO
NOT TOUCH. KEEP CHILDREN, ANIMALS, CLOTHING AND COMBUSTIBLES AWAY FROM HEATER.
SAFETY INFORMATION (CONT.)
WARNING
For use with propane (LP) gas only.
- ALWAYS install the heater so that it is not directly exposed to water spray, rain, dripping water, or wind.
- Use heater in accordance with all local codes and with CSA 5.90 U.S. (5th Ed.) Infrared Patio Heater.
- This heater is shipped from the factory for use with propane (LP) gas only. Do not convert to any other gas. Installation must conform to local codes, or in their absence, with the standard for the Storage and Handling of Liquefied Petroleum Gases ANSI/NFPA 58 and the Natural Gas and Propane Installation Code CSA B149.1.
-
Gas supply connections should be checked by using a 50/50 soap and water solution. Never use a flame to check for gas leaks.
-
Use only the regulator and hose assembly provided with this heater. Inspect the regulator/hose assembly prior to each use of the heater. If there is excessive abrasion or wear, or if the hose is cut, replace it with the proper assembly shown in the parts list, prior to using the heater.
- This heater is not for use on finished floors.
Minimum and Maximum Inlet Pressure
| Model | MH-18-PCH-A |
| Min. | 5 PSI |
| Max. | Bottle Pressure |
WARNING
The hose assembly shall be protected from traffic, building
material and contact with hot surfaces both during use and while in storage.
WARNING
RISK OF FIRE! ALWAYS LOCATE HEATER ON A STABLE AND LEVEL SURFACE!
SPECIFICATIONS
| Model # MH-18-PCH-A | |
| BTU 6,600 / 12,000 / 18,000 | |
| Fuel Consumption (lb./hr) 0.31 / | 0.56 / 0.83 |
| Heat Settings 3 | |
| Maximum Operating Hours 65 / | 36 / 24 |
| Required Cylinder Lbs. 20 | |
| Fuel Type Propane | |
| Heating Area (Ft. ^2 ) 165 / 300 / 4 | 50 |
Specifications subject to change without notice.
FEATURES
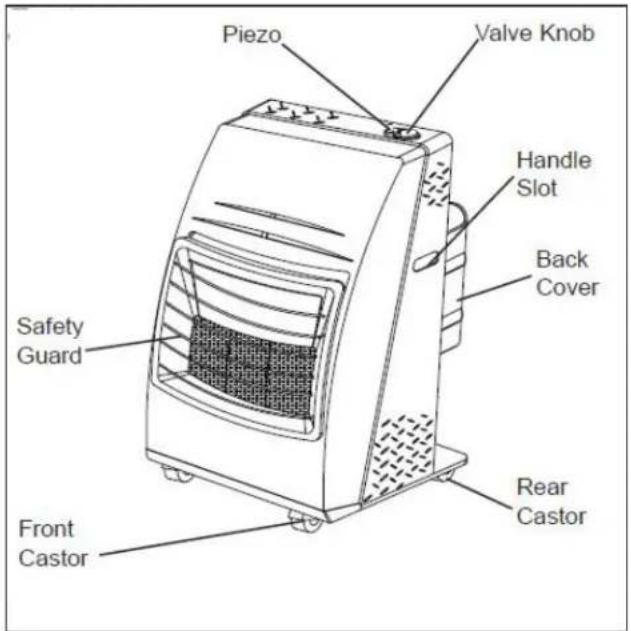
text_image
Piezo Valve Knob Handle Slot Back Cover Safety Guard Rear Castor Front CastorWHAT'S IN THE BOX
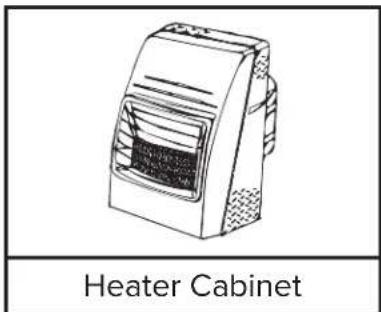
text_image
Heater Cabinet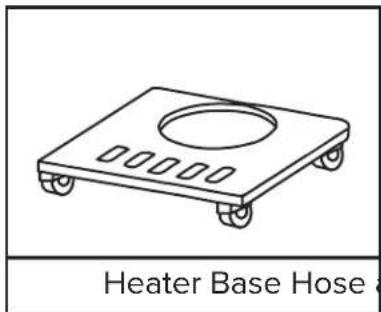
text_image
Heater Base Hose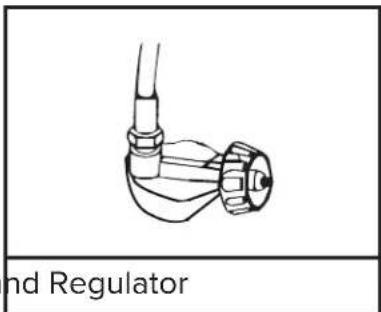
text_image
nd RegulatorUNPACKING
- Remove all packing items applied to heater for shipment. Keep plastic cover caps attached to inlet connector and hose / regulator assembly for storage.
- Remove all items from carton
- Check all items for shipping damage. If the heater is damaged, promptly inform dealer where you purchased the heater.
CAUTION
The Propane (LP) gas pressure regulator and hose
assembly supplied with the heater must be used without alteration.
ASSEMBLY
- Place heater base on flat surface with wheels on the ground.
- Line up holes in bottom of heater cabinet with locking tabs on top of base (see Figure 1)
- Mount heater cabinet to heater base, sliding tabs through holes in bottom of cabinet and sliding cabinet backward approximately 1/4" or until cabinet will not move further back.
- Use thumbscrews to attach heater cabinet to heater base.
- Inspect heater closely for any damage that may have occurred during shipping. If there is any damage, return the heater to place of purchase.
Connecting to Gas Supply
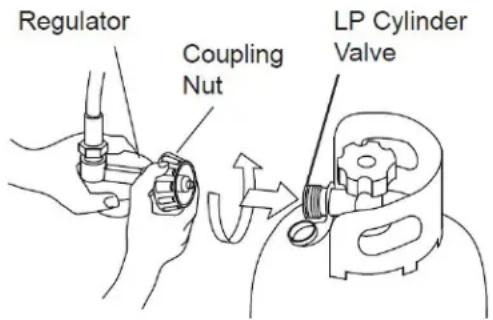
IMPORTANT! - Always use a propane (LP) cylinder that has a connection device compatible with the hose and regulator assembly supplied.
- Remove the back cover by sliding the cover straight up and away from the heater body. Place the LP cylinder on the bottom plate and replace the back cover.
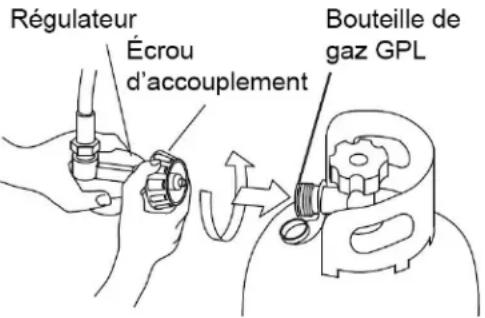
- To connect LP cylinder, insert regulator end fitting into cylinder valve, rotate coupling nut clockwise and tighten firmly (see Figure 2)
- Open valve on propane cylinder slowly. If the valve is not opened slowly, the excess flow check valve in the regulator will stop the flow of gas. If this should happen, close the valve, wait one minute (or until you hear the valve click), and re-open, slowly.
- Be sure to inspect all connections for leaks, by using a 50/50 mixture of dish soap and water on all connection. Any bubbles forming indicate a leak.
CAUTION
The Propane (LP) gas pressure regulator and hose
assembly supplied with the heater must be used without alteration.
CAUTION
Be sure to inspect the regulator hose before each use.
If the hose is cut or frayed, replace it with the manufacturer suggested assembly.

natural_image
Technical line drawing of a mechanical assembly with mounting holes and a circular component (no text or symbols)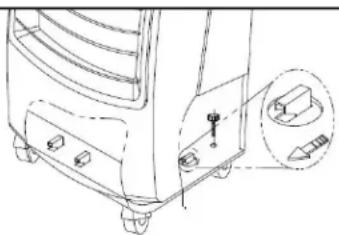
natural_image
Technical line drawing of a mechanical device with mounting holes and a close-up inset showing a component detail (no text or symbols)Figure 1 Figure 2
text_image
Regulator Coupling Nut LP Cylinder ValveOPERATION
Propane Supply / Information:
Propane (LP)
This heater is not supplied with a propane cylinder. Use only an approved propane cylinder.
LP Characteristics
- Flammable, explosive under pressure, heavier than air and pools in low areas.
– In its natural state, propane has no odor, but for your safety an odor that smells like rotten cabbage has been added. - Contact of propane (LP) gas with the skin can cause freeze burns.
- Heater is manufactured for use with propane gas only. DO NOT attempt to convert to any other gas. Such modifications are dangerous and will void the warranty.
- When heater is not in use, LP Cylinder must be turned OFF.
- Be sure that the LP Cylinder is located on a level and stable surface.
- DO NOT use this heater in a basement or below ground level. Propane is heavier than air and will always seek the lowest level. If you suspect a leak, shut off the valve at the LP Cylinder immediately.
The Propane (LP) cylinder must also be equipped with the following:
– A collar to protect the gas valve.
- A shut-off valve terminating a LP cylinder valve outlet as specified in the American National Standard for Compressed Gas Cylinder Valve Outlets and Inlets Connections.
– A safety relief valve having direct communications with the vapor space of the LP cylinder.
- The heater must operate on vapor withdrawal from the operating cylinder.
– Always keep LP cylinder fastened and upright.
▲CAUTION
Propane is safe to use when properly handled.
Careless handling of the LP cylinder could result in a fire and or an explosion.
- Avoid tipping the LP cylinder on its side when connected to a regulator, since this may cause damage to diaphragm in the regulator.
-
Handle valves with care.
-
Never connect an unregulated LP cylinder to a construction heater.
- DO NOT subject LP cylinder to excessive heat.
- Tightly close the gas shutoff valve on the LP cylinder after each use.
– All fittings must be protected when disconnected from the LP cylinder. - Never store an LP cylinder inside a building or in the vicinity of an gas burning appliances.
CAUTION
The disconnected tank must never be stored in a
building, garage or any other enclosed area.
Pre-Lighting Instructions:
Connecting the LP Cylinder
ALL NEW LP CYLINDERS MUST BE PURGED BEFORE THE FIRST FILLING.
- Turn heater gas valve knob and LP cylinder valve to OFF position.
- LP cylinder valve equipped with old style fitting has LEFT HANDED THREADS. Turn fitting CLOCKWISE to loosen. Protect this fitting when disconnected from LP cylinder.
- Have your LP cylinder filled by your local propane gas supplier.
- Some LP cylinders have a bleed-OFF valve. This valve should be inspected for leaks after each filling of the LP cylinder. Turn the valve clockwise to close.
- Fasten full propane tank and connect proper fitting to LP cylinder valve by turning COUNTER-CLOCKWISE.
- With heater gas valve knob still in OFF position turn ON the LP cylinder valve and check for leaks with soap solution.
WARNING
Purging and filling of the LP cylinders must be
performed by personnel who have been thoroughly trained in accepted LP gas industry procedures. Failure to follow these instructions may result in explosion, fire, severe personal injury or death.
OPERATION (CONT.)
Checking For Leaks
- To check for leaks, make up a 50/50 solution of dish soap and water. Apply this solution to all gas connections. If bubbles appear, there is a leak. If a leak is found, turn off the gas supply, and re-connect the leaking connection. If the leak persists after several tries, contact Pinnacle Customer Service at (800) 641-6996.
- The installation of this heater must meet all local codes and/or gas utility requirements. In the absence of local codes, the National Fuel Code ANSI Z223.1 should be followed.
- The minimum clearances to any combustible construction materials must be maintained at all times (See Page 3).
– Inspect the heater before each use, and at least annually by a qualified service person.
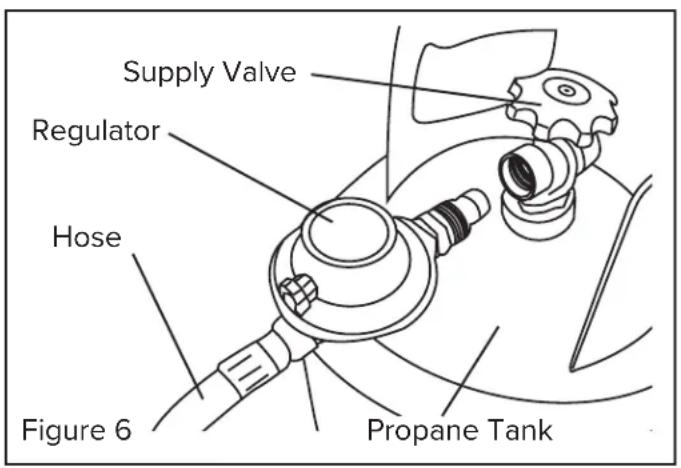
text_image
Supply Valve Regulator Hose Figure 6 Propane Tank
text_image
WARNING EXTREMELY HOT during operation. Do Not touch any metal components while in operation. Keep gasoline and any other flammable liquids away from the heater.Lighting Instructions:
- STOP! Read all of the safety information provided with this heater.
- Turn valve on propane cylinder COUNTERCLOCKWISE until fully open.
- Wait five (5) minutes for any gas to clear. Smell for gas. If none is evident, proceed to the next step.
- Push in the valve knob and turn to "PILOT".
NOTE: If this is first time use for heater or LP cylinder has been replaced, hold the valve knob for approximately 30 seconds to allow bleeding of air from system then turn valve knob to PILOT.
- While depressing the valve knob, press red piezo ignition button to ignite. It may be necessary to press the igniter button several times to ignite the center burner panel.
- Continue to hold valve knob down for 30 seconds after the panel has lit. This will heat the thermocouple. After 30 seconds, release the valve knob.
- If heater fails to light, or does not stay lit, repeat steps 2 through 6.
- When the center burner panel stays lit, turn the valve knob to the desired setting.
Shut Down Instructions:
- Turn valve knob to the OFF position.
- Turn the knob at the LP cylinder CLOCKWISE to the OFF position.
- Disconnect regulator hose assembly from the LP cylinder.
OPERATION (CONT.)
Test Firing Heater:
It is always a good idea to test fire your heater in a safe and controlled environment, in an area with adequate ventilation, and away from any combustibles to be sure that all functions of the heater and gas supply system are operating properly.
Leak test all gas connections with a 50/50 solution of dish soap and water. DO NOT use a flame to test for leaks!
Moving and Positioning the Heater:
There is a brake in each of the front wheels of your heater that helps keep it in place when in use. To engage the brakes, push the lever down on each wheel. To move the heater, release the brakes, simply by flipping the levers on both brakes up.
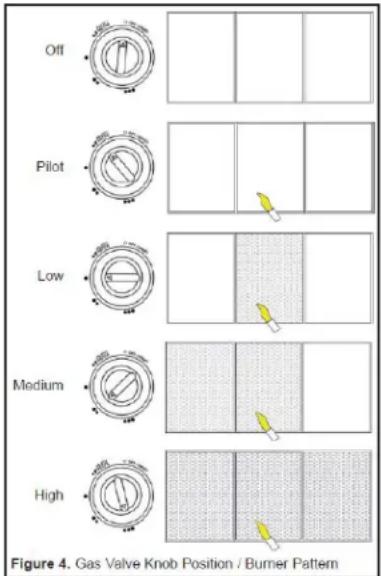
text_image
Off Pilot Low Medium High Figure 4. Gas Valve Knob Position / Burner Pattern⚠️ DANGER
CARBON MONOXIDE POISONING MAY LEAD TO DEATH!
VENTILATION
– Risk of indoor air pollution and Carbon Monoxide Poisoning. Use heater only in well ventilated areas.
– Refer to Safety Information on pages 2-3 for information about Carbon Monoxide Poisoning.
- ALWAYS provide a fresh air opening in the heated space of at least 3 square feet (2,800 sq. cm) for each 100,000 BTU / Hr. of heater output. Provide a larger opening if more heaters are being used.
- FOR OUTDOOR USE. INDOOR USE PERMITTED ONLY FOR: The temporary heating of adequately ventilated buildings or structures under construction, alteration or repair.
| Minimum Ventilation Opening Needed |
| MH-18-PCH-A |
| 0.54 ft. ^2 |
| 501.7 cm ^2 |
DANGER
Not for use in residential living areas or in
non-adequately ventilated enclosed spaces.
Always disconnect the LP cylinder from the regulator assembly and remove the LP cylinder from the heater before putting the heater into storage. If, for any reason, the heater is to be stored indoors, the heater MUST be disconnected from the LP cylinder, and the cylinder stored outdoors in a well-ventilated area, out of the reach of children, and in accordance with the Standard for Storage and Handling of Liquefied Gasses, ANSI/NFPA 58 - latest edition. The plastic valve plug or valve cover supplied with the LP cylinder must be reinstalled on the valve to protect the fitting from damage.
NOTE: Repair of this heater should be done by a qualified service person.
It is recommended that you save all of the packaging materials that came with your heater, and re-package the heater using these materials for safe storage.
Debris, dust and dirt inside of the heater body can affect the performance of your heater. This debris can impair the heaters ability to draw air for ventilation and combustion. Spiderwebs can also appear during periods of inactivity.
Be sure to inspect the heater before each use to look for any such obstructions. Be sure to keep the air passage-ways, burner and combustion areas clean. Wipe with a damp cloth or use a vacuum cleaner to clean these areas. It is suggested that you perform a thorough cleaning at least once every 30 days of operation. You may need to clean the heater more often if conditions are naturally dirty.
Clean the ceramic plaques using compressed air below 30 PSI to prevent damage to plaques.
A yellow tip of the pilot flame indicates that the burner area may be in need of cleaning.
⚠️ DANGER
Never store an LP cylinder inside of a building or near any other gas or oil burning appliances.
CAUTION
Always be sure that the heater has been allowed to cool for at least 30 minutes before attempting to store, service, or perform maintenance.
TROUBLESHOOTING GUIDE
| Problem Possible Cause Solution | ||
| Burner fails to ignite | 1. Air in gas line2. Gas pressure from cylinder too low.3. LP cylinder valve turned off4. Obstruction in air passageway.5. Dirt in pilot orifice.6. Safety switch in cylinder valve engaged.7. Tipover switch engaged. | 1. Keep depressing the gas control knob for at least 30 seconds to remove any in line.2. Check LP cylinder pressure. Tank may be empty.3. Open LP cylinder valve.4. Inspect and clean heater housing.5. Blow out, or clean pilot orifice.6. Close LP cylinder valve. Wait 1 min. for switch to click off. Reopen LP cylinder valve slowly.7. Move heater to a level surface. |
| No spark created when ignited | 1. Incorrect igniter electrode position.2. Electrode damaged or broken.3. Loose or disconnected igniter wire.4. Broken igniter wire. | 1. Properly position electrode2. Replace the electrode.3. Tighten or reconnect loose wire.4. Replace igniter wire. |
| Heater stops running by itself | 1. Thermocouple damaged2. Gas control valve damaged.3. Gas leak4. Thermocouple not in contact with pilot flame.5. Tip-over switch damaged, or loose connection at tip-switch.6. Out of fuel. | 1. Replace thermocouple.2. Replace gas control valve.3. Check all connections for leaks using 50/50 solution of dish soap and water. Repair any leaks found.4. Clean inside of heater housing.5. Inspect tip-over switch and connections. Replace if necessary.6. Replace LP cylinder |
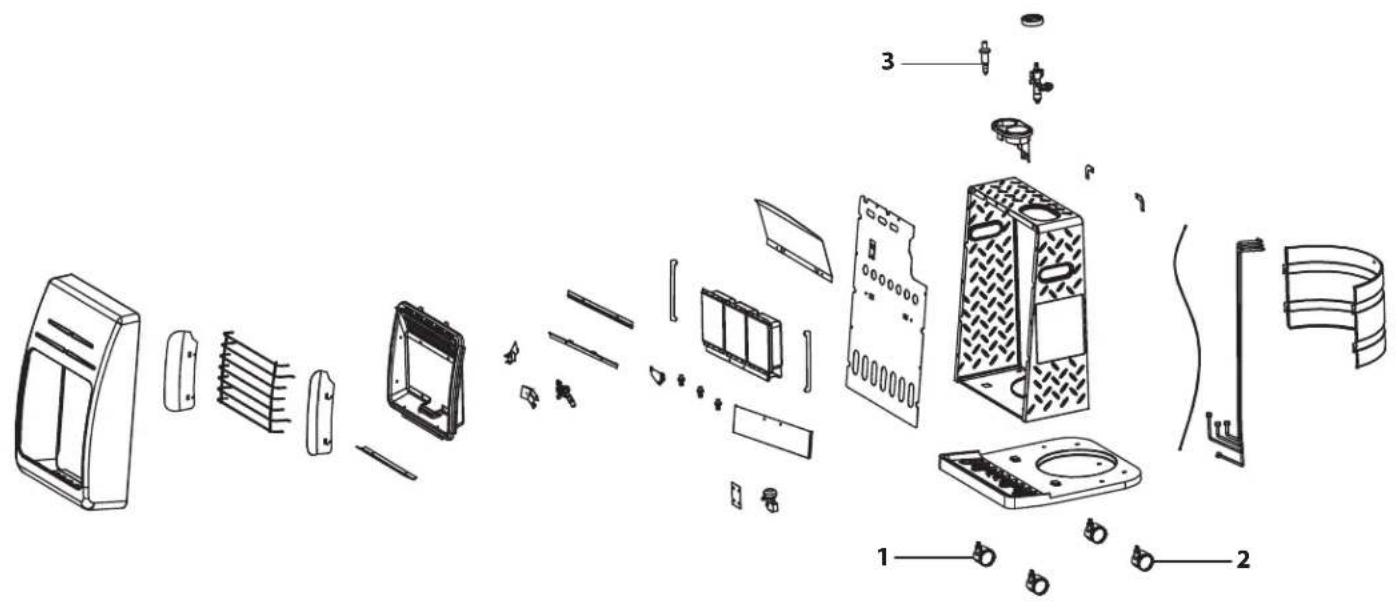
EXPLODED VIEW
text_image
Exploded view diagram of a device showing exploded and assembled parts with numbered labelsPARTS LIST
| Item # Description MH-18-PCH-A | ||
| 1 Front Castor 50-011-0110 | ||
| 2 Rear Castor 50-011-0210 | ||
| 3 Piezo Button 50-014-0100 | ||
LIMITED WARRANTY
Pinnacle Climate Technologies, Inc. warrants this heater to the original retail purchaser only, to be free from defects in material and workmanship for a period of one (1) year from the date of initial purchase. This product must be properly installed, maintained and operated in accordance with the instructions provided.
Pinnacle Climate Technologies, Inc. requires reasonable proof of your date of purchase from an authorized retailer or distributor. Therefore, you should keep your sales slip, invoice or cancelled check from the original purchase. This Limited Warranty shall be limited to the repair or replacement of parts, which prove defective under normal use and service within the warranty period, and which Pinnacle Climate Technologies, Inc. shall determine at its reasonable discretion.
This warranty does not apply to products purchased for rental use.
This Limited Warranty does not cover any failures or operating difficulties due to normal wear and tear, accident, abuse, misuse, alteration, misapplication, improper installation or improper maintenance and service by you or any third party. Failure to perform normal and routine maintenance on the heater, shipping damage, damage related to insects, birds or animals of any kind, and damage due to weather conditions are also not covered. In addition, the Limited Warranty does not cover damage to the finish, such as scratches, dents, discoloration, rust or other weather damage, after purchase.
All transportation costs for the return of damaged product or parts will be the responsibility of the purchaser. Upon receipt of damaged item, Pinnacle Climate Technologies, Inc. will examine the item and determine if defective. Pinnacle Climate Technologies, Inc. will repair or replace and return the item, freight pre-paid.
If Pinnacle Climate Technologies, Inc. finds the item to be in normal operating condition, or not defective the item will be returned freight collect. This Limited Warranty is in lieu of all other express warranties. Pinnacle Climate Technologies, Inc. disclaims all warranties for products that are purchased from sellers other than authorized dealers or distributors.
AFTER THE PERIOD OF THE ONE (1) YEAR EXPRESS WARRANTY EXPIRES, Pinnacle Climate Technologies, Inc. DISCLAIMS ANY AND ALL IMPLIED WARRANTIES, INCLUDING WITHOUT LIMITATION THE IMPLIED WARRANTIES OF MERCHANTABILITY AND FITNESS FOR A PARTICULAR APPLICATION. FURTHER, Pinnacle Climate Technologies, Inc. SHALL HAVE NO LIABILITY WHATSOEVER TO PURCHASER OR ANY THIRD PARTY FOR ANY SPECIAL, INDIRECT, PUNITIVE INCIDENTAL, OR CONSEQUENTIAL DAMAGES. Pinnacle Climate Technologies, Inc. assumes no responsibility for any defects caused by third parties. This Limited Warranty gives the purchaser specific legal rights; a purchaser may have other rights depending upon where he or she lives. Some states do not allow the exclusion or limitation of special, incidental or consequential damages, or limitations on how long a warranty lasts, so the above exclusion and limitations may not apply to you.
Pinnacle Climate Technologies, Inc. does not authorize any person or company to assume for it any other obligation or liability in connection with the sale, installation, use, removal, return or replacement of its equipment, and no such representations are binding on Pinnacle Climate Technologies, Inc.
Always be sure to specify the model number and serial number when making any claim with Pinnacle Climate Technologies, Inc. For your convenience, use the space provided below to list this information.
Locating Your Serial Number:
Your serial number can be found on the heater's rating label. It will begin with the letters PGCV followed by 8 digits. For Example: PGCV12345678. Have your Serial Number ready before calling customer service at 1-800-641-6996.
Model #:
Serial #:
Date of Purchase:
NUMÉRO DE MODÈLE
MH-18-PCH-A
NOTE AU CLIENT : LIRE ET CONSERVER CE MANUEL POUR CONSULTATION ULTÉRIEURE
natural_image
Black master portable heater with open vent and wheels (no visible text or symbols)text_image
Chaufferette cabinet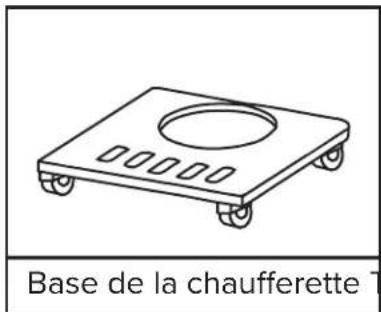
text_image
Base de la chaufferette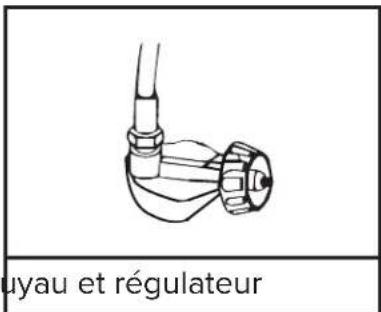
natural_image
Technical line drawing of a mechanical assembly with mounting holes and a circular component (no text or symbols)
natural_image
Technical line drawing of a mechanical device with mounting holes and a close-up inset showing a component (no text or symbols)Figure 1 Figure 2
text_image
Exploded view diagram of a device showing exploded and assembled parts with numbered labelsLISTE DES PIÈCES
natural_image
Black master portable heater with open vent and wheels (no visible text or symbols)natural_image
Technical line drawing of a mechanical assembly with mounting holes and a circular component (no text or symbols)
natural_image
Technical line drawing of a mechanical device with mounting holes and a close-up inset showing a component detail (no text or symbols)Figura 1 Figura 2