HCHREF30SS - Basket HomeCraft - Free user manual and instructions
Find the device manual for free HCHREF30SS HomeCraft in PDF.

| Product Type | Range Hood |
| Brand | HomeCraft |
| Model | HCHREF30SS |
| Width | 30 inches (76.2 cm) |
| Product Dimensions | 76.0 x 50.0 x 14.0 cm (29.9 x 19.7 x 5.5 in) |
| Power Supply | 120 V ~ 60 Hz, 283 W |
| Plug Type | Polarized plug (120 V AC outlet only) |
| Maximum Airflow (CFM) | 250 CFM |
| Number of Motors | 2 |
| Fan Speeds | 3 (Low, Medium, High) |
| Noise Level | 69 dB |
| Lighting | 2 LED lights of 1.5 W each |
| Grease Filters | 2 removable and dishwasher-safe aluminum filters |
| Charcoal Filter | Optional (not included), replacement every 2-3 months |
| Ventilation Modes | Air extraction (ducted) or recirculation |
| Installation | Under cabinet or wall-mounted |
| Minimum Distance Above Cooktop | 65 cm (25.6 in) for electric cooktop, 75 cm (29.5 in) for gas |
| Material | Brushed stainless steel |
| Warranty | 1 year |
| Cleaning | Surface with mild soap, washable grease filters |
| Safety | Automatic motor shut-off, grease fire protection |
Frequently Asked Questions - HCHREF30SS HomeCraft
User questions about HCHREF30SS HomeCraft
0 question about this device. Answer the ones you know or ask your own.
Ask a new question about this device
Download the instructions for your Basket in PDF format for free! Find your manual HCHREF30SS - HomeCraft and take your electronic device back in hand. On this page are published all the documents necessary for the use of your device. HCHREF30SS by HomeCraft.
USER MANUAL HCHREF30SS HomeCraft
All products are trademarks of Nostalgia Products LLC.
Worldwide design & utility patented or patents pending.
© 2020 Nostalgia Products LLC.
www.nostalgiaproducts.com
(rev. 08/25/20 MD)

natural_image
Line drawing of a kitchen air conditioner unit with ventilation duct and vent slots (no text or symbols)30-Inch Hood Range Exhaust Fan Ventilador de campana de extracción de 30 pulgadas Ventilateur d'extraction de hotte de 30 pouces (76,2 cm)
Instructions and Recipes
Make every day a party!
Visit www.nostalgiaproducts.com for more fun products.
CONTENTS
SAFETY....2
IMPORTANT SAFEGUARDS 3
INTRODUCTION 5
PARTS & ASSEMBLY 6
INSTALLATION 7
HOW TO OPERATE 11
HELPFUL TIPS 12
CLEANING & MAINTENANCE .... 13
RETURNS & WARRANTY 14
SAFETY
Your safety and the safety of others is very important.
We have provided many important safety messages in this manual and on your appliance. Always read and obey all safety messages.

This is the safety alert symbol.
This symbol alerts you to potential hazards that can cause serious injury to you and others.
All safety messages will follow the safety alert symbol.
All safety messages will tell you what the potential hazard is, tell you how to reduce the chance of injury, and tell you what can happen if the instructions are not followed.
Appliance Specifications:
120 Volts, 60 Hz, 283 Watts
THIS PRODUCT IS FOR USE IN 120V AC OUTLET ONLY.

Intertek
Refer to www.nostalgiaproducts.com/user-manuals/ for the most updated manual.

IMPORTANT SAFEGUARDS
A person who has not read and understood all operating and safety instructions is not qualified to operate this appliance. All users of this appliance must read and understand this Instruction Manual before operating or cleaning this appliance.
When using electrical appliances, basic safety precautions should always be followed, including:
- Read all instructions before operating this appliance.
- DO NOT TOUCH the hot surfaces. Use handles or knobs.
- This appliance is NOT A TOY.
- Unsupervised young children and cognitively challenged individuals should never operate this appliance.
- Close supervision is necessary when any appliance is used by or near children.
- To protect against electrical shock do not immerse cord, plug or any part of this unit in water or other liquids.
- Unplug from outlet when not in use, before removing parts and before cleaning. Allow to cool before putting on or taking off any parts, and before cleaning.
- DO NOT operate any appliance with a damaged cord or plug, or after the appliance malfunctions, or if the appliance has been damaged in any manner. Return the appliance to the nearest repair shop for examination, repair or adjustment.
- The manufacturer does not recommend the use of accessory attachments other than what is provided by the manufacturer. Use of attachments may cause injuries.
- DO NOT use the appliance for other than its intended use.
- DO NOT use outdoors. FOR HOUSEHOLD USE ONLY.
- For general ventilating use only. DO NOT use to exhaust hazardous or explosive materials or vapors.
- Use only with range hood cord connection kits that have been investigated and found acceptable for use with this model range hood.
- To reduce risk of fire and to properly exhaust air, do not vent exhaust air into spaces within walls, ceilings, attics, crawl spaces, or garages.
- To reduce the risk of fire, use only metal duct work. Install this hood in accordance with all requirements specified.
- To reduce the risk of a range top grease fire:
- Never leave surface units unattended at high settings. Boil overs cause smoking and greasy spill overs that may ignite. Heat oils slowly on low or medium settings.
- Always turn hood ON when cooking at high heat or when flambeing food (i.e. Crepes Suzette, Cherries, Jubilee, Peppercorn Beef Flambe').
- Clean ventilating fans frequently. Grease should not be allowed to accumulate on fan or filter.
- Use proper pan size. Always use cookware appropriate for the size of the surface element.
- TO REDUCE THE RISK OF FIRE, ELECTRIC SHOCK, OR INJURY TO PERSONS, OBSERVE THE FOLLOWING:
- Use this unit only in the manner intended by the manufacturer.
If you have questions, contact the manufacturer
- Before servicing or cleaning the unit, switch power off at service panel and lock service panel disconnecting means to prevent power from being switched on accidentally. When the service disconnecting means cannot be locked, securely fasten a prominent warning device, such as a tag, to the service panel.
- Installation Work and Electrical Wiring Must Be Done By a Qualified Person(s) In Accordance With all Applicable Codes & Standards, Including Fire-rated Construction.
- When cutting or drilling into wall or ceiling, do not damage electrical wiring and other hidden utilities.
- Ducted systems must always be vented to the outdoors.
- To reduce the risk of fire or electric shock, do not use this hood with any external solid state speed control device.
- TO REDUCE THE RISK OF INJURY TO PERSONS, IN THE EVENT OF A RANGE TOP GREASE FIRE, OBSERVE THE FOLLOWING:
- Smother flames with a close fitting lid, cookie sheet, or other metal tray, then turn off the gas burner or electrical element. BE CAREFUL TO PREVENT BURNS. If flames do not go out, call the fire department.
- NEVER PICK UP A FLAMING PAN or you may be burned.
- DO NOT USE WATER, including wet dish cloths or towels - a violent stream explosion will result.
Use an extinguisher ONLY if:
- You know you have a class ABC extinguisher and you already know how to operate it.
- The fire is small and contained in the area where it started.
- The fire department is being called.
-
You can fight the fire with your back to an exit.
-
OPERATION: Always leave safety grills and filters in place. Without these components, operating blowers could catch onto hair, fingers and loose clothing. The manufacturer declines all responsibility in the event of failure to observe the instructions given here for installation, maintenance and suitable use of the product. The manufacturer further declines all responsibility for injury due to negligence and the warranty of the unit automatically expires due to improper maintenance.
-
Unplug or disconnect the appliance from the power supply before servicing.
Instructions for the Electrical Cord and Plug
- This appliance has a polarized plug (one blade is wider than the other). To reduce the risk of electrical shock, this plug is intended to fit into a polarized outlet only one way. If the plug does not fit fully into the outlet, reverse the plug. If it still does not fit, contact a qualified electrician. Do not attempt to modify the plug in any way.
- A short power supply cord is provided to reduce the risk resulting from becoming entangled or tripping over a long cord.
-
If a long detachable power-supply cord or extension cord is used:
-
Extension cords can be used if care is exercised in their use.
- The marked electrical rating of the cord or extension cord should be at least as great as the electrical rating of the appliance.
- When using a longer cord or extension cord, make sure that
the cord does not drape over a countertop or tabletop where it can be pulled on or tripped over unintentionally.
- The manufacturer does not recommend using this machine in countries that do not support 120V AC even if a voltage adapter, transformer, or converter is in use.
SAVE THESE INSTRUCTIONS!
INTRODUCTION
Congratulations on your purchase of the HomeCraft RANGE HOOD EXHAUST FAN!
Features:
- SIZE: 30 Inches
- DESIGN: Elegant Brushed Stainless-Steel Low-Profile Under Cabinet Slim Design
- INSTALLATION: Suitable For Ducted Outside Air Ventilation or Recirculating Air Operation
- PLACEMENT: Can Be Installed Under A Cabinet or Against A Wall
• DUAL MOTORS: On-Off With Indicator Light
• 3 SPEED POWER LEVELS: Low-Medium-High
• CFM EXHAUST RATING: 250CFM Removes Smoke, Steam, Cooking Odors, Grease & More - VENTING: Suitable For Top or Front Venting
- ADJUSTABLE CONTROLS: Easy Push Button Controls
• QUIET OPERATION: Low Noise 69db
• LIGHTS: 2 X 1.5W LED Lights Provides Bright Cook Top Surface Lighting - CLEANING: Includes Two Removable, Dishwasher Safe Aluminum Grease Filters
• PRODUCT DIMENSIONS: 29.9 X 19.7 X 5.5
PARTS & ASSEMBLY
text_image
DDDO 1 2 3 4
natural_image
Simple line drawing of a cylindrical object with a vertical line extending from its top (no text or symbols)6

7

natural_image
Simple line drawing of a circular object with concentric rings and a vertical line at the bottom (no text or symbols)5

8
9
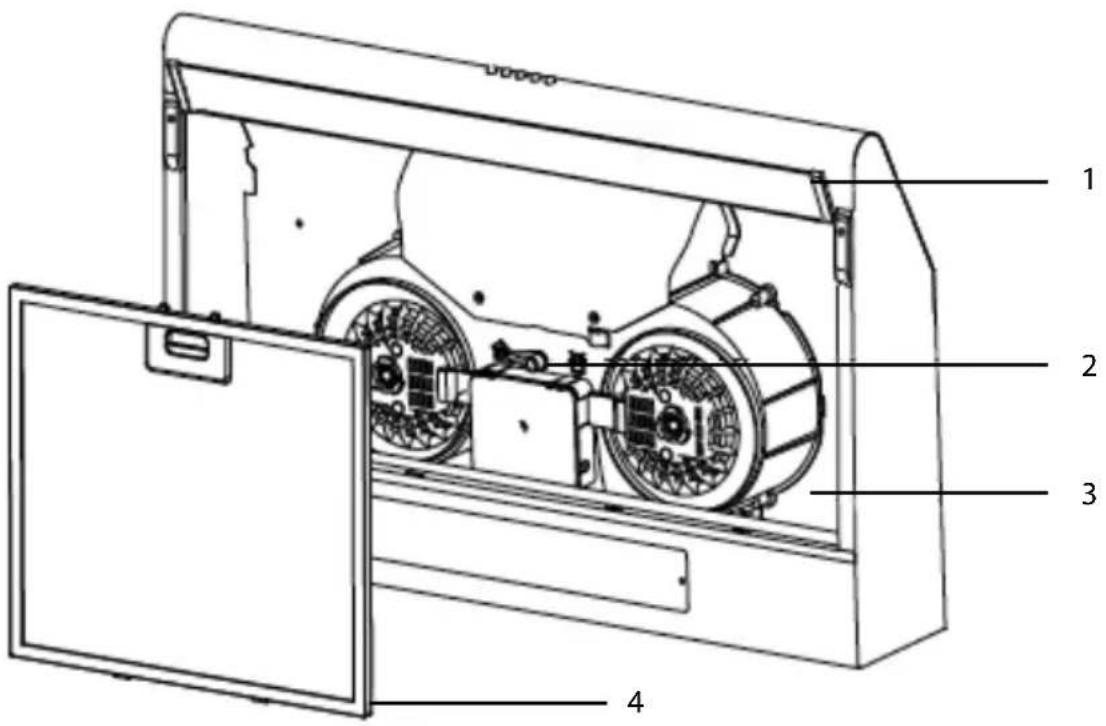
1: Air Duct Assembly
2: Venting Knob
3: Main Body
4: Filter Assembly (2)
5: Carbon Filter (optional)
6: Check Valve
7: Air Outlet Cap
8: Screws 5mm x 49mm (4)
9: Plastic Wall Plugs (4)
text_image
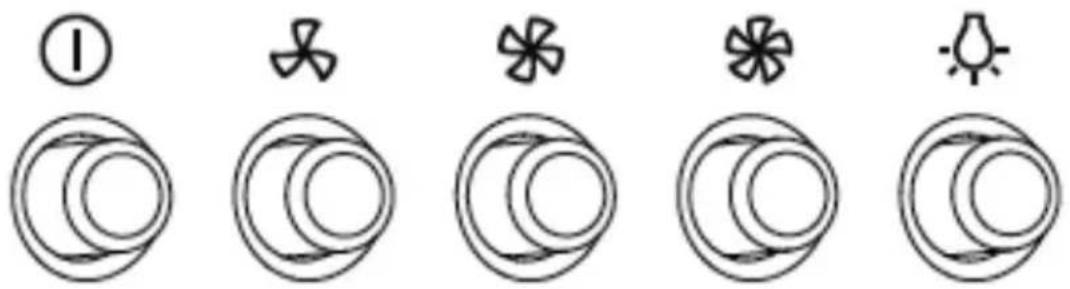
① ② ③ ④| 1 | OFF MOTOR SWITCH: Press to stop the operation. |
| SPEED SWITCH: Press to run on LOW. | |
| SPEED SWITCH: Press to run on MEDIUM. | |
| SPEED SWITCH: Press to run on HIGH. | |
| ON/OFF LIGHTING: Press to turn on the lights, press again to turn them off. |
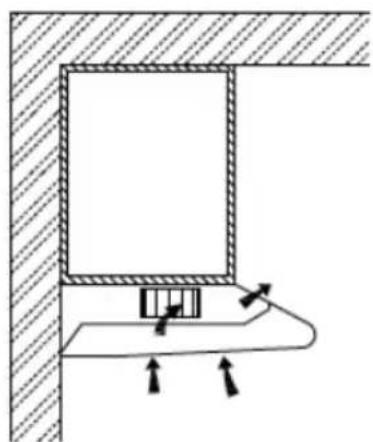
INSTALLATION
WALL DRILLING & BRACKET FIXING
Please read the instructions carefully.
- Unpack the canopy and check that all functions are working. Ensure that the voltage (V) and the frequency (Hz) indicated on the serial plate match the voltage and frequency at the installation site.
- Check that the area behind the installation surface to be drilled is clear of any electrical cables or pipes, etc.
- The stainless steel and glass surfaces of the canopy are very easily damaged during installation if grazed or knocked by tools. Please take care to protect the surfaces during installation.
- Protect the cooktop surface below with cardboard, or the like, to prevent damage occurring whilst the wall canopy is being installed above.
- The manufacturer shall not be liable for failure to observe all safety regulations in force for the correct and normal operation of electrical parts.
Choose a venting mode:
EXTRACTION-AIR MODE

natural_image
Technical diagram of a mechanical assembly with directional arrows indicating motion (no text or labels)RECIRCULATION MODE
natural_image
Technical diagram of a mechanical assembly with directional arrows indicating movement or force (no text or symbols)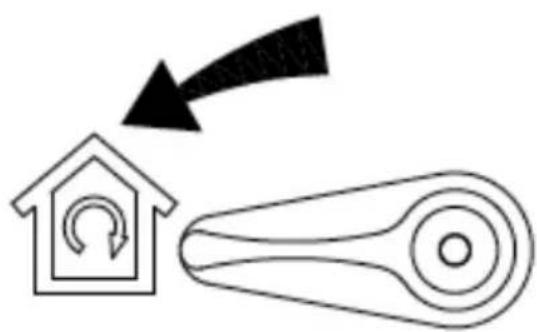
flowchart
graph TD
    A["House Icon"] --> B["Mechanical Component"]
    style A fill:#f9f,stroke:#333
    style B fill:#ccf,stroke:#333

natural_image
Simple line drawing of a house with arrows pointing downward (no text or symbols) | Extraction-air mode: Turn the venting knob here means venting outside |
 | Circulating-air mode: Turn the venting knob here means recirculation |
NOTES:
- Sufficient air is needed for proper combustion and exhaustion of gases through the flue (chimney) of fuel burning equipment to prevent back drafting. Ductless fans must always be vented to the outdoors.
- When assessing the air pressure, the entire ventilation system in the house/apartment must be taken into account, e.g. hob and/or gas cooker, this rule does not apply.
• Government regulations must be observed for the conveyance of exhaust air. If the extractor hood is used in circulating air mode with activated carbon filter, there are no operating restrictions. - If you choose extraction-air mode, install check valve on the vent hole.
PREPARE THE INSTALLATION
Ensure the power has been turned off before beginning this installation.
Plug must be assembled in places easy to drag and insert.
To install this hood you will require two assistants. Tools you will need:
- Drill
• Phillips Screwdriver - Tape Measure
NOTES:
- Installation work and electrical wiring must be done by qualified person(s) in accordance with all applicable codes and standards, including fire rated construction.
• Do not discharge the exhaust air into a fuel from other appliances burning gas or other fuels. - Regulations concerning the discharge of air have to be fulfilled.
- The cooker hood must be placed at a minimum distance of 65cm above the cooking surface of a hob.
- The cooker hood must be placed at a maximum distance of 75cm above the cooking surface of a hob.
CUPBOARD MOUNTING INSTALLATION
- Drill a 130mm diameter and four 3.5mm diameter hole as below picture. ATTENTION: If your cooker hood works at circulating-air mode, it is not necessary to drill 130mm diameter hole.
- Use the 4 screws to fix the cooker hood to a kitchen cupboard. Check that your fixings are correctly located, by temporarily fitting the cooker hood. If correct, fit the unit into position. Tighten the screws if necessary.

text_image
X 100 180 110 130WALL MOUNTING INSTALLATION
- To mount on the wall, drill two10mm diameter holes 538/615/675/696mm with the vent hole on the top of the cooker hood in the middle as below picture. Make sure the hood is aligned directly over the hob.
- Insert two plastics wall plugs(supplied) into the holes.
- Insert two screws into the upper two plastic wall plugs and tighten them leaving 3mm protruding from the wall.
- Mount the cooker hood onto the two screws and mark the bottom two screw positions.
- Remove the hood and drill the bottom two screw holes and Insert the plastic wall plugs.
- Mount the hood on the top screws, Insert the bottom screws and fully tighten all the screws.

natural_image
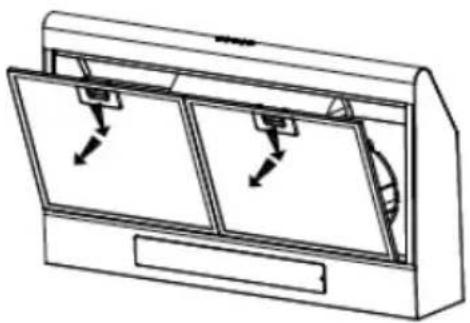
Technical line drawing of a 3D mechanical part with dimension lines and a central cylindrical feature (no text or symbols)CARBON FILTER INSTALLATION (OPTIONAL)
This model does not come with carbon filters, but they can be purchased and installed.
- Remove the grease filter.
- The charcoal filter is located at the end of the motor. Turn the carbon filter until it is unscrewed.
- Replace a new carbon filter and screw it in.
WARNING: The carbon filter cannot be washed or recycled. It should be replaced after approximately 2-3 months of use.

text_image
Open Close Carbon FilterLIGHT REPLACEMENT
- Switch off the extractor hood and isolate the extractor hood by pulling out the mains plug or switching off the fuse.
- Remove the grease filter.
- Replace the lamp (commercially) led modules, separate ballast.
- Reconnect the power by inserting the mains plug or by switching on the fuse.
natural_image
Line drawing of a two-panel air conditioner unit with directional arrows indicating airflow or movement (no text or symbols)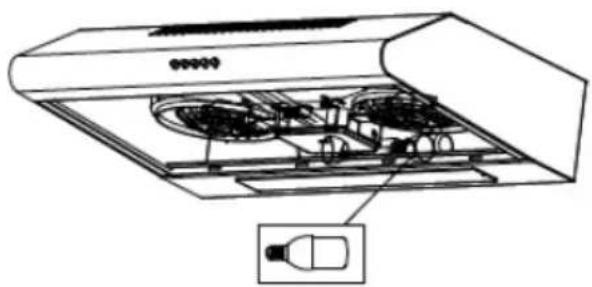
natural_image
Technical line drawing of an air conditioner unit with internal components and a close-up inset showing a bottle (no text or symbols)| MAX POWER V | OLTAGE LAMP | CAP ILCOS D | CODE | |
| Filament lamp | 40 Watts 110-1 | 27V E14 IBT-40-1 | 10/127-E14-2 | 5/58 |
| Filament lamp | 40 Watts 220-2 | 40V E14 IBT-40-2 | 20/240-E14-2 | 5/58 |
| Halogen lamp | 28 Watts 220-2 | 40V E14 HSG-28- | 220/240-E14- | 37 |
| LED module | 3 Watts 110-24 | 0V E14 DBL-3-H- | E14-35 | |
| LED modules, separate ballast | 1.5 Watts 120V | DSH-1.5-S-33.2/ | 120 |
HOW TO OPERATE
The range hood over your stove is there to remove smoke, vapors, heat, and cooking odors.
- Turn the fan on a few minutes before you start cooking. Choose between three speed options (LOW, MEDIUM & HIGH).
- If you need light, press the ON/OFF switch on the control panel to turn on the dual LED lights.
- Start cooking.
- Once finished, leave it running for 15 minutes and then turn off.
HELPFUL TIPS
| FAULT CAUSE SOLUTION | ||
| Light on, but motor does not work | The blades are blockedThe capacitor is damagedThe motor is damagedThe internal wiring is disconnected | Replace capacitorReplace motorReplace motor |
| Both light and motor do not work | Light damagedPower cord is loose | Replace lightsConnect wires |
| Oil Leakage Outlet and air ventilation is not tightly sealedLeakage from the connection of U-shaped section and cover | Take down the outlet and seal with glueTake U-shaped section down and seal with soap or paint | |
| Vibration The blade, if damaged, can cause vibratingThe motor is not tightly fastenedThe cooker hood is not tightly fixed | Replace the bladeFasten the motor tightlyTighten the cooker hood | |
| Insufficient suction | The distance between the cooker hood and cooker top is too largeToo much ventilation from open doors or windows | Readjust the distanceChoose a new place to install the appliance or close some doors/windows |
| The machine inclines | The fixing or hanging screws are not tight enough | Tighten screw and make it horizontal |
CLEANING & MAINTENANCE
Disconnect range hood from power supply before cleaning or servicing.
- Cleaning the surface of hood frequently. Use mild soap or detergent to clean the hood.
- Do not use harsh alkalis or abrasives.
- Avoid the use of scouring powers or dishwasher compounds.
- Grease filter may be washed using mild soap or detergent. (Heavygrease build-up may not be cleaned easily and the filter may require replacement).
- Charcoal filter cannot be cleaned and must be replaced regularly.
NOTE: Cleaning water must not inter into motor, control switch etc. electrical parts. It is recommended to clean the metallic filter every three months by carrying out the following instruction:
- Remove the metallic filter from the cooker hood and wash it in a so on of water and neutral liquid detergent, leaving to soak.
- Rinse thoroughly with warm water and leave to dry.
- The metallic filter may alter in color after several washes. This is not cause for customer complaint or replacement of metallic filter.
RETURNS & WARRANTY
SHOULD YOUR UNIT NOT WORK OR IF DAMAGED WHEN YOU FIRST TAKE IT OUT OF THE BOX, PLEASE RETURN IT TO THE PLACE OF PURCHASE IMMEDIATELY.
30-INCH RANGE HOOD EXHAUST FAN / HCHREF30SS
Should you have any questions, please contact us via email or at the customer service number listed below between the hours of 8:00 AM and 5:00 PM, Monday through Friday, Central Standard Time.
Distributed by:
Nostalgia Products LLC
1471 Partnership Dr.
Green Bay, WI 54304-5685
Customer Service
Phone: (920) 347-9122
Web: www.nostalgiaproducts.com
Customer Service Inquiry
To submit a Customer Service inquiry, go to www.nostalgiaproducts.com and fill out the Customer Service Inquiry form and click the Submit button.
A representative will contact you as soon as possible.
Product Warranty Terms
Nostalgia Products LLC (the "Company") hereby warrants that for a period of one (1) year from the date of original purchase, this product will be free of defects in material and workmanship under normal home use, provided that the product is operated and maintained in accordance with the operating instructions. As the sole and exclusive remedy under this warranty, the Company will at its discretion either repair or replace the product found to be defective, or issue a refund on the product during the warranty period. This warranty is only available to the original retail purchaser of the product from the date of initial retail purchase, and is only valid with the original sales receipt, as proof of purchase date is required to obtain warranty benefits. All warranty claims must be brought to the attention of the Company within the warranty period and no later than 30 days of the failure to perform. This warranty does not cover normal wear or damage caused by shipping, mishandling, misuse, accident, alteration, improper replacement parts, or other than ordinary household use. You may be required to return the product (with shipping prepaid by you) for inspection and evaluation. Return shipping costs are not refundable. The Company is not responsible for returns damaged or lost in transit. Unless otherwise specifically permitted by the operating instructions, this warranty applies to indoor household use only. In order to obtain service under this warranty, please contact the Company at the telephone number listed above or by filling out the Customer Service Inquiry Form located at www.nostalgiaproducts.com. Warranty valid only in USA and Canada.
This warranty is in lieu of all other warranties, expressed or implied, including warranties of merchantability and fitness for a particular purpose, which are hereby excluded to the extent permitted by law. In no event shall the Company be liable for any indirect, incidental, consequential, or special damages arising out of or in connection with this product or the use thereof. Some states, provinces or jurisdictions do not permit the exclusion or limitation of incidental or consequential damages, so the foregoing exclusion or limitation may not apply to you.
This warranty does not apply to re-manufactured merchandise.
Please read the operating instructions carefully. Failure to comply with the operating instructions will void this warranty.
For more information, visit us online at www.nostalgiaproducts.com.
Like us on Facebook at www.facebook.com/NostalgiaElectrics.
Follow our boards on Pinterest at www.pinterest.com/nostalgiaelctrx.
Tweet along with us on Twitter at www.twitter.com/NostalgiaElctrx.
natural_image
Pure mechanical diagram showing a piston-cranked joint with directional arrows indicating motion (no text or symbols)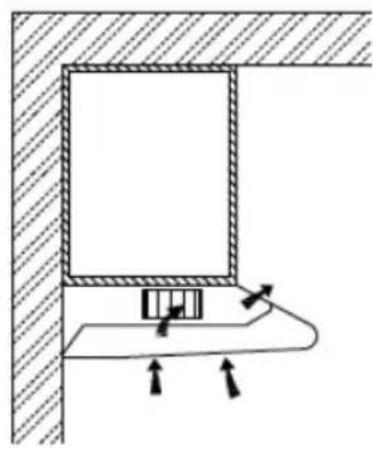
natural_image
Simple line drawing of a mechanical assembly with arrows indicating force or movement (no text or symbols)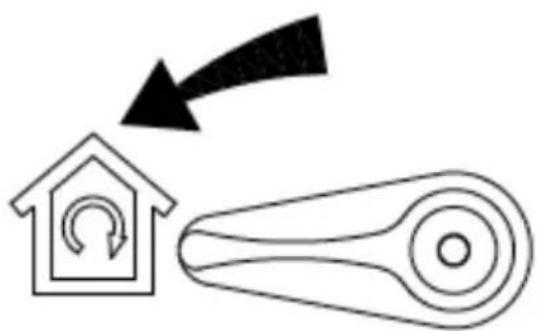
flowchart
graph TD
    A["House Icon"] --> B["Mechanical Component"]
    style A fill:#f9f,stroke:#333
    style B fill:#ccf,stroke:#333

natural_image
Simple line drawing of a house with arrows pointing downward (no text or symbols)natural_image
Technical line drawing of a mechanical component with Y-axis and dimension lines (no text or symbols)natural_image
Technical line drawing of a mechanical device with two panels and directional arrows indicating movement (no text or symbols)
natural_image
Diagram of an air conditioner unit with internal fan and ventilation system (no text or labels)| POTENCIAMÁX. V | VOLTAJE CUBIERTA DE LÁMPARA | CÓDIGO ILCOS D | |
| Lámpara de filamento | 40 vatios 110-127 | VE14 IBT-40-1 | 110/127-E14-25/58 |
| Lámpara de filamento | 40 vatios 220-240 | VE14 IBT-40- | 220/240-E14-25/58 |
| Lámpara de halógeno | 28 vatios 220-240 | VE14 HSG-28 | -220/240-E14-37 |
| Módulo de ledes | 3 vatios 110-240 V | E14 DBL-3-H | -E14-35 |
| Módulos de ledes, balasto separados | 1.5 vatios 120 V DSH | H-1.5-S-33.2 | 120 |
CÓMO FUNCIONA
Nostalgia Products LLC
1471 Partnership Dr.
Green Bay, WI 54304-5685
Servicio al cliente
CONSERVEZ CES INSTRUCTIONS!
INTRODUCTION
natural_image
Simple line drawing of a dome-shaped object with a diagonal line and the number 6 below it (no text or symbols on the object itself)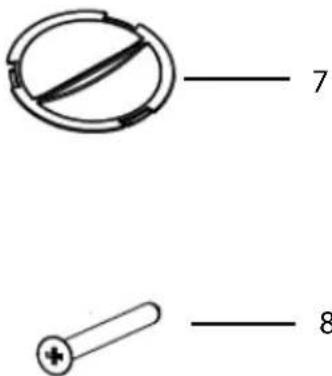
text_image
7 8
natural_image
Simple line drawing of a circular object with concentric rings and a vertical line labeled '5' (no text or symbols on the object itself)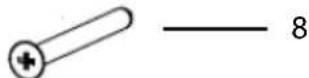

text_image
Five circular diagrams with symbols: one with a numbered circle, three with a clover and star-like symbol, two with overlapping circles, and one with a sun-like symbol.natural_image
Technical line drawing of a 3D mechanical part with Y-axis and dimension lines, no readable text or symbolsINSTALLATION DU FILTRE À CARBONE (FACULTATIF)
natural_image
Line drawing of a cabinet or rack with two panels and directional arrows indicating movement (no text or symbols)
natural_image
Technical line drawing of an air conditioner unit with internal components and a close-up inset showing a bulb (no text or symbols)| PUISSANCE MAXIMALE | TENSION | CAPUCHON DE LAMPE | CODE ILCOS D | |
| Lampe pourvue d'un filament | 40 watts maximum | 110-127 V E | 14 IBT-40-110/127- | E14-25/58 |
| Lampe pourvue d'un filament | 40 watts maximum | 220-240 V E | 14 IBT-40-220/240- | E14-25/58 |
| Lampe halogène | 28 watts maximum | 220-240 V E | 14 HSG-28-220/240- | E14-37 |
| module DEL | 3 watts 110-240 V E | 14 DBL-3-H- | E14-35 | |
| Modules DEL, ballast séparé | 1,5 watt 120 V DSH | -1.5-S-33.2/1 | 20 |
COMMENT FAIRE FONCTIONNER
Nostalgia Products LLC
1471 Partnership Dr.
Green Bay, WI 54304-5685