CBD5SS - Drink dispenser HomeCraft - Free user manual and instructions
Find the device manual for free CBD5SS HomeCraft in PDF.

| Product Type | Beverage Dispenser / Keg Beer System |
| Brand | HomeCraft |
| Model | CBD5SS |
| Dimensions (L x W x H) | 39.4 x 26.7 x 43.2 cm |
| Weight | 6.8 kg |
| Power Supply | 120 V, 60 Hz, 65 W |
| Included Keg Capacity | 5 L |
| Cooling Cavity Capacity | 9 L (0.32 ft³) |
| Plug Type | Polarized (120 V AC only) |
| Refrigeration | Cold water (3 cups / 800 ml) + electronic temperature control |
| Display | Adjustable temperature LED (buttons - and +) |
| Pressure System | 16 g non-threaded CO₂ cartridges |
| CO₂ Regulator | Rotary dial (clockwise: decrease, counterclockwise: increase) |
| Keg Compatibility | Standard 5 L kegs: pressurized, non-pressurized, and included gravity keg |
| Exterior Materials | Stainless steel and plastic |
| Maintenance | Clean the cooling cavity, beer line, and removable parts with warm soapy water |
| Safety | Polarized plug, do not immerse, do not use outdoors, supervision required |
| Warranty | 1 year (parts and labor) – valid in the United States and Canada |
| Intended Use | Indoor household, for alcoholic or non-alcoholic beverages |
| Spare Parts Available | Additional beer line, dip tube, washer, CO₂ cartridges, cleaning bottle |
Frequently Asked Questions - CBD5SS HomeCraft
User questions about CBD5SS HomeCraft
0 question about this device. Answer the ones you know or ask your own.
Ask a new question about this device
Download the instructions for your Drink dispenser in PDF format for free! Find your manual CBD5SS - HomeCraft and take your electronic device back in hand. On this page are published all the documents necessary for the use of your device. CBD5SS by HomeCraft.
USER MANUAL CBD5SS HomeCraft
All products are trademarks of Nostalgia Products LLC.
Worldwide design & utility patented or patents pending.
© 2018 Nostalgia Products LLC.
www.nostalgiaproducts.com
(rev. 02/26/18 WL)
natural_image
Black and white photo of a Home Craft water dispenser with a glass of milk beside it (no visible text or symbols on the device itself)HomeCraft On-Tap Beer Growler System Sistema de barril de cerveza tirada artesanal Système de bière en fût HomeCraft On-Tap Beer Growler
Instructions Instrucciones Instructions
Make every day a party!
Visit www.nostalgiaproducts.com for more fun products.
CONTENTS
SAFETY 2
IMPORTANT SAFEGUARDS 3
ADDITIONAL IMPORTANT SAFEGUARDS 3
INTRODUCTION 5
PARTS & ASSEMBLY 6
HOW TO OPERATE 9
HELPFUL TIPS 12
CLEANING & MAINTENANCE .... 13
RETURNS & WARRANTY 14
SAFETY
Your safety and the safety of others is very important.
We have provided many important safety messages in this manual and on your appliance. Always read and obey all safety messages.

This is the safety alert symbol.
This symbol alerts you to potential hazards that can cause serious injury to you and others.
All safety messages will follow the safety alert symbol.
All safety messages will tell you what the potential hazard is, tell you how to reduce the chance of injury, and tell you what can happen if the instructions are not followed.
Appliance Specifications:
120 Volts, 60 Hz
65 Watts

Intertek
THIS PRODUCT IS FOR USE IN 120V AC OUTLET ONLY.
Refer to www.nostalgiaproducts.com/user-manuals/ for the most updated manual.

IMPORTANT SAFEGUARDS
A person who has not read and understood all operating and safety instructions is not qualified to operate this appliance. All users of this appliance must read and understand this Instruction Manual before operating or cleaning this appliance.
When using electrical appliances, basic safety precautions should always be followed, including:
- Read all instructions before operating this appliance.
- DO NOT TOUCH the hot surfaces. Use handles or knobs.
- This appliance is NOT A TOY.
- Keep out of reach of children.
- Unsupervised young children and cognitively challenged individuals should never operate this appliance.
- Close supervision is necessary when any appliance is used by or near children.
- To protect against electrical shock do not immerse cord, plug or any part of this unit in water or other liquids.
- Do not operate this appliance when parts are missing or broken.
- Unplug from outlet when not in use, before removing parts and before cleaning. Allow to cool before putting on or taking off any parts, and before cleaning.
- DO NOT operate any appliance with a damaged cord or plug, or after the appliance malfunctions, or if the appliance has been damaged in any manner. Return the appliance to the nearest repair shop for examination, repair or adjustment.
- The manufacturer does not recommend the use of accessory attachments other than what is provided by the manufacturer. Use of attachments may cause injuries.
- DO NOT use the appliance for other than its intended use.
- DO NOT use outdoors. FOR HOUSEHOLD USE ONLY.
- DO NOT place on or near a hot gas or electric burner, or in a heated oven.
- DO NOT put any parts of this appliance in dishwasher.
- DO NOT let cord hang over edge of table or counter, or touch not surfaces.
- NEVER leave unit unattended while in use or when plugged into an outlet.
- To disconnect, turn any control to "off," then remove plug from wall outlet.

ADDITIONAL IMPORTANT SAFEGUARDS
Operating Safety Precautions
- This appliance is designed for use by responsible adults of legal drinking age.
- Never place the appliance under direct sunlight, and avoid any other heat source.
- To ensure proper ventilation, this appliance should not be recessed or built into an enclosed cabinet. It is designed for freestanding assembly only.
- Do not insert any object into the ventilation spaces.
- Do not operate your appliance in the presence of explosive fumes.
- Kegs pre-charged with CO2 do not require the use of the external CO2 system regulator, so there is no need to install a CO2 cartridge. The knob on the Top Cover will not work when using a pre-charged keg.
Instructions for the Electrical Cord and Plug
- This appliance has a polarized plug (one blade is wider than the other). To reduce the risk of electrical shock, this plug is intended to fit into a polarized outlet only one way. If the plug does not fit fully into the outlet, reverse the plug. If it still does not fit, contact a qualified electrician. Do not attempt to modify the plug in any way.
- A short power supply cord is provided to reduce the risk resulting from becoming entangled or tripping over a long cord.
-
If a long detachable power-supply cord or extension cord is used:
-
Extension cords can be used if care is exercised in their use.
- The marked electrical rating of the cord or extension cord should be at least as great as the electrical rating of the appliance.
-
When using a longer cord or extension cord, make sure that the cord does not drape over a countertop or tabletop where it can be pulled on or tripped over unintentionally.
-
The manufacturer does not recommend using this machine in countries that do not support 120V AC even if a voltage adapter, transformer, or converter is in use.
CO _2 (Carbon Dioxide) Gas
- DO NOT remove the CO2 cartridge from unit until CO2 cartridge is completely empty.
- Always keep CO _2 cartridges away from heat. Store extra cartridges in a cool, dry place (preferably 70°F/20°C).
- DO NOT use the CO2 cartridge if the room temperature is over 120°F (49°C). Failure to do so can result in explosion or injury. Escaping CO2 gas can cause frostbite if allowed to come in contact with skin.
- CO 2 gas can be dangerous! CO 2 cartridges contain high-pressure compressed gas, which can be hazardous if not handled properly. Make sure you read and understand all the procedures for the CO _2 cartridge before installation.
- Never connect the CO 2 cartridge directly to the beer keg.
- Always follow the correct procedures when changing the CO 2 cartridge.
- ALWAYS ventilate and leave the area immediately if CO _2 leakage has occurred.
- Never drop or throw a CO 2 cartridge.
- Never attempt to refill a CO 2 cartridge.
SAVE THESE INSTRUCTIONS!
INTRODUCTION
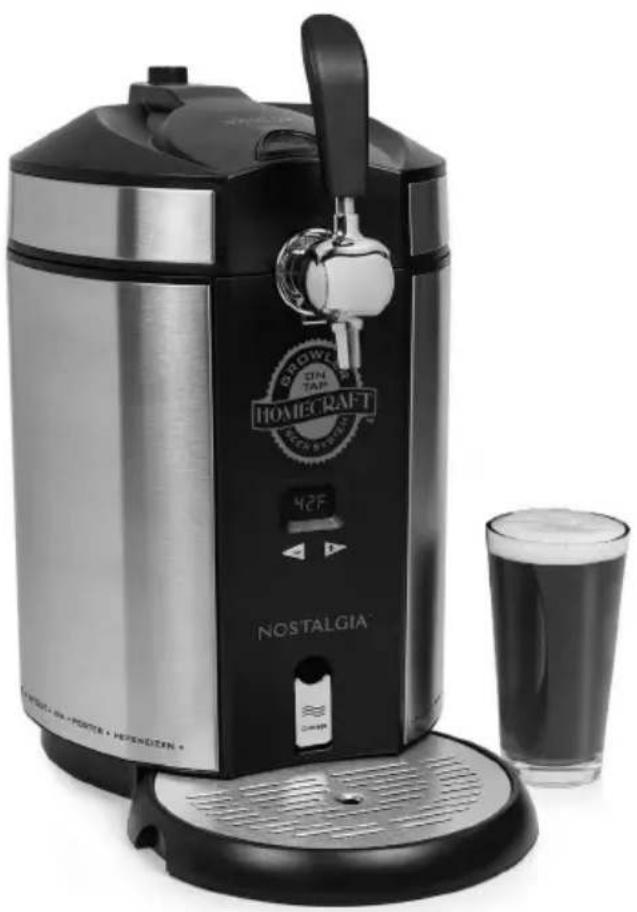
Congratulations! You are now the proud owner of your very own HOMECRAFT ON-TAP BEER GROWLER SYSTEM from Nostalgia™! Perfect for the kitchen or bar countertop, use the included reusable growler or any standard 5-liter growler keg to dispense your favorite craft brews at home. Equipped with a CO2 cartridge pressure system, this unit will keep your beer fresh for up to 30 thirst-quenching days.
Proper Location
To ensure that your ON-TAP BEER GROWLER SYSTEM works to the maximum efficiency for which it was designed, keep it in a location where there is proper air circulation and electrical outlets.
Choose a location where the unit will be away from heat and will not be exposed to direct sunlight.
- Indoor use only. It should not be used outdoors.
- Unit requires the use of a standard unthreaded CO2 cartridge.
• Each CO2 cartridge should be able to dispense up to one (5L) growler kegs.
• Capacity: 0.32 cu. ft. - Unit dimensions: L 15.5" x W 10.5" x H 17"
- Designed to be freestanding and should not be placed in a built-in or recessed area.
- Recommended dimensions for clearances around the ON-TAP BEER GROWLER SYSTEM: Sides .... 2 ½" (64 mm) Back .... 4" (102 mm)
- Unit weight: 15 lbs.
Selecting A Keg
The ON-TAP BEER GROWLER SYSTEM includes a Reusable 5L Growler Keg. Simply bring the reusable keg to your favorite brewery to be filled with your favorite craft beer, then bring it home so it can be enjoyed within the next 30 days.
This unit is also compatible with all standard 5L growler kegs, both pressurized and non-pressurized. Unit DOES NOT fit non-standard 5L growler keg sizes.
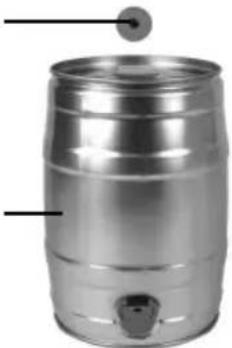
PRESSURIZED

natural_image
Close-up of a metallic beer barrel with visible internal structure and branding (no readable text or symbols)Pressurized Kegs
include a built-in tapping system that connects to the top of the keg.
NON-PRESSURIZED

natural_image
Metallic cylindrical beer can with a small water outlet (no text or symbols visible)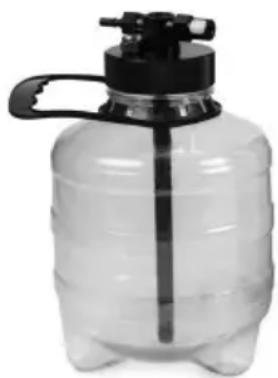
natural_image
Clear plastic water dispenser bottle with black handle and spout (no text or symbols visible)Non-Pressurized Kegs (Gravity Kegs) have a venting plug on the top, and in some cases, have a pouring spout on the side towards the bottom.
PARTS & ASSEMBLY
PARTS

text_image
Non-threaded 16g CO2 Cartridges (3) Reusable 5L Growler Keg Suction Cup Door Release Button Tap Handle Tap Faucet Drip Tray Drain Tab CO2 Regulator Knob Top Cover LED Temperature Display NOSTALGIA Power Switch Cleaning Bottle Beer Line (with connector) Beer Line (extra) CO2 Cartridge Puncture Point (extra) CO2 Cartridge Washer (extra) Dip Tube Washer (extra)LED Temperature Display

text_image
42F "-" Decrease Temperature "+" Increase TemperatureCO2 Regulator Knob
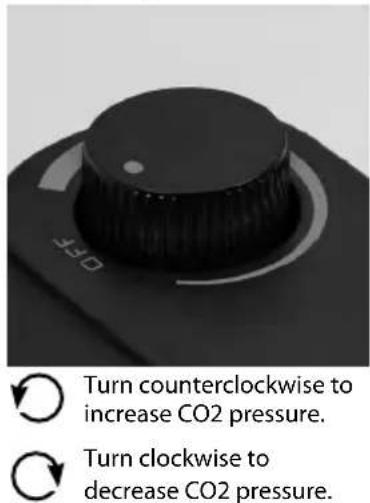
text_image
Turn counterclockwise to increase CO2 pressure. Turn clockwise to decrease CO2 pressure.①
natural_image
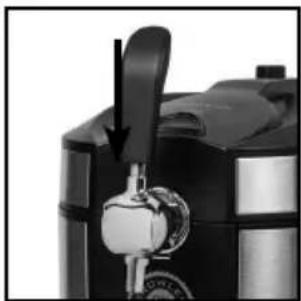
Close-up of a kitchen grater with a black handle and metallic base (no visible text or symbols)Fit the Tap Handle onto the Tap Faucet.
②
natural_image
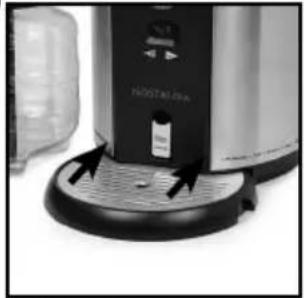
Close-up of a stainless steel milkshake organizer with control panel and side-mounted lid (no visible text or symbols)Slide the notches on the Drip Tray into the tabs located at the bottom of the main unit
③

text_image
NOSTALGIAMake sure the Drain Tab is in the closed position, like shown above.
KEG LIFTER ASSEMBLY
Once you have determined the type of keg you will be tapping, correctly secure the Keg Lifter Assembly to the keg.

Keg Lifter

Dip Tube

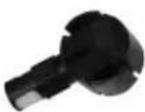
Keg Adapter (circle)
Keg Adapter (square)
Pressurized
Keg Adapter

Keg Bung
5L Standard Non-Pressurized Kegs
- Follow any required instructions marked on the keg to eliminate excess gas, and to ensure the keg has rested long enough to avoid foam coming out of the Tap Faucet.
- Place the Keg Adapter (square) into the top opening of the Keg Lifter, then screw the Dip Tube into the bottom of the Beer Line Connector. When done correctly, this will secure all three pieces together.
- Pierce the seal on the top of the keg and place the Keg Bung into the opening.
- Insert the Dip Tube into the Keg Bung and fully into the keg.
- Secure the ends of the Keg Lifter onto the lip of the keg.

text_image
Keg Adapter (square) Keg Lifter Dip Tube Keg Bung Keg5L Growler Keg (Non-Pressurized)
- Unscrew the Cap on the top of the keg.
- Place the Keg Adapter (circle) into the hole on top of the Cap.
- Screw the Dip Tube to the bottom of the Keg Adapter. When done correctly, this will secure all three pieces together.
- Insert the Dip Tube into the keg and screw the cap onto the keg tightly.
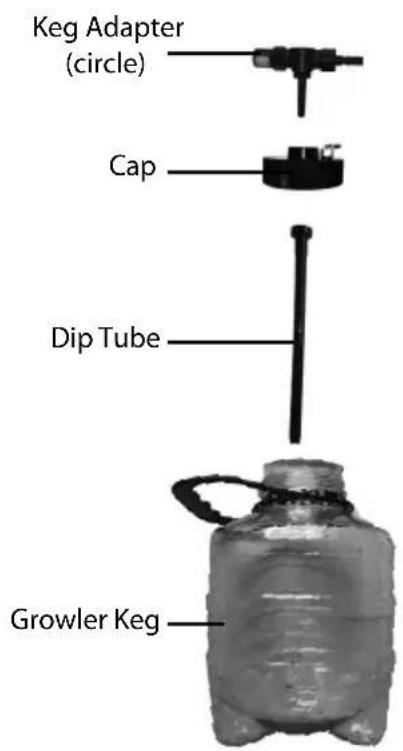
text_image
Keg Adapter (circle) Cap Dip Tube Growler Keg5L Pressurized Kegs (Heineken™)
- Follow any required instructions marked on the keg to eliminate excess gas, and to ensure the keg has rested long enough to avoid foam coming out of the Tap Faucet.
- Carefully place the Pressurized Keg into the Cooling Cavity.
- Use a flat head screwdriver to remove the plastic plug from the top of the keg.
- Connect the Pressurized Keg Adapter to the Tap Beer Line.
- Insert the Pressurized Keg Adapter into the top of the Pressurized Keg.
Cooling Cavity
Pressurized Keg Adapter
Tap Beer Line

natural_image
Close-up of a black industrial kettle with open lid and internal components (no visible text or symbols)HOW TO OPERATE
Before you begin, determine whether you are tapping a pressurized keg, non-pressurized keg, or the included 5L Growler Keg. Follow the steps below for each type of keg.
5L STANDARD NON-PRESSURIZED KEGS
- Chill the keg for 10-12 hours in the refrigerator, or for 4-6 hours in an ice bath.
- Find a stable, waterproof surface near an electrical outlet to set the unit. Make sure the cord is away from any water source.
NOTE: When moving the keg, take care not to shake or jostle the keg as it may cause your beer to pour with too much foam.
-
Check that the Drain Tab is in the closed position (up position), and there are no extra objects in the Cooling Cavity.
-
Add 3 cups (800 ml) of water into the Cooling Cavity. Be sure water levels do not exceed the MAX line found inside the Cooling Cavity. The water works to keep the keg cool.
-
Set the LED Temperature Display to your desired temperature by pressing the "-" and "+" buttons.
NOTE: It may take several hours to reach your desired temperature. This is why it is important to chill your keg beforehand.
-
Turn the Power Switch to ON (I).
-
Follow the steps under KEG LIFTER ASSEMBLY for STANDARD NON-PRESSURIZED KEGS, and secure the Keg Lifter Assembly to your keg.
-
Turn the CO2 Regulator Knob to the OFF position (turn dial all the way clockwise).
-
Making sure the keg is upright, carefully place your keg into the Cooling Cavity. NOTE: Make sure the Suction Cup is securely fashioned to the bottom of the Cooling Cavity. The Suction Cup ensures the keg will not float.
-
Connect the Keg Adapter to the CO2 Line and Beer Line.
-
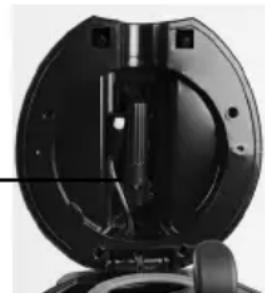
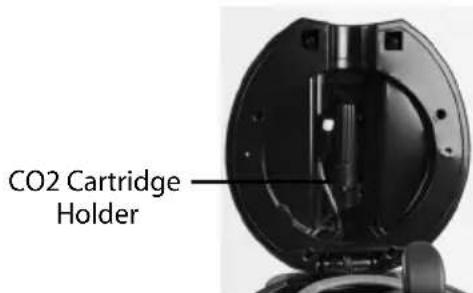
Tilt the CO2 Holder out from the Top Cover and unscrew the CO2 Sheath. Insert a CO2 Cartridge into the CO2 Sheath, rounded end first. Then screw the CO2 Sheath tightly onto the CO2 Holder. Tilt the CO2 Holder back into the Top Cover.
NOTE: When the CO2 cartridge has been pierced, your should hear a short burst of CO2 escape from the cartridge.
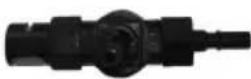
CO2 Cartridge Holder
natural_image
Close-up of a mechanical component with internal components and mounting base (no visible text or symbols)- To pour a beer, slowly turn the Regulator Dial counterclockwise to increase the CO2 pressure within the keg. When you hear the CO2 begin to flow, you may want to pause to try pouring a beer.
- If the beer does not have enough foam for your liking, slowly increase the CO2 pressure. DO NOT increase the CO2 pressure too quickly or your beer may dispense too quickly and with too much foam.
PRO TIP: When the regulator is open, CO2 will continue flowing into the keg. This may result in a surplus of pressure flowing into the keg, and may be a cause of foamy beer. If you experience foamy beer, simply fill the keg with CO2, then turn the Regulator Knob to the OFF position. As more beer is dispensed, add small amounts of CO2 into the keg to displace the dispensed beer, then turn the Regulator Knob back to OFF.
5L GROWLER KEG (NON-PRESSURIZED)
- Chill the keg for 10-12 hours in the refrigerator, or for 4-6 hours in an ice bath.
- Find a stable, waterproof surface near an electrical outlet to set the unit. Make sure the cord is away from any water source.
NOTE: When moving the keg, take care not to shake or jostle the keg as it may cause your beer to pour with too much foam.
-
Check that the Drain Tab is in the closed position (up position), and there are no extra objects in the Cooling Cavity.
-
Add 3 cups (800 ml) of water into the Cooling Cavity. Be sure water levels do not exceed the MAX line found inside the Cooling Cavity. The water works to keep the keg cool
-
Set the LED Temperature Display to your desired temperature by pressing the "-" and "+" buttons. Recommended temperature is 37°F.
NOTE: It may take several hours to reach your desired temperature. This is why it is important to chill your keg beforehand.
-
Turn the Power Switch to ON (I).
-
Follow the steps under KEG LIFTER ASSEMBLY for STANDARD NON-PRESSURIZED KEGS, and secure the Keg Lifter Assembly to your keg.
-
Turn the CO2 Regulator Knob to the OFF position (turn dial all the way clockwise).
-
Making sure the keg is upright, carefully place your keg into the Cooling Cavity.
NOTE: Make sure the Suction Cup is securely fashioned to the bottom of the Cooling Cavity. The Suction Cup ensures the keg will not float.
-
Connect the Keg Adapter to the CO2 Line and Beer Line.
-
Tilt the CO2 Holder out from the Top Cover and unscrew the CO2 Sheath. Insert a CO2 Cartridge into the CO2 Sheath, rounded end first. Then screw the CO2 Sheath tightly onto
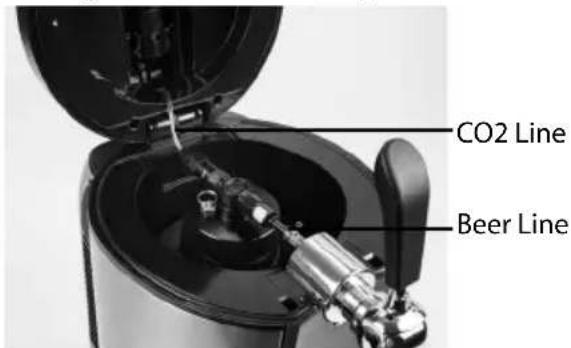
text_image
CO2 Line Beer Linethe CO2 Holder. Tilt the CO2 Holder back into the Top Cover.
NOTE: When the CO2 cartridge has been pierced, you should hear a short burst of CO2 escape from the cartridge.
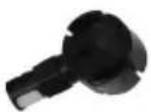
text_image
CO2 Cartridge Holder- Slowly turn the Regulator Dial counterclockwise to increase the CO2 pressure within the keg.
When you hear the CO2 begin to flow, you may want to pause to try pouring a beer.
- If the beer does not have enough foam for your liking, slowly increase the CO2 pressure. DO NOT increase the CO2 pressure too quickly or your beer may dispense too quickly and with too much foam.
- If the beer has too much foam, turn the Regulator Knob to the OFF position,
pull the Pressure Relief Valve on the 5L Growler Keg, then slowly turn the Regulator Dial counterclockwise to increase the CO2 pressure within the keg.
- PRO TIP: When the regulator is open, CO2 will continue flowing into the keg. This may result in a surplus of pressure flowing into the keg, and may be a cause of foamy beer. If you experience foamy beer, simply fill the keg with CO2, then turn the Regulator Knob to the OFF position. As more beer is dispensed, add small amounts of CO2 into the keg to displace the dispensed beer, then turn the Regulator Knob back to OFF.
5L PRESSURIZED KEGS (HEINEKEN™)
- Chill the keg for 10-12 hours in the refrigerator, or for 4-6 hours in an ice bath.
- Find a stable, waterproof surface near an electrical outlet to set the unit. Make sure the cord is away from any water source.
- Check that the Drain Tab is in the closed position (up position), and there are no extra objects in the Cooling Cavity.
- Add 3 cups (800 ml) of water into the Cooling Cavity. Be sure water levels do not exceed the MAX line found inside the Cooling Cavity. The water helps to keep the keg cool.
- Set the LED Temperature Display to your desired temperature by pressing the "-" and "+" buttons.
NOTE: It may take several hours to reach your desired temperature. This is why it is important to chill your keg beforehand.
-
Turn the Power Switch to ON (I).
-
Carefully place the Pressurized Keg into the Cooling Cavity.
NOTE: When moving the keg, take care not to shake or jostle the keg as it may cause your beer to pour with too much foam.
NOTE: Make sure the Suction Cup is securely fashioned to the bottom of the Cooling Cavity. The Suction Cup ensures the keg will not float.
-
Use a flat head screwdriver to remove the plastic plug from the top of the keg.
-
Connect the Pressurized Keg Adapter to the Beer Line.
-
Insert the Pressurized Keg Adapter into the top of the Pressurized Keg.
-
Pour yourself a beer! NOTE: Pressurized kegs come pre-charged with CO2. These kegs do not require the use of this unit's external CO2 system, so there is no need to install a CO2 cartridge. The Regulator Knob on the Top Cover does not work with these kegs.
-
When the keg is empty, remove the Pressurized Keg Adapter from the keg by pressing inward on both sides of the adapter.

text_image
Pressurized Keg Adapter Beer LineHELPFUL TIPS
Pouring Draft Beer
- Start with a clean glass.
- Hold the glass at a 45° angle about 1 inch below the Tap Faucet.
- Pull the Tap Handle forward to completely open the flow of beer.
- Continue holding the glass at 45^ and allow the beer to flow down the side of the glass until the glass is half full.
-
Once glass is half full, continue pouring while you gently tilt the glass upright and pour down the center of the glass. Ideally, this will create about a 1" head of foam as you finish the pour.
-
Quickly put the Tap Handle back into the original upright position. NOTE: If a beer pour foams more than expected, let the beer rest until the head calms down, and then finish your pour. This prevents beer waste.
Prevent Foamy Beer
- Chill the beer. Warm beer is more likely to cause foamy beer. It is recommended to buy beer the day before and allow it to chill in the refrigerator for 10-12 hours. The recommended temperature is 37^
- Pour into a clean glass. Reside in an unclean glass can disrupt the pour and taste of your beer. Follow the directions on Pouring Draft Beer to perfect your pour.
- Confirm the beer lines are not kinked and are clean.
- Adjust down your CO2 pressure.
- Do not shake or jostle the keg. Too much agitation of the keg can create foamy pours. If the keg has been shaken or jostled, allow the keg to rest and settle for 2-3 hours before pouring.
- Foamy beer may also be caused by a faulty seal or connection between the keg and the main unit. Make sure all connections are secure, well tightened and correctly placed.
Pressurized Kegs
- Pressurized kegs come pre-charged with CO2 and do not require the use of this unit's external CO2 system regulator. The Regulator Knob on the Top Cover does not work when using a pressurized keg.
- If you experience a less than satisfactory pour of beer, such as foamy beer, please contact the manufacturer or seller of the keg.
CO2 Regulator Knob
- When the regulator is open, CO2 will continue flowing into the keg. This may result in a surplus of pressure flowing into the keg, and may be a cause of foamy beer. If you experience foamy beer, simply fill the keg with CO2, then turn the Regulator Knob to the OFF position. As more beer is dispensed, add small amounts of CO2 into the keg to displace the dispensed beer, then turn the Regulator Knob back to OFF.
CLEANING & MAINTENANCE
- After using your ON-TAP BEER GROWLER SYSTEM, disconnect the unit from the electrical outlet.
- Detach the Keg Lifter Assembly from the keg, then remove the keg from the Cooling Cavity.
- Clean the Cooling Cavity.
a. Make sure there are no foreign objects in the Cooling Cavity.
b. Drain the water in the Cooling Cavity by placing the unit near the edge of a table or countertop so that a bowl can be placed below the Drain Tab.
c. Place a bowl beneath the Drain Tab, then pull down on the Drain Tab to allow the water in the Cooling Cavity to drain into the empty bowl.
d. Wipe the Cooling Cavity dry with a soft, non-abrasive cloth.
- Clean the beer line using the included Cleaning Bottle.
a. Place an empty bowl beneath the Tap Faucet.
b. Load the Cleaning Bottle with warm, soapy water.
c. Insert the tip of the Cleaning Bottle into the open end of the Dip Tube (part of the Keg Lifter Assembly).
d. Pull down on the Tap Handle, then squeeze the Cleaning Bottle to allow the soapy water to flow through the beer line and into the empty bowl.
e. Repeat this process with just warm water as many times as necessary until the beer lines are clean and all soap is cleared from the beer line.
f. If the Beer Line needs to be replaced, lift up on the Beer Line and chrome plate covering the line. Pull down on the Tap Handle, then pull on the old Beer Line to remove. The new Beer Line can be put back into place by again pulling down on the Tap Handle, then inserting the Beer Line into the tap. Releasing the Tap Handle will pinch the new Beer Line, securing it.
- Wash the remaining removable parts in warm, soapy water. Dry with a soft, non-abrasive cloth.
- As needed, wipe down the exterior of the unit with a damp, non-abrasive cloth.
RETURNS & WARRANTY
SHOULD YOUR UNIT NOT WORK OR IF DAMAGED WHEN YOU FIRST TAKE IT OUT OF THE BOX, PLEASE RETURN IT TO THE PLACE OF PURCHASE IMMEDIATELY.
HOMECRAFT ON-TAP BEER GROWLER DISPENSER / CBD5SS
Should you have any questions, please contact us via email or at the customer service number listed below between the hours of 8:00 AM and 5:00 PM, Monday through Friday, Central Standard Time.
Distributed by:
Nostalgia Products LLC
1471 Partnership Dr.
Green Bay, WI 54304-5685
Customer Service
Phone: (920) 347-9122
Web: www.nostalgiaproducts.com
Customer Service Inquiry
To submit a Customer Service inquiry, go to www.nostalgiaproducts.com and fill out the Customer Service Inquiry form and click the Submit button.
A representative will contact you as soon as possible.
Product Warranty Terms
Nostalgia Products LLC (the "Company") hereby warrants that for a period of one (1) year from the date of original purchase, this product will be free of defects in material and workmanship under normal home use, provided that the product is operated and maintained in accordance with the operating instructions. As the sole and exclusive remedy under this warranty, the Company will at its discretion either repair or replace the product found to be defective, or issue a refund on the product during the warranty period. This warranty is only available to the original retail purchaser of the product from the date of initial retail purchase, and is only valid with the original sales receipt, as proof of purchase date is required to obtain warranty benefits. All warranty claims must be brought to the attention of the Company within the warranty period and no later than 30 days of the failure to perform. This warranty does not cover normal wear or damage caused by shipping, mishandling, misuse, accident, alteration, improper replacement parts, or other than ordinary household use. You may be required to return the product (with shipping prepaid by you) for inspection and evaluation. Return shipping costs are not refundable. The Company is not responsible for returns damaged or lost in transit. Unless otherwise specifically permitted by the operating instructions, this warranty applies to indoor household use only. In order to obtain service under this warranty, please contact the Company at the telephone number listed above or by filling out the Customer Service Inquiry Form located at www.nostalgiaproducts.com. Warranty valid only in USA and Canada.
This warranty is in lieu of all other warranties, expressed or implied, including warranties of merchantability and fitness for a particular purpose, which are hereby excluded to the extent permitted by law. In no event shall the Company be liable for any indirect, incidental, consequential, or special damages arising out of or in connection with this product or the use thereof. Some states, provinces or jurisdictions do not permit the exclusion or limitation of incidental or consequential damages, so the foregoing exclusion or limitation may not apply to you.
This warranty does not apply to re-manufactured merchandise.
Please read the operating instructions carefully. Failure to comply with the operating instructions will void this warranty.
For more information, visit us online at www.nostalgiaproducts.com.
Like us on Facebook at www.facebook.com/NostalgiaElectrics.
Follow our boards on Pinterest at www.pinterest.com/nostalgiaelctrx.
Tweet along with us on Twitter at www.twitter.com/NostalgiaElctrx.
natural_image
Ceramic beer barrel with visible liquid and branding (no readable text or symbols)natural_image
Metallic cylindrical beer barrel with a small outlet (no text or symbols visible)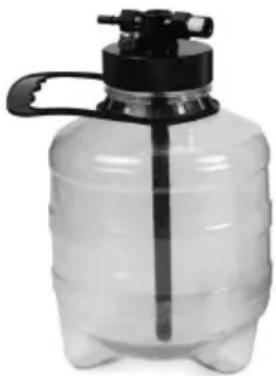
natural_image
Clear plastic water dispenser bottle with black handle and spout (no text or symbols visible)natural_image
Close-up of a black industrial rotary knob with a curved dial and pointer (no text or symbols visible)natural_image
Close-up of a kitchen stainless steel grater with a black handle and metallic base (no visible text or symbols)natural_image
Close-up of a kitchen blender with control panel and water dispenser (no visible text or symbols)text_image
NOSTALGIA™natural_image
Pure electrical circuit lines without any symbolsTubo de inmersión
Tapón del barril
natural_image
Metal barrel with a small water drop at the bottom (no text or symbols visible)natural_image
Interior view of a mechanical device showing internal components and housing (no visible text or symbols)CÓMO FUNCIONA
natural_image
Close-up of a mechanical component with internal structure and mounting base (no visible text or symbols)NOTE: Make sure the Suction Cup is securely fashioned to the bottom of the Cooling Cavity. The Suction Cup ensures the keg will not float.
natural_image
Close-up of a black mechanical component with circular housing and internal components (no visible text or symbols)Nostalgia Products LLC
1471 Partnership Dr.
Green Bay, WI 54304-5685
Servicio al cliente
natural_image
Close-up of a transparent cylindrical beer can with visible internal bands and branding (no readable text or symbols)natural_image
Metallic cylindrical beer barrel with a small water outlet (no text or symbols visible)
natural_image
Clear plastic water dispenser bottle with black handle and spout (no text or symbols visible)natural_image
Close-up of a black industrial rotary knob with a circular dial and 'OFF' label (no additional text or symbols)
natural_image
Close-up of a kitchen stainless steel grater with a black handle and metallic base (no visible text or symbols)natural_image
Close-up of a stainless steel milk tea maker with a white label and black base, showing no visible text or symbols on the device itself.text_image
NOSTALGIA®natural_image
Close-up of a mechanical component with internal structure and mounting base (no visible text or symbols)natural_image
Close-up of a mechanical component with internal components and mounting base (no visible text or symbols)Nostalgia Products LLC
1471 Partnership Dr.
Green Bay, WI 54304-5685