CBG64 - Drink dispenser HomeCraft - Free user manual and instructions
Find the device manual for free CBG64 HomeCraft in PDF.

| Product Type | Beer pitcher / Beverage dispenser |
| Capacity | 1.89 L |
| Material | Food-grade stainless steel |
| Insulation | Double-walled vacuum, keeps cold up to 24 hours |
| Carbonation system | 16g threaded CO2 or N2 cartridge (3 included) |
| Max pressure | 30 psi (built-in pressure gauge) |
| Faucet | Spring-loaded faucet for easy pouring |
| Cap | Screw cap with double silicone anti-leak seal |
| Handle | Side carrying handle |
| Carbonation retention | Up to 30 days |
| Maintenance | Wash with warm water no soap, do not put in dishwasher |
| Safety | Do not expose to heat, do not use in direct sunlight, handle CO2 cartridges with care |
| Warranty | 1 year |
| Use | Indoor household use only |
| Included accessories | Regulator, 3 CO2 cartridges, faucet handle, dispensing cap |
Frequently Asked Questions - CBG64 HomeCraft
User questions about CBG64 HomeCraft
0 question about this device. Answer the ones you know or ask your own.
Ask a new question about this device
Download the instructions for your Drink dispenser in PDF format for free! Find your manual CBG64 - HomeCraft and take your electronic device back in hand. On this page are published all the documents necessary for the use of your device. CBG64 by HomeCraft.
USER MANUAL CBG64 HomeCraft
All products are trademarks of Nostalgia Products LLC.
Worldwide design & utility patented or patents pending.
© 2018 Nostalgia Products LLC.
www.nostalgiaproducts.com
(rev. 04/13/18 TL)

natural_image
Black and white photo of a HomeCraft water dispenser with a glass of liquid, no visible text or symbols on the main subject.HomeCraft™ Beer Growler Barril de cerveza HomeCraft™ Cruchon pour bière HomeCraft™
Instructions and Recipes Instrucciones y recetas Instructions et recettes
Make every day a party!
Visit www.nostalgiaproducts.com for more fun products.
CONTENTS
SAFETY 2
IMPORTANT SAFEGUARDS 3
ADDITIONAL IMPORTANT SAFEGUARDS 3
INTRODUCTION 5
PARTS & ASSEMBLY 6
HOW TO OPERATE 8
HELPFUL TIPS 10
CLEANING & MAINTENANCE .... 11
RECIPIES 11
RETURNS & WARRANTY 12
SAFETY
Your safety and the safety of others is very important.
We have provided many important safety messages in this manual and on your appliance. Always read and obey all safety messages.

This is the safety alert symbol.
This symbol alerts you to potential hazards that can cause serious injury to you and others.
All safety messages will follow the safety alert symbol.
All safety messages will tell you what the potential hazard is, tell you how to reduce the chance of injury, and tell you what can happen if the instructions are not followed.
Refer to www.nostalgiaproducts.com/user-manuals/ for the most updated manual.

IMPORTANT SAFEGUARDS
A person who has not read and understood all operating and safety instructions is not qualified to operate this appliance. All users of this appliance must read and understand this Instruction Manual before operating or cleaning this appliance.
- Read all instructions before operating this appliance.
- DO NOT TOUCH the hot surfaces. Use handles or knobs.
- This appliance is NOT A TOY.
- Keep out of reach of children.
- Unsupervised young children and cognitively challenged individuals should never operate this appliance.
- Close supervision is necessary when any appliance is used by or near children.
- Do not operate this unit when parts are missing or broken.
- The manufacturer does not recommend the use of accessory attachments other than what is provided by the manufacturer. Use of attachments may cause injuries.
- DO NOT use the appliance for other than its intended use.
- DO NOT use outdoors. FOR HOUSEHOLD USE ONLY.
- DO NOT place on or near a hot gas or electric burner, or in a heated oven.
- DO NOT put any parts of this appliance in dishwasher.

ADDITIONAL IMPORTANT SAFEGUARDS
Operating Safety Precautions
- This appliance is designed for use by responsible adults of legal drinking age.
- Never place the appliance under direct sunlight, and avoid any other heat source.
- To ensure proper ventilation, this appliance should not be recessed or built into an enclosed cabinet. It is designed for freestanding assembly only.
- Do not operate your appliance in the presence of explosive fumes.
CO _2 (Carbon Dioxide) Gas
- DO NOT remove the CO2 cartridge from unit until CO2 cartridge is completely empty.
- Always keep CO _2 cartridges away from heat. Store extra cartridges in a cool, dry place (preferably 70°F/20°C).
- DO NOT use the CO2 cartridge if the room temperature is over 120°F (49°C). Failure to do so can result in explosion or injury. Escaping CO2 gas can cause frostbite if allowed to come in contact with skin.
- CO 2 gas can be dangerous! CO 2 cartridges contain high-pressure compressed gas, which can be hazardous if not handled properly. Make sure you read and understand all the procedures for the CO _2 cartridge before installation.
- Never connect the CO 2 cartridge directly to the beer keg.
-
Always follow the correct procedures when changing the CO 2 cartridge.
-
ALWAYS ventilate and leave the area immediately if CO _2 leakage has occurred.
- Never drop or throw a CO 2 cartridge.
- Never attempt to refill a CO 2 cartridge.
SAVE THESE INSTRUCTIONS!
INTRODUCTION
Congratulations! You are now the proud owner of your very own HOMECRAFT™ BEER GROWLER! This 64 oz. growler comes with a twist-on cap and is double-wall vacuum-insulated to keep your beer cold and spill-free wherever your adventures may take you. The side handle makes carrying, refilling and pouring an easy task, while the quick-connect regulator attaches and releases quickly without losing carbonation. Equipped with a CO2 cartridge system, this system will keep your beer fresh for up to 30 thirst-quenching days.
- 64 oz. (2 L) capacity
- Quick-connect regulator attached & releases quickly while maintaining carbonation
• Pressure gauge (0-30 PSI) - Double-wall vacuum-insulated to keep beverage cold up to 24 hours
- Simple pull tap dispensing is spring loaded for easy pouring
- Growler cap with double silicone rings to ensure growler remains sealed & spill-free
- Side handle allows for easy carrying, refilling & pouring
- Compatible with food grade 16g threaded CO2 or N2 cartridges (3 included)
- Food grade stainless steel is light weight & very durable
PARTS & ASSEMBLY
PARTS
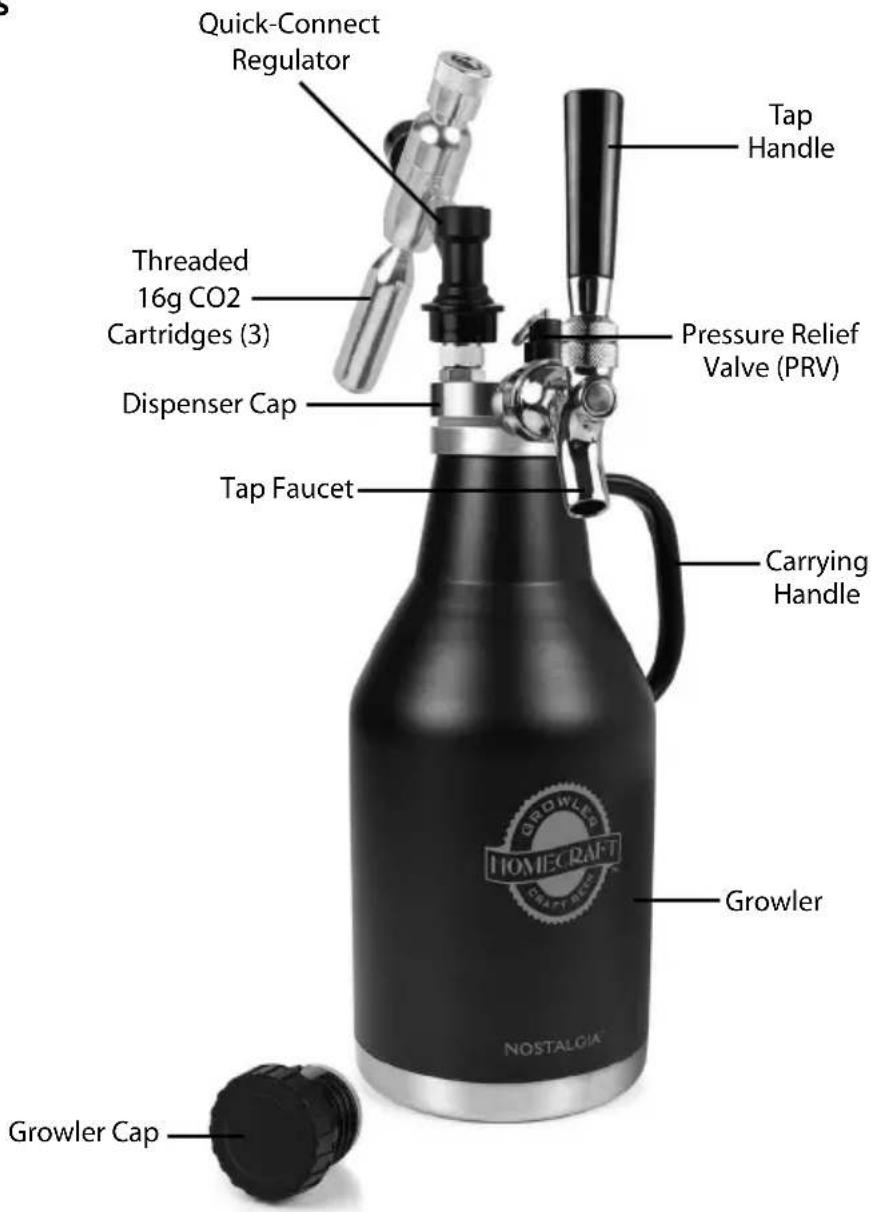
text_image
Quick-Connect Regulator Threaded 16g CO2 Cartridges (3) Dispenser Cap Tap Faucet Tap Handle Pressure Relief Valve (PRV) Carrying Handle Growler GROWLER NOSTALOIA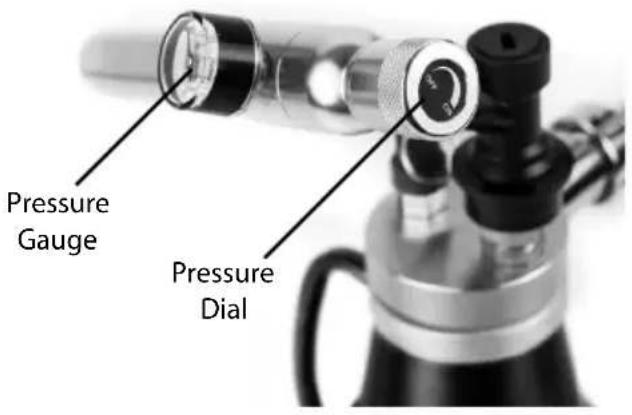
text_image
Pressure Gauge Pressure DialASSEMBLY OVERVIEW
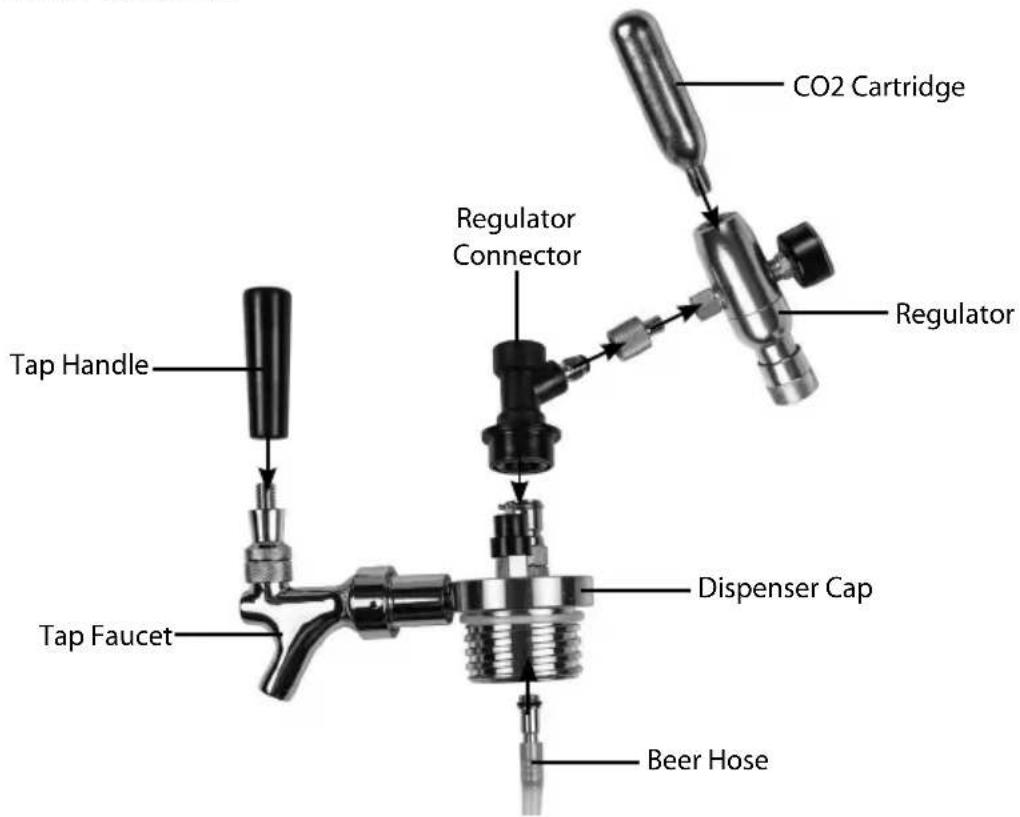
text_image
CO2 Cartridge Regulator Connector Regulator Tap Handle Tape Tape Faucet Dispenser Cap Beer HoseBASIC ASSEMBLY

Fasten the Dispenser Cap to the mouth of the growler by threading the Beer Hose into the mouth of the Growler, then secure Cap by twisting clockwise.
If not already attached, screw the Beer Hose into the bottom of the Dispenser Cap.

text_image
Dispenser Cap
Lift up the collar at the bottom of the Regulator (as shown), then lower and press onto the receiver. Release the collar to complete the connection. Gently pull up on the Regulator to ensure the connection is secure.
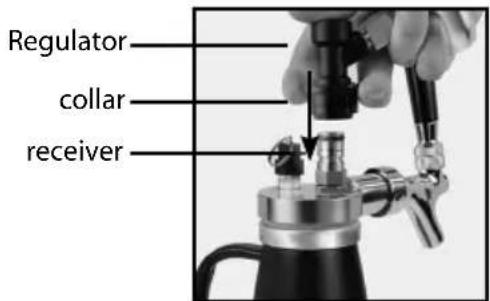
text_image
Regulator collar receiver
If the Tap Handle is not already attached, screw the Tap Handle clockwise onto the Tap Faucet.
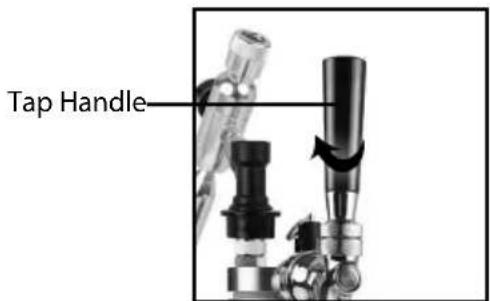
text_image
Tap HandleHOW TO OPERATE
FILLING THE GROWLER
- Follow the directions under CLEANING & MAINTENANCE to thoroughly clean your growler before filling.
- Your growler can be filled at your favorite local craft brewery, or with your own homebrew.
- When filling from a tap, we recommend using a down tube to fill the growler from the bottom up. This will reduce foaming and minimizes contact between the beer and oxygen.
- Fill the growler until the beer reaches the "64 OZ" fill line marked on the outside of the growler.
NOTE: There may be some foam on top of the beer, and this is okay.
DISPENSING FROM THE GROWLER
- Ensure the Pressure Dial is turned to the OFF position by turning the dial all the way counter-clockwise.
- Quickly and smoothly screw the threaded end of the CO2 Cartridge into the Regulator. NOTE: When the CO2 Cartridge has been pierced, you should hear a short burst of CO2 escape from the cartridge. Be sure to fully thread the CO2 cartridge into the Regulator.
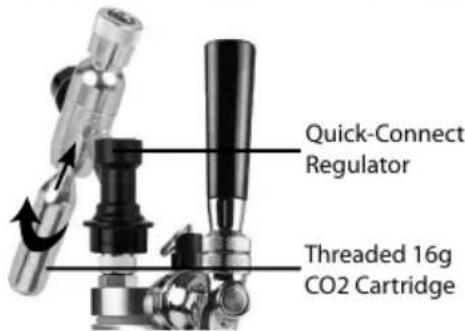
text_image
Quick-Connect Regulator Threaded 16g CO2 Cartridge-
Release any pressure in the growler by pulling up on the Pressure Relief Valve.
-
Add CO2 to the growler by slowly turning the Pressure Dial clockwise. When you hear the CO2 begin to flow, pause to check the PSI on the Pressure Gauge. For best results, follow this chart to choose the best PSI for your beer.
| Beer Style | Recommended PSI* |
| Stouts Porters Cream Ales Barley Wines | 3-6 PSI |
| Brown Ales Ambers Reds | 5-10 PSI |
| IPAs Pale Ales Wheat Beers Other Ales | 7-12 PSI |
| Lagers Pilsners | 12-15 PSI |
* Keep in mind this is just a guide and you can always experiment to suit your own taste!
- If the PSI is higher than you would like, turn the Pressure Gauge to the off position, then pull the Pressure Relief Valve to release all CO2 from the growler. Add CO2 to the growler again by slowly turning the Pressure Dial clockwise until your desired PSI is reached.
- When the Pressure Gauge is set to your desired PSI, it's time to pour a beer!
POURING DRAFT BEER
- Start with a clean glass.
- Hold the glass at a 45^ angle about 1 inch below the Tap Faucet.
- Pull the Tap Handle forward to completely open the flow of beer.
- Continue holding the glass 45^ and allow the beer to flow down the side of the glass until the glass is about half full.
- Once the glass is half full, continue pouring while you gently tilt the glass upright and pour down the center of the glass. Ideally, this will create about a 1 inch head of foam as you finish the pour.
- Quickly put the Tap Handle back into the original upright position.
NOTE: If a beer pour foams more than expected, let the beer rest until the head calms down, and then finish your pour. This prevents beer waste.
- If the beer does not have enough foam for your liking, slowly increase the CO2 pressure until the desired PSI. DO NOT increase the CO2 pressure too quickly or your beer may dispense too quickly and with too much foam.
PRO TIP: When the regulator is open, CO2 will continue flowing into the keg. This may result in a surplus of pressure flowing into the keg, and may be a cause of foamy beer. If you experience foamy beer, simply fill the keg with CO2, then turn the Pressure Dial fully counter-clockwise to the OFF position. As more beer is dispensed, add small amounts of CO2 into the keg to displace the dispensed beer, then turn the Pressure Dial back to OFF.
- Lastly, drink up and enjoy!
REPLACING CO2 CARTRIDGES
- When the CO2 Cartridge has depleted all CO2, it's time to replace it with a new one.
- Ensure the Pressure Dial is turned OFF, pull the Pressure Relief Valve, then remove the old CO2 Cartridge by turning counter-clockwise.
PRO TIP: If your hands are sensitive to cold, avoid touching the old CO2 Cartridge with your skin. You may want to use a cloth to remove the old cartridge.
CAUTION: Be sure the threaded end of the CO2 Cartridge is pointed away from you before removing. Leftover CO2 gas escaping from the regulator outlet is very cold! Keep your hands and body away from the discharge.
- Quickly and smoothly screw the threaded end of the new CO2 Cartridge into the Regulator.
NOTE: When the CO2 Cartridge has been pierced, you should hear a short burst of CO2 escape from the cartridge.
HELPFUL TIPS
Pouring Draft Beer
- Start with a clean glass.
- Hold the glass at a 45° angle about 1 inch below the Tap Faucet.
- Pull the Tap Handle forward to completely open the flow of beer.
- Continue holding the glass at 45^ and allow the beer to flow down the side of the glass until the glass is half full.
-
Once glass is half full, continue pouring while you gently tilt the glass upright and pour down the center of the glass. Ideally, this will create about a 1" head of foam as you finish the pour.
-
Quickly put the Tap Handle back into the original upright position. NOTE: If a beer pour foams more than expected, let the beer rest until the head calms down, and then finish your pour. This prevents beer waste.
Prevent Foamy Beer
- Chill the beer. Warm beer is more likely to cause foamy beer. Allow your beer to chill in the refrigerator for several hours before consuming. The recommended temperature is 37^
- Pour into a clean glass. Reside in an unclean glass can disrupt the pour and taste of your beer. Follow the directions on Pouring Draft Beer to perfect your pour.
- Adjust down your CO2 pressure.
- Do not shake or jostle the growler. Too much agitation of the growler can create foamy pours. If the growler has been shaken or jostled, allow the growler to rest and settle for about an hour before pouring.
- Foamy beer may also be caused by a faulty seal or connection between the keg and the main unit. Make sure all connections are secure, well tightened and correctly placed.
CO2 Regulator Knob
- When the regulator is open, CO2 will continue flowing into the keg. This may result in a surplus of pressure flowing into the keg, and may be a cause of foamy beer. If you experience foamy beer, simply fill the keg with CO2, then turn the Regulator Knob to the OFF position. As more beer is dispensed, add small amounts of CO2 into the keg to displace the dispensed beer, then turn the Regulator Knob back to OFF.
Storage
- While your growler is double-walled and vacuum insulated to ensure your beverage stays cold for up to 24 hours, it also fits neatly into many refrigerator side door shelves. To save space in your refrigerator, remove the Quick-Connect Regulator and Tap Handle before placing in your refrigerator.
Beer Not Dispensing
- If your beer won't dispense, first recheck that the collar of the Regulator is securely connected to the receiver on the Dispensing Cap. Secondly, be sure the CO2 cartridge is fully and securely threaded into the Regulator.
CLEANING & MAINTENANCE
DO NOT use soap or put the growler in a dishwasher. The residue leftover from soap can cling to the vessel and leave behind an unpleasant taste.
AFTER EVERY USE:
- Remove the Growler Cap or Dispenser Cap, then pour out any extra beer (there shouldn't be much).
- Fill the growler about half way with warm tap water.
- Place the palm of your hand over the mouth of the growler, then give it a good swirl and shake. Be careful to not shake water out of the mouth of the growler.
- Repeat this two more times.
- Next, unscrew the silicone tube from the bottom of the Dispenser Cap by twisting clockwise.
- Fill the growler once more with warm water, then screw the Dispenser Cap (minus silicone tube) back onto the growler.
- Dispense the warm water through the Tap Faucet:
» If you have CO2 remaining in the CO2 Cartridge, use the CO2 to dispense the warm water. Simply open the Tap Handle and the water will dispense until the pressure drops to zero.
» If there is no pressure left to dispense water, remove the Quick-Connect Regulator, then simply turn the growler upside down and open the Tap Handle to allow the water to run through the Tap Faucet.
-
Remove the Dispenser Cap and dump out any remaining water.
-
Rinse and drain warm water through the Tap Faucet two more times.
-
Soak the Dispenser Cap (minus Quick-Connect Regulator), Growler Cap and silicone tube in warm water.
-
Drain the growler upside down until completely dry. Allow all extra parts to completely dry before reassembling.
DEEP CLEANING:
- If your growler has any funky odors or foreign smells, fill your growler half way with hot water and add 1 tablespoon of baking soda.
- Screw the Dispenser Cap onto the growler, then shake vigorously for 30 seconds.
- Dispense baking soda/water solution through the Tap Faucet:
» If you have CO2 remaining in the CO2 Cartridge, use the CO2 to dispense the solution. Simply open the Tap Handle and the solution will dispense until the pressure drops to zero.
» If there is no pressure left to dispense the solution, remove the Quick-Connect Regulator, then simply turn the growler upside down and open the Tap Handle to allow the solution to run through the Tap Faucet. - Follow these steps two more times, once with hot water, then once with cold water. Be sure to swirl each rinse cycle to remove all leftover baking soda.
- Drain the growler upside down until completely dry.
RECIPES
Craft beer doesn't have to be the only thing you dispense from your BEER GROWLER. Try your favorite soda pop, or whip up and dispense your favorite cocktails! Have fun and stay thirsty!
RETURNS & WARRANTY
SHOULD YOUR UNIT NOT WORK OR IF DAMAGED WHEN YOU FIRST TAKE IT OUT OF THE BOX, PLEASE RETURN IT TO THE PLACE OF PURCHASE IMMEDIATELY.
HOMECRAFT™ BEER GROWLER / CBG64
Should you have any questions, please contact us via email or at the customer service number listed below between the hours of 8:00 AM and 5:00 PM, Monday through Friday, Central Standard Time.
Distributed by:
Nostalgia Products LLC
1471 Partnership Dr.
Green Bay, WI 54304-5685
Customer Service
Phone: (920) 347-9122
Web: www.nostalgiaproducts.com
Customer Service Inquiry
To submit a Customer Service inquiry, go to www.nostalgiaproducts.com and fill out the Customer Service Inquiry form and click the Submit button.
A representative will contact you as soon as possible.
Product Warranty Terms
Nostalgia Products LLC (the "Company") hereby warrants that for a period of one (1) year from the date of original purchase, this product will be free of defects in material and workmanship under normal home use, provided that the product is operated and maintained in accordance with the operating instructions. As the sole and exclusive remedy under this warranty, the Company will at its discretion either repair or replace the product found to be defective, or issue a refund on the product during the warranty period. This warranty is only available to the original retail purchaser of the product from the date of initial retail purchase, and is only valid with the original sales receipt, as proof of purchase date is required to obtain warranty benefits. All warranty claims must be brought to the attention of the Company within the warranty period and no later than 30 days of the failure to perform. This warranty does not cover normal wear or damage caused by shipping, mishandling, misuse, accident, alteration, improper replacement parts, or other than ordinary household use. You may be required to return the product (with shipping prepaid by you) for inspection and evaluation. Return shipping costs are not refundable. The Company is not responsible for returns damaged or lost in transit. Unless otherwise specifically permitted by the operating instructions, this warranty applies to indoor household use only. In order to obtain service under this warranty, please contact the Company at the telephone number listed above or by filling out the Customer Service Inquiry Form located at www.nostalgiaproducts.com. Warranty valid only in USA and Canada.
This warranty is in lieu of all other warranties, expressed or implied, including warranties of merchantability and fitness for a particular purpose, which are hereby excluded to the extent permitted by law. In no event shall the Company be liable for any indirect, incidental, consequential, or special damages arising out of or in connection with this product or the use thereof. Some states, provinces or jurisdictions do not permit the exclusion or limitation of incidental or consequential damages, so the foregoing exclusion or limitation may not apply to you.
This warranty does not apply to re-manufactured merchandise.
Please read the operating instructions carefully. Failure to comply with the operating instructions will void this warranty.
For more information, visit us online at www.nostalgiaproducts.com.
Like us on Facebook at www.facebook.com/NostalgiaElectrics.
Follow our boards on Pinterest at www.pinterest.com/nostalgiaelctrx.
Tweet along with us on Twitter at www.twitter.com/NostalgiaElctrx.
SUGERENCIA PROFESIONAL: If your hands are sensitive to cold, avoid touching the old CO2 Cartridge with your skin. You may want to use a cloth to remove the old cartridge.
Nostalgia Products LLC
1471 Partnership Dr.
Green Bay, WI 54304-5685
Servicio al cliente
Nostalgia Products LLC
1471 Partnership Dr.
Green Bay, WI 54304-5685