IWCTLICM353CRHBKS - Water dispenser Igloo - Free user manual and instructions
Find the device manual for free IWCTLICM353CRHBKS Igloo in PDF.

User questions about IWCTLICM353CRHBKS Igloo
0 question about this device. Answer the ones you know or ask your own.
Ask a new question about this device
Download the instructions for your Water dispenser in PDF format for free! Find your manual IWCTLICM353CRHBKS - Igloo and take your electronic device back in hand. On this page are published all the documents necessary for the use of your device. IWCTLICM353CRHBKS by Igloo.
USER MANUAL IWCTLICM353CRHBKS Igloo
All products are trademarks of Nostalgia Products LLC.
Worldwide design & utility patented or patents pending.
© 2020 Nostalgia Products LLC.
IGLOO® and the Igloo design are trademarks of Igloo Products Corp. All rights reserved.
www.nostalgiaproducts.com
(rev. 07/13/20 HI)
natural_image
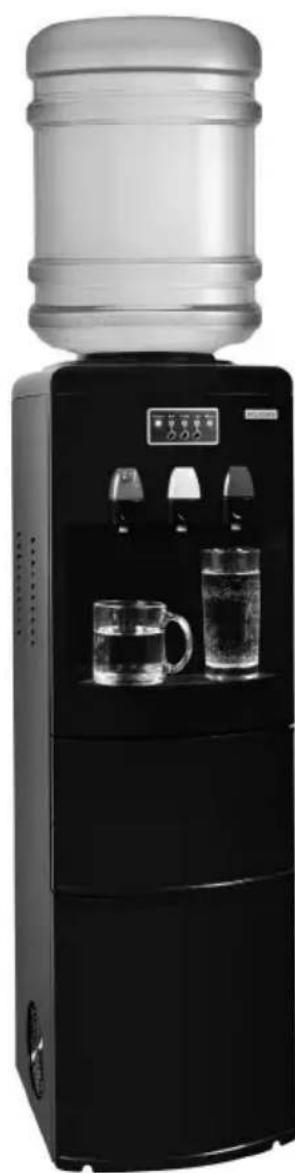
Black and white photo of a water dispenser with two glass cups on the side (no visible text or symbols)Instructions and Recipes
Make everyday a party!
Visit www.nostalgiaproducts.com for more fun products.
CONTENTS
SAFETY 2
IMPORTANT SAFEGUARDS 3
ADDITIONAL IMPORTANT SAFEGUARDS 4
INTRODUCTION 5
PARTS & ASSEMBLY 6
HOW TO OPERATE 7
HELPFUL TIPS 9
CLEANING & MAINTENANCE 10
RETURNS & WARRANTY 12
SAFETY
Your safety and the safety of others is very important.
We have provided many important safety messages in this manual and on your appliance. Always read and obey all safety messages.
This is the safety alert symbol.
This symbol alerts you to potential hazards that can cause serious injury to you and others.
All safety messages will follow the safety alert symbol.
All safety messages will tell you what the potential hazard is, tell you how to reduce the chance of injury, and tell you what can happen if the instructions are not followed.
Appliance Specifications:
115 Volts, 60 Hz, 660 Watts
THIS PRODUCT IS FOR USE IN 120V AC OUTLET ONLY.

Refer to www.nostalgiaproducts.com/user-manuals/ for the most updated manual.

IMPORTANT SAFEGUARDS
A person who has not read and understood all operating and safety instructions is not qualified to operate this appliance. All users of this appliance must read and understand this Instruction Manual before operating or cleaning this appliance.
When using electrical appliances, basic safety precautions should always be followed, including:
- Read all instructions before operating this appliance.
- DO NOT TOUCH the hot surfaces. Use handles or knobs.
- This appliance is NOT A TOY.
- This appliance is not intended for use by persons (including children) with reduced physical, sensory, or mental capabilities, or lack of experience and knowledge, unless they are closely supervised and instructed concerning use of the appliance by a person responsible for their safety. Close supervision is necessary when any appliance is used by or near children. Children should be supervised to ensure that they do not play with the appliance.
- Close supervision is necessary when any appliance is used by or near children.
- Turn the appliance OFF, then unplug from the outlet when not in use, before assembling or disassembling parts and before cleaning. To unplug, grasp the plug and pull from the outlet. Never pull from the power cord.
- Do not operate any appliance with a damaged cord or plug or after the appliance malfunctions, or is dropped or damaged in any manner. Contact the manufacturer at their customer service telephone number for information on examination, repair, or adjustment. Customer service number is (920) 347-9122.
- Unplug from outlet when not in use, before removing parts and before cleaning. Allow to cool before putting on or taking off any parts, and before cleaning.
- DO NOT operate any appliance with a damaged cord or plug, or after the appliance malfunctions, or if the appliance has been damaged in any manner. Return the appliance to the nearest repair shop for examination, repair or adjustment.
- The manufacturer does not recommend the use of accessory attachments other than what is provided by the manufacturer. Use of attachments may cause injuries.
- DO NOT use the appliance for other than its intended use.
- DO NOT use outdoors. FOR HOUSEHOLD USE ONLY.
- DO NOT place on or near a hot gas or electric burner, or in a heated oven.
- DO NOT let cord hang over edge of table or counter, or touch hot surfaces.
- NEVER leave unit unattended while in use or when plugged into an outlet.
- Extreme caution must be used when moving an appliance containing hot food.
- Always attach plug to appliance first, then plug cord in the wall outlet. To disconnect, turn any control to "off," then remove plug from wall outlet.

ADDITIONAL IMPORTANT SAFEGUARDS
Operating Safety Precautions
- Prior to use, this dispenser must be properly assembled and installed in accordance with this manual.
- The dispenser and ice maker is intended only for water dispensing. Do NOT use other liquids. Do NOT use for other purposes. Never use other liquids in the dispenser other than known and microbiologically safe bottled water. Warranty is void if used with any other liquids, such as coffee, tea, juices, beer or wine.
1. Instructions for the Electrical Cord and Plug
-
ELECTRICAL SHOCK HAZARD: Failure to follow these instructions can result in death, fire, or electrical shock.
-
Plug into a grounded 3 prong outlet.
• DO NOT remove ground prong.
• DO NOT use an adapter.
• DO NOT use an extension cord. -
This unit MUST be grounded. In the event of an electrical short circuit, grounding reduces the risk of electric shock by providing an escape wire for the electric current. This unit is equipped with a cord having a grounding wire with a grounding plug. The plug must be plugged into an outlet that is properly installed and grounded.
- WARNING: Improper use of the grounding plug can result in a risk of electric shock. If the plug does not fit fully into the outlet, contact a qualified electrician. Do not attempt to modify the plug in any way.
- A short power supply cord is provided to reduce the risk resulting from becoming entangled or tripping over a long cord.
The manufacturer does not recommend using this machine in countries that do not support 120V AC even if a voltage adapter, transformer, or converter is in use.
SAVE THESE INSTRUCTIONS!
INTRODUCTION
Thank you for purchasing the HOT & COLD WATER TOP LOAD WATER COOLER WITH ICE MAKER from IGLOO! With the Igloo Hot & Cold Top Load Water Cooler, ease is at your fingertips! This top-loader gives you ice-cold and hot water as well as ice in just minutes! This water cooler allows you to load 3 or 5 gallon bottles with no plumbing required! There is a child safety lock for the hot button so there are no accidents. Satisfy your thirst with cool water and ice or relax with a hot beverage using the brand you can trust!
- Top loading cooler for hot, cold & room temperature water
- Uses standard 3 and 5 gallon bottles (not included)
- Compressor Cooling
- Direct water line hookup available
- Adjustable front leveling legs
- Three push buttons & three separate spigots for cold, room temperature and hot water
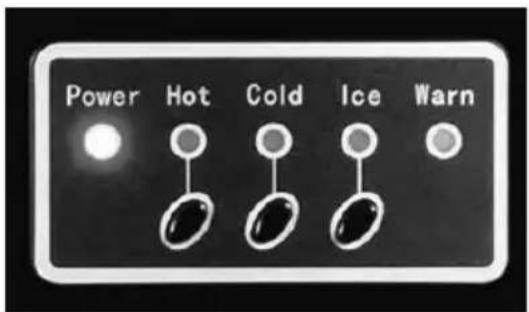
• Hot water child safety lock - Power Light, Hot Water, Cold Water, Ice Maker, Water Out warning & Alarm indicator lights
- Removable drip tray for easy clean up
- Dispensing area suitable for up to 7" bottle
- Hot water tank capacity: 1.5L/ Cold water tank capacity: 3.8L
• Water temperature: Hot 200°F/ Cold 40°F - Ice maker produces 30 lbs. of ice per day, ice storage holds 7 lbs.
- Comes with ice scoop
- Coolant: R290a
PARTS & ASSEMBLY
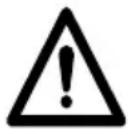
text_image
1 2 3 4 5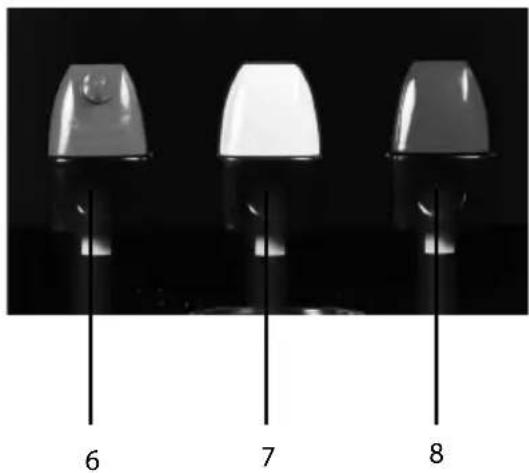
natural_image
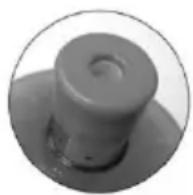
Three identical mechanical components with numbered labels 6, 7, and 8 on their bases (no text or symbols on the components themselves)1- Smart Device For Water Bottle
2-Control Panel
3- Removable Drip Tray
4- Ice Maker With Ice Scoop
5- Adjustable Front Feet
6- Hot Temperature Push Button
7- Room Temperature Water Push Button
8- Cold Water Push Button
text_image
Power Hot Cold Ice Warn
ASSEMBLY
Use EXTREME CAUTION when handling the appliance. When taking out of package, it is recommended to lay the box safely on its side. For the most part, the HOT & COLD WATER TOP LOAD WATER COOLER is assembled. Once unpacked and standing up right, the drip tray will need to be inserted.
Location Requirements:
- Install in the area where it is protected from the elements including direct sun.
- Install and use only on a hard, flat and level surface.
- Do NOT place the dispenser inside an enclosed space or cabinet.
- Position the dispenser no closer than 4 inches from the wall with at least 4 inches clearance on the sides to permit free airflow.
- Service should only be performed by a certified technician.
WATER COOLERS
It is very easy to replace 3 or 5 gallon coolers (not included). NOTE: Excessive weight hazard - It is recommended to use two or more people to move and install bottles. Failure to do so can result in injury.
With reusable cap:
- If your water bottle has a reusable cap on the end with a plug, safely place the 3 or 5 gallon bottle onto the bottle probe and the nozzle should fit securely onto the base. Once secure, you will begin to see water flowing from the bottle to the tank.
If there is no reusable cap:
- Stand with your feet shoulder-width apart and bend down to grab the new water bottle.
- Lift the bottle up and slowly tip it to a 45-degree angle to allow water to begin dripping into the cooler.
- Place the bottle into an upright position as the flow of water into the cooler begins to increase, and then secure it onto the base. Once secure, you will begin to see water flowing from the bottle to the tank.
natural_image
Close-up of a mechanical component dispensing liquid into a circular opening (no text or symbols visible)
natural_image
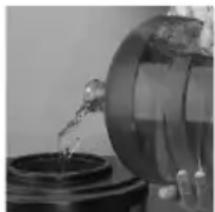
Close-up of a glassware pouring liquid into a container (no visible text or symbols)HOW TO OPERATE
WARNING: This unit is intended for water dispensing only. Do NOT use other liquids. Do NOT use for other purposes. Warranty is void if used with any other liquids such as coffee, tea, juices, beer or wine.
This dispenser has been designed to use water bottles with a 3 or 5 gallon capacity. Do NOT use alternative bottles.
INITIAL SET UP

To avoid damage to the compressor, allow the unit to sit upright for at least 4 hours prior to operation.
- Remove the tamper seal from bottle cap. Do not remove plastic cap.
- Lift the bottle safely (see assembly above) and place bottle until it's secure and bottle is seated.
- Plug the cord into a properly grounded wall outlet. WARNING: Always make sure that the cord is away from a water source.
DISPENSING COLD WATER
- Press the cold water button on the panel to start making the cold water. After this, the cold water indicator light will start to blink, meaning the compressor has started to cool the water.
- When light changes from blinking to staying on, cold water has reached its desired temperature and you can start dispensing.
- Place bottle, glass, or pitcher below the cold water tap.
- Push the cold water dispenser to start dispensing water.
- Release the button once desired fill level is achieved.
NOTE: After some while or after you drain out the cold water from the cold water faucet, the Cold Water indicator will blink again, meaning it's cooling again. Cold Water function and Ice-making function can work together.
natural_image
Close-up of a hand pouring liquid into a glass with white foam in a container (no visible text or symbols)DISPENSING ROOM TEMPERATURE WATER
- Place bottle, glass, or pitcher below the room temperature water tap.
- Push the room temperature water dispenser forward to start dispensing water.
- Release the button once the desired fill level is achieved.
DISPENSING HOT WATER
- Press the hot water button on the control panel and the green hot water indicator light will start to blink, meaning the heating element is starting to work.
- When the green light stops blinking and stays green, hot water has reached the desired temperature and you can now dispense.
- Place bottle, glass, pitcher, pot below the hot water tap.
- Release child-safety lock by turning it counter-clockwise while pushing in. Proceed to push the hot water dispenser to start dispensing water.
- Release from the dispenser and release the button once desired fill level is achieved.
NOTE: If there is no water in the hot tank in the first time using or after you drain out all of the water from the unit, after some minutes, the warning sound will alarm 10 times, and the Warning indicator will illuminate. If you place the water bottle again and need hot water, press the Hot Water button again, the heating element will start working again. And the Warning indicator will turn off at once. If you do not want the hot water drink, please press the Hot Water button once more, it will save the electricity and reduce the electricity cost. (After this, the Hot Water indicator will be off).
WARNING: Be careful when dispensing hot water as temperature can reach 200 °F.
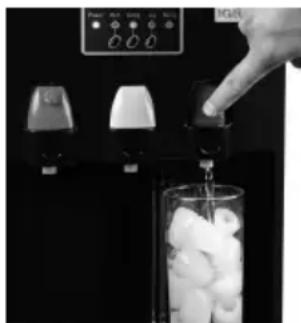
ICE MAKER
- Press the Ice Maker button on the operation panel to begin the ice making cycle. The Ice Maker indicator light will start to blink.

- The ice making cycle lasts 7 to 15 minutes, depending on the ambient room temperature.
- While the ice-maker is on, the unit will verify water level periodically. If there is no enough water to make ice, the ice maker will stop automatically, and the warning indicator will be on, meaning that the water level can not reach the requirement level for ice making.
- The ice maker automatically stops working when the unit has detected full of the ice inside. At same time the ice-maker indicator will change from blinking to illuminating.
- Ensure to keep a reasonable hygiene level in the water tank of the ice maker. If unit isn't in use for a long time, take down the water bottle and drain out all water from both drain port at the back of the unit.
HOW TO GET THE ICE
- Open the ice getting entrance door and use the ice scoop that is included to scoop the ice.
NOTE: When you turn on the cold water operation and ice making operation at same time, wait a few minutes to let the water temperature in the cold tank go down. It will sthen switch to the ice-making operation. If the cold water temperature goes up again or you drink the cold water from the cold water faucet, the unit will switch to Cold Water operation again after the present ice making cycle finished.
REPLACING AN EMPTY BOTTLE
Replace the bottle as soon as you notice that it is empty.
- Lift the bottle straight up to disengage it from the bottle probe.
- Remove the tamper seal from the bottle cap of the NEW bottle. DO NOT remove the plastic cap.
- Lift the bottle and insert it (assembly directions above). Apply slight pressure until the plug inside the cap pushes in and the bottle is secure.
HELPFUL TIPS
| PROBLEM CHECK PROBABLE CAUSE SOLUTION | |||
| Hot and cold water, ice-maker are all not available, and the power indicator light isn't on | Main power supply switch in your housePower plugCircuit breaker | At "OFF" positionNot plugged inTripped | Move to "ON" positionPlug it inCheck and reclose |
| Hot water anot available | Hot water button and hot water indicator | Hot water function is not turned on | Press the hot water button on control panel |
| Cold water not available | Cold water button and cold water indicator | Cold water function is not turned on | Press the cold water button on control panel |
| Air clearance between unit and wall | Ventilation around unit is insufficient | Space the unit from the wall by at least four inches | |
| Water bottle | The temperature is too high (exposed to sunlight) | Put the water in a shady, cool place that isn't exposed to sunlight | |
| Ice-making | Both ice-making and cold water function are running at same time | Wait a few minutes or stop ice-making function | |
| Ice making not available | Ice button and ice indicator light | Ice-making function is not turned on the control panel | Press the ice-making button on the control panel |
| Cold water function | Both ice-making and cold water functions are running at same time | Wait a few minutes or stop the cold water function | |
| Compressor doesn't run or suddenly stops | Main power supply | Voltage too low | Contact electrician |
| Ventilation blocked | Blocked | Remove the blocked substance | |
| Clearance around unit | Too small of a clearance, bad air circulation | Leave 4 inches around unit | |
| Condenser | Too dirty, overheating | Clean | |
| Cooling system | Refrigerant overcharged or leaked | Contact qualified serviceman to repair | |
| Compressor and accessories | Breakdown | Contact qualified serviceman to repair | |
| Warning indicator lights and alarms | Water bottle There | is no water Replace with a new bottle | |
| Warning indicator flashes | Ice-making box in the ice-making chamber | The ice-making box is clogged by ice or mechanism | Stop the unit and wait for the clogged ice to melt |
| Water leaks from taps or faucet | Water faucet button | Water faucet button may have been clogged | Check it and let the button go |
| Water faucet | Water faucet has been damaged | Call a qualified serviceman or customer service to get it replaced | |
| Water is dripping out of water dispenser | Water bottle | The bottle has small holes | Replace bottle |
| Water drain cap on the back | Loose | Tighten and check sealing silicon material inside to see if drain cap is torn or damaged. If so, replace. | |
| Noise Floor Unit is not level Make sure unit is on even floor | |||
CLEANING & MAINTENANCE
General Cleaning
General cleaning should be performed as needed and only takes five minutes or less.
- Clean the cabinet surfaces using a soft cloth and warm, soapy water. Rinse.
- Wipe dust in the back of the water cooler to improve efficiency.
-
Remove drip tray cover and hand wash. Take a cloth and warm, soapy water to rinse the inside of the drip tray. Rinse.
-
Reattach drip tray.
Cleaning Water Tanks
Cleaning the water tanks is recommended to happen once every three months.
NOTE: Recommended to do before loading a new 3 or 5 gallon jug.
- Unplug power cord from outlet.
- Remove water cooler bottle.
-
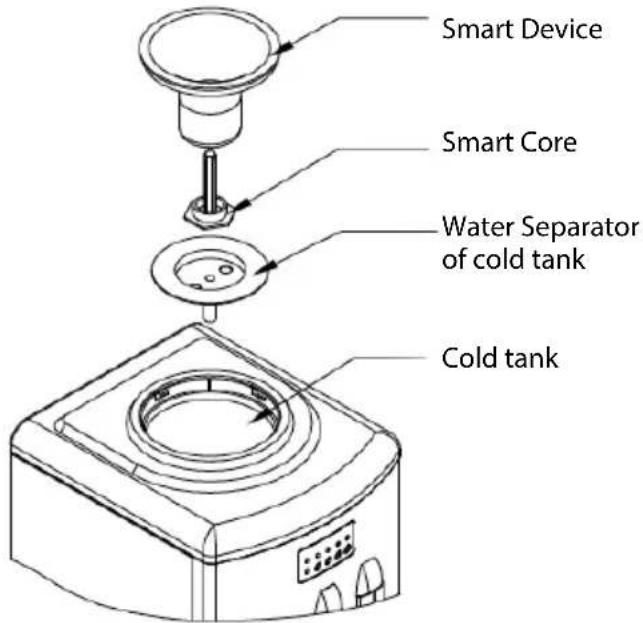
For hot and cold water dispensers, twist the bottle receptacle of the smart device counterclockwise and pull it up.
-
Take apart the non-spill system and hand wash it with warm, soapy water. Rinse and reassemble.
-
Empty both tanks (hot and cold) by unplugging the drain cap of the hot tank at the back of the unit.
-
Clean the inside parts of the water dispenser system, using vinegar or a 2% citric acid solution to remove mineral scaling caused by the water.
-
Rinse well, then open the drain cap for the hot water tank to get the water out.
-
Put all the parts back and securely fasten the drain cap.
-
Let the unit dry for two hours before plugging it back in and install the bottle receptacle (smart device).
text_image
Smart Device Smart Core Water Separator of cold tank Cold tankCleaning Ice Maker
- Remove the ice and water separator and ice storing plate by unscrewing the screw with a screwdriver (not included).
- Wash inside parts of ice-making chamber with warm, soapy water.
- Rinse and open the drain cap to drain all water. Rinse it several times.
- Securely fasten the drain camp and after it's dry, install them back to original position with screwdriver (not included).
RETURNS & WARRANTY
SHOULD YOUR UNIT NOT WORK OR IF DAMAGED WHEN YOU FIRST TAKE IT OUT OF THE BOX, PLEASE RETURN IT TO THE PLACE OF PURCHASE IMMEDIATELY.
HOT & COLD TOP LOAD WATER DISPENSER WITH ICE MAKER / IWCTLICM353CRHBKS
Should you have any questions, please contact us via email or at the customer service number listed below between the hours of 8:00 AM and 5:00 PM, Monday through Friday, Central Standard Time.
Distributed by:
Nostalgia Products LLC
1471 Partnership Dr.
Green Bay, WI 54304-5685
Customer Service
Phone: (920) 347-9122
Web: www.nostalgiaproducts.com
Customer Service Inquiry
To submit a Customer Service inquiry, go to www.nostalgiaproducts.com and fill out the Customer Service Inquiry form and click the Submit button.
A representative will contact you as soon as possible.
Product Warranty Terms
Nostalgia Products LLC (the "Company") hereby warrants that for a period of one (1) year from the date of original purchase, this product will be free of defects in material and workmanship under normal home use, provided that the product is operated and maintained in accordance with the operating instructions. As the sole and exclusive remedy under this warranty, the Company will at its discretion either repair or replace the product found to be defective, or issue a refund on the product during the warranty period. This warranty is only available to the original retail purchaser of the product from the date of initial retail purchase, and is only valid with the original sales receipt, as proof of purchase date is required to obtain warranty benefits. All warranty claims must be brought to the attention of the Company within the warranty period and no later than 30 days of the failure to perform. This warranty does not cover normal wear or damage caused by shipping, mishandling, misuse, accident, alteration, improper replacement parts, or other than ordinary household use. You may be required to return the product (with shipping prepaid by you) for inspection and evaluation. Return shipping costs are not refundable. The Company is not responsible for returns damaged or lost in transit. Unless otherwise specifically permitted by the operating instructions, this warranty applies to indoor household use only. In order to obtain service under this warranty, please contact the Company at the telephone number listed above or by filling out the Customer Service Inquiry Form located at www.nostalgiaproducts.com. Warranty valid only in USA and Canada.
This warranty is in lieu of all other warranties, expressed or implied, including warranties of merchantability and fitness for a particular purpose, which are hereby excluded to the extent permitted by law. In no event shall the Company be liable for any indirect, incidental, consequential, or special damages arising out of or in connection with this product or the use thereof. Some states, provinces or jurisdictions do not permit the exclusion or limitation of incidental or consequential damages, so the foregoing exclusion or limitation may not apply to you.
This warranty does not apply to re-manufactured merchandise.
Please read the operating instructions carefully. Failure to comply with the operating instructions will void this warranty.
For more information, visit us online at www.nostalgiaproducts.com.
Like us on Facebook at www.facebook.com/NostalgiaElectrics.
Follow our boards on Pinterest at www.pinterest.com/nostalgiaelctrx.
Tweet along with us on Twitter at www.twitter.com/NostalgiaElctrx.
natural_image
Three identical white and gray electronic components with labeled pins 6, 7, and 8 (no text or symbols on the components themselves)natural_image
Two grayscale images showing a mechanical component and a close-up of a cylindrical part being inserted into a circular opening (no text or symbols visible)natural_image
Two grayscale images: left shows a cylindrical container with liquid, right shows a glass pouring liquid from a container (no text or symbols visible)natural_image
Hand pouring liquid into a glass of ice cubes on a digital counter (no visible text or symbols)DISPENSAR AGUA A TEMPERATURA AMBIENTE
text_image
Smart Device Smart Core Water Separator of cold tank Cold tankNostalgia Products LLC
1471 Partnership Dr.
Green Bay, WI 54304-5685
Servicio al cliente
120 volts, 60 Hz, 660 watts
CE PRODUIT EST UTILISÉ DANS SORTIE ÉLECTRIQUE DE 120V AC SEULEMENT.

CONSERVEZ CES INSTRUCTIONS!
INTRODUCTION
natural_image
Three identical mechanical components with labeled parts 6, 7, and 8, shown against a black background (no text or symbols on the objects themselves)natural_image
Close-up of a mechanical component dispensing liquid into a circular white component (no text or symbols visible)natural_image
Close-up of a glass bottle pouring liquid into a dark container (no visible text or symbols)COMMENT FAIRE FONCTIONNER
natural_image
Close-up of a hand pouring liquid into a glass with ice cubes, next to a digital control panel (no visible text or symbols)COMMENT OBTENIR LA GLACE
text_image
Smart Device Smart Core Water Separator of cold tank Cold tankNostalgia Products LLC
1471 Partnership Dr.
Green Bay, WI 54304-5685