IWCBL50SCEC1CHBKS - Water dispenser Igloo - Free user manual and instructions
Find the device manual for free IWCBL50SCEC1CHBKS Igloo in PDF.

User questions about IWCBL50SCEC1CHBKS Igloo
0 question about this device. Answer the ones you know or ask your own.
Ask a new question about this device
Download the instructions for your Water dispenser in PDF format for free! Find your manual IWCBL50SCEC1CHBKS - Igloo and take your electronic device back in hand. On this page are published all the documents necessary for the use of your device. IWCBL50SCEC1CHBKS by Igloo.
USER MANUAL IWCBL50SCEC1CHBKS Igloo
All products are trademarks of Nostalgia Products LLC.
Worldwide design & utility patented or patents pending.
© 2020 Nostalgia Products LLC.
IGLOO® and the Igloo design are trademarks of Igloo Products Corp. All rights reserved.
www.nostalgiaproducts.com
(rev. 05/14/20 ET)
natural_image
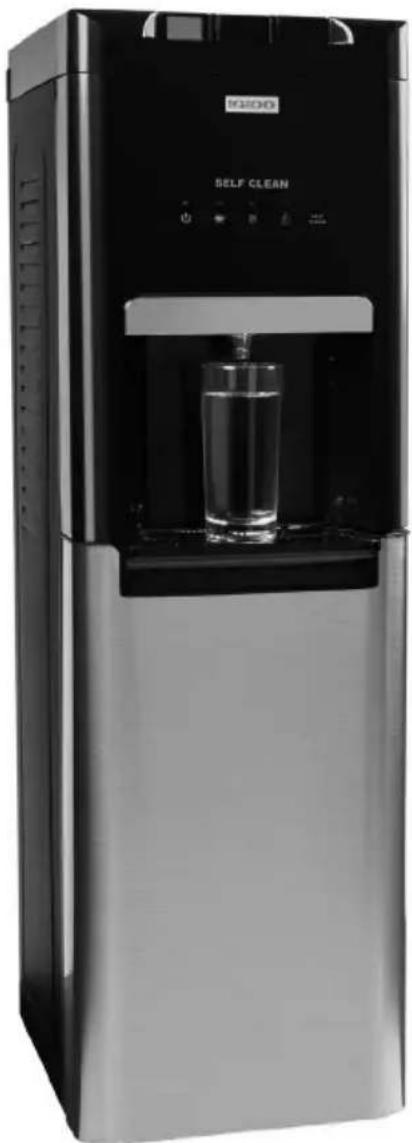
Exterior view of a modern water dispenser with a glass inside, no visible text or symbols on the device itself.Instructions and Recipes
Make everyday a party!
Visit www.nostalgiaproducts.com for more fun products.
CONTENTS
SAFETY 2
IMPORTANT SAFEGUARDS 3
ADDITIONAL IMPORTANT SAFEGUARDS 4
INTRODUCTION 5
PARTS & ASSEMBLY 6
HOW TO OPERATE 7
HELPFUL TIPS 8
CLEANING & MAINTENANCE 10
RETURNS & WARRANTY 12
SAFETY
Your safety and the safety of others is very important.
We have provided many important safety messages in this manual and on your appliance. Always read and obey all safety messages.
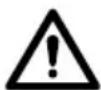
This is the safety alert symbol.
This symbol alerts you to potential hazards that can cause serious injury to you and others.
All safety messages will follow the safety alert symbol.
All safety messages will tell you what the potential hazard is, tell you how to reduce the chance of injury, and tell you what can happen if the instructions are not followed.
Appliance Specifications:
120 Volts, 60 Hz, 650 Watts
THIS PRODUCT IS FOR USE IN 120V AC OUTLET ONLY.

Refer to www.nostalgiaproducts.com/user-manuals/ for the most updated manual.

IMPORTANT SAFEGUARDS
A person who has not read and understood all operating and safety instructions is not qualified to operate this appliance. All users of this appliance must read and understand this Instruction Manual before operating or cleaning this appliance.
When using electrical appliances, basic safety precautions should always be followed, including:
- Read all instructions before operating this appliance.
- DO NOT TOUCH the hot surfaces. Use handles or knobs.
- This appliance is NOT A TOY.
- This appliance is not intended for use by persons (including children) with reduced physical, sensory, or mental capabilities, or lack of experience and knowledge, unless they are closely supervised and instructed concerning use of the appliance by a person responsible for their safety. Close supervision is necessary when any appliance is used by or near children. Children should be supervised to ensure that they do not play with the appliance.
- Close supervision is necessary when any appliance is used by or near children.
- Turn the appliance OFF, then unplug from the outlet when not in use, before assembling or disassembling parts and before cleaning. To unplug, grasp the plug and pull from the outlet. Never pull from the power cord.
- Do not operate any appliance with a damaged cord or plug or after the appliance malfunctions, or is dropped or damaged in any manner. Contact the manufacturer at their customer service telephone number for information on examination, repair, or adjustment. Customer service number is (920) 347-9122.
- Unplug from outlet when not in use, before removing parts and before cleaning. Allow to cool before putting on or taking off any parts, and before cleaning.
- DO NOT operate any appliance with a damaged cord or plug, or after the appliance malfunctions, or if the appliance has been damaged in any manner. Return the appliance to the nearest repair shop for examination, repair or adjustment.
- The manufacturer does not recommend the use of accessory attachments other than what is provided by the manufacturer. Use of attachments may cause injuries.
- DO NOT use the appliance for other than its intended use.
- DO NOT use outdoors. FOR HOUSEHOLD USE ONLY.
- DO NOT place on or near a hot gas or electric burner, or in a heated oven.
- DO NOT let cord hang over edge of table or counter, or touch hot surfaces.
- NEVER leave unit unattended while in use or when plugged into an outlet.
- Extreme caution must be used when moving an appliance containing hot food.
- Always attach plug to appliance first, then plug cord in the wall outlet. To disconnect, turn any control to "off," then remove plug from wall outlet.

ADDITIONAL IMPORTANT SAFEGUARDS
Operating Safety Precautions
- Prior to use, this dispenser must be properly assembled and installed in accordance with this manual.
- This dispenser is intended only for water dispensing. Do NOT use other liquids. Do NOT use for other purposes. Never use other liquids in the dispenser other than known and microbiologically safe bottled water. Warranty is void if used with any other liquids, such as coffee, tea, juices, beer or wine.
1. Instructions for the Electrical Cord and Plug
-
ELECTRICAL SHOCK HAZARD: Failure to follow these instructions can result in death, fire, or electrical shock.
-
Plug into a grounded 3 prong outlet.
• DO NOT remove ground prong.
• DO NOT use an adapter.
• DO NOT use an extension cord. -
This unit MUST be grounded. In the event of an electrical short circuit, grounding reduces the risk of electric shock by providing an escape wire for the electric current. This unit is equipped with a cord having a grounding wire with a grounding plug. The plug must be plugged into an outlet that is properly installed and grounded.
- WARNING: Improper use of the grounding plug can result in a risk of electric shock. If the plug does not fit fully into the outlet, contact a qualified electrician. Do not attempt to modify the plug in any way.
- A short power supply cord is provided to reduce the risk resulting from becoming entangled or tripping over a long cord.
The manufacturer does not recommend using this machine in countries that do not support 120V AC even if a voltage adapter, transformer, or converter is in use.
SAVE THESE INSTRUCTIONS!
INTRODUCTION
Thank you for purchasing the HOT, COLD & ROOM TEMPERATURE WATER BOTTOM LOAD WATER COOLER from IGLOO! With the Igloo Hot, Cold & Room Temperature Bottom Load Water Cooler, ease is at your fingertips! This bottom-loader gives you ice-cold and hot water in just seconds! This water cooler allows you to load 3 or 5 gallon bottles with no plumbing required! There is a child safety lock for the hot button so there are no accidents. Satisfy your thirst with cool water or relax with a hot beverage using the brand you can trust!
- Bottom loading cooler for hot, cold & room temperature water
• Power, Heating, Cooling, Empty Bottle & Self Cleaning Indicators & Alarms - Dual-ozone self-cleaning technology helps prevent formation of bacteria
- Uses standard 3 and 5 gallon bottles (not included)
- Retractable angled plastic siphon tube for 3 & 5 gallon water bottles
- Direct water line hookup available
- Adjustable rear leveling legs
- Hot, cold and room temperature dispensing buttons & one separate spigot with child safety lock for hot button
• Over heating protection for hot tank - Removable stainless steel drip tray for easy clean up
- Dispensing area suitable for up to 8" bottle
- Hot water tank capacity: 1.2L/ Cold water tank capacity: 4L
• Water temperature: Hot 200°F/ Cold 40°F
• Hot and Cold LED On/Off switches - LED Night Light
- Compressor cooling
• FDA food grade silicone tubes
PARTS & ASSEMBLY
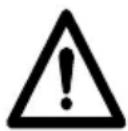
PARTS

text_image
ENGLISH1- Indicator Lights
2- Water Spigot
3- Removable Drip Tray
4- Retractable Siphon Pump/Cover
5- Hot Water Push Button/Safety Lock
6- Room Temperature Push Button
7- Cold Water Push Button
8- Hot Water On/Off Switch
9- Cold Water On/Off Switch
LED INDICATOR LIGHTS
POWER INDICATOR (1)
When the LED light is constantly lit it indicates that power is being supplied to the unit.
text_image
SELF CLEAN SELF CLEANHEATER INDICATOR (2)
When the LED light is flashing it indicates that the heating system is working. When the LED light is constantly lit, it indicates that the hot water is ready. When the LED light is off it shows that the heating system is off.
COOLING INDICATOR (3)
When the LED light is flashing it indicates that the cooling system is working. When the LED light is constantly lit, it indicates that the cold water is ready. When the LED light is off it indicates that the cooling system is off.
EMPTY BOTTLE INDICATOR (4)
The LED light is constantly lit when the water bottle has enough water for normal operation. When the LED light is flashing it indicates that the level of water in the bottle is low and a new full bottle should be installed.
SELF CLEAN INDICATOR (5)
When the LED light is flashing it indicates that the self cleaning takes place. When the LED light is constantly lit it indicates that the self clean protection is on.
ASSEMBLY

Use EXTREME CAUTION when handling the appliance. When taking out of package, it is recommended to lay the box safely on its side. For the most part, the HOT & COLD WATER BOTTOM LOAD WATER COOLER is assembled. Once unpacked and standing up right, the drip tray will need to be inserted.
Location Requirements:
- Install in the area where it is protected from the elements including direct sun.
- Install and use only on a hard, flat and level surface.
- Do NOT place the dispenser inside an enclosed space or cabinet.
- Position the dispenser no closer than 4 inches from the wall with at least 4 inches clearance on the sides to permit free airflow.
- Service should only be performed by a certified technician.
WATER COOLERS
It is very easy to replace 3 or 5 gallon coolers (not included). NOTE: Excessive weight hazard - It is recommended to use two or more people to move and install bottles. Failure to do so can result in injury.
- Open up the cabinet door on the bottom and take the water cap off the water cooler.
- Place the siphon pump inside of the water jug so it's touching the bottom.
- Make sure the siphon pump cover cap fits securely over the water jug top, ensuring no leakage.
NOTE: The siphone pump is adjustable. Adjust the length by pulling the portion of the tube to its maximum extension. Insert the probe into the bottle and push it down. The probe will self-adjust to its appropriate length.
- Close the door.
HOW TO OPERATE
WARNING: This unit is intended for water dispensing only. Do NOT use other liquids. Do NOT use for other purposes. Warranty is void if used with any other liquids such as coffee, tea, juices, beer or wine.
This dispenser has been designed to use water bottles with a 3 or 5 gallon capacity. Do NOT use alternative bottles.
Initial Set Up
NOTE: Make sure that switches are ON. Both the Hot and Cold water, and LED light switches are located in the back of the water cooler.
- Remove the tamper seal from bottle cap and remove the cap.
- Place the siphon pump inside the water cooler and make sure cap is on securely and place inside water cooler door.
- Plug the cord into a properly grounded wall outlet. WARNING: Always make sure that the cord is away from a water source.
Dispensing Cold & Room Temperature Water
After setup, it will take up to one hour to get the water to its maximum cold temperature.
- Place bottle, glass, or pitcher below the water tap.
- Push the cold or room temperature water button downward to start dispensing water.
- Release the button once the desired fill level is achieved.
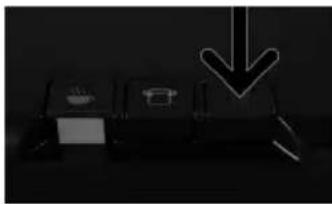
Dispensing Hot Water
After setup, it will not take long to reach maximum hottest temperature. NOTE: For safety, there is a lock on the dispensing button.
natural_image
Black-and-white photo of three electronic components with a downward arrow overlay (no text or symbols)
- Place bottle, glass, pitcher, pot below the hot water tap.
- Release child-safety lock by pushing inward on the red button while pushing the hot water button downward at the same time to start dispensing water.
- Release the button once desired fill level is achieved.


WARNING: Be careful when dispensing hot water as temperature can reach 200 °F.
Self-Cleaning Mode
The unit's self-cleaning feature prevents the formation of Biofilm. The self-cleaning feature is not intended for water purification.
When the LED light is flashing it indicates that the self cleaning takes place. When the LED light is constantly lit it indicates that the self clean protection is on.
NOTE: Self cleaning works every four hours for a short time. The selfcleaning pump sound is normal.
Replacing An Empty Bottle/Low Water Indicator lights
When your water bottle is empty, the EMPTY BOTTLE lights will blink until a fresh bottle is installed. You may also hear a sucking sound when the bottle is empty and needs changing. This is normal and is another way to be alerted that your bottle is empty and needs to be replaced.
To install a new bottle:
- Open the door and slide the bottle out.
- Place the fresh bottle in front of the tray.
- Clean the fresh bottle using a soft cloth and warm soapy water.
- Remove the entire plastic cap from the top of the bottle.
- Remove probe from old bottle and insert into the fresh bottle.
- Push the probe down until it is seated.
- Slide the bottle onto the tray and close the door completely.
HELPFUL TIPS
Do the LED lights use a lot of electricity?
No. LED lights are known for being energy efficient and consume very little energy.
I can't find the rectangular bottles? What other kind of bottles does the cooler take?
The cooler will accept any standard three or a five gallon water bottle, circular or rectangular.
How do I know when and if the Self Cleaning function is working?
The self cleaning function will run every four hours and the self clean LED light will flash.
Between self clean cycles, the LED light is glowing steady to indicate that cooler is protected from contamination.
Can I use anything else other than bleach for cleaning the water cooler?
Bleach is safe to use to clean the machine. However, if you wish you can use a vinegar based solution instead. Mix 16 oz of vinegar per every gallon of water.
There is no hot or cold water?
Ensure that both the hot and cold buttons on the back side of the cooler have been turned on. The LED lights on the control panel will have a steady glow indicating the power has been turned on. When lights are flashing, heating and cooling is currently taking place.
The water is not pumping water into the holding tank.
Ensure that the front door of the cooler is closed. In the event the cooler door is not closed the pump will not be activated. If pump is still not being activated reset the power.
Where is the filter for the air intake?
The filter is located on the top of the probe. The filter resembles a black sponge.
Does the air filter need to be washed or changed?
No, the filter does not need to be washed or changed. If you desire, the filter can be cleaned by unscrewing the cover on top of bottle cap the filter can then be removed for washing.
Hot water tap is dripping.
Perform de-scaling procedure outlined in cleaning section.
The buttons for dispensing water are slow-moving or jammed.
Ensure that buttons are clean and no dust or particles are causing buttons to move slowly.
Dispenser is not operating.
Make sure that the power cord is properly connected to a working outlet.
Water is leaking.
Replace water bottle. The most common cause of this issue is a cracked bottle. If the leak remains, unplug unit and call customer service for assistance.
No water is coming from the taps.
Make sure the water bottle is not empty. If it is, replace it. If not, adjust the probe to an appropriate length.
Water dispensed is not cold.
Please note that it takes a minimum of one hour after setup to dispense cold water. Make sure that the back of the dispenser is at least 4 inches from a wall and that air is free to flow on all 4 sides of the dispenser. Make sure that the cold-water switch is ON.
Water dispensed is not hot.
Please note that it takes approximately fifteen to twenty minutes after setup to dispense hot water.
Make sure that the power cord is properly connected to a working outlet. Make sure that the hot-water switch is ON.
Water tastes bad.
CLEANING & MAINTENANCE
General Cleaning
General cleaning should be performed as needed and only takes five minutes or less.
- Clean the cabinet surfaces using a soft cloth and warm, soapy water. Rinse.
- Wipe dust in the back of the water cooler to improve efficiency.
- Remove drip tray cover and hand wash. Take a cloth and warm, soapy water to rinse the inside of the drip tray. Rinse.
- Reattach drip tray.
Cleaning Water Lines & Reservoirs
Cleaning the water lines is recommended to happen once every three months. NOTE: Recommended to do before loading a new 3 or 5 gallon jug.
- Unplug power cord from outlet.
- Remove water cooler bottle.
- Remove the siphon pump and clean with warm, soapy water. Rinse.
- Fill water cooler jug with a mixture of water and bleach and let it sit for 30 minutes.
- Install the water bottle filled with cleaning solution and allow the reservoir to fill with the solution. Let the mixture sit for five to 10 minutes to disinfect the reservoir.
- Drain the cleaning mixture by dispensing it from both taps into a bowl or pitcher.
- Refill your empty water bottle with clean water and allow to fill the reservoir again. Drain again through the spigots. If you detect a vinegar taste or chlorine taste, add another two gallons of clean water, drain and retest.
- Install a new bottle of water and plug in the power cord into grounded outlet.
Descaling
If you use spring (mineral) water you will need to de-scale your hot water tank. Heated spring (mineral) water will cause minerals to fall out. Eventually they will plug up your waterways, resulting in a gradual slowdown of the flow rate, leaking faucets, and other problems.
Descaling Solutions
Cooking vinegar is proven to remove calcium deposits efficiently. Depending on the frequency of decalcification treatments, please use the following proportions of White Vinegar.
- For descaling once every three months, use two cups (500 ml) of white vinegar with 2.5 liters of hot water.
-
For descaling once every six months, use a mixture of six cups (1500 ml) of white vinegar with two liters of hot water.
-
For descaling once every year, use 12 cups (3000 ml) of white vinegar and one liter of hot water.
- For descaling less frequently than once a year, use undiluted white vinegar.
Descaling Procedure
- Turn off hot & cold switches and unplug the cooler from the wall.
-
Using rear drain plug, drain the water from the cooler into a bucket and discard the water.
-
Locate the white plastic cap at the back of the cooler.
- Remove the screw and remove the clear silicone drain plug and allow water to drain out.
- Re-attach the drain plug and plastic cap before proceeding.
- Fill a bucket or empty 5-gallon water bottle with solution of white vinegar. For proportions, refer to "Descaling Solutions" section. Choose quantity in accordance with the frequency of your treatments.
- Attach or insert the probe to the bucket/bottle.
- Place the bucket/bottle into the cooler and close the door. The water will be pumped up into the holding tanks.
-
Wait for 1 hour. Using rear drain plug, drain the water from the cooler into a bucket and discard the water.
-
Locate the white plastic cap at the back of the cooler.
- Remove the screw.
- Remove the clear silicone drain plug and allow water to drain out.
-
Re-attach the drain plug and plastic cap before proceeding.
-
Fill the bucket/bottle with tap water and place into the machine.
- Plug the cooler back into the wall, do not turn hot or cold switches ON, close the door and wait for 10 minutes.
- Dispense water from both cold and hot faucets until smell from cleaning substances disappears.
- Open drain plug and cap once again and drain all tap water. Replace the drain plug and cap.
- Place a fresh bottle of water into the machine and operate as usual.
- This procedure must be repeated every 3 to 6 months, depending on mineral content and usage of water cooler.
RETURNS & WARRANTY
SHOULD YOUR UNIT NOT WORK OR IF DAMAGED WHEN YOU FIRST TAKE IT OUT OF THE BOX, PLEASE RETURN IT TO THE PLACE OF PURCHASE IMMEDIATELY.
Should you have any questions, please contact us via email or at the customer service number listed below between the hours of 8:00 AM and 5:00 PM, Monday through Friday, Central Standard Time.
Distributed by:
Nostalgia Products LLC
1471 Partnership Dr.
Green Bay, WI 54304-5685
Customer Service
Phone: (920) 347-9122
Web: www.nostalgiaproducts.com
Customer Service Inquiry
To submit a Customer Service inquiry, go to www.nostalgiaproducts.com and fill out the Customer Service Inquiry form and click the Submit button.
A representative will contact you as soon as possible.
Product Warranty Terms
Nostalgia Products LLC (the "Company") hereby warrants that for a period of one (1) year from the date of original purchase, this product will be free of defects in material and workmanship under normal home use, provided that the product is operated and maintained in accordance with the operating instructions. As the sole and exclusive remedy under this warranty, the Company will at its discretion either repair or replace the product found to be defective, or issue a refund on the product during the warranty period. This warranty is only available to the original retail purchaser of the product from the date of initial retail purchase, and is only valid with the original sales receipt, as proof of purchase date is required to obtain warranty benefits. All warranty claims must be brought to the attention of the Company within the warranty period and no later than 30 days of the failure to perform. This warranty does not cover normal wear or damage caused by shipping, mishandling, misuse, accident, alteration, improper replacement parts, or other than ordinary household use. You may be required to return the product (with shipping prepaid by you) for inspection and evaluation. Return shipping costs are not refundable. The Company is not responsible for returns damaged or lost in transit. Unless otherwise specifically permitted by the operating instructions, this warranty applies to indoor household use only. In order to obtain service under this warranty, please contact the Company at the telephone number listed above or by filling out the Customer Service Inquiry Form located at www.nostalgiaproducts.com. Warranty valid only in USA and Canada.
This warranty is in lieu of all other warranties, expressed or implied, including warranties of merchantability and fitness for a particular purpose, which are hereby excluded to the extent permitted by law. In no event shall the Company be liable for any indirect, incidental, consequential, or special damages arising out of or in connection with this product or the use thereof. Some states, provinces or jurisdictions do not permit the exclusion or limitation of incidental or consequential damages, so the foregoing exclusion or limitation may not apply to you.
This warranty does not apply to re-manufactured merchandise.
Please read the operating instructions carefully. Failure to comply with the operating instructions will void this warranty.
For more information, visit us online at www.nostalgiaproducts.com.
Like us on Facebook at www.facebook.com/NostalgiaElectrics.
Follow our boards on Pinterest at www.pinterest.com/nostalgiaelctrx.
Tweet along with us on Twitter at www.twitter.com/NostalgiaElctrx.
text_image
SELF CLEAN SELF CLEANINDICADOR DE ENFRIAMIENTO (3)
natural_image
Black rectangular object with two small icons and a downward arrow overlay, no visible text or symbols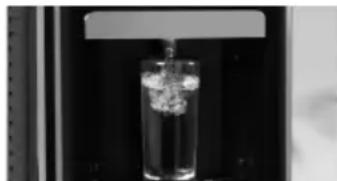
natural_image
Black and white photo of a glass with a submerged object, possibly a container or container filled with liquid (no visible text or symbols)Nostalgia Products LLC
1471 Partnership Dr.
Green Bay, WI 54304-5685
Servicio al cliente
120 volts, 60 Hz, 650 watts

CE PRODUIT EST UTILISÉ DANS SORTIE ÉLECTRIQUE DE 120V AC SEULEMENT.
CONSERVEZ CES INSTRUCTIONS!
INTRODUCTION
text_image
SELF CLEAN SELF CLEANINDICATEUR DE REFROIDISSEMENT (3)
natural_image
Black-and-white photo of stacked electronic components with a downward arrow overlay (no text or symbols)natural_image
Black and white photo of a glass beaker with a white liquid, being poured into a dark chamber (no text or symbols visible)Nostalgia Products LLC
1471 Partnership Dr.
Green Bay, WI 54304-5685