
AKZ9S 8271 IX - Oven WHIRLPOOL - Free user manual and instructions
Find the device manual for free AKZ9S 8271 IX WHIRLPOOL in PDF.

User questions about AKZ9S 8271 IX WHIRLPOOL
0 question about this device. Answer the ones you know or ask your own.
Ask a new question about this device
Download the instructions for your Oven in PDF format for free! Find your manual AKZ9S 8271 IX - WHIRLPOOL and take your electronic device back in hand. On this page are published all the documents necessary for the use of your device. AKZ9S 8271 IX by WHIRLPOOL.
USER MANUAL AKZ9S 8271 IX WHIRLPOOL
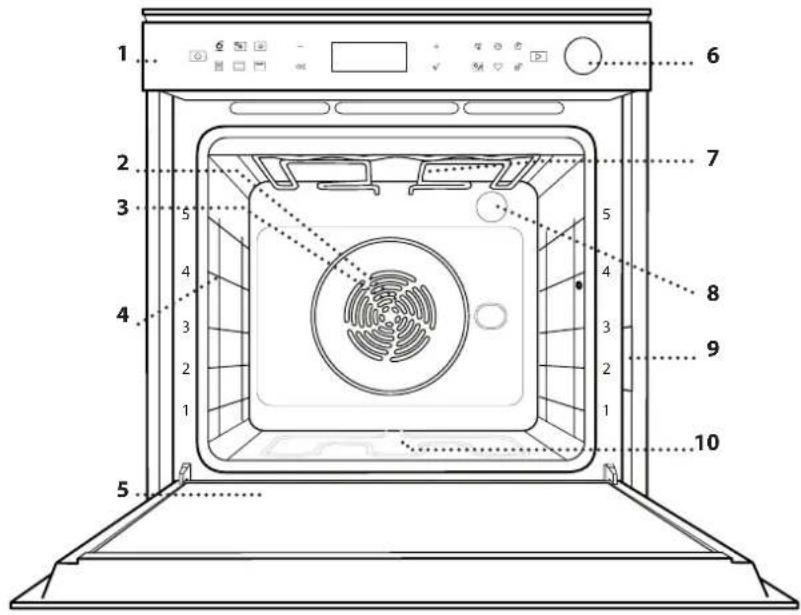
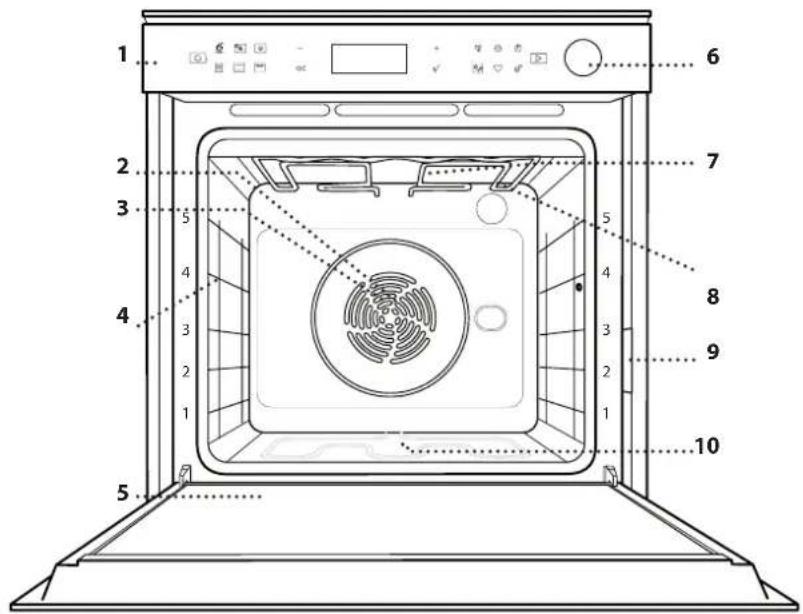
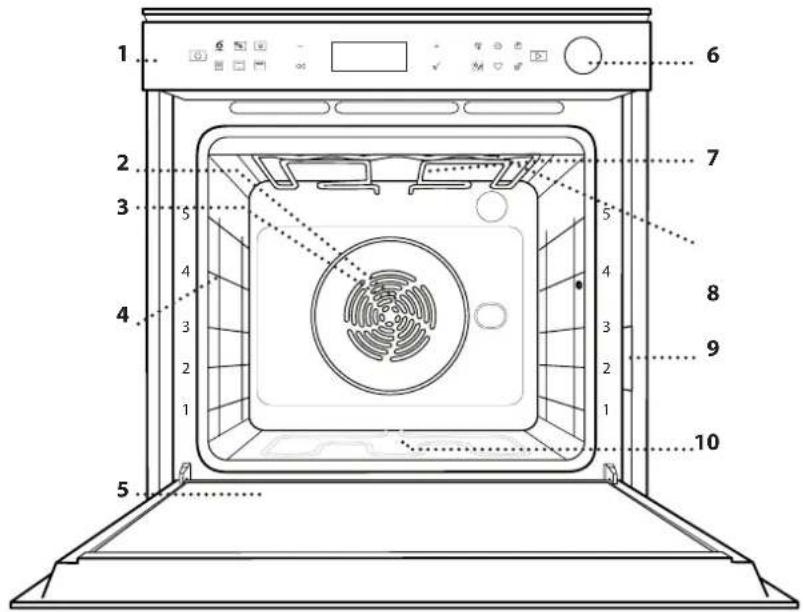
- Control panel
- Fan
- Circular heating element (not visible)
- Shelf guides (the level is indicated on the front of the oven)
- Door
- Water drawer
- Upper heating element/grill
- Lamp
- Identification plate (do not remove)
- Lower heating element (not visible)
CONTROL PANEL DESCRIPTION

1. ON/OFF
For switching the oven on and off and for stopping an active function.
2. FUNCTIONS DIRECT ACCESS
For quick access to the functions and menu.
3. NAVIGATION BUTTON MINUS
For scrolling through a menu and decreasing the settings or values of a function.
4. BACK
For returning to the previous screen.
During cooking, allows settings to be changed.
5. DISPLAY
For immediately starting a function.
6. CONFIRM
For confirming a selected function or a set value.
7. NAVIGATION BUTTON PLUS
For scrolling through a menu and increasing the settings or values of a function.
8 OPTIONS / FUNCTIONS DIRECT ACCESS
For quick access to the functions, duration, settings and favorites.
9. START
For starting a function using the specified or basic settings.
ACCESSIONS
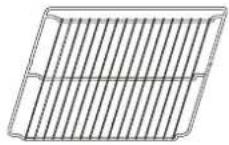
Use to cook food or as a support for pans, cake tins and other ovenproof items of cookware.
Use as an oven tray for cooking meat, fish, vegetables, focaccia, etc. or position underneath the wire shelf to collect cooking juices.

Use for cooking all bread and pastry products, but also for roasts, fish en papillotte, etc.
To facilitate inserting or removing accessories.
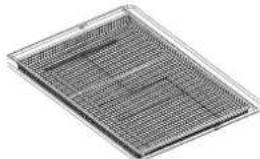
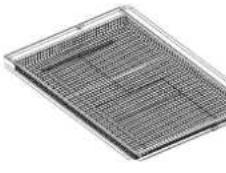
AIR FRY TRAY*

To be used when cooking foods with Air Fry function, with a baking tray positioned at a lower level to collect possible crumbs and drip. It can be cleaned in the dishwasher.
- Available only on certain models
The number and the type of accessories may vary depending on which model is purchased.
Other accessories can be purchased separately; for orders and information contact the after sales service or www.whirlpool.eu.
INSERTING THE WIRE SHELF AND OTHER ACCESSORIES
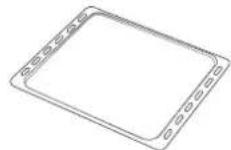
Insert the wire shelf horizontally by sliding it across the shelf guides, making sure that the side with the raised edge is facing upwards.
Other accessories, such as the drip tray and the baking tray, are inserted horizontally in the same way as the wire shelf.
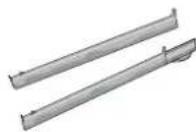
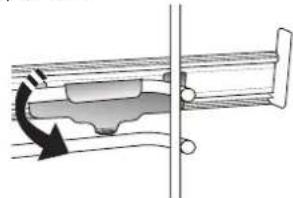
REMOVING AND REFITTING THE SHELF GUIDES
-
To remove the shelf guides, lift the guides up and then gently pull the lower part out of its seating: The shelf guides can now be removed.
-
To refit the shelf guides, first fit them back into their upper seating. Keeping them held up, slide them into the cooking compartment, then lower them into position in the lower seating.
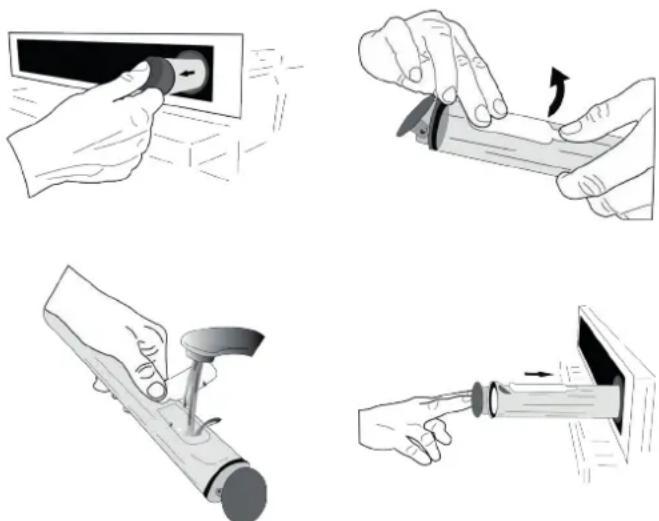
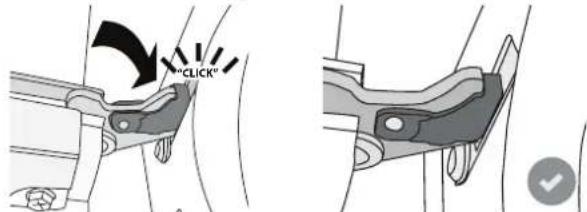
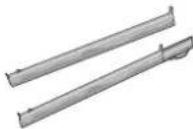
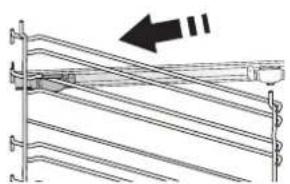
FITTING THE SLIDING RUNNERS (IF PRESENT)
Remove the shelf guides from the oven and remove the protective plastic from the sliding runners.
Fasten the upper clip of the runner to the shelf guide and slide it along as far as it will go. Lower the other clip into position. To secure the guide, press the lower portion of the clip firmly against the shelf guide. Make sure that the runners can move freely. Repeat these steps on the other shelf guide on the same level.

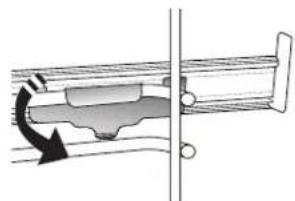
Please note: The sliding runners can be fitted on any level.
FUNCTIONS

6^th SENSE
These allow a fully automatic cooking for all types of food (Lasagna, Meat, Fish, Vegetables, Cakes & Pastries, Salty cakes, Bread, Pizza).
To get the best from this function, follow the indications on the relative cooking table.

FORCED AIR + STEAM
Combining the properties of steam with those of the forced air, this function allows you to cook dishes pleasantly crispy and browned outside, but at the same time tender and succulent inside. To achieve the best cooking results, we recommend to select STEAM 1 level for bread and desserts, and STEAM 2 for meat, fish and vegetables.

FORCED AIR
For cooking different foods that require the same cooking temperature on several shelves (maximum three) at the same time. This function can be used to cook different foods without odours being transferred from one food to another.

TRADITIONAL FUNCTIONS
- CONVECT BAKE
For cooking meat, baking cakes with fillings on one shelf only.
TURBO GRILL
For roasting large joints of meat (legs, roast beef, chicken). We recommend using a drip tray to collect the cooking juices: Position the pan on any of the levels below the wire shelf and add 500ml of drinking water.
FROZEN BAKE
The function automatically selects the ideal cooking temperature and mode for 5 different types of ready frozen food. The oven does not have to be preheated.
SPECIAL FUNCTIONS
AIR FRY
This function allows you to cook French fries, chicken nuggets and more using less oil, resulting pleasantly crispy. Heating elements cycle to properly heat the cavity, while the fan circulates hot air.
Best expected cooking results can be achieved only by using an Air Fry tray (provided with some models). Position the food on the Air Fry tray in a single layer and follow Air Fry Cooking Table instructions for best performances.
Avoid using more than one tray to prevent uneven cooking.
RISING
For optimal proving of sweet or savoury dough. To maintain the quality of proving, do
not activate the function if the oven is still hot following a cooking cycle.
DEFROST
To speed up defrosting of food. Place food on the middle shelf. Leave food in its packaging to prevent it from drying out on the outside.
> KEEP WARM
For keeping just-cooked food hot and crisp.
ECO FORCED AIR
For cooking stuffed roasting joints and fillets of meat on a single shelf. Food is prevented from drying out excessively by gentle, intermittent air circulation. When this ECO function is in use, the light will remain switched off during cooking. To use the ECO cycle and therefore optimise power consumption, the oven door should not be opened until the food is completely cooked.

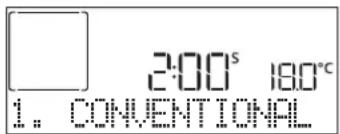
CONVENTIONAL
For cooking any kind of dish on one shelf only.

GRILL
For grilling steaks, kebabs and sausages, cooking vegetables au gratin or toasting bread. When grilling meat, we recommend using a drip tray to collect the cooking juices: Position the tray on any of the levels below the wire shelf and add 500ml of drinking water.

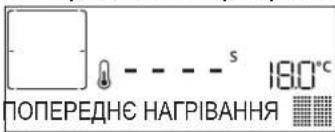
FAST PREHEAT
For preheating the oven quickly.

TIMERS
For editing function time values.

MINUTEMINDER
For keeping time without activating a function.

CLEANING
AUTOMATIC OVEN CLEANING - PYRO
For eliminating cooking spatters using a cycle at very high temperature. Two selfcleaning cycles are available: A complete cycle (Pyro) and a shorter cycle (Pyro Eco). We recommend using the quicker cycle at regular intervals and the complete cycle only when the oven is heavily soiled.
- DRAIN
For draining the boiler in order to prevent residual water remaining in there when the appliance will not be used for a certain period of time.
- DESCALE
For removing limescale deposits from the boiler. We recommend using this function at regular intervals. If yuo do not, a message will appear on the display reminding you to clean the oven.
SMART CLEAN
The action of the steam released during this special low-temperature cleaning cycle allows dirt and food residues to be removed with ease. Pour 200ml of drinking water on the bottom of the oven and only activate the function when the oven is cold.

SETTINGS
For adjusting the oven settings.
When "ECO" mode is active the brightness of the display will be reduced to save energy and lamp switches off after 1 minute. It will be reactivated automatically whenever any
FIRSTTIMEUSE
1. SELECT THE LANGUAGE
You will need to set the language and the time when you switch on the appliance for the first time: "English" will show on the display.
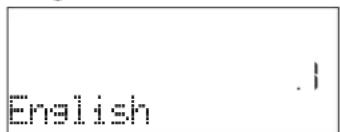
Press or to scroll through the list of available languages and select the one you require. Press to confirm your selection.
Please note: The language can subsequently be changed by selecting "LANGUAGE" in " SETTINGS" menu, available by pressing
2. SET THE POWER CONSUMPTION
The oven is programmed to consume a level of electrical power that is compatible with a domestic network that has a rating of more than 3kW (16): If your household uses a lower power, you will need to decrease this value (13).
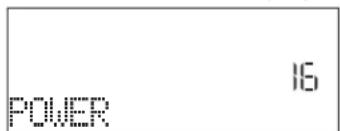
Press or to select 16 "High" or 13 "Low" and press to confirm.
3. SET THE TIME
After selecting the power, you will need to set the current time: The two digits for the hour will flash on the display.

Press to set the current hour and press : The two digits for the minutes will flash on the display. Press + or to set the minutes and press to confirm.
Please note: You may need to set the time again following lengthy power outages. Select "CLOCK" in " SETTINGS" menu, available by pressing
of the buttons are pressed.When "DEMO" is "On" all commands are active and menus available but the oven doesn't heat up. To deactivate this mode, access "DEMO" from "SETTINGS" menu and select "Off".
By selecting "FACTORY RESET", the product switches off and then it returns to first switch on. All settings will be deleted.

FAVORITES
For retrieving the list of 10 favorite functions.
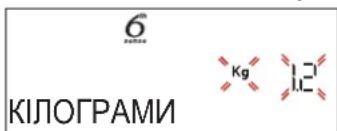
4. SET THE WATER HARDNESS LEVEL
In order to allow the oven to work efficiently, and to guarantee that it regularly prompts the user to perform Descale cycle when needed, it is important to set the correct water hardness level. To set it, switch on the oven by pressing 0 , press Settings and use navigation buttons + and -to select "WATER HARDNESS". Press to confirm. Use navigation buttons + and -to select the correct level for the water of your area, based on the following table:
| WATER HARDNESS LEVELS TABLE | ||||
| Level | °dH German degrees | °fH French degrees | °Clark English degrees | |
| 1 Very soft 0-6 | 0-10 0-7 | |||
| 2 Soft 7-11 11-20 | 20 8-14 | |||
| 3 Mid 12-16 21-29 | 29 15-20 | |||
| 4 Hard 17-34 30-60 | 60 21-42 | |||
| 5 Very hard | 35-50 | 61-90 | 43-62 | |
Press to confirm.
For Water Hardness level, "Hard" is preset.
5. HEAT THE OVEN
A new oven may release odours that have been left behind during manufacturing: this is completely normal. Before starting to cook food, we therefore recommend heating the oven with it empty in order to remove any possible odours. Remove any protective cardboard or transparent film from the oven and remove any accessories from inside it. Heat the oven to 200^ for around one hour, ideally using a function with air circulation (e.g. "Forced Air" or "Convection Bake").
Please note: It is advisable to air the room after using the appliance for the first time.
DAILYUSE
1. SELECT A FUNCTION
Press to switch on the oven: the display will show the last running main function or the main menu. The functions can be selected by pressing the icon one of the main functions or by scrolling through a menu: To select an item from a menu (the display show the first available item), press + or to select the desired one, then press to confirm.
2. SET THE FUNCTION
After having selected the function you require, you can change its settings. The display will show the settings that can be changed in sequence. Pressing allows you to change the previous setting again.
When the value flashes on the display, press to change it, then press to confirm and continue with the settings that follow (if possible).
In the same way, it is possible to set the grill level: There are three defined power levels for grilling: 3 (high), 2 (mid), 1 (low).
In "Forced Air + Steam" function, you can select the amount of steam from the following values: STEAM 1, STEAM 2.
Please note: Once the function has been activated, the temperature/grill level can be changed using +or -
DURATION
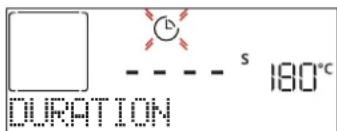
When the 念 on flashes on the display, press or ^+ to set the cooking time you require and then press to confirm. You do not have to set the cooking time if you want to manage cooking manually (untimed): Press or to confirm and start the function. By selecting this mode, you cannot program a delayed start.
Please note: You can adjust the cooking time that has been set during cooking by pressing : press to amend it and then press to confirm.
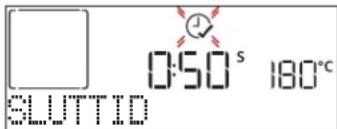
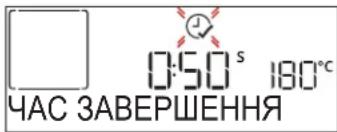
END TIME (START DELAY)
In many functions, once you have set a cooking time you can delay starting the function by programming its end time. The display shows the end time while the icon flashes.
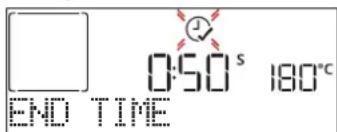
Press or to set the time you want cooking to end,
then press to confirm and activate the function. Place the food in the oven and close the door: The function will start automatically after the period of time that has been calculated in order for cooking to finish at the time you have set.
Please note: Programming a delayed cooking start time will disable the oven preheating phase: The oven will reach the temperature you require gradually, meaning that cooking times will be slightly longer than those listed in the cooking table. During the waiting time, you can press+ or to amend the programmed end time or press to change other settings. By pressing , in order to visualize information, it is possible to switch between end time and duration.
.6th SENSE
These functions automatically select the best cooking mode, temperature and duration to cook, roast or bake all the dishes available.
When required, simply indicate the characteristic of food to obtain an optimal result.
WEIGHT / HEIGHT / PIZZA (ROUND-TRAY-LAYERS)

To set the function correctly, follow the indications on the display, when prompted, and press + or to set the required value then press to confirm.
DONENESS/BROWNING
In some 6th Sense functions it is possible to adjust the doneness level.

When prompted, press or to-select the desired level between rare (-1) and well done (+1). Press or to confirm and start the function.
In the same way, where allowed, in some 6th Sense functions, it's possible to adjust the browning level between low (-1) and high (1).
. COOKING WITH STEAM
By selecting the "Forced Air + Steam" or one of the several 6^th Sense dedicated recipes it is possible cook any kind of food thanks to the use of the steam. Steam spreads more quickly and more evenly through food compared to just the hot air typical of Conventional Functions: this reduce cooking times, locking in food's precious nutrients and ensuring you obtain excellent, truly delicious results with all your recipes. Through the complete duration of the steam cooking the door must be kept closed.
To proceed with steam cooking, it will be necessary to provide water to the boiler located inside the oven using the extractable drawer on the control panel.
When requested on the display with "ADD WATER" indications, open the drawer by pressing the tilting cap. Once extracted, open drawer's lid and slowly pour in some drinking water until the notch corresponding to the level requested on the display (LEVEL 1 or 2, based on selected function) is reached. In any case, do not overfill the drawer exceeding the notch indicating Level 2. Close the drawer by pushing it carefully towards the panel until completely closed. The drawer must always remain closed, except for water filling.
After the first filling, in case of longer cooking cycles, once water will have ran out, it could be necessary to add it again, in order to complete the cycle: the oven will prompt it in case it is needed.
Avoid to fill the drawer when the oven is switched off, or up to it is requested from the display.
We suggest emptying the drawer after the cooking steam cycle.
3. START THE FUNCTION
At any time, if the default values are those desired or once you have applied the settings you require, press to activate the function.
During the delay phase, by pressing the oven will ask if you want to skip this phase, starting immediately the function.
Please note: Once a function has been selected, the display will recommend the most suitable level for each function. At any time you can stop the function that has been activated by pressing .
If the oven is hot and the function requires a specific maximum temperature, a message will shown on the display. Press to return to previous screen and select a different function or wait for a complete cooling.
4. PREHEATING
Some functions have an oven preheating phase: Once the function has started, the display indicates that the preheating phase has been activated.
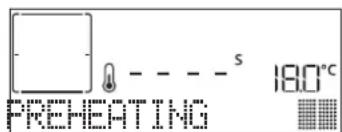
Once this phase has finished, an audible signal will sound and the display will indicate that the oven has reached the set temperature, requiring to "ADD FOOD". At this point, open the door, place the food in the oven, close the door and start cooking by pressing or
Please note: Placing the food in the oven before preheating has finished may have an adverse effect on the final cooking result. Opening the door during the preheating phase will stop pause it.
The cooking time does not include a preheating phase. You can always change the temperature you want the oven to reach using + or -
5. PAUSE COOKING / TURN OR CHECK FOOD
By opening the door, the cooking will be temporarily paused through deactivating heating elements.
To resume the cooking, close the door.
Some 6th Sense functions will require the food to be turned during cooking.
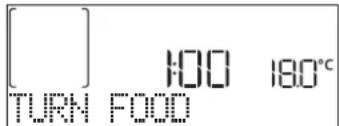
An audible signal will sound and the display shows the action to be done. Open the door, do the action prompted by the display and close the door, then press to continue cooking.
In the same way, at 10% of time before the end of cooking, the oven prompts you to check the food.
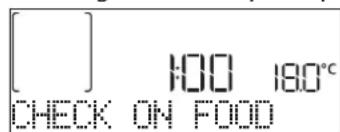
An audible signal will sound and the display shows the action to be done. Check the food, close the door and press or to continue cooking.
Please note: Press to skip these actions. Otherwise, if no action is done after a certain time the oven will continue the cooking.
6.END OF COOKING
An audible signal will sound and the display will indicate that cooking is complete.
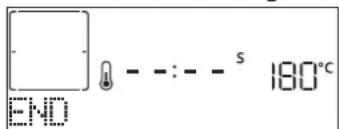
Press to continue cooking in manual mode (untimed) or press + to extend the cooking time by setting a new duration. In both cases, the cooking parameters will be retained.
BROWNING
Some functions of the oven enable you to brown the surface of the food by activating the grill once cooking is complete.
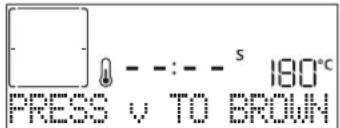
When the display shows the relevant message, if required press to start a five-minute browning cycle. You can stop the function at any time by pressing 0 to switch the oven off.
. FAVORITES
Once cooking is complete the display will prompt you to save the function in a number between 1 and 10 on your list of favorites.
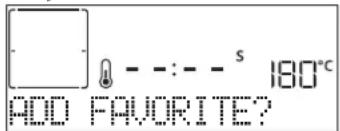
If you would like to save a function as a favorite and store the current settings for future use, press otherwise, to ignore the request press.
Once has been pressed, press the or to select the number position, then press to confirm.
Please note: If the memory is full or the number chosen has already been taken, the oven will ask you to confirm overwriting the previous function.
To call up the functions you have saved at a later time, press : The display will show your list of favorite functions.
Press to select the function, confirm by pressing , and then press to activate.
.CLEANING
SMARTCLEAN
Press to show "Smart Clean" on the display.

Press to activate the function: the display will prompt you to do all actions needed to obtain the best cleaning results: Follow the indications and then press when done. Once you have done all steps, when required press to activate the cleaning cycle.
Please note: It is recommended to do not open the oven door during the cleaning cycle to avoid a loss of water vapor that could get an adverse effect on the final cleaning result.
An appropriate message will start flashing on the display once the cycle has finished. Leave the oven to cool and then wipe and dry the interior surfaces with a cloth or sponge.
AUTOMATIC CLEANING - PYRO
Do not touch the oven during the Pyro cycle. Keep children and animals away from the oven during and after (until the room has finished airing) running the Pyro cycle.
Remove all accessories - including shelf guides - from the oven before activating the function. If the oven is installed below a hob, make sure that all the burners or electric hotplates are switched off while running the self-cleaning cycle. For optimum cleaning results, remove excessive residuals inside the cavity and clean the inner door glass before using the pyrolytic function. We recommend only running the Pyro function if the appliance contains heavy soiling or gives off bad odours during cooking.
Press to show "Pyro" on the display.
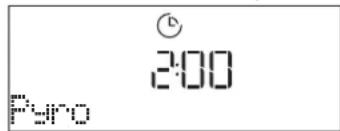
Press to select the desired cycle, then press to confirm. Once a cycle has been selected, if desired, press + or to set end time (start delay), then press to confirm. Clean the door and remove all accessories as prompted, then close the door and press when done: the oven will begin the self-cleaning cycle, while the door locks automatically: a warning message appears on the display, along with a countdown indicating the status of the cycle in progress. Once the cycle has been completed, the door remains locked until the temperature inside the oven has returned to a safe level.
Please note: remove water from the drawer before pyro cycle activation
DRAIN
The drain function allows the water to be drained in order to prevent stagnation in the boiler. This product has been developed in order to automatically run a drain cycle once cooking has been stopped/has ended. Approximately 30min after the stop/end of cooking, the oven will automatically drain the system, moving the residual water in the drawer (be careful not to remove the drawer after cooking). Once done, the drawer can be extracted and emptied.
We recommend emptying the drawer as soon as the drain is completed, after the cooking cycle.
If needed, a manual drain can in any case be executed by the user following the instruction below.

Select the "Drain" function with the water drawer properly inserted in the oven, press and wait for the cycle to automatically run. The average duration for full load drainage is about one minute. Once done, the drawer can be extracted and emptied.
Please note: to ensure that the water is cold, it is not possible to perform this activity before 30 minutes have elapsed from the last cycle (or the last time the product was powered). During this waiting time, the display will show the following feedback "WATER IS HOT"
- DESCALE
This special function, activated at regular intervals, allows you to keep the steam system in the best condition. Once the function is started, follow all the steps indicated on the display and press when done to start each phase. The average duration of the full function is around 100 minutes.
Please note: If the function is stopped at any time, the entire descending cycle must be repeated.
The display will show you when it is time to run a Descale cycle (see the table below).
| DESCALEMESSAGE MEANING | |
| <RECOMMENDED DESCALE>It appears after around 15 hours of steam cycles* | It is recommended to run a Descale cycle. |
| <PLEASE DESCALE>It appears after around 20 hours of steam cycles* | Descale is mandatory. It is not possible to run a Steam cycle until a Descale cycle will be carried out. |
*considering the default value (4 - Hard) of water hardness level. The number of hours of steam cycles that must pass before the Decale messages are shown depends on the water hardness level set on the appliance.
The descending procedure can also be performed whenever the user desires a deeper cleaning of the internal steam circuit.
Before to run the descending phase, the appliance will check if some residual water is contained into the boiler, and a Drain cycle could be performed, if needed. In this case, you will have to empty the drawer after the Drain cycle, before continuing with the Descale Phase.
Please note: to ensure that the water is cold, it is not possible to perform this activity before 30 minutes have elapsed from the last cycle (or the last time the product was powered). During this waiting time, the display will show the following feedback "WATER IS HOT".
PHASE 1/2: DESCALING (70 MIN)
When display will show
Once the descending solution is poured inside the drawer, press to start the main descending process. The descending phases do not need you to stay in front of the appliance. After each phase is completed, an acoustical feedback will be played and the display will show instructions to proceed with the next phase.
Once the descending phase has been completed, the boiler will be drained: the descending solution used during this phase will be poured into the extractable drawer.
PHASE 2/2: RINSING (30 min.)
To remove descale residuals from the drawer and the steam circuit, rinse cycle has to be done. When display shows <ADD 0.25 L OF WATER> fill the tank with 0,25 L of drinking water, then press to start the rinsing. Do not turn off the oven until all the steps required by the function have been completed.
When the message "DESCALING COMPLETED" appears on the display, please press OK to confirm.
Cooking functions cannot be activated during the cleaning cycle. Please note: A message will be shown on display, to remind you to execute this operation regularly.
When Descale procedure is completed, it is suggested to dry the cavity from potential water residuals. It will be then possible to use all the steam functions.
Note: during the Descale cycle, some noise could potentially be heard since the oven pumps are activated in order to guarantee the optimal descale efficiency.
Once the maintenance cycle has started, do not remove the drawer unless requested by the appliance.
. MINUTEMINDER
When the oven is switched off, the display can be used as a timer. To activate this function, make sure that the oven is switched off and press + or :The icon will flash on the display.
Press + or to set the length of time you require and then press to activate the timer.
An audible signal will sound and the display will indicate once the minuteminder has finished counting down the selected time.
Please note: The minuteminder does not activate any of the cooking cycles. Press + or to change the time set on the timer.
Once the minuteminder has been activated, you can also select and activate a function.
Press to switch on the oven and then select the function you require.
Once the function has started, the timer will continue to count down independently without interfering with the function itself.
Please note: During this phase, it isn't possible to see the minuteminder (only the icon will be displayed), that will continue counting down in background. To retrieve the minuteminder screen press to stop the function that is currently active.
. KEYLOCK
To lock the keypad, press and hold for at least five seconds. Do this again to unlock the keypad.
Please note: This function can also be activated during cooking. For safety reasons, the oven can be switched off at any time by pressing.
| FOOD CATEGORIES SUGGESTED QUANTITY | TURN(of cook time) | LEVEL AND ACCESSORIES | ||
| LASAGNA - 0.5 - 3 kg- | 2 | |||
| MEAT | Beef roasted 0.6 - 2 kg- | 3 | ||
| Hamburgers 1.5 - 3 cm 3/5 | 5 4 | |||
| Roasted 0.6 - 2.5 kg- | 3 | |||
| Chicken-roasted 0.6 - 3 kg- | 2 | |||
| Fillet & breast 1 - 5 cm 2/3 | 5 4 | |||
| FISH | Fish fillets 0.5 - 3 (cm)- | 3 2 | ||
| Fillets-frozen 0.5 - 3 (cm)- | 3 2 | |||
| VEGETABLES | Potatoes | 0.5 - 1.5 kg | - | 3 |
| Vegetable-roast | 0.5 - 1.5 kg | - | 3 | |
| Vegetable-gratin | one tray | - | 3 | |
| CAKES & PASTRIES | Sponge cake | 0.5 - 1.2 kg- | 3 | |
| Cookies | 0.2 - 0.6 kg- | 3 | ||
| Tart | 0.4 - 1.6kg | - | 3 | |
| Quiche | 0.8 - 1.2 kg- | 2 | ||
| PIZZA & BREAD | Thin pizza | round - tray | - | 2 |
| Thick pizza | round - tray | - | 2 | |
| Pizza- frozen | 1 - 4 layers - | 2 | ||
| Rolls | 60 - 150 g each | - | 3 | |
| Big bread | 0.7 - 2.0 kg- | 2 | ||
ACCESSIONS

Wire shelf

Oven tray or cake tin on wire shelf

Drip tray / Baking tray or oven tray on wire shelf

Drip tray / Baking tray

Drip tray with 500ml of water

Air fry
| RECIPE STEAM LEVEL PREHEAT TEMPERATURE (°C) | DURATION (MIN.) | SHELF AND ACCESSORIES | ||
| Shortbread / Cookies STEAM 1 Yes 140 - 150 35 - 55 | 3 | |||
| Small cake / Muffin STEAM 1 Yes 160 - 170 30 - 40 | 3 | |||
| Leavened cakes STEAM 1 Yes 170 - 180 40 - 60 | 2 | |||
| Sponge cakes STEAM 1 Yes 160 - 170 30 - 40 | 2 | |||
| Focaccia | STEAM 1 | Yes | 200 - 220 | 20 - 40 |
| Bread loaf | STEAM 1 | Yes | 170 - 180 | 70 - 100 |
| Small bread | STEAM 1 | Yes | 200 - 220 | 30 - 50 |
| Baguette | STEAM 1 | Yes | 200 - 220 | 30 - 50 |
| Roast potatoes | STEAM 2 | Yes | 200 - 220 | 50 - 70 |
| Veal / Beef / 1 kg | STEAM 2 | Yes | 180 - 200 | 60 - 100 |
| Veal / Beef / (pieces) | STEAM 2 | Yes | 160 - 180 | 60 - 80 |
| Roast Beef rare 1 kg | STEAM 2 | Yes | 200 - 220 | 40 - 50 |
| Roast Beef rare 2 kg | STEAM 2 | Yes | 200 | 55 - 65 |
| Leg of lamb | STEAM 2 | Yes | 180 - 200 | 65 - 75 |
| Stewed knuckles | STEAM 2 | Yes | 160 - 180 | 85 - 100 |
| Chicken / guinea fowl / duck 1 - 1.5 kg | STEAM 2 | Yes | 200 - 220 | 50 - 70 |
| Chicken / guinea fowl / duck (pieces) | STEAM 2 | Yes | 200 - 220 | 55 - 65 |
| Stuffed vegetables (tomatoes, courgettes, aubergines) | STEAM 2 Yes 180 - 200 | 25 - 40 | 3 | |
| Fish fillet | STEAM 2 | Yes | 180 - 200 | 15 - 30 |
| ACCESSIONS | Wire shelf | Oven tray or cake tin on wire shelf | Drip tray / Baking tray or oven tray on wire shelf | Drip tray / Baking tray | Drip tray with 500 ml of water | Air fry |
AIR FRY COOKING TABLE
| RECIPE FUNCTION | SUGGESTED QUANTITY | PREHEAT TEMPERATURE (°C) DURATION (Min.) | SHELF AND ACCESSORIES | ||
| Frozen French Fries 650-850g | 200 25 - 30 | L4 L1 | |||
| Homemade Fries | 300 - 800g Yes 200 20 - 40 | L4 L1 | |||
| Fresh Breaded Zucchini | 400g Yes 200 15 - 20 | L4 L1 | |||
| Mixed Vegetables | 300 - 800g Yes 200 20 - 30 | L4 L1 | |||
| Frozen Chicken Nuggets | 500g Yes 200 15 - 20 | L4 L1 | |||
| Breaded Chicken Breast | 1 - 4cm Yes 200 20 - 40 | L4 L1 | |||
| Frozen Fish Sticks | 500g Yes 220 15 - 20 | L4 L1 | |||
| Breaded Cutlet | 1 - 4cm Yes 220 20 - 50 | L4 L1 | |||
For cooking fresh or homemade foods, spread the oil evenly.
We suggest adding an empty tray on L1 in order to collect eventual grease residual coming from the Air fry tray during the cooking.
In order to guarantee uniform cooking results, mix food halfway through the recommended cooking time.
FUNCTIONS

Conventional

Forced air

Convection bake

Grill

TurboGrill

Eco Forced air

Air Fry
COOKING TABLE
| RECIPE FUNCTION PREHEAT TEMPERATURE (°C) DURATION (MIN.) | SHELF AND ACCESSORIES | |||||
| Leavened cakes / Sponge cakes | Yes 170 30 - 50 | 2 | ||||
| Yes 160 30 - 50 | 2 | |||||
| Yes 160 30 - 50 | 4 | 1 | ||||
| Filled cakes(chesecake, strudel, apple pie) | Yes 160 - 200 30 - 85 | 3 | ||||
| Yes 160 - 200 35 - 90 | 4 | 1 | ||||
| Cookies / Shortbread | Yes 150 20 - 40 | 3 | ||||
| Yes 140 30 - 50 | 4 | |||||
| Yes 140 30 - 50 | 4 | 1 | ||||
| Yes 135 40 - 60 | 5 | 3 1 | ||||
| Small cakes / Muffin | Yes 170 20 - 40 | 3 | ||||
| Yes 150 30 - 50 | 4 | |||||
| Yes 150 30 - 50 | 4 | 1 | ||||
| Yes 150 40 - 60 | 5 | 3 1 | ||||
| Choux buns | Yes 180 - 200 30 - 40 | 3 | ||||
| Yes | 180 - 190 | 35 - 45 | 4 | 1 | ||
| Yes | 180 - 190 | 35 - 45* | 5 | 3 1 | ||
| Meringues | Yes | 90 | 110 - 150 | 3 | ||
| Yes | 90 | 130 - 150 | 4 | 1 | ||
| Yes | 90 | 140 - 160* | 5 | 3 1 | ||
| Pizza / Bread / Focaccia | Yes 190 - 250 | 15 - 50 | 2 | |||
| Yes 190 - 230 20 - 50 | 4 | 1 | ||||
| Pizza (Thin, thick, focaccia) | Yes 220 - 240 | 25 - 50* | 5 | 3 1 | ||
| Yes 250 10 - 15 | 3 | |||||
| Frozen pizza | Yes 250 | 10 - 20 | 4 | 1 | ||
| Yes 220 - 240 | 15 - 30 | 5 | 3 1 | |||
| Savoury pies(vegetable pie,quiche) | Yes | 180 - 190 | 45 - 55 | 3 | ||
| Yes | 180 - 190 | 45 - 60 | 4 | 1 | ||
| Yes | 180 - 190 | 45 - 70* | 5 | 3 1 | ||
| Vols-au-vent / Puff pastry crackers | Yes 190 - 200 20 - 30 | 3 | ||||
| Yes | 180 - 190 | 20 - 40 | 4 | 1 | ||
| Yes | 180 - 190 | 20 - 40* | 5 | 3 1 | ||
| RECIPE | FUNCTION | PREHEAT | TEMPERATURE (℃) | DURATION (Min.) | SHELF AND ACCESSORIES | |
| Lasagne / Flans / Baked pasta / Cannelloni | Yes 190 - 200 45 - 65 | 3 | ||||
| Lamb / Veal / Beef 1 kg Yes 190 - 200 80 - 110 | 3 | |||||
| Chicken / Rabbit / Duck 1 kg Yes 200 - 230 50 - | 3 | |||||
| Turkey / Goose 3 kg Yes 190 - 200 80 - 130 | 2 | |||||
| Baked fish / en papillote (fillets, whole) | Yes 180 - 200 40 - 60 | 3 | ||||
| Stuffed vegetables (tomatoes, courgettes, aubergines) | Yes 180 - 200 50 - 60 | 2 | ||||
| Toast | - | 3 (High) | 3 - 6 | 5 | ||
| Fish fillets / Steaks | - | 2 (Mid) | 20 - 30 ** | 4 3 | ||
| Sausages / Kebabs / Spare ribs / Hamburgers | - | 2 - 3 (Mid - High) | 15 - 30 ** | 5 4 | ||
| Roast chicken 1-1.3 kg | - | 2 (Mid) | 55 - 70 *** | 2 1 | ||
| Leg of lamb / Shanks | - | 2 (Mid) | 60 - 90 *** | 3 | ||
| Roast potatoes | - | 2 (Mid) | 35 - 55 *** | 3 | ||
| Vegetable gratin | - | 3 (High) | 10 - 25 | 3 | ||
| Complete meal: Fruit tart (level 5) / lasagne (level 3) / meat (level 1) | Yes | 190 | 40 - 120 * | 5 3 1 | ||
| Lasagna & Meat | Yes | 200 | 50 - 100 * | 4 1 | ||
| Meat & Potatoes | Yes | 200 | 45 - 100 * | 4 1 | ||
| Fish & Vegetables | Yes | 180 | 30 - 50 * | 4 1 | ||
| Stuffed roasting joints | - | 200 | 80 - 120 * | 3 | ||
| Cuts of meat (rabbit, chicken, lamb) | - 200 | 50 - 100 * | 3 | |||
- Estimated length of time: dishes can be removed from the oven at different times depending on personal preference.
Turn food halfway through cooking.
* Turn food two thirds of the way through cooking (if necessary).
HOW TO READ THE COOKING TABLE
The table lists the best function, accessories and level to use to cook different types of food.
Cooking times start from the moment food is placed in the oven, excluding preheating (where required).
Cooking temperatures and times are approximate and depend on the amount of food and the type of accessory used.
Use the lowest recommended settings to begin with and, if the food is not cooked enough, then switch to higher settings.
Use the accessories supplied and preferably darkcoloured metal cake tins and baking trays. You can also use Pyrex or stoneware pans and accessories, but bear in mind that cooking times will be slightly longer.

CLEANING AND MAINTENANCE
Make sure that the oven has cooled down before carrying out any maintenance or cleaning. Do not use steam cleaners.
Do not use wire wool, abrasive scourers or abrasive/corrosive cleaning agents, as these could damage the surfaces of the appliance.
Wear protective gloves. The oven must be disconnected from the mains before carrying out any kind of maintenance work.
EXTERIOR SURFACES
Clean the surfaces with a damp microfibre cloth. If they are very dirty, add a few drops of pH-neutral detergent. Finish off with a dry cloth.
. Do not use corrosive or abrasive detergents. If any of these products inadvertently comes into contact with the surfaces of the appliance, clean immediately with a damp microfibre cloth.
INTERIOR SURFACES
After every use, leave the oven to cool and then clean it, preferably while it is still warm, to remove any deposits or stains caused by food residues To dry any condensation that has formed as a result of cooking foods with a high water content, let the oven to cool completely and then wipe it with a cloth or sponge.
. Activate the "Smart Clean" function for optimum cleaning of the internal surfaces.
. Clean the glass in the door with a suitable liquid detergent.
. The oven door can be removed to facilitate cleaning.
ACCESSIONS
Soak the accessories in a washing-up liquid solution after use, handling them with oven gloves if they are still hot. Food residues can be removed using a washing-up brush or a sponge.
WATER DRAWER MAINTENANCE
Caution: The water drawer is not suitable for dishwasher use: risk of damage!
At the end of each cooking cycle with steam, after about 30 min the oven automatically performs a drain cycle lasting about one minute, thus transferring all the water in the system to the extractable drawer.
Once completed the auto-drain, proceed as follows:
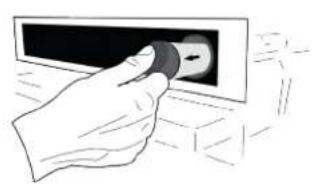
- Press the top of the drawer front cap, indicated with a recess, to pull out the handle
- Grasp the handle and pull out the water drawer.
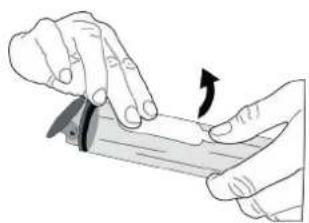
- Remove the lid of the water drawer.
- Empty the water drawer and clean it.
- Dry the different components by using a soft cloth.
- If necessary, allow the drawer to air dry without closing it with the lid.
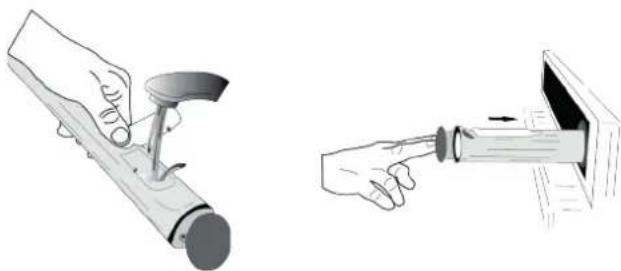
- Replace the water drawer lid.
- Re-insert the washed and dried removable water drawer into its housing making sure to push it all the way down
- Press the bottom of the drawer front cap to reposition the handle.
Note: If needed, a manual drain cycle can be performed: press the Cleaning icon on the UI panel and by navigating with the + and - buttons, select the Drain option and press the icon to start. The oven will drain the water in the system, conveying it to the extractable drawer.
Note: Avoid to leave the water in the system more than 2 days.
Use only room temperature water when filling the water drawer: hot water may affect the operation of the steam system. Use only drinking water.
BOILER
To ensure that the oven always works at optimum performance and to help prevent the build-up of limescale deposits over time, we recommend using the "Drain" and "Descale" functions regularly.
After a long period of non-use of the "Forced Air + Steam" function, it is highly suggested to activate a cooking cycle with the empty oven by filling completely the tank.
REPLACING THE LIGHT
- Disconnect the oven from the power supply.
- Unscrew the cover from the light, replace the bulb and screw the cover back on the light.
- Reconnect the oven to the power supply.
Please note: 40W / 230 V type G9, T300°C halogen bulbs. The bulb used in the product is specifically designed for domestic appliances and is not suitable for general room lighting within the home. Light bulbs are available from our After-sales Service.
- If using halogen bulbs, do not handle them with your bare hands as your fingerprints could cause damage. Do not use the oven until the light cover has been refitted.
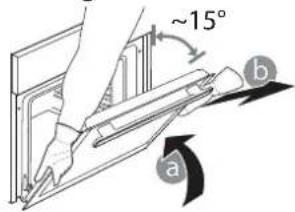
REMOVING AND REFITTING THE DOOR
- To remove the door, open it fully and lower the catches until they are in the unlock position.
- Close the door as much as you can. Take a firm hold of the door with both hands - do not hold it by the handle.
Simply remove the door by continuing to close it while pulling it upwards at the same time until it is released from its seating. Put the door to one side, resting it on a soft surface.
-
Refit the door by moving it towards the oven, aligning the hooks of the hinges with their seating and securing the upper part onto its seating.
-
Lower the door and then open it fully. Lower the catches into their original position: Make sure that you lower them down completely.
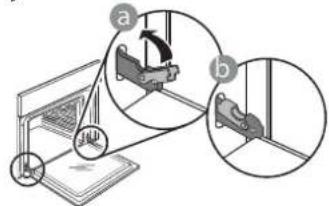
Apply gentle pressure to check that the catches are in the correct position.
- Try closing the door and check to make sure that it lines up with the control panel. If it does not, repeat the steps above: The door could become damaged if it does not work properly.
TROUBLESHOOTING
| PROBLEM POSSIBLE CAUSE SOLUTION | ||
| The oven is not working. | Power cut.Disconnection from the mains. | Check for the presence of mains electrical power and whether the oven is connected to the electricity supply.Turn off the oven and restart it to see if the fault persists. |
| The display shows the letter “F” followed by a number or letter. | Oven failure. | Contact you nearest Client After-sales Service Centre and state the number following the letter “F”. |
| The oven does not heat up.The function does not start. | “DEMO” mode is running. Access | DEMO" from “ SETTINGS” and select “Off”. |
| The light switches off. “ECO” mode is “On”. Access “ECO” from “ SETTINGS” and | select “Off”. | |
| The door will not open. Cleaning cycle in progress. | Wait for the function to finish and for the oven to cool down. | |
| Drain pump activation some minutes after end/stop of steam cycle | Expected automatic water drain No action needed. |
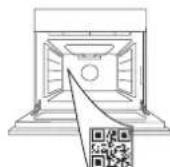
Policies, standard documentation and additional product information can be found by:
- Using the QR code in your appliance
- Visiting our website docs.whirlpool.eu
- Alternatively, contact our After-sales Service (See phone number in the warranty booklet). When contacting our After-sales Service, please state the codes provided on your product's identification plate.
DESCRIPTION DU PRODUIT
8. ACCES DIRECT AUX OPTIONS / FONCTIONS
ZAHVALUJEMO VAM NA KUPOVINI PROIZVODA WHIRLPOOL
Kako bismo vam mogli pruziti potpuniju pomoc, registrirajte svoj uredaj na adresi www.whirlpool.eu/register

Pazljivo procitajte sigurnosne upute prise upotrebe uredaja.
SKENIRAJTE QR KOD NA SVOM UREDAJU DA BISTE DOBILI VI SE INFORMACIJA
OPIS PROIZVODA
- Upravljacka ploca
- Ventilator
- Kružni grijac (nije vidljiv)
- Vodilice rešetke (razina je označena na prednjem dijelu pećnice)
- Vrata
- Ladica za vodu
- Gornji grijac/grill
- Žarulja
- Identifikacijska pločica (ne skidati)
- Donji grijac (ne vidi se)
OPIS UPRAVLJACKE PLOCE

1.ON/OFF
Za ukljucivanje i iskljucivanje pecnice ili zaustavljanje ukljucene funkcije.
2.IZRAVAN PRISTUP FUNKCIJAMA
RIST DRYPBAKKE BAGEPLADE GLIDESKINNER*


Anvendes til tilberedning af mad eller som understotning til pander, kageforme og andre ovnfaste kogegrej.
Anvendes som bradepande til tilberedning af k od, fisk, gronsager, focaccia, etc. ell anbragt under risen til at opsamle saften fra madlavningen.
ISÄTNING AF RIST OG ANDET TILBEHØR
Tryk pā for at vise "Smart Clean" pā displayet.

FASE 1/2: AFKALKNING (70 MIN)
KUIDAS KUPSETUSTABELLIT LUGEDA
8. VALINNAT / SUORA PÄASY TOIMINTOIHIN
3. TOIMINNON KAYNNISTYS
SMARTCLEAN-PUHDISTUStOIMINTO
KYPSENNYSTAULUKON LUKEMINEN
200s 180c 1.ALSO ES FELSO SUTES
2/2. POSMS: SKALOŠANA (30 MIN
Lai nonemtu atkalkosanas atlikumus no atvilktnes un tvaika kontura, ir javeic skalošanas cikls.Kad displejá ir redzams
Kad displeja tiek paradits pazinojums "ATKALKOSANA PABEIGTA", ludzu, nospiediet OK, lai apstiprinatu. Tirišanas cikla laika nevar aktivizet gatavosanas funkcijas. Ludzu, nemiet vera: Displeja tiks paradits pazinojums, kas atgadinas, ka si darbiba veicama regulari.
Kad atkalkošanas procedura ir pabeigta, ir ieteicams izžavet dobumu no iespejamām udens atliekam.Tad bus iespejams izmantot visas tvaika funkcjjas.
Piezime. Atkalkosanas cikla laika var but dzirdams troknsis, jo tiek aktivizeti krasns sukni, lia garantetu optimalu atkalosanas efektivitatei.
DEKOJAME, KAD ISIGJOTE, WHIRLPOOL"GAMINI
Kad galétuméte tinkamai pasinaudoti pagalba, užregistruokite gaminji svetainéje www.whirlpool.eu/register

SETTE INN GLIDESKINNENE (HVIS AKTUELT)
SLUTTID (UTSATT START)
For mange funksjoner, nár du Först har stilt inn steketiden kan du utsette start av funksjonen ved Å programmere tidspunktet for slutt. Display viser sluttiden mens ⑦ ikonet blinker.
. TILBEREDNING MED DAMPING
FASE 1/2:AVKALKING (70 MIN)
Eco Forced Air (Varmluft)

Air Fry
TILBEREDNINGSTABELL
| OPPSKrift | FUNKSJON | FORVARM | TEMPERATUR (°C) | VARIGHET (MIN.) | RIST OG TILBEHØR |
| Surdeigs-/sukkerbrødkaker | Ja 170 30 - 50 | 2 | |||
| Ja 160 30 - 50 | 2 | ||||
| Ja 160 30 - 50 | 4 1 | ||||
| Fylte kaker(ostekake, strudel, eplepai) | Ja 160 - 200 30 - 85 | 3 | |||
| Ja 160 - 200 35 - 90 | 4 1 | ||||
| Kaker/shortbread | Ja 150 20 - 40 | 3 | |||
| Ja 140 30 - 50 | 4 | ||||
| Ja 140 30 - 50 | 4 1 | ||||
| Ja 135 40 - 60 | 5 3 1 | ||||
| Småkaker/muffins | Ja 170 20 - 40 | 3 | |||
| Ja 150 30 - 50 | 4 | ||||
| Ja 150 30 - 50 | 4 1 | ||||
| Ja 150 40 - 60 | 5 3 1 | ||||
| Vannbakkers | Ja 180 - 200 30 - 40 | 3 | |||
| Ja | 180 - 190 | 35 - 45 | 4 1 | ||
| Ja | 180 - 190 | 35 - 45* | 5 3 1 | ||
| Marengs | Ja | 90 | 110 - 150 | 3 | |
| Ja | 90 | 130 - 150 | 4 1 | ||
| Ja | 90 | 140 - 160* | 5 3 1 | ||
| Pizza/brød/focaccia | Ja | 190 - 250 | 15 - 50 | 2 | |
| Ja 190 | 230 20 - 50 | 4 1 | |||
| Pizza (Tynn, tykk, focaccia) | Ja | 220 - 240 | 25 - 50* | 5 3 1 | |
| Frossenpizza | Ja | 250 | 10 - 15 | 3 | |
| Ja | 250 | 10 - 20 | 4 1 | ||
| Ja | 220 - 240 | 15 - 30 | 5 3 1 | ||
| Middagspaier(grønnsakspai, quiche) | Ja | 180 - 190 | 45 - 55 | 3 | |
| Ja 180 | 190 45 - 60 | 4 1 | |||
| Ja 180 | 190 45 - 70* | 5 3 1 |
FUNKSJONER

Over-/Underv.

Trykkluft

Eco Forced Air (Vamluft)

Air Fry
| Vols-au-vent/butterdeigskjeks | Ja 190 - 200 20 - 30 | 3 | ||
| Ja 180 - 190 20 - 40 | 4 1 | |||
| OPPSKRIFT | FUNKSJON | Ja 180 - 190 20 - 40*FORVARM TEMPERATURE (°C) | Varighet (min.) | 5 3 1RIST OG TILBEHØR |
| Lasagne / flans / olnsbakt pasta / cannelloni | Ja 190 - 200 45 - 65 | 3 | ||
| Lam / kalv / storfekjøtt 1 kg Ja 190 - 200 80 - 10 | 3 | |||
| Kylling /kanin /and 1 kg Ja 200 - 230 50 - 100 | 3 | |||
| Kalkun/gås 3 kg | Ja 190 - 200 | 80 - 130 | 2 | |
| Bakt fisk / en papillote (fileter, hel) | Ja 180 - 200 40 - 60 | 3 | ||
| Fylte grønnsaker (tomater, squash, aubergine) | Ja 180 - 200 50 - 60 | 2 | ||
| Toast (Ristet brød) | — | 3 (høy) | 3 - 6 | |
| Fiskefileter / Stek | — | 2 (mid) | 20 - 30 ** | |
| Pølser / Kebab / spareribs / hamburgere | — | 2 - 3 (mid - høy) | 15 - 30 ** | |
| Stekt kylling 1-1,3 kg | — | 2 (mid) | 55 - 70 *** | |
| Lammelær/lammeskank | — | 2 (mid) | 60 - 90 *** | |
| Stekte poteter | — | 2 (mid) | 35 - 55 *** | |
| Gratinerte grønnsaker | — | 3 (høy) | 10 - 25 | |
| Fullt måltid: Fruktterte (nivå 5) / lasagne (nivå 3) / kjøtt (nivå 1) | Ja | 190 | 40 - 120 * | |
| Lasagna og kjøtt | Ja | 200 | 50 - 100 * | |
| Kjøtt og poteter | Ja | 200 | 45 - 100 * | |
| Fisk og grønnsaker | Ja | 180 | 30 - 50 * | |
| Fylte grillsteker | — | 200 | 80 - 120 * | |
| Kjøttskiver (kanin, kylling, lam) | — | 200 | 50 - 100 * |
RENGJØRING OG VEDLIKEHOLD
VEDLIKEHOLD AV VANNSKUFFEN
VAMULTUMIMCAATI ACHIZITIONATUN PRODUS WHIRLPOOL
Pentru a beneficia de servicii complete de asistente,va rugam sa va inregistrati produsul pe www.whirlpool.eu/register

Inainte de autiliza aparatul,citi ci atentie instructiunile privind siguranta.
SCANATI CODUL QR DE PE APARATUL DUMNEAVOASTRA PENTRU A OBTINE MAI MULTE INFORMATI

DESCRIEREA PRODUSULUI
Conventional Aer fortat

SMARTCLEAN (PAMETNO CIscENJE)
Pritisnite prikažete „Smart Clean" (Pametno cisćenje) na displeju.

Pritisnite da aktivitate funkciju: na displeju se prikazuju sve radnje koje je potrebno da obavite
za postizanje najboljih rezultata ciscenja: Sledite uputstva i zatim pritisnite kada zavrsite. Kada obavite sve korake, kada se pojav zahev pritisnite da biste aktivirali ciklus ciscenja.
Obratite pažnju na sledece: Preporučuje se da ne otvarate vrata pećnice tokom ciklusa cisćzenia, kako biste sprećili gubitak vodene pare što moze imati kontraefekat na konačan rezultat cisćzenia.
Kada se ciklus zavrski, na displeju ce pocei da treperi odgovarajuca poruka. Pustite pecnicu da se ohladi, a zatim obrisite i osusite unutrasnje povrsine krpom ili sunderom.
AUTOMATSKO CIscENJE -PYRO
Ne dodirujte pećnicu tokom ciklusa Pyro. Decu iŽivotinje držite dalje od pećnice tokom i nakon (dok se prostorija ne provetri) ciklusa Pyro (pirolize).
TACK FOR ATT DU HAR KOPT EN PRODUKT FRAN WHIRLPOOL
For att f en mer omfattande support, vnligen registrar din produit pa www.whirlpool.eu/register

UGNSBAKA MED KONVEKTION
AVSLUTNINGSTID (FORDROJNING START)
FAS 1/2:AVKALKNING (70 MIN)
TELECKONIUYH HANPMAHI*
TnnoonrueHHBCTAHOBNEHHa60BNTyBaHHnpnna
DEKOДЯ AEPOΓРЛЯ*

BnKOpNCTOByeTbCnI
npurotyBaHHCTpAB3
fYHKJIeIOAeporPnIb》(nid
HMMaE6yTN BCTaHOBNeHe
NEKOJNBNiKaHHN DnI 36Opy
MOxKnBuX Kpnxt i Kpaenb).
NOrO MoxHa MNTN B
PiocydommHi MaunHi.
BCTAHOBJIeHHI TEJIeCKOIIuHIX HANPIMHX (3A HABHOCTI)
BntarHtB HanpMHI nIpewiTKn 3 dYXBOi
waΦn i 3HIMITb 3axNCHI nIaCTMacOBI enemeHTn 3
TeleckoniuHx HanpMHNX.
3amkhitb Bepxhi 3atnckau Teleckoniuhoi HanpmaHoi Ha HapmHi dIpewiKu Ta npocyhbTe Ioro B3doBx HanpmaHoi do ynpoy. Onycitb Ha miue iHsiu 3atnckau. Uo6 3aphiKcyBaTu HappmHy, MiHO npTnCHtB HXHHIO uactHy 3atnckau dO HappmHoi dIpewiTK. PeekohaiTecra, 0 to TeleckoniuHl HappmHMOxyTb BilbHO pyxaTnc. NobtopiTB ci di 3 IHsoU HappmHOIO dIpewiTKHa TOMy K camomy pibHi.
3BepHt b yBary: TeneckoniHi HanpMHi MoKHa BCTaHOBNIbATo H a 6yDb-akomy pIBHi.
ФУHKUII

6th SENSE
Po6ntb npoec npiroToyBaHHn iKi 6yDb-koTO Tny (na3aHb, M'aco, p6ba, oOoi, nporTu Ta iHsa BUNiUka, COJHO npORn, xNIO, Niua) NobHicTIO ABTomATuHM.
Ioo6 AKnHaKpaune 3aCTocyBatn uO fynkuio,
DOtpmMyTeCb BkazIBOK, HabeDeHNx y BiINOBIDHI Ta6nui ToTyBaHHn.

KOHBEKUII + IAPA
IoeHyouN BnactuOCTi nap3 npMycOBIM HArHItaHHm NOBITpy, UyHKuiJIO3BOJIe npiroTOyBaTn CTpaBN pInEMHO xpyCTKUMn iNiDpym'HeHMn 33OBHi, anE B ToH Jue cac HixHMn I cOKOBtUMn BCEpeDiHi. Jn daDCsRHeHHaHkPaUnx pezIbTaIb npiroToyBaHH M peKoMeHdycMo O6npaTuPiBeHb IAPA 1 dny npiroToyBaHHxli6a Ta Deceptib Ta IAPA 2 -dny M'ca, Pn6Tu OBOuyIB.

KOHBEKLII
Дя npirotoyBaHHЯ pi3Hnx npodykTIB 3 OndaKOBOTo TEMnepaTyPOI npirotoYBaHHЯ Ha DeKilbKOx NOINuKax (MaKcIMy Tpbox) OndouacHO. Lz cyHKiJa e 3Mory OndouacHO roTyBaTHpi3Hi CtpaBn i npn cboMy yHnKaTn 3MiUyBaHHa apomatIB.

TPAДИЦIHIФУHKLII
BUNIK.3 KOHB.
Ira rotybaHHM'ara,BniiuN nporib i3 HauHkoTinbKn Ha Ondi Niouci.
- TYP60FPIJb
Дя смжehн Велкхшмткь M'яса (HIXOK, poct6iib, kypuat). PekomeHyEmo BnKOpNCTOByBaTu n iIDOn DЯ 36napaHn COKy, lo BVtIkae npr roTyBaHHI: NocTabe nIDOn Ha 6ydb-akomy pIBHi nd pewiTKOTo Ta Hannte B HbOrO 500 mI nITHOI BOIN.
3AMOPOXEHA BUNIUKA
Функця abTomatunno 6npae ideaIbHy Tempepatyp roTyBaHHa Ta peKIM dIg5 p3Hnx TUNIB roTOBUX 3amopoxhenx npOdykTIB. IyXoby ufoy He notpi6Ho nporpiBatN.
CNIELIAJIbHIΦYHKUII
》AEPOΓPnJIb
Lya yHKzIa DO3BOJAE rOTyBaTn KapToJIIO
phi, KpyaHa HareTCn Ta iHsi CTpaBn 3 MeHWOIO
KInbKiCTHO ONII Ta pNcEMHO XpCYKTKOIO CKOpHHKOIO. HarpiaBnHi enemeHTn UKJIiUHO HarpiaBIOb
KaMepy,a BeHTnIaTOp cIPKynIO rApYe NOBITpR.
HaIKpaux PezylbTaTIB npIROTyBaHH MoXHa
DOCAITN IINe 3a yMOBN BkOOPNCaHH DaKO
dIa aeporpnIO (BXoDnTb DO KOMPiKeTMy DeAKNX
MoJeNe).Uo6 CTpaBN 6yNI YKOMORA CMaHlWiIMM,
PO3MIuYTe npOdyKTn Ha KeO dIra aeporpnIO
B ODNH wap i DOnTPmHyIteCb IHCTpyKci,
HabeDeHNx y BiNobIDHI TabNiCi rOTyBaHHr.
He BkOpncTOByte 6Inbwe OndHoro DeKa, 0o6
3ano6irn HeipBHomipHomy npiroTOyBaHHIO.
》ПДИМАНХТICTA
Дя ONTUMaNbHOrO BnCTOIOBaHHaCOJOKOro
a60 coNoHOrTO ticta.ДЯ 3a6e3neueHHaIKiCHORO
NiHIMaHHa He BMNKaHTe LIO yHKUIO,RAUO
dYxOBa IaΦa NdoI rapraa NiCIAu cNkny
TOTyBaHHa.
》PO3MOPOXyBAHH
IpyKoepHO PO3MOPOxyBaHHN pOdyKTIB. IocTaBte npOyKTn Ha cepeHNO nOIuTo. 3aJIuTe npOyKTn BynaKobUci, uo6 3ano6irTu BucxHaHHIO 33OBHi.
》ПДИГРIB
IJIITPIMAHHJIOHO npiroTOBAHIX CtpaB rapAUMTaXpCTKMM.
KOHBEKLII ECO
IpyroBaHHAeHApHnPoBAnx mMaTkiB M'ra Ta fine Ha oDiH nOnu.i. Ixy 3axnuae Bid HAdmipHoro nepecnxHaHn nepioDnHa lerka UnpKnyaia nobitrp.Ii dac po6otn FyHKii ECO CBITNO 3aIIuHaetbCBAIMKHeHIM IpOTAROM ycboro roTyBaHHa. 06 ckopncTaTcN CkNOM ECO ta ONTMI3yBatn eheprocNoXnBaHH, cId BiyHnTn DBepuTa dyXOBoI waΦn NlWe nicna 3abepweHHn npriOtBuHHA CTpaB.

CTAHAPTHI
DnI npurotyBaHHa 6yDb-koCtpaBn IiWe Ha OdnHnnoi.

PnIb
ДлmaСмжehнCTeKIB,Ke6a6iBIKOB6acok, 3anikahnOBOuHbI npnroTyBaHHraPihOK.Pid cac CmxeHHaM'raCaHa rpnI pekomehnyEMO BnKOpNCTOByBaTHnIDOnDnA36paHHcCOKy,IOBNTiKae npn roTsyBaHHI:NoCTaBe nIDOn Ha byb-akomy pIBHI nIppewiTKoTo Ta HAnInTe B HbOrO 500 mNITHOI BOHN.

WBIDKE PIIIDPIBAHH
3BepHtbyBary: 3roDOM MOBy MoXHa 3miHHTN, B6paBUnn MOBA》BMehIO HAIALITYBAHHA》,Ke moXHa BiKpHTN, HATNCHYBUN
2. BCTAHOBITb CNOXKNBAHHN NOTYKHHOCTI
Dyxoby 3a nporpaHO Ha cnoXnBaHH pIBH eektpuHoi NotyxHocTi, Cymichoro 3 No6yTOBOIO MepexeO 3 HomiHaIOM nOHad 3 kBt (16): JaKuo y BaWi oCeli BnKOpNCbOBycTBc HxKHa NotyxHicTb, Heo6XiHO 3MeHwntu ce 3NaueHHA (13).

HaTnCHiB a6o, u6bBn6paTu 16 «BnCOKn» a6o 13 «Hn3bkn», iHaTnCHiB v nIaNTBepdxKeHH.
3. BCTAHOBJIeHHaYACy
Picna Bn6opy notyXHOCTI Heo6xIDHO BCTaHOBtU nOTouHn yac:Ha dncnnei 6JImaIOb DbluΦpn rOHN.

HaTnCHiB a60,ue6 BCTaHOBtNnotouHe 3NaueHHraOuH,a notim HaTnCHiB V:Ha ducnnei 6IImatmMyb DBi uΦpnu XBUNH.
HaTnCHITb KHONKy +a6o, uO6 BCTaHOBNTu
XBUNHHI HaTNCHTb KHONKJ NJI TBePdKeHH. 3BepHtYbary:nicra Tpmbanoro nepioy BiCytHOCTi KINBHeHHa MOnke 3HaIObNTnC BCTaHOBTN Yac NOBTOHO. BIn6epiY «TOINHHK» B MeHIO «HAIAUITyBAHHR», JKe MoKHa BiKpNTn, HATNCHyBUn
4. BCTAHOBJIeHHa PIBHIO XOJPCTKOCTI BOJN
ДяТOrO,云6dIyXOBa 7aФ npaIobana eΦeKTHBHO, aTakoxДЯTORO,云6BOHa peryIapH O npoHbAla KOpNCTyBaueBi BnKOHaTu CnKn BnDaJIeHH HaKIny, KOJI ue Heo6xIDHO,BAJINBO BCTaHOBHTn PpaBnblHn pIBeHb JopcTKOci BOu.ДЯ ZbOro YbIMKnITb 7aФy,HaTNCHyBUn ,HaTNCHtB «HaJaWtBuHn» Ta3a DonOMorIO KHONOK Habiraui - Bn6epiTB «KOPCTKICTb BOU».HaTNCHtB √ДЯ nIITBePdIXeHH.3a DonOMorIO KhONOK Habiraui + Ta-Bn6epiTB HaneKHN pIBeHb JopcTKOci BOu y BaWoMy perioHi BiINOBiINO Do Ta6NIu HnXue:
3BepHb yBary:KuO notpi6HO BiDperyIIOBaTu qac npnroTyBaHHa,Kn 6yoN BCTaHOBNeHO npn npnroTyBaHHHaNTCKaHTe :HaTnCKaHTe apo ,ue6 3MiHHTn NOrO,a NOTIM HATNCHTb Vdna NiITBepXKeHH.
YAC 3ABEPUHEHH (3ATPUMKA NOYATKY)
Дя 6araTboxФункiIMMOxHa BiKnaCTn IxHiI 3anyck, BCTaHOBnBUn Yac 3abepWeHHNicn BCTaHOBneHHY acy npuroTyBaHH. Ha dinCnneBIO6paKaεTbcraac 3abepWeHH, nOKn 6JIIMa€ 3NaUOK
HaTnCHiB a6o, 6b BCTaHOBnT 6axaHn
vac 3aBepweHHraTOyBaHHra,notim HATNCiTB
√dIaPiTBePdxKeHHraIakTNBynte yHKciIO.
Poklaaditb npOdyKtnB dyXoby wafy Ta 3aunHtB
DBepura:ФyHKcIa 3anyctuTbcra ABTomTuHo
uepe3 o6ucneneHn nepioq uacy, 06 roTyBaHH
3aBepwnloCBAYCTaHOBLeHn uac.
3BepHb yBary: Y pa3i nporpaMyBaHHa cacy BiDknaeHoro 3anycky roTyBaHHa a3y nonpeHbHO nporpipBaHH6yde ckacobaho:Bpi6 doCraAe Heo6xioHOI TemnepaTpyn NOCTynOBO, TOMy cac npiroToyBaHH6yde DeIO DOBIMHIX Bka3aHO B Ta6nui npiroToyBaHH.B pexmIo OUYBaHH MoXHa HATNCHTN 3AnporpamOBAHu qac 3aBepWeHH, a6o HaTNCHTN 心 106 3miHHTN 3AnporpamOBAHu qac 3aBepWeHH, a6o HaTNCHTN 心 106 3miHHTN iHNI HanaTByHH. HATNCAKOHN DInr B3yanl3auii HOpMaui MoXHa BVKOHyBaTN nepemKahHH MIX qacom 3aBepWeHH I TpNBanictIO.
.6 ^th SENSE
Li fyHKui ABTomaTuHNO Bu6npaIb HaaiKpaun peKIM roTyBaHH, TempeaTypy Ta TpNBaIcTb roTyBaHH, CmaKeHH a6o BUNiKaHH BCix DOCTynHx CTpaB.
3a Heo6xidHocTi npocTo BkaKiTh xapaKTepcntKy cTpaBn, 06 OTpMaTu ONTumalbHn pe3yIbTaT.
BARA/BVCOTA/PIUCA(KPYTNEDEKO)
Ioo6 npabnblho HanaWtByaTn 0yHKciio,
DToPmMyTeCb BiINOBiHnx Bka3IBOK Ha IIncPiEi,
iHaTNCiTB + a6o,06 BCtAHOBiTn Heo6XiHe
3NaueHHa, a NOTIM HATNCiTB V, 0o6 NiTBePdNTn.
TOTOBHICTb /ПДРУМ'ЯНIOBAHHN
Y deKnx fynkci8 6th Sense moXHa HanaWtByBAtn pBeHb roTOBHOCTi.

KoN 3'ABtBc3aNT,HaTnCHiB a6o,u6bBn6paTn 6axaHnPiBeHb,NouHaOuN 3 «I3 KpOB'IO」(-1)do《Dobpe npocmaKeHH(+1).HaTncHtB√a6o npiTBePdJKeHHi 3aNyCTiTb BnKOHaHHaYHKui.
Takum camuHOM, y deaKx fYHKuiX 6th Sense, MojNBO HanaWTOBByATn pibeHb niDpym'raHOBaHHa BID Hn3bkoro (-1) do BuCOKoro (1).
.ROTYBAHHHAIAPI
O6npaOnuKOHBEKUII+IAPA》a6o OdnH 3
deKibkoX peceTIB dna 6th Sense BN MoKeTe
npuroTyBaTH 6yDb-rykCTpaBv, BnKOpNCTOBUoyn napy.
PiJ uac npuroTyBaHHc TcPabn napa
p03NOBcIOJxkyETbCra WbNDwe Ta pIBHomipHiwe
nopBnHO 3 rapaum NOBITpRm, aKe
BnKOpNCTOBYETbCRA y 3BnuAHHx fynKciAx: ce
D03BOJIe cKOpOTHTu cac npuroTyBaHHa iXi,
36epertTu ciHNI NOxNVBI peOvBNH Ta rapaHTye
HepepeBseHn pezylbTaT npn npuroTyBaHHi 6ydB- koi CTPaBn. Pid uac BcBOrO npouecy npuroTyBaHHa npay DBepi MaOTb 6ytu 3aunHeHIMN.
Dnna npodobxeHHn npuroTyBaHHa napi,
Heo6XiHO DoaTN BODy U HarpIBauchCTeMM
napoyTBopeHHra, AKN 3haxOuNTbcg BCEpeHNi
dyXOBKn, BnKOpNCTOBUoyn BNCyBHn KOHTeHep Ha KOHTpOblHi NaHeni.
KOnn Ha DIncPnei 3'ABNTbcn HaHnc «DOJIINTE BOy》, BuTARHtB KOteHep,HaTNCyBUnn Ha NoRO nepeDNIO KpnWky. Picra BnMaHn BIDkpniTe
KpnWky KOteHepa NOBilbHO HAnlnte NITHy
Body DO No3Nauchn, 10 BiNObiDae pIBHou, AKn BIdobpaKaETbCra Ha DIncPnei (PIBEHb 1 a6o 2,
3aneJHo BiD o6paHOI cyHKcu). Y XODHomy pa3i He nepenOBHIOte KOteHep BNuE no3NauchK, 10
Bka3ye Ha pIBehb 2. 3akpnite NiirpiBaU, o6epexHo
HaTNCyBUnNoRO B HanpamKy NaHeni TaK, 106
BIN NobHICTO 3auHHBCA. PidirpiBaMae 3abXdN
3aIIuWATNCs 3akpntm, OKpim BUNaKDIB HANOBHeHHa BOIOU.
Iicra nepworo 3anOBHeHHy, y pa3i TpnbAnx uKKnIB npnroTyBaHHa, KOIN BODa 3akHHTbcra, MoKe 3HaO6bntncr DOJNTu II 3HOBy, o6 3aBepuHTu cNKl: dYXOba wa a nobIDOMtB npo ue, kKuo ue 6yde notpi6Ho.
3a60pOHaTbC3aONBHOBaTu KOHTeHep,AKUO dYxOBy waCy BmKHeHo,a6o Ha dncnEi He 3'ABNTbcBIDNOBIDHe NOBIDOMHeHH.
Mn pekomehyEmo cnopoxHOBaTu KOHTeHep nicra 3aBepweHHu NKly npuroTyBaHHa napi.
3.3ANYCKΦYHKLIJI
B6ydb-akn yac, kso 6axaHO 3actocybaTu 3haeHHra 3a 3amOBuyBaHHm a6o kto 3actocobHi Heo6xHHa HanaTsyBaHHa, HATNCHTb > ,IO6 aKTNByBatn LIO fYHKciIO.
KuO NiJ cac a3n 3aTpMKn HaTnCHyTu KHONky 13'ABNTbcra 3aNT, u He 6axaTe npOnyCTntu cIoo a3y, HeraiHO 3anyCTNBUN BkOHaHHaYHKcii.
3BepHt b yary: Picra Bn6opy fynkui Ha nucnnei BiO6paXaTumetbca Hain6ilbW ONTMaIbHn pBeHb dna KoxhoI cyHKui.
B6yNb-RAKIM MOMENT MOXHa 3yINHHTN BUKOHAHHaKTNBBOBaHOI dyHKUII, HATNCHyBUN
KxO DxyOba 1a0Ha HarpBaETbcI dIyHkcii
nOTpi6Ha neBHa MaKcImaIbHa TempePaTypa, Ha
DncPiE 3'ABNTbc BIDNOBIHe NOBIOMJeHHa.
HaTNCHTb A,IO6 NobepHyTuCdo nonepedHbOro
ekpHa Nv6patn IHwY FyHKciO a6o doyeKaTeCnOBHO OXoJOnKeHHa.
4. NOINEPEHHE HAPIBAHNHA
IeKfynKcii npe6aauTb nonepeHne po3irpiBaHHBnpo6y:PiCn 3anycky fynKcII Ha dncnEi 3'ABnTbcNobIDomHeHH, 0o a3y nonepeHbOro nporpibaHHaKTuBOHaHO.
Iicna 3aBepHnHa ciEi fao n npOyHae cnHan i Ha dncnnei 3'ABtbcra NObIDOMnEHn npo Te, zo duXoBa waΦa Docra BCTaHOBHeOH TeMnepaTypu Ta Heo6xIDHO «ODATN PPOyKTN».BueM MOMENT BiKpnTe DBepaTa, NOKlaTb npOdyKTn Do duXoBOi WaΦn, 3akpnTe DBepaTa i 3anyctITb roTybaHHa, HATNCHyBwU a6o
3BepHt b yBary: KIIO NOCTaBHT iKy B W aOy Do 3aKiHcHnnonepHbOro nporpiBaHH, ce MoKe nOripuHTNOctatoHn pe3yIbTaT roTyBaHH. Kaio Ha a3i nonepHbOro nporpiBaHH BiDunHHTN DBePcTa, 3a3HaueHy onepaio 6yde npn3yInHeHO.
Yac npirotoybaHH He BkIooaE a3y nonepeHboro nporpibaHH. BaXaHy TemnepaTyB dyxobii waFi 3aBXd MoKHa 3MiHHTN 3a DOnOMOIO KHOKN +a60.-
5. PAY3A PUNIOTYBAHHA / IPEBEPHYTNA BO IPEBIPNTI PPOJyKT
Pn BiKpnBaHHI DBepqt roTyBaHH6yTe TmUacOBO np3ynHeHO wJxOM deakTNaCiH HarpibaBbHex enemehtib.
Uo6 3HOBy 3aNyCTnTn roTyBaHHa, 3aunHiTb DBepuTa. Y DeaKnx fynKcix 6th Sense notpi6Ho nepeBepTaTn npOdyKTn nId yac roTyBaHHa.
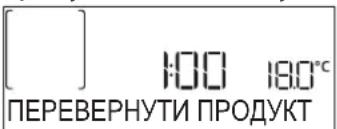
IpoNYHa3ByKOBn CnHai I Ha DnCnnei 6yde
BIDO6paKeHo DiIO, Aky Notpi6HO BnKOHaTu. BiKpnTe DBepaTa, BnKoHaNe 3aPOnOHObAHy DiIO, 00
BIDO6paKaETbcra Ha DnCnPeI, i 3akpnTe DBepuTa,
NOTIM HATNCHTb + , 06 npOdoBXNTu roTyBaHHa.
Tak cAmO, HApNkInci npriToYBaHHa (10% BiD qacy do 3abepWeHH), dYXOba WaaΦa 3anpOnOHye npeBipuTN ixy.
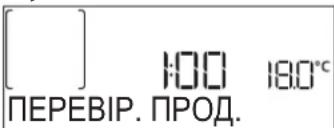
PpOnuHa3ByKOBn CunHan iHa dncnnei 6yde BiO6paKeHO IIO, kY noTpi6Ho BnKoHaTu. NpeBipTe cTpaBv, 3aKnIte DBepuTa i HaTNCHtB a6o V 06 npOdoBxHTn rOtBuHHra.
3BepHt b yBary:HaTnCHt b ,uO6 npOnyCTnTu i dI.
Ihakwe, kuo He 6ynde Bxnto KODnHex dii nicna neBHoro
acy, dyXOba waopa npOdoBxntb roTyBaHH.
6.3ABEPUEHHRAOTYBAHH
PpOlyHa3ByKOBn CnHaj I Ha DnCnJIe 3'ABITbCa NOBIDOMJHeHH npo Te, IIO npuROTuBaHH iXi 3aBepseHo.

HaTnCHiB,06 npOIOBxyBaTu roTyBaHH B pyuHomy pexkmi (6e3 TaMepa) a6o HATnCHiB + ,06 36IbWHTN Yac roTyBaHH, BCTaHOBUBH NOBY TpNBAniCTb. B 06x BuNaIkax napaMeTpN roTyBaHH 6ydyTB 36epExeni.
ПИДРУМ'ЯHIOBAHHA
Jeyk yHKii dYxOoi waofo3BOJIOTb nipym'HNOBaTI NOBepXHIO CTpaBN 3a DOnOMOIO aKTHBaCiI rniln icNla 3aBepWeHHr rotyBaHH.
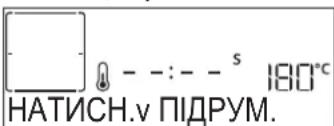
KoHa dncnnei 3'ABNTcBc BiIOBIDHe NOBIOMJIeHHa NotpeBu HATNCHITb
3anycky n'ayxBUNHHORO uKny npdym'raHOBaHH. BnkoHaHH yHKcII MoXHa 3ynHHTn y 6yDb-aknn MOMeHT, HATNCHyBwn 日 , 06 BUMKHHTn DyxOBy wafoy.
BUN6PAHE
Iicra 3aBepweHHra roTyBaHnHa dncnnei 3'ABNTbcr npon03nui 36epertn yHKciu nID Homepom BiD 1do 10y cnpcky Bn6paHoro.
IIO6 36epertn fynkciio kBn6paHy ta 36epertn nOTouHi HanaTByaHHN dnn MaHbTOBn BnKOpNCtAHn,HaTnCHiTB V,BIHOWMy BnNaKy,IO6 npoiRhopyBaTu 3anT,HaTnCHiTb 忍
Nicna HatackaHHaONKu VHaTnCHiB a6o,- 06 Bn6paTHn Homep no3uii,notim Hatachitb Vdna niTBePdxKeHH.
3BepHt b yBary: RaIIO nAm'raTb 3aNOBHeHa a6o Bn6paHn HOMeBKe 3aHrTn, 3'ABiTbC4 3aINT 0do NiITBepdKeHH nepe3aNNcy nonepeHbOi fHyKci.
IЯ BnKlnky 36epexeHOro pexmMy 3 naM'arTi HaTncHtB♥:Ha dinCnnei 6yde BiO6paXeHo cncoc K Bu6paHnX fYHKciI.
HaTnCHiB a6o, u6 Bn6paTn fynKciio, nIITBePdItb Bn6ip, HATnCHyBun , a NOTIM HaTnCHiTb DnAaKTnByBaHHJ.
. OyHJEHH
SMARTCLEAN
HaTnCHiB 6 BiO6pa3ntu «Smart Clean» Ha duCnnei.
HaTnCHiB,06aKTHyBaTuΦHKciI:Ha
DncPnei 6yde 3anponoHOBAHO BnKOHyBaTu BCI ii,
Heo6xDiH IJRA OTpMaHH HaIKpaux Pe3yIbTaTiB
OuHsEHn: DOpymuYTeCBA3IBOK,aOTIMnicr
3aBepWeHH HaTnCHiB ✓.PiCra 3aBepWeHH BCix
KpOKiB 3a Notpe6u HaTnCHiB △dJIa AKTNaCiI cNKny
OuHsEHn.
3BepHtB yBary: He peKoMeHdyEybCBAIkpNbATn DBepyTaDxyXOBoi 7aΦn iJv lac uKlny OuyuHHeHH, Uo6 yHKnHyTn BtpaTN BOaHOi nap, IIO MOKe HeRaTbHBO BpInHyTu Ha KInCeBn pe3yNbTaT OUYuEHHa.
Iicra 3aBepweHnHa dncnnei noHe MuroTiN bIDNOBIDHe NOBIOMNeHHaJaTe dyXOBiW aphi OxONOHTu, a NotIM BnTpiTB i BucywiTB II BHyTpiwHi nobepxhi raHuyipKOIO a60 r6koio.
- ABTOMATUHHE YIUEHHRA - NIPOJI3
He TopkaTecy dYxOBoi waHn iN qac uKny nipoJI3y.
He nidnyckaTe ditei i TBapnDo dyxoboio waHn iD qac uKny niponl3y ta nicra Hboro (nokn npimiueneHH He npoBITpntbc).
Bnmiy yci akcecyapn (BknnoH0 3 HnnpaHmnppeiTk) 3 dyxobo iwa, nepu hiX aKTbByBaTn fynkciio. JaQo dYxoBa wa a BCTahOBneHa nIb BapnbHOIO NOBepxHeO, nepeBiPe, uN BUMKHeHO BcIra3OBI naBnKn qu eNEKTPnuHi KOHOpKn iIac uKny camoounueHHa. IJIa ONTMaNBHO OUnsHn BuaJIb 3aJnUKN iKi BCEpeDNI Kamepni OuncITb BHytpiHc cKnO DBePcT nped 3anyckom nipoiTuHoro uKny. Mn pekomEnyEMo BnKOpncTOByBaTn fynkciio nipoi3y, tiBKn kuo npnilad CnilbHO 3a6pydHenn a6o BuDInae He npnEMHI 3anax niD qac roTybaHH.
HaTnCHTb , 0o6 BiO6pa3nTu «IPOJN3» Ha nucnnei.

HaTnCHiB a6o,u6Bn6paTu Heo6xHn uKn, a Notim NiIbTbePdItb Bn6ip 3a Donomoro .KaKo uKnBn6paHo,y pa3iNotpe6nHaTnCHtB +a60 -,uO6 HanaTByaTu Yac 3aBepWeHHa (3aTpumKy noatky), a Notim NiIbTbePdItb Bn6ip 3a Donomoro .Ouncitb DBepuTa Ta BnMiTp npnaJa3rIdHO 3 peKomeHdaucieIO,Notim 3akpNte DBepuTa Ta nCIn BAKOHaHH Bka3aHnx DiH aTnCHiB D:dyXOBa WaΦa NoUHaε UKN CamooUneHH, DBepuTa ABTomAtuNo 6lOKyOTbcR: Ha DcPnei 3'ABnEeTbcR nonepJxBaJIbHe NOiDOMNeHH, a TAKOX 3BOPOTHiB BiNlK, BkA3yOuChiTah UKNy, UO BnKOHyETbcR. Picnra 3aBepWeHHu Kny DBepuTa 3aIIuHaOTbcR 3a6NokOBaHmN, NOKI TempePaTyba BCEpeDiHi dyXOBoi waHn He NoBepHeTbcR do 6e3neuHOro pIBH.
3BepHt b yBary: nepea kTnBaui eio uKny npOni3y cnopokhItb KOHTeHep.
ДРЕHAK
Функця «3лнванн»do3BOJЯЗЛВаTN BODY, 6о6 3ano6irtn 3aToH B Harpibaii. Zei Bnpi6 6уно pO3po6neHo dIЯ ABTomatNCHoro 3aNYCKy 3лнванн BOIN NICJI 3yNInHK/3aBepWeHH RAOTyBaHH. Pn6IIN3HO uepe3 30 XBNIN NICJI 3ynHKn/3akInHeHH ROTyBaHH dyXOBa WdaabOMATNUHO 3lnBaE BODY 3CnCTeMNI, nepeMIuYUOn 3aIIINKBI BOKTeHep (6ydTe OBepekHi, He BnMaTe KOHTeHep NICr rOTyBaHH). NcIra cboRO KOHTeHep MOxHa BVITaRHyTu i CnOpOxHNtN.
Mn pekomehdyemo cnopoxhny KOhtenHep opa3y nicra 3nby BOnn HapnkiHci ZNKny npiroTybaHHa.
Y pa3i Heo6xidHocti KopnctyBaM MoKe BnKoHaTn pyuHe CnpOxKHeHHa, DOpymyUOuNCb HabeJeHX HxKue iHCTpyKciI.

IpekeKaHTeCra, 0KoHTeHep DnB BODINBCaHOBHeHO BdyXOBy 7aΦyHaJIeKHM YHOM,Bu6epiTbФyHKciIO «3JNuBaHHA,HaTNCiTb iDoyekaTecraABTomaTHUHorO 3aNyCKy UNKny.CpeHr TpNBaNICTb 3JNuBaHHa3a NOBHOrO 3aNOBHeHH
CNCTeMn CTAHOBtB 6JIN3bKO OdHiei XBNUNHN. Nicna UboRo KOHTeHep MOXHa BNTaRHyTu i CNOpOxHHTu.
3BepHtbybary: 06 nepekoHaTncs, 0o BOa oxonona, BIKOHyBaTN 10 DiIO MOxHa He paHIe HIX uepe3 30 XBnIHn nicra octaHHbOrO cIKJy npriroTyBaHHa (a6o OCTaHHbOrO 3aBaHTaKeHHn npOdyKtIB).IpoTAROM yacy oukiyBaHHa Ha dinCnnei BiO6paXkATmEtbcra nobIDomnEHN «BOJa TAPRAUA».
BVIDAJIENHHAKINY
LcneiaIbHa fHyKci, aKTUBObaHa uepe3 neBn npomixok yacy,do3BOJRe yTpmyBaTu CNCTemy napoyTBopeHnB hainKpaUOMy cTahi. Picra 3anycky fHyKci BnKOhyTe dii, 3a3NaueHi Ha dinCnnei, i HATNCHTb ,0o6 po3NoaTu NaCTynHf a3y. Cepenr TprBaJIcTb BnKOHaHHa FHyKci CTahOBNTb 6In3bko 100 XBlnH.
3BepHtbybary:YkUO 3yunHHTn fynKciu,BeCb zKnBnDaJIeHHHaKNpy Heo6xIHO 6yde NOBTOpHTN.
Koln 6ynde notpi6HO BUKOHaTu cIKN BuaIeHHaHakiny Ha dncnnei 3'ABNTbcra BiIOBIDHe NOBIDOMenneHHA (INB. Ta6nnu daJI).
8. ACCÉS DIRECTÉ A LES OPTIONS O FUNCTIONS
Per acceder rrapidamente a les functions, a la durada, als ajustements i les preferides.
9. INICI
INSERIR LA REIXETA I ALTRES ACCESSORIS
For cooking different foods that require the same cooking temperature on several shelves (maximum three) at the same time. Aquesta funciona permit coureels alimentés sense que se'n barregin les olors.

FUNCTIONS TRADICIONALS
CONVECT BAKE (FORN DE CONVECCIó)
> KEEP WARM (MANTENIR CALENT)
SETTINGS (AJUSTAMENTS)
Perajustarlaconfiguraciondelforn.
Atencion: remove water from the drawer before pyro cycle activation