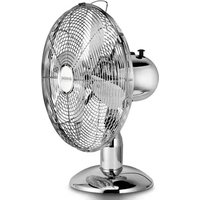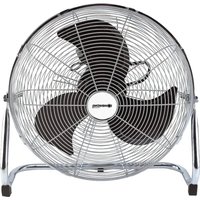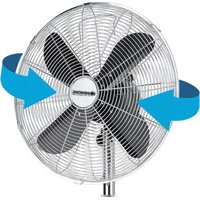
Metal Black 16 - Fan Sonnenkönig - Free user manual and instructions
Find the device manual for free Metal Black 16 Sonnenkönig in PDF.


User questions about Metal Black 16 Sonnenkönig
0 question about this device. Answer the ones you know or ask your own.
Ask a new question about this device
Download the instructions for your Fan in PDF format for free! Find your manual Metal Black 16 - Sonnenkönig and take your electronic device back in hand. On this page are published all the documents necessary for the use of your device. Metal Black 16 by Sonnenkönig.
USER MANUAL Metal Black 16 Sonnenkönig
natural_image
Black-and-white photo of a standard office desk fan with a four-petal blade and a stand (no text or symbols visible)text_image
Technical diagram of a fan assembly with labeled parts and internal componentsA. Grill Dekoration
B. Frontschutzbügel
C. Spange
D. Lüfterflügel
natural_image
Pure mechanical diagram showing a shaft and pulley system without any text, numbers, or symbolsDE
natural_image
Mechanical assembly diagram showing a valve mechanism with gears and a cylinder (no text or symbols)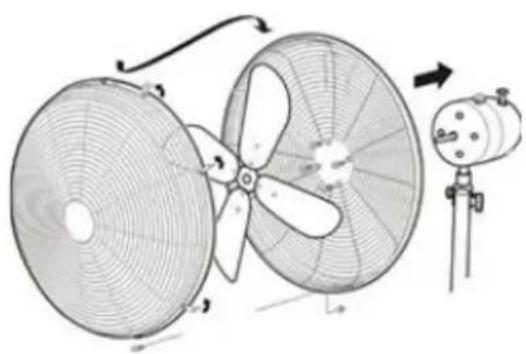
natural_image
Diagram of a multi-tiered fan assembly with a mounted device (no text or symbols present)natural_image
Simple line drawing of a balloon with a string and two hanging objects (no text or symbols)natural_image
Diagram of a desktop fan with labeled parts (a, b) and a small mechanical component below (no text or symbols present)natural_image
Close-up of a black industrial vessel with no visible text or symbolsDE
natural_image
Technical line drawing of a multi-tiered fan assembly with a mounted device (no text or symbols)Festnetz 14 Cent/Minute
natural_image
Black-and-white photo of a standard office desk fan with a four-petal blades mounted on a stand (no text or symbols visible)Article-nr. METAL BL ACK 16" 10510412
FR
SOMMAIRE
text_image
Technical diagram of a fan assembly with labeled components and internal partsnatural_image
Pure mechanical diagram showing a shaft and pulley system without any text, numbers, or symbolsnatural_image
Mechanical assembly diagram showing a valve mechanism with gears and a cylinder (no text or symbols)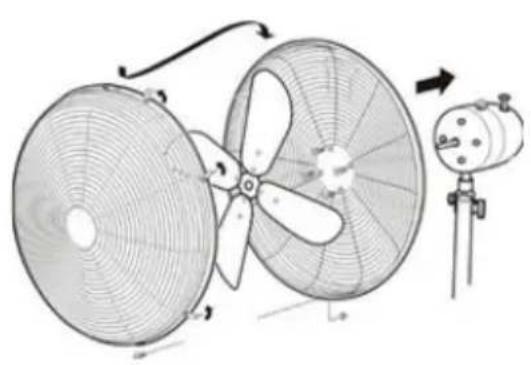
natural_image
Technical line drawing of a multi-blade fan assembly with a mounted device (no text or symbols)natural_image
Simple line drawing of a balloon with a string and two labeled points (no text or symbols)natural_image
Diagram of a fan with internal blades and a small mechanical device (no text or symbols)natural_image
Close-up of a black cylindrical industrial vessel with a knob and flange (no visible text or symbols)FR
natural_image
Technical line drawing of a multi-tiered fan with a mounted device (no text or symbols)7 Informations techniques
FR
Modifications techniques
Festnetz 14 Cent/Minute
natural_image
Black-and-white photo of a standing electric fan with five blades, mounted on a stand (no text or symbols visible)Nr. articolo METAL BLACK 16" 10510412
IT
INDICE
text_image
A B C D E F G H I J K L M N O T U V X W P Q R S U. Vitenatural_image
Pure mechanical diagram showing a shaft and pulley system without any text, numbers, or symbolsnatural_image
Mechanical assembly diagram showing a valve mechanism with gears and a cylinder (no text or labels)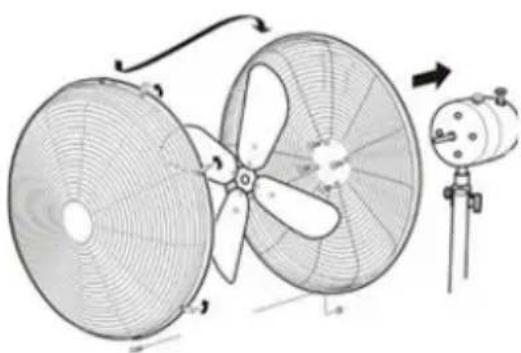
natural_image
Technical line drawing of a multi-blade fan assembly with a mounted device (no text or symbols)natural_image
Simple line drawing of a balloon with a string and two hanging objects (no text or symbols)natural_image
Diagram of a desktop fan with blades and a small mechanical device (no text or symbols)natural_image
Close-up of a black industrial vessel with labeled ports (I, II, III) and a knob, no readable text or symbols beyond labels.natural_image
Technical line drawing of a fan with blades and a mounted device (no text or symbols)7 Informationen tecniche
IT
natural_image
Black and white photo of a standing electric fan with four blades, mounted on a stand (no text or symbols visible)1 Safety information.... 44
2 Description of the parts.... 46
3 Operating Instructions....47
4 Operation – Before using it for the first time....47
5 Operation – Ventilate 49
6 Cleaning and maintenance 50
7 Technical information....51
8 Warranty / Disposal / Technical change 52
1 Safety Information
GB
Please read before first commissioning the safety instructions carefully and observe the safety instructions to prevent damage due to misuse, improper operation, and improper environmental conditions to be avoided. Keep these for later reference. Please make sure to place the device on a suitable and waterproof surfaces, so that spilled liquids can not cause harm.
Check the device after removing the packaging for damage. Do not put the unit in case of suspected corruption in operation and consult a specialist. The recyclable packaging material must not be stored or disposed accessible for young children, but must be disposed of properly.
This appliance is only for the purpose for which it was explicitly developed. Any other use is regarded as improper and therefore dangerous. The supplier is not liable for damage to persons and / or property damage due to an improper or incorrect use.
This appliance can be used by children aged from 8 years and above and persons with reduced physical, sensory or mental capabilities or lack of experience and knowledge if they have been given supervision or instruction concerning use of the appliance in a safe way and understand the hazards involved. Children shall not play with the appliance. Cleaning and user maintenance shall not be made by children without supervision.
Please make sure to place the device on a suitable and waterproof surfaces, so that spilled liquids can not cause harm.
Repairs to electrical appliances must only be carried out by trained personnel only. Improperly performed repairs and alterations to the equipment can have dangerous consequences for the user according to what the warranty will be rejected.
- Incorrect operation and improper use can damage the appliance and cause injury to the user.
- The appliance may be used only for its intended purpose. No responsibility can be taken for any possible damage caused through incorrect use or improper handling.
- Before connecting the appliance to the power source, check that the current and power match those indicated on the rating label.
- Do not put the appliance or the plug in water or any other liquid. However, should the appliance accidentally fall into water, unplug the appliance immediately and have it checked by a qualified person before using it again. Non-observance could cause a fatal electric shock!
- Never attempt to open the housing yourself.
-
Do not place any kind of object into the inside of the housing.
-
Do not use the appliance with wet hands, on a damp floor or when the appliance itself is wet.
- Do not touch the plug with wet or damp hands.
- Check the cord and the plug regularly for any possible damage. If the cord or plug is damaged, it must be replaced by the manufacturer or a qualified person in order to avoid a hazard.
- Do not use the appliance if it is dropped or otherwise damaged or if the cord or plug are damaged.
- In the case of any damages, take the appliance to an authorised service centre for examination and repair if necessary.
- Never attempt to repair the appliance yourself. This could cause an electric shock.
- Do not allow the cord to run over sharp edges and keep it well away from hot objects and open flames. Remove the plug from the socket only by pulling the plug.
- Make sure there is no danger of the cord or extension cord inadvertently being pulled out or causing anyone to trip when in use.
- If an extension cord is used, it must be suited to the power consumption of the appliance, otherwise overheating of the extension cord and/or plug may occur.
- This appliance is not suitable for commercial use or outdoor use.
- Never leave the appliance unattended while it is in use.
ATTENTION:
- Children cannot recognize the dangers involved in the incorrect use of electrical appliances. Therefore never allow children to use household appliances without supervision.
- Always remove the plug from the socket when the appliance is not in use and each time before it is cleaned.
- Danger! Nominal voltage is still present in the appliance as long as the appliance is connected to the mains socket.
- Switch the appliance off before disconnecting from the mains.
- Never use the cord to carry the appliance. Use the handle to carry the appliance.
Special security advice
- The protective frame must be closed properly during operation.
- Do not place anything in the protective frame. Do not cover the protective frame during operation.
2 Description of the parts
GB
This sleek and modern high-velocity fan provides more powerful wind than ordinary plastic fans. It draws air off the floor and circulates it through the entire room keeping the room cool and breezy. Put it near the windows and it helps to exchange the hot, stuffy air from the room with fresh air from outside.
• Energy-saving, high velocity motor for maximum air circulation
- Tilt-adjustment for flexible use
- Triple speed selection
- Precision fan blades for powerful wind but low noise
• Solid construction of the chrome stand
• Thermal protection to prevent the motor from overheating
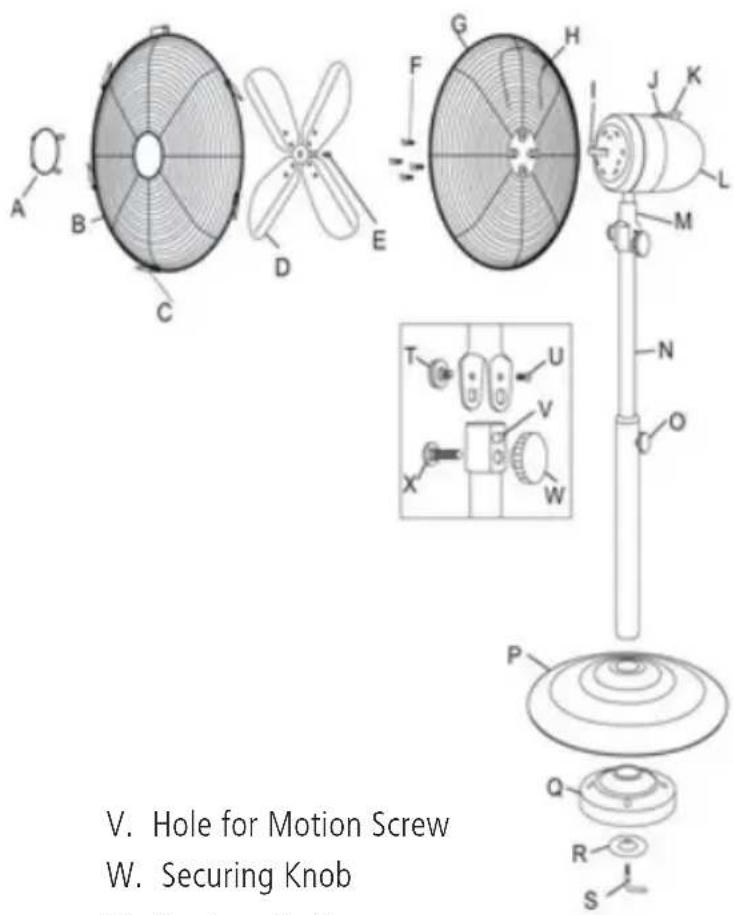
A. Grille Cap
B. Front Grille
C. Clip
D. Fan Blade
E. Rear Grille Securing Screw
F. Safety Screw
G. Rear Grille
H. Carrying Handle
I. Motor Shaft
J. Speed Control Knob
K. Oscillation Knob
L. Motor Housing
M. Fan Head Neck
N. Pole
O. Adjustable Height Knob
P. Fan Base
Q. Weight
R. Washer
S. L-shaped Screw
T. Thumb Screw
U. Motion Screw
text_image
V. Hole for Motion Screw W. Securing KnobX. Carriage Bolt
3 Operating Instructions
- Ensure that the voltage used corresponds with the voltage indicated.
- Turn the speed control to select the speed: 0 (off) and speeds 1, 2, 3 mean slow, medium, fast.
- Tilting angle: By pushing the tilt guard you can adjust the fan to the elevation preferred.
- Never touch the blades with your hands or any object!
- Do not pull the cord too hard. If is damaged after extensive use, get it repaired by an authorized electrician.
- To clean it: Disconnect the power cord from the mains. Remove the guard and the blades carefully. Do not drop the blades! First use a soft cloth with a little bit of soap to clean off oil stains. Then wipe and polish with a dry cloth. Never use a cleaning agent or any corrosive liquid that will damage the paint, metal or plastic! Put back the blades and lock the guard securely before use
No exchange will be made if the above instructions are not followed. Always test the product first before purchase.
4 Operation – Before using it for the first time
Remove the fan from the packaging.
Mounting – Assembling the stand
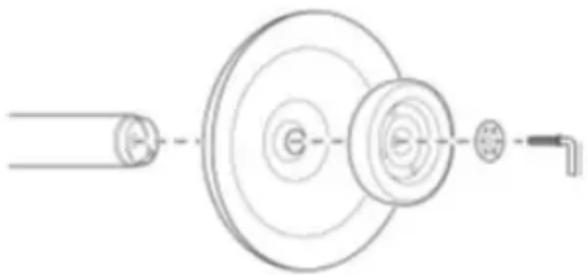
- Remove the 'L' shaped screw and the small washer from the end of the pole
- Insert the pole into the fan base. Put the weight and the small washer onto the fan base
- Use the 'L' shaped screw to fasten all parts together.
natural_image
Pure mechanical diagram showing a shaft and pulley system without any text, numbers, or symbolsGB
Mounting – Assembling the fan
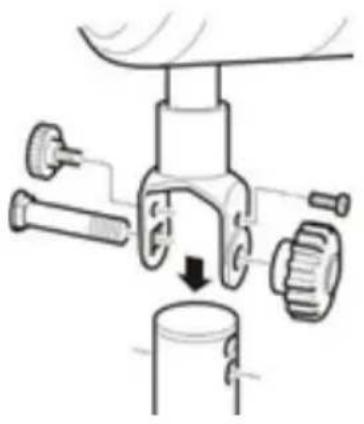
- Remove the thumb screw from the upper end of the pole.
- Remove the screws from the motor unit bracket.
- Attach the motor unit to the pole by placing the fan head neck onto the pole.
-
Reinstall the screws on both sides of the motor unit bracket.
-
Install and tighten the thumb screw to hold the motor unit in place.
-
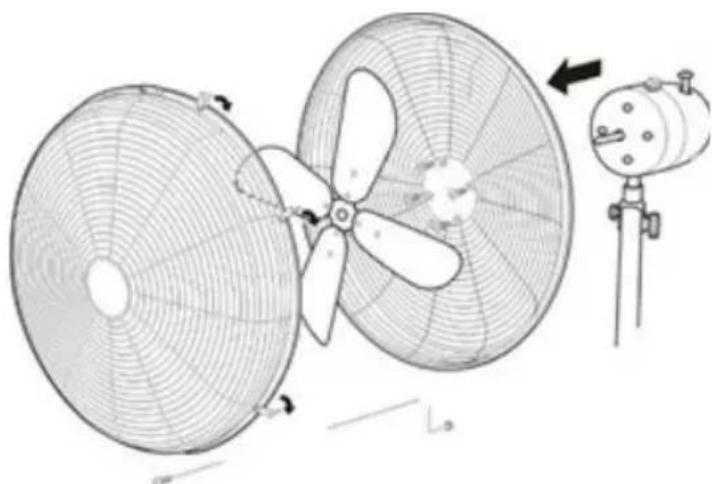
Make sure appliance is disconnected. Remove the 4 safety screws from the motor unit.
-
Install the rear grille with its handle facing to the motor unit using the 4 screws.
-
Remove the rubber part and turn the groove of the motor shaft upwards.
-
Slide the fan blade onto the motor shaft, aligning and tightening the screw to the groove.
-
Hook the front grille onto the rear grille aligning both screw holes.
-
Install the screw and nut to lock the guards. Close the clips.
natural_image
Mechanical assembly diagram showing a valve mechanism with gears and a cylinder (no text or symbols)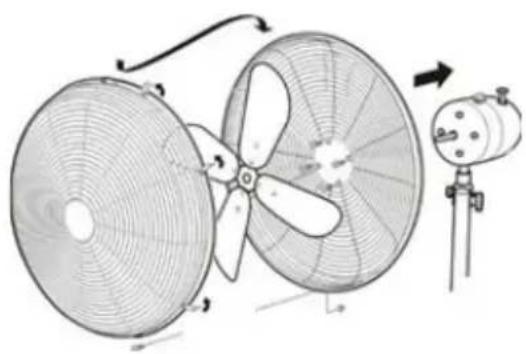
natural_image
Technical line drawing of a multi-blade fan assembly with a mounted device (no text or symbols)5 Operation - Ventilate
- Set the fan on the floor, on a level surface.
natural_image
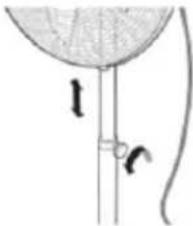
Simple line drawing of a balloon with a string and two hanging objects (no text or symbols)- Adjust the stand to the required height. To do so, loosen the height knob (anticlockwise). Adjust the stand to the required height, and tighten the height knob (by turning it clockwise).
natural_image
Diagram of a fan with blades and a side-view schematic showing airflow direction (no text or labels)-
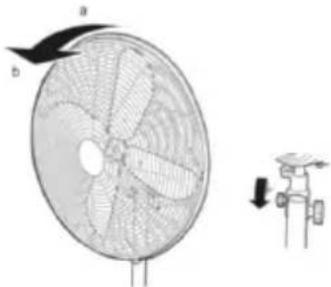
Tilt the fan to the required angle. You can set the fan:
-
to blow horizontally (position a) or angled slightly downwards (position b). Tilt the ventilator housing and motor housing to the required angle
- to oscillate from left to right (with a sweep of 90°). This will ventilate much of the room. Press the oscillation button on the motor housing fully in.
-
Remain in the same position while the fan is turning. This will ventilate one area. Pull out the oscillation button until you hear it click.
-
Put the plug into the wall socket.
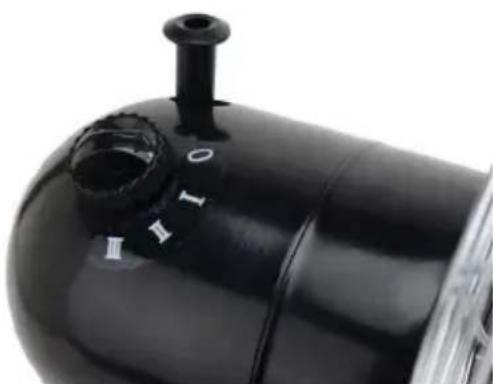
- Switch on the fan by turning the speed dial:
0 = The fan is switched off
I = The fan operates at low speed.
II = The fan operates at normal speed.
III = The fan operates at high speed.
natural_image
Close-up of a black industrial vessel with labeled sections (I, II, III) and a small protruding knob (no readable text beyond labels)6 Cleaning and maintenance
GB
Over the course of time, dust can accumulate between the spokes of the fan housing, and on the fan blades. Always begin by trying to remove the dust with a brush and/or vacuum cleaner. If this does not remove all the dust, you can always dismantle the fan and clean it.
- Remove the plug from the wall socket.
- Release the six clips around the rim of the fan housing.
- Use a small crosshead screwdriver to loosen the screw at the bottom of the fan housing; hold the bolt at the rear of the fan housing to prevent it from turning.
- Remove the front grille.
- Hold the fan blades to prevent them from turning, and use a small crosshead screwdriver to loosen the locking screw. Remove the fan blades from the shaft.
- Use a crosshead screwdriver to loosen the screws from the motor unit and then remove the rear grille.
- Clean the dismantled parts and the base with a damp cloth. Dry thoroughly with a dry cloth.
-
Clean the motor unit with a dry cloth.
-
Verify that the appliance is not connected to the power supply before you clean it.
- Never use corrosive or scouring cleaning agents or sharp objects (such as knives or hard brushes) to clean the appliance.
- Be careful not to cut yourself on the sharp edges of the fan blades.
natural_image
Technical line drawing of a multi-tiered fan assembly with a mounted device (no text or symbols)7 Technical information
- Rated Voltage: 220–240 V
• Rated Frequency: 50 Hz
• Power Consumption: 50 W
GB
8 Warranty / Disposal / Technical change
GB
Warranty
All products are checked from our company before the delivery. In case that there is a lack on your product, please contact the vendor. Please bring your proof of purchase for guarantees.
Disposal
Please remove the device properly. You can bring the product to any specialist dealer for the removal.
Technical changes
Technical changes in technique and design are possible.
Please save the packaging materials of the unit.
CE declaration of Conformity
This device complies with the following standards:
EN 55014-1:2017
EN 55014-2:2015
EN 60335-1:2012/AC:2014
EN 60335-2-80:2003+A1:2004+A2:2009
EN 61000-3-2:2014
EN 61000-3-3:2013
EN 62233:2008
2014/30/EU
2014/35/EU
206/2012/EU
DISPOSAL INSTRUCTIONS FOR THE ELECTRICAL PART OF THE PRODUCT
In accordance with Article 26 of the Decree-Law of 14 March 2014 implementing Directive 2012/19/EC, and the Law of 4 March 2014 implementing Directive 2011/65/EC on the reduction of the use of hazardous substances in electrical and electronic equipment and on waste management.
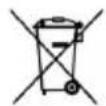
The crossed-out dustbin symbol on the machine or packaging indicates that the waste generated at the end of its useful life must be collected separately from other waste. The user must therefore take the device to the appropriate collection points at the end of its service life. Sort electronic and electrical waste or send back to the retailer when purchasing new, equivalent devices in a one-to-one process. Appropriate separate collection for subsequent commissioning of the equipment to be recycled, treatment and environmentally sound disposal helps to avoid possible adverse effects on the environment and health, and promote the reuse and/or recycling of the materials to which they belong. Misuse of this product by the user will result in the application of the administrative penalties provided for in the applicable legislation. Batteries contained in the device must be disposed of separately in the appropriate containers for the collection of used batteries.
DISPOSAL OF BATTERIES AND ACCUMULATORS
In accordance with Legislative Decree 188 of 20 November 2008 implementing Directive 2006/66/EC on batteries, accumulators and related waste, the symbol of the crossed-out waste bin on the battery indicates that the disposal of used batteries is prohibited in household waste.
Single-use and rechargeable batteries contain substances that are highly polluting for the environment. The user is obliged to dispose of used batteries at collection points in the municipality or in appropriate containers. This service is free. In this way, legal requirements are adhered to and the environment protected. The symbols identifying hazardous materials that may be present in single-use and rechargeable batteries are as follows: Hg = Mercury, Cd = Cadmium, Pb = Lead.
Company
Armin Schmid
Festnetz 14 Cent/Minute