River 83 NRG - Dishwasher Elettrobar - Free user manual and instructions
Find the device manual for free River 83 NRG Elettrobar in PDF.

User questions about River 83 NRG Elettrobar
0 question about this device. Answer the ones you know or ask your own.
Ask a new question about this device
Download the instructions for your Dishwasher in PDF format for free! Find your manual River 83 NRG - Elettrobar and take your electronic device back in hand. On this page are published all the documents necessary for the use of your device. River 83 NRG by Elettrobar.
USER MANUAL River 83 NRG Elettrobar

After salt fill, empty the machine and do a manual tank rinse.

IMPORTANT
Fig.8
TRANSLATION FROM THE ORIGINAL INSTRUCTIONS
CONTENTS
CHAP 1 RISKS AND IMPORTANT WARNINGS 2
1.1 NORMAL OPERATING CONDITIONS 3
CHAP 2 PREFACE 4
CHAP 3 INSTALLATION 4
3.1 UNPACKING 4
3.2 POSITIONING 4
3.3 ELECTRICAL CONNECTION 5
3.4 WATER CIRCUIT HOOKUP 6
3.5 CONNECTION TO THE DRAIN LINE 6
3.6 RINSE AID AND DETERGENT 6
CHAP 4 USING THE MACHINE. 7
4.1 GRAPHIC INTERFACE 7
4.2 STANDBY 8
4.3 STARTUP AND PROGRAMME SELECTION 8
4.4 FILLING THE RACK 10
4.5 CYCLE START-UP 10
4.6 AUTOMATIC CYCLE START-UP 10
4.7 DISPLAYING INFORMATION 10
4.8 TURNING THE DISHWASHER OFF 10
4.9 REMOVING THE INTEGRAL FILTER 11
4.10 EMPTYING THE DISHWASHER 11
4.10.1 Appliances with no drain pump 11
4.10.2 Appliances with drain cycle (*optional) 11
4.11 RESIN REGeneration (*OPTIONAL) 11
4.12 MACHINE WITH EXTERNAL WATER SOFTENER 11
4.13 END OF SHIFT 11
CHAP 5 MAINTENANCE 12
5.1 GENERAL RULES 12
5.2 CLEANING 12
5.3 CLEANING THE FILTER UNIT 12
5.4 CLEANING THE ARMS 12
CHAP 6 SELF DIAGNOSTICS 13
CHAP 7 SETTINGS. 14
7.1 HARDNESS SETTINGSFOR THE INCORPORATED WATER SOFTENER 15
CHAP 8 SCRAPPING 15
CHAP 9 ENVIRONMENT 15
In legal terms, the manufacturer reserves the property of this document. It is forbidden to reproduce it or divulge it with any means without prior written authorisation. The manufacturer reserves the right to introduce changes in order to achieve the improvements it deems necessary without prior notice.

Read the instruction manual carefully before starting the machine. The warnings contained in the manual provide important information on safety and installation, use and maintenance. Failure to observe the instructions in the enclosed documentation may compromise the safety of the appliance and immediately voids the warranty.
Chap 1 RISKS AND IMPORTANT WARNINGS
- This appliance is intended solely for the use for which it was designed. Any other use is improper and therefore hazardous.
- The specialised technician responsible for installing the appliance must instruct the user on its operation and any attendant safety measures, including practical demonstrations.
- Only the manufacturer or an authorised service centre with qualified staff may work on the machine, even in case of malfunction, using only original spare parts.
- Always disconnect or isolate the machine from its power and water supplies before servicing, repairing or cleaning it.
- The machine may NOT be used by persons untrained in its use.
- The appliance may be used by children aged at least 8 years old or persons with reduced physical, sensory or mental capacities, or with no experience or knowledge, provided they are supervised or after they have received training in the safe use of the appliance.
Children must not play with the appliance. - Cleaning and maintenance by the user must not be performed by unsupervised children.
- The machine must NOT be kept powered up when not in use.
- If the machine is not fitted with a plug or other device for completely disconnecting all contacts, these disconnection devices must be incorporated in the power supply, in compliance with the installation rules.
- If the power cable is damaged, it must be replaced by the manufacturer or an authorised technical assistance service, or in any case by a person with similar qualifications, to prevent all associated risks.
- The screw on the appliance marked with the IEC 60417 standard symbol 5021 represents the equipotential connection.
- NEVER open the machine quickly if it has not completed its cycle.
- NEVER use the machine with the guards installed by the manufacturer removed.
- NEVER use the machine to wash objects of any form, size or material not guaranteed to be machine-washable or not in good condition.
- NEVER use the machine or any of its assemblies as steps or support for persons, property or animals.
- NEVER overload the open door of front-loading machines, which is rated only to support the basket loaded with dishes.
-
NEVER place your bare hands in the wash solution.
-
NEVER overturn the machine after it has been installed.
- If you notice any malfunction or fluid leak, immediately disconnect the power supply and shut off the water supply.
- Do not install the dishwasher in the vicinity of heat sources over 50^ .
- NEVER leave the dishwasher exposed to the weather (rain, direct sunlight, etc.)
- The dishwasher may not be installed outdoors without proper cover.
- Never start a wash programme without the overflow in the tub, as applicable.
- Never place magnetic objects in the vicinity of the machine.
- Do not use the top of the machine as a table or support.
- The installer is responsible for checking that the grounding system is full operational.
- At the end of testing, the installer must issue a written declaration stating that the machine has been installed and tested in accordance with established legislation and good practice.
- DO NOT change the position or tamper with the elements of the machine, as this could compromise the machine safety.
- Noise pressure level according to EN ISO 4871
LpA Max = 55db Kpa=2.5db for undercover versions
LpA Max = 65db Kpa=2.5db for hood versions
LpA Max = 76db Kpa=1.5db for utensil washer versions
Max inlet water temperature: 50^
Max inlet water pressure: 4bar (400kPa)
- Appliance designed for permanent connection to the water supply
- Do not clean the appliance with steam or water jets.
- Max loading height
On the ground in the versions with overflow
Maximum height 1 m in versions with discharge pump
1.1 Normal operating conditions
Ambient temperature: 40^ / 4^ (average 30^ )
Altitude : up to 2000 metres
Relative humidity : Max 30% at 40^ / max 90% at 20^
Chap 2 PREFACE
Warnings:
Keep all documentation in the vicinity of the appliance; make it available to the technicians and operators charged with operating it and keep it in good condition in a safe place, along with extra copies for frequent reference
The operator must read, understand and familiarise himself with the contents of this manual before working on or with the appliance.
The appliance is intended solely for professional heavy duty dishwashing applications and must be installed, operated and serviced only by qualified persons according to the manufacturer's instructions.
Warranty:
The manufacturer is not liable for any damage or injury resulting from failure to observe the instructions or improper use of the machine
Failure to observe the instructions in the enclosed documentation may compromise the safety of the appliance and immediately voids the warranty
Installation and repair by unauthorised technicians and the use non-original spare parts immediately void the warranty.
Storage:
Transport and storage: -10^ to 55^ with peaks up to 70^ (for no longer than 24 hours)
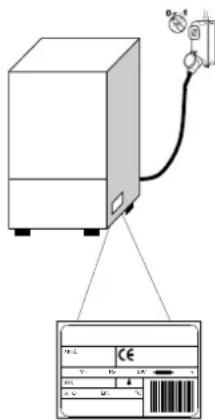
Chap 3 INSTALLATION
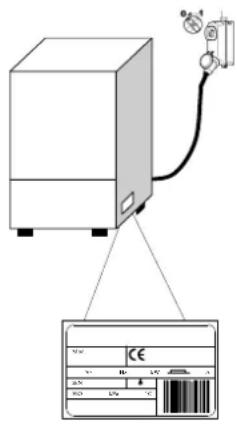
Proper installation is essential to the good operation of the appliance. Some of the data required for installation of the appliance are given on the nameplate on its RH body panel, and a copy is included on the cover page of this manual.

The appliance may only be installed by qualified persons authorised to do so.
For Australia and New Zealand this machine must be installed in accordance with AS/NZS3500.1 and PCA.
3.1 Unpacking
Check the condition of the packaging, and note any evident damage on the shipping bill. Remove the packaging and check that the appliance is in good condition; immediately report any damage to the reseller and the shipping agent by fax or registered letter with return receipt. If the damage is such as to compromise the safety of the appliance, do not install or operate it until it has been inspected by a qualified technician.

The packaging (plastic bags, expanded polystyrene, nails, etc.) are hazardous and must not be left within the reach of children or pets.
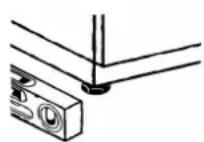
3.2 Positioning
- Check that there are no objects or materials in the installation area which may be damaged by the steam emitted by the appliance during operation, or if there are, make sure they are properly protected.
- Before positioning the appliance, set up the electrical power supply, water supply and drain connections.
- For flush-mounting single panel machines, leave a space of at least 10mm between the machine walls and the adjacent surfaces.
- The floor or build-in unit must be rated to support the weight of the appliance
- To ensure that it is stable, level the appliance with its four feet.
- The appliance is intended for fixed installation only; any other approaches must be agreed with and approved by the manufacturer.
- Remove the protective film from its body panels before operating the dishwasher.
3.3 Electrical connection
- The power supply must be fitted with a omnipolar circuit breaker (master power switch) to break all contacts including neutral, with a contact gap of at least 3mm and thermal cutout or fuses, which must be set or rated to the power indicated on the machine's nameplate.
- The master power switch must be fitted to the power line in the vicinity of the installation and may be connected to only one machine at a time.
- The mains voltage and frequency must match the nameplate ratings.
-
The installation must include a grounding system conforming with established electrical safety legislation, to protect the operator and the appliance itself
-
This appliance conforms to EN/IEC 61000-3-11 certification if the system impedance Z_sys is less than or equal to Z_max in the point of interface between the user's supply system and the public system. The installer or appliance user is responsible for checking that the appliance is connected exclusively to a supply with system impedance Z_sys less than or equal to Z_max
| Zmax | |
| Utensil washers | 0.21 Ω |
| Hood | 0.24 Ω |
| Undercounter | 0.41 Ω |
-
The power cable, which must be exclusively type H07RN-F with current capacity at 60^ on the cable:
-
Three-phase machine
-5x2.5 mm^2 up to 20 A
-5x4 mm^2 up to 30 A
-5x6 mm^2 up to 38 A
-5x10 mm^2 up to 54 A
- Single-phase machines
-3x1.5 mm^2 up to 16 A
-3x2.5 mm^2 up to 25 A
- Must not be stretched or crushed during normal operation or routine maintenance.
- The appliance must also be connected to an equipotential system, connected by a screw marked by the symbol 5021 - IEC 60417.
- The equipotential cable must have a cross section of 10mm^2
- Respect the polarities indicated in the wiring diagram.
- For further information, refer to the wiring diagram.

Do not use multi-sockets, adapters, cables of an inadequate cross section or type or with extensions not conforming to established electrical installation regulations.

INSTRUCTION MANUAL FOR DISHWASHERS
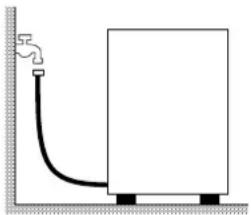
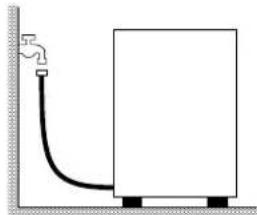
3.4 Water circuit hookup
The appliance must be connected to its water supply with a flexible hose. A shut off valve (cock) must be installed between the water supply line and the appliance's solenoid valve. The cock must be close to the appliance.
- The water supply, temperature and pressure must be compatible with the ratings shown on the technical data plate on the machine.
Make sure that the water supply flow rate is no less than 20 l/min - If the water hardness is greater than 14^ ( 8^ ), we recommend using an internal water softener. If the water hardness is greater than 35^ ( 19.5^ ), install an external water softener upline of the solenoid valve
- For machines without water softener: if the water hardness is greater than 14^ ( 8^ ), install an external water softener upline of the solenoid valve.
- If the water has a very high residual concentration of high conductivity minerals, we recommend installing a demineralisation system.
- Machines intended for use with desalinated water or in any case with high sodium chloride concentration must be ordered specifically, as they require specific construction materials
- Do not supply fully demineralised water to machines with a heat recovery unit with batteries with copper pipes. In this case, request the version with batteries with stainless steel pipes.
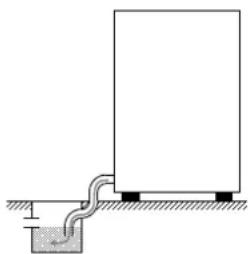
Free drain
3.5 Connection to the drain line
- The drain line must consist of a free drain sump with siphon suited to the flow capacity of the drain hose supplied with the appliance. The hose must be able to reach the sump without stretching, restriction, folding, crushing, pressing or forcing in any way.
- The tub drains under gravity, so the drain sump must be lower than the machine's base.
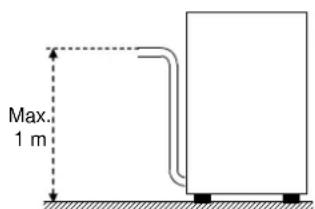
With pump (available on request)
- if the drain is not lower than the base of the appliance, you can use the version with drain pump (available on request).
- In this case, the drain connection may be no higher than 1m .
- Always check that the drain works properly and is not blocked.
- Any other solution must be approved by the manufacturer in advance.
3.6 Rinse aid and detergent
- The rinse aid and detergent are dispensed by the machine's integral dispenser (depending on model).
- The dose is set by the installer in relation to the hardness of the water, and he also calibrates the dispensers themselves.
Before calibrating them, fill the dispenser supply tubes with their respective product.
The units are calibrated with the adjuster screws, or directly with the control panel (as applicable). - The level of fluid in the container must be sufficient for priming; do not allow it to drain completely or top it up with corrosive or impure product.
NEVER use CHLORINE or HYPOCHLORITE based detergents.
We recommend installing an automatic detergent dispenser.
Chap 4 USING THE MACHINE

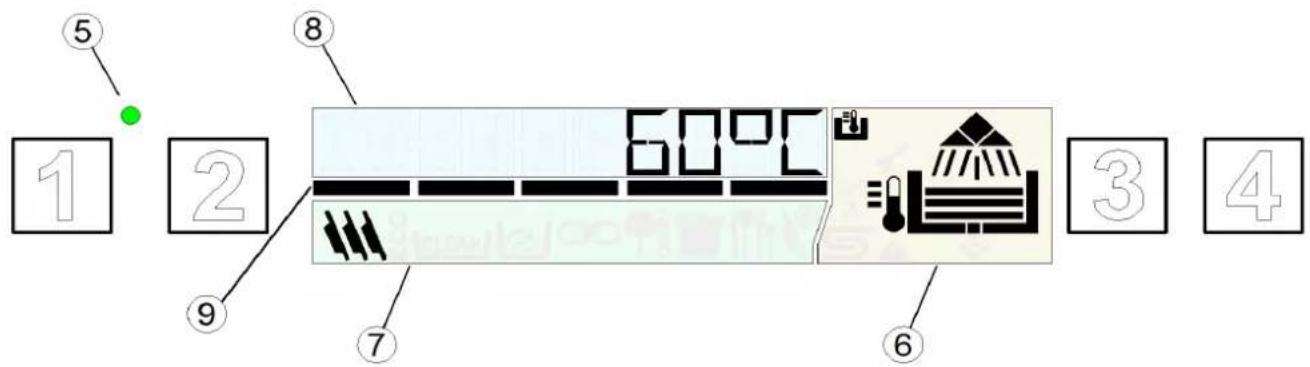
4.1 Graphic Interface
Referring to Fig.1:
| 1 | ON/OFF BUTTON | 6 | MACHINE STATUS INDICATORS AREA |
| 2 | SPECIAL PROGRAMME SELECTION BUTTON | 7 | CYCLE INDICATORS AREA |
| 3 | PROGRAMME SELECTION BUTTON | 8 | TEXT DISPLAY |
| 4 | START BUTTON | 9 | TIME BAR |
| 5 | STANDBY LED |
Colour codes and operating status
Referring to Fig.2:


Green (Fig.2a)
Machine ready
Blue (Fig.2b)
- Washing cycle in progress.
Yellow (Fig. 2c)
- Machine in preparation stage
- No washing additives
- No salt (versions with integral water softener only)
Red (Fig. 2d)
Serious fault.
- Operation limited or not possible: check error code signalled and contact technical assistance service if necessary.
| Washing stages | |||
| During machine operation, the display in area (6) will indicate the various stages of the washing cycle: | |||
| Filling | Washing | ||
| Heating Operating level reached | Rinsing | ||
| Operating temperature reached | Draining | ||
| Function symbols | |||
| Appears when boiler temperature is shown on the display | Appears when the tub temperature is shown on the display | ||
| A | Automatic start enabled | Regeneration system on | |
| Fault: limited operation possible | Fault: operation not possible | ||
4.2 Standby
- Turn on the main electrical power switch.
- Open the external water tap.
- When the machine is in standby, the display is off and the STANDBY (5) LED is red.
4.3 Startup and programme selection
- Check that the spray arms and filters are positioned correctly.
- Check that an overflow is present (if required).
- Check the levels of detergent and rinse aid in the dispensers.
- Press the ON/OFF button (1) to start the machine, the STANDBY LED (5) will turn green.
- During the filling stage, the display will be coloured yellow
- Once the optimal conditions are reached, the DISPLAY will turn green to indicate that the machine is ready.
- A symbol on the display indicates the selected programme.
Each time it is switched on, the last programme used before switching off will be that set.
Using the PROGRAMME SELECTION button (3) you can choose between the following cycles:
| Standard Programmes | Dishwashers | Glasswashers | Utensilwashers | |
| \ | \ | \ | PRG 1 Short wash programme for lightly soiled dishes. | |
| PRG2 Medium wash programme for averagely soiled dishes. | ||||
| PRG3 Long wash programme for heavily soiled dishes. | ||||
| DRAIN | DRAIN Drain cycle. | |||
| \CLEAN\ | CLEAN Drain and self-cleaning cycle to be used at the end of working day. | |||
Using the SPECIAL PROGRAMME SELECTION button (2) you can choose between the following cycles:
| Special Programmes | ECO | ECO Reduces energy consumption by washing at lower temperatures and with reduced water consumption than normal wash programmes; a good washing result is achieved by a prolonged mechanical washing action. |
| NEW Recommended when you wish to wash with a total change of water in the washing tub, so suitable for consecutive washes of particularly greasy and dirty dishes. The complete change of the water in the tub requires a longer wash cycle. | ||
| LONG Continuous wash. The cycle can be stopped at any time by pressing the Start button. After a short pause, the rinse stage will start. The cycle ends automatically after 12 minutes. | ||
| GLASS For dishwashers only: Suited for washing glasses of any shape or type. This programme washes with a low rinse temperature and requires a long drying time. | ||
| OSMO | WATER The recommended cycle for sparkling glassware; may be used only in combination with a reverse osmosis device. | |
| ACT 1 - ACT 2 Suitable for washing very dirty, even encrusted dishes that have been left for some time. The programme includes 2 washes and 2 rinses. | ||
| PRG 4 - PRG 5 Long wash programme for heavily soiled dishes (8'). Long wash programme for heavily soiled dishes (10'). | ||
| STEEL Suitable for washing forks, spoons, knives and all sorts of other cutlery. This wash programme lasts longer than the other programmes and uses a higher water temperature. | ||
| COLD Specific programme for glass washers with cold water rinse. | ||
| PLATE Plate programme for glass washers. | ||
| SAN A030 - SAN A060 Recommended when the dishes to be washed also have to be sanitized (EN ISO 15883-1/3). This programme controls the wash temperature and time calculating the constant A0. The programme ends when the A0 value equals 30-60. The length is variable, but is generally around 10 minutes and the wash temperature reaches approximately 70 C°. N.B. If you require an A0 value other than 30-60, contact an authorised technician, who will modify the machine software for you. |
The special programmes available may vary according to the machine type and model
4.4 Filling the rack
Referring to Fig.4
, to ensure the correct operation of the dishwasher follow the rules described below:
- Use a suitable rack, fill without overloading and without overlapping the dishes.
Always wipe the dishes before placing in the dishwasher; do not put dishes with dry or solid residues in the washer.
- Place the empty dishes in the rack facing downwards.
- Place plates and the like in the sloping rack, with the inner surface facing upwards.
- Place the cutlery in the cutlery basket, handle end down.
- Do not place silver and stainless steel cutlery in the same cutlery basket as this will turn the silver brown and may corrode the steel.
- Wash the dishes immediately after use, in order to prevent any residue from hardening and sticking on them.
- Use only solid, dishwasher-proof dishes.
4.5 Cycle start-up
- To start the programme, press the START button (4); during the wash cycle, the TIME BAR (9) indicates cycle progress and the display is coloured blue (Fig. 2b) and shows the name of the preselected programme.
- At the end of the cycle, the display will turn green and display the word END.
- For rapid drying, take the rack out of the machine as soon as the cycle finishes.
- To stop a wash cycle early, press the START button (4) again.
4.6 Automatic cycle start-up
This function lets you start a cycle by simply closing the door (or hood) without pressing any buttons. To enable the function, proceed as follows:
The letter "A" on the display indicates that the function is enabled.
- If not made available by default, the function must first be enabled via the settings menu.
- To disable the function, press the START button (4) for a few seconds while the door is open. This disabling is only applied for a single wash cycle.
N.B. In hood versions, the automatic start function is automatically enabled after the first work cycle; all subsequent cycles will start automatically when the hood is closed. This operating mode is indicated by the letter "A" on the display.
4.7 Displaying information
- By holding the START button (4) pressed for a few seconds you can display in sequence the Boiler temperature, the Tub temperature and the number of cycles performed by the machine.
This information can be displayed both before and during the wash cycle and will only be visible temporarily.
- By holding the PROGRAMME SELECTION button (3) pressed for a few seconds you can display in sequence the Boiler temperature, the Tub temperature and the number of cycles performed by the machine.
- The function can be activated by holding the PROGRAMME SELECTION button (3) pressed for a few seconds.
4.8 Turning the dishwasher off
- To switch off the dishwasher, press the ON/OFF button (1); only the STANDBY LED (5) will remain illuminated to indicate that the mains power is on.
N.B. If the dishwasher stays on with the door open for more than one hour, it will switch off automatically.
4.9 Removing the integral filter
- Move the washing and rinsing arms at right angles to the edge of the door
- Lift each semi-filter by the relative handle (Fig.7).
4.10 Emptying the dishwasher
4.10.1 Appliances with no drain pump
- Switch the dishwasher off.
- Remove the integral filter (Fig.7A).
- Pull up and remove the overflow pipe (Fig.7).
- Wait for the tub to empty completely.
- If necessary, extract the tub filter and clean.
4.10.2 Appliances with drain cycle (*optional)
- With the machine on, press the PROGRAMME SELECTION button (3) to select the programme ProClean or ProDrain.
- Press the START button (4), to start the drain and self-clean programme.
- At the end of the drain cycle, the dishwasher will switch off; only the STANDBY LED (5) will remain illuminated to indicate that the mains power is on.
4.11 Resin regeneration (*optional)
In machines with an incorporated water softener the "REGeneration SYSTEM ON" symbol indicates that the machine is running a resin regeneration cycle and that the current wash programme could be longer.

N.B. Do not switch off the machine if a regeneration cycle is underway
In machines fitted with water softener, when the warning 'NO SALT' appears you should add salt to the relative container; proceed as follows:
- Remove the basket from the machine.
- Remove the integral filter (Fig. 7).
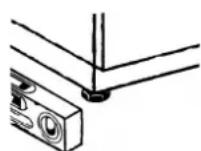
- Unscrew the cap on the salt container (Fig. 8).
- Pour approx. 700g of regeneration salt (1 or 2mm grain size kitchen salt with no additives) into the container using the funnel supplied.
- Close the container firmly.
After a few minutes the 'NO SALT' warning will disappear.
4.12 Machine with external water softener
On machines equipped with an external water softener, after a certain number of cycles, the word 'SERVICE' will appear on the display; this means that it is necessary to regenerate the resin of the external water softener. The service alert will remain even when the machine is off. To cancel it, press and hold all 4 buttons for at least 5 seconds, with the machine off and the door open.
4.13 End of shift
- At the end of the day always drain the machine as described in the section Machine draining.
- Disconnect the power supply by means of the main switch and close the external water cock.
- Perform routine maintenance and clean the machine as described in the section Maintenance.
- If possible, leave the door ajar to prevent bad odours building up inside the machine.
Chap 5 MAINTENANCE
5.1 General rules

Before doing any maintenance, completely drain out all water, shut off the power supply and close the water supply cock.
Do not use water under pressure - it can damage the electrical equipment.
Only wash the body panelling when it is cold, using only product specifically designed for steel.
If there is a risk of ice forming, drain the water from the boiler and wash pump.
5.2 Cleaning
To keep the machine in good working order, it must be maintained regularly as explained below. We recommend periodically running a sanitising treatment with suitable non-corrosive commercial products.
5.3 Cleaning the filter unit
Run this procedure at the end of the day or when you see the filters are dirty:
- Remove and clean the baskets.
- Empty out the tub as explained in "Machine draining".
- Remove and carefully clean all the filters.
- Do not use abrasive products to clean the tub.
- Restore all removed parts when finished.
5.4 Cleaning the arms
The wash and rinse arms are easily removed in order to clean their nozzles and prevent blockage/encrustations.
Proceed as follows (Fig.9):
- Remove the spray arms by unscrewing the retaining nuts or by unclipping the quick-fit attachments on machines so equipped.
- Wash all parts under a jet of running water and clean the nozzles thoroughly, using a toothpick or pointed tool if necessary.
- Clean the arm rotation pins inside the machine and the wash and rinse water drainage area.
- Restore the arms and check that they rotate freely.
Chap 6 SELF DIAGNOSTICS
The machine is equipped with a self-diagnosis system that registers and warns of a number of malfunctions.
| Fault | Description and possible remedies | |
| Er-01 | No rinsing. The rinsing cycle was not completed correctly. Make sure that the rinsing nozzles are clean. | |
| Er-02 | No drainage. The water was not drained or drained incorrectly. Check that the drain pipe is not bent or crushed and that the siphon and filters are not blocked. In machines fitted with an overflow pipe, remove this before starting the drainage cycle. | |
| Er-03 | Rinsing temperature reset fault. The boiler temperature did not reset in the set time during the washing cycle. Switch the machine off and then on and run a new cycle. | |
| SAFE | Er-04 | Water filling in tank fault. Make sure the pipes are connected correctly, and that the water tap is open. Where foreseen, check the presence of the overflow. Switch the dishwasher off and then on and fill again. |
| Er-05 | Tank thermometer fault. (Probe open) The machine does not read the tank temperature value. Switch the dishwasher off and then on. | |
| Er-06 | Tank thermometer fault. (Probe short circuited) The machine does not read the tank temperature value. Switch the dishwasher off and then on. | |
| Er-07 | Boiler thermometer fault. (Probe open) The machine does not read the boiler temperature value. Switch the dishwasher off and then on. | |
| Er-08 | Boiler thermometer fault. (Probe short circuited) The machine does not read the boiler temperature value. Switch the dishwasher off and then on. | |
| Er-09 | Boiler loading time out: boiler not filled. Impossible to carry out rinse cycle. Check that the water tap is open. Switch the dishwasher off and then on and run a new cycle. | |
| Er-21 | Insufficient rinse: the right amount of rinsing did not take place; make sure the rinse nozzles are clean. The error does not stop machine operation. | |
| Er-22 | Tank temperature reset fault: The tank temperature did not reset in the set time during the washing cycle. Switch the machine off and then on and run a new cycle. | |
| Er-25 | Regenerate resins: The number of litres set for external water treatment equipment has been reached, the error does not prevent dishwasher operation, the message can be deleted from the "Water Service Set" menu. | |
| SAFE | Er-5F | Electro-mechanical safety device: the boiler or tub safety thermostats have cut in, or the tub safety pressure switch has been triggered. |
| Er-5L | Level safety switch: Incorrect water level in the tank. | |
| dr-b | Dirty filter: incorrect water level in tank due to dirty filter or overflow fitted incorrectly. | |
| WARNING! Switching the dishwasher off and then on again "resets" the signals, if after carrying out the instructions given the problem persists, contact an Authorised Service Centre. | ||

The following settings should only be configured by a qualified technician.
The parameters listed below can be set during installation of afterwards, accessing the settings menu as follows:
Machine in standby with door open.
- Press buttons 1 and 2 together (ON/OFF and SPECIAL PROGRAMME SELECTION) for 5 seconds and enter the key KEY 12 (buttons 3 and 4 to change the parameter, 1 to confirm).
- Then press button 1 (ON/OFF) repeatedly to scroll through the following headings, enabling and/or changing them using buttons 3 and 4 (the modified parameter is memorised without being confirmed). The list of parameters may vary according to the type of dishwasher.
| Language | Language selection |
| Boiler Set | Boiler temperature settings for programmes. In the versions with atmospheric boiler (rinse pump) there are different settings for each programme (b1 – b2 – b3) |
| Tank Set | Tub temperature regulation for programmes. Rinse pump versions have different settings for each programme (t1 – t2 – t3) |
| ThermoStop | Enabling the Thermostop function, which guarantees the correct rinse temperature. |
| Energy Saving | Enabling the Energy Saving function, which guarantees energy savings when the dishwasher is on but not in use. |
| Manual Detergent | Manual operation of detergent doser By setting ON, the suction pipe is automatically loaded. The length of the pipe is predetermined according to the dishwasher model. |
| Manual Rinse Aid | Manual operation of rinse aid doser By setting ON, the suction pipe is automatically loaded. The length of the pipe is predetermined according to the dishwasher model. |
| Detergent Dose | Adjustment of detergent dosing time or quantity in g/L according to the model |
| Rinse Aid Dose | Adjustment of rinse-aid dosing time or quantity in g/L according to the model. |
| Water Hardness | Water supply hardness setting, for machines with built-in water softener, set according to measured water hardness. |
| External Softener Cycles | Cycle counter setting and activation to enable the Service alert for an external water softener. The Service alert can be cancelled by holding pressed all 4 buttons with the machine off and the door open. |
| Manual Rinse Pump | Manual operation of the rinse pump |
| Manual Drain | Manual operation of the drain pump |
| Autostart Enable | Automatic enabling of automatic starting |
| Cycle Counter | Cycle counter |
| Water Service Set | Setting of litres of autonomy for external water treatment equipment, adjustment setting from 0 to 12000 litres in steps of 200. The message Er 25 can be reset by simultaneously pressing all 4 buttons from this menu. |
Once all necessary parameters have been set, to exit and save any changes simply press and hold button 1 for a few seconds until the display switches off.
7.1 Hardness settings for the incorporated water softener
The conversion table gives the correspondence between German degrees and the Franc degrees used for the machine settings.
| Measured hardness | |||
| °fr | °dGH | ||
| 0 ÷ 20 | 41 ÷ 45 | 0 ÷ 11 | 23 ÷ 25 |
| 21 ÷ 25 | 46 ÷ 50 | 12 ÷ 14 | 26 ÷ 28 |
| 26 ÷ 30 | 51 ÷ 55 | 15 ÷ 17 | 29 ÷ 31 |
| 31 ÷ 35 | 56 ÷ 60 | 17 ÷ 20 | 31 ÷ 34 |
| 36 ÷ 40 | 20 ÷ 22 | ||
Chap 8 SCRAPPING

Our machines do not contain materials requiring special handling. (Applicable in the EU and countries with sorted waste disposal)
The mark applied to the product or its documentation indicates that it must not be
scrapped with domestic waste when it reaches the end of its service life. To prevent damage to the
environment or health risks due to improper scrapping, keep this product separate from other waste and recycle it so as to promote sustainable use of materials.
Corporate users are requested to contact their supplier and check the terms and conditions of the purchase contract.
The product may not be scrapped together with other commercial waste.
| Symbols | Object | Material | % | |
| Recyclable directly | 40 FE | Sheet | Steel | |
| 20 PAP | Cardboard packaging | PAP | ||
| 50 FOR | Wooden pallet | ISPM15 | ||
| 05 PP | Plastic parts | PP, PP+FV | ||
| Compounds | Motors | Assemblies | 20 | |
| Electric parts | ||||
| Electronic parts | ||||
| Rubber parts | EPDM | |||
Chap 9 ENVIRONMENT
RESPECT FOR THE ENVIRONMENT
Proper use of the dishwasher can improve its environmental footprint, if the following simple rules are observed:
Only wash full baskets.
Switch the dishwasher off when not using it.
Keep the machine closed when it is in standby.
Use wash programmes suited to the amount of soiling.
Supply the machine with hot water, if gas heated.
Make sure the drains flow into a suitable sewer.
Do not exceed the recommended dose of detergent.
The manufacturer reserves the right to modify the electrical, technical and aesthetic features of this appliance and replace any of its parts without notice, as he deems necessary to offer a reliable product with a long service life and advanced technology.

m = 311 ;
HFDST8 AFVALVERWERKING 15
HFDST 9 MILIEU 15
HANDLEIDING VOOR AFWASMACHINES
Hfdst 8 AFVALVERWERKING
1.1 NORMALE DRIFTSFORHOLD 3
KAP2 FORORD 4
KAP 3 INSTALLATION 4
3.1 UDPAKNING 4
3.2 PLACERING 4
3.3 ELTILSLUTNING 5
3.4 HYDRAULISK TILSLUTNING 6
3.5 TILSLUTNING TIL AFLØB 6
3.6 AFSPAENDINGSMIDDEL OG VASKEMIDDEL 6
KAP 4 BRUG AF MASKINEN 7
4.1 GRAFISK GRENSEFLADE 7
4.2 STANDBY 8
4.3 TENDINGOGPROGRAMVALG 8
4.4 FORBEREDELSEFKURVEN 10
4.5 START AF CYKLUS 10
4.6 START AF AUTOMATISK CYKLUS 10
4.7 VISNING AF INFORMATIONER 10
4.8 SLUKNING AF MASKINEN 10
4.9 FJERN INTEGRERET FILTER 11
4.10 TOMNING AF MASKINEN 11
4.10.1 Maskiner Eden aflobspumpe 11
4.10.2 Maskiner med tomningscyklus (*ekstraudstyr) 11
4.11 REGENERERING 11
4.12 MASKINER MED UDVENDIGT BLDGORINGSANL/EG 11
4.13 SLUT PÄ DRIFT 11
KAP 5 VEDLIGEHOLDELSE 12
5.1 GENERELLE REGLER 12
5.2 RENGORING 12
5.3 RENSNING AF FILTERAGGREGAT 12
5.4 RENGORING AF ARME 12
KAP 6 SEVLDIAGNOSE 13
KAP 7 JUSTERINGER OG INDSTALLINGER. 14
7.1 INDSTILLING AF HARDHEDEN AF DET INTEGREDE BLDGORINGSANLAEG 15
KAP 8 BORTSKAFFALSE 15
KAP 9 MILJ0 15
INNEHALLSFÖRTECKNING
KAP 1 RISKER OCH VIKTIGA VARNINGAR 2
1.1 NORMALA ANVÄNDNINGSVILLKOR 3
KAP 2 FORD. 4
KAP 3 INSTALLATION 4
3.1 UPPACKNING 4
3.2 UPPSTÄLLNING 4
3.3 ELEKTRISK ANSLUTNING 5
3.4 VATTENANSLUTNING 6
3.5 ANSLUTNING TILL AVLOPPET 6
3.6 GLANSMEDEL OCH DISKMEDEL 6
KAP 4 ATT ANVANDA MASKINEN 7
4.1 GRAFISKT GRANSSNITT 7
4.2 STANDBY 8
4.3 PAsLAGNING OCH PROGRAMVAL 8
4.4 ATT LASTA DISKKORGEN 10
4.5 PROGRAMSTART 10
4.6 AUTOMATISK PROGRAMSTART 10
4.7 VISNING AV INFORMATION 10
4.8 AVSTÄNGNING AV MASKINEN 10
4.9 ATT TA LOSS INTEGRALFILTRET 11
4.10 TOMNING AV MASKINEN 11
4.10.1 Maskinerutan tomningspump 11
4.10.2 Maskiner med tomningspump (*tillval) 11
4.11 REGENERERING AV HARTSER (*TILLVAL) 11
4.12 MASKINER MED EXTERN AVHARDARE 11
4.13 VID ARBETSDAGENS SLUT 11
KAP 5 UNDERHALL 12
5.1 ALLMÄNNA REGLER 12
5.2 RENGORING 12
5.3 RENGORING AV FILTERENHETEN 12
5.4 RENGORING AV DISK- OCH SKOLJARMARNA 12
KAP 6 SJALVDIAGNOS 13
KAP7 INSTALLNINGAR OCH JUSTERINGAR 14
7.1 INSTALLING AV VATTENHARDHET MED INBYGGD AVHARDARE 15
KAP 8 AVFALLSHANTERING. 15
KAP 9 MILJÖ 15
TJABA1 PNCKN IN BAXHbIE MEPbI IPEIOCTOPOXHOCTN 2
1.1 YCIOBNA HOPMAJIbHOI 3KcPIYATAUIN 3
TJABA2 BBEeHne 4
JIABA3 YCTAHOBKA 4
3.1 PACNAKOBKA 4
3.2 PA3MEUeHne 4
3.3 POKNIIOUCHNE 3JIeKTPONITAHNIA 5
3.4 POKJIIOUeHIE K CNTEME BOIOCHABXEHN 6
3.5 POKJIIOUeHNE K CNTEME KAHAJIIN3AUIN 6
3.6 OIOJIACKINBATEJIb I MOIOUIEE CPEICTBO 6
TJABA4 IcnoJIb3OBAHNE MAUINHbl 7
4.1 PAPHUECKNIHTEPFEC 7
4.2 PEXKIM OXUDAHNA 8
4.3 3Anyck IN BbIEOP IPOIgPAMMbI 8
4.4 3ANJHHeNIE KOP3INHbI 10
4.5 3aIyck LIIKJIa. 10
4.6 ABTOMATUHECKN 3APYCK LUKJIa 10
4.7 OTOBPAXHEHNE INHOPMALIN 10
4.8 BbIKIOUeHHe IocydomOeHOn MAunHbI 11
4.9 CHaTne BCTPOEHHO FOJIbTPA 11
4.10 OIOPOXKHEHNE IOCYDOMOECHOI MAUNHBI 11
4.10.1 MauuHbI 6e3 dpehaXHo2o Hacoca 11
4.10.2MaunbI c dpenakhblm uKlom (^* don. kOMnneKmauera). 11
4.11 PENEHEPAUINIOHOO6MEHHO CMONbl (^* KOMPNEKTAUIN) 11
4.12 MAUHA C BHEHIM UMRYHTEJIEM BOIbI 11
4.13 12
TJABA5 TEXHnueCKOE OBCJIyXINBAHNE 12
5.1 OBUNIE INPABNIA 12
5.2 12
5.3 YIcTKAΦNJIbTPOB 12
5.4 YIcTKA JIOnACTeI 12
ΓLABA6 CAMOДИАГHOCTИKA 13
TJABA7 HACTPOIKN 14
7.1 IAPAMETPbI JECTKOCTN IJI BCTPOEHHO YMRAHTENBAODbl 15
TJABA8 YTNJIIN3AUIN 15
TJABA9 OKPYKAIOUIA CPEA 15
B coomeemcmeu c 3aokohodamelbcmeom npou3eodumelb coxpaHem 3a cobou npaeo cobcmeehnocmu Ha hacmou duokymem. 3anpeuaemc8 oocnpou3eodumb cam dokymem upu pa2anaawmb e2o codepxahue nio6bmu cpedcmam 63 npedeapumenbnoo nucbmenho0 papeuenu.
Ppou3eodumnb ocmaenr 3a cobou npaeo ehcumb heo6xodumble u3meHnue ycoepueehcmeoeaHua ceoe npodykuuu 6e3 npedeapumelbno zyeedomneu.

BHHMaTeJbHo npOHTaIe pyKOBODCTBO NO 3KcNJaTaUu Npeed TeM, KaK BKnIOuATb MaunHy. B HEM cOpEgXaTcB BaxHbIe yKa3aHnA OTHOCHTeJbHO 6e3OnaCHocTn pa3INuYhbIX 3TaNOB yCTaHOBKN, 3KcNPyTaUuN I Texo6CnyXuBaHnMaunHbI. HecobIoJeHne INHCTpyKcN, npNBedeHHbIX B COnpoBOdITeJbHO JOKyMeHTaUu, MoKeT HeRaTbHO IOBJIaTb Ha 6e3OnaCHocTb yCTpOcTBa N npNBecTN K HeMeJLeHHo NOTepe rapaHTnHBIX npab.
ГЛABA 1 PИСКИ BAXKHbI E MEPbl ПРЕДОCTOPOXHOCTHN
-Данна Maшина Doлжна Испльбоватбая NСКПОЧТЕЛБНО NO TOMY Ha3HaueHNO, Дя КOTOPORO Oha 6bla cnpoeKtupobaha.ЗкпnyatauaЯ Maшинь B Лобьдpyгnx Zeilex ChITaETcЯ HeHaJNeXaUe n, cneIOBaTeNbHO, onaCHOI.
CneunactbI, ocuieCTBnaIOUme MOHTax, 63aHbI DaTb NOb3OBaTeJIHOeOxOIMbIe yka3AHnNo pa6ote C MaUNHO n pacCKa3aTb O npabINax TexHNK6e3OpacHOCTN, KOtOpbie OH DoJXeH CO6JIoDaTb, B TOM YNCNE, C DEMOHCTpaCneNBx peKOMHeAaHn Ha npaKTnke.
Bce pa60tbi Ha MaunHe, B TOM YncIe N B Cnyae NOJOMKn, DOJXHbI npOn3BOIDITbcra NCKIOUHTeJIbHO 3aBODOM-N3ROTOBNTeJIeM, IINo KBaIINΦnIupOBaHHbIMN CNEuJaNCtAmN JInueH3npOBaHHORO cepBnCHORO ueHTpa C INcNoJIb3OBaHHem PnI 3TOM TOJIbKO ΦIpMeHHbIX 3aAnacteI.
- Ipeed TexHnueckm 06cnyxnbAHnem, npOBeDeHnem pEmOHThbIX pa6OT nIN YnCTKN, Bcerda OTCoeDnHnTe INN IN3OInpyuTe MaunHy OT 3JekTpocetN IN BOIDOpBODa.
MaunHa HE donkha nCnoJb3OBaTbcra HeNOIROTOBHeHHbIM nepcoHaIOM.
MaunHa MoKeT nCNoIb3OBAtbcr DeTbMn He MnaIe 8 Jet N IuCaMn C OrpaHnueHHbIMn cHcOpHbIMn NJI MENTaJIbHbIMN CNOC6HOCTaMn NJI Hne IMeIOUIMN Heo6XODMbIX 3HaHn TOJbKO B Tex CJyuaX, KOrDa OHN HaxoJrTcR NOd PrncmOTpOM JNuCA, OTBETCTBEHHORO 3a INx 6e3OnaCHOCTb, NJI NOLyHIN OT Hero yka3AHn No ee 6e3OnaCHOKcnPnyatauIN.
He no3boJnTe DeTm nIgPaTb c MaunHOH.
Pa60tbl no YnCTKe MaunHbI nn yxOdy 3a Hei, NOJExKaUne BbIOJIHeHIO nOlb3OBaTeIeM, MoryT OcyuEcTBJIaTbcr DeTbMn TOnbKO B TOM Cnyae, ecNI OHn HaxoJrTcN IO npNCMOTpOM.
MaunHa HE donxHa HaxoDbTbC noHnpanjKeHneM, KOrda OHa He nCnoJb3yETc.
- EcIn MaunHa He Ochauhe Ha BnKo NIN DpyrM yCTpoiCTBOM, ObecneuBaUzmm NOHoe OTcoeHNHeHne BCEX KOHTaKTOB OT NCTOCHNka 3JeKTPoNTaHna, COOTBeTCTByUOune yCTPOIcTBa DOJXHbI 6bITb yCTaHOBJeHbI B ZeHH 3JIeKTPoNTaHna CorlaCHO DeNCTByUOIm CTAHdApTaM.
B clyae noBpeKdHnKa6eIaTAHn BO n36exHne BO3MOxHbIX pNCKOB erO 3ameHa dJnxHa 6bITb BbINOJIHeHa n3ROTOBnTeJeM IIN erO cepBnCHOn cnyk6oI IIN, B JIObOM clyae, CneuaNCTOM, IMeIoUm aHaONHyO KBaJIΦnKaUIO.
- YctaHOBJIeHHbI Ha MaunHe BnHT, 6o3HaueHHbI CmMBOJOM 5021 cTaHapTa IEC 60417, ABnEeTcra ToUKoN NOkJIIOUeHnK 3KBnInoteHuaJbHomy KOHTpy.
- HNKOДA He OTKpbIbaiTe pe3ko MaunHy Do OKOHuaHna pa6oUero uNKna.
- HNKOgA He nCNoIb3yIte MaunHy 6e3 npEynCMOTpeHHbIX n3rOToBnTeJIem 3aunTHbIX yCTPOINCTB.
HNKOΓA He nCnoB3yTe MaunHy dIa MoKn IpeMeTOB, He NOxOJaXnX IO TnY, fOpMe, pa3Mepam nn MaTePnaJAm dIa MaunHHoN MoKn, Jn6o
PpeMeTOB C HapuWeHHo CEJIOCTHOCTbIO.
- HNKOgA He nCNoB3yIe MaunHy nn ee qactn B KaueCTBe JeCTHnCbI nn onopbl IJIpei, XNBOTbIX nn ppeDMetOB.
- HNKOgA He nepepykaTe OTKpbIyU DBepu MaunHbI c fpoHTaJbHOJ 3arpy3KoJ, NOCKoJIbKy OHa paCCHTaHa Ha BEc TOJIbKO KOp3INbI C NocydoJ.
- HNKOgA He norgykaTe o6haxeHHbIe pyKn B MOIoIu paCTBOp.
- HNKOДA He nepeBopaUbaIte MaUNHy nocJe ee yCTaHOBKn.
- Пи обнаружени Нсправно Илу утуки Хдков� с HeMeДлeно OTKПОЧТЕ зелКТрОПТаHne И почу BODbl.
He pa3meaTe nocydomoeyHy MaunHy pAOM c NCTOCHKAMN TePna C TemnepaTypoi Bbiwe 50^
HnKoIa He octabTne NocyDOMoeHyu MaunHy nOd BO3deNCTBnem aTMocepHBix areHTOB (doxdb, coNHue n T.d.) - IocydomoeHna MaunHa He DoJnxHa yCTaHaBnBaTbCBA HHe NOMEeHn BOTcYtCTBn HaIJIexKaUero YKpbITnA.
- Hikorda He 3anyckaite nporpammy MOIKN B OTCyTCTBNE CNTEmbl CNIBa-nepeniba, ecn OH a npeducMOrpeHa.
- HnKoIa He npi6JIxKaIte HaMaHnUeHHbI nepeMTeBk MaIInHe.
He nCnoJb3yIe BepXHIOU qAcTb MaunHbI B KaueCTBe ONOpHOI NOBepXHOCTN. - CnepaJIncT no MOHTaxy o6raH npOBepuTB 3eKTHBHOCTb CNTEmbl 3a3emHeHJ.
- OKOHuaHHN TectnpOBaHHN CneuHaJnCT-MOHTaxHnK 063aH COCTaBntb NcBMeHHoe 3aABHeHne O npabUNbHOY yCTAHOBKe MaunHbI n pOBeDeHN ee NCbITAHN CORNaCHO BcEM DeiCTByIOUm HOpMaM n npabUNam.
HE IN3MeHЯITe NIOJoxHeNKe KOMHOENTOB MaUNHbI IN He BHOCHTe IN3MeHEnB INX KOHCTpyKcUH, T.K. TaKne DeiCTBnA MOryT NOCTaBnTb IOnd yrpo3y 6e3ONaCHOCTb ee 3KcPnyatauIN. - YpOBeHb 3ByKOBOrO daBJeHnra corIacHo EN ISO 4871
LpAMax=55D5Kpa=2,5D5ДЯВСТРANBAeMbIXMaшИн
LpAMax = 65 dB Kpa = 2,5 dB JnKynoIbHbIX MaunH
LpAMax=76dBKpa=1,5dBJnKaTlOMoeHbIXMaunH
- Makc. TempepaTypa noJaBaEMoB BoJb: 50^
MaKc. daBHeHne noDaBaemo BOdbi: 46ap (400 KPa)
KoHCTpykCnMaunHbI npEynCmATpNBAeT ee 0HKcnpOBaHHoe NOcOeINHeHne K BOOpPBOADHO CETN
3anpeaetc8 ocuieCTBnTb uCTky MaunHb C nCnoJb3OBaHneM ctpy BODbl NOd DaBHeHem nn npa.
MaKcImaJIbHaBbICota CJIbBa
Ha ypoBHe noJra IcnoJHHeN C yCTpoIcTBOM nepeJIbBa
MaKcImaJIbHaB BbICota 1 M dIy IcNoJIHeHn, OChaUeHHbIX HaCOCOM cIIBa
1.1 YcnoBna HopMaIbHOn 3KcNlyaTaun
Okpykaioa TaemepaTypa:MaKc.40°C/MnH.4°C(BcpeDHeM:30°C)
BbICota Hau yPOBHeM MOpR:do 2000 MeTpOB
OTHOCHTeBHaB BJIaXHoCTb: MaKc. 30% npn 40 °C / MaKc. 90% npn 20 °C
ГЛABA2 BBEDEHNE
PpeynpexKeHne:
XpaHNTe BcIO DOKymeHTaCIOB HHeNOCpeDCTBeHHoB 6JIN3OCTn OT npi6bopa; oBecepeyTe DOKymeHTaCneI CNeuAInCTOB I ONEpATOpOB, KOToPbIM NOpUyeHa erO 3KcnPyataunr, IN PnIMTe Mepbl, YTObI OHa XOpOo COxpaHJaLacb C TeueHMeB PBeMeHN, XpaHnlaCb B HADEXHOM MeCTe BmecTe C DoONJIHHTeJIbHbIM KOnnMn DJIaYCaTbIX KOHCyJbTaunl.
Ipejde yem BbINOHrTb KaKne-Jn6o onepaun Ha np6ope onepaTop DoJxeh npOHTaTb, NOHrTb N YCBONTb HactoJIeepyKOBOdCTBO.
Pnp6op npedHa3NaueH nckIouHTeNbHO nI npoepccnHaNbHO nCNoIb3OBAHn Iocydomoeyhbx Maunc BbICOKo Harpy3Ko, noTOMy eTO yCTaHOBka, 3KcIpyatauN I TexHnueckoe o6cJyXnBaHne DOJXHbOCUeCTBnTbcra TOnbKO KBaINΦnIpOBaHHbIMn CneunaJIncTaMn B COOTBeTCTBm C INHCTpyKUmaN pON3BOdnteJI.
TapaHTn:
Ipon3BOIDTeJIb He Hecet OTBETCTBeHHOCTn 3a IIO6bIe NOBpeKdEHNr NIN TpaBMbl, BO3HKNWINE B pe3yIbTaTe HecobJHODeEHN rHCTpykCNI INr HeHaDJIeXaUero NCNOB3OBAHNA MaUNHbl.
HecobIouHeHnCTpyKu,coepXaunxCBy npnilaraemO JOKyMeHTaun,MOKeT OtpuateJIbHO cKa3aTbCn Ha 6e3oNaChocTn npibopa n BeTe K HeMeJInHoNOTMeHe 3aBODCKoI rapaHTnn.
Clyuyan yctaHOBn n peMOHTa MaunHbI HeynoJHOMOeHHbIMn TexHueCKMn CneuaJIINCTaMM NcNoJIb30BaHnA HeOpnHaJIbHbIX 3aNaChbIX YacTee BeyT K HemeJeHHoN OTMeHe 3aBOJCKoR rapaHTnn.
XpaHeHne:
TpaHcnpTnpoBka n xpaHeHne: oT -10 ^ C do 55 ^ C , kpaTKOBpeMeHHo - do 70 ^ C (MaKcHMyM 24 yaca)
ΓJIABA 3 YCTAHOBKA
IpaBnBna yCTaHObKa nMeET nepBOcTepeHHoe 3NaueHne dJa 6e3OTka3HO np6Otbl np6Oba. HeKOTOpBie daHHbIe, Heo6xOIMMbIe dJa yCTaHOBKn np6Opa, yKa3aHbI B nacOpTHoN Ta6nUKe H naHeJI KOpNyCa C npAOB CTOpOHbl, a KOIIra Ta6nUKN NOMEeHa Ha THTyJbHOM JnCTe HactOaero pyKOBoDCTBa.

Pn6op MoKeT 6bITb yCTaHOBJIeH TOJIbKO yNOLHOMOyeHHbIMKBAIINΦUncIpOBaHHbIMn CneuHaNCTAmN.
3.1 PacnaKOBka
IpoBepbTe COCTOAHnE ynaKOBKn,OTMeTIN NIO6bIe O6HApXeHHbIe NOBpeXdEHnB B OTpy3oHOM DOKyMeHTe.CHMInTe ynaKOBky uYbeINTEcb,yTO np6OpB xOPOwEM COCTOAHn;HEMeJInHO COo6uInTe O JIO6bIX IOBpeXdEHnX DNlEPy IN 3KcpeINrTOpy PO paKcy INN 3aKa3HbIM INCbMOM C UBeDOMLeHNEM O BpuEHn. PpN O6HApXeHN NOBpeXdEHn, CTABJeero ND yRpo3y 6e3OnacHocTB np6Opa,3aPpeUaeTcY cTaHaBnBaTb INCNoJIb3OBAtbpnp6Op,poka OH He 6ydet IpoBepen KBaIIINΦuINrPoBAHHbIM CneuaJIINCTOM.

3JIeMeHbI ynaKOBKn (noJn3TnJHeHOBbie naKeTbI, neHONoJNcTHnpO, rBO3n n T.d.) npEcdTabJrOT noteHuaNbHyIO onaCHOCTb N DOJXHbI XpaHHTbcra Bhe DoCRAeMOCTn dJeTeu I DOMaUHnx KNBOTHbIX.
3.2 Pa3meeHne
- y6eNTecb, yTO B 3OHe yCTaHOBKn HET npEIMeTob uIN MaTePuaNoB, KOTOpbIe MOryt 6bITb NOBpeXdeHbI napOM, BbIXoJaUm N3 npi6opa BO BpeM pa60tbl; B clyuae INx HAnuYra, y6eNTecb, yTO OHI 3aUnueHbI DOJXHBIM o6pa3OM.
-
Ppepa3meueneepnnp6opa oecneyte noKIOUeHne K nCTOHNky 3JIeKTPoPNTaHn, BOOcHa6KeHHIO n KaHaIN3aun.
B cnyae BCTpaunBaHnmaHH C OINHapHO CTeHKo OCTaBbTe 3a3Opbl BeJInuHoi He MeHee 10 MM MExdy CTeHKAMMaHHbI IN PpNJerAIOUIMN IOBepxHOCTaMn. -
IopI INB BCTPOeHHbIMoDyJIbdoJIXHbI6bITb paccHTaHbHa BEc np6opa.
- Дя обесенья устоньости BBIPOBHЯITE npnbop c nomоьу YeTbipex HOKEK.
- Pnp6op npedHa3Haueh TOnbko dIy cTaunHOapHou yCTaHOBKn; IIO6bIe pyrHe BapnAHtbl DoJXHbI 6bITb corJaocBaHbI uYTBepKdEhbl npOn3BODntTeJIem.
- Pered nCnoJIb3OBAHnEM nocydoMoeyHO mAsHHbI CHIMITE 3aunTHyIO npeHky c naHeJe KOpnyca.
3.3 PoiKluoyeHne 3JIekTpponTaHn
- ICTOCHNK ПИТАнЯ ДОЛЖЕН 6БITБ OСHAUCEH MHRONONIOCHbIM ABTOMaTNUeCKM BByIKIIOUaTeJIeM (Главьн BBIKIIOUaTeJIb ПИТAHN)ДЯ pa3MbIKAHNY BCEX KOHTAKTOB, BKIIIOUaЯ HeITpaJIb, C 3a3OpOM MEXdY pa3OMKHyTBIMN KOHTaTAMrH He MeHee 3 MM, И ТЕМOBыКIIOUaTeJIaMn IIN IПаВКIMN INpeOxpaHNTeJIaMn, KOTOpbie DOJIXHbI 6БITb HAcTpoEHbl IIN paCCHTaHbI Ha MOUHOCtB, yKa3aHHYIO B NacNOPTHOJ TabJIuYe MaUNHbI.
- IlaBbIy BbIKHouateIb NITaHn DOJIKeH 6bITb yCTaHOBHeH Ha JINHH 3NeKTPoNtAHnB HEnOcpeDCTBeHHoB 6JIn3OCTn OT npIbOpa, n MOxET 6bITn POdKJIIOUeH OJHOBpeMeHHO TOJbKO K OJHO MaUNHe.
- Hanpajxehne n yactota TOka B 3JIeKtpocetn DOJXHbI COOTBETCTBOBaTb npaMeTpam, yka3aHHbIM B nacnopTHoT Ta6nUke np6opa.
- YctaHOBka DoJXHa BKNIOyATb CNTeMy 3a3eMJIeHnB B COOTBETCTBnC yctaHOBJIeHHbIMn HOpMaMn 3JIeKTPo6e3OanachocTn DnIg 3aIITbI OpeaTopa n camoro np6opa.
-Данная машина COOTBETCTBYET NOLOжehнЯ СERTNФКATA EN/IEC 61000-3-11,ecnIMpeDAHc CNTeMbI Zsys MeHbWe nIN paBeH Z max B TOUKe COnpJxHeH NCTeMbI 3NEKTPoNTaHnI NOlb3OBaTeJI N O6UeROPOdCKoN CETn 3NEKTPoCHa6XeHnI. O6r3AHHOCTbIO MOHTAXHnka IN NOlb3OBaTeJI MaUNHbI YBnAETcN IPOCNeIDNTb 3a TEM, YTO6bl MaUNHa 6blna NOdkNoyeHa NCKlIOHTeNbHO K CETn 3NEKTPoNTaHnI C NMIpeDAHCOM Zsys, MeHbWIM nIN paHBbIM Zmax
3.5 PoiKJIIOUeHHe K CnCTeMe KaHaJIIN3aIIM
- Линя слова дожнога сокая ть ИС Свобдого Дренихого колда ссфоном, COOTBetCTByUHIM nponyckho CnOCOBHCTN CINBHOОlaHa, NOCTabIeMOrO c np6opom.Длнha WlnaHra DoJxHa obecneuBaTb BO3MOXHOCTb erO NOdCOeDInHeHЯ K OTCTOnHNY 6e3 HataxeHЯ, OrpaHueHЯ, CrnbAHHa, CMrTna, CdaBnBaHnЯ JINI npNKlaDbIBAHnY yCINNJI NIObblm CnOCOBom.
CINB BOIbI n3 6aKa npOcXoDnT caMOTeKOM, NO3OMy DpeHaxHbIKOLOdeUdoJKeH paONaratbcra Hxke OCHOBaHnMaunHbl. - Ecni Cniv HaxoHITcBbIe OCHOBaHna np6opa, MoXHO nCNoB3OBAbB BepCNIO CO CnIBHbIM HAcOCOM (npedocTabnEeTcno 3anpocy).
B 3TOM cnyae dpeHaxHbI nATpy6OK MOKeT HAXOHTbcra Ha BbICOTE He 60Jee 1 M.
Bcerda npoBepaIe npabunbHoctb pa60tbi cInBa n He donyckaTe erO 6loKupoBaHnA. - JIo6oe npyroe peueHne DoJxHo 6bItb 3a6naorOBpeMeHHo yTBepxKeHO npou3BOuNTeJIem.
3.6 OnonacknBaTeIb MIOoee cpeCTBO
- OnolacknBaTeIb n MOIOe e CpeICTBO IOnaHTcC NOMOuB BCtpoEHbIX DInCneHcePOB (B3aBNCIMOCrN OT MoJI).
-Дозирову onpeденият мотаяхнik obopyдobань B COOTBETCTBUN C JECTKOCTbIO BOДы, КрOME TOrO, OHcam npo3BOdNT KaIb6poBky dncneHcepoB. - Ipeaix KaIIb6pOBKo 3aONHnTe HApOpHbIe Tpy6Kn DInCHeHcePob COOTBeTCTByIOUcIM pOdykTOM.
KajnbpoBka yctpoiCTB ocyueCTBnAETcC nOMOupepynpoBOHbIX BHTOB nIN HENOCpeDCTBeHHO c naHeNy npaBHeHna (ecn npimeHmo). - YpOBeHb JxNkOCTn B KOHTeHHepe DoJKeH 6bITb DOCTaOHTbIM DnA3aONHeHn DaNCHeCepOB; He DOnyckaIte NOJHO OncyTOUeHnKoHTeHepa n He NonoJIHrTe erO arpeCCNBbIM nn 3aRpy3HeHHbIM npOdykTom.
KATEROPUHECKN 3APPEUCAETCnNoJb3OBaTb MoOuNe CpeIcTBA Ha OCHOBe XIOPA nnnrINOXLOPNTA.
PekomeHnyeTcYyTaHOBnTB aBTOMaTHueckn DmCneHcepeMoUoJero CpeIcTbA.
ГЛABA 4 ИСПОЛьЗOBAHNE MAШИнны
4.1 TpaФнчecки nHTeppeic
CM.puc.1:
BbiknouaTe nocydomoeyHy MaunHy, KOrda OHa He NcNoJIb3yeTc.
ДерхиTe MaшИну 3аКрыТон, KOrda OHa HaxOДNTсВ ржIMe OxИданЯ.
IcnoIb3yIte nporpaMMblMbITb, COOTBeTCTBYIOUne CTeNEHn 3aqr3HeHn Nocybl.
ObecneuBaIte MaunHy ropaey BDOJ, ecn OHa harpeBaetra3OM.
ObecnebyTe noKIOUeHne cTOKOB K IOXoJaIe KaHaJIIN3aUN.
He npebbwaIte pekomeHdyemyo do3y MOIOJero cpeicTba.
ПюИЗВОДИТЕЛБ OCTABЛЯТ 3a COбОп ПраBO ИЗМЕнЯТь эЛЕКТРИСЕСКЕ, ТЕХИСЕСКЕ И эCTEVЧЕСКЕ XAPAKTEРИСТIKN 3TOGO YCTPOICTBA N 3aMEHЯТь ЛЮБIE erO DeTAlN 6e3 PpeДВAPITeHOrO yBeDOMJIeHNY, NOCKOLbky OH CHTaET HeO6XODIMbIM PpeДЯТь 6OJIeH NaDEЖHbIe I3dJIIN, C 6OЛьшIM CpOKOM Clyx6blI NepeДOBbIMn TEXHOJIOΓYIMN.
OBSAH
KAP 1 RIZIKA A DÜLEZITÁ UPOZORNÉNÍ
1.1 NORMÁLNÍ PROVOZNÍ PODMÍNKY 3
KAP 2 PREDMLUVA. 4
KAP 3 INSTALACE. 4
3.1 VYBALENI 4
3.2 UMISTENI 4
3.3 PRIPOJENI K ELEKTRICKE SITI 5
3.4 PRIPOJENI K VODOVODNI SITI 6
3.5 PRIPOJENI K ODPADNIMU POTRUBI 6
3.6 LEsTIDLO A MYCIPROSTREDEK 6
KAP 4 POUZITI SPOTREBICE 7
4.1 GRAFICKE ROZHRANI 7
4.2 STANDBY 8
4.3 ZAPNUTI VOLBA PROGRAMU 8
4.4 PRIPRAVAKOSE 10
4.5 START CYKLU 10
4.6 AUTOMATICKE SPUSTENI CYKLU 10
4.7 ZOBRAZENI INFORMACI 10
4.8 VYPNUTI SPOTREBICE 10
4.9 ODSTRANENI UPLNEHO FILTRU 10
4.10 VYPUSTENI SPOTREBICE 11
4.10.1 Spotbrebcbez vypoustecho cerpadla 11
4.10.2 Spotbrebc s vypoustecim cyklem (*volitelne) 11
4.11 REGENERACE PRYSKYRIC (^*VOLITELNA) 11
4.12 SPOTREBICE S VNEJSIM ZMEKCOVACEM 11
4.13 UKONcENi PROVOZU 11
KAP 5 UDRZBA 12
5.1 OBECNÁ PRAVIDLA 12
5.2 CIstENI 12
5.3 CIstENI FILTRAcnJ JEDNOTKY 12
5.4 CISTENI MYCICH RAMEN 12
KAP 6 AUTODIAGNOSTIKA 13
KAP7 SERIZENIA NASTAVENI 14
7.1 TABULKA TVRPOSTI VODY 15
KAP 8 LIkvidace 15
KAP 9 ZIVOTNI PROSTREDI 15
KAP.5 VEDLIKEHOLD 12
5.1 GENERELLE REGLER 12
5.2 RENGJORING 12
5.3 RENGJORING AV FILTERENHETEN 12
5.4 RENGJORING AV ARMENE 12
KAP.6 SELVDIAGNOSE 13
KAP.7 JUSTERINGER OG INNSTILLINGER 14
7.1 TABELL OVER VANNHARDHET 15
KAP.8 SKROTING 15
KAP.9 MILJ0ET 15