
Rocket HV381 - Vacuum Cleaner SHARK - Free user manual and instructions
Find the device manual for free Rocket HV381 SHARK in PDF.

User questions about Rocket HV381 SHARK
0 question about this device. Answer the ones you know or ask your own.
Ask a new question about this device
Download the instructions for your Vacuum Cleaner in PDF format for free! Find your manual Rocket HV381 - SHARK and take your electronic device back in hand. On this page are published all the documents necessary for the use of your device. Rocket HV381 by SHARK.
USER MANUAL Rocket HV381 SHARK
natural_image
Front view of a black and silver robotic vacuum cleaner (no visible text or symbols)REGISTER YOUR PURCHASE

isteryourshark.com

1-800-798-7398

TIP: You can find the model number on the rating label which is located behind the dust cup.

TIP: You can locate the date code on one of the prongs of the power cord plug.
RECORD THIS INFORMATION
Model Number: ____
Date Code: ____
Date of Purchase (Keep receipt): ____
Store of Purchase:
TECHNICAL SPECIFICATIONS
Voltage: 120V., 60Hz
Watts: 600W
Amps: 5A
PLEASE READ CAREFULLY AND KEEP FOR FUTURE REFERENCE.
This Owner's Guide is designed to help you get a complete understanding of your new Shark Rocket Complete with DuoClean.
If you have any questions, please call the customer service line at 1-800-798-7398.
Important Safety Instructions .... 3
Getting To Know Your Shark® Rocket® Complete with DuoClean™ 5
Assembling Your Vacuum ....7
Using the Motorized Floor Nozzle ...... 9
Choosing the Appropriate Setting ..... 10
Using Your Vacuum in Above-Floor Mode .....11
Storage 13
Accessories 15
Maintaining Your Vacuum 17
Emptying the Dust Cup 17
Cleaning the Filters ....18
Maintaining the Brushroll .....19
Maintaining the Soft Roller....20
Checking for Blockages 20
Troubleshooting Guide 21
Warranty 22
IMPORTANT SAFETY INSTRUCTIONS
To reduce the risk of injury, fire, electric shock, and property damage resulting from improper use of the appliance, carefully observe the following instructions. This unit contains electrical connections and moving parts that potentially present risk to the user.
THE MOTORIZED FLOOR NOZZLE, WAND, AND HANDHELD VACUUM CONTAIN ELECTRICAL CONNECTIONS:
• These are not serviceable parts.
- Do not use to vacuum any liquids.
- Do not immerse in water when cleaning.
- If handheld vacuum/wand is damaged, discontinue use.
1 Inspect power cord and plug for any damage before use. DO NOT use vacuum cleaner with a damaged cord or plug. Turn off all controls before plugging in or unplugging the vacuum cleaner. Store your vacuum cleaner with the power cord secured around the two cord hooks.
2 DO NOT use outdoors or on wet surfaces. Use only on dry surfaces.
3 Unplug from electrical outlet when not in use and before servicing.
4 If vacuum cleaner is not working as it should, or has been dropped, damaged, left outdoors, or dropped into water, return it to SharkNinja Operating LLC for examination, repair, or adjustment.
5 DO NOT pull or carry vacuum cleaner by the cord or use the cord as a handle.
6 DO NOT unplug by pulling on cord. Grasp the plug, not the cord.
7 DO NOT handle plug or vacuum cleaner with wet hands.
8 DO NOT run the vacuum cleaner over the power cord, close a door on the cord or pull the cord around sharp corners.
9 The use of an extension cord is NOT recommended.
10 DO NOT leave vacuum cleaner unattended when plugged in.
11 Keep cord away from heated surfaces.
12 Always turn off this appliance before connecting or disconnecting motorized nozzle.
GENERAL USE
13 Hair removal tool has a sharp edge. Take care when using and keep tool away from children.
14 Use only as described in this manual.
15 Keep your work area well lit.
16 Keep the vacuum cleaner moving over the carpet surface at all times to avoid damaging the carpet fibers.
17 DO NOT place vacuum cleaner on unstable surfaces such as chairs or tables.
18 DO NOT put any objects into openings. DO NOT use with any opening blocked; keep free of dust, lint, hair, and anything that may reduce airflow.
19 DO NOT allow the appliance to be used by children. Close attention is necessary when used near children. This is not a toy.
20 DO NOT use without brushroll, Soft Roller, dust cup, and all filters in place.
21 DO NOT use if airflow is restricted; if the air paths or the motorized floor nozzle become blocked, turn the vacuum cleaner off and unplug from electrical outlet. Remove all obstructions before you turn on the unit again.
22 Keep nozzle away from hair, face, fingers, uncovered feet, or loose clothing.
23 Only use manufacturer's recommended attachments.
DUST CUP/FILTERS/ACCESSORIES
Before turning on the vacuum:
24 Make sure that all filters are thoroughly dry after routine cleaning.
25 Make sure brushroll, Soft Roller, dust cup, and all filters are in place after routine maintenance.
26 Make sure accessories are free of blockages and keep openings away from face and body.
27 Only use Shark®-brand filters and accessories (failure to do so will void the warranty).
GENERAL CLEANING
28 DO NOT vacuum up hard or sharp objects such as glass, nails, screws, or coins that could damage the vacuum cleaner.
29 DO NOT vacuum up drywall dust, fireplace ash, or embers. DO NOT use as an attachment to power tools for dust collection.
30 DO NOT vacuum up smoking or burning objects such as hot coals, cigarette butts, or matches.
31 DO NOT vacuum up flammable or combustible materials (e.g., lighter fluid, gasoline, or kerosene) or use vacuum in areas where they may be present.
32 DO NOT vacuum up toxic solutions (e.g., chlorine bleach, ammonia, or drain cleaner).
33 DO NOT use in an enclosed space where vapors are present from paint, paint thinner, moth-proofing substances, flammable dust, or other explosive or toxic materials.
34 DO NOT vacuum up any liquids.
35 DO NOT immerse vacuum cleaner in water or other liquids.
36 Use extra care when cleaning on stairs.
POLARIZED PLUG
To reduce the risk of electric shock, this vacuum cleaner has a polarized plug (one blade is wider than the other). As a safety feature, this plug will fit into a polarized outlet only one way. If the plug does not fit fully into the outlet, reverse the plug. If it still does not fit, contact a qualified electrician. DO NOT force into outlet or try to modify to fit.
WELCOME!
Congratulations on your purchase. Use this Owner's Guide to learn about your new vacuum's great features. From assembly to use to maintenance, you will find it all in here.
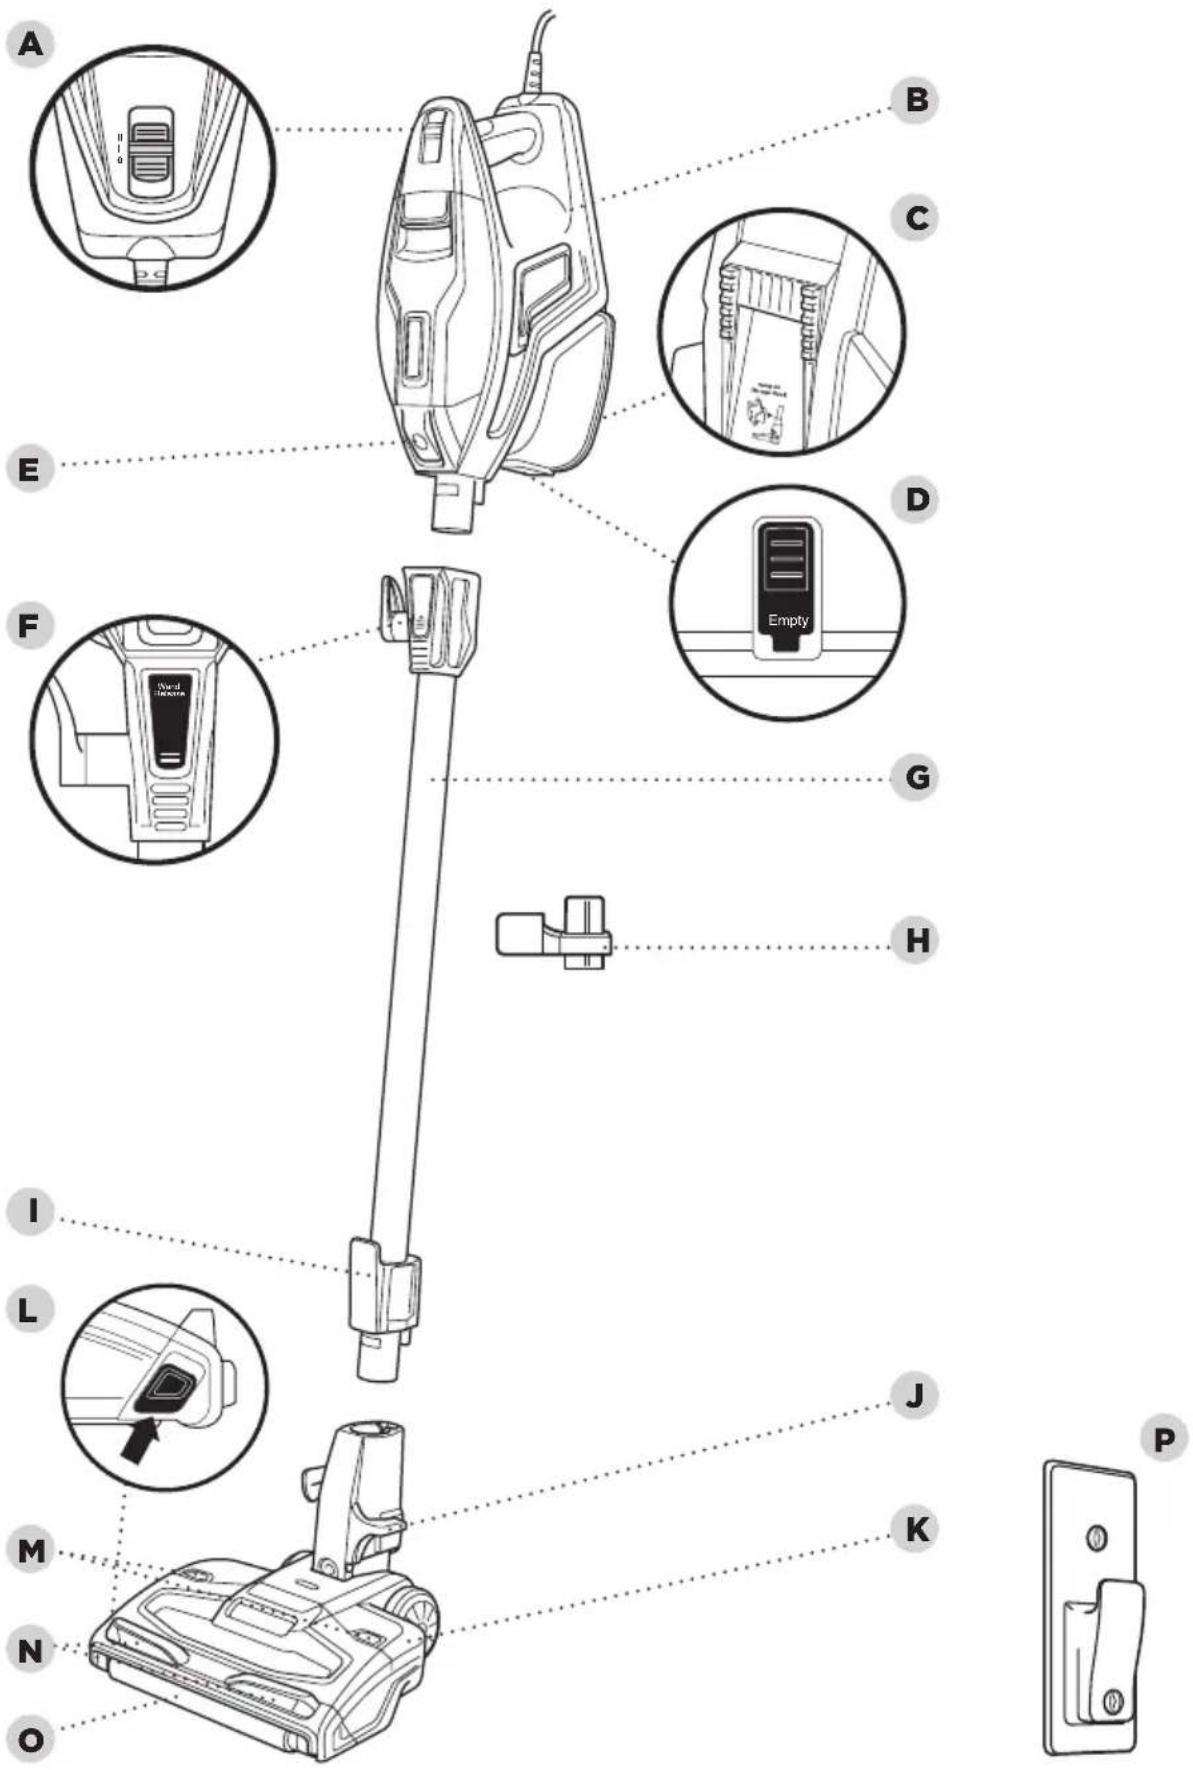
MAIN UNIT
APowerSwitch
B Handheld Vacuum
C Handheld Vacuum Catch
D Dust Cup Release
ELEDLight
F Wand Release
G Wand
H On-Board Tool Clip
■ Handheld Vacuum Storage Hook
J Lower Wand Release Pedal
K Motorized Floor Nozzle
L Soft Roller Access Button
M Brushroll Garage Release Buttons
N Headlights
Soft Roller
P Wall Mount
text_image
A B C D E F G H I L J K M N O PDID YOU KNOW?
The motorized floor nozzle and handheld vacuum have LED lights that illuminate the floor surface being cleaned. The lights turn on automatically in either speed setting.
text_image
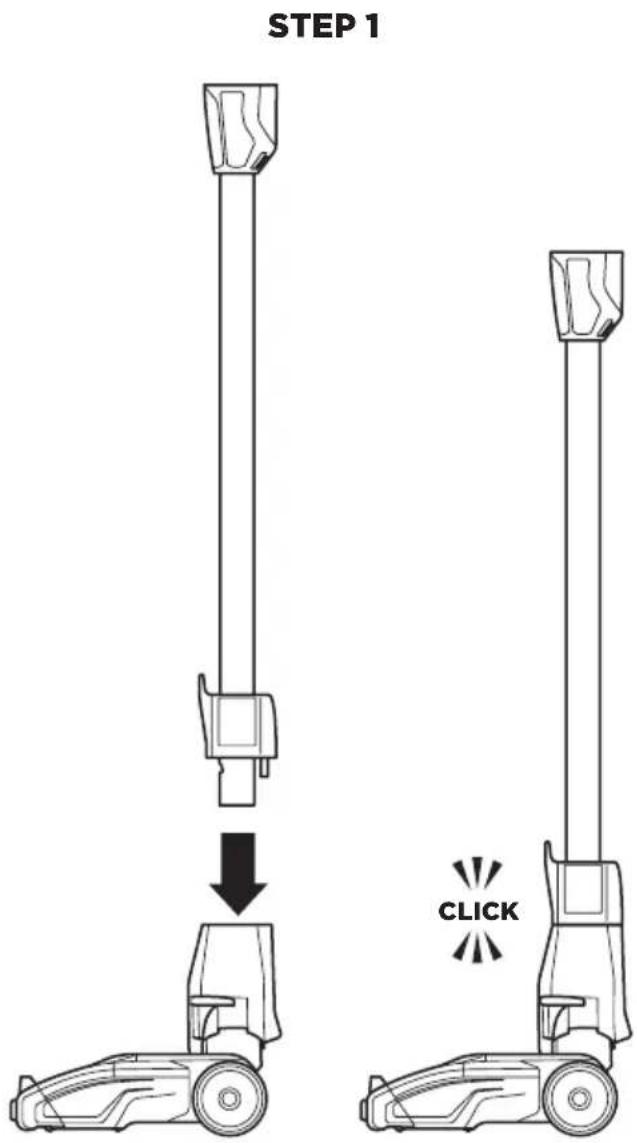
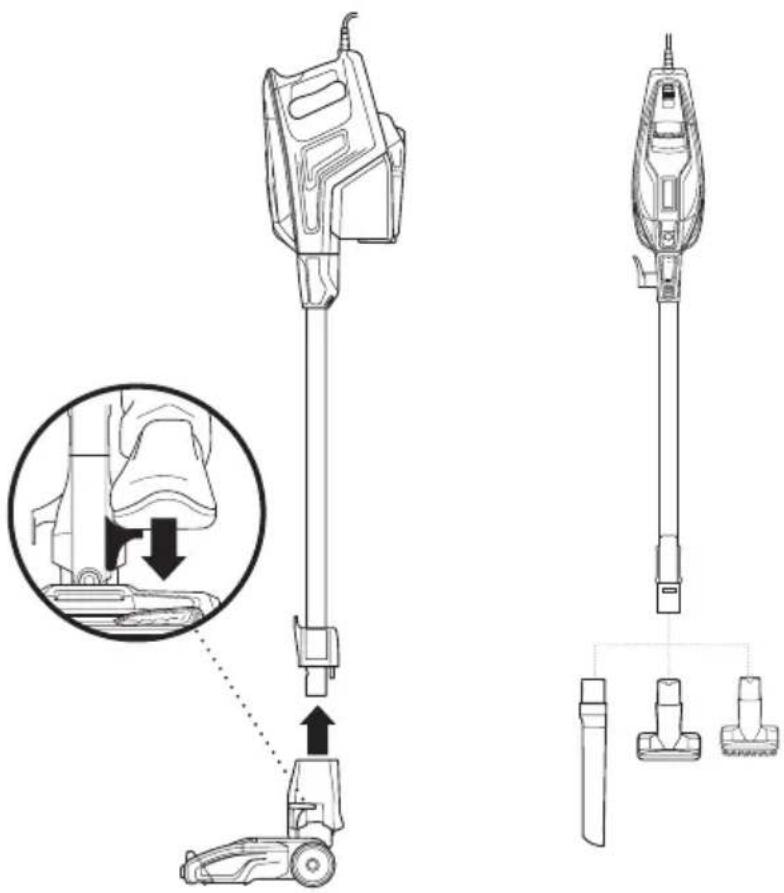
STEP 1 CLICK1 Insert the wand into the motorized floor nozzle connector until you hear a click.
STEP 2 STEP 3
text_image
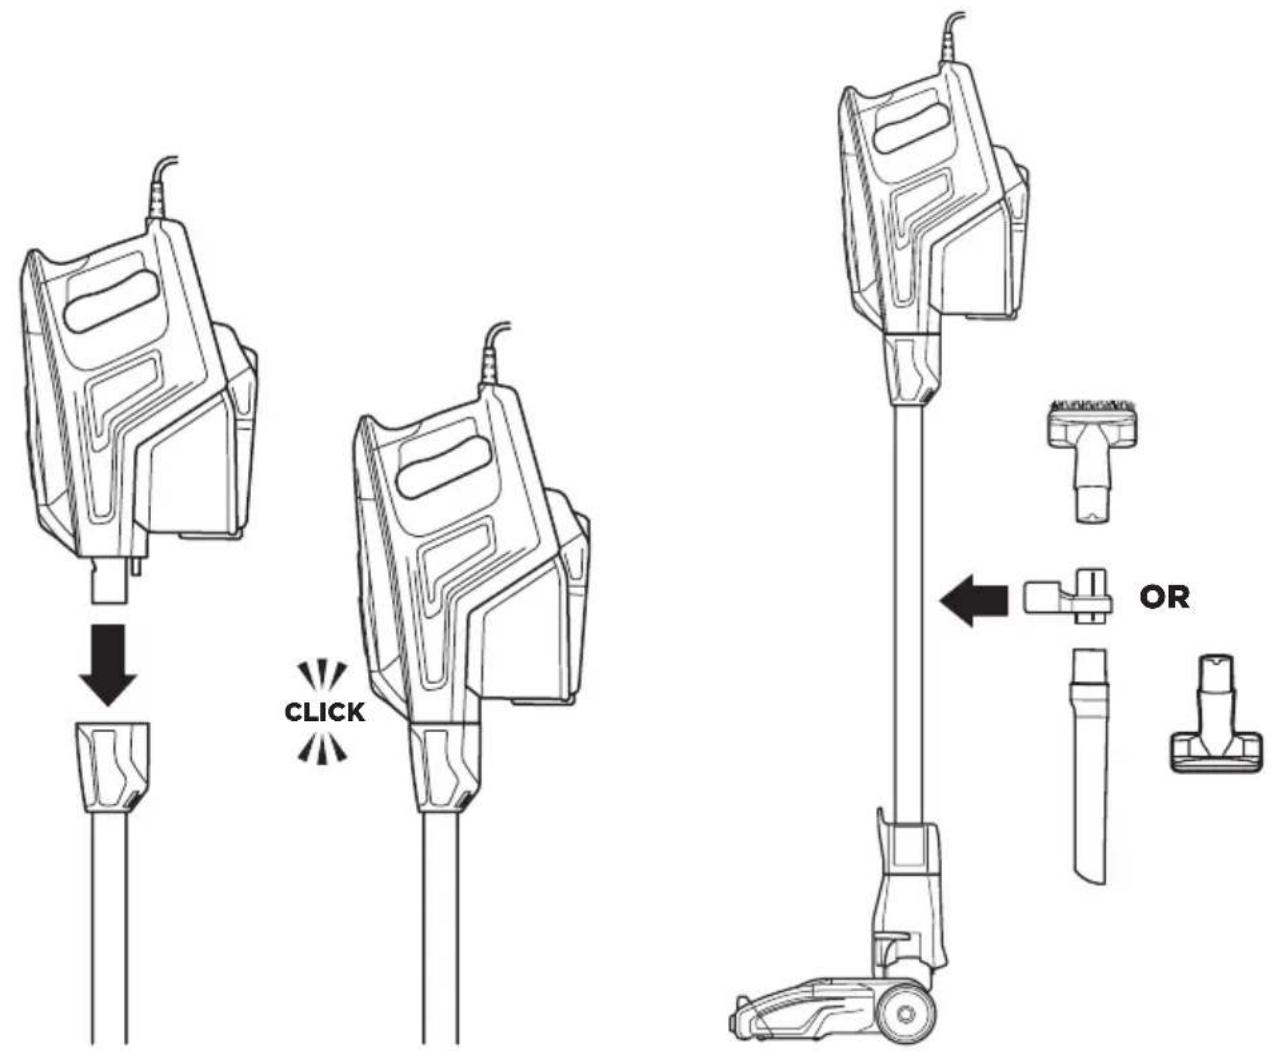
CLICK OR2 Insert the handheld vacuum into the top of the wand until you hear a click.
3 This vacuum comes with a detachable clip to store up to 2 accessories on board. Snap clip onto the wand. Store one accessory on top holder and one accessory on bottom holder.
USING THE MOTORIZED FLOOR NOZZLE

WARNING: This vacuum does not stand up on its own, so when taking a break from cleaning, rest it against a piece of stable furniture or lay it flat on the floor. Using for an application where the unit lacks stability may result in personal injury.

NOTE: Before vacuuming your delicate area rugs or carpet, refer to the manufacturer's recommended cleaning instructions.
WHAT DOES THE BRUSHROLL INDICATOR LIGHT MEAN?
Solid Green
The brushrolls are on and working as they should.
Solid Red
There is a jam in the brushroll area. Turn your vacuum off and remove the blockage.
No Light
The brushrolls are off because the vacuum is off.
natural_image
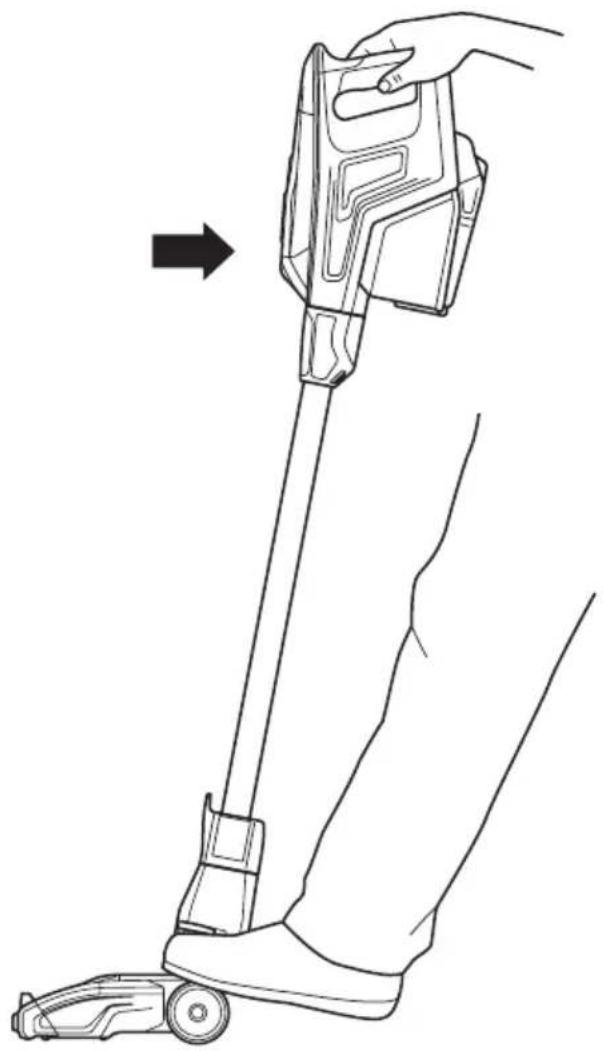
Line drawing of a hand using a vacuum cleaner to lift a person's leg (no text or symbols present)1 Plug the unit in and recline the wand.
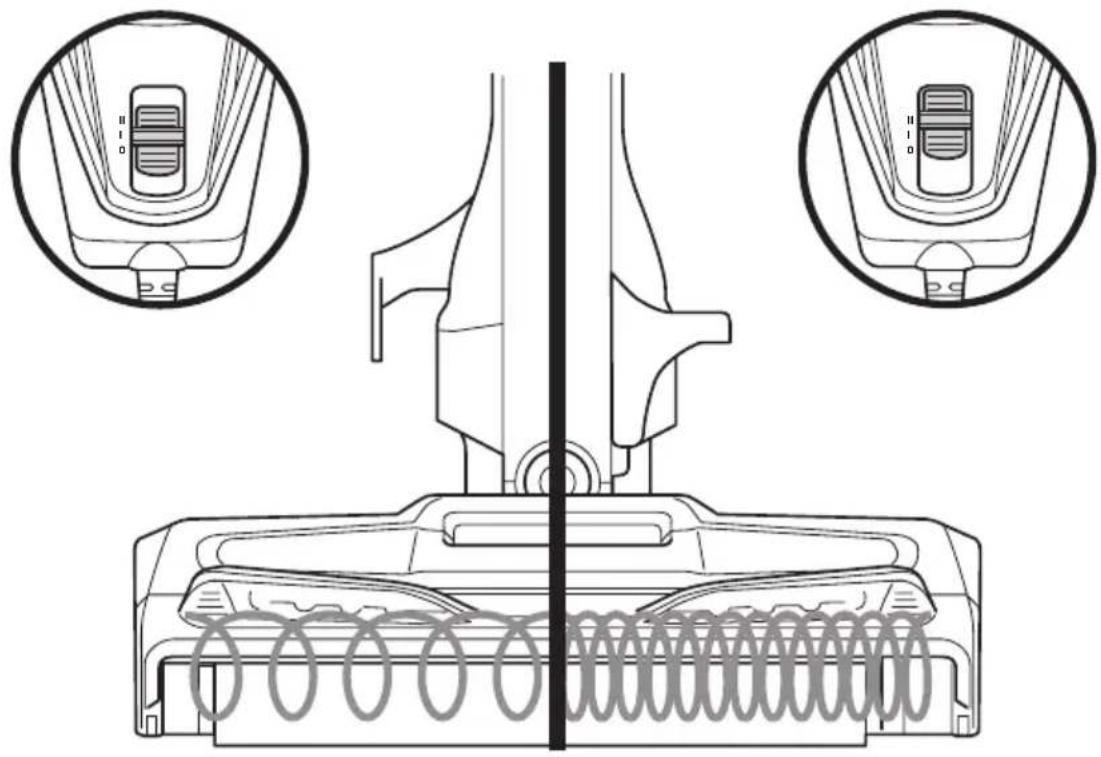
Bare Floor, Area Rugs (I) High Pile Carpets (II)
natural_image
Technical line drawing of a mechanical device with two circular insets showing internal components (no text or symbols)The Shark® Rocket® Complete with DuoClean™ has a 2-speed power slider switch on the handle. Slide the power switch to appropriate speed setting (I or II) and start cleaning.
Bare Floor, Area Rugs (I) – The brushroll and the Soft Roller both spin together slowly to clean bare floors and delicate area rugs. The Soft Roller traps fine dust and large particles, while the brushroll directs that debris to the suction channel.
High Pile Carpets (II) – Both brushrolls spin faster, working together to pick up debris below the surface of your carpets.
NOTE: For deep cleaning per ASTM F 608 (embedded dirt in carpets) please set to High Pile Carpets (II).
USING YOUR VACUUM IN ABOVE-FLOOR MODE

NOTE: Both power settings provide the same suction power.

TIP: You can attach the handheld vacuum directly to the motorized floor nozzle for convenient stair cleaning.
STEP 1 STEP 2
text_image
Technical diagram showing a vacuum cleaner's internal structure with labeled parts and a magnified detail view.For Long-Reach Cleaning:
1 Stand the vacuum upright. Step on the foot pedal and pull the wand up to disconnect it from the motorized floor nozzle.
2 Attach desired cleaning accessory.
STEP 1 STEP 2
text_image
Wear Release
natural_image
Technical line drawing of a vacuum cleaner with three labeled components (no text or symbols)For Short-Reach Cleaning:
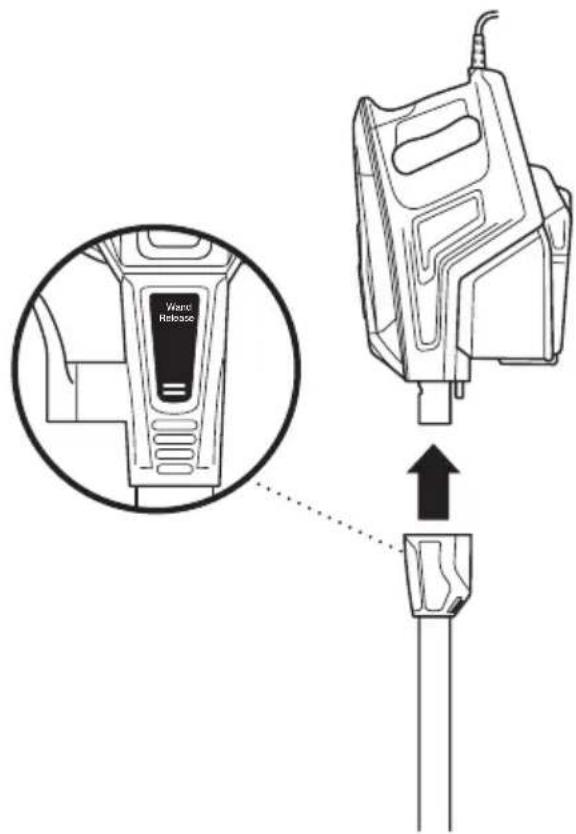
1 Press the Wand Release button on the top of the wand to disconnect it from the handheld vacuum.
2 Attach desired cleaning accessory. The LED light on the handheld vacuum turns on automatically when the power is on.

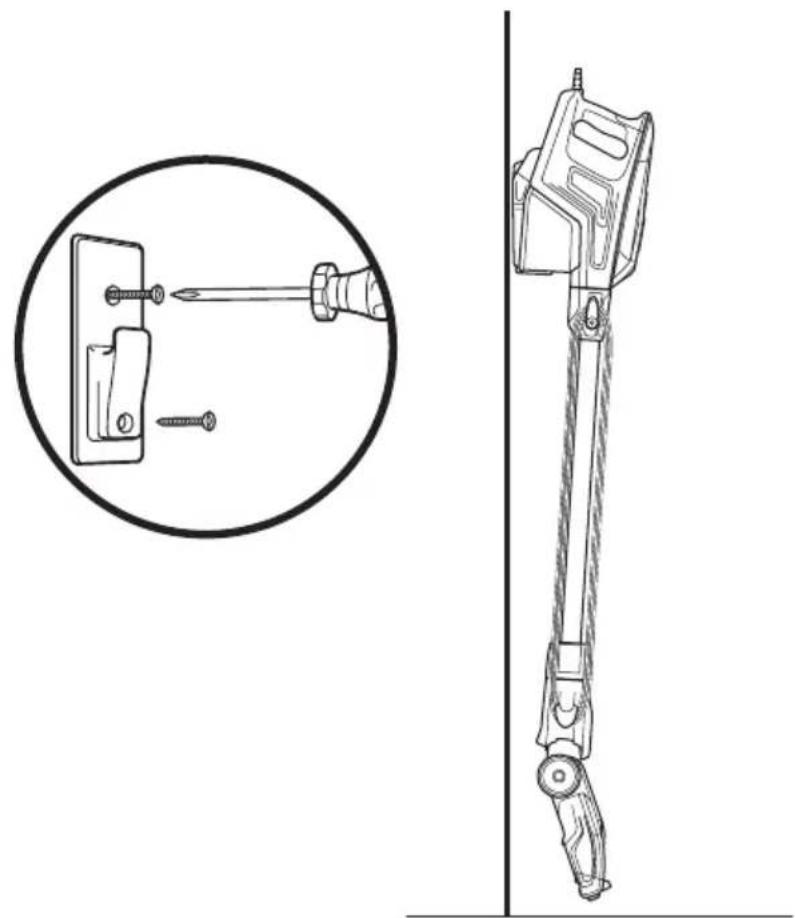
TIP: If your unit came with an accessory bag, you can hang the bag on the wall mount with the vacuum.
OPTION 1
text_image
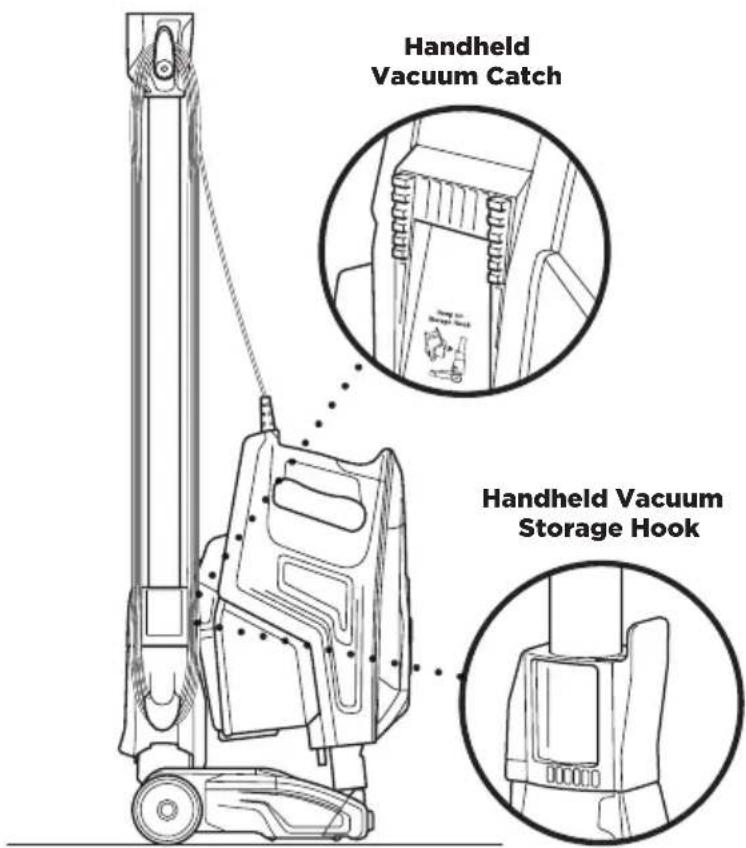
Handheld Vacuum Catch Handheld Vacuum Storage Hook1 Press the Wand Release button on the top of the wand to release the handheld vacuum. There is a catch on the bottom of the handheld vacuum. Hang it from the hook located on the bottom portion of the wand. Wrap the cord around the two cord hooks.
OPTION 2
natural_image
Technical line drawing of a screwdriver and its mechanical lever assembly (no text or symbols)2 Use the wall mount that is included. Drill two 5/16" holes into the wall and insert the provided plastic anchors into the holes. Using a Phillips-head screwdriver, screw the wall mount into the plastic anchors. Hook the catch on the bottom of the handheld vacuum onto wall mount.
There are a variety of accessories that are compatible with this vacuum series.
The top flap of your box shows the select accessories that are included with your model.
To purchase additional accessories, go to sharkclean.com
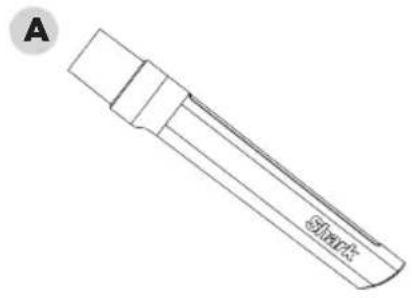
A 12" Crevice Tool
Clean in between tight spaces or reach baseboards and ceilings with this slim crevice tool.
B Dusting Brush
Great for dusting a multitude of surfaces such as shelves, baseboards, window frames and more.
C Upholstery Tool
Perfect for grabbing pet hair and lint from furniture and other upholstered surfaces. Ideal for: pet hair, dusting, large particle pickup.
natural_image
Line drawing of a pen-like object with a circular label 'A' and no visible text or symbols on the object itself.
natural_image
Technical line drawing of a mechanical component with a cylindrical shaft and textured base (no text or symbols)
natural_image
Technical line drawing of a mechanical component with no visible text or symbols
WARNING: Hand wash filters with water only to prevent damage from cleaning chemicals. Allow ALL filters to dry completely before replacing in the vacuum to prevent liquid from being drawn into electric parts.

CAUTION: Turn power off and unplug before servicing.

IMPORTANT: Clean the dust screen inside the dust cup as required.

NOTE: Empty dust cup when debris reaches the MAX fill line.
RECOMMENDED FILTER CLEANING SCHEDULE:
Pre-Motor Filter Kit
(Foam & Felt)
XFFH380
Clean once a month.
Post-Motor Filter
XPSTFH380
Clean once a year.
natural_image
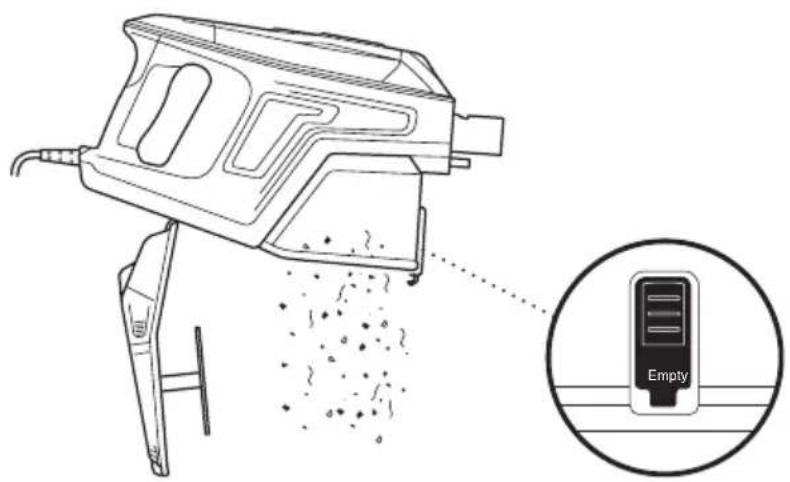
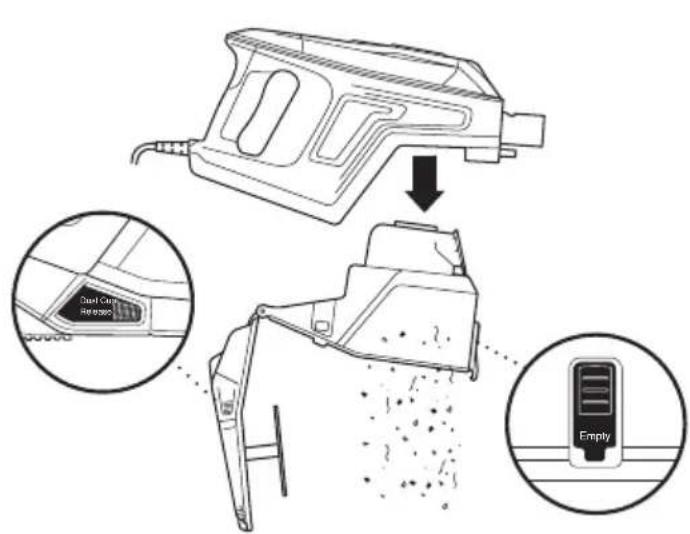
Line drawing of a hairdryer with particles being dispensed, showing the main body and a close-up of the empty device (no text or symbols on the diagram itself)1 Press the Wand Release button on the top of the wand to disconnect the handheld vacuum from the wand.
OR
To remove the dust cup from the handheld vacuum, squeeze the two Dust Cup Release buttons on both sides of the base at the same time, then pull out the dust cup.
text_image
Dual Cut Hearbox Empty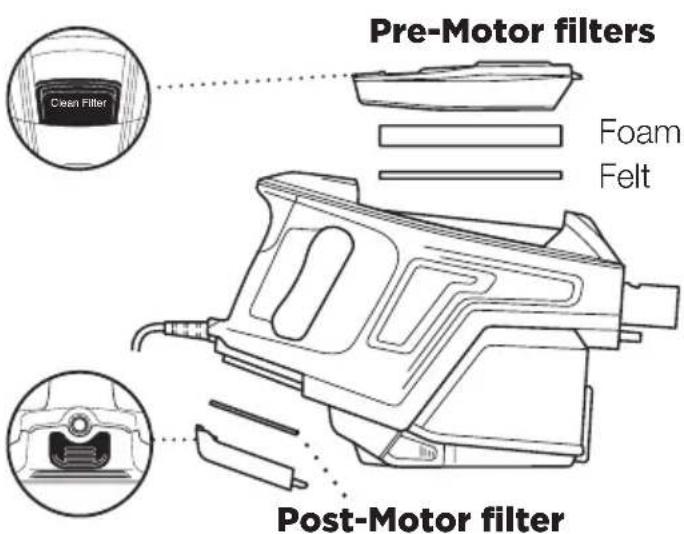
text_image
Pre-Motor filters Clean Filter Foam Felt Post-Motor filter2 Hold dust cup over a trash bin and press the Empty button on the front of the dust cup. The bottom lid will open, allowing the debris to fall out.
3 Once dust cup is empty, close the bottom lid and insert dust cup back into handheld vacuum until you hear it click into place.
CLEANING THE FILTERS
1 Access the Pre-Motor foam and felt filters by lifting the latch on the top of the handheld vacuum. Remove and rinse the filters with water. Tap loose dirt off filters between washes as needed. Once completely dry, insert the felt filter first, then place the foam filter on top of it.
2 Access the Post-Motor filter under the handle. Remove and rinse the filter with water.

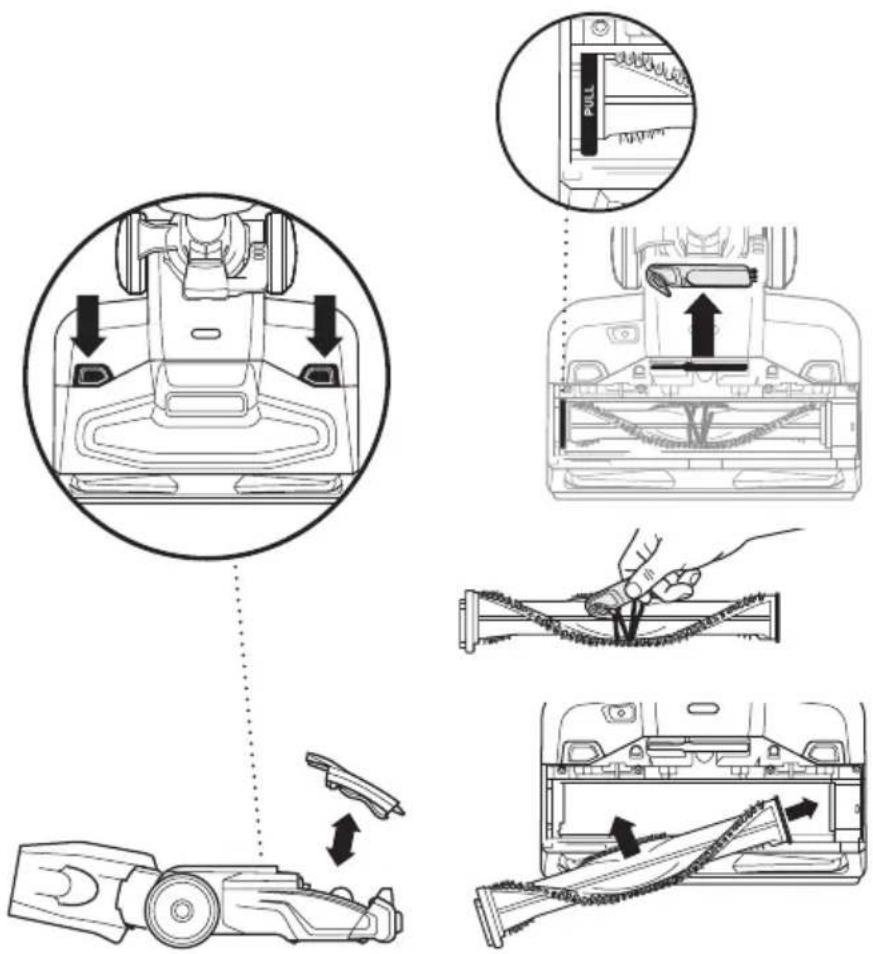
WARNING: Do not cut anything but the hair, fibers or string that is wrapped around the the brushroll.

TIP: Ensure the brushroll garage is completely sealed and closed before using.

NOTE: Heavy usage over time may require minimal upkeep in order to maintain your vacuum's appearance.
STEP 1 STEP 2
text_image
Diagram illustrating the step-by-step installation of a vacuum cleaner's internal components, showing hand positioning and cleaning steps.1 Press down on the two buttons on the floor nozzle to pop up the brushroll garage lid.
2 Lift the brushroll out by the tab on the left side. To remove any string, hair or debris that may be wrapped around the brushroll, use the onboard hair removal tool. The tool is located in a compartment on the nozzle, above the brushroll.
3 To reinstall the brushroll, return it to the brushroll garage. Press down on the brushroll garage lid until you hear it click into place.
text_image
Diagram illustrating three-step automotive seatbelting process: cutting, fastening, and rolling steps with magnified detail view.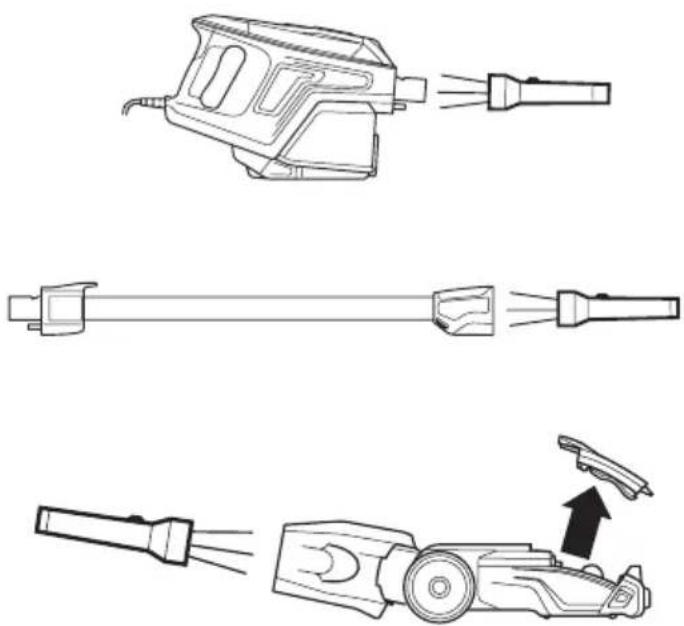
natural_image
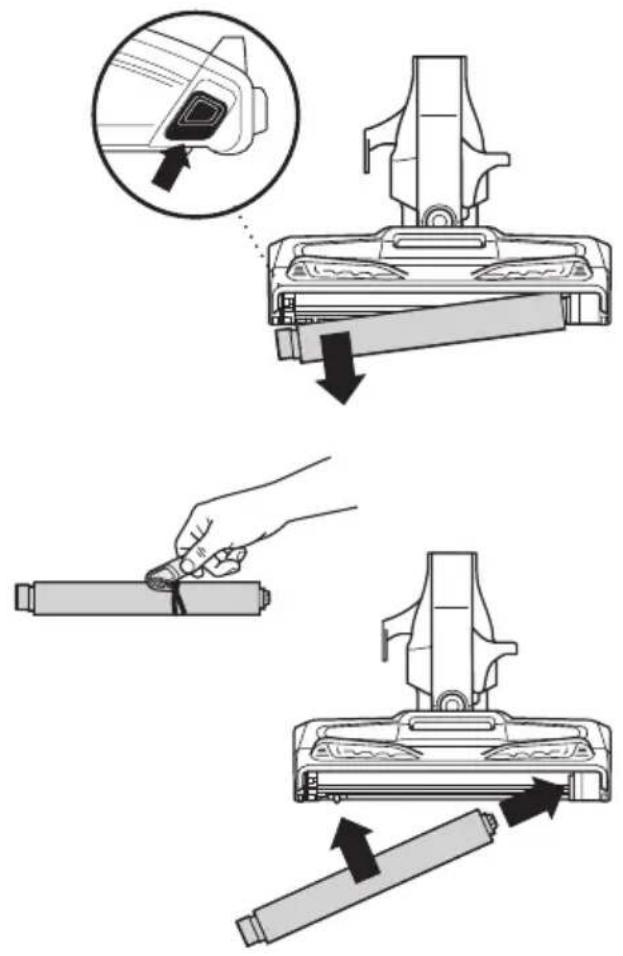
Technical line drawings of a hair dryer with three different components and an arrow indicating motion (no text or symbols)2 Use the onboard hair removal tool to remove any string, carpet fibers or hair that may be wrapped around the Soft Roller. The tool is located in a compartment on the nozzle, above the brushroll. You can also tap loose debris off the Soft Roller, or wipe it clean with a dry towel. If you see any fibers or hair buildup in the teeth behind the Soft Roller, take a dry towel and wipe it away.
3 Wash the Soft Roller as needed. Use only water, and let air-dry completely for at least 24 hours.
4 Reinsert the Soft Roller by sliding it into the front of the nozzle until it clicks into place.
CHECKING FOR BLOCKAGES: HANDHELD, WAND, AND FLOOR NOZZLE
1 Remove the wand from the handheld portion and check all dust cup intake openings.
2 Remove the floor nozzle from the wand and check the wand for blockages.
3 Tilt neck of floor nozzle back to straighten the airway. Remove blockages.

WARNING: To reduce the risk of shock and unintended operation, turn power off and unplug unit before servicing.
Vacuum is not picking up debris. No suction or light suction. (Refer to Maintenance section for more information.)
- Check filters to see if they need cleaning. Follow instructions for rinsing and completely air-drying the filters before reinserting in the vacuum.
- Dust cup may be full; empty dust cup.
- Check floor nozzle for blockages; clear blockages if required.
- Remove any string, carpet fibers, or hair that may be wrapped around the brushroll and Soft Roller or trapped behind the Soft Roller.
Vacuum lifts area rugs.
- Suction is powerful. Take care when vacuuming area rugs or rugs with delicately sewn edges.
- Turn off the unit to disengage the brushroll and restart with the Power slider switch.
Brushroll/Soft Roller does not spin.
- If Brushroll Indicator Light on the floor nozzle turns red, the brushroll and/or Soft Roller have stopped spinning. Immediately turn off and unplug vacuum and remove blockage before reconnecting and turning vacuum back on.
- If Brushroll Indicator Light on the floor nozzle is green, the blockage has been successfully cleared. If the light is still red, please contact customer service at 1-800-798-7398.
Vacuum turns off on its own.
This vacuum is equipped with a motor-protective thermostat so the vacuum will shut off if it overheats. Should this occur, perform the following steps to restart the motor-protective thermostat:
- Turn vacuum off and unplug it.
- Empty dust cup and clean filters (see Maintenance section).
- Check for blockages in hose, accessories, and inlet openings.
- Allow unit to cool for a minimum of 45 minutes.
- Plug in vacuum and turn it on.
Note: If vacuum still does not start, contact Customer Service at 1-800-798-7398.
The 5-Year Limited Warranty applies to purchases made from authorized retailers of SharkNinja
Operating LLC. Warranty coverage applies to the original owner and to the original product only and is not transferable.
SharkNinja warrants that the unit shall be free from defects in material and workmanship for a period of 5 years from the date of purchase when it is used under normal household conditions and maintained according to the requirements outlined in this instruction manual, subject to the following conditions and exclusions.
What is covered in my warranty?
-
The original unit and/or non-wearable components deemed defective, in SharkNinja's sole discretion, will be repaired or replaced for up to 5 years from the original purchase date.
-
In the rare event that a replacement unit is issued, the warranty coverage ends six months following the receipt date of the replacement unit or the remainder of the existing warranty, whichever is greater. If the unit is replaced, SharkNinja reserves the right to replace the unit with one of equal or greater value.
What is not covered in my warranty?
Our Customer Care/Product Specialists are available to provide all the warranty service options available to you, including the possibility of upgrading to our VIP Warranty Service Options for select product categories.
- Normal wear and tear of wearable parts such as foam filters, HEPA filters, pads etc., which require regular maintenance and/or replacement to ensure the proper functioning of your unit are not covered by this warranty.
- Any unit that has been tampered with or used for commercial purposes.
- SharkNinja will cover the cost for the customer to send in the unit to us for repair or replacement. A fee of \$19.95 for return shipping costs will be charged at the time of return shipment of the repaired or replacement unit.
- Damage caused by misuse, abuse, or negligent handling, or damage due to mishandling in transit.
- Consequential and incidental damages.
- Defects caused by or resulting from damages from shipping or from repairs, service or alteration to the product or any of its parts which have been performed by a repair person not authorized by SharkNinja.
- Products purchased, used or operated outside of North America.
Problems with your unit/How to get service
If your appliance fails to operate properly while in use under normal household conditions within the warranty period, visit sharkclean.com for product care/maintenance self-help. Our customer care and product specialists are also available at 1-800-798-7398 to assist with product support and warranty service options.
How to initiate a warranty claim
You must first activate your warranty by registering your unit online at registryyourshark.com (Note: Purchases made directly from SharkNinja are automatically registered with us and the warranty activated.) Alternatively you can call 1-800-798-7398 to have a customer care specialist assist you. Please note you must call 1-800-798-7398 to initiate a warranty claim. Return and Packing Instruction information will be provided at that time.
The customer care line is open Monday-Friday 8am-10pm ET and Saturday-Sunday, 9am-6pm ET.
Replacement parts are available for purchase at sharkclean.com. For more information on what is classified as wearable and non-wearable parts, please visit sharkwarranty.com.
This warranty gives you specific legal rights, and you also may have other rights that vary from state to state.
Some states do not permit the exclusion or limitation of incidental or consequential damages, so the above may not apply to you.
ENREGISTRER VOTRE ACHAT

isteryourshark.com

1-800-798-7398

text_image
A B C D E F G H I L J K M N O PLE SAVIEZ-VOUS?
natural_image
Line drawing of a hand using a vacuum cleaner to lift a person's leg (no text or symbols present)natural_image
Technical line drawing of a mechanical device with two circular insets showing internal components (no text or symbols)text_image
Technical diagram showing a vacuum cleaner's internal structure with labeled parts and a magnified detail view.text_image
Wind Release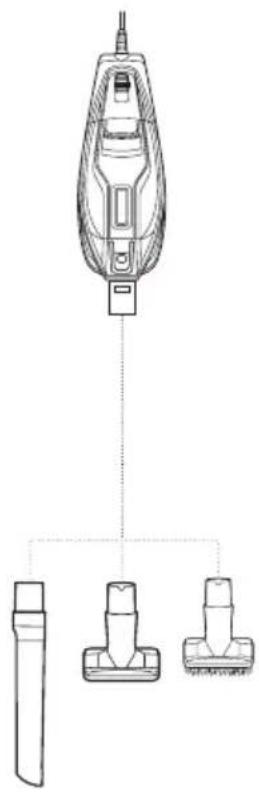
natural_image
Technical line drawing of a vacuum cleaner with three labeled components (no text or symbols)natural_image
Technical line drawing of a screwdriver and its mechanical lever assembly (no text or symbols)natural_image
Line drawing of a pen-like object with a circular label 'A' and no visible text or symbols on the object itself.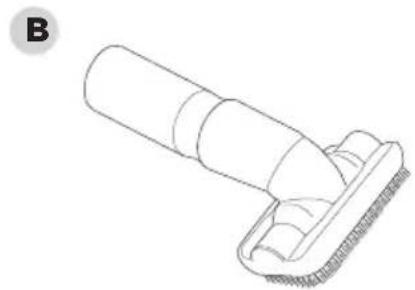
natural_image
Technical line drawing of a mechanical component with a cylindrical shaft and textured base (no text or symbols)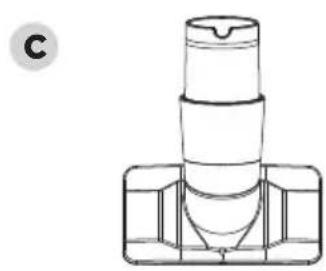
natural_image
Technical line drawing of a mechanical component with no visible text or symbols
text_image
Diagram showing a hairdryer with particles being dispensed, alongside an empty device labeled 'Empty'VIDANGE DU RÉCIPIENT À POUSSIÈRE
text_image
Double Cap Retiree Empty
text_image
Diagram illustrating the step-by-step installation of a vacuum cleaner's internal components, showing hand positioning and cleaning steps.NETTOYAGE DE LA BROSSE ROTATIVE
text_image
Diagram illustrating three-step automotive seatbelting process: pinning, rolling, and fastening steps with magnified detail.
natural_image
Technical line drawings of a hair dryer, cable, and mechanical device with no visible text or symbolsNETTOYAGE DU ROULEAU DOUX
text_image
A B C D E F G H I L J K M N O PCÓMO ARMAR SU ASPIRADORA
¿SABÍA QUE...?
text_image
PASO 1 CLICnatural_image
Line drawing of a person using a vacuum cleaner to lift a leg, showing the motion of the lever (no text or symbols present)text_image
Technical diagram showing the installation of a vacuum cleaner with labeled parts and a magnified detail view.text_image
Word Release
natural_image
Technical line drawing of a vacuum cleaner with three labeled components (no text or symbols)natural_image
Technical line drawing of a screwdriver and its mechanical lever assembly (no text or symbols)natural_image
Line drawing of a pen-like object with a circular label 'A' and no visible text or symbols on the object itself.
natural_image
Technical line drawing of a mechanical component with a cylindrical shaft and textured base (no text or symbols)
natural_image
Technical line drawing of a mechanical component with no visible text or symbols
text_image
Diagram showing a hairdryer with particles being dispensed, alongside an empty device labeled 'Empty'CÓMO VACIAR EL RECIPIENTE PARA EL POLVO
text_image
Diagram illustrating the step-by-step installation of a vacuum cleaner's internal components, showing disassembly and cleaning steps.LIMPIEZA DEL CEPILLO GIRATORIO
text_image
Diagram illustrating three-step automotive seatbelting process: cutting, fastening, and rolling steps with magnified detail
natural_image
Technical line drawings of a hair dryer with three different components and an arrow indicating motion (no text or symbols)CÓMO LIMPIAR EL RODILLO SUAVE
Illustrations may differ from actual product. We are constantly striving to improve our products; therefore the specifications contained herein are subject to change without notice.
Shark and Rocket are registered trademarks of SharkNinja Operating LLC.
DuoClean is a trademark of SharkNinja Operating LLC.
For SharkNinja U.S. Patent information, visit sharkninja.com/USPatents
SharkNinja Operating LLC
SharkNinja Operating LLC
ESTADOS UNIDOS: Newton, MA 02459
CANADÁ: Ville St-Laurent, QC H4S 1A7
1-800-798-7398