ADI250 - Doorbells ALECTO - Free user manual and instructions
Find the device manual for free ADI250 ALECTO in PDF.

User questions about ADI250 ALECTO
0 question about this device. Answer the ones you know or ask your own.
Ask a new question about this device
Download the instructions for your Doorbells in PDF format for free! Find your manual ADI250 - ALECTO and take your electronic device back in hand. On this page are published all the documents necessary for the use of your device. ADI250 by ALECTO.
USER MANUAL ADI250 ALECTO
Receiving Frequency Range: 2.400GHz ~ 2.4835GHz
Monitor: 3.5" Color LCD
Data Rate: 2.0Mbps
Receiving Sensitivity: -90dBm
Demodulation Type: GFSK
Resolution:
Transmitting Power: 19dBm (TYP)
Power Requirement: Ni-MH3.6V, 800mAh
Power Consumption: 400mA Max
Operating Temperature: -10^ 40^
Operating Humidity: 0% 85% RH
Weight:
Size receiver: 85x115x27mm (WxHxD)
charger: 93× 55× 75mm (WxHxD)
No. of outdoor stations: Max.4
320x240(RGB)
13.2 Outdoor-unit
Transmit Frequency: Range 2.400GHz 2.4835GHz
Data Rate: 2.0Mbps
Transmitting Power: 19dBm (TYP)
Modulation Type:
Transmitting Distance:
Image Sensor Type:
Effective Pixels: H:320 V:240
Image Processing:
Image Resolution / Frame Rate:
White Balance:
Lens:
Viewing Angle (Diagonal):
Minimum Illumination:
LED:
Power Requirement: 8~12V AC or DC +/- 5%
GFSK
Outdoor: 200m, Indoor: 50m
1/4" Color CMOS Image Sensor
Motion JPEG
H:320 V:240 / 25fps
Auto
2.1mm/F2.6
135°
1 LUX (without LED illumination)
6 LEDs
Power Consumption: 500mA Max (cells)
4 LR6(AA),1.5V alkaline batteries
400mA Max (8~12V AC or DC)
Door contact:
Contact rating (Res. load):
Max. switch voltage:
Max. switching current:
Max. switching power:
0.3A 60VDC/0.5A 125VAC/1A 30VDC
125VAC/60VDC
2A
62.5VA/30W
Operating Temperature: -30^ 40^
Operating Humidity: 0% 85% RH
Weight:
Size:
109g excl. 251 incl. batteries
50x125x35mm (WxHxD) excl. batteries
50x200x35mm (WxHxD) incl. batteries
3.3 VERKLARING VAN CONFORMITEIT
Monitor: 3.5" Farb-LCD
Datenrate: 2.0 Mbps
Ubertragungsfrequency:
Datenrate: 2.0 Mbps
4 LR6 (AA),1.5 V Alkaline-Batterien
4.1 Charger 56
4.2 Indoor unit 56
4.3 Outdoor unit 56
Batteries 57
Power adaptor 57
Mounting 58
- OVERVIEW 59
5.1 Indoor unit 59
5.2 Outdoor unit 59
-
OPERATION 60
6.1 To switch on/off 60
6.2 When the doorbell rings 60
6.3 Monitor (looking outside yourself) 61 -
SETUP 62
7.1 Volume 62
7.2 Brightness 62
7.3 Time and date 63
7.4 Key tone 63
7.5 Automatic snapshot 63
7.6 To view photos 64
7.7 Reset to factory settings 64 -
EXPANDING WITH MULTIPLE OUTDOOR UNITS 65
8.1 Introduction 65
8.2 To register additional outdoor units 65
8.3 To de-register 66
9. INCREASING THE RANGE USING THE EXTERNAL ANTENNA 66
-
PHOTOS 67
10.1 Introduction 67
10.2 To view and delete 67 -
DOOR OPENER 67
11.1 Introduction 67
11.2 Operating the door lock 68
11.3 Door lock connection 68
11.4 Door lock switch duration setup 69
-
SYSTEM ERROR 69
-
TECHNICAL SPECIFICATIONS 69
13.1 Indoor-unit 69
13.2 Outdoor-unit 70
13.3 Declaration of conformity 70
1. INTRODUCTION
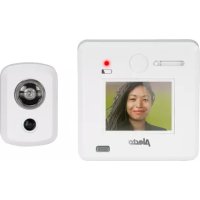
The ADI-250 is a wireless video door telephone system. It allows you to see who's at the door and to ask what the purpose of the visit is before you open the door. Additionally, a photo is taken of each visitor ringing your doorbell, including the date en time, which is saved in the memory of the indoor post. The indoor post has a memory capacity for 50 of these photos.
2. INTENDED USE
The Alecto ADI-250 allows you to wirelessly see who's at the door and to communicate with this person. The Alecto ADI-250 is only suitable for household use and can in no way prevent undesired visitors.
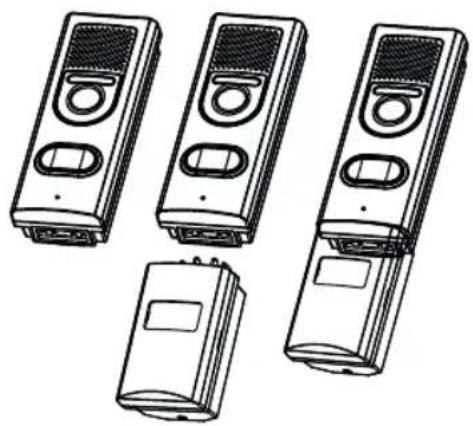
3. PACKAGING CONTENTS
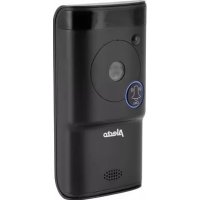
outdoor unit with built-in camera and microphone / speaker, suspension bracket, optionally with battery compartment (extra large suspension bracket)

indoor unit with built-in display and microphone / speaker and rechargeable battery pack and belt clip
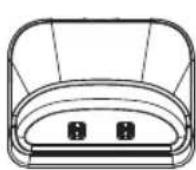

charger with adaptor
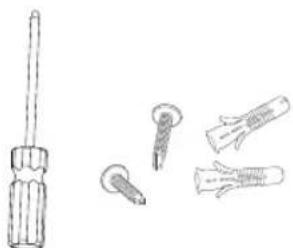
screwdriver with screws for installation and mounting
4. INSTALLATION
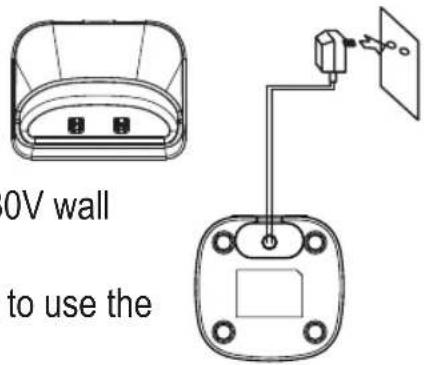
4.1 Charger:
- Insert the small plug of the adaptor cable into the bottom of the adaptor and plug the adaptor into a 230V wall socket.
- You may choose to place the charger into a table or to use the 2 screws for wall-mounting.
The adaptor for the charger is included.
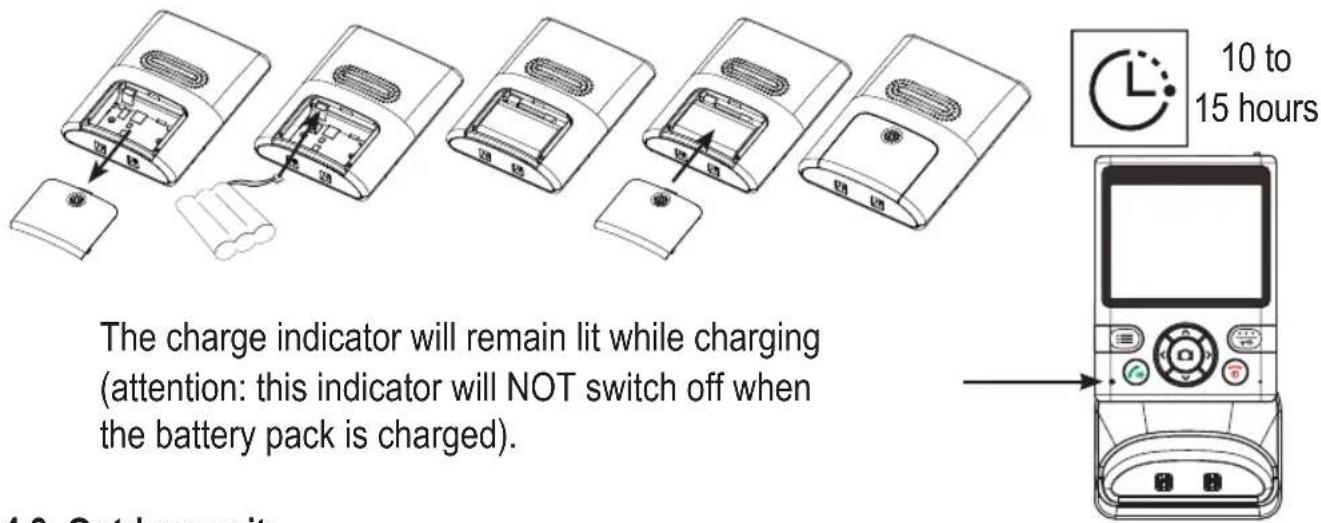
4.2 Indoor unit:
- Slide the battery cover at the rear of the indoor unit down and off the indoor unit.
- Install the supplied battery pack in the indoor unit, connecting the plug to the battery input.
- Slide the battery cover back onto the indoor unit.
- You may also place the belt clip.
- Place the indoor unit into the charger and leave it there for 10-15 hours to properly charge the battery pack.
4.3 Outdoor unit:
You may choose to have the outdoor unit run on batteries or power it via a power adaptor. When powered by batteries, the monitor function will be unavailable. Batteries or a power adaptor for the outdoor unit are NOT included. You may also choose to use the standard doorbell transformer; the current doorbell and bell pusher will then be excluded.
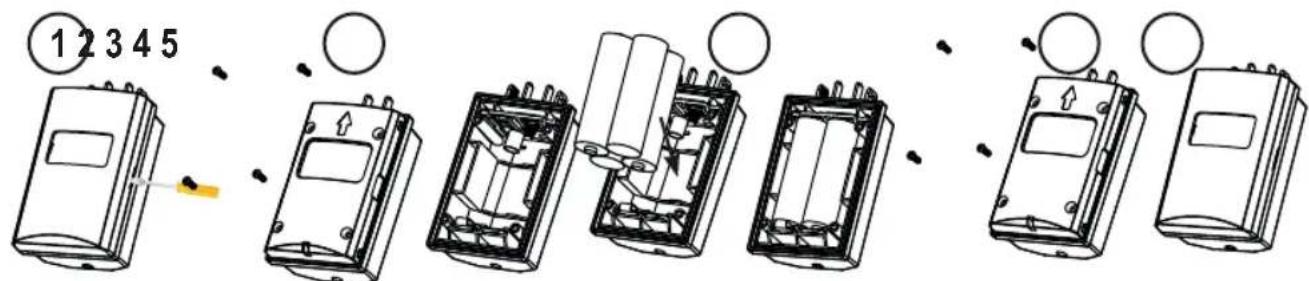
Batteries: (size AA, penlite LR-6, 1.5V, 4x, excluded)
- Remove the protective cover by flipping off the cover using a screwdriver underneath the clip.
- Remove the battery cover by unscrewing the 4 small screws.
- Install the batteries, paying attention to the + and - . Preferably, use Alkaline batteries.
- Replace the battery cover onto the outdoor unit, fasten it with the 4 small screws and replace the protective cover.
- Click the battery compartment into the bottom of the outdoor unit.
Power adaptor: (8~12V AC or DC, 1000mA, excluded)
- Remove the seal cover by unscrewing the 4 small screws.
- Connect the 8-12V adaptor according to the illustration below.
- Fasten the seal cover back onto the outdoor unit.
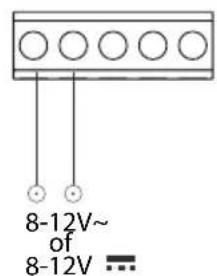

First, strip the insulation approximately 1cm.
You may ignore the (+) and (-) connection.
Push in the wire and fix it.
You may hide the connection for the battery compartment with the supplied rubber panel with bonding strip. Remove the protective layer of the rubber panel en stick it onto the bottom covering the connections.
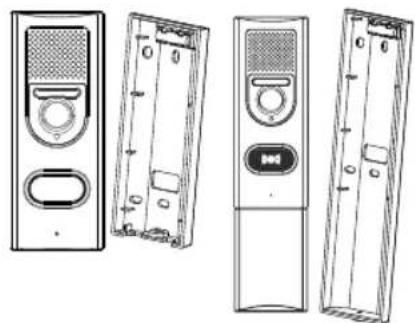
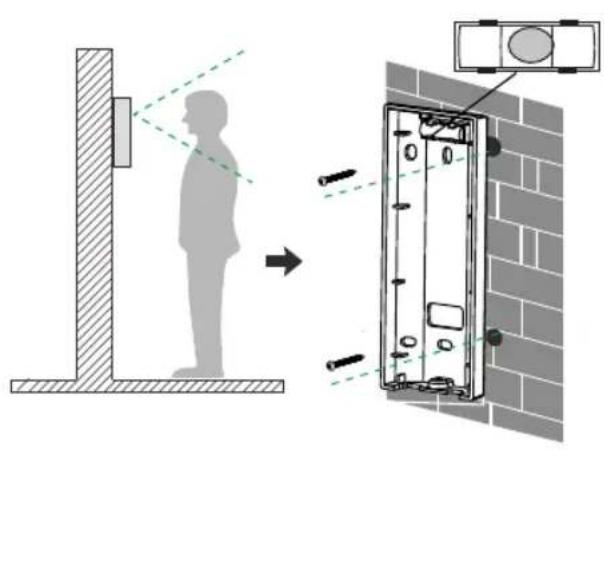
Mounting:
- Determine the installation height for the outdoor unit.
- Hold the suspension bracket against the wall at the desired height and draw the drill holes.
- Drill the holes, insert the plugs and mount the suspension bracket. You can suspend the bracket exactly straight using the built-in spirit level. When using an external power source, lead the wires through the hole in the rear of the suspension bracket and connect them to the connection strip.
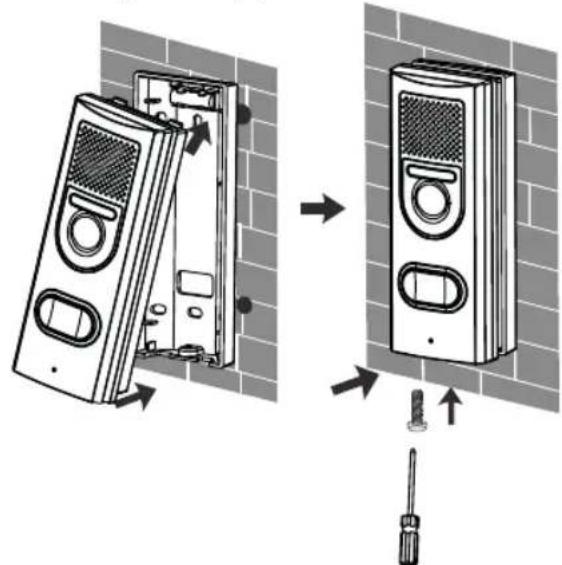
- Now first slide the top of the outdoor unit into the suspension bracket and then push the bottom into the bracket, according to the illustration below.
- Now fasten the outdoor unit into the bracket using the supplied screw.
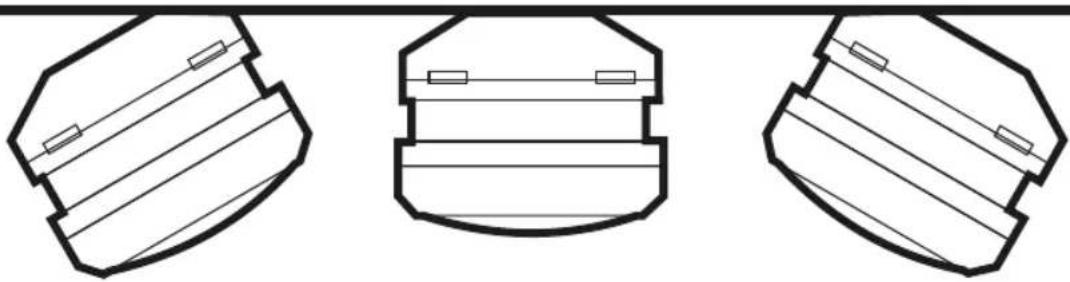
If the camera must be aimed at an angle to the left or right, first mount the wall bracket at an angle to the wall and then place the straight wall bracket onto it.
5. OVERVIEW
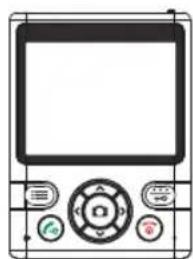
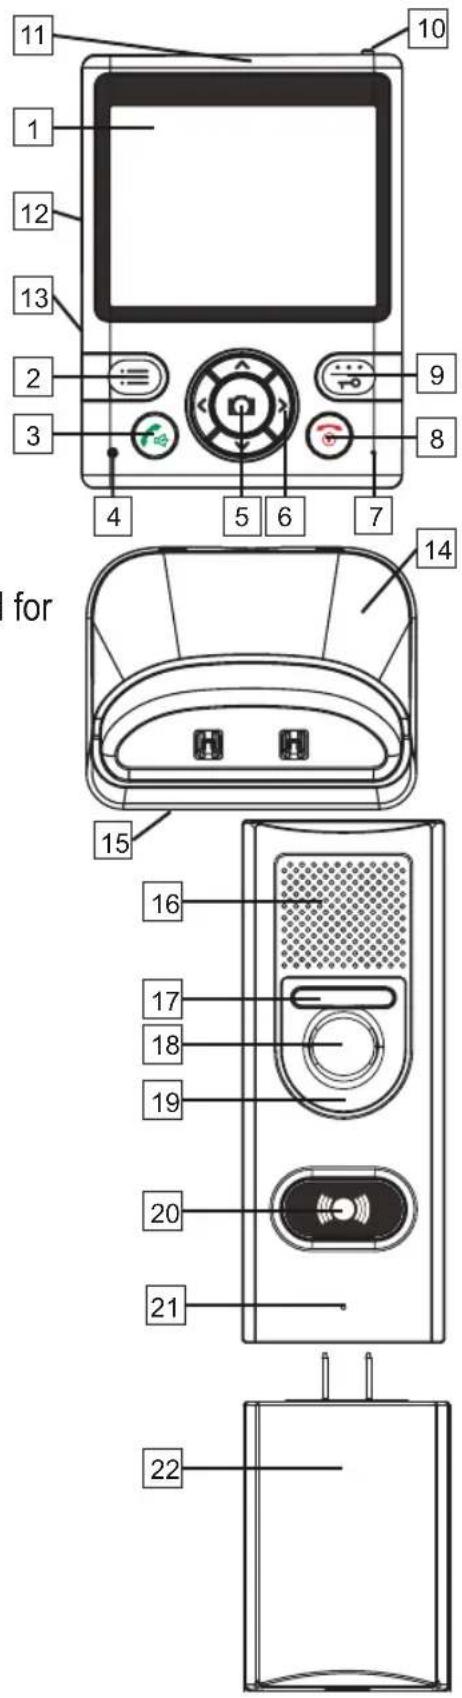
5.1 Indoor unit:
- Display
2.Left soft-button - Talk button, to answer calls
- Charge LED indication
- Manual snapshot, camera selection button
- Direction buttons
- Built-in microphone
- Power button, Stop button, to end calls
- Right soft-button, to show images, to unlock
- Switch for clicking the external antenna outward for improved range
- External antenna
- Built-in speaker
- Battery compartment
- Charger
- Adaptor cable input
5.2 Outdoor unit:
- Built-in speaker
- Night light
- Built-in camera
- Photo cell
- Bell pusher with built-in lighting
- Built-in microphone
- Separate battery compartment
6. OPERATION
6.1 To switch on/off:
Outdoor unit:
As soon as the batteries are installed or the adaptor is connected, the outdoor unit will be enabled. The outdoor unit cannot be switched off.
Indoor unit:
Press and hold the button for 4 seconds to switch on the indoor unit.
Press and hold the button again for 8 seconds to switch off the indoor unit.

Attention: the indoor unit is NOT switched off automatically when placed into the charger.
6.2 When the doorbell rings:
Upon pressing the push button, the push button will illuminate. A "ding dong" sound will be emitted and the face of the visitor will be shown on the display of the indoor unit.
- when the surrounding light is inadequate, the object lighting of the outdoor unit is enabled
-
a photo of the visitor is taken automatically and is stored in the memory of the indoor unit (see also chapter 9)
-
when you do nothing, the call is ended automatically after ± 20 seconds
- if you want to ignore this visit, press the button; the image of the visitor will disappear from the display
- if you'd like to talk to your visitor, you may press the button to accept the call
After accepting the call (max. 1 minute):
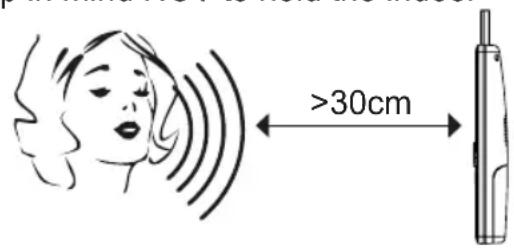
- You may talk to your visitor through the built-in microphone and speaker in the indoor unit and in the outdoor unit; please keep in mind NOT to hold the indoor
unit against your ear like a regular telephone receiver. Leave the indoor unit in the charger while talking to your visitor or keep the indoor unit in your hand at approx. 30cm from your mouth and speak at a normal voice volume level.
- the volume of the speaker of the indoor unit may be adjusted using the < and > buttons (the volume of the speaker of the outdoor unit is fixed and cannot be changed).
-
use the and buttons to set the screen brightness.
-
a photo was already taken upon ringing the doorbell, but you may choose to take another picture of your visitor during your conversation by pressing the button.
- press the button to disconnect the call (or wait for 2 minutes until the call is disconnected automatically)
When multiple outdoor units are registered:
When multiple outdoor units are registered and somebody presses the doorbell, the camera number X# in the upper part of the screen will indicate at which outdoor unit your visitor is calling.
6.3 Monitor: (looking outside yourself (only when used on external power))
Also when there's nobody pressing the doorbell, you may still enable the camera and take a picture.
- briefly press the button to switch on the indoor unit from its sleep mode
- press and hold the soft-button for 1 second to switch on the monitor function; the display will be enabled to show the area in front of the camera
- you may listen via the speaker (talking back is only possible after pressing the button)
- press the button to take a picture
- press the button to disconnect or wait for 5 minutes until the connection is disconnected automatically
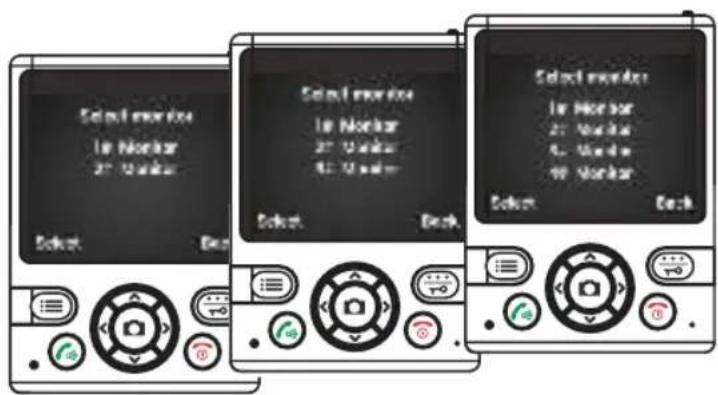
When multiple outdoor units are registered:
When multiple outdoor units are registered and you press and hold the button for 1 second, you must first use the and buttons to select the desired outdoor unit and then press the button to confirm.

Attention: if the outdoor unit is powered by batteries, the monitor function is NOT available.
7. SETUP
Via the menu function of the indoor unit, you may manage the various settings of the video door phone.
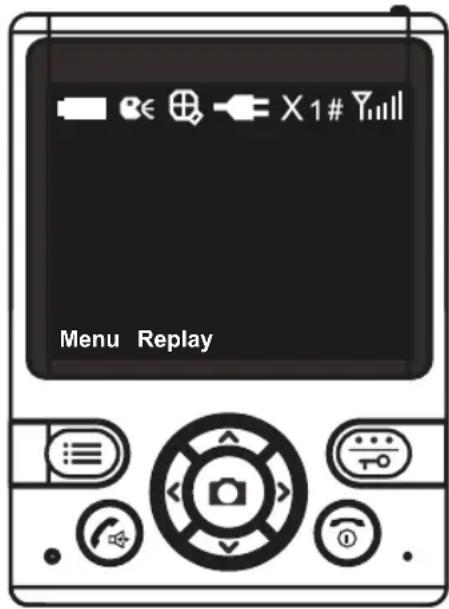

Battery capacity indication

Talk-back indication

Indication while zooming
Power indication, the intercom is connected to fixed power

Call signal disconnected

Active camera

RF signal strength
7.1 Volume:
Except for when in use, you may adjust the volume in the menu:
- with the indoor unit on stand-by, first briefly press the button to wake up the indoor unit
- press the MENU soft-button
- use the and buttons to select the Volume function
- press the Select soft-button
- use the < and > buttons to set the volume
- press 2x the BACK soft-button to save your settings and to leave the menu
7.2 Brightness:
Except for when in use, you may adjust the Brightness in the menu:
- with the indoor unit on stand-by, first briefly press the button to wake up the indoor unit
- press theENU soft-button
- use the and buttons to select the Brightness function
- press the Select soft-button
- use the< and >buttons to set the Brightness
- press 2x the BACK soft-button to save your settings and to leave the menu
7.3 Time and date:
The photo of the visitor also shows the time and date. You may set the time and date here:
- with the indoor unit on stand-by, first briefly press the button to wake up the indoor unit
- press the MENU soft-button
- use the and buttons to select the Date & Time function
- press the Select soft-button
- press the < and > buttons to switch between hours, minutes, day and date and use the < and > buttons to change the settings
- press 2x the BACK soft-button to save your settings and to leave the menu
7.4 Key tone:
Each time you press a button, a key tone will be emitted. You may enable or disable this key tone:
- with the indoor unit on stand-by, first briefly press the button to wake up the indoor unit
- press theENU soft-button
- use the and buttons to select the Key tone function
- press the Select soft-button
- use the and buttons to select whether you want to switch the key tone On or Off
- press the Select soft-button to save your setting and press the BACK button to leave the menu
7.5 Automatic snapshot:
Of each visitor pressing the doorbell a photo is taken automatically. You may disable or enable this function or set it to 1 photo/press, 2 photos/press or 3 photos/press:
- with the indoor unit on stand-by, first briefly press the button to wake up the indoor unit
- press the FENU soft-button
- use the and buttons to select the Auto snap set function.
- press the Select soft-button
- use the and buttons to set the automatic snapshot to On or Off
- press the Select soft-button to save your setting and press the BACK button to leave the menu
7.6 To view photos:
Of each visitor pressing the doorbell a photo is taken automatically (the automatic snapshot function must be enabled). You may view these photos as follows:
- with the indoor unit on stand-by, first briefly press the button to wake up the indoor unit
-
press the REPLAY button OR
-
with the indoor unit on stand-by, first briefly press the button to wake up the indoor unit
- press the ENU soft-button
- use the and buttons to select the Snap show function.
- press the Select soft-button
Now the last photo taken will appear in the display.
The red letter in the upper part of the screen indicates which camera has taken the photo.
The green digits represent the photo number.
Press the Del button to delete a photo.
Press the BACK button to leave the photo viewer.
7.7 Reset to factory settings:
- with the indoor unit on stand-by, first briefly press the button to wake up the indoor unit
- press the MENU soft-button
- use the and buttons to select the Default Set function.
- press the Select soft-button and use the and buttons to choose whether to perform a factory reset (Yes) or not (No)
Factory settings:
volume: level 5 brightness: level 5
key tone: on automatic 1 snapshot: on photo memory: empty
8. EXPANDING WITH MULTIPLE OUTDOOR UNITS
8.1 Introduction:
Up to a maximum of 4 outdoor units may be connected to a single indoor unit. In this way you can guard multiple entrances to your company or home (main entrance, personnel entrance, warehouse, garden gate, and garage).
Additional outdoor units are available via the Alecto service department via the internet www.alecto.nl
8.2 To register additional outdoor units:
Preparation for registration:
- Install the batteries into the indoor unit and charge them.
- Install the batteries into the outdoor unit or connect the adaptor to the unit
- Keep both the indoor unit and outdoor unit handy
- Keep a small screwdriver or paperclip handy
To register:
- with the indoor unit on stand-by, first briefly press the button to wake up the indoor unit
- press the MENU soft-button
- use the and buttons to select the Register function
- press2x the SELECT soft-button; in the lower part of the display 'Searching...' will appear.
- press 1x the bell pusher of the outdoor unit
- now press and hold the register button at the rear of the outdoor unit until the camera lighting starts flashing after several seconds
- the indoor unit and outdoor unit are now searching for each other; the registration is successful
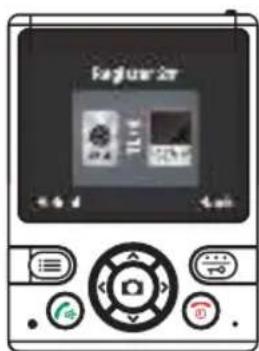
as soon as the indoor unit shows the image of the outdoor unit; the number of the outdoor unit is indicated in the middle of the display at the top
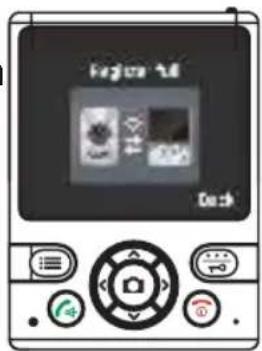
Maximum 4 outdoor units.
The indoor unit is suitable for registering 4 outdoor units. As soon as you try to register a fifth outdoor unit, the warning "Register Full" will appear.
8.3 To de-register:
You can only de-register ALL outdoor units at once. After doing so you may choose to register a certain outdoor unit again.
- With the indoor unit on stand-by, first briefly press the button to wake up the indoor unit
- Now simultaneously press the button and the right button and press and hold these buttons for 5 seconds.
- After 5 seconds the message 'Registration Cleared' will appear and all outdoor units are now de-registered.

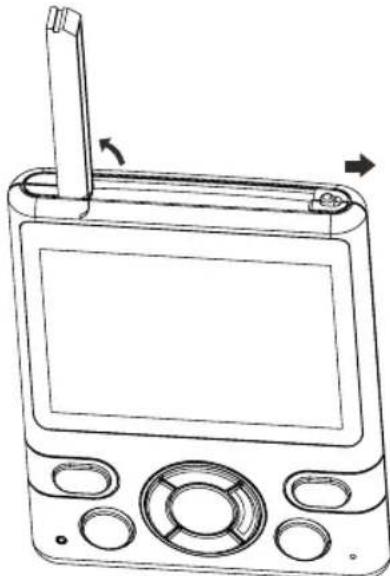
9. INCREASING THE RANGE USING THE EXTERNAL ANTENNA
The indoor unit is provided with an external antenna. The antenna sits on top of the indoor unit.
- Push the silver button to the right.
- The external antenna will pop out.
- Rotate the antenna until it's standing upright to increase the reception sensitivity.
10. PHOTOS
10.1 Introduction:
- Of each person pressing the doorbell a photo is taken automatically.
- This photo is saved in the internal memory of the indoor unit, including the time and date of that picture.
- You may also take photos yourself in the monitor mode.
- The photos are saved in the internal memory of the indoor unit and CANNOT be copied or moved elsewhere.
- The indoor unit has a memory capacity for 50 photos.
- Via the menu function of the indoor unit you may disable the automatic snapshot function for visitors.
- The indoor unit has a memory capacity for 50 photos. When the memory is full, each new photo will overwrite the oldest photo in the memory. You CANNOT export the photos
10.2 To view and delete:
- with the indoor unit on stand-by, first briefly press the button to wake up the indoor unit
- press the Replay soft-button; the most recent photo will be shown
- use the < and > buttons to scroll the photo directory
- in the bottom of the screen the time and date of the snapshot are shown
- in the upper middle part of the screen the order number of the photo is shown
- press the left DEL soft-button to delete the current photo, press the right YES button to confirm or press the left soft-button to cancel
In addition to using the Replay soft-button, you may also view photos via the menu by selecting the 'Snap Show' option in the setup menu.
11. DOOR OPENER
11.1 Introduction:
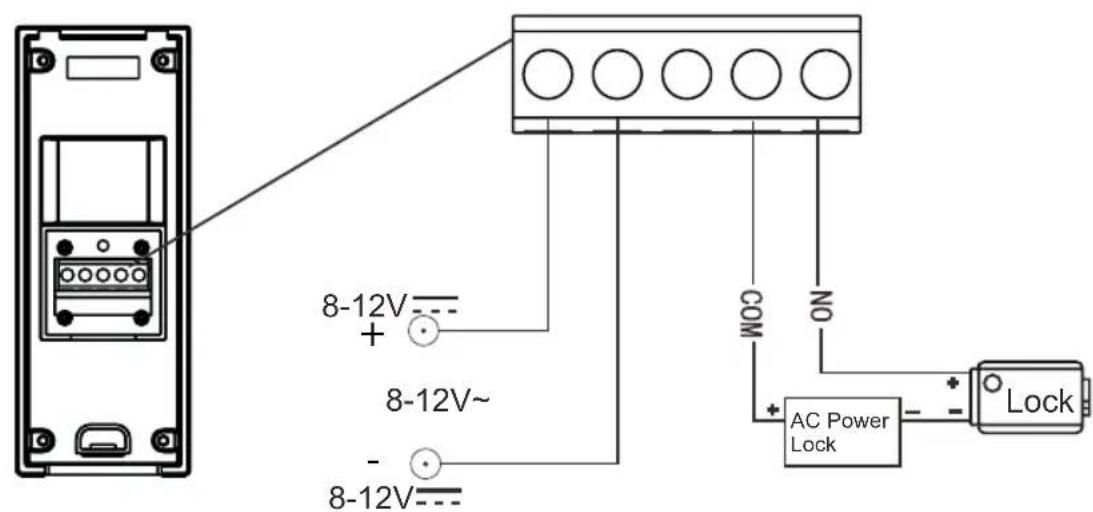
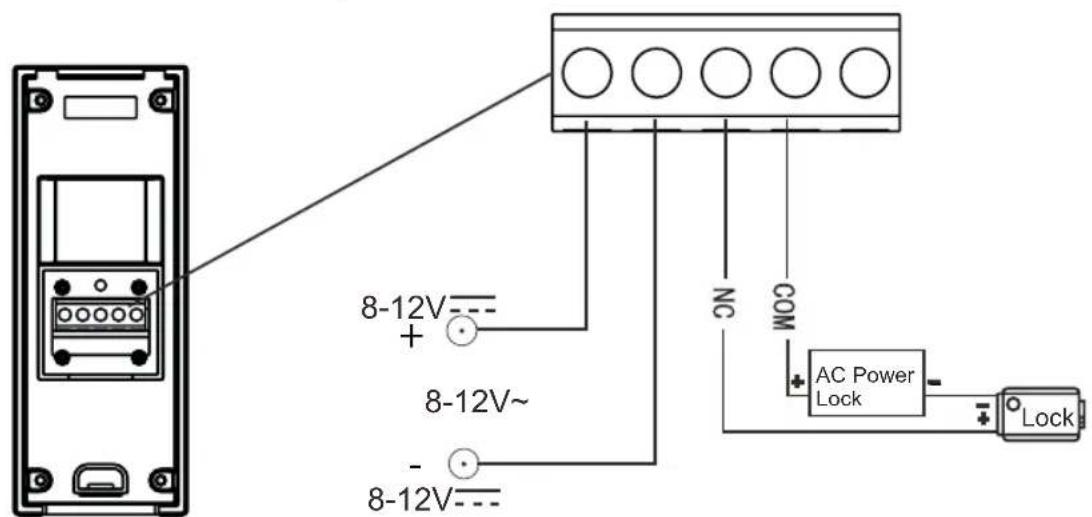
The indoor post is provided with a control function to open an automatic electric door lock. This function is only available when the outdoor unit is connected to an external adaptor OR, in the alternate installation, if the indoor unit is placed on the charger. The device can control both NC (normally closed) and NO (normally opened) door locks.
11.2 Operating the door lock:
You may activate the door lock as follows.
- Upon pressing the push button, the push button will illuminate. A 'ding dong' bell signal is emitted and the face of your visitor appears in the display of the indoor unit.
- To talk to your visitor, press the button to accept the call.
- Press the button to activate the door lock.
- Your visitor can now open the door and enter.
Alternatively, you may hold the button for 5-8 seconds at any time to activate the door lock
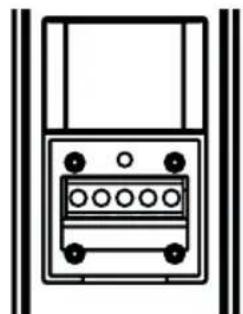
11.3 Door lock connection with outdoor unit:
The door lock may be connected according to the illustration below.
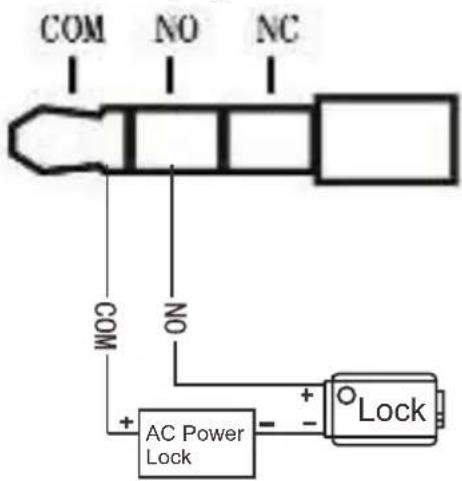
11.4 Door lock connection with indoor unit:
The door lock may be connected to the cradle according to the illustration below. Use a cable with a stereo plug.
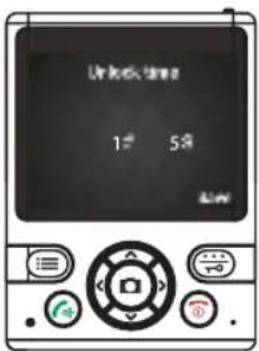
11.5 Door lock switch duration setup:
You may set a time for how long the door lock can be activated.
- With the indoor unit on stand-by, first briefly press the button to wake up the indoor unit
- Now simultaneously press the button and the right button and press and hold these buttons for 5 seconds. "Unlock time" will appear in the display.
- Use the< and >buttons to select the correct outdoor post with door lock (1~4)
- Press the button to set the switch duration (1~25 sec.)
- Now press the Back soft-button; "OK" will appear in the display as a confirmation.
- The screen turns off automatically after 5 seconds.
12. SYSTEM ERROR
If you think that an error has occurred in the system, please remove the batteries from the indoor unit and outdoor unit. Now wait several minutes and replace the batteries. If this does not resolve the problem, please contact the Alecto service department via the internet www.alecto.nl
13. TECHNICAL SPECIFICATIONS
13.1 Indoor-unit
Receiving Frequency Range: 2.400GHz ~ 2.4835GHz
Monitor: 3.5" Color LCD
Data Rate: 2.0Mbps
Receiving Sensitivity: -90dBm
Demodulation Type: GFSK
Resolution:
Transmitting Power: 19dBm (TYP)
Power Requirement: Ni-MH3.6V, 800mAh
Power Consumption: 400mA Max
Operating Temperature: -10^ 40^
Operating Humidity: 0% 85% RH
Weight:
Size receiver: 85x115x27mm (WxHxD)
charger: 93 × 55 × 75 ~mm (WxHxD)
No. of outdoor stations: Max.4
320x240(RGB)
13.2 Outdoor-unit
Transmit Frequency: Range 2.400GHz 2.4835GHz
Data Rate: 2.0Mbps
Transmitting Power: 19dBm (TYP)
Modulation Type: GFSK
Transmitting Distance:
Image Sensor Type:
Effective Pixels:
Image Processing:
Image Resolution / Frame Rate:
White Balance:
Lens:
Viewing Angle (Diagonal):
Minimum Illumination:
LED:
Power Requirement: 8~12V AC or DC +/- 5%
Outdoor: 200m, Indoor: 50m
1/4" Color CMOS Image Sensor
H:320 V:240
Motion JPEG
H:320 V:240 / 25fps
Auto
2.1mm/F2.6
135°
1 LUX (without LED illumination)
6 LEDs
Power Consumption: 500mA Max (cells)
4 LR6(AA),1.5V alkaline batteries
400mA Max (8~12V AC or DC)
Door contact:
Contact rating (Res. load):
Max. switch voltage:
Max. switching current:
Max. switching power:
0.3A 60VDC / 0.5A 125VAC / 1A 30VDC
125VAC/60VDC
2A
62.5VA/30W
Operating Temperature: -30^ 40^
Operating Humidity: 0% 85% RH
Weight:
Size:
109g excl. 251 incl. batteries
50x125x35mm (WxHxD) excl. batteries
50x200x35mm (WxHxD) incl. batteries
13.3 DECLARATION OF CONFORMITY
The declaration of conformity is available at:
http://DOC.hesdo.com/ADI-250-DOC.pdf
Frequency: 2.400GHz 2.4835GHz
Maximum Power: < 19dBm

Service

Heliop


WWW.ALECTO.NL
SERVICE@ALECTO.NL

Hesdo,Australielaan 1
5232 BB, 's-Hertogenbosch
The Netherlands
v3.0