
MVH-180UI - Car stereo PIONEER - Free user manual and instructions
Find the device manual for free MVH-180UI PIONEER in PDF.

User questions about MVH-180UI PIONEER
0 question about this device. Answer the ones you know or ask your own.
Ask a new question about this device
Download the instructions for your Car stereo in PDF format for free! Find your manual MVH-180UI - PIONEER and take your electronic device back in hand. On this page are published all the documents necessary for the use of your device. MVH-180UI by PIONEER.
USER MANUAL MVH-180UI PIONEER
DIGITAL MEDIA RECEIVER
RECEPTEUR NUMERIQUE MULTIMEDIA
RICEVITORE MULTIMEDIALE DIGITALE
RECEPTOR DIGITAL DE MEDIOS
DIGITALER MEDIA RECEIVER
DIGITALE MEDIA-RECEIVER
LINΦΡΟΒΟΥ MEДΙΑΝΕΝΒΕP
MVH-X380BT
MVH-180UI
MVH-180UBG
MVH-180UB
MVH-181UB
Pioneer

Bluetooth
Made for

iPod

iPhone
Owner's Manual
Mode d'emploi
PykoBoIDCTBO NOIb3OBaTeJia
Table of Contents
Before You Start 3
Getting Started 4
Radio 7
USB/iPod/AUX 8
Bluetooth 10
App Mode. 14
Using Pioneer ARC APP. 15
Settings. 16
FUNCTION settings 16
AUDIO settings. 17
SYSTEM settings 18
ILLUMINATION settings 19
MIXTRAX settings 19
Connections/Installation 20
Additional Information 23
About this manual:
- In the following instructions, a USB memory or USB audio player are referred to as "USB device".
- In this manual, iPod and iPhone are referred to as "iPod".
Declaration of Conformity with regard to the R&TTE Directive 1999/5/EC
C E
Manufacturer:
PIONEER CORPORATION
1-1, Shin-ogura, Saiwai-ku, Kawasaki-shi,
Kanagawa 212-0031, JAPAN
EU Representative's:
Pioneer Europe NV
Haven 1087, Keetbergaan 1, B-9120 Melsele, Belgium/Belgique
http://www.pioneer.eu
English:
Herby, Pioneer, declares that this MVH-X380BT is in compliance with the essential requirements and other relevant provisions of Directive 1999/5/ EC.
Suomi:
Härmed intygar Pioneer attenna MVH-X380BT
Thank you for purchasing this PIONEER product
To ensure proper use, please read through this manual before using this product. It is especially important that you read and observe WARNINGs and CAUTIONs in this manual. Please keep the manual in a safe and accessible place for future reference.


If you want to dispose this product, do not mix it with general household waste. There is a separate collection system for used electronic products in accordance with legislation that requires proper treatment, recovery and recycling.
Private households in the member states of the EU, in Switzerland and Norway may return their used electronic products free of charge to designated collection facilities or to a retailer (if you purchase a similar new one).
For countries not mentioned above, please contact your local authorities for the correct method of disposal.
By doing so you will ensure that your disposed product undergoes the necessary treatment, recovery and recycling and thus prevent potential negative effects on the environment and human health.

WARNING
-
Do not attempt to install or service this product by yourself. Installation or servicing of this product by persons without training and experience in electronic equipment and automotive accessories may be dangerous and could expose you to the risk of electric shock, injury or other hazards.
-
Do not attempt to operate the unit while driving. Make sure to pull off the road and park your vehicle in a safe location before attempting to use the controls on the device.

CAUTION
- Do not allow this unit to come into contact with moisture and/or liquids. Electrical shock could result. Also, damage to this unit, smoke, and overheating could result from contact with liquids.
-
Always keep the volume low enough to hear outside sounds.
The CarStereo-Pass is for use only in Germany. -
This product is evaluated in moderate and tropical climate conditions under the Audio, video and similar electronic apparatus - Safety requirements, IEC 60065.
If you experience problems
Should this unit fail to work properly, please contact your dealer or nearest authorized PIONEER Service Station.
Getting Started
Basic operation
MVH-X380BT/180UI/180UBG/180UB/181UB
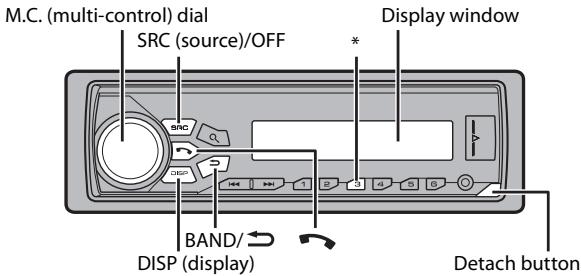
* The button indications vary depending on the unit.
Remote Control
NOTE
Remote control is supplied only for MVH-181UB.
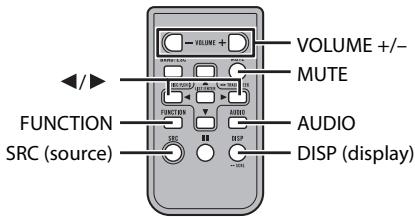
Frequently used operations
| Purpose | Operation | |
| Head Unit | Remote Control | |
| Turn on the power* | Press SRC/OFF to turn on the power. Press and hold SRC/OFF to turn off the power. | Press SRC to turn on the power. Press and hold SRC to turn off the power. |
| Adjust the volume | Turn the M.C. dial. | Press VOLUME + or -. Press MUTE to mute the unit. Press again to unmute. |
| Select a source | Press SRC/OFF repeatedly. | Press SRC repeatedly. |
| Change the display information | Press DISP repeatedly. | Press DISP repeatedly. |
| Return to the previous display/list | Press BAND/→. | Press Ↄ/ ➔ to select the next/previous folder. |
| Return to the normal display from the menu | Press and hold BAND/→. | - |
| Answering a call | Press ↕. | - |
| Ending a call | Press ↕. | - |
- When this unit's blue/white lead is connected to the vehicle's auto-antenna relay control terminal, the vehicle's antenna extends when this unit's source is turned on. To retract the antenna, turn the source off.
Display indication
| Indication | Description |
| & | Appears when a lower tier of the menu or folder exists. |
| I | Appears when a Bluetooth telephone is connected to this unit by HFP (Hands Free Profile) (page 10) and flashes while the telephone is on hold. (Only for Bluetooth-compatible models.) |
| J | Appears when a Bluetooth audio player is connected to this unit by A2DP (Advanced Audio Distribution Profile) (page 10). (Only for Bluetooth-compatible models.) |
| P | Appears when the \ button is pressed. |
| LOC | Appears when the local seek tuning function is set (page 16). |
| TP | Appears when a traffic program is received. |
| TA | Appears when the TA (traffic announcements) function is set (page 16). |
| S.Rtrv | Appears when the sound retriever function is set (page 17). |
| XX | Appears when random/shuffle play is set (except when BT AUDIO is selected as the source). |
| ← | Appears when repeat play is set (except when BT AUDIO is selected as the source). |
| 4 | Appears when the iPod control function is set (page 10). |
| θ | Appears when a Bluetooth connection is made (page 10). (Only for Bluetooth-compatible models.) |
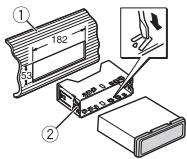
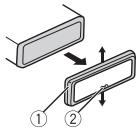
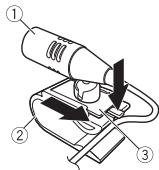
Detaching the front panel
Detach the front panel to prevent theft. Remove any cables and devices attached to the front panel and turn off the unit before detaching it.
Detach


Attach
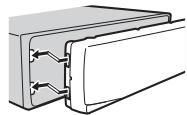
Important
- Avoid subjecting the front panel to excessive shock.
- Keep the front panel out of direct sunlight and high temperatures.
Always store the detached front panel in a protective case or bag.
Preparing the remote control
Remove the insulation sheet before use.

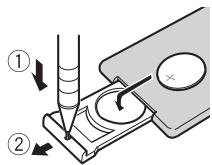
How to replace the battery
Insert the CR2025 (3 V) battery with the plus (+) and minus (-) poles orientated properly.
WARNING
- Do not ingest the battery, Chemical Burn Hazard.
- This product, including the supplied remote control, contains a coin/button cell battery. If the coin/button cell battery is swallowed, it can cause severe internal burns in just two hours and can lead to death.
-
Keep new or used batteries out of the reach of children. If the battery is swallowed or placed inside any part of the body, consult a doctor immediately.
-
If the battery compartment does not close securely, stop using the product and keep it away from children.
- Do not expose the battery or remote control to excessive heat such as direct sunlight or fire.

CAUTION
- There is a potential danger of explosion if the battery is incorrectly replaced. When replacing the battery, replace it with the same type.
- Do not handle or store the battery with metallic tools or objects.
- If the battery leaks, remove the battery and wipe the remote control completely clean. Then install a new battery.
- When disposing of used batteries, please comply with governmental regulations or environmental public institutions' rules that apply in your country/area.

Important
- Do not store the remote control in high temperatures or direct sunlight.
- Do not let the remote control fall onto the floor, where it may become jammed under the brake or accelerator pedal.
Setup menu
When you turn the ignition switch to ON after installation, [SET UP :YES] appears in the display.
1 Press the M.C. dial.
The setup menu disappears after 30 seconds of no operation. If you prefer not to set at this time, turn the M.C. dial to select [NO], then press to confirm.
2 Turn the M.C. dial to select the options, then press to confirm. To proceed to the next menu option, you need to confirm your selection.
| Menu Item | Description |
| LANGUAGE [ENG](English), [PYC](Russian), [TUR](Turkish) | Select the language to display the text information from a compressed audio file. |
| CLOCK SET | Set the clock. |
| Menu Item | Description |
| FM STEP[100], [50] | Select the FM tuning step from 100 kHz or 50 kHz. |
3 [QUIT:YES] appears when all the settings have been made.
To return to the first item of the setup menu, turn the M.C. dial to select [QUIT:NO], then press to confirm.
4 Press the M.C. dial to confirm the settings.
NOTES
- You can cancel the menu setting by pressing SRC/OFF.
- These settings can be made at any time from the SYSTEM settings (page 18) and INITIAL settings (page 6).
Canceling the demonstration display (DEMO OFF)
1 Press the M.C. dial to display the main menu.
2 Turn the M.C. dial to select [SYSTEM], then press to confirm.
3 Turn the M.C. dial to select [DEMO OFF], then press to confirm.
4 Turn the M.C. dial to select [YES], then press to confirm.
INITIAL settings
1 Press and hold SRC/OFF until the unit turns off.
2 Press and hold SRC/OFF to display the main menu.
3 Turn the M.C. dial to select [INITIAL], then press to confirm.
4 Turn the M.C. dial to select an option, then press to confirm.
NOTE
The options vary depending on the unit.
| Menu Item | Description |
| FM STEP[100], [50] | Select the FM tuning step from 100 kHz or 50 kHz. |
| SP-P/O MODE[REAR/SUB.W] | Select when there is a full-range speaker connected to the rear speaker output leads and there is a subwoofer connected to the RCA output. |
| [SUB.W/SUB.W] | Select when there is a passive subwoofer connected directly to the rear speaker output leads and there is a subwoofer connected to the RCA output. |
| [REAR/REAR] | Select when there are full-range speakers connected to the rear speaker output leads and RCA output. If there is a full-range speaker connected to the rear speaker output leads, and the RCA output is not used, you may select either [REAR/SUB.W] or [REAR/REAR]. |
| S/W UPDATE | Select to update the unit to the latest Bluetooth software. For details on Bluetooth software and updating, visit our website. |
| SYSTEM RESET[YES], [CANCEL] | Select [YES] to initialize the unit settings. The unit will be restarted automatically.(Some of the settings will be retained even after resetting the unit, such as Bluetooth pairing information, etc.) |
Radio
The tuner frequencies on this unit are allocated for use in Western Europe, Asia, the Middle East, Africa and Oceania. Use in other areas may result in poor reception. The RDS (radio data system) function only works in areas that broadcast RDS signals for FM stations.
Receiving preset stations
1 Press SRC/OFF to select [RADIO].
2 Press BAND/ to select the band from [FM1], [FM2], [FM3], [MW] or [LW].
3 Press a number button (1/ ∧ to 6/←).
TIP
The / buttons can be also used to select a preset station when [SEEK] is set to [PCH] in the FUNCTION settings (page 17).
Best stations memory (BSM)
The six strongest stations are stored on the number buttons (1 / to 6 / =)
1 After selecting the band, press the M.C. dial to display the main menu.
2 Turn the M.C. dial to select [FUNCTION], then press to confirm.
3 Turn the M.C. dial to select [BSM], then press to confirm.
To seek a station manually
1 After selecting the band, press / to select a station. Press and hold then release to seek an available station. Scanning stops when the unit receives a station. To cancel seek tuning, press /
NOTE
[SEEK] needs to be set to [MAN] in the FUNCTION settings (page 17).
To store stations manually
1 While receiving the station you want to store, press and hold one of the number buttons (1 / to 6 / ) until it stops flashing.
Using PTY functions
The unit searches for a station by PTY (program type) information.
1 Press during FM reception.
2 Turn the M.C. dial to select a program type from [NEWS/INFO], [POPULAR], [CLASSICS] or [OTHERS].
3 Press the M.C. dial.
The unit begins to search for a station. When it is found, its program service name is displayed.
NOTES
To cancel the search, press the M.C. dial.
- The program of some stations may differ from that indicated by the transmitted PTY.
- If no station is broadcasting the type of program you searched for, [NOT FOUND] is displayed for about two seconds and then the tuner returns to the original station.
PTY list
For more details about PTY list, visit the following site: http://www.pioneer.eu/eur/products/25/121/tech/CarAudio/PTY.html
USB/iPod/AUX
NOTE
iPod function is not available for MVH-180UBG/180UB/181UB.
Playing back
Disconnect headphones from the device before connecting it to the unit.
USB devices (including Android™)/iPod
1 Open the USB port cover.
2 Plug in the USB device/iPod using an appropriate cable.
NOTE
To automatically switch to [USB] source when a USB device/iPod is connected to the unit, set [USB AUTO] to [ON] in the SYSTEM settings (page 18).

CAUTION
Use an optional Pioneer USB cable (CD-U50E) to connect the USB device as any device connected directly to the unit will protrude out from the unit, which could be dangerous.
Before removing the device, stop playback.
AOA connections
For details on AOA connection, see page 15.
MTP connection
A device installed with Android OS 4.0 or later can be connected to the unit via MTP, using the cable supplied with the device. However, depending on the connected device and the numbers of the files in the device, audio files/songs may not be able to be played back via MTP. Note that MTP connection is not compatible with WAV and FLAC* file formats, and cannot be used with the MIXTRAX function.
- The FLAC files are only compatible with MVH-180UI/180UBG/180UB/181UB.
NOTE
If you use an MTP connection, [ANDROID WIRED] needs to be set to [MEMORY] in the SYSTEM settings (page 19).
AUX
1 Insert the stereo mini plug into the AUX input jack.
2 Press SRC/OFF to select [AUX] as the source.
NOTE
If [AUX] is set to [OFF] in the SYSTEM settings, [AUX] cannot be used as a source (page 18).
Operations
You can make various adjustments in the FUNCTION settings (page 16). Note that the following operations do not work for an AUX device. To operate an AUX device, use the device itself.
| Purpose | Operation |
| Select a folder/album*1 | Press 1/ \ or 2/ \ . |
| Select a track/song (chapter) | Press ↓ or ↑↓. |
| Fast forward or reverse*3 | Press and hold ↓ or ↑↓. |
| Search for a file from a list | 1 Press Q to display the list. 2 Turn the M.C. dial to select the desired file (folder) name or category, then press to confirm. 3 Turn the M.C. dial to select the desired file, then press to confirm. Playback starts. |
| View a list of the files in the selected folder/category*1 | Press the M.C. dial when a folder/ category is selected. |
| Play a song in the selected folder/ category*1 | Press and hold the M.C. dial when a folder/category is selected. |
| Purpose | Operation |
| Alphabetical search (iPod only) | 1 Press to display the list.2 Turn the M.C. dial to select the desired category list, then press to enter the alphabetical search mode.(Turning the M.C. dial twice also enters the alphabetical search mode.)3 Turn the M.C. dial to select a letter, then press to display the alphabetical list.To cancel alphabetical search, press BAND/→. |
| Repeat play | Press 6/→. |
| Random/shuffle play | Press 5/→. |
| Shuffle all play (iPod only) | Press and hold 5/→. |
| Pause/resume playback | Press 4/PAUSE. |
| Sound retriever*2 | Press 3/S.Rtrv.[1]: Effective for low compression rates[2]: Effective for high compression rates |
| Return to root folder (USB only)*1 | Press and hold . |
| Change drives in USB device(Devices that support the USB mass storage device class protocol only) | Press BAND/→. |
1 Compressed audio files only
2 When there is no 3/S.Rtrv. button on the unit, the sound retrieval function can be set by the FUNCTION settings.
*3 When you use the fast forward or reverse function while playing a VBR file, the playback time may be not correct.
Useful functions for iPod
Link play mode
You can access songs based on the artist, album, or genre currently playing.
1 While listening to a song, press and hold to enter the link play mode.
2 Turn the M.C. dial to select the mode ([ARTIST], [ALBUM], [GENRE]), then press to confirm.
The selected song/album will be played after the currently playing song.
NOTE
The selected song/album may be canceled if you use functions other than those from the link play mode (e.g. fast forward and reverse).
iPod control
You can control the unit via a connected iPod.
The following iPod models are not compatible with this function.
- iPod nano 1st generation, iPod with video
1 Press BAND/ during playback, then select the control mode.
[CONTROL iPod]: The unit's iPod function can be operated from the connected iPod.
[CONTROL AUDIO]: The unit's iPod function can only be operated by the buttons on the unit or supplied remote control. In this mode, the connected iPod cannot be turned on or off.
NOTES
- Pressing iPod can also switch the control mode (only for MVH-180UI).
- Switching the control mode to [CONTROL iPod] pauses song playback. Use the connected iPod to resume playback.
-
The following operations are still accessible from the unit, even if the control mode is set to [CONTROL iPod].
-
Pause, fast forward/reverse, song/chapter selection
-
The volume can only be adjusted from the unit.
About MIXTRAX (USB/iPod only)
(Only for MVH-X380BT)
The MIXTRAX function creates a non-stop mix of your music library. For details on MIXTRAX settings, see page 19.
NOTES
- This function is not compatible with an Android device connected via MTP.
- When USB is selected as a source and the MIXTRAX function is in use, the sound retriever function is disabled.
- Depending on the file/song, sound effects may not be available.
1 Press 3/MIX to turn MIXTRAX on/off.
Bluetooth
(Only for MVH-X380BT)
Bluetooth connection
Important
If three or more Bluetooth devices (e.g. a phone and separate audio player) are connected, they may not work properly.
1 Turn on the Bluetooth function of the device.
2 Press to display the phone menu.
3 Turn the M.C. dial to select [BT SETTING], then press to confirm.
4 Turn the M.C. dial to select [ADD DEVICE], then press to confirm. The unit starts to search for available devices, then displays them in the device list.
- To cancel searching, press the M.C. dial.
- If the desired device is not in the list, select [RE-SEARCH].
- If there is no device available, [NOT FOUND] appears in the display.
5 Turn the M.C. dial to select a device from the device list, then press to confirm.
Press and hold the M.C. dial to switch the displayed device information between the Bluetooth device address and device name.
6 Select [Pioneer BT Unit] shown in the device display.
7 Make sure the same 6-digit number appears on this unit and the device, then select "Yes" on the device.
NOTES
- [DEVICE FULL] appears if the unit has already been paired with three other devices. In this case, delete one of the paired devices. See [DEL DEVICE] or [GUEST MODE] in the Bluetooth settings (page 11).
- Depending on the device, the PIN code is required in step 7. In this case, input [0000].
TIP
The Bluetooth connection can be also made by detecting the unit from the Bluetooth device. To do so, [VISIBLE] in the Bluetooth settings needs to be set to [ON]. For details on a Bluetooth device operations, refer to the operating instructions supplied with the Bluetooth device.
Bluetooth settings
| Menu Item | Description |
| DEVICELIST | Display the list of paired Bluetooth devices. “*” appears on the device name when the Bluetooth connection is established. |
| DEL DEVICE [DELETE YES], [DELETE NO] | Delete the device information. |
| ADD DEVICE | Register a new device. |
| A.CONN [ON], [OFF] | Select [ON] to connect to a Bluetooth device automatically. |
| Menu Item | Description |
| VISIBLE [ON], [OFF] | Select [ON] so that a Bluetooth device can detect the unit when the unit is connected via Bluetooth to another device. |
| PIN CODE | Change the PIN code. 1 Press the M.C. dial to display the setting mode. 2 Turn the M.C. dial to select a number. 3 Press the M.C. dial to move the cursor to the next position. 4 After inputting the PIN code, press and hold the M.C. dial. After inputting the PIN code, pressing the M.C. dial returns you to the PIN code input display, and you can change the PIN code. |
| DEV. INFO | Switch the device information on the display between the device name and Bluetooth device address. |
| GUEST MODE [ON], [OFF] | Select [ON] to move to the [DEL DEVICE] screen automatically when the unit has already been paired with three devices. |
| A.PAIRING [ON], [OFF] | Select [ON] to pair the unit and iPhone automatically when an iPhone is connected to the unit via USB. (This function may not be available depending on the version of iOS you are using.) |
Bluetooth telephone
First, make a Bluetooth connection with the Bluetooth telephone (page 10). Up to two Bluetooth telephones can be connected simultaneously.
Important
- Leaving the unit on standby to connect to your phone via Bluetooth while the engine is not running can drain the vehicle's battery.
- Be sure to park your vehicle in a safe place and apply the parking brake before operation.
To make a phone call
1 Press to display the phone menu.
When two phones are connected, a phone name appears first then a phone menu will display. To switch to another phone, press again.
2 Turn the M.C. dial to select [RECENTS] or [PHONE BOOK], then press to confirm.
If you select [PHONE BOOK], proceed to step 4.
3 Turn the M.C. dial to select [MISSED], [DIALLED] or [RECEIVED], then press to confirm.
4 Turn the M.C. dial to select a name or phone number, then press to confirm.
The phone call starts.
To answer an incoming call
1 Press when a call is received.
TIP
When two phones are connected to the unit via Bluetooth and there is an incoming call while one phone is being used for a call, a message will appear in the display. To answer that incoming call, you need to end the existing call.
Basic operations
| Purpose | Operation |
| End a call | Press ↗. |
| Reject an incoming call | Press and hold ↗ when a call is received. |
| Switch between the current caller and a caller on hold | Press the M.C. dial. |
| Cancel a caller on hold | Press and hold ↗. |
| Purpose | Operation |
| Adjust the volume of the caller's voice (When private mode is on, this function is not available.) | Turn the M.C. dial during the call. |
| Turn the privacy mode on or off | Press BAND/▶ during the call. |
To preset phone numbers
1 Select a phone number from a phone book or call history.
2 Press and hold one of the number buttons (1 / to 6 / 一
The contact is stored in the selected preset number.
To make a call using a preset number, press one of the number buttons (1/ ∧ to 6/), then press the M.C. dial.
Voice recognition (Only for iPhone)
This function is only available when an iPhone equipped with voice recognition is connected to the unit via Bluetooth.
1 Press and hold to activate the voice recognition mode.
2 Press the M.C. dial and then talk into the microphone to input voice commands.
To exit the voice recognition mode, press BAND/
NOTE
For details on the voice recognition features, refer to the manual supplied with your iPhone.
Phone menu
| Menu Item | Description |
| RECENTS [MISSED] | Display the missed call history. |
| [DIALLED] | Display the dialed call history. |
| [RECEIVED] | Display the received call history. |
| PHONE BOOK*1 | Display the contacts which have been transferred from your phone. Set [VISIBLE] in the Bluetooth settings to [ON] to browse the contacts via this unit. |
| PRESET 1-6 | Recall the preset phone numbers. You can also recall the preset phone numbers by pressing one of the number buttons (1/∧ to 6/←). |
| A.ANSR*2 [ON], [OFF] | Select [ON] to answer an incoming call automatically. |
| R.TONE [ON], [OFF] | Select [ON] if the ring tone does not come out from the car speakers. Depending on the connected phone, this function may not work. |
| PB INVIT | Invert the order of names in the phone book (name view). |
| PB A.SYNC [ON], [OFF] | Select whether or not to transfer the contacts from your phone automatically when your phone is connected to the unit. ·When connected for the first time, the contacts from your phone are transferred automatically, regardless of the [PB A.SYNC] setting. ·If you switch from [ON] to [OFF], the auto synchronization will not be performed on the next connection. ·If you switch from [OFF] to [ON], the auto synchronization will be performed when your phone is connected to the unit. ·During the auto synchronization, you cannot cancel the synchronization, even if you select [OFF]. |
| Menu Item | Description |
| BT SETTING | You can adjust various settings for Bluetooth connections. For details on Bluetooth settings, see page 11. |
1 The contacts on your phone will normally be transferred automatically when the phone is connected. If they are not, use your phone to transfer the contacts.
2 If two phones are connected, this function does not work on incoming calls that are received while one of the phones is being used for a call.
Bluetooth audio
Important
-
Depending on the Bluetooth audio player connected to this unit, the available operations will be limited to the following two levels:
-
A2DP (Advanced Audio Distribution Profile) can only play back songs on your audio player.
-
AVRCP (Audio/Video Remote Control Profile) can perform functions such as playback, pause, select song, etc.
-
The sound of the Bluetooth audio player will be muted when the phone is in use.
- When the Bluetooth audio player is in use, you cannot connect to a Bluetooth telephone automatically.
- Depending on the type of Bluetooth audio player you have connected to this unit, operation and information displayed may vary based on availability and functionality.
1 Make a Bluetooth connection with the Bluetooth audio player.
2 Press SRC/OFF to select [BT AUDIO] as the source.
3 Press BAND/ to start playback.
Basic operations
You can make various adjustments in the FUNCTION settings (page 16).
| Purpose | Operation |
| Fast forward or reverse | Press and hold ↓ or ▷. |
| Select a track | Press ↓ or ▷. |
| Repeat play* | Press 6/←. |
| Random play* | Press 5/20. |
| Pause/resume playback | Press 4/PAUSE. |
| Search for a file from a list | 1 Press to display a list. 2 Turn the M.C. dial to select the desired folder name, then press to confirm. 3 Turn the M.C. dial to select the desired file, then press to confirm. Playback starts. |
- Depending on the connected device, these operations may not be available.
App Mode
(APP mode is not available for MVH-180UBG/180UB/181UB.)
You can enjoy listening to an application on an iPhone/Android device via the unit. In some cases, you can control an application by using the unit.
For details on compatible devices, visit our website.

Important
Use of third party apps may involve or require the provision of personally identifiable information, whether through the creation of a user account or otherwise, and for certain applications, the provision of geolocation data.
ALL THIRD PARTY APPS ARE THE SOLE RESPONSIBILITY OF THE PROVIDERS, INCLUDING WITHOUT LIMITATION COLLECTION AND SECURITY OF USER DATA AND PRIVACY PRACTICES. BY ACCESSING THIRD PARTY APPS, YOU AGREE TO REVIEW THE TERMS OF SERVICE AND PRIVACY POLICIES OF THE PROVIDERS. IF YOU DO NOT AGREE WITH THE TERMS OR POLICIES OF ANY PROVIDER OR DO NOT CONSENT TO THE USE OF GEOLOCATION DATA WHERE APPLICABLE, DO NOT USE THAT THIRD PARTY APP.
For iPhone users
This function is compatible with iPhones and iPod touches installed with iOS 5.0 or later.
For Android device users
This function is compatible with devices that have Android OS 2.3 or later installed and also support Bluetooth SPP (Serial Port Profile) and A2DP (Advance Audio Distribution Profile).
NOTE
PIONEER IS NOT LIABLE FOR ANY THIRD PARTY APPS OR CONTENT, INCLUDING WITHOUT LIMITATION THEIR ACCURACY OR COMPLETENESS. THE CONTENT AND FUNCTIONALITY OF SUCH APPS ARE THE SOLE RESPONSIBILITY OF THE APP PROVIDER.
Playback of an application via the unit
The Bluetooth connection is available for MVH-X380BT.
1 Connect this unit with the mobile device.
- iPhone via USB (page 8)
Android device via Bluetooth (page 10)
2 Press the M.C. dial to display the main menu.
3 Turn the M.C. dial to select [SYSTEM], then press to confirm.
4 Turn the M.C. dial to select [APP CONN. SET], then press to confirm.
5 Turn the M.C. dial to select one of the below.
- Select [Wired] for iPhone.
- Select [BLUETOOTH] for an Android device.
6 Press SRC/OFF to select [APP].
7 Operate the mobile device to start up the application.
Basic operations
You can make various adjustments in the FUNCTION settings (page 16).
| Purpose | Operation |
| Select a track | Press ↓ or ▷. |
| Fast forward or reverse | Press and hold ↓ or ▷. |
| Pause/resume playback | Press BAND/→. |
Using Pioneer ARC APP
(Pioneer ARC APP for iPhone is not available for MVH-180UBG/180UB/181UB.) You can operate the unit from Pioneer ARC APP installed on an iPhone/Android device. In some cases, you can control aspects of the application, such as source selection, pause, etc., by using the unit.
For details on what operations are available on the application, see the application's help section.

WARNING
Do not attempt to operate the application while driving. Make sure to pull off the road and park your vehicle in a safe location before attempting to use the controls on the application.
For iPhone users
This function is compatible with iPhones (iPhone 5 or later) and iPod touches installed with iOS 8.0 or later.
You can download Pioneer ARC APP on iTunes App Store.
For Android device users
This function is compatible with devices that have Android OS 4.1 or later installed and also support Bluetooth SPP (Serial Port Profile) and AOA (Android Open Accessory) 2.0.
You can download Pioneer ARC APP on Google Play™.
NOTE
Some Android devices connected via AOA 2.0 may not work properly or emit sounds due to their own software design, regardless of the OS version.
Making a connection with Pioneer ARC APP
The Bluetooth connection is available for MVH-X380BT.
1 Connect this unit with the mobile device.
- iPhone/Android device via USB (page 8)
Android device via Bluetooth (page 10)
2 Press the M.C. dial to display the main menu.
3 Turn the M.C. dial to select [SYSTEM], then press to confirm.
4 Turn the M.C. dial to select [APP CONN. SET], then press to confirm.
5 Turn the M.C. dial to select one of the below.
- Select [Wired] for a device connected via USB.
- Select [BLUETOOTH] for an Android device connected via Bluetooth. Proceed to step 9 if you select the USB connection for iPhone or the Bluetooth connection.
6 Press BAND/ to display the previous menu list.
7 Turn the M.C. dial to select [ANDROID WIRED], then press to confirm.
8 Turn the M.C. dial to select [APP CONTROL] for an Android device connected via USB.
If [ON] is selected in [P.APP AUTO ON] (page 19), Pioneer ARC APP on the Android device starts automatically, and all the steps are finished.
NOTE
If Pioneer ARC APP has not been installed on your Android device yet, a message that prompts you to install the application will appear on your Android device. Select [OFF] in [PAPP AUTO ON] to clear the message (page 19).
9 Press SRC/OFF to select any source.
10 Launch Pioneer ARC APP on the mobile device.
NOTE
You can also launch the application by pressing and holding the M.C. dial if you select the USB connection for iPhone or the Bluetooth connection.
Listening to music on Android
1 Press SRC/OFF to select [ANDROID].
Basic operations
| Purpose | Operation |
| Select a track | Press▶or▶. |
| Fast forward or reverse | Press and hold |←| or ▷|. |
| Pause/resume playback | Press 4/PAUSE. |
| Sound retriever* | Press 3/S.Rtrv. [1]: Effective for low compression rates [2]: Effective for high compression rates |
- When there is no 3/S.Rtrv button on the unit, the sound retriever function can be set by the FUNCTION settings.
Settings
You can adjust various settings in the main menu.
1 Press the M.C. dial to display the main menu.
2 Turn the M.C. dial to select one of the categories below, then press to confirm.
FUNCTION settings (page 16)
- AUDIO settings (page 17)
SYSTEM settings (page 18)
ILLUMINATION settings (page 19)
- MIXTRAX settings (page 19)
3 Turn the M.C. dial to select the options, then press to confirm.
NOTES
- The Bluetooth related menu items in the following tables are not available for MVH-180UI/180UBG/180UB/181UB.
- iPod-related menu items in the following tables are not available for MVH-180UBG/180UB/181UB.
- APP mode-related menu items in the following tables are not available for MVH-180UBG/180UB/181UB.
FUNCTION settings
The menu items vary according to the source.
| Menu Item | Description | |||
| FM SETTING RADIO [TALK], [STANDARD], [MUSIC] | Match the sound quality level with the broadcast signal conditions of the FM band signal. (Available only when FM band is selected.) | |||
| BSM RADIO | Store the six strongest stations on the number buttons (1/▲ to 6/▲) automatically. | |||
| REGIONAL RADIO [ON], [OFF] | Limit the reception to the specific regional programs when AF (alternative frequencies search) is selected. (Available only when FM band is selected.) | |||
| LOCAL RADIO FM: [OFF], [LV1], [LV2], [LV3], [LV4] MW/LW: [OFF], [LV1], [LV2] | Restrict the tuning station according to the signal strength. | |||
| TA RADIO [ON], [OFF] | Receive current traffic information if available. (Available only when FM band is selected.) | |||
| AF RADIO [ON], [OFF] | Allow the unit to retune to a different frequency providing the same station. (Available only when FM band is selected.) | |||
| Menu Item | Description | |||
| NEWS RADIO [ON], [OFF] | Interrupt the currently selected source with news programs. (Available only when FM band is selected.) | |||
| SEEK RADIO [MAN], [PCH] | Assign ↓ or ↑ buttons to seek the stations one by one (manual tuning) or select a station from the preset channels. | |||
| SEL DEVICE APP BT AUDIO | Connect a Bluetooth device in the list. | |||
| S.RTRV USB iPod APP BT AUDIO ANDROID | ||||
| [1] (effective for low compression rates), [2] (effective for high compression rates), [OFF] | Enhance compressed audio and restore rich sound. Not available when: • USB is selected as a source and the MIXTRAX function is set to on. • The FLAC file is played back. (Available for MVH-180UI/180UBG/180UB/181UB) | |||
| AUDIO BOOK iPod [FASTER], [NORMAL], [SLOWER] | Change the playback speed. (Not available when [CONTROL iPod] is selected in the control mode.) | |||
| PAUSE APP | Pause or resume playback. | |||
| PLAY BT AUDIO | Start playback. | |||
| STOP BT AUDIO | Stop playback. | |||
AUDIO settings
| Menu Item | Description |
| FADER*1 | Adjust the front and rear speaker balance. |
| BALANCE | Adjust the left and right speaker balance. |
| EQ SETTING | |
| [SUPER BASS], [POWERFUL], [NATURAL], [VOCAL], [CUSTOM1], [CUSTOM2], [FLAT] | Select or customize the equalizer curve. [CUSTOM1] can be set separately for each source. However, each of the below combinations are set to the same setting automatically. |
| Select an equalizer band and level for further customizing. Equalizer band: [80HZ], [250HZ], [800HZ], [2.5KHZ], [8KHZ] | • USB, iPod, ANDROID, and APP (iPhone) • BT AUDIO, ANDROID, and APP (Android) [CUSTOM2] is a shared setting used for all sources. You can also switch the equalizer by pressing EQHLI repeatedly (Only for MVH-180UBG/180UB/181UB). |
| Equalizer level: [+6] to [-6] | |
| LOUDNESS | |
| [OFF], [LOW], [MID], [HI] | Compensate for clear sound at low volume. |
| SUB.W*2 | |
| [NOR], [REV], [OFF] | Select the subwoofer phase. |
| SUB.W CTRL*2*3 | |
| Cut-off frequency: [50HZ], [63HZ], [80HZ], [100HZ], [125HZ], [160HZ], [200HZ] | Only frequencies lower than those in the selected range are output from the subwoofer. |
| Output level: [-24] to [+6] | Slope level: [-12], [-24] |
| BASS BOOST | |
| [0] to [+6] | Select the bass boost level. |
| HPF SETTING | |
| Cut-off frequency: [OFF], [50HZ], [63HZ], [80HZ], [100HZ], [125HZ], [160HZ], [200HZ] | Only frequencies higher than the high-pass filter (HPF) cutoff are output from the speakers. |
| Slope level: [-12], [-24] | |
| SLA | |
| [+4] to [-4] | Adjust the volume level for each source except FM. Each of the below combinations are set to the same setting automatically. • USB, iPod, ANDROID, and APP (iPhone) • BT AUDIO, ANDROID, and APP (Android) |
1 Not available when [SUB.W/SUB.W] is selected in [SP-P/O MODE] in the INITIAL settings (page 7).
2 Not available when [REAR/REAR] is selected in [SP-P/O MODE] in the INITIAL settings (page 7).
*3 Not available when [OFF] is selected in [SUB.W].
SYSTEM settings
You can also access to these menus when the unit is turned off.
| Menu Item | Description |
| LANGUAGE | |
| [ENG](English), [PYC] (Russian), [TUR](Turkish) | Select the language to display the text information from a compressed audio file. |
| CLOCK SET | |
| Set the clock (page 6). | |
| 12H/24H | |
| [12H], [24H] | Select the time notation. |
| Menu Item | Description |
| AUTO PI | |
| [ON], [OFF] | Search for a different station with the same programming, even if using a preset station. |
| AUX | |
| [ON], [OFF] | Set to [ON] when using an auxiliary device connected to the unit. |
| USB AUTO | |
| [ON], [OFF] | Select [ON] to automatically switch to [USB] source when a USB device/iPod is connected to the unit. Select [OFF] when a USB device/iPod is being connected to the unit just for charging. |
| BT AUDIO | |
| [ON], [OFF] | Set the Bluetooth signal on/off. |
| MUTE MODE (Only for MVH-180UI) | |
| [MUTE], [20dB ATT], [10dB ATT] | Mute or attenuate sound automatically when a signal from equipment with a mute function is received. |
| PW SAVE* | |
| [ON], [OFF] | Reduce the battery power consumption. Turning on the source is the only operation allowed when this function is on. |
| BT MEM CLEAR | |
| [YES], [CANCEL] | Clear the Bluetooth device data (device list, PIN code, call history, phone book, preset phone numbers) stored in the unit. [CLEARED] appears when data is successfully deleted. |
| BT VERSION | Displays the system version of the unit and the Bluetooth module. |
| APP CONN. SET | |
| [Wired], [BLUETOOTH] | Select the appropriate connection method according to your device. |
| ANDROID WIED | |
| [MEMORY], [APP CONTROL] | Select the appropriate connection method for an Android device. · This setting is not available when [BLUETOOTH] is selected in [APP CONN. SET]. |
| P.APP AUTO ON | |
| [ON], [OFF] | Select [ON] to automatically launch the car remote application when an Android device is connected to the unit via AOA. (Not available when [MEMORY] is selected in [ANDROID WIED].) |
- [PW SAVE] is canceled if the vehicle battery is disconnected and will need to be turned back on once the battery is reconnected. When [PW SAVE] is off, depending on connection methods, the unit may continue to draw power from the battery if your vehicle's ignition does not have an ACC (accessory) position.
ILLUMINATION settings
| Menu Item | Description |
| DIM SETTING | |
| [SYNC CLOCK], [MANUAL] | Change the display brightness. |
| BRIGHTNESS | |
| [1] to [10] | Change the display brightness. The available setting ranges differ depending on [DIM SETTING]. |
MIXTRAX settings
(Only for MVH-X380BT)
| Menu Item | Description |
| SHORT PLAYBCK | |
| [1.0 MIN], [1.5 MIN], [2.0 MIN], [2.5 MIN], [3.0 MIN], [OFF] | Select the length of the playback time. |
| MIX PATTERN | |
| [SOUND LEVEL] | Change the MIXTRAX special effects according to the audio level. The mix pattern changes according to the sound level. |
| [LOW PASS] | The mix pattern changes according to the bass level. |
| [RANDOM] | The mix pattern changes randomly according to the sound level mode and low pass mode. |
| DISPLAY FX | |
| [ON], [OFF] | Set the MIXTRAX special effects on/off. |
| CUT IN FX | |
| [ON], [OFF] | Turn the MIXTRAX sound effects on/off while manually changing the tracks. |
Connections/Installation
Connections

Important
- When installing this unit in a vehicle without an ACC (accessory) position on the ignition switch, failure to connect the red cable to the terminal that detects operation of the ignition key may result in battery drain.

ACC position

No ACC position
- Use of this unit in conditions other than the following could result in fire or malfunction.
- Vehicles with a 12-volt battery and negative grounding.
- When speaker output is used by 4 channels, use speakers over 50W (maximum input power) and between 4 to 8 (impedance value). Do not use 1 to 3 speakers for this unit.
- When rear speaker output is used by 2 of subwoofer, use speakers over 70 W (maximum input power).
- Please refer to connections for a connection method.
- To prevent a short-circuit, overheating or malfunction, be sure to follow the directions below.
-
Disconnect the negative terminal of the battery before installation.
-
Secure the wiring with cable clamps or adhesive tape. Wrap adhesive tape around wiring that comes into contact with metal parts to protect the wiring.
- Place all cables away from moving parts, such as the shift lever and seat rails.
- Place all cables away from hot places, such as near the heater outlet.
- Do not connect the yellow cable to the battery by passing it through the hole to the engine compartment.
- Cover any disconnected cable connectors with insulating tape.
-Do not shorten any cables. - Never cut the insulation of the power cable of this unit in order to share the power with other devices. The current capacity of the cable is limited.
- Use a fuse of the rating prescribed.
- Never wire the negative speaker cable directly to ground.
-
Never band together negative cables of multiple speakers.
-
When this unit is on, control signals are sent through the blue/white cable. Connect this cable to the system remote control of an external power amp or the vehicle's auto-antenna relay control terminal (max. 300mA 12 V DC). If the vehicle is equipped with a glass antenna,
connect it to the antenna booster power supply terminal.
- Never connect the blue/white cable to the power terminal of an external power amp. Also, never connect it to the power terminal of the auto antenna. Doing so may result in battery drain or a malfunction.
- The black cable is ground. Ground cables for this unit and other equipment (especially, high-current products such as power amps) must be wired separately. If they are not, an accidental detachment may result in a fire or malfunction.
- The graphical symbol placed on the product means direct current.
This unit
MVH-X380BT/180UI/180UBG/180UB/ 181UB
① Microphone 4m Only for MVHX380BT
② Rear output or subwoofer output
③ Front output (Only for MVHX380BT/180UI)
④ Antenna input
⑤ Power cord input
⑥ Fuse(10A)
⑦ Wired remote input (Only for MVH-X380BT/180UI) Hard-wired remote control adapter can be connected (sold separately).
⑧ Microphone input (Only for MVH-X380BT)
Power cord
① To power cord input
② Depending on the kind of vehicle, the function of ③ and ⑤ may be different. In this case, be sure to connect ④ to ⑤ and ⑥ to ③
③ Yellow Back-up (or accessory)
④ Yellow Connect to the constant 12 V supply terminal.
⑤ Red
Accessory (or back-up)
⑥ Red
Connect to terminal controlled by the ignition switch (12 V DC).
⑦ Connect leads of the same color to each other.
⑧ Black (chassis ground)
Blue/white
The pin position of the ISO connector will differ depending on the type of vehicle. Connect 9 and 11 when Pin 5 is an antenna control type. In another type of vehicle, never connect 9 and 11.
10 Blue/white
Connect to the system control terminal of the power amp (max. 300 mA 12 V DC).
① Blue/white
Connect to the auto-antenna relay control terminal (max. 300mA12V DC).
Yellow/black (Only for MVH-180UI) If you use equipment with a Mute function, wire this lead to the Audio Mute lead on that equipment. If not, keep the Audio Mute lead free of any connections.
⑬ Speaker leads
White: Front left
White/black: Front left
Gray: Front right
Gray/black:Front right
Green: Rear left or subwoofer
Green/black: Rear left or subwoofoe
Violet: Rear right or subwoofer
+
Violet/black: Rear right or subwoofer
ISO connector
In some vehicles, the ISO connector may be divided into two. In this case, be sure to connect to both connectors.
NOTES
- Change the initial menu of this unit. Refer to [SP-P/O MODE] (page 7). The subwoofer output of this unit is monaural.
- When using a subwoofer of 2 , be sure to connect the subwoofer to the violet and violet/black leads of this unit. Do not connect anything to the green and green/black leads.
Power amp (sold separately)
Perform these connections when using the optional amplifier.
① System remote control
Connect to blue/white cable.
② Power amp (sold separately)
③ Connect with RCA cables (sold separately)
④ To front output
⑤ Front speaker
⑥ To rear output or subwoofer output
⑦ Rear speaker or subwoofer
* Only for MVH-X380BT/180UI
Installation
Important
- Check all connections and systems before final installation.
- Do not use unauthorized parts as this may cause malfunctions.
- Consult your dealer if installation requires drilling of holes or other modifications to the vehicle.
- Do not install this unit where:
-it may interfere with operation of the vehicle.
- it may cause injury to a passenger as a result of a sudden stop.
- The semiconductor laser will be damaged if it overheats. Install this unit away from hot places such as near the heater outlet.
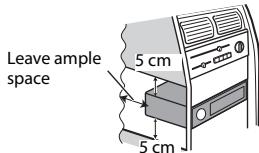
Optimum performance is obtained when the unit is installed at an angle of less than 60^
- When installing, to ensure proper heat dispersal when using this unit, make sure you leave ample space behind the rear panel and wrap any loose cables so they are not blocking the vents.
DIN mount installation
1 Insert the supplied mounting sleeve into the dashboard.
2 Secure the mounting sleeve by using a screwdriver to bend the metal tabs (90^) into place.
① Dashboard
② Mounting sleeve
Make sure that the unit is installed securely in place. An unstable installation may cause skipping or other malfunctions.
When not using the supplied mounting sleeve
1 Line up the holes on the mounting bracket with the holes on the sides of the unit to attach the bracket.
2 Screw in one screw on each side to hold the unit in place.
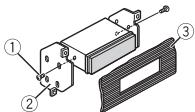
① Tapping screw (5 mm × 9 mm, not supplied with product)
② Mounting bracket
③ Dashboard or console
Using the included bracket
Check to make sure that the included bracket matches your particular model of vehicle and then attach it to the unit as shown below.
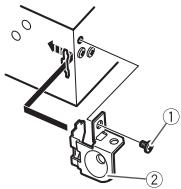

① Screw
② Bracket
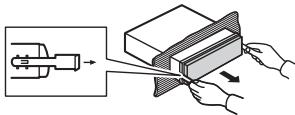
Removing the unit (installed with the supplied mounting sleeve)
1 Remove the trim ring.
① Trim ring
② Notched tab
- Releasing the front panel allows easier access to the trim ring.
- When reattaching the trim ring, point the side with the notched tab down.
2 Insert the supplied extraction keys into both sides of the unit until they click into place.
3 Pull the unit out of the dashboard.
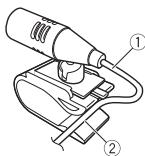
Installing the microphone
(Only for MVH-X380BT)
The microphone should be placed directly in front of the driver at a suitable distance to pick up their voice clearly.
A CAUTION
It is extremely dangerous to allow the microphone lead to become wound around the steering column or shift lever. Be sure to install the microphone in such a way that it will not obstruct driving. It is recommended to use the clamps (sold separately) to arrange the lead.
To install on the sun visor
1 Fit the microphone lead into the groove.
① Microphone lead
② Groove
2 Install the microphone clip on the sun visor.
Lowering the sun visor reduces the voice recognition rate.

① Microphone clip
To install on the steering column
1 Slide the microphone base to detach it from the microphone clip.
① Microphone
② Microphone clip
③ Microphone base
2 Install the microphone on the rear side of the steering column.
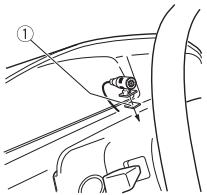
① Double-sided tape
Additional Information
Troubleshooting
The display automatically returns to the normal display.
No operations have been made for about 30 seconds.
- Perform an operation.
The repeat play range changes unexpectedly.
Depending on the repeat play range, the selected range may change when another folder or track is being selected or during fast forwarding/reversing.
-Select the repeat play range again.
A subfolder is not played back.
Subformers cannot be played when [FLD] (folder repeat) is selected.
- Select another repeat play range.
The sound is intermittent.
→ You are using a device, such as a cellular phone, that may cause audible interference.
- Move electrical devices that may be causing the interference away from the unit.
The sound from the Bluetooth audio source is not played back.
There is a call in progress on a Bluetooth-connected cellular phone.
- The sound will be played back when the call is terminated.
A Bluetooth-connected cellular phone is currently being operated.
- Stop using the cellular phone.
→ The connection between the unit and the cellular phone is not established correctly after a call made by a Bluetooth-connected cellular phone.
- Make a Bluetooth connection between the unit and the cellular phone again.
Error messages
Common
AMP ERROR
→ This unit fails to operate or the speaker connection is incorrect.
The protective circuit is activated.
-
Check the speaker connection.
-
Turn the ignition switch OFF and back to ON again. If the message remains, contact your dealer or an authorized Pioneer Service Station for assistance.
NO XXXX (NO TITLE, for example)
There is no embedded text information.
- Switch the display or play another track/file.
USB device/iPod
FORMATREAD
→ Sometimes there is a delay between the start of playback and when you start to hear any sound.
Wait until the message disappears and you hear sound.
NO AUDIO
→ There are no songs.
- Transfer the audio files to the USB device and connect.
The connected USB device has security enabled.
- Follow the USB device instructions to disable the security.
SKIPPED
→ The connected USB device contains DRM protected files.
- The protected files are skipped.
PROTECT
All the files on the connected USB device are embedded with DRM.
-Replace the USB device.
N/A USB
The connected USB device is not supported by this unit.
- Disconnect your device and replace it with a compatible USB device.
HUB ERROR
→ The USB device connected via a USB hub is not supported by this unit.
-Connect the USB device directly to this unit using a USB cable.
CHECK USB
→ The USB connector or USB cable has short-circuited.
- Check that the USB connector or USB cable is not caught in something or damaged.
→ The connected USB device consumes more than maximum allowable current.
- Disconnect the USB device and do not use it. Turn the ignition switch OFF and back to ACC or ON. Connect only compliant USB devices.
→ The iPod operates correctly but does not charge.
- Make sure the connection cable for the iPod has not shorted out (e.g., not caught in metal objects). After checking, turn the ignition switch OFF and back to ON, or disconnect the iPod and reconnect.
ERROR-19
Communication failed.
Perform one of the following operations, then return to the USB source.
- Turn the ignition switch OFF and back to ON.
- Disconnect the USB device.
- Change to a different source.
iPod failure.
- Disconnect the cable from the iPod. Once the iPod's main menu
is displayed, reconnect the iPod and reset it.
ERROR-23
USB device was not formatted properly.
- Format the USB device with FAT12, FAT16 or FAT32.
ERROR-16
The iPod firmware version is old.
- Update the iPod version.
iPod failure.
- Disconnect the cable from the iPod. Once the iPod's main menu is displayed, reconnect the iPod and reset it.
STOP
→ There are no songs in the current list.
- Select a list that contains songs.
NOT FOUND
No related songs.
- Transfer songs to the iPod.
Bluetooth device
ERROR-10
The power failed for the Bluetooth module of the unit.
- Turn the ignition switch OFF and back to ACC or ON.
Apps
NO BT DEVICE GO TO BT MENU TO REGISTER
No Bluetooth device found.
- Connect the unit and the device via Bluetooth (page 10).
CONN. Failed PRESS BAND KEY TO RETRY
Bluetooth connection failed.
-Press BAND/ to make a connection again.
DISCONNECTED PRESS BAND KEY TO RETRY
Bluetooth connection failed.
-Press BAND/ to make a connection again.
CHECKAPP
Connection to the application failed.
- Follow the instructions that appear on the screen.
STARTUPAPP
The application has not started running yet.
- Operate the mobile device to start up the application.
Handling guidelines
USB storage device
- Connections via USB hubs are not supported.
- Firmly secure the USB storage device before driving. Do not let the USB storage device fall onto the floor, where it may become jammed under the brake or accelerator pedal.
Depending on the USB storage device, the following problems may occur.
- Operations may vary.
- The storage device may not be recognized.
- Files may not be played back properly.
The device may cause audible interference when you are listening to the radio.
iPod
- Do not leave the iPod in places with high temperatures.
- Firmly secure the iPod when driving. Do not let the iPod fall onto the floor, where it may become jammed under the brake or accelerator pedal.
- The settings of the iPod such as the equalizer and repeat play are changed automatically when the iPod is connected to the unit. Once the iPod is disconnected, those settings will return to the original settings.
- Incompatible text saved on the iPod will not be displayed by the unit.
Compressed audio compatibility
Only the first 32 characters can be displayed as a file name (including the file extension) or a folder name.
- The unit may not work properly depending on the application used to encode WMA files.
- There may be a slight delay at the start of the playback of audio files embedded with image data, or audio files stored on a USB device with numerous folder hierarchies.
-
Russian text to be displayed on this unit should be encoded in one of the following character sets:
-
Unicode (UTF-8, UTF-16)
A character set other than Unicode that is used in a Windows environment and is set to Russian in the multi-language setting
A CAUTION
- Pioneer cannot guarantee compatibility with all USB mass storage devices, and assumes no responsibility for any loss of data on media players, smartphones, or other devices while using this product.
- Do not leave discs or a USB storage device in any place that is subject to high temperatures.
WMA files
| File extension | .wma |
| Bit rate | 48 kbps to 320 kbps (CBR), 48 kbps to 384 kbps (VBR) |
| Sampling frequency | 32 kHz, 44.1 kHz, 48 kHz |
| Windows MediaTM Audio Professional, Lossless, Voice/ DRM Stream/ Stream with video | Not compatible |
MP3 files
| File extension | .mp3 |
| Bit rate | 8 kbps to 320 kbps (CBR), VBR |
| Sampling frequency | 8 kHz to 48 kHz (32 kHz, 44.1 kHz, 48 kHz for emphasis) |
| Compatible ID3 tag version | 1.0, 1.1, 2.2, 2.3, 2.4 (ID3 tag Version 2.x is given priority over Version 1.x.) |
| M3u playlist | Not compatible |
| MP3i (MP3 interactive), mp3 PRO | Not compatible |
WAV files
- WAV file formats cannot be connected via MTP.
| File extension | .wav |
| Quantization bits | 8 and 16 (LPCM), 4 (MSADPCM) |
| Sampling frequency | 16 kHz to 48 kHz (LPCM), 22.05 kHz and 44.1 kHz (MS ADPCM) |
AAC files (MVH-X380BT only)
| Compatible format | AAC encoded by iTunes |
| File extension | .m4a |
| Sampling frequency | 11.025 kHz to 48 kHz |
| Transmission rate | 16 kbps to 320 kbps, VBR |
| Apple Lossless | Not compatible |
| AAC file bought from the iTunes Store (.m4p file extension) | Not compatible |
FLAC files (MVH-180UI/ 180UBG/180UB/181UB only)
- FLAC file formats cannot be connected via MTP.
- FLAC files may not be playable, depending on the encoder.
| File extension | .flac |
| Sampling frequency | 8/11.025/12/16/22.05/24/32/44.1/48 kHz |
| Quantization bit rate | 16 bit |
| Channel mode | 1/2 ch |
USB device
- There may be a slight delay when starting playback of audio files on a USB storage device with numerous folder hierarchies.
| Playable folder hierarchy | Up to eight tiers (A practical hierarchy is less than two tiers.) |
| Playable folders | Up to 500 |
| Playable files | Up to 15 000 |
| Playback of copyright-protected files | Not compatible |
| Partitioned USB device | Only the first partition can be played. |
iPod compatibility
This unit supports only the following iPod models. Supported iPod software versions are shown below. Older versions may not be supported.
Made for
-iPod touch (1st through 5th generation)
-iPod classic
- iPod with video
-iPod nano (1st through 7th generation)
iPhone 6
iPhone 6 Plus
iPhone 5s
iPhone 5c
iPhone 5
iPhone 4s
iPhone 4
iPhone 3GS
iPhone 3G
iPhone
- Operations may vary depending on the generation and/or software version of the iPod.
- Users of iPod with the Lightning Connector should use the Lightning to USB Cable (supplied with iPod).
- Users of iPod with the Dock Connector should use the CD-IU51. For details, consult your dealer.
Refer to the iPod manuals for information about the file/format compatibility. - Audiobook, Podcast: Compatible
CAUTION
Pioneer accepts no responsibility for data lost on the iPod, even if that data is lost while this unit is used.
Sequence of audio files
The user cannot assign folder numbers and specify playback sequences with this unit. Sequence of audio file depends on the connected device.
Note that the hidden files in a USB device cannot be played back.
Example of a hierarchy
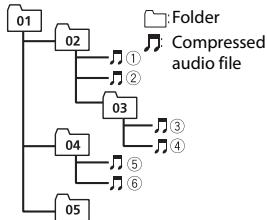
Level 1 Level 2 Level 3 Level 4
01 to 05: Folder number
① to ⑥: Playback sequence
Russian character chart
D:Display C:Character
| D: C | D: C | D: C |
| R:A | Б:B | Д:В |
| F:Γ | Д:Д | Ε:Ε,Ε |
| *:Ж | Ž:3 | И:И,И |
| K:К | Л:Л | М:М |
| H:H | Ω:O | Π:Π |
| P:P | E:C | Τ:Τ |
| Y:Y | Φ:Φ | «:X |
| ü:ü | Ч:Ч | Ш:Ш,Ш |
| ž:þ | Η:bl | 𝑏:𝑏 |
| ʒ:ʒ | Η:Ю | η:Я |
Copyright and trademark
Bluetooth
The Bluetooth® word mark and logos are registered trademarks owned by Bluetooth SIG, Inc. and any use of such marks by PIONEER CORPORATION is under license. Other trademarks and trade names are those of their respective owners.
iTunes
Apple and iTunes are trademarks of Apple Inc., registered in the U.S. and other countries.
WMA
Windows Media is either a registered trademark or trademark of Microsoft Corporation in the United States and/or other countries.
This product includes technology owned by Microsoft Corporation and cannot be used or distributed without a license from Microsoft Licensing, Inc.
FLAC
Copyright © 2000-2009 Josh Coalson
Copyright © 2011-2013 Xiph.Org Foundation
Redistribution and use in source and binary forms, with or without modification, are permitted provided that the following conditions are met:
- Redistributions of source code must retain the above copyright notice, this list of conditions and the following disclaimer.
- Redistributions in binary form must reproduce the above copyright notice, this list of conditions and the following disclaimer in the documentation and/or other materials provided with the distribution.
- Neither the name of the Xiph.org Foundation nor the names of its contributors may be used to endorse or promote products derived from this software without specific prior written permission.
THIS SOFTWARE IS PROVIDED BY THE
COPYRIGHT HOLDERS AND
CONTRIBUTORS "AS IS" AND ANY
EXPRESSION OR IMPLIED WARRANTY,
INCLUDING, BUT NOT LIMITED TO, THE
IMPLIED WARRANTY OF
MERCHANTABILITY AND FITNESS FOR A PARTICULAR PURPOSE ARE
DISCLAIMED. IN NO EVENT SHALL THE FOUNDATION OR CONTRIBUTORS BE LIABLE FOR ANY DIRECT, INDIRECT, INCIDENTAL, SPECIAL, EXEMPLARY, OR CONSEQUENTIAL DAMAGES (INCLUDING, BUT NOT LIMITED TO, PROCEDURE OF SUBSTITUTE GOODS OR SERVICES; LOSS OF USE, DATA, OR PROFITS; OR BUSINESS INTERRUPTION) HOWEVER CAUSED AND ON ANY THEORY OF LIABILITY, WHETHER IN CONTRACT, STRICT LIABILITY, OR TORT (INCLUDING NEGLIGENCE OR OTHERWISE) ASING IN ANY WAY OUT OF THE USE OF THIS SOFTWARE, EVEN IF ADVISED OF THE POSSIBILITY OF SUCH DAMAGE.
iPod & iPhone
iPhone, iPod, iPod classic, iPod nano, and iPod touch are trademarks of Apple Inc., registered in the U.S. and other countries.
Lightning is a trademark of Apple Inc. "Made for iPod" and "Made for iPhone" mean that an electronic accessory has been designed to connect specifically to iPod or iPhone, respectively, and has been certified by the developer to meet Apple performance standards. Apple is not responsible for the
operation of this device or its compliance with safety and regulatory standards. Please note that the use of this accessory with iPod or iPhone may affect wireless performance.
Android & Google Play
Android, Google Play, and the Google Play logo are trademarks of Google Inc.
MIXTRAX
MIXTRAX is a trademark of the
PIONEER CORPORATION.
Specifications
General
Power source: 14.4 V DC (10.8 V to 15.1 V allowable)
Grounding system: Negative type
Maximum current consumption: 10.0 A
Dimensions (W× H× D) DIN
Chassis: 178mm× 50mm× 97 mm
Nose: 188mm× 58mm× 17mm D
Chassis: 178mm× 50mm× 97 mm
Nose: 170mm× 46mm× 17mm
Weight: 0.5kg
Audio
Maximum power output:
-
50 ~W × 4 ch / 4 (for no subwoofer)
-
50W× 2ch / 4 +70W× 1ch / 2 (for subwoofer)
Continuous power output:
22 W × 4 (50 Hz to 15 000 Hz, 5 % THD, 4 Ω load, both channels driven)
Load impedance: 4 (4 to 8 allowable)
Preout maximum output level: 2.0 V
Loudness contour: +10 dB (100 Hz), +6.5 dB (10 kHz) (volume: -30 dB)
Equalizer (5-Band Graphic Equalizer): Frequency: 80 Hz/250 Hz/800 Hz/2.5 kHz/8 kHz
Equalization range: ± 12 dB (2 dB step)
Subwoofer (mono):
Frequency: 50 Hz/63 Hz/80 Hz/
100 Hz/125 Hz/160 Hz/200 Hz
Slope: -12 dB/oct, -24 dB/oct
Gain: +6 dB to -24 dB
Phase: Normal/Reverse
USB
USB standard specification: USB 2.0 full speed
Maximum current supply: 1 A
USB Protocol:
MSC (Mass Storage Class)
MTP (Media Transfer Protocol)
AOA (Android Open Accessory) 2.0
File system: FAT12, FAT16, FAT32
MP3 decoding format: MPEG-1 & 2 Audio Layer 3
WMA decoding format:Ver.7,7.1,8,9, 10,11,12 (2 ch audio) (Windows Media Player)
AAC decoding format: MPEG-4 AAC (iTunes encoded only) (Ver. 10.6 and earlier) (MVH-X380BT)
FLAC decoding format: v1.3.0 (Free Lossless Audio Codec) (MVH-180UI/180UBG/180UB/181UB)
WAV signal format: Linear PCM & MS ADPCM (Non-compressed)
FM tuner
Frequency range: 87.5 MHz to 108.0 MHz
Usable sensitivity: 11 dBf (1.0 μV/75 Ω, mono, S/N: 30 dB)
Signal-to-noise ratio: 72 dB (IEC-A network)
MWtuner
Frequency range: 531 kHz to 1602 kHz
Useable sensitivity: 25 V (S/N: 20 dB)
Signal-to-noise ratio: 62 dB (IEC-A network)
LWTuner
Frequency range: 153kHz to 281kHz
Useable sensitivity: 28 V (S/N: 20 dB)
Signal-to-noise ratio: 62 dB (IEC-A network)
Bluetooth
(MVH-X380BT)
Version: Bluetooth 3.0 certified
Output power: +4 dBm Maximum (Power class 2)
Frequency band(s): 2 400 MHz to 2 483.5 MHz
Bluetooth profiles: GAP (Generic Access Profile)
SDAP (Service Discovery
Application Profile)
OPP (Object Push Profile)
HFP (Hands Free Profile) 1.6
PBAP (Phone Book Access Profile)
A2DP (Advanced Audio
Distribution Profile)
AVRCP (Audio/Video Remote
Control Profile) 1.5
SPP (Serial Port Profile) 1.1
NOTE
Specifications and the design are subject to modifications without notice.
Table des matieres
Raccordements/Installation 21
You could also use the connection to a local Wi-Fi router in your home. You could also use the connection to a local Wi-Fi router in your office.
Raccordements/Installation
Raccordements

Important
Phase :normale/inverse
USB
MSC (Mass Storage Class)
MTP (Media Transfer Protocol)
AOA (Android Open Accessory)
2.0
(Windows Media Player)
MS ADPCM (non compressed)
Symtoniseur FM
GAP (Generic Access Profile)
SDAP (Service Discovery
Application Profile)
OPP (Object Push Profile)
HFP (Hands Free Profile) 1.6
PBAP (Phone Book Access Profile)
A2DP (Advanced Audio
Distribution Profile)
AVRCP (Audio/Video Remote
Control Profile) 1.5
SPP (Serial Port Profile) 1.1
REMARQUE
Best stations memory (BSM)
File AAC (solo MVH-X380BT)
Copyright © 2000-2009 Josh Coalson
Copyright © 2011-2013 Xiph.Org Foundation
Pendenza: -12 dB/oct, -24 dB/ oct
Specifica standard USB: USB 2.0 full speed
MSC (Mass Storage Class)
MTP (Media Transfer Protocol)
AOA (Android Open Accessory) 2.0
File system: FAT12, FAT16, FAT32
GAP (Generic Access Profile)
SDAP (Service Discovery
Application Profile)
OPP (Object Push Profile)
HFP (Hands Free Profile) 1.6
PBAP (Phone Book Access Profile)
A2DP (Advanced Audio
Distribution Profile)
AVRCP (Audio/Video Remote
Control Profile) 1.5
SPP (Serial Port Profile) 1.1
NOTA
Alternatively, you can use the following method.
Curva: -12 dB/oct, -24 dB/oct
Ganancia: +6 dB a -24 dB
Anschlüsse/Einbau 22
AOA (Android Open Accessory) 2.0
(Windows Media Player)
AAC-Decodierformat MPEG-4 AAC
Lossless Audio Codec (MVH
180UI/180UBG/180UB/181UB)
GAP (Generic Access Profile)
SDAP (Service Discovery
Application Profile)
OPP (Object Push Profile)
HFP (Hands Free Profile) 1.6
PBAP (Phone Book Access Profile)
A2DP (Advanced Audio
Distribution Profile)
AVRCP (Audio/Video Remote
Control Profile) 1.5
SPP (Serial Port Profile) 1.1
HINWEIS
Best stations memory (BSM)
U aunt Pioneer ARC APP downloaden op iTunes App Store.
Helling: -12 dB/oct, -24 dB/oct
Gain: +6 dB tot -24 dB
Fase: Normaal/tegengesteld
3
MSC (Mass Storage Class)
MTP (Media Transfer Protocol)
AOA (Android Open Accessory) 2.0
Bestandsystem: FAT12, FAT16, FAT32
MP3-decoderingsformaat: MPEG-1 & 2 Audio Layer 3
WMA-decoderingforma:Versie7, 7,1,8,9,10,11,12(2-
kanaalsaudio) (Windows Media Player)
AAC-decoderingsformaat: MPEG-4
GAP (Generic Access Profile)
SDAP (Service Discovery
Application Profile)
OPP (Object Push Profile)
HFP (Hands Free Profile) 1.6
PBAP (Phone Book Access Profile)
A2DP (Advanced Audio
Distribution Profile)
AVRCP (Audio/Video Remote
Control Profile) 1.5
SPP (Serial Port Profile) 1.1
OPMERKING
- Bby mojke Te OTMeHnTb HacToPou Ky npaMeTp a MeHIO, HaxaB KHOnKy SRC/OFF.
- HactpoNTbI npaAMetpbl MeHIO MOxHO B hAcTpoKax SYSTEM (ctp.19) nHaCTpoKAX INITIAL (ctp.6).
OTmeHa DeMoHcTpaCnOHHorO nCnPJIe (DEMO OFF)
1 Haxmte M.C.ДЯ OTO6paXeHnI rIaHBoro MeNo.
2 NobeprHneM.C.dIy BbI6opa [SYSTEM], 3aTeM haxMnte dIy noDTbePjXdEHH.
3ПовернITE M.C.dЯ Bblbopa [DEMO OFF],Затем нахмite дя noTbePckdhen.
4 NOBePHTe M.C.ДЯ BbIbOpa [YES], 3aTeM HaxMITE dIy noTBePKeJdEHH.
HactpoynkN INITIAL
1 Haxmte u yedeKbaiTe SRC/OFF, noka yctpoictBO He otKliouHTcA.
2 Haxmte u yedepxuBaIte SRC/OFF Ira oTo6paXeHn rnaBHoro MeNo.
3 NobepnTe M.C. nIy Bbl6opa [INITIAL], 3aTeM haxmTe nIy noTBePckDeHn.
4 Nobepnite M.C. nla Bb6opa napametpa, 3aTe m Haxmte nla noTBePKeHn.
ПРИМЕЧАНЕ
NapametpbMOrT OTnUaTBcB 3aBcMocToN OYctpoiCTBa.
3aKaKdoNcNoBOKNHKnO KoCoXpaHeHaOnHa 3eTaepTaIOCTaHcN C HAnJyUIMKaueCTBOM npMeMa (c1/An6/).
1 Pocne Bb6opa nooCbl haxmnte peryarntop M.C. nla oTo6paXehnnaBHOrO MeHIO.
2 ПовернITE M.C.дя Быбopa [FUNCTION], за tem нахшITE дя посторжdenи.
3 NobeprHneM.C.dIy Bbl6opa [BSM], 3aTeM haxmTe dIy noDTBepKdEHH.
Ponck cTaHcNn BpyHyIO
1 Pocne Bb6opa noocbHaXMMTe I/>>I dny Bb6opa ctaHcnn.
Haxmte u ydepxnbaiTe 1/3aTeM OTnyctne dIy IONcKa DOCTynHO CTAHUN. IONCK OCTaHOBITcK, KOrDa yCTPOcTBO BbINONHT npHem cTAHN. DInr OTMeHbI IONcKa HaxmTe 1/3
ПРИМЕЧАНО
Длпnapametpa [SEEK] Heo6xodmO yctaHOBnBt 3naueHne [MAN] b HactpoiKaX FONCTION (ctp.18).
Coxpahene cTanuBpyHyO
1 Bo Bpem npnema cTahun, KOtOpuy Tpe6yeTcOxpaHmTb, HaxMnTe uDepKmbaTe OndHy n3 YncNoBix KhoNOK (c 1/ A no 6/), Noka MrranHe He pekpatntc.
IcnoJIb3OBAHneФyHKmI PTY
YCTPOCTBO BbIOpJIHReT NOnCK CTaHcNn No INΦOpMaun PTY (TNnporpaMMbl).
1 Haxmite BOBpemFM-npneMa.
2 ПовернITE М.С. Дяг Вьбopa Тида nporpaMMы ИЗ [NEWS/INFO], [POPULAR], [CLASSICS] ИИ [OTHERS].
3 Haukmite perynatop M.C..
UcTPOCTBO HauHET NOnCK CTaHcNII. Pocne HaxOxJeHnI CTaHcNIOtO6pa3NTcRaHa3BaHHe pOrpamMHO cnJyKbI.
ПРИМЕЧАНО
-TO6bI OTMeHHTb NOcK, HaxMITE M.C..
- IpongpAMMbH HeKOTOPbX paRIOCTAHmI MOYr OTNIVAHbCt OT npORpAMM, yKa3AHHbX B nepedaaEMOM kOe PTY.
- ECNI N ODA n3 CTAHNHy NE Hepeaet nprrpAmmbMy HxKHorO TnIa, To hA dVcIeB e TeueHHe NpIeMepHO bcyHKd 6ydt E NOKT A3oH [NOT FOUND], n3aTe mTIOhepepejEET B pEXm PnEEMA CTAHNc, C kTOPOB bbl NaHT oNCK.
Cnncok PTY
Ipeed n3BnueHneM yctpoiCTBa OCTaHOBInTe BOCnpOn3BeDeHne.
IopknloeHna AOA
*1 TônbkocKaTbIe aaynOaaibl
2 Esnin ha'tcpoiBte OTCyTCTBYe KKNoka 3/S.Rtrv, ΦyHKuHIO npEO6pBaO8nHIA 3bYka MOnHO HAcToPBoH B HactoKAs FUNCTION.
^3 Pπi IκηονλθοBBANH ΜβειστρεπΟΓΟ έΠι ΜαδθηρΑθεπΟΓΟ ΒΟ BPΜΑ BOCPONBSEDEHΗ ΕλΑΙΝ VBR βρεΜΑ BOCPONBSEDEHΗ ΜΚΟΥ ΜΘΙ ΘΕΒΕHΠΜ.
Pone3HbIe yHKnUnn dJa iPod
Pexmm CcbIOuHOro BocpnOn3BeDeHn
BbMoKeTe OcyuIeCTBnTb IOCTyN K KOMN03NcIaM Ha OCHOBE TeKUeero IcNoJIHITeIa, aIb6Oma NIIJxHaHa.
1 Bo BpemB OBCpnO3BeDHeN KOMNo3nHn HaxMnte N ydpexNBaTe Q, DnI npexoDa B pexm CcbIOuHOrO BOCpnO3BeDHeN.
2 ПовернITE M.C. Дд Вьбopa ржима ([ARTIST], [ALBUM], [GENRE]), 3atem Нжмite Дд поТВерждени. Bыбраная KMПОЗИЦA/aльбом 6уdт ВOCПОНЗБЕДны послеTekуцей KMПОЗИЦИ.
ПРИМЕЧАНО
Bb6paHnHyo KOMNo3uIIO/Anb6oM oKHO OTMeNHTb PnP nCnoNt3oBaHNyHxuIN,OTNIuHbIX Of yHKunpeKMA cBbIOuHOrO BocPOn3BeDEHN (HaNPmEp, b6CTpAnepeMTOKa Bnepd Hn34J).
UnpaBneHne iPod
BbMoJeTe ynpabTbY cTpoCTbOM c NMOUbIO nOdkHNoeHHOro iPod. CnEyIoNe moJei iPod HecoMeTmblc dAnHOHФyHKuNei. - iPod nano1-ro pOKoENHei, iPod C bIeDo
1 Bo Bpemra Bocnpon3BedeHnna Haxmnte BAND/ , 3aTeM Bb6epuTepeXm ynpabHeHn.
yCTPOIcTB HauHET NOnCK DocTyNbIX yCTPOIcTB, nOcNe Yero OTo6pa3NT INB CnICKe yCTPOIcTB.
- 4TO6bI OTMeHHTb NONCK, HAXMITE M.C..
- Ecni Heo6xOaMOrO yCTpoiCTBa HET B cInsKe, BbI6epuTe [RE-SEARCH].
- EcIn Het doctynhbx yctpoiCTB, Na ekpahe OTO6pa3nTcR [NOT FOUND].
BbI MoKeTe 3aRpy3uTb Pioneer ARC APP BiTunes App Store.
* HeNcOToYnHO, eCNI BbIbpaH npaMeTp [SUB.W/SUB.W] b [SP-P/O MODE] b HactpoKax INITIAL (ctp. 7).
2 HeNoctyUmHo, ecn Bb6pban napaMetr [REAR/REAR] b [SP-P/O MODE] b HactpoiKaX INITIAL (ctp. 7).
3 HeNoctynH, ecn Bb6paH npaMeTp [OFF] B [SUB.W].
Hactpoikn SYSTEM
BbMokete npolyuTb doCTyN k3TNM MeHIO daXe ecN yctpoCTBO bblKIOUHO.
| Земент мени | Опесане | |
| CLOCK SET | Настоюк часов (ст. 6). | |
| 12H/24H | ||
| [12H], [24H] | Быбор Формата вретейни. | |
| AUTO PI | ||
| [ON], [OFF] | Почьдругий стуцу с тakоже, пPORГаммо дадж bo Вретя БИЗОВа празварительно настоюки. | |
| AUX | ||
| [ON], [OFF] | БыберITE [ON] рир полічουени к даному устюч STBY BCNOMORA TEьного устюства. | |
| USB AUTO | ||
| [ON], [OFF] | БыберITE [ON]对于我们 ABTomatnieско- пегклічουени на Источник [USB], кordа устюстBO USB/iPod полічeuны к устюстВ. | |
| БыберITE [OFF], кordа устюстBO USB/ iPod полічuaetсу к устюстВу дя зардки. | ||
| BT AUDIO | ||
| [ON], [OFF] | Вкlioоченье/откlioоченье сигнана Bluetooth. | |
| MUTE MODE (Достушино толъкдд MVH-180UI) | ||
| [MUTE], [20dB ATT], [10dB ATT] | АВТOMATNUCHEСКOE OTKlioоченье пли пprigлuyшенье звука рли поочени сигнана с оборуданы с φунkees OTKlioоченье звуka. | |
| PW SAVE* | ||
| [ON], [OFF] | Реким за教职工 reserves reserves reserves reserves reserves reserves reserves reserves reserves reserves reserves reserves reserves reserves reserves reserves reserves reserves reserves reserves reserves reserves reserves reserves reserves reserves reserves reserves reserves reserves reserves reserves reserves reserves reserves reserves reserves reserves reserves reserves reserves reserves reserves reserves reserves reserves reserves reserves reserves reserves reserves reserves reserves reserves reserves reserves reserves reserves reserves reserves reserves reserves reserves reserves reserves reserves reserves reserves reserves reserves reserves reserves reserves reserves reserves reserves reserves reserves reserves reserves reserves reserves reserves reserves reserves reserves reserves reserves reserves reserves reserves reserves reserves reserves reserves reserves reserves reserves reserves reserves resolves reserves resolves resolves resolves resolves resolves resolves resolves resolves resolves resolves resolves resolves resolves resolves resolves resolves resolves resolves resolves resolves resolves resolves resolves resolves resolves resolves resolves resolves resolves resolves resolves resolves resolves resolves resolves resolves resolves resolves resolves resolves resolves resolves resolves resolves resolves resolves resolves resolves resolves resolves resolves resolves resolves resolves resolves resolves resolves resolves resolves resolves resolves resolves resolves resolves resolves resolves resolves resolves resolves resolves resolves resolves resolves resolves resolves resolves resolves resolves resolves resolves resolves resolves resolves resolves resolves resolves resolves resolves resolves resolves resolves resolves resolves resolves resolves resolves resolves resolves resolves resolves resolve resolve resolve resolve resolve resolve resolve resolve resolve resolve resolve resolve resolve resolve resolve resolve resolve resolve resolve resolve resolve resolve resolve resolve resolve resolve resolve resolve resolve resolve resolve resolve resolve resolve resolve resolve resolve resolve resolve resolve resolve resolve resolve resolve resolve resolve resolve resolve resolve resolve resolve resolve resolve resolve resolve resolve resolve resolve resolve resolve resolve resolve resolve resolve resolve resolve resolve resolve resolve resolve resolve resolve resolve resolve resolve resolve resolve resolve resolve resolve resolve resolve resolve resolve resolve resolve resolve resolve resolve resolve resolve resolve resolve resolve resolve resolve resolve resolve resolve resolve resolved resolve resolved resolve resolved resolve resolved resolve resolved resolve resolved resolve resolved resolve resolved resolve resolved resolve resolved resolve resolved resolve resolved resolve resolved resolve resolved resolve resolved resolve resolved resolve resolved resolve resolved resolve resolved resolve resolved resolve resolved resolve resolved resolve resolved resolve resolved resolve resolved resolve resolved resolve resolved resolve resolved resolve resolved resolve resolved resolve resolved resolve resolved resolve resolved resolve resolved resolve resolved resolve resolved resolve resolved resolve resolved resolve resolved resolve resolved resolve resolved resolve resolved resolve resolved resolve resolved resolve resolved resolve resolved resolve resolved resolve resolved resolve resolved resolve resolved resolveResolved resolve resolved resolve resolved resolve resolved resolve resolved resolve resolved resolve resolved resolve resolved resolve resolved resolve resolved resolve resolved resolve resolved resolve resolved resolve resolved resolve resolved resolve resolved resolve resolved resolve resolved resolve resolved resolve resolved resolve resolved resolve resolved resolve resolved resolve resolved resolve resolved resolve resolved resolve resolved resolve resolved resolve resolved resolve resolved resolve resolved resolve resolved resolve resolved resolve resolved resolve resolved resolve resolved resolve resolved resolve resolved resolve resolved resolve resolved resolve resolved resolve resolved resolve resolved resolve resolved resolve resolved resolve resolved resolve resolved resolve resolved resolve resolved resolve resolved resolve resolving resolve resolved resolve resolved resolve resolved resolve resolved resolve resolved resolve resolved resolve resolved resolve resolved resolve resolved resolve resolved resolve resolved resolve resolved resolve resolved resolve resolved resolve resolved resolve resolved resolve resolved resolve resolved resolve resolved resolve resolved resolve resolved resolve resolved resolve resolved resolve resolved resolve resolved resolve resolved resolve resolved resolve resolved resolve resolved resolve resolved resolve resolved resolve resolved resolve resolved resolve resolved resolve resolved resolve resolved resolve resolved resolve resolved resolve resolved resolve resolved resolve resolved resolve resolved resolve resolved resolve resolved resolve resolved resolve resolved resolve resolved resolve resolved resolve resolved resolve resolve resolved resolve resolved resolve resolved resolve resolved resolve resolved resolve resolved resolve resolved resolve resolved resolve resolved resolve resolved resolve resolved resolve resolved resolve resolved resolve resolved resolve resolved resolve resolved resolve resolved resolve resolved resolve resolved resolve resolved resolve resolved resolve resolved resolve resolved resolve resolved resolve resolved resolve resolved resolve resolved resolve resolved resolve resolved resolve resolved resolve resolved resolve resolved resolve resolved resolve resolved resolve resolved resolve resolved resolve resolved resolve resolved resolve resolved resolve resolved resolve resolved resolve resolved resolve resolved resolve resolved resolve resolved resolve resolved resolve resolved resolve resolved resolve resolved resolved resolve resolved resolve resolved resolve resolved resolve resolved resolve resolved resolve resolved resolve resolved resolve resolved resolve resolved resolve resolved resolve resolved resolve resolved resolve resolved resolve resolved resolve resolved resolve resolved resolve resolved resolve resolved resolve resolved resolve resolved resolve resolved resolve resolved resolve resolved resolve resolved resolve resolved resolve resolved resolve resolved resolve resolved resolve resolved resolve resolved resolve resolved resolve resolved resolve resolved resolve resolved resolve resolved resolve resolved resolve resolved resolve resolved resolve resolved resolve resolved resolve resolved resolve resolved resolve resolved resolve resolved resolve resolved resolve resolved resolve resolved resolve resolved resolve resolved resolved resolved resolve resolved resolve resolved resolve resolved resolve resolved resolve resolved resolve resolved resolve resolved resolve resolved resolve resolved resolve resolved resolve resolved resolve resolved resolve resolved resolve resolved resolve resolved resolve resolved resolve resolved resolve resolved resolve resolved resolve resolved resolve resolved resolve resolved resolve resolved resolve resolved resolve resolved resolve resolved resolve resolved resolve resolved resolve resolved resolve resolved resolve resolved resolve resolved resolve resolved resolve resolved resolve resolved resolve resolved resolve resolved resolve resolved resolve resolved resolve resolved resolve resolved resolve resolved resolve resolved resolve resolved resolve resolved resolve resolved resolve resolved resolve resolved resolveResolvedResolvedResolvedResolvedResolvedResolvedResolvedResolvedResolvedResolvedResolvedResolvedResolvedResolvedResolvedResolvedResolvedResolvedResolvedResolvedResolvedResolvedResolvedResolvedResolvedResolvedResolvedResolvedResolvedResolvedResolvedResolvedResolvedResolvedResolvedResolvedResolvedResolvedResolvedResolvedResolvedResolvedResolvedResolvedResolvedResolvedResolvedResolvedResolvedResolvedResolvedResolvedResolvedResolvedResolvedResolvedResolvedResolvedResolvedResolvedResolvedResolvedResolvedResolvedResolvedResolvedResolvedResolvedResolvedResolvedResolvedResolvedResolvedResolvedResolvedResolvedResolvedResolvedResolvedResolvedResolvedResolvedResolvedResolvedResolvedResolvedResolvedResolvedResolvedResolvedResolvedResolvedResolvedResolvedResolvedResolvedResolvedResolvedResolvedResolvedResolveResolvedResolvedResolvedResolvedResolvedResolvedResolvedResolvedResolvedResolvedResolvedResolvedResolvedResolvedResolvedResolvedResolvedResolvedResolvedResolvedResolvedResolvedResolvedResolvedResolvedResolvedResolvedResolvedResolvedResolvedResolvedResolvedResolvedResolvedResolvedResolvedResolvedResolvedResolvedResolvedResolvedResolvedResolvedResolvedResolvedResolvedResolvedResolvedResolvedResolvedResolvedResolvedResolvedResolvedResolvedResolvedResolvedResolvedResolvedResolvedResolvedResolvedResolvedResolvedResolvedResolvedResolvedResolvedResolvedResolvedResolvedResolvedResolvedResolvedResolvedResolvedResolvedResolvedResolvedResolvedResolvedResolvedResolvedResolvedResolvedResolvedResolvedResolvedResolvedResolvedResolvedResolvedResolvedResolvedResolvedResolvedResolvedResolvedResolved resolvedResolvedResolvedResolvedResolvedResolvedResolvedResolvedResolvedResolvedResolvedResolvedResolvedResolvedResolvedResolvedResolvedResolvedResolvedResolvedResolvedResolvedResolvedResolvedResolvedResolvedResolvedResolvedResolvedResolvedResolvedResolvedResolvedResolvedResolvedResolvedResolvedResolvedResolvedResolvedResolvedResolvedResolvedResolvedResolvedResolvedResolvedResolvedResolvedResolvedResolvedResolvedResolvedResolvedResolvedResolvedResolvedResolvedResolvedResolvedResolvedResolvedResolvedResolvedResolvedResolvedResolvedResolvedResolvedResolvedResolvedResolvedResolvedResolvedResolvedResolvedResolvedResolvedResolvedResolvedResolvedResolvedResolvedResolvedResolvedResolvedResolvedResolvedResolvedResolvedResolvedResolvedResolvedResolvedResolvedResolvedResolvedResolvedResolvedResolvedolvedResolvedResolvedResolvedResolvedResolvedResolvedResolvedResolvedResolvedResolvedResolvedResolvedResolvedResolvedResolvedResolvedResolvedResolvedResolvedResolvedResolvedResolvedResolvedResolvedResolvedResolvedResolvedResolvedResolvedResolvedResolvedResolvedResolvedResolvedResolvedResolvedResolvedResolvedResolvedResolvedResolvedResolvedResolvedResolvedResolvedResolvedResolvedResolvedResolvedResolvedResolvedResolvedResolvedResolvedResolvedResolvedResolvedResolvedResolvedResolvedResolvedResolvedResolvedResolvedResolvedResolvedResolvedResolvedResolvedResolvedResolvedResolvedResolvedResolvedResolvedResolvedResolvedResolvedResolvedResolvedResolvedResolvedResolvedResolvedResolvedResolvedResolvedResolvedResolvedResolvedResolvedResolvedResolvedResolvedResolvedResolvedResolvedResolvedResolved resolvingResolvedResolvedResolvedResolvedResolvedResolvedResolvedResolvedResolvedResolvedResolvedResolvedResolvedResolvedResolvedResolvedResolvedResolvedResolvedResolvedResolvedResolvedResolvedResolvedResolvedResolvedResolvedResolvedResolvedResolvedResolvedResolvedResolvedResolvedResolvedResolvedResolvedResolvedResolvedResolvedResolvedResolvedResolvedResolvedResolvedResolvedResolvedResolvedResolvedResolvedResolvedResolvedResolvedResolvedResolvedResolvedResolvedResolvedResolvedResolvedResolvedResolvedResolvedResolvedResolvedResolvedResolvedResolvedResolvedResolvedResolvedResolvedResolvedResolvedResolvedResolvedResolvedResolvedResolvedResolvedResolvedResolvedResolvedResolvedResolvedResolvedResolvedResolvedResolvedResolvedResolvedResolvedResolvedResolvedResolvedResolvedResolvedResolvedResolvedresolve resolved resolved resolved resolved resolved resolved resolved resolved resolved resolved resolved resolved resolved resolved resolved resolved resolved resolved resolved resolved resolved resolved resolved resolved resolved resolved resolved resolved resolved resolved resolved resolved resolved resolved resolved resolved resolved resolved resolved resolved resolved resolved resolved resolved resolved resolved resolved resolved resolved resolved resolved resolved resolved resolved resolved resolved resolved resolved resolved resolved resolved resolved resolved resolved resolved resolved resolved resolved resolved resolved resolved resolved resolved resolved resolved resolved resolved resolved resolved resolved resolved resolved resolved resolved resolved resolved resolved resolved resolved resolved resolved resolved resolved resolved resolved resolved resolved resolved resolved resolved resolving resolved resolved resolved resolved resolved resolved resolved resolved resolved resolved resolved resolved resolved resolved resolved resolved resolved resolved resolved resolved resolved resolved resolved resolved resolved resolved resolved resolved resolved resolved resolved resolved resolved resolved resolved resolved resolved resolved resolved resolved resolved resolved resolved resolved resolved resolved resolved resolved resolved resolved resolved resolved resolved resolved resolved resolved resolved resolved resolved resolved resolved resolved resolved resolved resolved resolved resolved resolved resolved resolved resolved resolved resolved resolved resolved resolved resolved resolved resolved resolved resolved resolved resolved resolved resolved resolved resolved resolved resolved resolved resolved resolved resolved resolved resolved resolved resolved resolved resolvedResolvedResolvedResolvedResolvedResolvedResolvedResolvedResolvedResolvedResolvedResolvedResolvedResolvedResolvedResolvedResolvedResolvedResolvedResolvedResolvedResolvedResolvedResolvedResolvedResolvedResolvedResolvedResolvedResolvedResolvedResolvedResolvedResolvedResolvedResolvedResolvedResolvedResolvedResolvedResolvedResolvedResolvedResolvedResolvedResolvedResolvedResolvedResolvedResolvedResolvedResolvedResolvedResolvedResolvedResolvedResolvedResolvedResolvedResolvedResolvedResolvedResolvedResolvedResolvedResolvedResolvedResolvedResolvedResolvedResolvedResolvedResolvedResolvedResolvedResolvedResolvedResolvedResolvedResolvedResolvedResolvedResolvedResolvedResolvedResolvedResolvedResolvedResolvedResolvedResolvedResolvedResolvedResolvedResolvedResolvedResolvedResolvedResolved resolving resolvingResolvedResolvedResolvedResolvedResolvedResolvedResolvedResolvedResolvedResolvedResolvedResolvedResolvedResolvedResolvedResolvedResolvedResolvedResolvedResolvedResolvedResolvedResolvedResolvedResolvedResolvedResolvedResolvedResolvedResolvedResolvedResolvedResolvedResolvedResolvedResolvedResolvedResolvedResolvedResolvedResolvedResolvedResolvedResolvedResolvedResolvedResolvedResolvedResolvedResolvedResolvedResolvedResolvedResolvedResolvedResolvedResolvedResolvedResolvedResolvedResolvedResolvedResolvedResolvedResolvedResolvedResolvedResolvedResolvedResolvedResolvedResolvedResolvedResolvedResolvedResolvedResolvedResolvedResolvedResolvedResolvedResolvedResolvedResolvedResolvedResolvedResolvedResolvedResolvedResolvedResolvedResolvedResolvedResolvedResolvedResolvedResolvedResolved resolvingRESOLVEDRESOLVEDRESOLVEDRESOLVEDRESOLVEDRESOLVEDRESOLVEDRESOLVEDRESOLVEDRESOLVEDRESOLVEDRESOLVEDRESOLVEDRESOLVEDRESOLVEDRESOLVEDRESOLVEDRESOLVEDRESOLVEDRESOLVEDRESOLVEDRESOLVEDRESOLVEDRESOLVEDRESOLVEDRESOLVEDRESOLVEDRESOLVEDRESOLVEDRESOLVEDRESOLVEDRESOLVEDRESOLVEDRESOLVED35 | |
(Tonbko JIa MVH-X380BT)
Cepb/cepHbI:PepdHnnpaBbI
3eennu: 3aDnH neBb nnn c6Bvep
3eHehI/YeHbI:3aHnJIeBbI
nIuI ca6Byepep
ΦIoJIeTOBbI:3aHnnpabBi ⊕ nnCa6Byep
ΦIoNeToBbIy/ερHbIy:3aDnHi npaBbIy Θ nII ca6ByΦeP Θ
14 Pa3beM ISO
B heKoToPbIx abTOMO6nIaX
pa3bEM ISO M0tMe 6bIb pa3dEneH na Dba. B 3OM cnYae bIyoNHIte
IOKnIOUChHe K O6OBmPa3bEmAM.
ПРИМЕЧАНО
EcnBxOJaA B KOMnIeK T yCTaHOBOUHaa WaxTa He NCNoJIb3yETc
1 CoBmectIte OTbepCTnHa KpEnKHom KpOnHtTeiHe C OTbepCTnMn Ha Kopnyce UcTpoCTBa n 3aKpePiTe KpOnHtTeiH.
2 BkpyTInTe No OndHomy BnHTy c KaKdoI CTOpObI, TTO6bl 3aΦnKcnpoBaTb yCTpOHTBO Ha MeCTe.
① Camopez3 (5MM×9MM, He npunaraetcK yctpoiCtBy)
② KpenexHbI KPOHHTeH
③Пиборнаяпений по КОнсль
KaK nCnOJIb3OBaTb
KOMNJIeKTHbI KPOHHTeIH
Y6eHntEcB, YTO KOMNJIeKTHbI KPOHHTeIN paCCHTaH aKnpeHHe N B VaEem AToMOnObIne, a 3aTeM PnICoEHNtE rO K UcTpoCTBy, KaK nOKa3aHO daJe.
① BnHT
②KpoHusTeH
I3BneueHene yctpoNCTBa (yCTaHOBJIeHHORO C NOMOJbIO npINaeroMoY cTahOBoOHn loxTbl)
1 CHUMMTE OKAHTOBKY.
① OkaHTOBka
②Ланka c 3a3y6pnuHami
- Пгснтып reservesндэн oblenyaetacdoctynKOKAHTOBE.
- Ппн NOВTOPHОУCTAHOBKE OKAHTOBKN NOBEPHNTe NaHEnb CTOPOHON C3a3y6peHHOn NaKKnO BHN3.
2 BCTaBbTe pIiIaRaembe KIIOU nIIBLeuHnIO o6eIM CTOpOHAM yCTpoIeTaBO duIeNka.
3 NotaHnTe UcTpoIcTBo n3 npu6OpHoi paHeJI.
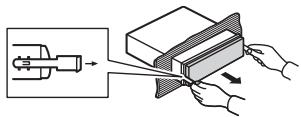
YCTaHOBKa
MVKPOΦoHa
(TonbkoДЯ MVH-X380BT)
MnKpoΦoH Heo6xOДIMO
yCTaHaBnBaTb HenOceDCTBeHNO
HANPOTNB BOIDTEJIHA
COOTBeTCTByUoIeMpacCTOHHIN DIA
npabnblbHOroΦNKcnpOBaHHrToIocA.

BHIMAHNE
3ayntbbaHme pnoOda MMKPOoHa BOKpy rpyeBoi KOLOHKn mN pybara nepekniueHNn nepedau MOKET
PnPBecTI K BO3HKNHOBHeHIO
Upe3BbUaHNO ONaCHO CNTyaUIN.
UcTahAIBVBAIte MInKPOΦOH TAKIM Opbazom, YtOb6H OH He MseJAH ynpABaTb ABTOMo6bIeM.
PekomHeyTeC nIOnIb3OaBt baxHmbl (nIpo6peTaOTcT OTeNbHO) dNfKcauun npoBaDa.
YctaHOBka Ha
COINHue3aunTHbI K03bipeK
1 BCTaBbTe npoBoMnKpOfoHa B Jxel6.
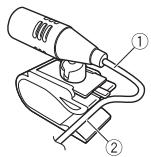
① Hyp
MnKPOOHOa
② XeNo6
2 YctaHOBtE 3azHM MmKpOfoHa HcONHueaunTHbI K03bipeK.
PnOnyckaHmN CoJHcE3aunTHORO K03bpyKa paCNo3HaBaHne rONoCA yXuDhaTeTc.
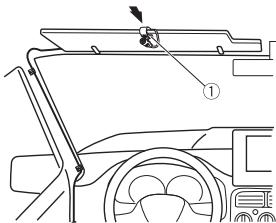
① 3axim mKpOfoHa
YctaHObKaHa pyneByIO
KOLOHky
1 PeneBnHbTe OCHOBy
MnKpOfoHa, YTO6bI OTOeINHtB erO t3axmua nla MnKpOfoHa.
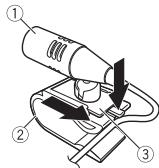
①MnKpoΦOH
② 3axmMnKpO0Ha
③ Ochoba MUKpoΦoHa
2 UctaHOBtMe MmKpOfoH Ha 3aDHIO TaCTb pyNeBOJ KOLOHNK.
UcTaPaHeHne HEnCnpaBHOCTeI
IcnnneabOMaTuYeCKn BOBbpaaetc3BXCNOHbIpeXIM. BTeueHHe 36KeYnd He bIoTo BbIOJIHeHO HNKaKHX onepaui. -BbIOJNHte onepauiO.
Диana30н NOBTOPHORO BOCNpON3BeDEHINCA MCMONPOMBOIbHO N3MeHReTcA.
→B3aBvCmOCTOn OT Bb6paHnHO rDnaIa3OHa NOBtOPHOrO BOCpnO3BeDEHnOH MOKet N3MeHЯTbcPn Bb6OpE dpyoJn PAnK nIIN DopOxKn, a TAKKe npn nepemOTke BnepeH/Ha3ad. -Bb6epTe DnIa3OHNobTOpHOrO BOCpnO3BeDEHnE eue pa3.
BloxenHHa nanka He Bocnpn3bOIMTc.
→BnOKeHHbIeTaeNAnHKe IBOcPOnI3BODaTcA,ecNn BbIbpaH dIana30H [FLD] (NoTbTropHe bOCpOnIBBeDEHne nAnKn). -BbIbepTe dpyroyn dIana30nOBtporHO BocnpIm3BeDEHn.
ImeoTcI NOMEXn 3Byka.
→IcnpoB3yetyC yctpoiCTBO, HnPmep,COTobbY TenefoH, KOTopoE MoKET Bb3BaTb UJMOBBIE NOEMX.
Android, Google Play and Android Google Play and TobapbIMs 3nakammy Google Inc.
MIXTRAX
MIXTRAX JANIELTCA TOPROBO MAPKOK PIONEER CORPORATION.
CepinHbI Homep
Ha 3TOM pncyHke noka3aHa INΦOpMaZI O MeCAe I rOde INrTOBHeNIA yCTPOiCTBa.

Data n3rOToBHeNnI O6OpyDoBaHnI
P1-Toa n3roTOBHeHn
| Год | 2001 | 2002 | 2003 | 2004 | 2005 | 2006 | 2007 | 2008 | 2009 | 2010 |
| Симв的对象 | A | B | C | D | E | F | G | H | I | J |
| Год | 2011 | 2012 | 2013 | 2014 | 2015 | 2016 | 2017 | 2018 | 2019 | 2020 |
| Симвор | К | L | M | N | O | P | Q | R | S | T |
P2-MecuN3ROTOBNEHNA
| Мессяц | 1 | 2 | 3 | 4 | 5 | 6 | 7 | 8 | 9 | 10 | 11 | 12 |
| Симв养老金 | A | B | C | D | E | F | G | H | I | J | K | L |
TexHnueckne xapakTepncTnKn
067ne
IcOuHnK nHTaHmN: 14,4 B NoCT. ToKa (DOnyctmMbI dHaIa3oH O T 10,8B Do 15,1B)
Ситема заимелену:Заимелену оруцадьногrodu полоча
MaKcMnAblbNtOpEbnAeMbEmbTOK: 10.0 A
Pa3MePb(II × B × Γ) DIN
Ullacu: 178mm× 50mm× 97 mm
Пеледнaya паненть: 188 MM × 58 MM × 17 MM
D
Uacn: 178mm× 50mm× 97 mm
Пеледнaya паненть: 170 MM×46 MM×17 MM
Macca: 0.5 kr
Aydno
MaKcImaJIbHaB BIXOHaR MOUHOCTb:
-
50 Bt × 4 kaHana/4 Ω (6e3 ca6byφepa)
-
50B × 2 KaHana/4Ω+70Bt×1 KaHan/2Ω(Дяпсабbyфepa)
HOMHaJIbHaB BbIXOJHa MOUHOCTb:
22 Br× 4 (ot 50 do 15 000 CymmaPhoe 3aHcHene
Ko3ΦΦnUneHTa HeJIInHeiHbIX
икамени 5 % ,нагузka 4 Ω干嘛Oбих сkanabol)
ConpoTnBneHne Harpy3Kn:4Ω
(DOnyctmO-OT4Ωdo8Ω)
Conpotublenhe harpy3kn:2,0B
KoHTyp rpoMkoCTn: +10 Φ (100 Γu),
+6,5d5 (10 kT) (rpoMkoctb:-30 d5)
3KbAiaJ3ep (5-noIOcbH)
rpaΦnueckn ΘKBaIaN3ep):
Yactota:80 Fu/250 Fu/800 Fu/2,5 KfU/8 KfU
MSC (Mass Storage Class)
MTP (Media Transfer Protocol)
AOA (Android Open Accessory) 2.0
Фанова симета: FAT12, FAT16, FAT32
GAP (Generic Access Profile)
SDAP (Service Discovery
Application Profile)
OPP (Object Push Profile)
HFP (Hands Free Profile) 1.6
PBAP (Phone Book Access Profile)
A2DP (Advanced Audio
Distribution Profile)
AVRCP (Audio/Video Remote
Control Profile) 1.5
SPP (Serial Port Profile) 1.1
Примechани:
B COOTBETCTBUN CO CTaTbei 5 3aKoHa
PocnckoΦeepaun «O 3aunTe
npab nTope6nteJen> n
IOCTAHOBJIeHMeIpaBNTeJIbCTBa
PocnckoΦepaunN 720 ot
16.06.97 Kompania Pioneer Europe NV
OrOBaPaET CLeDyUoIcn cPOK CnyK6bl
m3denn, OoHuaanbHO NOCTaBnREmbix
Ha poccnckn pbIHOK.
ABTOMO6nJIbHaJ 3NeKtPoHnKa:6NET
PpOue n3dennn (hayuHnKn,
MnKpOfoHbI n.T.n.):5 neT
ПРИМЕЧАЦA
XapakTepeRCTKIN KOCHTpyKINMAOTb6bN3MeHeneB6e3npEBDApENTbHOrO yBEdOMNeHN
-ДанhoeуctpoCTBO npO3BedeHO B INHDoNeSH.
http://www.pioneer.eu
Visit www.pioneer.co.uk (or www.pioneer.eu) to register your product.
Visitez www.pioneer.fr (ou www.pioneer.eu) pour enregistrer votre apparéil.
Si prega di visitare il site www.pioneer.it (o www.pioneer.eu) per registrar il prodotto.
Visite www.pioneer.es (o www.pioneer.eu) para registrar su producto.
Zum Registrieren Ihres Produktés besuchen Sieitte www.pioneer.de (oder www.pioneer.eu).
Bezoek www.pioneer.nl (of www.pioneer.eu) om uw producte te registrieren.
Посетитewe www.pioneer-rus.ru (ини www.pioneer.eu)對於 peintcaun prinio6pehenHoro Bamn i3dienia.
Pioneer CarStereo-Pass
Please fill out immediately after purchase.
HmnpTeP OOO "IIOHEP PYC"
105064, Pocca, r. MockBa, HnXhH CyCaNbH nepeynok, Dom 5, cTpoeHne 19
TeN.: +7(495) 956-89-01
PIONEER EUROPE NV
Haven 1087, Keetberglaan 1, B-9120 Melsele, Belgium/Belgique
TEL: (0) 3/570.05.11
PIONEER ELECTRONICS (USA) INC.
P.O.Box 1540, Long Beach, California 90801-1540,U.S.A.
TEL: (800) 421-1404
PIONEER ELECTRONICS OF CANADA, INC.
340 Ferrier Street, Unit 2, Markham, Ontario L3R 2Z5, Canada
TEL: 1-877-283-5901
TEL: 905-479-4411
PIONEER ELECTRONICS ASIACENTRE PTE. LTD.
2 Jalan Kilang Barat, #07-01, Singapore 159346
TEL: 65-6378-7888
PIONEER ELECTRONICS AUSTRALIA PTY. LTD.
5 Arco Lane, Heatherton, Victoria, 3202 Australia
TEL: (03) 9586-6300
PIONEER ELECTRONICS DE MEXICO, S.A. de C.V.
Blvd. Manuel Avila Camacho 138 10 piso
Col.Lomas de Chapultepec, Mexico, D.F. 11000
TEL: 55-9178-4270
先鋒股份有限公司
台北市內湖區瑞光路407號8樓