DVC1000 - Doorbells ALECTO - Free user manual and instructions
Find the device manual for free DVC1000 ALECTO in PDF.

| Technical Features | Wireless doorbell, range up to 100 meters, 36 melodies, adjustable volume. |
|---|---|
| Usage | Easy installation, battery operated, ideal for homes and offices. |
| Maintenance and Repair | Battery replacement required, regular cleaning of the outdoor unit recommended. |
| Safety | Weather resistant, sound signal to alert in case of visitors. |
| General Information | Compatible with multiple door types, modern and discreet design. |
Frequently Asked Questions - DVC1000 ALECTO
User questions about DVC1000 ALECTO
0 question about this device. Answer the ones you know or ask your own.
Ask a new question about this device
Download the instructions for your Doorbells in PDF format for free! Find your manual DVC1000 - ALECTO and take your electronic device back in hand. On this page are published all the documents necessary for the use of your device. DVC1000 by ALECTO.
USER MANUAL DVC1000 ALECTO
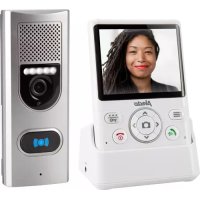
Doorbell with camera and App.

NL 1.0 PRODUCTOMSCHRIJVING
7.5 ALARM OF CONTINUE OPNAME BEKIJKEN.
8.0 TIPS EN WAARSCHUWINGEN
8.1 ALGEMEEN
| Model: | DVC-1000 | |
| Image Sensor | Image Sensor Color CMOS W | XGA(megapixel) HD sensor |
| Display Resolution 720p/WXG | A(1280*720), VGA(640*480), QVGA(320*240) | |
| Lens | Lens Type Glass Lens | |
| Focal Length 2.5mm | ||
| Aperture F1.6 | ||
| Angle of view 135° | ||
| Audio | Input/Output Built-in Mic. and $speaker | |
| Audio Compression ADPCM/G | .726 | |
| Echo Suppression Support | ||
| Video | Image Compression H.264 | |
| Image Frame Rate 25fps max | num | |
| Resolution 1280 x 720(720P), | 640 x 480(VGA), 320 x 240(QVGA) | |
| Stream Single stream | ||
| Light Frequency | 50Hz, 60Hz | |
| Network | Ethernet | 10/100Mbps |
| Protocol | FTP, TCP/IP, UDP, SMTP, DHCP, UPnP, RTSP | |
| Wireless Standard | IEEE 802.11b/g/n | |
| Data Rate | IEEE802.11b: 11Mbps(Max.) | |
| IEEE802.11g: 54Mbps(Max.) | ||
| IEEE802.11n: 150Mbps(Max.) | ||
| Wireless Security | WEP, WPA, WPA2 | |
| App | App OS | Android, iOS |
| Physical | Dimension 108.78x54.64x24 mm | |
| Gross Weight | 100g | |
| Shell | Plastic+Matel | |
| Power | Power Supply | 12VAC or 12VDC / 1A |
| Battery | Supported | |
| Environment | Operate Temper. | -20° ~ 50°C (-4°F ~ 122°F) |
| Operating Humidity | 20% ~ 85% non-condensing | |
| Storage Temper. | -20°C ~ 60° (-4°F ~ 140°F) | |
| Storage Humidity | 0% ~ 95% non-condensing | |
| Other Features | Waterproof | IP65 |
| User Accounts | Two levels user role | |
| Certification | CE, FCC, RoHS | |
| Warranty | Limited 2-year warranty | |
10.0 DECLARATION OF CONFORMITY:
Compliance with the directive 2014/53/EU.
http://DOC.hesdo.com/IVM-DVC-1000-DOC.pdf
Frequency: 2407-2475MHz
Maximum Power: < 20 dBm
Frequency: 433.92 Mhz
Maximum Power:
FR 1.0 DESCRIPTION DU PRODUIT
GB 1.0 PRODUCT DESCRIPTION
The Alecto doorbell camera DVC-1000 is a doorbell push-button with camera and can replace the existing doorbell pusher. If the old installation is a mechanical doorbell (a doorbell operating with a spindle and clapper), it may remain operational.
Easy installation without pulling wires, suitable for nearly all current installations.
The internal battery is charged via the installation. For correct functioning, the battery should be full and should be kept fully charted.
Via the WIFI connection of the doorbell camera you'll be informed when somebody press the doorbell push-button. Additionally, it's possible to make a video recording of the person standing in front of the door. The free app (AlectoCam) allows you to see who's visiting you. You may then choose to speak with that person.
The AlectoCam app is developed for Android and iOS devices.
The camera is provided with night lighting for a clear view of any objects within 5 meters from the camera in a dark environment.
When everything is working properly, you should first change your password. The default factory password is not unique, which would allow others to use your UID code and gain unauthorised access to your camera.
ATTENTION: The AlectoCam app is developed for operating multiple types of camera. The app may offer functions that are not supported by the currently used camera.
2.0 Preparation before the installation
To have the doorbell camera work via the WIFI network and the associated APP on the phone or tablet, it must first be registered on the WIFI network.
- Connect the supplied battery to the doorbell camera via the connector and then insert the battery into the battery compartment.
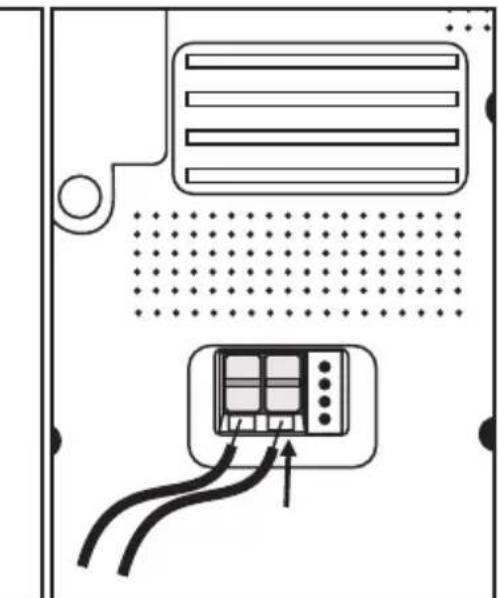
- Connect the doorbell camera to a doorbell transformer or a separate adaptor (i.e. power source) of 12 Volts and 1 Amp. The power supply may provide either direct current or alternating current, however please use a power supply of at least 1A. Press the clip at the top of the terminal block and insert the wires into the terminal block. Do not yet press the doorbell of the camera; otherwise you'll cause a short circuit in the power supply. The battery is now being charged.

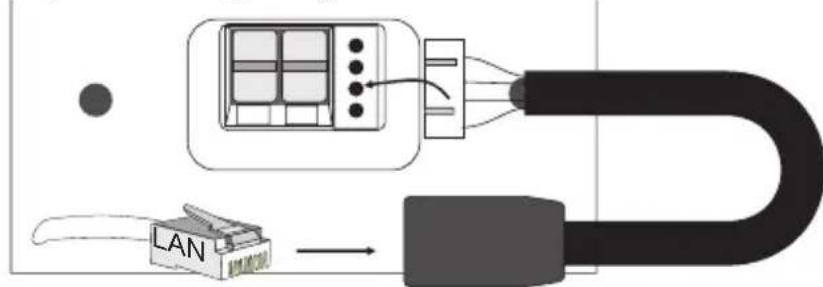
- Connect the supplied separate UTP connection to the terminal block at the bottom of the doorbell camera. Now use a UTP cable to connect the doorbell camera with the router used in your home.
Advice: Charge the battery for at least 12 hours.
- Download the AlectoCam APP via the Play Store or App Store.
Android
Go to the Play Store
and search for AlectoCam
or
iOS
Go to the App Store
and search for AlectoCam
Install the following APP:
3.0 TO REGISTER THE CAMERA ON YOUR SMARTPHONE OR TABLET
- Connect the doorbell camera according to the instructions in the paragraph "2.0 Preparation before the installation".
- Launch the AlectoCam App (attention: use the same network as the camera when it's connected using a LAN cable).
- Press the + sign in the upper right corner in the display to add a camera.
- You may activate the camera in two ways: A: QR code
B: Search via LAN.
A: Press 'Scan' to scan the UID code marked on the doorbell camera using a QR code scanner. If the scan fails, you may enter the UID code manually.
Go to step 5.
B: Press 'Search' to search for available cameras on the same network as the network on which your smartphone/tablet is registered. This only works when the smartphone or tablet uses the same WIFI router or modem connection to which the doorbell camera is connected. The following screen shows the found camera(s).
Select the camera. Go to step 5.
- Enter the correct password of the doorbell camera in the password field. The default password is "admin".
- You may change the name of the doorbell camera into a personal name (e.g. front door) in the field "Device name".
- Now press the check mark in the upper right corner.
- If the correct password is entered, the APP will make contact with the camera. If this is not the case, the pop-up dialogue "Wrong password" will appear. Please enter the correct password.
- The APP will now login on the doorbell camera. The message "Camera successfully added" will appear followed by the overview screen. Press the camera screen (which may still be gray) to see a live image.
3.1 TO REGISTER THE CAMERA ON YOUR OWN NETWORK
- Press the Settings button in the overview screen.
- Now press the WIFI networks button
- The camera starts searching for available WIFI networks. Select your own WIFI network and enter the correct password.
- Disconnect the LAN cable. If the battery is sufficiently charged the camera will now connect to the WIFI network. If the battery isn't sufficiently charged, the camera will attempt to make the connection but fail to do so. Please wait until the battery is sufficiently charged.
- The camera will now register itself through the WIFI network on your own WIFI network.
- Launch the app to make contact with the camera.
Note: The operation screen may differ somewhat between iOS and Android.
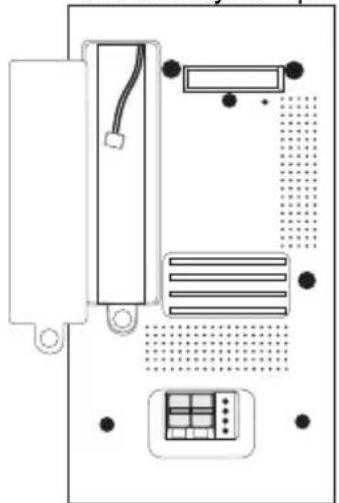
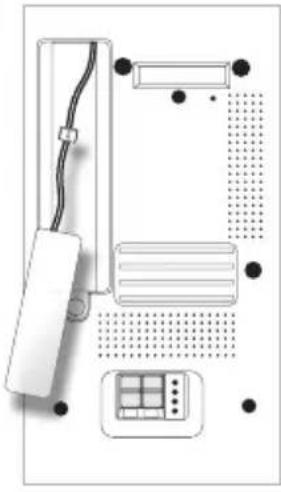
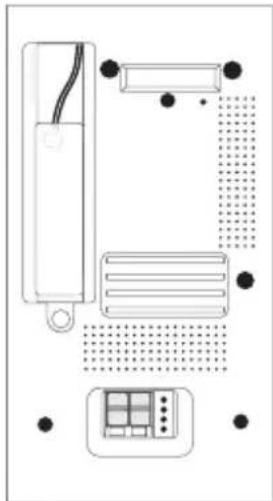
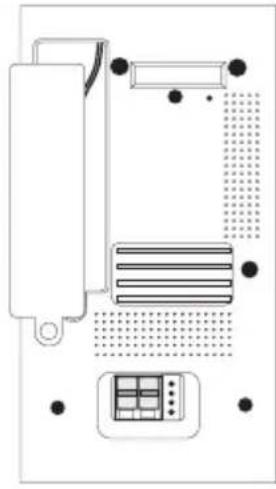
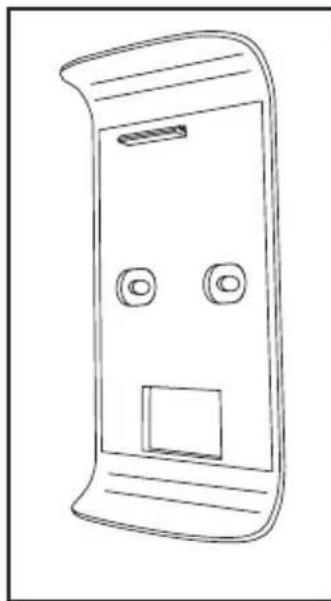
4.0 OVERVIEW
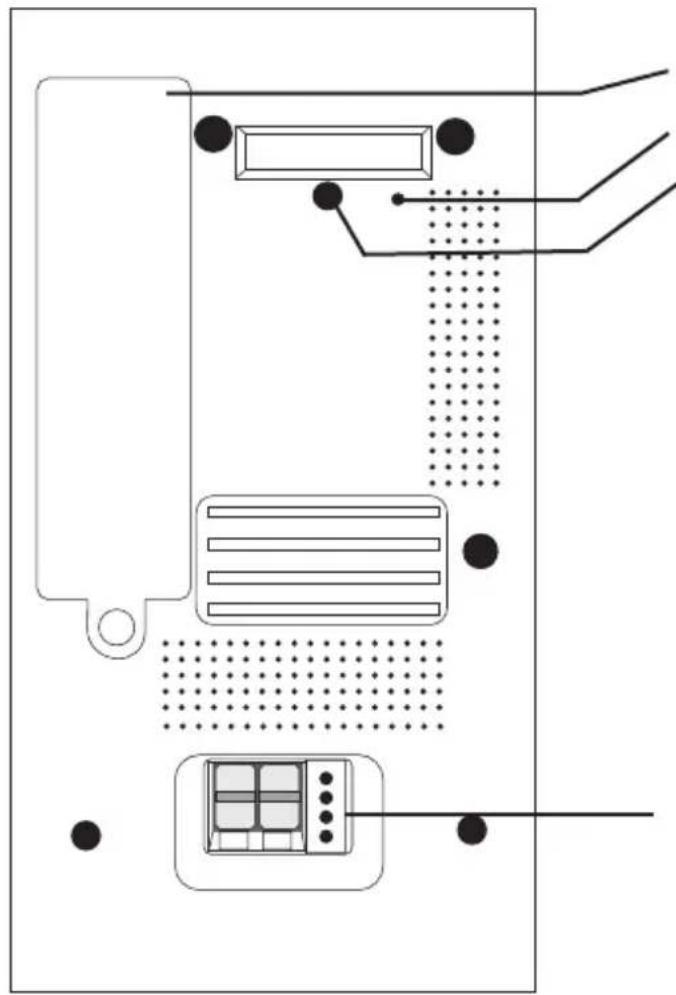
terminal block (power and UTP plug)
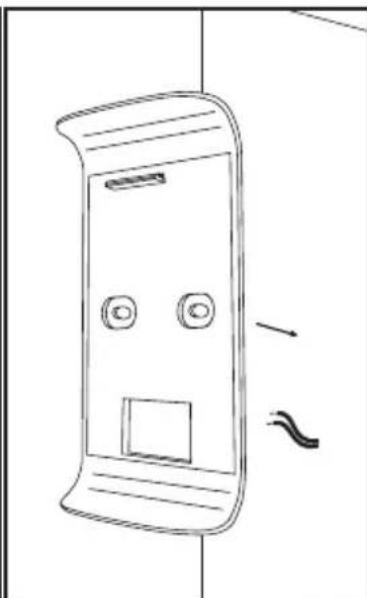
5.0 INSTALLATION
When replacing the doorbell pusher for the DVC-1000, check whether it's connected in the following way. Also check whether the current doorbell is of the mechanical type. A mechanical doorbell has a spindle and clapper. Doorbell transformers providing 8V must be replaced by a 12V type.
- Ensure the doorbell installation is without power by switching off the doorbell transformer.
- Remove the push-button that is mounted at the (front) door.
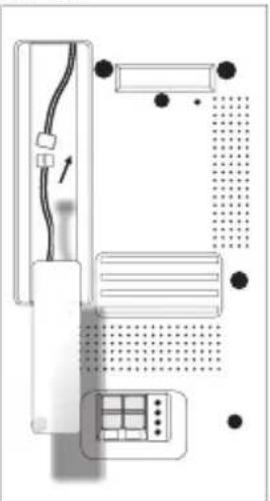
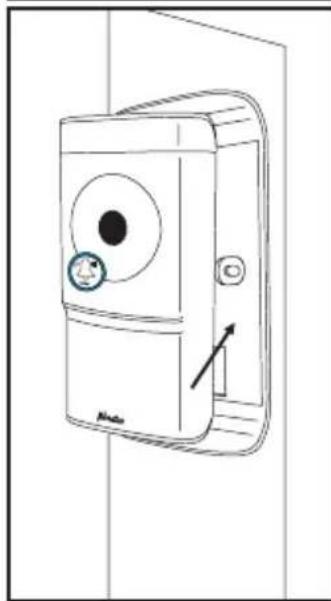
- Place the bell pusher holder of the DVC-1000 onto the door post. Make sure to lead the wires through the hole of the terminal block.
- If required, strip the wires to ensure that the copper core of the wire is exposed by 5mm .
- Connect the wires to the terminal block of the bell pusher by depressing the pull tab at the top and inserting the wires into the connector. Release the pull tab again making sure that the wires are secured in the terminal block.
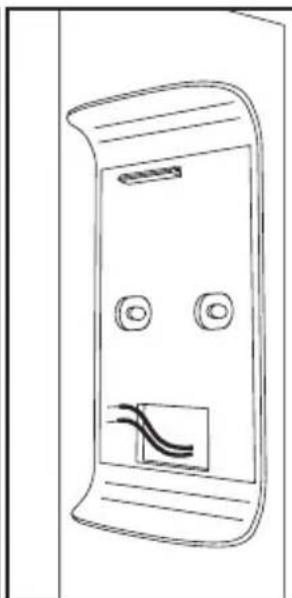
- Reconnect the doorbell transformer to the mains and switch it back on.
- The doorbell camera will then start-up and connect to the router.
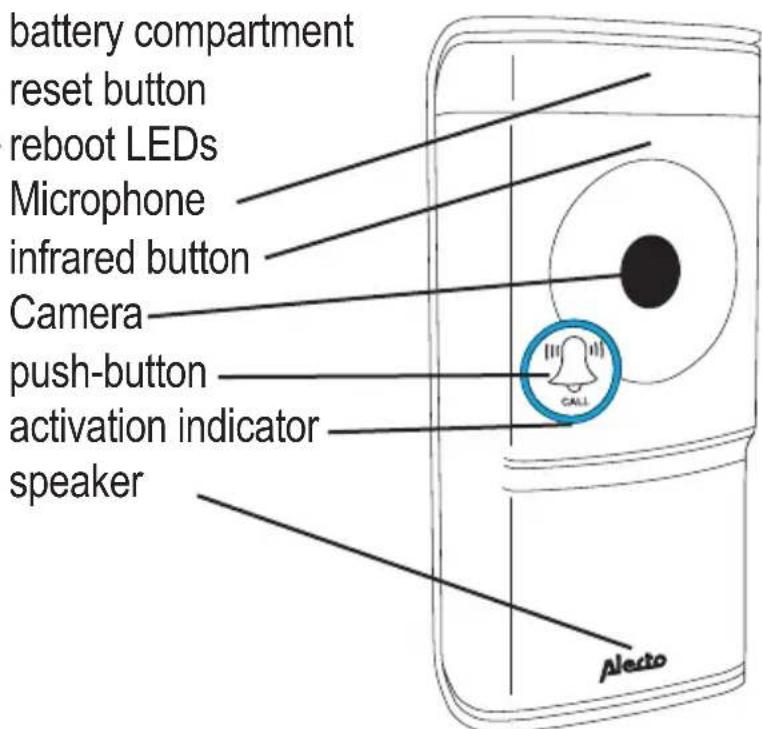
- Press and hold the Reboot button at the rear for 5 seconds to have the doorbell start-up correctly.
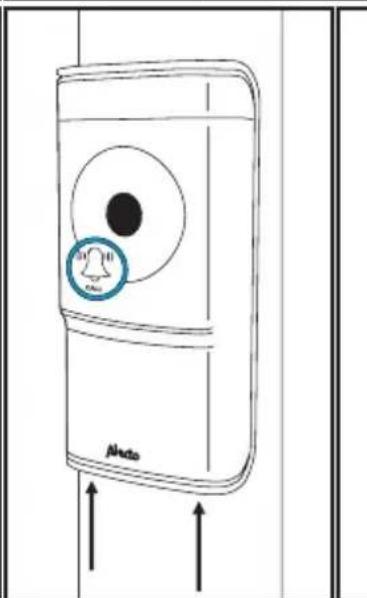
- Click the doorbell pusher into the holder and use the locking screws at the bottom to fasten the doorbell pusher into the holder.
- The doorbell camera is now ready for use.
Note: If the battery capacity is too low and the battery is not sufficiently charged, the WIFI connection will fail. You'll be informed of this through a voice prompt. As soon as the battery is sufficiently charged, the connection with the WIFI router will be made and then you'll have access to the doorbell via the app.
ATTENTION: The rechargeable battery may still need to be charged. As soon as the doorbell transformer is switched on, the battery starts charging. For a correct functioning the battery must be reasonably charged. This may take up to 24 hours.
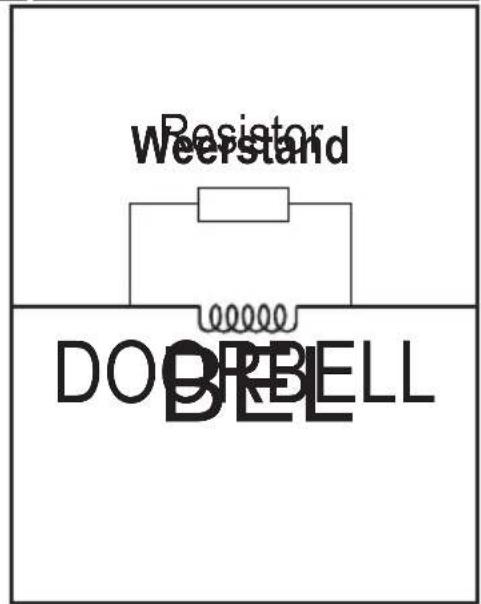
Because the battery is being charged, a low voltage runs through the circuit that also runs up to the doorbell. This may cause the clapper to vibrate somewhat. You can resolve this by placing the supplied resistor over the spindle. If this is not sufficient, you may place a second resistor over the spindle.
The doorbell can also function outside an existing installation. Through the Alecto service department you may order an extra separate wireless doorbell (DVC-25). The additional separate wireless doorbell is inserted directly into a wall socket.
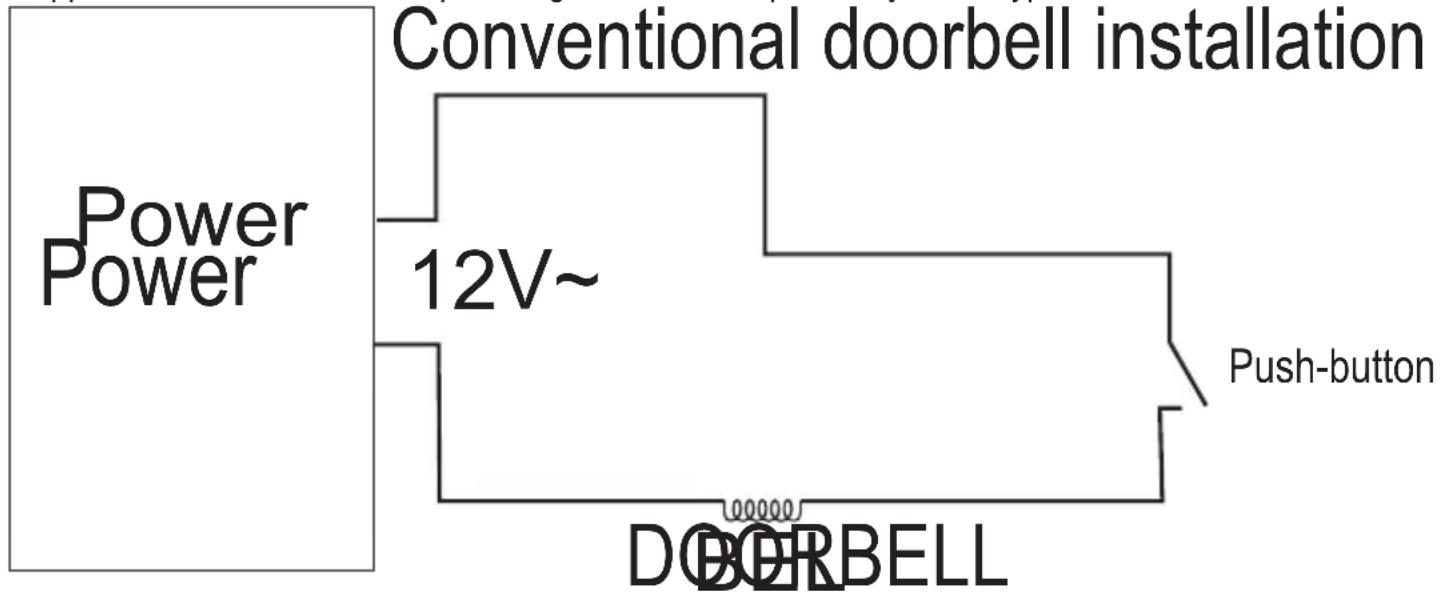
6.1 TO CONNECT THE DOORBELL PUSHER
The doorbell pusher should be connected to an external adaptor or doorbell transformer. The adaptor must supply a minimum of 1 Amp while the voltage must range between 8 and 12V . This may be either direct current or alternating current.
Connect the doorbell pusher in the same way as is described in the paragraph 4.0 Installation.
The wires found at the old doorbell now serve for the adaptor or transformer. See below diagram:
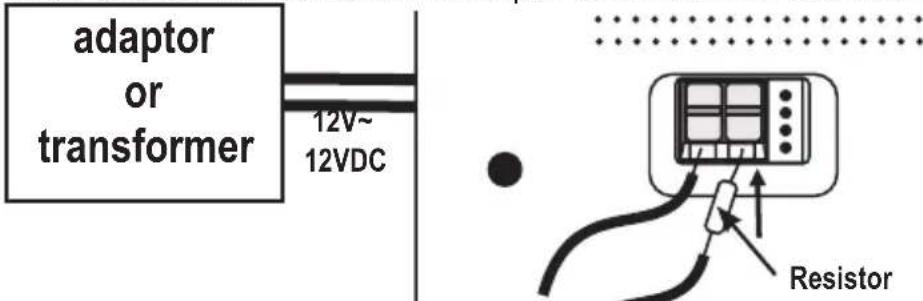
You may also place the transistor close to the adaptor or transformer.
6.2 TO CONNECT THE (EXTRA) DOORBELL
You may order a wireless doorbell via the service department of Alecto. This doorbell is also suitable as an additional doorbell for an existing installation. When you've received the doorbell, it should be inserted into a free wall socket.
Use the doorbell melody setting to select the desired melody (36 melodies).
Press the Setting button for the next melody.
Use the doorbell volume setting adjust the volume in 4 increments or to turn the sound off. To do so, repeatedly press the button.
To register the doorbell on the DVC-1000 doorbell pusher
-
press the holln and keep it depressed
-
press the button of the DVC-1000 doorbell once and then release the button of the extra doorbell
-
the wireless doorbell is now registered on the DVC-1000
We now assume that the doorbell pusher with camera is registered correctly on the network and that the doorbell pusher with camera can make contact with the internet. As of now we talk about the camera, because most functions apply to the camera function.
7.1 TO LAUNCH THE APP
Launch the AlectoCam application. To do so, click the AlectoCam icon on your smartphone or tablet. The AlectoCam is a collective App developed for various cameras. Certain functions may differ or may be unavailable on the camera.

The welcome screen appears, directly followed by the overview screen.
Menu button.
Underneath the Menu button you'll find the following buttons.
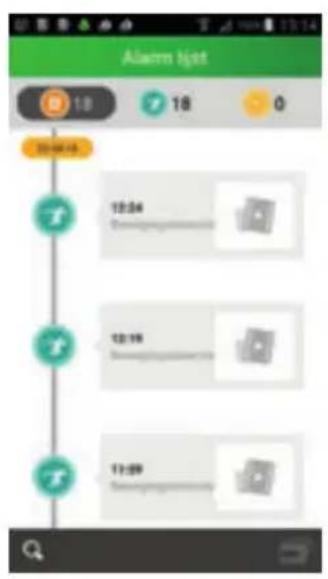
Alarm: select the camera in the list and view the recorded alarm notifications (camera memory).
Album: select the camera in the list for recorded snapshots and manual video recordings.
Info: Information data about the app.
Exit: to exit the App (only available for Android).
When the menu is activated, click the Menu button again to leave this menu.
At the bottom of the overview screen you'll find the following four buttons:
: view the recorded alarm notifications or continuous recording (see 7.5) (internal camera memory).
: view recorded snapshots and manual recordings (see 7.6).
: advanced camera settings (see 7.4 additional settings and functions).
remove the camera from the app.
7.2 TO VIEW LIVE IMAGES
Press the camera image in the overview screen to view the live image.
While viewing the live image on a smartphone (portrait), at the top of the screen some information about the app is provided.
640 x 480: screen resolution
Online No. of Users: this is the number of devices (smartphones or tablets) actively connected to the camera at that moment.
Quality: the image quality of the received image signal.
At the bottom of the screen you'll find the following buttons:
: To activate the receiving sound. The Speak icon appears in the screen.
Listen to the surrounding sounds of the camera or press the icon to talk back (because of the internet connection there might be some delay while speaking and receiving).
: Press this button again to switch off the receiving sound.
To start a manual recording. Use the button in the overview screen to playback the video. The recording is saved in the memory of the smartphone or tablet.
: Press this button again to stop the recording.
Press this button to make a snapshot. Use the button in the overview screen to review the photo. This recording is saved in the memory of the smartphone or tablet.
: To mirror the image horizontally.
To mirror the image vertically.
: Setup for the video quality and the size of the data traffic. A low video quality also means less video data.
: Surrounding situation. Use 50Hz at a net frequency of 50Hz. Use the Outdoor mode when using the outdoor image. Use Night in the dark.
The following buttons have no function:


7.4 ADDITIONAL SETTINGS AND FUNCTIONS
Press the button in the overview screen to open the additional settings and functions. You may adjust the following functions in the settings screen:
(the description of the icon may differ somewhat, depending on the operating system).

Camera name: To enter a camera name or to edit the camera name.
Camera password: To change the camera password when entered incorrectly.
Change password: To change the password of the camera.
WiFi Networks: To change the WIFI network on which the camera is registered.
Notification interval: To select the interval between notification messages.
Recording mode: To determine how video must be recorded in the internal memory (8G) of the camera. Off. No recording.
Continuous recording. Always record
During alarm notification. Only record upon ringing the doorbell and/or motion detection (the alarm setting must be activated)

Time zone: to enter the correct time zone for the correct time. For the Netherlands during winter time GMT + 1 and during summer time GMT + 2 .

Format SD card: To format the internal memory of the camera.
Attention: All recordings are erased.

Alarm setting: This setting must be used to send notifications to your smartphone or tablet. This setting contains the following functions:
- off: no notification
- on/low: notification only when the doorbell pusher is pressed.
- on/medium: notification when the doorbell pusher is pressed and low motion detection
- on/high: notification when the doorbell pusher is pressed and medium motion detection
- on/max: notification when the doorbell pusher is pressed and maximum motion detection

Camera info: Provides information about the camera and the internal memory.

Reconnect: This restores the connection in case of a connection error.

Remove this device: To remove the camera from the app.
7.5 TO VIEW ALARM OR CONTINUOUS RECORDINGS
Press the button in the overview screen to open the recording list.
In this screen the videos will appear that were recorded the previous day (in the settings menu, set the recording mode to Recording at Alarm or Continuous Alarm).
These videos are saved in the memory of the camera.

0
: Shows the number of recordings.

: Recording upon motion detection of when the doorbell pusher is pressed.

: Continuous recording.

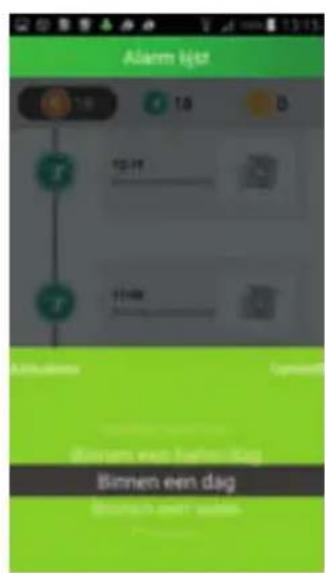
: To search for a recording for a certain period. Choose from:
within an hour
- within half a day
- within a week
- Custom/Adjusted period (select dates in the calendar yourself)
7.6 TO VIEW SNAPSHOTS AND/OR MANUALLY RECORDED VIDEOS
Press the button in the overview screen to go to the snapshots and manually recorded videos. During camera displays a snapshot or manually recorded video must have been made for the data to appear in this screen. This recorded data is saved in the memory of your smartphone or tablet.
Display of the data with icons.
Display of the data in a list.
Press the preview to enlarge the image or to play the video. In this screen you may also share or erase the data.
or
Press the Edit option to share or erase the data.
8.0 TIPS AND WARNINGS
8.1 GENERAL
- Read the user manual carefully and follow all instructions.
Take care of proper heat dissipation; never cover the camera unit and/or the power supply adapter(s), and do not place them directly beside a heat source. The camera and adaptor already become warm themselves during operation.
Take care that the cables and the adapter do not get damaged, and prevent that they cause tripping or falling. - Never disassemble the camera unit and/or adaptor; this may only be performed by qualified personnel.
- The video connection occurs via the public internet and is secure according to the current standards, but can still be hacked. We are not liable for this in any way. We advise you to instantly change the password, preferably using a combination of letters, numbers and special characters.
8.2 MAINTENANCE
- Only clean the camera with a moist cloth; never use chemical cleaners. Before any cleaning, you must disconnect the adapters.
8.3 ERROR
After installation of the DVC-1000 to current doorbell doesn't function.
It may happen that after installing the DVC-1000 the current installation is no longer working
properly. This is due to the power usage and charging of the battery of the DVC-1000. In this case, replace the transformer with a 12 VAC/2A type and the doorbell with a 12 VAC type.
-
Because the DVC-1000 also requires power in standby mode to e.g. recharge the battery, the doorbell may audiably vibrate a little. In this case, place the supplied resistor over the spindle of the doorbell. If this still doesn't resolve the problem, place a second resistor over the doorbell. This depends on the doorbell you're using. The doorbell will no longer function when placing too many resistors. When the battery is fully charged, this vibration will lessen or stop completely.
In case the camera no longer shows any images and/or there's no more sound, please check the following: -
the camera is connected
- the correct UID code is used
- the correct password is used
- restart the camera by briefly interrupting its power supply
- reboot the camera by depressing the Reboot button for 5 seconds
- use a paperclip to depress the Reset button for at least 10 seconds to reset the camera. The camera will now reboot. Repeat the entire setup and actions from the beginning, because all settings will be reset to the default factory settings
- restart your smartphone or tablet.
-
replace the camera in the app.
-
When it becomes dark, the camera will switch to the night mode and turn on the infra-red lights. In certain environmental lighting conditions, the screen might start flashing. You can resolve this by increasing or decreasing the environmental light.
If you still see no images, please contact the service department of Alecto.
8.4 IMAGE DELAY
- Because of coding and decoding of the images, there will be a slight delay in the signal. The image quality also depends on changes in the bandwidth via internet. If required, set the resolution (image quality) to a lower value.
8.5 DATAUSE
If you're using a mobile network, please keep in mind that the data use can increase considerably while watching video. We recommend you to use a Wi-Fi network.
- Also the battery usage of your smartphone or tablet will increase.
9.0 SPECIFICATION:
| Model: | DVC-1000 | |
| Image Sensor | Image Sensor Color CMOS WXGA(megapixel) HD sensor | |
| Display Resolution 720p/WXGA(1280*720), VGA(640*480), QVGA(320*240) | ||
| Lens | Lens Type Glass Lens | |
| Focal Length 2.5mm | ||
| Aperture F1.6 | ||
| Angle of view 135° | ||
| Audio | Input/Output Built-in Mic. and Speaker | |
| Audio Compression ADPCM/G726 | ||
| Echo Suppression Support | ||
| Video | Image Compression H.264 | |
| Image Frame Rate 25fps maxnum | ||
| Resolution 1280 x 720(720P), 640 x 480(VGA), 320 x 240(QVGA) | ||
| Stream Single stream | ||
| Light Frequency | 50Hz, 60Hz | |
| Network | Ethernet | 10/100Mbps |
| Protocol | FTP, TCP/IP, UDP, SMTP, DHCP, UPnP, RTSP | |
| Wireless Standard | IEEE 802.11b/g/n | |
| Data Rate | IEEE802.11b: 11Mbps(Max.) | |
| IEEE802.11g: 54Mbps(Max.) | ||
| IEEE802.11n: 150Mbps(Max.) | ||
| Wireless Security | WEP, WPA, WPA2 | |
| App | App OS | Android, iOS |
| Physical | Dimension 108.78x54.64x24 mm | |
| Gross Weight | 100g | |
| Shell | Plastic+Matel | |
| Power | Power Supply | 12VAC or 12VDC / 1A |
| Battery | Supported | |
| Environment | Operate Temper. | -20° ~ 50°C (-4°F ~ 122°F) |
| Operating Humidity | 20% ~ 85% non-condensing | |
| Storage Temper. | -20°C ~ 60° (-4°F ~ 140°F) | |
| Storage Humidity | 0% ~ 95% non-condensing | |
| Other Features | Waterproof | IP65 |
| User Accounts | Two levels user role | |
| Certification | CE, FCC, RoHS | |
| Warranty | Limited 2-year warranty | |
10.0 DECLARATION OF CONFORMITY:
Compliance with the directive 2014/53/EU.
http://DOC.hesdo.com/IVM-DVC-1000-DOC.pdf
Frequency: 2407-2475MHz
Maximum Power: < 20 dBm
Frequency: 433.92 Mhz
Maximum Power: <

ServiceHelp


WWW.ALECTO.NL
SERVICE@ALECTO.NL

Hesdo,Australielaan 1
5232 BB, 's-Hertogenbosch
The Netherlands
v3.0