KAPEX KS 60 - Saw FESTOOL - Free user manual and instructions
Find the device manual for free KAPEX KS 60 FESTOOL in PDF.

Frequently Asked Questions - KAPEX KS 60 FESTOOL
User questions about KAPEX KS 60 FESTOOL
0 question about this device. Answer the ones you know or ask your own.
Ask a new question about this device
Download the instructions for your Saw in PDF format for free! Find your manual KAPEX KS 60 - FESTOOL and take your electronic device back in hand. On this page are published all the documents necessary for the use of your device. KAPEX KS 60 by FESTOOL.
USER MANUAL KAPEX KS 60 FESTOOL
Head of Standardization & Appropriation
1 Symbols. 20
2 Safety warnings. 20
3 Intended use. 23
4 Technical data. 23
5 Machine features. 23
6 Commissioning. 24
7 Settings. 25
8 Working with the power tool. 26
9 Service and maintenance. 29
10 Accessories 30
11 Environment 31
12 General information. 31
1 Symbols
Symbol Significance

Warning of general danger

Risk of electric shock

Read operating instructions and safety notices!

Wear ear protection.

Wear protective gloves.

Wear a dust mask.

Wear protective goggles.

Do not look directly at the light.

Do not dispose of as domestic waste.

Direction of rotation of saw and the saw blade

Saw blade dimensions
a ... Diameter
b ... Locating bore

Tip or advice

Handling instruction

Safety class II

Disconnect from the power supply!
Symbol Significance

Hazardous area! Keep hands away!

Warning: Hot surface!

Risk of pinching fingers and hands!

Danger of injury by free-moving saw blade

UKCA marking: The United Kingdom Conformity Assessed symbol is a marking for products being placed on the market in the United Kingdom. It is a manufacturers indication that the product is in conformance with the relevant regulations in the UK.

CE marking: Confirms the conformity of the power tool with the European Community directives.
2 Safety warnings
2.1 General power tool safety warnings

WARNING! Read all safety warnings, instructions, illustrations and specifica
tions provided with this power tool. Failure to follow all instructions listed below may result in electric shock, fire and/or serious injury.
Save all warnings and instructions for future reference.
The term "power tool" in the warnings refers to your mains-operated (corded) power tool or battery-operated (cordless) power tool.
2.2 Safety instructions for metre saws
-
Mitre saws are intended to cut wood or wood-like products, they cannot be used with abrasive cut-off wheels for cutting ferrous material such as bars, rods, studs, etc. Abrasive dust causes moving parts such as the lower guard to jam. Sparks from abrasive cutting will burn the lower guard, the kerf insert and other plastic parts.
-
Use clamps to support the workpiece whenever possible. If supporting the workpiece by hand, you must always keep your hand at least 100mm from either side of the saw blade. Do not use this saw to cut pieces that are too small to be securely clamped or held by hand. If your hand is placed too close to the saw blade,
there is an increased risk of injury from blade contact.
- The workpiece must be stationary and clamped or held against both the fence and the table. Do not feed the workpiece into the blade or cut "freehand" in any way. Unrestrained or moving workpieces could be thrown at high speeds, causing injury.
- Push the saw through the workpiece. Do not pull the saw through the workpiece. To make a cut, raise the saw head and pull it out over the workpiece without cutting start the motor, press the saw head down and push the saw through the workpiece. Cutting on the pull stroke is likely to cause the saw blade to climb on top of the workpiece and violently throw the blade assembly towards the operator.
- Never cross your hand over the intended line of cutting either in front or behind the saw blade. Supporting the workpiece "cross handed" i.e. holding the workpiece to the right of the saw blade with your left hand or vice versa is very dangerous.
- Do not reach behind the fence with either hand closer than 100mm from either side of the saw blade, to remove wood scraps, or for any other reason while the blade is spinning. The proximity of the spinning saw blade to your hand may not be obvious and you may be seriously injured.
- Inspect your workpiece before cutting. If the workpiece is bowed or warped, clamp it with the outside bowed face toward the fence. Always make certain that there is no gap between the workpiece, fence and table along the line of the cut. Bent or warped workpieces can twist or shift and may cause binding on the spinning saw blade while cutting. There should be no nails or foreign objects in the workpiece.
- Do not use the saw until the table is clear of all tools, wood scraps, etc., except for the workpiece. Small debris or loose pieces of wood or other objects that contact the revolving blade can be thrown with high speed.
- Cut only one workpiece at a time. Stacked multiple workpieces cannot be adequately clamped or braced and may bind on the blade or shift during cutting.
- Ensure the litre saw is mounted or placed on a level, firm work surface be
fore use. A level and firm work surface reduces the risk of the litre saw becoming unstable.
- Plan your work. Every time you change the bevel or mitre angle setting, make sure the adjustable fence is set correctly to support the workpiece and will not interfere with the blade or the guarding system. Without turning the tool "ON" and with no workpiece on the table, move the saw blade through a complete simulated cut to assure there will be no interference or danger of cutting the fence.
- Provide adequate support such as table extensions, saw horses, etc. for a workpiece that is wider or longer than the table top. Workpieces longer or wider than the metre saw table can tip if not securely supported. If the cut-off piece or workpiece tips, it can lift the lower guard or be thrown by the spinning blade.
- Do not use another person as a substitute for a table extension or as additional support. Unstable support for the workpiece can cause the blade to bind or the workpiece to shift during the cutting operation pulling you and the helper into the spinning blade.
- The cut-off piece must not be jammed or pressed by any means against the spinning saw blade. If confined, i.e. using length stops, the cut-off piece could get wedged against the blade and thrown violently.
- Always use a clamp or a fixture designed to properly support round material such as rods or tubing. Rods have a tendency to roll while being cut, causing the blade to "bite" and pull the work with your hand into the blade.
- Let the blade reach full speed before contacting the workpiece. This will reduce the risk of the workpiece being thrown.
- If the workpiece or blade becomes jammed, turn the litre saw off. Wait for all moving parts to stop and disconnect the plug from the power source and/or remove the battery pack. Then work to free the jammed material. Continued sawing with a jammed workpiece could cause loss of control or damage to the litre saw.
- After finishing the cut, release the switch, hold the saw head down and wait for the blade to stop before removing the cut-off
English
piece. Reaching with your hand near the coasting blade is dangerous.
- Hold the handle firmly when making an incomplete cut or when releasing the switch before the saw head is completely in the down position. The braking action of the saw may cause the saw head to be suddenly pulled downward, causing a risk of injury.
2.3 Further safety instructions
- Only use saw blades that correspond to the specifications for intended use. Saw blades that do not fit correctly with the assembly parts will run unevenly and may cause fragments to break off from the material and be ejected. These fragments may hit the eyes of the user or any persons standing in the vicinity.
- Only use saw blades with a chip angle ≤slant 0^ .
A chip angle >0^ will pull the saw into the workpiece. There is a risk of injury caused by saw kickback and the rotating workpiece.
- Before each use, check that the pendulum guard is working correctly. Only use this power tool when it is in perfect working order.
- Never reach into the chip ejector with your hands. Rotating parts may injure your hands.
- Dust that is harmful to your health may be produced as you work (e.g. paint products containing lead and some types of wood).
Contact with or inhalation of this dust may pose a risk for the operating personnel or persons in the vicinity. Observe the safety regulations that apply in your country.

P2 respiratory mask to protect health. In enclosed spaces, ensure there is sufficient ventilation and con- a mobile dust extractor.
- Replace any sawn-off or damaged limit stops. Damaged limit stops may be ejected when you work with the saw. Any persons standing in the vicinity of the saw may be injured.
- Only use original Festool accessories and consumables. Only accessories tested and approved by Festool are safe and perfectly adapted to the machine and application.
- The power tool should only be used indoors and in a dry environment.

Do not look directly at the light. Optical radiation can damage the eyes.
- Only for AS/NZS: The tool shall always be supplied via residual current device with a rated residual current of 30mA or less.
2.4 Other risks
In spite of compliance with all relevant design regulations, dangers may still present themselves when the machine is operated, e.g.:
- Touching rotating parts from the side: Saw blade, clamping flange, flange screw,
- Touching live parts when the housing is open and the mains plug is still plugged in,
-Workpiece parts being thrown off, - Parts of damaged tools being thrown off,
- Noise emissions,
Dust emissions.
2.5 Aluminium processing

When sawing aluminium, the following measures must be taken for safety reasons:
- Install an upstream residual-current circuit breaker (RCD, PRCD).
- Connect the power tool to a suitable dust extractor.
- Regularly clean dust deposits from the motor housing on the power tool.
- Use an aluminium saw blade.

Wear protective goggles.
2.6 Emission levels
The levels determined in accordance with EN 62841 are typically:
Sound pressure level L
$$ \mathrm {P A} = 9 1 \mathrm {d B} (\mathrm {A}) $$
Sound power level L
$$ \mathrm {w} _ {\mathrm {A}} = 1 0 0 \mathrm {d B} (\mathrm {A}) $$
Uncertainty K = 3 dB


CAUTION
Noise generated when working Risk of damage to hearing
Use ear protection.
The specified noise emission values
have been measured in accordance with a standardised test procedure, can be used to compare one power tool with another,
- and can also be used for a provisional assessment of the load.

CAUTION
Depending on how the power tool is used, particularly which type of workpiece is being machined, the noise emitted by the power tool during use may deviate from the specified values.
To protect the operator, safety measures should be defined based on load estimates obtained under real conditions of use. (All parts of the operating cycle must be taken into account here, including, for example, times in which the power tool is switched off or when it is switched on but idling.)
3 Intended use
The power tool is a stationary unit designed for sawing blocks of wood, plastic, aluminium profiles and similar materials. Do not use it to process other materials, in particular steel, concrete and mineral materials.
Only use Festool saw blades that are designed for use in this power tool.
The saw blades must comply with the following data:
-Sawblade diameter 216mm
- Cutting width 2.3 mm (corresponds to the tooth width)
- Locating bore 30mm
- Standard blade thickness1.6 mm
Saw blade in accordance with EN 847-1
-Sawblade with chip angle ≤slant 0^
- Suitable for speeds above 5000 rpm
Festool saw blades comply with EN 847-1.
Only saw materials for which the saw blade in question has been designed.
This power tool may only be used by experts or instructed persons.

The user is liable for damage and accidents caused by improper and non-inten
ded use.
4 Technical data
Sliding compound litre KS 60 saw
Power 1200 W
Power supply 220-240 V~50-60 Hz
Speed (no-load)
1300-3500 rpm
| Sliding compound metre saw | KS 60 |
| Max. speed[2] | 5000 rpm |
| Max. litre angle 60° left/right | |
| Max. inclination angle 47/46° left/right | |
| Saw blade dimensions 216 x 2.3 x 30 mm | |
| Weight as per EPTA-Procedure 01:2014 | 17.8 kg |
5 Machine features
[1-1] Handle
[1-2] Safety button
[1-3] On/Off switch
[1-4] Lever for groove depth limit
[1-5] Rotary knob for slide locking device
[1-6] Lever for transport locking device Spindle stop
[1-8] Stop ruler (both sides)
[1-9] Rotary knobs for securing the table extension (both sides)
[1-10] Angle display for litre cuts
[1-11] Lever for locking the litre angle
[1-12] Rotary base
[1-13] Pendulum guard
[2-1] Cable clamp
[2-2] Extractor connector
[2-3] On/off switch for spotlight (available as an accessory depending on the model)
[2-4] FSZ120 fastening screw clamp
[2-5] Adjusting wheel for setting the speed
[2-6] Rotary knob for securing the rotary base
[2-7] Table extension (both sides)
[2-8] Bevel holder for clamping the bevel
[2-9] Star handle for securing the inclination angle
[2-10] Key storage box for the Allen key
English
[2-11] Cable winder with integral carry handle
[3] Remove the transport safety device
[4] Insulated gripping surfaces (grey shaded area)
The illustrations specified are located at the beginning and end of the operating instructions.
6 Commissioning
6.1 Initial commissioning

WARNING
Unauthorised voltage or frequency!
Risk of accidents
Observe the specifications on the machine's name plate.
Observe country-specific regulations.
Ensure that the power tool is securely positioned. Risk of tipping over. If required, observe the assembly instructions for the MFT multifunction table or UG-KAPEX KS 60 underframe.
- Remove the transport safety device [3].
Remove the protective sleeve from the left-hand pulling rail 1
Push the saw unit down, thus breaking through the cable ties that are securing it in place 2
Remove the clamp from around the tilt locking device 3
- Set up the machine and move it into the working position.
6.2 Setting up and securing [5]
Pull out the mains plug before you carry out any work on the machine.
Before securing, if required, install the A-SYSKS60 support legs (optional accessory). Thanks to these support legs, the work surface on the rotary base is at the same height as a Systainer 1. These Systainers mean that long workpieces can then be supported [5].
You have the following options for securing:
Secure the machine in such a way that it cannot slip when you are working on it.
Screws [5A]: Use four screws to secure the machine to the work surface. Use the holes [5A-1] at the four support points on the saw table to do this.
Fastening clamps [5B]: Use fastening clamps [5B-1] to secure the machine to the work surface. The support points are used to firmly secure the machine while taking the centre of gravity into consideration.
Clamping set (for MFT) [5C]: Use the clamping set [5C-2] to secure the machine onto the Festool MFT 3 or MFT/Kapex (SZ-KS) multifunction table. The hexagonal holes [5C-1] close to the table extension on both sides are used for this.
UG-KAPEX KS 60 underframe[5D]: Observe the installation instructions that are enclosed with the underframe.
6.3 Transport

CAUTION
Risk of crushing
The saw unit may swing out/extend
The machine must always be transported in the transport position that has been provided for this purpose.
Risk of injury! The machine may slip out of your hands when you are carrying it.
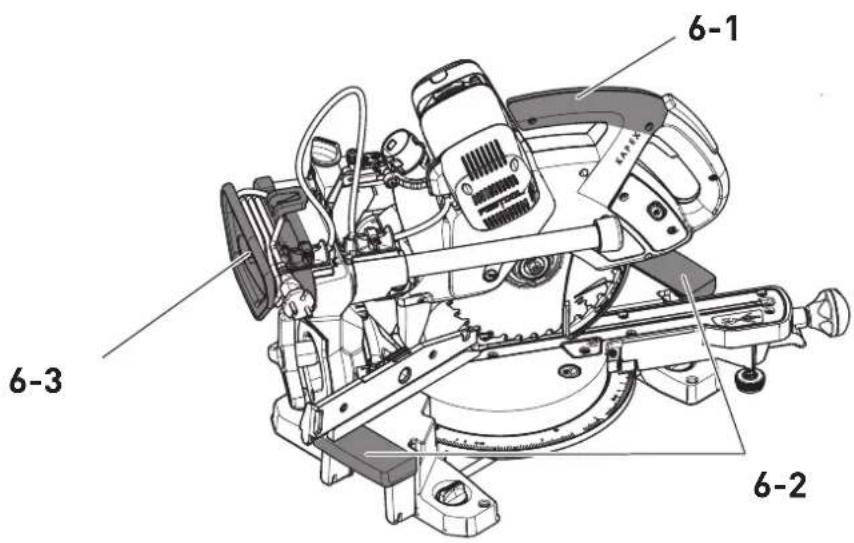
Always carry the machine with both hands, using the carrying handles [6] provided.
Securing the machine (transport position)
Wind up the mains cable on the cable winder [2-11] and use the cable clamp [2-1] to secure it.
- Move the saw unit into the rear position and lock it in place using the rotary knob [1-5].
- Swivel the saw unit into a vertical position.
Loosen the star handle [2-9].
Move the saw unit into a vertical position.
Tighten the star handle.
Lock the saw unit in place.
Press and hold the safety button [1-2].
Move the saw unit downwards until it reaches the limit stop.
Pull the lever for the transport locking device [1-6].
Release the safety button.
The saw unit remains in the lower position.
- Swivel the rotary base into the right-hand position.
Release the rotary knob [2-6].
Press and hold the detent lever [1-11].
Swivel the rotary base [1-12] as far to the right as it will go.
Release the detent lever, close the rotary knob.
The machine is in the transport position [6].
The machine has several carrying handles: Handles on the saw unit[6-1], in the cord holder [6-3] and the extension tables [6-2] (when they are securely in place).
6.4 Working position
Unlock the machine (working position)
- Swivel the saw unit into a vertical position (saw blade is vertical) [10].
- Push the saw unit downwards as far as the limit stop and hold it there.
Pull the lever for the transport locking device [1-6].
Slowly guide the saw unit upwards.
Unwind the mains cable and plug in the mains plug.
The machine is ready for operation.
6.5 Switch on/off
- Check the electrical safety of the power connection.
- Move the machine into the working position or release the lock on the saw unit.
Press and hold the safety button [1-2].
Press and hold the On/Off switch [1-3].
Press = ON
Release = 0 F
7 Settings
7.1 Electronics
The machine features electronics with the following properties:
Smooth start-up
The electronically controlled smooth start-up ensures that the machine starts up jolt-free.
Speed control
You can continuously adjust the speed within the speed range using the adjusting wheel [2-5]. As a result, you can adapt the cutting speed in a way that best suits the relevant material (see table).
Recommended position of the adjusting wheel
Wood 3-6
Plastic 3 - 5
Fibrous material 1 - 3
Aluminium and non-ferrous profiles 3 - 6
Current limiting
Current limiting prevents excessive current consumption under extreme overload, which can lead to a decrease in the motor speed. The motor immediately restarts after the load is removed.
Temperature cut-out
When exceeding a certain engine temperature level, the machine power supply and speed are capped. The power tool continues operating at reduced power to allow the ventilator to cool the motor rapidly. The power tool resumes to full performance automatically once the motor has cooled sufficiently.
7.2 Connecting the mobile dust extractor

WARNING
Dust hazard
Dust can be hazardous to health. Always work with a dust extractor.
Always read applicable national regulations before extracting hazardous dust.
Festool mobile dust extractor
A Festool mobile dust extractor with an extractor hose diameter of 27mm or 36mm (36 mm is recommended due to the reduced risk of clogging) can be connected to the extractor connector [2-2] at the elbow.
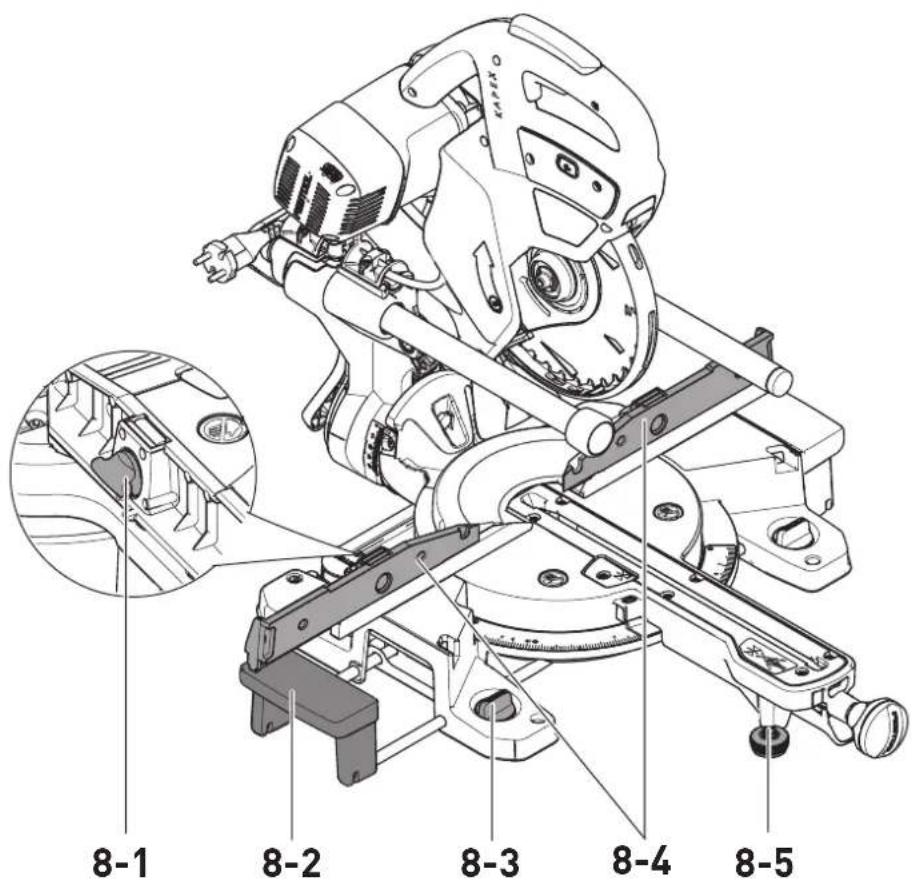
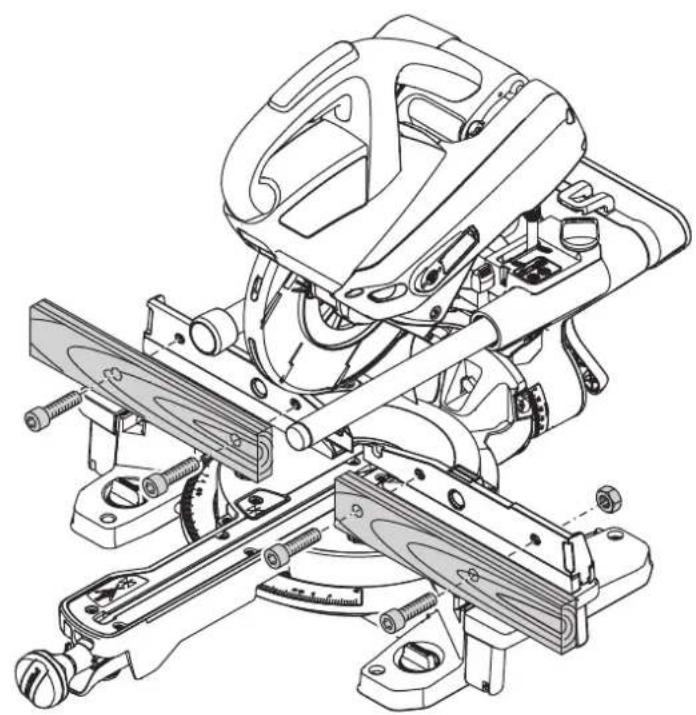
7.3 Setting the stop rulers [8]
Moving the stop rulers may make it necessary to implement special settings for inclined cutting. In the case of inclined cutting, there is a risk that the stop ruler will be sawed.
- Open the rotary knobs (on both sides).
- Move the stop rulers [8-3] in such a way that there is a maximum clearance of 8mm from the saw blade.
- While the machine is switched off, lower the saw unit in a trial run to check whether the saw blade comes into contact with the stop rulers.
- Close the rotary knobs.
English
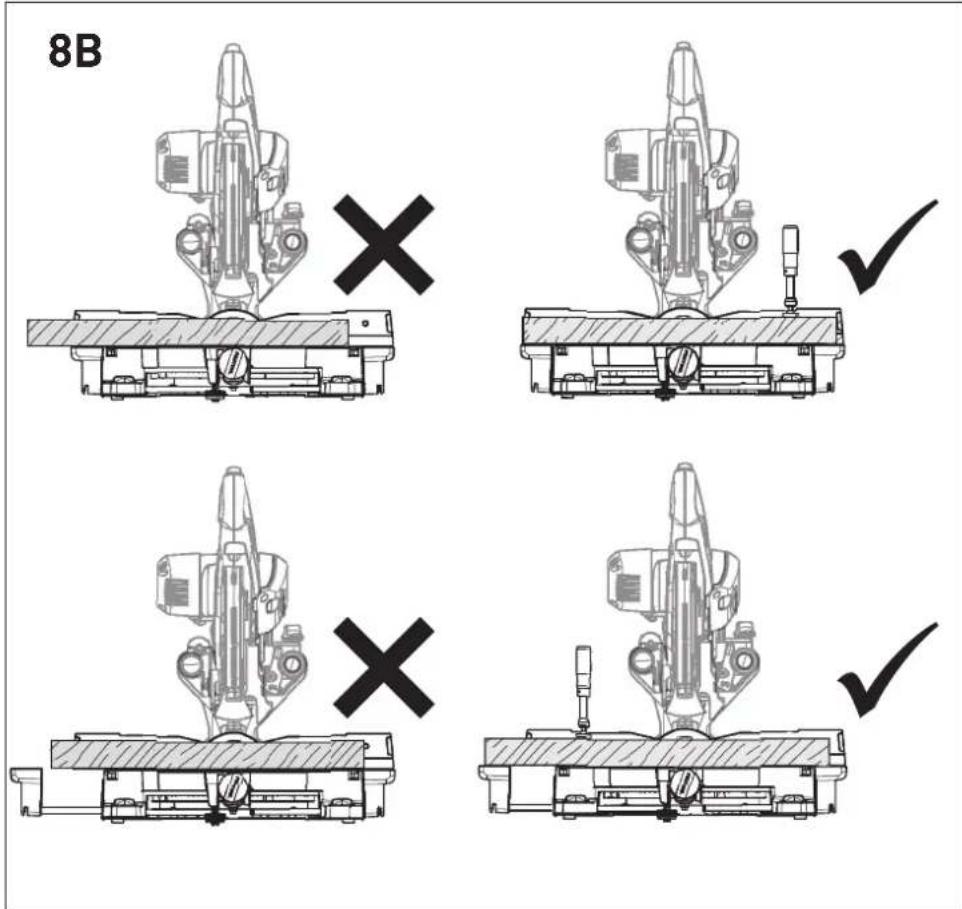
i The contact surface of the stop ruler can be individually adjusted by screwing in suitable tap blocks [8A]. When doing so, ensure that the functionality of the saw is not restricted in any way.
7.4 Adjusting the table extension
- Open the rotary knob [8-3].
Pull out the table extension [8-2] far enough that the workpiece is laid out fully. - Close the rotary knob.
i If, despite the table extension being extended as far as possible, the workpiece protrudes over the table, the workpiece must be supported by other means.
7.5 Selecting the saw blade
Festool saw blades are identified by a coloured ring. The colour of the ring represents the material for which the saw blade is suited.
| Colour Material Symbol | |
| Yellow Wood, soft plastics | φ |
| Red Plastics/mineral materi-als | K |
| Green Building materials | |
| Blue Aluminium, steel/sand-wich panels | AI |
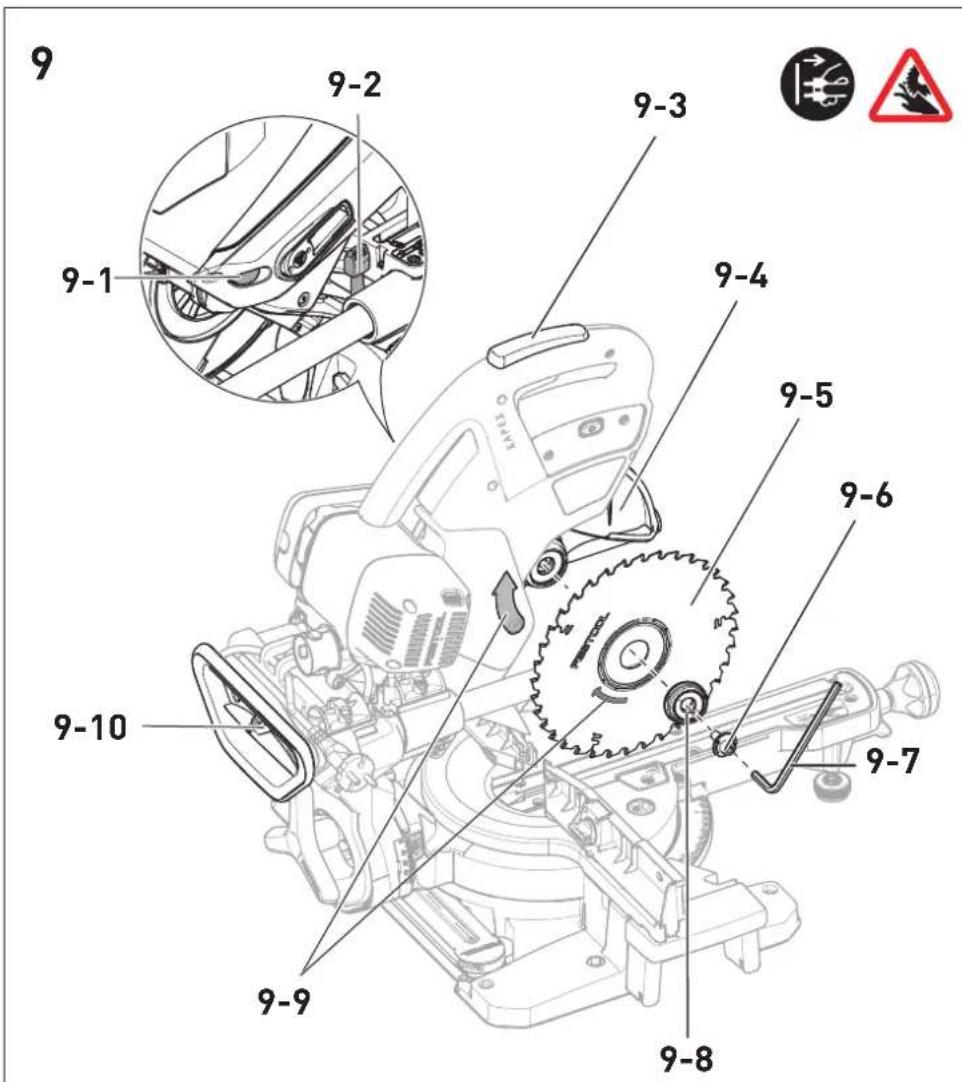
7.6 Replacing the saw blade [9]
![FESTOOL KAPEX KS 60 - Replacing the saw blade [9] - 1](/content/2026/02/418909/images/447a4e1eceb9c36c84ecea43a9560eaca55df1942a42fa0efc9f33b070fb43fc.jpg)
WARNING
Risk of injury, electric shock
Always disconnect the mains plug from the socket before performing any work on the machine.

CAUTION
Hot and sharp tool
Risk of injury
- Do not use any blunt or defective insert tools.
Always wear protective gloves when replacing the saw blade.
Preparing the machine
Pull out the mains plug and wind up the mains cable.
- Move the saw unit downwards until it reaches the limit stop.
Pull the lever for the transport locking device [9-2].
Slowly guide the saw unit upwards.
- Remove the hex key [9-7] from the holder in the cable winder [9-10] (key storage box).
Remove the saw blade
Press and hold the spindle stop [9-1].
- Use the hex key [9-7] to turn the saw blade until the spindle stop clicks into place.
Use the hex key to undo the screw [9-6] (left-hand thread, turn in the direction of the arrow).
- Remove the screw and flange [9-8].
Release the spindle stop.
Press and hold the safety button [9-3].
- Lift and hold the pendulum guard [9-4] with one hand.
- Remove the saw blade [9-5].
Fitting the saw blade
The saw blade and flange must be free of dust and dirt in order to ensure that the saw blade runs smoothly.
The saw blade and flange must be free of dust and dirt in order to ensure that the saw blade runs smoothly.
Insert the new saw blade [9-5].
The writing on the saw blade must be visible. The saw blade's direction of rotation must correspond to the direction of the arrow [9-9].
- Insert the flange [9-8] in such a way that the flange, holding thread and saw blade all interlock perfectly with each other.
Press and hold the spindle stop [9-1]. - Use the hex key [9-7] to turn the saw blade until the spindle stop clicks into place.
Insert the screw [9-6] and tighten it against the direction of the arrow.
Risk of injury! Whenever you replace a saw blade, always check that it is securely in place. If a screw is loose, the saw blade may become detached.
8 Working with the power tool

WARNING
Flying tool parts/workpiece parts Risk of injury
Wear protective goggles.
- Ensure that no other persons are close to the machine while it is being used.
Always clamp workpieces tightly.
The clamps must be fully laid out.

WARNING
The pendulum guard does not close Risk of injury
Stop the sawing process.
- Unplug the mains cable and remove waste. In the event of damage, remove the pendulum guard.
Working safely

When working on the machine, observe all of the safety notes that are listed at
the start and the following rules:
-
Correct working position:
-
At the front on the side of the operator;
- Head-on to the saw;
-
Beside the line of cut.
-
During operation, always hold the power tool tightly by the handle [1-1] in your operating hand. Always keep your free hand outside of the hazardous area.
- Only guide the power tool towards the workpiece when it is switched on.
- Adjust the feed speed in order to prevent the machine from overloading and to prevent the plastic from melting if you are cutting plastics.
- Ensure that the star handle [2-9] and the rotary knob [2-6] have been tightened.
- Do not work on the power tool if its electronics are defective as this may lead to excessive speeds. You can tell if the electronics are defective if there is no smooth startup, if it is not possible to regulate the speed and in the event of generation of smoke or the smell of burning from the machine.
8.1 Clamping the workpiece

Warning! Note the workpiece's properties:
Risk of injury
Securely in place - Place the workpieces on the stop ruler. Do not process any workpieces that have not been securely clamped.
Size - do not process workpieces that are too small. In the interests of safety, the cut piece remaining should be at least 30mm long.
Small workpieces may be pulled backwards by the saw blade and into the gap between the saw blade and the stop ruler.
Correct support - Observe the maximum workpiece dimensions. Always use and secure extensions to the workpiece support. Otherwise, the workpiece may be subjected to internal stresses, which may lead to sudden deformations. If required, observe the information for workpiece dimensions (see section 7.4.
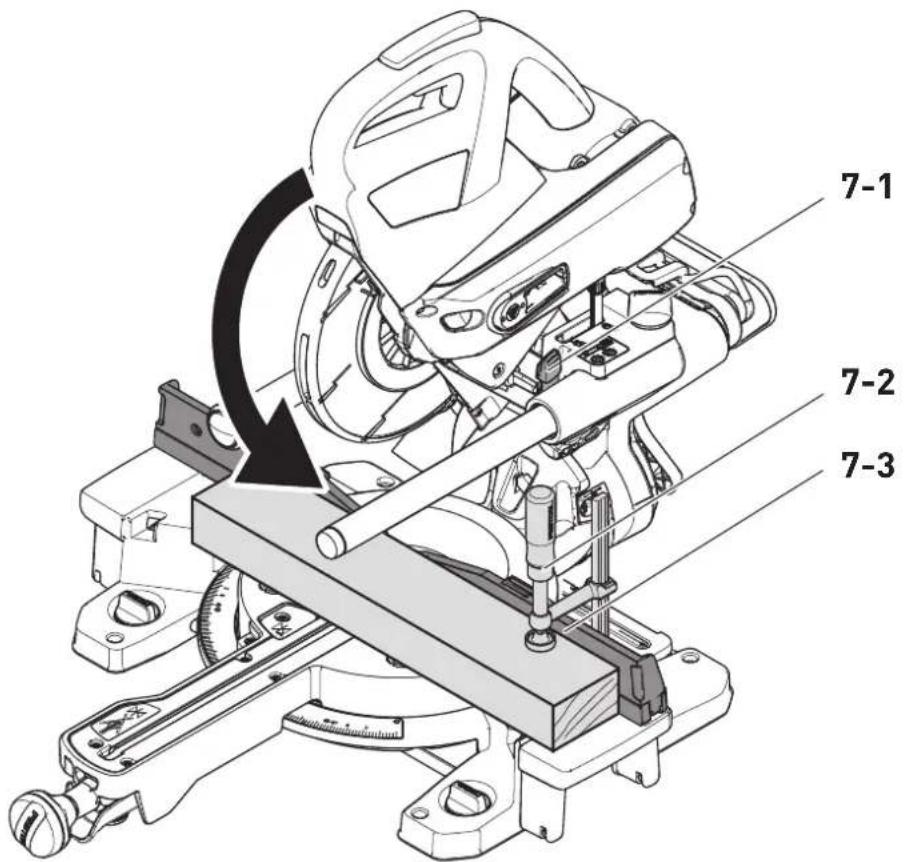
Proceed as follows to clamp the workpiece [7]
- Push the saw unit downwards until it reaches the limit stop.
- Pull the lever for the transport locking device [7-1].
Slowly guide the saw unit upwards. - Place the workpiece so that it is flush with the stop ruler [7-3].
Use the fastening clamp [7-2] to secure the workpiece in place. - Check that the workpiece is securely in place.
8.2 Observe the workpiece dimensions
Maximum workpiece dimensions without extension using accessory parts
| Mitre/bevel angle, to Height x width x length scale |
| 0°/0° 60 x 305 x 720 mm |
| 45°/0° 60 x 215 x 720 mm |
| 0°/45° right 20 x 305 x 720 mm |
| 0°/45° left 40 x 305 x 720 mm |
| 45°/45° right 20 x 215 x 720 mm |
| 45°/45° left 40 x 215 x 720 mm |
Maximum workpiece dimensions when installing together with UG-KS60 and KA-KS60
The maximum height and width of the workpiece do not change if accessory parts are installed. The contact surface when installing the
English
underframe must be the same as the contact surface when the extension table is extended.
Accessory part used Length
UG-AD-KS60 720 mm
KA-KS60 (one side) 1880-2800 mm
KA-KS60 (both sides) 3360-5200 mm
Long workpieces
Provide extra support for any workpieces that protrude over the sawing surface:
- Provide extra support for any workpieces that protrude over the sawing surface:
Adjust the extension table, see section 7.4.
If the workpiece still protrudes, retract the extension table and install a KA-KS60 trimming attachment, or raise the compound litre saw using A-SYS-KS60 screw-in feet and then support the workpieces using T-LOC SYS-MFT Systainers that are Systainer size 1. - Use additional fastening clamps to secure the workpiece.
Thin workpieces
During sawing, thin workpieces may wobble or break.
During sawing, thin workpieces may wobble or break.
- Reinforce the workpiece: Clamp it together with wood offcuts.
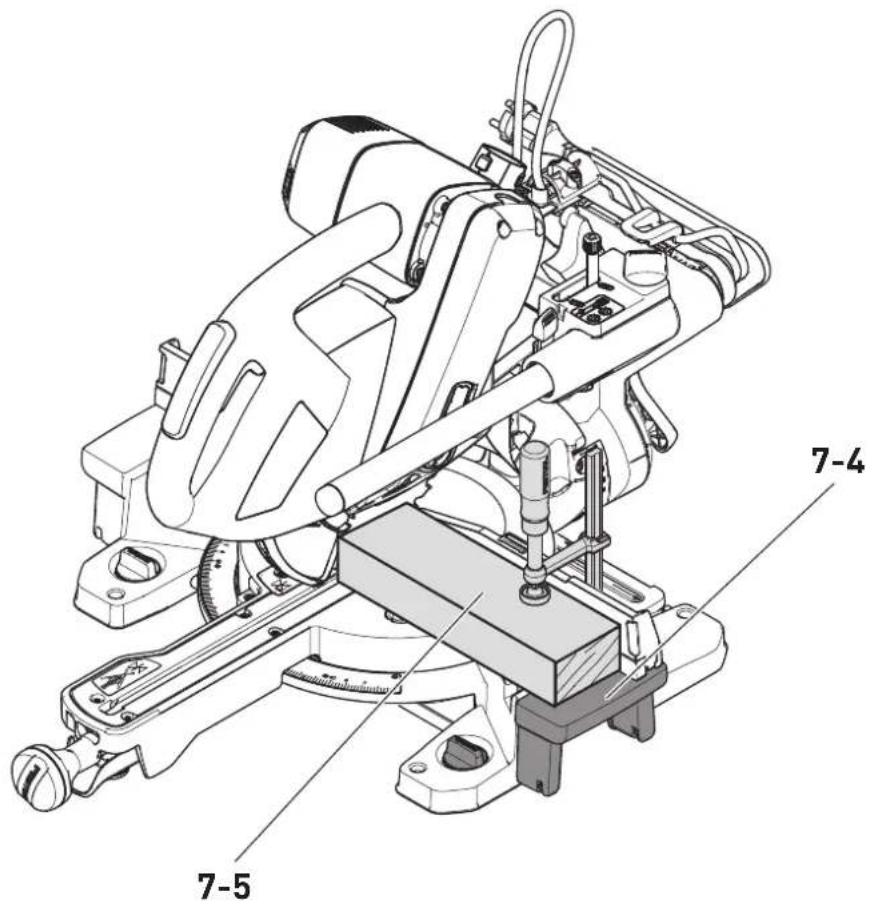
Heavy workpieces
To guarantee the stability of the machine, even when sawing heavy workpieces, adjust the support foot [8-5] so that it is flush with the base.
8.3 Sawing the workpiece
Check that the pendulum guard can move

The pendulum guard must always be able
to move freely and close independently.
Pull out the mains plug.
Take hold of the pendulum guard and, as a trial run, slide it into the saw unit.
The pendulum guard must be easy to move and must be almost fully lowered into the pendulum hood.
Cleaning the area of the saw blade
Always keep the area around the pendulum guard clean.
- Clear dust and chippings by blowing out with compressed air or using a brush.
Compound litre saws
The basic function of the compound litre saw is to saw using a fixed saw unit with no inclination. Recommended: Workpieces up to 70mm in width.
The rotary knob [1-5] locks the saw unit so that it can no longer be moved forwards or backwards.
The spotlight SL-KS60 (available as an accessory depending on the model) casts a shadow over the saw blade and onto the workpiece. Use the On/Off switch [2-3] to activate this function. The cutting line becomes visible when the saw unit is lowered.
Slide-sawing
When slide-sawing, the saw blade is guided to the workpiece from the front, which means the sawing is controlled and requires less effort. Recommended for workpieces over 70mm in width.
Correct sawing process when slide-sawing

Avoid reverse cutting. When sawing, do
not pull the lowered saw unit up to the
body. The saw blade could hook in and the saw unit could accelerate towards the operator.
- Release the rotary knob for the slide locking device [1-5].
Pull the saw unit to the limit stop.
Press and hold the safety button [1-2]. - Push the saw unit down and, when doing so, press and hold the On/Off switch [1-3].
- Only guide the saw unit towards the workpiece once the set speed has been reached.
Cut the workpiece; slide the saw unit through the workpiece until the limit stop.
Once the cut is complete, guide the saw unit back to its upwards position.
The pendulum guard closes automatically.
- Release the safety button and the On/Off switch. Close the rotary knob.
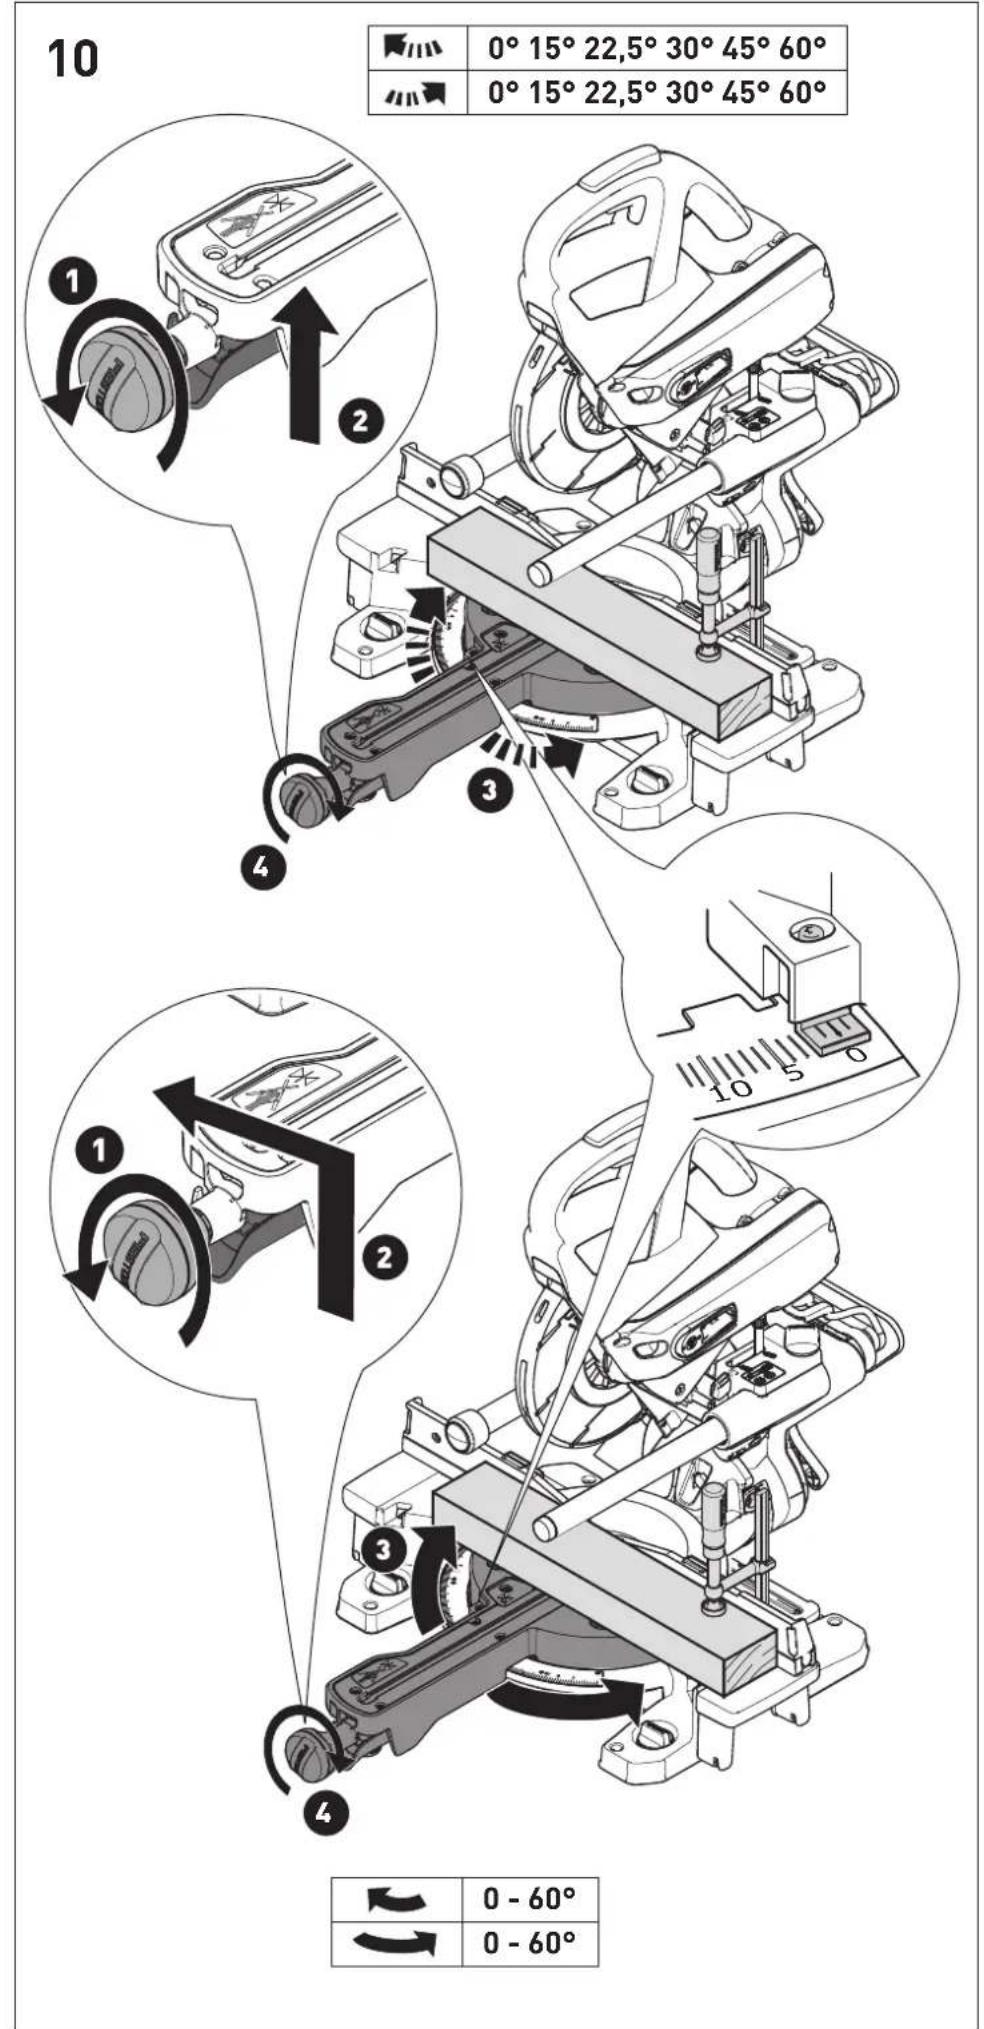
8.4 Saw the litre angle [10]
Standard litre angle
The following metre angles (left and right) automatically engage: 0^ , 15^ , 22.5^ , 30^ , 45^ , 60^
Setting the standard litre angle
Release the rotary knob. 1
Press the detent lever but do not hook it into place.
- Rotate the rotary base into the required position, release the detent lever shortly
before the required angle has been reached.
The rotary base easily clicks into place at the intended metre angles.
- Close the rotary knob. 4
Setting individual metre angles
Release the rotary knob. ①
Press the detent lever and let it click into place by pressing on it at the left.
- Continuously swivel the rotary base into the required position 3
- Close the rotary knob. 6
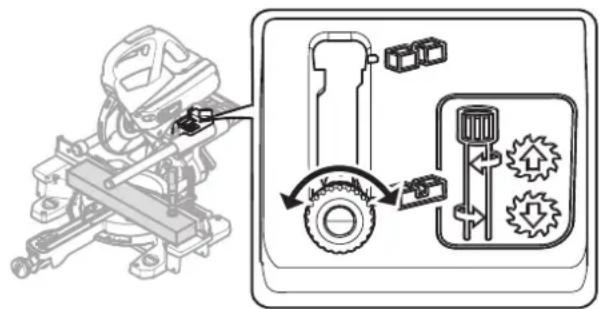
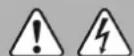
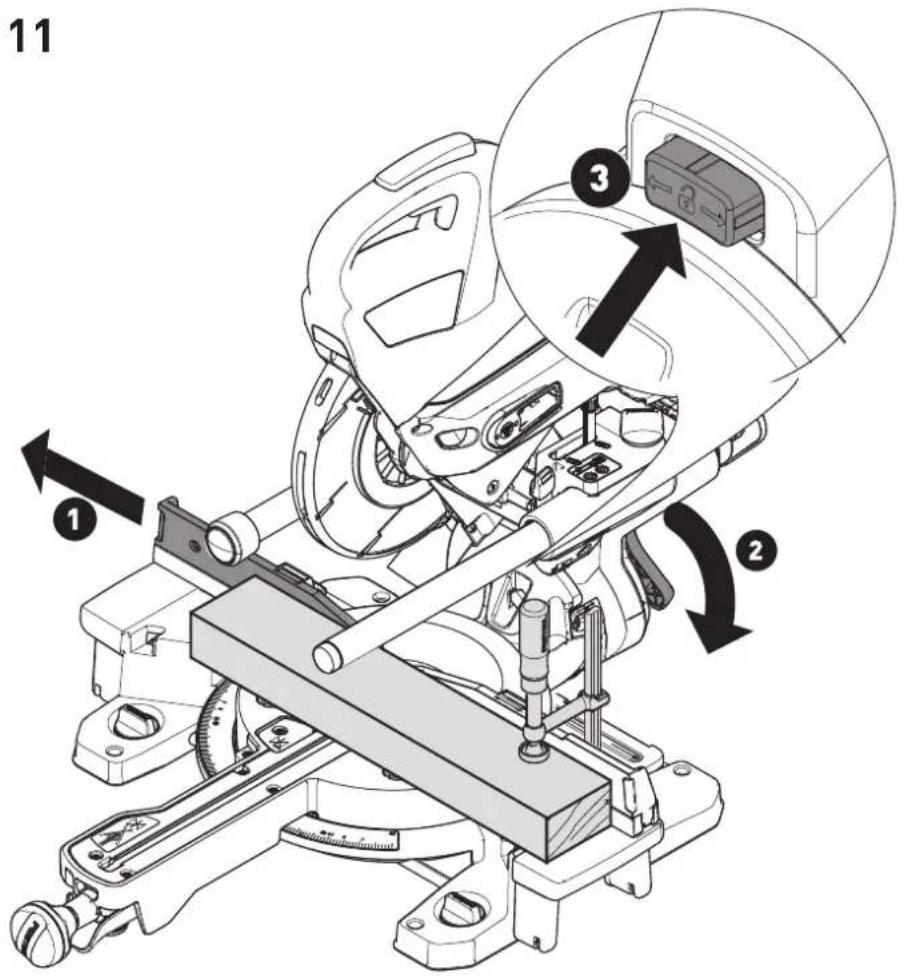
8.5 Saw inclined cuts [11]
![FESTOOL KAPEX KS 60 - Saw inclined cuts [11] - 1](/content/2026/02/418909/images/8bc74bdc8b925f58ae0cf7f745ec9068abbf4f17556796597b37ebc939d0e210.jpg)
Moving or removing the stop rulers 1
may make it necessary to implement special settings for inclined cutting, see section 7.3.
Inclination to the left between 0^ and 45^
Loosen the star handle. 2
- Tilt the saw unit to the desired cutting angle 4 .
- Tighten the star handle. 5
Inclination to the right between 0^ and 45^ :
Loosen the star handle. 2
Press the release button ; required, relieve the tension by slightly tilting it in the opposite direction.
Tilt the saw unit to the desired cutting angle 4.
- Tighten the star handle. 5
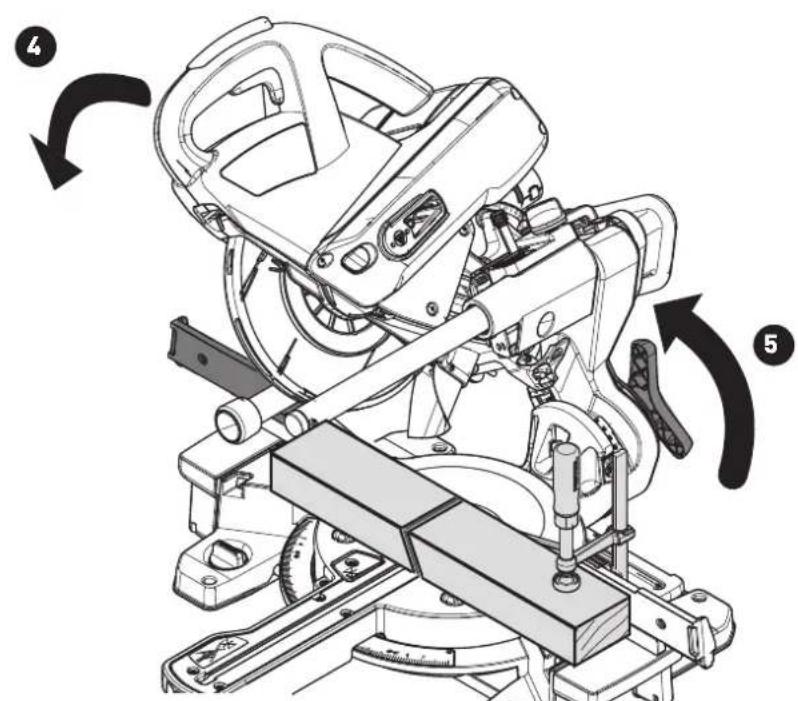
46 - 47^ inclination to the right/left (undercutting)
Loosen the star handle. 2
Press the release button ; required, relieve the tension by slightly tilting it in the opposite direction.
Tilt the saw unit to the limit stop. 4
Press the release button again. 3
Tilt the saw unit again. 6
- Tighten the star handle. 5
8.6 Sawing grooves
The continuously adjustable groove depth limit can be used to individually define groove areas using the total cutting depth. Grooving or facing is therefore possible at any height for any workpiece size.
The round shape of the saw blade means that, when grooving, a slight cutting curve upwards is required. For grooving that is precisely horizontal, a tap block must be clamped between the workpiece and the stop ruler so that a clearance of 4cm can be guaranteed.
Move the machine into the working position.
1 Only turn down the lever for the groove depth limit [1-4] if the saw unit is in the upper position (= working position).
Pull the lever for the groove depth limit [1-4] all the way to the front. The saw unit can now be pushed down only as far as the preset cutting depth.
- Turn the lever for the groove depth limit to set the required depth (turn to the left = increase the groove depth, turn to the right = decrease the groove depth)
Push down the saw unit as a trial run to check whether the groove depth limit is set to the required groove depth.
Only push the saw unit down when the lever for the groove depth limit has engaged in one of the two end positions. Risk of damage to the power tool.
Make the cuts.
To deactivate the groove depth limit, reset the lever [1-4].
9 Service and maintenance
WARNING
Risk of injury, electric shock
Always pull the mains plug from the socket before performing any servicing and maintenance work.
- All maintenance and repair work which requires the motor housing to be opened should always be carried out by an authorised service workshop.

Customer service and repairs must only be carried out by the manufacturer or service workshops. Find the nearest address at: www.festool.co.uk/service

Always use original Festool spare parts. Order no. at: www.festool.co.uk/service
Follow the instructions below:
- Damaged safety devices and components must be repaired or replaced in a recognised specialist workshop, unless otherwise indicated in the operating instructions.
- Use an extractor on all openings of the power tool to remove wood chips and splinters. Sawing chips and small parts that get caught up in the sawing channel can be gently pulled out through the opening [12-4].
To ensure constant air circulation, always keep the cooling air openings in the housing clean and free of blockages.
! Cleaning the machine regularly, especially the adjusting devices and guides, is an important safety factor.
The tool is equipped with special self-disconnecting carbon brushes. If they wear out, the power supply is disconnected automatically and the tool stops.
9.1 Replacing the chip deflector [12]
To ensure that dust and chips are collected properly, you must only work if a chip deflector is installed.
- Undo the screws [12-1] on the guard, remove the chip deflector and clamp.
- Attach the clamp [12-2] to the new chip deflector.
Screw the chip deflector [12-3], along with the clamp, onto the guard.
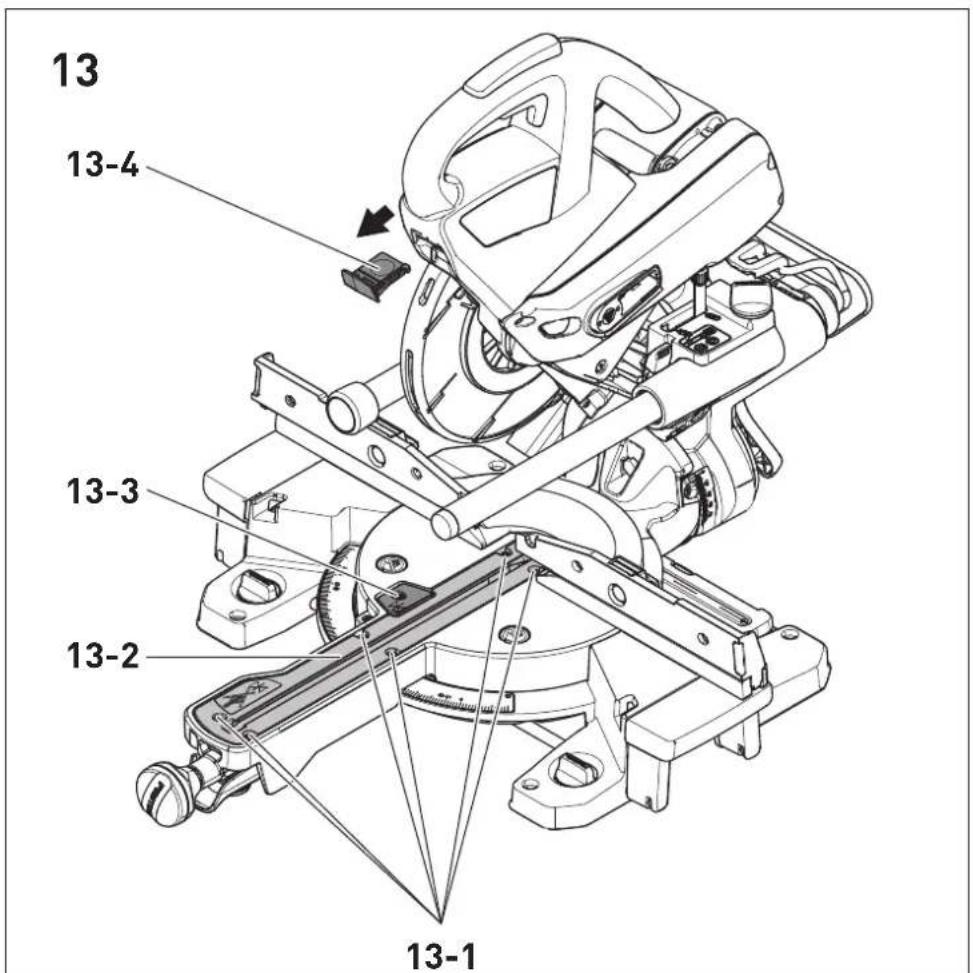
9.2 Replacing the tabletop insert [13]
Always replace worn tabletop inserts. Never use the machine without tabletop inserts.
Unscrew the position marking for the bevel.
- Undo the screws in the tabletop insert.
Replace the tabletop insert and position marking.
Reattach the screws.
- Check that the position markings lie on a line that, at the same time, must run at a right angle to the stop rulers.
9.3 Cleaning/replacing the spotlight window (available as an accessory depending on the model
The spotlight SL-KS60 lights up the cutting edge on the workpiece. Dust-intensive work may affect the power of the light. Proceed as follows to clean the spotlight [13]:
- Move the machine into the working position.
Pull out the spotlight window by hand, and clean/replace it. - Reinsert the spotlight window. The spotlight window audibly clicks into place.
10 Accessories
The order numbers of the accessories and tools can be found in the Festool catalogue or on the Internet under "www.festool.com".
In addition to the accessories described,
Festool also provides a comprehensive range of system accessories that allow you to use your saw more effectively and in diverse applications, e.g.:
- Trimming attachment KA-KS60
- Base frame UG-KAPEX KS 60
- Screw-in feet A-SYS-KS60
- Clamping connection for MFT SZ-KS
- Bevel SM-KS60
- Spotlight SL-KS60
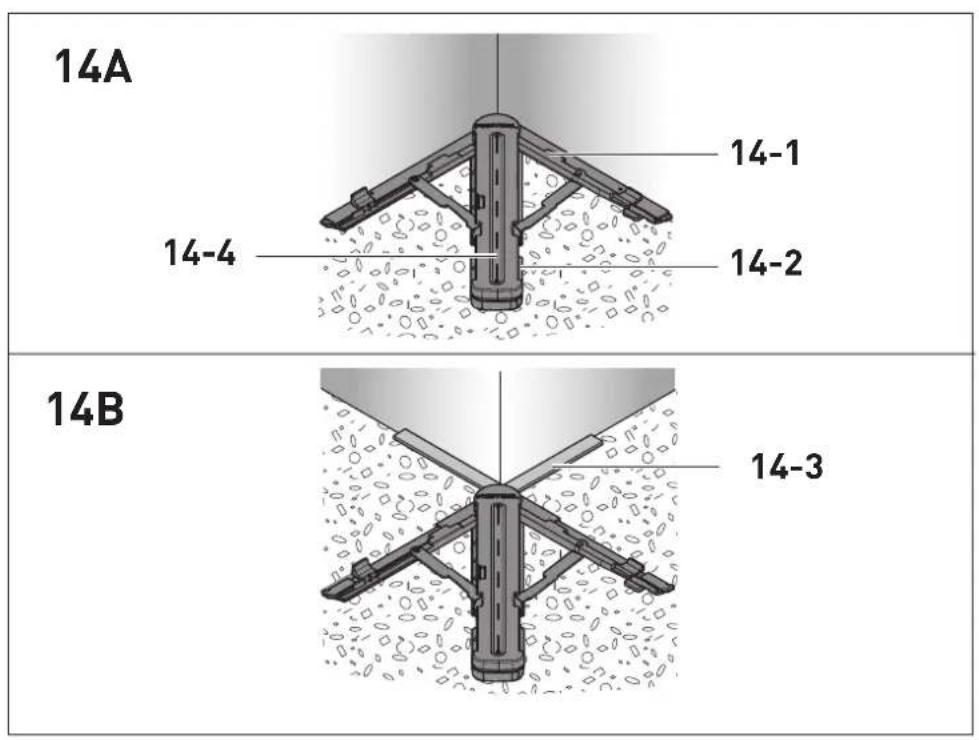
10.1 Bevel SM-KS60 (available as an accessory depending on the model)
The bevel can be used to gauge any angle (e.g. between two walls). The bevel therefore forms the angle bisection.
Gauging the interior angle [14A]
- Open the locking device [14-2].
- Swivel the router [14-1] out in order to gauge the interior angle.
Close the locking device.
The dashed mark [14-4] provides the angle bisection. The angle bisection can be transferred via the outside edges of the bevel to the position
markings on the rotary base.
Gauging the exterior angle [14B]
- Open the locking device [14-2].
- Slide the aluminium profiles [14-3] on the router forwards.
- Swivel the router [14-1] out so that the aluminium profiles are at the exterior angle.
- Close the locking device.
- Slide the aluminium profiles for the two routers back again.
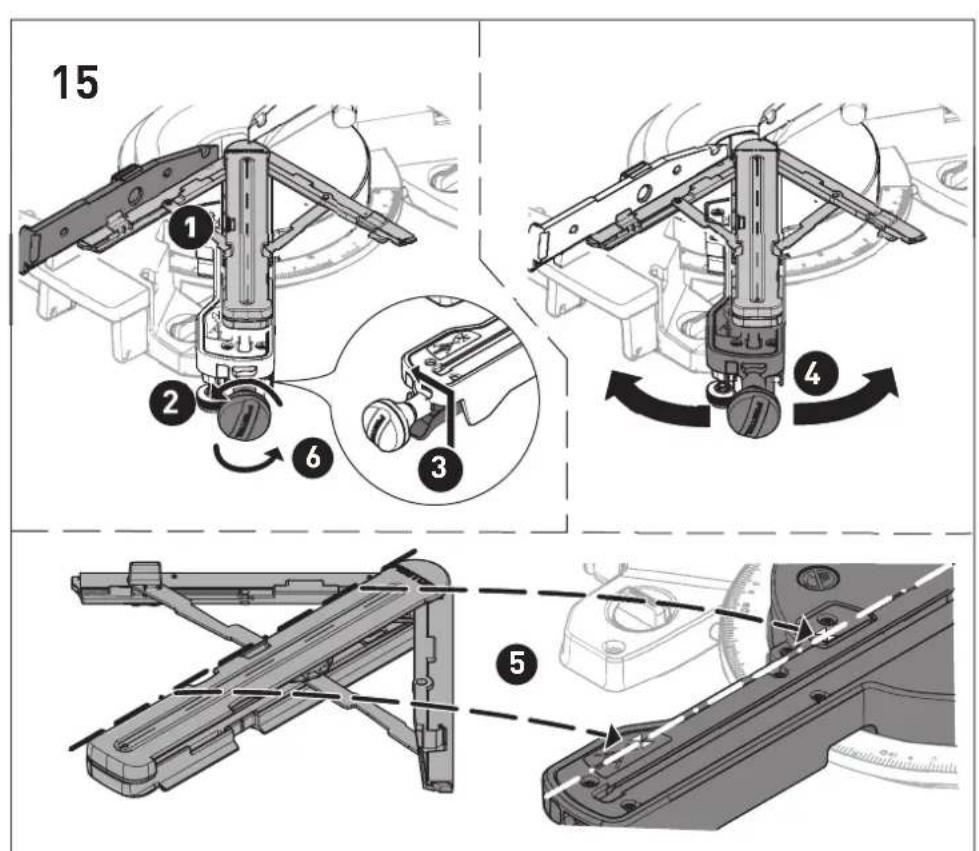
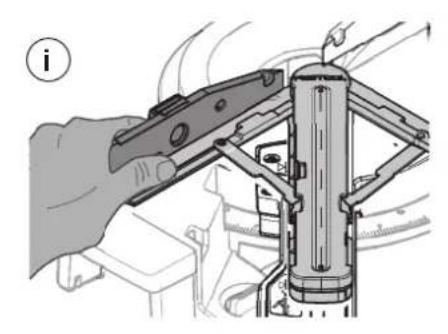
Transferring the angle [15]
- Place the angle bevel perfectly in place on one of the stop rulers. 1 press with your thumb.
Release the rotary knob 2
Hook in the detent lever 3
Swivel the rotary base 4, until the outside edge of the bevel is congruent with the marking 5.
To do so, the bevel must be positioned so that it is parallel to the stop of the compound litre saw. At the same time, apply pressure to the stop ruler by pressing in the recessed grip with your thumb.
- Close the rotary knob 6, remove the angle bevel.
The angle is transferred, the sawing process can be started.
10.2 Saw blades, other accessories
In order to saw different materials quickly and cleanly, Festool offers saw blades for all applications and these are specially designed for your Festool saw.
11 Environment

Do not dispose of the device in the household waste! Recycle devices, accessories and packaging. Observe appli-national regulations.
EU only: In accordance with the European Directive on waste electrical and electronic equipment and implementation in national law, used power tools must be collected separately and handed in for environmentally friendly recycling.
Information on REACH: www.festool.com/reach
12 General information
Imported into the UK by
Festool UK Ltd
1 Anglo Saxon Way
Bury St Edmunds
IP30 9XH
Great Britain
Sommaire
Chássis de transport UG-KAPEX KS 60[5D]: respectfully, please, I am very grateful to you for your support in the design of this vessel.
6.3 Transport

ATTENTION
Risque d'échéement
8.5 Sciage inclé [11]
![FESTOOL KAPEX KS 60 - Sciage inclé [11] - 1](/content/2026/02/418909/images/1b9e040532224c1b19804457004aedc9f2a9f97dc1d8878d9b7298678a4100b7.jpg)
8.6 Sciage de rainures
$$ \text {l o s l a t e n} = \text {U I T} $$
7 Installingen
7.1 Electronic
Varning for allman risk!

Varning for elstötar

2.5 Aluminiumbearbetting
$$ S l i p = s l u k $$
7 Indstillinger
7.1 Elektronik
Sikre maskinen (transportstilling)
Rull strømledningen opp på kabelopprullingen [2-11], og fest den med kabelklemmen [2-1].
- Skyv sagaggregateti bakre stilling, og lás det med dreieknappen [1-5].
Vipp sagaggregateti loddrett stilling.
A alterations and changes in the language of the text.
A alterations and changes in the language of the text.
A translation of the text.
A translation of the text.
A translation of the text.
A translation of the text.
He BBipacbIBaTb BmecTe C 6blTOBblMN OTXoJam!

HanpaBHeHne BpaUeHnI nnIbI nIINbHO rNcKa

Pa3Mep nIbHOro dNcKa a ... dNaMeTp
b ... nocaoquhoe OTBepctne

HctpyKu,peKoMeHdaun
CnMBoJ 3HaueHne
HctpyKUnaNo nCnoB3ObaHnIO
Klaacc 3aunTbI II

BbHbTe BnIky ceTeBoro ka6eIa!

OnapaHa 3oHa! DepeKnte pyKn Ha 6e30nacHom pacctToHnn!

OctopokHo! Topya noBepxHocTb!

Onacnoctb 3aueemlenna nalbcBn KncTeynpK!

Onachoctb nope3a He3aKpbItbIM NnIbHbIM INCKOM

MapknpoBka CE: POnTBePxAaET cooTBeTCTBnE 3JIeKTPoHnHCTpyMeHTa OCHOB- HbIM Tpe6OBAHNm DnpeKtNB EC.
2 Yuka3aHnno TExHnKe 6e3oNaChocTu
2.1 06ие yka3aHnno TeXnke 6e3oNaChOCTnДЯ 3JIeKTPoHnCtpyMeHTOB

OCTOPOXHO! Празніte Всіуказань по Тхиke 6e3oPacHocTи ИнсТPyKuzn.
HeToUHoe c6JIIOJeHne yKa3aHn MoXeT CTAb npuHou yIapa 3JIeKTpueckm TOKOM, noXapa n/nn cepbE3HbIX TpaBM.
CoxpaHnTe Bce yKa3aHnNo TExHnKe 6e3- onaChOCTn N HnCTpyKuNn Dnla CneDyUoJero noIb30BaTeJIa.
IcnoJb3yEmbB yka3aHnX NO TexHKe 6e3- ONaCHOCTN TepMNH «3JIeKTPoHnHCTpyMeHT> OTHO-CNTcK CeTeBBIM 3JIeKTPoHnHCTpyMeHTam [C ceTeBBIM Ka6eJEM] n aKKyMylTOpHbIM 3JIeKTPoHnHCTpyMeHTam [6e3 ceTeBOrO Ka6eJRA].
2.2 Yka3aHnno TeXnKe 6e3oNaChOCTn npn noJb30BaHnn nHcTpymeHTom
-TopoBO-yCope3HbIe NnblippeHa3NaueHbI DJIa HIIeHnA DpeBecHbI INn DpeBecHbIX MaTePnaIOB I He npuROdHbI dJIpe3-KN CTaJIbHbIX CTePxHei, WTAHr, BnHTOB nT.Д.CkOJIeHne a6pa3nBHOJ nbIIN npuBO-DNT K 6JIoKupOBaHNIO NOBHXbIX DeTaJIeN, HApPIMep, HxKHeRo 3aUHTHOrKOxUxa.IckpbI B pnocece pe3Kn MaTePnaJa MoYt cTaTB npuHHo OBropAHn HxKHeRo 3a-
Pycckn
UHTHOrO KoKxya, BCTaBKn Ipyrnx nlaCTMaccOBbIX DeTaJnei.
-ПО BOЗМоЖнOCиФИКСИРУТЕ 3aROTOВКу CTpy6цинам.Еслу ydepxKnBaTe 3aroTobKу рукo,ДeрхNiTe pyKу Ha paCCTOHHN He MeHee 100 MM ot KaXdoJ cTOpHbI nIIbHoroДиСka. He nCnoJIb3yIte 3Tu nIly npi pa6Ote c 3aROToBkAmu,pa3Mep KOTOpbIX He nO3BOJЯETФИКСИРOBaTb IX 3aXIMAMn NIN pNIDepxKNBaTb ryko. Korda pyKa HaxODITcR OueHb 6IIN3KO K 3aROTOBKe, NOBblIshaETcR OAnCHOCTb TpaBMnPOBaHnI INJIbHbIM DnCKOM.
-B npoecce 6pa60TK 3aTOBka DOJXHa 6b1b HenoDBNXHO.ДЯ 3TOr eHyXHO 3aKaTb 3aKIMamN IIN npXaTb K yNOpY IIN pIInTe-ocHOBaHNIO.HNKOrda He noTalKNBaIte 3aROTBKY K NIIbHOMy DnCKy I He pa60TaIte 6e3 yNopOB.He3aKpenJIeHN-Ha 3aROTBKa MoKeT OTCKOHTb C 6OJIbWoI CKOpocTbIO IN npuunHtB Bam TpaBMy.
- Beinte nIy B 3arotobke ot ce6. Hko- rda He TAHnte eHa ce6. Ira BbINOJIHeHnpe3a NOpHMnTe NIIbHyIO roJOBky IN npoBeInTe eHa 3arotOBKoB 6e3 pe3aHnra. 3aTeM BKIOUHTe DBNrAteNb, ONyCTN- Te NIIbHyIO roJOBky n, Haxmna Ha nIy, npoBeInTe euepe3 3arotOBKy. Pn Bbl- IIOJIHeHN TAnHyUeRo pe3a NIIbHbI dNCK MoXeT ONaCHO BbIITu N3 3aROTOBKn, a NIIb-HaYacThb OTCKOHTb B CToPOHy N0lb3OBA- TeJIa.
- HnkOrda He KlaInde pyky Ha IInHIO pe3a, HN nepei NnIbHbIM dNcKOM, HN 3a HNM. YdepknBaTb 3arOToBky «CKpeueHHbIM XBaTOM>, T. e. cnpaba OT NnIbHoro dNcKa JeBoi pykoi nII HAo6oPoT, ouehb onaCHO.
- He 6ePntecb 3a ynp npn Bpaaiooemcna NllbHOM dncke. Co6IouaIte 6e3oNaChoe paCCToHne 100 MM mexky pykoN n Bpa- uOUMCn NNbHbIM dNcKOM, HApnPmep, npu ydaJeHHn 6pe3KOB (3TO OTHCNTcK o6eM cTOpOHam dNcKa). Bbl MoKeTe He 3a-MetNb 6IIN3OCTb BpaauoUeROc na NllbHOrO dNcKa K pyKe I NOJyHTb cepbe3HbIe TpaB-Mbl.
-Проверяпгулары Вьллнеленem pe3a.Еси 3агOTOBka Имeel n3r6 nIи покорблеса,зжмte eBbIrHyToI CTopoHон К унор.Всeredа поверяпгу ot-cyTCTBne 3a30pa BdoJIь ЛHHnpe3a MeKdY 3arOTOBko,ynopomИПЛTOH-OCHOBa-Hem.Пokopo6lenHьe 3arOTOBkn MOryt npobopaauBaTbcR ИлсMeUaTbcR,чTO Bbl
3OBETaKlnHbAHHe BpaaaUoJcOeRnHbHO DnCKaB npouecce pe3Kn. B 3aIroTOBKe He DoJIxHo 6bITb rBO3dE n dpyrnx HOpOdHbIX TeI.
- Pn pa6oTe Ha nnTe-ocHOaHnn He doJXHo 6bITb HnCTpyMeHTOB, o6pe3KOB dpEBeCnHbI N. D. — Ha nnTe DoJXHa JLeJXaTb ToIbKO 3aTOBKa. Pn KoNTaKTe C BpaUOuMcra NJIbHbIM NUCOM Mycop, He3aKpeNJIeHHbIe DepeBraHHbIe 3aTOBKn I dpyrHe npEdMeTb MoYr OTJeTaTb B CTOpOHy C 60JIbWoN CKOpocTbIO.
- Bcerda 6bTaBaiTe ToIbko Ody 3aToBky. HeckoIbKO yIoxKeHHbIX dpyr Ha dpYra 3aToTOBOK 6e3 DoJXHOJ KCaunnCTpy6uHoi nn HAdEJxHoro yDePknBaHny pyKoBbl3bIAOT 3aKJIINHBAHne DnCKa nnCockaJIb3bIAOT.
-Перед работон ставытплу Ha poBhoe npочhoe ochOBaHne,Ha KOTOpOM OHa 6ydeT CToTb yCTOuHBO.
-Планнугсвою pa60Tu.При ретулповке угла косогп попла сддente 3aTeM,чTOбы перевнхногур6bl npabNlbHo OTperylnuPoBaH,аЗагOTOBka 6blaHaadedжнOзФИКсUpOBaHa И He KacalacbNIIbHOrO DnCKa NIN 3auntHOrO KOxUxa.CmmylnpuYte noJIHoe DBNXeHne pe3aNIIbHOrO DnCKa,He BKIIOUay 3JIeKTpOnHCTpyMeHT I6e3AzroTOBKn Ha cTOne,чTO6bly6eINTbcR B OTCyTCTBnB 03MOXHBix PpeIITCTBn INI INОpACHOCTN 3ape3AHnЯДnCKaB ynop.
-ПрнобразOTke 3aROTOBOK,шИРиHAллДИнHa KOTOpbIX 60Льшe NOBepxHocTN ПИNTbI-OCHOBAHN,сLEdYEt NOdpePetb 3aROTOBky,HanpIMepc c NOMOUsbU yDInHHTeJIeN cTOLa HIN NODXODaUx NODCTaBOK.3aROTOBKn,ДИнHa ILIshPINA KOTOpbIX60Льшe ПИNTbI-OCHOBAHN,6e3 NaIeJxHoNOnopblMOrT OnpOKnHyTBc.Прn OnpOKn-DbIBAHN OTpe3aHHaJeTaJIb ILIg 3aROTOB-Ka MoKeT PrnNoHЯTb HIXHn 3aUnTHbIKoKxHII ONTeB B CToPOHy OT BpaSaIO-ⅢeOcR NILbHOr DnCKa.
-He npnBneKaIte NOMOuHKnOB KauEcTBe 3aMeHbI ydHInHtela CToLa Hn DJa YdepKHNBaHn3aTOBKn. HeHaJExKHOe OnpaHnE 3aTOBKn MoKeT PnUBeCTN K 3aKlnHnBaHnO NIIbHOrO DnCkA. TaKxe B Ipocecepe3Kn MoKeT CmecNTbcra Cama 3aTOBka INBTaHyTB Bac n NpOMuHnKa B 3oHy Bpaue-Hnra NIIbHOrO DnCKa.
-HeIb3a npnxKMaTb OTpe3aHHyU qacTb K BpaauoueMcy nIbHomy dNcKy. By cnoBnIX OgranuyeHHoro IpoCTpaHCTBa, Hanpi-Mep npu nCNOJb3OBAHN IpoOJbHbIX ynpOB,OTpe3aHHa Yactb MoKeT 6blTb 3a-JxTa MeJy DnCKOM uYnpOM n C cnIoOn OTbpoWeHa B CTOpOHy.
-Bcerda pa6oTaIe co cTpy6uHoi nI npyrrnnoxOaunm npncnocobHeHem InaHaedXHOH oKcaun KpyrIbIX 3arToBOK, HapnpMePHTaHr nn Tpy6.B npocecCe pe3Kn UtaHra MoKeT OTKaNTbCra, BCJeCTBnE Yero NIIbHbIN DnCK MoKeT «3aeCTb» n 3arOTOBka C BaWe pyKoH Ha Hei 6ydet npTuHyTa K NIIbHOMy DnCKy.
-Дохдntecb pa3roHa пььногdo nCKa do
полночacToTbВpaueHn,прждчem
БвОДиТь erO B 3arOTOBk.ЗтмepапpeД-
OTВparNT OTdauy 3arOTOBKn.
-ПризaklnHbAHn 3aToOBKn nIn 6IoknpoBKe nIbHOrO dNcKa BbIKIOuHTe nIny.Дoxdntecb ocTaHOBKn BCex noDBrXhblxdeTaleN, BbIHbTe BNky ceTeBOro Ka6eNn/nnn n3BLeKnTe aKKymJyTOp.3aTeM n3-BleKnTe 3aklnHHBm MaTePnaI. EcnN Bbl npodJnxTe pa60Ty c 3aklnHbUnm DnCKOM, Bo3MOxHa nTepr KoHTpOJa nnNoBpeJxHeNe TOpCObO-yCope3HoN nIbl.
-ПослеЗаВершени pe3a OTnyctnte BblKlIOuATEJIb,OnyCTnte ПИьнHyI OToOBkyBHN3 NdoXdITecb OCTaHOBKn PIIbHOrOДИСКА,TOlbKO NOcIe 3TOrO y6epnTe OTpe3aHHyU qAcTb 3aRrTOBKn.ПрвОДNTb py-KoN B6IIN3N BbIXOJaIeRo n3 3aRrTOBKnПИьHOrO DnCKA OYeH b OnaCHO.
-Прочно deprхкnte pyKoTky nIbI, KOrda BblnoHЯTe paCnII He Do KOHca 3aRoTOB-KN NIN OTnyCKaTe BblKnOuAteJIb Do DoCTNXKeHNA NIIbHOI RoIOBKO HIXKHeRO NOLOXKeHNA. ПОД DeiCTBnEM TopMOxKeHNA NIIbHyIO rOIOBKY MoKET pBlKOM 3aTaNHTb BHN3, YTO NOBblaet ONaCHOCTb TpaBMnpoBaHna.
2.3Дугпе уka3aHHЯ no TeXHnKe 6e3oNaChOCTn
-ИсpoЛьзУITEпиьнBLEДССКИ CTpORO B coOTBETCTBnCnxHa3HauChHEm.ПиьнBLEIДИСКИ, KOTOpblE He NOДXODT K MOHTaXHbIMDeTaJIaM ПИbl,ВpaUaOTcRc 6bueHNeM IMOryr CTAb IIpyuHoi cKoJIOB Ha o6pa6a-TbIBaEMOM MaTePnaJe.Pa3JIeTaIoUneCsBCTopoHbICKOJIbIMOryr IOnaCTbB rJa3a pa-60taUSeTo Илн HaxODAuXxCra PЯdOM JIO-Dei.
-Исpoь3уиTe TOLbKO ПИлььпье ДИСКИ C 3y6bЯm cперEDHM yrIOM ≤0°. 3y6bЯ cперEDHM yrIOM >0° 3aTЯгИВаOT ПИлуВ 3aRoTOBky.Bo3HnkaeTo npachocTb TpaBMn-pOBAHnpyОБpahHom yДape ПИльи И Вра-шЕнN 3aRoTOBKN.
- KaЖдь pa3 nepeД pa6ToI npOBepaHpa6ToCnOc6Hoc7b NOBnKHO 3aHT-Horo Koxya.ИспльзуITE TOLko 6e3-ynpueHNO pa6ToIoumJ əJIeKtpOnHCTpyMeNT.
-He cyIte pyKn B KaHaJ OTbOJa ONnIOK. BpaaIooNecr DetaJIIMoRyT TpaBMnpoBAtb pyKn.
B xoJe 6b60TKN BO3MOxHNO 6bpa3OBaHne BpeHOn/IAOHTOn nbIIN (HaPnMep,OT coJepKaUe CBHeu KpacKn, HeKToOpbIX BNDOB DpeBecnbl). KoHTaKT c TaKOJIbIO nn eBdIXaHne npedCTabLraE onac-HocTb KaK dJa pa6OtaUoIeO c 3JeKeTPOIH-CTpyMeHTOM, TaK n IJRA JIODeH, HaxOJaXxCr N6bn3OcTN. Co6JIouaTe npabnla TexHNKn 6e3ONaChOCtN, DeIcTByUoIe B Ba-Wei cTpaHe.
-Дл-auntbI JERKnx pa6oTaIte B pecnnapope P2.B 3aKpbIbIX nOmeueHnaX o6ecneYbTe DoCTaTOHyU BeHTnJIaUIO I nCNoJIb3yIte NblJeUdAJaUOuN annapat.
-3aMeHnTe 3ape3aHHbIe nIIN NOBpeKdEHNbIe ynpbl. B npOcece pa6oTbI NobpeXdEHHbIe ynpbl MoYr OTJeTeTb B CTOpOHy IN TpaBMnPoBaTb CToAunx PraDom IIOdeN.
-нспьзуITE TOlbko OPNrHnHaIbHyIO ocHactky n pacxOdHbIe MaTePnAbliФnpMbI Festool.ToIbko npOBepenHnaI nDonyuSeHHaFestool ocHacTka YBnIeTc86e3OpaCHOB bKcNpyatauIN ONTMaJIbHO NOxODHTДЯ INHCTpyMeHTa N yKa3aHHO 6bIaCTn npIMeHHeN.
-Испοльзу内蒙古Троннструмент дя pa-60ты только в сухи пошених.

He cmoptne npmao B nctouhNk CBeTa.CBETOIOK MOKeT NOBpeNTb rna3a.
2.4 OctaTochBle pCKN
Дахе пи сблюдени BCex Heo6xOIMbIX CTponTeJbHbIX HopM n npaBnI prn pa60Te C 3JIeKTPoINHCTpyMeHTOM MOKeT BO3HNKaTb ONaC-HocTb, HApPIMep, BCJIeDCTBVe:
- cOpnKocHOBeHnBpaaHouXxCJ DeTaeJe 6OKOBbIMN NOBepxHocTAMN: NJIbHbI JNCK, 3aXHMHOJ FJaHeU, 6OJT KpePJIeHnJ FJaHaH- Za,
Pycckn
- KOHTaKTA C TOKOpPObOJaUIMN YacTAm N pN OTKpbITOM KOpNyce N He OTCoeDnH亥HHoB BUNke ceTeBOrKa6eJ;
-OTNeTaUxuacte3aToBKn;
-OTNeTaIOUx qacteN IOBpeJdEHHbIX pa6O- uNX INHCTpyMeHTOB; - UymoBoH Harpy3Kn,
-06pa3oBaHnI nblI.
2.5 06pa6oTKa aJIHOMHHN

Ppna pa6oTe c aJIOMnHne m no cooopaXe-
HnM 6e3oNaChOCTn Heo6xoIIMo co6JIIOaTb CneDyUOuNe MepbI:
-ПоДКЛЮЧАУЕCTРОДЗАЦИТНΟу OTKЛЮЧЕНИ [Y30].
-Подключай Te эльктуонстумент K похдашему nbileydaаляшему annapaTy.
- Peryulapno ouuzaaTe 3JeKtpoHnCTpyMeHT OT OTNoXeHn nbIIN B Kopnyce DBNrataTeJ.
-ИспοльзутTe ПильныДиСК NO aJIOMNHIO.

Pa6oTaIe B 3aIuTHbIX oukax!
2.6 ypoBn yMa
3haueHn, onpeJeHHbIe no EN 62841, kak npabNIO coCTaBJIOT:
YpoBHeH 3ByKOBOrO daBne-HnIa
$$ L _ {P A} = 9 1, \Omega B (A) $$
YpoBeHb MoUHocTn 3ByKoBbIX K0JIe6aHn
$$ L _ {W A} = 1 0 0 \Omega B (A) $$
POrpeuHocTbK=3D6

BHIMAHNE
Uym,Bo3HnKaIOuI np pa6oTe
PobpeKdHne opraHOB cIyxa
Pa6oTaIeB3aunTHbIXHayuHnKaX.
Yka3aHHbIe 3NaueHn ypoBna WyMa
- noIyueHbI corglaCHO cTaHdapTHbIM MeToaM n3MepeHn I MOryT NcNoIb3ObaTbcrДЯ cpaBHeHn 3JIeKtpoHHCTpyMeHTOB MeKdy co60i
- nДлЯ npedВapnteIbHои oцeнКи haRpy3KN Ha INHCTpyMeNT.

BHIMAHNE
B 3aBnCmOCTn OT cNoC06a HcNoJb3oBaHnIHHCTpyMeHTa NocO6eHNO OT BnDa O6pa6aTbI-BAemoro MaTePnAra Noka3aTeN C03aBaEmoro IM pa6oery Wyma MoYr OTJNuA TbCBaOT yKa3aHHbIX B nacOpTe n3dEJIy.
3a oCHOBy IJIЯ onpeJeHnIe Mep no oxpaHe Tpyda pa6oTHNKOB bepnte foakTuYeCKn ypoBeHb Wyma Ha pa6ooyem MeCTe. (PpN 3TOM yUHTbBAuTE Bce npaMeTpbl TexHOIo- rHuEcKOTo UKJa, HApPmEp NepNoDbI, KOrDa 3JIeKtponHcTpymEt BbIKlOueH N KOrDa BKIOUeyH, HO He HaxoDITcB pa6oTe.)
6bl npn BbIIOJIHeHnn pa60T OH He MoI CMeUaTb- cA.
BnHTbI [5A]: 3aKpeNITe 3JIeKTpONHCTpyMeHT Ha pa6ooye NOBepXHocTn YeTbIpBm BnHTaMn.ДЯ Hnx ecTb CneuaJbHbIe OTBepCTna [5A-1] B ueTbIpex ONOpHbIX TOOKaX PJIntbI-OCHOBaHnI.
BnHTOBbIe Ctpy6uHbI [5B]: 3aKpeNITe 3JIeK- TpOuHCTpyMeHT Ha pa6oey NOBepxHOcTn BnHTOBbIMn Ctpy6uHaMn [5B-1]. OOpHbIe ToUKn CnyXkAT Dnla HAdEckHoRo KpePNeHry C yUeTOM cEHTPa TjXKeCTn.
3aKMMHON KOMNJIeKT dIy MFT [5C]: 3aKpeNITe 3JIeKTPoINHCTpyMeHT dTeTAMN 3aKIMHOrO KOMnJIeKTA [5C-2]Ha MHOrOfoYHKUHOHaJIbHOM cToJIe MFT/3 nIIu MFT/Kapex (SZ-KS).ДЯ 3ToRo cIyJxAT WeCTnIRpaHHbIe OTBepCTnR [5C-1]cDByX CTOpOH pIaOM c paCUnpInTeIeM PJIITbI-OCHOBaHN.
TeLeKka-TpaHcΦopMepUG-KAPEX KS 60[5D]: co6IIOdaIte npINaRaEmoe pyKOBoIcTBO nO MOHTaJy.
6.3 TpaHcnpTnpoBka

BHHMAHNE
Onachoctb 3aueMJIeHnA
Bo3MOxHOppackJaIbIbAHne/BblBnraHne nnJIbl
TpaHcnpOpTnpoBaTb NnIy HxKHO BceRdaB npedycMoTpeHHOM IJIa 3ToTO TpaHCnpTHOM nOLOXKeHN.

Onacnoctb TpaBMnpoBaHnra! Pn nepeHocke Nnla MoKeT BbInactb n3 pyK. No-DepxNte eBcERda 06eMn pyKaMn 3a aJIbHbIe pyKn [6].
Фиксаннстугм enta (TpaHcnpTHoe noLoXeHne)
HAmotaTe ceTeBoi Ka6eJb Ha na3 [2-11] JIa Ka6eJIa N 3aΦHKcnpuTe Ka6eJIbHbIM 3a-JXMMOM [2-1].
CdBnHbTe PnIbHyIO qAcTb B 3aJHee NOLOXe-Hne n 3aΦNKcnpyIte BNHTOM-6apawKOM [1-5].
- IpepeBEnTe nIbHyu acTb B BepTKaJIb-Hoe noJIOXeHne.
Ocna6bTe pyky-rgn6ok [2-9],
yCTaHOBNTe NINbHyIO YaCTb B BepTNKaJIbHOe NOJIOKeHne I
CHOBa 3aTaNHTe pyuKy-rgn60K.
3acToOpnte nHbHyu acTb.
Haxmte u ydepknaTe haxaTo npedoxpaHnTeJbHyIO KhoNky [1-2].
Onyctnte nnIbHyu yactb Bn3 do ynpa.
Перекиньт epiurблokирвк [1-6]НВрем ТраHCnOpTIpovBkn.
Otnyctnte npedeoxpaHnTeJbHyIO KhoNky.
HnIbHaayactb octaetcB HnXHem noIoxeHHN.
ПовернITE NOBOPOTьн ДИСКВпраBoe no-JIoXKeHne.
Ocna6bTe BnHT-6apaWeK [2-6].
HaxmTe oKcaTop [1-11] u yepxuBaIte eRO B haxkTOM nOJoxKeHHN.
HaKNoHnTe NOBOpOTbIy DnCK [1-12] BnpaBO Do ynpa.
Otnyctnte fHKcaTOp, 3aKpyTnTe BnHT-6apawek.
Tepeb HctpymeHT haoNTcB TpaHCnOpTHOM noJoxHn [6].
Ha nIbHou qactn [6-1] nB na3y [6-3] nIa HAMOTKN Ka6eJIy npeducmoTpeHbI cne- IaIbHbIe yIy6IeHnI dIy nepeHoCKN, Iy TaKKe MoXHO nepeHocNTb 3a pacwnPTeIIN PInTbIOHOBaHnI [6-2] (BΦHKcnpoBAHHOM coCTOAHnn!).
6.4 Pa6ooye noJoxKeHne
Pa36IoknpoBka 3JIeKTPoHcTpymeHTa (pa6oyee noJoxKeHne)
YcTaHOBnte NnJy B BepTKKaJIbHoe NOLOXe-Hne (NnJIbHbI DnCK B BepTKKaJIbHOM NOLO-XeHN) [10].
PnKMTe Nny Bn3 Do ynpa N yepKnBaHTe B 3TOM NOJXKeHN.
- NpekeKnHbTe pbluar 6JIOKnpOBKn Ha BpeMra TpaHCnOpTnpOBKn [1-6].
- POnaBaIte nIy nIaBHO BBepx.
OTMToaTe ceTeBOI Ka6eJIb N BCTaBbTe BUNKy ceTeBOrO Ka6eJra.
7.5 Bb6op nIbHoro dNcKa
Пильные Festool MeIOT МаркИрOBКУВ ВИDE CBETHOrO KoIbca. ZubET KoIbca yka3bIBAeТ haHa3HaueHneДИСKa.
UBeT MaTePnaJ CnMBoJ
XeIbI DpeBecnHa mYrKn IJaCTNk

KpacbI InactNk/NckycctBeHbI KameHb

3eHbI CToNTeHbIe MaTePnabl

CnHnAJIOMnHn, cTaNb/ C3HNDbN-NAHeN

7.6 CmeHa nnIbHoro dNcka [9]
![FESTOOL KAPEX KS 60 - CmeHa nnIbHoro dNcka [9] - 1](/content/2026/02/418909/images/c3a3c7df401eae89fb2c05ac031b37f00cb92b08eae2bc0d75e0e8374f609b0d.jpg)
PPEyPPEKDEHNE
Onachoctb TpaBMnpoBaHn, nopaxKeHne 3JeKtpnuecknM TOKOM
- Ipeed Haayanom JIO6bix pa60T Ha uHctpyMeHTe BceIa BbIHMaIte BNkY n3 pO3eTKI!

BHUMAHNE
CunbHo HaraBauoUncra NoctpbI pa60uHnHcTpymENT
Onachoctb TpaBMnpoBaHn
He nCnoB3yIe 3aTyNnBUnneCn HeNCnpaBhIe pa6OuNe nHcTpymEnTb!
3aMeHy nIbHOrO dNcKa BblIOJHnTe B 3a- uTHbIX nepyATkax.
Iodrotobka HnctpymeHa
BbHbTe BnIKy ceTeBOrKa6eJra,cmotaTe ceTeBOi Ka6eJb.
Onyctnte nInbHyio yactb Bn3 do ynpa.
-Перекиньтepыuar6лokировkn[9-2]HaВремТраHCnOPTnровkn.
MeIJIeHHOOTBeINTe NIIbHyIO YAcTb BBepx.
- N3BJIeKInTe KJIIOU-WeCTnIgpaHHNK [9-7] n3 depkaTeIb na3y [9-10]ДЯ HAMOTKN Ka-6eJr (OTcEK dIg KJIIOuA).
ChrTne nnIbHoro dNcKa
HaxmTe uyepeKuBaIe cToOp [9-1] ⅢnHdJIa.
PpOBoPaUHbAte PnIbHbI DnCK C NOMoUbIO KJIoua-WeCTnIrpaHHnka [9-7]doΦNKcauN cTOnopa WnHdJIa.
Ocna6bTe BnHT [9-6] c nOMoUbIO KJIoua-WeCTnIrpaaHHka (JeBaJ pe3b6a,OTKpyuBaTBe HAnpaBHeHm CTpeKN!.
- IV3BJIeKNTe BnHT IN CHIMNTE ΦlaHeu [9-8].
OTnyctnte cToOp ⅢHdJIa.
HaxMnte n ydepxnBaIte HaxKaToI npedoxpaHNTeIbHyIO KhoNky [9-3].
BbITaHnTe POBuXKhBi 3aunTHbI KOxUx [9-4]pykoN ydepkBaIteero.
CHIMITE NJIbHbI INCK [9-5].
YctaHOBKa NnIbHoro DnCKa
Дя obecneueHЯ BpaueHЯ 6e3 6neHЯ NnIb-HbI DnCK I ΦlaHeU DoJIKHyI 6bITb YNCTbIMN OT nbIIN 3aFpy3HeHIn.

Дя obecneueHЯ BpaSeHn6e3 6NeHn HbHbI nCK n ΦlaHeu DoJxHbI 6bItb YnCTbl-OT bJIIN 3aFpy3HeHn.
- YcTaHOBInTe HObBi NnJIbHbI INCK [9-5].
HaIINcB Ha NInbHOM DnCKe DoJXHa 6bITb BnDHa. HApBaBHeHne BpaUeHnA NInb-Horo DaNCKa DOJXHo COBnaDaTb C HApBaBHeHnEm CTpeJIKN [9-9]!
YCTaHOBInTe ΦIaHeu [9-8] TaKIM o6pa3oM, YTO6bI npRHaHHbIe φOpMbI φLnHua, Kpe- nEHXaPe3b6a I NnIbHbI dNcK BOWIN B 3aueJIeHne dpyr c dpyrom.
HaxmTe uyepeKuBaIte cToOp [9-1] WnHdJIa.
PpOBoPaUBaIe NnIbHbI DNCK C NOMoUbIO KJIoua-WeCTnIgpaHHNka [9-7]doΦNKcauIN CTOnopa WnHdJIa.
BCTaBbTe BnHT [9-6] n 3aTaNHe erO npOTNB HApBaBHeHna, yKa3aHHOro cTpEkoN.

Onachocb TpaBMpoBaHna!Pocne KaJxdoi 3aMeHb NnIbHoro DnCKa npoBe-
PraHTe HAdEeXHoCTb erO nocaKn. Ppi cna6o 3aTAYHTOM BnHTe NIIbHbI DNCK MoKeT pacfHK-CnPOBaTbcr.
8 Pa6ota c
3JIeKTPoHHCTpyMeHTOM


PPEyPPEKDEHNE
Otneauuue qactn pa6oery nHctpymenta/ 3aROTOBKN
Onachoctb TpaBMnpoBaHn
Pa6oTaIeB3aunTHbIX oukax!
BoBpempa60bI nnblIpyrne nua doJxHbI HaxoNTbcra Ha 6e3oNaCHom pacctOaHH.
BcerdaHaedEckHoΦnKcnpuTe3arToBKn.
3axmHbI NOBepxHOCTN BnHTOBbIX cTpy6- CINHdoJXHBIpNJrTaTbNOJHOCTbIO.

PPEyPExKdEHN
POnBnXHbI 3aUHTbI KOxYx He 3aKpbIBaETcR
Onachoctb TpaBMnpoBaHn
- Pnpebnte nJneHne.
OTcoeHnHTe cTeBOJ Ka6eJIb, ydaJInte o6pe3Kn. B cnlyae nobpejKeHnJ 3aMeHnTe NOdBnKHBi 3aUHTbI KOxYX.
Ppabnla 6e3oanHoi pa6oTbI
IpBbIpOJIHeHn pa60T co6JIoJaTe BCE BblweynomHaYtBe yKa3aHnNo TexHnKe
6e3oNaChocTn,aTaKKe cIeNyUOuNe npaBnla:
- PpaBnJIbHoe pa6ooye noJoxKeHne:
-cpepeHnHa pa6oey cToPOHe;
JIUNOMKIIJIe;
-paOMcJINHnepe3a.
-Пи Вьлон HeHn pa6oT Bcerga ydepxu-BaIte 3JIeKtpOnHcTppyMeHT pa6oYe pyko3a pykoTky [1-1].Cbo6OHa8 pyKa DoJxHaBcerga HaxOHTbc8 BHe ONaCHO 30HbI.
-ПОДВОДNTe 3ЛЕКТРОИНСТРУМЕТ K 3aRTOBKe TOJIbKO BO BKJIQUECHHOM COCTOHIN.
- CkoppeKtnpyIte ckopocTb nOdaun, yTo6bl n36eXaTb nepeRpy3Kn 3JIeKTPoHcTpymEHTa n OIIaBJeHnI pIaCTMaCCbI npI pe3Ke IJa-CTIKOB.
- y6eIntecb B TOM, cyTo pyuKa-rpN60k [2-9] n BnHT-6apawek [2-6] 3aTaNHyTbl.
-3anpeaetcpa6oTaTb npn HecnpabHoi 3JIeKTPoHnke 3JIeKTPoHnCtpyMeHTa, T. K. 3To MoKeT npNBecTI K 4pe3MePHOMy yBelenue-HNIO qAcTObI BpaUeHnA. HeucnpaBHOCTb 3JIeKTPoHHOrO 6JIOKa MOXHO ONpeJeINbI NO OTCyTCTBnIO PIAbHOrO NysCa, HeBO3MOxHOCTn peYInpOBKn qAcTObI BpaUeHnBAJa DBNrataJIe I IO DblmLeHnIO nII IN 3aAnaxy Ra-pN N3 MaunHKn.
8.1Фнкацязarotobkn

OcToPoxHo!UyntbIbAaTe cBoiCTBa 06pa6aTbIbAemoro MaTePnAna:
OnachocTb TpaBMnpoBaHn
YcToHnBOeNoJoxKeHne-3aRoTOBKnIOJXHbI npIneratb KynOpHoN PAnHe. He 6pa6aTbBaNTe 3aROTOBKn, KOToPbIE HeBO3MOxHO 3aKpeNTb DOJIKNbIM 6pa3OM.
Pa3mep—He 6pa6aTbIbAitcJHxKOM MaJIeHbKne 3arotOBKn. Ioo6paXeHNrM 6e3-ONaCHocTN pa3mep 6pe3KOB DOJKeH 6bITb He MeHbWe 30 MM.MaJIeHbKne 3arotOBKn MoRyT 6bITb BTAHyTbI NJIbHbIM DnCKOM B 3a3Op MeKdY DNCKOM N yNOPHOI PAnHKoN.
IpaBnBna onopa co6JIOaNe Te MaKcMaJIbHbIe pa3Mepbl 3aTobKn. Bcerda nCnoJb3yIteN 3aKpeJIaIe ydINHInTeJIbHbIe 3JeMeHTbl dIaONOpbl 3aTobKn. B npOTNBHom cIyuae B 3aTobKe MOrYT BO3HNKHyTB BHyTpEHnE HApJXeHn, KOTOpbl eMOrYT npNBecTI K HeOxNdaHHbIM DeΦopMaunm. Co6JIoJaTe yka3aHnNo pa3-Mepam 3aTobOK (cm. pa3de7.4).
Iopraok 3axkma 3arotobkn [7]
PnKMTe NJIbHyIO YacTb BHN3 Do yNopa.
- IpekeHbTe pblar 6IoknpoBkn [7-1]Ha BpeMraHcnpTnpOBKn.
MeIeHNo OTBeNTe NINbHyU qAcTb BBepx.
- YIIOXKeTe 3aIOrTOBky 3aIOndInuO cyIopHoi IJIaHKoN [7-3].
3aKpeNte 3aToBky BnHToBOcTpy6uHoi [7-2].
- Y6eIntecb B HauEckHoH φHKcauN 3aRoTOB-Kn.
8.2 Co6IoudeHne pa3MepoB 3aRoTOBOK
MaKcMaJIbHbIe pa3Mepbl 3aRoTOBOK npu pa6Ote 6e3 ycTpoiCTB pacUmpenna pa6ooye IOBepxHOcTu
YroI Kocoro npoIIa/ NaKloHa no ⅢKaJIe
BbicotaXu npHa X nnHa
0^ / 0^60× 305× 720MM
45^ / 0^60× 215× 720mm
0^ / 45^ BnpaBo 20 x 305 x 720 MM
0^ / 45^ BJIeBo 40× 305× 720MM
45^ / 45^ BnpaBo 20× 215× 720MM
45^ / 45^ BnEBo 40× 215× 720MM
MaKcImaJIbHbIe pa3Mepbl 3aToTOBOK npn cMOHTnpoBaHHbIX UG-KS60 und KA-KS60
MaKcImaJIbHaBbICotaHUnPnHa3aROTOBKnHe n3MeHReTc. OnopHaNoBepxHoCTb CO CMOHTn-
Pycckn
poBaHHo TeJeXko-TPaHcΦOpMePOM COOTBeTCTBye TOnOpHO NOBepXHOCTN C BblBnHyTbIMpacuupTeJem cToJa.
YcTaHOBJIeHHa OChACTKa JInHa
UG-AD-KS60 720 MM
PpOBePKa NOBnKHOCTN NOBnKHOrO 3aUNTHoro Koxyxa
3aunthbikoxyxdojxeh6bItbBcerda POBnKHBIM 3aKpbBaTbcraABTomatuecken.
- IV3BnEKeNTe BnIky cTeBOrO ka6eJra.
Bo3bMntecb 3a noBnKhBn 3aunTHbN KOxpykO nnoPobyTe 3aDbHHTb ero B NlhbHbN CTahOK. POnBnKhBn 3aunTHbN KOxyDolXeH mEt b JERKn XOD n NOUTN POJHOCTbIO 3aXo- dNTb BM aTnHKOBbl KOKyx.
OuHcTka 30HbI BOKpyr NnIbHoro DnCKa
30Ha BOKpyr NoBnKHO 3aUNTHoro Koxyxa DoJxHa 6bITb BCerda YnCToI.
- YdaIaIte nbIb n OOnJIKN cTpyeN CKaTOrO BO3dYxa NIN KnCTOuKoN.
TopceBaHne
OchOBHOyHKUeN TopoBOOH NJIbI ABJ-ETcNJIeHHe CO CTAuNoHApHbIM NJIbHbIM CTaHKOM 6e3 HAKLOHa. PeKomeHdyemar UnpHa 3aTOBOK -do70 MM.
BnHT-6apaaek [1-5] cTOnOpNT nIbHbI cTa-HOK, n OH 60JIbWe He MoKe TpeMeaTbcra Bneped/Ha3aI.
iRpkoe ocbeueHne SL-KS60 (B KOMnIeKeT e nIOnu)OT6paCbIBaet Ype3 NIIbHbI INCK pe3KyTO TehBa Ha 3aROTOBky. AKTNBuPyInTe FyHKUIO HaxKaTneM BblKJIIOuAte- Ira [2-3].NINHpe3a cTaHOBITcBnHa IocJe OnySCKaHnI NIIbHOrO cTaHka.
PnJIeHHe c npOraKkoI
Pn nIeHn c npTgKo nnBbHbJ dNcK noBODNTcA Cpeepn K 3aTOBKe, YTO oBeCneuBaET KOHTPOIpUye Moe nIeHHe C He3NaHTeJIbHbIM fN3NuEcKm ycUInem. PeKomeHdyTeTcIyO6pa6OTKn 3aTOBOK uInpHo 60Nbwe 70 MM.
PpabnlbHbI nopAOK nJIeHn c npToXKoN
I36eraTe nJelenno no noaue! Pn nn- JIeHn He TAHnTe OnyuEHHyIO NJIbHyIO qactb K c6e. NJIbHbI DnCK MoKet 3aKlnHnTb I NNbHaayacTb yckOpNT DBNXeHne B HappaJIeHn K onepaTopy.
OTnyctnte BnHT-6apawek 6loKnpOBKn yH_ npotJxKn [1-5].
PnDnHbTe NnIbHyu qacTb Do ynopaa.
- YdepxnBaHte HaxKaToI npeOxpaHnTeJbHyIO KHOJIky [1-2].
-ПрижмпгБи3 ПИьHyIOЧы,удржваянжатои KHOKNy BKJIQUeHnry/БblKJIQUeHnry[1-3].
IIOBBOIDTe NINbHyU qacTb K 3aTOBKe TOnbKO IocNe IOCTNKeHnY yCTaHOBHeHHo YAcTToTbI BpaueHnY.
BbinoHnTe pe3, noaBaA nnIbHyIO yAcTb uepe3 3arOToBky do ynopa.
- Nocne BblnoJIHeHnpe3a OTBeIte NIIbHyIO qAcTb Ha3aI BBePx. IoBnXhI 3aIHTbI KoxyX 3aKpoETc aBTOMATnueCKN.
OTnyctnte npedoxpaHnteJbHyo KhoNky IN KHOKNy BKJIIOUeHnra/BbIKJIIOUeHnra.3aTaNHT BnHT-6apaWeK.
8.4 Kocbie npoNJIbI [10]
CTaHdapThbIe yIblkocbIX npoNiIOB
CleyuOuNe yIbI cKoCa (BLeBO u BnpaBo) KcnpyIOCTaBtOMaTnueckn: 0^ 15°,22.5°,30°,45°,60°
PereynilpoBka cTaHdapTHbIX yrIob KocbIX npoNilOB
Ocna6bTe BnHT-6apaWeK. 1
Haxmnte fukcaTOp, Ho 6e3 fukcaun. 2
- YcTaHOBnTe NOBOpTHbI DnCK B HyXHoe NoJIOxKeHHe 3TnycTnTe fNkCaTop He3aDolrO Do yCTaHOBKn HxHOrO yrJa.
IobopothbI dNcKJIeRKO fNkCupyeTcB CtaHdapTHbIX yIIOBbIX IIOJKeHNx DnI KocbIX npOnNoB.
3aTAHNTBnHT-6apaWeK. 4
PerynpoBka npo3BbHoro yrJa Kocoro npoHa
- Ocna6bTe BnHT-6apaWeK. 1
HaxmTeΦnKcaTop aΦnKcnpyTe eO HaxaTneM BLeBO.
-Плавно повернite поворотьи дись В hyжhoe noJoxeHne 3
3aTAHnTe BnHT-6apaWeK. 4
8.5Пиеленецnodуrom[11]
!
Pn HeKoToPbIX cneuaJIbHbIX HacTpoIKaX
pe3OB noI yIOM Heo6xOIMo CdBnRaTb NIN CHImaTb yOpHbI e INaHKn 1M. pa3dJI 7.3.
OT 0^ Do 45^ , HauKloH BneBo
Ocna6bTe pyky-rgn60k. 2
HaKIOHnTe nIbHyu qactb do Heo6xOIMo- ro yrna pe3a
CHOBa 3aTaNHTe pyuKy-rgn6ok .5
OT 0^ Do 45^ , HAKJOH BnpaBO:
Ocna6bTe pyuKy-rgn60k. 2
HaxMnte KhoNky De6JoknpoBKn, Pu Heo6xOAnMoCTn pa3rpy3nte e, CJIerKa Ha-KIOHNB B DpyrHy O CTOpOHy.
HaKIOHnTe nIbHyO qAcTb Do Heo6xOIMo- ro yrna pe3a
CHOBa 3aTaNHTe pyuKy-rgn6ok .
46-47°, NaKIoH BnPaBo/BIeBO (npoNJIbI c TblbHOI CTOpOHbI)
Ocna6bTe pyky-rgn60k. 2
HaxMnte KhoNky De6IoknpoBKn, Pu Heo6xOaIMocTn pa3rpy3nte e, cJeRka Ha-KloHNB B dpyrYIO CTOpOHy.
HaKIOHnTe nnIbHyIO yactb do ynopa. 4
- NOBTOPO HAXMNTe KHOKNy De6NOKnPOBKN 3.
CHOBAHaKIOHInTe NJIbHyU qAcTb. 6 - Choba 3aTЯнite pyuKy-rpnsok.
8.6 06pa6oTkα na3OB
Пила Имeel 6eecTyneHcyaTyO peRyIInpOBky rIy-6nHbI Bbl6OpKn Na3a.БlaRoIapЯ 3Tomy MoKHO Bbl6nPaTb Na3bI Nn npoФnN JIO6OJ rIy6nHbIB 3aToTOBkax IIO6Oro pa3Mepa.
Kpyrnaopma nIbHoro dNcKa obycaBnBaet Ierkn u3rnbpe3a BBepx. JIra 06pa60TKuToHOro rOpN3OHTaJIbHOro na3a MeJy 3aTOBkoN uYnpHOJ PAnHKoJ cJeNyET 3aKaTb DepeBHHbI 6pycOK dJIra CO3dAHn paCCTOAHN OK.4cm.
YcTaHOBnte PnIy B pa6Ooee noIooKeHne.
i IpekeNdbaBte pbyar orpaHnueHnaIy- 6nHbI Bbl6OpKn n3a [1-4] TOnbKO TOrda, KOrda NIIbHaJ yAcTb HaxOJNTcB B Bepx-Hem noLoKeHN pa6ooye noLoKeHne).
-NotaHnTe pblar orpaHnueHnraIy6bHbIBbl-6opkn na3a [1-4]BnepeJdo fHKcaun. Teepb nIbHa qactb onyckaeTcB Hn3 T0JIbKO do yCTaHOBJeHHoI rIy6bHbI TopceBaHn.
NobopoToM pbyara orpaHnueHn rny6nHbI Bb6opKn n3a yctahOBnTe HxKHyo rny6nHy (BpaueHne BLeBO = yBeJnueHne, Bpaue-Hne BnpaBO = yMeHbWeHne)
PpOBepe Te BbIOnHeHHyH NaCTpoKy PpO6HbIM OnyckaHnem NIIbHOJ Yactn.
OnyckaIte nIIbHyU qAcTb TOnbKO, KOrda pyuar orpaHnueHnraLy6nHb Bbl6OpKn na3a 3aΦnKcnpoBaH B OdHom N3 DByx KoHeuHbIX noloxeHn. OnacHocTb NobpeXDeHnE 3JIeKtpoHnCTpyMeHTa.
BbInonHnTepe3bl.
Дядeблokировки орранчeyняг ly6nbl BbI6opkn Na3a OTTЯНTe pblurar [1-4]Ha3aJ.
9 06cIyXkBaanHe n yxoD
PPEyPExKdEHN
Onachoctb TpaBMPOBaHn, nopaxKeHne 3JeKtpnuecknM TOKOM
Ipeed hauanom IIO6bIX pa60T no peMOHTy IN TexHnueckomy 6cnyXnBAHNIO yCTpoNCTBa BbHmaiTe BNkY n3 po3eTK!
Bce pa60tbo npo pemOnTu nTexHnueckOMy 6cnykubAHNO, KOToPbI Tpe6yIO TkpbI- BaHnja KOpNyca DBNrataJIe, DOJXhBI BblONHЯTbcra ToIbKO CneuJaNCTaMn ABTOpN3O-BaHHo MaCTepCKoCepBnCHO cLyX6bl.

CepBnchoe 06cIyKbAHne n
peMOHTdoJXHbI BblIOJIHrTbcraToJb- KO CpeuaJIncTaMn HnPmbl-N3rTOBNTeJI NIN B cepBnCHoM MaCTepcko. AApec 6bnxkaIwe Mactep
Perylaepna uNCTka HNCTpyMeHTa, oObeHNO MexaHn3MOB perylnpOBKN Ha
PpabJIOxH, JbIeTc Heo6XoIMMbIM ycIOBnEM 6e30NaCHO pa6Obl.
MaunHka ochaueHa cAmooTKIouaIoMmucy yroIbHbIMn ⅢeTkamn. Pn nX nOJHom n3HaUNBaHn ABTomatUeCKn PpeKpaaaetcnoJaTaTOKa n MaunHka npekpaaet pa6oty.
9.1 3aMeHa nblJeYnaBnBaTeJra [12]
i InnaHnneJxero c6opa nbInn oOnIOK cnEnyET Bcerda pa6oTaTb co CMOnHpOBAH- HbIM nbIeYnabNtBeTeJeM.
OcnaabeBnHbI [12-1]Ha 3aunTHOM Koxy-Xe,CHMITE nblneynaBnBaTeIb N 3aXIM.
- YcTaHOBnTe 3axm [12-2] Ha HObBi NblJeyJaBnBaTeJIb.
PnBepHnte nbIeynabnBaTeIb [12-3] BmecTe C 3aXIMOM K 3aIHTHomy KOxxy.
9.2 3aMeHa BCTaBKn CToJa-OCHOBAHn [13]
Bcerda 3aMeHnTe n3HoWeHHbIe BCTaBKn CToJa-ocHOBaHNr. He nCnoJb3yInTe nNly 6e3 BcTaBOK.
OTBnHTte MeKy [13-3]ДЯ MaJIKN-yrIome- pa.
Ocna6bTe BnHTbI [13-1] BO BCTaBKe cToJa-OCHOBAHNA.
3aMeHnTe BCTaBky cToJa-OCHOBaHNy [13-2] N MeTKy [13-3].
CHOBA BCTaBbTe BuHTbl.
PpoBepbTe pacnoJIOKeHne no3nOHHbIX
MeTOK Ha 6dH0J LInHn, KOTOpaJdoJI-XHa npoxoIbTb NOD pIpaMbIM yrIOM Kynp-HbIM PlaHKaM.
9.3 OuncTkA/3aMeHa OKoUka dIyApKoro ocBeueHn (B KOMPJIeKeTne HnOnOpun)
Яркoe ocbeшени SL-KS60 ocbeшаet kpoMky pe3a Ha 3arotobke. Пп рабоTe c nHTeHcNBbIM obpa3OBaHnem nbIINярКocTb ocBeшени mo- ket 6bITb ocla6leHa. Рорадok ouNCTkn [13]:
- YcTaHOBInTe nIy B pa6Ouee noLoXeHne.
- N3BneKeTe OKOuKo DnI pyKOrO ocBeueHnra [13-4] 6e3 nCnoJIb3OBaHHn IHNCTpyMeH-Ta n OUnCTNe/3aMeHnTe erO.
- Choba yctaHOBNTe OKoWKo JIJIЯrkoro OcBeuHn.OKoWKo DoJXHo 3aΦNKCuPoBaTbcr C xapakTePHbIM UeJyKOM.
10 Ochactka
KoIbI 3aKa3a OChAcTKn N HNCTpyMeHTOB MoXHo HaTn B KaTalore Festool n B INHtepHeTe Ha www.festool.com
IOnOHnTeBHO K BblweynomHyToH OChactKe Festool npedlaaet Wnpokn accoptmert Dpynx npncnoc6JIeHni, KOtOpbIe pacwnpT yHKUHOHaJIbHbIe BO3MOXHOCTN I NOBbICrT 0- eKTHBHOCTb pa6oTb BaWei nnbl, HapnPMeP:
- TopoBouHbI ynop KA-KS60
- noctabka UG-KAPEX KS 60
- BnHTObBie onOpbl (HoxKn) A-SYS-KS60
- 3axmHoe coeDnHeHne IJIa MFT SZ-KS
- MaJIka-угломер SM-KS60
- rapkoe ocbeueHne SL-KS60
10.1 MaIIka-yrIoomep SM-KS60 (B KOMnJIeKTe nn onu)
C nOMOuBIO MaJIKN-yrIOMepa MoXHO n3MepNTb IIO6oN yroN (HaNPIMeP, 6pa3yeMbI nDByMa r cTeHkAmn). Pn n 3TOM MaJIka-yrIOMep o6pa3yET 6nccekTpncy.
ChTne BHyTppeHrero yrna [14A]
Pa36JokpyTe nKcaTOp [14-2].
Pa3noXnTe nIeun [14-1] IJIa onpeJeHEnBHyTpEHHero yrna.
3a6JnoKpyIte oHKcaTOp.
LtpnxOBHHa MeTka [14-4] npedctabnaretco6oBb6ccekTpncy. BucceKtpncy MoxHo nepheCTN NO HApXHbIM KpOMKa MaJKN Ha No3N
UHOHHbIe MetKn HIOBOpOTHom IUCKe.
Kolor Material Symbol
Barvy Material Symbol
Declaration of Conformity
We as the manufacturer Festool GmbH, Wertstraße 20, 73240 Wendlingen, Germany declare under our sole responsibility that the product(s):
Designation:
Designation of Type(s):
Serial number(s) 11
Mitre saw
KS 60 E
200113, 10006965
fulfills all the relevant provisions of the following UK Regulations:
S.I. 2008/1597
S.I. 2016/1091
S.I. 2012/3032
Supply of Machinery (Safety) Regulations 2008
Electromagnetic Compatibility Regulations 2016
Restriction of the Use of Certain Hazardous Substances in Electrical and Electronic Equipment Regulations 2012
and are manufactured in accordance with the following designated standards:
BS EN 62841-1:2015
BS EN IEC 62841-3-9:2020+A11:2020
BSEN55014-1:2017
BS EN 55014-2:2015
BS EN IEC 61000-3-2:2019
BS EN 61000-3-3:2013
BS EN IEC 63000:2018
11 in the specified serial number range (S-Nr.) from 40000000 - 49999999

Place and date of declaration: Wendlingen, 15.04.2021
Signed on behalf of and in name of Festool GmbH

(1)
i.v. Q Brann
Ralf Brandt
Head of Productconformity
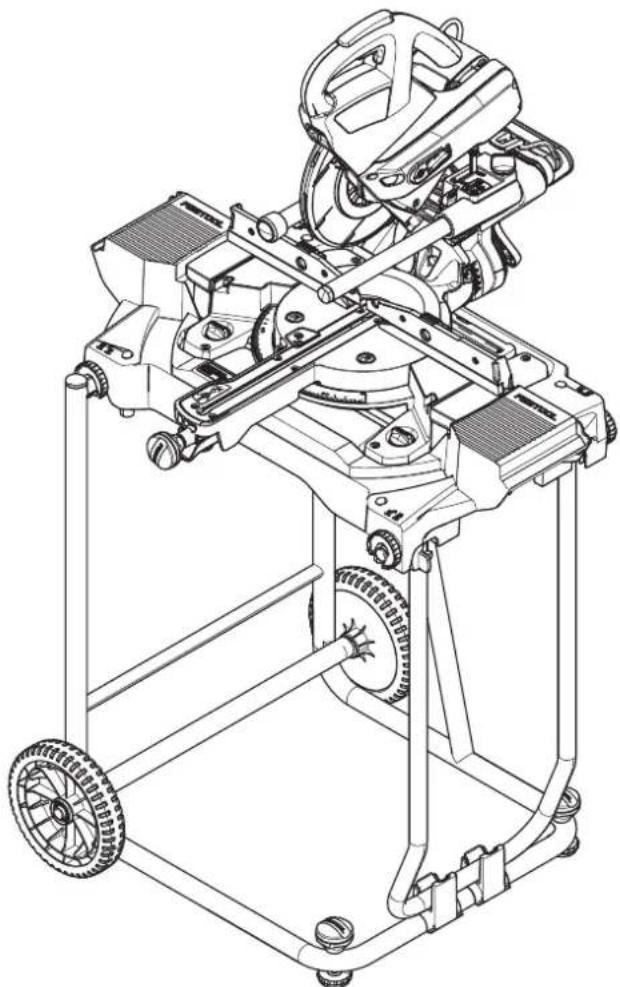
5D
optional:
facultative:UG-KAPEX KS60/UG-AD-KS60
optional:
6
7
8
8A
11
| 1x 4 | 0-45° |
| 1x32x4 | 46-47° |
| 1x3,4 | 0-45° |
| 2x3,4 | 46-47° |