BO05289E - Washing machine BOMPANI - Free user manual and instructions
Find the device manual for free BO05289E BOMPANI in PDF.

User questions about BO05289E BOMPANI
0 question about this device. Answer the ones you know or ask your own.
Ask a new question about this device
Download the instructions for your Washing machine in PDF format for free! Find your manual BO05289E - BOMPANI and take your electronic device back in hand. On this page are published all the documents necessary for the use of your device. BO05289E by BOMPANI.
USER MANUAL BO05289E BOMPANI
Thank you for choosing our product.
Please read these instructions carefully before connecting and using the appliance.

Knowledge of the operating principles will help guarantee correct and safe use of the appliance. This instruction booklet contains the technical characteristics of the washing machine and is full of useful information regarding its operation, all designed to help you get the best out of your appliance. If the appliance is sold or handed over for use by others, remember to give the new user the instruction booklet.
MODEL: DATE OF PURCHASE: / /
SERIAL NUMBER:
CONTENTS

NOTES AND ADVICE FOR THE USER 4-5
DESCRIPTION OF THE APPLIANCE 5
STALLING THE WASHING MACHINE 6-8
Unpacking the washing machine and removing the locking devices 6
- Levelling the washing machine 6
- Connecting to the mains water supply 7
- Connecting to the mains electricity supply 8
USING THE WASHING MACHINE 8-10
- Recommendations prior to use 8
Use of detergents 9
How to remove some stains 10
International clothing care symbols 10
11-12
AINTENANCE Cleaning the washing machine 11
- Cleaning the filter 11
- Resolving problems 12
This appliance is marked as complying with European Directive 2012/19/EU, Waste Electrical and Electronic Equipment (WEEE). Make sure that the product is disposed of in a correct manner. The user is obliged to contribute towards preventing negative consequences for health and the environment.

The symbol affixed to the product or accompanying documents signifies that the product must not be treated as normal domestic refuse, but must be delivered to an authorised collection centre to enable the electric and electronic equipment to be recycled. When disposing of the appliance, comply with local waste disposal regulations. For further information on the treatment, recovery and recycling of this product, refer to the appropriate offices, local domestic waste collection service or the retailer from where the appliance was purchased.

Before connecting the appliance read these instructions carefully.
Repairing the failure arising from inappropriate connections or use of the appliance is not covered by the guarantee.
THE MANUFACTURER WILL NOT BE HELD RESPONSIBLE FOR ANY INCIDENTS RESULTING FROM NON-COMPLIANCE WITH SAFETY STANDARDS OR THE REQUIREMENTS OF THIS INSTRUCTION BOOK.
This appliance can be used by children aged from 8 years and above and person with reduced physical, sensory or mental capabilities or lack of experience and knowledge if they have been given supervision or instruction concerning use of the appliance in a safe way and understand the hazard involved. Children shall not play with the appliance. Cleaning and user maintenance shall not be made by children without supervision. Do not allow children to play with the equipment.
The appliance must be properly connected to the system with new hoses provided. Used hoses must never be reused.
The operating pressure of water (minimum and maximum) must be between 0.5bar (0.05MPa) and 10 bar (1MPa)
If the supply cord is damaged, it must be replaced by the manufacturer, its service agent or similar qualifi ed person in order to avoid a hazard.
Ventilation opening in the base must not be obstructed by a carpet.
Observe the maximum volume of dry load as indicated in the section "Program Table".
Before using the washing machine, remove all the packing and locking devices used for the transport (locking screws). If this is not done, serious damage may be caused to both the appliance and your home.
This appliance has been designed for use as a domestic washing machine. Any other use is considered as improper and therefore dangerous.
Any modifications or attempts to interfere with the washing machine can be dangerous for the user and may damage the appliance itself.
Considering the substantial weight of the washing machine, specific safety standards must be observed during handling.
When the appliance is in operation, avoid
any contact with the water being discharged through the drain hose, as it may be very hot. Do not touch the door glass either, as this will tend to heat up during washing.
Use the washing machine for machine-washable items only. In the case of any doubts, refer to the manufacturer's instructions on the label attached to the item to wash (see "Clothing care symbols")
Before placing the washing in the washing machine, make sure that all pockets are empty. Hard or pointed objects such as coins, pins, nails, screws or stones can cause serious damage to the appliance.
Never wash items that have been soiled with substances containing petrol. In the case where stains have been removed using vaporising products, wait until these substances have fully evaporated from the surface of the material before loading into the washing machine.
The use and quantities of detergent, softener and bleach must comply with the instructions reported on the packaging.
Do not use detergents designed for hand washing, in that the excessive suds produced could damage the internal components.
After washing mats, blankets or any other long-fibre materials, remove the filter and clean it if necessary.
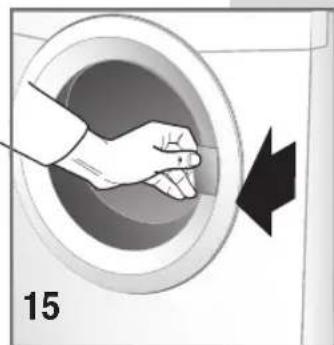
It is advisable to leave the door open at the end of the wash cycle.
Do not attempt to repair any appliance faults alone, in that repairs carried out by a nonprofessional may cause serious damage and will invalidate any rights to repairs under guarantee.
Repairs to the appliance can only be carried out by personnel authorised by the customer service centres. All repairs must make use of original spare parts only.
- Never insert or remove the plug from the mains socket with wet hands.
The washing machine must be connected to a mains socket fitted with an efficient earth complying with current safety standards.
Do not use extension leads or multiple plug
adapters to connect the washing machine to the mains electricity supply.
Do not expose the appliance to atmospheric agents.
The washing machine can only be opened once the led or display indicates that the cycle has finished. On some models, this is signalled by a flashing start button.
- When servicing or cleaning the washing machine, remember to disconnect it from the mains electricity supply.
- Do not pull the power supply cable to unplug the washing machine from the mains supply. Pull the plug only.
It is advisable to unplug the washing machine from the mains electricity supply and close-off the water supply after each wash.
FOR WASHER/DRIER VERSIONS:
Never dry unwashed items.
- Do not dry items that have been washed or had stains removed using chemical products.
Never dry items that have been soiled with substances such as cooking oil, petroleum, acetone, alcohol, petrol, kerosene, stain removers, turpentine, wax. Remove these substances in a hot wash using an abundant quantity of detergent prior to loading the items in the drier.
Do not dry items such as foam rubber, latex, raincoats, waterproof fabrics, rubber mats, preformed items, clothes or cushions with foam rubber padding, as
these may melt and damage other items in the washing or even the appliance itself.
- Fabric softeners, or similar products, should be used as specified by the fabric softener instructions.
Children of less than 3 years should be kept away unless continuously supervised.
- That the appliance must not be installed behind a lockable door, a sliding door or a door with a hinge on the opposite side to that of the appliance, in such a way that a full opening of the appliance door is restricted.

WARNING!!! THE FINAL PART OF A DRYING CYCLE IS THE COOLING DOWN PHASE. CONSEQUENTLY, NEVER SWITCH OFF THE DRIER BEFORE THE CYCLE HAS BEEN COMPLETED. OTHERWISE, THE WASHING MUST BE IN OUT QUICKLY AND HUNG OUT TO ALLOW THE HEAT TO DISSIPATE.
DESCRIPTION OF THE APPLIANCE

The washing machine has been constructed in steel panels which have been treated and painted to guarantees that its aesthetic qualities remain unaltered over time.
The motor and all moving parts have been designed and manufactured to guarantee the minimum possible noise levels
The large easily-accessible stainless steel drum will ensure a better quality wash and help to prolong the life of your washing
The easy to use control panel will satisfy all washing and drying needs (see control panel and programme table).
The wide door makes loading and unloading the washing much easier.
The very high stability of the appliance is the result of constant research by our technicians into the equilibrium of masses in movement.
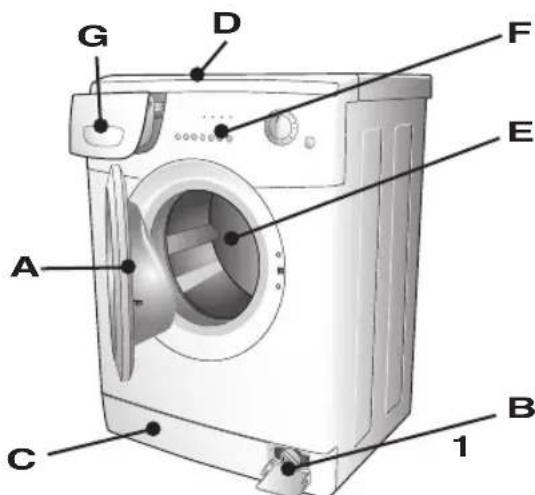
A - Door
B-Filter
C - Adjustable feet
D - Top cover
E - Drum
F - Control panel
G - Detergent drawer
Installation must be carried out by qualified personnel in line with the instructions supplied by the manufacturer. Incorrect installation may result in damage and injury.
The appliance can be installed anywhere providing that the ambient temperature is not less than 3^ and that the wires or pipes on the rear of the machine are not squashed.

WARNING!! The washer/drier version must not be installed behind a locked door, a sliding door or with a hinged door on the opposite wall to the washer/drier itself.

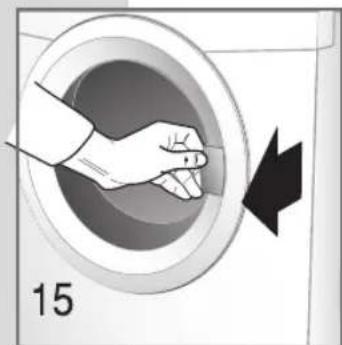
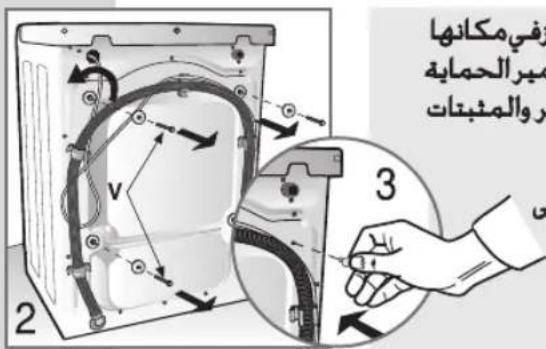
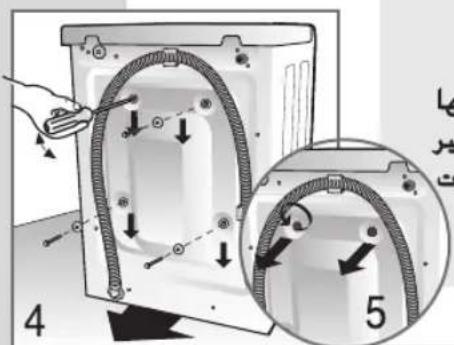
For transport reasons, the washing machine's oscillating group is locked in place by 4 spacers and screws. Before using the machine, remove the spacers and locking screws. Keep the screws and spacers for future use.
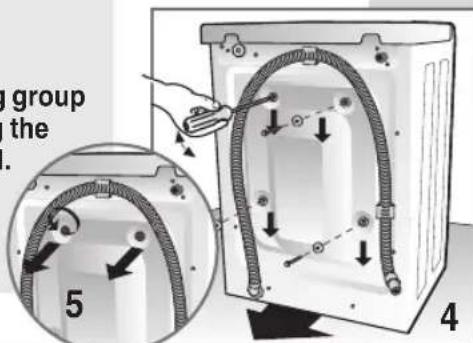
Close off the holes using the plugs supplied. The plugs can be found in the bag containing the documents.
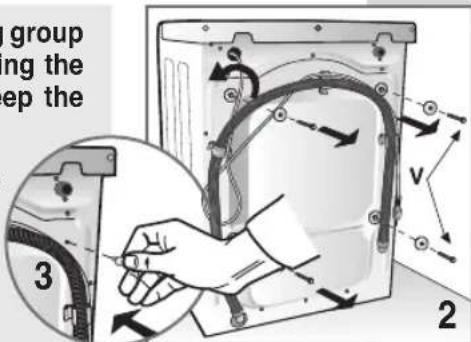

For transport reasons, the washing machine's oscillating group is locked in place by 4 spacers and screws. Before using the machine, remove the locking screws with a suitable tool.
Insert a screwdriver in the holes and lever out the 4 plastic spacers as shown in the figure.
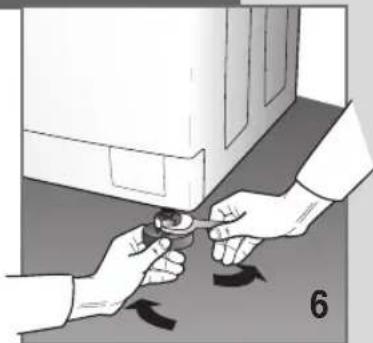
LEVELLING THE WASHING MACHINE
After having selected the most suitable location for the appliance, make sure it is level by regulating the adjustable feet (Fig. 6).
Pay particular attention to the positioning and levelling of the washing machine and make sure that the lock nuts are tight.

If the appliance is not levelled correctly, it will be unstable and noisy and may cause damage.
If the washing machine is installed on a carpeted floor, leave sufficient space between the appliance and the floor to guarantee the free circulation of air.
It is not advisable to install the appliance in rooms where the temperature could fall below 0^ .
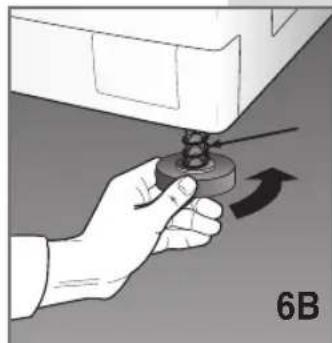
In the under-worktop versions, screw in the feet until the spring is fully compressed, thus allowing the appliance to be installed under the worktop (Fig. 6B).
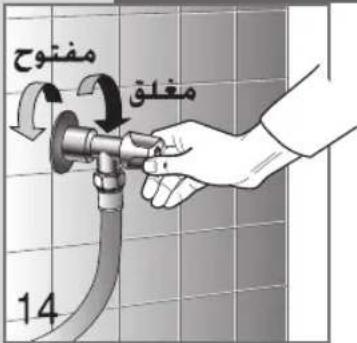
CONNECTING THE WATER SUPPLY

The mains water pressure must be between 0.05 and 1.00 Mpa (0.5 - 10 bar.)
Before connecting the washing machine, open the valve and allow a certain quantity of water to flow out in order to clean the pipes of any sand or rust. This operation is particularly important in the case where the washing machine has been left standing for a long time or when connecting to a new water supply system.
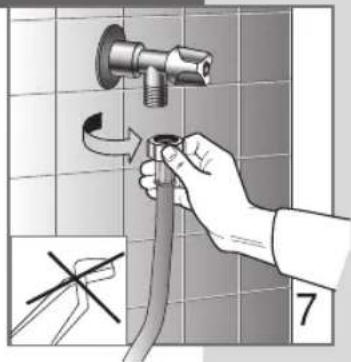
The fill hose must be connected to the mains supply using a 3/4 threaded connection.
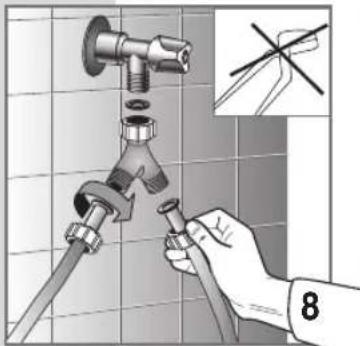

N.B. On electronic washing machines fitted with a dual solenoid valve (hot and cold water), connect the red hose to the hot water supply valve and the other hose to the cold water supply valve.
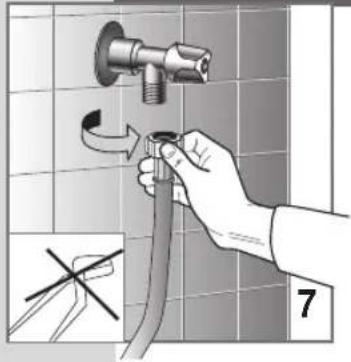
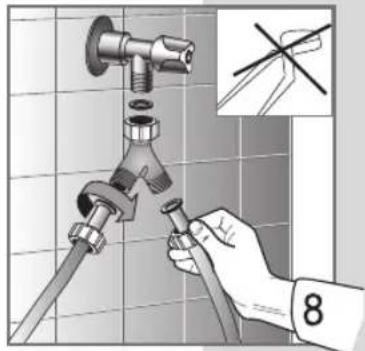
If a hot water supply is not available, both hoses must be connected to the cold supply using the fitting supplied (see fig. 8)
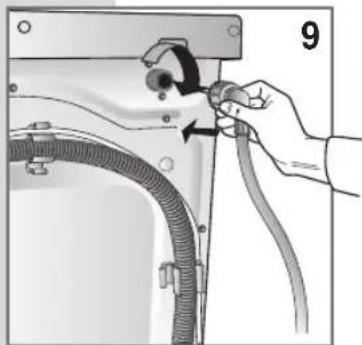
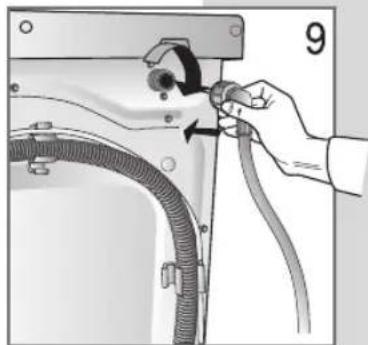
Connect the fill hose (fig. 9).

N.B. Washing machines and condensation type washer/driers must be connected to the mains water supply using the new hoses provided with the appliance. The old hoses must not be re-used.
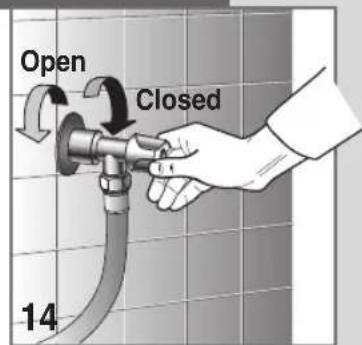
During the wash, the water supply valve must be fully open.
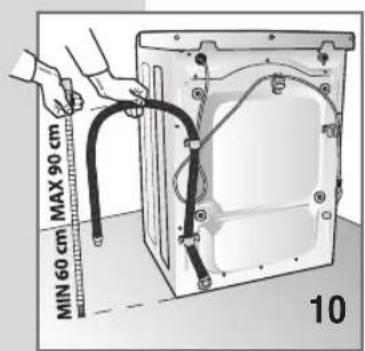
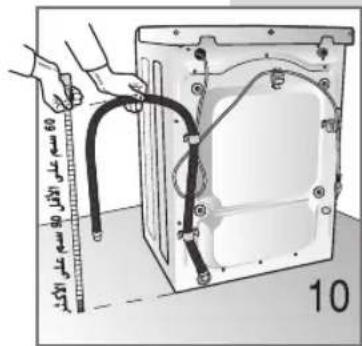
The drain hose must be positioned at a height of between 60 cm and 90 cm (fig. 10).
If the water is drained directly into the drainage system, the free end of the drain hose must be inserted in a pipe of internal diameter not less than 40~mm
The drain hose connection to the drainage system must not be hermetically sealed, as this would cause a build up of air in the siphon and allow water to leak out.
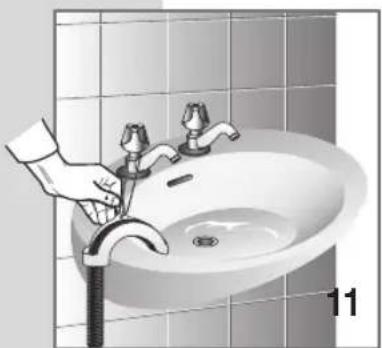
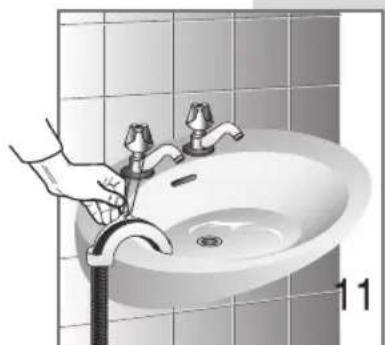
If the wash water is drained into a washbasin, sink or other similar system, the free end of the hose must be reinforced at the bend using the bracket supplied with the washing machine. Place the hose over the edge of the washbasin and anchor the bracket in such as manner that prevents the hose from falling (fig. 11). The washbasin outlet must be clean and must allow the water to flow freely.
CONNECTING TO THE MAINS ELECTRICITY SUPPLY

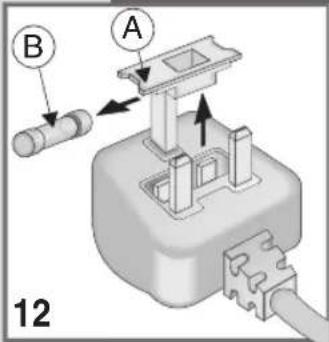
WARNING: THIS APPLIANCE MUST BE EARTHED.
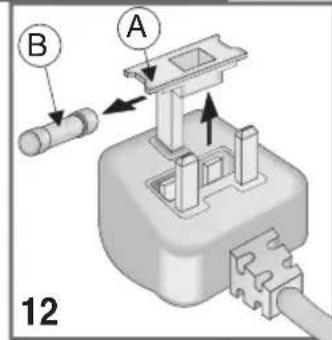
The mains lead of this appliance is fitted with a BS1363A 13 amp fused plug. To change a fuse in this type of plug use an A.S.T.A. approved
fuse to BS1362 type.
- Remove the fuse cover (A) and fuse (B) (fig 12).
- Fit replacement 13 amp fuse into fuse cover.
- Refi t both into plug.
IMPORTANT: The fuse cover must be refitted when changing a fuse and if the fuse cover is lost the plug must not be used until a correct replacement is fitted.
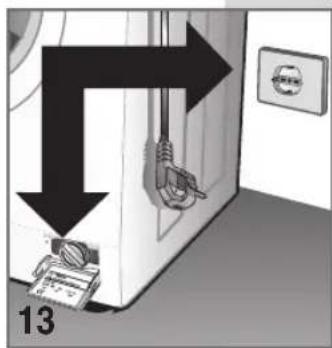
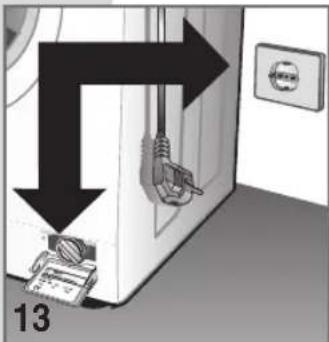
Check that the voltage indicated on the technical data plate on the back of the washing machine is the same as that of the mains power supply (fig. 13).
The fuses, electric cables and wall socket must be rated to withstand the maximum power load indicated on the data plate.
On completion of the installation, the appliance must be connected to the mains supply through a two-pole switch.
The power supply socket into which the washing machine will be plugged must be earthed. Otherwise, the manufacturer will not be held responsible for any accidents. If the socket to which the machine will be connected is faulty or does not comply with the requirements, it must be replaced by a qualified electrician.
The washing machine must not be connected to the electricity supply using extension leads or multi-plug adapters.
During maintenance the washing machine must be unplugged from the power supply socket.
Do not plug-in or unplug the machine with wet hands.
If the power cable is damaged in any way, contact the specialised technical service centre.
Position the appliance so that the power supply cable can be accessed with ease, enabling it to be disconnected when required.

USING THE WASHING MACHINE
RECOMMENDATIONS PRIOR TO USE

Warning: Before carrying out the first wash, allow the washing machine to effect a short wash cycle without any washing.
This will allow the operation of the washing machine to be checked and will clean the drum.
Before each wash make sure that:
the water connections are correct, the drain hose is properly positioned (see connecting to the water supply) and that the water supply valve is open.
with dry hands, insert the plug in the mains socket.
sort the wash into types of fabric (refer to clothing care symbols).
check that there are no objects left in any of the pockets of the items to wash, as these may damage the washing, the appliance or the fi lter.
USE OF DETERGENTS

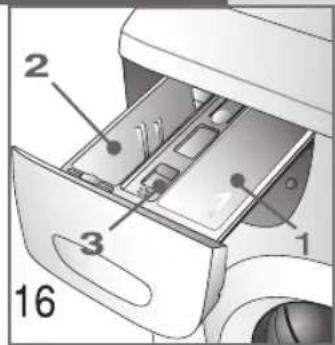
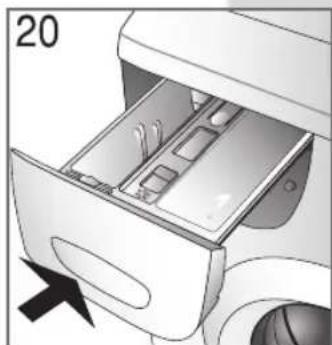
The washing machine is fitted with a three-compartment detergent drawer
compartment for pre-wash or soak soap powder (1)
2 compartment for normal wash soap powder (2)
softener compartment (3)
Use a low-suds detergent and softener (if required) recommended for automatic washing machines. Follow the dosage instructions written on the packet.
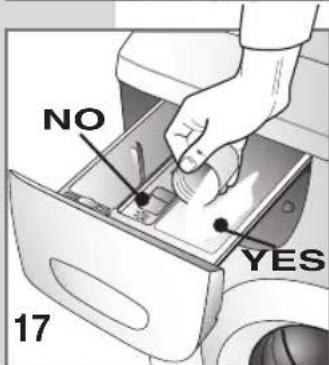

N.B. Too much detergent can produce excessive suds and may result in a poor wash.
Too little detergent will produce an unsatisfactory wash.

N.B. When adding detergent to the dispenser, remember to avoid any spillage into the softener compartment, in that this would create a soapy rinse and stain the fabrics white. Vice versa, if softener is added to the detergent compartment, the quality of n will be compromised.

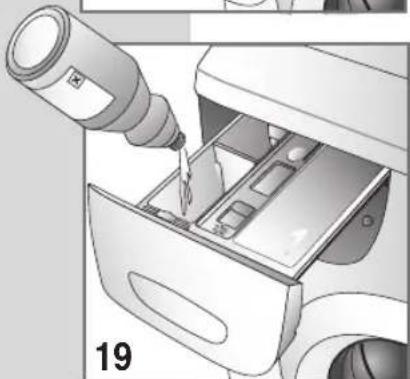
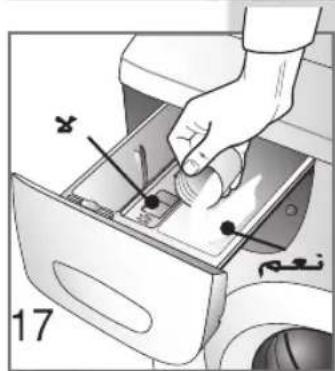
N.B. When using a liquid detergent (recommended for programmes without pre-wash) proceed as follows: remove the baffle from its housing at the front of compartment 2 and insert it in the near the centre of the same compartment.
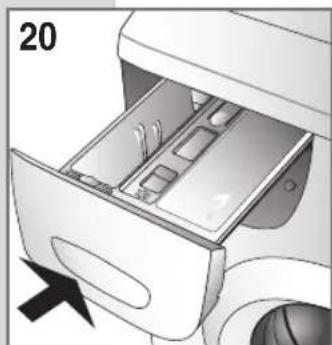
close the detergent drawer before starting the wash.

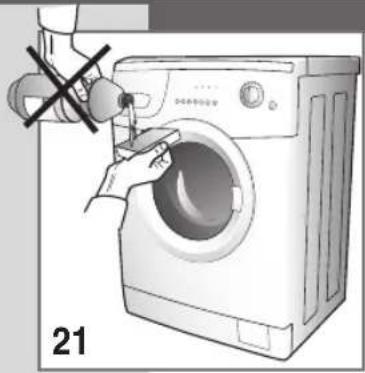
Warning! Do not attempt to remove the detergent drawer while the washing machine is in operation, as this will cause water to flow out.
HOW TO REMOVE SOME STAINS
Stains exist that cannot be removed by machine washing alone. Before trying to remove any type of stain by hand, first try the removal procedure on a small area of hidden fabric. Start from the edge of the stain and working inwards, this will prevent a dark ring from forming around the site of the stain. A few methods to adopt for removing stains are reported below.
WAX: Scrape the wax using a rounded point in order not to damage the fabric. Then, with the fabric placed between two pieces of absorbent paper, run a hot iron over the stain.
BALL POINT PENS AND FELT-TIP PENS: clean using a soft cloth soaked in ethyl alcohol. Take care not to spread the stain.
DAMP AND MOULD: if the fabric supports the use of bleach, carry out a wash cycle adding bleach. Otherwise, soak the soiled part in hydrogen peroxide (10 volumes) and leave for 10 to 15 minutes.
LIGHT SCORCH MARKS LEFT BY IRONING: follow the instructions for mould and damp.
Rust use products specially designed for rust stains, following the manufacturer's instructions written on the packet.
CHEWING GUM: rub ice over the fabric, scrape away as much chewing gum as possible and then rub with a piece of cotton soaked in acetone.
PAINT: do not allow the paint to dry. Rub the area with the solvent recommended by the paint manufacturer (e.g. water, turps, trichloroethylene), soap and then rinse.
Lipstick: stains on cotton or wool can be eliminated using a cloth soaked in ether. Stains on silk require the use of trichloroethylene.
NAIL VARnish: place a sheet of absorbent paper on the stained material, then dampen the back of the fabric with acetone, frequently changing the absorbent paper placed over the stain. Continue in this manner until the stain has disappeared.
TAR OR DIRT: spread a little fresh butter over the stain, allow to stand and then wash with oil of turpentine.
GRASS: delicately soap the stain, use diluted bleach. Good results can be obtained on woollen fabrics using 90% alcohol.
Blood: put into soak in cold water with added salt, then wash with washing soap.
INTERNATIONAL CLOTHING CARE SYMBOLS
Before placing the clothes in the washing machine and selecting the wash programme, examine the symbols on the manufacturer's label. The table reported below will provide a useful guide to reading the symbols.


Normal wash
Delicate wash
Wash at max 95^

Wash at max 60^
Wash at max 40^
Wash at max 30^
Hand wash
Dry-clean only
Bleach in cold water

Do not bleach

Iron at up to max 200^

Iron at up to max 150^

Iron at up to max 100^

Do not iron

Dry-clean using solvent

Dry-clean using benzine, pure alcohol and R113 only

Dry-clean using ethyl perchlorate, benzine, pure alcohol, R111 and R113.

Do not dry-clean

Dry flat

Dry hanging

Dry on hanger

Dry in tumble dryer at normal temperature

Dry in tumble dryer at low temperature

Do not tumble-dry
CLEANING THE WASHING MACHINE
The washing machine has been specifically designed to reduce maintenance to a minimum. Nevertheless, it is important that it is cleaned regularly.
Before cleaning, make sure that the appliance has been disconnected from the power supply and that the water supply valve has been closed.
The external structure and the parts of the washing machine in plastic must be cleaned with a soft damp cloth only.
WARNING!! Never use chemicals, abrasive products, alcohol, soap, petrol or other solvents to clean the appliance as these may cause damage. (fi g. 21)

After washing, leave the door open for a short time to allow rubber parts to dry.
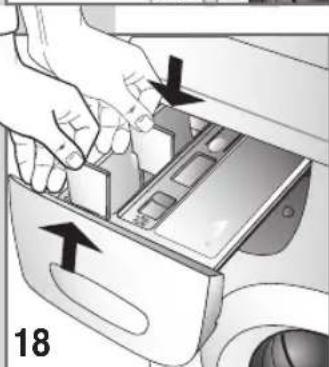
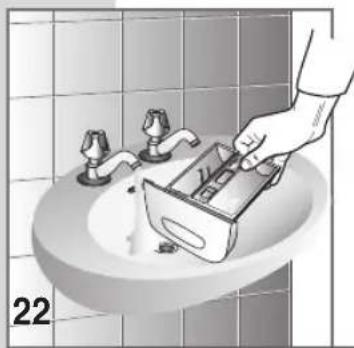
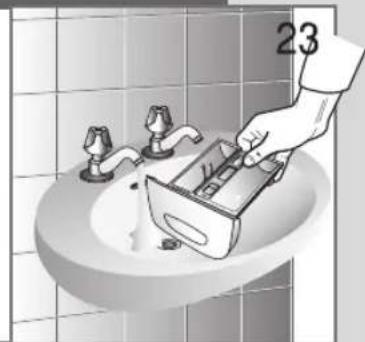
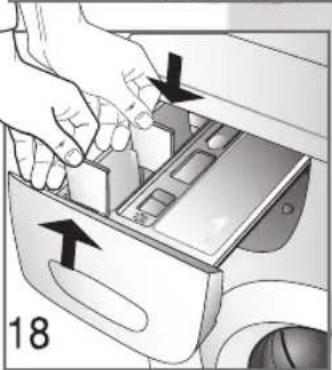
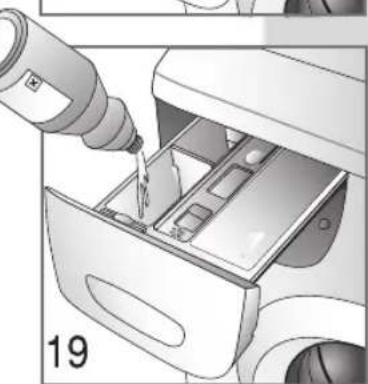
Periodically wash out the detergent compartments. To do this, remove the detergent compartment and rinse it under running water (fig. 22). Then replace it.
REMOVING THE DETERGENT DRAWER

open the detergent drawer;
press on the word "PUSH" with the right hand and pull out the drawer with the left hand (fig. 23).
CLEANING THE FILTER

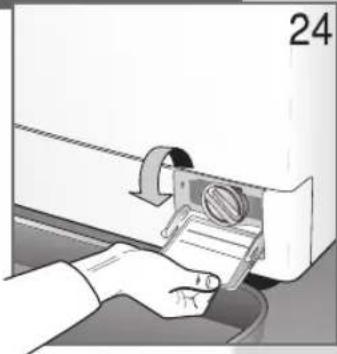
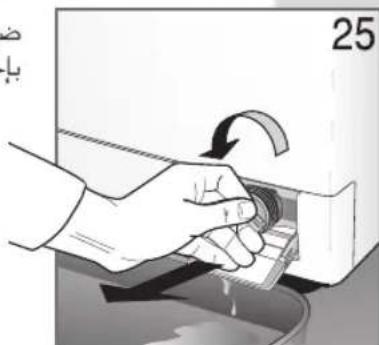
WARNING!! Before starting the operations described below, make sure that the washing machine is empty. Do not remove the fi liter while the washing machine is running, or when full of water.
Place a cloth or tray under the filter to collect any water that may still be inside Open the filter door, unscrew the filter and remove it by turning it in an anticlockwise direction (fig. 24-25).
The fi Iter must be cleaned periodically.
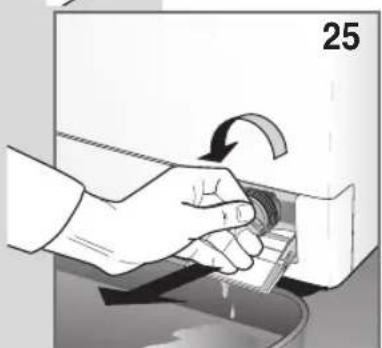
Rinse the filter under running water to eliminate any residues. Replace the filter by screwing it in clockwise, making sure it closes and seals properly.
RESOLVING PROBLEMS
If the appliance is not working properly, check through the following troubleshooting guide before calling for technical assistance. In some models malfunctions are indicated by an error code displayed at the end of the cycle.
Code: E:00 Carry out all the checks listed in paragraphs marked with *
E:01 Carry out all the checks listed in paragraphs marked with **
E:02 Technical malfunction "Call Customer Service"
E:03 Technical malfunction "Call Customer Service"
The washing machine does not work (warning lights are off) (Display off)
Make sure that:
1) The mains power supply is working
2) The plug is inserted correctly in the socket
3) The On/Off button has been pressed, or if not present, check that the programming knob is positioned on a programme.
The washing machine does not work (warning lights are off) (Display lit)*
Make sure that:
1) The programme has been selected
2) The door is closed properly
3) The "Start" button has been pressed (electronic models only)
4) Refer to the information provided for "The washing machine does not fit with water"
The washing machine does not fi ll with water*
Check that:
1) There is water in the water supply system
2) The water fill pipe is connected to the washing2) The filter between the valve and the supply machine hose is clean
2) The filter between the valve and the supply hose is clean
3) The mains water supply valve is open.
4) The filter is not blocked If it is, clean the filter after first unplugging the appliance from the power supply
The washing machine continuously fi IIs and drains the water\*\*
- Check that:
1) The drain hose has been installed at the correct height (60-90 cm)
2) The end of the drain hose is not under water
The washing machine does not drain or spin**
- Check that:
1) The drain hose is properly connected
2) The drain hose is not kinked
3) The drain fi lter is not blocked
4) The no-spin function has not been selected
5) The Stop with water function has not been selected.
The washing machine vibrates and is noisy
Make sure that:
1) All the locking elements used for transporte
tion have been removed.
2) The washing machine is perfectly level
3) Bulky items such as sheets, tablecloths etc. are not all bundled in one part of the drum
The door will not open
Make sure that:
1) The wash cycle has finished.
2) The Stop with water function has not been selected (automatic on some models).
The washing has not been spun properly
Make sure that:
1) The washing is evenly distributed in the drum
2) The correct spin speed has been selected
The washing machine stops during a wash
Make sure that:
1) The mains power supply is working
There is still a lot of detergent in the compa
ment
Make sure that:
1) The mains water supply valve is open
The washing is not clean at the end of the wash cycle
Make sure that:
1) The drum has not been overloaded.
2) The correct amount of detergent has been used
3) The correct programme has been selected
The washing has shrunk or faded
Make sure that:
1) The correct washing programme has been selected
2) The correct washing temperature has been selected
The washing machine does not dry (washer-dryer models only)
Make sure that:
1) The mains water supply valve is open
2) The drain filter is clean
3) The washing machine is switched on (indicator light or display lit)
4) The drying program has been selected
5) The drying time has been set
If, after all these checks have been carried out, the appliance still does not work, inform the nearest customer service centre. When contacting the service centre, inform them of the appliance model, serial number and type of fault. The data relating the appliance can be found on the rating plate affixed to the inside of the filter door. This information will help the service centre operator in procuring the necessary spare parts, thus guaranteeing a speedy and efficient repair.
Cher client,
"claoa Jaiil aaiil albll Jn E.02
"slalldojuiJaiil" aaiiI aiibgll JnE:03
jglg jgl gglg 2
图图
aIg jn Jio Jnnj no oJg hnn (3
Gaiio gui jiu liu jiao poao (1
(20 1
"LLL: L1e 8 jGLI" gdoJgll LogLeI gJ (4
Giao gui jiu liu jiao po Lao (3
a.10g200 15 19 20
aBJI JAAO JgJl JAAE ABAH
**jioiowu ciU iJyagxLgPjIg
yLe g
Cnall glaiy. gabj 1
(90-60)
sLLIgao zJ 11 J gboj 2
x
yLg
a a a a a a a a a a a a a a a a a a a a a a a a a a a a a a
Lgilo J aal gbo 2
1gdo 3
J 4
5
LJLc ligg jagjglg
yLg
1iic pssiw gill aIalg iio cgl 5 allj
lg32 = lg12
在 Rt AB = A^ B^ C = A
Labiaill 23
#
glu. 1jL jg jS JwJy aagol lalil iip .
yIaI alal yS gill sllg wI g aiaag 10lae aobg 11 (25g 24
Lwgljx y lsl 1 c h wll aagaae bwhl bai jy
aJ1 J2J 5
gJgLgagaaalno ggsalljAglLoa aaoaaljgaagaa Jglll 8 glll gaa
4y g ylll plalw a aal Lw (Jzllg lLg jyrrg) Ll (jio) ciiol 0aill p a nll pssil o al lgl all! 5c oaii y 0gaoo loa aoe plasw agall jhall ll plsiwl biae rall g a: Lo iitll
1c auii jgjll no aohoe gaa 111111111111111111111111111111111111
JcJlJI JI JI 100gJgJgJgJgJgJgJgJgJgJgJgJgJgJgJgJgJgJgJgJgJgJgJgJgJgJgJgJgJgJgJgJgJgJgJgJgJgJgJgJgJgJgJgJgJgJgJgJgJgJg
pssipn 10000000000000000000000000000000000000000000000000000000000000000000000000
ALW 100000000000000000000000000000000000000000000000000000000000
oLol plssw yail bui 1
uohn jy uill g uil ali U
lc aisLw ag oIg cllr .alil ggl 0
aai J
aohpplsiuayaaaihiiipaiyipil
10 15 10 0000
Lolg
aalgl aasaaagallgallpssw!
HsS, pIaJIgOJIJIaJIJIJIJIJIJIJIJIJIJIJIJIJIJIJIJIJIJIJIJIJIJIJIJIJIJIJIJIJIJIJIJIJIJIJIJIJIJIJIJIJIJIJIJIJIJIJIJIJIJIJIJIJIJIJIJIJIJIJIJIJIJIJIJIJIJIJIJIJIJIJIJIJIJIJIJIJIJIJIJIJIJIJIJIJIJIJIJIJIJIJIJIJIJIJIJIJIJIJIJIJ
huiS,ag. 1uJI U:(uU)uU
yU L 2111 j0
Jg j 150000000000000000000000000000000000000000000000
m = 311 ;
gale Jwic
J


m : x = 1 或 3x + 4y + 1 = 0

C
pplai 1c sio oiaioll jll jg
(1)gaiyogjLwllLoolabio
(2) aJLJI JauaJI g>LuJpa
(3)
L 11111111111111111111111111
aai 50g jy Jl! Jll aiai jn no aie buiu uo oos gjj:abglo
Jusu 11 oLAs pcc s2- Loo
a 1
LalbiJgJgJolJpaWJIgAebiaiJboloJIaLioJic:A@gLo
i 100
Laaill aaiil lgaiaaiaaiaaiaaiaaa
aogaojLl. Laiiaolai aai Jauuui Jauo aaii jiu
JJI 95
guiu 1yjulcoydy) JILw aiaio plaiiwiic: abgao
afo jolalj Ej1 Lo eJ (Jau Jlo 890
aiio no yjll oogagall colll sic lsi 2 paildo
aai jai
Jnnnss
UJ JIJIJIJIJIJIJIJIJIJIJIJIJIJIJIJIJIJIJIJIJIJIJIJIJIJIJIJIJIJIJIJIJIJIJIJIJIJIJIJIJIJIJIJIJIJIJIJIJIJIJIJIJIJIJIJIJIJIJIJIJIJIJIJIJIJIJIJIJIJIJIJIJIJIJIJIJIJIJIJIJIJIJIJIJIJIJIJIJIJIJIJIJIJIJIJIJIJIJIJIJIJ
JLLslljy

j1 1100

Ego gao 1g jgligilg aill JLS 0!
BS1362gjgA.S.T.A.
.12 (B) 1gall LgA gall slln eep .1
13 2
11111111111111111
clbc Jg gall jic gall sbc uol 1 p
a1 Sg. aI Jlaia aI Ii 11 11 11 11 11 11 11 11
10000000000000000000000000000000000000000000
aee aee
Jolol Jll jll jll jll
ySjLl 1
(13 J) aai eolg aI o algnno gnnnll
Lio g 120 a Jauuill jg > Jauo piu w sill aill uolao L3
aasio gLgS abwglalx
Jllw pIaIswI g yWuO aayka slgSsI Jauo JauuJI jge Jauogp
yjg624jJg0g
jLssu aaiiaa aaiaae aaiaae aaiaae aaiaae
110 1
JALI! 2019 1111 1111 1111 1111 1111 11
jLgJl alaSj jaiU aillbJaaoojlgJll Jusuall
J
puiwJj
ploj:JwJlJgJcLwJI.1gJUJUWJU
Jucg 100
aillbawll aikig jgJl Jzwi no gannil kol! ci

L L 1
()
aLgSloic aalll
(jUlll,aLilll aolll jgajg>1)aunuUglgUlaagjua
aLi:Li:Li:Li:Li:Li:Li:Li:Li:Li:Li:Li:Li:Li:Li:Li:Li:Li:Li:Li:Li:Li:Li:Li:Li:Li:Li:Li:Li:Li:Li:Li:Li:Li:Li:Li:Li:Li:Li:Li:Li:Li:Li:Li:Li:Li:Li:Li:Li:Li:Li
7
J
sui jia c jia jao
(140.5-10) 1.0 MPa 0.05

J 1 J 1 J 1 J 1 J 1 J 1 J 1 J 1 J 1 J 1 J 1 J 1 J 1 J 1 J 1 J 1 J 1 J 1 J 1 J 1 J 1 J 1 J 1 J 1 J 1 J 1 J 1 J 1 J 1 J 1 J 1 J 1 J 1 J 1 J
gigilploa 1jwllclslaall bgllo slal paoaogbbrJL josogbi (nLwI sIgJgIcI)

(8)(j)j()
(9 J<)soll as aegbfo
Lcai gllglllglgllgllg 1:abglo
ywlplwllgllgllgllg 1:clsall
aill ywlgl plsiwl pcc jll a

1
(10J5)90,60 60 60 LgLal JcLal JcLal JcLal JcLal JcLal JcLal JcLal JcLal JcLal JcLal JcLal JcLal JcLal JcLal JcLal JcLal JcLal JcLal JcLal JcLal JcLal JcLal JcLal JcLal JcLal J
pOgblallglbgljLwocgJyJyWdlo 100000000000000000000000000000000000000000000000000000000000000000


y
p 3 1 1 1 1 1 1 1 1 1 1 1 1 1 1 1
g jj j j j j j j j j j j j j j j j j j j j j j j j j j j j j j j j j j j j j j j j j j j j j j j j j j j j j j j j j j j j j j j j j j j j j j j j j
LgIgJgJgJgJgJgJgJgJgJgJgJgJgJgJgJgJgJgJgJgJgJgJgJgJgJgJgJgJgJgJgJgJgJgJgJgJgJgJgJgJgJgJgJgJgJgJgJgJgJgJg

1cgtll 5a jg jgl aai clll plssw llaal
glaolagaaaalagaaaagaaagaaagaaagaaagaaagaaagaaagaaagaaagaaagaaagaaagaaagaaagaaagaaagaaagaaagaaagaaagaaagaaagaaagaaagaaagaaagaaagaaagaaagaaagaaagaaagaaagaaagaaagaaagaaagaaagaaagaaagaaagaaagaaagaaagaa

JSCIJIgCIOOgLoSdUuUaL2wLL
jumlljld jaiy1 guiuulb

1281 h w g 1081 s g wll h uo 5i jg u wll l klljL 10
jgsw h w g u Ll Jus ylo pao 81 (6Jsw) Iu wll alal
aoc ao laol 131111111
gaiia jia gaiyagai yaiuogai
jLlalll jyJyJyJyJy
a.aaa
Blaalolaii gaiyloia
aaaal Laaill aag
3 1e jaej Jia jiljlabJla
Jpaie 1y1 pLo jglal jeol
.
aie jSj y1jg j4211 5ji j
iJlJI 1e 00000000000000000000000000000000000000
Jolll 1
gaii jie Jaoell y
aill g algall Jall ylo
.
bailg 1
aill jzg g 11 g 11 g
jgl 100
iJ1j1j1j1j1j1j1j1j1j1j1j1j1j1j1j1j1j1j1j1j1j1j1j1j1j1j1j1j1j1j1j1j1j1j1j1j1j1j
aal juaaiy dai jaae
aaii iial gali jgai jgiiaai jaojai
zilao jusll 1yjwai 1yjwai
Lulal
aIiI iKoi IiJ 1
yj jil) yjlll jy jll
()
Lalall jyj Jau 1 1 1
d = 10 - 1 = 8 - 10
F
山山山山山山山山山山
J
sslll.
y 11111111111111111111111111111

L 1