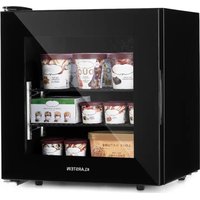
Garfield - Freezer Klarstein - Free user manual and instructions
Find the device manual for free Garfield Klarstein in PDF.

User questions about Garfield Klarstein
0 question about this device. Answer the ones you know or ask your own.
Ask a new question about this device
Download the instructions for your Freezer in PDF format for free! Find your manual Garfield - Klarstein and take your electronic device back in hand. On this page are published all the documents necessary for the use of your device. Garfield by Klarstein.
USER MANUAL Garfield Klarstein
text_image
QR code image containing encoded data, no visible human-readable textINHALTSVERZEICHNIS
natural_image
Line drawing of a simple refrigerator with lid and side door (no text or symbols)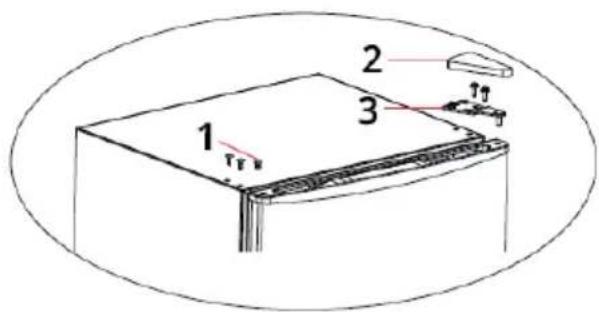
text_image
1 2 31 = Lochkappe 2 = obere Scharnier abdeckung 3 = oberes Scharnier
natural_image
Simple line drawing of a rectangular frame with rounded corners and a flat top (no text or symbols)natural_image
Line drawing of a simple refrigerator with lid and side door (no text or symbols)
natural_image
Simple line drawing of a kitchen counter with a shelf and utensil, enclosed in an oval frame (no text or symbols)natural_image
Symbol of a trash bin crossed with a diagonal line, no text or numbers presentBerlin Brands Group UK Limited
PO Box 42
272 Kensington High Street
London, W8 6ND
United Kingdom
Dear Customer,
Congratulations on purchasing this device. Please read the following instructions carefully and follow them to prevent possible damages. We assume no liability for damage caused by disregard of the instructions and improper use. Scan the QR code to get access to the latest user manual and more product information.

text_image
QR code image containing encoded data, no visible human-readable textCONTENTS
Safety Instructions 24
Device Overview 28
Installation 29
Operation 32
Cleaning and Care 34
Troubleshooting 36
Product Data Sheet 38
Disposal Considerations 40
Manufacturer & Importer (UK) 40
TECHNICAL DATA
| Item number 10045911, 10045912 | |
| Power supply 220-240 V ~ 50/60 Hz |
SAFETY INSTRUCTIONS
Information on the safety of children and persons at risk
- This appliance may be used by children over 8 years of age and persons with reduced physical, sensory or mental capabilities or lack of experience and knowledge, provided they are supervised during use or have received instruction in the safe use of the appliance and understand the risks involved.
• Children aged 3 to 8 years may fill refrigerators with food and remove food. - Ensure that children do not play with the appliance.
- Cleaning and maintenance of the appliance may only be carried out by children if they are at least 8 years old and supervised.
- Keep all packaging away from children. There is a danger of suffocation.
- When you dispose of the appliance, unplug it from the wall outlet, cut the power cord and remove the door. This will prevent children playing on the appliance from injuring themselves, getting hit or getting trapped.
- If this machine replaces an older machine with a spring lock and latch on the door or lid, disable the spring lock and latch before disposing of the old machine. This will prevent children from getting trapped and suffocating.
General advice
- Keep ventilation openings in the unit housing or in the built-in cabinet free of obstacles.
- Do not use mechanical devices or other means to speed up the defrosting process.
- Do not damage the refrigerant circuit.
- Do not use other electrical appliances, such as ice machines, inside refrigeration appliances unless they are approved for this purpose by the manufacturer.
- If there is a light bulb inside the appliance, do not touch it. If it has been switched on for a long time, it can become very hot. The light bulb supplied with this unit is a special bulb that may only be used with the unit supplied. This light bulb is not suitable for household lighting. Do not use the unit without the light bulb.
- When setting up the machine, take care not to pinch or damage the power cord.
- Do not store explosive substances such as spray cans containing a flammable propellant in this appliance.
-
During transport and installation of the unit, take care not to damage any components of the refrigerant circuit.
-
Avoid naked flames and sources of ignition near the unit.
- Thoroughly and regularly ventilate the room in which the unit is located.
- It is dangerous to modify this product in any way. Any damage to the cable may cause a short circuit, fire or electric shock.
- All electrical components such as the plug, power cord and compressor must be replaced by a certified service centre or by qualified service personnel.
- The power cord must not be extended.
- Be careful not to pinch or damage the power plug. A pinched or damaged power plug may overheat and cause a fire.
- Make sure that you can reach the power plug of the machine at any time.
- Do not pull on the power cord.
- If the power outlet is loose, do not plug in the power plug. There is a risk of electric shock or fire.
- This machine is heavy. Be careful when moving it.
- Do not touch the freezer compartment if your hands are damp or wet, as this may cause skin abrasions or cold burns.
- Do not place the unit in direct sunlight.
-
This appliance is intended for use in the home and similar environments. These include:
-
Staff kitchens in shops, offices and other working environments
- Farms, hotels, motels and other residential facilities
- Pensions that offer breakfast (Bed & Breakfasts)
- Catering and similar applications outside the retail trade
This appliance contains the coolant isobutane (R600a), a natural gas which is environmentally friendly. Although it is flammable, it does not damage the ozone layer and does not increase the greenhouse effect. The use of this coolant has, however, led to a slight increase in the noise level of the appliance. In addition to the noise of the compressor, you might be able to hear the coolant flowing around the system. This is unavoidable, and does not have any adverse effect on the performance of the appliance. Care must be taken during the transportation and setting up of the appliance that no parts of the cooling system are damaged. Leaking coolant can damage the eyes.
Notes on daily use
- Do not put hot food in the machine.
- Do not place food directly against the rear panel.
- Frozen food must not be refrozen after defrosting.
- Store packaged frozen food according to the instructions of the frozen food manufacturer.
- Do not place carbonated fizzy drinks in the freezer compartment as the pressure they generate can cause them to explode and damage the appliance.
- Open the door as rarely as possible.
- Do not leave the door open too long.
- Do not set the thermostat too low.
- To reduce energy consumption, leave all accessories, such as drawers, shelves or racks in the appliance.
Notes on installation
- Unpack the machine and check for damage. Do not connect the machine if it is damaged. Report any damage immediately to the manufacturer. Save the original packaging for possible return shipment.
- Wait at least four hours before connecting the unit to allow the coolant to distribute itself in the cooling circuit.
- Ensure that there is sufficient air circulation around the unit. Otherwise, the unit may overheat.
- If possible, the spacers on the unit should rest against the wall. This prevents burns caused by touching the hot compressor or condenser.
- The unit must not be installed near radiators or cookers.
- Make sure that the mains plug is always accessible after the unit has been installed.
- Install this unit in a location where the ambient temperature corresponds to the climate class indicated on the unit's nameplate:
| SN Low | This cooling unit is designed for use at ambient temperatures of 10-32 °C. | |
| N Moderate | This cooling unit is intended for use at ambient temperatures of 16-32 °C. | |
| ST Subtropical | This cooling unit is intended for use at ambient temperatures of 16-38 °C. | |
| T Tropical | This cooling unit is intended for use at ambient temperatures of 16-43 °C. | |
Notes on cleaning and maintenance
- Before cleaning and maintenance, switch the machine off and unplug the power cord from the wall outlet.
- Do not clean the machine with metal objects. Do not use sharp objects to remove frost from the machine. Use a plastic scraper.
- All electrical work required to service the unit should be performed by a qualified electrician or competent person.
Special instructions for freezers and chest freezers
- When positioning the machine, make sure that the mains cable is not pinched or damaged.
- Ensure that there are no multiple sockets or power supply units on the rear of the machine.
To avoid contamination of food, please follow the instructions below:
- Prolonged opening of the door can cause a significant temperature rise in the compartments of the unit.
- Clean surfaces that may come into contact with food regularly. Clean the water drain regularly.
- Store raw meat and fi sh in suitable containers in the refrigerator so that meat and fi sh do not come into contact with or drip onto other foods.
Notes on the freezer compartments
- Two-star freezer compartments are suitable for storing pre-frozen food, storing or making ice cream and making ice cubes.
- One-, two- and three-star freezer compartments are not suitable for freezing fresh food.
- If the refrigerator is left empty for a long period of time, switch it off, let it defrost, clean it, dry it and leave the door open to prevent mould from forming in the appliance.

WARNING
When using, servicing and disposing of the unit, pay attention to the left symbol on the rear of the unit or on the compressor. This symbol warns of possible fi res. There are fl ammable substances in the refrigerant lines and in the compressor. Keep the appliance away from sources of fi re during use, maintenance and disposal.
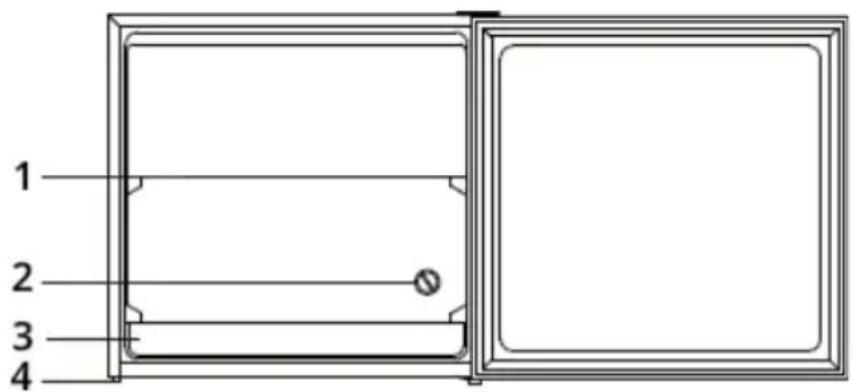
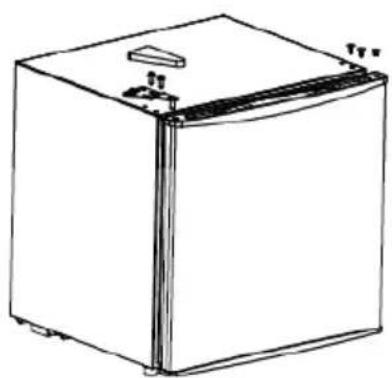
DEVICE OVERVIEW
text_image
1 2 3 4| 1 Shelf 3 Drip tray | ||
| 2 Thermostat 4 Adjustable feet |
INSTALLATION
How to adjust the feet

text_image
L H- Rotate the feet clockwise to raise the freezer.
- Rotate the feet anti-clockwise to lower the freezer.
- Adjust the right and left feet to a horizontal level as described above.
How to turn the door
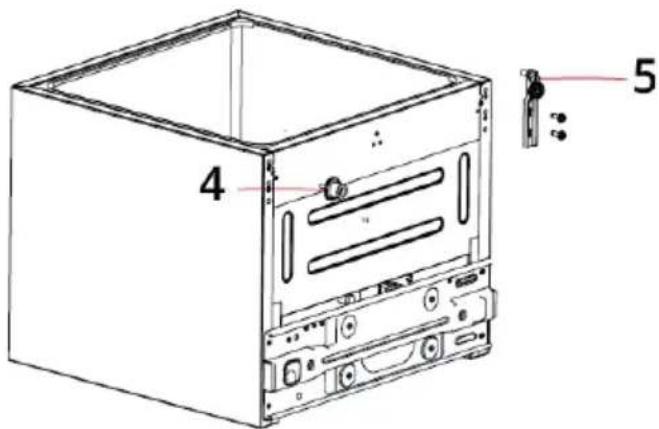
Tools needed: Flat screwdriver, Phillips screwdriver, masking tape.
| Unplug the device from the mains socket. Remove all food from door shelves. Secure the door with tape. |  |
Disassemble the hole caps, top hinge cover, top hinge mounting screws and remove the top hinge. Keep the door vertical throughout the entire process to prevent it from falling.

natural_image
Line drawing of a simple refrigerator with lid and frontrest (no text or symbols)
text_image
1 2 3 TF TF TF1 = hole cap 2 = upper hinge cover 3 = upper hinge
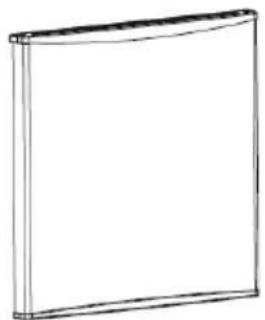
Remove the door.
natural_image
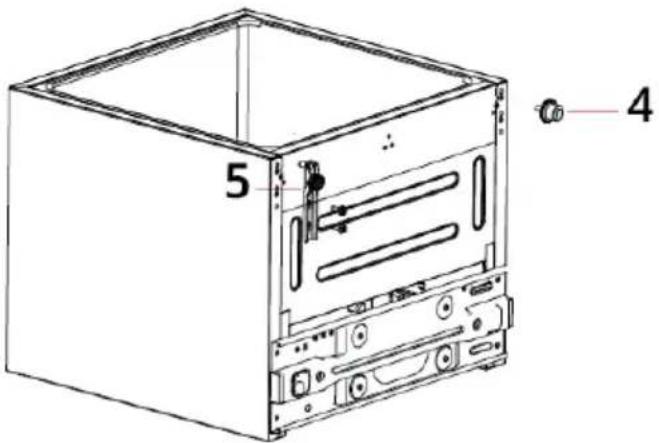
Simple line drawing of a rectangular frame with rounded corners (no text or symbols)Disassemble the bottom hinge and adjustable stand.
text_image
4 54 = adjustable stand 5 = lower hinge
Attach the lower hinge and adjustable stand to the bottom left side of the cabinet and the bottom right side, respectively.
text_image
4 54 = adjustable stand 5 = lower hinge
Place the door vertically on the lower hinge and check that the door seal closes properly. Then install the upper hinge with the screws and hinge cover and then cover the hole caps on the top right side.
natural_image
Line drawing of a simple refrigerator with lid and side door (no text or symbols)
natural_image
Simple line drawing of a laboratory bench setup with a tray and stand (no text or labels)Note on location
- Keep the device away from heat and avoid direct sunlight. To avoid rust or reduction in insulation effect, do not place the freezer in damp or wet places.
- The freezer should be placed in a well-ventilated indoor location. The floor must be level and stable.
- The distance to the top of the freezer must be more than 30 cm, and the clearances to both sides and the back must be more than 10 cm to facilitate heat dissipation.
OPERATION
Before first use
- Before using the freezer, remove all packing materials, including the bottom pads, the foam pads and straps inside the freezer. Peel the protective film off the freezer door and body.
- When starting up for the first time, the freezer must run for half an hour before connecting to the power supply. The freezer must run for 2 to 3 hours before fresh or frozen food is placed in it. In summer, the freezer must run for more than 4 hours when the ambient temperature is high.
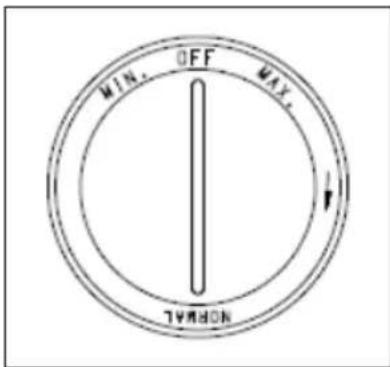
Adjusting the thermostat
- The markings on the dial indicate the "MIN", "NORMAL", "MAX" and "OFF" settings for the different temperature levels.
- "MIN." is the warmest setting.
- "MAX." is the coldest setting.
- For normal use, set the knob to the "NORMAL" position.
Recommended operating mode: "NORMAL".
text_image
MIN. OFF MAX. TURNONNotes on operation
- The low temperature of the freezer allows food to be kept fresh for a long time, and it is mainly used for storing frozen food and making ice.
- The freezer is suitable for storing meat, fish, shrimp, baked goods and other foods that will not be consumed in the short term.
- Pieces of meat should preferably be divided into small pieces for easy access.
- Please note that the food must be consumed within its shelf life.
- The drip tray is used to absorb water when defrosting. Empty the water in the drip tray regularly to prevent the water from overflowing into the cabinet.
Energy saving recommendations
- The device should be placed in the coolest possible area of the room, away from heat-producing devices or heating pipes and out of direct sunlight.
- Allow hot foods to cool to room temperature before placing them in the appliance. Overloading the device forces the compressor to run longer. Food that freezes too slowly can lose quality or spoil.
- Make sure you pack food properly and wipe containers dry before placing them in the appliance. This will reduce the formation of frost inside the device.
- The device's storage container should not be lined with aluminium foil, wax paper, or paper towels. Liners impede the circulation of cold air and make the unit less efficient. Organise and label food to avoid keeping the door open and searching for too long. Only take out as much food as you need at a time and close the door as quickly as possible.
CLEANING AND CARE
For hygiene reasons, the interior, including interior fittings, should be cleaned regularly.

CAUTION
Risk of injury! Before defrosting and cleaning, turn off the appliance and unplug it from the mains socket to prevent electric shock.
- The dust behind the freezer and on the floor must be removed in a timely manner to improve the cooling effect and save energy.
- Check the door seal regularly to ensure there is no contamination. Clean the door seal with a soft cloth dampened with soapy water or diluted detergent.
- The inside of the freezer should be cleaned regularly to prevent odours.
- Before cleaning the interior, turn off the device and remove all food, drinks, shelves, drawers, etc.
- Use a soft cloth or sponge to clean the inside of the freezer with two tablespoons of baking soda and a quart of warm water. Then rinse with water and wipe off. After cleaning, open the door and allow it to air dry before reconnecting the device to power.
- We recommend cleaning areas of the freezer that are difficult to clean (e.g. narrow gaps, crevices or corners) regularly with a soft cloth, a soft brush, etc. and, if necessary, in combination with some tools (e.g. thin sticks) to ensure that contaminants or bacteria do not build up in these areas.
- Do not use soap, detergents, scouring powders, cleaning sprays, etc. as these may cause odours inside the freezer or contaminated food.
- Clean the bottle frame, shelves and drawers with a soft cloth dampened with soapy water or diluted detergent. Dry the device with a soft cloth or let it air dry.
- Wipe the exterior surface of the freezer with a soft cloth dampened with soapy water or dishwashing liquid, then wipe dry.
- Do not use hard brushes, steel balls, wire brushes, abrasive cleaners (e.g. toothpaste), organic solvents (e.g. alcohol, acetone, banana oil, etc.), boiling water, acids or alkalis, as these can damage the surface and interior of the cooling device. Boiling water and organic solvents such as benzene can warp or damage plastic parts.
- Do not rinse the appliance directly with water or other liquids during cleaning to avoid short circuits or damage to the electrical insulation caused by immersion in water.
Defrosting the freezer
- The freezer must be defrosted manually.
- Unplug the appliance, open the door and store all food in a cool place.
- We recommend removing the frost with a plastic scraper or allowing the temperature to rise naturally until the frost melts. Then wipe off the remaining ice and water and plug in the plug to turn on the freezer.
Operational disruptions, storage and transport
- Power outage: In the event of a power outage, food can be stored for a few hours, even in summer. We recommend opening the door less frequently and not putting fresh food in the freezer.
- Long-term non-use: Unplug the freezer when not in use for a long time to clean it. Leave the door open to avoid odours.
- Moving: Do not turn the freezer upside down or shake it. The carrying angle must not be greater than 45^ . Do not hold the door or hinge when moving the device.
Note: It is recommended to run the freezer continuously when it is put into operation. So as to not affect the life of the device, please do not turn off the freezer under normal circumstances.
TROUBLESHOOTING
Note: The following simple problems can be solved by the user themselves. Please contact the manufacturer, customer service or a qualified specialist if the problems cannot be resolved.
| Problem Possible cause / solution | |
| The appliance does not work. The freezer | is not connected to the mains. |
| Low voltage | |
| The thermostat is not set to the correct operating mode. | |
| Power failure or the fuse has been tripped. | |
| Odour formation Foods with a strong odour | our should be packaged well. |
| Food has spoiled | |
| The inside of the device needs to be cleaned. | |
| The compressor runs continuously. It is | normal for the freezer to operate longer in summer when the ambient temperature is higher. |
| Do not put too much food in the freezer at once. | |
| Only put food that has already cooled down into the freezer. | |
| The freezer door has been opened frequently. | |
| Thick layer of frost (defrosting is required). | |
| The freezer door does not close properly. | The freezer door is blocked by food packaging. |
| There is too much food in the freezer. | |
| Freezer imbalance. | |
| Loud noises The floor is uneven. | |
| The freezer has not been placed in a stable position. | |
| The freezer accessories are not placed correctly. | |
| The freezer door is sometimes difficult to open. | After the cooling process, there will be a pressure difference between the inside and outside of the freezer, which may cause temporary difficulty opening the door. This is a normal physical phenomenon. |
| Overheating of the sidewall The freezer | housing can give offheat during operation, especially in summer. This is caused by radiation from the capacitor and is a normal phenomenon. |
| Condensation on the surface of the device | When humidity is high, condensation may form on the exterior surface and door seals of the freezer, which can be wiped off with a dry towel. |
| Unusual noises(Air flow noise, humming, clattering) | The refrigerant circulating in the refrigerant pipes produces loud noises, these noises are normal and do not impair the cooling effect. |
| The running compressor produces a humming noise, which occurs particularly when switching on and off. | |
| The solenoid valve or electric swit-ching valve rattles. This is a normal phenomenon and does not affect operation. |
PRODUCT DATA SHEET
Information according to Regulation (EU) No. 2019/2016
| Supplier's name or trademark: Klarstein | ||||
| Supplier's address: Wallstraße 16, 10179 Berlin, DE | ||||
| Model identifier: 10045911, 10045912 | ||||
| Type of refrigerating appliance: | ||||
| Low-noise appliance: No D | Design type: freestanding | |||
| Wine storage appliance: No | Other refrigerating appliance: | Yes | ||
| General product parameters: | ||||
| Parameter Value Parameter Value | ||||
| Overall dimensions (mm) | Height 492 | Total volume (dm3or L) | 31Width 472 | |
| Depth 450 | ||||
| EEI | 100 | Energy efficiency class | E | |
| Airborne acoustical noise emissions (dB(A) re 1 pW) | 41 | Airborne acoustical noise emission class | C | |
| Annual energy consumption (kWh/a) | 147 Climate class: | temperate, subtropical | ||
| Minimum ambient temperature (°C), for which the refrigerating appliance is suitable | 16 | Maximum ambient temperature (°C), for which the refrigerating appliance is suitable | 38 | |
| Winter setting No | ||||
| Compartment Parameters: | |||||
| Compartment type | Compartment parameters and values | ||||
| Compartment volume (dm3 or L) | Recommended temperature setting for optimised food storage (°C) These settings shall not contradict the storage conditions set out in Annex IV, Table 3 | Freezing capacity (kg/24h) | Defrosting type (auto-defrost=A, manual defrost=M) | ||
| Pantry No - - - - | |||||
| Wine storage No - - - - | |||||
| Cellar No - - - - | |||||
| Fresh food Yes - - - - | |||||
| Chill No - - - - | |||||
| 0-star or icemaking No - - - - | |||||
| 1-star No - - - - | |||||
| 2-star No - - - - | |||||
| 3-star No - - - - | |||||
| 4-star Yes 31,0 -18 2,0 A | |||||
| 2-star section | No - - - - | ||||
| Variable temperature compartment | - | - - - - | |||
| For 4-star compartments | |||||
| Fast freeze facility | No | ||||
| Light source parameters: | |||||
| Type of light source | - | ||||
| Energy efficiency class | - | ||||
| Minimum duration of the guarantee offered by the manufacturer: 24 months | |||||
| Additional information: | |||||
| Weblink to the manufacturer's website, where the information in point4(a) Annex of Commission Regulation (EU) 2019/2019 is found: www.klarstein.co.uk | |||||
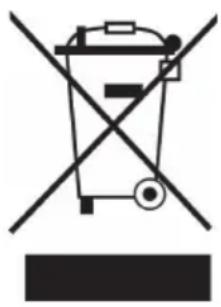
DISPOSAL CONSIDERATIONS
natural_image
Symbol of a trash bin crossed with a diagonal line, no text or numbers presentIf there is a legal regulation for the disposal of electrical and electronic devices in your country, this symbol on the product or on the packaging indicates that this product must not be disposed of with household waste. Instead, it must be taken to a collection point for the recycling of electrical and electronic equipment. By disposing of it in accordance with the rules, you are protecting the environment and the health of your fellow human beings from negative consequences. For information about the recycling and disposal of this product, please contact your local authority or your household waste disposal service.
MANUFACTURER & IMPORTER (UK)
Manufacturer:
Chal-Tec GmbH, Wallstrasse 16, 10179 Berlin, Germany.
Importer for Great Britain:
Berlin Brands Group UK Limited
PO Box 42
272 Kensington High Street
London, W8 6ND
United Kingdom
Chère cliente, cher client,
text_image
QR code image containing encoded data, no visible human-readable textSOMMAIRE
natural_image
Line drawing of a simple refrigerator with lid and side door (no text or symbols)
text_image
1 2 3natural_image
Simple line drawing of a rectangular frame with rounded corners and a flat top (no text or symbols)natural_image
Line drawing of a simple refrigerator with lid and side door (no text or symbols)
natural_image
Simple line drawing of a kitchen counter with a shelf and utensil, enclosed in an oval frame (no text or symbols)FICHE DE DONNÉES PRODUIT
natural_image
Symbol of a trash bin crossed with a diagonal line, no text or numbers presentBerlin Brands Group UK Limited
PO Box 42
272 Kensington High Street
London, W8 6ND
United Kingdom
Estimado cliente:
text_image
QR code image containing encoded data, no visible human-readable textÍNDICE
natural_image
Line drawing of a single refrigerator with lid and frontrest (no text or symbols)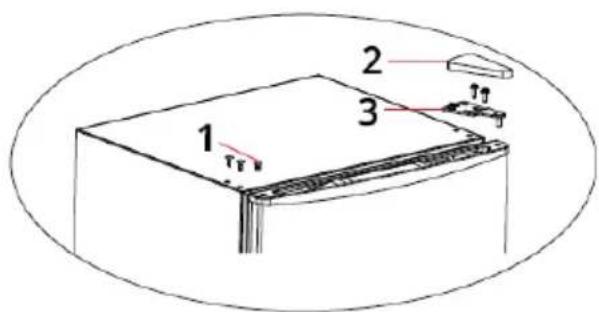
text_image
1 2 3 Tg1 = Tapa perforada 2 = Tapa de la bisagra 3 = bisagra superior
Retire la puerta.
natural_image
Simple line drawing of a rectangular frame with rounded corners (no text or symbols)4 = pie regulable 5 = Bisagra inferior
natural_image
Line drawing of a simple refrigerator with lid and side door (no text or symbols)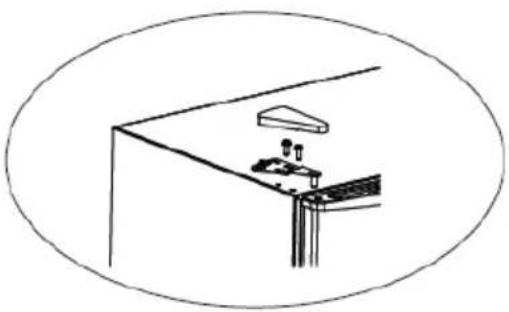
natural_image
Simple line drawing of a kitchen counter with a shelf and utensil, enclosed in an oval frame (no text or symbols)natural_image
Symbol of a trash bin crossed with a diagonal line, no text or numbers presentBerlin Brands Group UK Limited
PO Box 42
272 Kensington High Street
London, W8 6ND
United Kingdom
Gentile cliente,
text_image
QR code image containing encoded data, no visible human-readable textINDICE
natural_image
Line drawing of a single refrigerator with lid and frontrest (no text or symbols)
text_image
1 2 3 1natural_image
Simple line drawing of a rectangular frame with rounded corners (no text or symbols)natural_image
Line drawing of a simple refrigerator with lid and side door (no text or symbols)
natural_image
Simple line drawing of a laboratory bench setup with a tray and stand (no text or labels)natural_image
Symbol of a trash bin crossed with a diagonal line, no text or numbers presentPRODUTTORE E IMPORTATORE (UK)
Produttore:
Chal-Tec GmbH, Wallstraße 16, 10179 Berlino, Germania.
Berlin Brands Group UK Limited
PO Box 42
272 Kensington High Street
London, W8 6ND
United Kingdom

area
| Category | Value | |---|---| | 1 | 100 | | 2 | 100 | | 3 | 100 | | 4 | 100 | | 5 | 100 | | 6 | 100 | | 7 | 100 | | 8 | 100 | | 9 | 100 | | 10 | 100 | | 11 | 100 | | 12 | 100 | | 13 | 100 | | 14 | 100 | | 15 | 100 | | 16 | 100 | | 17 | 100 | | 18 | 100 | | 19 | 100 | | 20 | 100 | | 21 | 100 | | 22 | 100 | | 23 | 100 | | 24 | 100 | | 25 | 100 | | 26 | 100 | | 27 | 100 | | 28 | 100 | | 29 | 100 | | 30 | 100 | | 31 | 100 | | 32 | 100 | | 33 | 100 | | 34 | 100 | | 35 | 100 | | 36 | 100 | | 37 | 100 | | 38 | 100 | | 39 | 100 | | 40 | 100 | | 41 | 100 | | 42 | 100 | | 43 | 100 | | 44 | 100 | | 45 | 100 | | 46 | 100 | | 47 | 100 | | 48 | 100 | | 49 | 100 | | 50 | 100 | | 51 | 100 | | 52 | 100 | | 53 | 100 | | 54 | 100 | | 55 | 100 | | 56 | 100 | | 57 | 100 | | 58 | 100 | | 59 | 100 | | 60 | 100 | | 61 | 100 | | 62 | 100 | | 63 | 100 | | 64 | 100 | | 65 | 100 | | 66 | 100 | | 67 | 100 | | 68 | 100 | | 69 | 100 | | 70 | 100 | | 71 | 100 | | 72 | 100 | | 73 | 100 | | 74 | 100 | | 75 | 100 | | 76 | 100 | | 77 | 100 | | 78 | 100 | | 79 | 100 | | 80 | 100 | | 81 | 100 | | 82 | 100 | | 83 | 100 | | 84 | 100 | | 85 | 100 | | 86 | 100 | | 87 | 100 | | 88 | 100 | | 89 | 100 | | 90 | 100 | | 91 | 100 | | 92 | 100 | | 93 | 100 | | 94 | 100 | | 95 | 100 | | 96 | 100 | | 97 | 100 | | 98 | 100 | | 99 | 100 | | Note: The actual values in the 'Value' column are not provided in the code. I have used the label 'The Region' to represent the 'Region'. The values are estimated based on the provided code.