NDX200 - Mixer NUMARK - Free user manual and instructions
Find the device manual for free NDX200 NUMARK in PDF.

User questions about NDX200 NUMARK
0 question about this device. Answer the ones you know or ask your own.
Ask a new question about this device
Download the instructions for your Mixer in PDF format for free! Find your manual NDX200 - NUMARK and take your electronic device back in hand. On this page are published all the documents necessary for the use of your device. NDX200 by NUMARK.
USER MANUAL NDX200 NUMARK
Please go to http://www.numark.com to register your NDX 200. Registering your product ensures that we can keep you up-to-date with any new product developments and provide you with world-class technical support, should you run into any problems.
GROUND RULES
- Make sure all items listed in the BOX CONTENTS section are included in the box.
- READ SAFETY & WARRANTY INFORMATION BOOKLET BEFORE USING THE PRODUCT.
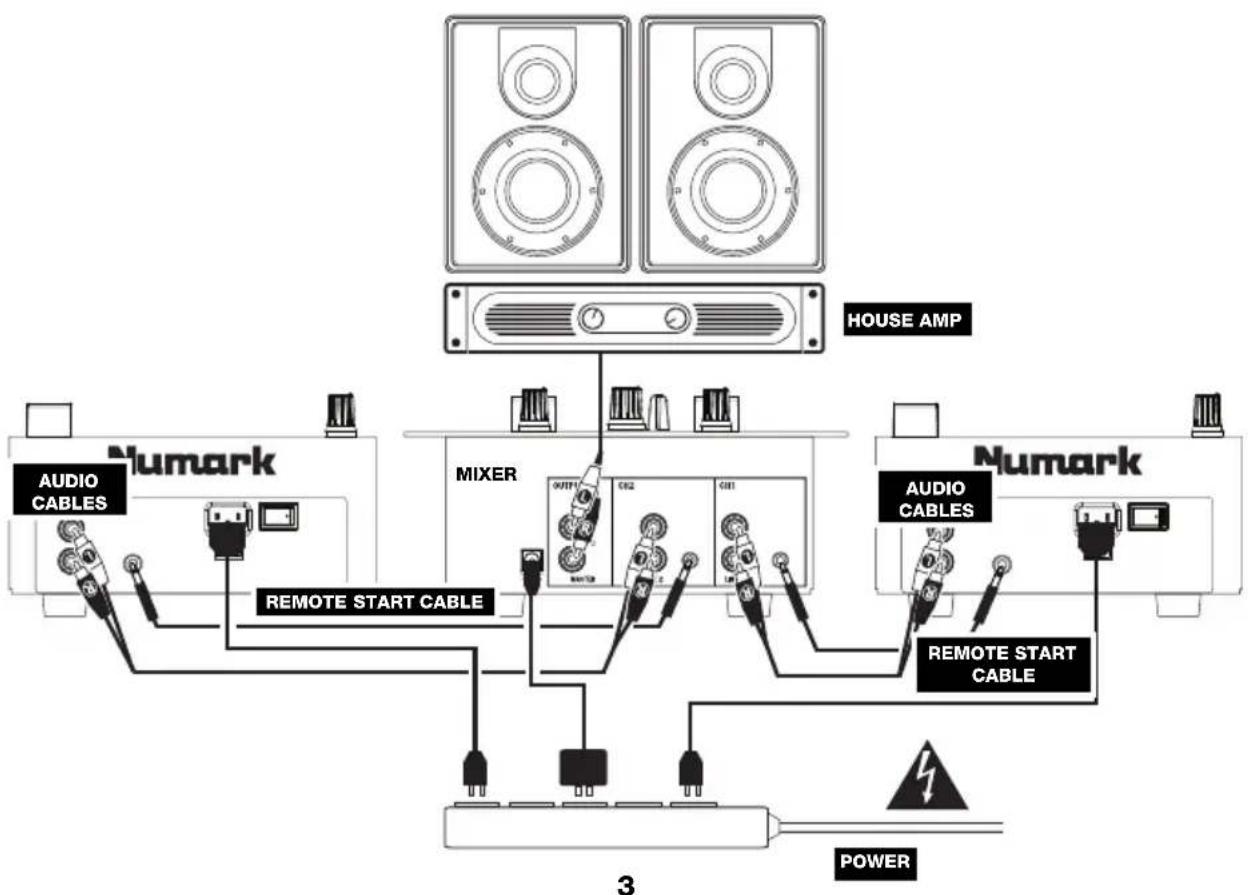
- Study the connection diagram in this guide.
- Place mixer in an appropriate position for operation.
- Make sure all devices are turned off and all faders and gain knobs are set to "zero."
- Connect all stereo input sources as indicated in the diagram.
- Connect the stereo outputs to power amplifier(s), tape decks, and/or other audio sources.
- Plug all devices into AC power.
- Switch everything on in the following order:
• Audio input sources (i.e. turntables, CD players, etc.)
- Mixer
- Last, any amplifiers or output devices
-
When turning off, always reverse this operation by turning off:
-
Amplifiers
- Mixer
- Last, any input devices
CONNECTION DIAGRAM
flowchart
graph TD
    A["House AMP"] --> B["Numark"]
    B --> C["AUDIO CABLES"]
    B --> D["REMOTE START CABLE"]
    B --> E["MIXER"]
    E --> F["OUTPUT"]
    E --> G["CIB2"]
    E --> H["CIB1"]
    E --> I["3"]
    E --> J["REMOTE START CABLE"]
    J --> K["POWER"]
    style A fill:#f9f,stroke:#333
    style B fill:#ccf,stroke:#333
    style E fill:#cfc,stroke:#333
    style F fill:#fcc,stroke:#333
    style G fill:#fcc,stroke:#333
    style H fill:#fcc,stroke:#333
    style I fill:#fcc,stroke:#333
    style J fill:#fcc,stroke:#333
    style K fill:#fff,stroke:#333
    style_L["Power Supply"] --> M["Induction Cable"]
    style_N["External Power Supply"] --> O["Induction Cable"]
    style_P["External Power Supply"] --> Q["Induction Cable"]
TOP PANEL FEATURES
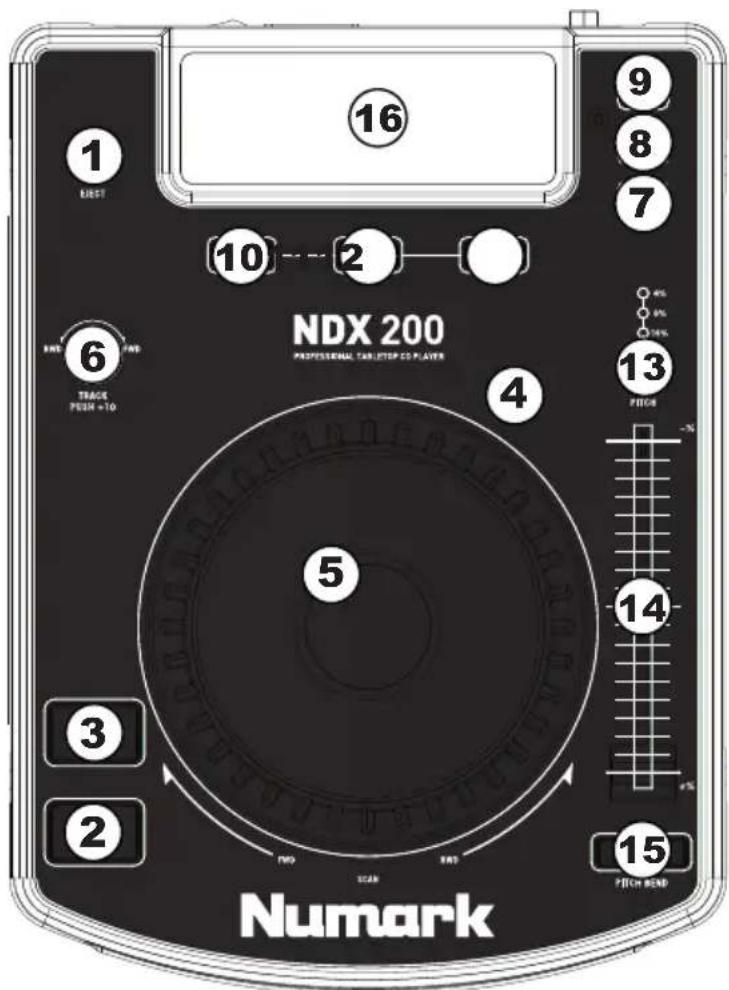
- EJECT – Pressing will open or close the disc tray on the transport. This unit is designed to play commercially available CDs and properly burned and finalized CD-Rs. Due to variances on the specification of certain CD burners and CDs, some homemade CDs may not play properly. We recommend burning CDs at the minimum speed possible for the best performance.
- PLAY / PAUSE – Plays or pauses the track. Pausing the track will create a cue point at that location (which can be adjusted with the JOG WHEEL in Search Mode).
- CUE – During playback, pressing CUE will return to the most recent point where playback was started and will pause the track. Holding down CUE will start playback from this point, and releasing CUE will cause it to return to that point and will pause the track. Also, if the track is paused, you can use the JOG WHEEL to locate a new cue point.
- SEARCH - Pressing this button allows you to use the JOG WHEEL to rapidly scan through the music. The LED indicator will be red when Search Mode is active. (Note: If the JOG WHEEL is not used for 8 seconds, Search Mode will be deactivated.)
- JOG WHEEL – The jog wheel serves many functions depending on its current mode.
a) If a track is not playing, the JOG WHEEL will search slowly through a track's frames. To set a new cue point, rotate the JOG WHEEL then
text_image
16 9 8 7 10 2 NDX 200 PROFESSIONAL TABLETOP CD PLAYER 4 5 6 BWD FWD TRACK FUSH +10 3 2 ND SCAN END 13 FUSH -14% 4% 8% 4% 9% 15 FITCH BAND Numarkbegin playback when you have determined the proper position. Press CUE to return to that cue point.
b) If a track is playing, the JOG WHEEL will temporarily bend the pitch of the track. Rotating the JOG WHEEL clockwise temporarily speeds it up while rotating it counterclockwise slows it down. This is a useful tool for beat-matching.
c) When the SEARCH button has been activated, rotating the JOG WHEEL will scan rapidly through the track.
- TRACK KNOB – Turn this knob to select a track to play. Press this knob to skip through your track listing 10 tracks at a time.
- PROGRAM - This button helps you create a program - a sequence of tracks to play continuously. To create a program, press PROGRAM when the CD player is paused. To enter a track into the program, use the TRACK KNOB to select the desired track then press PROGRAM to enter it. Repeat this process for each track you want to enter (in the order you want them to play). When you have finished, press PLAY / PAUSE to start playing the program. The tracks will play in the order you entered them, and "PROGRAM" will be shown on the LCD. To cancel your program as it is playing, press and hold PROGRAM for 2 seconds so "PROGRAM" disappears from the LCD.
- SINGLE – Press this button to toggle between Single Play (the deck will stop at the end of each track) or Continuous Play (the entire disc will be played without interruption).
- TIME – Switches the time display between elapsed playing time, remaining time on the track, and total remaining time on the entire CD.
- LOOP IN – Sets a new cue point or the start point of a loop (a "Loop In" point) during playback.
- LOOP OUT – Sets the end point of a loop (a "Loop Out" point) and starts playing the loop. While playing a loop, press LOOP OUT to release it from the loop and continue normal playback.
- RELOOP – Plays the track immediately from the beginning of a loop (and reactivates the loop).
- PITCH – Adjusts the range of the PITCH FADER ( ±4% , 8%, and 16%). The current range will be indicated on the LCD and by different LEDs.
- PITCH FADER – The pitch can be changed by pressing the PITCH button so a PITCH LED is lit, then moving the sliding fader. The pitch will not be changed if the PITCH LED is off.
- PITCH BEND -/+ - You can use these two pitch bend buttons to temporarily adjust the pitch and tempo of the music up to -/+ 16% from the current pitch setting.
- LCD - Indicates all the functions, as they are occurring, with the CD.
REAR PANEL FEATURES
-
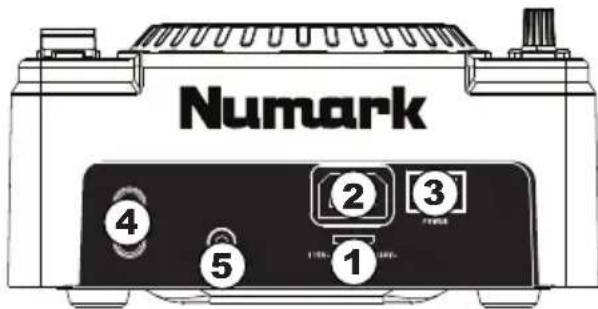
VOLTAGE SELECTOR - Set this switch to the voltage for your location.
-
POWER PLUG CONNECTOR – Plug your supplied power cord in here.
-
POWER SWITCH - Turn the machine on and off with this button. The unit should always be shut down with this button first before any external power is removed. Typically it is recommended that the CD player is powered on before amplifiers and powered off after amplifiers.
-
RCA AUDIO CONNECTORS – Connect your CD player to your mixer from this line level output.
-
REMOTE START CONNECTOR – To use this connector for fader start, connect a fader start cable (not included) to a fader start-compatible mixer. Every time you move the crossfader on the mixer over to the side that the unit is on, it will automatically start playing. When you move the fader away from that side, the unit will stop. Moving the fader back to the unit side will start play again.
text_image
Numark ④ ⑤ ② ③ 1LCD FEATURES
-
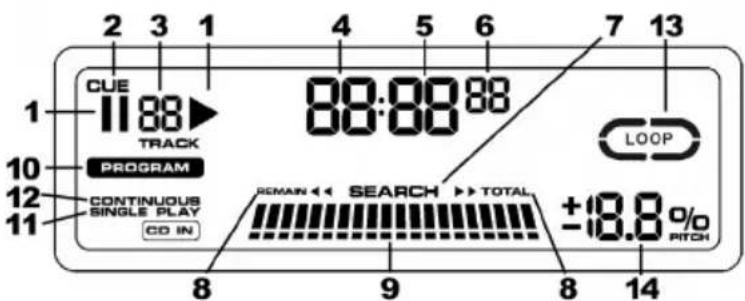
PLAY / PAUSE – This shows when the unit is playing or paused.
-
CUE - Flashing when the unit is setting a cue point. Lit continuously when the unit is paused at a cue point.
-
TRACK NUMBER - Shows the current track number.
-
MINUTES - Shows the minutes elapsed or remaining depending on mode setting.
-
SECONDS - Shows the seconds elapsed or remaining depending on mode setting.
-
FRAMES – The CD player breaks down a second into 75 frames for accurate cueing. This shows the frames elapsed or remaining depending on mode setting.
-
SEARCH – When engaged, search mode will allow you to use the jog wheel to quickly scan through the current track.
-
TIME MODE – Indicates whether the time shown on the LCD is the elapsed time for the track, remaining time for the track, or total remaining time for the entire CD.
-
TIME BAR – Shows either time remaining or elapsed depending on the setting of the TIME button.
-
PROGRAM – Indicates that a program is playing.
-
SINGLE - Shows when the unit is set to play just one track at a time (Single Play Mode). This function is controlled by the SINGLE button.
-
CONTINUOUS – Shows when the unit is set to play tracks continuously, without stopping (Continuous Play Mode). This function is controlled by the SINGLE button.
-
LOOP – Indicates when a loop is programmed. When the indicator is flashing, a loop is currently playing. When "IN / OUT" is shown, a loop is programmed but not currently playing.
-
PITCH – Shows the percentage change in pitch.
text_image
2 3 1 4 5 6 7 13 CUE 11:88 TRACK 88:88:88 PROGRAM CONTINUOUS SINGLE PLAY CO IN 8 9 8 14 LOOP REMAIN << SEARCH >> TOTAL ±18.8% /0 RITCHCONTENIDO DE LA CAJA
TIME DISPLAY: Track Elapsed, Track Remaining, Total Remaining
FREQ RESPONSE: ±3 dB (20 Hz - 20 kHz)
THD: 0.015%
SNR: 80 dB (A-weighted)
OUTPUT LEVEL: 2.0 V
CHANNEL SEPARATION: > 60 dB
CHANNEL DIFFERENCE: < 1 dB
PITCH CONTROL RANGE: ± 4, 8, or 16%
DIMENSIONS (W x D x H): 296 mm x 212 mm x 108 mm
WEIGHT: 2.8 kg
POWER SUPPLY: 115/230 V AC, 60/50 Hz
POWER CONSUMPTION: 20 W
* Specifications are subject to change
www.numark.com