M8 - Mixer NUMARK - Free user manual and instructions
Find the device manual for free M8 NUMARK in PDF.

User questions about M8 NUMARK
0 question about this device. Answer the ones you know or ask your own.
Ask a new question about this device
Download the instructions for your Mixer in PDF format for free! Find your manual M8 - NUMARK and take your electronic device back in hand. On this page are published all the documents necessary for the use of your device. M8 by NUMARK.
USER MANUAL M8 NUMARK
Please go to http://www.numark.com to register your M8. Registering your product ensures that we can keep you up-to-date with any new product developments and provide you with world-class technical support, should you run into any problems.
QUICK SETUP
- Make sure all items listed in the BOX CONTENTS section are included in the box.
- READ SAFETY & WARRANTY INFORMATION BOOKLET BEFORE USING THE PRODUCT.
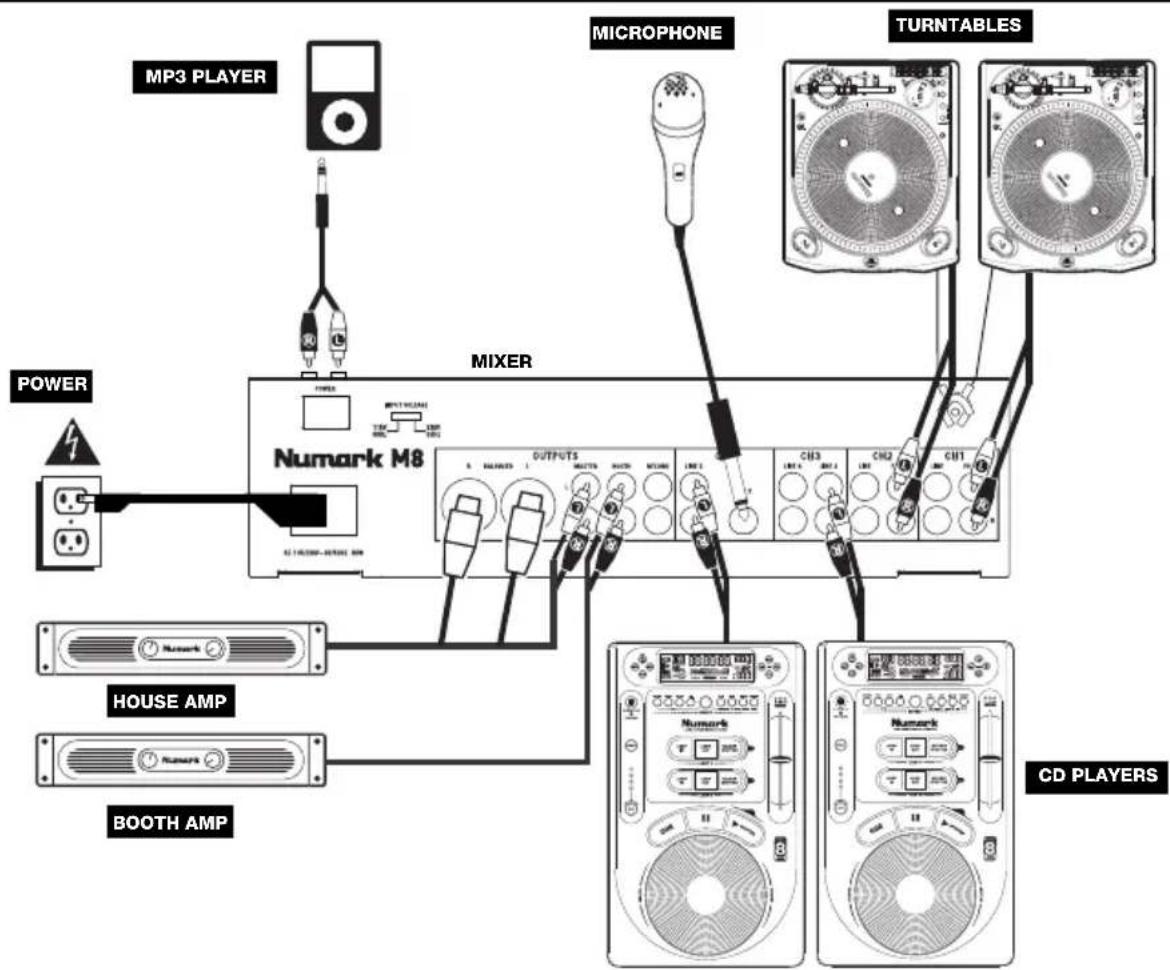
- Study the connection diagram in this guide.
- Place mixer in an appropriate position for operation.
- Make sure all devices are turned off and all faders and gain knobs are set to "zero."
- Connect all stereo input sources as indicated in the diagram.
- Connect the stereo outputs to power amplifier(s), tape decks, and/or other audio sources.
- Plug all devices into AC power.
- Switch everything on in the following order:
• Audio input sources (i.e. turntables, CD players, etc.) - Mixer
-
Last, any amplifiers or output devices
-
When turning off, always reverse this operation by turning off:
-
Amplifiers
- Mixer
- Last, any input devices
CONNECTION DIAGRAM
text_image
MP3 PLAYER POWER HOUSE AMP BOOTH AMP MIXER MICROPHONE TURNTABLES CD PLAYERS Numark M8 OUTPUTS CH13 CH2 CH1 Numark NUARK NUARK NUARK NUARK NUARK NUARK NUARK NUARK NUARK NUARK NUARK NUARK NUARK NUARK NUARK NUARK NUARK NUARK NUARK NUARK NUARK NUARK NUARK NUARK NUARK NUARK NUARK NUARK NUARK NUARK NUARK NUARK NUARK NUARKREAR PANEL FEATURES
text_image
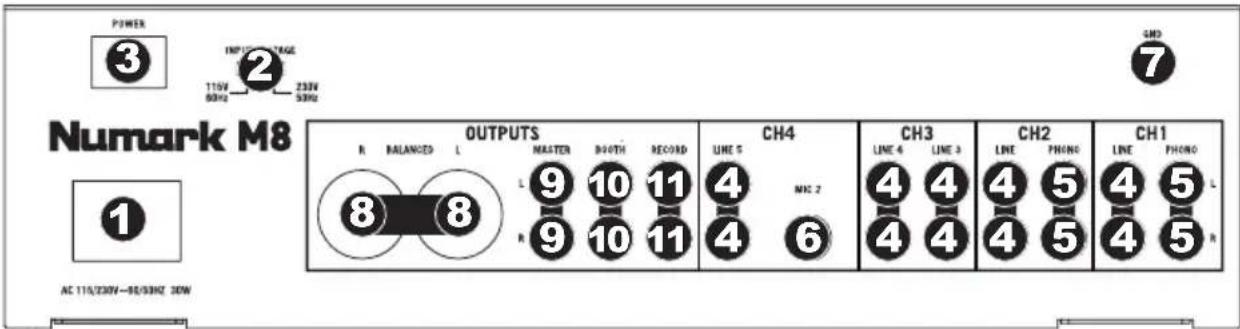
POWER 3 INPUT TAGE 110V 230V 50Hz 50Hz Numark M8 OUTPUTS R BALANCED L MASTER WIDTH RECORD LINE 5 CH4 LINE 6 CH3 LINE 4 LINE 3 CH2 LINE PHONG CH1 LINE PHONG L 9 10 11 8 8 9 10 11 4 NC 2 4 4 4 4 4 4 4 4 4 4 4 4 4 4 4 4 4 4 4 4 4 4 4 4 4 4 4 4 4 4 4 4 4 4 4 4 4 4 4 4 4 4 4 4 4 4 4 4 4 4 7 AC 110/230V-80/30Hz 30W- POWER IN – Use the included power adapter to connect the mixer to a power outlet. While the power is switched off, plug the power supply into the mixer first, then plug the power supply into a power outlet.
- VOLTAGE SELECTOR – This 2-position switch sets the AC input voltage. U.S. users should set this switch to "115V" whereas U.K. and most European users will need to set this to "230V".
- POWER SWITCH – Turns the mixer on and off. Turn on the mixer after all input devices have been connected and before you turn on amplifiers. Turn off amplifiers before you turn off the mixer.
- LINE INPUTS (RCA) – Connect line-level devices, such as CD players, samplers or audio interfaces, to these inputs.
- PHONO INPUTS (RCA) – Connect phono-level devices, such as turntables, to these inputs.
- MIC 2 INPUT – If you would like to use an additional 1/4" microphone on Channel 4, connect it to this input. To route the microphone signal to the mix, you will need to flip the Channel 4 Input Selector switch, located on the top panel, to "Mic".
- GROUNDING TERMINAL - If using phono-level turntables with a grounding wire, connect the grounding wire to these terminals. If you experience a low "hum" or "buzz", this could mean that your turntables are not grounded.
Note: Some turntables have a grounding wire built into the RCA connection and, therefore, nothing needs to be connected to the grounding terminal. - MASTER OUTPUT (BALANCED XLR) - Connect this low-impedance XLR output to a speaker or amplifier system. The level of this output is controlled with the MASTER FADER on the top panel.
- MASTER OUTPUT (RCA) – Use standard RCA cables to connect this output to a speaker or amplifier system. The level of this output is controlled by the MASTER FADER on the top panel.
- BOOTH OUTPUT (RCA) - Use standard RCA cables to connect this output to a booth monitoring system. The level of this output is controlled by the Booth knob on the top panel.
- RECORD OUTPUT (RCA) – Use standard RCA cables to connect this output to a recording device, such as a CD recorder or tape deck. The level of this output is based upon pre-master levels.
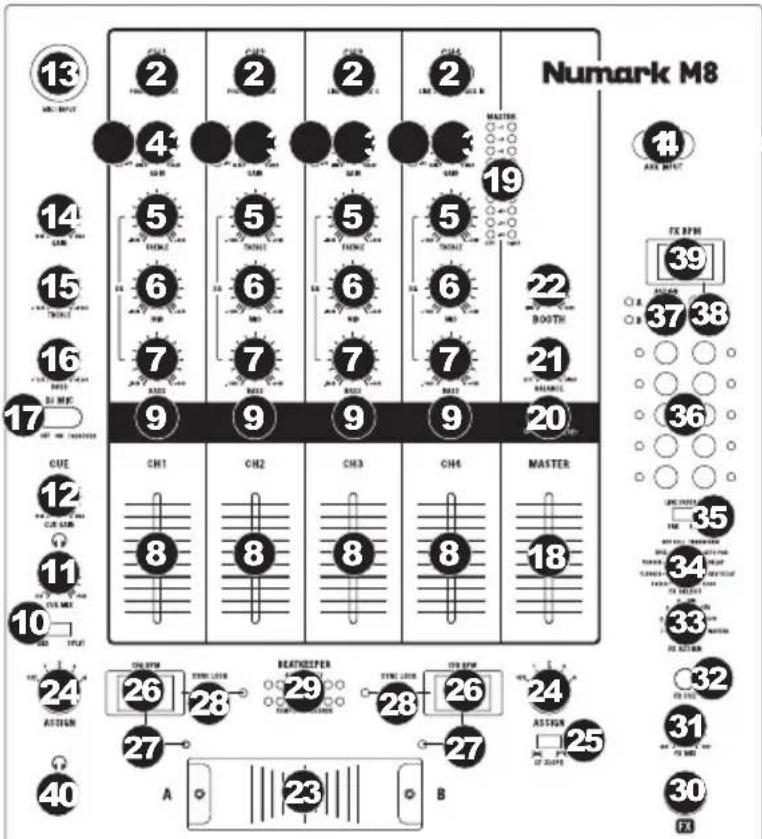
TOP PANEL FEATURES
- AUX INPUT (RCA) – Connect your MP3 player, CD player, etc. here.
- INPUT SELECTOR - Selects the input source to be routed to the corresponding channel. Input jacks are located on the rear panel.
- CHANNEL LEVEL INDICATOR – Displays the audio level of the corresponding channel.
- CHANNEL GAIN – Adjusts the channel's pre-fader and pre-EQ gain level.
- CHANNEL TREBLE – Adjusts the high (treble) frequencies of the corresponding channel.
- CHANNEL MID – Adjusts the mid-range frequencies of the corresponding channel.
- CHANNEL BASS – Adjusts the low (bass) frequencies of the corresponding channel.
- CHANNEL FADER – Adjusts the audio level on the corresponding channel.
- CHANNEL CUE – Sends pre-fader audio to the Cue Channel for headphone monitoring.
- CUE MIX / SPLIT - When this
text_image
Numark M8 13 2 2 2 2 4 5 6 7 CH1 CH2 CH3 CH4 MASTER 19 14 15 16 17 CX BRTM 39 37 38 22 BOOTH 21 CX BRTM 36 35 34 33 32 31 FX BRTM 30 FX BRTM 27 26 25 24 23 22 21 18 17 16 15 14 13 MAX BRTM MAX BRTM MAX BRTM MAX BRTM MAX BRTM MAX BRTM MAX BRTM MAX BRTM MAX BRTM MAX BRTM MAX BRTM MAX BRTM MAX BRTM MAX BRTM MAX BRTM MAX BRTM MAX BRTM MAX BRTM MAX BRTM MAX BRTM MAX BRTN MAX BRTN MAX BRTN MAX BRTN MAX BRTN MAX BRTN MAX BRTN MAX BRTN MAX BRTN MAX BRTN MAX BRTN MAX BRTN MAX BRTN MAX BRTN MAX BRTN MAX BRTN MAX BRTN MAX BRTN MAX BRTN MAX BRTN MAX BRT NTRRIN RORI TURRIN RORI TURRIN RORI TURRIN RORI TURRIN RORI TURRIN RORI TURRIN RORI TURRIN RORI TURRIN RORI TURRIN RORI TURRIN RORI TURRIN RORI TURRIN RORI TURRIN RORI TURRIN RORI TURRIT NTRRIN RORI TURRIN RORI TURRIN RORI TURRIN RORI TURRIN RORI TURRIN RORI TURRIN RORI TURRIN RORI TURRIN RORI TURRIN RORI TURRIN RORI TURRIN RORI TURRIN RORI TURRIN RORI TUTRIN RORI TUTRIN RORI TUTRIN RORI TUTRIN RORI TUTRIN RORI TUTRIN RORI TUTRIN RORI TUTRIN RORI TUTRIN RORI TUTRIN RORI TUTRIN RORI TUTRIN RORI TUTRIN RORI TUTRIN RORI TUTRIT NTRRIN RORI TUTRIN RORI TUTRIN RORI TUTRIN RORI TUTRIN RORI TUTRIN RORI TUTRIN RORI TUTRIN RORI TUTRIN RORI TUTT NTRRIN RORI TUTT RORI TUTT RORI TUTT RORI TUTT RORI TUTT RORI TUTT RORI TUTT RORI TUTT RORI TUTT RORI TUTT RORI TUTT RORI TUTT RORI TUTT RORI TUTT RORI TUTT RORI TUTT RORI TUTT RORI SUTT NTRRIN RORI TUTT RORI TUTT RORI TUTT RORI TUTT RORI TUTT RORI TUTT RORI TUTT RORI TUTT RORI TUTT RORI TUTT RORI TUTT RORI TUTT SUTT NTRRIN RORI TUTT RORI TUTT RORI TUTT RORI TUTT RORI TUTT RORI TUTT SUTT NTRRIN RORI TUTT RORI TUTT RORI TUTT RORI TUTT RORI TUTT SUTT NTRRIN RORI TUTT RORI TUTT RORI TUTT RORI TUTT SUTT NTRRIN RORI TUTT SUTT NTRRIN RORI TUTT SUTT NTRRIN SUTT NTRRIN SUTT NTRRIN SUTT NTRRIN SUTT NTRRIN SUTT NTRRIN SUTT NTRRIN SUTT NTRRIN SUTT NTRRIN SUTT NTRRIN SUTT NTRRIN SUTT NTRRIN SUTT NTRRIN SUTT NTRRIN SUTT NTRRIN SOUTT NTRRIN SOUTT NTRRIN SOUTT NTRRIN SOUTT NTRRIN SOUTT NTRRIN SOUTT NTRRIN SOUTT NTRRIN SOUTT NTRRIN SOUTT NTRRIN SOUTT NTRRIN SOUTT NTRRIN SOUTT NTRRIN SOUTT NTRRIN SOUTT NTRRIN SOUTT SUTT NTRRIN SOUTT NTRRIN SOUTT NTRRIN SOUTT NTRRIN SOUTT NTRRIN SOUTT NTRRIN SOUTT NTRRIN SOUTT NTRRIN SOUTT NTRRIN SOUTT NTRRIN SOUTT NTRRIN SOUTT NTRRIN SOUTT NTRRIN SOUTT NTRRIN SOTU PUE OF SUITE FAXswitch is in the SPLIT position, the headphone audio will be "split" such that all channels sent to CUE are mixed to mono and applied to the left headphone channel and the Program mix is mixed to mono and applied to the right channel. When the switch is in the MIX position, Cue and Program audio will be "blended" together.
- CUE MIX – Turn to mix between Cue and Program in the Headphone channel. When all the way to the left, only channels routed to CUE will be heard. When all the way right, only the Program mix will be heard.
- CUE GAIN – Adjusts the audio level of the Cue channel.
- MIC 1 INPUT - Connect a microphone to this input with an XLR cable.
- MIC GAIN – Adjusts the audio level of the microphone signal.
- MIC TREBLE - Adjusts the high (treble) frequencies of the microphone channel.
Tip: If you experience feedback when using a microphone at loud levels, try turning down the high frequencies.
- MIC BASS – Adjusts the low (bass) frequencies of the microphone channel.
- MIC ON / OFF – Turns the microphone input on or off. "TALKOVER" reduces the combined levels of Channels 1-4 to -12dB (an appropriate "talkover" level).
- MASTER FADER – Adjusts the output volume of the Program mix.
- STEREO LEVEL INDICATOR – Displays the audio level of the Program mix.
- MONO / STEREO – Adjusts the Program mix for stereo or mono operation.
- BALANCE - Adjusts the balance of right to left audio in all outputs (MASTER, RECORD, and ZONE OUTPUTS).
- BOOTH VOLUME – Adjusts the Booth output level.
- CROSSFADER – Blends audio between the channels assigned to the left and right side of the crossfader.
- CF ASSIGN – Selects which input channel will be heard when the crossfader is moved towards this knob. All channels not assigned will remain active.
- CF SLOPE – Adjusts the slope of the crossfader curve. Flip switch to the left for a smooth fade (mixing) or to the right for a sharp cut (scratching).
- BEATKEEPER BPM DISPLAY – M8's built-in BeatKeeper™ technology will automatically detect the tempo (in BPM – "beats per minute") of the song playing on that side of the CROSSFADER and show it in this display.
- TAP - To manually enter a new BPM in the BEATKEEPER BPM DISPLAY, tap this button in time with the song. You can tap the button once to reset the song's downbeat. To register a new BPM, tap the button 4 times to the beat of the music. For even greater accuracy, enter more taps.
- SYNC LOCK – When there is a BPM shown in the BEATKEEPER BPM DISPLAY, press this button to lock the BPM of the song playing on that side of the CROSSFADER. This feature limits "drifting" of the BPM reading. Deactivating the SYNC LOCK button will prompt the BeatKeeper to rescan for a new BPM reading.
Numark
- BEATKEEPER – Use this meter to tempo-match and beat-match the songs playing on either side of the CROSSFADER to create your mix. (Match the songs' tempos before matching their beats.) When the tempos or beats are properly synced, the green center LED on their respective meters will light up.
Note: You must have SYNC LOCK activated on both BPM displays to use the meter.
- Tempo Difference – This meter shows the difference in BPM between the two SYNC LOCKED BPM displays. The LEDs will light on the side which has the faster BPM. To make the green LED illuminate, either slow down or speed up your songs until this LED lights.
-
Beat Offset – After the tempos are aligned of your two songs, then you must align the downbeats. Bend the pitch of your playing tracks until the green LED illuminates. When both the green LEDs on the Beat Offset and Tempo Offset meters are lit, your tracks are aligned.
-
FX ON – Turns effects processing on and off. Note that you will also have to raise the FX MIX control to be able to hear the effects once they have been turned on.
-
FX MIX – Controls the amount of effected (wet) vs. non-effected (dry) sound in the mix.
- FX CUE – Sends the effected sound to the Cue channel for headphone monitoring. To preview effects: set the FX ASSIGN knob to the desired source, make sure that FX ON is off (so the audience will not hear the effects while you are previewing them) and turn on FX CUE. Make sure that the CUE BLEND control is adjusted such that CUE can be heard. Adjust the effects controls to your desired settings. Once satisfied, turn on FX ON to activate the effect.
- FX ASSIGN - This knob selects the audio source on which the effects will be applied. You can address individual mixer channels (1/2/3/4), either side of the crossfader (CFA/CFB) or you can apply the effect on the Master mix.
- FX SELECT – This knob selects the effect to be applied to the channel (set with the FX ASSIGN knob). See the "EFFECTS DESCRIPTION" section for more information.
- LINE FADER FX - This switch sets whether the effects are applied to the channel (set with the FX ASSIGN knob) pre-fader ("PRE") or post-fader ("POST").
Note: The "POST" setting is most effective when using Echo or Delay effects in conjunction with fader movement.
- BEAT DIVISION BUTTONS – Sets the note division of the effects, which controls the rate of the effects in conjunction with the FX BPM DISPLAY reading. Tapping a button once will reset the downbeat to which your effect is applied.
- FX BPM ASSIGN - To sync the effects to the BPM of the song on the left (A) or right (B) side of the CROSSFADER, press this button until the desired LED (A or B) is lit. The light will turn off if you manually enter a BPM with the FX TAP button.
- FX TAP – To manually enter a BPM to which the effects will be synced, tap this button in time with the song's tempo. For even greater accuracy, enter more taps. Tapping the button once will reset the downbeat to which your effect is applied.
- FX BPM DISPLAY – This display shows the BPM reading that controls the rate of the effects. The BPM reading will be determined by the FX BPM ASSIGN button or by manually entering a BPM with the FX TAP button.
- HEADPHONES – Connect your 1/4" headphones to this output for cueing and mix monitoring.
EFFECTS DESCRIPTION:
Note: The rate of these effects is determined by the current FX BPM setting and BEAT DIVISION BUTTONS.
• FILTER – Sweeps the entire frequency range.
- FLANGER – Creates a rushing, flanging sound.
- PHASER – Creates an effect similar to the sound of an airplane taking off.
- ROLL – Samples a portion of audio and loops it. (Note: The track itself will continue to play. The looped audio is only heard in the effected sound of the mix.)
- REV ROLL – The "roll" effect but with the looped audio played in reverse.
• TRANSFORM – Switches the audio on/off at a regular rate – like tremolo with a sharp curve.
• AUTO PAN – Alternates between playing audio in the left and right channels.
• DELAY – Standard delay effect.
- REV DELAY – Standard delay effect with the delayed audio played in reverse.
• ECHO – Standard echo effect.
CONTENIDO DE LA CAJA
text_image
Numark M8 13 2 2 2 2 14 15 16 17 CUE 12 11 10 A B CUE 19 18 17 WHI WMH WMH WMH WMH WMH WMH WMH WMH WMH WMH WMH WMH WMH WMH WMH WMH WMH WMH WMH WMH WMH WMH WMH WMH WMH WMH WMH WMH WMH WMH WMH WMH WMH WMH WMH WMH WMH WMH WMH WMH WMH WMH WMH WMH WMH WMH WMH WMH WMH WMH WM WHI WMH WMH WMH WMH WMH WMH WMH WMH WMH WMH WMH WMH WMH WMH WMH WMH WMH WMH WMH WMH WMH WMH WMH WMH WMH WMH WMH WMH WMH WMH WMH WMH WMH WMH WMH WMH WMH WMH WMH WMH WMH WMH WMH WMH WMH WMH WMH WMH WHI WMH WMH WMH WMH WMH WMH WMH WMH WMH WMH WMH WMH WMH WMH WMH WMH WMH WMH WMH WMH WMH WMH WMH WMH WMH WMH WMH WMH WMH WMH WMH WHI WHM WM HAM HAM HAM HAM HAM HAM HAM HAM HAM HAM HAM HAM HAM HAM HAM HAM HAM HAM HAM HAM HAM HAM HAM HAM HAM HAM HAM HAM HAM HAM HAM HAM HAM HAM HAM HAM HAM HAM HAM HAM HAM HAM HAM HAM HAM HAM HAM HAM HAM HAM HAN WHI WHM WTHT WAT TOW TOW TOW TOW TOW TOW TOW TOW TOW TOW TOW TOW TOW TOW TOW TOW TOW TOW TOW TOW TOW TOW TOW TOW TOW TOW TOW TOW TOW TOW TOW TOW TOW TOW TOW TOW TOW TOW TOW TOW TOW TOW TOW TOW TOW TOW TOW TOW TOW TOW TLOW WHI WHM WTHT WAT TOW TOW TOW TOW TOW TOW TOW TOW TOW TOW TOW TOW TOW TOW TOW TOW TOW TOW TOW TOW TOW TOW TOW TOW TOW TOW TOW TOW TOW TOW TOW TOW TOW WHI WHM WTHT WAT TOW TOW TOW TOW TOW TOW TOW TOW TOW TOW TOW TOW TOW TOW TOW TOW TOW TOW TOW WHI WHM WTHT WAT TOW TOW TOW TOW TOW TOW TOW TOW TOW TOW TOW TOW WHI WHM WTHT WAT TOW TOW TOW TOWTAWTAWTAWTAWTAWTAWTAWTAWTAWTAWTAWTAWTAWTAWTAWTAWTAWTAWTAWTAWTAWTAWTAWTAWTAWTAWTAWTAWTAWTAWTAWTAWTAWTAWTAWTAWTAWTAWTAWTAWTAWTAWTAWTAWTAWTAWTAWTAWTAWTAWTAV WHI WHM WTHT WAT TOW TOW TOW WHI WHM WTHT WAT TOW WHI WHM WTHT WAT WHI WHM WTHT WAT WHI WHM WTHT WAT WHI WHM WTHT WAT WHI WHM WTHT WAT WHI WHM WTHT WAT WHI WHM WTHT WAT WHI WHM WTHT WAT WHI WHM WTHT WAT WHI WHM WTHT WAT WHI WHM WTHT WAT WHI WHM WTHT WATBalanced (XLR): +22 dBV
SNR: > 92 dB (A-weighted) for all paths from line inputs to output.
80 dB (A-weighted) for all paths from phono inputs to output.
80 dB (A-weighted) for all paths from MIC inputs to output.
THD+N: < 0.01% for all line inputs
Frequency Response:
Line: Flat +/- 1 dB, 20 Hz - 20 kHz
Phono: RIAA curve +/- 2 dB plus anti-rumble
* Specifications are subject to change
www.numark.com