
HAVIR21 - Radio KONIG - Free user manual and instructions
Find the device manual for free HAVIR21 KONIG in PDF.

| Product Type | Internet Radio |
| Brand | Konig |
| Model | HAVIR21 |
| Category | Radio |
| Power Supply | 110-240 V AC, 50/60 Hz |
| Wired Network Connectivity | Ethernet 10/100 Mbps |
| Wireless Network Connectivity | Wi-Fi 802.11 b/g (optional USB dongle) |
| Wireless Encryption | WEP64/128, WPA-TKIP-PSK, WPA2-AES-PSK |
| Supported Audio Formats | MP3, WMA (ID3 v1, v2) |
| Audio Sources | Internet Radio (World Station, SHOUTCast), podcasts, USB, auxiliary input |
| Recording | Yes, in MP3 128 Kbps from an Internet station |
| USB Storage | USB FAT16/32 |
| Alarm | Dual configurable alarm |
| Time Synchronization | Yes, via network |
| Firmware Update | Yes, via network |
| Care and Cleaning | Clean with a dry cloth, do not use solvents |
| Safety | Do not open, do not expose to water or moisture |
| General Information | Design and specifications subject to change without notice |
Frequently Asked Questions - HAVIR21 KONIG
User questions about HAVIR21 KONIG
0 question about this device. Answer the ones you know or ask your own.
Ask a new question about this device
Download the instructions for your Radio in PDF format for free! Find your manual HAVIR21 - KONIG and take your electronic device back in hand. On this page are published all the documents necessary for the use of your device. HAVIR21 by KONIG.
USER MANUAL HAVIR21 KONIG
MANUAL DE USO (p. 62)
Radio Internet
KAYTTOOHJE (s. 88)
Internetradio
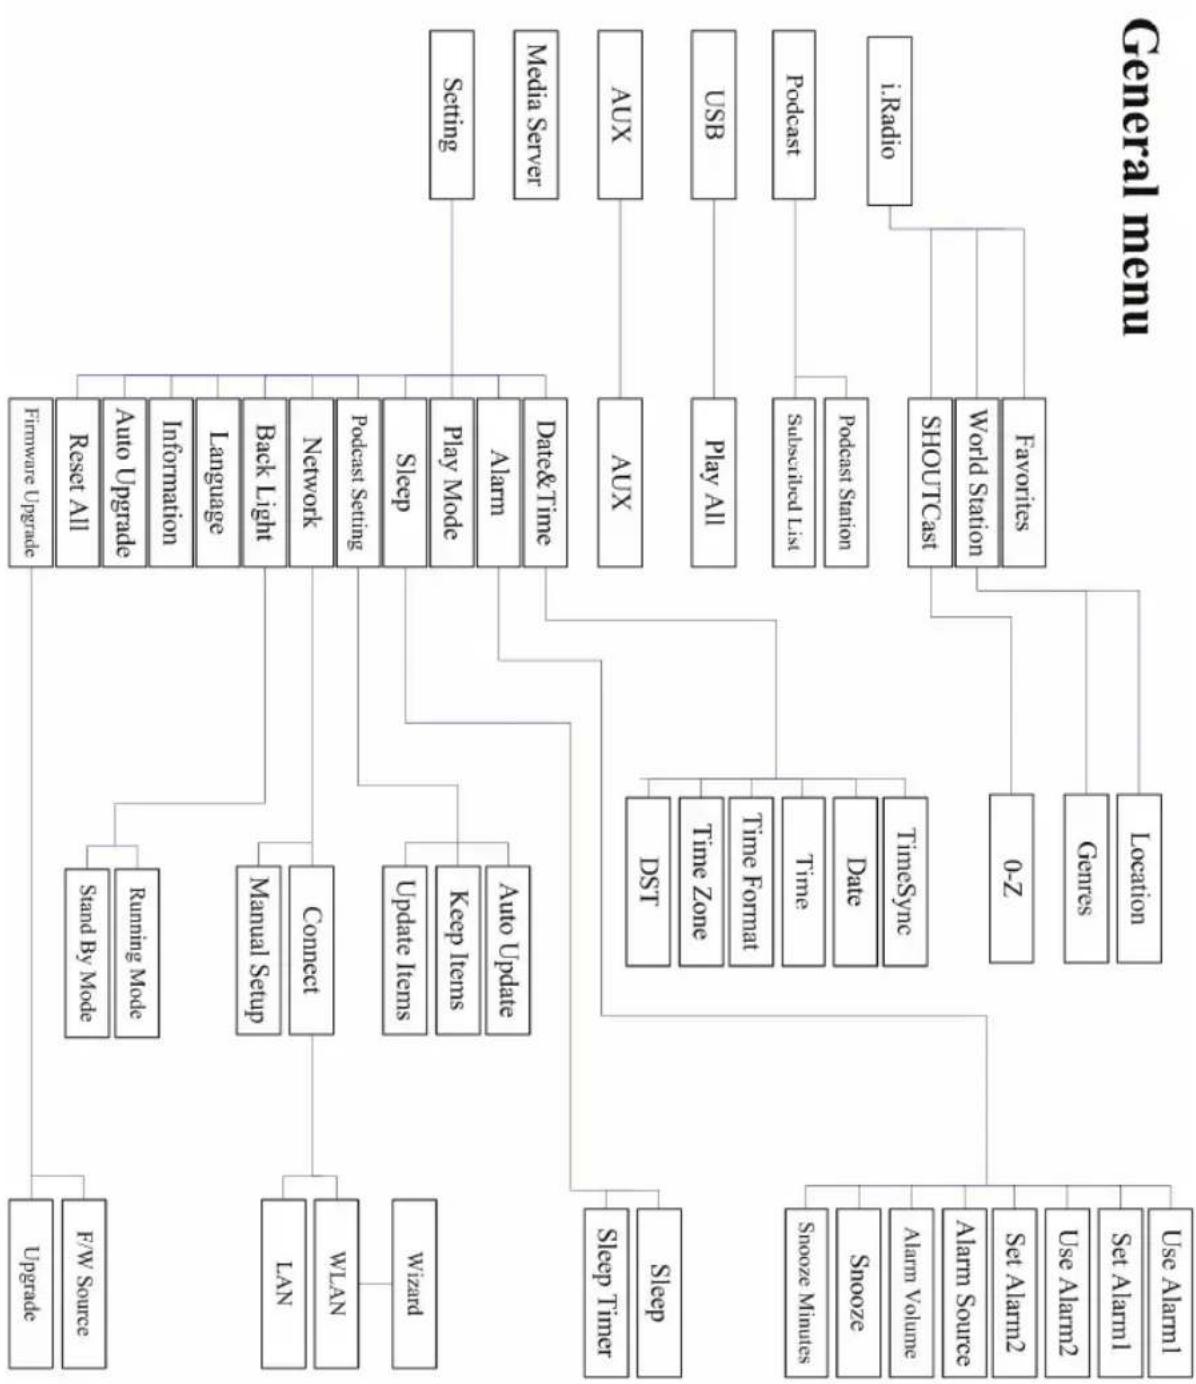
Internet Radio is a radio system integrated digital audio playback that functions with network connectivity. The system can play MP3/WMA audio files, USB devices and internet radio services such as World Station and SHOUTCast which provide above 15,000 internet radio stations. Internet Radio also supports audio streaming via UPnP Media Server.
1.2 Audio Sources
- Support MP3/ Windows Media ^ audio files (known as WMA)(Included ID3V1 ,2)
- Support static lyrics and syncsed lyrics (.txt/.lrc/.smi)
- Support USB Flash drive
- SHOUTCast Internet Radio (http://www.shoutcast.com)
- Support Podcast
- Support AUX
1.3 Storage
- Support standard USB Mass Storage device (FAT16/32).
1.4 Recording
- Be able to record audio data from internet radio stations (World Station / SHOUTCast) and transfer audio data into 128K MP3 format.
1.5 Networking
- Support Ethernet 10/100 Mbps
Support Wireless LAN IEEE 802.11 b/g dongle - Support Infrastructure / Ad-hoc
- Support WEP64/128 and WPA-TKIP-PSK, WPA2-AES-PSK encryption
- Support Proxy Setting
- The system provides a wireless setting wizard to make wireless network setup easier.
1.6 Others
- Support two alarm clock settings
- Support time sync technology (* network available)
- Support firmware upgrade
Chapter 2 Installation
2.1 Installation
NOTE: The proper voltage for Internet Radio is AC 110V~240V/50-60Hz. Be sure to the voltage in your area before plugging in the unit.
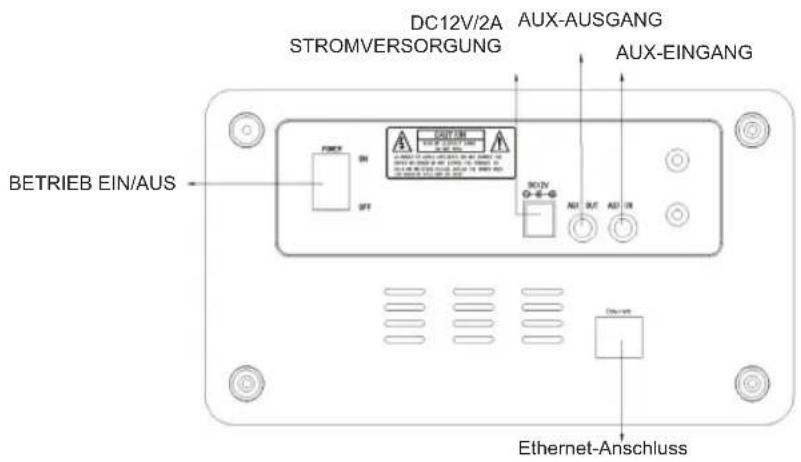
2.1.1 Installing onto network (LAN)
- Make sure the internet environment is ready and the network setting is available (ADSL or Cable Modems is highly recommended).
- The default setting of network in your Internet Radio is DHCP. (more network setting please check 11.6 Network)
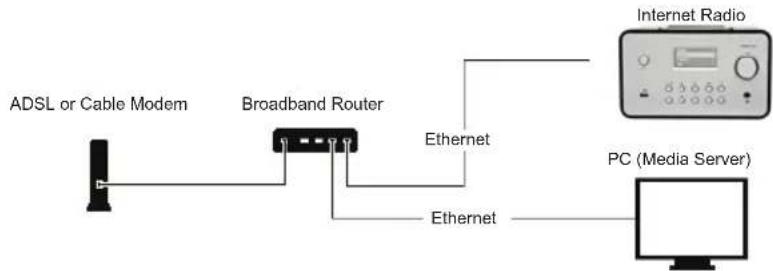
- Connect the device to an Internet connected router according to the picture. Use a standard network cable.
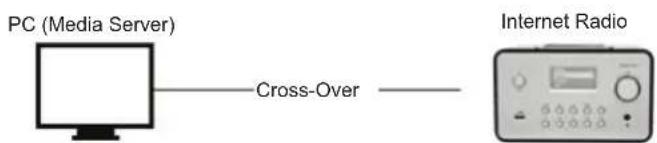
- Connect the device to a PC according to the picture if it is only going to be used for listening to music that is stored in the computer. Use a crossed network cable.
- When the device is connected like this you can only listen to music which is stored in the computer. The computer must have special software installed. See section Media Server.
2.1.2 Installation of a wireless network (WLAN)
- Make sure the internet environment is ready and the network setting is available.
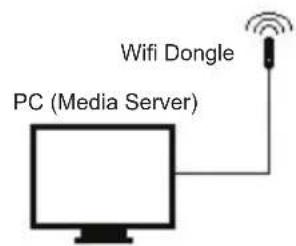
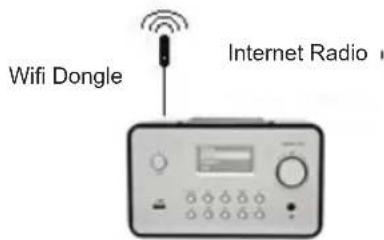
- Plug-in Wifi Dongle into Internet Radio (More setting please see 11.6 Network)
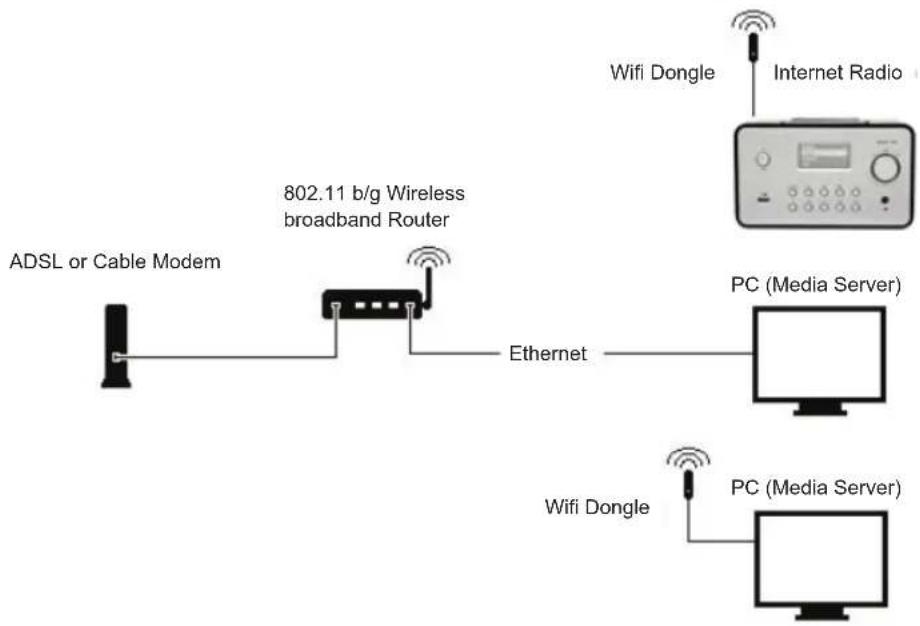
- Connect the wireless network dongle to the socket.
- You can connect the device wireless to a computer with a wireless network card.
- When the device is connected like this you can only listen to music which is stored in the computer. The computer must have special software installed. See section Media Server.
2.2 Starting The Equipment for The First Time
When you turn on the equipment for the first time the stereo will try to automatically search for an IP address. If the network is connected to the Internet, the equipment will also synchronize the time with the time server and then goes to standby mode. Usually it will take 6-30 seconds to finish the whole process.
2.3 World Station
2.3.1 Listen to World Station
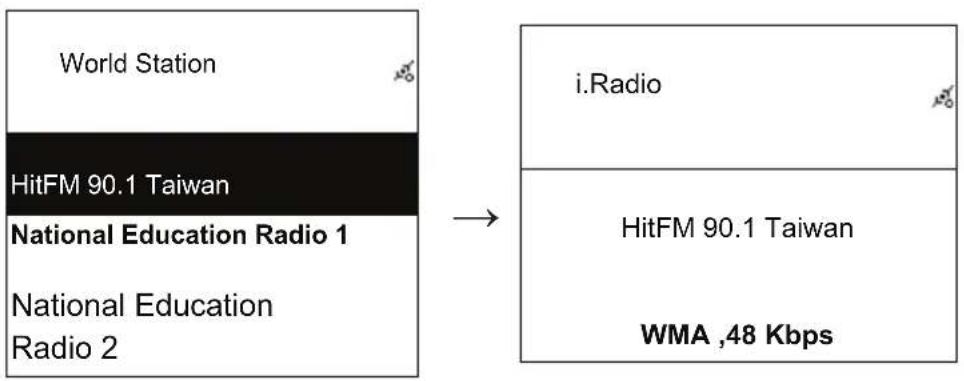
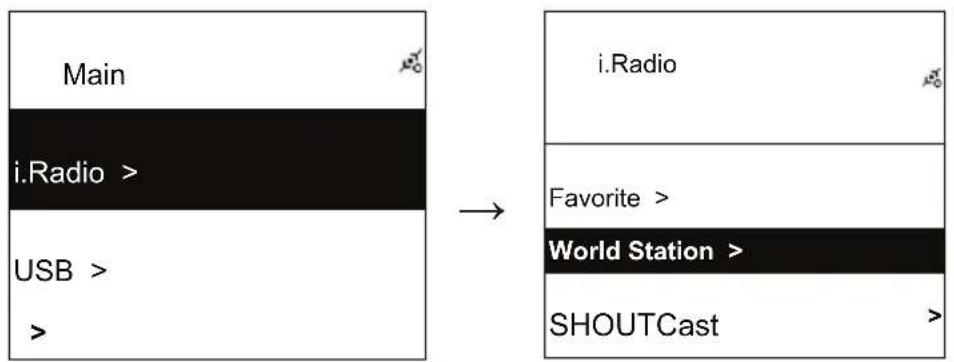
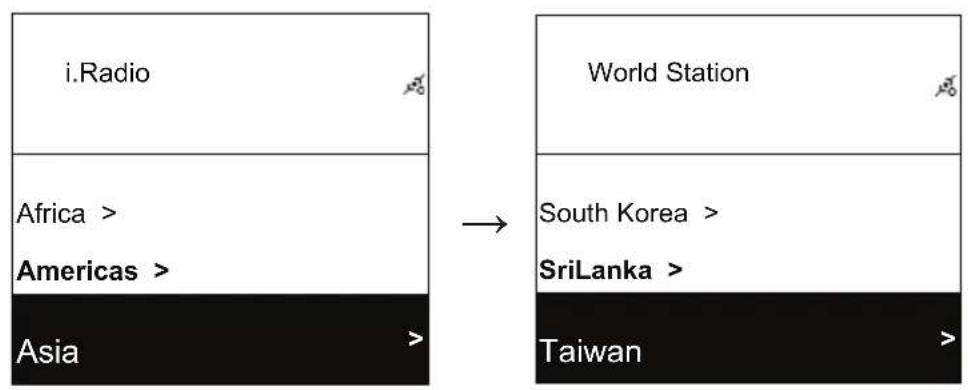
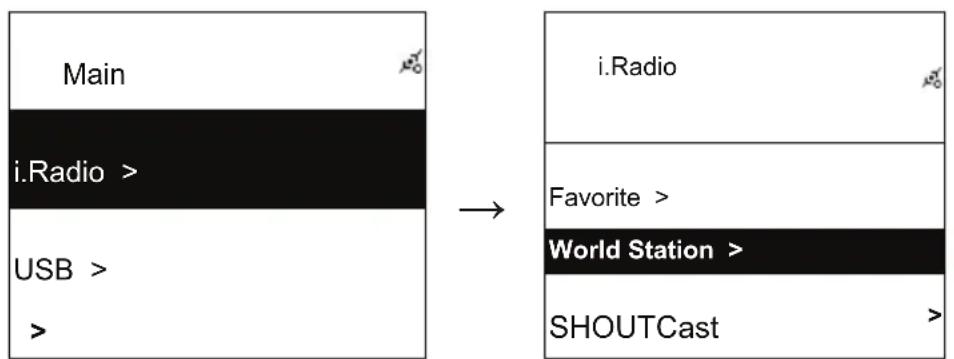
- Go to [Main] menu, choose [i.Radio] and press ENTER/OK button.
- Choose [World Station] and then press ENTER/OK button.
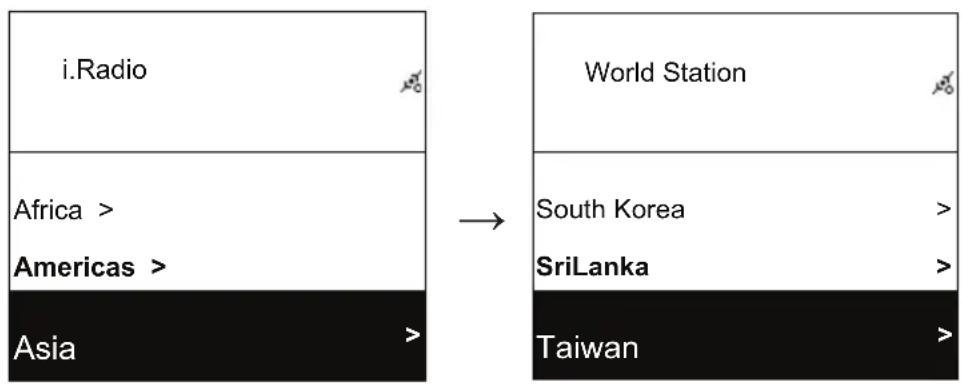
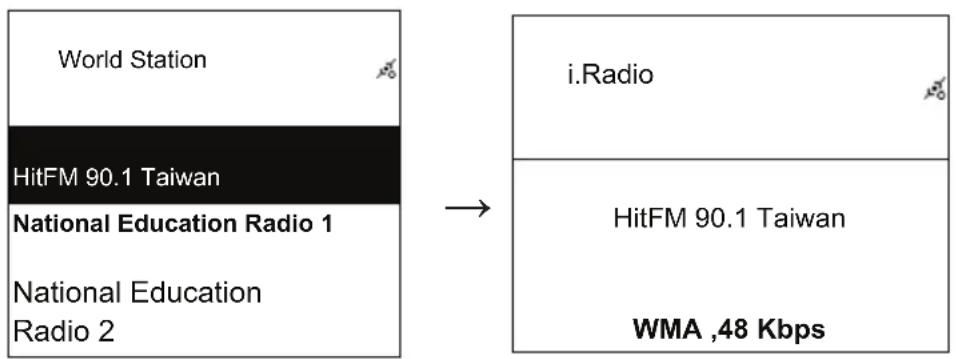
- Scroll up/down to a station and then press ENTER/OK button to play.
- You will hear music after buffering reaches to 100% .
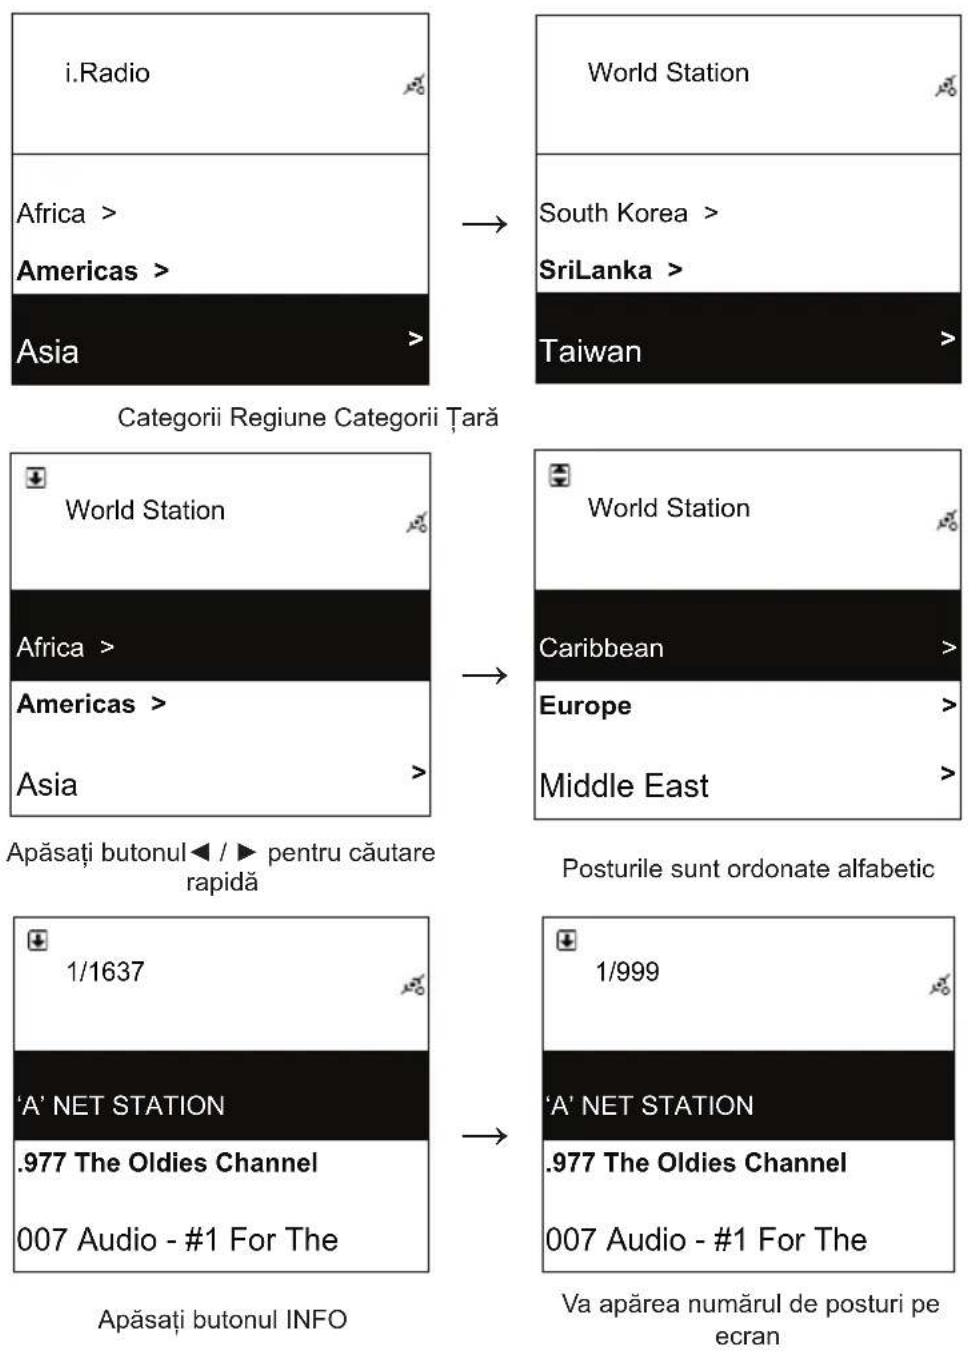
Note: For fast search for an internet radio station, press Right button to jump from radio stations started with alphabet A to alphabet B, alphabet B to alphabet C, and so on. Press Left button to jump backward.
Table 2.3.1
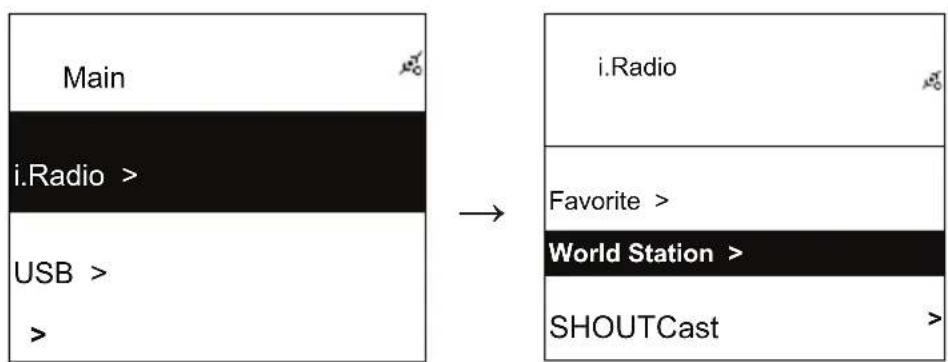
Select i.Radio Choose World Station
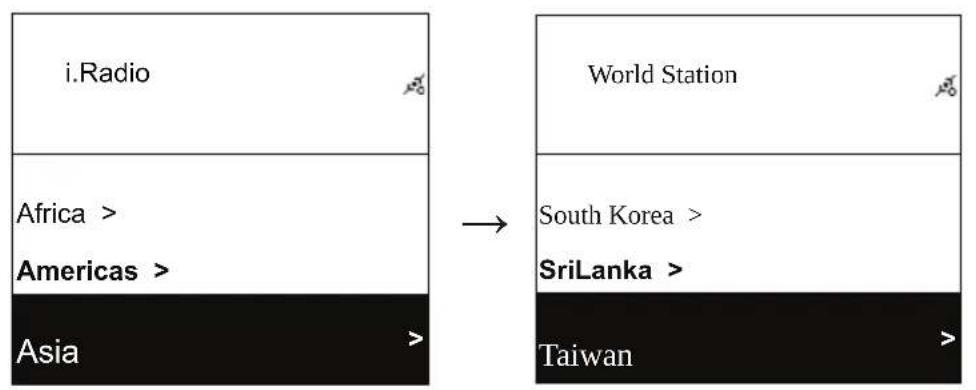
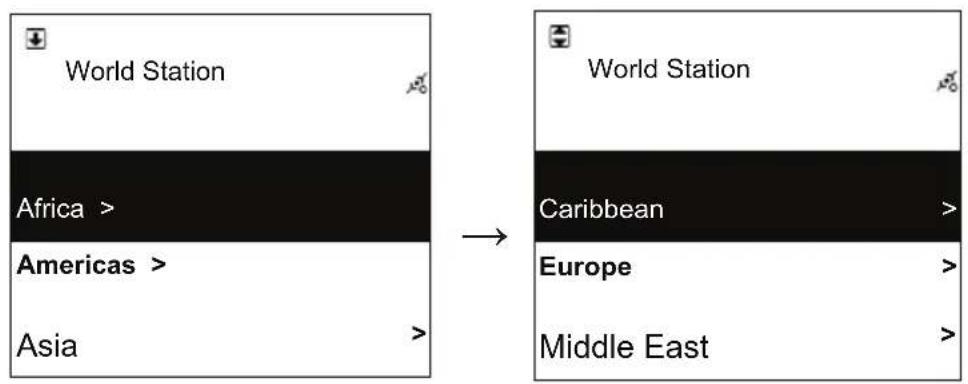
Categorized by Area Categorized by Country
Press button for fast search

The amount of stations will show on the screen
Press INFO button
The name of stations change alphabetically
Categorized by alphanumeric order Playing
2.4 Network
- Support LAN (Ethernet) and WLAN (802.11b/g wifi Dongle is optional)
Support Wi-Fi Encryption WEP64/128, WPA-TKIP-PSK, and WPA2-AES-PSK. - Support dynamic IP via DHCP (Dynamic Host Configuration Protocol) and static IP. Default setting is Ethernet and DHCP.
- Support Infrastruct mode and Ad-hoc mode.
Support Upnp. - Auto-detect and auto-run LAN or WLAN(wireless LAN) environment.
2.4.1 Understanding the Networking States on The System
- The network connectivity status icon will show on the top side of the screen.
Table2.4.1.1 - LAN Status
| Title | → | ·It is failed to detect the Ethernet cable. |
| Title | → | ·It is successful to detect the Ethernet cable. ·It is failed to get available DHCP information. |
| Title | → | ·It is successful to detect the Ethernet cable. ·It is successful to get available DHCP information |
Table 2.4.1.2 - WLAN Status
| Title | y | → | ·It is failed to detect the USB Wi-Fi adapter. |
| Title | y | → | ·It is successful to detect the USB Wi-Fi adapter. ·It is failed to get available DHCP information. |
| Title | y | → | ·It is successful to detect the USB Wi-Fi adapter. ·It is successful to get available DHCP information. |
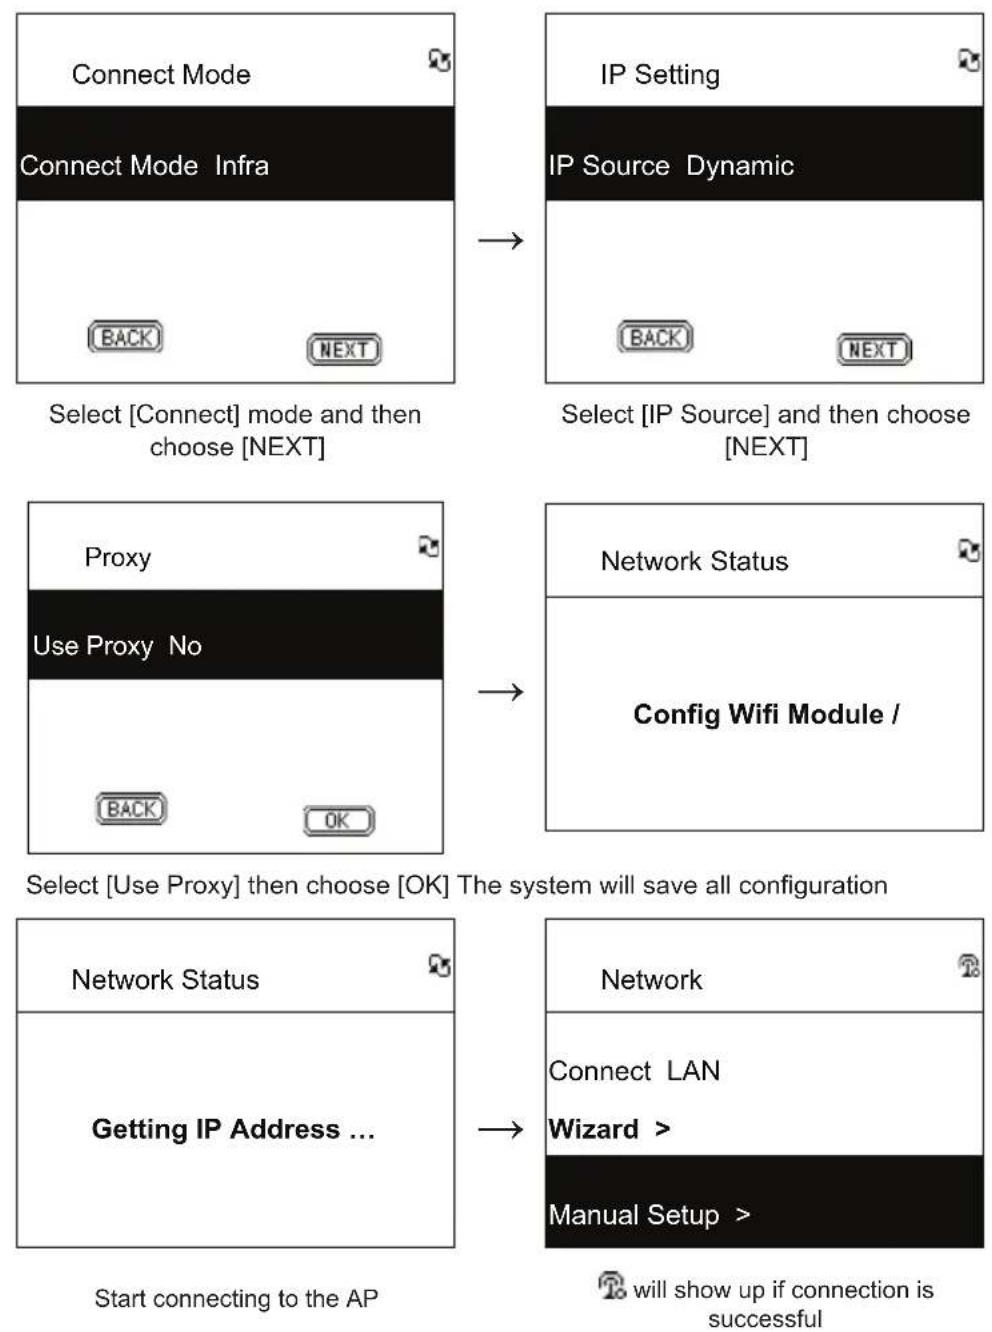
2.4.2 Setting the Wi-Fi Connectivity in infrastruct mode
- Insert a Wi-Fi USB adapter into the USB connector. (The Wi-Fi USB adapter is optional)
- then scroll up/down to [Network] and press ENTER/OK button.
- Select [Manual Setup] and press ENTER/OK button
- Select [Connect] and press ENTER/OK button
- Then please follow the steps below:
Table 2.4.2
| Network | Network |
| Connect LAN | Connect WLAN |
| Wizard > | BACK NEXT |
| Manual Setup > | Select [WLAN] mode, for example, then choose [NEXT] |
| Select [Manual Setup] and press [ENTER/OK] button | |
| SSID | Site Survey |
| SSID Auto Search | AP01 75% wireless 100% |
| BACK NEXT | |
| Choose [NEXT] to search any AP available | Available APs listed by signal strength. If an AP is required encryption, it will be marked with a symbol of lock. |
| Encryption | Passphease |
| Encryption Mode WPA2 | >0 00 00 00 00 00 00 00 |
| Passphrase > | ENTER/OK: Next |
| Select [Encryption] mode and then choose [NEXT] | Key in the encryption code and then press [ENTER/OK] |
2.4.3 Setting the Wi-Fi Connectivity by Wi-Fi Wizard
- Insert a Wi-Fi USB adapter into the USB connector. (The Wi-Fi USB adapter is optional).
- Then scroll up/down to [Network] and press ENTER/OK button.
- Select [Connect] and switch [LAN] to [WLAN].
- Select [Wizard] and then press ENTER/OK button.
- Scroll up/down to an access point you want to connect, and then press ENTER/OK button.
- If the access point that you are selecting is protected, press ENTER/OK button to select the protected AP.
- To input the encryption key, press UP/DOWN (or numbered key) button to change characters and press LEFT/RIGHT button to shift.
- Press ENTER/OK after you finish setting.
- 8icon will show on the topside of the screen if the wireless setting is successful.
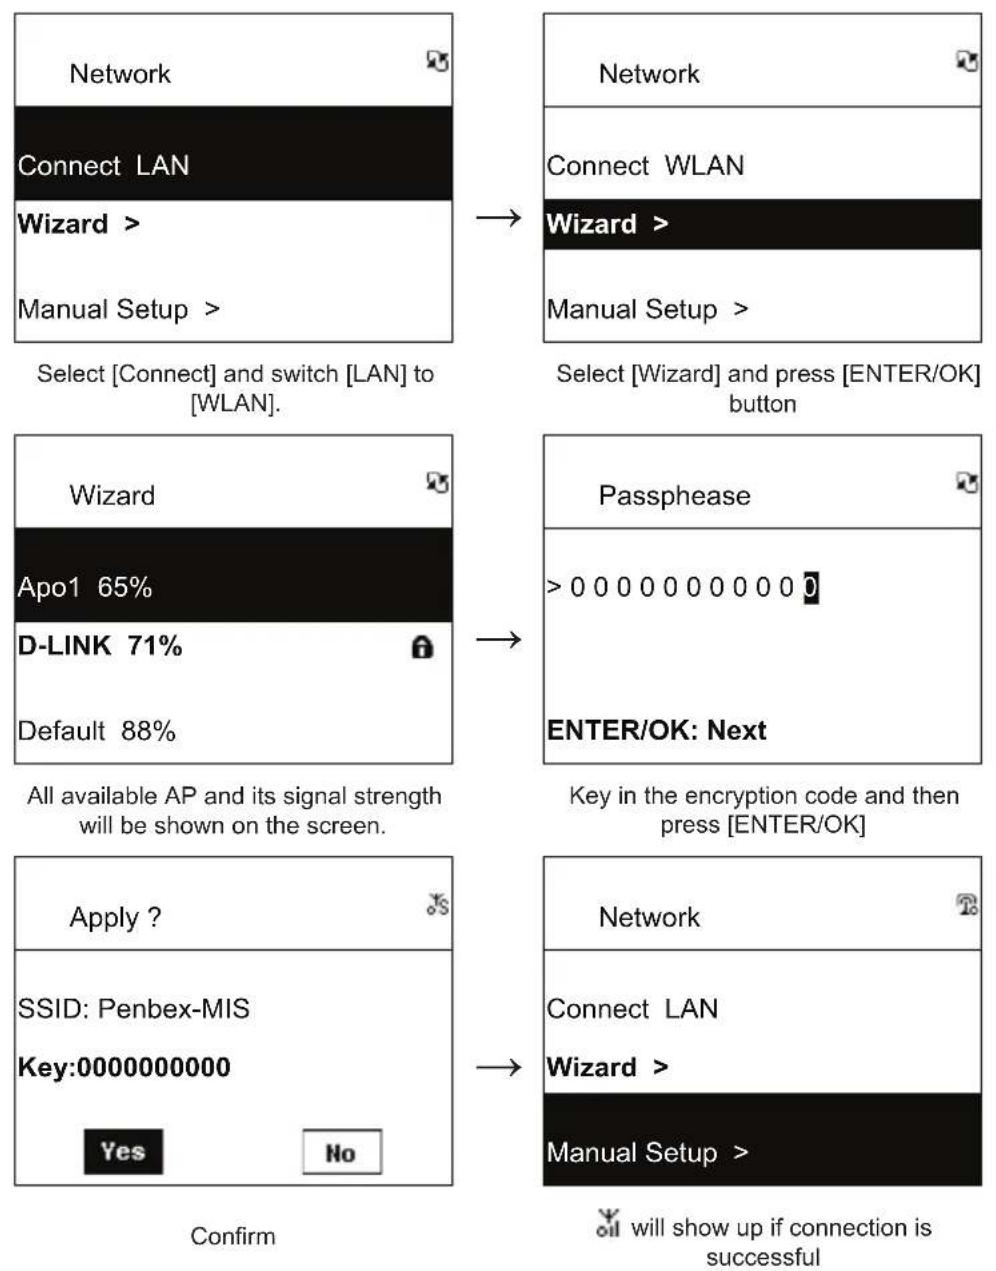
Table 2.4.3
2.4.4 Inputting Static IP
- Then scroll up/down to [Network] and press ENTER/OK button.
- Scroll up/down to [IP Setting] and then press ENTER/OK button to enter.
- Select [IP Source] and press ENTER/OK button to switch [Dynamic] to [Static].
- Scroll up/down to [TCP/IP] and press ENTER/OK button to start editing.
- Press UP/DOWN to change characters and press LEFT/RIGHT button to shift.
- After finishing, press REC button to confirm.
Table 2.4.4
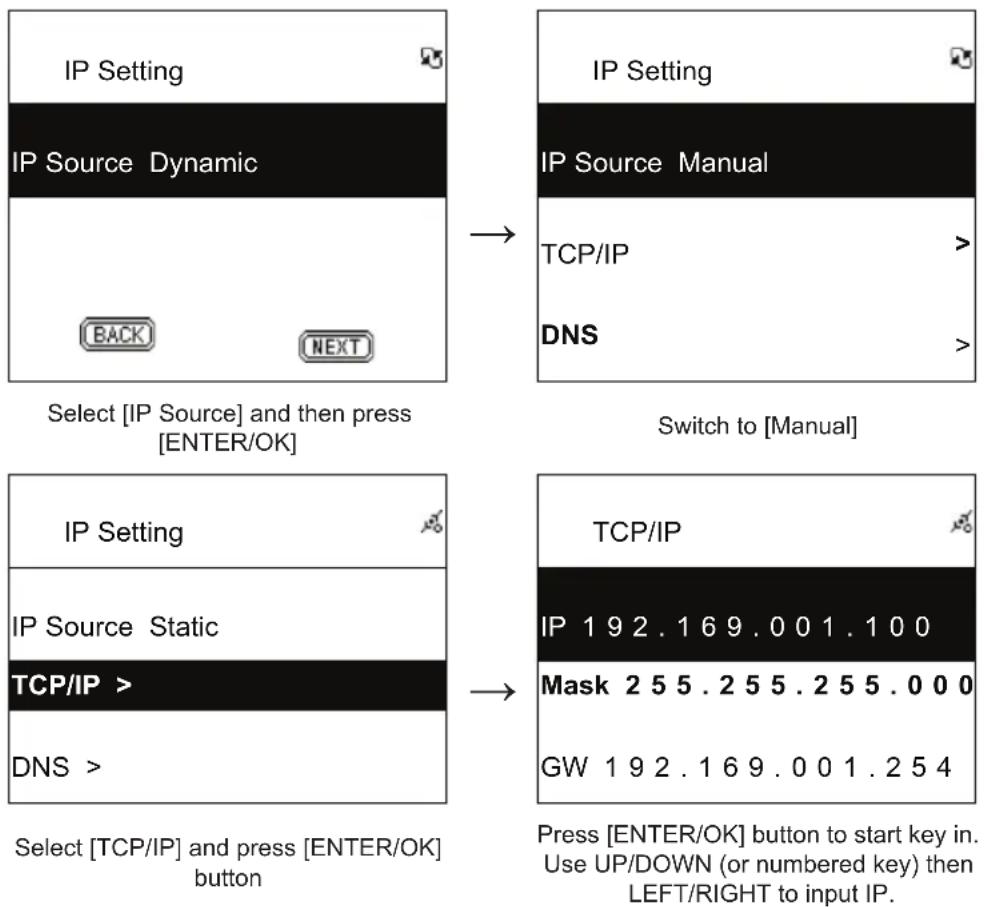
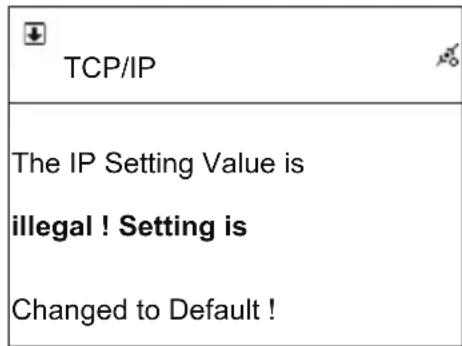
NOTE: When IP setting value (including IP, Subnet Mask, or Gateway) is illegal, IP setting will change to default value.
2.4.5 Inputting DNS
- Then scroll up/down to [Network] and press ENTER/OK button.
- Scroll up/down to [IP Setting] and then press ENTER/OK button to enter.
- Select [DNS] and then press ENTER/OK button.
- Press UP/DOWN button to change characters, then press LEFT/RIGHT button to shift.
- After finishing, press ENTER/OK button to confirm.
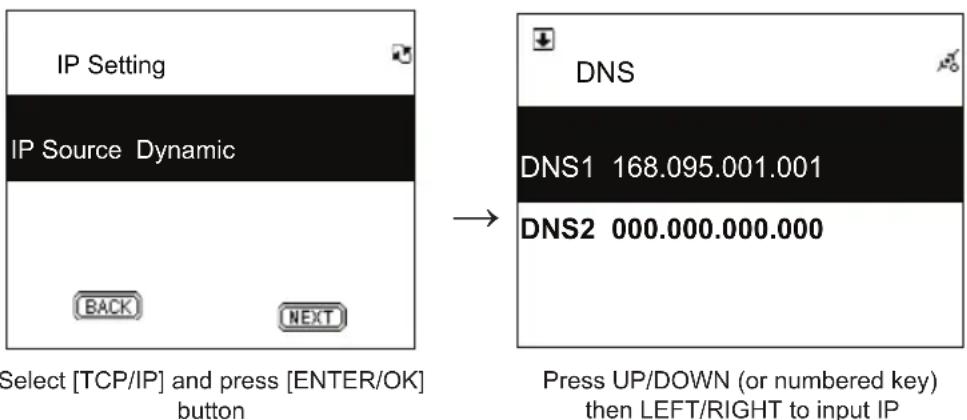
Table 2.4.5
Safety precautions:


To reduce risk of electric shock, this product should ONLY be opened by an authorized technician when service is required. Disconnect the product from mains and other equipment if a problem should occur. Do not expose
the product to water or moisture.
Maintenance:
Clean only with a dry cloth. Do not use cleaning solvents or abrasives.
Warranty:
No guarantee or liability can be accepted for any changes and modifications of the product or damage caused due to incorrect use of this product.
General:
Designs and specifications are subject to change without notice.
All logos brands and product names are trademarks or registered trademarks of their respective holders and are hereby recognized as such.
Keep this manual and packaging for future reference.
Attention:

This product is marked with this symbol. It means that used electrical and electronic products should not be mixed with general household waste. There is a separate collections system for these products.
DEUTSCH
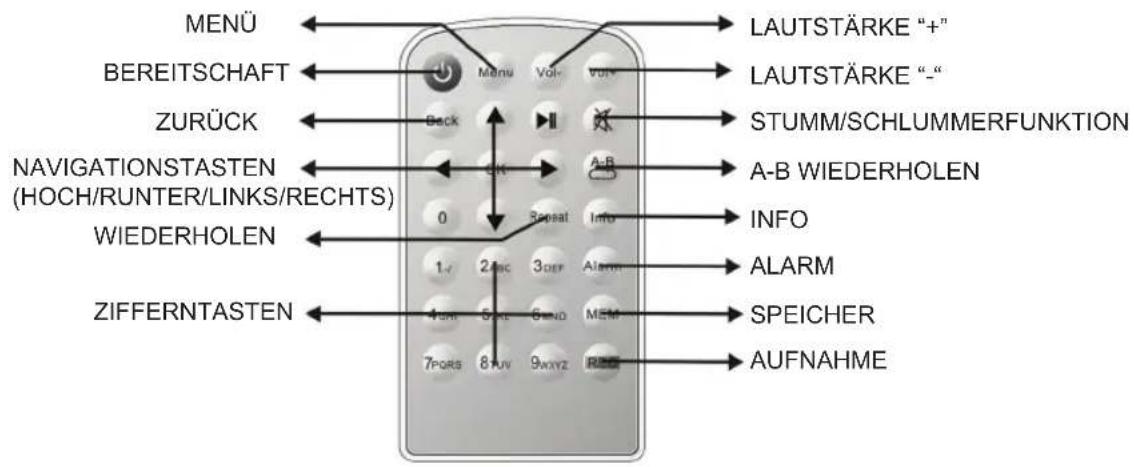
Fernbedienung
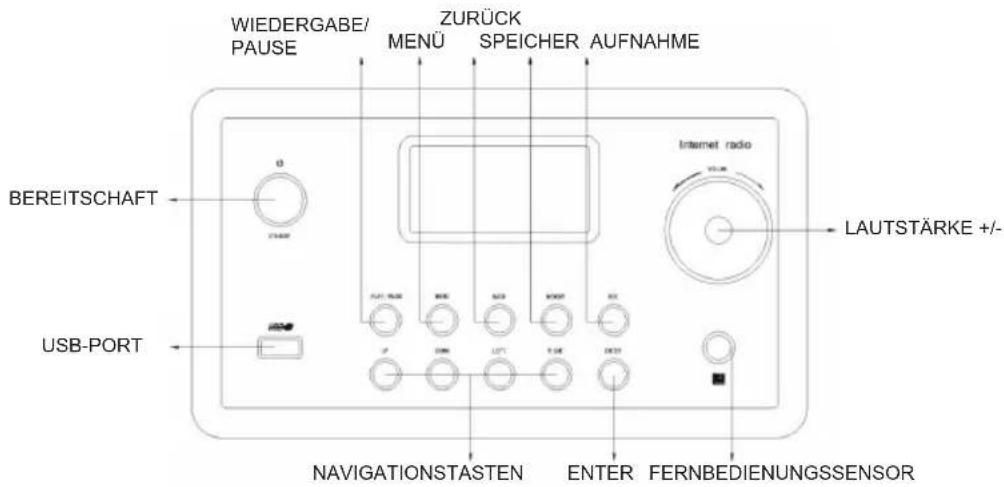
Vorderseite
Rückseite
Kapitel 1 Übersicht
1.1 Einführung
Designs and specifications are subject to change without notice.
All logos brands and product names are trademarks or registered trademarks of their respective holders and are hereby recognized as such.
Keep this manual and packaging for future reference.
Achtung:

2.3 World Station (Station Mondiale)
2.3.1 Ecouter la World Station
Selecteer i.Radio Selecteer World Station
Valj [i.Radio] Valj [World Station]
Indelat after omrade (Area)
Indelat after land (country)

2.4 Nätverk
ELEKTHICKYM PRODUEM APPOINATE
OPPRA INTE


Selectare i.Radio Alegere World Station
Ordonare alfanumerica Redare
2.4 Retea
's-Hertogenbosch, 2009, March 04
Mrs. / Mme. / Mevr. / Sig.ra / D. / Fru / Pani: J. Gilad