F1117-07201 - Veste chauffante KEMIMOTO - Free user manual and instructions
Find the device manual for free F1117-07201 KEMIMOTO in PDF.
Download the instructions for your Veste chauffante in PDF format for free! Find your manual F1117-07201 - KEMIMOTO and take your electronic device back in hand. On this page are published all the documents necessary for the use of your device. F1117-07201 by KEMIMOTO.
USER MANUAL F1117-07201 KEMIMOTO
1 Year Limited Warranty
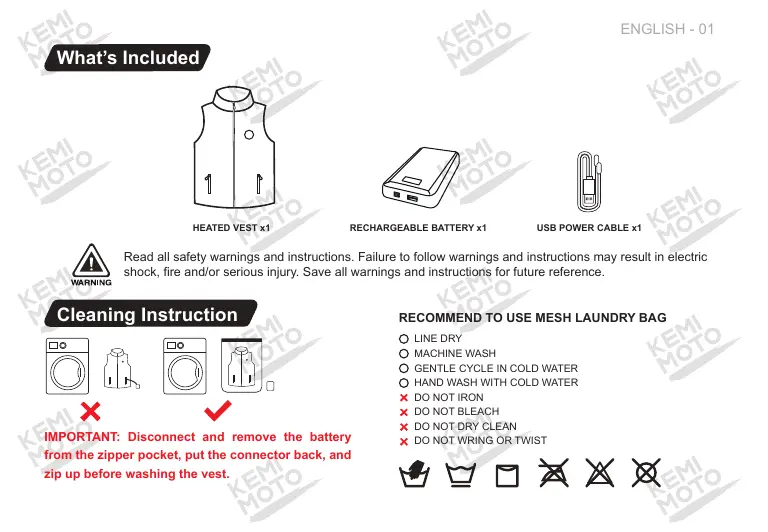
HEATED EST xt RECHARGEABLE BATTERY xt USB POWER CABLE xt
Read al safety wamings and instructions. Fallure o follow wramings and instructions may resul in electric shock, fire and/or serious injury, Save all wamings and instructions fo future reference.
IMPORTANT: Disconnect and remove the battery from the zipper pocket, put the connector back, and Zip up before washing the vest.
RECOMMEND TO USE MESH LAUNDRY BAG O LINE ORY
© GENTLE CYCLE IN COLD WATER
© HAND WASH WITH GOLD WATER.
x DO NOT WRING ORTWIST
#1 0 X X X Operation Instruction
1. Connect the battery Lo he power cable located in the pocket. 2. To tu on, press and hold single for 3 seconds.
3. Press the power button Lo switch heating levels between High {cd led light), Medium (blue led light) and Low (green led light) 4. To turn off, press and hold the power button for 3 seconds until the LED lights turn of.
Protection function: if ne temperature réaches 55°C, the clothes wl stop heating and continue heating after the temperature drops lo 45°C.
The heating level can be adjusted by pressing the power button. Each press will cycle through the apparels temperature settings. AL a room temperature of 77°F/25°C, he heat wil rise to 122-181°F/50-55°C on high, 113-122°F/45-50°C on medium, and 104-113°F/40-45°C on low.
Capacity | 9600mAh/35.5Wh
+ Do not freeze or immerse the battery in water or any other liquid.
1. Press he battery button to check the remainingl power level or charging level.
2. Remove battery from the apparel before charging and connect battery with charger.
3. ILtekes about 5-6 hours Lo fully charge a completely empty battery.
+ Do not drop, disassemble, open, crush, bend, deform, puncture, shred, microwave.incinerate or paint the battery.
+ Do not store your battery with metal objects, such as coins, keys or necklaces. Ifthe battery terminals come in contact
with metal objects, this may cause are.
+ Recommended operating temperature of 14°F lo 86*F(-10°C to 45°C)
+ Fully charge before first use.
- Fuly charge every 6 months if not in use lo preserve the battery life.
* Keep the battery away from moisture: Store the battery pack where the relative humidity is 60 + 15% RH.
APP operation pages and
Open the Heatech APP and enter the main page as shown in the figure below. (Upon first installation, location permission will be prompted and must be allowed.)
Click on the icon in the upper left corner to enter the device page. The App will automatically search for nearby heated clothing devices, as shown in the figure below.
{1) The iypés of devices include Cloth, Giove, Ves, and otner series of devices. The App diéplays the device name as the ype followed by Le last four dits of ne Mac adress.
(2)In the “Available devices” module, simply cl£k on the device name to automaticaly connect to he device and display tin the “List of palred devices” module.
(8) In the “List of pairod devices” module, you can view the current status and batery level of ina device, as well as modify the name, fresh, and delete operations.
= the devica is powered of or ot connected he device icon ul be displayed in white. the device is powered on and connected, th icon wil be displayed in red
Edit: Click El to edit the selected device name, up to à maximurn of 14 characters. 1h rame is bank when saved, il be modifie back 1 he default name:
- Refresh: Generaly used when Ie device is powered an again, icking Refresh can quickiy connect oi
- Delete: Click Delete to deleta the selected device. After deletion, in “List of paired devices" module wil na longer display the device, but can be roconnectod in the “Available devices" moduie.
{4) Glickng in refresh icon at tne bottom of the page can search far nearby heated cioting devices again.
On the main page, you can perform operations such as turning the device on or off, setting the gear position, adjusting the backlight, and setting the countdown timer.
{Al connected device types wil be displayed on the main page. “SeloctAIl" can bé sad ta select all or desaiect al.
(2) Diérent temperature values can be sal on ii temperature disk, with a default range of 360.85 C(85 74
(3) Wen suitéhing Lo diflarent gears, the device ioon vil display different colors according}, and he colors vil be synchronized with ne devices LED backlight
{&) Gliekte switch to turn anoff he selected device. The device icon wiltum white wien tumed of and red uen tumed on.
(6) Gliek the backight switch Lo turn the Backght on forte selected device. Wnen ne backlght is tumed of, swtching gears or pressinghe device button wi cause to brie. light up fo 2-3 seconde before automatial lüming of.
(6) Set tne countdaun üme and cik OK to start the countdoun operation. The device wi automatically shut don afer the countéeum ends. Currenty, the minimum countdorn üme is 16 minutes and the maximum s 6 hours.
In the settings page, you can set the temperature unit and view the “About Us” page.
{) Static detection sensor: sors can customize the three-axls function of ne device ta ba tumed of After tuming off, even if ne device Is inactive for ten minutes, il not automalicaly shut dou.
{2) Temperature Unit: Set ne temperatuie uni according to actual needs, which can be set 1e C or F. Afer adjusiment the lomperalurs on tn main page wil respond according Temperature Unit
(8) About Us: View the “About Us” page, including the APP logo, website, and version number.
Do not try to use this product outside of its designated use, as doing so might be dangerous.
+ Do not use this heated vest with an infant, child, a helpless person, or anyone insensitive to heat, such as a person with poor blood circulation.
+ If your health condition makes you sen
e to overheating, please consult your physi
determine whether it is appropriate to use this product. + Do not allow the cords to be pinched or forced pull out. + Not recommended to wear over bare skin.
+ Never use it if inner liner is wet.
+ Turn off the power immediately if discomfort occurs.
Please contact us if you have any questions
HA senicé@kemimoto com €) htp:humaikemimoto com
BR service@kemimoto.com € htip:limwwkemimoto.com
FCC Statement ‘This device complies with part 15 of the FCC Rules. Operation is subject to the following two conditions: {1) This device may not cause harmful interference, and (2) this device must accept any interference received, including interference that may cause undesired operation.
Any Changes or modifications net expressly approved by {he party responsible for compliance could void he users authority to operate the equipment.
Note: This equipment has been tested and found to comply with the limits for a Class B digital device, pursuant to part 15 ofthe FCC Rules. These limits are designed Lo provide reasonable protection against harmful interference in a residential installation. This equipment generates uses and can radiate radio frequency energy and, not installed and used in accordance with {he instructions, may cause harmiul interference to radio communications. However, there is no guarantee that interference will not oceur in à particular installation. this equipment does cause harmiul interference to radio or television reception, which can be determined by tuning the equipment off and on, the user is encouraged to try to correct the interference by one or mare of the following measures: -Reorient or relocate the recelving antenna. “increase the separation between the equipment and receiver. Connect the equipment into an outiet on à circuit different from that to which the receiver is connected. -Consult the dealer or an experienced radio/TV technician for help.
‘The device has been evaluated to meet general RF exposure requirement. The device can be used in portable exposure condition without restriction.
Please contact us if you have any questions