
P729 - Auxiliary heating ZIBRO - Free user manual and instructions
Find the device manual for free P729 ZIBRO in PDF.

User questions about P729 ZIBRO
0 question about this device. Answer the ones you know or ask your own.
Ask a new question about this device
Download the instructions for your Auxiliary heating in PDF format for free! Find your manual P729 - ZIBRO and take your electronic device back in hand. On this page are published all the documents necessary for the use of your device. P729 by ZIBRO.
USER MANUAL P729 ZIBRO
For safety reasons, please read this manual carefully before operating. Persons who are not familiar with this manual must not use this air conditioner. We strongly recommend keeping this manual in a safe place for future reference.
| A. Do not use a damaged cable. | G. Do not immerse in water. |
| B. Do not clamp or bend the cable. | H. Do not spill. |
| C. Do not place unevenly. | I. Do not insert anything. |
| D. Do not place in front of an open window. | J. Do not use an extension cord. |
| E. Do not bring in contact with chemicals. | K. Keep out of the reach of children. |
| F. Do not place near a heat source. | L. Do not repair. |
H
#
SICUREZZA
K CONDITIONS DE GARANTIE
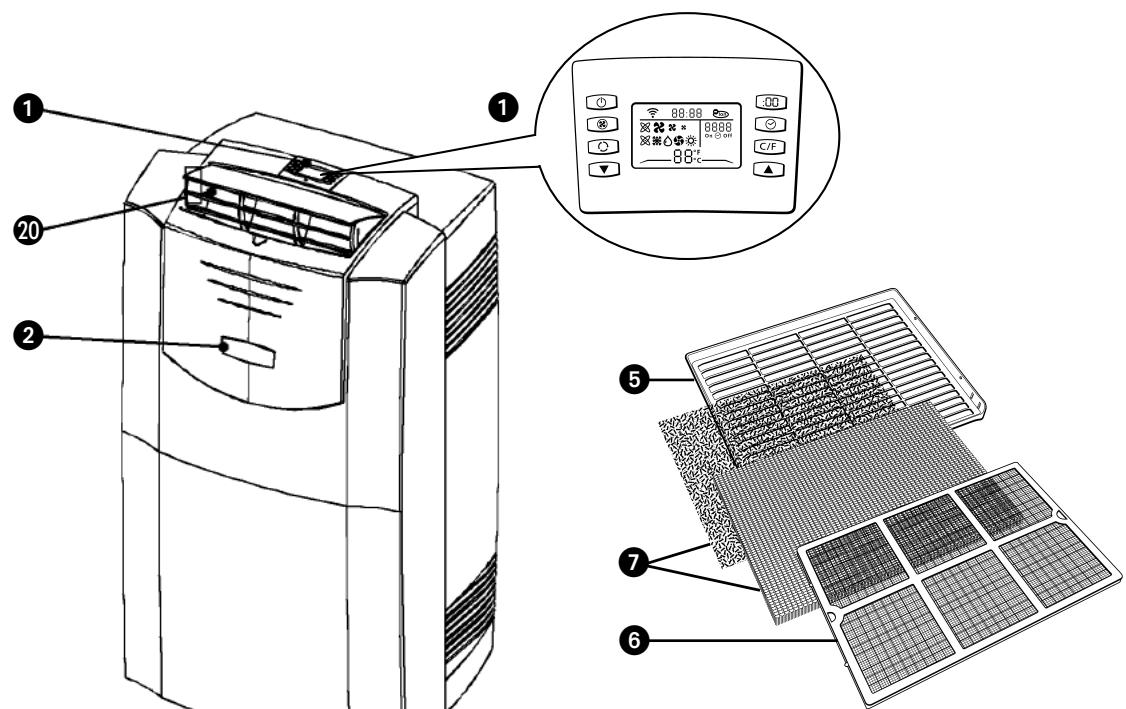
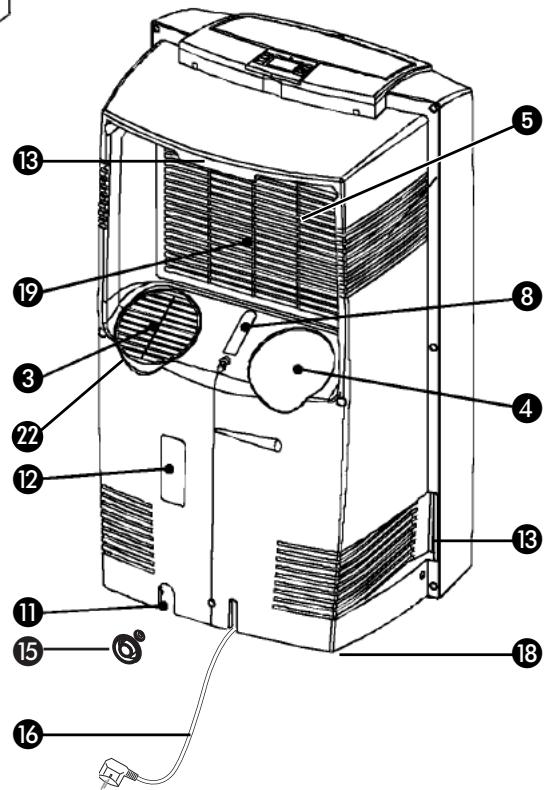
Remote control / Control panel
On/off switch
3 Air inlet
Air outlet
Filter holder
Filter clamp
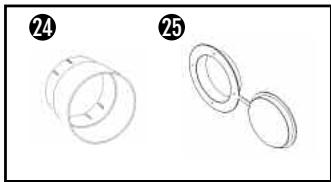
Air filters (activated carbon + 3M^TM FiltreteTM filter) **
Cable hook
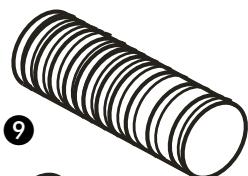
Air supply hose (only with P729 and PH733, optional for P720 and P726)
10 Air exhaust hose
Water drain
12 Drainage point (PH733)
18 Handles
14 Hose connector (2 x P720 and P726 / 4 x P729 and PH733)
Plug for water drain
16 Electricity cable
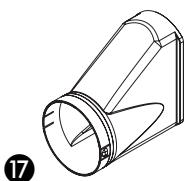
Hose adapter (1 x P720 + P726 / 2 x P729 + PH733)
18 Wheels
19 Air inlet for air to be cooled/filtered
Air exhaust for air to be cooled/filtered
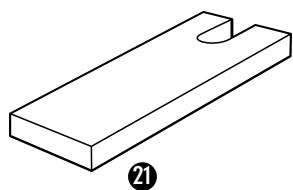
Foam component 2x
Air inlet protective grill
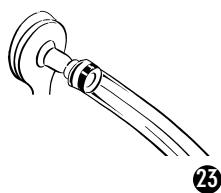
Water hose (PH733)
24 Hose connector
25 Hose adapter
14
10
(optional)
To increase the effectiveness of the device a second air hose with two hose connectors, a hose adapter and additional foam components are available as an option for the P720 and the P726. These can be used as described in this manual.
* P726 / P729 / PH733
-
FIRST READ THE INSTRUCTIONS.
-
IF YOU HAVE ANY DOUBTS, CONSULT YOUR DEALER.
Dear Sir, Madam,
Congratulations on the purchase of your airconditioner. This airconditioner has three functions besides cooling the air, namely dehumidification, air circulation, heating (only by PH 733) and air filtration. This mobile airconditioner is extremely easy to operate and move. You have acquired a high quality product that will give you many years of pleasure on condition that you use it properly. Read this manual first in order to optimise the life span of your airconditioner.
We wish you coolness and comfort with your airconditioner.
Yours sincerely,
PVG International B.V.
Customer Service Department

IMPORTANT
- The installation must be completely in accordance with local regulations, ordinances and standards.
- The device is suitable exclusively for use in dry places, indoors.
- Check the mains voltage. This device is suitable exclusively for earthed sockets - connection voltage 220-240 Volt/ 50 Hz.
- The device MUST always have an earthed connection. You may absolutely not connect the device if the power supply is not earthed.
- The plug must always be easily accessible when the device is connected.
- Read these instructions carefully and follow the directions.
Before connecting the device, check that:
- The connection voltage corresponds to that on the type plate.
- The socket and power supply are suitable for the device.
The plug on the cable fits the socke.t
The device is on a stable and flat surface.
Have the electrical installation checked by a recognised expert if you are not sure that everything is in order.
- The airconditioner is a safe device, manufactured in accordance with CE safety standards. Nevertheless, as with every electrical device, exercise caution when using it.
- Never cover the air inlets and outlets.
- Empty the water reservoir through the water drain before moving it.
- Never allow the device to come into contact with chemicals.
- Do not insert objects into the openings of the device.
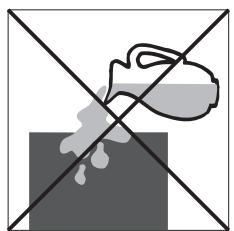
- Never allow the device to come into contact with water. Do not spray the device with water or submerge it as this may cause a short circuit.
- Always take the plug out of the socket before cleaning or replacing the device or a part of the device.
- NEVER connect the device with the aid of an extension cable. If a suitable, earthed socket is not available, have one fitted by a recognised electrician.
- Always consider the safety of children in the vicinity of this device, as with every electrical device.
- Always have any repairs – beyond regular maintenance – carried out by a recognised service engineer. Failure to do so may lead to invalidation of the guarantee.
Always take the plug out of the socket when the device is not in use. - A damaged electricity cable may only be replaced by the supplier or n authorised person/service point.


ATTENTION!
- Never use the device with a damaged cable or plug. Never allow the cable to be pinched off or come into contact with sharp edges.
- Never seal the room in which the device is to be used completely airtight (also not when using two air hoses). This will prevent the occurrence of underpressure in this room. Underpressure can disrupt the safe operation of geysers, extractor fans, ovens, etc.
- Failure to follow the instructions may lead to invalidation of the guarantee on the device.
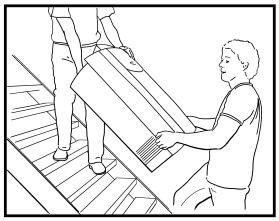
Always lift the device with two people.
B THE INSTALLATION

ATTENTION!
- Your airconditioner must be standing upright for at least two hours before use.
- Ensure that the air outlet on the front of the unit 20 is always open when the device is in use. The device may be damaged if this is closed while the device is in use. The user is responsible for the correct use of the airconditioner.
The airconditioner is mobile and can easily be moved to a different location. While moving the device, take account of the following:
1 Ensure that the device is upright and on a flat surface.
Place the filters supplied in the filter holder (see chapter D).
3 Do not use the device in the bathroom, shower or any other damp environment.
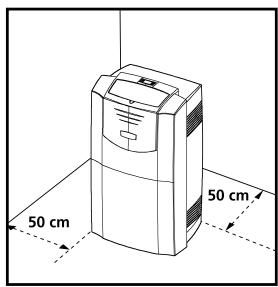
4 Leave a gap of at least 50~cm around the device in order to ensure effective air circulation.
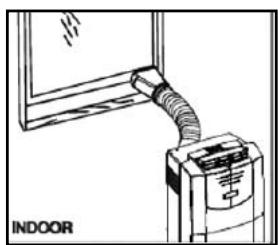
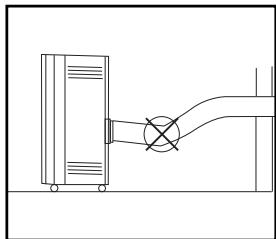
5 Open the air outlet on the top of the airconditioner.
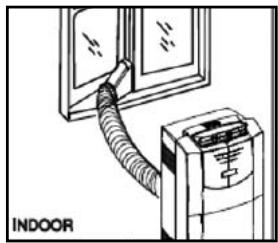
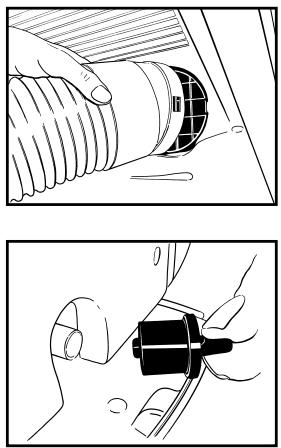
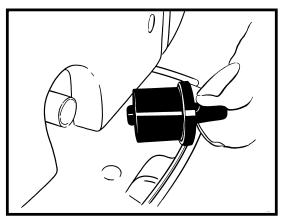
6 Insert both ends of the air hose into the hose connectors and twist them to the right onto the hose(s). Attach the hose adapter to one end.
7 Attach the hose connector ② to air outlet ④ at the back of the unit. Lead the hose adapter ⑦ outside and close the gap with the foam components supplied. These may have to be cut to size.
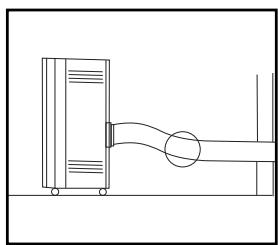
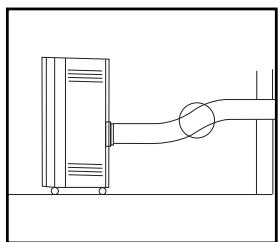
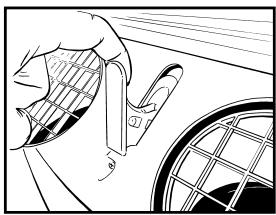
P729 and PH733 are fitted with the EVS (Effective Ventilation System) as standard. The second hose must be attached in order to utilise this option. Attach the hose connectors 14 and the hose adapter as described above. Now remove the protective grill 12 from the air inlet 3: First turn the protective grill approximately 20-30 degrees (left or right) and then pull it towards you. Connect the hose connector 14 to the air inlet 3 at the back of the airconditioner. Lead the hose adapter 17 to the outside (under the hose that is already present) and seal the gap between the window and the frame with the foam components supplied. Cut these to size if necessary.

ATTENTION!
If the device is used with 2 hoses, it may fall into a different Energy Efficiency Class. Refer to the technical specifications in this manual. However, using a second hose as described can have a positive effect on the energy balance in the room where the device is placed.
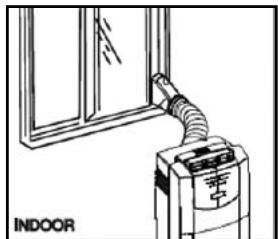
If use of the second hose is not possible or desired, then connecting a single hose to the air outlet 4 at the back of the airconditioner will suffice for the cooling mode.

ATTENTION!
If the device is used with 1 hose, the protective grill must always be fitted to the air inlet at the back of the device.

Keep windows and outside doors closed as much as possible in order to prevent the inflow of exterior air. The air that is intended to enter the room (specifically during the use of a single hose) in order to allow the air conditioner to function correctly must always be as cool as possible. Leading this air through a passage or adjacent room increases the comfort level.
TIP!
When the device is in use in the cooling mode with two air hoses, it is prudent to lead the hoses to the outside (e.g. through a window) on the shadow side of the building. This will cool the air that is sucked in as much as possible. In the heating mode, the air hoses can be led out of the building on the sunny side. The expelled air is then as warm as possible.

COMMENT!
The flexible air exhaust hose(s) can be stretched to a length of approximately 1200mm . The length of these hose(s) was calculated on the basis of the capacity of the device. The use of other hoses or extensions may cause faults in the device. The exhaust air must be able to flow out unhindered. If this is not possible this may lead to overheating or water condensation in the air exhaust hose ⑩.
This is why you must ensure that there are no kinks or sharp corners in the air hose(s). To obtain an optimum result, the air hoses must be kept shorter than 1 metre while the airconditioner is in use.
Automatic
Cooling
Dehumidify
Circulate air
Heat (only by PH 733)
Highventilatorspeed
Average ventilator speed
Lowventilatorspeed

ATTENTION!
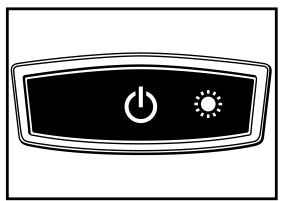
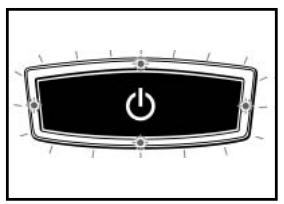
Without the remote control, the air-conditioner can be operated by using the button on the front of the device. In this event however, only the automatic function can be used.
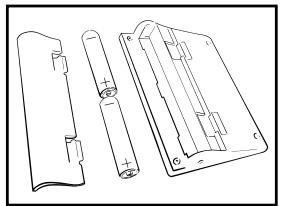
PLACING BATTERIES IN THE REMOTE CONTROL
Remove the battery cover by pressing the lips in and then pulling the cover toward you. Place the new batteries as indicated (pay attention to the plus- (+) and minus poles (-) . Now replace the battery cover.

NOTE!
Use 2 AAA (1.5 Volt) batteries. Do not use rechargeable batteries. Replace batteries with new batteries of the same type when the display becomes fuzzy or the signal deteriorates.
Push the plug into the socket.

ATTENTION!
If the airconditioner does not respond to the remote control, follow the following procedures:
- Ensure that there are batteries in the remote control.
- Ensure that the plug of the airconditioner is inserted in the socket and switched off.
- Press the on/off switch on the front of device ② and hold it down until after the beep signal after approximately 8 seconds.
- Briefly press the on/off button of the remote control.
- The remote control is ready for use after the beep signal.
Press the C/F-button to set ^ C (Celsius) or ^ F (Fahrenheit). The default setting is ^ C (Celsius).
3 The following functions can be selected with the mode button on the remote control.
Automatic regulation of ventilator speed
Cooling;
Dehumidify;
Circulate;
Heating (PH733).
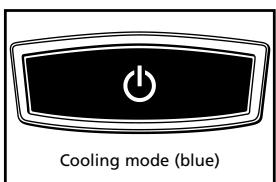
COOLING
When the cooling mode is activated, the transparent ring around the button on the front of the device ② emits a BLUE light.
The following settings are possible in the cooling mode:
- The ventilator speed can be adjusted by pressing the -button
Automatic regulation of ventilator speed
High
Average
高 Low
- The temperature can be set between 18^ C and 32^ C by pressing the and buttons. The display on the remote control shows the set temperature.

Whether the desired temperature can actually be reached depends on the ambient conditions. The room temperature remaining above the set temperature is normal.
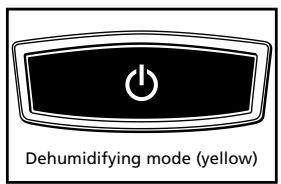
DEHUMIDIFICATION
When the dehumidification mode is activated, the transparent ring around the button on the front of the device ② turns YELLOW.
The dehumidification function can be used in different ways.
1) All models:
Only connect the air exhaust hose to the air outlet 4 and lead it outside, as when using the device in the cooling function with a single hose. Place the hose in such a way that the hot air is expelled outside. The device will then dehumidify the air in the room and remove excess moisture through the air hose.
2) All models:
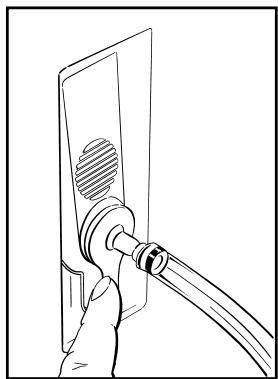
Do not connect both the air supply 9 and the air exhaust hose 10. Remove the rubber plug from the water drain 11 and ensure that the water that is removed (e.g. through a drain hole in the floor). You can also connect a water hose to the water drain (see chapter G).
3) PH733:
Connect the supplied water hose to the plug ⑤ that fits into the water drain. Lead the other end to a drain or sink and insert the plug ⑤ into the water drain ⑩. Do not connect both the air supply ⑨ and the air exhaust hose ⑩. The condensed water will be removed through the hose. The maximum rise may be 1.5 ~m from the floor on which the device is standing. Exceeding this distance may damage the machine or cause leaks.
During the dehumidification, the ventilator speed ⑧ can not be adjusted. The speed changes automatically to medium. The and buttons are inactive.

ATTENTION!
In the automatic mode, the condensed moisture is always removed through the air exhaust hose ⑩. Removing the rubber plug from the water drain ⑪ will allow the water to drain out at this point. The water drain ⑫ can not be used.
When the device is not being used in the (manual) dehumidification mode, the plug 15 must be removed from the water drain 12.
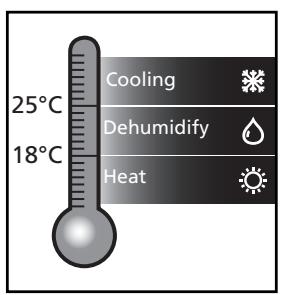
CIRCULATION
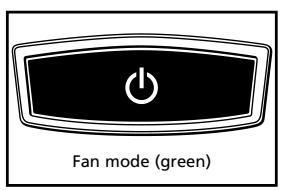
When the air circulation mode is switched on, the transparent ring around the button on the front of the device ② emits GREEN light. In this mode, the air is circulated and filtered but not cooled, dehumidified or heated. In this mode, only the ventilator speed can be adjusted by pressing the ⑧ - button:
Automatic regulation of ventilator speed
High
Medium
Low
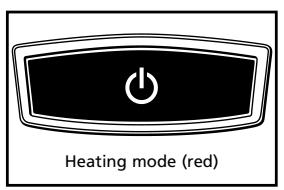
HEATING MODE (PH733)
When the heating mode is activated, the transparent ring around the button on the front of the device ② emits a RED light.
The heating mode of this device works on the heat pump principle. This makes it more efficient than a normal electric heater. The heating mode can only be activated when the ambient temperature is below 27^ . Depending on the outside temperature, the device will stop heating regularly in order to thaw ice that has accumulated. The lower the outside temperature, the more frequently this will occur. The transparent ring on the front of the device will flash RED/ORAGNE/GREEN while this is taking place. In this mode, the desired temperature can be set between 18 and 27^ .
When the device is in heating mode, both air hoses must be connected and led outside.
AUTOMATIC
In the automatic mode × , the device will cool, dehumidify or heat depending on the ambient temperature. When the temperature in the room changes, the mode changes automatically in order to maintain the desired temperature as accurately as possible. The ventilator speed also adjusts automatically. The colour of the transparent ring around the button on the front of the device will change depending on the mode.

NOTE!
- To prevent damage to the device, changing from the cooling or dehumidification mode (or the reverse) takes two to three minutes.
- Negative ions are generated in every operating mode (automatic, cooling, dehumidification, circulation and heating). (P726/P729/PH733)
You can use the timer function to set in advance when the airconditioner is to switch on or off.
Switching off
The timer OFF function can be set when the airconditioner is switched on:
Press
- Set the number of hours desired (1-12) with the aid of and .
- Press

Switching on
The timer ON function can be set when the airconditioner is switched off (stand-by):
Press
- Set the number of hours desired (1-12) with the aid of and
- Press
You can delete the set timer function by pressing the on the remote control.
When the set time is at "00", the timer is switched off. When the Timer function has been set the light in the button on the front of the device will switch on.
ADJUSTING THE CLOCK
Press the : button. Change the time by pressing the and -button. When the desired time has been set, press the : button again in order to save the setting.

TIP!
The light of the display fades when the remote control has not been used for some time. This is reactivated when you touch any button.

ATTENTION
Avoid the remote control from getting wet. Remove it from the unit when condensation can occur.
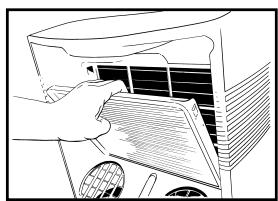
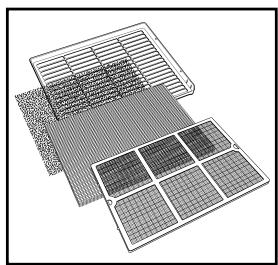
AIR FILTER
This airconditioner is fitted with a 3-layer filter to purify the circulating air. The airconditioners are supplied with a separately packaged 3M^TM Filtrete™ filter (P726 / P729 / PH733) and activated carbon filter. These filters must be placed in accordance with the instructions before the airconditioner is used.
1 Wire mesh filter to remove coarse dust particles.
2 3M^TM FiltreteTM filter to remove particles from the air that are detrimental to your health, such as pollen, bacteria, flakes of animal skin and dust.
3 Activated carbon filter to remove odours.
The mesh filter is part of the filter holder. The filter holder can be opened. The activated carbon filter and the 3M^TM Filtrete™ filter can be removed.
1 The mesh filter must be cleaned regularly with a vacuum cleaner in order to prevent blockage of the air flow.
We recommend replacing the positively/negatively electrostatically charged 3M^TM Filtrete™ filter every three months.
new filter
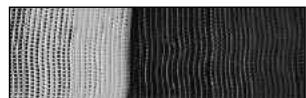
recommended change of filter
3 If it has become dusty, the activated carbon filter can be cleaned with a vacuum cleaner, but it must be replaced simultaneously with the 3M^TM FiltreteTM filter.
Excessive dust, building work, pets, the presence of smoke and frequent use of the device affect the lifespan of the 3M^TM Filtrete™ filter. A signal is given after approximately 650 hours of operation in order to prevent you from forgetting to replace the filter: The light in the button on the front of the device is blinking. Take the following action:
1 Switch the unit off, but leave the mains cable in the socket.
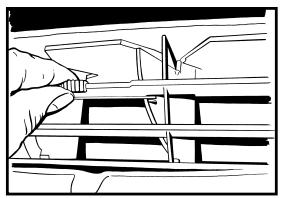
2 Replace the old filters with new, original filters that are available from your dealer;
- Remove the filter holder ⑤ from the airconditioner
- Open the filter holder ⑤, take the filter clamp ⑥ off the filter holder and remove the old filters. Place the new activated carbon filter (black) and 3M^TM Filtrete™ filter (white) in the filter holder ⑤.
- Fit the filter clamp ⑥ back onto the holder.
- Put the filter holder ⑤ back into the airconditioner.
Press the on/off button on the front of the device until you hear a beep (after approximately 4 seconds).
4 The indicator light is switched off.
The old filters are not chemical waste and may be thrown away in the normal rubbish container (not biological waste).

NOTES!
- Never use the airconditioner without the mesh filter!
- Using the device without the activated carbon filter and/or 3M^TM FiltreteTM filter will not damage the device. In this case, particles that may be detrimental to health are not removed.
- Filter packages are available at your dealer.
- Only use suitable Zibro filters. This will prevent any damage to your airconditioner. Using other than the original filters is entirely at the risk of the consumer. This may have a negative effect on the operation of the device and may result in damage. The device may also leak water subsequent to the formation of ice.
E AIR FLOW
You can change the direction of the air flow by adjusting the positions of the horizontal and vertical louvers.
F EMPTYING THE WATER RESERVOIR
In extreme circumstances it may be necessary to empty the internal water reservoir. When the water reservoir is full, the transparent ring around the button on the front of the device ② flashes RED. To empty the water reservoir, take the following action:
1 Do not move the device. This may cause water leakage.
2 First switch the device off and remove the plug from the socket.
3 Place a pan or container on the floor under the water drain 1.
4 Remove the rubber plug from the water drain 1 and let the water drain out (± 1 litre).
5 Insert the rubber plug back into the water drain ①, push the plug into the socket and switch the device on. The warning signal must now be switched off.

NOTE!
Under normal conditions, the condensed water in the airconditioner is removed via the air outlet hose.
G CONNECTION TO A PERMANENT DRAIN
1 First switch the device off and pull the plug out of the socket.
2 Place a pan or container on the ground under the water drain in order to catch any remnant water.
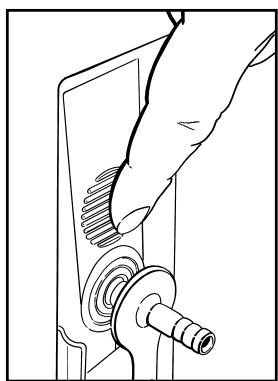
3 Remove the rubber plug from the water drain 1.
4 Slide a water drain hose (diameter: 15 mm internal) over the water drain 11.
5 Lead the other end of the water drain hose to suitable place (drain/sink). Ensure that the drain hose is not twisted or kinked. The hose must be descending along its entire length.
H MAINTENANCE

ATTENTION!
First switch the device off and pull the plug out of the socket before you clean the device or filter or when you replace the filters.
Use a soft, damp cloth for the regular cleaning of the exterior of the device. Never use aggressive cleaning agents, solvents, benzene or abrasives. Refer to chapter D "Air Filter" for filter maintenance.

NOTE!
Never use the device without the mesh filter.
STORAGE
1 Empty the water reservoir (see chapter F).
2 Clean the mesh filter (see also chapter D).
- Remove the activated carbon filter and the 3M^TM Filtrete™ filter at the end of the season and only insert the new filters at the start of the new season. The old filters are not chemical waste and may be thrown away in the waste container (not biological waste).
- New filters are available at your dealer.
3 Switch the device to air circulation mode for several hours. This will completely dry out the interior.
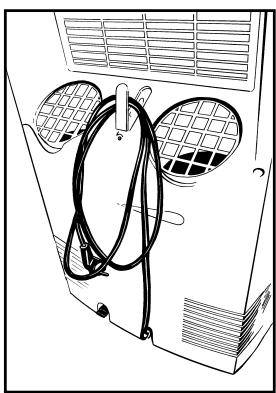
Store the cable as illustrated.
5 Protect against dust and store in a dry place that is not accessible to children.
| Problem | Cause | Solution |
| The device does not work and the transparent ring around the button on the front of the device flashes RED. | The internal water reservoir is full. | Empty the internal water reservoir (see chapter F). |
| The device does not work and the top horizontal edge of the transparent ring around the button on the front of the device flashes BLUE. | The room temperature sensor is defective. | Consult your dealer. |
| The device does not work and the lower horizontal edge of the transparent ring around the button on the front flashes BLUE. | The temperature sensor of the heat exchanger is disrupted or has short circuited. | Consult your dealer. |
| The device does not work. | No power supply. | Insert the plug into a socket that is live. |
| The device works insufficiently. | Standing in direct sunlight. | Move the device into the shade. |
| Windows or doors are open or there are a large number of people or heat sources in the room. | Close windows and/or doors or place an extra airconditioner. | |
| The filter is dirty. | Clean the filter or replace it (see chapter D). | |
| Air inlet or exhaust is blocked. | Remove the blockage. | |
| The device makes a great deal of noise. | The device is standing on an uneven surface. | Place the device on an even surface (less vibration). |
| The compressor does not work. | The overheating safety feature has been activated. | Wait 30 minutes until the temperature has dropped and then switch it on again. |
| The remote control does not respond. | The distance is too big. The batteries are empty. | Replace the batteries. |
| The signal of the remote control cannot be received by the unit. | Restore the connection between the remote control and the air conditioner (see chapter C). |
Never attempt to disassemble or repair the device. Inexpert repairs invalidate the guarantee and can endanger the users of the device.
K GUARANTEE CONDITIONS
We provide a 24-month warranty on the airconditioner from the date of purchase.
All material and production faults will be repaired free of charge within this period. The following rules apply:
- We expressly reject all other claims for damage compensation, including consequent damage.
- Repairs or replacements carried out during the guarantee period do not result in an extension of the guarantee.
- The guarantee is invalidated when changes are made, non original parts are fitted or repairs are conducted by third parties.
- Parts that are subject to normal wear, such as the filter, fall outside the guarantee.
- The guarantee is only valid if you submit the original, dated and unaltered purchase invoice.
- The guarantee does not apply to damage caused by actions that deviate from the instructions or negligence.
- The shipping costs of the airconditioner or parts and the related risk are always borne by the purchaser.
- Damage, caused by not using suitable Zibro filters falls outside the guarantee.
To prevent unnecessary costs, we recommend that you always first read the instructions carefully. If this does not provide a solution, take the airconditioner to your dealer for repairs.
L TECHNICAL SPECIFICATIONS
Use indicatively, subject to change.
| Model | P 720 | P 726 | P 729 | PH 733 | |
| Cooling capacity* | W | 2000 | 2600 | 2900 | 3300 |
| EE Class | B | B | A | B | |
| EER* | 2.36 | 2.42 | 2.64 | 2.46 | |
| Heating capacity* | 3300 | ||||
| Heating performance | B | ||||
| COP* | 2.81 | ||||
| Power consumption | W | 900 | 1100 | 1200 | 1400 |
| Current nom. | A | 5.8 | 5.8 | 5.8 | 6.4 |
| Mains | V/Hz/Ph | 220 - 240 / 50 / 1 | 220 - 240 / 50 / 1 | 220 - 240 / 50 / 1 | 220 - 240 / 50 / 1 |
| Air delivery max. | m³/h | 380 | 380 | 420 | 450 |
| Dehumidification max. ** | L/24h | 43 | 43 | 43 | 54 |
| For rooms up to | m³ | 65 | 90 | 95 | 105 |
| Compressor type | rotary | rotary | rotary | rotary | |
| Refrigerant | type/gr | R-407c / 800 | R-407c / 800 | R-410a / 730 | R-410a / 850 |
| Thermostatic range | °C | 18 - 32 | 18 - 32 | 18 - 32 | 18 - 32 |
| Fan speed positions | 3 | 3 | 3 | 3 | |
| Noise level | dB | 52 | 52 | 52 | 54 |
| Dimensions (w x h x d) | mm | 505 x 915 x 420 | 505 x 915 x 420 | 505 x 915 x 420 | 505 x 915 x 420 |
| Weight | kg | 37 | 37 | 40 | 40 |
| Unit protection | IP 21 | IP 21 | IP 21 | IP 21 | |
| Remote control | yes | yes | yes | yes | |
| 3MTM FiltreteTM filter | no | yes | yes | yes | |
| Active carbon filter | yes | yes | yes | yes | |
| Fuse rating | 250V, T3.15A | 250V, T3.15A | 250V, T3.15A | 250V, T3.15A | |
- Conform EN 14511
** Moisture removal at 32^ , 80% RH
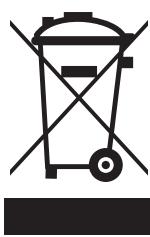
Defective electrical devices and batteries must be kept separate from household waste. Ensure that there is effective recycling where possible. Ask you local council or dealer for expert advice on recycling.
Holloway Bank, Wednesbury
West Midlands WS10 OAW
tel.: +44 121 506 1818
fax: +44 121 505 1744
email: gases@lister.co.uk
ITALIA
PVG Italy SRL
Via Niccolò Copernico 5
50051 CASTELFIORENTINO (FI)
tel: +39 571 628 500
fax: +39 571 628 504
email: pvgitaly@zbro.com
N NORGE
Sunwind -Gylling A/S
Rudsetta 71-75 / P.O. Box 64
N-1309 RUD
tel: +47 67 17 13 70
fax: +47 67 17 13 80
email: pvgint@zibro.com
NEDERLAND
PVG International B.V.
P.O.Box 96
5340 AB OSS
tel: +31 412 694 694
fax: +31 412 622 893
email: pvgnl@zibro.com
PORTUGAL
Gardena, Lda