Topaz - Solar bench Hapro - Free user manual and instructions
Find the device manual for free Topaz Hapro in PDF.

User questions about Topaz Hapro
0 question about this device. Answer the ones you know or ask your own.
Ask a new question about this device
Download the instructions for your Solar bench in PDF format for free! Find your manual Topaz - Hapro and take your electronic device back in hand. On this page are published all the documents necessary for the use of your device. Topaz by Hapro.
USER MANUAL Topaz Hapro
natural_image
Line drawing of a stroller on an orange background (no text or symbols)
natural_image
Line drawing of a stroller on an orange background (no text or symbols)cybex
CYBEX ONYX/TOPAZ
USER GUIDE
DE / EN / FR / NL / SI / HU / IT / ES / PT
0+
from birth
EN1888 from birth - 20kg

natural_image
Abstract graphic with a black circular shape and arrow on orange background (no text or symbols)

natural_image
Close-up of a black athletic trolley with a yellow X mark and 'BOX' label, no readable text or symbols beyond the graphic elements.
natural_image
Close-up of a black mechanical component with an orange checkmark pointing downward (no text or symbols visible)
natural_image
Close-up of mechanical components with a yellow 'X' mark, no visible text or symbols
natural_image
Close-up of a black mechanical component with orange checkmark and 'sex' label (no readable text or symbols beyond the mark)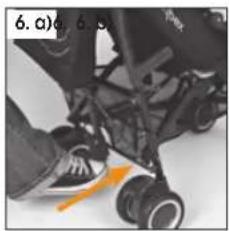
natural_image
Close-up of a person's foot wearing a stroller with wheels and a yellow arrow pointing to the wheel (no visible text or symbols)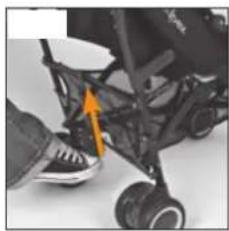
natural_image
Close-up of a black and white toy car's leg and foot, with an orange arrow pointing to the sole (no visible text or symbols)
text_image
7. c) CLICK!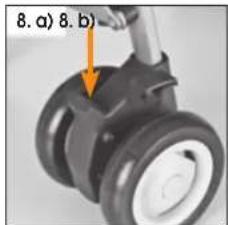
text_image
8. a) 8. b)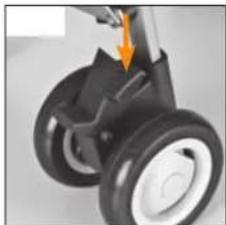
natural_image
Close-up of a black and white hover Wheeler with visible wheels and a handle (no text or symbols)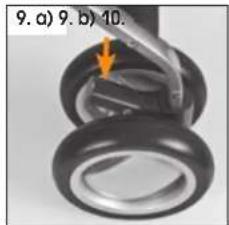
natural_image
Close-up of a mechanical component with two wheels and a highlighted section (no text or symbols)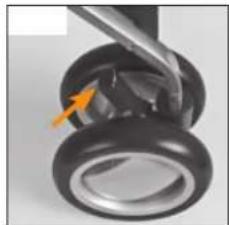
natural_image
Close-up of a mechanical component with a yellow arrow indicating a specific part (no visible text or symbols)
natural_image
Close-up of a mechanical component with an orange arrow pointing to a specific part (no visible text or symbols)
natural_image
Close-up of a black bicycle seatbelt with visible seat number 10.10.11.11 (no text or symbols on the seat cover itself)
natural_image
Black stroller with white handle and side arm, no visible text or symbols
natural_image
Top-down view of a black athletic chair with curved arms and seat (no text or symbols visible)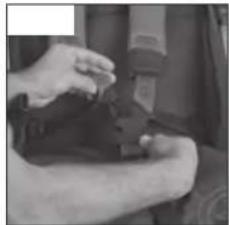
natural_image
Close-up of a person's arm wearing a seatbelt, seated in a vehicle (no visible text or symbols)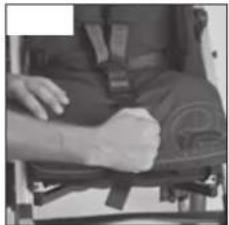
natural_image
Close-up of a person in a wheelchair with visible leg and wrist area (no text or symbols)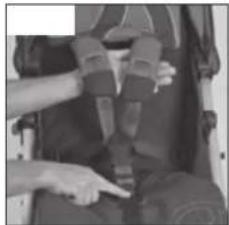
natural_image
Close-up of a person adjusting a seatbelt, no visible text or symbols
natural_image
Close-up of hands operating a mechanical device with no visible text or symbols
text_image
14.13. (Topaz only) 3. 9. 4. 5. 6.
natural_image
Close-up of a mechanical buckle assembly with no visible text or symbols
text_image
14. 15. o)14. 8.
natural_image
Close-up of a hand holding a small object, possibly a device or tool, in a mechanical setting (no visible text or symbols)
natural_image
Close-up of a hand adjusting a small car seatbelt (no visible text or symbols)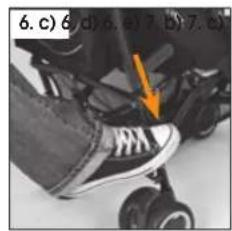
natural_image
Close-up of a person's shuttlecock with a yellow arrow pointing to the sole (no text or symbols visible)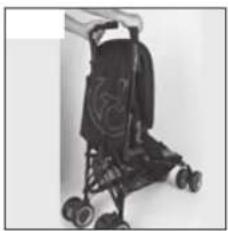
natural_image
Black and white photo of a stroller with wheels, no visible text or symbols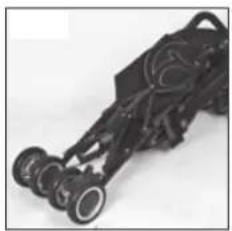
natural_image
Close-up of a black mechanical device with multiple wheels and a handle (no visible text or symbols)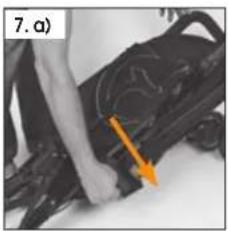
natural_image
Close-up of a person's hand holding a black object with an orange arrow pointing to a specific area (no text or symbols visible)
natural_image
Close-up of a black athletic backpack with an orange arrow pointing to the side (no text or symbols visible)
natural_image
Close-up of a person's legs and feet wearing a black athletic vest, with a yellow arrow pointing to the foot (no visible text or symbols)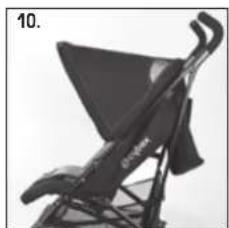
natural_image
Black and white photo of a stylized bird perched on a stand, no visible text or symbols
natural_image
Close-up of a black industrial fan or turbine component with orange arrows indicating motion or force, no visible text or symbols.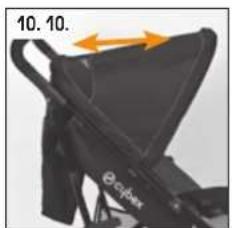
natural_image
Close-up of a black athletic trolley with orange arrow indicating measurement (no text or symbols)
natural_image
Close-up of a black mechanical device with orange arrows indicating motion or force (no visible text or symbols)
natural_image
Close-up of a black athletic jacket with a yellow arrow pointing to the shoulder area, labeled 'cybex' (no other text or symbols visible)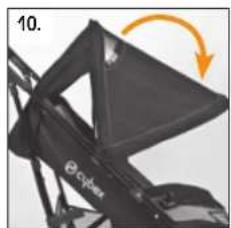
natural_image
Close-up of a black mechanical component with an orange arrow indicating rotation (no text or symbols visible)
natural_image
Close-up of hands adjusting a small object on a car seat (no visible text or symbols)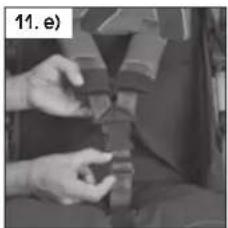
natural_image
Close-up of hands adjusting a small object on a dark surface (no visible text or symbols)
natural_image
Mechanical assembly diagram showing a belt drive mechanism with orange circular components and a tool (no text or symbols)
natural_image
Close-up of mechanical components with no visible text or symbols
natural_image
Topaz car seat with Cybex logo and label (no additional text or symbols)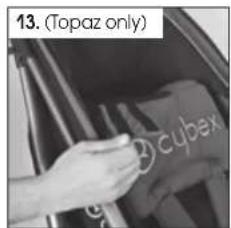
text_image
13. (Topaz only) cubex
text_image
16. a) 16. b) 18. (optional)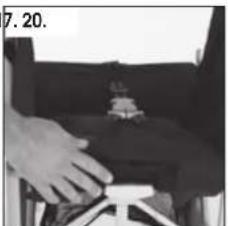
natural_image
Close-up of a hand pressing down on a dark mechanical component (no visible text or symbols)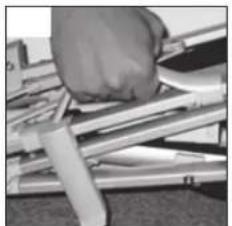
natural_image
Close-up of a hand using a tool to adjust metal components (no visible text or symbols)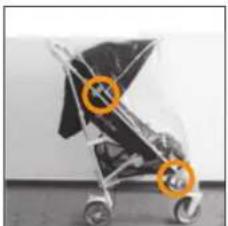
natural_image
Black and white photo of a baby stroller with orange circular annotations on the side (no visible text or symbols)
text_image
30°C
natural_image
Abstract graphic with a black circular shape on an orange background, resembling a stylized letter or symbol (no text or symbols present)Read these instructions carefully before use and keep them for future reference. Your child's safety may be affected if you do not follow these instructions.
Cher(e)s Client(e)s,
MERCI D'AVOIR CHOISI LA CYBEX ONYX/TOPAZ. CETTE POUSSETTE CONVIENT À UN ENFANT DÈS LA NAISSANCE ET JUSQU'À 20 KG. ELLE EST CONÇUE POUR UN ENFANT SEULEMENT. LA POUSETTE EST ÉQUIPÉE D'UN CANOPY – TOUTES LES FONCTIONALITÉS SONT EXPLIQUÉES DANS LE MANUEL D'INSTRUCTIONS. NOTRE FOCUS, LORS DE LA CONCEPTION DE LA CYBEX ONYX/TOPAZ, FUT SÉCURITÉ, CONFORT ET FACILITÉ D'UTILISATION. CE PRODUIT A ÉTÉ DÉVELOPPÉ SOUS DES CONTRÔLES DE QUALITÉ STRICTES ET RÉPOND AUX NORMES DE SÉCURITÉ ACTUELLES. POUR TOUTES INFORMATIONS COMPLÉMENTAIRES, N'HÉSITER PAS À NOUS CONTACTER.
Riedinger Str. 18, 95448 Bayreuth, Germany
Tel.: +49 921 78511-0, Fax.: +49 921 78511-999
EN CONTENT
I. General Information & Safety 6
II. Instructions for maintenance and service 7
III. Instructions for use 7
1. Opening the stroller for assembling 7
2. Assembling the handles....8
3. Assembling the front wheels 8
4. Assembling the rear wheels 8
5. Attaching the bumperbar 8
6. Folding the stroller 8
7. Opening the stroller 8
8. Using the brakes....8
9. Automatic front wheels swivel locks 8
10. Canopy 8
11. Using the harness system....8
12. Adjusting the harness system for newborns....8
13. Removing the headhugger and the shoulder pads (Topaz only) ...... 8
14. Removing the seatcover....9
15. Reclining the leg rest 9
16. Reclining the seat 9
17. Carrying the stroller....9
18. Attaching the raincover....9
19. Warranty 9
20. Care instructions 9
I. GENERAL INFORMATION & SAFETY
WARNING: IT MAY BE DANGEROUS TO LEAVE YOUR CHILD UNATTENDED.
Your child's safety is your responsibility. Always use the harness system to prevent your child from falling or sliding out of the seat. This vehicle is suitable for one child only.
Follow all instructions carefully to avoid incorrect handling as this can impair the stroller's correct function.
THIS VEHICLE IS INTENDED FOR CHILDREN UP TO 20 kg (UP TO 22,5KG LOAD CAPACITY.)
Use of this stroller with a child weighing more than 20 kg will cause excessive wear and tear on the stroller.
WARNING: ALWAYS USE THE CROTCH STRAP IN COMBINATION WITH THE WAIST BELT
The harness always needs to be attached and adjusted correctly. If not adjusted correctly according to the instructions the stability of the stroller will be affected.
WARNING: USE A HARNESS SYSTEM AS SOON AS THE CHILD CAN SIT UNAIDED
The harness and seat belt do not replace the permanent supervision by an adult. WARNING: THIS PRODUCT IS NOT SUITABLE FOR RUNNING OR SKATING.
- To attach an additional full harness system for safety reasons 'D' rings (according to EN13210 or BS6684) are provided.
- The child should be clear of any moving parts while making adjustments. Prevent children from grabbing the stroller while folding and unfolding, as fingers can become trapped and scissoring actions are unavoidable.
WARNING: ANY LOAD ATTACHED TO THE HANDLES AFFECTS THE STABILITY OF THE STROLLER.
Do not carry additional children, do not hang shopping bags from the handlebars or carry shopping bags on the stroller except in the stroller's basket. Maximum load 2 kg. Otherwise the stroller is likely to become unstable. Overloading can also damage the vehicle. Maximum load canopy bag 0.5 kg.
- Damages caused by the use of accessories not approved by CYBEX, such as rain covers, buggy boards, bag hooks, etc. will not be covered by the terms of our warranty.
- It may be unsafe to use replacement parts other than those approved by CYBEX.
- Before using the stroller, always check whether the accessories are well secured.
- Ensure that the stroller is always in the brake position when you put your child into the seat.
- Never lift the stroller with the child inside; never ascend or descend stairs or escalators with the child inside or when traveling on other forms of transport.
-
When opening and closing the stroller, do not use force, as incorrect folding can damage or break the stroller. Check the Instruction manual if necessary.
-
Drive carefully over curbs and gravel roads. The vehicle will be damaged by repeated impact.
- Make sure your child does not use the footrest to stand on.
- Do not expose the stroller to any artificial heat or direct sunlight.
II. INSTRUCTIONS FOR MAINTENANCE - The user is responsible for the regular maintenance of the stroller. All connecting parts and rivets have to be tightened and secured properly. It is particularly important to ensure that the locking mechanism and swiveling mechanism are treated regularly with Teflon spray (dry lubricant). It is important that brakes, wheels and tyres are not impalred during use. Inspect them regularly and repair or replace if necessary. STOP using any product that does not appear structurally sound.
- Do not make any modifications to the product. If you have any complaints or problems, please contact your supplier or importer.
- A service should be scheduled every 12 months.
- You can also treat the other moving parts with Teflon spray (dry lubricant). After spraying on the Teflon, wipe the product with a soft cloth.
- Use only original CYBEX replacement parts. It may be unsafe to use substitutes.
- The frame tubes covered by the locking mechanism and turning mechanism should also be regularly cleaned and sprayed. This will ensure that you enjoy your stroller without any problems.
- Do not use abrasives to clean the frame! Use a damp cloth and a mild detergent and dry thoroughly.
- Should the stroller be exposed to salt water, please rinse it down with fresh (tap) water as soon as possible afterwards.
- The seatcover and the canopy can be washed by hand with mild detergent (not warmer than 30°C).
- The seatcover is maschine washable (See care label for details). Do not use the tumble drier. Dry thoroughly before reuse.
- All CYBEX fabrics have been tested, but when the stroller is very wet, the water may permeate the lining through the bottom edges and seams and leave water stains on the upholstery. We advise you to use a rain cover to avoid this. Also please do not fold or store the product while wet. If the stroller is wet, allow to dry with the hood extended. Never store in a damp environment as this can cause mildew to form.
Note! Please wash the cover separately before you use it the first time. Do not tumble dry and do not expose to direct sunlight! Do not iron!
This product was approved according to the EN 1888:2003 + A1/A2/A3:2005 standard.
CLEANING
SERVICE
In general the Cybex pushchairs will run smooth without any problems. A dry and/or dusty environment can have a negative effect on the wheel systems. To avoid this it is very important that the wheel systems will be regularly checked, cleaned and lubricated. This will ensure a smooth operation of the stroller in daily use. Please follow the instruction below to maintain the wheel systems (wheel axles & suspension system).
II.-I Check of wheel systems
a) Wheel system must be cleaned before applying the lubricant.
b) Wheel system must not be broken or damaged.
For eliminate squeaking on you CYBEX buggy take only WD 40 and follow the mentioned pictures below. Do not use any other kind of lubricant! Insert always a cloth or a carton in order to leave no oil stains. Please pay special attention to not apply the lubricant on any other part of the stroller (fabrics, tubes, etc.).
II.-II Applying of the lubricant
a) Rear Wheel - Spray from the rear side of the buggy in the space between the rim and the housing on both sides. Let the lubricant get into the system for approx. 10 seconds, and then turn the wheels.
b) Front Wheel - Spray in the space between the rim and the housing on both sides. Let the lubricant get into the system for approx. 10 seconds, and then turn the wheels. Should this not avoid the squeaking, please remove the rim cap and apply the spray on the axle.
c) Suspension - Apply some lubricant between the suspension slider and the housings.
DISPOSAL
When you are done using your CYBEX ONYX/TOPAZ, a proper disposal is important. Garbage disposal can be different in every country. Please contact your local waste management company to make sure you are taking the right steps to dispose of the CYBEX ONYX/TOPAZ. Always follow the disposal regulations of your country.
III. INSTRUCTIONS FOR USE
IMPORTANT: READ THESE INSTRUCTIONS CAREFULLY BEFORE USE AND KEEP THEM FOR FUTURE REFERENCE. YOUR CHILDREN'S SAFETY MAY BE AFFECTED IF YOU DO NOT FOLLOW THESE INSTRUCTIONS.
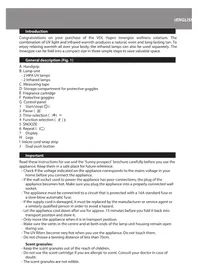
ONYX/TOPAZ ASSEMBLY INSTRUCTION
DELIVERY STATUS
a) Release the folding lock lever.
b) Open the stroller.
c) Push the pedal button down until the locking system is engaged.
2. ASSEMBLING THE HANDLES
ATTENTION: THE PINS ON BOTH SIDES MUST BE ENGAGED.
3. ASSEMBLING THE FRONT WHEELS
- Fit the front wheels to the end of the frame until they engage with a "click".
4. ASSEMBLING THE REAR WHEELS
ATTENTION: THE WHEEL SYSTEM WITH THE BRAKE PEDAL MUST BE FITTED TO THE RIGHT SIDE OF THE BUGGY (VIEWED FROM BEHIND THE BUGGY).
ATTENTION: THE PINS ON BOTH SIDES MUST BE ENGAGED.
ENSURE THE BOWDEN CABLE IS INSERTED INTO THE CLIPS ON BOTH SIDES.
5. ATTACHING THE BUMPER BAR
a) Slide in latches on left and right side into gadgets sewn into the seat fabric.
b) Press the buttons on left and right side of the bumper bar to take it off.
Remove all contents from the basket. Close the canopy. Remove the bumperbar.
a) Push forward the primary lock lever underneath the pedal button.
b) Lift the activated primary lock lever to release the stretching system.
c) Push down the secondary lock lever (extended bar on the right side of the locking system).
d) Grip handles and push forward on the stroller to fold it.
e) Press folded stroller until the fold lock is engaged. Its recommended to fasten the harness before folding the stroller.
a) Release the fold lock lever.
b) Open the stroller
c) Push the pedal button down until the locking system is engaged.
WARNING: ENSURE THAT ALL LOCKING DEVICES ARE ENGAGED BEFORE USE.
8. USING THE BRAKES
a) Engage Brake
b) Release Brake
9. AUTOMATIC FRONT WHEEL SWIVEL LOCKS - LOCK - UNLOCK
a) Push the Front Swivel Lock Lever until it "clicks". It can be activated in any wheel positions. The swivel Lock will engage automatically when it reaches the right position.
b) Lift the Front Swivel Lock Lever up again to release the Swivel Lock.
10. EXTENDABLE CANOPY
- Attach the canopy adaptor on to the inside of the frame tubes of the buggy.
- To remove the canopy reverse procedure.
- Extend the canopy and place canopy rear flap behind the seat.
- Lie-flat position: Put the rear flap over the seat's back rest and fixate it with the two velcros underneath.
- The canopy is adjustable to various positions. The Canopy has a height adjustment and a forward rotation function. To rotate open the zip located at the top of the canopy.
The canopy has a fully ratcheting function to create complete coverage. Simply pull on the front of the canopy to the desired position. The height can be easily adjusted by simply sliding the canopy up or down the frame. The entire canopy can also be tilted forward. For maximum coverage, unzip the extra panel on top of canopy and pull forward.
- The canopy flap at the rear of the stroller can be rolled up and fixed with a velcro fastener, if required.
11. USING THE HARNESS SYSTEM
a) To fasten the harness system insert left and right side fasteners into the central harness buckle.
b) To tighten the belts pull the strap on the front of the central harness buckle.
c) To release the belt system press the release button located on the seat in front of the belt lock while pulling at the shoulder belts.
d) To release the fasteners squeeze the grooves on left and right side of the central harness buckle.
e) Adjust the length of the crotch strap with the corresponding slider.
WARNING: ALWAYS USE THE CROTCH STRAP IN COMBINATION WITH THE WAIST BELT.
12. ADJUSTING THE HARNESS SYSTEM FOR NEWBORNS
a) Release the loops at the end of the shoulder straps from the triangle in the belt system, situated at the bottom of the backrest under the seat cover.
b) Completely pull the shoulder straps out of the holes in the backrest
c) Feed the shoulder straps through the two bottom holes. Make sure to feed the straps back through the holes in the backrest mechanism and re-attach them to the triangle.
d) To adjust the length of the shoulder straps to newborns please attach the inner loop of the shoulder strap ends to the triangular ring. Switch back to the upper holes as soon as the shoulder straps do no longer fit over the child's shoulders.
13. REMOVING THE HEADHUGGER AND SHOULDER PADS (TOPAZ ONLY)
Remove the headhugger as soon as the headhugger does no longer fit over the child's shoulders.
a) Remove the velcros of the headhugger on the top leh and right side on the back of the seat cover.
b) Release the loops at the end of the shoulder straps from the triangle in the belt system, situated at the bottom of the backrest under the seat cover.
c) Completely pull the shoulder straps out of the holes in the backrest.
d) Pull the shoulder straps through the shoulder pads and the headhugger. Make sure to feed the straps back through the holes in the backrest mechanism and
attach them to the triangle. You can use the headhugger and the shoulder pads separately.
14. REMOVING THE SEATCOVER
a) Slightly fold the stroller to reduce tension.
b) Remove the canopy from the stroller, if attached.
c) Take the seat cover's hooks (3) off the frame on left and right side
d) Open the press buttons (4) of the straps connected to the seat side panels and the basket rear tube.
e) Open the flaps (5) which are fixed with velcro over the tubes, one on each side.
f) Feed the strap with the slider (6) of the central harness buckle through the hole in the seat fabric.
g) Feed the loops on the end of the shoulder straps through the triangle in the backrest (7).
h) Feed the shoulder straps through the holes in the seat fabric (8).
1) Open the press buttons which are on the left and the right side from the seat on the bottom from the fabric.
j) Pull the seat cover over the belt shifting button on the seat.
k) Slide the fabrics from the seat base tubes.
1) Reverse this procedure to refit the seat cover and the harness. Make sure that the seat tubes slide back into the pockets inside the seat cover.
15. RECLINING THE LEG REST
a) Press the leg rest on both front edges and push down.
b) Simply lift the leg rest to put it back to the starting position.
16. RECLINING THE SEAT
a) Pull the recline lever at the back of the seat in order to recline the backrest to the 4 different positions.
b) To raise lift the complete backrest up to required position.
- Pull the flexible carriing handle on right rear tube and lift the stroller.
18. ATTACHING THE RAINCOVER (OPTIONAL)
a) Extend the rain cover over the stroller like shown in the Image
b) To fit the rain cover fasten the velcro strips around the frame at the top and bottom on both sides of the buggy.
19. WARRANTY
The following warranty applies solely in the country where this product was initially sold by a retailer to a customer. The warranty covers all manufacturing and material defects, existing and appearing, at the date of purchase or appearing within a term of two (2) years from the date of purchase from the retailer who initially sold the product to a consumer (manufacturer's warranty). In the event that a manufacturing or material defect should appear, we will – at our own discretion – either repair the product free of charge or replace it with a new product. To obtain such warranty it is required to take or ship the product to the retailer, who initially sold this product to a customer and to submit an original proof of purchase (sales receipt or invoice) that contains the date of purchase, the name of the retailer and the type designation of this product. This warranty shall not apply in the event that this product is taken or shipped to the manufacturer or any other person other than the retailer who initially sold this product to a consumer. Please check the product with respect to completeness and manufacturing or material defects immediately at the date of purchase or, in the event that the product was purchased in distance selling, immediately after receipt. In case of a defect stop using the product and take or ship it immediately to the retailer who initially sold it. In a warranty case the product has to be returned in a clean and complete condition. Prior to contacting the retailer, please read this instruction manual carefully. This warranty does not cover any damages caused by misuse, environmental influence (water, fire, road accidents etc.) or normal wear and tear. It does solely apply in the event that the use of the product was always in compliance with the operating instructions, if any and all modifications and services were performed by authorized persons and if original components and accessories were used. This warranty does not exclude, limit or otherwise affect any statutory consumer rights, including claims in tort and claims with respect to a breach of contract, which the buyer may have against the seller or the manufacturer of the product.
20. CARE INSTRUCTIONS
- wash separately
- gentle action wash warm water
- do not bleach
- do not tumble dry
- do not iron
- do not dry clean

UK – AFTER SALES SERVICE:
If you need assistance, spare parts or you are unhappy with any aspect of the goods please contact Customer Care on: +44 (0)845 268 2000, or e-mail us at: customer.care@mamasandpapas.com.
Visit our website at www.mamasandpapas.com for the latest product information.
FR CONTENU
natural_image
Abstract graphic with a black circular shape and arrow on orange background, no text or symbols presentGeachte klant!
WIJ DANKEN U VOOR HET AANKOPEN VAN DE CYBEX ONYX/TOPAZ. DIT PRODUKT IS EEN BUGGY DIE GESCHIKT IS VOOR KINDEREN VAN 0 JAAR TOT 20KG. HET IS GESCHIKT VOOR ÉÉN ENKEL KIND. DE BUGGY IS UITGERUST MET EEN KAP - ALLE KENMERKEN WORDEN BESCHREVEN IN DE HANDLEIDING. WIJ GARANDEREN U DAT BIJ DE ONTWIKKELING VAN DIT PRODUKT, VEILIGHEID, KOMFORT EN GEBRUIKSVRIENDELIJKHEID CENTRAAL STONDEN. DIT PRODUKT WERD ONTWIKKELD ONDER EEN STRICTE KWALITEITSCONTROLE EN BEANTWOORDT AAN ALLE RELEVANTE VEILIGHEIDSVOORWAARDEN. INDIEN U VRAGEN HEEFT, KAN U ONS STEEDS CONTACTEREN.
OPGELET: DIT PRODUKT IS NIET GESCHIKT OM MEE TE LOPEN OF TE ROLSCHAATSEN.
ONYX/TOPAZ HANDLEIDING
LEVERINGSSTAAT
1. DE BUGGY OPENVOUWEN
a) Ontgrendel the veiligheidshendel.
7. DE BUGGY OPENVOUWEN
natural_image
Abstract graphic with a large black circular shape on an orange background, no text or symbols present.Gentile Cliente,
LA RINGRAZIAMO PER AVERE ACQUISTATO IL PASSEGGINO CYBEX ONYX/TOPAZ. SI TRATTA DI UN PASSEGGINO ADATTO AL TRASPORTO DI BAMBINI DALLA NASCITA, FINO AI 20 KG. E' CONCEPITO PER IL TRASPORTO DI UN SOLO BAMBINO. IL PASSEGGINO È DOTATO DI CAPOTTINA - TUTTE LE CARATTERISTICHE SONO DESCRITTE IN DETTAGLIO NELLE ISTRUZIONI. LE GARANTIAMO CHE NELLA PROGETTAZIONE DEL PASSEGGINO CYBEX ONYX/TOPAZ I NOSTRI OBIETTIVI PRINCIPALI SONO STATI LA SICUREZZA, IL COMFORT E LA MANEGGEVOLEZZA. IL PRODOTTO È STATO ELABORATO SOTTO UNO STRETTO CONTROLLO QUALITATIVO E RISPONDE A TUTTI GLI STANDARD DI SICUREZZA. PER QUALSIASI DOMANDA O INFORMAZIONE SIAMO A SUA COMPLETA DISPOSIZIONE, NON ESITI A CONTATTARCI IN QUALSIASI MOMENTO.
Riedinger Str. 18, 95448 Bayreuth, Germany
tel. +39 0444 602721, fax +39 0444 1876734
ES CONTENIDO
www.cybex-online.com - [watch instructional video here]
www.facebook.com/cybex.online
CY_170_0021_H0212