Pick your language and provide your email: we'll send you a specifically translated version.
This manual is not available in your language
User questions about Melody Media MCR503 MARANTZ
0 question about this device. Answer the ones you know or ask your own.
Ask a new question about this device
No questions yet. Be the first to ask one.
Download the instructions for your Receiver in PDF format for free! Find your manual Melody Media MCR503 -
MARANTZ and take your electronic device back in hand. On this page are published all the documents necessary for the use of your device. Melody Media MCR503 by MARANTZ.
USER MANUAL Melody Media MCR503 MARANTZ
natural_image
Pure electrical circuit lines without any symbols
□ SAFETY PRECAUTIONS
CAUTION RISK OF ELECTRIC SHOCK DO NOT OPEN
CAUTION:
TO REDUCE THE RISK OF ELECTRIC SHOCK, DO NOT REMOVE COVER (OR BACK). NO USER-SERVICEABLE PARTS INSIDE. REFER SERVICING TO QUALIFIED SERVICE PERSONNEL.
The lightning II ash with arrowhead symbol, within an equilateral triangle, is intended to alert the user to the presence of uninsulated "dangerous voltage" within the product's enclosure that may be of sufficient magnitude to constitute a risk of electric shock to persons.
The exclamation point within an equilateral triangle is intended to alert the user to the presence of important operating and maintenance (servicing) instructions in the literature accompanying the appliance.
WARNING:
TO REDUCE THE RISK OF FIRE OR ELECTRIC SHOCK, DO NOT EXPOSE THIS APPLIANCE TO RAIN OR MOISTURE.
CLASS 1 LASER PRODUCT
LUOKAN 1 LASERLAITE
KLASS 1 LASERAPPARAT
ADVARSEL: USYNLIG LASERSTRÁLING VED ÁBNING, NÁR
SIKKERHEDSAFBRYDERE ER UDE AF FUNKTION.
UNDGÁ UDSAETTELSE FOR STRÀLING.
VAROITUS! LAITTEEN KÄYTTÄMINEN MUULLA KUIN TÄSSÄ
KÄYTTÖOHJEESSA MAINITULLA TAVALLA SAATTAA
ALTISTAA KÄYTTÄJÄN TURVALLISUUSLUOKAN 1
YLITTÄVÄLLE NÄKYMÄMTTÖMÄLLE LASERSÄTEILYLLE.
VARNING: OM APPARATEN ANVÄNDS PÅ ANNAT SÄTT ÄN I DENNA
BRUKSANVISNING SPECIFICERATS, KAN ANVÄNDAREN
UTSÄTTAS FÖR OSYNLIG LASERSTRÅLNING SOM
ÖVERSKRIDER GRÄNSEN FÖR LASERKLASS 1.
ATTENZIONE: QUESTO APPARECCHIO E' DOTATO DI
DISPOSITIVO OTTICO CON RAGGIO LASER.
L'USO IMPROPRIO DELL'APPARECCHIO PUO' CAUSARE
IMPORTANT SAFETY INSTRUCTIONS
Read these instructions.
Keep these instructions.
Heed all warnings.
Follow all instructions.
Do not use this operative groundwater
Do not use this apparatus
Close only with dry cloth
Clean only urinary drain.
Do not block any ventilation openings
Install in accordance with the manufacturer's instructions.
Do not install near any heat sources such as radiators, heat registers,
stoves, or other apparatus (including amplifiers) that produce heat
Protect the power cord from being walked on or pinched particularly at plugs, convenience receptacles, and the point where they exit from the apparatus.
Only use attachments/accessories specified by the manufacturer.
Use only with the cart, stand, tripod, bracket, or table
specified by the manufacturer, or sold with the apparatus.
When a cart is used, use caution when moving the cart/
apparatus combination to avoid injury from tip-over.
Chipping this apparatus during lightning storms of when unused for long periods of time.
Refer all servicing to qualified service personnel.
Servicing is required when the apparatus has been damaged in any way, such as power-supply cord or plug is damaged, liquid has been spilled or objects have fallen into the apparatus, the apparatus has been exposed to rain or moisture, does not operate normally, or has been dropped.
Batteries shall not be exposed to excessive heat such as sunshine, fire or the like.
CAUTION:
To completely disconnect this product from the mains, disconnect the plug from the wall socket outlet.
The mains plug is used to completely interrupt the power supply to the unit and must be within easy access by the user.
VORSICHT:
USE OF CONTROLS OR ADJUSTMENTS OR PERFORMANCE OF PROCEDURES OTHER THAN THOSE SPECIFIED HEREIN MAY RESULT IN HAZARDOUS RADIATION EXPOSURE.
THIS PRODUCT SHOULD NOT BE ADJUSTED OR REPAIRED BY ANYONE EXCEPT PROPERLY QUALIFIED SERVICE PERSONNEL.
ENGLISHDEU
TSCHFRANÇAISI
ALIANOESPAÑO
NEDERLANDSS
ENSKA
NOTE ON USE / HINWEISE ZUM GEBRAUCH / OBSERVATIONS RELATIVES A L'UTILISATION / NOTE SULL'USO / NOTAS SOBRE EL USO / ALVORENS TE GEBRUIKEN / OBSERVERA ANGÄENDE ANVÄNDNINGEN
- Avoid high temperatures. Allow for sufficient heat dispersion when installed in a rack
- Handle the power cord carefully. Hold the plug when unplugging the cord.
- Keep the unit free from moisture, water, and dust.
- Unplug the power cord when not using the unit for long periods of time.
- Do not obstruct the ventilation holes.
- Do not let foreign objects into the unit.
- Do not let insecticides, benzene, and thinner come in contact with the unit.
- Never disassemble or modify the unit in any way.
- Ventilation should not be impeded by covering the ventilation openings with items, such as newspapers, tablecloths or curtains.
- Naked Il ame sources such as lighted candles should not be placed on the unit.
- Observe and follow local regulations regarding battery disposal.
- Do not expose the unit to dripping or splashing fluids.
- Do not place objects filled with liquids, such as vases, on the unit.
- Do not handle the mains cord with wet hands.
- When the switch is in the OFF position, the equipment is not completely switched off from MAIN5.
• The equipment shall be installed near the power supply so that the power supply is easily accessible.
• DECLARATION OF CONFORMITY
We declare under our sole responsibility that this product, to which this declaration relates, is in conformity with the following standards: EN60085, EN55013, EN55020, EN61000-3-2 and EN61000-3-3.
Following the provisions of Low Voltage Directive 2006/95/EC and EMC Directive 2004/108/EC, the EC regulation 1275/2008 and its frame work Directive 2009/125/EC for Energy-related Products (ErP).
Following the provisions of low voltage directive 2006/95/EC and EMC directive 2004/108/EC, the EC regulation 1275/2008 and its frame work directive 2009/125/EC for energy-related products (ErP).
• DECLARATION DE CONFORMITE
A division of D&M Europe B.V.
A NOTE ABOUT RECYCLING:
This product's packaging materials are recyclable and can be reused. Please dispose of any materials in accordance with the local recycling regulations. When discarding the unit, comply with local rules or regulations.
Batteries should never be thrown away or incinerated but disposed of in accordance with the local regulations concerning battery disposal.
This product and the supplied accessories, excluding the batteries, constitute the applicable product according to the WEEE directive.
HINWEIS ZUM RECYCLING:
* For proper heat dispersal, do not install this unit in a confined space, such as a bookcase or similar enclosure.
• More than 0.3 m is recommended
- Do not place any other equipment on this unit.
Cautions on handling 2
About this guide....2
Discs 3
Discs playable on this unit 3
Holding discs 3
Loading discs 3
Cautions on loading discs 3
Cautions on handling 3
Cautions on storing discs 3
Cleaning discs 3
About the remote control....4
Inserting the batteries 4
Operating range of the remote control 4
Part names and functions....5
Front panel 5
Display 6
Rear panel 6
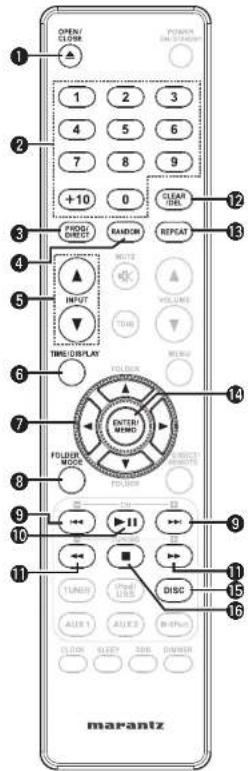
Remote control 7
Basic connections....9
Speaker connections 9
Connecting the speaker cables....9
Connecting components 10
Wireless dock for iPod / CD recorder / MD recorder 10
Connecting an antenna 10
FM/AM 10
Connecting the power cord 11
Basic operations....12
Preparations 12
Turning the power on 12
Before playing a disc 12
Turning the power off 12
Setting the current time (24-Hour Display) 13
Operations possible during playback 13
Adjusting the master volume 13
Input source switching 13
Adjusting the tone 13
Muting the sound 14
Switching the display's brightness 14
Listening with headphones....14
CD playback 14
Playing CDs 14
Playing repeatedly (Repeat playback) 15
Playing random order (Random playback) 15
Playing tracks in the desired order (Program playback) 15
Switching the display 15
Tuner playback 16
Tuning in Broadcast Stations 16
Automatically presetting FM stations (Auto preset) 16
Presetting FM/AM stations manually 17
Listening to preset stations 17
RDS (Radio Data System) 17
PTY (Program Type) 1B
TP (Traffic Program) 18
RT (Radio Text) 18
CT (Clock Time) 19
Advanced connections 19
The wireless receiver connection 19
Remote control connection 19
Setting the remote control 19
USB memory device connection 20
iPod connection 20
Advanced Operations 21
Preparations 21
Before playing a USB or an iPod 21
MP3 or WMA playback order of MP3 or WMA files 21
MP3 and WMA files playback 21
MP3 and WMA formats 21
MP3 and WMA files playback 22
iPod ^® playback 23
Disconnecting the iPod 24
Portable audio player playback 24
Connecting a portable player 24
Portable audio player playback 24
USB memory device playback 25
Playable USB memory formats 25
USB memory device playback 25
Setting the timer 26
Setting the timer 26
Setting the sleep timer 27
Setting the speakers 28
Setting speaker output 28
Setting AMP characteristics 29
Other functions 30
Auto power on 30
Auto input source selector function 30
Auto standby....30
Last function memory 30
Resetting the microprocessor 30
iPod stand 31
Explanation terms 32
Troubleshooting 32
Specifications 34
Index 34
ENGLISH
Getting started
Thank you for purchasing this Marantz product. To ensure proper operation, please read this user guide carefully before using the product.
After reading the guide, be sure to keep it for future reference.
Accessories
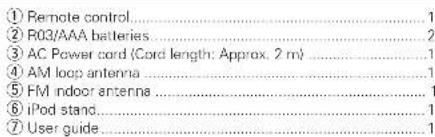
Check that the following parts are supplied with the product.
text_image
① Remote control....1
② R03/AAA batteries....2
③ AC Power cord (Cord length: Approx. 2 m)....1
④ AM loop antenna....1
⑤ FM indoor antenna....1
⑥ iPod stand....1
⑦ User guide....1
①③④
⑤
6
Main features
Incorporates 4 high-quality digital audio amplifiers.
Incorporates a Bi-amp system to realize full performance of the Bi-wiring speaker system.
Allows switching between Speakers A and B and simultaneous playback on Speakers A and B.
Allows playback of iPod, iPhone and MP3/WMA audio sources through use of the USB port on the front panel.
Equipped with screw-in speaker terminals for secure connections.
Stylish design that hides rear panel connection terminals from view from above.
Provides 3.5 mm diameter external input jacks on the front panel for easy connection to a digital audio player.
M-XPort (Marantz-eXtension Port).
The unit has the M-XPort, a Marantz original innovation, which boats excellent expandability.
Cautions on handling
• Before turning the power switch on
Check once again that all connections are correct and that there are no problems with the connection cables.
- Power is supplied to some of the circuitry even when the unit is set to the standby mode. When going on vacation or leaving home for long periods of time, be sure to unplug the power cord from the power outlet.
• Proper ventilation
If the unit is left in a room full of smoke from cigarettes, etc., for long periods of time, the surface of the optical pickup may get dirty, preventing it from receiving signals properly.
• About condensation
If there is a major difference in temperature between the inside of the unit and its surroundings, condensation may form on parts inside the unit, causing it to fail to operate properly.
If this happens, let the unit sit for an hour or two with the power turned off and wait until there is little difference in temperature before using the unit.
• Cautions on using mobile phones
Using a mobile phone near this unit may result in noise. If that occurs, move the mobile phone away from the unit when it is in use.
- Moving the unit
Turn off the power and unplug the power cord from the power outlet. Next, disconnect the cables connected to other system units before moving the unit.
About this guide
Operation buttons
The operations described in this guide are based mainly on remote control operation.
Symbols
This symbol indicates a reference page on which related information is described.
This symbol indicates a supplementary information and tips for operations.
NOTE This symbol indicates points to remember operations or function limitations.
Illustrations
Note that the illustrations in these instructions may differ from the actual unit for explanation purposes.
Discs
Discs playable on this unit
① Music CDs
Discs marked with the logo below can be played in this unit.
② CD-R/CD-RW
NOTE
Discs in special shapes (heart-shaped discs, octagonal discs, etc.) cannot be played. Do not attempt to play them, as doing so can damage the unit.
• Some discs and some recording
formats cannot be played.
• Non-fi nalized discs cannot be
played.
• What is fi nalization?
Finalization is the process that
makes recorded CD-R/CD-RW discs playable on compatible players.
Holding discs
Do not touch the signal surface.
Loadingdiscs
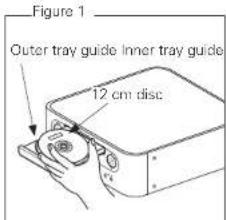
Place the disc in the tray, label side up.
Make sure the disc tray is fully open when inserting the disc.
Place the discs flat, 12 cm discs in the outer tray guide (Figure 1), 8 cm discs in the inner tray guide (Figure 2).
Place 8 cm discs in the inner tray guide without using an adapter.
"00 Tr 00 : 00" is displayed if a disc that cannot be played is loaded.
"NO DISC" is displayed if the disc is loaded upside-down or if no disc is loaded.
NOTE
Do not push the disc tray in by hand when the power is turned off. Doing so could damage the set.
Cautions on loading discs
Only load one disc at a time. Loading two or more discs can damage the unit or scratch the discs.
Do not use cracked or warped discs or discs that have been repaired with adhesive, etc.
Do not use discs on which the sticky part of cellophane tape or labels is exposed or on which there are traces of where labels have been removed. Such discs can get caught inside the player and damage it.
Cautions on handling
Do not get fingerprints, oil or dirt on discs.
• Take special care not to scratch discs when removing them from their cases.
Do not bend or heat discs.
Do not enlarge the hole in the center.
Do not write on the labeled (printed) surface with ball-point pens, pencils, etc., or stick new labels on discs.
Water droplets may form on discs if they are moved suddenly from a cold place (outdoors for example) to a warm place, but do not try to dry them off using a hairdryer, etc.
Cautions on storing discs
Be sure to remove discs after using them.
Be sure to store discs in their cases to protect them from dust, scratches, warping, etc.
Do not store discs in the following places:
Places exposed to direct sunlight for long periods of time
Dusty or humid places
Places exposed to heat from heaters, etc.
Cleaningdiscs
If there are fingerprints or dirt on a disc, wipe them off before using the disc. Fingerprints and dirt can impair sound quality and cause interruptions in playback.
Use a commercially available disc cleaning set or a soft cloth to clean discs.
Gently wipe the disc from the inside towards the outside.
Do not wipe in a circular motion.
NOTE
Do not use record spray, antistatic agents, benzene, thinner or other solvents.
ENGLISH
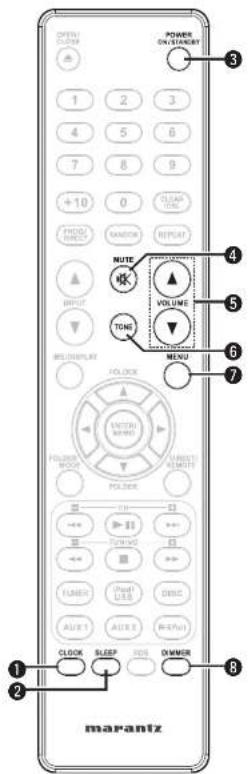
About the remote control
Inserting the batteries
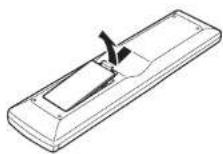
① Remove the rear cover of the remote control.
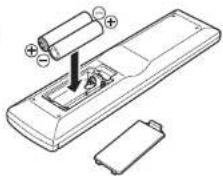
② Set two R03/AAA batteries in the battery compartment in the indicated direction.
natural_image
Diagram of a remote control with battery and battery casing (no text or symbols)
③ Put the rear cover back on.
NOTE
Insert the specified batteries in the remote control unit.
Replace the batteries with new ones if the set does not operate even when the remote control unit is operated close to the unit. (The supplied batteries are only for verifying operation.)
When inserting the batteries, be sure to do so in the proper direction, following the and marks in the battery compartment.
• To prevent damage or leakage of battery fluid
Do not use a new battery together with an old one.
Do not use two different types of batteries.
Do not attempt to charge dry batteries.
Do not short-circuit, disassemble, heat or dispose of batteries in flames.
Do not keep the battery in a place exposed to direct sunlight or in places with extremely high temperatures, such as near a heater.
If the battery fluid should leak, carefully wipe the fluid off the inside of the battery compartment and insert new batteries.
Remove the batteries from the remote control unit if it will not be in use for long periods.
• Used batteries should be disposed of in accordance with the local regulations regarding battery disposal.
Operating range of the remote control
Operate the remote control while pointing it at the remote sensor.
text_image
Approx. 7 m
30°
30°
NOTE
The set may function improperly or the remote control may not operate if the remote control sensor is exposed in direct sunlight or strong artificial light such as a fluorescent or infrared light.
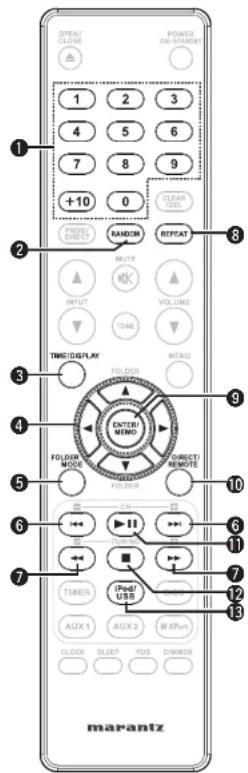
Part names and functions
For buttons not explained here, see the page indicated in parentheses ( ).
Frontpanel
text_image
16 15
13 12 11 14 9 8 10
marantz
7
17
POWER
AUX
Power
GND/STANDARD
VOLUME
CO. RECEIVER AC CHASED
1 2 3 4 5 6
① Headphones jack (PHONES)....(14)
Used to connect headphones.
② AUX1 input jack....(24)
Used to connect portable audio devices.
③ USB port (iPod/USB) ...... (20)
Used to connect USB devices
④ Power operation button (ON/STANDBY) …… (12)
⑤ Remote control sensor …… (4)
⑥ Volume up/down button (VOLUME ▲▼) …… (13)
Adjusts the audio volume.
⑦ Reverse-skip/Forward-skip buttons (I◄◄, ►►I)
TUNER mode
Selects the previous/next preset channel.
• DISC, iPod/USB mode
Selects the previous/next track.
⑧ Play/Pause button (▶/II)....(14, 25)
⑨ Disc tray open/close button (▲)……(12)
Used to open/close the disc tray.
⑩ Stop button (■) …… (14, 25)
⑪ Disc tray …… (3)
Tray used to insert a compact disc.
⑫ Display……(6)
Displays play status, settings, etc.
13 TIMER indicator (27)
⑭ INPUT button …… (13)
Selects the input source.
⑮ ENTER button …… (13)
Used to confirm an item.
TUNER mode ..... (17)
Used to register a broadcast station.
16 MODE button
SET UP mode....(13)
Calls up the SETUP menu when pressed continuously.
TUNER mode ..... (16)
Used to select reception band
⑰ △/▽ buttons
SET UP mode....(13)
Used to select the item to be set
TUNER mode ..... (16)
Used when switching frequencies.
DISC, iPod/USB mode (22, 25)
Used to select folder.
ENGLISH
ENGLISH
Part names and functions
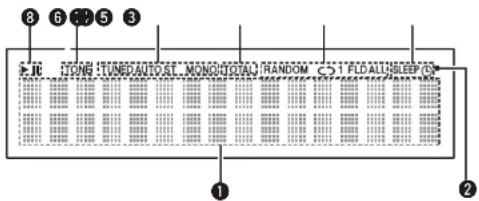
Display
text_image
8 6 5 3
FROG TUNEDAUTOST MONO TOTAL RANDOM CO1 FLOALLSLEEP/0
①
②
① Information display
Various information is displayed here.
② Remote control signal reception indicator
③ Timer operation indicator
④ Play mode indicator ..... (15, 23, 25)
5 TOTAL indicator
Lights when the total number of tracks and total time of the CD are displayed.
⑥ Tuner reception mode indicators …… (16)
⑦ Tone indicators....(13)
Lights when the tone (bass/treble) is being adjusted.
The buttons listed at "Buttons that work with all input sources" can also be used.
text_image
OPEN/
SLOMB
POWER
ON/OFF/ON/OFF/ON/OFF
1 2 3
4 5 6
7 8 9
+10 0
GREEN
VIDEO
DIRECT
RANDOM
RESET
INPUT
VOLUME
TONE
TIME/DISPLAY
MENU
FOLDER
ENTER/MEMO
POLDER
MODE
TURNO
TUNER
(Pod/
USB)
AUX 1 AUX 2 RF/Port
CLOCK SLIGHT RDS CHMOR
marantz
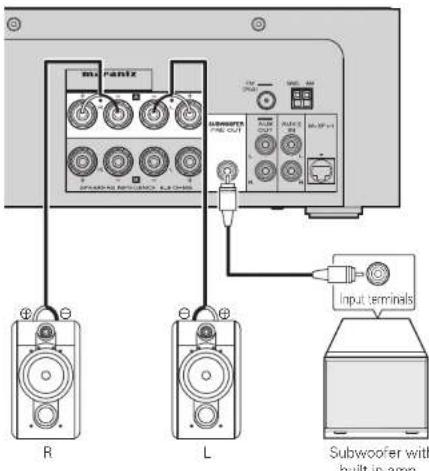
text_image
MURANTZ
SPRINGING RELIANCE
R
L
Input terminals
Subwoofer with
built-in amp
Set the speaker output for the unit to match the speaker connections made to terminals A and B (page 28 "Setting the speakers"). The default setting is SPEAKER A.
NOTE
Be sure to lower the audio volume before making speaker settings.
Connecting the speaker cables
Carefully check the left (L) and right (R) channels and + (red) and - (black) polarities on the speakers being connected to the unit, and be sure to connect the channels and polarities correctly.
1 Peel off about 10 mm of sheathing from the tip of the speaker cable, then either twist the core wire tightly or apply solder to it.
2 Turn the speaker terminal counterclockwise to loosen it.
3 Insert the speaker cable's core wire to all the way into the speaker terminal.
4 Turn the speaker terminal clockwise to tighten it.
NOTE
Use speakers with an impedance of 6 to 8 Ω. The protection circuit may be activated if speakers with an impedance other than specified are used.
Connect the speaker cables so they do not stick out of the speaker terminals. The protection circuit may be activated if the wires touch the rear panel or if the + and - sides touch each other (CB page 10 "Protection circuit").
Never touch the speaker terminals while the power supply is connected. Doing so could result in electric shock.
ENGLISH
Speaker connections
Protectioncircuit
The protection circuit is be activated in the following situations:
If the speaker cable wire touches the rear panel or screws or if the speaker cable wire touches the speaker cable's + and - sides are touching
If the surrounding temperature is extremely high
If the inside of the amplifier gets hot to extended use at a high output
If this happens, unplug the power cord, then check the connections of the speaker cables and input cables. If the unit becomes very hot, wait for it to cool off and improve the ventilation around it. After doing this, plug the power cord back in.
If the protection circuit is activated even though there are no problems with the ventilation around the unit or in connections, the unit may be damaged. Turn off the power and then contact a Marantz service center.
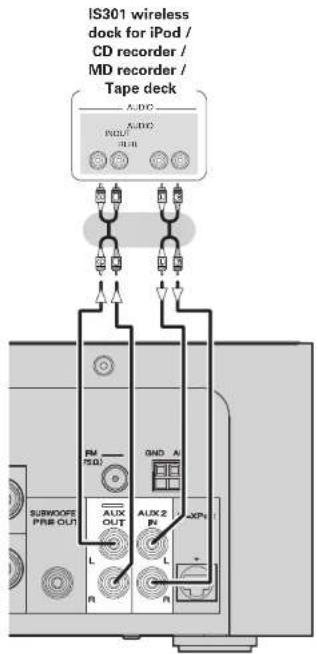
Connectingcomponents
Wireless dock for iPod / CD recorder / MD recorder
text_image
IS301 wireless
dock for iPod /
CD recorder /
MD recorder /
Tape deck
AUDIO
AUDIO
PULU
TUE
R
GND A
PM
TSQ
SUBWOOPS
PRE-OUT
L
R
ALUX 2
PN
L
+KPN
LPN
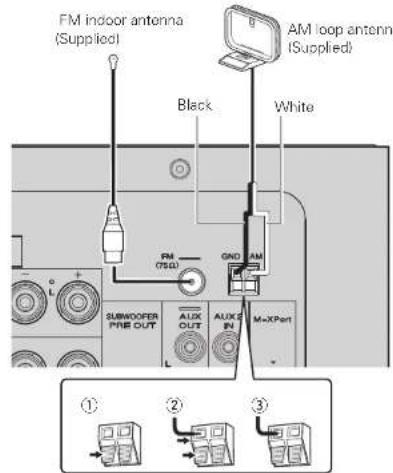
Connectinganantenna
FM/AM
Connect the FM antenna or AM loop antenna supplied with the unit to enjoy listening to radio broadcasts.
After connecting the antenna and receiving a broadcast signal (127 page 16 "Tuning in Broadcast Stations"), fi x the antenna with tape in a position where the noise level becomes minimal.
text_image
FM indoor antenna
(Supplied)
Black
AM loop antenna
(Supplied)
White
FM
(750)
GND AM
SUBWOFER
PHB OUT
AUX
OUT
AUX IN
M=XPart
①
②
③
NOTE
Do not connect two FM antennas simultaneously.
Even if an external AM antenna is used, do not disconnect the AM loop antenna.
Make sure the AM loop antenna lead terminals do not touch metal parts of the panel.
If the signal has noise interference, connect the ground terminal (GND) to reduce noise.
If you are unable to receive a good broadcast signal, we recommend installing an outdoor antenna. For details, inquire at the retail store where you purchased the unit.
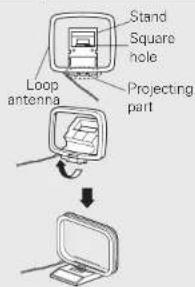
Connecting an antenna
□ AM loop antenna assembly
1 Put the stand section through the bottom of the loop antenna from the rear and bend it forward.
2 Insert the projecting part into the square hole in the stand.
text_image
Stand
Square
hole
Loop
antenna
Projecting
part
□ Using the AM loop antenna
Suspending on a wall
Suspend directly on a wall without assembling.
Standing alone
Use the procedure shown upper to assemble.
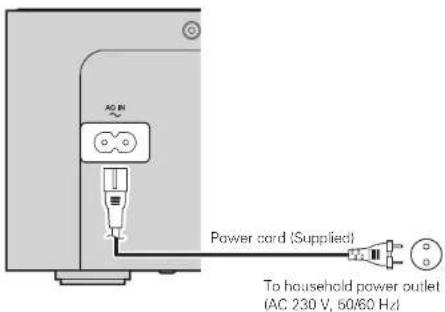
Connecting the power cord
text_image
AC dB
Power cord (Supplied)
To household power outlet
(AC 230 V, 50/60 Hz)
NOTE
ENGLISH
Only use the supplied power cord.
Be sure the power cord is unplugged from the power outlet before connecting or disconnecting it to the AC IN.
Only use the supplied power cord.
Be sure the power cord is unplugged from the power outlet before connecting or disconnecting it to the AC IN.
ENGLISH
Basic operations
Symbols used to indicate buttons in this guide
Button located on both the main unit and the remote control
→ BUTTON
Button only on the main unit
→ <BUTTON>
Button only on the remote control
→ [BUTTON]
text_image
△/▽ ▶/▲/▼▶▶▶▶/▼▲
<

text_image
ON/STANDBY
[INPUT ▲▼]
[VOLUME ▲▼]
[TONE]
[MENU]
[ENTER/MEMO]
[◀]
[CLOCK]
This section explains how to set the current time, and how to playback a CD or tuner.
For other operations, see the sections below.
□ MP3 and WMA files playback (page 21)
iPod playback (page 23)
☐ Portable audio player playback (page 24)
☐ USB memory device playback (page 25)
Setting the timer (1 page 26)
Setting the speakers (page 28)
Preparations
Turning the power on
Press ON/STANDBY.
The power turns on. Press again to set the power to standby.
NOTE
- Power continues to be supplied to some of the circuitry even when the power is in the standby mode. When leaving home for long periods of time, either press ON/STANDBY to turn off the power, or unplug the power cord from the power outlet.
- Be sure to stop playback before turning the power off.
□ Completely turning off the power
Unplug the power cord from the wall outlet.
- Note that the time setting is cleared when the power cord is unplugged from the outlet.
- The settings made for the various functions may be cleared if the power cord is left unplugged from a power outlet for an extended period of time.
Before playing a disc
1 Press ON/STANDBY.
2 Press [INPUT ▲▼] or to set the input source to "DISC".
If no disc is loaded "NO DISC" is displayed.
2 Insert a disc (1 page 3).
- Press ▲ to open/close the disc tray.
- The disc tray also closes when ▶/■ is pressed.
NOTE
Do not place any foreign objects in the disc tray. Doing so could damage it.
Turning the power off
Press ON/STANDBY.
NOTE
- Be sure to stop playback before turning the power off.
- Make sure that the disc tray is completely shut before turning off the power.
- Do not push the disc tray in by hand when the power is turned off. Doing so could damage the set.
Setting the current time (24-Hour Display)
[Example] Setting the current time to 10:15 am
1 Press ON/STANDBY to turn the power on.
2 Press [MENU] or press for 3 or more seconds. Various types of setting menus are displayed.
3 Use △▽ to select "CLOCK SETUP", then press [ENTER/MEMO], or [▷].

4 Use to set the “hours”.

5 Press [ENTER/MEMO], or |▷|. The "minutes" display flashes.
6 Use △▽ to set the "minutes".

7 Press [ENTER/MEMO], or [▷]. The current time is set, and the normal display reappears.
Operations possible during playback
Adjusting the master volume
Press VOLUME ▲▼.
The volume level is displayed.
[Adjustable range]
VOLUME MIN, 1 - 59, MAX
Input source switching
Press [INPUT ▲] or to select the input source.

\*1 "M-XPort" appears only when an RX101 wireless receiver is connected to M-XPort.
Adjusting the tone
1 Use [TONE] to select the tone parameter to be adjusted.

2 Adjust the volume with I◀◀,▶▶l or [◀ ▷].
• To make other tone adjustments at this time, press [TONE].
• If no operation is performed for 5 seconds, the adjustment is retained and the normal display reappears.
BASS Adjusts the bass sound.
[Variable range] -10dB - +10dB
TREBLE Adjusts the treble sound.
[Variable range] -10dB - +10dB
BALANCE Adjusts the left/right volume balance.
[Variable range] +LOG - CENTER - +ROG
Settings made upon purchase:
\- BASS....0dB
- TREBLE....0dB
- BALANCE....CENTER
☐ Checking the current time when the power is on Press [CLOCK].
Press once more and the display returns to its original condition.
☐ Checking the current time when the power is set to standby
Press [CLOCK]
The current time is displayed for 10 seconds.
NOTE
The time cannot be set when in the standby mode. Turn on the power first.
💬 Hi! I'm your manual assistant.I know your MARANTZ Melody Media MCR503.
How can I help you? (use, settings, error codes, maintenance, explaining a step from the manual, etc.)💡 Examples :
• How do I use it ?
• Error code E3 ?
• How do I clean it ?