GAS 15 L Professional - Steam cleaner BOSCH - Free user manual and instructions
Find the device manual for free GAS 15 L Professional BOSCH in PDF.

User questions about GAS 15 L Professional BOSCH
0 question about this device. Answer the ones you know or ask your own.
Ask a new question about this device
Download the instructions for your Steam cleaner in PDF format for free! Find your manual GAS 15 L Professional - BOSCH and take your electronic device back in hand. On this page are published all the documents necessary for the use of your device. GAS 15 L Professional by BOSCH.
USER MANUAL GAS 15 L Professional BOSCH
1609 92A 4FZ (2021.04) PS/75

1609 92A 4FZ

natural_image
Illustration of a Bosch vacuum cleaner with control panel and wheels (no text or symbols visible)en Original instructions
fr Notice originale
pt Manual original
zh 正本使用说明书
zh原始使用说明書
English ...... Page 8
Français Page 14
text_image
B1 (2) (16)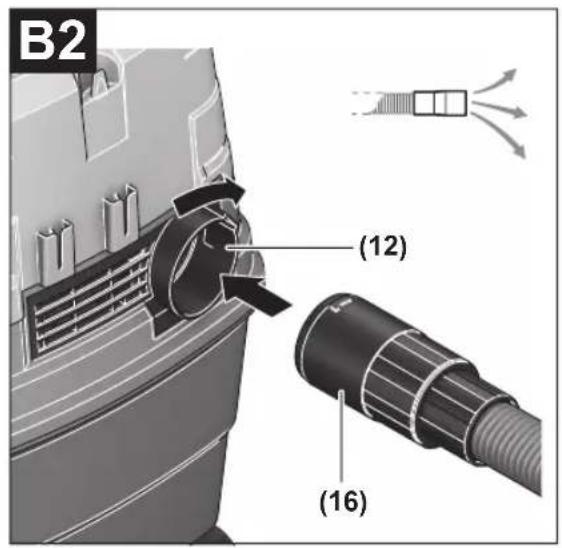
text_image
B2 (12) (16)
text_image
C1 BOSCH (7) BOSCH (8)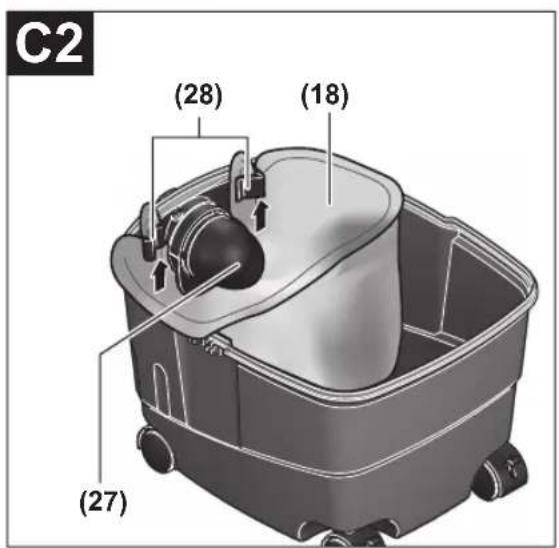
text_image
C2 (28) (18) (27)
text_image
C3 (18)6
text_image
C4 (2) (18)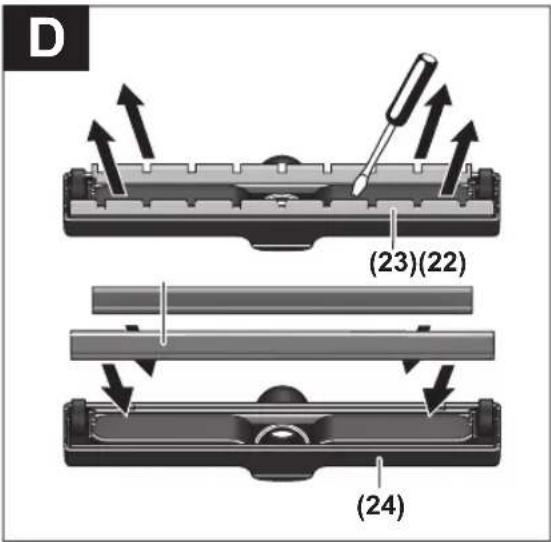
text_image
D (23)(22) (24)
text_image
E1 (29) (19) ① ②
text_image
E2 (20) (30)
text_image
F (31) (14) (16) (4) (3) GAS 15 PS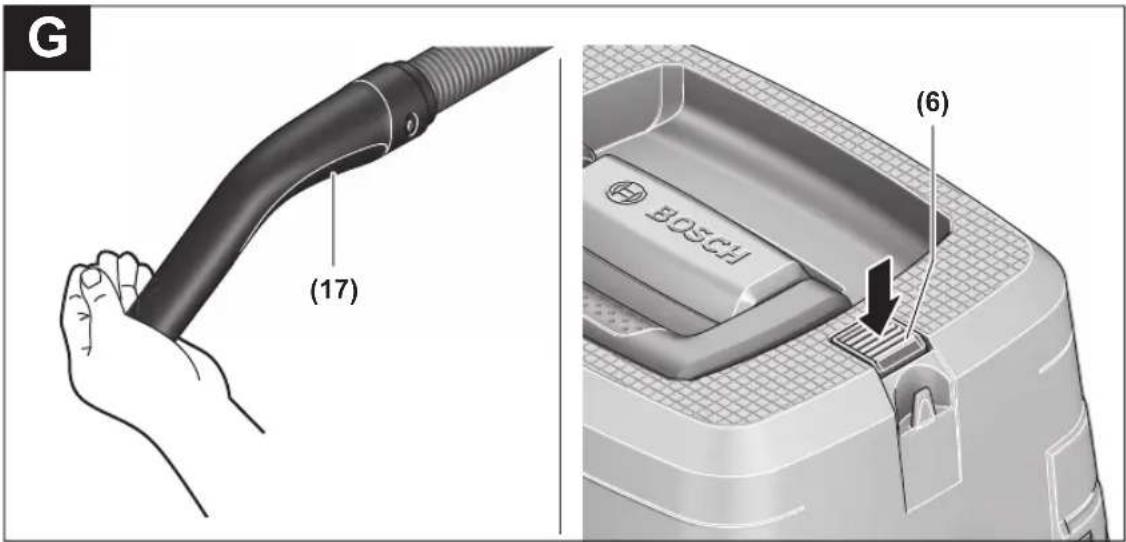
text_image
G (17) (6)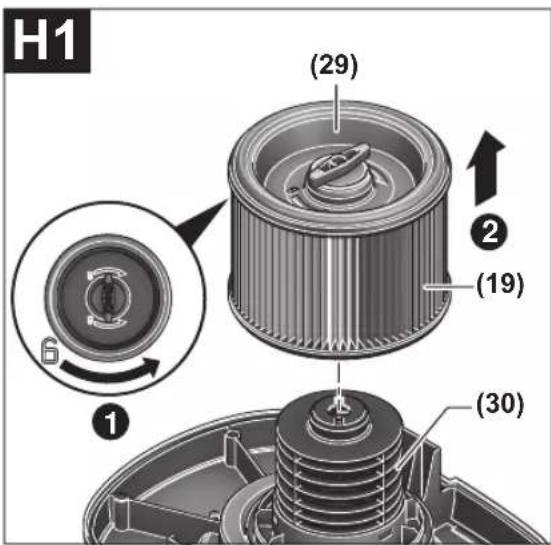
text_image
H1 (29) (19) (30) ① ②
text_image
(10) (15) (5) (11) (25) (13)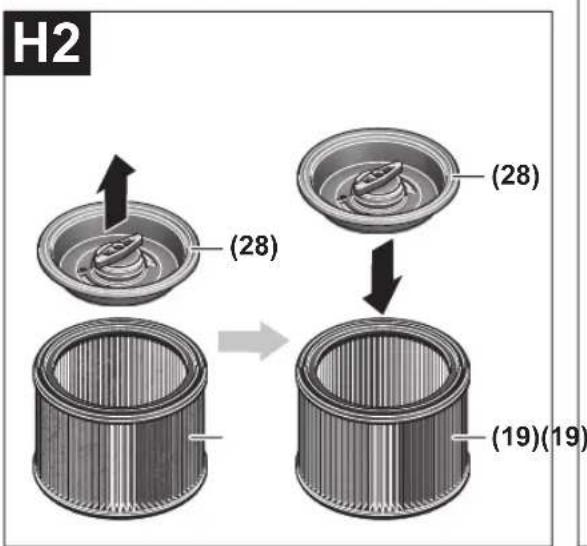
text_image
H2 (28) (28) (19)(19)Bosch Power Tools 1 609 92A 4FZ | (01.04.2021)
English
Safety Instructions
Safety information for vacuum cleaners

Read all the safety information and instructions. Failure to observe the safety information and follow instructions may result in electric shock, fire and/or serious injury.
Save all warnings and instructions for future reference.
This vacuum cleaner is not intended for use by children or persons with physical, sensory or mental impairments. It should not be used by persons who have insufficient experience and knowledge. Otherwise, there is a risk of operating errors and injuries.
▶ Supervise children. This will ensure that children do not play with the vacuum cleaner.
WARNING
Do not vacuum any harmful substances, e.g. beech or oak wood
dust, rock dust or asbestos. These substances are considered carcinogenic. Make sure you inform yourself about the applicable regulations/laws on how to handle harmful types of dust in your country.
▶ Only use the vacuum cleaner if you have been adequately informed about how to use it. Thorough instruction on how to use the equipment prevents accidental misuse and injuries.
WARNING
The vacuum cleaner is suitable for vacuuming dry substances, and
can also be used to vacuum liquids when taking appropriate measures. The penetration of liquids increases the risk of an electric shock.
▶ Do not use the vacuum cleaner to vacuum combustible or explosive liquids, such as petrol, oil, alcohol or solvents. Do not vacuum hot, burning or explosive dust. Do not operate the vacuum cleaner in areas subject to explosion hazards. Dust, vapours and liquids can ignite or explode.
WARNING
Only use the socket for the purpose stipulated in the operating
manual.
WARNING
If you notice a foam or water leak, switch off the vacuum cleaner im-
mediately and empty the container. Otherwise, the vacuum cleaner can become damaged.
NOTE: The vacuum cleaner must only be stored indoors.
NOTE: Clean the float regularly and check whether it is damaged. Otherwise, the equipment may not function properly.
▶ If operating the vacuum cleaner in a damp location is unavoidable, use a residual current device (RCD). Use of an RCD reduces the risk of electric shock.
▶ Always check the vacuum cleaner, cable and plug before use. Do not use the vacuum cleaner if you discover any damage. Do not open the vacuum cleaner yourself. It should be repaired exclusively by a qualified professional using only genuine spare parts. Damaged vacuum cleaners, cables and plugs increase the risk of electric shock.
▶ Do not crush the cable or run the device over it. Do not pull on the power cable to pull the plug out of the socket or to move the vacuum cleaner. Damaged cables increase the risk of an electric shock.
▶ Pull the plug out of the socket before cleaning or performing maintenance on the vacuum cleaner, making tool adjustments, changing accessories or putting away the vacuum cleaner. This safety measure prevents the vacuum cleaner from being started accidentally.
▶ Ensure that the workplace is well ventilated.
The vacuum cleaner should be repaired exclusively by a qualified professional using only genuine spare parts. This will ensure that the safety of the vacuum cleaner is maintained.
Before using the equipment for the first time, check that the vacuum hose is in perfect condition. Leave the vacuum hose fitted to the vacuum cleaner while doing this so that no dust escapes accidentally. Otherwise, you may end up inhaling dust particles.
▶ Do not sit on the vacuum cleaner. You can damage the vacuum cleaner this way.
▶ Take care when using the power cable and the vacuum hose. Improper use of these can put other people at risk.
▶ Do not clean the vacuum cleaner by spraying a jet of water directly at it. Water entering the top of the vacuum cleaner will increase the risk of electric shock.
▶ Connect the dust extractor to a properly earthed power supply system. The plug socket and extension cable must have a fully functioning protective conductor.
Products sold in GB only:
Your product is fitted with an BS 1363/A approved electric plug with internal fuse (ASTA approved to BS 1362). If the plug is not suitable for your socket outlets, it should be cut off and an appropriate plug fitted in its place by an authorised customer service agent. The replacement plug should have the same fuse rating as the original plug. The severed plug must be disposed of to avoid a possible shock hazard and should never be inserted into a mains socket elsewhere.
Symbols
The following symbols may provide you with important information pertaining to the use of your dust extractor. Please take note of these symbols and their meaning. Knowing what these symbols mean will help you to use your extractor more effectively and more safely.
Symbols and their meaning
WARNING! Read all the safety and general instructions. Failure to observe the safety and general instructions may result in electric shock, fire and/or serious injury.
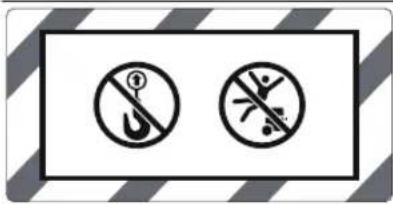
text_image
Two circular symbols with pictograms and Chinese text, indicating no pictograms or no incidents.
Do not hang the dust extractor on a crane hook, e.g. in order to transport it. The dust extractor is not suitable for moving with a crane. There is a risk of injury and damage if you do this.

Do not sit or stand on the dust extractor. The dust extractor may tip over and become damaged if you do this. This poses a risk of injury.
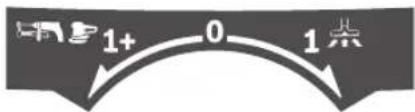
GAS 15

text_image
Off On
Switching Off

Extraction
Extracting dust deposits
GAS 15 PS
flowchart
graph LR
    A["第一步"] --> B["0"]
    B --> C["1点"]
Automatic start/stop
Extracting dust that accumulates from working power tools The dust extractor switches on automatically and off again with a time delay

Switching Off

Extraction
Extracting dust deposits
Symbols and their meaning

Permitted connected load of the connected power tool (country-specific)
Product Description and Specifications

Read all the safety and general instructions. Failure to observe the safety and general instructions may result in electric shock, fire and/or serious injury.
Please observe the illustrations at the beginning of this operating manual.
Intended Use
The tool is intended for collecting, extracting, conveying and separating non-flammable dry dust types, non-flammable liquids and a mixture of water and air. It is suitable for the more stringent demands in professional use, e.g. in trade, industry, hotels, schools, factories, offices and workshops, as well as for household/domestic use.
Only use the dust extractor if you can fully evaluate all functions and carry them out without restrictions, or if you have received corresponding instructions.
Product features
The numbering of the components shown refers to the diagram of the dust extractor on the graphics page.
(1) Container
(2) Hose connection piece (vacuuming function)
(3) Electric socket for power tool (GAS 15 PS)
(4) Mode selector switch (GAS 15 PS)
(4) On/off switch (GAS 15)
(5) Carrying handle
(6) SFC switch
(7) Top part of vacuum cleaner
(8) Catch for top part of vacuum cleaner
(9) Castor
(10) Holder for vacuum hose
(11) Holder for suction tubes
(12) Hose connection piece (blowing function)
(13) Castor brake
(14) Dust extraction adapter (GAS 15 PS)
(15) Retaining strap of the vacuum hose
(16) Vacuum hose
(17) Curved nozzle
(18) Plastic bag/dust bag ^a)
(19) Main filter
10 | English
(20) Wet filter
(21) Crevice nozzle
(22) Rubber lip
(23) Brush inserts
(24) Floor nozzle
(25) Suction tube
(26) Snap fastener
(27) Intake port
(28) Clips for securing the plastic bag
(29) Filter holder
(30) Filter basket
(31) False air intake
a) Accessories shown or described are not included with the product as standard. You can find the complete selection of accessories in our accessories range.
Technical data
A) Measured using a vacuum hose 3 m long and 35 mm in diameter
The specifications apply to a rated voltage [U] of 230 V. These specifications may vary at different voltages and in country-specific models.
Automatic start/stop ^A)
| Rated voltage | Maximum power | Minimum power | |
| JP | 100 V | 1050 W | 100 W |
| TW | 115 V | 1050 W | 100 W |
| CN | 220 V | 1100 W | 100 W |
| High voltage | 220–240 V | 2200 W | 100 W |
A) Permitted connected load of the connected power tool (country-specific)
Assembly
▶ Pull the plug out of the socket before cleaning or performing maintenance on the vacuum cleaner, making tool adjustments, changing accessories or putting away the vacuum cleaner. This safety measure prevents the vacuum cleaner from being started accidentally.
Fitting the vacuuming accessories (see figure A)
The vacuum hose (16) is equipped with a clip system which can be used to connect vacuuming accessories (dust extraction adapter (14), curved nozzle (17)).
Fitting the nozzles and tubes
- Push the curved nozzle (17) onto the vacuum hose (16) until you hear both snap fasteners (26) on the vacuum hose engage.
- Then attach the required extraction accessory (floor nozzle, crevice nozzle, suction tube, etc.) firmly to the curved nozzle (17).
- To remove the accessory, press the snap fasteners (26) inwards and pull apart the components.
Fitting the dust extraction adapter
GAS 15
- Push the dust extraction adapter (14) onto the vacuum hose (16) until you hear both snap fasteners (26) on the vacuum hose engage.
- To remove the adapter, press the snap fasteners (26) inwards and pull apart the components.
Fitting the vacuum hose
Vacuuming function (see figure B1)
- Push the vacuum hose (16) into the hose connection piece (2) and turn it as far as possible in the direction of rotation
Note: The friction generated by the dust in the vacuum hose and accessory during extraction causes an electrostatic charge that the user may experience as static discharge (depending on environmental factors and their physiological state).
Bosch generally recommends using an anti-static vacuum hose (accessory) to vacuum up fine dust and dry materials.
Blowing function (see figure B2)
The vacuum cleaner has a blowing function. Do not blow exhaust air out into the open air. Only use the blowing function with a clean hose. Dust can be hazardous to health.
- Switch on the vacuum cleaner for at least five seconds (GAS 15: On/off switch (4) to "on"; GAS 15 PS: Mode selector switch (4) to the "vacuuming" symbol) to clean the vacuum hose (16) of dust deposits.
- Turn the vacuum hose (16) as far as possible in the direction of rotation and pull it out of the hose connection piece (2).
- Push the vacuum hose (16) into the hose connection piece (12) and turn it as far as possible in the direction of rotation
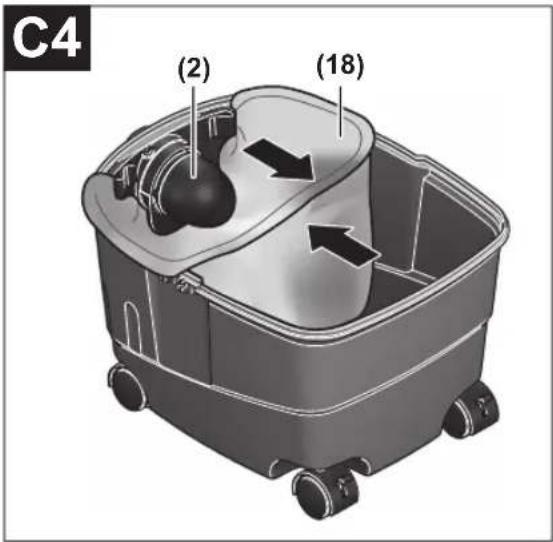
Inserting/removing the plastic bag or dust bag (dry vacuuming) (see figures C1–C4)
For dry vacuuming, you can insert a plastic bag (18) or a dust bag (accessory) into the container (1). This makes it easier to dispose of coarse dirt.
Inserting the plastic bag
- Open the catches (8) and remove the top part of the vacuum cleaner (7).
- Insert the plastic bag (18) into the container (1) with the inlet facing upwards. Secure the plastic bag under the suction hole (27) using the clips (28).
- Make sure that the plastic bag (18) touches all the inside walls of the container (1).
- Fold the rest of the plastic bag (18) over the edge of the container (1).
- Put the top part of the vacuum cleaner (7) on and close the catches (8).
Removing and sealing the plastic bag
- Open the catches (8) and remove the top part of the vacuum cleaner (7).
- Pull the edge of the full plastic bag (18) backwards out of the clips (28).
- Carefully take the plastic bag (18) out of the container (1) without damaging it.
- When doing so, make sure that the plastic bag does not scrape against the intake port (27) or other sharp objects.
Changing/inserting the dust bag (accessory)
- Open the catches (8) and remove the top part of the vacuum cleaner (7).
- Pull the full dust bag (18) backwards out of the connection flange. Close the opening in the dust bag by turning down the top. Take the closed dust bag out of the container (1).
- Place the new dust bag over the vacuum cleaner's connection flange. Make sure that the entire length of the dust bag touches the inside wall of the container (1).
- Put the top part of the vacuum cleaner (7) on and close the catches (8).
Fitting the rubber lip (wet vacuuming) (see figure D)
- Use a suitable tool to lift the brush inserts (23) out of the floor nozzle (24).
- Place the rubber lips (22) in the floor nozzle (24).
Note: The textured side of the rubber lips must be facing outwards.
Inserting the wet filter (wet vacuuming) (see figures E1–E2)
To make disposal easier when vacuuming water-solid mixtures, the vacuum cleaner has a wet filter (20) that separates the liquid from the solids.
- Open the catches (8) and remove the top part of the vacuum cleaner (7).
- Turn the filter holder (29) as far as possible in the direction of rotation and take the filter holder, together with the main filter (19), out of the top part of the vacuum cleaner (7).
- Place the wet filter (20) over the filter basket (30).
- Put the top part of the vacuum cleaner (7) on and close the catches (8).
Operation
▶ Pull the plug out of the socket before cleaning or performing maintenance on the vacuum cleaner, making tool adjustments, changing accessories or putting away the vacuum cleaner. This safety measure prevents the vacuum cleaner from being started accidentally.
When operating the dust extractor, ensure that the lockable castors on the dust extractor are blocked to prevent the dust extractor from rolling away unintentionally. Test the correct functioning of the castors on the relevant surface before operation.
12 | English
Start-up
▶ Pay attention to the mains voltage. The voltage of the power source must correspond with the data on the type plate of the vacuum cleaner.
▶ Make sure you inform yourself about the applicable regulations/laws on how to handle harmful types of dust in your country.
▶ Products that are only sold in AUS and NZ: Use a residual current device (RCD) with a nominal residual current of 30 mA or less.
The dust extractor must categorically not be used in potentially explosive areas.
To ensure optimum suction power, you must always fully unwind the vacuum hose (16) from the top part of the dust extractor (7).
Dry vacuuming
Note: When carrying out dry extraction, ensure that the main filter (19) is inserted into the dust extractor.
Vacuuming up dust deposits (GAS 15)
- To switch on the vacuum cleaner, set the on/off switch (4) to the "on" symbol.

- To switch off the vacuum cleaner, set the on/off switch (4) to the "off" symbol.

Extracting dust deposits (GAS 15 PS)
- To switch on the dust extractor, set the mode selector switch (4) to the "extraction" symbol.

- To switch off the dust extractor, set the mode selector switch (4) to the "switch off" symbol.

Extracting dust that accumulates from working power tools (GAS 15 PS) (see figure F)
There must be a sufficient air exchange rate (L) in the room when the exhaust air comes back into the room. Be aware of the corresponding national regulations.
The dust extractor has an electric socket with a protective earth contact (3), which can be used to connect an external power tool. Observe the maximum permitted load of the connected power tool.
- Fit the dust extraction adapter (14).
- Insert the dust extraction adapter (14) into the extraction outlet of the power tool.
Note: When working with power tools that have a low air feed into the vacuum hose (e.g. jigsaws, sanders, etc.), the false air intake (31) of the dust extraction adapter (14) must be opened. This will ensure that the semi-automatic filter cleaning function works correctly.
To do this, turn the ring above the false air intake (31) until the opening is at its maximum size.
- To activate the automatic start/stop function of the dust extractor, set the

mode selector switch (4) to the "automatic start/stop" symbol.
- To start the dust extractor, switch on the power tool connected to the plug socket (3). The dust extractor will start automatically.
- To stop dust extraction, switch the power tool off. The automatic start/stop run-on function will run for up to 6 seconds longer in order to extract the remaining dust from the vacuum hose.
- To switch off the dust extractor, set the mode selector switch (4) to the "switch off" symbol.
Wet vacuuming
▶ Do not use the vacuum cleaner to vacuum combustible or explosive liquids, such as petrol, oil, alcohol or solvents. Do not vacuum hot, burning or explosive dust. Do not operate the vacuum cleaner in areas subject to explosion hazards. Dust, vapours and liquids can ignite or explode.
The vacuum cleaner must not be used as a water pump. The vacuum cleaner is designed for vacuuming air and vacuuming water mixtures.
Note: When wet vacuuming, ensure that the main filter (19) is removed from the vacuum cleaner.
Steps to Take before Wet Vacuuming
- Open the catches (8) and remove the top part of the vacuum cleaner (7).
- Turn the filter holder (29) as far as possible in the direction of rotation and take the filter holder, together with the main filter (19), out of the top part of the vacuum cleaner (7).
- Remove the plastic bag (18) or dust bag if necessary.
- Put the top part of the vacuum cleaner (7) on and close the catches (8).
- Place the rubber lip (22) in the floor nozzle (24).
Vacuuming up liquids
- Switch the dust extractor on (GAS 15: On/off switch (4) to "on"; GAS 15 PS: Mode selector switch (4) to the "extraction" symbol).
The dust extractor is equipped with a float. Extraction is stopped when the maximum filling level is reached.
- Set the on/off switch (4) to "off" (GAS 15) or set the mode selector switch (4) to the "switch off" symbol (GAS 15 PS).
- Empty the container (1).
To prevent mould growth after wet extraction:
- Remove the top part of the dust extractor (7) and leave it to dry thoroughly.
- Remove the wet filter (20) and also leave this to dry thoroughly.
Semi-automatic filter cleaning (see figure G)
The filter cleaning function should be used regularly, and at the very latest when the suction power is no longer sufficient.
How often filter cleaning needs to be carried out will depend on the type and quantity of dust that has been vacuumed. With regular use, the maximum conveying capacity will be maintained for longer.
During semi-automatic filter cleaning (SFC), the air flow is reversed to clean deposited dust from the flaps of the filter. A pleated filter with surface dirt is still fully functional. It is not necessary to clean the flat-pleated filter manually by shaking or blowing it out; this may even damage the filter.
Triggering the SFC Filter Cleaning
- Use the palm of your hand to close the nozzle or vacuum hose opening.
- Press the SFC switch (6) three times.
Maintenance and Service
Maintenance and Cleaning
▶ Pull the plug out of the socket before cleaning or performing maintenance on the vacuum cleaner, making tool adjustments, changing accessories or putting away the vacuum cleaner. This safety measure prevents the vacuum cleaner from being started accidentally.
▶ To ensure safe and efficient operation, always keep the dust extractor and the ventilation slots clean.
▶ Wear a dust mask when servicing and cleaning the vacuum cleaner.
In order to avoid safety hazards, if the power supply cord needs to be replaced, this must be done by Bosch or by an after-sales service centre that is authorised to repair Bosch power tools.
Cleaning the Filters
Regularly emptying the dust container and cleaning the filters will ensure optimum suction power. If suction power is not achieved after that, the vacuum cleaner is to be brought to the after-sales service.
Removing/changing the filter (see figures H1-H2)
Replace the damaged pleated filter immediately.
- Turn the filter holder (29) as far as possible in the direction of rotation and take the filter holder, together with the main filter (19), out of the top part of the vacuum cleaner (7).
- Take the dirty/damaged main filter (19) out of the filter holder (29).
- Brush the folds of the main filter (19) with a soft brush. or Replace the main filter (19) if damaged.
- Place the filter holder (29) on the cleaned/new main filter (19).
- Place the filter holder (29), together with the main filter (19), over the filter basket (30) and turn the filter holder (29) as far as possible in the direction of rotation
- Put the top part of the vacuum cleaner (7) on and close the catches (8).
- Open the catches (8) and remove the top part of the vacuum cleaner (7).
Cleaning the container
- Wipe the container (1) from time to time using a non-abrasive off-the-shelf cleaning product and leave it to dry.
Storage and transport (see figure I)
- Wrap the power cable around the carrying handle (5).
- Place the suction tubes (25) in the holders (11).
- Place the vacuum hose (16) around the top part of the vacuum cleaner and hang the retaining strap (15) on the holder (10).
- Carry the vacuum cleaner by the carrying handle (5).
- Store the dust extractor in a dry room and secure it so that it cannot be used by unauthorised persons.
- Put the castor brake (13) down to hold the castors (9) in place.
Rectifying faults
▶ If a fault (e.g. a filter damage) occurs, the vacuum cleaner must be switched off immediately. The fault must be repaired before resuming operation.
Problem Corrective measure
Suction turbine will not switch on. - Check the mains cable, mains plug, fuse and socket.
| GAS 15 PS:The mode selector switch (4) is set to "automatic start/stop".- Set the mode selector switch (4) to the "extraction" symbol or switch on the power tool plugged into the plug socket (3). | |
| The suction turbine will not switch on again after the container has been emptied. | - Switch the dust extractor off and wait 5 seconds before switching it back on. |
| The suction power is decreasing. | - Empty the container (1). |
14 | Français
Problem Corrective measure
| - Remove any blockages from the vacuum nozzle, suction tube (25), vacuum hose (16) or filter (19). | |
| - Change the plastic bag (18) or dust bag. | |
| - Make sure the filter holder (29) is engaged correctly. | |
| - Place the top part of the dust extractor (7) on correctly and close the catches (8). | |
| - Change the main filter (19). | |
| Dust is escaping during extraction | - Check that the main filter (19) has been fitted correctly. |
| - Change the main filter (19). | |
| Automatic switch-off (wet extraction) is not working. | Automatic switch-off will not work in the presence of non-conductive liquids or foaming. |
| - Check the fill level regularly. | |
| The filter cleaning function is not working. | - Press the SFC switch (6). |
After-Sales Service and Application Service
Our after-sales service responds to your questions concerning maintenance and repair of your product as well as spare parts. You can find explosion drawings and information on spare parts at: www.bosch-pt.com
The Bosch product use advice team will be happy to help you with any questions about our products and their accessories.
In all correspondence and spare parts orders, please always include the 10-digit article number given on the nameplate of the product.
Malaysia
Robert Bosch Sdn. Bhd.(220975-V) PT/SMY
No. 8A, Jalan 13/6
46200 Petaling Jaya
Selangor
Tel.: (03) 79663194
Toll-Free: 1800 880188
Fax: (03) 79583838
E-Mail: kiathoe.chong@my.bosch.com
www.bosch-pt.com.my
You can find further service addresses at:
www.bosch-pt.com/serviceaddresses
Disposal
The vacuum cleaner, its accessories and packaging should be recycled in an environmentally friendly manner.

Do not dispose of the vacuum cleaner along with household waste.
Français
text_image
Two prohibition signs with pictograms, one without a hook and the other with a broken tool, set against a striped background.
Robert Bosch Morocco SARL
53, Rue Lieutenant Mahroud Mohamed
20300 Casablanca
Tel.: +212 5 29 31 43 27
E-Mail : sav.outillage@ma.bosch.com
www.bosch-pt.com/serviceaddresses
text_image
Two safety symbols: no hook and without a bug, both enclosed in a rectangular border with diagonal stripes.
www.bosch-pt.com/serviceaddresses
Eliminação
text_image
Two safety symbols with pictograms, one without a hook and the other with a broken hand gesture, both enclosed in a rectangular border.
www.bosch-pt.com/serviceaddresses
处理废弃物
text_image
Two safety symbols: no hook and no pictogram, both marked with a diagonal stripe background.
flowchart
graph LR
    A["1+"] --> B["0"]
    B --> C["1点"]
自動開始/停止運轉
www.bosch-pt.com/serviceaddresses
廢棄物處理
text_image
Two pictograms of a hook and a broken hook symbol, both marked with no accompanying text.
www.bosch-pt.com/serviceaddresses
การกำจัดขยะ
text_image
Two circular symbols with pictograms and Chinese characters, one marked with a hook and the other with a broken hook and debris.
Palma Tower 10th Floor
Jalan RA Kartini II-S Kaveling 6
Pondok Pinang, Kebayoran Lama
www.bosch-pt.com/serviceaddresses
Cara membuang
text_image
Two safety warning symbols: no hook and pictogram, both without text.
www.bosch-pt.com/serviceaddresses
Sự thải bổ
text_image
Two circular symbols with pictograms and Chinese text, one marked with a hook and the other with a broken tool, set against a striped background.Robert Bosch Morocco SARL
- شارع الملازم محمد م representatives
20300 الدار البيضاء
www.bosch-pt.com/serviceaddresses
text_image
Two circular symbols with pictograms and Chinese text, one marked with a hook and the other with a broken figure.www.bosch-pt.com/serviceaddresses
natural_image
Illustration of a flexible hose with dashed curved lines indicating internal structure (no text or symbols)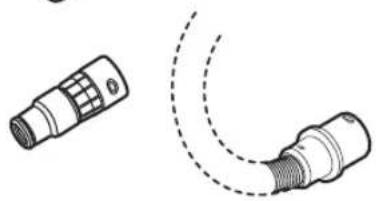
natural_image
Technical line drawing of two connectors with a dashed curved line indicating connection (no text or symbols)


5 m 35 mm - 2 608 000 565
5 m 35 mm • 2 608 000 566
5 m 22 mm - 2 608 000 567
5 m 22 mm • 2 608 000 568
3 m 35 mm - 2 608 000 569
3 m 35 mm • 2 608 000 570
3 m 22 mm - 2 608 000 571
3 m 22 mm • 2 608 000 572