KAMFWASH80A - Washing machine Kogan - Free user manual and instructions
Find the device manual for free KAMFWASH80A Kogan in PDF.

User questions about KAMFWASH80A Kogan
0 question about this device. Answer the ones you know or ask your own.
Ask a new question about this device
Download the instructions for your Washing machine in PDF format for free! Find your manual KAMFWASH80A - Kogan and take your electronic device back in hand. On this page are published all the documents necessary for the use of your device. KAMFWASH80A by Kogan.
USER MANUAL KAMFWASH80A Kogan
natural_image
Front view of a white Kogan washing machine with a black circular vent and digital display (no visible text or symbols on the device body)8KG FRONT LOAD BLDC INVERTER WASHING MACHINE
KAMFWASH80A
Safety & Warnings 3
Components 7
Overview 8
Installation 9
Operation 18
Cleaning & Care 29
Specifications 34
Troubleshooting 35
Notes 37
SAFETY & WARNINGS
For your safety, the information in this user guide must be followed to minimise the risk of fire or explosion, electric shock or to prevent property damage, personal injury, or loss of life.
WARNING:
- If the power cord is damaged, cease use immediately and contact help.Kogan.com for support. Do not attempt to repair the power cord yourself.
- If the washing machine is damaged, cease use immediately and contact help.Kogan.com for support.
Risk of Electric Shock
- This washing machine can be used by children aged from 8 years and above and persons with reduced physical, sensory or mental capabilities or lack of experience and knowledge if they have been given supervision or instruction concerning use of the appliance in a safe way and understand the hazards involved.
- Cleaning and user maintenance must not be made by children without supervision.
- Children should be supervised to ensure that they do not play with the washing machine.
- Children 3 years and under must be kept away from the appliance or continuously supervised.
- Caution: To prevent any potential hazards, ensure that neither animals nor children can access the washing machine. Prior to each use, inspect the drum carefully.
- Do not climb on or sit on the washing machine.
Location and Surroundings
- All washing and additional substances are to be kept in a safe place out of the reach of children.
- Do not install the machine on a carpet floor. The obstruction of the openings by the carpet can damage the machine.
- Keep the washing machine clear of sources of heat and direct sunlight to avoid corrosion of plastic and rubber components.
-
Do not use the machine in humid environments or rooms containing explosive or caustic gas.
-
In the instance of water leakage or water splashes, let the machine dry in the open air.
- The washing machine must not be installed behind a lockable door, a sliding door or a door with a hinge on the opposite side to that of the washer.
- Do not operate the machine in rooms with a temperature of below 5^ C as this can damage the machine. If it is unavoidable, make sure to drain the water completely from the appliance after every use to avoid damage caused by frost.
- Never use flammable sprays or substances in the immediate proximity of the washing machine.
Installation
- Remove all packaging material and transport bolts before using the washing machine to prevent serious damage to the machine.
- This appliance is equipped with a single inlet valve and can be connected to the cold-water supply only.
- The power plug must be accessible after installation.
- Before washing clothes for the first time, the machine must be operated once without any clothes inside.
- Do not place any excessively heavy objects on top of the appliance, like water containers or heating devices.
- Only use the water supply hose provided with this machine. Old hoses should not be reused.
• Max. inlet water pressure 1 MPa. - Min. inlet water pressure 0.05 MPa.
Water Connection
- Check the connections of the water supply hose, the tap, and the drain hose for possible problems due to changes of water pressure. If the connections loosen or leak, close the tap and get them repaired.
- The door may be very hot during operation.
- Keep children and pets far away from the washing machine during operation.
- Do not remove the drain pump filter while there is still water in the machine. Large quantities of water can leak out.
Electrical Connection
- Ensure the power cable is not trapped by the machine.
- The power plug must be inserted into an earthed three-prong electrical outlet. Check carefully and make sure that your outlet is properly and reliably earthed.
- If you are unsure or have questions about installing this washing machine, contact a qualified trade professional.
WARNING:
- Do not use multiple plugs or extension cords.
- The washing machine must not be connected to an external switching device such as a timer or a circuit that is regularly switched on and off.
- Do not remove the plug from the electrical outlet if there is flammable gas nearby.
- Never touch the power plug with wet hands.
• Always pull at the plug, not at the cord. - Always unplug the washing machine and turn off the water supply when the washing machine will not be used for a long time.
Operation and Maintenance
- Never use any flammable, explosive or toxic solvents. Do not use gasoline and alcohol etc. as detergents. Only select detergents that are suitable for machine washing.
- Make sure that all pockets are emptied. Sharp and rigid items such as coins, brooches, nails, screws, stones etc. may cause serious damages to this machine.
- Remove all objects from pockets such as lighters and matches.
- Thoroughly rinse items that have been washed by hand.
- Items that have been soiled with substances such as cooking oil, acetone, alcohol, petrol, kerosene, spot removers, turpentine, wax, and wax removers should be washed in hot water with an extra amount of detergent before being cleaned in the machine.
- Items containing foam rubber (latex foam), shower caps, waterproof textiles, rubber backed articles and clothes or pillows fitted with foam rubber pads should not be washed in the machine.
- Fabric softeners or similar products should be used as recommended in their instructions.
-
Never try to open the door forcefully. The door will unlock shortly after the end of a cycle.
-
Do not close the door with excessive force. If it is difficult to close the door, check if the clothes are properly inserted and distributed.
- Always unplug the power cord and close the water tap before performing cleaning and maintenance.
- Never pour water over the appliance for cleaning purposes as this creates a risk of electric shock.
Transport
- Before transport:
- Transit bolts shall be reinstalled to the machine by a qualified trade professional.
o Accumulated water shall be drained out of the machine.
- This washing machine is heavy. Transport with care. Never hold any protruding parts of the machine when lifting. The machine door cannot be used as a handle.
Intended Use
- The washing machine is intended only for home use and for textiles in household amounts suitable for machine washing.
- This washing machine is for indoor use only and is not intended to be built in.
- This washing machine is not intended for commercial use.
- This appliance is intended to be used in household and similar applications such as:
- Staff kitchen areas in shops, offices and other working environments.
o Farmhouses. - By clients in hotels, motels and other residential type environments.
- Bed and breakfast type environments.
o Areas for communal use in blocks of flats or in launderettes.
Disposal

This marking indicates that this appliance should not be disposed with other household wastes. To prevent possible harm to the environment or human health from uncontrolled waste disposal, recycle it responsibly to promote the sustainable reuse of material resources.
COMPONENTS
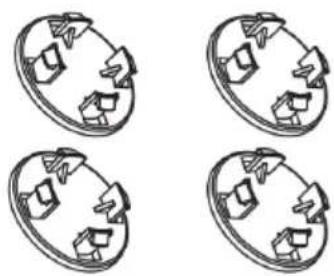
Hole Cover (x4)

Water Supply Hose

natural_image
Isometric line drawing of a mechanical component with two cylindrical parts and internal features (no text or symbols)Levelling Tool Kit
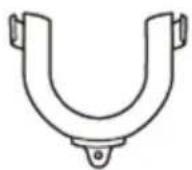
U-Shape Drain Hose Bracket
text_image
8KG FRONT LOAD BLOOD BROSTER WASHING MACHINEUser Guide

Acoustic Sponge
OVERVIEW
text_image
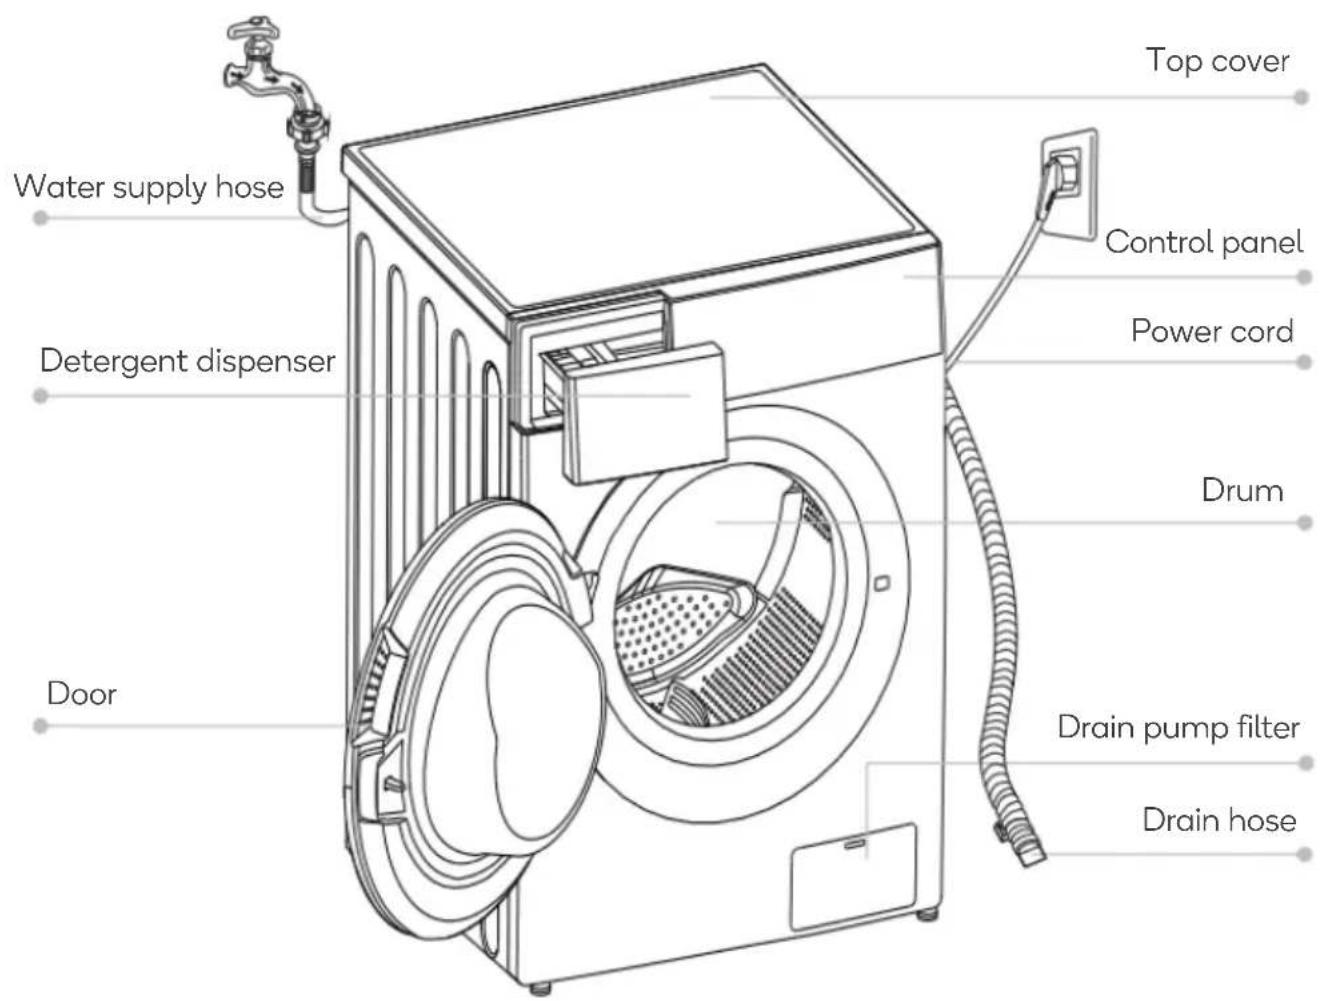
Water supply hose Detergent dispenser Door Top cover Control panel Power cord Drum Drain pump filter Drain hoseNote:
This image is for illustrative purposes only. Refer to the product as standard.
INSTALLATION
Placement
WARNING:
- Stability is important to prevent the washing machine from moving.
- Ensure the washing machine is not standing on the power cord.
- The washing machine must be installed in a location with the following characteristics:
o A steady, dry and level surface.
- Avoids direct sunlight.
o Sufficient ventilation.
o Room temperature above 0°C.
- Away from sources of heat.

natural_image
Simple line drawing of a washing machine with a crossed X mark on its side (no text or symbols)- Ensure there is 20mm of space on the back and sides of the washing machine.
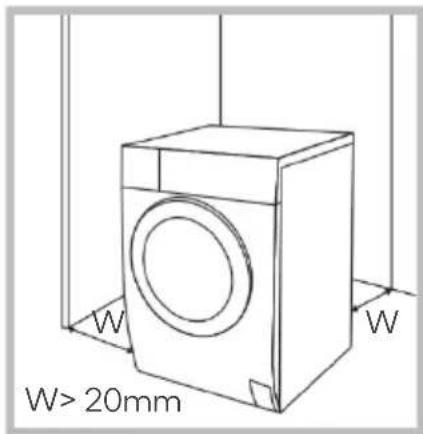
text_image
W W> 20mmWARNING:
- Packaging materials (e.g. film, Styrofoam) can be dangerous for children.
-
Keep all packaging away from children to avoid the risk of suffocation.
-
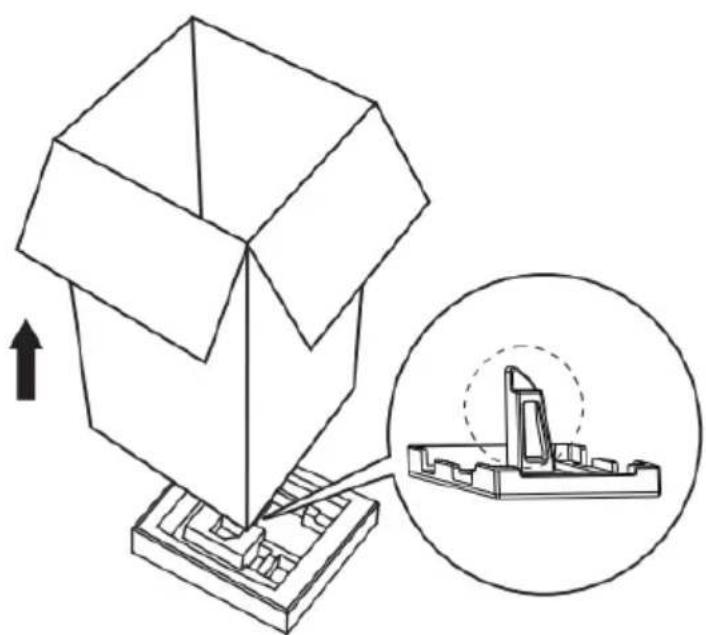
Remove the cardboard box and Styrofoam packaging.
- Lift the washing machine and remove the base packaging. Ensure the small foam triangle is removed with the base packaging. You may need to lay the washing machine on its side and remove the foam manually.
- Remove the tape securing the power cord and drain hose.
- Remove the water supply hose from the drum.
natural_image
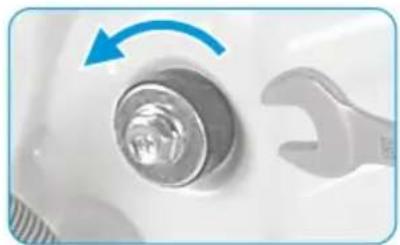
Technical line drawing of a mechanical assembly with an inset showing a 3D model (no text or symbols present)WARNING:
- The transport bolts must be removed before using the washing machine.
-
Keep the transit bolts in a safe place, as they will be required to move the washing machine in the future.
-
Loosen the 4 transport bolts with a spanner.
-
Remove the bolts, including the rubber, and keep them for future use.
-
Close the holes using the cover caps.
natural_image
Close-up of a car wheel with a wrench and blue arrow indicating rotation (no text or symbols)
natural_image
Close-up of a mechanical component with a blue arrow pointing to a small metallic part (no visible text or symbols)
natural_image
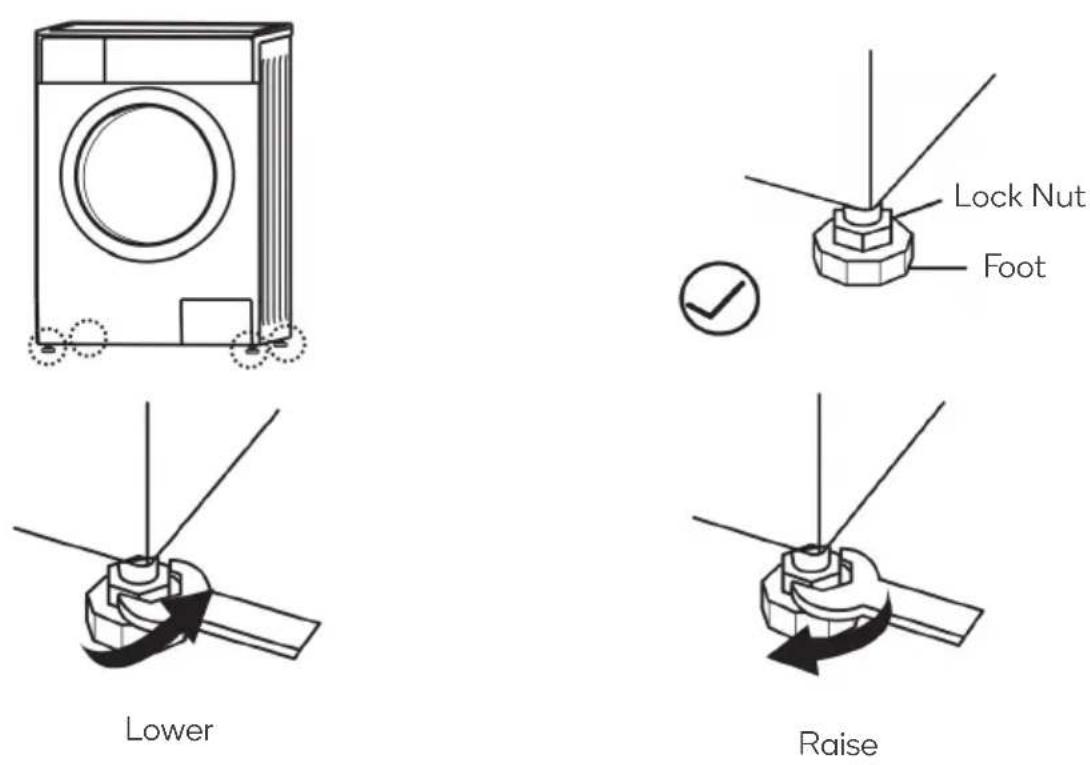
Close-up of a circular object with a blue arrow pointing to it, no visible text or symbolsWARNING:
The lock nuts on all four feet must be screwed tightly against the housing.
- Check if the feet are in the factory position. The lock nuts should be tightly fastened to the machine body and the feet should be locked tightly on the lock nuts.
- If a foot is not in the factory position, use the levelling tool kit to loosen the lock nut to lower the foot until it meets the floor or tighten the lock nut to raise the foot.
- Adjust the height of the feet so they are all touching the floor and the machine is steady and not shaking.
Connect the Water Supply Hose
WARNING:
Do not kink, crush, modify or sever the water supply hose.
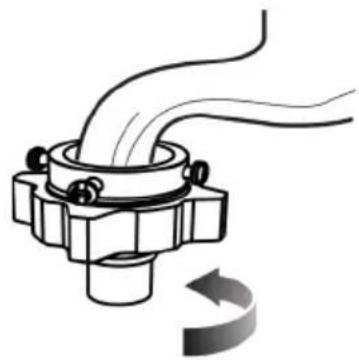
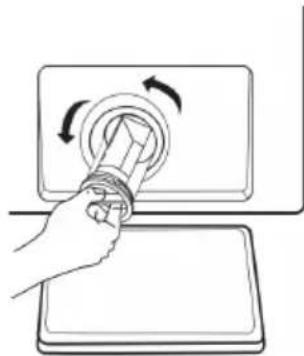
Screw tap:
Tighten the hose onto the tap but rotating the lock ring anticlockwise.

natural_image
Diagram showing the change in faucet handle and valve position before and after (no text or symbols)Tap adapter:
- Loosen the clamp nut and 4 screws.

text_image
5mm Clamp Nut-
Press the slide bushing down and attach the hose to the tap adapter.
-
Place the clamp nut over the tap. Tighten the clamp and the screws.
natural_image
Mechanical diagram showing a rotating mechanical component with curved arrows indicating rotation (no text or symbols)- Connection is complete.

text_image
Slide Bushing
natural_image
Diagram of a mechanical valve assembly with a curved pipe and directional arrow (no text or labels)Quick connect tap:
Press the slide bushing down and attach the hose to the tap.

text_image
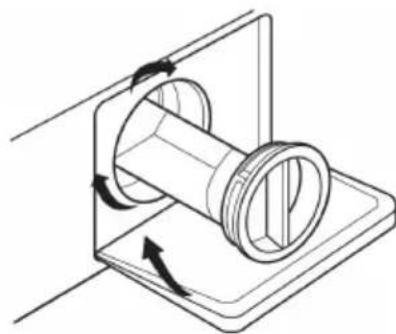
Slide BushingConnect the water supply hose to the washing machine:
Connect the other end of the water supply hose to the inlet valve at the rear of the washing machine and fasten it tightly clockwise.
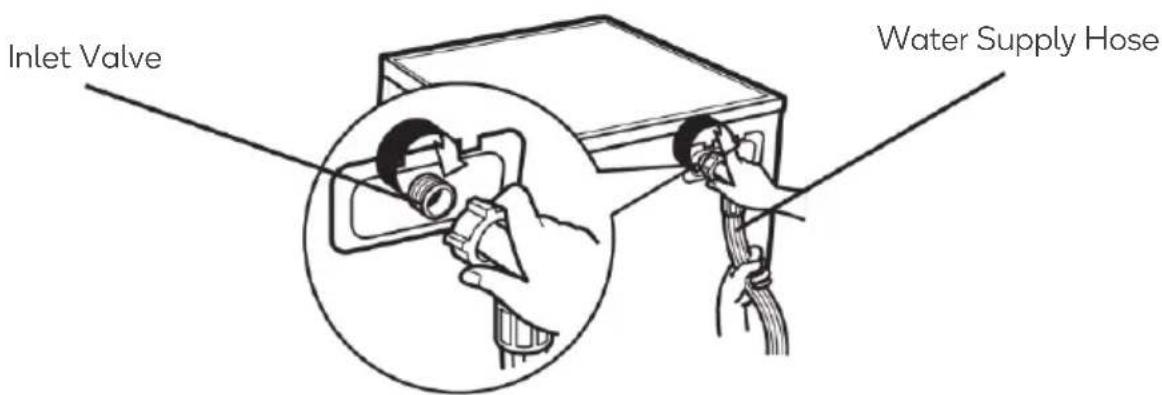
text_image
Inlet Valve Water Supply HoseDrain Hose
WARNING:
- Do not kink the drain hose.
- Position drain hose according to the instructions below to prevent water leakage.
There are three ways to use the drain hose:
- Place the drain hose directly into a floor drain.

text_image
Floor Drain- Place the drain hose into the laundry sink.
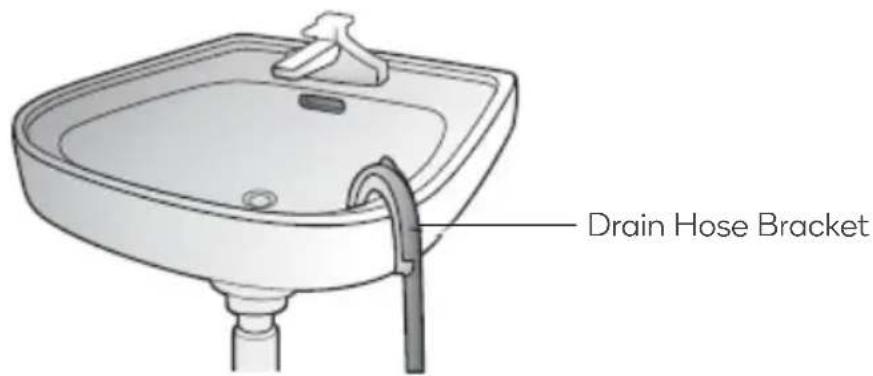
text_image
Drain Hose Bracket- Connect the drain hose to the drainpipe of the laundry sink.

text_image
Max.100cm Min.60cmAcoustic Sponge
Install the acoustic sponge to reduce noise and vibration caused by the washing machine.
-
Place a blanket on the floor and gently lay the washing machine on top.
-
Stick the 2 longer sponges to the front and rear edges of the machine and the 2 short sponges to the side edges.

text_image
x2 x2OPERATION
- Ensure the machine is installed properly before use.
- Run a complete cycle without clothes before washing clothes for the first time.
Sort Clothes
Read the following recommendations carefully to avoid common issues with washing machines. Failure to follow these instructions may result in damage to your clothing and machine.
- Do not fill clothes over the rated capacity.
- Sort the laundry by care label. Most garments have a textile care label in the collar or side seam.
- Make sure all pockets are empty. Foreign objects (such as nails, coins, paper clips, etc.) can cause damage to garments and components in the machine.
- Close any zips, fasteners, hooks, etc. before washing.
- Clothes should be sorted by colour. Dark clothes should not be washed with light clothes especially.
-
Badly soiled areas, stains etc. should be pre-treated with liquid detergent, stain removers etc.
-
Turn woollen clothes and other clothes which pill easily inside out before putting them into the machine.

text_image
Illustration showing garment turnover process with labeled parts and clothing itemsNotes:
- The working condition of the machine should be 0-40°C. If used under 0°C, the water supply valve and draining system may be damaged. If the machine is placed under condition of 0°C or less, then it should be transferred to normal ambient temperature to ensure the water supply hose and drain hose are not frozen before use.
- Do not wash, spin or dry water-proof seats, mats or clothing.
- Use non-foaming or less-foaming detergent suitable for machine washing.
- Ensure that no clothes are caught in the door seal.
Before Washing
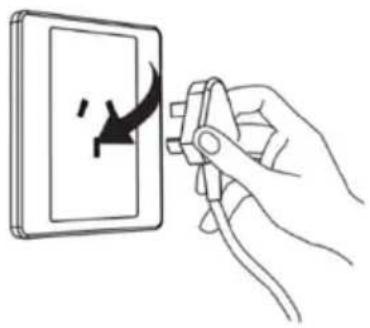
-
Plug the power plug into the electrical outlet.
-
Open the tap.
-
Load the washing machine.
natural_image
Hand using pliers to clean or adjust a wall-mounted panel (no text or symbols visible)- Close the door.

natural_image
Line drawing of a faucet with a handle and valve (no text or symbols)
natural_image
Diagram showing a mechanical or biological process with concentric circles and an arrow indicating rotation (no text or symbols)- Add detergent.

natural_image
Hand pressing down on a circular mechanical component with an arrow indicating rotation (no text or symbols)
text_image
Technical diagram of a mechanical component with labeled parts and symbolsWashing
-
Select a cycle.
-
Optional: Select additional functions.
-
Press Start/Pause to start the cycle.
natural_image
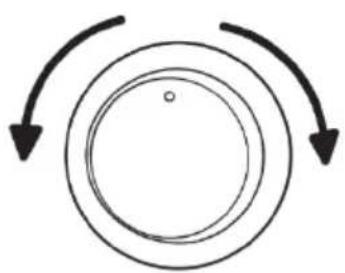
Simple diagram showing two concentric circles with curved arrows indicating rotation or direction (no text or symbols)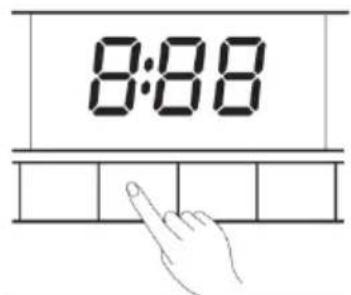
text_image
8:00
natural_image
Hand pointing at a button with a play symbol and double vertical line (no text or numbers)After Washing
The buzzer will beep, and 'End' will illuminate on the display.
Detergent Drawer
text_image
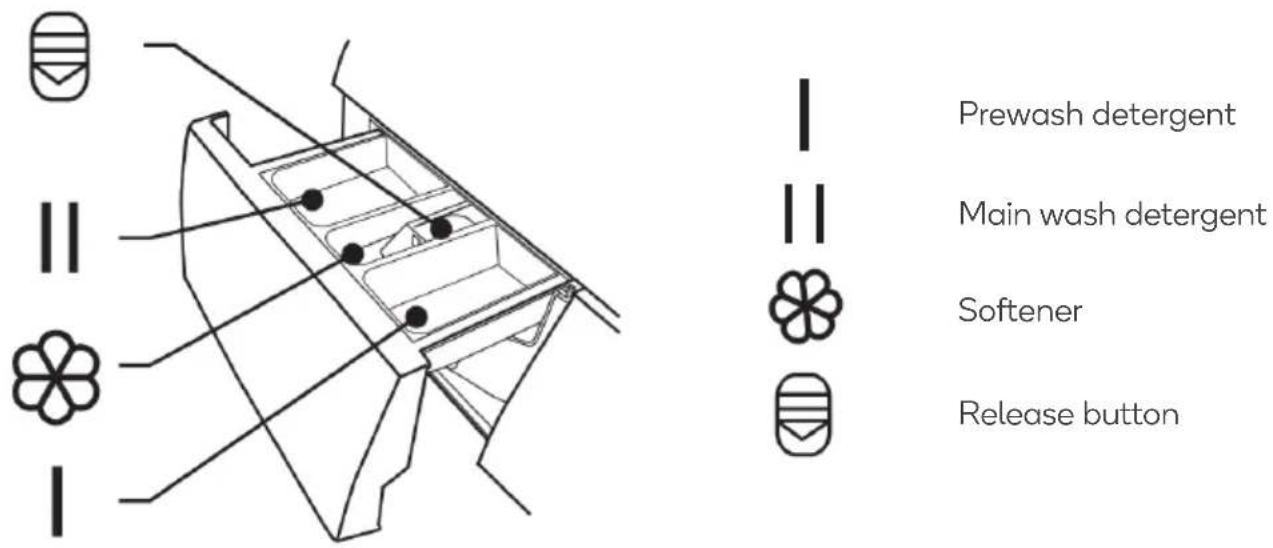
Prewash detergent Main wash detergent Softener Release buttonNote:
Prewash detergent is only required when the Prewash cycle is selected. It is not required when running a main wash.
Add detergent:
- Pull out the detergent drawer.
- Add prewash detergent into compartment 'I'. This is only necessary for prewash cycles. Both liquid and powder detergents can be used.
- Add detergent for the main wash into compartment 'II'. Both liquid and powder detergents can be used.
- If using fabric softener, add this into the ‘ ’’mpartment.
| Cycle | I | II | ♣ |
| Cotton | ○ | ● | ○ |
| Synthetic | ○ | ● | ○ |
| Mix | ○ | ● | ○ |
| Jeans | ○ | ● | ○ |
| Spin Only | |||
| Rinse & Spin | ○ | ||
| ECO Wash | ● | ○ | |
| 20°C | ● | ○ | |
| Bulky | ○ | ● | ○ |
| Baby Care | ○ | ● | ○ |
| Wool | ● | ○ | |
| Sport Wear | ○ | ● | ○ |
| Rapid 45' | ● | ○ | |
| Quick 15' | ● | ○ | |
| Steam Wash | ○ | ● | ○ |
Notes:
- Add water to the detergent compartment to dilute thick fabric softener or bleach to prevent overflowing and blockages forming.
- Choose suitable type of detergent for the various washing temperatures to get the best washing effect with less water and energy consumption.
- If there is any break in the power supply while the machine is operating, the cycle will resume when power is restored.
Control Panel
text_image
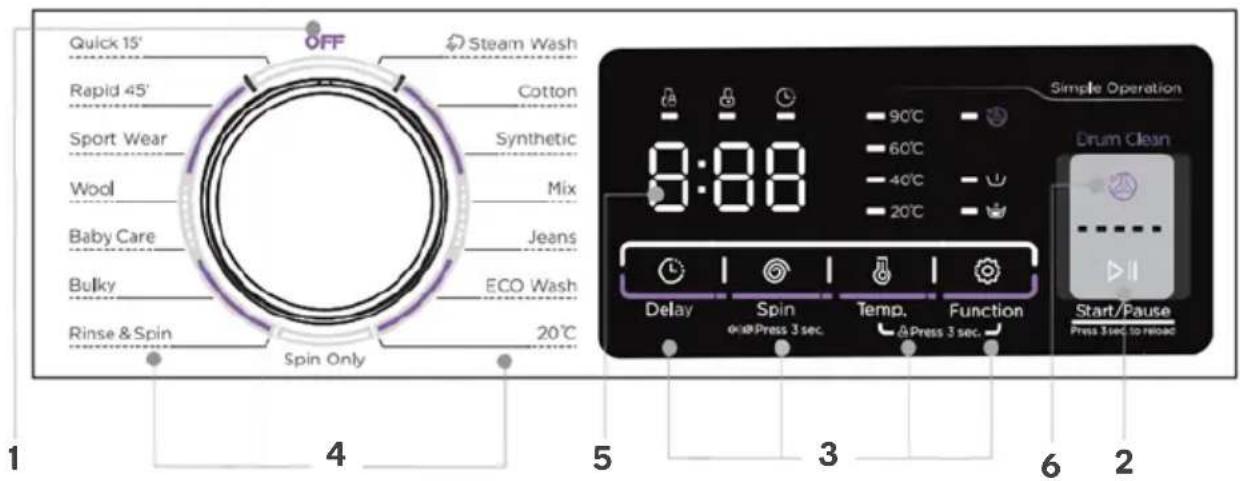
Quick 15' Rapid 45' Sport Wear Wool Baby Care Bulky Rinse & Spin OFF Steam Wash Cotton Synthetic Mix Jeans ECO Wash Spin Only 20℃ Simple Operation Drum Clean Delay Spin on@Press 3 sec. Temp. △Press 3 sec. Function Start/Pause Press 3 sec. to reload| 1 On/Off | Turn the dial to the desired cycle to turn the washing machine on.Turn the dial to ‘OFF’ to turn the washing machine off. | |
| 2 | Start/Pause | Press to start/pause the cycle. |
| 3 Options | Select additional functions. The option will illuminate when selected. | |
| 4 | Cycle | Turn the dial to select a cycle according to your item type. |
| 5 Display | The display shows current cycle information and estimated time remaining, or an information code when a problem occurs. | |
| 6 Drum Clean | Press to clean the drum.Make sure the drum is empty.Do not use any cleaning agents for cleaning the drum. | |
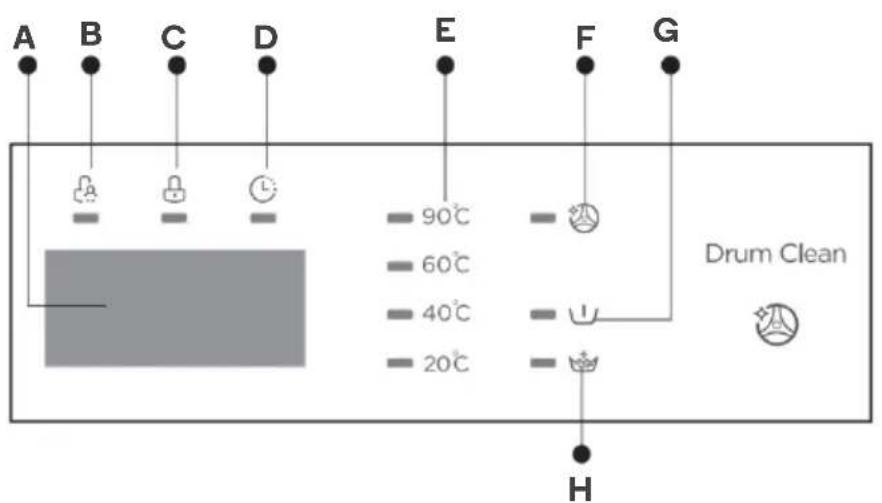
text_image
A B C D E F G 90°C 60°C 40°C 20°C Drum Clean H| A Display |
| B Child Lock |
| C Door Lock |
| D Delay |
| E Temperature |
| F Drum Clean |
| G Pre-Wash |
| H Extra Rinse |
Delay
-
Select a cycle.
-
Press 'Delay' repeatedly to cycle through the available delay options, from 0 to 24 hours, in one-hour increments.
-
Press 'Start/Pause' to commence the delayed operation.

Choose the Cycle


Set a Time


Start
Cancel the Delay
- If the cycle hasn't started yet, press 'Delay' repeatedly until the display illuminates 'OH'.
- If the cycle has started, turn the dial to select a different cycle.

Prewash
- Add a preliminary washing process before starting the main wash.
- Prewash is suitable for removing dust from the clothes.
- Add detergent to the prewash compartment.

Extra Rinse
Undergo an additional rinse.

Drum Clean
- Cleans the drum by removing dirt and bacteria. Make sure the drum is empty. Do not use any cleaning agents for cleaning the drum.
- After 25 cycles, the drum clean indicator will illuminate to remind you to perform a drum clean.
- Press and hold the 'Drum Clean' button for 3 seconds to extinguish the drum clean indicator.
• The drum clean indicator will illuminate again after 25 more cycles.
• The counted cycles will be recounted when the drum clean cycle is finished.
Child Lock
- The child lock deactivates the function of all buttons. - Press and hold the 'Temp' and 'Function' buttons simultaneously for 3 seconds until the buzzer beeps to turn the child lock on/off.
- When the child lock is on:
o The child lock indicator will illuminate.
- 'CL' and the remaining time will illuminate on the display.
- If a button is pressed while the child lock is on, the child lock indicator will flash for 3 seconds.
- When the cycle ends, 'CL' and 'END' will alternate on the display.

flowchart
graph TD
    A["Temp"] --> C["Output Symbol"]
    B["Function"] --> C["Output Symbol"]
Mute the Buzzer
Press the 'Spin' button for 3 seconds to mute/unmute the buzzer.
When the drum is still rolling, there is a large amount of water, or the temperature inside the drum is high, the door cannot be opened.
- Press and hold the 'Start/Pause' button for 3 seconds.
- The drum will stop rolling and the door will unlock.
- Open the door, reload the clothes and close the door again.
- Press 'Start/Pause' to resume the cycle.

Press 'Start/Pause' for 3 seconds.


Reload the clothes.


Press 'Start/Pause' to resume.
Note:
Prewash detergent is only required when the Prewash cycle is selected. It is not required when running a main wash.

Temp
Press the 'Temp' button to adjust the temperature (Cold, 20°C, 40°C, 60°C, 90°C).

Spin Speed
Press the 'Spin' button to adjust the speed (0-400-600-800-1000-1200-1400).
| Cycle | Default Speed (rpm) | Cycle | Default Speed (rpm) |
| Steam Wash | 1000 | Rinse & Spin | 1000 |
| Cotton | 1000 | Bulky | 1000 |
| Synthetic | 1000 | Baby Care | 1000 |
| Mix | 1000 | Wool | 600 |
| Jeans | 800 | Sport Wear | 800 |
| ECO Wash | 1000 | Rapid 45' | 800 |
| 20°C | 1000 | Quick 15' | 800 |
| Spin Only | 1000 | Drum Clean | - |
Cycles
| Cycle Description | |
| Cotton | Hard-wearing and heat-resistant textiles made of cotton or linen. |
| Synthetic | Wash synthetic clothing, such as shirts, coats, blended fabrics.Reduce the detergent quantity when washing knitted textiles. |
| Baby Care Wash baby clothes with improved rinse performance. | |
| Rapid 45' | Washing few and not very dirty clothes quickly. |
| Mix | Mixed load consisting of textiles made of cotton and synthetics. |
| Jeans Wash denim. | |
| 20°C | Wash bright coloured clothes on this cycle to protect the colours. |
| Quick 15' | Extra short cycle suitable for only a few items or lightly soiled clothing. |
| Wool | Hand or machine-washable wool or wool rich textiles.A gentle wash cycle to prevent shrinkage and longer cycle pauses so the clothes sit in the washing fluid. |
| Spin Only Extra spin with selectable spin speed. | |
| Rinse & Spin Extra rinse with spin. | |
| Sport Wear Wash activewear. | |
| Bulky Wash bulky items. | |
| Steam Wash | Effectively eliminate bacteria and germs, prevent odours, and protect health. |
| ECO Wash | A standard washing cycles suitable for efficiently cleaning normally soiled cotton laundry. |
| Drum Clean | Clean and sterilise the drum and tube at 90°C.Do not add washing to the drum during cleaning.Add chlorine bleach for a better cleaning effect. |
Washing Cycles
| Cycle Load (kg) | Default Temp (°C) | Default Time | |
| Steam Wash 4.0 40 1:26 | |||
| Cotton 8.0 40 1:28 | |||
| Synthetic 4.0 40 1:25 | |||
| Mix 8.0 40 0:58 | |||
| Jeans 8.0 40 1:40 | |||
| ECO Wash | 8.0 | 20 | 0:59 |
| ECO Wash* | 8.0 | 60 | 6:32 |
| 20°C 4.0 20 1:01 | |||
| Spin Only 8.0 - 0:12 | |||
| Rinse & Spin | 8.0 | - | 0:20 |
| Bulky | 8.0 40 1:48 | ||
| Baby Care | 8.0 | 60 | 2:01 |
| Wool | 2.0 40 1:07 | ||
| Sport Wear | 4.0 20 0:47 | ||
| Rapid 45' | 2.0 | 20 | 0:45 |
| Quick 15' | 2.0 | Cold | 0:15 |
| Drum Clean | - 90 1:18 | ||
Notes:
- The parameters in this table are a guide only. The actual parameters may be different to the parameters in the above table.
- The actual water temperature may differ from the listed cycle temperature.
• Energy test cycle: ECO Wash*.
o Speed: Highest speed.
o Temperature: 60°C.
- Other settings as default.
○ Half load: 4.0kg.
Additional Functions
| Cycle | Additional Functions | Cycle | Additional Functions |
| Steam Wash |  | Rinse & Spin |  |
| Cotton |  | Bulky |  |
| Synthetic |  | Baby Care |  |
| Mix |  | Wool |  |
| Jeans |  | Sport Wear |  |
| ECO Wash |  | Rapid 45' |  |
| 20°C |  | Quick 15' |  |
| Spin Only | [2277] | Drum Clean | [3Y04] |
WARNING: Close the tap and unplug the power cord before performing cleaning and maintenance.
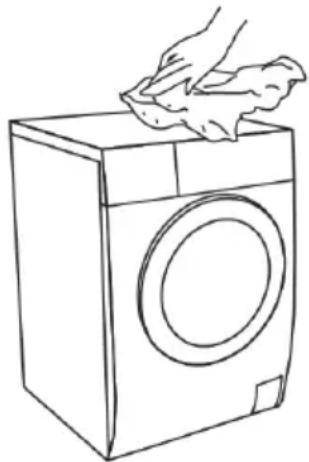
Cleaning the Surface
- Proper maintenance can extend the working life of the washing machine.
- The surface can be cleaned with diluted non-abrasive neutral detergents when necessary.
- If there is any water overflow, use a dry cloth to wipe it off immediately.
- Do not use sharp items to clean the washing machine.
natural_image
Line drawing of a hand cleaning a washing machine with a cloth (no text or symbols)Note:
Do not use solvent or chemical products to clean the surface of the washing machine.
Cleaning The Drum
Rust left inside the drum by metal items should be removed immediately with chlorine-free detergents. Never use steel wool.
Notes:
Do not put laundry in the washing machine during drum cleaning.
Cleaning the Door Seal and Glass
- Wipe the glass and seal after each wash to remove lint and stains. If lint builds up, it can cause leaks.
- Remove coins, buttons, and other objects from the seal after each wash.
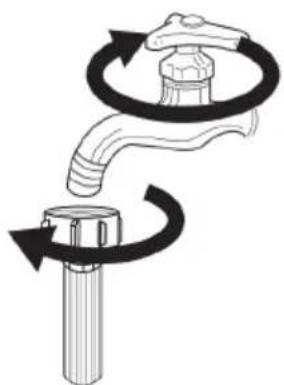
Cleaning the Inlet Filter
The inlet filter must be cleaned if there is insufficient water when the tap is opened.
Washing the filter in the tap:
- Close the tap.
- Remove the water supply hose from the tap.
- Clean the filter.
- Reconnect the water supply hose.
natural_image
Diagram of a faucet with rotating arrows indicating clockwise motion (no text or symbols)
natural_image
Line drawing of a hand holding a connector with a tool inserted (no text or symbols)Washing the filter in the washing machine:
- Screw off the water supply hose.
- Pull out the filter with long nose pliers and reinstall it back after being washed.
- Using a brush, clean the filter.
- Reconnect the water supply hose.

natural_image
Illustration of a hand using a tool to adjust or install a mechanical component, with no visible text or symbols.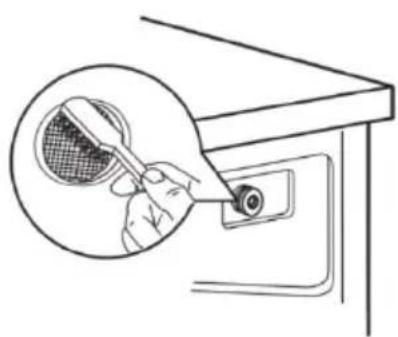
natural_image
Line drawing of a hand using a tool to clean or inspect a component, with no visible text or symbols.Cleaning the Detergent Drawer
Step 1:
- Open the detergent drawer and press the release button inside the softener compartment.
- Lift the clip upwards the remove the softener cover.
- Remove the detergent drawer.
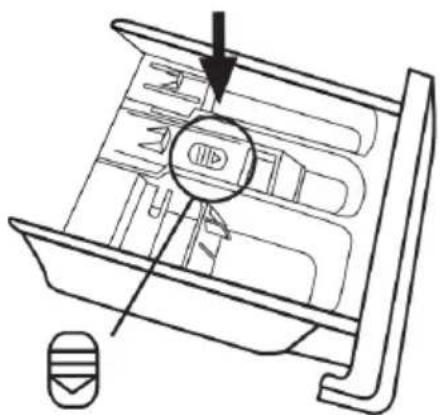
natural_image
Technical line drawing of a mechanical component with a circular inset showing a labeled section (no text or symbols present)Step 3:
Clean inside the crevices with an old toothbrush.
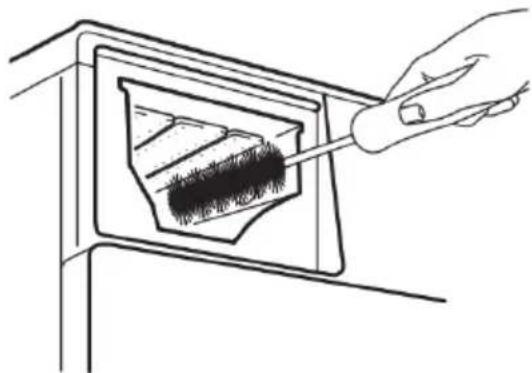
natural_image
Line drawing of a hand using a tool to clean or store items inside a window (no text or symbols)Step 2:
Clean the detergent drawer under water.

natural_image
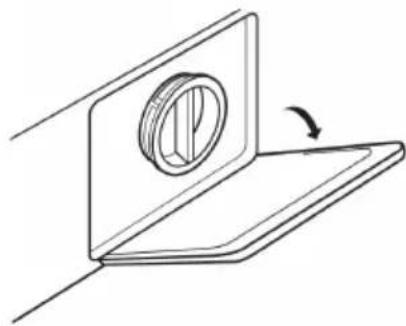
Line drawing of a hand holding a tool above a multi-level device (no text or symbols)Step 4:
Return the softener cover and re-insert the detergent drawer.

natural_image
Technical line drawing of a mechanical device with internal compartments and a directional arrow (no text or symbols)Note:
- Do not use solvent or chemical products to clean the detergent drawer.
- Clean the detergent drawer every 3 months to ensure the normal operation of the washing machine.
WARNING:
- Unplug the washing machine before cleaning to avoid electric shock.
- Never remove the pump cover during a wash cycle. Always wait until the washing machine has finished the cycle and is empty.
-
Clean the filter every 3 months to ensure the normal operation of the washing machine.
-
Open the pump cover.
natural_image
Simple line drawing of a mechanical component with a circular feature and an arrow indicating rotation (no text or symbols)- Remove foreign materials.
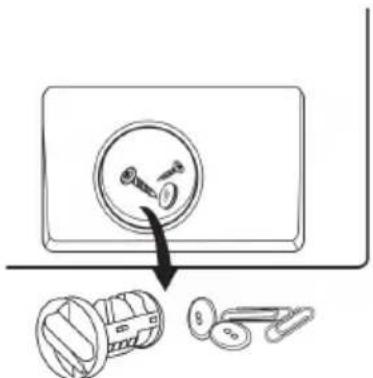
text_image
Diagram showing a device with a circular component and two separate parts, illustrating assembly or repair process.- Rotate the filter anticlockwise to remove it.
natural_image
Hand holding a tool with circular motion arrows, poised to press or interact with a device (no text or symbols visible)- Rotate the filter clockwise to re-insert it. Close the pump cover.
natural_image
Technical line drawing of a mechanical component with rotational arrows indicating motion (no text or symbols)Transport
Before moving the washing machine:
- Unplug the washing machine and close the water tap.
- Check if the door and the detergent dispenser are closed properly.
- Remove the water supply hose and the drain hose.
- Let the water drain completely from the appliance.
- Important: Re-install the 4 transit bolts.
- This appliance is heavy. Transport with care. Never hold any protruding parts of the machine when lifting. The machine door cannot be used as a handle.
Testing Methods
Additional Information for standard performance testing: (AS/NZS 2040.1:2005 + Amdt1 - 2007 + Amdt2 - 2009).
| Warm wash cycle | ECO Wash 1400RPM, 60°C.Display: 6:32. |
| Cold wash cycle Cotton cold (no temperature display). | |
| Detergent type Drum detergent. | |
| Detergent quantity Default. | |
| Adding detergent | The detergent is dissolved and added as Paragraph B7.3 of AS/NZS 2040.1.The detergent will be dissolved in 1L of water. |
| Anti-foaming agent | Max. |
| Test load mass 8.0kg. | |
| Water consumption 68L. | |
| Test Voltage | 220-240V~, 50Hz. |
SPECIFICATIONS
| Power Supply | 220-240V~, 50Hz |
| MAX. Current 10A | |
| Standard Water Pressure 0.05MPa~1MPa | |
| Washing Capacity 8.0kg | |
| Weight 60kg | |
| Rated Power 1950W | |
| Dimensions | |
| A 595mm | |
| B 850mm | |
| C 475mm | |
| D 533mm | |
| E 480mm | |
| F 969mm | |
| G 152mm | |

text_image
A B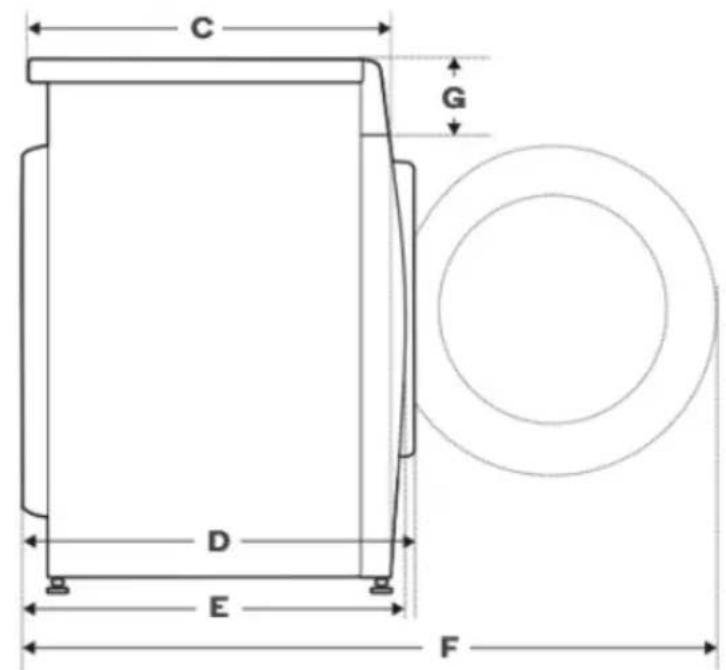
text_image
C G D E FTROUBLESHOOTING
If the following solutions are unsuccessful, contact help.Kogan.com for support.
| Problem | Possible Cause | Solution |
| The cycle will not start. | The door is not closed properly. | Check if clothes are trapped in the door seal.Closet the door and restart the cycle. |
| The door can’t be opened. | The safety protection mechanism is activated. | Disconnect the power restart the washing machine. |
| Water leakage. | The connection between the water supply hose or drain hose is not tight. | Check the water supply hose and drain hose connections and secure them. |
| Detergent residue in the drawer. | Detergent is dampened or agglomerated. | Wipe and clean the detergent drawer. |
| An indicator or the display does not illuminate. | The power plug is not connected properly. | Ensure the power plug is connected correctly. |
| The power cord is damaged. Contact help.Kogan.com for support. | ||
| Abnormal noise. | Transit bolts have not been removed. | Remove the transit bolts. |
| The washing machine is installed on an uneven surface. | Install the washing machine on a solid and level surface. |
Error Codes
| Description | Reason | Solution |
| E30 | Door is not closed properly. | Check if clothes are stuck in the door seal and close the door. |
| E10 | Water injecting problem while washing. | Check if the water pressure is too low.Straighten the water supply hose and drain hose.Check if the inlet filter is blocked. |
| E21 | Overtime water draining. Check if the drain hose is blocked. | |
| E12 | Water overflow. Restart the washing machine. | |
| EXX | Other. | Restart the washing machine.Contact help.Kogan.com for support |
NOTES
Need more information?
We hope that this user guide has given you the assistance needed for a simple set-up.
For the most up-to-date guide for your product, as well as any additional assistance you may require, head online to help.kogan.com
kogan.com