AS108 - Speaker ATEN - Free user manual and instructions
Find the device manual for free AS108 ATEN in PDF.

User questions about AS108 ATEN
0 question about this device. Answer the ones you know or ask your own.
Ask a new question about this device
Download the instructions for your Speaker in PDF format for free! Find your manual AS108 - ATEN and take your electronic device back in hand. On this page are published all the documents necessary for the use of your device. AS108 by ATEN.
USER MANUAL AS108 ATEN
Coaxial Ceiling Loudspeakers
User Manual
Compliance Statements
RoHS
This product is RoHS compliant.
User Information
Online Registration
Be sure to register your product at our online support center:
International http://eservice.aten.com
Telephone Support
For telephone support, call this number:
| International 886-2-86 | 92-6959 |
| China 86-400-810-0-8 | 10 |
| Japan 81-3-5615-5811 | |
| Korea 82-2-467-6789 | |
| North America 1-888- | 999-ATEN ext 4988 |
| 1-949-428-1111 |
User Notice
All information, documentation, and specifications contained in this manual are subject to change without prior notification by the manufacturer. The manufacturer makes no representations or warranties, either expressed or implied, with respect to the contents hereof and specifically disclaims any warranties as to merchantability or fitness for any particular purpose. Any of the manufacturer's software described in this manual is sold or licensed as is. Should the programs prove defective following their purchase, the buyer (and not the manufacturer, its distributor, or its dealer), assumes the entire cost of all necessary servicing, repair and any incidental or consequential damages resulting from any defect in the software.
The manufacturer of this system is not responsible for any radio and/or TV interference caused by unauthorized modifications to this device. It is the responsibility of the user to correct such interference.
The manufacturer is not responsible for any damage incurred in the operation of this system if the correct operational voltage setting was not selected prior to operation. PLEASE VERIFY THAT THE VOLTAGE SETTING IS CORRECT BEFORE USE.
Product Information
For information about all ATEN products and how they can help you connect without limits, visit ATEN on the Web or contact an ATEN Authorized Reseller.
Visit ATEN on the Web for a list of locations and telephone numbers:
| International http://www.aten.com |
| North America http://www.aten-usa.com |
Package Contents
Check to make sure that all the components are in working order. If you encounter any problem, please contact your dealer.
◆ 2 AS104 (4") / AS106 (6.5") / AS108 (8") Coaxial Ceiling Loudspeakers
◆ 2 Euroblock connectors
◆ 2 ceiling reinforcement kits
◆ 2 cutout templates
◆ 2 speaker grilles
◆ 1 user instructions
Contents
Compliance Statements ...... ii
User Information ....iii
Online Registration .....iii
Telephone Support .....iii
User Notice ....iii
Product Information ....iv
Package Contents ...... v
Contents ......vi
About this Manual ....viii
Conventions ix
1. Introduction
Overview 1
Features....2
Planning the Installation 3
Requirements 3
Components 4
Hardware Overview 4
2. Hardware Setup
Connecting the AS104 / AS106 Unit 7
3. Operation
Frequency Response Chart 13
Polarity 14
Safety Cable Anchor 16
Adjusting the Tap Selector....17
Appendix
Safety Instructions 19
General....19
Technical Support 21
International 21
North America 21
Specifications 22
AS104 22
AS106....23
AS108 24
ATEN Standard Warranty Policy 25
Limited Warranty 25
About this Manual
This user manual is provided to help you get the most from the AS104 / AS106 / AS108 unit. It covers all aspects of installation, configuration, and operation. An overview of the information found in the manual is provided below.
Chapter 1, Introduction introduces you to the Coaxial Ceiling Loudspeakers. Its purpose, features, installation considerations, and panel components are presented and described.
Chapter 2, Hardware Setup describes the steps that are necessary to quickly and safely set up your installation.
Chapter 3, Operation explains the audio source input operation using the Coaxial Ceiling Loudspeakers and its limitations.
Appendix, provides a list of safety instructions and precautions, contact information for ATEN technical support, product specifications, and other technical information.
Note:
- Read this manual thoroughly and follow the installation and operation procedures carefully to prevent any damage to the unit or any connected devices.
This product may be updated, with features and functions added, improved or removed since the release of this manual. For an up-to-date user manual, visit http://www.aten.com/global/en/
Conventions
This manual uses the following conventions:
MonospacedIndicates text that you should key in.
[] Indicates keys you should press. For example, [Enter] means to press the Enter key. If keys need to be chorded, they appear together in the same bracket with a plus sign between them: [Ctrl+Alt].
- Numbered lists represent procedures with sequential steps.
◆ Bullet lists provide information, but do not involve sequential steps.
Indicates selecting the option (on a menu or dialog box, for example), that comes next. For example, Start > Run means to open the Start menu, and then select Run.

Indicates critical information.
This Page Intentionally Left Blank
Overview
The AS104 / AS106 / AS108 comes in a pair of 4" / 6.5" / 8" coaxial 2-way ceiling loudspeakers that deliver decent sonic performance. Each speaker ships with a 4" / 6.5" / 8" woofer, 20 mm dome tweeter, and 30 W RMS, 60 W peak (8 Ω) / 60 W RMS, 120 W peak (8 Ω) / 80W RMS, 160W peak (8Ω) power handling capability. Excellent and consistent sound quality is ensured by taking advantages of its 100 - 20 kHz / 80 - 20 kHz / 65 - 20 kHz bandwidth and wide coverage, allowing less speakers used to cover the listening area to lower the cost of the system installed.
The loudspeaker contains a matching transformer, running comfortably on 70 / 100 V lines or at 8 Ω to suit various application demands. Phase issues are minimized as a result of the adoption of the coaxial neodymium magnetic driver, making sound waves with various frequency bands easier to be added together instead of canceling each other out. Made of UL94-V0-compliant flame retardant materials, the housing, together with the Zinc-coated steel backcan, improve safety for applications where flame and fire protection is of the highest importance. When it comes to installation, each speaker features a cutout template for quick and easy post construction installation and can be secured with its dog-leg mounting system. The paintable magnetic grille assures effortless installation and cleaning while giving unobtrusive appearance in any room design.
AS104 / AS106 / AS108 is ideal for residence and enterprise-grade audio applications, such as auditoriums, houses of worship, sports venues, and any small or mid-sized commercial spaces that require a clear and intelligible sound solution without compromise on life safety.
Features
◆ Coaxial design with premium components:
◆ 4" / 6.5" / 8" high output driver with rubber surround and heavy-duty voice coil
◆ 20 mm dome tweeter
◆ 100 - 20 kHz (AS104) / 80 - 20 kHz (AS106) / 65 - 20 kHz (AS108) bandwidth with wide coverage for consistent, full-range coverage of the space while reducing the amount of the speakers needed
- Switchable for use as either an 8 Ω low-impedance speaker or as part of a 70V / 100V distributed loudspeaker system
◆ UL94-V0 compliance for life safety applications
◆ Paintable magnetic grille for blending into any room decor
Ease of installation guaranteed with the magnetic grille, dog leg mounting system and cutout template
Planning the Installation
Requirements
Prepare the following before installing the AS104 / AS106 unit:
◆ 1 amplifier
◆ 1 or more audio source devices
Components
Hardware Overview
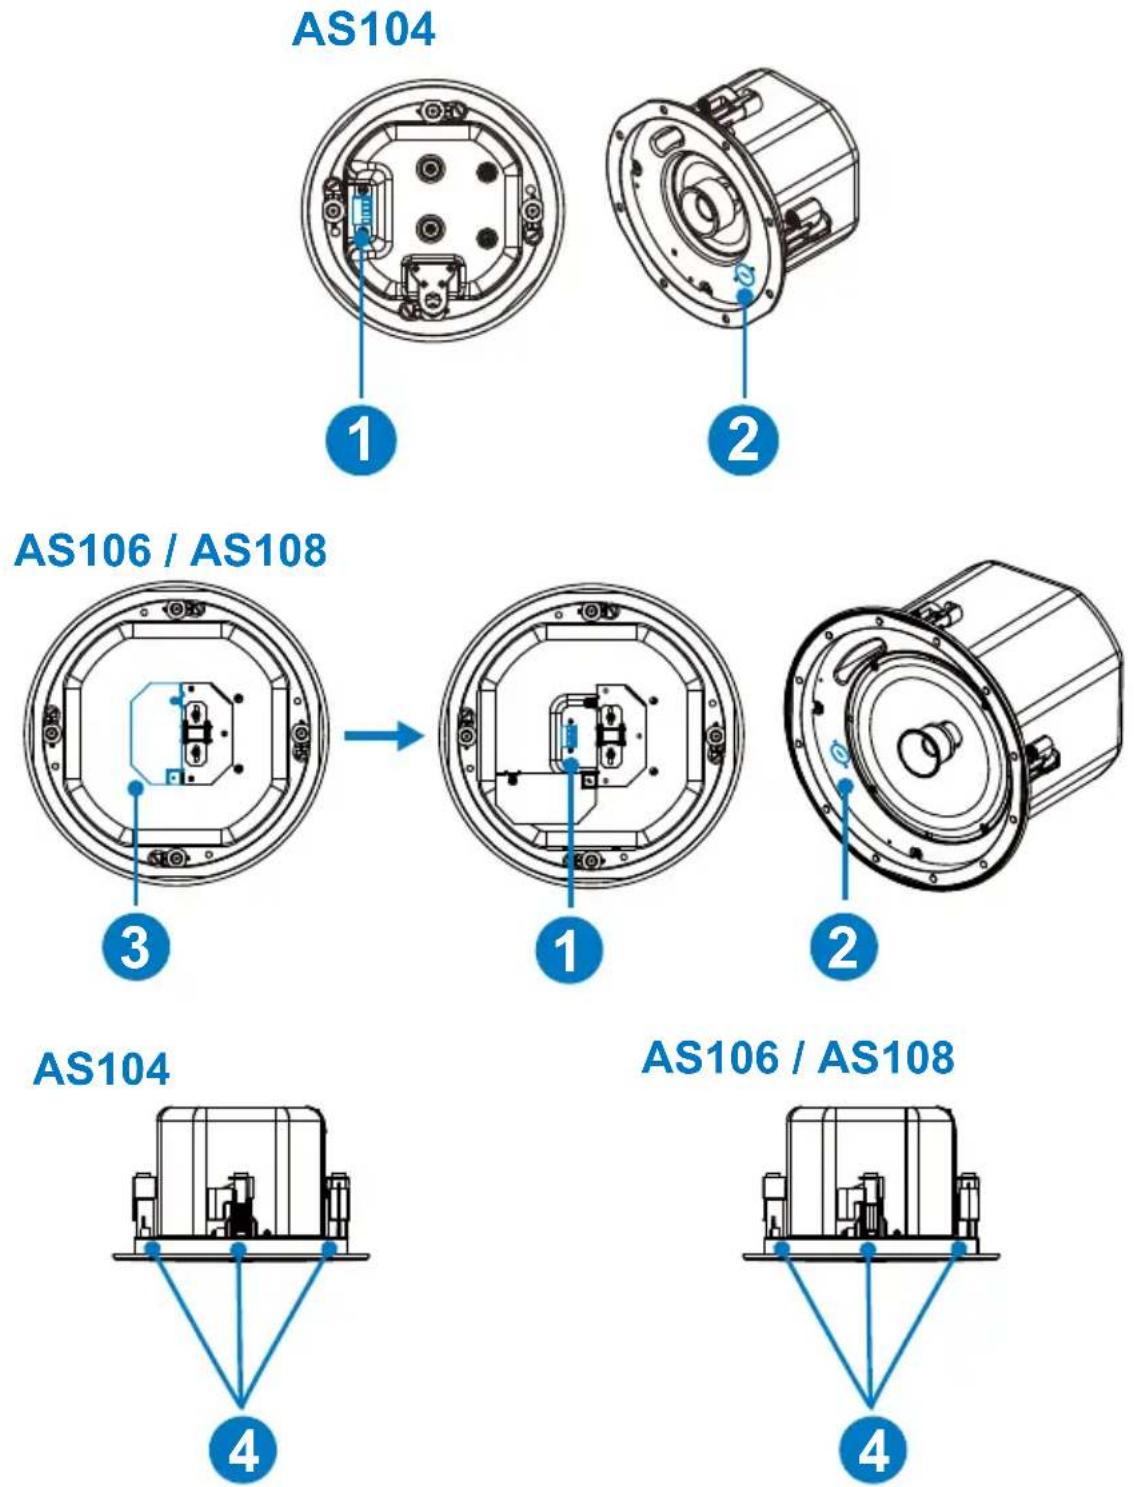
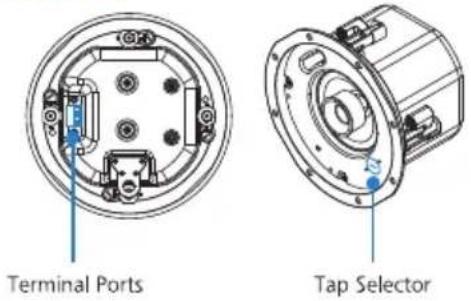
| No. | Component Description | |
| 1 | terminal ports Connects to an amplifier or other speaker via a 5.08 mm Euroblock connector. | |
| 2 | tap selector Adjusts the speaker impedance. | |
| 3 | terminal cover (AS106 / AS108) | Secures the wirings pipe in place. |
| 4 | rotating mount tabs (dog-legs) | Mounts the speakers to the ceiling tiles. |
This Page Intentionally Left Blank
Chapter 2
Hardware Setup

-
Please review the safety information regarding the placement of this device in Safety Instructions, page 19.
-
Do not power on the AS104 / AS106 / AS108 until all the necessary hardware is connected.
Connecting the AS104 / AS106 Unit
Follow the steps below to connect the AS104 / AS106 / AS108 to an amplifier.
- Use the cutout template as a guide to cut a hole on your ceiling tile.
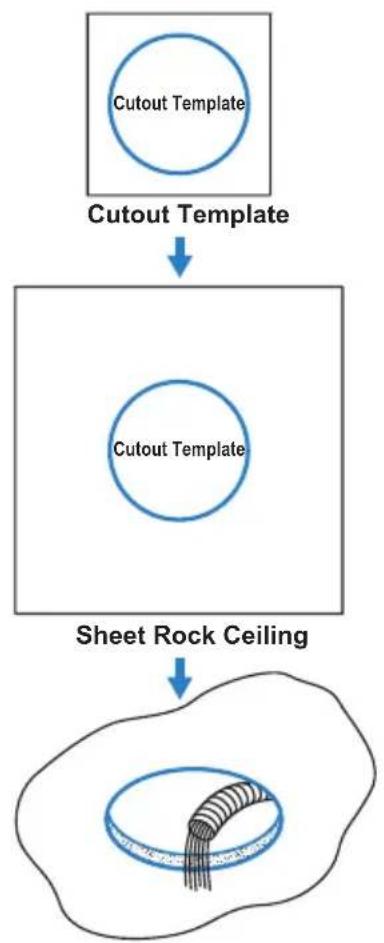
flowchart
graph TD
    A["Cutout Template"] --> B["Sheet Rock Ceiling"]
    B --> C["Cutout Template"]
- Do the following to enhance the stability of the AS104 / AS106 / AS108 speakers installed on the ceiling tile:
a) Insert and screw the C-bracket on the V-rails.
b) Insert both ends of the V-rails on to a suspended ceiling.
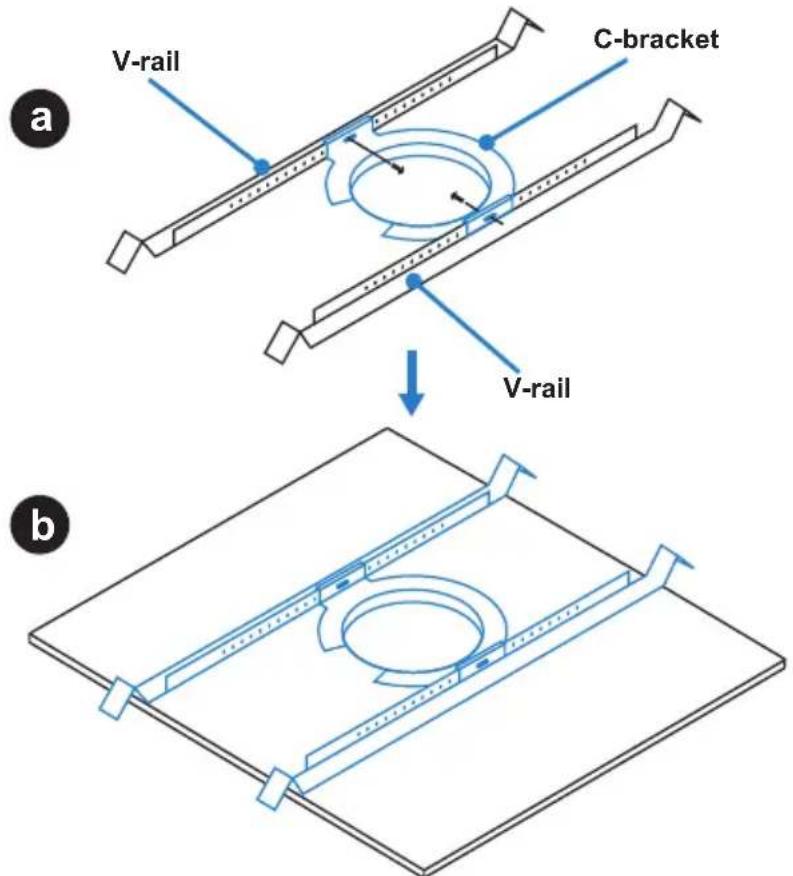
text_image
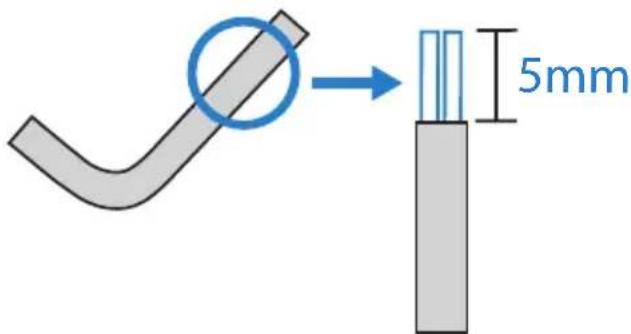
V-rail C-bracket a V-rail b- Strip insulation back about 5 mm on self-supplied speaker wires.
text_image
5mm- Insert the wire leads into the Euroblock connector and screw the hold-down screw until tight.
Note:
- Please do not tin the wire leads when connecting the Euroblock connector. Tinned wires may influence the sound quality and could be pulled out easily.
- To avoid rattling from the vibration, tighten any unused hold-down screws.

text_image
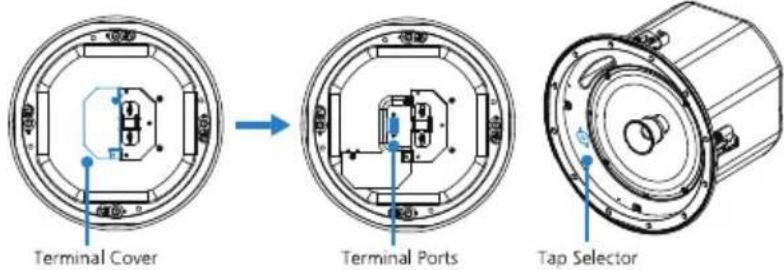
Euroblock Connector- Based on your application type, refer to the corresponding diagram to connect the terminal ports on the AS104 / AS106 / AS108 to your output device.
Note:
If you are connecting the terminal ports on the AS106 / AS108, please slide the terminal cover open by loosening the screws.
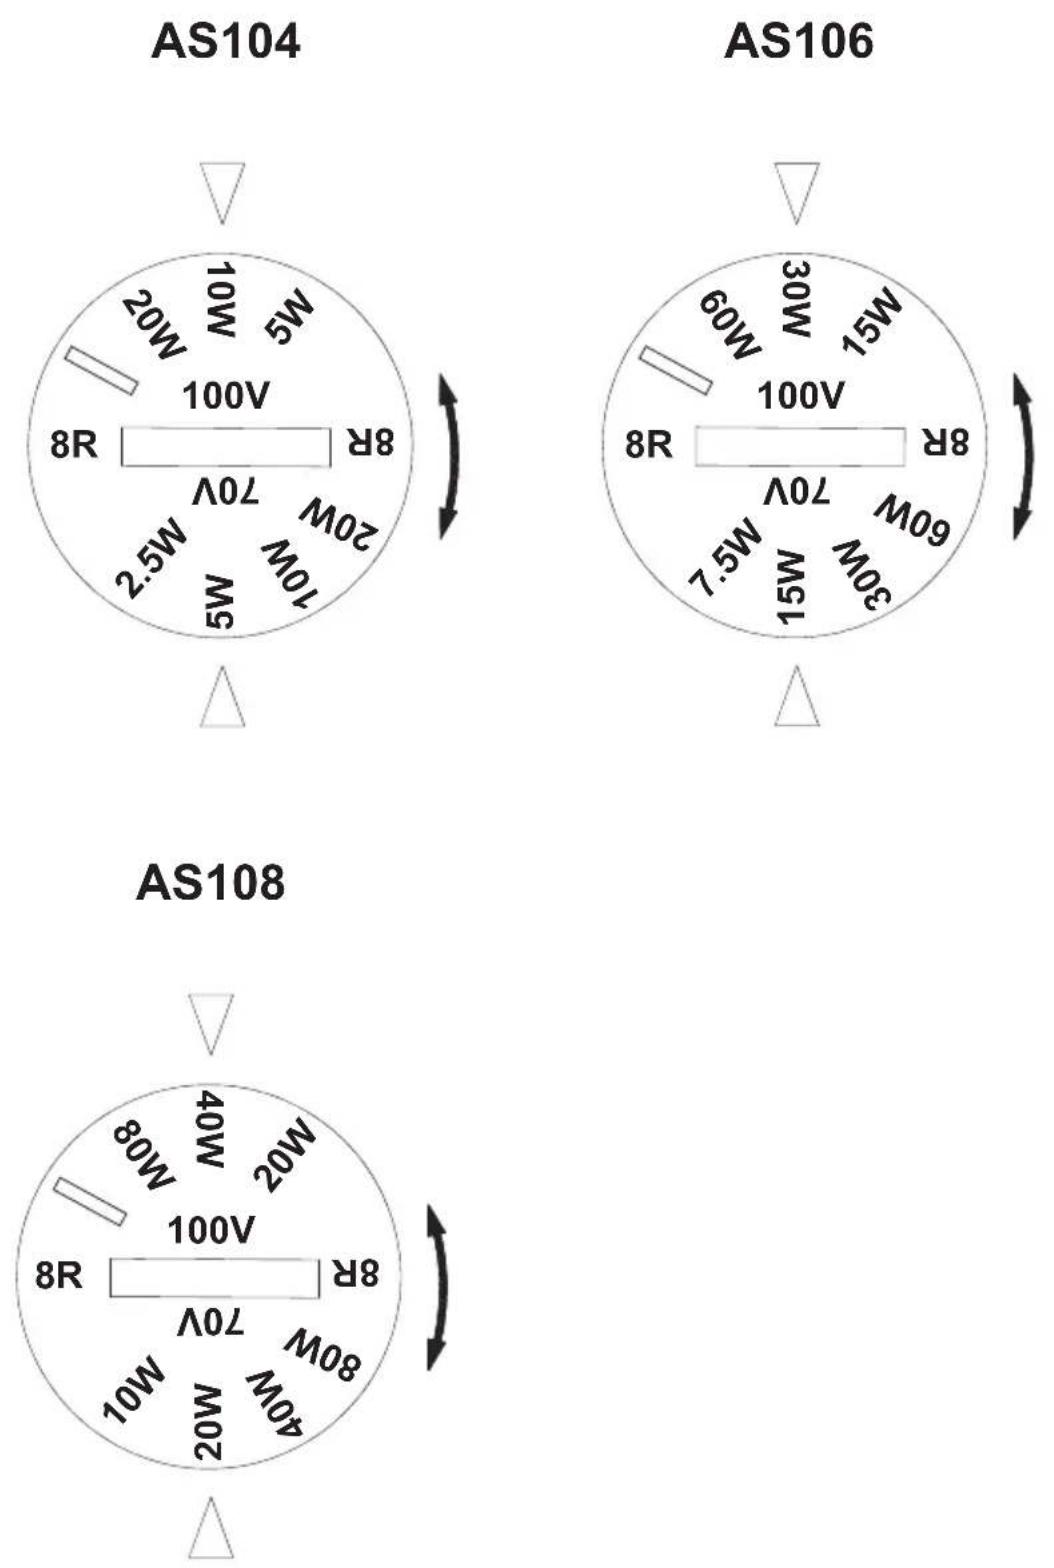
Make sure the tap selector on the speakers is set to a proper position, please refer to your power amplifier settings before adjusting the tap selector.
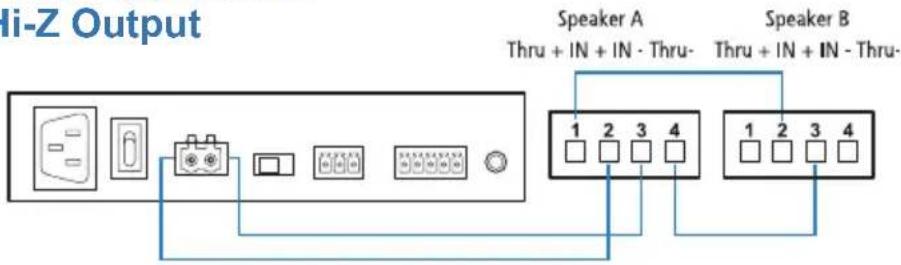
- For Low-Z output, make sure the tap selector on the speakers is set to 8R position.
AS104
AS106 / AS108
Mono Application
flowchart
graph LR
    A["Input"] --> B["Switch"]
    B --> C["Control Panel"]
    C --> D["Display"]
    D --> E["Display"]
    E --> F["Display"]
    F --> G["Display"]
    G --> H["Output"]
    I["Speaker A\nThru + IN + IN - Thru-"] --> J["1 2 3 4"]
    K["Speaker B\nThru + IN + IN - Thru-"] --> L["1 2 3 4"]
Stereo Application
Low-Z Output

text_image
Speaker A Speaker B- Screw the four rotating mount tabs (dog-legs) tightly to the ceiling tile.
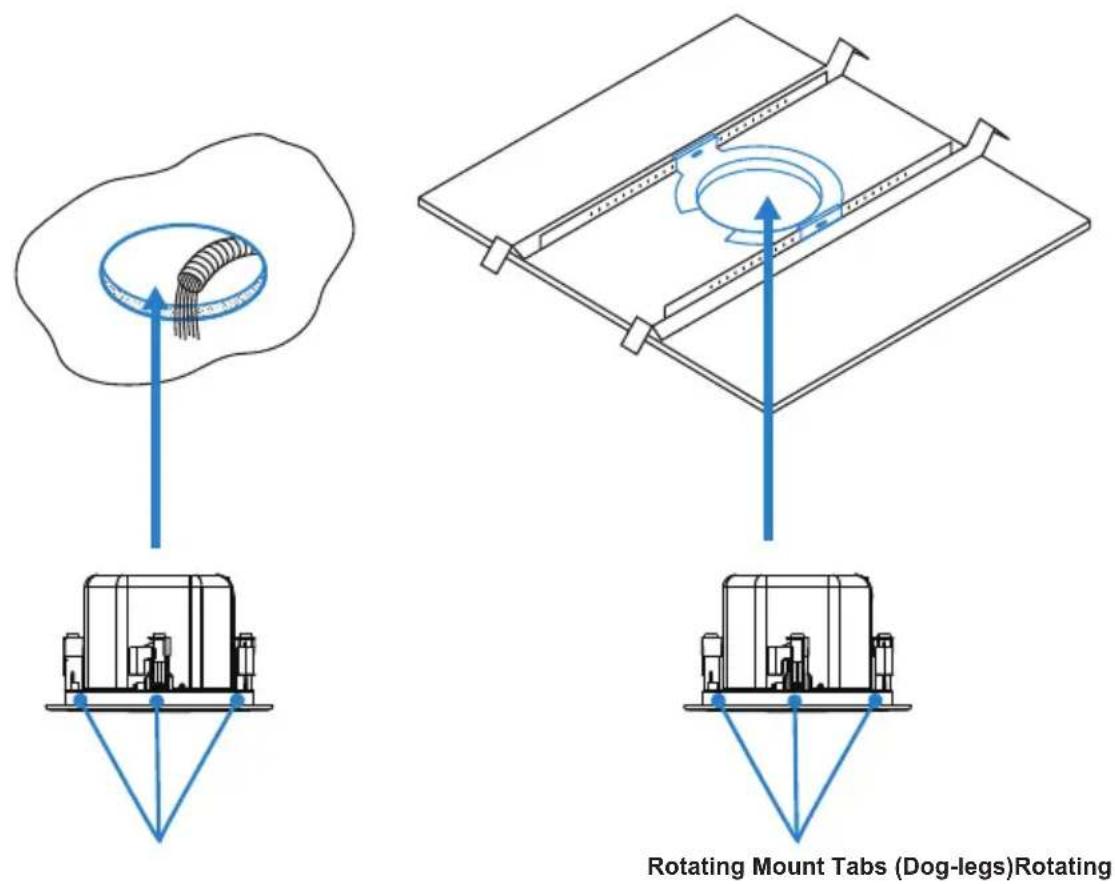
text_image
Rotating Mount Tabs (Dog-legs)Rotating- Attach the speaker grilles onto the AS104 / AS106 / AS108 speakers.
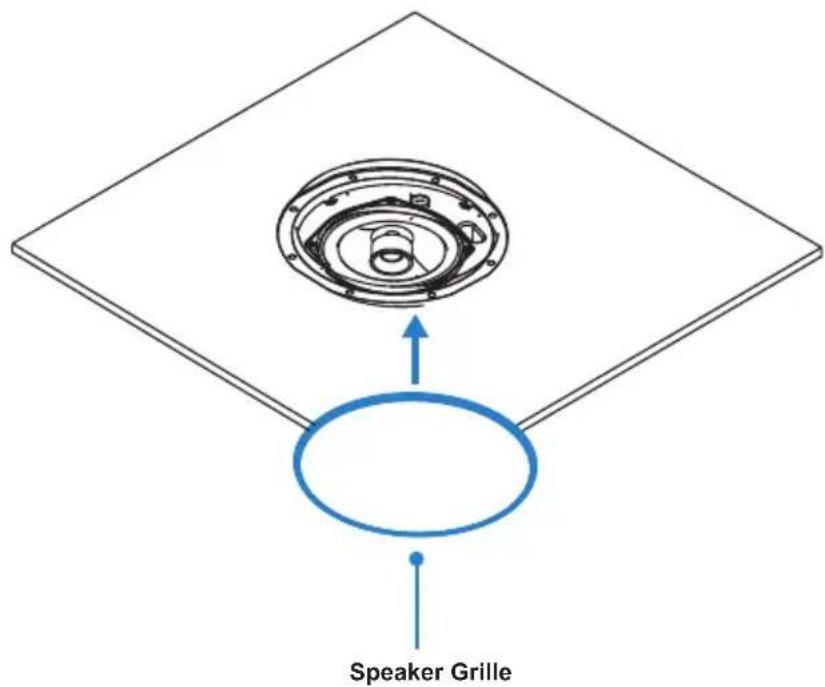
text_image
Speaker GrilleThis Page Intentionally Left Blank
Chapter 3 Operation
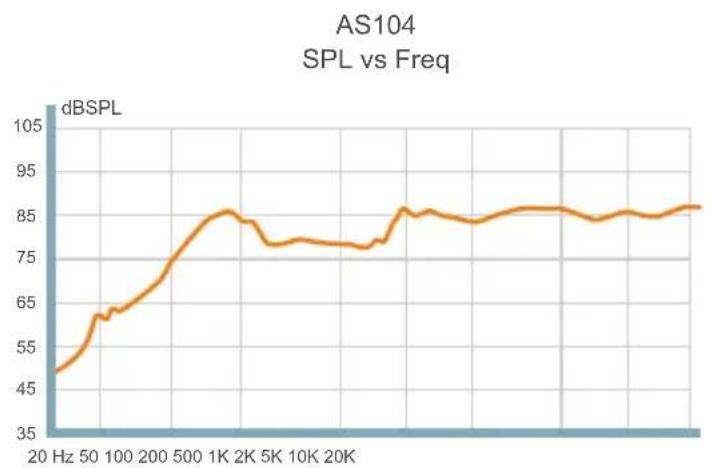
Frequency Response Chart
line
| Frequency | dBSPL | | --------- | ----- | | 20 Hz | 45 | | 50 Hz | 60 | | 100 Hz | 65 | | 200 Hz | 75 | | 500 Hz | 85 | | 1K | 85 | | 2K | 80 | | 5K | 75 | | 10K | 75 | | 20K | 85 | | >20K | 85 |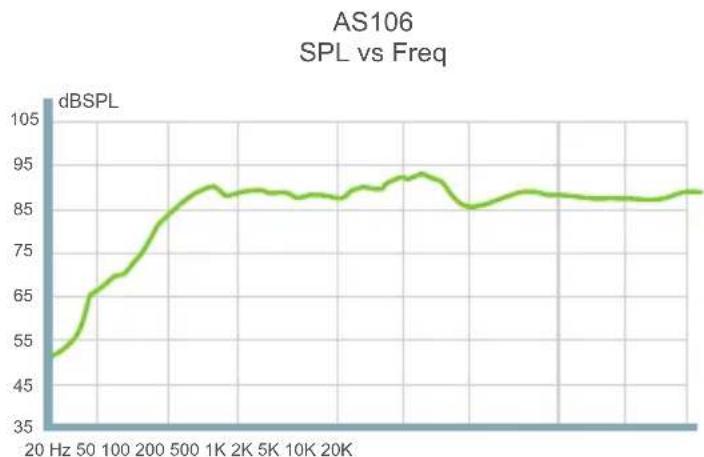
line
| Frequency | dBSPL | | --------- | ----- | | 20 Hz | 45 | | 50 | 65 | | 100 | 75 | | 200 | 85 | | 500 | 90 | | 1K | 92 | | 2K | 93 | | 5K | 92 | | 10K | 91 | | 20K | 90 |
line
| Frequency | dBSPL | | --------- | ----- | | 20 Hz | 55 | | 50 Hz | 65 | | 100 Hz | 75 | | 200 Hz | 85 | | 500 Hz | 90 | | 1K | 90 | | 2K | 90 | | 5K | 90 | | 10K | 90 | | 20K | 90 |Polarity
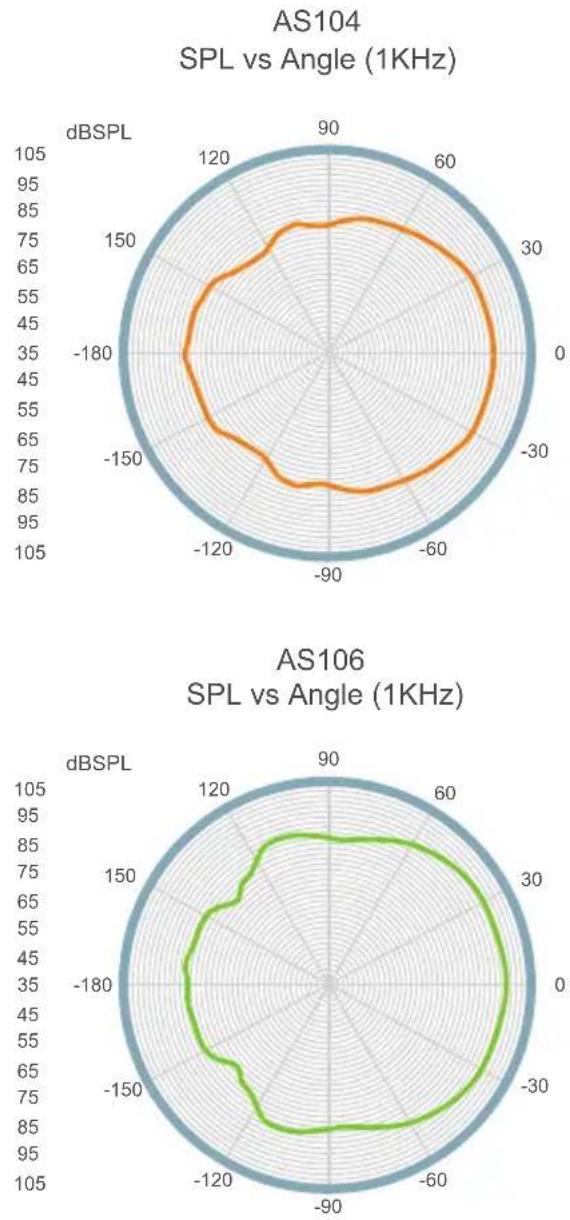
AS108
SPL vs Angle (1KHz)
radar
| Angle | dBSPL | |-------|-------| | 0 | 90 | | 30 | 85 | | 60 | 80 | | 90 | 75 | | 120 | 70 | | 150 | 65 | | 180 | 60 | | 210 | 55 | | 240 | 50 | | 270 | 45 | | 300 | 40 | | 330 | 35 | | 360 | 30 |Safety Cable Anchor
A safety cable anchor is available on the back of each unit for securing the speakers in case the ceiling tile breaks. Please do not omit this step. ATEN strongly recommended to secure the speakers using its safety cable anchors to a separate secure point.
AS104
natural_image
Top-down schematic of a circular device with internal components and a connector (no text or symbols)Safety Cable Anchor
AS106 / AS108
Safety Cable Anchor

natural_image
Technical line drawing of a circular mechanical assembly with internal components and mounting holes (no text or symbols)Adjusting the Tap Selector
A tap selector can be found on the front baffle of each unit. It is necessary to adjust to tap selector before powering on the speaker and attaching the speaker grille. Turn the selector clockwise to adjust the distributed system tap settings.
This Page Intentionally Left Blank
General
- This product is for indoor use only.
- Read all of these instructions. Save them for future reference.
◆ Follow all warnings and instructions marked on the device. - Do not place the device on any unstable surface (cart, stand, table, etc.). If the device falls, serious damage will result.
- Do not use the device near water.
- Do not place the device near, or over, radiators or heat registers.
- The device cabinet is provided with slots and openings to allow for adequate ventilation. To ensure reliable operation, and to protect against overheating, these openings must never be blocked or covered.
- The device should never be placed on a soft surface (bed, sofa, rug, etc.) as this will block its ventilation openings. Likewise, the device should not be placed in a built-in enclosure unless adequate ventilation has been provided.
◆ Never spill liquid of any kind on the device. - Unplug the device from the wall outlet before cleaning. Do not use liquid or aerosol cleaners. Use a damp cloth for cleaning.
- The device should be operated from the type of power source indicated on the marking label. If you are not sure of the type of power available, consult your dealer or local power company.
- To prevent damage to your installation it is important that all devices are properly grounded.
Do not allow anything to rest on the power cord or cables. Route the power cord and cables so that they cannot be stepped on or tripped over. - Position system cables and power cables carefully; Be sure that nothing rests on any cables.
-
Never push objects of any kind into or through cabinet slots. They may touch dangerous voltage points or short out parts resulting in a risk of fire or electrical shock.
-
Do not attempt to service the device yourself. Refer all servicing to qualified service personnel.
- If the following conditions occur, unplug the device from the wall outlet and bring it to qualified service personnel for repair.
◆ The power cord or plug has become damaged or frayed.
◆ Liquid has been spilled into the device.
- The device has been exposed to rain or water.
- The device has been dropped, or the cabinet has been damaged.
- The device exhibits a distinct change in performance, indicating a need for service.
- The device does not operate normally when the operating instructions are followed.
- Only adjust those controls that are covered in the operating instructions. Improper adjustment of other controls may result in damage that will require extensive work by a qualified technician to repair.
Technical Support
International
- For online technical support – including troubleshooting, documentation, and software updates: http://support.aten.com
- For telephone support, see Telephone Support, page iii:
North America
| Email Support support@aten-usa.com | ||
| Online Technical Support | Troubleshooting Documentation Software Updates | http://www.aten-usa.com/support |
| Telephone Support 1-888-999-ATEN ext 4988 | ||
When you contact us, please have the following information ready beforehand:
Product model number, serial number, and date of purchase
- Your computer configuration, including operating system, revision level, expansion cards, and software
◆ Any error messages displayed at the time the error occurred
◆ The sequence of operations that led up to the error
◆ Any other information you feel may be of help
Specifications
AS104
| Function AS104 | |
| System Specification | |
| LF Driver 4" Paper Cone with | Rubber Suspension |
| HF Driver 20 mm PEI Dome | Tweeter |
| Frequency Response 100–20 kHz (-10 dB) | |
| Distortion <= 5% | |
| Rated Power 30Wrms / 60Wpeak | |
| Sensitivity 86 dBSPL, @ 1 m, 1W, 1 kHz | |
| Transformer Taps 70V (2.5W, 5W, 10W, and 20W)100V (*, 5W, 10W, and 20W) | |
| Compliance | |
| Certification CE, WEEE, RoHs | |
| Connectors | |
| Audio Inputs 5.08 mm Euroblock Connector | |
| Environmental | |
| Operating Temperature 0–40°C | |
| Humidity 0–80% RH, Non-Condensing | |
| Storage Temperature -20–60°C | |
| Physical Properties | |
| Weight | 2.20 kg (4.85 lb) |
| Housing | UL94-V0 ABS Plastic BaffleZinc-Coated Steel Backcan |
| Dimensions (L x W x H) | 21.80 × 21.80 × 13.00 cm(8.58 × 8.58 × 5.12 in) |
| Color White Speaker Grille (Paintable) | White Speaker Baffle |
| Cut-out Diameter | 182 mm |
| In-ceiling Clearance Height | 125 mm |
| Carton Lot | 2 Pcs / Carton |
| Note: This product is sold in pair. | |
AS106
| Function AS106 | |
| System Specification | |
| LF Driver 6.5" Paper Cone with Rubber Suspension | |
| HF Driver 20 mm PEI Dome | Tweeter |
| Frequency Response 80–20 kHz (-10 dB) | |
| Distortion <= 5% | |
| Rated Power 60Wrms / 1200 Wpeak | |
| Sensitivity 90 dBSPL, @ 1 m, 1W, 1 kHz | |
| Transformer Taps 70V (7.5W, 15W, 30W, and 60W)100V (*, 15W, 30W, and 60W) | |
| Compliance | |
| Certification CE, WEEE, RoHs | |
| Connectors | |
| Audio Inputs 5.08 mm Euroblock Connector | |
| Environmental | |
| Operating Temperature 0–40°C | |
| Humidity 0 - 80% RH, Non-Condensing | |
| Storage Temperature -20–60°C | |
| Physical Properties | |
| Weight | 3.70 kg (8.15 lb) |
| Housing | UL94-V0 ABS Plastic BaffleZinc-Coated Steel Backcan |
| Dimensions (L x W x H) | 25.72 × 25.72 × 19.75 cm(10.13 × 10.13 × 7.78 in) |
| Color White Speaker Grille (Paintable)White Speaker Baffle | |
| Cut-out Diameter | 221 mm |
| In-ceiling Clearance Height | 195 mm |
| Carton Lot | 2 Pcs / Carton |
| Note: This product is sold in pair. | |
AS108
| Function AS108 | |
| System Specification | |
| LF Driver 8" Paper Cone with | Rubber Suspension |
| HF Driver 20 mm PEI Dome | Tweeter |
| Frequency Response 65–20kHz (-10dB) | |
| Distortion <= 5% | |
| Rated Power 80Wrms/160Wpeak | |
| Sensitivity 90dBSPL, @1m, | 1W, 1kHz |
| Transformer Taps 70V(10W, | 20W, 40W, 80W) |
| 100V(*, 20W, 40W, 80W) | |
| Compliance | |
| Certification CE, WEEE, RoHs | |
| Connectors | |
| Audio Inputs 5.08 mm Euroblock Connector | |
| Environmental | |
| Operating Temperature 0–40°C | |
| Humidity 0–80% RH, Non-Condensing | |
| Storage Temperature -20–60°C | |
| Physical Properties | |
| Weight | 5.70 kg (12.56 lb) |
| Housing | UL94-V0 ABS Plastic BaffleZinc-Coated Steel Backcan |
| Dimensions (L x W x H) | 30.90 × 30.90 × 24.80 cm(12.17 × 12.17 × 9.76 in.) |
| Color White Speaker Grille (Paintable) | White Speaker Baffle |
| Cut-out Diameter | 271mm |
| In-ceiling Clearance Height | 243mm |
| Carton Lot | 2 Pcs / Carton |
| Note: This product is sold in pair. | |
ATEN Standard Warranty Policy
Limited Warranty
ATEN warrants its hardware in the country of purchase against flaws in materials and workmanship for a Warranty Period of two [2] years (warranty period may vary in certain regions/countries) commencing on the date of original purchase. This warranty period includes the LCD panel of ATEN LCD KVM switches. For UPS products, the device warranty is two [2] years but battery is one [1] year. Select products are warranted for an additional year (see A+ Warranty for further details). Cables and accessories are not covered by the Standard Warranty.
What is covered by the Limited Hardware Warranty
ATEN will provide a repair service, without charge, during the Warranty Period. If a product is detective, ATEN will, at its discretion, have the option to (1) repair said product with new or repaired components, or (2) replace the entire product with an identical product or with a similar product which fulfills the same function as the defective product. Replaced products assume the warranty of the original product for the remaining period or a period of 90 days, whichever is longer. When the products or components are replaced, the replacing articles shall become customer property and the replaced articles shall become the property of ATEN.
To learn more about our warranty policies, please visit our website: http://www.aten.com/global/en/legal/policies/warranty-policy/
© Copyright 2024 ATEN® International Co., Ltd.
Released: 2024-03-08
ATEN and the ATEN logo are registered trademarks of ATEN International Co., Ltd. All rights reserved. All other brand names and trademarks are the registered property of their respective owners.