LDH50-FAI400K - Surveillance Dahua Technology - Free user manual and instructions
Find the device manual for free LDH50-FAI400K Dahua Technology in PDF.

User questions about LDH50-FAI400K Dahua Technology
0 question about this device. Answer the ones you know or ask your own.
Ask a new question about this device
Download the instructions for your Surveillance in PDF format for free! Find your manual LDH50-FAI400K - Dahua Technology and take your electronic device back in hand. On this page are published all the documents necessary for the use of your device. LDH50-FAI400K by Dahua Technology.
USER MANUAL LDH50-FAI400K Dahua Technology
This manual introduces the functions and operations of the 3.0 digital signage (hereinafter referred to as the "Signage"). Read carefully before using the Signage, and keep the manual safe for future reference.
Safety Instructions
The following signal words might appear in the manual.
| Signal Words Meaning | |
 | Indicates a high potential hazard which, if not avoided, will result in death or serious injury. |
 | Indicates a medium or low potential hazard which, if not avoided, could result in slight or moderate injury. |
 | Indicates a potential risk which, if not avoided, could result in property damage, data loss, reductions in performance, or unpredictable results. |
 | Provides methods to help you solve a problem or save time. |
 | Provides additional information as a supplement to the text. |
Revision History
| Version | Revision Content | Release Time |
| V1.0.2 | Updated basic operations. | November 2022 |
| V1.0.1 | Updated basic operations. | August 2022 |
| V1.0.0 | First release. | May 2021 |
Privacy Protection Notice
As the device user or data controller, you might collect the personal data of others such as their face, fingerprints, and license plate number. You need to be in compliance with your local privacy protection laws and regulations to protect the legitimate rights and interests of other people by implementing measures which include but are not limited: Providing clear and visible identification to inform people of the existence of the surveillance area and provide required contact information.
About the Manual
- The manual is for reference only. Slight differences might be found between the manual and the product.
- We are not liable for losses incurred due to operating the product in ways that are not in compliance with the manual.
- The manual will be updated according to the latest laws and regulations of related jurisdictions. For detailed information, see the paper user's manual, use our CD-ROM, scan the QR code or visit our official website. The manual is for reference only. Slight differences might be found between the electronic version and the paper version.
- All designs and software are subject to change without prior written notice. Product updates might result in some differences appearing between the actual product and the manual. Please contact customer service for the latest program and supplementary documentation.
- There might be errors in the print or deviations in the description of the functions, operations and technical data. If there is any doubt or dispute, we reserve the right of final explanation.
- Upgrade the reader software or try other mainstream reader software if the manual (in PDF format) cannot be opened.
- All trademarks, registered trademarks and company names in the manual are properties of their respective owners.
- Please visit our website, contact the supplier or customer service if any problems occur while using the device.
- If there is any uncertainty or controversy, we reserve the right of final explanation.
Important Safeguards and Warnings
This section introduces content covering the proper handling of the Signage, hazard prevention, and prevention of property damage. Read carefully before using the Signage, and comply with the guidelines when using it.
Installation Requirements

WARNING
- Improper use of the battery might result in a fire or explosion.
- Replace unwanted batteries with new batteries of the same type and model.
- Use the standard power adapter. We will assume no responsibility for any problems caused by the use of a nonstandard power adapter.
- Use the power cords that are recommended for the region and conform to the rated power specifications.

- This is a class A product. In a domestic environment this may cause radio interference in which case you may be required to take adequate measures.
- Do not place the Signage in a place exposed to sunlight or near heat sources.
- Keep the Signage away from dampness, dust, and soot.
- Install the Signage on a stable surface to prevent it from falling.
- Install the Signage in a well-ventilated place, and do not block its ventilation.
- Use an adapter or cabinet power supply provided by the manufacturer.
- The power supply must conform to the requirements of ES1 in IEC 62368-1 standard and be no higher than PS2. Note that the power supply requirements are subject to the device label.
- The Signage is a class I electrical appliance. Make sure that the power supply of the Signage is connected to a power socket with protective earthing.
- The appliance coupler is a disconnection device. Keep it at a convenient angle when using it.
Operation Requirements

- Do not drop or splash liquid onto the Signage, and make sure that there is no object filled with liquid on the Signage to prevent liquid from flowing into it.
- Operate the Signage within the rated range of power input and output.
- Do not disassemble the Signage without professional instruction.
- Use the Signage within its working humidity (10%-85% (RH)) and temperature (0 °C to 40 °C or 32 °F to 104 °F).
Table of Contents
Foreword....II
Important Safeguards and Warnings...... IV
1 Overview.... 1
2 Structure 2
3 Basic Operations.... 3
3.1 Starting and Shutting Down....3
3.2 Initializing the Signage .... 3
3.3 Login 6
3.4 Resetting Password ....7
3.5 Changing Password and Security Questions....8
3.5.1 Setting Password Validity Period....8
3.5.2 Changing Password 9
3.5.3 Changing Security Questions....9
3.6 Quick Toolbar....10
3.7 Releasing Project....11
3.7.1 Network Release....11
3.7.2 Local Release 15
3.8 App Manager....24
3.8.1 Installing App 25
3.8.2 File Manager....26
4 System Settings.... 27
4.1 Setting Date & Time....27
4.2 Selecting Input Source....27
4.3 Configuring Visual & Audio Parameters....28
4.4 System Language....29
5 Maintenance and Update.... 30
5.1 Maintenance Requirements....30
5.2 Restoring Factory Defaults ....30
5.3 Upgrading System....30
5.4 Configuring Auto Maintenance Time....31
5.5 Turning Screen On/Off at Fixed Time....31
5.6 Turning the Signage On/Off at Fixed Time 32
5.7 Restarting Device....32
5.8 Viewing Device Information....32
Appendix 1 Remote Control 34
Appendix 2 Cybersecurity Recommendations.... 36
1 Overview
The Signage is an innovative, intelligent cloud information terminal that features multimedia content release, advertisement and network access, and has LCD display and audio power amplifier. The Signage is applicable for use in government buildings, office parks, shopping malls, and more.
2 Structure
Figure 2-1 Ports

text_image
1 2 3 4 5 6 7 8Table 2-1 Description of ports
| No. | Name | Description |
| 1 Reset button | Contact customer service to use the button to restore the Signage to its factory settings or reset the password. | |
| 2 | Headphone jack | Connects to 3.5 mm headphones to receive audio from the Signage. |
| 3 TF card slot | Insert a TF card. The TF card is used to force update the Android OS or provide media for projects. A force update is needed when the Android OS restarts repeatedly or the Signage cannot be started.You cannot use the TF card to store data on the Signage.Contact the technical support if your Signage needs a force update. | |
| 4 | HDMI port | Connects to HDMI input source device. |
| 5 | ON/OFF | Turn the screen on/off. |
| 6 | Network port | Connects the Signage to the network through Ethernet cable. |
| 7 | USB 2.0 port | Connects to devices such as mouse or USB drive. |
| 8 DIP switch | Switch the function (OTG/USB) of the USB port on the right side (two ports are designed). To use the port as a USB port, push the switch to the side of the network port. | |
3 Basic Operations
The remote control supports limited operations: You can use the remote control to turn on or off the screen, turn on, turn off, or restart the Signage, adjust the volume and go back to the home page. We recommend you connect a mouse to operate the Signage. This chapter uses connecting a mouse for device operations as an example.

Wireless mouse is not supported to control the Signage.
3.1 Starting and Shutting Down

- Before starting the Signage, check whether the input voltage matches rated voltage of the Signage.
- To ensure stable operation and long service life of the Signage and external devices connected to the Signage, follow national standards and provide a power supply with stable voltage and low ripple interference.
Starting the Signage
Plug in the power cable of the Signage. The Signage starts.
Shutting down the Signage
Unplug the power cable. The Signage shuts down.
3.2 Initializing the Signage
For first-time use or after restoring the system to factory settings, you need to initialize the Signage.
After that, you can start configuring and operating your device.
Step 1 Power on the Signage. The Signage starts.
Step 2 Select the language and then click Save and Next. Currently, only Chinese and English are supported.
Step 3 Read the software license agreement and then click Next.
Step 4 Read the privacy policy, select I have read and agree to all the terms, and then click OK.
Step 5 Configure your password.
1) Enter your new password, and confirm it.

The password must be 8–32 characters and contain at least two types from letters, numbers, and special characters.
2) Click Confirm.
Initialization starts.
Figure 3-1 Device initialization (2)

text_image
Device initializingStep 6 On the Password Protection interface, select questions, enter answers to the questions, and then click Save and Next.

Click Skip to skip setting security questions.
Figure 3-2 Password protection
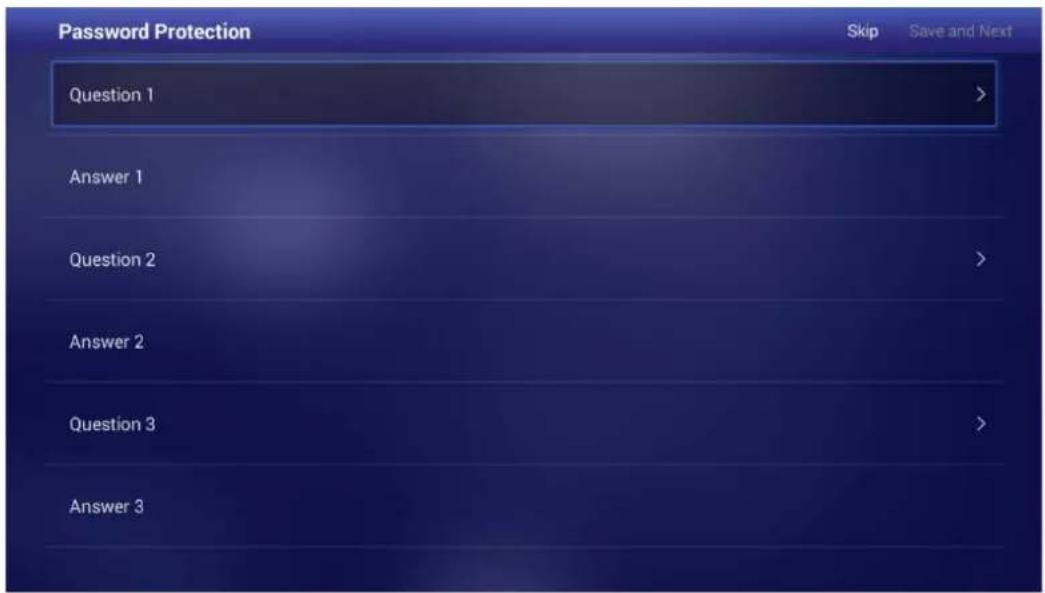
text_image
Password Protection Skip Save and Next Question 1 > Answer 1 Question 2 > Answer 2 Question 3 > Answer 3Step 7 On the Terminal Info interface, configure device information.
1) Click to set the name that identifies the Signage.
2) Click Save and Next.
Figure 3-3 Device information
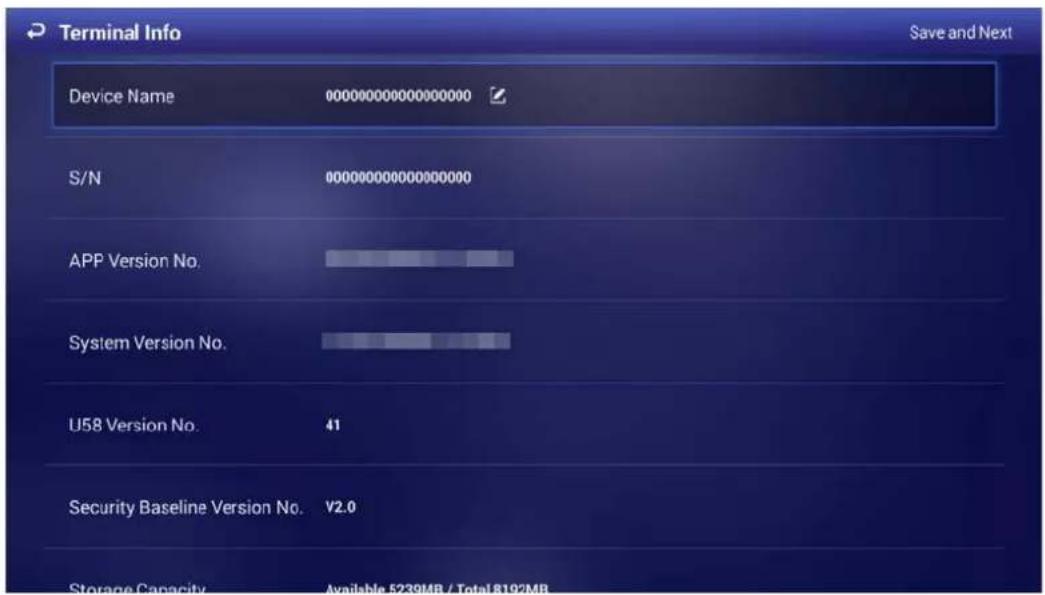
text_image
Terminal Info Save and Next Device Name 000000000000000000 S/N 000000000000000000 APP Version No. System Version No. U58 Version No. 41 Security Baseline Version No. Y2.0 Storage Capacity Available 5239MB / Total8192MBStep 8 On the Network Setting interface, configure the network.

Click Skip to skip setting the network.
1) Select network type as needed and configure the network.
Connect your device to network by Ethernet. Two methods are available to plan your device IP.
☐ DHCP: When there is a DHCP server on the network, after selecting the DHCP option, the Signage automatically obtains IP address from the DHCP server.
Static IP: After selecting Static IP, respectively click IP Address, Gateway and Netmask, and enter the IP address, default gateway and net mask according to your network plan.
Figure 3-4 Network setting
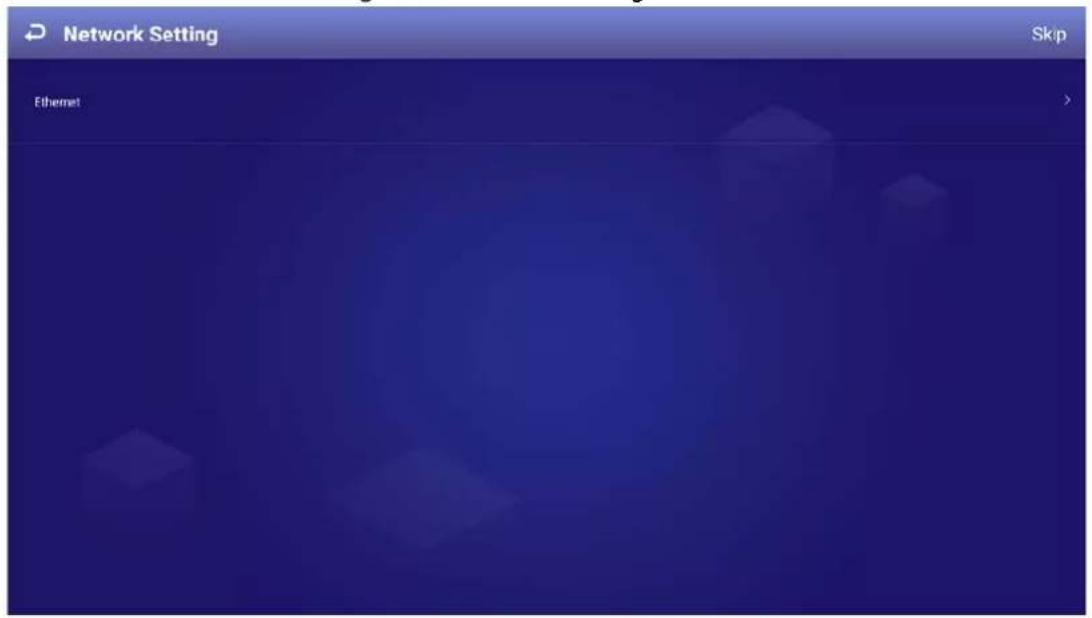
text_image
Network Setting Skip Ethernet2) Click Save and Next.
Step 9 On the Platform Registration interface, register the Signage to the platform (MPS or ICC).

Click Skip to skip platform registration. Platform is required when multiple signages are used in a solution.
Figure 3-5 Platform registration
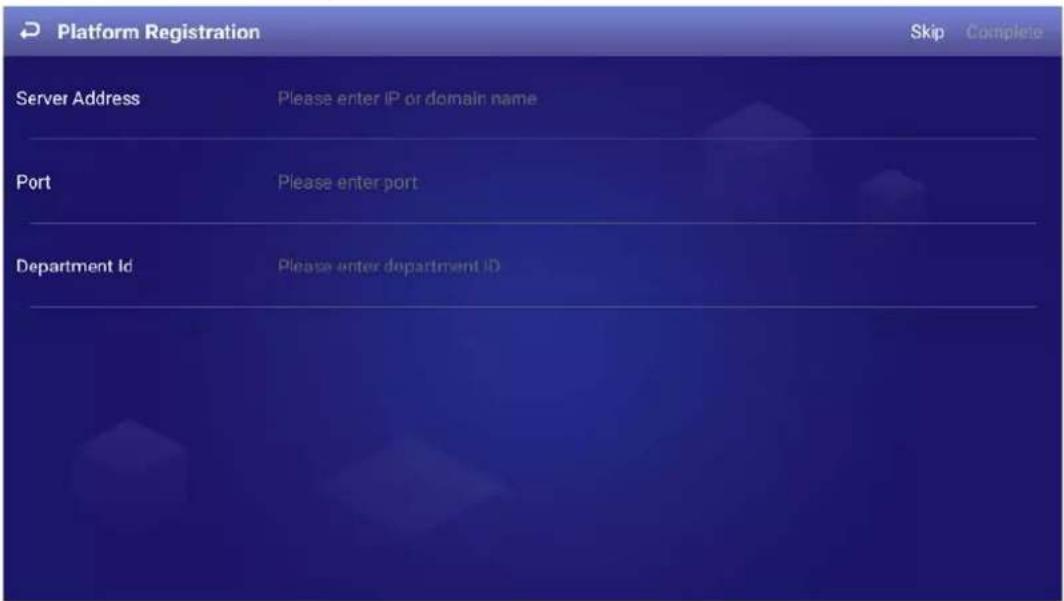
text_image
Platform Registration Skip Complete Server Address Please enter IP or domain name Port Please enter port Department Id Please enter department ID1) Enter the IP address or domain name, port of the platform (MPS or ICC) and the department ID.
2) Click Complete.
Figure 3-6 Main interface
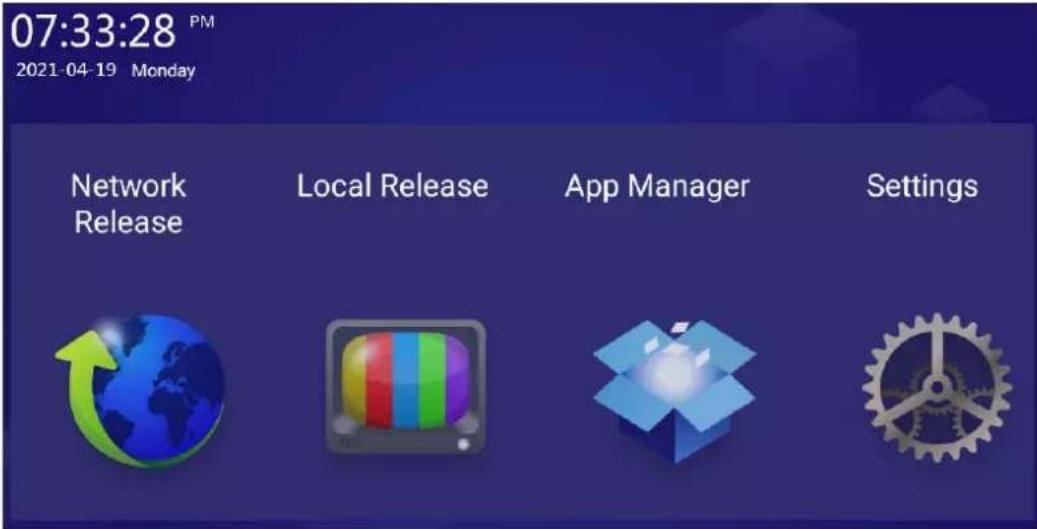
text_image
07:33:28 PM 2021-04-19 Monday Network Release Local Release App Manager Settings3.3 Login
You need to log in to the Signage for first-time use after initialization, or you lock the screen manually, or the screen is locked automatically after no operation is done for the defined time.
Step 1 Click any position on the screen.
Figure 3-7 Login
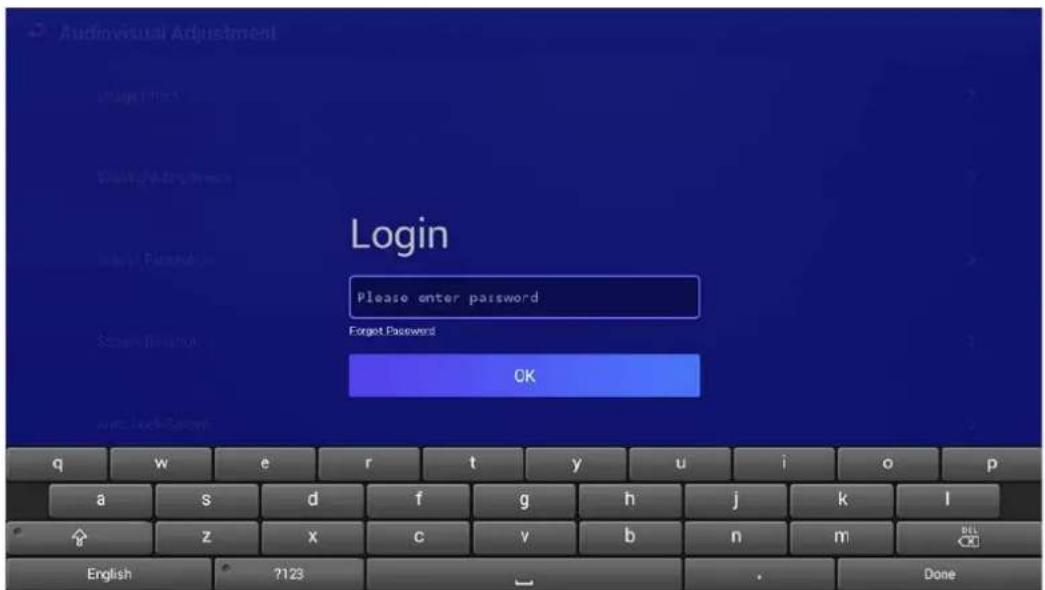
text_image
AudioVisual Adjustment Login Please enter password Forgot Password OK q w e r t y u i o p a s d f g h j k l z x c v b n m English ?123 DoneStep 2 Enter your password.

If you forgot your password, click Forgot Password to reset the password after answering the security questions.
Step 3 Click OK.
The main menu or the interface before the system is locked is displayed.

- When the password is incorrectly entered, a note reminding you of the remaining tries will be displayed. You can try 5 times.
- After the password has been incorrectly entered for 5 times, the system displays Account locked, restart or try 5 minutes later.
3.4 Resetting Password
Reset the password when you forgot it.
Step 1 On the login interface (see Figure 3-7), click Forgot Password.
Step 2 Enter answers to all the security questions.
Step 3 Click Confirm, enter the new password and then confirm it.
Figure 3-8 Verify security questions
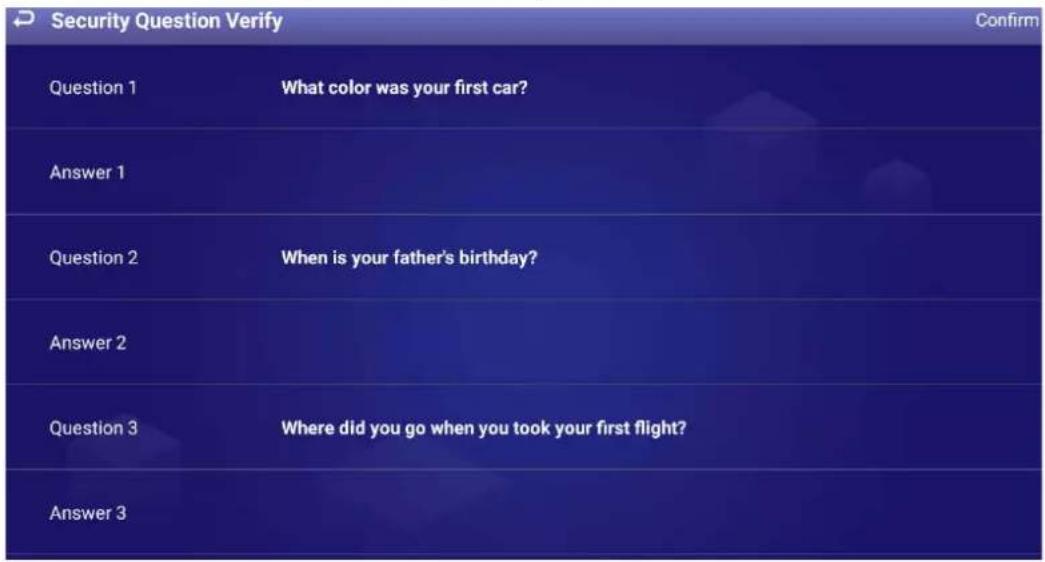
text_image
Security Question Verify Question 1 What color was your first car? Answer 1 Question 2 When is your father's birthday? Answer 2 Question 3 Where did you go when you took your first flight? Answer 3 Confirm3.5 Changing Password and Security Questions
We recommend updating the login password and security questions regularly to ensure device security.
3.5.1 Setting Password Validity Period
Step 1 On the home page, select Settings > Password Setting > Password Validity Period Setting. Figure 3-9 Password validity period setting
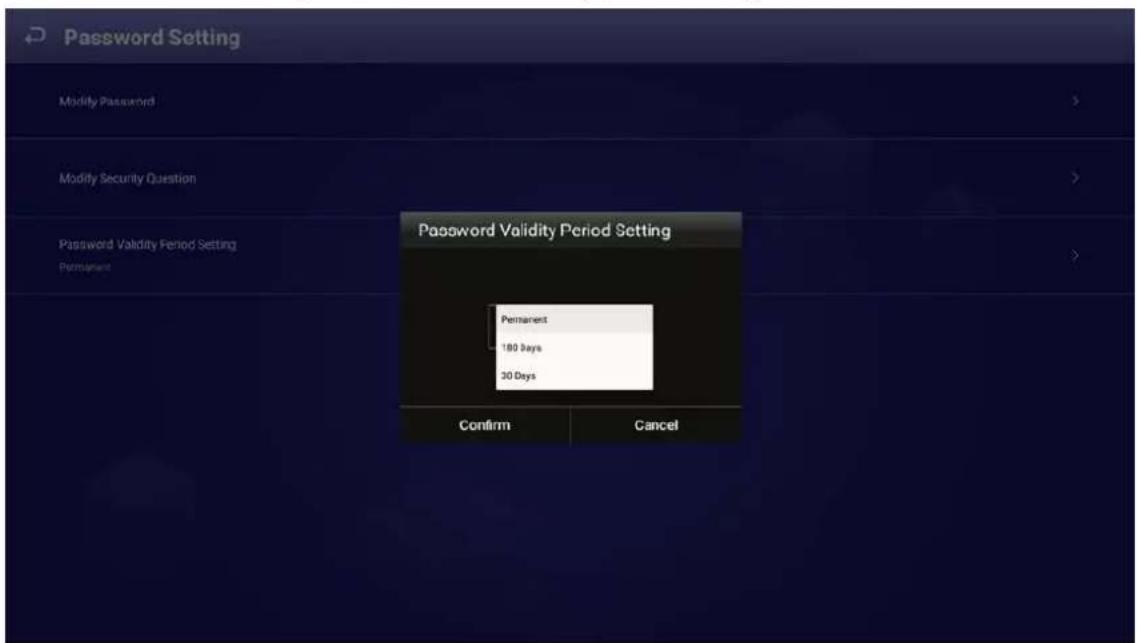
text_image
Password Setting Modify Password Modify Security Question Password Validity Period Setting Permanent Password Validity Period Setting Permanent 180 days 30 Days Confirm CancelStep 2 Select a password validity period. Permanent is selected by default. Step 3 Click Confirm.
Step 4 (Optional) If the password remains unchanged after the validity period expires, the system will prompt you to change password. Click Modify to change the password immediately; click Not Now to log in without changing the password.
Figure 3-10 Password expired

text_image
14:50:38 2021-07-29 Wednesday Network Release Tip Password expired. Please change your password. Modify Not Now3.5.2 Changing Password
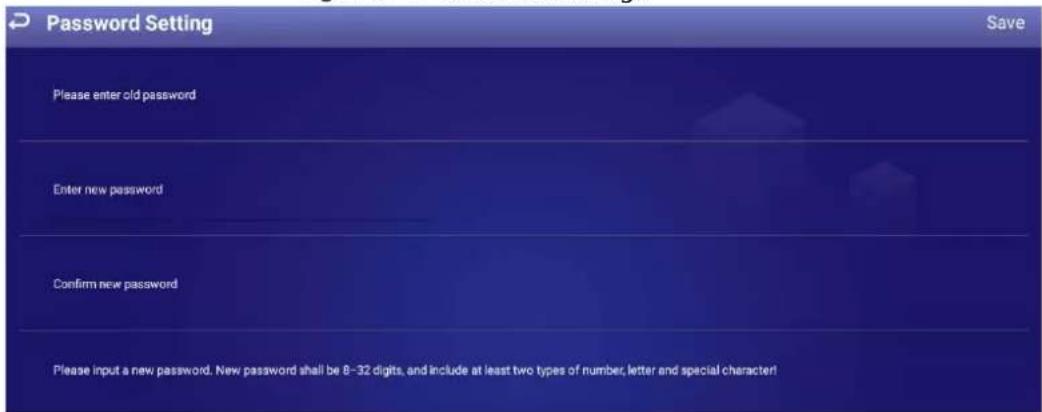
Step 1 On the main interface, select Settings > Password Setting > Password Setting.
Step 2 Enter old password and new password, and then confirm your new password.
Step 3 Click Save.
Figure 3-11 Password settings
text_image
Password Setting Save Please enter old password Enter new password Confirm new password Please input a new password. New password shall be 8-32 digits, and include at least two types of number, letter and special character!3.5.3 Changing Security Questions
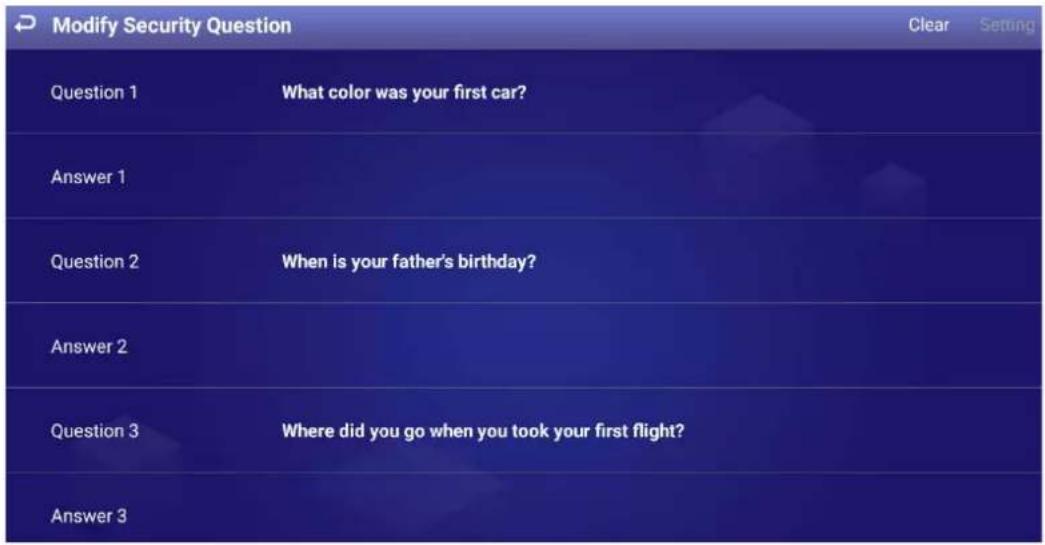
Step 1 On the main interface, select Settings > Password Setting > Modify Security Question.
Figure 3-12 Modify security question
text_image
Modify Security Question Question 1 What color was your first car? Answer 1 Question 2 When is your father's birthday? Answer 2 Question 3 Where did you go when you took your first flight? Answer 3 Clear SettingStep 2 Change answers to the security questions.

To change security questions, correctly answer the questions, and then click Clear to clear the answers first, and then set them again.
Step 3 Click Setting.
3.6 Quick Toolbar
Move your mouse pointer to the bottom of the interface, and the quick toolbar will be displayed. You can perform operations including: Rotate the screen, adjust the backlight, select input source, go to quick play interface, lock your screen, disconnect the USB drive from the Signage, and more.
Figure 3-13 Quick toolbar

text_image
Screenshot of a software toolbar with icons for home, news, app, play, lock, and folderTable 3-1 Description of quick toolbar
| Icon Description | |
| Displays whether the Signage is registered to the platform. This icon means not registered. | |
| Go to main interface. | |
| Adjust the backlight. | |
| Select input source fromLocalandHDMI.Different devices support different input sources. | |
| Go to the quick play interface. | |
| Lock the Signage. | |
| (ZYHH) | Disconnect your USB drive from the Signage. |
3.7 Releasing Project
You can release projects locally or through the platform.
● Releasing projects locally is ideal for scenarios with a single required Signage.
- If multiple signages and media (pictures, videos) are involved, and network connection is available, we recommend releasing projects through the platform. This will facilitate central management of the Signage and media (pictures, videos).

You cannot release a project locally and through the platform at the same time. To release a project through the platform, stop playing local projects first.
3.7.1 Network Release
Release projects through the network. Register the Signage to the platform when you use network release for the first time.
3.7.1.1 Configuration Flow
Figure 3-14 Network release

flowchart
graph LR
    A["Log in"] --> B["Configure network"]
    B --> C["Register to MPS"]
    C --> D["Release project through MPS"]
    D --> E["Play project on Signage"]
Table 3-2 Configuration flow (network release)
| Operation Description | |
| Log in | Log in and configure the Signage. For details, see "3.3 Login." |
| Configure network | Connects the Signage to the network. For details, see "3.7.1.2 Configuring Network." |
| Register the Signage to the platform | After registering the Signage to the platform, you can release projects and operate the Signage throughthe platform. For details, see "3.7.1.3 3.7.1.3 Registering the Signage to the platform." |
| Release project through the platform | After adding meida and configuring project plans on the platform, the project can be played on the Signage. For details, see the user's manual of the platform. |
3.7.1.2 Configuring Network
3.7.1.2.1 Connecting the Signage to Network
Connect your Signage to the network by Ethernet. Also, after connecting the Signage to the network, it can be used as a hotspot for other digital signage.
Step 1 On the main interface, select Settings > Network Setting.
Figure 3-15 Network setting

text_image
Network Setting Ethernet AllowlistStep 2 Configure the network type that you want to use.
Table 3-3 Configure network
| Network Type | Description |
| Ethernet | Connect your device to the network by Ethernet. Two methods are available to plan your device IP.DHCP: When there is a DHCP server on the network, after selecting the DHCP option, the Signage automatically obtains IP address from the DHCP server.Static IP: After selecting Static IP, respectively clickIP Address, GatewayorNetmask, and enter the IP address, default gateway and net mask according to the network plan. |
| Allowlist | See "3.7.1.2.2 Configuring Allowlist." |
3.7.1.2.1 Configuring Allowlist
Configure IP addresses that are allowed to access the Signage. Only IP addresses in the allowlist can be used to log in to the web interface. This is to enhance data security.
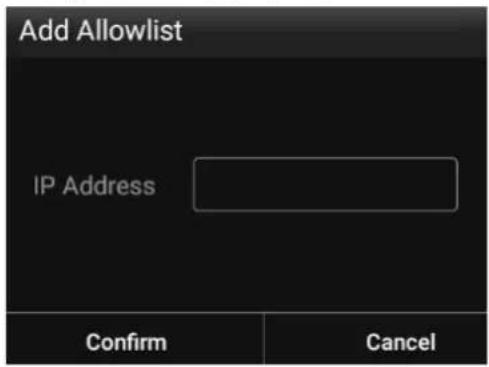
Step 1 On the main interface, select Settings > Network Setting > Allowlist.
Step 2 Click to enable allowlist functions. means enabled.
Step 3 Add the IP address of target device to your allowlist.
1) Click.

Figure 3-16 Add allowlist
text_image
Add Allowlist IP Address Confirm Cancel2) Enter an IP address.
3) Click Confirm.
The IP address that you have added is displayed.

You can repeat 1)-3) to add multiple IP addresses to your allowlist.
3.7.1.3 Registering the Signage to the platform
Connect the Signage to the platform, and then you can release projects through the platform and play the projects on the Signage.
Preparation
- The Signage and the platform are connected to the same network. To connect the Signage and the platform to the network, see "3.7.1.2.1 Connecting the Signage to Network."
- If allowlist is enabled, make sure that the IP address of the platform is added to the allowlist. For allowlist configuration, see "3.7.1.2.2 Configuring Allowlist."
Procedure
For first-time use of network release, register the Signage to the platform.
Step 1 On the main interface, click Network Release.
Figure 3-17 Network release

text_image
No project playedMove your mouse pointer to the bottom of the interface, and then a floating toolbar is displayed. You can:
- Click to import a project from USB drive.
- Click to go back to the main interface.
• View the status of registering to the platform. 📄 means not registered.
Step 2 Click on the lower-left corner.
Figure 3-18 Platform address
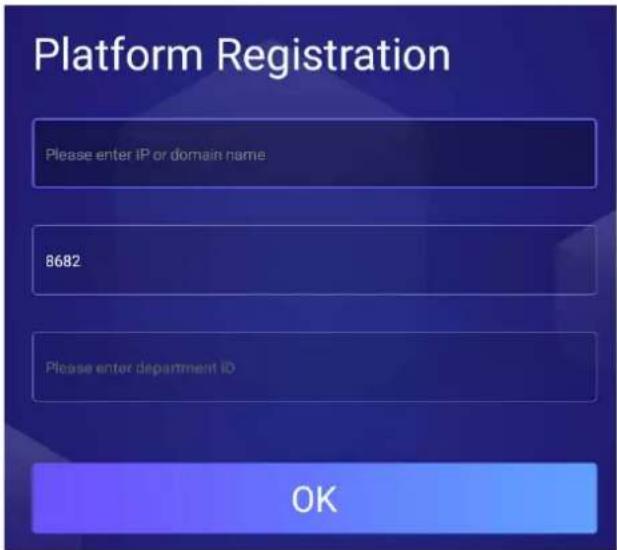
text_image
Platform Registration Please enter IP or domain name 8682 Please enter department ID OKStep 3 Enter the IP address or domain name of the platform (MPS or ICC), the platform port and ID of the department that Signage is in.

After registration, you can only link the Signage with devices in the same department. For details about operations on the platform, see the corresponding user's manual.
Step 4 Click OK.
3.7.1.4 Releasing Project
Manage Signages and release projects through the platform. For details, see the user's manual of the platform.
3.7.2 Local Release
Add videos or pictures to projects, and release projects locally by using General or Special template.
● For General template, you can select from Quick Play and Customized Play.
- For Special templates, you can select from Catering & Life, Special Offer & Promotion, Brand Publicity, Supermarket & Hotel, Info & News, Face Attendance, Stream Media, and Video Surveillance.
3.7.2.1 Configuration Flow
Figure 3-19 Local release (general template)

flowchart
graph LR
    A["Define project"] --> B["Insert USB drive"]
    B --> C["Log in"]
    C --> D["Select play mode"]
    D --> E["Quick play of project"]

    F["Prepare pictures and videos"] --> G["Insert USB drive"]
    G --> H["Log in"]
    H --> I["Customize template"]
    I --> J["Customized play of project"]
Table 3-4 Configuration flow (general template)
| Release Mode | Procedure Description | |
| Quick play | Define project | 1. Create a USBPLAY folder in the USB drive.1. Name the media (pictures, videos) to be played in the play order to create a custom project.2. Move the custom project to the USBPLAY folder. |
| Insert the USB drive | Insert the USB drive with the defined project into the USB port of the Signage. | |
| Log in | Log in and configure the Signage. For details, see "3.3 Login." | |
| Select play mode | Select project play mode. For details, see "3.7.2.2.1 Quick Play." | |
| Customized play | Prepare pictures and videos | Save the media (pictures, videos) to be played to the USB drive. |
| Insert the USB drive | Insert the USB drive with prepared media into the USB port of the Signage. | |
| Log in | Log in and configure the Signage. For details, see "3.3 Login." | |
| Customize template | Define the media (pictures, videos) to be played according to the template. For details, see "3.7.2.2.2 Custom Play." |
Figure 3-20 Local release (special template)
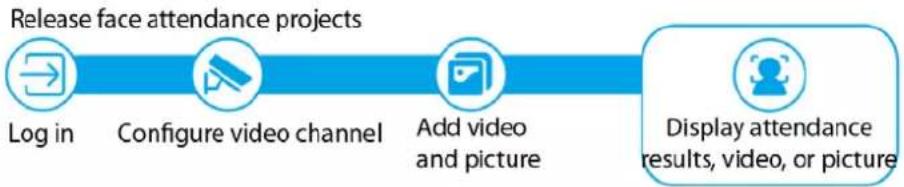
flowchart
graph LR
    A["Log in"] --> B["Configure video channel"]
    B --> C["Add video and picture"]
    C --> D["Display attendance results, video, or picture"]

flowchart
graph LR
    A["Prepare video and picture"] --> B["Insert USB drive"]
    B --> C["Log in"]
    C --> D["Create project by using special template"]
    D --> E["Play project"]
Table 3-5 Configuration flow (special template)
| Release Mode | Procedure Description | |
| Release face attendance projects | Log in | Log in and configure the Signage. For details, see "3.3 Login." |
| Configure video channel | Add video channels to the Signage. You can add channels from the camera, Smart PSS, DSS platform, or IVSS. For details, see "3.7.2.3.1 Configuring Face Attendance Template." | |
| Add video and picture | Add videos and pictures to the Signage. For details, see "3.7.2.3.1 Configuring Face Attendance Template." | |
| Release projects by using other special templates | Prepare video and picture | Save the videos and pictures to be played to the USB drive. |
| Insert the USB drive | Insert the USB drive with prepared media into the USB port of the Signage. | |
| Log in | Log in and configure the Signage. For details, see "3.3 Login." | |
| Create project by using special template | Add the media and then create projects according to special templates. For details, see "3.7.2.3.2 Configuring Other Special Templates." |
3.7.2.2 Releasing Projects by General Templates
3.7.2.2.1 Quick Play
Use the given templates to quickly release projects.
Preparation
• The USBPLAY folder is created on the USB drive.
- Insert the USB drive with media to be played into the Signage. Make sure that the pictures and videos are saved in the root directory of the USBPLAY folder.
Procedure
Step 1 On the main interface, select Local Release > General > Quick Play.
Figure 3-21 Quick play
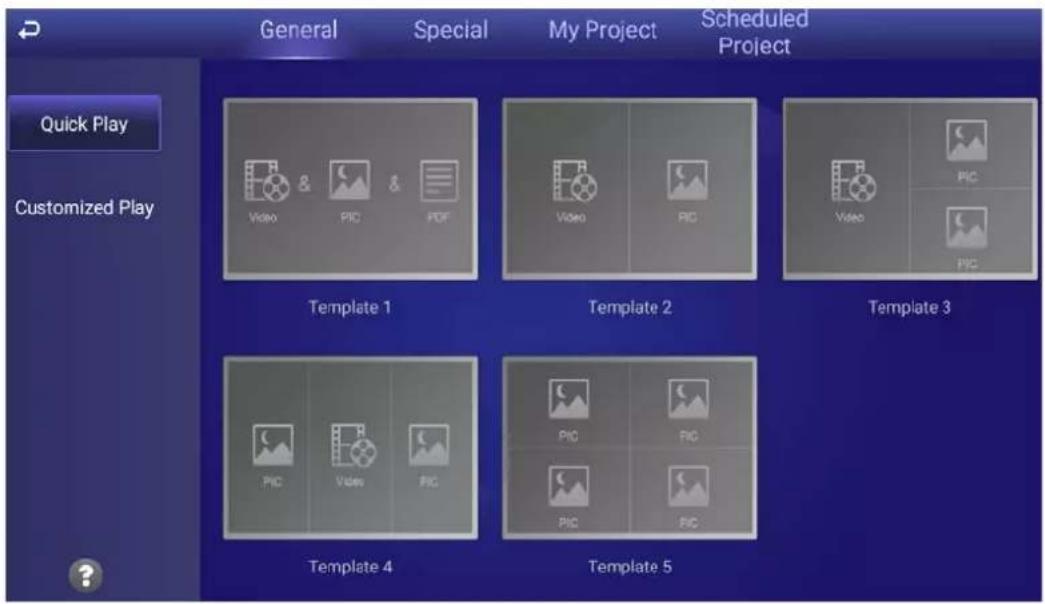
text_image
General Special My Project Scheduled Project Quick Play Customized Play Template 1 Template 2 Template 3 Template 4 Template 5Step 2 Select a template.
The system will display pictures and videos according to their layout in the template. A picture is displayed for 10 seconds by default and a video to the end.
3.7.2.2.2 Custom Play
Define your own templates to release information.
Step 1 On the main interface, select Local Release > General > Customized Play.
Figure 3-22 Customized play

text_image
D General Special My Project Scheduled Project Quick Play Customized Play Template 1 Template 2 Template 3 Template 4 Template 5Step 2 Click a template that you want to define.
The template configuration interface is displayed.
Step 3 Define the template.
1) Click + to configure this region's display sequence and content.
Figure 3-23 Interface of adding media

text_image
Template 1 Preview Publish + + Pictureplay duration: 16h OK Cancel2) Click.

3) Select a picture or a video, and configure the picture play duration as needed.

- Pictures are displayed for 10 seconds by default and videos to the end. - You can repeat 2)-3) to upload multiple pictures or videos. After adding the media (pictures and videos), you can drag the media to sort them.
4) Click OK.
The system displays the media by their order.
If there are multiple regions in your template, to make the template effective, you need to repeat 1)-4) to add projects to other regions.
Step 4 (Optional) Click Preview to preview the project to be played.
Step 5 Click Publish to play your project immediately.
3.7.2.3 Releasing Projects by Special Templates
Special templates include Catering & Life, Special Offer & Promotion, Brand Publicity, Supermarket & Hotel, Info & News, Face Attendance, Stream Media, and Video Surveillance. Select template as needed.
- To configure face attendance template, see "3.7.2.3.1 Configuring Face Attendance Template."
- To configure other templates, see "3.7.2.3.2 Configuring Other Special Templates."
3.7.2.3.1 Configuring Face Attendance Template
Add a camera channel to the Signage, and then the face information captured by the camera will be displayed, such as the similarity between the faces captured and faces saved in the database, and capture time.
Preparation
- When connecting your camera and the Signage through DSS or PSS protocol, make sure that a registration code is assigned to the Signage by the DSS platform or the Smart PSS client. When you have done this, your signage will successfully connect to the platform or client.
- The Signage, your camera, and the platform (for example DSS) are connected to the same LAN (Local Area Network).
- Your camera supports face detection and face comparison, and face database is configured.
Procedure
Step 1 On the main interface, select Local Release > Special.
Step 2 Click the Face Attendance template.
Figure 3-24 Configure face attendance template

text_image
Face Attendance 10:17:02 2021-04-20 Tuesday Preview Publish Edit No Info! No Info! No Info! No Info! No Info! No Info!Step 3 Click Edit on the upper-right corner.

- You can add video channels, video recordings and pictures to the template.
• Only one kind of media can be played at the same time.
Step 4 Add a channel, and then configure other parameters.
Figure 3-25 Setting

text_image
Setting Add Channel Display Video Image Play Media Display Comparison Results Display LOGO1) Click Add Channel, and then configure channel parameters.
Figure 3-26 Add channel
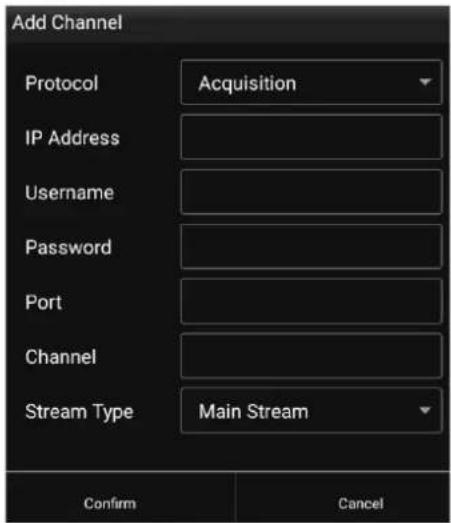
text_image
Add Channel Protocol Acquisition IP Address Username Password Port Channel Stream Type Main Stream Confirm CancelTable 3-6 Description of adding channel
| Parameter | Description |
| Protocol | You can select fromAcquisition(IP camera, IVSS (intelligent video surveillance server)),DSS, andPSS(SmartPSS), depending on the device connected. |
| IP Address | IP address of device (IP camera, IVSS), DSS, or PSS, depends on theProtocolthat you select. |
| Username | Username and password for logging in to IP camera or IVSS. |
| Password | You need to enter the username and password whenAcquisitionis selected fromProtocol. |
| Port | Port for logging in to IP camera, IVSS, DSS, or PSS.It is 37777 by default for IP camera and IVSS, and 8101 for DSS and PSS. |
| Channel | You need to enter channel No. when IP camera or IVSS is connected.Enter 1 when IP camera is connected.Enter the number of channels that you want to display when IVSS is connected. |
| StreamType | Main stream: Provides large bit stream and images with high resolution, but requires large bandwidth.Sub stream: Provides small bit stream and smooth image, and requires less bandwidth. |
Step 5 Click Confirm, and then configure other parameters.
Table 3-7 Description of other parameters
| Parameter Description | |
| Display Video Image | Screen split: You can view the video image of the added channels by 1, 2, 3, or 4 splits.Switching time(seconds): Switch to play video of another added channel after the defined time.Channel selection: Select the channel to be played in each screen split. |
| Play Media |  [T5H] to add media (video or picture). [T5H] to add media (video or picture). Select media, and then click [T5X] to delete it.Drag the media to sort them.Pictures are displayed for 10 seconds by default and videos to the end.Only one kind of media can be played at a time. Select media, and then click [T5X] to delete it.Drag the media to sort them.Pictures are displayed for 10 seconds by default and videos to the end.Only one kind of media can be played at a time. |
| Display Comparison Results | Enable or disable voice broadcast and temperature information and display face comparison results.[0WHC] [X2D] to enable voice broadcast.Display successful comparison results: Click , and then select the item to be displayed when face comparison succeeds.Display failed comparison results: Click , and then select the item to be displayed when face comparison fails.Display card number: After registering the certificate number (such as ID No., passport No.) of person on the platform, if Display Card Number is enabled, such information will be displayed next to the person name on the Signage.Temperature: Click to enable temperature .[ZSC8]The temperature function is available only when the Signage is associated with the turnstiles from the same manufacturer. |
| Display LOGO | Click to add a picture, which will be the logo displayed on the upper-right corner when face attendance project is played. |
Step 6 (Optional) Click Preview on the upper-right corner to preview the project to be played.
Step 7 Click Publish on the upper-right corner to play your project immediately.
3.7.2.3.2 Configuring Other Special Templates
The other special templates are similar in configurations. This sections uses supermarket & hotel template as an example.
Step 1 On the main interface, select Local Release > Special.
Step 2 Click a template that you want to define.
Step 3 Configure the template.
1) Click

to configure this region's display sequence and content.
Figure 3-27 Add media
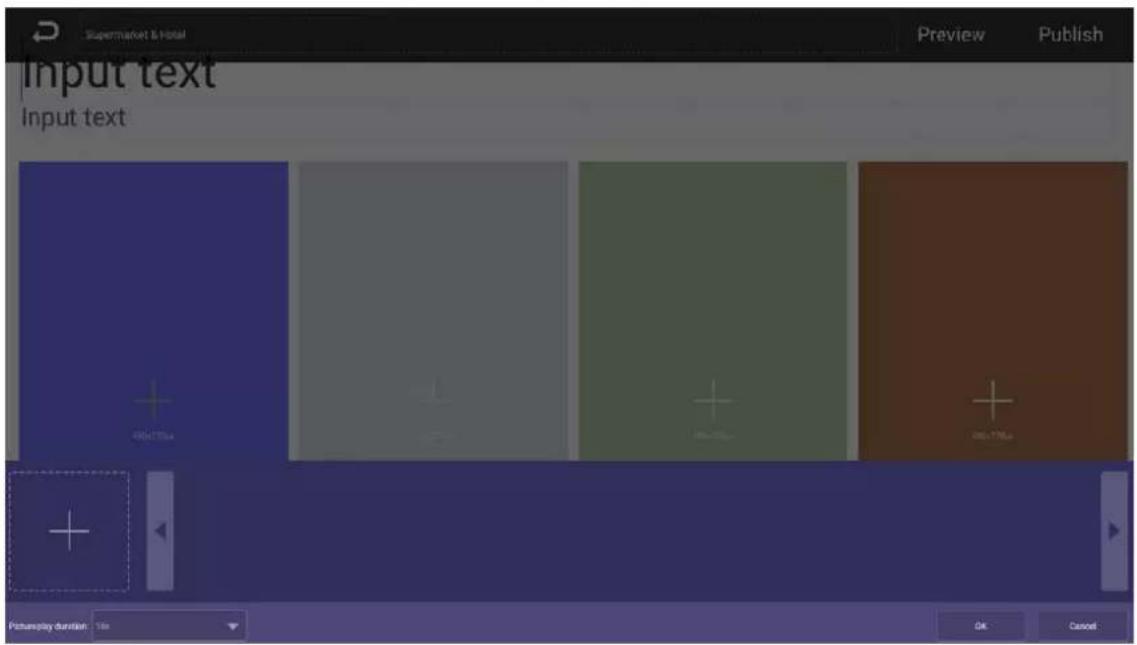
text_image
Supermarket & Hotel Preview Publish Input text Input text 40x75x4 10x20x 0x75x Postersply duration: 10x OK Cancel2) Click.

3) Select a picture, and configure the picture play duration as needed.

● Pictures are displayed for 10 seconds by default and videos to the end.
- You can repeat 2)-3) to upload multiple pictures or videos. After adding the media (pictures, videos), you can drag the media to sort them.
- Click 📁 to delete media.
4) Click OK.
The system displays the media by their order.
If there are multiple regions in your template, to make the template effective, you need to repeat 1)–4) to add projects to other regions.
Step 4 Operate the template that you have almost finished. On the upper-right corner of the current interface:
- Click Preview to preview the project to be played.
- Click Publish to play your project immediately.
3.7.2.4 Managing My Project
On the main interface, select Local Release > My Project, and then you can view projects that have been played and the templates you have saved.
You can also:
• View played projects and saved templates.
- Click a project to play it.
- Click 📋, and then select a project to delete this project.
Figure 3-28 My project

text_image
General Special My Project Scheduled Project 09:30:02 Attendance-2021-04-20 10:21:293.7.2.5 Scheduled Project
Configure which and when projects will be played.
Step 1 On the main interface, select Local Release > Scheduled Project.
Step 2 Click , and then on the interface displayed, click Add order play period.
Figure 3-29 Add order play period

text_image
ScheduledProject Save Publish Add order play manualStep 3 Set time period, and then click .
Figure 3-30 Add order play period
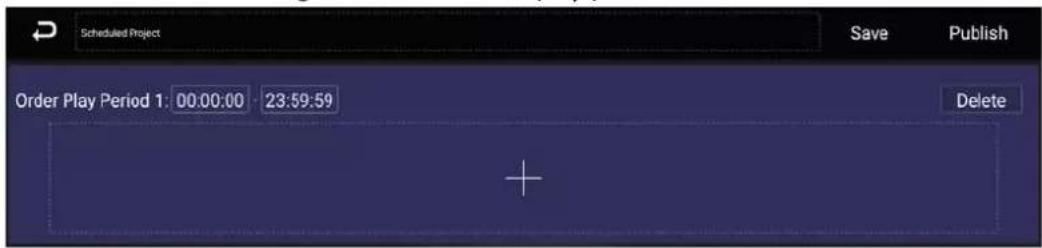
text_image
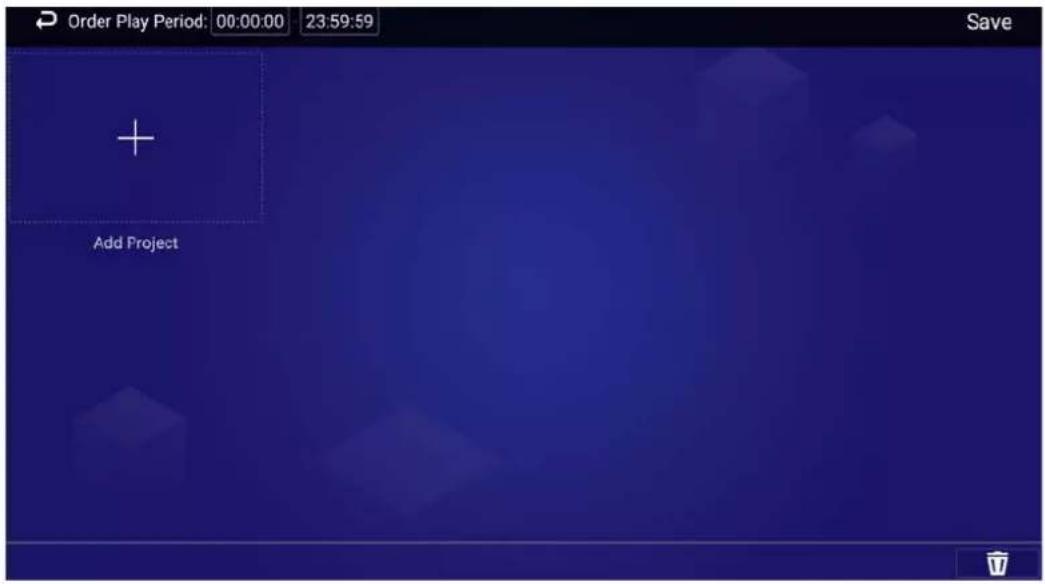
Scheduled Project Order Play Period 1: 00:00:00 23:59:59 Save Publish DeleteStep 4 Click , select a project, and then click OK.
The system goes back to the Add Project interface.

Up to 30 projects can be added to each time period.
Figure 3-31 Add project
text_image
Order Play Period: 00:00:00 23:59:59 Save Add ProjectStep 5 Click Save.
The system goes back to the Add order play period interface.

- Repeat Step 2–Step 5 to add multiple order play periods.
• Up to 30 periods can be added.
Step 6 Click Save.

You can also click Publish to play the project immediately.
3.8 App Manager
On the main interface, click App Manager, and then the App Center interface is displayed.
You can:
- Click the App Center app to install new apps, view and manage different files, search for and download media (pictures, videos).
◇ Click Install App to install new apps. For details, see "3.8.1 Installing App."
◇ Click File Manager to view and manage different files. For details, see "3.8.2 File Manager."
Connect the Signage to network, and then click Browser to search for and download media (pictures, videos).
- Click the App Uninstall tab to uninstall the app from the Signage.
Figure 3-32 App center

text_image
App Center App Uninstall Install App File Manager Browser3.8.1 Installing App
Install an app to the Signage, and then you can manage and operate the app.
Preparation
Insert the USB drive with the installation package (.apk) into the Signage.
Procedure
Step 1 On the main interface, select App Manager > App Center > Install App.
Figure 3-33 Select location

text_image
Select Location USB driveStep 2 Click the USB where the installation file is installed.
The system will automatically find an app file for you.
Figure 3-34 Install an app

text_image
Name Modify time File size Lapk 2017-11-08 19:16:30 12.939MBStep 3 Click the installation file.
The system prompts Allow install xxx.apk application?.
Step 4 Click OK.
The installation starts. Follow the onscreen instructions to finish the installation.
You can use and view the app you have installed in App Center.
3.8.2 File Manager
View and manage different types of files.
Step 1 On the main interface, select App Manager > App Center > File Manager.
Figure 3-35 File manager

text_image
FileManager Internal Storage USB driveStep 2 Select a storage path, for example, internal storage.
Files are displayed in different types.
Click a file type to view and operate (such as delete) files.
Figure 3-36 Different types of files

text_image
FileManager Music (0) Video (0) Picture (0) Document (0) Installer (0)4 System Settings
4.1 Setting Date & Time
You can set time and date for the Signage. Remember to select a correct time zone based on where the Signage lies.
Step 1 On the main interface, select Settings > Date & Time.
Step 2 Set date, time, and time zone. You can also enable the 24-hour format. The operation takes effect immediately.
Step 3 Enable IPC time setting, configure the Renewal cycle (24 hours by default), and then click Save. The time of IPC will be synchronized with that of the Signage within the defined renewal cycle.
Step 4 Enable NTP time setting, configure the Renewal cycle, and then click Save. The time of the Signage will be synchronized with that of the NTP server within the defined renewal cycle.
Figure 4-1 Date & time

text_image
Date & Time Set date 2021-04-20 Set time 11:36 Select time zone GMT+08:00 China Standard Time Use 24-hour format 13:00 IPC time setting NTP time setting4.2 Selecting Input Source
Input sources include Local (default) and HDMI.
- Local: Play projects from your USB drive or through the platform.
● HDMI: Play projects from the HDMI input source, for example, your PC.

Different devices support different input sources.
Step 1 On the main interface, select Settings > Input Source Setting.
Figure 4-2 Input source
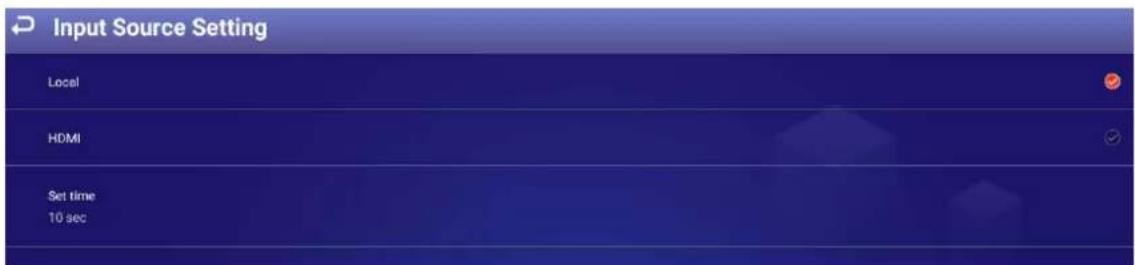
text_image
Input Source Setting Local HDMI Set time 10 secStep 2 Select input source.
- Local: Displays videos or pictures released locally or through the platform.
• HDMI: Displays images from HDMI input source.
Step 3 Configure HDMI waiting time.

If HDMI is selected, but there is no signal, the Signage displays NO SIGNAL. In this case, if the defined waiting time ends, the Signage will count down 10 seconds, and then display videos or pictures released locally.
4.3 Configuring Visual & Audio Parameters
Adjust display effect of screen and device volume.

If it prompts This operation may cause power increase. Do you want to continue?, click Confirm to continue.
Step 1 On the main interface, select Settings > Audiovisual Adjustment.
Figure 4-3 Audiovisual adjustment
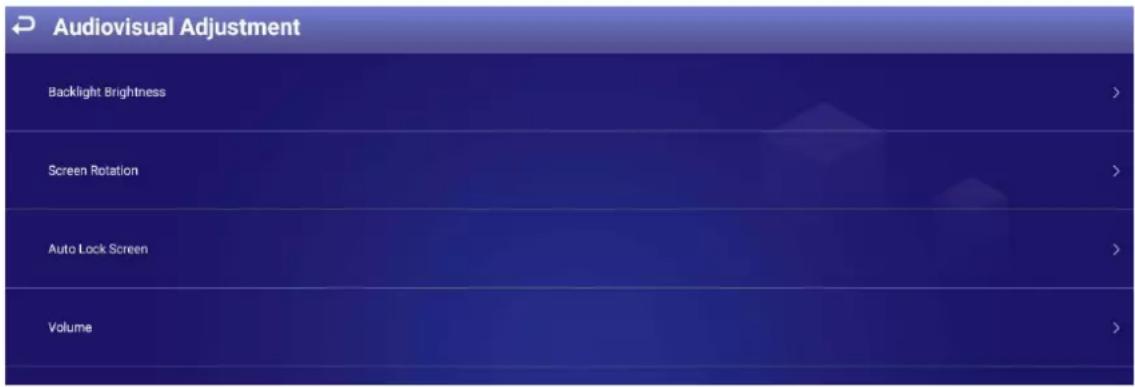
text_image
Audiovisual Adjustment Backlight Brightness Screen Rotation Auto Lock Screen VolumeStep 2 Configure visual & audio parameters.
Table 4-1 Visual & audio adjustment
| Item Description | |
| Backlight Brightness | Adjust the screen's background brightness manually or automatically.[IMAGE]Auto background brightness adjustment is available on select models.Auto: EnableAuto, and the background brightness will be adjusted according to the surrounding lighting conditions.Manual: DisableAuto, and then you need to drag the brightness bar to adjust the background brightness manually.Click[2YKB]to restore to default value. |
| Screen Rotation | Rotate your screen with angles available on the Signage. |
| Auto Lock Screen | When your device is not playing any projects, you can set a device idle time (the time when you do not operate the device), beyond which your device will be locked.You can select locking your device after 1min, 3min, 10min, or select Never to keep your device unlocked. |
| Volume | Adjust the volume of playing projects.Click Volume, and then drag the volume bar to adjust the volume. 0 represents muted.Click [GZY] to restore to default value. |
4.4 System Language
Select the display language from Settings > Language. Currently, only Chinese and English are available.
Figure 4-4 Language

text_image
Language 中文 English Save5 Maintenance and Update
5.1 Maintenance Requirements
To keep the Signage running normally, you need to:
- Change the user password every three months.
- Restart the Signage regularly.
- Update firmware regularly.
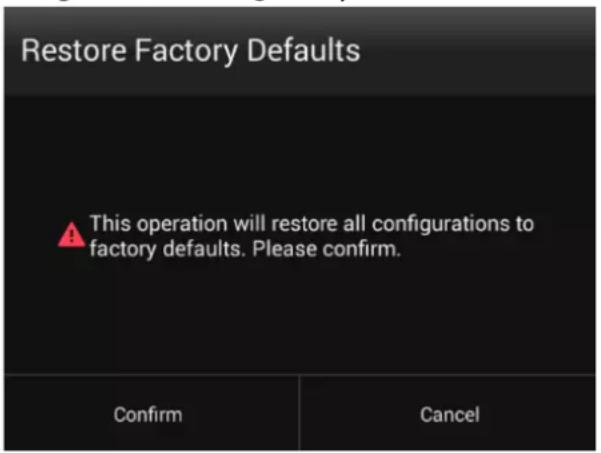
5.2 Restoring Factory Defaults
Restore your device to factory settings to handle problems such as storage insufficiency and system error. Be cautious because this might cause data loss.
Step 1 On the main interface, select Settings > Maintenance and Upgrade > Restore Factory Defaults.
Step 2 Click Confirm.
After restoring factory defaults, the Signage will restart.
Figure 5-1 Restoring factory defaults
text_image
Restore Factory Defaults This operation will restore all configurations to factory defaults. Please confirm. Confirm Cancel5.3 Upgrading System
Update system software.
Preparation
Insert a USB drive with the update package into your Signage. Contact our customer service to get an update package.
Procedure
Step 1 On the main interface, select Settings > Maintenance and Upgrade > System Upgrade.
Step 2 Select an update package to start update.
After being updated, your device restarts.
Figure 5-2 System update

text_image
System Upgrade USB drive5.4 Configuring Auto Maintenance Time
By default, the Signage auto restarts at 1:00 a.m. each day. You can also set the time that the system auto restarts, and click Save. The system auto restarts at the specified time.
Step 1 On the main interface, select Settings > Maintenance and Upgrade > Auto Maintenance Time Setting.
Step 2 Drag your mouse up and down to select a time.
Step 3 Click any position out of the Auto Maintenance Time Setting interface to finish configuration.
Figure 5-3 Configure auto maintenance time

text_image
Auto Maintenance Time Setting 21 58 22 57 23 58 00 59 01 : 00 02 01 03 02 04 03 CONFIRM CANCEL5.5 Turning Screen On/Off at Fixed Time
Step 1 On the main interface, select Settings > Maintenance and Upgrade > Timing Screen Turn On.
Step 2 Click 🐘 to enable turning screen on by week or customized time. 🐘 means enabled.

Custom settings come first when Custom and Week are enabled at the same time.
Step 3 Click + to configure the specific date and time. The screen will stay on for the defined period.
Step 4 Click Save.
5.6 Turning the Signage On/Off at Fixed Time
Step 1 On the main interface, select Settings > Maintenance and Upgrade > Timing Device Turn On.
Step 2 Click ☐ to enable turning the Signage on by week or customized time. ☐ means enabled.

Custom settings come first when Custom and Week are enabled at the same time.
Step 3 Click ☐ to configure the specific date and time. The Signage will stay on for the defined period.
Step 4 Click Save.
5.7 Restarting Device
Manually restart your device to solve problems such as system crash.
Step 1 On the main interface, select Settings > Maintenance and Upgrade > Restart Now.
Step 2 Click Confirm.
The Signage starts restarting.
Figure 5-4 Restart now
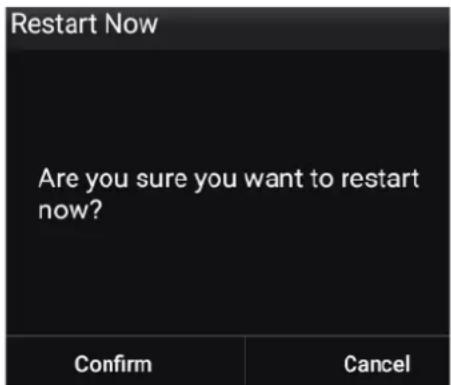
text_image
Restart Now Are you sure you want to restart now? Confirm Cancel5.8 Viewing Device Information
On the main interface, select Settings > Terminal Info, and then you can view device information such as device name, S/N, and app version.
Figure 5-5 Device information
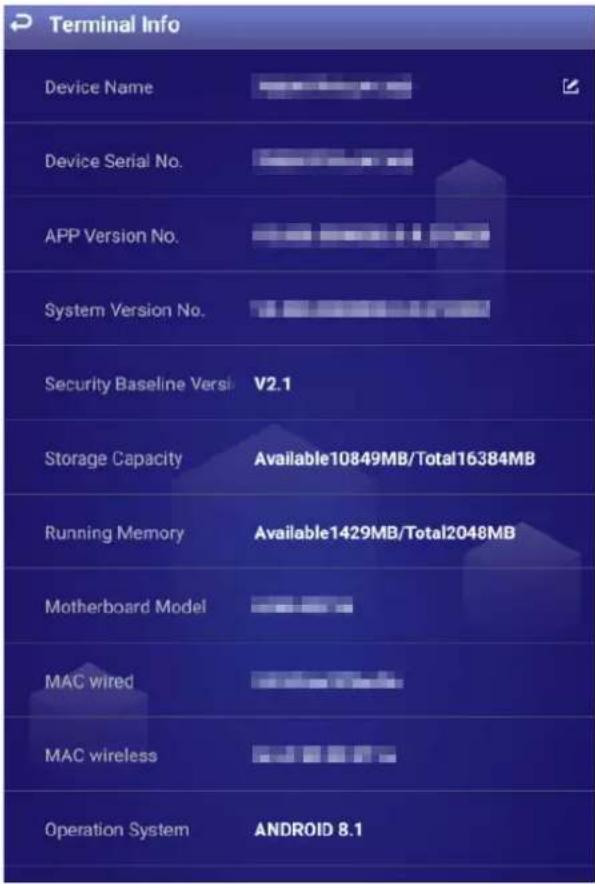
text_image
Terminal Info Device Name Device Serial No. APP Version No. System Version No. Security Baseline Versi V2.1 Storage Capacity Available10849MB/Total16384MB Running Memory Available1429MB/Total2048MB Motherboard Model MAC wired MAC wireless Operation System ANDROID 8.1Appendix 1 Remote Control
For Signage of specified models, you can use remote controls to operate them.

- The remote control supports limited operations: You can use the remote control to turn on or off the screen, turn on, turn off, or restart the Signage, adjust the volume and go back to the home page.
- Refer to the packing list to see whether the remote control comes with the Signage. If not, you need to purchase it separately.
Appendix figure 1-1 Remote control appearance

natural_image
Black remote control with navigation buttons and a home button (no text or symbols visible)Appendix table 1-1 Buttons description
| Operation Item Buttons Needed | |
| Turn on/off device | Press  |
| Turn on/off device screen | Hold  three seconds. three seconds. |
| Adjust volume | Volume up: Press  and press right arrow button.Volume down: Press and press right arrow button.Volume down: Press  and press left arrow button. and press left arrow button. |
| Operation Item | Buttons Needed |
| Log in | 1. When you find the screen is locked, you can use your remote control to type the password. Press  on your remote control. The Login interface is displayed.2. Operate arrow keys and move pointer to password box, and type password.3. Move pointer to Done on virtual keyboard.4. Move pointer to OK and press on your remote control. The Login interface is displayed.2. Operate arrow keys and move pointer to password box, and type password.3. Move pointer to Done on virtual keyboard.4. Move pointer to OK and press  on your remote control to log in to the device. on your remote control to log in to the device. |
| Return to the previous page | Press  |
| Return to the main menu | Press  |
| Bring up the frequently used tool bar | Press  , and operate the left/right arrow keys to select a function you want. , and operate the left/right arrow keys to select a function you want. |
Appendix 2 Cybersecurity Recommendations
Mandatory actions to be taken for basic device network security:
1. Use Strong Passwords
Please refer to the following suggestions to set passwords:
● The length should not be less than 8 characters.
- Include at least two types of characters; character types include upper and lower case letters, numbers and symbols.
- Do not contain the account name or the account name in reverse order.
- Do not use continuous characters, such as 123, abc, etc.
- Do not use overlapped characters, such as 111, aaa, etc.
2. Update Firmware and Client Software in Time
- According to the standard procedure in Tech-industry, we recommend to keep your device (such as NVR, DVR, IP camera, etc.) firmware up-to-date to ensure the system is equipped with the latest security patches and fixes. When the device is connected to the public network, it is recommended to enable the "auto-check for updates" function to obtain timely information of firmware updates released by the manufacturer.
- We suggest that you download and use the latest version of client software.
"Nice to have" recommendations to improve your device network security:
1. Physical Protection
We suggest that you perform physical protection to device, especially storage devices. For example, place the device in a special computer room and cabinet, and implement well-done access control permission and key management to prevent unauthorized personnel from carrying out physical contacts such as damaging hardware, unauthorized connection of removable device (such as USB flash disk, serial port), etc.
2. Change Passwords Regularly
We suggest that you change passwords regularly to reduce the risk of being guessed or cracked.
3. Set and Update Passwords Reset Information Timely
The device supports password reset function. Please set up related information for password reset in time, including the end user's mailbox and password protection questions. If the information changes, please modify it in time. When setting password protection questions, it is suggested not to use those that can be easily guessed.
4. Enable Account Lock
The account lock feature is enabled by default, and we recommend you to keep it on to guarantee the account security. If an attacker attempts to log in with the wrong password several times, the corresponding account and the source IP address will be locked.
5. Change Default HTTP and Other Service Ports
We suggest you to change default HTTP and other service ports into any set of numbers between 1024–65535, reducing the risk of outsiders being able to guess which ports you are using.
6. Enable HTTPS
We suggest you to enable HTTPS, so that you visit Web service through a secure communication channel.
7. MAC Address Binding
We recommend you to bind the IP and MAC address of the gateway to the device, thus reducing
the risk of ARP spoofing.
8. Assign Accounts and Privileges Reasonably
According to business and management requirements, reasonably add users and assign a minimum set of permissions to them.
9. Disable Unnecessary Services and Choose Secure Modes
If not needed, it is recommended to turn off some services such as SNMP, SMTP, UPnP, etc., to reduce risks.
If necessary, it is highly recommended that you use safe modes, including but not limited to the following services:
- SNMP: Choose SNMP v3, and set up strong encryption passwords and authentication passwords.
- SMTP: Choose TLS to access mailbox server.
- FTP: Choose SFTP, and set up strong passwords.
● AP hotspot: Choose WPA2-PSK encryption mode, and set up strong passwords.
10. Audio and Video Encrypted Transmission
If your audio and video data contents are very important or sensitive, we recommend that you use encrypted transmission function, to reduce the risk of audio and video data being stolen during transmission.
Reminder: encrypted transmission will cause some loss in transmission efficiency.
11. Secure Auditing
- Check online users: we suggest that you check online users regularly to see if the device is logged in without authorization.
- Check device log: By viewing the logs, you can know the IP addresses that were used to log in to your devices and their key operations.
12. Network Log
Due to the limited storage capacity of the device, the stored log is limited. If you need to save the log for a long time, it is recommended that you enable the network log function to ensure that the critical logs are synchronized to the network log server for tracing.
13. Construct a Safe Network Environment
In order to better ensure the safety of device and reduce potential cyber risks, we recommend:
- Disable the port mapping function of the router to avoid direct access to the intranet devices from external network.
- The network should be partitioned and isolated according to the actual network needs. If there are no communication requirements between two sub networks, it is suggested to use VLAN, network GAP and other technologies to partition the network, so as to achieve the network isolation effect.
- Establish the 802.1x access authentication system to reduce the risk of unauthorized access to private networks.
- Enable IP/MAC address filtering function to limit the range of hosts allowed to access the device.