LE40B9600T - TV HAIER - Free user manual and instructions
Find the device manual for free LE40B9600T HAIER in PDF.

User questions about LE40B9600T HAIER
0 question about this device. Answer the ones you know or ask your own.
Ask a new question about this device
Download the instructions for your TV in PDF format for free! Find your manual LE40B9600T - HAIER and take your electronic device back in hand. On this page are published all the documents necessary for the use of your device. LE40B9600T by HAIER.
USER MANUAL LE40B9600T HAIER
1) Read these instructions.
2) Keep these instructions.
3) Heed all warnings.
4) Follow all instructions.
5) Do not use this apparatus near water.
6) Clean only with dry cloth.
7) Do not block any ventilation openings, install in accordance with the instructions.
8) Do not install near any heat sources such as radiations, heat registers, stoves, or other apparatus (including amplifiers) that produce heat.
9) Do not defeat the safety purpose of the polarized plug. If the provided plug does not fit into your outlet, consult an electrician for replacement of the obsolete outlet.
10) Protected the power cord from being walked on or pinched particularly at plugs, convenience receptacles, and the point where they exit from the apparatus.
11) Only use attachments/accessories specified by the manufacturer.
12) Unplug this apparatus during lighting storms or when unused for long periods of time.
13) Refer all servicing to qualified service personnel. Servicing is required when the apparatus has been damaged in any way, such as power-supply cord or plug is damaged, liquid has been spilled or objects have fallen into the apparatus, the apparatus has been exposed to rain or moisture, does not operate normally, or has been dropped.
14) Mains plug is used as the disconnect device, the disconnect device shall remain readily operable.
15) The ventilation should not be impeded by covering the ventilation openings with items, such as newspapers, table-cloth, curtains, etc.
16) No naked flame sources, such as lighted candles, should be placed on the apparatus.
17) Attention should be drawn to the environmental aspects of battery disposal.
18) The use of apparatus in moderate climate.
19) The apparatus shall not be exposed to dripping or splashing and that no objects filled with liquids, such as vases, shall be placed on the apparatus.

text_image
CAUTION RISK OF ELECTRIC SHOCK DO NOT OPEN! CAUTION TO REDUCE THE RISK OF ELECTRIC SHOCK, DO NOT REMOVE COVER (OR BACK).NO USER SERVICEABLE PARTS INSIDE. REFER SERVICING TO QUALIFIED SERVICE PERSONNEL.
text_image
The symbol indicates that dangerous voltages constituting a risk of electric shock are present within this unit. The symbol indicates that there are important operating and maintenance instructions in the literaturaccompanying this unit.WARNING:
To reduce the risk of fire or electric shock, do not expose this apparatus to rain or moisture.
WARNING:
The batteries shall not be exposed to excessive heat such as sunshine, fire or the like.

This symbol indicates that this product incorporates double insulation between hazardous mains voltage and user accessible parts. When servicing use only identical replacement parts.

This marking indicates that this product should not be disposed with other household wastes throughout the EU. To prevent possible harm to the environment or human health from uncontrolled waste disposal, recycle it responsibly to promote the sustainable reuse of material resources. To return your used device, please use the return and collection systems or contact the retailer where the product was purchased. They can take this product for environmental safe recycling.
natural_image
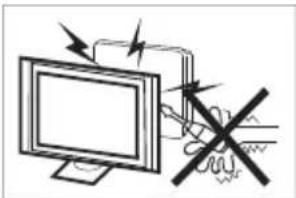
Illustration of a computer monitor with arrows indicating motion and a hand holding a device (no text or symbols present)High voltages are used in the operation of this television receiver. Do not remove the cabinet back from your set. Refer servicing to qualified service personnel.
natural_image
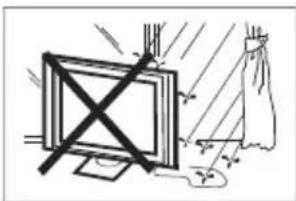
Illustration of a window with a cross mark and a cloth, no text or symbols presentTo prevent fire or electrical shock hazard, do not expose the television receiver to rain or moisture.

natural_image
Simple line drawing of a computer monitor with a cross symbol crossed out, no text or symbols present.Do not drop or push objects into the television cabinet slots or openings. Never spill any kind of liquid on the television receiver.
natural_image
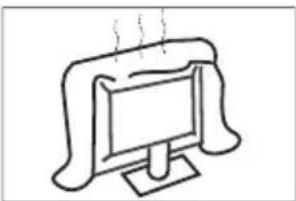
Simple line drawing of a computer monitor with a base, emitting steam (no text or symbols)Do not block the ventilation holes in the back cover. Adequate ventilation is essential to prevent failure of electrical components.

natural_image
Simple line drawing of a flat-screen TV with a stand (no text or symbols)Do not trap the power supply cord under the television receiver.

natural_image
Computer monitor displaying three prohibition symbols: a crossed-out circle, a document icon, and a circular icon (no text or labels)If you are going to clean the product, Unplug the TV, use soft fabric, no water, never chemicals.

natural_image
Cartoon illustration of a person on a computer monitor with a crossed-out X symbol (no text or symbols present)Never stand on, lean on, or suddenly push the television or its stand. You should pay special attention to children. Serious injury may result if it falls.
natural_image
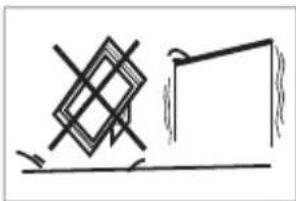
Simple line drawing of a geometric shape with intersecting lines and a rectangular block, no text or symbols present.Do not place your television on an unstable cart, stand, shelf or table. Serious injury to an individual, and damage to the television, may result if it falls.
natural_image
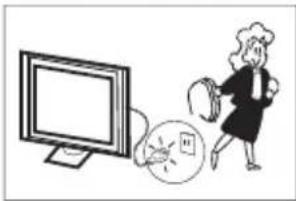
Illustration of a person running away from a computer screen with a clock nearby (no text or symbols)When the television receiver is not used for an extended period of time, it is advisable to disconnect the AC power cord from the AC outlet.

natural_image
Simple line drawing of a monitor with a 'X' symbol crossed out, and a small lamp emitting smoke (no text or symbols)Avoid exposing the television receiver to direct sunlight and other sources of heat. Do not stand the television receiver directly on other products which give off heat, e.g. video cassette players and audio amplifiers. Do not place naked flame sources, such as lighted candles on the television.
text_image
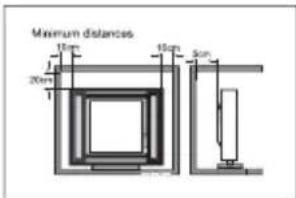
Maximum distances 20mm 15mm 30mmIf the television is to be built into a compartment or similar enclosure, the minimum distances must be maintained. Heat build-up can reduce the service life of your television, and can also be dangerous.
Note: the use of apparatus in moderate climates.
Main features
① Used as Television, display terminal, PC display;
② High luminance, wide viewing angle;
③ Can store 99 TV programs;
④ HDMI interface;
⑤ Multi-Media player (USB);
Accessories
Infrared Remote Controller
User's Manual
Main parameter
| Viewing Picture Size (Diagonal) | 39inch |
| Resolution | 1366x768 |
| Aspect Ratio | 16:9 |
| TV System | PAL/BG |
| Video Signal System | PAL/SECAM |
| Receiving Channel | ATV 48.25 MHz - 863.25 MHz DVB-T/T2/C VHF(50MHz-230MHz) UHF(474MHz-862MHz) |
| Input Power Voltage | AC 100-240V 50/60Hz |
| Power consumption | 74W |
| Audio Output Power (THD≤7%) | 2 x8W |
| Signal input/output | Analog RGB(VGA) x 1PC AUDIO x 1AV x 1YCb (Pb)Cr (Pr) x 1RFx 1HEADPHONE OUTPUT x 1High-Definition Multimedia Interface(HDMI) x 3USBx 1COAXIAL OUTPUT x 1 |
| Horizontal definition (TV line) | Composite Video input >= 350Y Cb(Pb) Cr(Pr) >=400 |
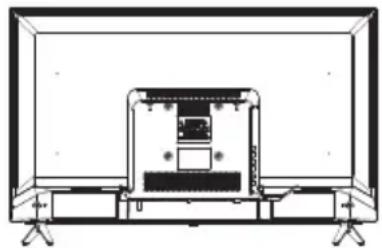
Stand Assemble Instruction
1 Attach the stand base set to the bottom of the TV by firmly tightening the
.swercscp4
2 Finished.

natural_image
Technical line drawing of a flat-screen TV or monitor with visible internal components and mounting feet (no text or symbols)e i l p p u s
natural_image
Technical line drawing of a mechanical device with no visible text or symbolsINSTALLATION NOTES
Locate the TV in a room where light does not strike the screen directly. Total darkness or a reflection on the screen can cause eyestrain. Soft and indirect lighting is recommended for comfortable viewing. Allow enough space between the TV and the wall to permit ventilation.
Please do not attempt to rotate the TV on the stand.
Avoid excessively warm locations to prevent possible damage to the cabinet or premature component failure.
Wall Mounting Installation Guidelines
Use the four screws to fix the TV onto a wall mounting bracket (not included) via the four VESA standard holes on the back of the television.
Specification:
100mm x 100mm using 4 screws (not included) at size M6.
WARNING
Never place a television set in an unstable location. A television set may fall, causing serious personal injury or death. Many injuries, particularly to children, can be avoided by taking simple precautions such as:
– Using cabinets or stands recommended by the manufacturer of the television set.
- Only using furniture that can safely support the television set.
- Ensuring the television set is not overhanging the edge of the supporting furniture.
- Not placing the tele vision set on tall furniture (for example, cupboards or bookcases) without anchoring both the furniture and the television set to a suitable support.
- Not placing the television set on cloth or other materials that may be located between the television set and supporting furniture.
– Educating children about the dangers of climbing on furniture to reach the television set or its controls.
If your existing television set is being retained and relocated, the same considerations as above should be applied.

text_image
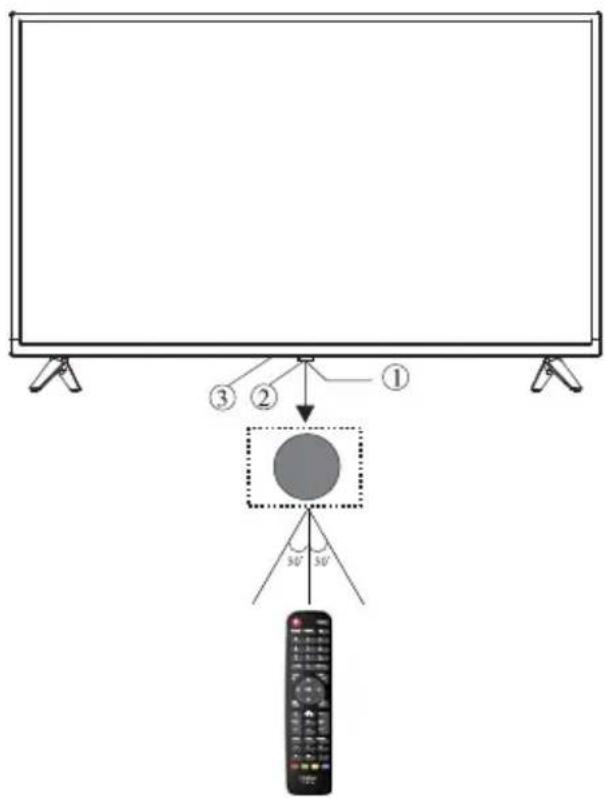
M6 M6 M6 M6Front panel
text_image
Diagram showing a monitor setup with labeled components and a circular button, including directional arrows and a remote control.-
Remote control sensor.
-
Indicator LED: RED
STANDBY.
- Keyboard
REAR AV Connections

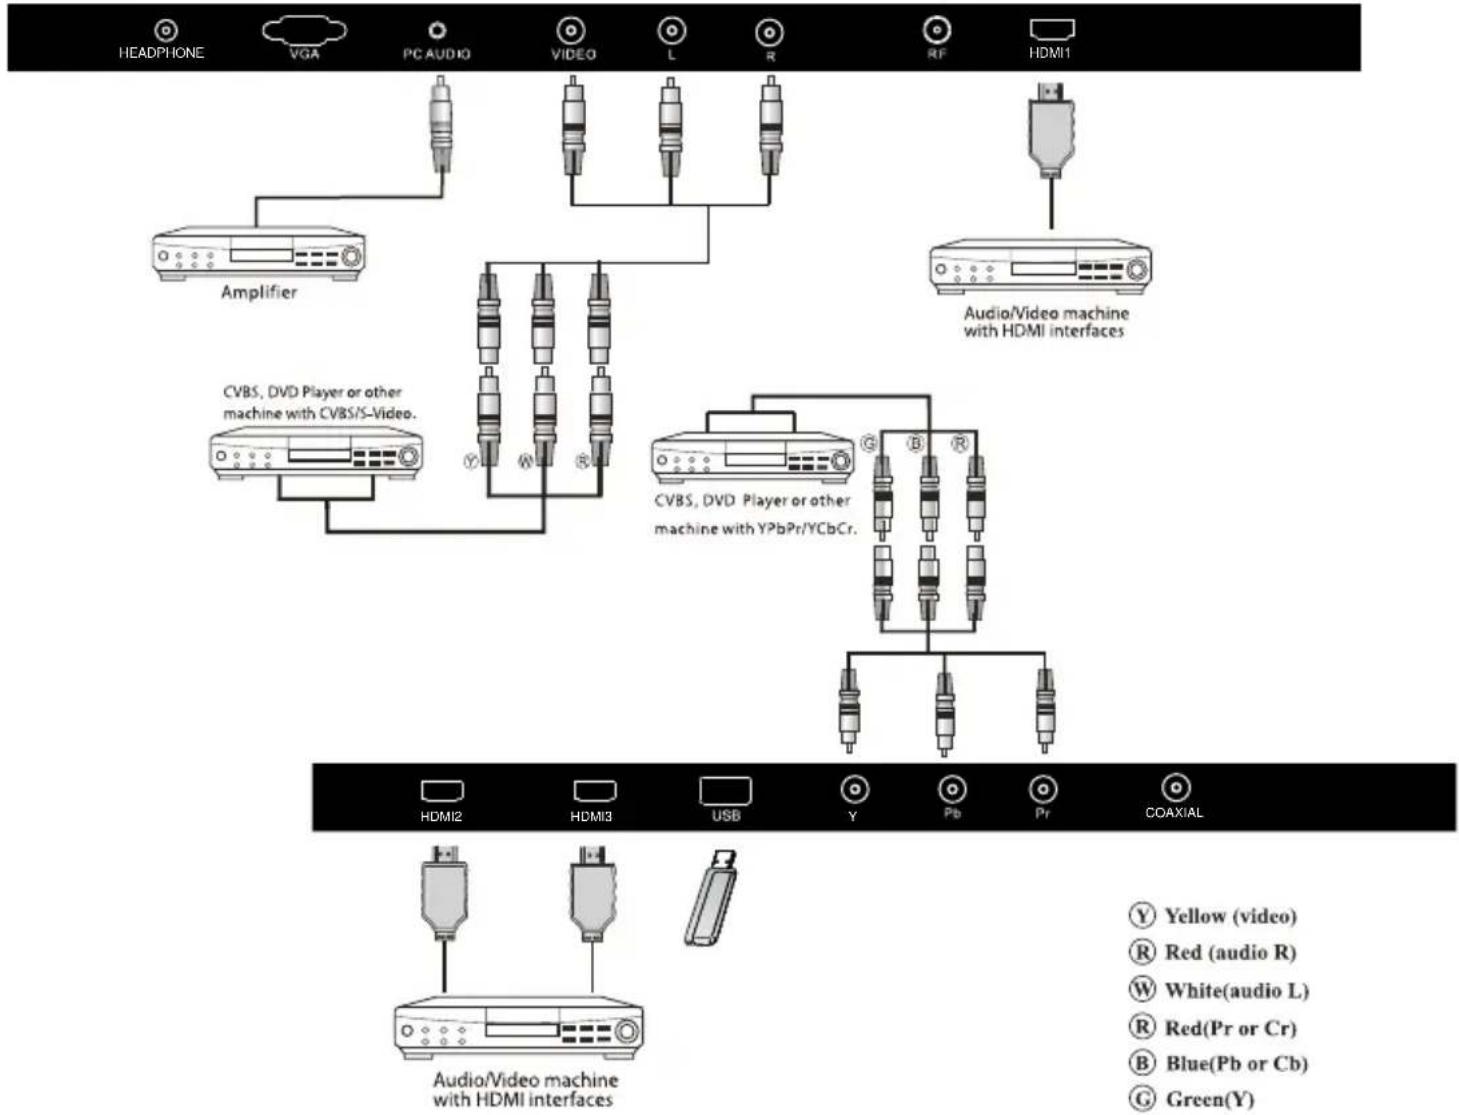
text_image
HEADPHONE VGA PC AUDIO VIDEO L R RF HDMI1All the terminals are(from left to right):
HEADPHONE, VGA, PC AUDIO, VIDEO, L, R, RF, HDMI
Note: Video and YPbPr share one audio channel.
When HDMI port get DVI signal, the audio signal receives from the PC Audio channel.
REAR AV Connections(SIDE)

text_image
HDMI2 HDMI3 USB Y Pb Pr COAXIALAll the terminals are (from down to top):
HDMI2, HDMI3, USB, Y, Pb, Pr, COAXIAL
Note: VIDEO and YPbPr share one audio channel.
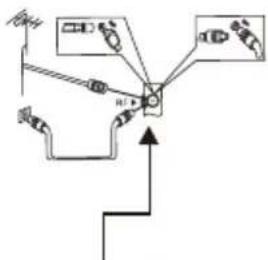
ANTENNA

text_image
Plug ANT 75Ω Adaptor (NOT SUPPLIED) TWIN-LEAD FEEDER(300Ω) An outdoor antenna An indoor antenna CATV netNote:
Aerial connections: F(male).
Input impendance: 75Ω unbalanced.
Loosen the screws Insert the feeder in Wires Tighten the screws

natural_image
Mechanical assembly diagrams showing two configurations of a cylindrical component with arrows indicating motion (no text or labels)PC
STEPS:
Be sure both the TV and computer are set to Power off.
-
Connect VGA and audio cable.
-
Connect the power cord.
-
Power on the TV, switch to PC mode.
-
Power on the PC.
This sequence is very important.

text_image
HEADPHONE VGA PC AUDIO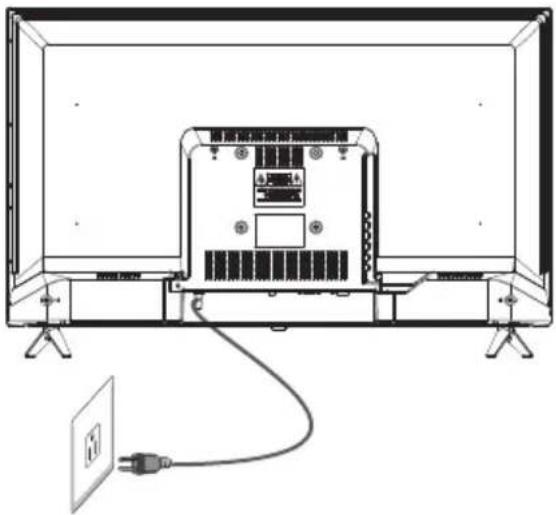
natural_image
Line drawing of a flat-screen TV with an attached cable and a power outlet (no text or symbols)PRESET MODE (PC)
| RESOLUTION | V.Freq.(Hz) | H.Freq.(KHz) | |
| 1 | 800*600 | 60 | 37.88 |
| 2 | 1024*768 | 60 | 48.36 |
| 3 | 1360*768 | 60 | 47.7 |
| 4 | 1280*768 | 60 | 47.3 |
NOTE: PC V.Freq.(Hz) not more than 60Hz.
PRESET MODE (HDMI)
| Signal format | Freq (Hz) | |
| 1 | 480i/480P | 60 |
| 2 | 576i/576P | 50 |
| 3 | 720P | 50/60 |
| 4 | 1080i/1080P | 50/60 |
AV EQUIPMENT
This TV provides one group of AV, one group of YPbPr for convenient connection to VCR, DVD or other video equipment. Please refer to the owner's manual of the equipment to be connected as well.
You can use the input terminals on TV set rear as follows.
flowchart
graph TD
    A["Top Node"] --> B["Central Node"]
    C["Left Node"] --> B
    D["Right Node"] --> B
    B --> E["Bottom Left"]
    B --> F["Bottom Right"]
    B --> G["Bottom Left"]
    B --> H["Bottom Right"]
flowchart
graph TD
    A["HEADPHONE"] --> B["Amplifier"]
    B --> C["CVBS, DVD Player or other machine with CVBS/S-Video."]
    C --> D["Audio/Video machine with HDMI interfaces"]
    D --> E["Coaxial"]
    E --> F["USB"]
    F --> G["Yellow (video)"]
    F --> H["Red (audio R)"]
    F --> I["White(audio L)"]
    F --> J["Red(Pr or Cr)"]
    F --> K["Blue(Pb or Cb)"]
    F --> L["Green(Y)"]
It can be connected to the following appliances: VCR, multi disc player, DVD, camcorder, video game or stereo system, etc.....
YPbPr can support these video formats:480i,576i,480p,576p,720p,1080i,1080P.
Note:
- Video and YPbPr share one audio channel.
- When HDMI port get DVI signal, the "PC Audio" channel is changed to receive the audio for HDMI port.
- Sometimes it will not support in different device because the device supplies nonstandard signal.
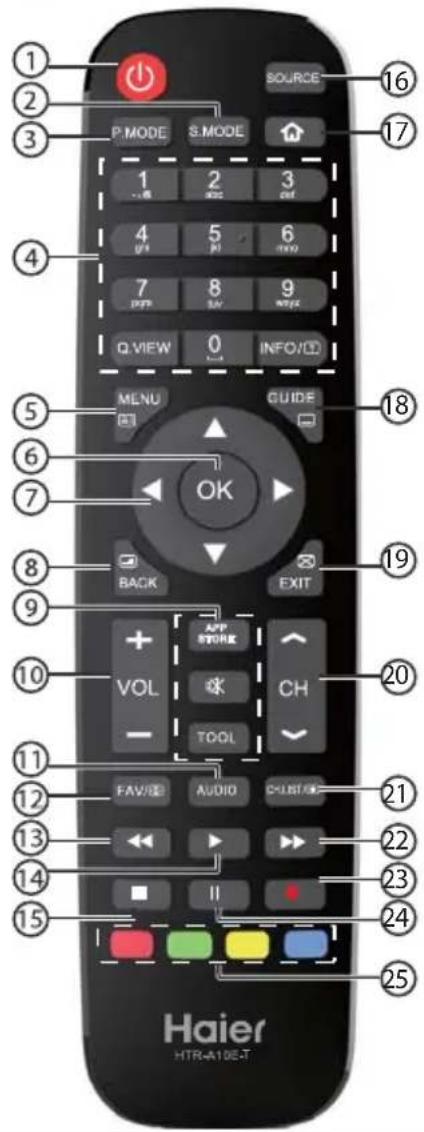
Using Your Remote Control
text_image
1 2 3 P.MODE S.MODE SOURCE 1 2 3 1.1K 2K 4M 4 5 6 (###) ### 7 8 9 (###) ### Q.VIEW INFO/ID MENU GUIDE OK BACK EXIT APP STORE VOL CH TOOL FAV/ID AUDIO CHUST/ID FAV/ID AUDIO CHUST/ID FAV/ID AUDIO CHUST/ID Haier HTR-A10E-T| 9 | APP STORE No function. | |
| (Mute) | Press to turn the sound on or off. | |
| TOOL | Press to open the shortcut menu of tool. | |
| 10 | VOL +/- | Press to adjust the volume level. |
| 11 | AUDIO | Turn on audio under ATV stereo or DTV/USB. |
| 12 | FAV/∅ | Press to open a favorite channel list. In teletext mode, press to hold a page. |
| 13 | ◀(reverse) | Press to reverse playback in multimedia & Timeshift mode. |
| 14 | ▶ (Play) | Press to play in multimedia mode & Timeshift mode. |
| 15 | ■ (stop) | Press to stop multimedia playback, REC& Timeshift mode. |
| 16 | SOURCE | Press to open the input source list. |
| 17 | Press to open the Home Page. | |
| 18 | GUIDE/∅ | Press to display electronic programme guide in TV mode. Press to enter the teletext subpage. |
| 19 | EXIT/∅ | Press to close the on-screen menu.In teletext mode,press to hide the text. |
| 20 | CH ≈/≈ | Press to change the channel. |
| 21 | CH.LIST/∅ | Press to open the channel list.In teletext mode, press to switch the image to top,bottom or full. |
| 22 | ▶ (forward) | Press to fast forward in multimedia & Timeshift mode. |
| 23 | ● (REC) | Press to record the TV program you are watching in DTV mode. |
| 24 | II (Pause) | Press to pause in multimedia mode & Timeshift mode. |
| 25 | Coloured buttons | Programme Edit: Delete, Rename, Move, Skip.EPG: Record, Info, Schedule, Reminder. |
| # | Button | Descriptions |
| 1 | (Power) | Press to turn the TV on or df. |
| 2 | S.MODE | Press to select the sound mode. |
| 3 | P.MODE | Press to select the picture mode. |
| 4 | 0-9 | Press to enter a channel number or password. |
| Q.VIEW | Press to switch to the last viewed channel. | |
| INFO/☐ | Press to display the channel information In teletext mode, press to reveal the hidden information. | |
| 5 | MENU/☐ | Press to open the on-screen menu. In teletext mode, press to open the INDEX page. |
| 6 | OK | Press to confirm a selection. |
| 7 | ▲▼◀▶ | Press to navigate the on-screen menu |
| 8 | BACK/☐ | Press to return to the previous screen. In teletext mode, press to enter mix mode. |
Insert Batteries into the Remote Control
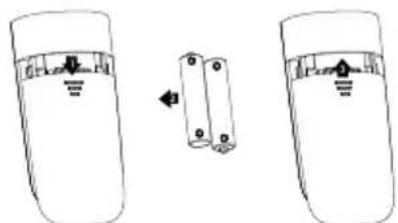
natural_image
Diagram showing two battery cells with a switch and an open circuit breaker (no text or symbols)- Remove the battery cover.
- Inserting the 2 AAA 1.5V batteries making sure the polarity (+ or -) of the batteries matches the polarity marks inside the unit.
- Mount the battery cover. Replace with new batteries when the TV set begins to show the following symptoms: Operation is unsteady or erratic. Sometimes the TV set does not function with Remote Control Unit.
Remark:
1) Alkaline Battery Recommended.
2) Remove batteries when they are exhausted or if the remote control is not to be used for long time.
Press ▲/▼ button to select the input source you want to watch;
Press OK button to enter the input source;

text_image
Picture Picture Mode Standard Brightness 50 Contrast 50 Sound Sharpness 50 Colour 50 Channel Tint 50 Feature Colour Temperature Standard Aspect Ratio 18.9 Setup Move OK Enter Exit Exit BACK Return- Press MENU button to display the MAIN OSD MENU;
- Press ▲/▼ button to select the MENU you want;
- Press OK button or ▶ button to enter the sub menu, and press ◀ button to return back to the previous menu.
- Press ▲/▼ button to select the option and then press OK button or ▶ button to enter the sub-menu, press ◀/▶ button to adjust the value or press ◀/▶ button to select in the sub menu;
- You can press MENU button to save and return back to the previous menu, and press EXIT button to exit the entire menu.
- Press INFO button on the remote control to display program information.

text_image
ATV CH 001 C06 Mono PAL DK 1 2 3- Current program Number.
- The NICAM mode of current program.
- The sound system of current channel could be changed on Analog Manual Search Menu.
Picture Menu
The picture is for a reference only; the actual item is the standard.
Press MENU button to display the main menu.
Press ▲/▼ button to select Picture in the main menu, and then press OK button to enter.
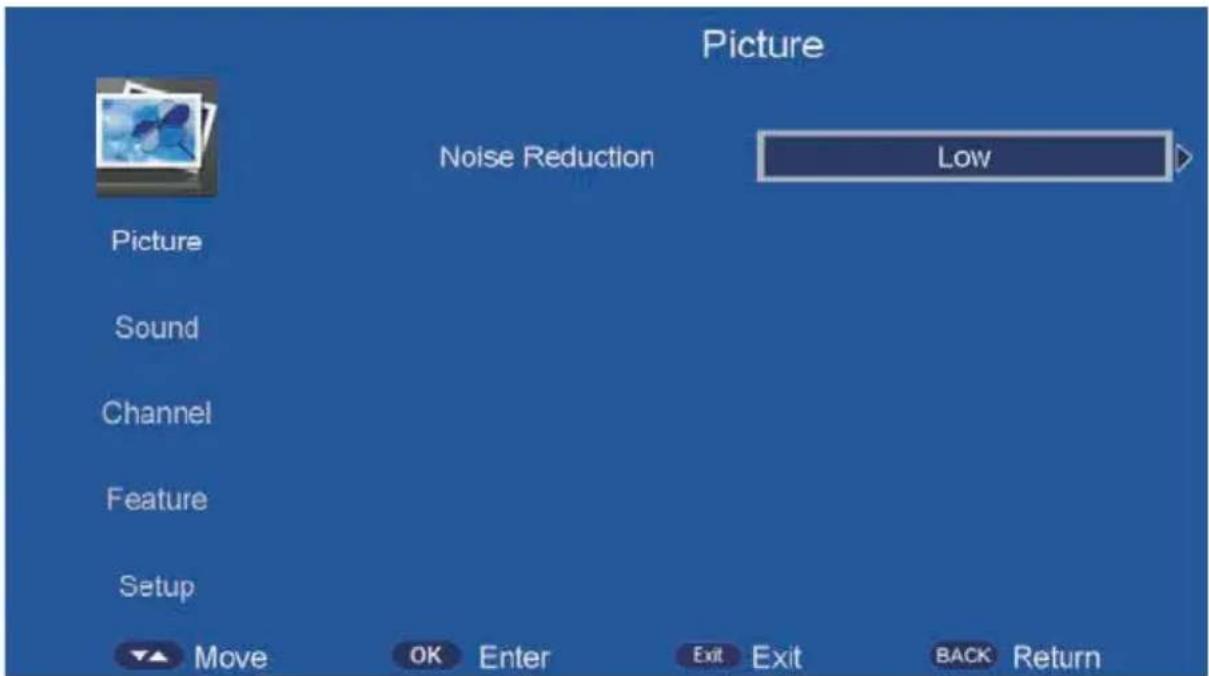
text_image
Picture Noise Reduction Low Picture Sound Channel Feature Setup Move OK Enter Exit Exit BACK Return- Press ▲/▼ button to select the option that you want to adjust in the Picture menu, and then press OK button or ▶ button to enter.
- Press ◀/▶ button to adjust or press ▲/▼ button to select. And press OK button to select the sub menu.
- After finishing your adjustment, press MENU button to save and return back to the previous
menu, and press EXIT button to exit the entire menu.
Picture Mode
Press ▲/▼ button to select Picture Mode, then press OK button to enter and press ▲/▼ button to select. (Available Picture Mode: User, Dynamic, Standard, Mild, Energy saving) You only can change the value of brightness, contrast, sharpness, color, when the picture is in User mode.
TIPS: You can press P-MODE button on the remoter control again and again to change the picture mode directly.
Picture Mode: Standard
Brightness
Press ▲/▼ button to select Brightness, then press OK button to enter and press ◀/▶ button to adjust. Then press MENU button to return back the previous menu directly.
Contrast
Press ▲/▼ button to select Contrast, then press OK button to enter and press ◀/▶ button to adjust. Then press MENU button to return back the previous menu directly.
Sharpness
Press ▲/▼ button to select Sharpness, then press OK button to enter and press ◀/▶ button to adjust. Then press MENU button to return back the previous menu directly.
Colour
Press ▲/▼ button to select Colour, then press OK button to enter and press ◀/▶ button to adjust. Then press OK button to return back the previous menu directly.
Tint
Press ▲/▼ button to select Tint, then press OK button to enter and press ◀/▶ button to adjust. Then press MENU button to return back the previous menu directly.
Colour Temperature
Press ▲/▼ button to select Colour Temperature, then press OK button to enter and ◀/▶ button to select Standard, Cool, Warm.
Aspect Ratio
Press ▲/▼ button to select Aspect Ratio, then press OK button to enter and ◀/▶ button to select Auto, 4:3, 16:9, Full, Zoom1, Zoom2, Cinema, Just Scan.
Noise Reduction
Press ▲/▼ button to select Noise Reduction, then press OK button to enter and ◀/▶ button to select Off, Low, Middle, High.
SOUND Menu
The picture is for a reference only; the actual item is the standard.
Press MENU button to display the main menu.
Press ▲/▼ button to select Sound in the main menu, and then press OK button or ▶ button to enter.
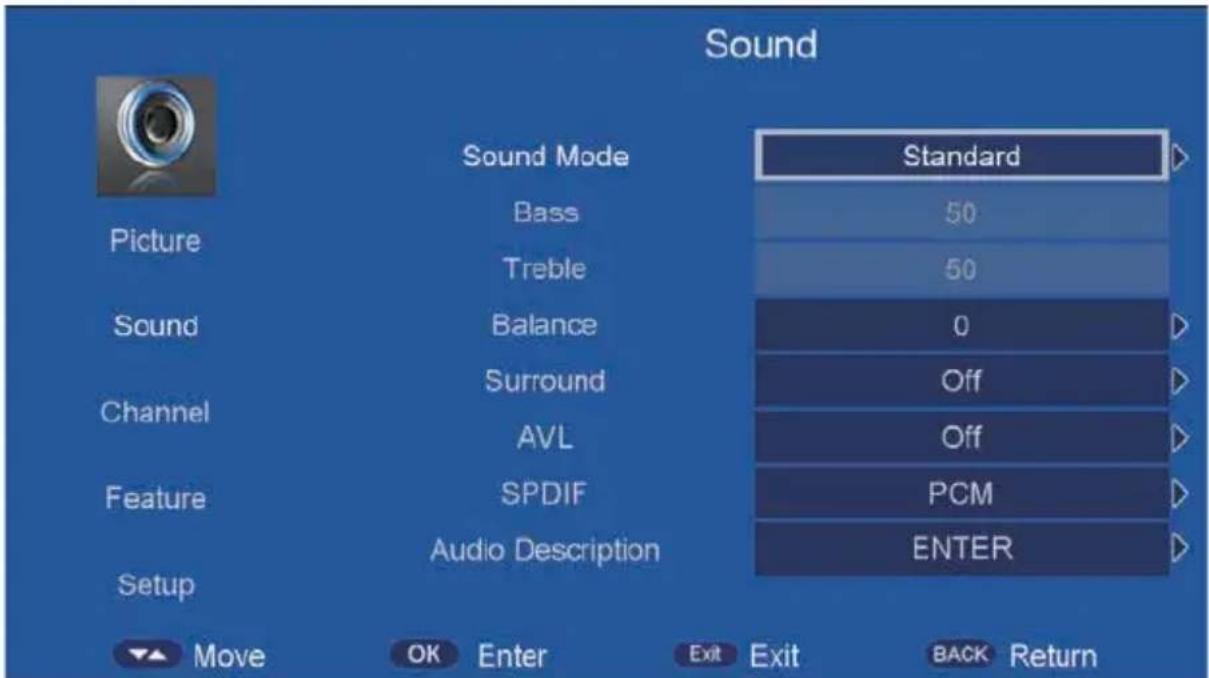
text_image
Sound Sound Mode Standard Picture Bass 50 Treble 50 Sound Balance 0 Surround Off Channel AVL Off Feature SPDIF PCM Audio Description ENTER Setup Move OK Enter Exit Exit BACK Return- Press ▲/▼ button to select the option that you want to adjust in the Sound menu, then press OK button to enter.
- press ◀/▶ button to adjust or press ▲/▼ to select, and press OK button to select submenu.
- After finishing your adjustment, Press MENU button to save and return back to the previous menu, or press EXIT button to exit the entire menu.
5.2.1 Sound mode
Press ▲/▼ button to select Sound mode, and then press OK button to enter. And then press ◀/▶ button to select. (Available Sound mode: User, Standard, Music, Movie, Speech). You can change the value of bass and treble, Balance and EQ, when the sound is in User mode.
TIPS: You can press S-MODE button on the remote control to change the Sound Mode directly.
Sound Mode: Standard
Bass
Press ▲/▼ button to select Bass, then press OK or ▶ button to enter and press ◀/▶ button to adjust. It can only be adjusted under user mode. Then press MENU button to return back the previous menu directly.
Treble
Press ▲/▼ button to select Treble, then press OK button to enter and press ◀/▶ button to adjust. It can only be adjusted under user mode Then press MENU button to return back the previous menu directly.
Balance
Press ▲/▼ button to select Balance, then press OK button to enter and press ◀/▶ button to adjust. Then press MENU button to return back the previous menu directly.
Surround
Press ▲/▼ button to select Surround, and then press OK button to enter and press ◀/▶ button to select ON or OFF.
AVL
Press ▲/▼ button to select AVL, and then press OK button to enter and press ◀/▶ button to select ON or OFF.
SPDIF
Press ▲/▼ button to select SPDIF, and then press OK button to enter and press ◀/▶ button to select Off, PCM, Auto, Multi.
Audio Description
Press ▲/▼ button to select Audio Description, and then press OK button to enter and press ▶button to enter the sub-menu.
Channel
The picture is for a reference only; the actual item is the standard.
Press MENU button to display the main menu.
Press ▲/▼ button to select Channel in the main menu, and then press OK button to enter.

text_image
Channel Picture Sound Channel Feature Setup Channel Management Favorite Management Country / region TV Connection Auto Search DTV Manual Search ATV Manual Search LCN On/Off ENTER ENTER Thailand Terrestrial ENTER ENTER ENTER ENTER On Move OK Enter Exit Exit BACK Return- Press ▲/▼ button to select the option that you want to adjust in the CHANNEL menu, and then press OK button to enter.
- Press ◀/▶ button to select and press OK button to select the sub menu.
- After finishing your adjustment, press MENU button to save and return back to the previous menu, or press EXIT button to exit the entire menu.
tnemeganaM lennah
Press ▲/▼ button to select Channel Management, and then press OK button to rename the channel selected. The menu will appear as follows:
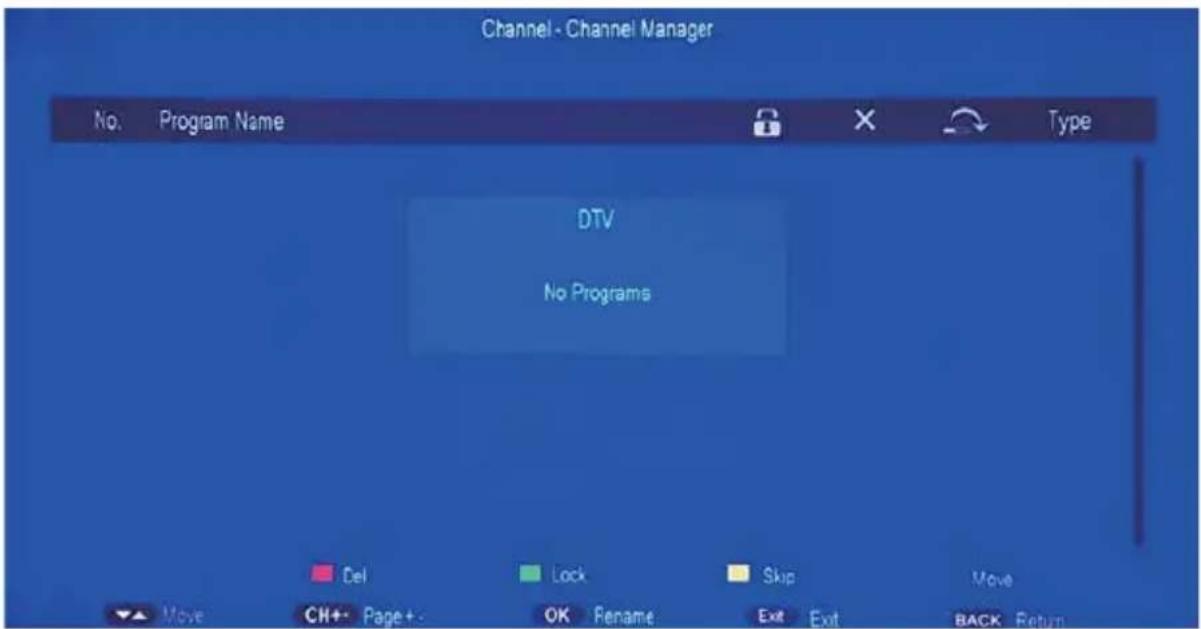
text_image
Channel - Channel Manager No. Program Name Type DTV No Programs Del Lock Skip Move Move CH+ Page+ OK Rename Exit Exit BACK ReturnKey Description:
CH button: Press CH+ or CH- to turn the page.
RED button: Press this button to to delete the channel selected.
GREEN button: Press this button to lock the channel.
YELLOW button: Press this button to skip the channel.
BLUE button: Press this button to move the channel.
Favorite Management
Press ▲/▼ button to select Favorite Management, and then press OK button to the Favorite Management menu. The menu will appear as follows:

text_image
Channel - Favorite Manager No. Program Name Fav1 Fav2 Fav3 Fav4 Type 0001 YLE TV1 dtv 0002 YLE TV2 dtv 0003 YLEN KLASSINEN radio 0004 YLE FSR+ radio 0003 YLE FST dtv 0004 YLE24 dtv 0005 YLE Teema dtv 0001 YLE PEILI radio 0002 YLEQ radio Favorite 1 Favorite 2 Favorite 3 Favorite 4 Move C++ Page +... Exit Exit BACK ReturnKey Description:
RED button: Press this button to set the favorite channel to "Favorite 1"
GREEN button: Press this button to set the favorite channel to "Favorite 2".
YELLOW button: Press this button to set the favorite channel to "Favorite 3".
BLUE button: Press this button to set the favorite channel to "Favorite 4".
TV Connection
Press ▲/▼ button to select TV Connection, and then press OK button to select which the TV connect type you use.
Auto Tuning
Press ▲/▼ button to select Auto Tuning, and then press OK button to enter (When the System Lock is on, please input the PIN code to unlock).
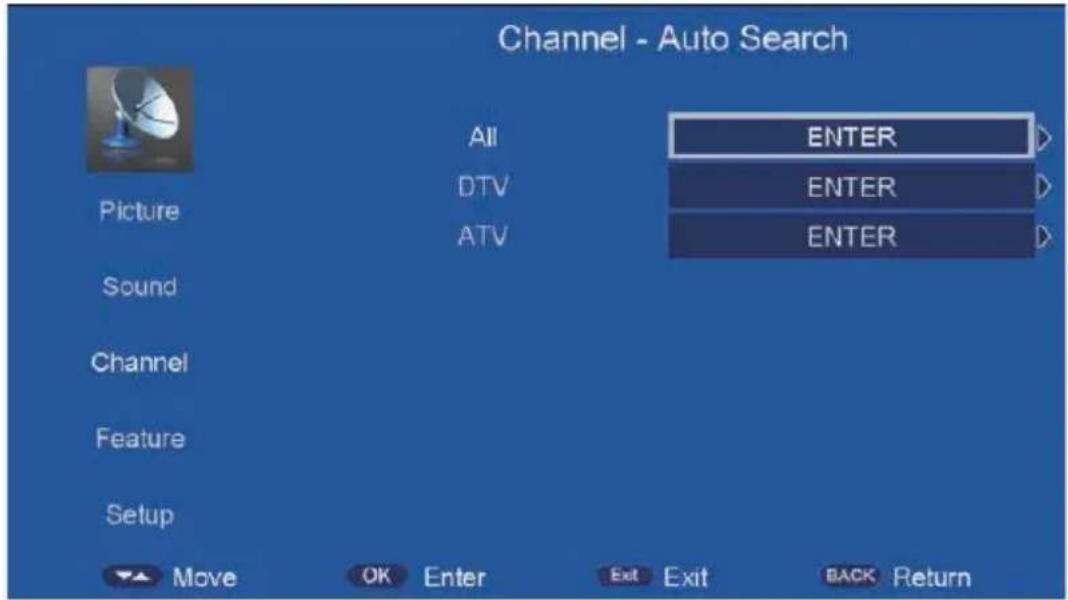
text_image
Channel - Auto Search All Picture DTV ATV Sound Channel Feature Setup MOVE OK Enter Exit Exit BACK Return ENTER ENTER ENTERDTV Manual Search
Press ▲/▼ button to select DTV Manual Search, and then press OK button to start the scan.
(When the System Lock is on, please input the PIN code to unlock).
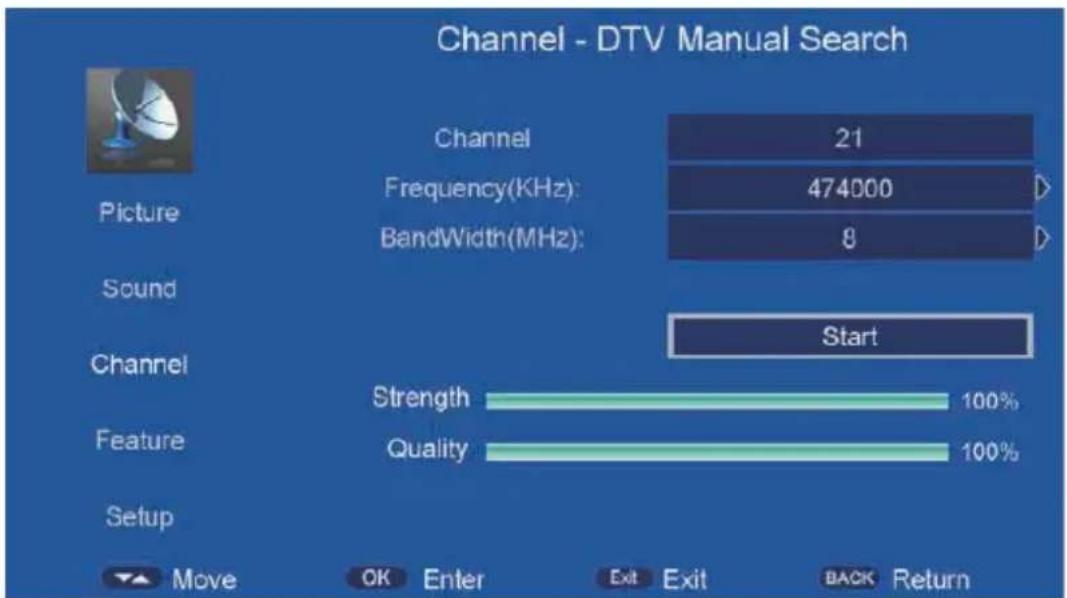
bar
| Channel | Value | | ------- | ----- | | Frequency(KHz) | 474000 | | Bandwidth(MHz) | 8 | | Strength | 100% | | Quality | 100% |ATV Manual Search
Press ▲/▼ button to select ATV Manual Search, and then press OK button to start the scan the ATV channels.
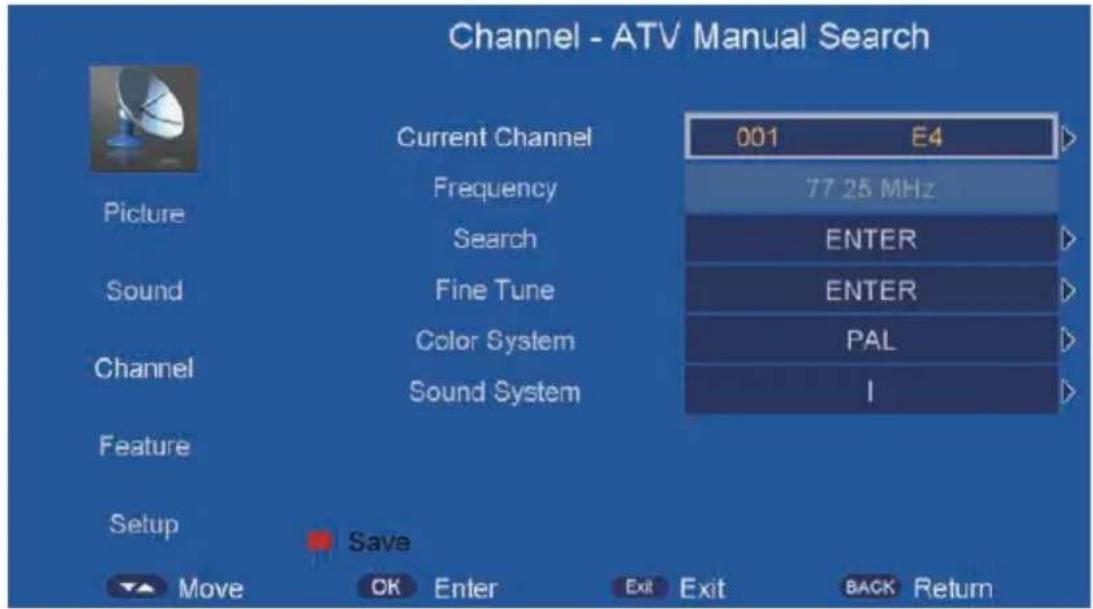
text_image
Channel - ATV Manual Search Current Channel 001 E4 Frequency 77.25 MHz Search ENTER Sound Fine Tune ENTER Color System PAL Channel Sound System I Feature Setup Save Move OK Enter Exit Exit BACK ReturnLCN On/Off
Press ▲/▼ button to select LCN On/Off, and then press OK button to set LCN to on or off.
EPG
Press EPG button to open EPG menu, and then press GREEN button to set a timer.
Press RED button to switch daily mode and weekly mode.
Press YELLOW button to switch to previous day.
Press BLUE button to switch to next day.

The picture is for a reference only; the actual item is the standard.
Press MENU button to display the main menu.
Press ▲/▼ button to select Feature in the main menu, and then press OKor ▶ to enter.
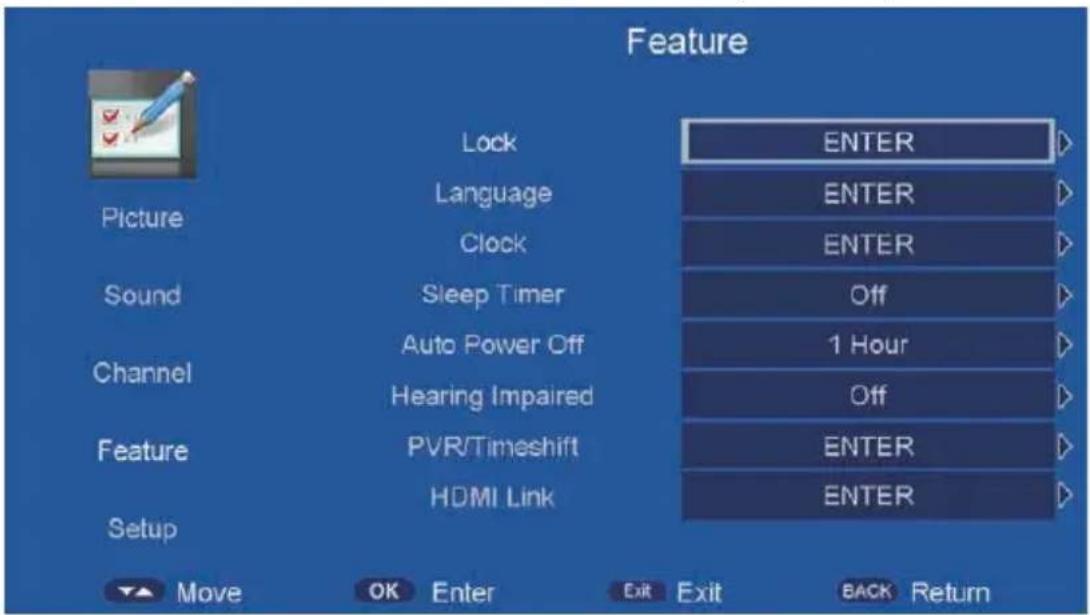
text_image
Feature Picture Lock Language Clock Sound Sleep Timer Auto Power Off Hearing Impaired Feature PVR/Timeshift HDMI Link Setup MOVE OK Enter Exit Exit BACK Return ENTER ENTER ENTER Off 1 Hour Off ENTER ENTER- Press ▲/▼ button to select the option that you want to adjust in the Feature menu, then press OK to enter.
- Press ◀/▶ button to adjust or press ▲/▼ button to select.
- After finishing your adjustment, press MENU button to save and return back to the previous menu and press EXIT button to exit the entire menu.
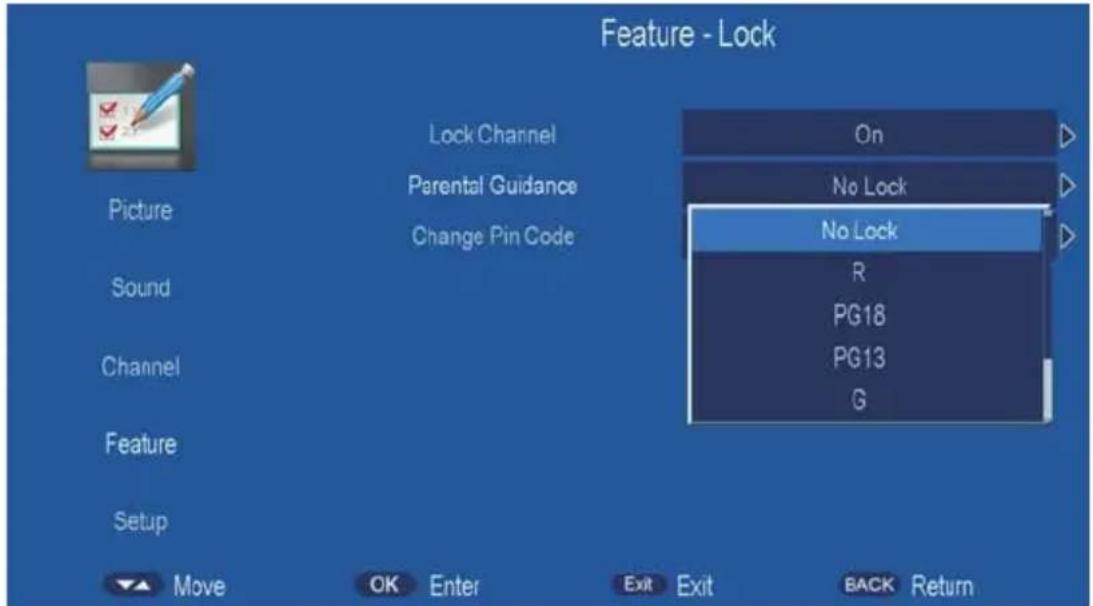
Lock
Press ▲/▼ button to select Lock, then press OK button to enter the sub menu with the password "0000":

text_image
Feature - Lock Lock Channel Picture Parental Guidance Change Pin Code Sound Channel Feature Setup Move OK Enter Exit Exit BACK Return Off Off ENTERLock Channel
Press ▲/▼ button to select Lock Channel, then press OK or ▶ button to select ON or OFF. Parental Guidance
Press ▲/▼ button to select Parental Guidance, then press OK or ▶ button to enter the sub menu. Then press ▲/▼ button to select Rate (From4-17, or None). Then press OK or ▶ button to confirm.
text_image
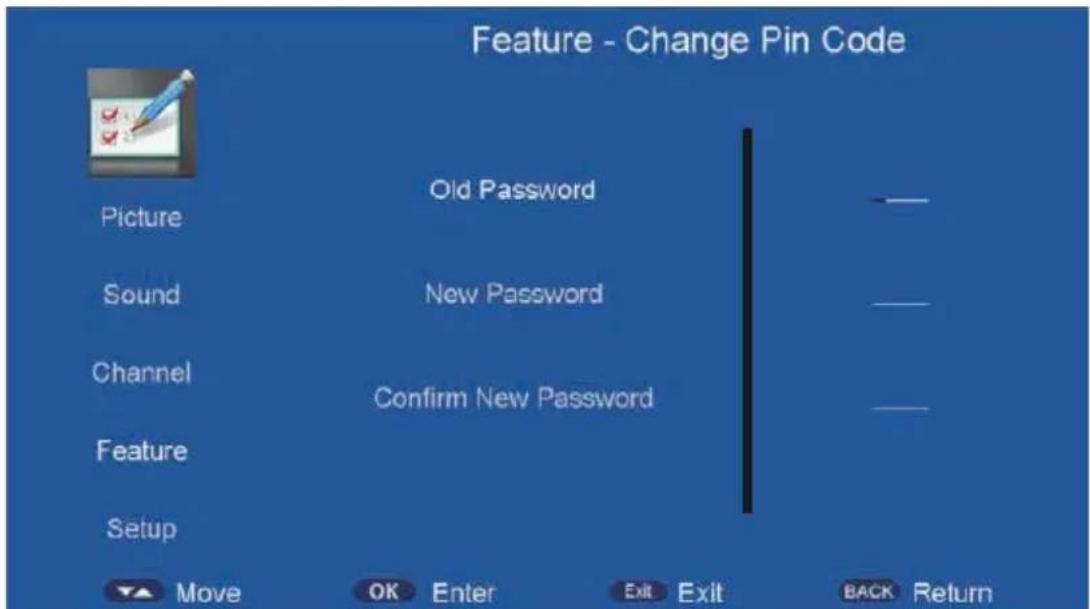
Feature - Lock Picture Lock Channel Parental Guidance Change Pin Code Sound Channel Feature Setup On No Lock No Lock R PG18 PG13 G Move OK Enter Exit Exit BACK ReturnChange Pin Code
Press ▲/▼ button to select Change Pin Code, then press OK to enter and Change Pin Code menu will appear as follows:
text_image
Feature - Change Pin Code Picture Old Password Sound New Password Channel Confirm New Password Feature Setup Move OK Enter Exit Exit BACK ReturnInput old password at "Old Password", (if the old password is incorrect, the password will not be allowed to modify.)
Input new password at "New Password".
Input new password again at "Confirm New Password", if new password and confirm new password consistent, the successfully updated menu will appear a few second, otherwise, the menu will display the password mismatch.
Language
Press ▲/▼ button to select Language, then press OK or ▶ button to enter the sub menu, then press ▲/▼ button to select, then press OK or ▶ button to confirm.
Sleep Timer
Press ▲/▼ button to select Sleep Timer, then press OK button to enter and press
▲/▼button to select off, 10mins, 20mins, 30mins, 60mins, 90mins, 120mins, 180mins, 240mins.
Auto Power Off
Press ▲/▼ button to select Auto Power Off, then press OK to enter the sub menu. Then Press ▲/▼ to select off, 1 hour, 2 hours, 4 hours then press OK to confirm. (When the PC signal is connected).
Hearing Impaired
Press ▲/▼ button to select Hearing Impaired, then press OK button to enter and press ▲/▼ button to select off or on.
PVR/TimeShift
Press ▲/▼ button to select PVR/TimeShift, then press OK button to open the sub-menu. As follows:s
- Press ▲/▼ button to select the option that you want to adjust in the PVR/TimeShift menu, then press OK or ▶ button to enter.
- After finishing your adjustment, press MENU button to save and return back to the previous menu and press EXIT button to exit the entire menu.

text_image
Feature - PVR/Timeshift Picture Partition Select Auto Timeshift Timeshift Buffer Sound Timer Record List Recorder Start Channel ENTER Off Auto ENTER ENTER ENTER ENTER Feature Setup Move OK Enter Exit Exit BACK ReturnPartition Select
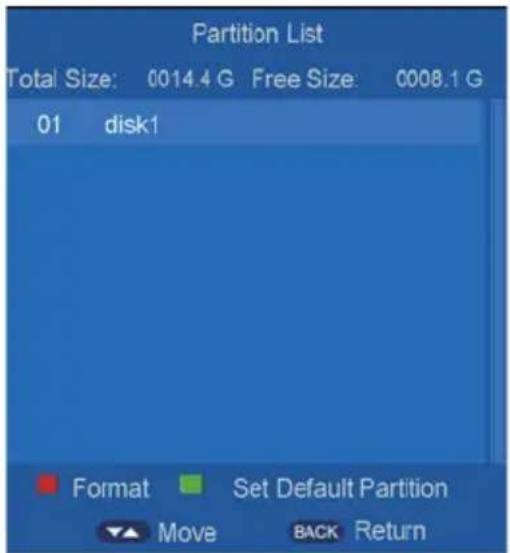
Press ▲/▼ button to select Partition Select, then press OK button to open the sub-menu. As follows:
text_image
Partition List Total Size: 0014.4 G Free Size 0008.1 G 01 disk1 Format Set Default Partition Move BACK ReturnPress ▲/▼ button to select different disk on in Partition Select menu Press RED button to format the disk you selected. Press GREEN button to set the disk you selected to default partition.
Auto TimeShift
Press ▲/▼ button to select Auto TimeShift, Press OK or ▶ button to open the sub-menu hen Press ▲/▼ to select on/off.
TimeShift Buffer
Press ▲/▼ button to select TimeShift Buffer, Press OK or ▶ button to open the sub-menu hen Press ▲/▼ to select Auto, 30 Mins, 1hr, 2hr.
Timer
Press ▲/▼ button to select Timer, Press OK or ▶ button to open the sub-menu.
Press ▲/▼ button to select Timer, and then press OK button to display the sub menu, and then press YELLOW button to set an appointment record. As follower:

text_image
Timer 07/12/2005 07:43:42 Ch No. Channel Start Duration Date Mode 01 02 03 04 05 06 07 08 09 Del Del Alt Add Edit Move Exit Back Return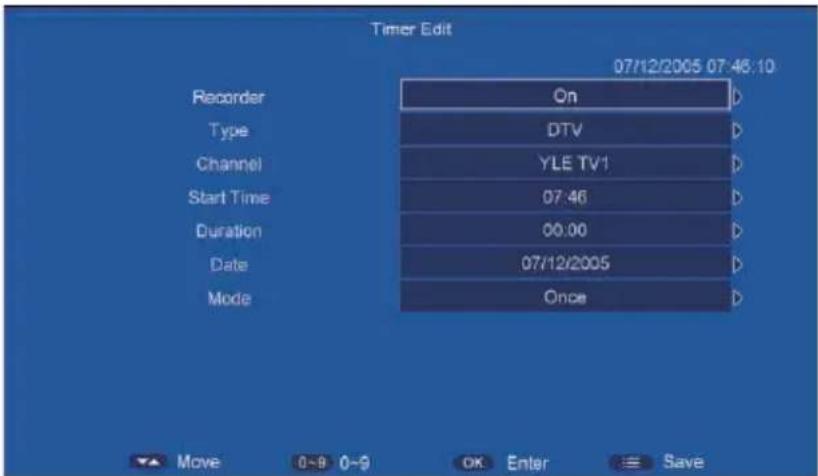
text_image
Timer Edit 07/12/2005 07:46:10 Recorder On Type DTV Channel YLE TV1 Start Time 07:46 Duration 00:00 Date 07/12/2005 Mode Once Move 0-9 0-9 OK Enter SavePress number keys and direction keys, user can set the channel, date, start time, mode, type and record length information on this menu.
When approaching the preset time, the screen will be appear a countdown to remind the user menu.
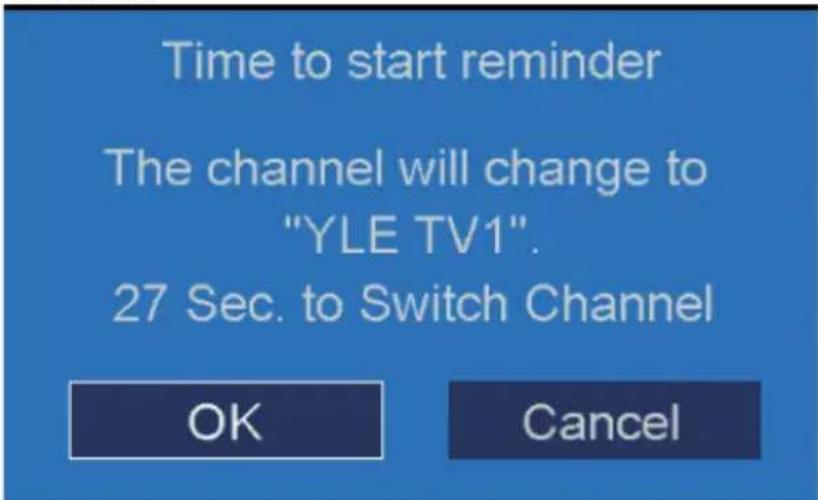
text_image
Time to start reminder The channel will change to "YLE TV1". 27 Sec. to Switch Channel OK CancelRecord List
Press ▲/▼ button to select Record List, Press ok or ▶ button to open the sub-menu.

text_image
Record List 0001 YLEQ 07/12/2005 07:37:43-07:38:26 0002 YLE TV1 07/12/2005 07:37:35-07:39:23 Delete BACK Return Move OK EnterPress ▲/▼ to select record program file(.ts file).
Press OK to play.
Press red button to delete the selected file.
If press OK to play, the menu will appear as follows:

text_image
YLE TV1 Playing Time:07:37:38 Start Time:07:37:35 End Time:07:39:23Recorder Start
Press ▲/▼ button to select Recorder Start, Press ok or ▶ button to enter directly record.
Note: you can also open Timer menu by key
HDMI Link
Press ▲/▼ button to select HDMI Link, Press ok or ▶ button to enter sub-menu.
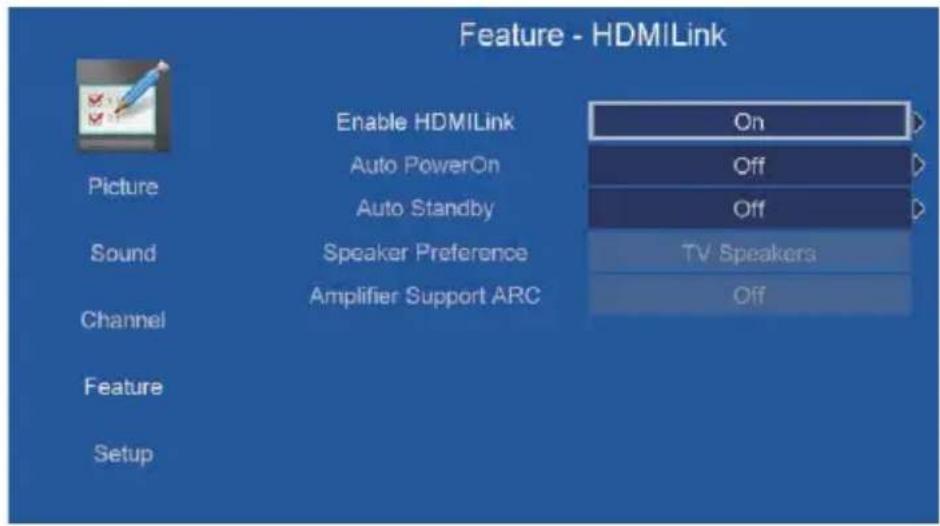
text_image
Feature - HDMILink Enable HDMILink On Picture Auto PowerOn Off Auto Standby Off Sound Speaker Preference TV Speakers Channel Amplifier Support ARC Off Feature SetupEnable HDMILink
Press ▲/▼ button to select Enable HDMILink ,Press ok or ▶ button to select on/off.
If you want to set the item in HDMILink menu, you must set Enable HDMIlink to on.
Auto PowerOn
Press ▲/▼ button to select Auto PowerOn ,Press ok or ▶ button to select on/off.
Auto Standby
Press ▲/▼ button to select Auto Standby ,Press ok or ▶ button to select on/off.
Speaker Preference
Press ▲/▼ button to select Auto Standby, Press ok or ▶ button to select TV
Speakers, Amplifier.
Note: This item can only be selected when cec device is detected.
Amplifier Support ARC
Press ▲/▼ button to select Amplifier Support ARC ,Press ok or ▶ button to select on/off.
Note: This item can only be selected when Amplifier device is detected.
Setup
The picture is for a reference only; the actual item is the standard.
Press MENU button to display the main menu.
Press ▲/▼ button to select Setup in the main menu, then press OK to enter.
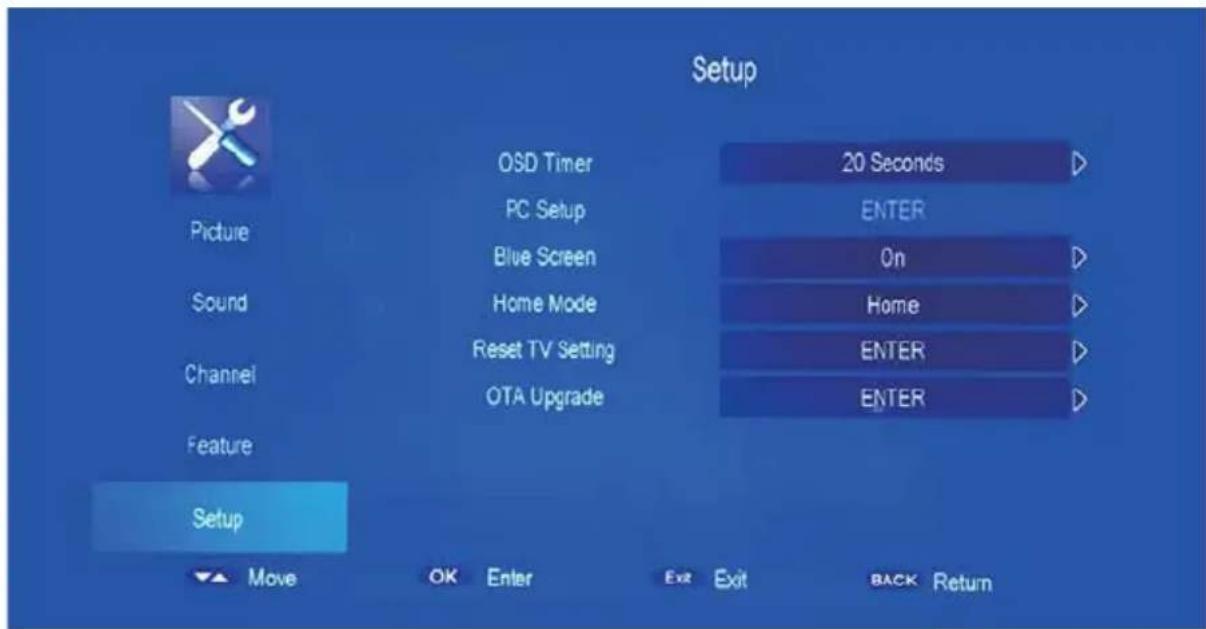
text_image
Setup Picture Sound Channel Feature Setup OSD Timer PC Setup Blue Screen Home Mode Reset TV Setting OTA Upgrade 20 Seconds ENTER On Home ENTER ENTER Move OK Enter Exit Exit BACK Return- Press ▲/▼ button to select the option that you want to adjust in the Setup menu, then press OK or ▶ button to enter.
- Press ◀/▶ button to adjust or press ▲/▼ button to select.
- After finishing your adjustment, press MENU button to save and return back to the previous menu and press EXIT button to exit the entire menu.
OSD Timer
Press ▲/▼ button to select OSD Timer, and then Press OK or ▶button to select. (Available OSD Timer: 5S,10 S, 15S,20S, 25S,30S, never), then press OK button to confirm.
Auto Scart
Press ▲/▼ button to select Auto Scart, and then Press OK or ▶ button to select on or off.
PC Setup
Press ▲/▼ button to select PC Setup, then press OK or ▶ to enter sub-menu.
Blue Screen
Press ▲/▼ button to select Blue Screen, and then Press OK or ▶button to select on or off.
Home Mode
Press ▲/▼ button to select Home Mode, and then Press ◀/▶ button to select Home or Store, then press OK button to confirm.
Reset TV Setting
Press ▲/▼ button to select Reset TV Setting, and then Press then press OK button to enter the sub menu, enter the password if locked, and then you can quickly make some basic settings of the TV. As follows:
Language
User can press ▲/▼ button to select the language.
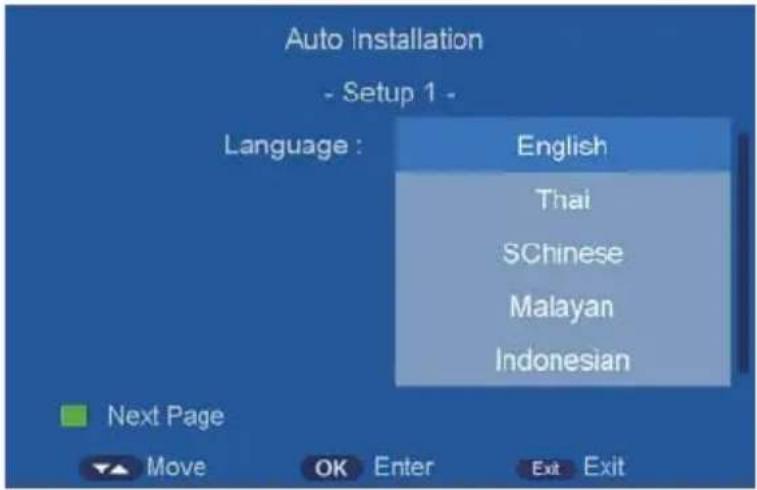
text_image
Auto Installation - Setup 1 - Language : English Thai SChinese Malayan Indonesian Next Page Move OK Enter Exit ExitAnd then press ENTER to enter the next step page.
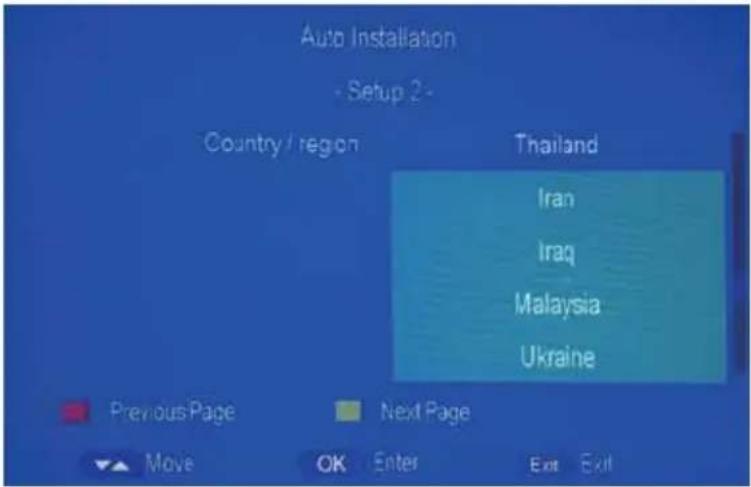
Country
User can press ▲/▼ button to select the country.
text_image
Auto Installation - Setup 2 - Country / region Thailand Iran Iraq Malaysia Ukraine Previous Page Next Page Move OK Enter Exit ExitAnd then press ENTER to enter the next step page.
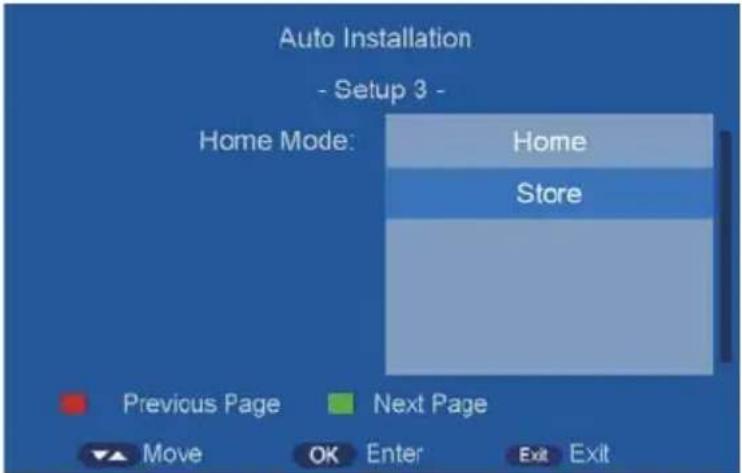
Home Mode
User can press ▲/▼ button to select the home mode of television programs.
text_image
Auto Installation - Setup 3 - Home Mode: Home Store Previous Page Next Page Move OK Enter Exit ExitAuto Power Off
User can press ▲/▼ button to select the Auto power off time: off,1Hour,2Hours,4Hours.
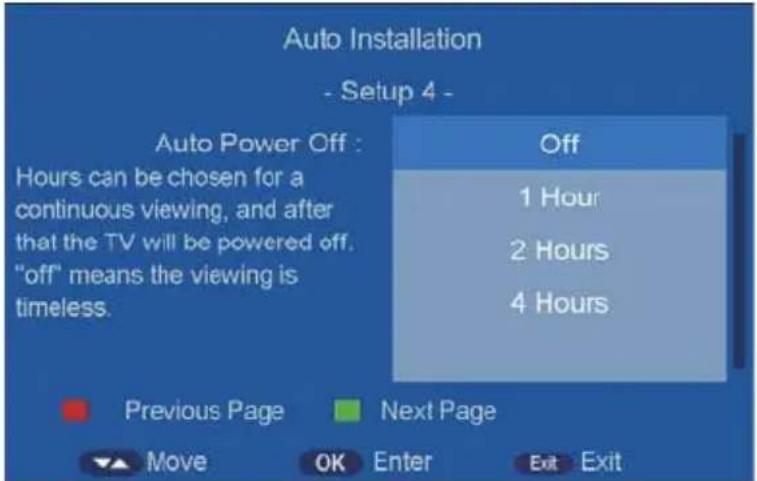
text_image
Auto Installation - Setup 4 - Auto Power Off : Hours can be chosen for a continuous viewing, and after that the TV will be powered off. "off" means the viewing is timeless. Off 1 Hour 2 Hours 4 Hours Previous Page Next Page Move OK Enter Exit ExitAnd then press ENTER to enter the next step page.
TV Connection
Press ▲/▼ button to select the item of TV Connection.

text_image
Auto Installation - Setup 5 - TV Connection : Please select the method of TV Connection. Terrestrial Cable Previous Page Next Page Move OK Enter Exit ExitAnd then press ENTER to enter the next step page.
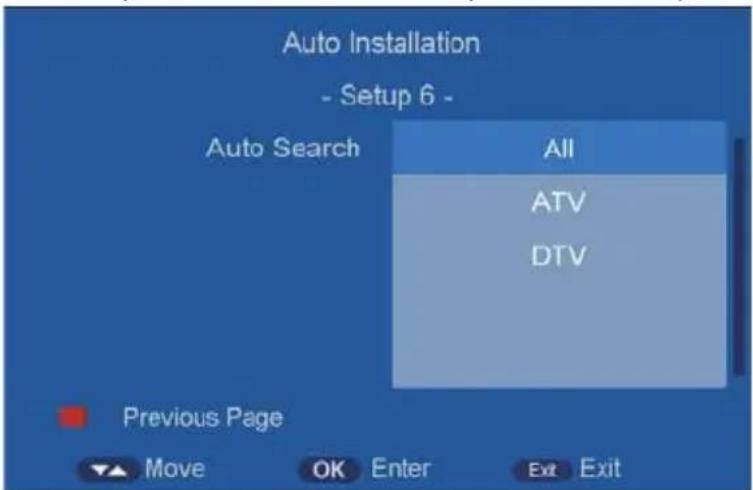
Auto Search
Press ▲/▼ button to select the turning mode, and then press ◀/▶ button to enter auto search process.
User can press MENU button to skip the scan and press EXIT button to exit the scan
text_image
Auto Installation - Setup 6 - Auto Search All ATV DTV Previous Page Move OK Enter Exit Exit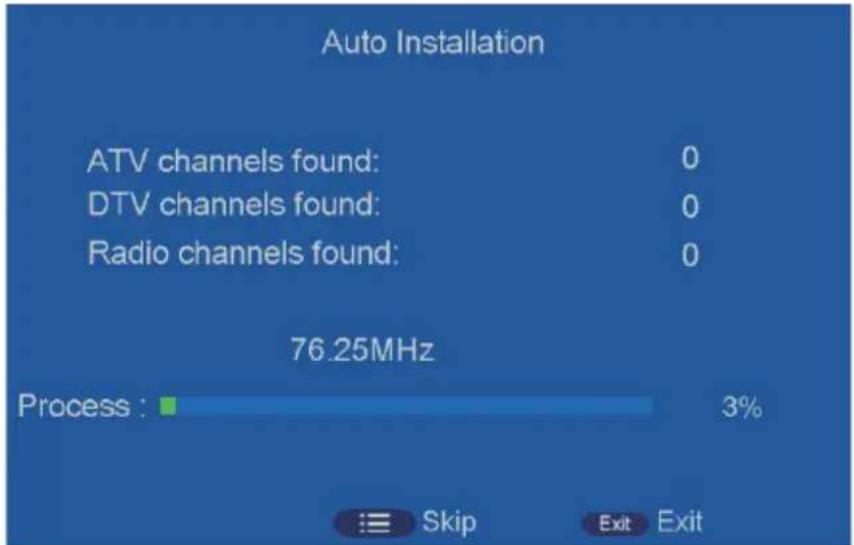
text_image
Auto Installation ATV channels found: 0 DTV channels found: 0 Radio channels found: 0 76.25MHz Process : 3% Skip Exit ExitVersion
Press ▲/▼ button to select Version, and then press OK to enter the sub menu, you can check the software version this TV.
How to use Record
The HK-T.S2512C support two type to record :
A、Direct Record
B、Subscribe Record
Direct Record。
- In the DTV source, you can start record function by press the “ ” key while program playing. Before that, you have to make sure the USB storage device is inserted and the device checking and Initialization is done.
If you press “key when there’s no USB storage device inserted, the prompt window will appear as follow.

text_image
Message Not valid enter RecorderIf you press "REC" key during the device checking and Initialization, the prompt window will show black screen about 2s.when the TV is recording, it will appear the recording menu.

text_image
Message Initializing Recorder ...- After record started, you can press the button of PLAY/PAUSE on the RC to set the play mode. You can seen the detail info by the record menu.
REC
Pause REC
- Press the ● Button on the remote to set rec duration time when rec is running. As follows:
Rec Duration Time 00:00
- You can press "STOP" key to stop record function after confirm.

text_image
Message Do you want to stop Recording? OK CancelNote: Time shift function will stop when there's no space left on the USB storage device.
Subscribe Record
- In the DTV source, you can enter the Timer menu set the Subscribe Record. Press the YELLOW button to add the record task.
The Way: Main menu-->Feature-->PVR/TimeShift-->Timer

text_image
Feature - PVR/Timeshift Picture Partition Select Auto Timeshift Timeshift Buffer Sound Timer Record List Recorder Start Channel Feature Setup MOVE OK Enter Exit Exit BACK Return ENTER Off Auto ENTER ENTER ENTER ENTER
text_image
Timer 14/10/2033 20:01:34 Ch No. Channel Start Duration Date Mode 01 02 03 04 05 06 07 08 09 Del Del All Add Edit Move Exit Back Return- If you enter the Timer Edit menu, you can set the record task that you want to record.

text_image
Timer Edit 14/10/2033 20:01:47 Recorder On Type DTV Channel FTA Channel 3 Start Time 20:01 Duration 00:00 Date 14/10/2033 Mode Once Move 0-8 0-9 OK Enter Save-
When you success to set the record task, if the TV is standby mode, it will auto power on when one minutes before the start of the task.
-
When the record task time is start, It will auto record, but you must check you USB storage device inserted and it is enough speed to record. Otherwise the task will failure.
-
The TV enter false standby mode when the task is start, you can press the POWER button to watch the TV program. You can do same operation as Direct Record. When you press POWER again, if the task is not over, the TV will power off the panel and continue to record. The TV will real power off until the record task is over.
Hotel Mode
1.How to enter and exit the hotel mode menu::
◆ Enter: You can enter the hotel mode menu by the follow steps: Press password "menu+1001" under the source menu.
◆ Select: use direction key to select the different items.
◆ confirm: Press the key “OK” or right direction key to confirm.

text_image
Hotel Setting Hotel Lock On Channel Lock Off Picture Lock Off Sound Lock Off Feature Lock Off Setup Lock Off Key Lock Off Source Lock → Set Source Off Channel Number 0 Max Volume 100 Default Volume 30 Next Page →
text_image
Hotel Setting Clear Lock --> DataBase Export --> DataBase Import --> Logo Import --> Previous Page -->- Function description of hotel mode:
| Name Value Description | Note | ||
| Hotel Lock On/Off Open or close hotem mode, set to off by default. | If want to adjust the items in Hotel Menu,you must set this item to “ON” | ||
| Channel Lock | On/Off Lock | the channel menu. | If set to ON,user can not enter the channel menu and can not search channel. |
| Picure Lock On/Off Lock the picture menu | If set to ON,user can not enter the picture menu and can not adjust the picture mode,contrast,brightness, and so on. | ||
| Sound Lock On/Off Lock the sound menu | If set to on ,user can not enter the sound menu,and can not adjust the item likes sound mode,balance,and so on. | ||
| Feature Lock On/Off Lock the feature menu | If set to on, user can not enter the feature menu. | ||
| Setup Lock On/Off Lock the setup menu | If set to on, user can not enter setup menu,and change the system settings. | ||
| Source Lock | Lock the input source. | Press key“enter” to enter the submenu.If set one source lock to “ON”, usercan not enter that source. | |
| Set Source Off/ATV/AV··· | The default source when power on to enter. | If select a source except the “Off”,the tv will enter that source when power on every time | |
| Channel Nummber | On/Off The default ATV channel to enter when power on. | ||
| Max Volume 0/.100 The max volume user to adjust | If change this value ,user can not set the volume out of this limitation. | ||
| Default Volume | off/0.... The default system volume when power on | The Default Volume can not out of the limit of Max volume. | |
| Next Page | Turn | to next | page |
| Clear lock Reset the hotel mode | |||
| DataBase Export | Export the channel data. | ||
| DataBase Import | Import the channel data. | ||
| Previous page | Turn to previous page | ||
| Logo import | File Browser | ||
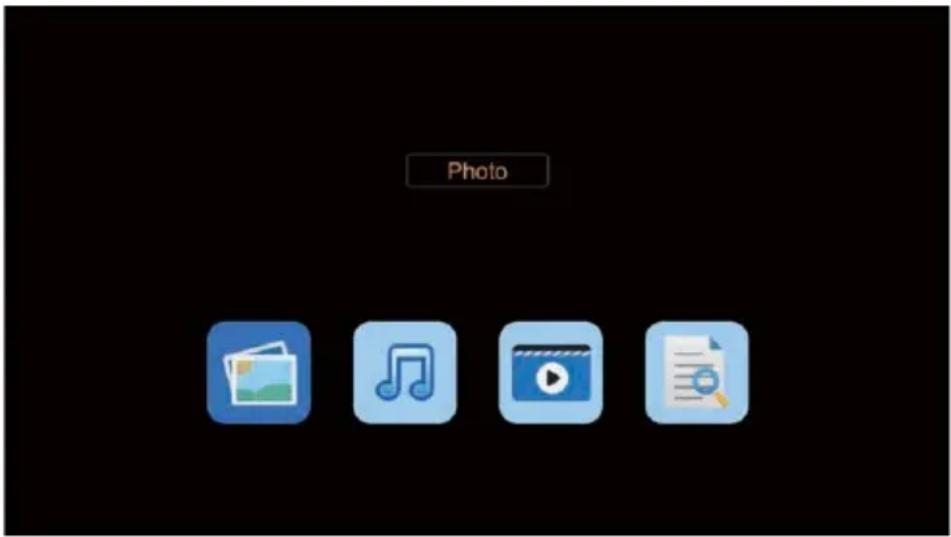
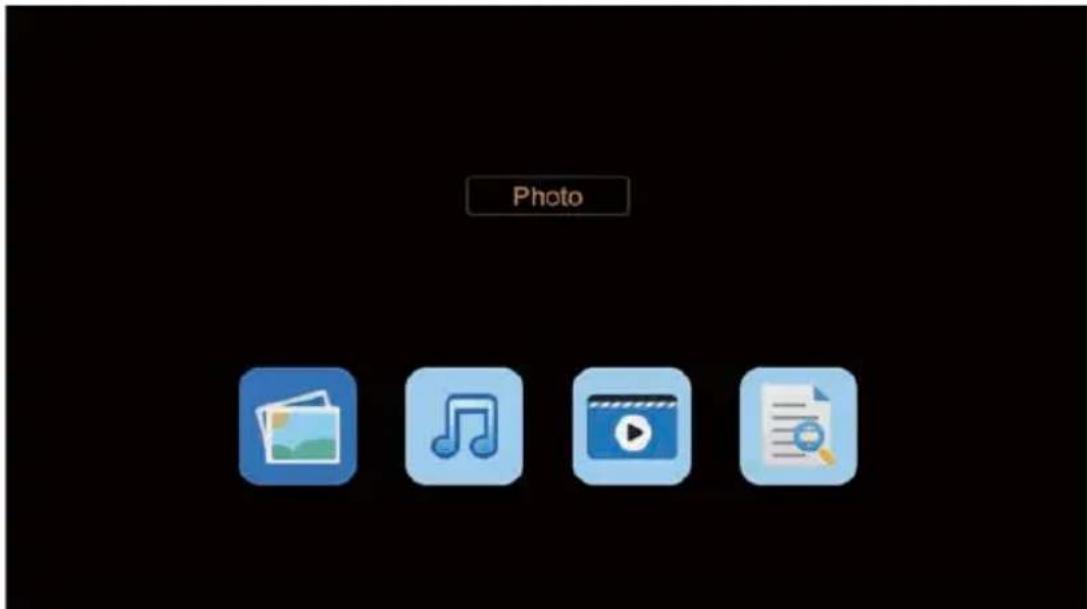
MEDIA OPERATION
The picture is for a reference only; the actual item is the standard.
Note: Before operation USB menu, Plug in USB device or memory card, then press SOURCE button to set the Source to Media.
Press ▲/▼ button to select USB in the Source Menu, and then press OK to enter.
text_image
Photo- Press ◀/▶ button to select the option that you want to adjust in the Media menu, then
press OK or ▶ button to enter.
- Press ◀/▶ button to adjust or press ▲/▼ button to select.
- After finishing your adjustment, press MENU button to save and return back to the previous menu and press EXIT button to exit the entire menu.
Photo
The picture is for a reference only; the actual item is the standard.
Press ◀/▶ button to select Photo in the main menu, and then press OK button to enter.
Press EXIT button to return back to the previous menu.
text_image
PhotoPress ▲/▼ to select the photos, press OK or ▶ or || button to view.
Press RED button to delete the photo you selected.
Press GREEN button to add all photos to play list.

text_image
Photo C:/picture/view Return view1.jpg view2.jpg view3.jpg view4.jpg view5.jpg view6.jpg view7.jpg Delete Add/Def all to playlist Move Page+/- Play OK Enter Exit ExitYou can see the information of the current playing photo after press INFO button, then press
▶ || button to play or pause, you can see the playing state in the right.
Then press ▲/▼ or ◀/► button to rotate the picture without control bar.
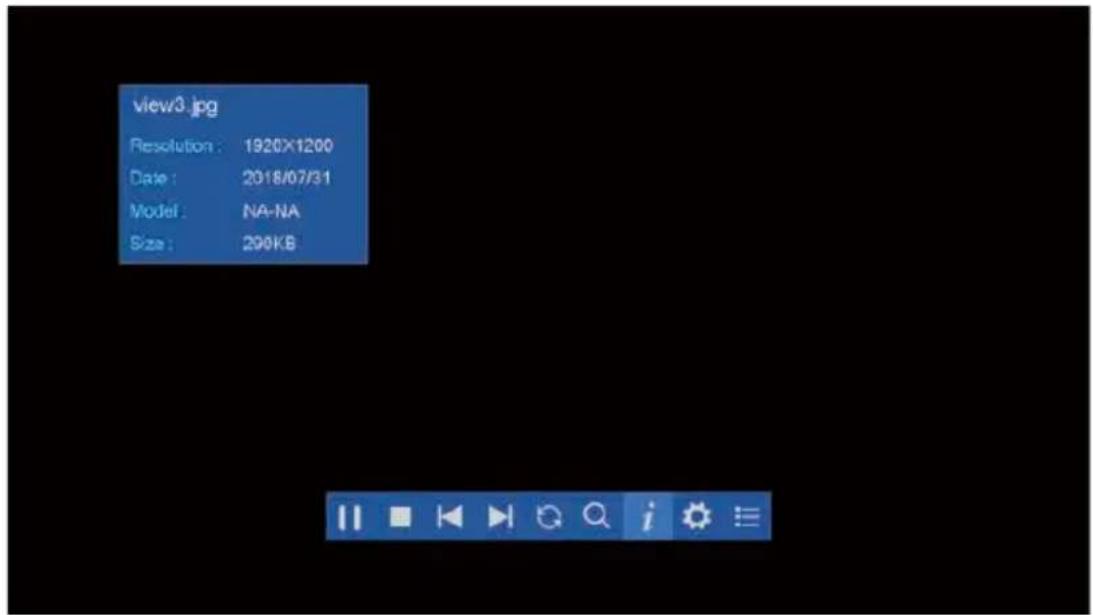
text_image
view3.jpg Resolution: 1920X1200 Date: 2018/07/31 Model: NA-NA Size: 290KBNotes: Other menu and description are the same as that for Movie menu.
Music
The picture is for a reference only; the actual item is the standard.
Press ◀/▶ button to select Music in the main menu, and then press OK button to enter.
Press EXIT button to return back to the previous menu.
Press RED button to delete the song you selected.
Press GREEN button to add all music to play list.
Press ▲/▼button to select the song you want to listen, and then press OK or ▶ or || or ▶ button to play.
Press button to return back to the previous menu.

text_image
Music C:\music\music1 Return 连序友,连译录.mp3 连脚针,脚点.mp3 201/002 7:10:46 加法文 主题&107 Delete AddDel at to playEnd Move Page Play OK Enter Exit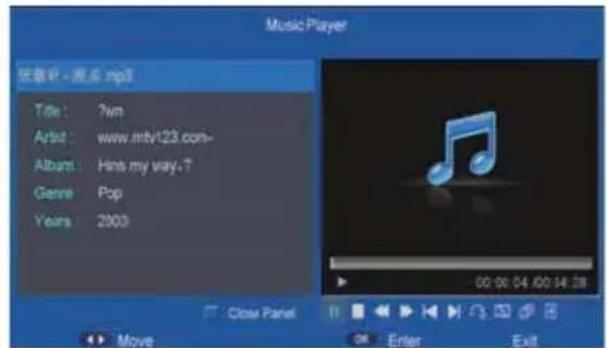
text_image
Music Player 在歌中 - 源点.mp3 Title: ?wm Artist: www.mty123.com- Album: Hins my way-7 Genre: Pop Years: 2003 Close Panel Move Enter ExitYou can see the information of the current playing song at the left of the menu.
Movie
The picture is for a reference only; the actual item is the standard.
Press ◀/▶ button to select Movie in the main menu, then press OK button to enter.
Press EXIT button to return back to the previous menu.
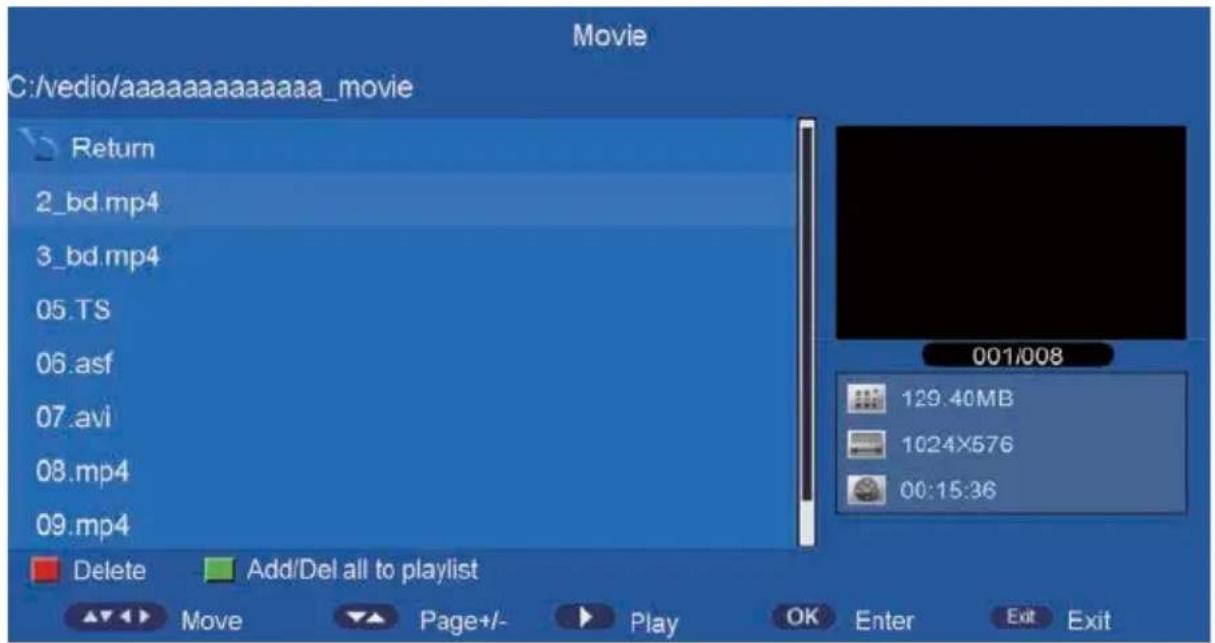
text_image
Movie C:/vedio/aaaaaaaaaaaaaa_movie Return 2_bd.mp4 3_bd.mp4 05.TS 06.asf 07.avi 08.mp4 09.mp4 Delete Add/Del all to playlist 129.40MB 1024X576 00:15:36Press ▲/▼button to select the folder that you want to view.
Press OK button to select the sub folder.
Press RED button to delete the movie you selected.
Press GREEN button to add all movies to play list.
Press ENTER button or ▶ or || button to play,
Press ■ button or EXIT button to stop playing.
Press the button to return back to previous page.
You can see the information of the current playing media at the first flew second or after press INFO button.
e-Book
The picture is for a reference only; the actual item is the standard.
Press ◀/▶ button to select e-Book in the main menu, then press OK button to enter.
Press EXIT button to return back to the previous menu.
Press Blue button to open play list.
Press Enter button to open quick menu.
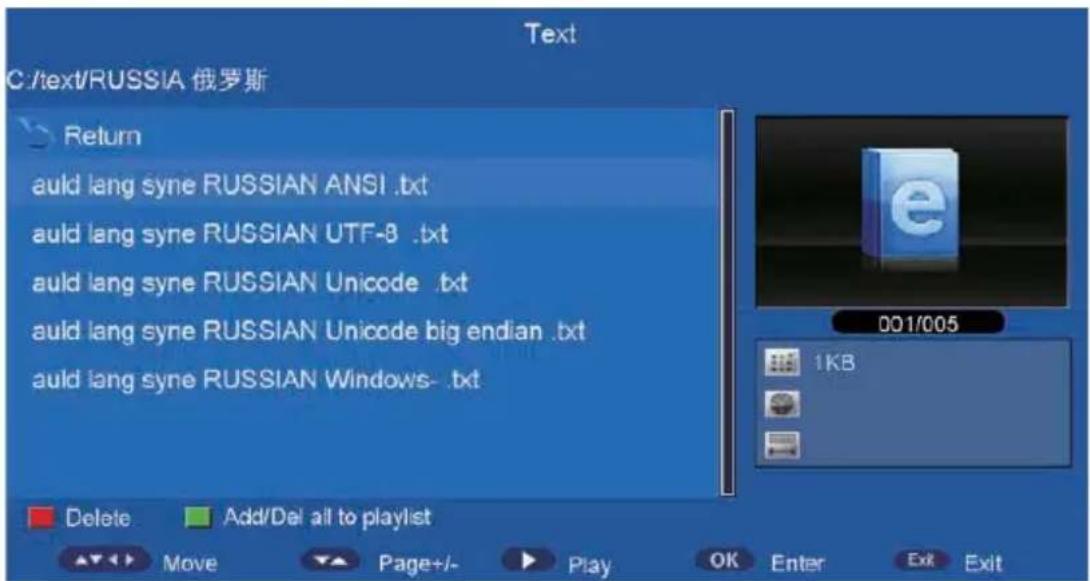
text_image
Text C:\text/RUSSIA 俄罗斯 Return auld lang syne RUSSIAN ANSI .txt auld lang syne RUSSIAN UTF-8 .txt auld lang syne RUSSIAN Unicode .txt auld lang syne RUSSIAN Unicode big endian .txt auld lang syne RUSSIAN Windows-.txt Delete Add/Def all to playlist Move Page+/- Play OK Enter Exit ExitPress ▲/▼button to select the file you want to view.
Press OK button to select the sub folder for file.
Press RED button to delete the text file you selected.
Press GREEN button to add all text files to play list.
Press ENTER button or ▶ or || button to play,
Press ■ button or EXIT button to stop playing.
Press the button to return back to previous page.
You can see the information of the current playing media at the first flew second or after press INFO button.

text_image
Text There was once a farmer. His land was hilly; the soil was not the best. He had a cow that wasn't giving much milk; he had chickens who were laying few eggs. The place looked run-down; barn and fences needed repair. The farmer and his wife were so dejected in spirit that they just could not manage to get the farm back on its feet. One stormy evening, a poorly-dressed man knocked on their door, asking if he could get shelter for the night. They shared what food had been prepared, while they talked a great deal about the sad shape of the farm. 1/17 Add/Del bookmark Go to page Bookmark list Playlists OK Quick Menu Exit ExitPress RED button to add/delete bookmark in current page.
Press GREEN button to jump to special page.
Press Yellow button to open bookmark list.
Operation instructions of Miracast
- Select the Miracast source or USB source and enter.
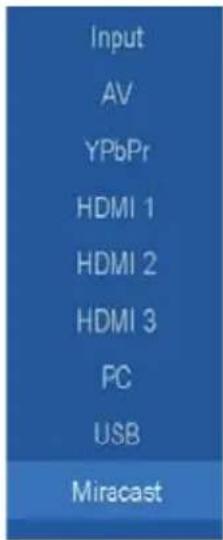
text_image
Input AV YPbPr HDMI 1 HDMI 2 HDMI 3 PC USB Miracast- Then you will see the Miracast icon.
- Enter the Miracast, wait for serival seconds you will see the Miracast Ready.

text_image
Miracast TV name Haier TV- After the Miracast ready, you can use your phone to connect.
- After connect success, The phone screen will be cast on the TV.

text_image
10:30 AM Wireless display Wireless display TV Connected Hikeen TV Unavailable Hikeen TV Unavailable Hikeen TV Unavailable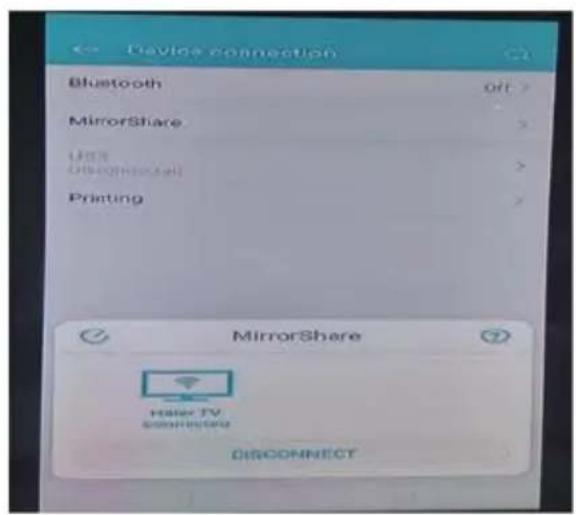
text_image
Device connection Bluetooth off > MirrorShare Unit Übergeschäft Printing MirrorShare Haler TV connected DISCONNECTNOTE: Only Android cellphone with projection screens function can support this function. Not all phone models support screen casting.
Troubleshooting
Carry out the problem-solving measures described in the following section before contacting customer support. Turn off the device immediately as soon as you suspect a malfunction and unplug the power plug. Do not attempt to repair the device yourself.
| SYMPTOM | CHECK IT |
| LCD screen stays Dark. | Make sure the unit is turned on and the connections are correct.Make sure the power adapter is correctly connected. |
| There is no sound | Make sure the system connection is correct.Mack sure the power of speaker is turned on. |
| There is no picture or picture move up and down unsteady. | Check if the connections with the external AV signal source are correct.Correctly set the items in the picture menu.Check if the video type input signal is not corresponding to the unit.Make sure the unit is turned on and in correct video type. |
| The remote control does not work. | Make sure there are no obstructions between the remote control and the unit.Make sure the remote control is pointing at the unit.Make sure the batteries are inserted or the polarity is correct.Make sure the batteries are not weak.Replace the weak battery. |
Other Notes:
Static or other external interfere may cause the player to behave abnormally. In this occurs, unplug the power-supply cord from the outlet and plug it in again to reset the player. If the problems persist, then please disconnect the power and consult a qualified technician.
| Trouble phenomenon | Inspection | |||
| Picture | Audio | |||
 | Snow |  | Noise | antenna position, direction or connection |
 | Ghost |  | Normal audio | antenna position, direction or connection |
 | Interfere |  | Noise | electronic equipment, car/ motorcycle, fluorescent light |
 | Normal Picture |  | Mute | Volume (inspect wether the mute function on the remote control are started, or audio system are correct or not) |
 | No picture |  | Mute | Power cord is not inserted Power switch is not opened Contrast and brightness/volume setup Press standby key on the remote control for inspecting |
 | No color |  | Normal audio | color control |
 | Scramble |  | Normal audio r weak | retune channel |
 | No color |  | Noise | Audio system |
Special Explanation: The accessories such as remote control is not belongs to the guarantee.