Comfort Pro Freedom CPF6P-1 - Vacuum Cleaner Powr-Flite - Free user manual and instructions
Find the device manual for free Comfort Pro Freedom CPF6P-1 Powr-Flite in PDF.

User questions about Comfort Pro Freedom CPF6P-1 Powr-Flite
0 question about this device. Answer the ones you know or ask your own.
Ask a new question about this device
Download the instructions for your Vacuum Cleaner in PDF format for free! Find your manual Comfort Pro Freedom CPF6P-1 - Powr-Flite and take your electronic device back in hand. On this page are published all the documents necessary for the use of your device. Comfort Pro Freedom CPF6P-1 by Powr-Flite.
USER MANUAL Comfort Pro Freedom CPF6P-1 Powr-Flite
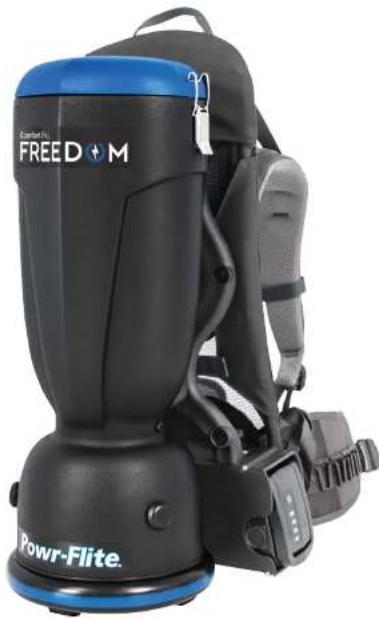
Comfort Pro FREEDOM Backpack Vacuum CPF6 Series
natural_image
Front view of a Comfort Pro FREED M exercise backpack (no visible text or symbols on the backpack body)NOTES
Model Number: ____
Serial Number:
Date of Purchase:
Retain this manual as a permanent record of your purchase.
INTRODUCTION
Check the carton for shipping damage. Carefully unpack and inspect your new Powr-Flite vacuum for shipping damage. Each unit is tested and thoroughly inspected prior to shipping. If damage is discovered, immediately notify the transportation company that delivered your machine and request an inspection. As a manufacturer, we are unable to act upon any claim for concealed damage; you must originate the claim. Be sure to keep the carton, packing inserts, packing lists, and carrier's receipt until the inspector has verified your claim.

PROTECT THE ENVIRONMENT
Please dispose of packaging materials in an environmentally safe way according to local waste disposal regulations.

Always remember to recycle
Introduction ......3
Safety Instructions ....4
Storage 4
Grounding Instructions....6
Operating Instructions....7
Troubleshooting....10
Machine Specifications....11
Schematic and Parts List....13
MANUAL
This manual has important information for the use and safe operation of the Comfort Pro. Read this manual carefully before starting the machine. Keep the manual available at all times and instruct all operators to read this manual.
REPLACEMENT/ACCESORIES
IMPORTANT SAFETY INSTRUCTIONS
Save These Instructions
SAFETY WARNINGS AND PRECAUTIONS
WARNING!
Read all instructions before using. Save these instructions.
Following the cleaning instructions will prolong the life of your Powr-Flite vacuum.
When using an electrical appliance, basic precautions should always be followed.
- Use only as instructed in this manual. Use only the recommended attachments and replacement parts.
- Do not use outdoors or on wet surfaces.
- Do not use to pick up liquids. This vacuum is for Dry Pickup only.
- Do not allow to be used as a toy. Close attention is necessary when used by or near children.
- If the unit is not working as it should, has been dropped, damaged, left outdoors, or exposed to water, return it to a service center before using.
- Do not vacuum up hard or sharp objects, as they may damage the hose, vacuum bag or the vacuum motor.
-
Do not use without paper vacuum bag, cloth bag and filters in place.
-
Do not operate the vacuum while it is standing on high-pile carpet. The exhaust airflow is restricted and will cause the unit to overheat.
-
Do not put any objects into openings. Do not use with any opening blocked. Keep free of dust, lint, hair and anything that might reduce airflow.
-
Keep hair, loose clothing, fingers, and all parts of body away from openings and moving parts.
-
Use with extra care when cleaning stairs.
-
Do not vacuum flammable or combustible materials or anything that is burning or smoking, such as cigarettes, matches, or hot ashes.
-
Do not use with dust bag not in place.
-
Sparks inside the motor can ignite flammable vapors or dust. To reduce the risk or fire or explosion, do not use near combustible liquids, gases, or dusts, such as gasoline or other fuels, lighter fluid, cleaners, oil-based paints, or natural gas.
-
To reduce the risk of inhaling toxic vapors do not vacuum or use near toxic or hazardous materials.
-
Keep children and unauthorized persons away from the vacuum when in use.
-
This machine is not intended for use by persons with reduced physical, sensory or mental capabilities, or lack of experience and knowledge.
-
Disconnect the battery pack from the machine before making any adjustments, changing accessories or storing machine.
- DO NOT expose battery packs to temperatures above 122^ F ( 50^ C). Never leave battery packs in automobiles on hot days, where temperatures can be much higher than the outside temperature.
- DO NOT use or store vacuum or batteries in wet or moist conditions, or with flammable or combustible materials.
- DO NOT charge batteries or store battery for extended periods, 1 month or more, in temperatures above 90°F (32°C) or below 40°F (5°C).
- When charging, make sure that the charger has at least 6 inches of clearance on all sides. Adequate airflow is required to cool the charger when in use.
- Connect charging cord to a properly grounded outlet only. See Grounding Instructions.
- DO NOT use a damaged cord or plug for charging.
- DO NOT pull on charger's cord to unplug. Grasp and pull the plug, not the cord.
- DO NOT handle the charger's cord plug with wet hands when inserting into electrical outlet.
- Keep sparks and flames away from batteries. DO NOT smoke near batteries or charger.
- DO NOT charge the unit outdoors.
- DO NOT attempt to repair, service, or modify the battery system or charger. Have servicing performed by a qualified repair person using only identical replacement parts. This will ensure that the safety of the product is maintained. Contact Powr-Flite Customer Service with any issues.
- DO NOT short-circuit the battery or charger terminals with conductive items such as paper clips. This can deliver high current, resulting in heat and fire.
- DO NOT crush, drop, incinerate or damage the battery pack. DO NOT use a battery pack that has been damaged in any way. DO NOT incinerate the battery even if it is severely damaged or nonworking. The battery can explode in a fire.
- Under abusive conditions, liquid may be ejected from the battery; avoid contact. If contact accidentally occurs, flush with water. If liquid contacts eyes, seek additional medical help. Liquid ejected from the battery may cause irritation or burns.
- Follow all charging instructions and do not charge the battery pack or appliance outside of the temperature range specified in the instructions. Charging improperly or at temperatures outside of the specified range may damage the battery and increase the risk of fire.
- Do not modify or attempt to repair the appliance or the battery pack (as applicable) except as indicated in the instructions for use and care.
CAUTION
CHARGER GROUNDING INSTRUCTIONS
THE COMFORT PRO FREEDOM BATTERY CHARGER MUST BE GROUNDED. If the charger should malfunction or stop working, grounding provides a path of least resistance for electrical current, thereby reducing the risk of electrical shock. This unit is equipped with a cord that has an equipment-grounding conductor and grounding plug. The plug must be inserted in an appropriate outlet that is properly installed and grounded in accordance with all local codes and ordinances. Cutting off the ground wire or using a cord that is not equipped with a ground plug will void the warranty on the unit, and Powr-Flite will accept NO liability associated with the unit.

WARNING!
Improper connection of the equipment-grounding conductor can result in a risk of electric shock. Check with a qualified electrician or service person if you are in doubt as to whether the outlet is properly grounded. Do not modify the plug provided with the appliance. If it will not fit the outlet, have a proper outlet installed by a qualified electrician.
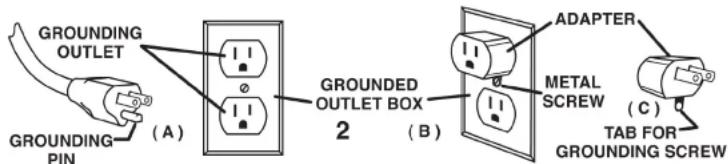
The vacuums are for use on a nominal 120-volt circuit, and have a grounded plug that looks like the plug illustrated in Figure A. A temporary adapter that looks like the adapter illustrated in Figure B and C may be used to connect this plug to a 2-pole receptacle as shown in Figure B if a properly grounded outlet is not available. The temporary adapter should be used only until a properly grounded outlet (Figure A) can be installed by a qualified electrician. The green colored rigid ear, lug, or the like, extending for the adapter must be connected to a permanent ground such as a properly grounded outlet box cover. Whenever the adapter is used, it must be held in place by a metal screw.
text_image
GROUNDING OUTLET GROUNDING PIN (A) 2 GROUNDED OUTLET BOX (B) ADAPTER METAL SCREW (C) TAB FOR GROUNDING SCREWNote: In Canada, the use of a temporary adapter is not permitted by the Canadian Electrical Code.
OPERATING INSTRUCTIONS
IMPORTANT!
PERFORM PROPER INSTALLATION OF HEPA BAGS AND CORD
IN COMFORT PRO BACKPACK VACUUMS.
Please read the following instructions carefully. They will help to get the best performance from this professional commercial vacuum cleaner and to maintain it in optimum condition. Always make sure the main power of the vacuum is off and the unit is not plugged in when doing any maintenance on the vacuum.
PREPARING TO VACUUM
- Remove vacuum hose from top of unit. (Fig. 1)
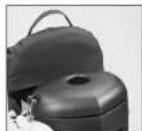
- Release the two latches and lift off lid. (Fig. 2)
- Ensure Micro Cloth bag is fully seated on Comfort Pro tank housing. (Fig. 3)
- Fold the bottom 2" of the HEPA bag up and hold into place. (Fig. 4)
- Insert HEPA bag inside of micro cloth bag. (Fig.5)
- Squeeze bag just below the cardboard collar and drop onto rubber gasket. (Fig. 6)
- Ensure that white bag is not protruding under cardboard collar. (Fig. 7)
- NOTE: Cardboard must be properly seated inside gasket groove. Cardboard will be flush with gasket. (Fig. 8)
- Replace lid, lock down the two latches and install hose. (Fig. 9).
- Fasten the ends of the top and bottom wand together.


WARNING!
Always unplug machine before cleaning, or making any adjustments or repairs.
The backpack vacuum has four levels of filtration: the paper vacuum bag, a micro cloth filter, a pre-motor filter and an exhaust filter. These bags and filters capture fine dust particles and protect the motor from dirt. It is important to replace the
paper bag when it is no more than 12 full and to clean the filters on a regular schedule and replace as necessary.
Paper Vacuum Bag
-
Remove paper bag. Insert a new paper bag into the cloth bag, making sure the cardboard disk is centered on the flexible sealing ring. When you replace the lid, the short nozzle in the center of the lid will be closed over the central hole of the cardboard disk of the paper vacuum bag providing a seal. (Fig. A)
-
Replace the lid. Fasten latches and replace hose. (Figs. C-D)
Micro Cloth Filter
After each use, the cloth filter bag should be inspected. Hand wash the cloth filter bag every 6 months using cold water and no detergent. Line dry.
-
Remove the micro cloth bag, clean and replace. (Fig. B)
-
Replace paper vacuum bag and lid. Fasten latches and insert hose. (Figs. C-D)
Pre-Motor Filter
The pre-motor filter is located under the micro cloth filter. Inspect after each use. The filter can be washed using cold water and no detergent. Lay flat to dry. Replace every 6 months.
-
Remove the lid, the paper vacuum bag, and the cloth bag to expose the pre-motor filter.
-
Remove the foam pre-motor filter from the dust compartment, clean and replace. If filter is extremely dirty, rinse out and air dry before replacing back into vacuum. (Fig. E)
-
Reinstall the cloth bag, the paper vacuum bag and replace the lid, fasten
A.

B.

C.
D

Wearing the Backpack Vacuum
The backpack is designed to balance the weight of the vacuum on the hips, not the shoulders.
- Adjust the VariQuick height adjuster to your back length.
- Loosen all of the straps and place the vacuum on your back.

text_image
Stabilizer Straps Shoulder Straps VariQuick Height Adjuster Sternum Strap Hip Belt


TROUBLESHOOTING
TROUBLESHOOTING
- If the vacuum will not operate, check the following:
a. The battery pack connection to the vacuum.
b. The battery pack is charged.
c. That the switch is in the "on" position and functioning properly. - If the battery pack is not charging, check that the charger is plugged into 120 Volt outlet and that the battery is properly connected to the charger. Also check fuse in charger.
- If the exhaust air from the bottom of the vacuum is warmer than usual, check, clean or replace all filters.
- If loss of suction occurs, check the following:
a. Check that debris is not plugging the hose, wand, and/or floor tool.
b. Check, clean or replace both Intercept Micro and Micro Cloth filters.
c. Check that the hose cuffs are fitting tightly on the hose and are not cracked.
d. Check that the cap is properly attached to the vacuum body. - If the charger's LED indicator is off and there is no output voltage when plugged in, check both ends of the power cord.
The backpack vacuum has been fitted with a thermal overload switch to protect the motor against damage should the airflow be blocked for extended periods. This may occur if the vacuum bag is overfull, the micro cloth bag is clogged, or if the vacuum hose or exhaust is blocked. The vacuum motor will stop before it can get too hot. If this happens, empty and thoroughly clean the vacuum bag and filters, or free any block-age and ensure that adequate airflow is restored. After the motor cools, you will be able to restart the machine - this may take up to 20 minutes.
SPECIFICATIONS
natural_image
Exterior view of a Freehold air purifier with blue and black casing (no text or symbols visible on body)Specifications and parts are subject to change without notice. Please refer to www.Powr-Flite.com for the latest schematic drawing and parts list.
TOOL KITS

text_image
Standard Tool Kit Fits: CPF6S CT171 2 Bend Wand J1006 43 Rigid Hose W/90° Bend & Cuff CT176 173 Crevice Tool W/Clip CT184 32 Dusting Tool W/Clip B352-PF10 Carpet Tool W/Clip CT188 5: Upholstery Tool W/Clip C352-PF20 Hard Floor Tool W/Clip CT194 Pown-Glide Carpet Tool W/Clip CT227 Scalloped Floor Tool W/Clip Tools Item# TK57
natural_image
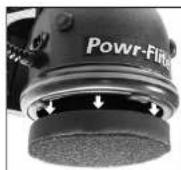
Close-up of a hand holding a black cylindrical object with an arrow indicating rotation (no text or symbols visible)Install the floor tool to the end of the wand. Align the brass ring with the groove on the floor tool to ensure a secure fit.
text_image
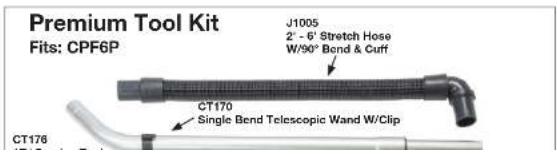
Premium Tool Kit Fits: CPF6P J1005 2" - 6" Stretch Hose W/90° Bond & Cuff CT170 Single Bend Telescopic Wand W/Clip CT176
TOOLS SCHEMATICS AND PARTS LIST
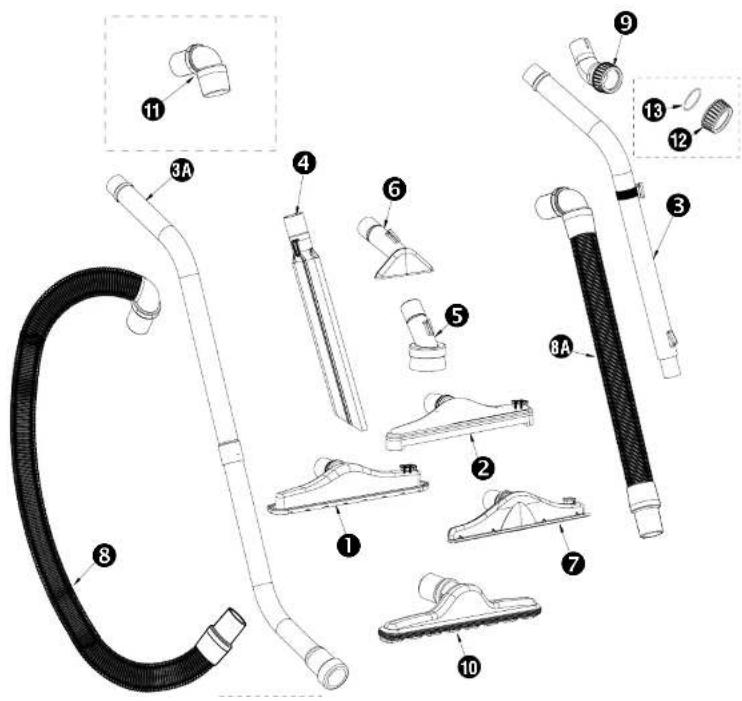
text_image
Exploded view diagram of a vacuum cleaner with numbered parts labeled 1 through 13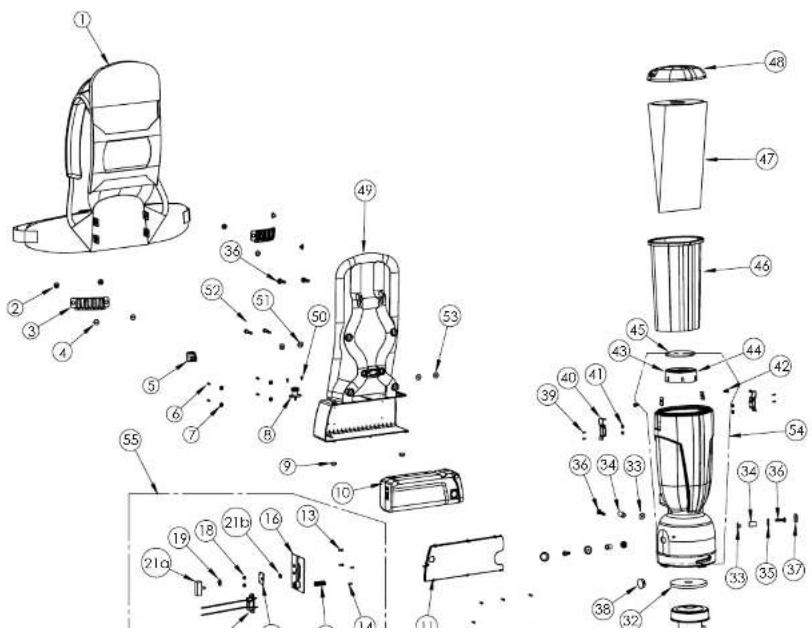
text_image
Exploded diagram of a blender with numbered parts and exploded view, likely for assembly or manufacturing purposes.| No. | Part No. Qty Description | ||
| 1 | X96 | 58 1 Deuter Backpack | Harness |
| 2 | A35 | 2-9401 4 Shoulder Rivet Female | |
| 3 | X12 | 41 2 Belt Clip W/ Retainer | |
| 4 | A35 | 2-9402 4 Shoulder Rivet Male | |
| 5 | PX8 | 7 1 Rocker Switch | |
| 6 | X96 | 90 7 Screw 8-18 x 1/2" | |
| 7 | X97 | 47 4 Washer | |
| 8 | X12 | 07 1 Spring Loaded Plunger | |
| 9 | X12 | 60 2 Rubber Foot | |
| 10 | X1 | 200 1 Battery | |
| 11 | X1 | 203 1 Battery Box Cover | |
| 12 | X1 | 261 1 Power Harness | |
| 13 | X9 | 748 2 Screw 6-32 X 5/8" | |
| 14 | X1 | 198 2 Screw, #4 X 1/2" | |
| 15 | X1 | 206 1 Spring | |
| 16 | X1 | 204 1 Terminal Plate | |
| 17 | X1 | 526 1 Switch Mounting Bracket | |
| 18 | X8 | 257 2 Nut | |
| 19 | 7C | M004 1 Washer | |
| 20 | X1 | 201 1 Terminal Block | |
| 21a | X1 | 523 Momentary Switch | |
| 21b | Nut Used For Mounting | X1523 Onto X1526 | |
| 22 | X9 | 685 1 Housing Bumper | |
| 23 | X9 | 682 1 Exhaust Filter | |
| 24 | X9 | 676 2 Screw 8-18 3/4" | |
| 25 | X9 | 667 1 Exhaust Filter Plate | |
| 26 | X9 | 717 1 Sound Damping Foam Ring (CPF6P Only) | |
| 27 | A7 | 32-8314 7 Screw 8-18 x 5/8" | |
| 28 | X9 | 669 1 Motor Shield | |
| 41 1575 4 Washer | ||
| 42 X9754 2 Screw 1/4-20 X 5/8" | ||
| 43 X9691 2 Clip Nut | ||
| 44 X9668 1 Inlet Filter Base | ||
| 45 X9683 1 Inlet Filter | ||
| 46 X9679A 1 Micropcloth Bag With Gasket | ||
| 47 X9739 1 HEPA Paper Bag (10 Pk.) | ||
| X9735 1 Closed Mouth Paper Bag (10 Pk.) | ||
| X9737 1 Open Mouth Paper Bag (10 Pk.) | ||
| 48 X9666 1 Lid | ||
| 49 X1202 1 Harness Frame | ||
| 50 X1263 2 Screw 8-18 3/8" | ||
| 51 2568 2 Washer | ||
| 52 X8843 2 Bolt 1/4-20 X 1-1/4" | ||
| 53 X8235 2 Washer | ||
| 54 | X9664 - F | 1 Housing With Filter |
| 55 X1527 1 Terminal Wall Assembly | ||
For warranty information go to www.Powr-Flite.com