AE-VC136T - Security Camera Hikvision - Free user manual and instructions
Find the device manual for free AE-VC136T Hikvision in PDF.

User questions about AE-VC136T Hikvision
0 question about this device. Answer the ones you know or ask your own.
Ask a new question about this device
Download the instructions for your Security Camera in PDF format for free! Find your manual AE-VC136T - Hikvision and take your electronic device back in hand. On this page are published all the documents necessary for the use of your device. AE-VC136T by Hikvision.
USER MANUAL AE-VC136T Hikvision
Low Illumination Fisheye
Vehicle-Mounted Camera
User Manual

See Far, Go Further
© 2022 Hangzhou Hikvision Digital Technology Co., Ltd. All right reserved.
This Manual is the property of Hangzhou Hikvision Digital Technology Co., Ltd. or its affiliates (hereinafter referred to as "Hikvision"), and it cannot be reproduced, changed, translated, or distributed, partially or wholly, by any means, without the prior written permission of Hikvision. Unless otherwise expressly stated herein, Hikvision does not make any warranties, guarantees or representations, express or implied, regarding to the Manual, any information contained herein.
About this Manual
The Manual includes instructions for using and managing the Product. Pictures, charts, images and all other information hereinafter are for description and explanation only. The information contained in the Manual is subject to change, without notice, due to firmware updates or other reasons. Please use this Manual with the guidance and assistance of professionals trained in supporting the Product.
Trademarks Acknowledgement
HIKVISION and other Hikvision's trademarks and logos are the properties of Hikvision in various jurisdictions. Other trademarks and logos mentioned are the properties of their respective owners.
LEGAL DISCLAIMER
TO THE MAXIMUM EXTENT PERMITTED BY APPLICABLE LAW, THIS MANUAL AND THE PRODUCT DESCRIBED, WITH ITS HARDWARE, SOFTWARE AND HIFRMAWARE, ARE PROVIDED "AS IS" AND "WITH ALL RAUTS AND ERRORS". HKVISION MAKES NO WARRANTIES, OR ANY INFORMATION IN ACCORDANCE. A PUBLIC COMMISSION OF THE EQUITY OF THE PREMISSIONAL MERCHANTABILITY, SATISABORAT QUALITY, OR FITNESS FOR A PARTICULAR PURPOSE. THE USE OF THE PRODUCT BY YOU IS AT YOUR OWN RISK. IN NO EVENT WILL HKIVISION BE LIABLE TO YOU FOR ANY SPECIAL, CONSEQUENTIAL, INCIDENTAL, OR INDIRECT DAMAGES, INCLUDING ANGINS OTHERS, DAMAGES FOR LOSS OF THE PROPERTY OF THE EQUIPMENT, OR ANY likelihood OF PROPERTY, TAX DEBT OF, COUBIPTION OF SYSTEMS, OR LOSS OF DOCUMENTATION, WHETHER BASED ON BRANCH OF CONTRACT, TORT (INCLUDING NEGLIGENCE, PRODUCT LIABILITY, OR OTHERWISE, IN CONNECTION WITH THE USE OF THE PRODUCT), EVEN IF HKIVISION HAS BEEN ADVISED OF THE POSSIBILITY OF SUCH DAMAGES OR ANY OTHER HISTORY. YOU ACKNOWLEDGE THAT THE NATURE OF INTERNET PROVIDES FOR INHERENT SECURITY RISKS, AND HKIVISION SHALL NOT TAKE ANY RESPONSIBLES FOR ABNORMAL OPERATION, PRIVACY LEAKAGE OR OTHER DAMAGES RESULTING FROM CYBER ATTACK, HACKER ATTACK, VIRUS INSPECTION, OR OTHER INTERNET SECURITY RISKS; HOWEVER, HKIVISION WILL PROVIDE TIMELY ERRORS TO CHINA BE CHECKED. YOU AGLE TO USE THIS PRODUCT IN COMPLIANCE WITH ALL APPLICABLE LAWS, AND YOU ARE SOLELY RESPONSIBLE FOR, ENSURING THAT YOUR USE CONFIRMERS TO THE APPLICABLE LAW. ESPECIMILY YOU ARE RESPONSIBLE FOR USING THIS PRODUCT IN A MANNER THAT DOES NOT INFINSE ON THE RIGHTS OF THIRD PARTY, INCLUDING ANY INFORMATION, OR ANY SUBJECTIVE TITELLE PROTECTION AS TO PROTECTION ON OTHER PRIVATE RIGHTS. YOU SHALL NOT USE THIS PRODUCT FOR ANY PROHIBITED END-USES, INCLUDING THE DEVELOPMENT OR PRODUCTION OF WEAPONS OF MASS DESTRUCTION, THE DEVELOPMENT OR PRODUCTION OF CHEMICAL OR BIOLOGICAL PROCESSED ITEMS. ANY INFORMATION CONTACT INTUITED TO ANY UNICREL EXPENSE OR UNSAFE NUCLEAR UVE LICE, OR IN SUPPORT OF HUMAN RIGHTS.
Regulatory Information
FCC Information
FCC compliance: This equipment has been tested and found to comply with the limits for a digital device, pursuant to part 15 of the FCC Rules. These limits are designed to provide reasonable protection against harmful interference when the equipment is operated in a commercial environment. This equipment generates, uses, and can radiate radio frequency energy and, if not installed and used in accordance with the instruction manual, may cause harmful interference to radio communications. Operation of this equipment in a residential area is likely to cause harmful interference in which case the user will be required to correct the interference at his own expense.
FCC Conditions
This device complies with part 15 of the FCC Rules. Operation is subject to the following two conditions:
-
This device may not cause harmful interference.
-
This device must accept any interference received, including interference that may cause undesired operation
EU Conformity Statement

This product and - if applicable - the supplied accessories too are marked with "CE" and comply therefore with the applicable harmonized European standards listed under the Low Voltage Directive 2014/35/EC, the EMC Directive 2014/30/EC.

2012/19/EU (WEEE directive): Products marked with this symbol cannot be disposed of as unsorted municipal waste in the European Union. For proper recycling, return this product to your local supplier upon the purchase of equivalent new equipment, or dispose of it at designated collection points. For more information see: www.recyclethis.info.

2006/66/EC (battery directive): This product contains a battery that cannot be disposed of as unsorted municipal waste in the European Union. See the product documentation for specific battery information. The battery is marked with this symbol, which may include lettering to indicate cadmium (Cd), lead (Pb), or mercury [Hg]. For proper recycling, return the battery to your supplier or to a designated collection point. For more information see: www.recyclathia.info.
Industry Canada ICES-003 Compliance
This device meets the CAN ICES 3 (A)/NMB 3(A) standards requirements.
Foreword
These instructions are intended to ensure that user can use the product correctly to avoid danger or property loss. Before using, please read the manual carefully and keep it properly for further reference.
Symbol Conventions
The symbols that may be found in this document are defined as follows.
| Symbol | Description |
| NOTE | Provides additional information to emplicate or supplement important points of the main test. |
| CAUTION | Indicates important operations or potential hazardous situation that could result in damage or property loss. |
| WARNING | Indicates a potentially hazardous situation, which if not avoided, could result in equipment damage, data loss, performance degradation, or unexpected results. |
| DAKGER | Indicates a hazard with a high level of risk, which if not avoided, will result in death or serious injury. |
Safety Instruction
- In the use of the product, you must be in strict compliance with the electrical safety regulations of the nation and region. Input voltage should meet both the SELV (Safety Extra Low Voltage) and the Limited Power Source with AC 24V or UC 12V according to the ILC00950 1 standard. Refer to technical specifications for detailed information.
- Keep the camera away from liquid w
- Do not drop the camera or subject it to physical shock.
- Do not touch senior modules with fingers. If cleaning is necessary, use clean cloth with a bit of ethanol and wipe it gently. If the camera will not be used for an extended period, replace the lens cap to protect the sensor from dirt.
- To avoid heat accumulation, good ventilation is required for operating environment.
- Do not aim the camera at the sun or extra bright places. Bleoming or smearing may occur otherwise (which is not a malfunction), and affect the endurance of sensor at the same time.
- The sensor may be burned out by a laser beam, so when any laser equipment is in using, make sure that the surface of sensor will not be exposed to the laser beam.
- Do not place the camera in extremely hot, cold, dusty or damp locations, and do not expose it to high electromagnetic radiation
- While in delivery, the camera shall be packed in its original packing, or packing of the same texture.
- If the product does not work properly, contact your dealer or the
1 Package Check
1.1 Before You Begin
Before unboxing, check if the package is intact. Refer to the list to make sure that all the assembly parts are included. The packing list of the vehicle-mounted camera is shown below.
1.2 Packing List
Table 1-1 Packing List
| No | Picture for Illustration | Name | Quantity |
| 1 | Camera | 1 | |
| 2 | User Manual | 1 | |
| 3 | Screw Pack | 1 |

The assembly parts may vary according to different camera models, Refer to the actual device for details.
2 Introduction
2.1 Product Features
This series of camera adopts new generation sensor with high sensitivity and advanced circuit design technology. It features high resolution, low image distortion and low noise, etc., which makes it suitable for monitoring system and image processing system.
The main features are as follows:
- High performance CMOS sensor for accurate capture of moving subjects
• High resolution image (up to 720p) - Low Illumination, D.01 Lux @(F1.2, AGC ON)
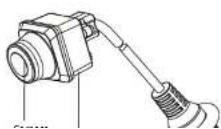
2.2 Overview
2.2.1 Overview of Camera
Li NOTE
The appearance of the device varies according to different models, as shown in the following figures. Refers to the actual device for detailed information.
Type A

text_image
Camera body Rubber Blanket Cable Figure 2-1 AC-VC1361(1.0mm) with ShieldType B

text_image
Camera Rubber Blanket CableFigure 2-2 AF-VC136T(1.0mm)
Type C
2.2.2 Cables
The product include 2 models, 2 kinds of cables are compared with different models. Make sure the cable is correct before you wiring.
Aviation Plug Interface
The camera is designed with an aviation plug, as shown below, to ensure shock-proof. Make sure your cable matches with the plug, 9V to 16 V DC power supply for vehicle-mounted cameras.
Cable A
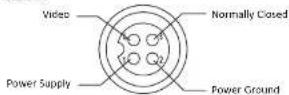
Cable B

Figure 2-4 Interfaces of Aviation Plug
4-Pins Plug Interface
The camera is designed with a 4-pins plug, as shown below. Make sure your cable matches with the plug. 5V to 16 V DC power supply for vehicle-mounted cameras.
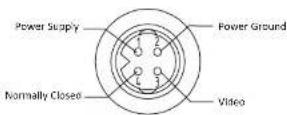
Figure 2-5 Interfaces of 4-Pins Plug
3 Installation
Before you start, Please make sure that the device in the package is in good condition and all the assembly parts are included.


The installation procedure of all three models are the same in
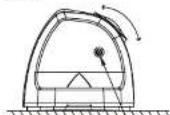
Step 1 Choose a suitable mounting location to ensure the camera catches the driver properly.
Pre-drill holes in the center of the mounting location. The hole diameter is determined according to the size of the wire harness, so that the wire harness can be passed through the car. If the structure of this section is a side outlet, there is no need to punch holes and go directly to step 4).
Step 2. Install the camera to a proper mounting place. Insert the cable through the cable hole in the vehicle.

Figure 3.1 install the Camera in Vehicle
Step 3 Fix the camera with screws to make sure it is secured.

Figure 3.2 Fix with Strows
Step 4 Adjust the camera to a desired angle to make sure it catches the driver properly. Fix the camera angle with screws using a hex screwdriver to complete installation.