Rapide Deluxe Pre-Treatment V-026PTS - Vacuum Cleaner VAX - Free user manual and instructions
Find the device manual for free Rapide Deluxe Pre-Treatment V-026PTS VAX in PDF.

User questions about Rapide Deluxe Pre-Treatment V-026PTS VAX
0 question about this device. Answer the ones you know or ask your own.
Ask a new question about this device
Download the instructions for your Vacuum Cleaner in PDF format for free! Find your manual Rapide Deluxe Pre-Treatment V-026PTS - VAX and take your electronic device back in hand. On this page are published all the documents necessary for the use of your device. Rapide Deluxe Pre-Treatment V-026PTS by VAX.
USER MANUAL Rapide Deluxe Pre-Treatment V-026PTS VAX
natural_image
Exterior view of a vax vacuum cleaner with red handle and transparent body (no text or symbols visible)Contents
Contents 1
Machine Overview 2
General Safety Information 3
Getting Started 4
How To Use 5
Looking After Your Machine 8
FAQs 10
Other Information 11
Guarantee 12
Machine Overview
1 Handle
2 Clean water tank latch
3 Clean water tank
4 Dirty water tank latch
5 Dirty water tank handle
6 Rotating brush bar
7 Dirty water tank
8 Dirty water tank lid
9 On/off switch
10 Handle screw
11 Power cord
12 Carrying handle
13 Handle release pedal
14 Cord hook
15 Solution spray trigger (hidden)
16 Upholstery water supply plug
17 Upholstery hose adaptor
18 Upholstery hose
19 Upholstery attachment tool
20 Water supply socket
21 Pre-treatment wand
22 Pre-treatment solution
23 Vax carpet cleaner solution

text_image
Labeled diagram of a vacuum cleaner with numbered parts for identification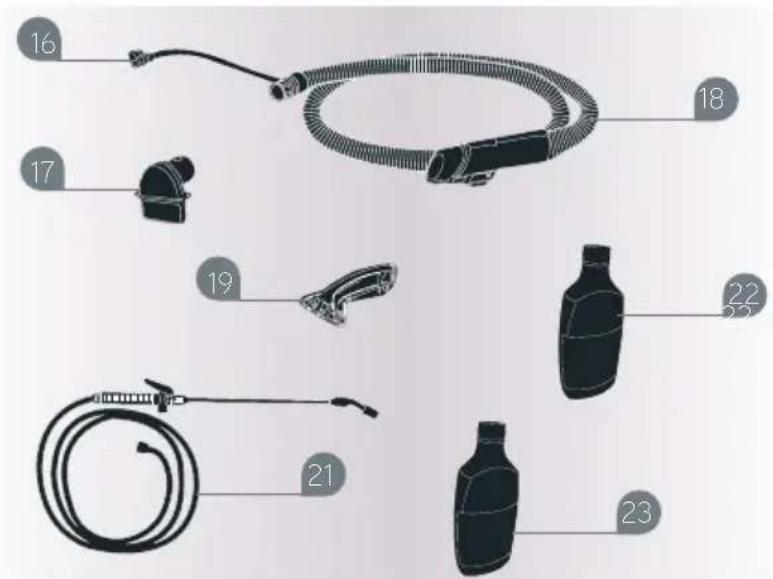
text_image
Diagram of automotive air purifier components with numbered labels pointing to each part.NOTE: Some parts may vary according to model. Please check inside flap of box for more details.
General Safety Information
This carpet washer is intended for household use only and NOT for commercial or industrial use.
Please keep instructions for further use.
When using the carpet washer, basic safety precautions should always be observed, including the following:
- Do not leave the carpet washer unattended when plugged in. Unplug the appliance from the socket when not in use.
- Only use the carpet washer indoors.
- Turn off all controls on the carpet washer before disconnecting or connecting from the mains supply.
- Always unplug the carpet washer before connecting or disconnecting the hose and accessories.
- Always unplug the carpet washer before carrying out any maintenance.
- Children should be supervised to ensure that they do not play with the appliance.
- This appliance is not intended for use by children under eight years of age and persons with reduced physical, sensory or mental capabilities or lack of experience and knowledge, unless they have been given supervision or instruction concerning use of the appliance in a safe way and understands the hazards involved.
- Cleaning and maintenance shall not be made by children without supervision.
- The appliance should only be used as described in the quick start guide or in the full online user guide.
- Only Vax recommended solutions and attachments should be used with this appliance.
- Do not use this carpet washer if it has been dropped, damaged, left outdoors or dropped into water. Do not use this carpet washer with a damaged cord or plug. If the supply cord is damaged return the carpet washer to a Vax Authorised Service Agent or contact our customer care centre.
- Do not pull or carry this appliance by the cord. Do not use the cord as a handle, close a door on the cord or pull the cord around sharp edges or corners. Do not run the carpet washer over the cord. Keep the cord away from heated surfaces.
- Do not handle the plug or the carpet washer with wet hands.
- Keep hair, loose clothing, fingers and all parts of the body away from openings and moving parts.
- Do not pick up with the machine any hot coals, cigarette butts, matches or any hot, smoking or burning objects.
- Do not pick up with the machine any flammable or combustible materials (lighter fluid, petrol, kerosene etc.) or use the machine in the presence of explosive liquids or vapours.
- Do not use the machine on areas where there may be harmful or toxic material (chlorine, bleach, ammonia, drain cleaner etc.)
- Store the carpet washer in a cool, dry area.
- Do not use an extension cord with this machine.
- Do not carry the appliance while it is switched on.
- To prevent dirty water from running into the motor, do not hold the appliance upside-down or lay it on its side. Use the appliance in a normal cleaning position.
- Do not use without all water tanks and solution tanks in place.
- Do not use the carpet washer unless the carpets have been dry vacuumed thoroughly first.
- Keep the unit on the floor.
- Do not put any objects into openings. Do not use with any openings blocked and do not restrict airflow. Keep all openings free of dust, lint, hair or anything that might reduce airflow.
- Do not attempt to remove blockages with sharp objects as they may cause damage.
- Using improper voltage may result in damage to the motor and possible injury to the user. The correct voltage is listed on the rating label.
- Do not use without all of the filters in place.
- Take extra care when cleaning on the stairs.
- Keep the area you are cleaning well lit.
- Do not unplug the machine by pulling on the cord.
Getting Started
PLEASE READ SAFETY INFORMATION BEFORE USE (p3)
Assembling your carpet washer handle
CAUTION: The carpet washer is a very powerful unit. Before plugging the cord into the electric outlet, make sure all controls on the unit are turned off. Hold the carpet washer firmly when starting and in use.

natural_image
Diagram showing a mechanical device with an orange arrow indicating compression or disassembly (no text or symbols present)Assemble the mid section onto the base. Insert two nuts into the recesses located on the left and right sides of the base. Hold the nuts in place and insert the two medium length screws through the front of the mid section and tighten.

natural_image
Technical line drawing of a mechanical device with motion indicators (no text or symbols)
natural_image
Illustration of a mechanical tool or device with an orange arrow indicating motion direction (no text or symbols present)Slide the handle onto the unit. Insert the nut into the recess in the back of the handle. Hold the nut in place and insert the long screw through the front of the handle and tighten.
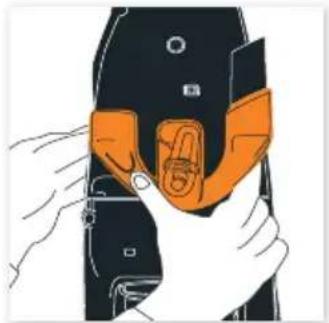
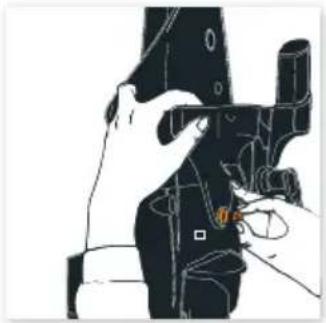
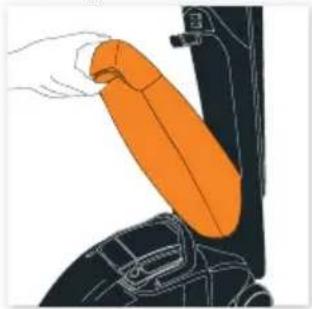
Assembling your tool caddy
natural_image
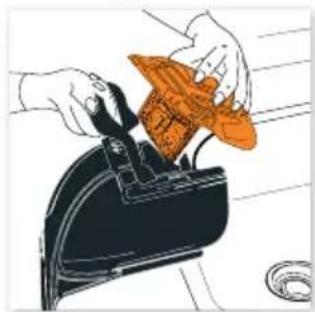
Illustration of hands holding an orange bandage on a device (no text or symbols visible)Align tabs on tool caddy with slots on midsection and snap into place.
natural_image
Line drawing of a hand holding a small object, possibly a tool or device, with no visible text or symbols.Place nut into recess on tool caddy and hold into place.

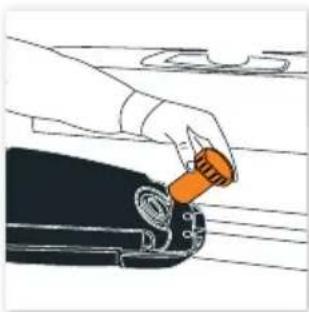
natural_image
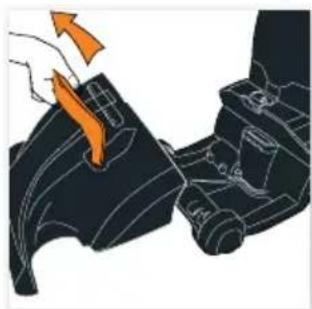
Illustration of a hand holding an orange tag attached to a black vehicle wheel (no text or symbols)Press handle release and tilt the midsection backwards.

natural_image
Line drawing of a hand holding a black object with a strap, no text or symbols presentPlace screw through the centre of the lower midsection and tighten.
Assembling your hose

natural_image
Illustration of a hand holding a tool interacting with a device (no text or symbols visible)Slide the adapter end of the hose into the left slot on the lower tool caddy.

natural_image
Illustration of a person wearing a high-visibility vest with orange cover (no text or symbols)Lock the hose into place by pressing down onto the post until secure.
How To Use
Before you begin cleaning
Do not saturate your carpet.
- Test for colourfastness – Wet a white absorbent cloth with the solution. In a small, hidden area of your carpet, gently rub the surface with the dampened cloth. Wait ten minutes and check for colour removal or bleed with white paper towel or cloth. If your carpet has more than one colour, check all colours.
- When cleaning an entire room, move furniture out of the area to be cleaned. If the furniture is too heavy to move, place aluminium foil or wax paper under legs. This will prevent wood finishes from staining your carpet. Pin up furniture skirts and curtains.
IMPORTANT: Carpets should be dry vacuumed thoroughly before washing.
IMPORTANT: Only use Vax carpet cleaning solution. Using other solutions may cause excess foaming. Excessive foam will prevent the machine from working effectively. Using other solutions will invalidate the guarantee.
Operating your pre-treatment wand
Pre-treating your carpet before washing will help to remove stubborn stains. Do not saturate your carpet.

natural_image
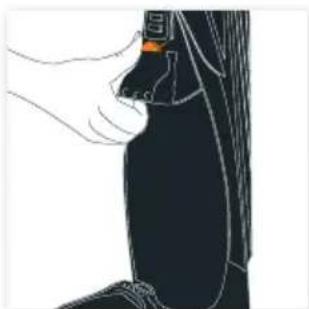
Illustration of a hand holding a black object, possibly a device or tool, against a white background (no text or symbols)Remove clean water tank.
natural_image
Illustration of a hand holding an orange belt or cushion, mounted on a black vehicle (no text or symbols visible)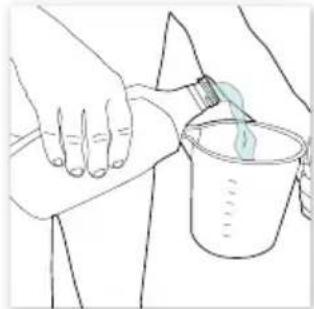
natural_image
Line drawing of a hand pouring liquid into a beaker with a green liquid, no text or symbols presentPour required dose of pre treatment solution (approx. 40ml per 1.0L of water
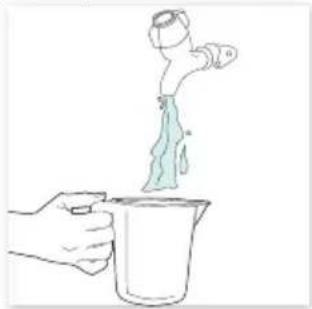
natural_image
Simple line drawing of a hand pouring liquid into a beaker (no text or symbols)Mix the solution with warm water (max 40°C) and fill tank with solution.
natural_image
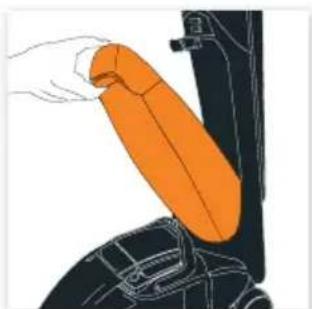
Illustration of a hand holding an orange tool over a car wheel (no text or symbols)Tighten cap before returning tank to unit.
natural_image
Diagram of a hand holding an orange belt or grip, with no visible text or symbolsPlace the clean water tank back on the carpet cleaner.
natural_image
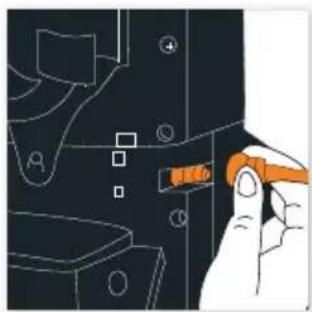
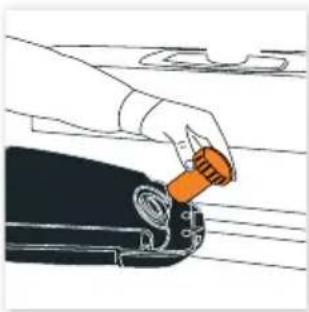
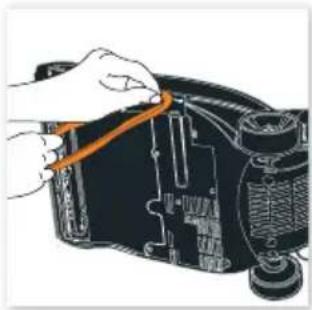
Hand holding a pen inserted into a device component (no visible text or symbols)Attach the pre-treatment tube to the water supply port. Turn clockwise to secure.

natural_image
Hand inserting a plug into a cable with an orange arrow indicating the insertion point (no text or symbols present)Unwrap power cord, plug unit in and turn the on/off switch.

natural_image
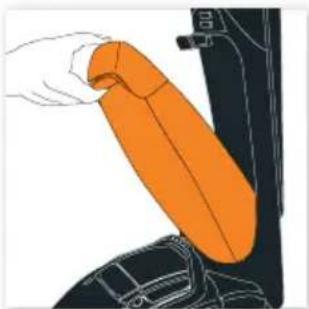
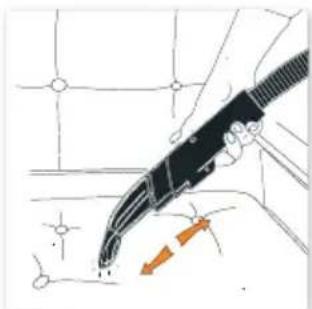
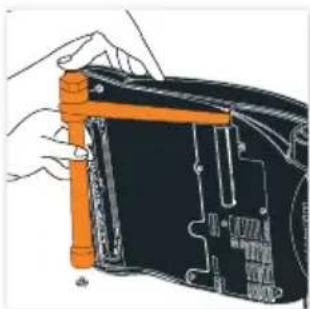
Silhouette of a mechanical tool or device with a curved handle and attached bracket (no text or symbols visible)Using the wand and trigger, apply the pre-treatment solution to your carpets.

natural_image
Illustration of a hand holding a cable with an orange tip, no text or symbols presentSpray evenly onto desired areas and leave for 10-15 minutes before washing.
IMPORTANT: Before setting the machine up to wash, ensure the clean water tank is rinsed thoroughly of pre-treatment solution.
Operating your carpet washer
Your dirty water tank is fitted with a float. When the dirty water tank is full or the floor head is not in contact with the carpet the float will shut off the suction at the floor nozzle. You will be able to hear if this has happened as the motor noise on the unit will increase. Once the float is activated, empty the dirty water tank if full. If the dirty water tank is not full then turn off your machine at the power switch and wait for the float to settle before re-starting.
natural_image
Line drawing of a person's lower body and upper torso, showing hand positioning (no text or symbols)Remove clean water tank.
natural_image
Illustration of a hand holding an orange belt or grip, partially enclosed in a black vehicle seatbelt (no text or symbols visible)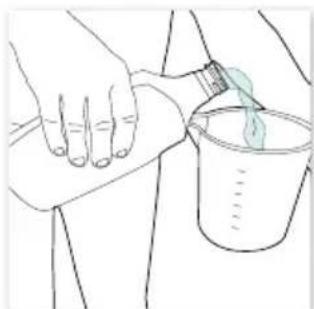
natural_image
Line drawing of a person pouring liquid into a beaker (no text or symbols)Pour required dose of carpet cleaning solution (approx. 40ml per 1.0L of water.)

natural_image
Hand pouring liquid into a beaker with a tool (no text or symbols visible)Mix the solution with warm water (max 40°C) and fill tank with solution.
natural_image
Illustration of a hand holding an orange tool over a car wheel (no text or symbols)Tighten cap before returning tank to unit.
natural_image
Illustration of a hand holding an orange oval object inside a vehicle seat (no text or symbols)Place the clean water tank back on the carpet cleaner.

natural_image
Line drawing of a hand inserting a plug into a socket (no text or symbols)Unwrap power cord and plug unit in.
text_image
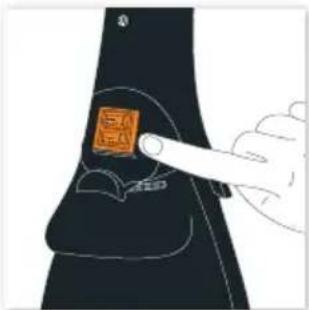
Diagram showing a hand inserting a device into a patient's knee joint, with an orange square marking the device's center.Turn the power and brush bar switches on.

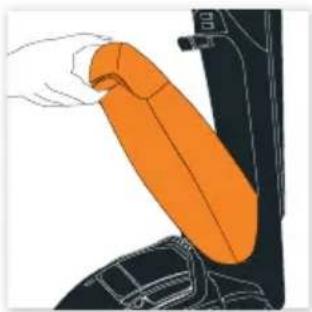
natural_image
Illustration of a person's foot and ankle joint with a highlighted orange area on the lower leg (no text or symbols)Press on the handle release pedal and pull the cleaner back into a reclined position.

natural_image
Line drawing of a vacuum cleaner with attached cable, no text or symbols presentWhen machine is reclined brushbar will power. Upright position brushbar will not power.

natural_image
Illustration of a person opening a black hood with an orange arrow pointing to the side (no text or symbols)Press trigger to release solution.

natural_image
Illustration of a black handheld vacuum cleaner with orange arrows indicating motion or signal flow (no text or symbols)For best results apply solution on the forward stroke and release the trigger to recover solution on the backward stroke.
How To Use
Using the wash tool
Do not saturate your upholstery.
The clean water tank will need to be filled with Vax carpet cleaning solution and water before use.

natural_image
Diagram of a hand inserting a component into a curved pipe or tube, with no visible text or symbols.Remove hose.

natural_image
Illustration of a hand placing an orange object into a car wheel (no text or symbols)Remove tank door from the top of the dirty water tank.
natural_image
Illustration of a hand inserting a plug into a device component (no text or symbols visible)Insert the hose adapter into the top of the dirty water tank.

natural_image
Illustration of a hand using a tool to adjust or install a mechanical component, with no visible text or symbols.Connect the hose water supply plug into the socket on the lower left side of the cleaner. Align inserts and push in. Turn clockwise to secure.

natural_image
Hand holding a tool applying material to a grid-patterned surface (no text or symbols visible)Press trigger to release solution.
natural_image
Illustration of a hand using a tool to cut or mark a grid pattern, with an orange arrow indicating the process (no text or symbols present)For best results apply solution on the forward stroke and release the trigger to recover on the backward stroke.
Looking After Your Machine
WARNING: Always switch off and unplug the carpet washer from the electrical outlet before assembling, filling and emptying the clean water tank, emptying the dirty water tank, or before connecting/disconnecting the attachments.
Emptying the dirty water tank
NOTE: Rinse out tank with clean water and leave to air dry before storing your machine.

text_image
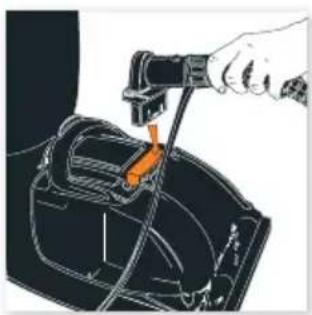
Diagram illustrating a mechanical or fluid system with labeled components and directional arrows indicating flow or movement.Grasp the top of the dirty water tank handle and press the release latch.
natural_image
Illustration of a hand pressing down on a mechanical component with an orange arrow indicating motion (no text or symbols present)Grasp the handle and pull up out of the base, take care to ensure that no dirty water leaks from the front.
natural_image
Illustration of hands using a tool to clean or store items, no text or symbols visibleRemove dirty water tank lid.

natural_image
Illustration of a hand pouring liquid into a container with a blue liquid inside (no text or symbols)Empty the water tank by grasping the handle with one hand and nozzle with the other and empty into the sink.
Removing blockages from the brushbar
WARNING: Always switch off and unplug the carpet washer from the electrical outlet before assembling, filling and emptying the clean water tank, emptying the dirty water tank, or before connecting/disconnecting the attachments.
natural_image
Illustration of a hand inserting a cable into a device with an orange band (no text or symbols visible)Threads caught in the brushbar can be cut.
Looking After Your Machine
Cleaning the filter
IMPORTANT: Cleaning filters maintains cleaning performance. For best cleaning results filters require cleaning at least every three months. If your filters are washable make sure that they are completely dry before inserting them back into the cleaner.
IMPORTANT: The motor is equipped with a thermal cut-out. If for any reason the unit should overheat, the thermostat will automatically turn the unit off. Should this occur, unplug the carpet washer from the electrical outlet and and turn off the switch. Check the hose for blockages. Clean the filters. Allow the unit to cool for approximately one hour (if you have cleaned the filters you will need to wait twenty four hours for the filters to dry before putting them back in the machine.) To re-start the machine, plug it into an electrical outlet and switch it back on.

natural_image
Illustration of a hand cleaning a pipe with a cloth (no text or symbols)Rinse the filter with warm water. Allow it to dry fully before replacing it in your cleaner.
Replacing the belt
WARNING: To reduce the risk of electric shock, turn the machine off and unplug from electrical socket before performing maintenance/troubleshooting checks.
WARNING: Always switch off and unplug the carpet washer from the electrical outlet before assembling, filling and emptying the clean water tank, emptying the dirty water tank, or before connecting/disconnecting the attachments.

natural_image
Diagram of a device with arrows indicating motion or force, showing internal components and wiring (no text or symbols)To remove the belt cover, use a phillips screwdriver to remove the two screws.

natural_image
Illustration of a hand using a tool to adjust or install electronic components (no text or symbols visible)Grasp the brush bar with one hand, using the other hand to keep tension on the belt while removing by lifting upwards.
natural_image
Illustration of a hand using a tool to adjust or install electronic components on a device (no text or symbols visible)Slide the belt off the motor shaft and dispose.
natural_image
Illustration of hands installing or adjusting a mechanical component with orange structural elements (no text or symbols visible)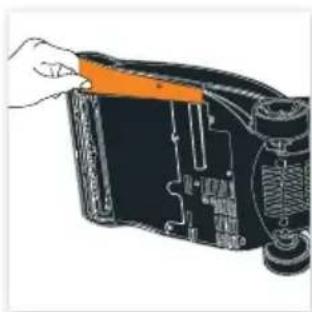
natural_image
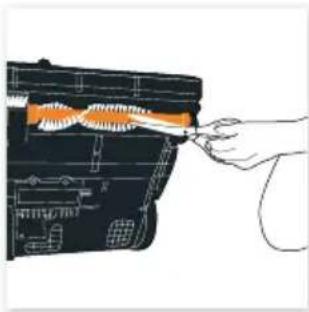
Illustration of a hand inserting an orange stripe into a device component (no text or symbols visible)Replace new belt on to spindles and secure the belt cover.
Replace the belt cover inserting the end furthest from the brush first. Then replace the front of the belt cover before securing in place with the two screws.
Is there an accessory missing?
- Check the 'This pack contains' panel on the box to make sure the part is definitely included in your unit.
Why won't the carpet washer turn on?
- It may not be plugged into the electrical socket correctly: ensure that the plug is pushed in securely and switched on.
- The power button on the unit hasn't been fully depressed.
- If unit cuts out during use, disconnect the unit from the electrical socket, allow to cool for one hour, clean the filter and empty the dirty water tank and check hose, brushbar for blockages.
Why won't the cleaner pick up solution/spills?
- The float in the dirty water tank may have been activated. Empty the dirty water tank if full. If the dirty water tank is not full
then switch the machine off and wait for the float to settle before re-starting your machine. - The dirty water tank may be full and the auto shut off engaged. Empty the dirty water tank.
- Ensure the dirty water tank is fitted correctly and the tank cap is securely fitted.
- Check the hose for blockages.
- Check the brushbar for blockages.
Why won't the solution/clean water dispense?
- Ensure the clean water tank is fitted securely.
• The solution/clean water tank may be empty. - Ensure dirty water tank is fitted securely.
Why won't the brushes rotate?
- The brushes will only rotate when the unit is reclined and turned on.
- Check the float chamber filter and clean if necessary.
- Belt may be broken – replace if necessary.
Other Information
UK Service & Help
Any queries or concerns about using your Vax, simply visit; vax.co.uk/support – vaxireland.ie or call the Vax Careline. Calls are charged at the UK local rate. Please make a note of the serial number and model number of the vacuum cleaner before calling.
Vax Careline:
(UK) 0844 412 8455
(ROI) 1-800 928 308
Monday-Friday 8.30am to 6.30pm
Saturday 9.00am to 5.00pm
Consumables
To purchase spares and accessories, please visit vax.co.uk
The use of genuine vax spare parts helps to maintain optimised performance and validates your guarantee
Float chamber filter kit: 1-9-130494-00
Belt kit - Type 16: 1-9-130510-00
Technical Specification
Voltage: 220-240V \~50Hz
Wattage: 600W
Capacity: Clean water tank 3.5L
Dirty water tank 2.0L
Cord length: 7.5m
Weight: 7.7kg
Filter: Float chamber filter

For best performance
Protect your guarantee
Subject to technical change without notice.
CE
EEC Statement of Compliance
Manufacturer/EEC importer: Vax Limited, hereby on our own responsibility, declare that the Rapide Deluxe series is manufactured in compliance with the following Directives:
Safety: 2006/95/EC Low Voltage Directive
EMC: 2004/108/EC Electromagnetic Compatibility Directive
Waste electrical products should not be disposed of with household waste. Please recycle where facilities exist. Check with your Local Authority or retailer for recycling advice.
It's quick and easy to register for your
FREE 2 year guarantee
online at: vax.co.uk/guarantees
Please retain your original receipt for proof of purchase.
UK based customer care centre — Open 6 days a week
Monday-Friday
8:30am-18:30pm
Saturday
9:00am-17:00pm
we're here if you need us
Instead of taking me back to the shop, simply visit:
vax.co.uk/support or call (UK) 0844 412 8455 (ROI) 1-800 928 308
Let us know what you think @VaxUK


text_image
vaxVax Ltd., Kingswood Road, Hampton Lovett, Droitwich, Worcestershire, WR9 0QH, UK
email: info@vax.co.uk website: vax.co.uk