WRG980CGS - Range hood WESTINGHOUSE - Free user manual and instructions
Find the device manual for free WRG980CGS WESTINGHOUSE in PDF.

User questions about WRG980CGS WESTINGHOUSE
0 question about this device. Answer the ones you know or ask your own.
Ask a new question about this device
Download the instructions for your Range hood in PDF format for free! Find your manual WRG980CGS - WESTINGHOUSE and take your electronic device back in hand. On this page are published all the documents necessary for the use of your device. WRG980CGS by WESTINGHOUSE.
USER MANUAL WRG980CGS WESTINGHOUSE
INSTALLATION AND USER MANUAL
WRG980CGS
WRG970CS
CANOPY RANGEHOODS
text_image
Westinghouse Westinghouse made for modern familiesCONTENTSCONGRATULATIONS
Congratulations and thank you for choosing our canopy rangehood. We are sure you will find your new rangehood a pleasure to use. Before you use your rangehood, we recommend that you read through the whole user manual, which provides the description of the rangehood and its function
To avoid the risks that are always present when you use an electrical appliance it is important that the canopy ranges should be installed correctly and that you need the safety instructions carefully to avoid misuse and hazards. We recommend that you keep in a instruction booklet for future reference and pass it on to any future owners.
After unpacking the canopy gatehood please check it is not damaged. It is doubt, do not use the appliance but contact your local Elecroux Service Centre.
CONDITIONS OF USE
This appliance is intended to be used in household and similar applications such as:
- Staff kitchen areas in shops, offices and other working environments
- Four houses
- By clients in hotels, hotels and other residential type environments
- Bed and breastfed type environment
Product description 3
Important safety instructions .... 4
Dimensions 4
Installation
Using the targetcc 7
Maintenance and cleaning 8
Changing halogen lamps 8
Optional ducting accessories 9
Warranty 11
WRG980CGS WRG970CS
text_image
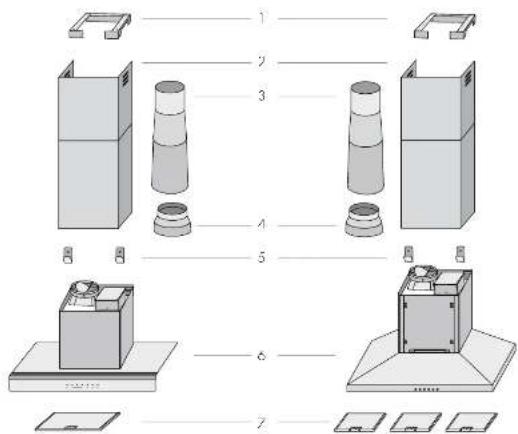
Diagram showing 7 labeled views of a refrigerator with numbered components and floor plan viewCOMPONENT LIST
- echond cross-ceiling mounting crackel
- elecopic exhaust cover set
- Flexible exhaust pipe
/ -exhaust duct transition - Main body mounting brackets
- Main body and fan housing assembly
- Crease filters
- extraction books
ADDITIONAL ITEMS REQUIRED FOR INSTALLATION
- Fixings required to attach main body mounting brackets and cut tilt fixings.
- Fixings required to attach exhaust cover mounting brackets to the ceiling
TECHNICAL SPECIFICATIONS
Model: WRG970CS
Power supply: 220 740 volts 50-7
Motor: "out power 200 words"
Light: 2 x 20 volt | 2 volt halogen
Model: VVRG980CGS
Power supply: 220-240 volts 50Hz.
Value: total power 700 while
Lights: 2 x 20 watt 12 volt halogen
SAfETY
This manual explains the proper use of your new canopy rangehood. Please read this manual carefully before using the product. This manual should be kept in a sole place for handy reference.
This canopy rangehood is a domestic oppliance which has been manufactured and tested to comply with Australian and New Zealand Standard AS/NZ5.60335 2.31
Meanings of symbols used in this manual are shown below:

THIS SYMBOL INDICATES THE POSSIBILITY AGE TO PROPERTY

THIS SYMBOL INDICATES NEVER TO DO THIS

THIS SYMBOL INDICATES ALWAYS DO THIS

CAUTION READ THE FOLLOWING CAREFULLY TO AVOID ELECTRIC SHOCK OR FIRE.
Young children should be supervised to ensure they do not play with the canopy forehead
This appliance is not intended for use by persons (including children with reduced physical sensory or mental capabilities, or lack of experience and knowledge, unless they have been given supervision or motivation concerning the use of the appliance, by a person responsible for their safety.
② Ensure the canopy ungeleaded a switch will before carrying out maintenance. To avoid any possibility of electric shock
Never carry out lumber cooking under the canopy long-hood.
© This canopy rangehood is not recommended for carbonics.
this canopy might not be installed for external use.
☑ Group filters must be removed or lose every four weeks for cleaning to reduce the risk of fire.
The exhaust from the company ranges must not be discharged into any netting line, which may only combustion produce from other sources. Fig. 11
Exhaust air must not be discharged into a waf cavity, unless the cavity is designed for the purpose.
There must be adequate ventilation of the room when the canopy rangehood is used at the same time as appliances burning gas or other fuels.
⑦ Always cover in gas bunnets with poas or prays when costly range/foot is in use
Always switch off gas currents before you remove sols of pans.
② Use not leave it gas human exposed due to the risk of life. Fig. 21
ELECTRICAL CONNECTION
- Check that the mains voltage matches with the voltage or the data plate inside the canopy rangehood.
- Check that the installation compl os with standards of local grax and electricity malthoxies.
- If the supply cord is damaged, it must be replaced by the manufacturer, its service agent or similarly qualified person in order to avoid a no-void.
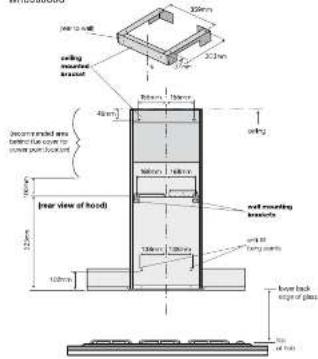
CANOPY DIMENSIONS
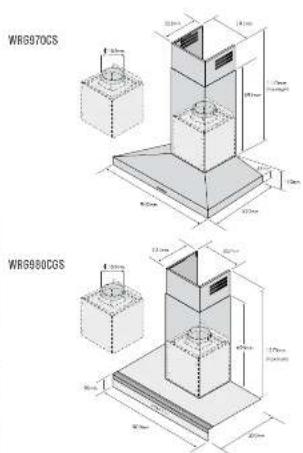
NOTE: The for housing exhaust cutter is 163mm in diameter. Use duct transition or flexible pipe supplied with the canopy rangehood as a reducer if using 50mm optional ducting accessories. (See page 9 for optional ducting accessories).


RANGEHOOD INSTALLATIONELECTRICAL CONNECTION
Check that the installation complies with standards of local building, gas and electrical authorities. Before connecting to the mains supply ensure that the mains voltage corresponds to the voltage on the rating plate inside the socket hand.
SAFETY WARNINGS - FOR THE INSTALLER
When inscalling the cooker hood, make sure you adhere to the minimum and maximum distances from the cooker hood base to the hole surface (as per table on right hand side) and as required by Australian Standards.
ExHAUST DUCT INSTALLATION
The following rules must be strictly followed to obtain optimal air extraction.
- Keep exhaust duct shor and straight
• Do not reduce the size or restrict exhaust duct. - Keep bends in the exchus duct to a minimum
- When using flexible duct always install duct with holik pulled out to minimise pressure loss.
- Failure to observe these basic instructions will practically reduce the performance and increase the noise levels of the cooker hood.
Exhaust air must not be discharged into a wall cavity unless the cavity is designed for that purpose.
The exhaust from the cocker hood must not be discharged into any heating fluo, which may carry combustion products from other sources
NOIL Some installations may move the teleoptic exhaust cover to be out to length. Cut with snap on snow or a firecrash hope raw block, laying care not to distort or extend the exhaust cover.
WRG970CS
text_image
below wall 200mm 250mm 40mm 150mm 150mm 200mm 100mm 100mm 100mm 100mm 773mm 750mm 750mm 200mm 200mm up 200mm good low good low good low good good good good good good good good good good good good good good good good good good good good good good good good good good good good good good good good good good good good good good good good good good good good good good good good good good GoodWRC980COS
text_image
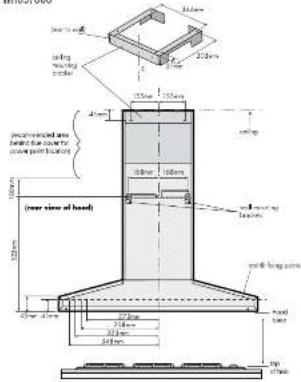
soiling mounted branesal 40mm 50mm 40mm 40mm 100mm 100mm 120mm 120mm 120mm 120mm floor view of hood floor mounting branesal wall falloons floor back edge of glass floor of bedINSTALLATION SEQUENCE
- Using a spirit level mark a vertical centre line on the wall where the hood is to be positioned, and a horizontal line at the hood base position (elet diagram above).
NOTE: The height of the underside of the hood body must be a minimum of 600mm above an electric cook up & 650mm above a gas cook too and a maximum height of 800mm liele to have below.
| Distance from hood base to top of hob | |
| Job type minimum* maximum | |
| gas 650mm 800mm | |
| electric 600mm 800mm | |
If the instructions of the job specify a greater distance from the minimum above, then that shall be the minimum weight for installation.
- Mark the location for the wall and ceiling bracket fixing points above the hood base using the hood base as the reference point [refer diagram previous page]
- Install wall and ceiling mounting brackets with a screws [to support a total weight of 30kg] to the wall at the positions marked in diagram below left
Remove the protective plastic film from the hood body and hang hood on the mounting brackets then seone at the anni-th locations as indicated in diagram bottom left. Depending on the prelented installation/ducing mode, follow step 5a or 5b below.
5c. Recirculating mode (Fig. 4). Using the control line, secure the ceiling mounted bracket to the wall using suitable screws. Attach the recirculating piece (optional kit AR6003K for model WRC978CS or AR600KCI for mode WRC980COS) to the ceiling mount bracket. Install flexible pipe between T-piece and fan transition outlet. Use cable ribs or suitable duct tape to secure flexible pcc to T-piece.
NOTE: When installed in oscillation mode, it is recommended to use a carbon fiber (included in an extraction kit ABCOCK for model VEGO/OCs or ABCOERG for model VEGO/BOCS), prior to page 9, to present colours being emitted back into the room OR
5b. Ducted mode (Fig. 6). The canopy rangschood has been supplied with flexible exhaust pipe and duct transition piece, alternatively: 120mm diameter nor combustible fuel pipe can be used. Continue the centre line to the ceiling. Attach the ceiling in rear, quarter or the centre line. Fill preferred fuel pipe to the front transition duct.
FIG. A FIG. b

natural_image
Technical illustration of mechanical assembly with base platforms and cylindrical components (no text or symbols)NOTE: For ducted mode, we recommend extending flue plot through the roof to external "clining nor" to seat exhaust orally. We do not recommend vesting into ceiling away. Refer optional ducting accessories on page 9.
NOTE: To ensure optimum performance of the longenoid, the use of rigid ducting is recommended. The use of bends should be avoided. Rigid flexure ducting is soluble, although cross flexible ducting is unacceptable. All ducting must be free antioxidant.
INSTALLATION OF TELESCOPIC ExHAUST COVERS
Separate the inner and outer exhaust covers, and carefully remove the protective coating from each. Carefully resemble the inner and outer exhaust covers sections by sliding the inner into the outer exhaust cover. Carefully lower the assembled inner and outer exhaust covers onto the top of the closer neck body. Fix inner (top) exhaust cover to the ceiling mounting brocker with screws supplied. Ensure that the inner (top) section is extended.

text_image
WRG970CS WRG880CGS
IMPORTANT
Care must be taken to ensure the screws are not cross threaded when attaching the outer hue cover. It installed in radiculating mode, insert the optional carbon filter includes in radiculation kit AR600RK for model WRG970CS and AR600RKG for model WRG980CGS. To complete the rangemouth installation, insert the three filters to the underside of the hood body. Place back edge of filter into position and push up front edge so that the filter clips into place.
Your Westinghouse rangelood is now ready to use.
USING THE RANGEHOOD - WRG970CS
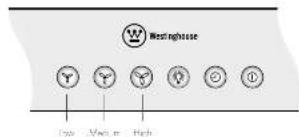
text_image
Westinghouse Low Medium HighTO OPERATE CANOPY
Dearest any of the lon symbols, depending on desired lon speed, a lon the janocy or.

Depress the OFF button to turn canopy off.
A. outons have back-lit symbols.
Fan operation - select speed to suit cooking conditions.

low light frying/boiling

Medium - frying/week cooking/heavy boiling

High - grilling, intensive frying and wok cooking

TO SWITCH LIGHTS ON AND OFF
Decrease the "light" button to turn the lights ON and depress "light" button again to turn the lights OF

USING THE TIMER
A: the end of cooking if the timer is switched on, the rangebose will continue to run for an additional 5 minutes to remove any colours that remain at the completion of cooking. After 5 minutes the canopy will turn itself OFF.
Decrease 'auto off' button to turn the timer ON and decrease 'auto off' button again to cancel the timer function.
USING THE RANGEHOOD - WRG980CGS
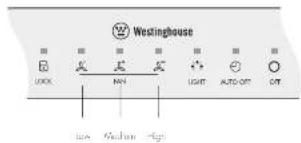
text_image
Westinghouse OK MAX LIGHT AUTO-OFF OFF low charge HighTO OPERATE CANOPY
Touch any of the fan symbols, depending on desired fan speed, to turn the canopy on.

Touch the OFF button to turn canopy off.
All symbols have illumination above
for operation - select speed to soil reusing conditions

low - light frying/boiling

Medium frying/wok cooking/ready coiling

High - grilling, Intensive frying and wok cooking

TO SWITCH LIGHTS ON AND OFF
Touch the 'light' button to turn the lights ON and touch the light button again to turn the lights OFF

USING THE TIMER
At the end of cooking if the timer is switched on, the rangehood will continue to run for an additional 5 minutes to remove any odours that remain at the completion of cooking. After 5 minutes the canopy will turn itself O+H
Touch 'auto of' button to turn the timer ON and touch 'auto off' button again to cancel the timer function.

Touch and hold 'lock' button for 3 seconds to lock an interface when cleaning, touch and hold for 3 rows to unlock control interface.
MAINTENANCE AND CLEANING

CAUTION
- Before maintenance or cleaning is carried out, the canopy rangehood should be disconnected from the main power supply. Ensure that the rangehood is switched off at the wall socket and the plug removed.
- External surfaces are susceptible to scratches and obstructions, so please follow the cleaning instructions to ensure the best possible result is achieved without damage.
STAINLESS STEEL SURFACE
Clean stainless steel surfaces using non-abusive cleaning products not use specifically for use of stainless steel
To ensure best results also use or even pressure and follow the grain of the stainless steel. Use of a soft cloth reduces the risk of scratching. If the cloth is wet ensure that a dry soft cloth is used to wipe down the surface again reducing the risk of any surface just upcoming.
CLEANING GREASE FILTERS
The mesh liters can be cleaned either by hard or in the dishwasher. After cleaning ensures that the liters are completely dry before refitting.
By hand: Soak in warm water with some washing liquid. For stubborn grooves stains use a soli nylon on brush to help remove these stains.
In a dishwasher, Ensure that placement of the filter is mode so as to not impede the function of the spray arm. Washing the filters in a dishwasher may cause discolouration of the aluminium inner mesh over time although it was not affect their performance. Filters should be washed separately to crockery and kitchen utensils.
GLASS TASCIA
The glass bottle on model WRGGBOXCGS can be cleaned with window cleaner or a mild detergent and hot water and power towel ring.
CHANGING THE HALOGEN LAMPS

natural_image
Simple line drawing of a magnifying glass with a handle (no text or symbols)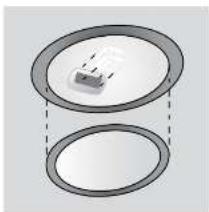
natural_image
Diagram of a circular device with internal components and dashed lines indicating hidden edges (no text or symbols)Using a small flat blade screwdriver remove the inner stainless steel ring to obtain access to the halogen globe. When removing the inner ring, do so carefully, as the glass lens could easily fall out of the inner ring. Remove halogen globe, while cool, and replace carefully with a new globe.
The vorgehand takes 2 x 20W, 12 volt hexogen globes.

IMPORTANT
When handling globes hold with a cloth or gloves, an entire perspiration does not come in contact with the gloos as this can reduce the life of the globe.
OPTIONAL DUCTING ACCESSORIES

text_image
AR150NC AR150N AR600R* AR600TSC* AR150NW AR600R* AR600TSC* AR600CT* AR600CCT* WRG978CS* WRG980CBS* 2024.11.1NOTE: Accessories are to be purchased separately.
| Part Numbers Description | ||
| WRG970CS* WRG980CGS | ||
| AR 50RC AR150RC 150mm G/Dond Roof Cowl | ||
| AR150F AR150F 150mm G/Dond Fluc 1200mm | ||
| AR 50MW AR150MW 50mm Wall Vent + Feed Dust | ||
| AR600R* | AR600RC | Rec. circulating K ^-1 |
| AR600CT* | AR600CHG | Replacement carbon mat filter |
| AR600TG* | AR600TSG* | Stainless steel exhaust cover extension 1200mm |
Electrolux Warranty
FOR SALES IN AUSTRALIA AND NEW ZEALAND
APPLIANCE RANCEHOOD
This document sets out the terms and conditions of the product
warranties for Electrolux Appliances. It is an important document. Please keep it with your proof of purchase documents in a safe place for future reference should you require service for your Appliance.
In this warranty
(a) Acceptable quality as referred to in clause 12 at this warranty has the same meaning referred to in the AG
(b) 'NCL' means Trade Practices Amendment (Australian Consumer Law) Act (No 2, 2010)
(iii) 'Appliorat' means any Histralux product purchased by you accompanied by this document;
(1) AGC means Electrodux authorities serviced centres.
(e) "Electrolux" means Electrolux Home Products Pty Ltd of 193 CHarden Express, Missouri. NEW 2020, AHI by 104 (69-34). In respect of Appliances purchases in Australia and Electrolux (N.V.) Limited at 3 (Nail Burgess Road, Mount Wellington, in respect of Appliances purchases in New Zealand.
(3) "major failure" as referred to in clause 10 of this warranty has the same meaning referred to in the ACL and includes a situation when an Appliance cannot be repeated or its unconsents for Hostrolux or its discretion, to repair an Appliance during the Warranty Period.
(2) "Warranty Period" means:
where the Appliance is used for personal, domestic or household use (e.g. normal single family uses as not in the reservoir manual, the Appliance is warranted against manufacturing demands in Australia for 24 months and in New Zealand for 24 months following the date of original purchase of the Appliance.
where the Appliance is used for commercial purposes (excluding being used to directly assist a business or where the Appliance is used in a multi-family communal or share type environment). The Appliance will then be warranted against manufacturing defects in Australia for 3 months and in New Zealand for 3 months, following the data of original purchase of the Appliances
(i) 'you' means the purchase of the Appliance not having purchased the Appliance for re-sale, and 'your' has a corresponding meaning.
-
The warranty only applies to Appliances purchased and used in Australia or New Zealand and is in addition, to lend does not exclude, restrict, or modify in any way any non-observable statutory warranties in Australia or New Zealand.
-
During the Warranty Period: Electrolux or its A50 will, at no extra charge if your Appliance is ready accessible for service, without special equipment and subject to these forms and conditions, repair or implant, any parts which should be necessary. Electrolux or its A50 may use remanufactured parts to repair your Appliance. You agree that, any replace Appliances or parts become the property of Electrolux. This warranty does not apply to light globe, batteries, there or similar parahole pens.
-
Parts and Appellene not supplied by Electrux are not covered by this warranty.
-
You will bear the cost of transportation, travel and delivery of the appliance to and from Electricus on its ASC. If you reside outside of the service area, you will bear the cost of.
(2) travel of an unroded representation;
(b) transportation and delivery of the Aépliances in and from electronux or the ANG,
In all instances, unless the Appliances transported by Electrolux or an Electrolux authorised representative, the Appliances transported at the owner's cost and risk while in transit to and from Electrolux or its ASC
-
Price of purchase is required before you can make a claim under this warranty.
-
You may not make a claim under the warranty unless we defect claimed a due to faulty or defective parts of workmanship. Excralus is not liable in the following situations (which are not exhaustive):
(5) the Apo Inons is damaged by
( accident
If misuse or abuse, including failure to properly maintain or service
(II) normal wear and tear
(2) power surges, electrical storm damage or incoiled power supply
[4] incomplete or proper installation
(a) improved, improve or inappropriate operation
My Invest or varin Investarian
Mixture to comply with any additional instructions supplied with the Appliance.
(c) the Appliance is modified without authority from Electrolux in writing. (d) the Appliance's social number or warranty seal has been removed or adjusted.
(2) The Appliance was served or repaired by anyone other than Exerculus, an authorized repair or ASC.
- This warranty, the contrast to which it relates and the relationship between you and Hestrolux are governed by the law application, where the Appliance was purchased. Where the Appliance was purchased in New Zealand for business purposes the Consumer Guarantee Act does not apply.
To the event permitted by law, Electronor excludes all warranties and liabilities other than an contained in this documentary including facility for any loss or damage whether direct or indirect arising from your purchase use or non-use of the Appliance.
-
For Appliances and services provided by Encholux in Australia, the Appliances come with a guarantee by Bototrol that cannot be acquired under the Australian Consumer Law. You are entitled to a replacement or refund for a major culture and for compensation for any other reasonably foreseeable loss or damage. You are also millions to have the Appliances acquired or reduced if the Appliances fail to be of acceptable quality and the failure does not amount, to a major failure. It's benefits to you given by this warranty can in addition to your order degrees and costs unless a sale in relation to the Appliances or services is which the warranty relates.
-
At all times during the Warranty Period, a sec. reflux shot, at its discretion, determine whether repair, replacement or refund will apply. If an Appliance has a valid warranty claim applicable to it.
-
For Appliances and services provided by Distribute in New Zealand, the Appliances come with a guarantee by Telecom pursuant to the provisions of the Consumer Overseas Act, the Sale of Goods Act and the Fair Trading Act.
-
In acquire about claiming under this warranty please follow these slopes (by carefully check the operating instructions, use manual and the terms of this warranty);
It has the mode and serial number of the Appliance available.
(c) have the proof of purchasing (eg an interest) availability
ca teighore the marbec sater below.
- You accept that if you have a warranty claim, Electrolux and to ASC may exchange information in relation to you to enable Electrolux to meet the obligations under this warranty;
Important Notice
Before calling for service, please ensure that the steps listed in point 13 above have been followed.
| FOR SERVICEor to find the orders of your professional state service centre in AustraliaPLEASE CALL 13 13 49For reference of contact (Prairie.com) | SERVICE AUSTRALIAElectroluxELECTROLUX HOME PRODUCTSwww.electrolux.com.au | FOR SPARE PARTSor to find the address of your nearest state spare parts centre in AustraliaPLEASE CALL 13 13 50For reference of contact (Australia only) |
| FOR SERVICOr to find the orders of your professional authorised service centre in New ZealandFREE CALL 0800 10 06 10New Zealand.org | SERVICE NEW ZEALANDElectroluxELECTROLUX HOME PRODUCTSwww.electrolux.com.au | FOR SPARE PARTSor to find the address of your nearest state spare parts centre in New ZealandFREE CALL 0800 10 06 20New Zealand.org |
For more information on all Westinghouse appliances, or for dimension and installation information, call into your retailer, phone or email our customer care team or visit our website:
AUSTRALIA
phone: 1300 363 640
fax: 1800 350 067
email: customercare@electrolux.com.au
web: www.westinghouse.com.au
NEW ZEALAND
phone: 09 573 2384
fax: 0800 363 600
email: customercare@electrolux.co.nz
web: www.westinghouse.co.nz

Electrolux

TOP SERVICE
Top Service encompasses the after sales service provided by The Electrolux Group to consumers including delivery, home service and spare parts.
Westinghouse. We are part of the Electrolux family.
Share more of our thinking at www.electrolux.com
Part number: 305469401/C
© 2011 Electrolux Home Products Pty Ltd
ABN 51 004 762 341
Print code: WMAN_CAN_RH_Jun11