KD-IRKIT300 - Electronic accessory Key Digital - Free user manual and instructions
Find the device manual for free KD-IRKIT300 Key Digital in PDF.

User questions about KD-IRKIT300 Key Digital
0 question about this device. Answer the ones you know or ask your own.
Ask a new question about this device
Download the instructions for your Electronic accessory in PDF format for free! Find your manual KD-IRKIT300 - Key Digital and take your electronic device back in hand. On this page are published all the documents necessary for the use of your device. KD-IRKIT300 by Key Digital.
USER MANUAL KD-IRKIT300 Key Digital
KD-JRKIT300 Operating Instructions
Key digital
The Experts in Digital Video Technology and Solutions™

text_image
Portrait photo of a man with glasses and mustache, accompanied by partial text fragments visible on the right side.Key Digital®, led by digital video pioneer Mike Tsimberg, develops and manufactures high quality, cutting-edge technology solutions for virtually all applications where high quality video imaging is important. Key Digital® is at the forefront of the video industry for Home Theater Retailers, Custom Installers, System Integrators, Broadcasters, Manufacturers and Consumers. We provide total video system solutions because we know and help drive the technology, the industry, the business and all the latest up-and-coming standards. Most of all, we know exactly what you need for your unique application - the right solution.
521 East 3rd Street, Mount Vernon, NY 10553
Phone: 914.667.9700 Fax 914.668.8666
Web : www.keydigital.com
Per 0 - Nov. 2008
KD-IRKIT300
IR System Central Control and Amplification Unit
Operating Instructions
natural_image
Electronic device with labeled components including a display case, earplifier, and power cord (no visible text or symbols)The KD-IRKIT300 is the central control and amplification unit for your IR system. The KD-IRKIT300 device connects IR receivers and emitters, extending the IR system interface to audio/video components and is capable of supporting two (2) IR receivers and up to four (4) IR emitters with the ability of expansion by connecting multiple units together.
CE
Key digital
The Experts in Digital Video Technology and Solutions™
KD-IRKIT300 Operating Instructions
Page 9
KD-IRKT300 Operating Instructions
Quick Setup Guide
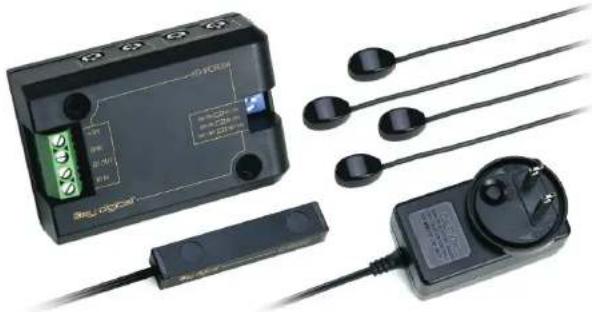
Your KD-IRKIT300 includes the following pieces:
4 - KD-IRE3601F IR Emitters
1 - KD-IRC3099D IR Receiver
1 - KD-PS1212 Power Supply
1 - KD-IRCB204 IR Amplification Block
Directions:
As shown in the following diagram, connect KD-IRC3099D IR Receiver(s), KD-IRE3501F Emitter(s), and KD-PS1212 12V DC In Power Supply to proper inputs, then connect power.
Position IR Receiver(s) and Emitter(s) in appropriate locations (for tips on finding best locations, see "Installation Instructions").
For additional installation instructions, please refer to "Installation Instructions" section.

text_image
KD-IRE3501F Emitters KD-IRCB204 Repeater (UR connecting box) KD-IRC3099D IR Receiver 1 +12V GND ST OUT +IN TD-862.2V Emitter Blastera Switch KD-PS1212 DC12V 1.2A IR Receiver 2 not included DC12V 90mA not includedThe Experts in Digital Video Technology and Solutions™
Warranty
All Key Digital ^® products are built to high manufacturing standards and should provide years of trouble-free operation. They are backed by a limited two-year parts and labor warranty.
Key digital
KD-IRKIT300 Operating Instructions
Page 1
KD-IRKT300 Operating Instructions
How to Contact Key Digital®
System Design Group (SDG)
For system design questions
please contact us at:
Phone: 914-667-9700
E-mail: sdg@keydigital.com
Key Digital Trainings
For questions about Key Digital Trainings
please contact us at:
Phone: 914-667-9700
E-mail: training@keydigital.com
Customer Support
For customer support questions
please contact us at:
Phone: 914-667-9700
E-mail: customersupport@keydigital.com
Technical Support
For technical questions about using Key
Digital ^® products, please contact us at:
Phone: 914-667-9700
E-mail: tech@keyd-gita.com
Marketing and Public Relations:
For marketing and public relations information,
please contact us at:
Phone: 914-667-9700
E-mail: marketing@keydigital.com
Shipping
For shipping questions please contact us at:
Phone: 914-667-9700
E-mail: shipping@keydigital.com
Accounting:
For accounting questions please contact us at:
Phone: 914-667-9700
E-mail: accounting@keydigital.com
Repairs and Warranty Service
Should your product require warranty service
or repair, please obtain a Key Digital Return
Material Authorization (RMA) number by
contacting us at:
Phone: 914-667-9700
E-mail: rna@keydigital.com
Table of Contents
Application Diagram 2
Installation Instructions 3
IR Receiver Installation 3
IR Emitter Installation 4
Emitter Blaster Installation
Product Features 5
Technical Specifications 5
Expansion 5
Expansion Instructions 5
Multi Zone Expansion Example 6
Important Product Warnings 7
Safety Warnings 7
How to Contact Key Digital ^® 8
Warranty 9
© 2008 Key Digital, Inc. All rights reserved.
Always follow the instructions provided in this Operating Manual.
The Experts in Digital Video Technology and Solutions™
Key digital
KD-IRKIT300 Operating Instructions
KD-IRKIT300 Operating Instructions
Application Diagram
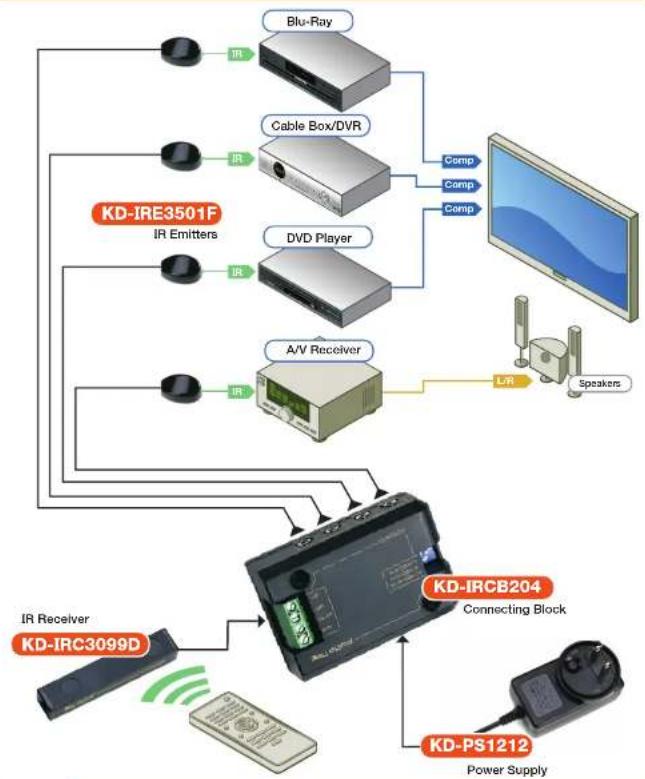
flowchart
graph TD
    A["IR Receiver KD-IRC3099D"] --> B["KD-IRC204 Connecting Block"]
    C["Power Supply KD-PS1212"] --> B
    D[" Speakers"] --> B
    E["Blu-Ray"] --> F["Cable Box/DVR"]
    G["DVD Player"] --> F
    H["A/V Receiver"] --> I["L/R"]
    J["KD-IRE3501F IR Emitters"] --> F
    K["IR"] --> F
    L["IR"] --> F
    M["IR"] --> F
    N["IR"] --> F
    O["IR"] --> F
    P["Camp"] --> F
    Q["Comp"] --> F

CAUTION: When unpacking the unit, make all hookups and connections before plugging in the Power Adapter provided with your unit. Do NOT apply power to the unit until all connections have been made. You MUST use the Power Supply provided with your unit or you VOID the Key Digital Warranty and risk damage to your unit and associated equipment.
The Experts in Digital Video Technology and Solutions"
Important Product Warnings
- Always test for proper operation of the unit before permanently securing to final location.
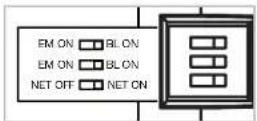
- Please set all DIP switch configurations appropriately.
→ "BL ON" switches are only to be set to the on position when IR Blaster Emitters are in use.
→ "NET ON" switch is only to be set to the on position when utilizing lengthy cable runs.
→ See "Product Features" and "Emitter Blaster Installation" sections of this manual.

Important Safety Instructions. Please be sure to follow these instructions for safe operation of your unit
- Read these instructions.
- Keep these instructions.
- Heed all warnings.
- Follow all instructions.
- Do not use this apparatus near water.
- Clean only with dry cloth.
- Do not block any ventilation openings. Install in accordance with the manufacturer's instructions.
- Do not install near any heat sources such as radiators, heat registers, stoves, or other apparatus (including amplifiers) that produce heat.
- Do not defeat the safety purpose of the polarized or grounding-type plug. A polarized plug has two blades with one wider than the other. A grounding type plug has two blades and a third grounding prong. The wide blade or the third prong are provided for your safety. If the provided plug does not fit into your outlet, consult an electrician for replacement of the obsolete outlet.
- Protect the power cord from being walked on or pinched particularly at plugs, convenience receptacles, and the point where they exit from the apparatus.
- Only use attachments/accessories specified by the manufacturer.
- Unplug this apparatus during lightning storms or when unused for long periods of time.
- Refer all servicing to qualified service personnel. Servicing is required when the apparatus has been damaged in any way, such as power-supply cord or plug is damaged, liquid has been spilled or objects have fallen into the apparatus, the apparatus has been exposed to rain or moisture, does not operate normally, or has been dropped.
Key digital
KD-IRKIT300 Operating Instructions
KD-IRKT300 Operating Instructions
Multi Zone Application Diagram

flowchart
graph TD
    A["IR Receiver KD-IRC3099D"] --> B["Connecting Block KD-IRC204"]
    B --> C["Power Supply KD-P51212"]
    C --> D["Power Supply KD-IRE3601F"]
    D --> E["IR Entitters"]
    E --> F["Blu-Ray"]
    E --> G["Cbox Box/DVR"]
    E --> H["DVD Player"]
    E --> I["A/V Receiver"]
    E --> J["Switch"]
    J --> K["IR Receiver KD-IRC3099D"]
    B --> L["Connecting Block KD-IRCB204"]
    L --> M["Power Supply KD-MSW8X4Pro"]
    L --> N["Power Supply KD-VPHD3"]
    L --> O["Power Supply KD-HDMI2X4P"]
    L --> P["Power Supply KD-MSV8X8"]
The Experts in Digital Video Technology and Solutions"
Installation Instructions
The KD-IRKIT300 receives power from the KD-PS1212 12V DC power jack included.
Installation of the KD-IRKIT300 should be done near the source equipment that the emitters are to be attached/mounted to.

The KD-IRKT300 features two (2) drill holes to allow for easy securing of unit to racks or entertainment center surfaces. The IR Receiver (KD-JRC3099D) and IR Emitters (KD-JRE3501F) included in this kit are designed with self-adhesive tape for quick and easy gripping to any hard surface.
) Please Note: Test for proper operation of the unit before permanently securing to final location.
KD-IRC3099D IR Receiver Installation:
Position the JR Receiver in a location that is unobstructed from infrared signals.
Ideal locations for your IR Receiver to be mounted include entertainment, centers, cupboards, cabinets, panels, racks, or on your displays.
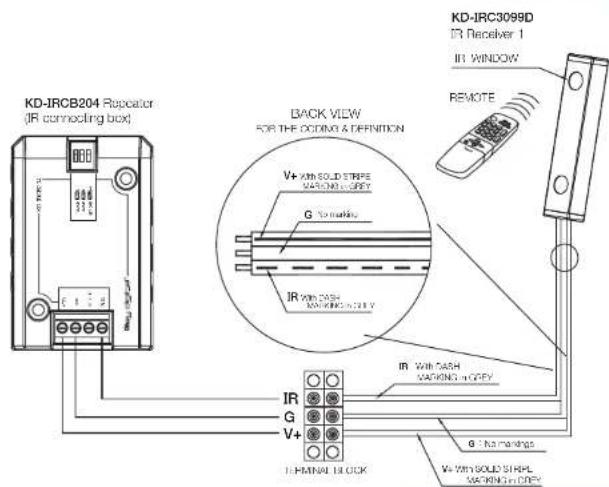
Connecting your IR Receiver into four-slot phoenix connector:
→ Insert wire with dashed markings into "IR IN" slot
→ Insert wire without any markings into "GND" (ground) slot
→ Insert wire with solid stripe markings into "+12V" slot

text_image
KD-IRCB204 Repeater (IR connecting box) BACK VIEW FOR THE OCDMA & DEFINITION V+ With SOLID STRIPLE MOUNTING ON CRY G - No markings IR With CASH MOUNTING ON CRY IR With CASH MOUNTING ON CRY V+ With SOLID STRIPLE MOUNTING ON CRY IN RECEIVER 1 IR WINDOW REMOTE IN TERMINAL BLOCK G - No markings V+ With SOLID STRIPLE MOUNTING ON CRYKey digital
KD-IRKIT300 Operating Instructions
KD-IRKT300 Operating Instructions
KD-IRE3501F IR Emitter(s) Installation:
Your KD-JRKIT300 can facilitate up to four (4) IR Emitters.
For the most reliable performance, mount your IR Emitter directly to your AV Device's IR sensor window. See example 1 below.
Other, less reliable, mounting locations for your IR Emitter include the shelving or cabinet doors that house your AV Device. See examples 2 and 3 below.
Note: Make sure that mounting surfaces are clean and dry for best results.
Example 1: Most Reliable Example 2: Reliable


text_image
To Repsator Shell A/V Receiver ShottExample 3: Reliable

text_image
Door Shelf A/V Receiver Shelf To Repeater
text_image
Infrared Diode Self-schematic Status Indicator Infrared Transparent Housing 10" wire 3.5mm mono plugEmitter Blaster Installation:
Your KD-IRKT300 can facilitate up to two (2) IR Emitter Blasters.
IR Emitter Blasters can be used in combination with JR Emitters.
IR Emitter Blasters are not included in this package.
To utilize Emitter Blasters, simply set dip-switches to "BL ON" setting.

text_image
Close-up of a black electronic device with a blue label and arrow indicating direction or flow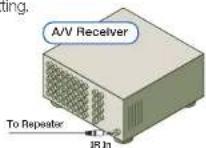
The Experts in Digital Video Technology and Solutions™
Product Features
Emitter output supports up to four (4) emitters or two (2) emitters and two (2) emitter blasters per unit (not included).
Accommodates cable runs up to 1000 ft when dipswitch is set to "net on" position. CAT5 cabling is recommended for lengthy IR Emitter distances.
Accepts total of two (2) IR Receivers through 3.5 mm IR Receiver input and/or through Phoenix Adapter Terminal Block.
Handles virtually all standard remote controls.
Capable of sending status signals to power and peripheral devices by utilizing the Status In jack. * Note: Additional power supply is not provided with this kit.
Technical Specifications
Control Range
Up to 30 feet depending on remote strength and ambient interference
Control Angle
+/- 45 degrees off center axis
Infrared modulation frequency bandwidth
30-100kHz
Power Requirements
DC 12V, 1.2A
Dimensions
3.125°×2.125°×1"
Expansion
You can expand your KD-IRKIT300 with additional KD-IRKIT300 units. A total of three (3) units can be expanded together, allowing you to utilize up to six (6) IR Receivers.
Total distance between expanded units is not to exceed a total of 50°. For example, two (2) units can be supported by 50 feet of high quality connection cable, or three (3) units can be supported by 25 feet in between each unit.
Expansion of KD-IRKIT300 units requires that power be given to one (1) unit only.
Expansion Instructions:
To expand your KD-IRKT300 with multiple units, simply connect the two units by inserting and securing high quality cabling into the phoenix adapter blocks of both units. It is suggested that speaker cabling be used.
Key digital