C3-540 - Decoder TV One - Free user manual and instructions
Find the device manual for free C3-540 TV One in PDF.

User questions about C3-540 TV One
0 question about this device. Answer the ones you know or ask your own.
Ask a new question about this device
Download the instructions for your Decoder in PDF format for free! Find your manual C3-540 - TV One and take your electronic device back in hand. On this page are published all the documents necessary for the use of your device. C3-540 by TV One.
USER MANUAL C3-540 TV One
natural_image
Abstract geometric pattern composed of colored rectangles (no text or symbols)CORIOgrapher
Copyright 2015 tvONE.All rights reserved.
Information in this document is subject to change without notice. The software described in this document is furnished under a license agreement or nondisclosure agreement. The software may be used or copied only in accordance with the terms of those agreements. No part of this publication may be reproduced, stored in a retrieval system, or transmitted in any form or any means electronic or mechanical, including photocopying and recording for any purpose other than the purchaser's personal use without the written permission of tvONE.
tvONE
Continental Approach
Westwood Industrial Estate
Margate, Kent, CT9 4UG
http://www.tvone.com/
Part number: PDF-MANUAL-CORIOMASTER
For use with CORIOmaster and CORIOmaster mini running firmware version M307 or later.
For use with CORIOgrapher version 1.0.5 or later.
CONTENTS
Introduction 1
Disclaimer 2
End User License Agreement 3
Service 7
Installation Information 8
Connecting the PC to the CORIOmaster 13
Administrator Setup Information 14
Getting Started 15
Configure Connection via Ethernet 16
Configure Connection via Serial 21
Logout 22
Input and Output Naming Convention 23
Configurations 25
About Configurations 26
Creating a New Configuration 27
Loading an Existing Configuration 29
Save Configuration 33
Getting Started 35
From Start to Finish 36
Displays and Sources pane 37
Adding Displays 38
Adding Sources 44
Configuring Displays and Windows (Sources) 50
Configuring Displays 51
Configuring Windows 53
Creating Display Equipment Profiles 55
Creating Source Equipment Profiles 58
Displays and Sources pane 62
Working in the Video Wall 63
Video Wall 65
Video Wall - Editor / Dashboard Buttons 66
Moving between Video Walls 67
Renaming Video Wall 69
Genlock/Framelock 71
HDCP 73
Video Wall Navigation 75
Video Wall- Editing Object Location 76
Video Wall - Editing Object Rotation 77
Video Wall - Editing Object..Size 78
Video Wall - Preview Mode 79
Video Wall Aids - Align Projector 80
Video Wall Aids - Align Projector - Gamma 82
Video Wall Aids - Align Projector - SCurve 84
Video Wall Aids - Align Projector - Black Level Boost 87
Video Wall Aids - Align Projector - Reset Edge Blending 89
Video Wall Aids - Test Pattern 91
Video Wall Aids - Alignment 93
Video Wall Aids - Distribution 94
Video Wall Aids - Move Object to Center .95
Video Wall Aids - Resize Objects..96
Video Wall Aids - Snap to Objects .97
Video Wall Aids - Undo and .Redo .98
Display Configuration 99
Display - Adjusting Color Scale 100
Display - Changing Gamma Values 102
Display - Changing Output .Slot..104
Display - Changing Resolution...105
Display - Lock Mode (Genlock, FrameLock) 107
Display - Defining Bezel 109
Display - Defining Display Type 111
Display - Defining Output .Type..113.
Display - Renaming Output Displays 115
Display - Specify Equipment 117
Edge Blending Tutorial 119
Source Configuration 123
Source - Adjusting a Window Border 124
Source - Adjusting Brightness and Contrast 125
Source - Changing Input Slot 127
Source - Color Scale 129
Source - Cropping inputs 131
Source - Defining Source Loss Window Color 133
Source - Enable HDCP 135
Source - Flip Horizontally or Vertically 137
Source - Ignore Bezel Compensation 138
Source - Renaming Windows or Inputs 139
Source - Set Preview Video 141
Source - Specify Equipment 144
Source - Verify Configuration Details 146
Source - Adjust Video Quality 148
Source - Transition - Fade Through Black 150
Source - Transition - Horizontal Shrink 151
Source - Transition - Vertical Shrink 152
Source - Transition - Spin 153
Settings 155
Console 156
Connections 157
Constraints 159
Firmware and Defaults - Current Firmware 161
Firmware and Defaults - Reset to Factory Defaults 162
Firmware and Defaults - Update Firmware 164
General - Default Units 166
General - Device Name 168
General - Log Size 170
General - Window Configuration 172
Networking 174
Users 176
Changing Passwords 177.
Slot Status..179
System 182
Timeout .183
Canvases 185
About Video Walls..186
Moving between Video Walls..187
Dashboard ..189.
About the Dashboard...190.
Getting to the Dashboard...191
Immediate vs Synchronized..193
Switching Presets In the Dashboard...195
Switching Sources in the Dashboard
Cut All to Black 197
Change Source Inputs On-The-Fly 198
Presets ..199.
About Presets 200
Save Preset 201
Edit Preset 204
Transitions
About Transitions 208
Basic Transition Tutorial 209
Resolution
Resolution Editor 219
Resolution Editor Overview 222
Resolution Editor Constraints 223
Accessing Resolution Editor from CORIOdiscover 224
Accessing Resolution Editor from the Command Line 277
Command Line Resolutions 303
Troubleshooting
Troubleshooting Connection Issues 314
Troubleshooting Crash During Login 315
Troubleshooting Framelock or Genlock with SDI Input Modules 316
Troubleshooting License Issues 317
Troubleshooting No Preview Video Clips When Using Preview Icon 318
Updating Firmware of Existing Units 319
Introduction
Disclaimer 2
End User License Agreement 3
Service .7....
Installation Information 8
Connecting the PC to the CORIOmaster...13.....
Administrator Setup Information 14
Getting Started...15....
Configure Connection via Ethernet 16
Configure Connection via Serial 21
Logout 22
Input and Output Naming Convention 23
Disclaimer
This product is intended for professional use. This product is not intended for use in a medical environment and does not have the required certifications for such use. Similarly, use aboard any aircraft or spacecraft while in flight or as an adjunct to any surface, airborne or marine navigation system or any offshore marine activity, including control of any watercraft, or any use similar to those specifically herein mentioned is prohibited. Use in the aforementioned circumstances would require additional testing and certification.
You have not become the owner of any software - you have merely purchased the right to use the software. You may make one copy of the software for your own use. Other copies will be deemed a breach of copyright.
No warranty is made either expressed or implied including but not limited to any implied warranties of merchantability or fitness for a particular purpose. In no event shall the supplier or manufacturer of this product be liable for errors found within, or be liable for any direct, indirect or consequential damages or loss in connection with the purchase or use of this hardware, software or manual. The sole and exclusive liability to the supplier and manufacturer regardless of the form of action shall not exceed the replacement cost of the materials described herein.
By using this equipment you have indicated that you have agreed to the terms listed above. If you do not wish to agree or the above terms are contrary to your conditions of purchase you may return the equipment, unused, to your supplier. All trademarks and copyrights are acknowledged. E&OE.
End User License Agreement
END USER LICENSE AGREEMENT
FOR TV ONE CORIOGRAPHER SOFTWARE
BY DOWNLOADING, INSTALLING OR USING THE SOFTWARE, YOU AGREE TO BE BOUND BY THIS END USER LICENSE AGREEMENT (the "Agreement"). IF YOU DO NOT AGREE, I NOT INSTALL, COPY OR USE THE SOFTWARE; YOU MUST DELETE OR DESTROY ANY COPY IN YOUR POSSESSION OR CONTROL. This Agreement is between you ("you" or "your") and TV One Ltd, a limited company incorporated in England and Wales (registrati number 1973948) having its registered office at Continental Approach, Westwood Ind. Est, Margate, Kent CT9 4JG ("Licensor") for CORIOgrapher software that accompanies this Agreement, including all associated media, printed or electronic documentation (collectively, the "Software").
- License Grants. During the term of this Agreement and conditioned upon your full comp with all of the Agreement's terms and conditions, Licensor grants to you the following licen
1.1 Software. Licensor grants to you a personal, nonexclusive, nonsublicensable, nontransferable revocable license to install and use the Software solely in conjunction with License or its affiliates' products ("Products").
1.2 Documentation. Licensor grants to you a personal, nonexclusive, nonsublicensable, nontransferable, revocable license to make and use a reasonable number of copies of documentation provided with the Software for your internal use in connection with your use of Software; provided that you reproduce all copyright and other proprietary notices that are the original copies.
- License Limitations. The license(s) granted in Section 1 are conditioned upon your compliance with the following limitations:
2.1 Reverse Engineering You may not decompile, decipher, disassemble, reverse engineer or otherwise attempt to access source code of the Software, or circumvent any technical ations in the Software that limit or restrict use of the Software, except as expressly per by applicable law notwithstanding this limitation.
2.2 No Distribution, Rental or Transfer may not distribute, rent, lease, lend, transfer, sublicense, disclose or otherwise provide (except as provided herein) the Software to any third party, except that the initial owner of a Product with respect to which the Software is used may make a one-time permanent transfer of this Agreement and Software to another end user, provided the initial user retains no copies of the Software. This transfer must all of the Software (including all component parts, the media and printed materials, documentation, any upgrades and this Agreement). The transfer may not be an indirect transfer such as a consignment. In the event you rent or lease Products, you may provide the ware to a third party to whom you rent or lease such Products ("Product Renter") during rental term of such a Product. Before the one time transfer or providing the Software to Product Renter, the end user receiving the Software must agree to all the terms and citations of this Agreement.
2.3 No Modification or Derivative Works may not modify or create derivative works of the Software, in whole or in part.
2.4 Proprietary Notices You may not remove any proprietary notices or labels on the Software or any copy thereof.
2.5 Non-Permitted Uses Without limiting any of the foregoing, you may not make any use of the Software in any manner not expressly permitted by this Agreement.
- Reservation of Rights and Ownership. Licensor, its parent or its affiliates own all right, title and interest, including all intellectual property rights, in and to the Software and reserve all rights not expressly granted to you in this Agreement. The Software is protected by copyright and other intellectual property laws and treaties.
- Additional Software or Services. This Agreement applies to updates, supplements, add-on components of the Software that Licensor may, in its sole discretion, provide or make available to you ("Update"). If Licensor provides additional terms along with the Update, those terms will apply to the Update.
- Termination. This Agreement will automatically terminate upon your breach of any of this Agreement's terms and conditions. In the event of termination, you must immediately destroy all copies of the Software, and the following Sections of this Agreement will survive: Sections 2, 3 and 5 to 11.
- DISCLAIMER OF WARRANTIES. TO THE MAXIMUM EXTENT PERMITTED BY APPLICABLE LAW THE SOFTWARE AND SUPPORT SERVICES ARE PROVIDED AND WITH ALL FAULTS. LICENSOR AND ITS PARENT, AFFILIATES AND SUPPLIERS HEREBY DISCLAIM ALL OTHER WARRANTIES AND CONDITIONS, WHETHER EXPRESS, IMPLIED OR STATUTORY, INCLUDING ANY IMPLIED WARRANTIES, DUTIES OR CONDITIONS OF MERCHANTABILITY OR FITNESS FOR A PARTICULAR PURPOSE. ALSO, THERE IS NO WARRANTY OR CONDITION OF TITLE, QUIET ENJOYMENT, QUIET POSSESSION, CORRESPONDENCE TO DESCRIPTION OR NON-INFRINGEMENT, LACK OF VIRUSES OR BUGS, ACCURACY OR COMPLETENESS OF RESPONSES OR RESULTS WITH REGARD TO THE SOFTWARE OR SUPPORT SERVICES. LICENSOR AND ITS PARENT, AFFILIATES AND SUPPLIERS DO NOT WARRANT THAT THE OPERATION OF THE SOFTWARE WILL BE UNINTERRUPTED OR ERROR-FREE OR THAT ANY DEFECTS WILL BE CORRECTED. THE ENTIRE RISK ARISING OUT OF THE SOFTWARE AND SUPPORT SERVICES REMAINS WITH YOU.
- EXCLUSIONS OF CERTAIN DAMAGES; LIMITATIONS OF LIABILITY. IN NO EVENT WILL LICENSOR OR ITS PARENT, AFFILIATES OR SUPPLIERS BE LIABLE FOR ANY SPECIAL, INCIDENTAL, PUNITIVE, INDIRECT OR CONSEQUENTIAL DAMAGES (INCLUDING DAMAGES FOR LOSS OF PROFITS, DAMAGES TO YOUR COMPUTER SYSTEM OR OTHER SYSTEMS, LOSS OF DATA, GOODWILL, USE OR OTHER LOSSES) ARISING OUT OF OR IN ANY WAY RELATED TO THE SOFTWARE, THE PROVISION OF OR FAILURE TO PROVIDE SERVICES OR THIS AGREEMENT, REGARDLESS OF THE CAUSE OF ACTION OR THE BASIS OF THE CLAIM AND EVEN IF LICENSOR HAS BEEN ADVISED OF THE POSSIBILITY OF THE DAMAGES OR REMEDIES FAIL OF THEIR ESSENTIAL PURPOSE. LICENSOR AND ITS PARENT, AFFILIATES AND SUPPLIERS BEAR NO LIABILITY FOR ANY DAMAGES RESULTING FROM USE OR ATTEMPTED USE OF THE SOFTWARE OR SUPPORT SERVICES.
LICENSOR'S AND ITS PARENT'S, AFFILIATES' AND SUPPLIERS' ENTIRE LIABILITY UNDER THIS AGREEMENT AND YOUR EXCLUSIVE REMEDY WILL BE LIMITED TO THE ACTUAL DAMAGES YOU INCUR IN REASONABLE RELIANCE ON THE SOFTWARE AND SUPPORT SERVICES UP TO THE PRICE YOU PAID FOR THE SOFTWARE. NO ACTION, REGARDLESS OF FORM, RELATING TO THE SOFTWARE OR SUPPORT SERVICES MAY BE BROUGHT BY YOU MORE THAN ONE YEAR AFTER YOU HAVE KNOWLEDGE OF THE OCCURRENCE WHICH GIVES RISE TO THE CAUSE OF ACTION.
-
U.S. Government License Rights. Software provided to the U.S. Government pursuant to citations issued on or after December 1, 1995 is provided with the commercial license rights restrictions described in this Agreement. Software provided to the U.S. Government pursuant to solicitations issued prior to December 1, 1995 is provided with “Restricted Rights” as provided for in FAR, 48 CFR 52.227-14 (JUNE 1987) or DFAR, 48 CFR 252.227-7013 (OCT 1988), as able.
-
Compliance with Law; Export Restrictions. You will comply with all applicable international and national laws, rules and regulations that apply to the Software and your use of the ^1 including the U.S. Export Administration Regulations, as well as end user, end use, and des-ation restrictions issued by U.S. or other governments.
-
Governing Law and Jurisdiction. This Agreement will be construed and controlled by Delaware law, without giving effect to its conflict of law provisions. Each party consents to exclusive jurisdiction and venue in the state and federal courts in Kenton County, KY for all disputes, claims and actions arising from or in connection with the Software and this Agreement. The United Nations Convention on Contracts for the International Sale of Goods does apply to this Agreement.
-
General. The section titles in this Agreement are used solely for the parties' convenience and have no legal or contractual significance. Any list of examples following "including" or "e.g.," illustrative and not exhaustive, unless qualified by terms like "only" or "solely." Licensor's failure to act with respect to a breach by you or others does not waive its right to act with subsequent or similar breaches. No waiver of any provision of this Agreement will be effective unless it is in a signed writing, and no waiver will constitute a waiver of any other provision of the same provision on another occasion. If a court of competent jurisdiction holds any covenant or restriction of this Agreement to be illegal, invalid or unenforceable, in whole or part, the remaining terms, covenants and restrictions will remain in full force and effect and no way be affected, impaired or invalidated. You may not assign, transfer or sublicense this Agreement or your rights (if any) under this Agreement. This Agreement will be binding up successors and assigns. This Agreement constitutes the entire agreement between you and Licensor with respect to the Software (including support services (if any)) and merges all prices and contemporaneous communications and proposals, whether electronic, oral or written, between you and Licensor with respect to the Software.
Patent Pending
CONTACT INFORMATION
If you have any questions about this Agreement, or want to contact Licensor for any reason please direct all correspondence to:
TV ONE Limited Legal Department
Continental Approach,
Westwood Ind. Est,
Margate, Kent CT9 4JG
For Customer Support please contact:
tech.usa@tvone.com or tech.europe@tvone.com or refer to http://www.tvone.com/contact_info.shtml
Service
Your CORIOmaster or CORIOmaster mini comes with various modules installed. CORIOmaster mini modules are factory installed and cannot be replaced in the field by end users. COR master module replacement should only be carried out by an authorized installer.
Installation Information
CORIOgrapher is a state-of-the-art software application made by tvONE as an enhanced way to control the tvONE CORIOmaster products. It can be installed on a PC running Windows Vista, Windows 7 or Windows 8, and it will install Windows .NET 4.5 if you do not already have it installed. The installer requires 600MB of free disk space, and the installed software is 100MB in size. We recommend that you use a display set to at least 1920 x 1080 for the optimal experience, as well as a PC with mouse/trackpad and network connection. (CORIOgrapher is designed to be installed on a PC, not on a tablet or phone, as tablets and phones do not h the necessary physical connections, processing power and display size to be able to use the software.)
To use the Preview feature, the destination PC must also have Windows Media Player installed (included by default with most installations of the Windows OS) and it must have been launched at least once in order to create the default file type associations. See "Troubleshooting No Preview Video Clips When Using Preview Icon" on page 318 for more information.
The CORIOgrapher software is not the only way to control your CORIOmaster. The CORIOmaster is controlled via a series of API commands. You can use the CORIOgrapher software as a front end to do this; you can use a third-party controller or you can use a terminal emulator such as Hyperterm or Putty. For documentation of specific command-line commands, see the tvONE CORIOmaster Commands document on the USB drive that was included in the box.
To install CORIOgrapher on your PC:
- Connect the tvONE CORIOgrapher USB flash drive to your computer's USB port. Note that a web link to the latest firmware is included, in the event that your CORIOmaster or CORIOmaster mini needs to be upgraded. The flash drive will show the following options (version numbers may vary):
-
Open the CORIOgrapher folder which contains both the EULA and the Setup file. Double-click the Setup file to begin the installation process.
-
Agree to the InstallShield request and the first screen of the installer appears.

text_image
CORIOgrapher - InstallShield Wizard Welcome to the InstallShield Wizard for CORIOgrapher The InstallShield(R) Wizard will install CORIOgrapher on your computer. To continue, click Next. WARNING: This program is protected by copyright law and international treaties.Click Next.
- You can read or print the EULA (also available as a PDF on the install disc, in the folder as the installer).

text_image
CORIOgrapher - InstallShield Wizard License Agreement Please read the following license agreement carefully. END USER LICENSE AGREEMENT FOR TV ONE CORIOGRAPHER SOFTWARE BY DOWNLOADING, INSTALLING OR USING THE SOFTWARE, YOU AGREE TO BE BOUND BY THIS END USER LICENSE AGREEMENT (the "Agreement"). IF YOU DO NOT - I accept the terms in the license agreement I do not accept the terms in the license agreement InstallShield < Back Next > CancelChoose to accept and click Next.
- Enter your information and the software license key (you can find this on a sticker envelope the install disc came in).

text_image
CORIOgrapher - InstallShield Wizard Customer Information Please enter your information. User Name: Organization: Serial Number: InstallShield < Back Next > CancelEnter the appropriate information and click Next.
- Choose the installation location. By default, CORIOgrapher is installed in C:\Program Files (x86)\TV One\CORIOgrapher\ but you can change the location if you wish to do so.

text_image
CORIOgrapher - InstallShield Wizard Destination Folder Click Next to install to this folder, or click Change to install to a different folder. Install CORIOgrapher to: C:\Program Files (x86)\(TV One\)CORIOgrapher\ Change... InstallShield < Back Next > CancelSet the location as you wish and click Next.
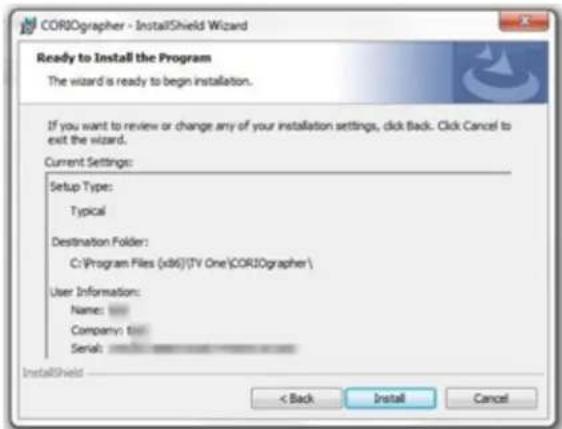
- The Summary screen reflects the choices you have made to this point. Review the information and, if you need to change anything, click the Back button to go back and alter the information.
text_image
CORIOgraper - InstallShield Wizard Ready to Install the Program The wizard is ready to begin installation. If you want to review or change any of your installation settings, click Back. Click Cancel to exit the wizard. Current Settings: Setup Type: Typical Destination Folder: C:\Program Files (x86)\( ^{TM} \) One\CORIOgraper\ User Information: Name: 100 Company: 100 Serial: 100 InstallShield < Back Install CancelAfter verifying the details, click Install.
- As the installer runs, you will see a standard install window with progress bar:

text_image
CORIOgraper - InstallShield Wizard Installing CORIOgraper The program features you selected are being installed. Please wait while the InstallShield Wizard installs CORIOgraper. This may take several minutes. Status: InstallShield < Back Next > CancelUnless you wish to cancel the installation, wait for the installation to occur.
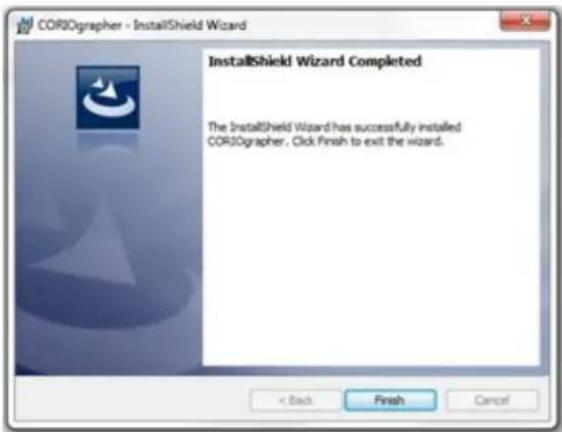
- When the installation is completed, the installer notifies you:
text_image
CORIOgrapher - InstallShield Wizard InstallShield Wizard Completed The InstallShield Wizard has successfully installed CORIOgrapher. Click Finish to exit the wizard.Click Finish to exit the installer.
- Once the installer closes, the program does not automatically launch. You should be able to find and launch CORIOgrapher from your Start menu.
Connecting the PC to the CORIOmaster
The physical connection between PC and CORIOmaster is the same as with previous tvONE products. The CORIOmaster can be connected to the PC by an Ethernet network, or by a (RS-232) cable.
By default, a CORIOmaster running up-to-date firmware will be set to accept a DHCP-assigned IP address and will appear in CORIOgrapher to any PC on the same subnet. You can also connect using a serial cable, but as the CORIOmaster only supports one connection at a you cannot connect using both Ethernet and serial simultaneously.
For more information on configuring the connection, see "Configure Connection via Ethernet" on page 16 or "Configure Connection via Serial" on page 21.
Administrator Setup Information
Password Administration
The Administrator is the only user who can change passwords for other users. See "Changing Passwords" on page 177 for more details.
First Boot Configuration
The first time an administrator logs in to the CORIOmaster, the unit will notify you that this is first time logging into the device. It will remind you to change the default password. (This alert will continue until you have saved settings on the device.)
For more details, you may wish to see "Users" on page 176, "Logout" on page 22, "Changing Passwords" on page 177, and "Timeout" on page 183

Caution: Be sure to remember your administrator password. Administrators can reset user passwords, but if you forget your administrator password, you will be locked out of the system.
Getting Started
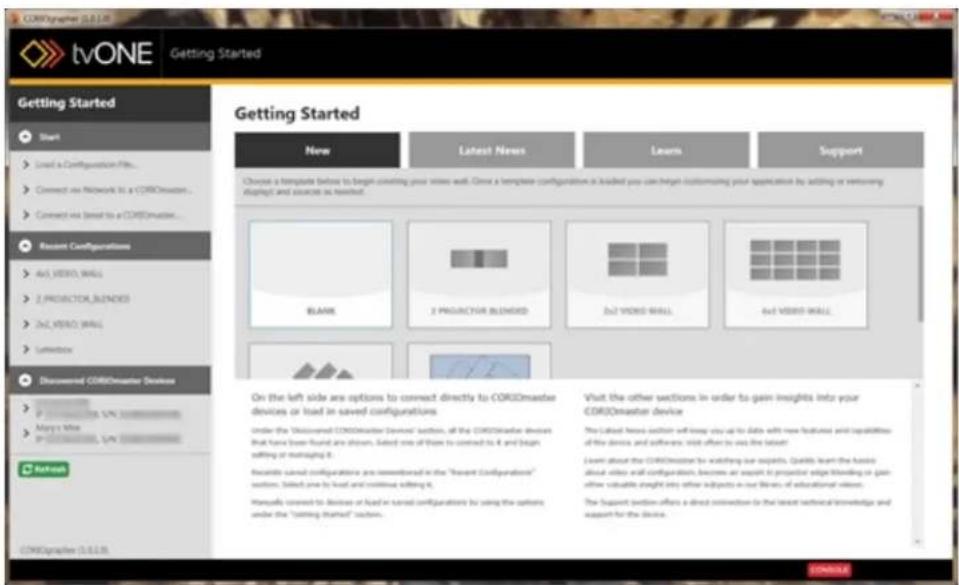
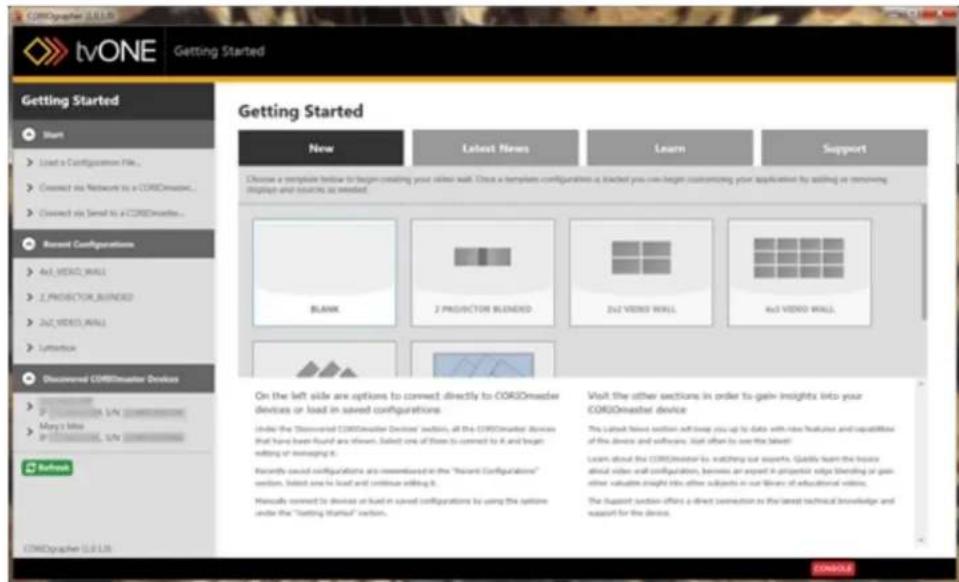
The first page you see when you launch the CORIOgrapher is a Getting Started page.

text_image
tvONE Getting Started Getting Started New Latest News Learn Support Choose a template below to begin creating your video wall. Once a template configuration is installed, you can begin customizing your application by adding or removing display and accurate as needed. Blank 2 PRODUCTION BLONDID D2 VIDEO WALL 4x1 VIDEO WALL On the left side are options to connect directly to COROImaster devices or load in saved configurations Under the " discoveries COROImaster Devices" section, all the COROImaster device that has been found and allows. Select one of them to connect it to it and height editing or managing it. Recently saved configurations are reconfigured in the "Record Configurations" section. Select one to load and continue editing it. Manually connect to devices or load in saved configurations by using the option under the "Collection Started" section. Visit the other sections in order to gain insights into your COROImaster device The Latest Text section will keep us up to date with new features and capabilities of the device and software. List often to use the latest! Learn about the COROImaster to watching our experts. Quick-learn the latest about video wall configurations, features an expert in projector edge blending or gain other valuable insight the other subjects in our library of educational videos. The Support section offers a direct connection to the latest technical knowledge and support for the device.From this page, you have many options:
In the main pane, you can choose the New tab to create a new configuration, either bla from an existing template; you can select the Latest News tab to read about what's new world of CORIOgrapher; you can click the Learn tab to watch some instructional videos; or can click the Support tab to go to the tvONE support page. (Internet connection required these tabs.)
Below the main pane is the ever-present Console button. If you press the Console button, can access a command-line window that allows you to send text commands, if you know appropriate syntax, or to review the commands that have been sent. For more information, "Console" on page 156.
On the left-hand pane, you can see available devices and configurations. In the top section labeled Start, you can select Load a Configuration File... which will open a window allowing to select a locally-stored configuration. You can also connect to a CORIOmaster either via Network (Ethernet) or via Serial (RS-232). This is the option you use if you don't see your CORIOmaster already listed in the bottom section, under Discovered CORIOmaster Devices. The center section lists recent configurations you have loaded, as a way to quickly and e open a configuration you have recently been working on.
Configure Connection via Ethernet
The process to connect to a CORIOmaster using an Ethernet connection is simple, as any CORIO master with up-to-date firmware (M300 or later) defaults to DHCP initially, and should be discoverable on your network. tvONE recommends that you change any CORIOmaster device in a fixed networked installation to a static IP address, for simplicity in locating individual devices.
If your network does not have a DHCP router, or if you are connecting directly to the CORIO-master using an Ethernet cable, you will need to configure the IP address before you can connect. Follow the instructions for the device appears under Discovered CORIOmaster
Devices, below. If the device has a self-assigned IP address, use the cog icon in the login
window to configure the IP address to an address in the same range as your PC before you can to log in to the CORIOmaster.
To connect via Ethernet from a DHCP-enabled network, follow these steps.
From the main screen of the CORIOgrapher, in the left-hand Getting Started toolbar, check to see if the CORIOmaster appears under Discovered CORIOmaster Devices. Proceed to the appropriate section below based on your own results.
text_image
tvONE Getting Started Getting Started New Latest News Learn Support Choose a template before to begin consulting your video wall. Once a template configuration is loaded you can begin customizing your application by adding or removing shapes and sources as needed. Blank 2 PROJETO FOR BLENDED 2x2 VIDEO WALL 4x2 VIDEO WALL On the left side are options to connect directly to COROMaster devices or load in saved configurations. Under the "Discovered COROMaster Devices" section, all the COROMaster devices that have been found are shown. Select one of them to connect it to and begin editing or managing it. Recent saved configurations are recommended in the "Recent Configuration" section. Select one to load and continue editing it. Initially connected to devices of load in saved configurations by using the options under the "Starting Started" section. Visit the other sections in order to gain insights into your COROMaster device The Labet News section will keep you up to date with new features and capabilities of the devices and software. Visit after to use the latest Learn about the COROMaster by watching our supports. Quickly learn the basic about video and configurations, become an support in projector edge blending or gain other valuable straight into other subjects in our library of educational videos. The support section offers a direct connection to the latest technical knowledge and support for the devices.If the device appears under Discovered CORIOmaster Devices:
-
If the device appears under the Discovered CORIOmaster Devices heading, click on the device.
-
An authentication window will pop up.

text_image
User name admin Password | Connect to Device CancelEnter the appropriate username and password.
-
A cog icon appears in the bottom left corner. Click this icon to configure the device without logging in first.
-
In the resulting window, enter the desired network configuration details.

text_image
Configuration Static IP Address 10 . 0 . 0 . 15 Subnet Mask 255 . 255 . 255 . 0 Default Gateway 10 . 0 . 1 . 1 Save Network Configuration Cancel- Click the Save Network Configuration button. The device will automatically reboot with the new settings enabled.
If the device doesn't appear in the Discovered CORIOmaster Devices section
-
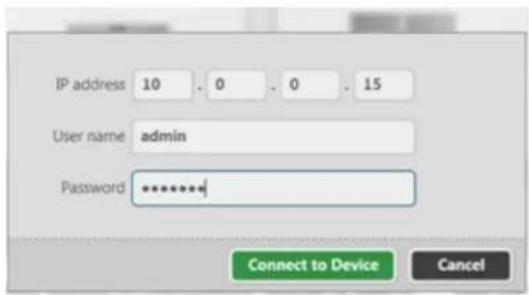
If the device doesn't appear in the Discovered CORIOmaster Devicessection, choose Connect via Network to a CORIOmaster... from the Start section.
-
A window will pop up with various options.
text_image
IP address 10 . 0 . 0 . 15 User name admin Password ********* Connect to Device CancelEnter the appropriate IP address and log in using your username and password.
- Click the Connect To Device button.
Once connected, if necessary, configure the CORIOmaster to the appropriate network settings:
Using DHCP
The default setting for CORIOmaster is DHCP. To verify, follow these steps:
- Once you are connected to the unit, click the Settings button in the top right corner.

text_image
Welcome: admin Settings | Logout-
In the Settings window, choose Networking from the left-hand navigation pane.
-
In the Networking pane, choose DHCP from the Configuration drop-down.

text_image
tVONE Settings // Networking Settings > General > Networking > Users > Connections > Firmware and Defaults Information > System > Slot Status > Constraints Networking Configuration Static IP Address 10 . 0 . 0 . 1 Subnet Mask 255 . 255 . 255 . 0 Default Gateway 10 . 0 . 1 . 1 Save Network Configuration Undo- Enter any appropriate Subnet Mask or IP Gateway details.
- Click the Save Network Configuration button.
You should now be able to connect to the CORIOmaster via Ethernet. You can configure device name in the General pane of system settings in order to ensure you know what for when you connect via Ethernet in future.
Using a Static IP
If you will be setting up a static IP address for your CORIOmaster, follow these steps:
- Once you are connected to the unit, click the Settings button in the top right corn
text_image
Welcome: admin Settings | Logout-
In the Settings window, choose Networking from the left-hand navigation pane.
-
In the Networking pane, choose Static from the Configuration drop-down.
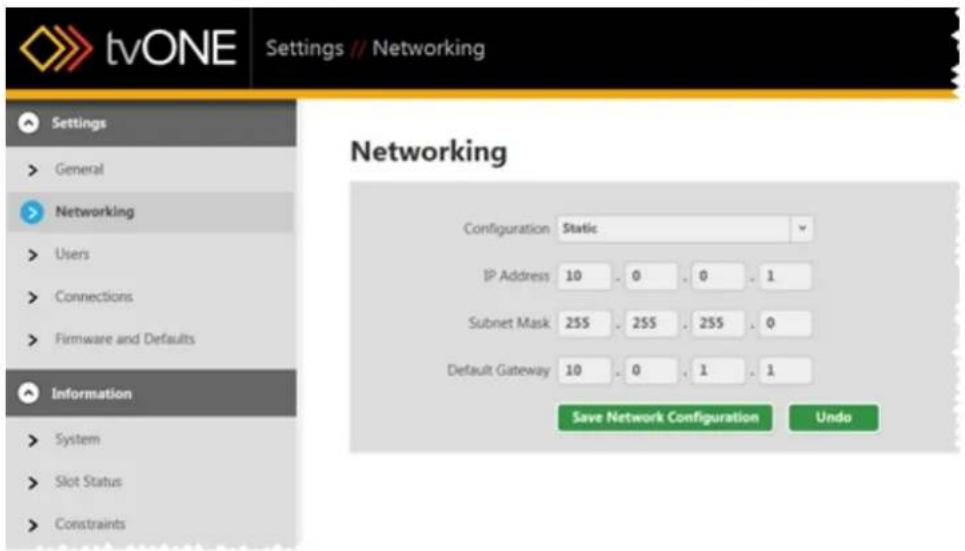
text_image
tvONE Settings // Networking Settings General Networking Users Connections Firmware and Defaults Information System Slot Status Constraints Networking Configuration Static IP Address 10 0 0 1 Subnet Mask 255 255 255 0 Default Gateway 10 0 1 1 Save Network Configuration Undo-
Enter the appropriate IP address, Subnet Mask and IP Gateway details.
-
Click the Save Network Configuration button.
You should now be able to connect to the CORIOmaster via Ethernet. You can configure any other configurable settings in this section, if you wish to do so.
Configure Connection via Serial
By default, any new CORIOmaster running firmware version M300 or later defaults to a DHCP network connection. If you wish to connect to a CORIOmaster using a serial (RS-232) connector, follow these steps.
-
From the main screen of the CORIOgrapher, in the left-hand Getting Started toolbar, choose Connect via Serial to a CORIOmaster... from the Start section.
-
A window will pop up with various options.

text_image
Serial port COMS User name admin Password | Connect to Device CancelSelect the appropriate COM port and log in using your username and password.
- Click the Connect To Device button.
You can connect to the device using a terminal emulator such as Hyperterm or Putty. For specific command-line

Note: Some versions of CORIOgrapher use Hardware Flow Control so please ensure that the RTC and CST lines are connected (pins 7 and 8 on the 9-way D connector).
Logout
You may log out at any time. All the main screens have a button in the top right marked Lo
text_image
Welcome: admin Settings | LogoutWhen you click Logout, if you have made changes, a pop-up window offers you the chance to save the settings (Yes), discard the changes and log out (No), or cancel logout (Cancel).

text_image
Save Configuration You have made changes to the configuration that have not been saved to your CORIOmaster. Would you like to save the changes now? Yes No CancelIf you do not actively send commands to the CORIOmaster for a certain period of time, you may be logged out due to inactivity. If this occurs, you need to log back in again if you wish to update the configuration on the CORIOmaster. If the timeout period is inconvenient, the administrator can change the length of time or disable the feature. See "Timeout" on page 183 to learn how to configure this.
For more details, you may wish to see "Administrator Setup Information" on page 14, "Users" on page 176, and "Changing Passwords" on page 177
Input and Output Naming Convention
The CORIOmaster protocol uses a fixed naming convention. You can create aliases within the CORIOgrapher but it is helpful to understand the default naming convention.
The naming is defined by the position of modules within the CORIOmaster product. The fig below shows the unit as viewed from the rear. Each location in which a module can be called a slot and each slot is numbered from the top left, going across then down.
The first slot is numbered 1; the last is 20. Slot 17 is a special slot holding the CPU 18,19 and 20 only work with data, not video signals.
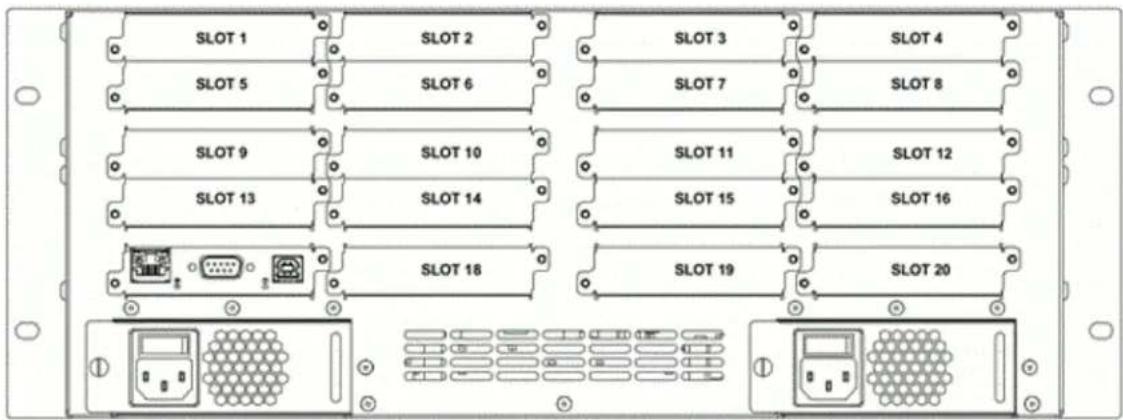
text_image
SLOT 1 SLOT 2 SLOT 3 SLOT 4 SLOT 5 SLOT 6 SLOT 7 SLOT 8 SLOT 9 SLOT 10 SLOT 11 SLOT 12 SLOT 13 SLOT 14 SLOT 15 SLOT 16 SLOT 18 SLOT 19 SLOT 20The fixed label for slot 1 is Slots.slot1
The video modules have inputs and outputs. Most cards have two connectors per slot or module that slides into the slot.
Inputs are addressed by in1 and in2; outputs are addressed by out1 and out2. HD-SDI input also have in3 and in4.
Like the slot numbering system, they are numbered from left to right facing the rear of t CORIOmax.
The fixed label for the left-most input on slot 1 is Slots.slot1.in1
The fixed label for the left-most output on slot 13 is Slots.slot13.out1
The input numbering starts from 1 and continues to the number of inputs on that card. L the output numbering starts at 1 and continues to the number of outputs on that card. S card in the first slot with four connectors would be slot1.in1, slot1.in2, slot1.in3, and slot1.in4, an output in slot 14 with two connectors would be slot14.out1 and slot14.out2, labeled from right.
These names may also be abbreviated to the first initial, so in the examples above, the inputs could also be s1i1, s1i2, s1i3 and s1i4 while the outputs would be s14o1 and s14o2. These are t default labels in the CORIOgrapher unless you change them.
For information on renaming the slots, see "Source - Renaming Windows or Inputs" on page 139 and "Display - Renaming Output Displays" on page 115.
Configurations
About Configurations 26
Creating a New Configuration 27
Loading an Existing Configuration..29....
Save Configuration 33
About Configurations
A configuration is a collection of all the settings for a CORIOmaster unit. A configuration on the CORIOmaster includes not just the inputs, outputs, video walls and presets but also CORIO-master name, user accounts and passwords, and network settings. (If you create a configuration on your PC, the specific inputs and outputs, user accounts and passwords, and network settings are configured later, once the configuration is on a CORIOmaster.)
Up to twenty configurations can be stored on a CORIOmaster but only one can be active at an given time. When you connect through the CORIOgrapher to a CORIOmaster, you can access all saved configurations on that unit or upload local configurations to the unit. While you are connected to the unit, you can change which configuration is active.
In the CORIOgrapher, you can create and modify configurations even when your computer is not connected to a CORIOmaster device. You can manage a configuration in the software, save it locally, and upload it to the CORIOmaster at a more convenient time. While a CORIOmaster can only save a maximum of twenty configurations, the number of locally saved configurations is limited only by the drive space on your computer.
If you create and edit a configuration on your PC to your satisfaction, you can save it to a file as a template locally, or upload it straight to a CORIOmaster. You need to be connected to the CORIOmaster when you assign inputs and outputs, in order to make sure that the physical connections are as expected. Network settings and user settings are also saved only on the CORIOmaster, not on a local configuration.

Caution: Be sure, when you load a different saved active configuration CORIOmaster, that you know the administrator login information. If the login details are changed from the default and you are not aware of yourself unable to access the unit.
on the administrator this, you may find
Creating a New Configuration
It is not necessary to have a CORIOmaster attached to your computer to create a new duration. It is only necessary to connect to the CORIOmaster when you wish to update the duration on the machine itself. The instructions below explain how to create a configuration CORIOgrapher. These steps can be done regardless of whether you are connected to a CO master at the time.
- From the main screen of the CORIOgrapher, in the main Getting Started pane, choos New tab.
text_image
CoreObserver 2.0.1.3 tvONE Getting Started Getting Started Start Load a Configuration File... Connect via Networks to a COROmaster... Connect via Send to a COROmaster... Recent Configurations Av2 VIDEO WALL Z PROVECTOR BLENDED Zv2 VIDEO WALL Lyntback Discovered COROmaster Devices Mary's file On the left side are options to connect directly to COROmaster devices or load in saved configurations. Under the "Discovered COROmaster Devices" section, all the COROmaster devices that have been found are shown. Select one of these to connect to it and begin editing or managing it. Recently used configurations are reentered at the "Recent Configurations" section, listed one in load and continue editing it. Manually connected to devices or load in saved configurations by using the option under the "Setting Started" section. New Latest News Learn Support Choose a template below to begin consisting your server wall. Close a template configuration is attached you can begin customizing your application by adding or removing display and source as selected. BLANK Z PROVECTOR BLENDED Zv2 VIDEO WALL Kv2 VIDEO WALL On the left side are options to connect directly to COROmaster devices or load in saved configurations. Visit the other sections in order to gain insights into your COROmaster device The latest news section will over you up to date with video features and capabilities of the device and software. Just often be seen the latest! Learn about the COROmaster by watching our supports. Quickly learn the future about video wall configurations, whereas an export is projected edge Shending or gain other valuation insight into other subjects in our video of educational videos. The support section offers a direct connection to the latest technical knowledge and support for the device.-
Several templates are available to use as a starting point, including Blank, 2 Projector Blended, 2x2 Video Wall, and others.
-
Click the template that most closely matches your desired output.
-
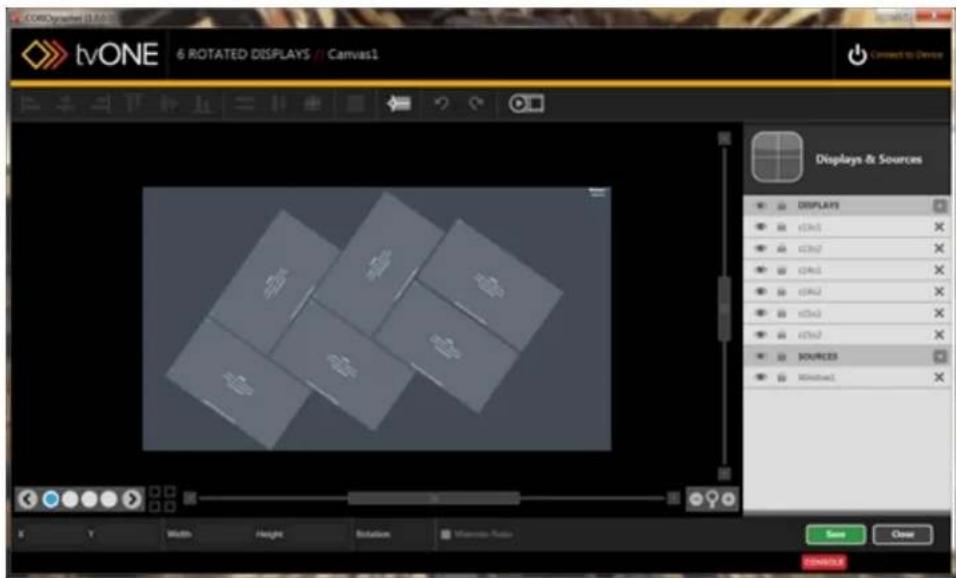
The resulting configuration will open in the Video Wall Editor.

text_image
CorelDrawset (1.0) tvONE 6 ROTATED DISPLAYS // Canvas1 Connect to Device Displays & Sources DISPLAYS c23v3 c23v2 c24v5 c24v2 c25v3 c25v2 SOURCES RIMES1 X Y Width Height Rotation Masterclass Auto Save Close COMPLETE- Edit the configuration as you wish. When you are ready to save, see "Save Configuration" on page 33 for details.
Loading an Existing Configuration
It is not necessary to have a CORIOmaster attached to your computer to load, edit, or s existing configuration. It is only necessary to connect to the CORIOmaster when you wish t save, update, or deploy the configuration on the machine itself. The instructions below expla how to load a configuration in the CORIOgrapher, whether the configuration is local or on CORIOmaster.
Load a Remote Configuration
- When you connect to the CORIOmaster as an administrator, you are taken straight to Video Wall Editor window, with the default configuration file loaded.

text_image
tvONE 2x2_VIDEO_WALL - Canvas1 Connected to Myers Mix Welcome admin Settings | Lograr Displays & Sources DISPLAYS shot vint SOURCES Window1 WINDOW USAGE Video Wall Window User 1.7% System Usage (50) 1.6 System Usage (40) 1.8 System Usage - Pressure 0.5A Take Reset 3 - SOL3 mm 4 - 451.6 mm Width: 1,966.6 mm Height: 981.3 mm Rotation: 0 Mountain Ratio Reports Configurations Save Close C:\WINDOWS\2000\2001\2002\2003\2004\2005\2006\2007\2008\2009\2010\2011\2012\2013\2014\2015\2016\2017\2018\2019\2020\2021\2022\2023\2024\2025\2026\2027\2028\2029\2030\2031\2032\2033\2034\2035\2036\2037\2038\2039\2040\2041\2042\2043\2044\2045\2046\2047\2048\2049\2050\2051\2052\2053\2054\2055\2056\2057\2058\2059\2060\2061\2062\2063\2064\2065\2066\2067\2068\2069\2070\2071\2072\2073\2074\2075\2076\2077\2078\2079\2080\2081\2082\2083\2084\2085\2086\2087\2088\2089\2090\2091\2092\2093\2094\2095\2096\2097\2098\2099\2100 C:\WINDOWS\CNYS.COMNote that there are additional green buttons for Presets and Configurations at the bot right of the screen when you are connected to a CORIOmaster.
-
From the selection of buttons at the bottom of the screen, click the Configurations I
-
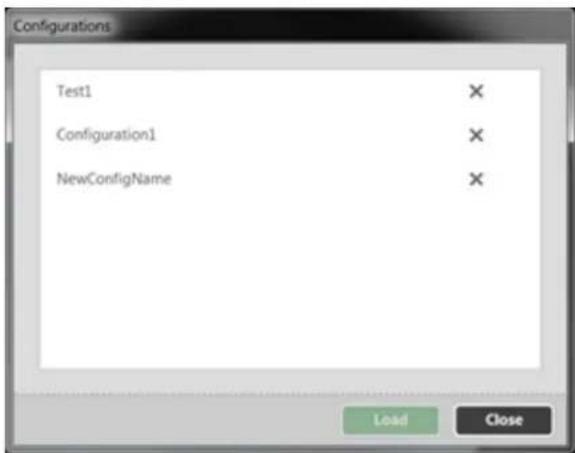
In the pop-up window, locate the configuration you wish to load on the CORIOmaster.
text_image
Configurations Test1 Configuration1 NewConfigName Load Close- To load the configuration, select the appropriate row and click the Load button.
- If you have modified the current configuration, an alert will notify you that you have made changes that have not been saved, and ask if you want to save changes to the old configuration before loading the new one. Choose Yes to save changes and continue with loading the other configuration; choose No to abandon changes and continue with loading the other configuration; and choose Cancel if you wish to return to the current configuration without loading another at this point.
- After the new configuration has been loaded, a pop-up message says "The configuration is restored successfully. You need to reconnect to the device." Since each configuration has unique network settings, when you click OK, you will be logged out of the CORIO-master and returned to the Getting Started page. Select the appropriate machine and reconnect to it, and the configuration you selected will be active.

Caution: Be sure, when you load a different saved active configuration on the CORIOmaster, that you know the administrator login information. If the administrator login details are changed from the default and you are not aware of this, you may find yourself unable to access the unit.
Load a Local Configuration
- From the main screen of the CORIOgrapher, in the left-hand side pane, select the configuration from the Recent Configurations section. If the configuration does not appear in that section, choose Load a Configuration File....

text_image
tvONE Getting Started Getting Started New Latest News Learn Support Choose a template button to begin controlling your video wall. Choose a template configuration is divided by you, not beginning customizing your applications by adding or removing stipps and sources as needed. Blank 2 PROJECTION BLOADED 32 VIDEO WALL Add VIDEO WALL On the left side are options to connect directly to COROmaster devices or load in saved configurations Under the "Discoverer COROmaster Devices" section, all the COROmaster devices that have been found are shown. Select one of them to convert to X and begin editing or managing it. Recent saved configurations are considered in the "board Configurations" section. Select one to load and confirm editing it. Manually saved to devices or load in saved configurations by using the options under the " launching Started" section. Visit the other sections in order to gain insights into your COROmaster device The listed news section will keep you up for data with new features and capabilities of the device and software. What often to use the latest! Learn about the COROmaster by matching our aspects. Quickly learn the website about video and configuration, become an expert in proper edge blinding or gain other valued insight into other subtests in our video of educational videos. The support section offers a direct connection to the latest technical knowledge and support for the device.- A Windows prompt shows local files - navigate to and select the configuration file y wish to load and click the Open button. (The default save location for configuration 1 your user\My Documents\CORIOgrapher\Configurations; configuration files have a .cmc
suffix.) The appropriate configuration file will appear in the Video Wall Editor.
text_image
CorelDrawset (1.0) 6 ROTATED DISPLAYS // Canvas1 Connect to Device Displays & Sources DISPLAYS c25x5 c25x7 c24x5 c24x2 c25x3 c25x7 SOURCES RIMES1 X Y Width Height Rotation Masterclass Auto Save ClearSave Configuration
It is not necessary to have a CORIOmaster attached to your computer to load, edit or sa existing configuration. It is only necessary to connect to the CORIOmaster when you wish t save/update the configuration on the machine itself. The instructions below explain how to s a configuration in the CORIOgrapher, whether the configuration is local or on the CORIOmas
- This configuration being edited in the Video Wall Editor is in active memory by default make changes as you desire, and when you are ready to do so, click the green S ton in the bottom right corner. (If you are actively connected to a CORIOmaster, then also be two more green buttons to the left, but these are not relevant in this situation.)

text_image
tvONE 2x2 VIDEO WALL Canvas1 Connected to: Maps Mini Welcome admin Settings | layout Displays & Sources DISPLAYS ch1 ch2 SOURCES Window1 WINDOW USAGE Video Wall Window Usage 1.7% System Usage - ISO 1.6 System Usage - ISO 0.8 System Usage - Presense 0.74 Take Insert 5.0/6.7 mm 451.6 mm Watts 2 PALL mm Height 381.3 mm Rotation Mountain Ratio Preabs Configuration Save Close Remove- You will be prompted to choose a location in which to save the configuration file:

text_image
Save Configuration Save to PC Save as... Save as a template... Save to the connected CORIOmaster Configuration Name Configuration1 Save the live config as the default power-on config Save Cancel- If you click Save to PC, if you haven't saved locally and given it a unique name yet, you will be prompted to choose a file name and location to save the file. (By default, it will save to your user/My Documents/CORIOgrapher/Configurations.) Configurations have a file extension of cmc. If the Configuration had previously been saved, choosing Save to PC will simply update the existing configuration of that name.
- If you click Save as..., you will be prompted to choose a file name and location to save the file (same default location as above).
-
If you click Save as a template..., additional fields will appear for Title and Description. When you click Save, you will be prompted to choose a file name and location to save the template. (By default, it will save to your user/My Documents/CORIOgrapher/Templates.) Templates have a file extension of .cmt.
-
If you are connected to a CORIOmaster when you click save, a further two options are available in addition (you will still need to save a copy locally, but you can also choose how to save it on the CORIOmaster.):
-
If you check Save to the connected CORIOmaster, you will need to enter a name in the Configuration Name field. After entering a configuration name, when you click Save, you will be prompted based on your choice of the local saving options above.
- If you uncheck Save to the connected CORIOmaster, the last option, Save the live config as the default power-on config, becomes active. If you check this one, the current configuration will become the active configuration when the CORIOmaster is booted up. When you click Save, you will be prompted based on your choice of the local saving options. (Note that this option can be checked as well as the Save to the connected CORIOmaster option, but that option must be unchecked in order to modify this one.)
Once the configuration file is saved locally to your PC, you can re-open and modify this configuration file at any time with no need to have the PC connected to a CORIOmaster until you are ready to do so. Or, if you wish to work with the file on the CORIOmaster, you can connect to CORIOmaster and edit the configuration as saved on the unit.
Getting Started
From Start to Finish 36
Displays and Sources pane 37
Adding Displays...38
Adding Sources 44
Configuring Displays and Windows (Sources) 50
Configuring Displays 51
Configuring Windows...53
Creating Display Equipment Profiles 55
Creating Source Equipment Profiles 58
Displays and Sources pane 62
Working in the Video...Wall....63
From Start to Finish
Have you got the CORIOmaster installed, and CORIOgrapher running, and you just want to get started? Follow the steps here to get your first video wall up and running.
Assuming you have already configured the network and user settings and you're connected to your CORIOmaster:
- Create or configure your Displays or outputs
See "Adding Displays" on page 38
- Create or configure your Sources
See "Adding Sources" on page 44
- Create Layouts in the Video Wall Editor
See "The Editor Window" on page 1
- Create Presets / Transitions
See "About Presets" on page 200 and "Basic Transition Tutorial" on page 209
-
Return to step 3 and create more layouts to save as Presets - repeat as necessary
-
Operate the system
See "About the Dashboard" on page 190
Displays and Sources pane
When you are editing a video wall in the Editor window, you can use the Displays & Soup pane to add your inputs and outputs. See "Adding Sources" on page 44 and "Adding Displays" on the next page for instructions.
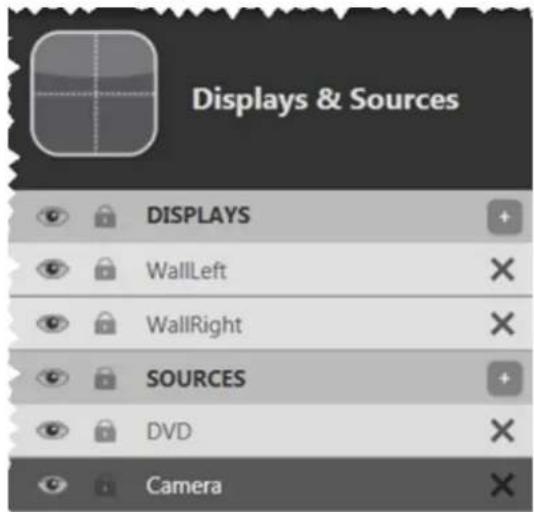
In addition to the editing that can be done in the video wall itself, the line in the Disp & Sources pane allows you to lock an item by clicking the lock icon (prevent it from being moved on the video wall), hide an item by clicking the eye icon (this is helpful if you reach the window behind it), edit its information by double-clicking the line, or delete it by clicking the X. See "Configuring Displays and Windows (Sources)" on page 50 for more information.
Priority
Once your displays and windows are added to the video wall, you can move them around needed by clicking and dragging the item up or down the list in the pane. The video v out of layers, with the top display in the Displays & Sources pane being at the back; the window of the Displays & Sources pane being at the front.
Visibility
If you want to work with a layer behind the top layer, you can use the eye icon on ( ) to hide that layer while you work with the bottom layer. Each input and output has visibility setting so you can toggle them as needed to work in the video wall.
Lock
If you have configured an item or multiple items on your video wall and don't want to move or being changed, you can lock those items to prevent accidental modification. The lock icon is on the side pane ( ) next to the eye icon and is unique to each input a
Edit
You can edit the information for a display or window by double-clicking the line for that. This will open a window of information that you can modify as you wish.
Delete
If you decide you don't want to have a certain display or window on your video wall at can delete the item by clicking the X ( ) at the far right of the line. If you change y can add it back using the plus button to the right of the header bar that says Displays
Adding Displays
When you begin to create your video wall, you need to define the inputs and outputs that are being used. This is done in the Video Wall Editor.
To add your outputs - Displays - to your video wall, click the plus button next to Displays in list.
A pop-up bar will show all available displays. To add a new one, click the Add Display button.
In the pop-up window, select the specific display you are using, or enter the details for your output.
When your output is specified and appears in the Displays pop-up window, simply click the appropriate Displays square and drag it onto your video wall. It will appear on the video wall, and a line for that display will appear under the Displays heading in the Displays & Sources pan
If this pop-window is empty, it means that there are no displays available or all output slots are use by another video wall. In this case, click the Add Display button to create a new display.
To add your outputs - Displays - to your video wall:
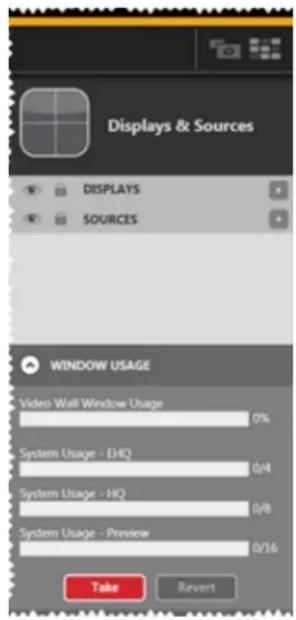
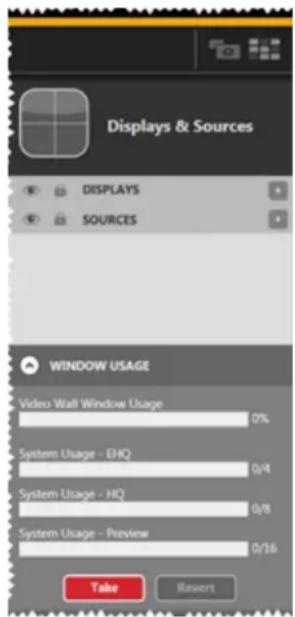
- Click the plus button next to Displays in the Displays & Sources pane.
text_image
Displays & Sources DISPLAYS SOURCES WINDOW USAGE Video Wall Window Usage 0% System Usage - EHQ 0/4 System Usage - HQ 0/8 System Usage - Preview 0/16 Take Revert- A pop-up bar will show all available recognized output slots, if you are actively connected to a CORIOmaster.

text_image
DISPLAYS Add Display Close Default 4x inch 16:9 Display s2x2 s2x1 WINDOW USAGE Video Wall Window Usage 0% System Usage - EHO 0/8 System Usage - HO 0/8 System Usage - Preview 0/16 Take Reset X Y Width Height Rotation Mountain Ratio Presets Configurations Save Close CONSOLE-
If you want to add a specific display, or if you are not currently connected to a master, follow the steps below. tvONE recommends that you create your displays and sources as a first step in the creative process, but if you don't want to set up our figuration data at this point, skip to the bottom of this section and you can add a 46-inch 1920x1080p60 display, and clarify details later via the displays configuration window.
-
Click the Add Display button.
-
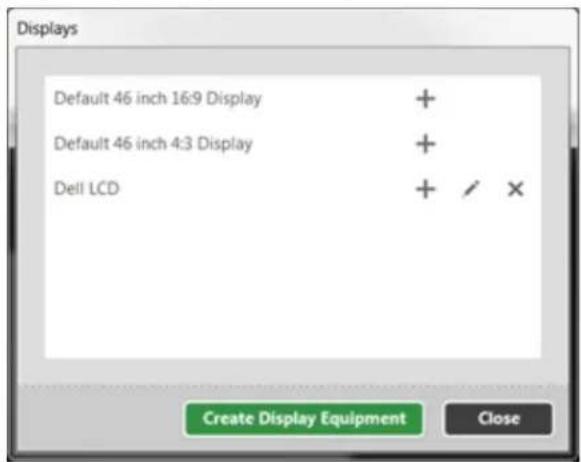
In the pop-up window, choose whether to begin with a default 46 inch 16:9 c or a default 46 inch 4:3 display (both are modifiable, they just give you a ba which to begin) or click the Create Display Equipment button to specify further.
(Any displays you have previously defined from this PC also appear in this list.)
text_image
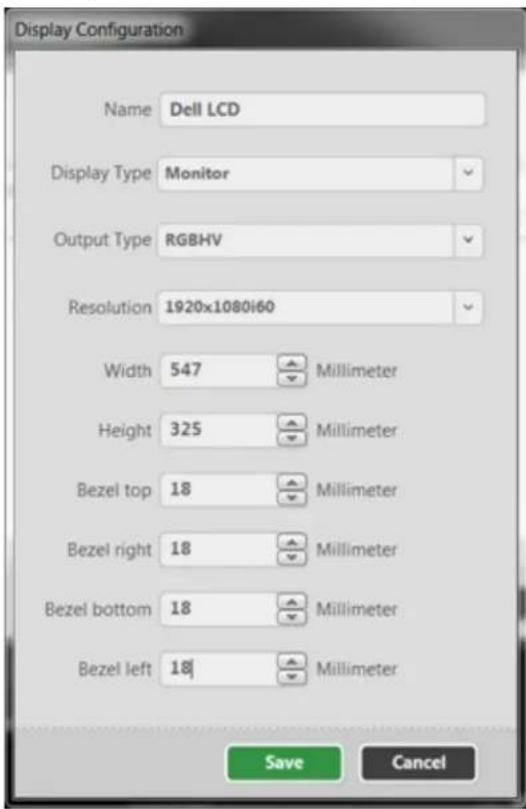
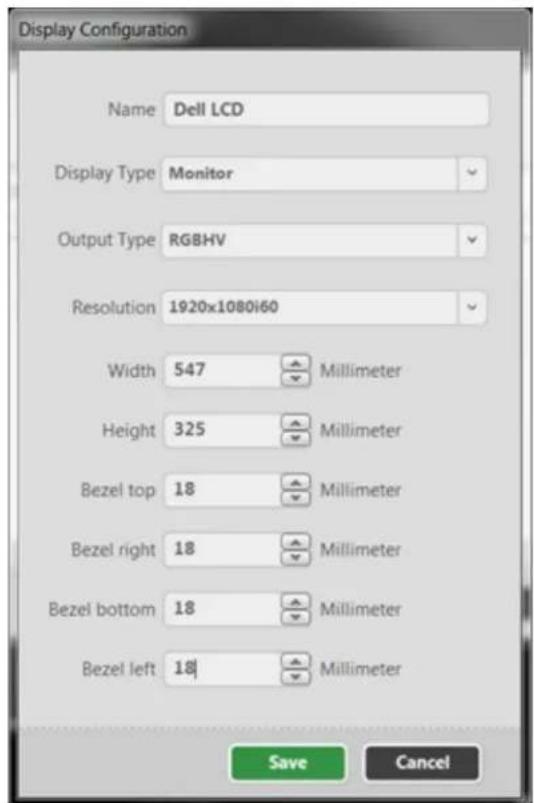
Displays Default 46 inch 16:9 Display + Default 46 inch 4:3 Display + Dell LCD + / × Create Display Equipment Close- If you choose Create Display Equipment, a window pops up asking you some details about your output device. See "Creating Display Equipment Profiles" on page 55 for details. The more specific you can be here, the more tailored your experience in the video wall can be. Resolution and bezel details are particularly useful in this context. Note that although inches are the default unit of measurement, you can use millimeters - see "General - Default Units" on page 166 for more information. After you have entered this information and clicked Save, you return to the window above, with the two default choices plus your newly-specified configuration. When you click Save from the Display Configuration window, you are saving the display as a template so you will not have to re-enter the information repeatedly
for any other matching displays.
text_image
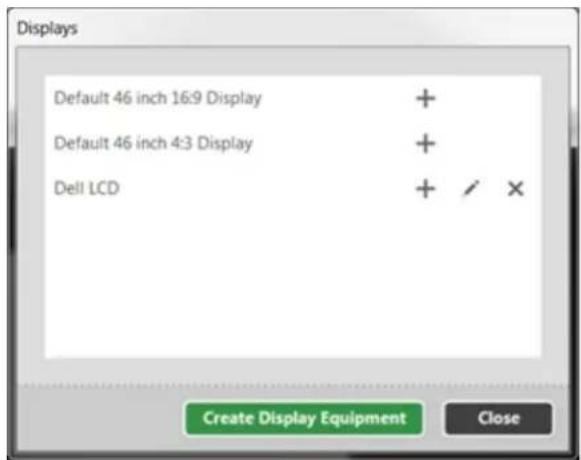
Display Configuration Name Dell LCD Display Type Monitor Output Type RGBHV Resolution 1920x1080i60 Width 547 Millimeter Height 325 Millimeter Bezel top 18 Millimeter Bezel right 18 Millimeter Bezel bottom 18 Millimeter Bezel left 18 Millimeter Save Cancel- After saving the display configuration, click the plus button next to the display you wish to use.
text_image
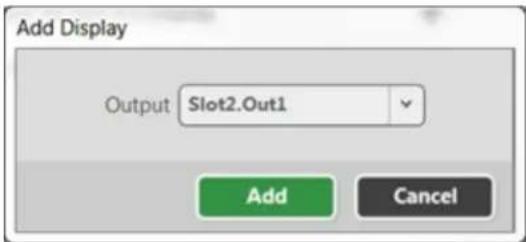
Displays Default 46 inch 16:9 Display + Default 46 inch 4:3 Display + Dell LCD + / × Create Display Equipment Close- Another pop-up window gives you a list of output slots, to choose which slot to associate with this display profile. (If you are connected to a CORIOmaster, it checks the device to see which ports are outputs. If you are not connected to a CORIOmaster, it gives you a list of 16 slots, each with two outputs. If you specify a slot now which turns out not to be an output when you do connect to the device, you will be prompted to correct this at that point.)
text_image
Add Display Output Slot2.Out1 Add Cancel-
When you have finished specifying display profiles, close the Displays pop-up window and return to the now-specified displays list.
-
Now that your display is specified and appears in the Displays bar, click the appropriate Displays rectangle or drag it onto your video wall. The display will appear on the video wall with name, size and resolution details, and a line for that display appears under the Displays heading in the Displays & Sources pane. You can rename the display on the video wall to identify it from other displays, which can be helpful when discussing the wall
layout with your creative associates or installation crew.
text_image
Displays & Sources DISPLAYS WallLeft WallRight SOURCES DVD Camera
Note: The equipment file you create can be saved and shared with other configurations you edit on that PC. The file is not copied to the CORIOmaster but you can share the file to any other PCs that need access to the same equipment in order to avoid setting up the same devices repeatedly. The .xml data file is located in My Documents\CORIOgrapher\Equipment\Displays.
Adding Sources
When you begin to create your video wall, you need to define the inputs and outputs that are being used. This is done in the Video Wall Editor.
To add your inputs - Sources - to your video wall, click the plus button next to Sources in th
A pop-up bar will show all available sources. To add a new one, click the Add Source button.
In the pop-up window, select the specific source you are using, or enter the details for your input.
When your input is specified and appears in the Sources pop-up window, simply click the appropriate Sources square and drag it onto your video wall. It will appear on the video wall, and for that source will appear under the Sources heading in the Displays & Sources pane.
If this pop-window is empty, it means that there are no sources available or all input slots are use by another video wall. In this case, click the Add Source button to create a new source.
To add your Sources to your video wall:
- Click the plus button next to Sources in the Displays & Sources pane.

text_image
Displays & Sources DISPLAYS SOURCES WINDOW USAGE Video Wall Window Usage 0% System Usage - EHQ 0/4 System Usage - HQ 0/8 System Usage - Preview 0/16 Take Revert- A pop-up bar shows all recognized Sources slots, if you are actively connected to a CORIOmaster.

text_image
SOURCES Add Source Close s6i1 s6i2 WINDOW USAGE Video Wall Window Usage 0% System Usage - EHQ 0/4 System Usage - HQ 0/8 System Usage - Preview 0/16 Take Revert X Y Width Height Rotation Maintain Ratio Presets CONSOLE-
If you want to add a specific source, or if you are not currently connected to a master, follow the steps below. tvONE recommends that you create your displays and sources as a first step in the creative process, but if you don't want to set up so figuration data at this point, skip to the bottom of this section and you can add a 16:9 input, and clarify details later via the source configuration window.
-
Click the Add Source button.
-
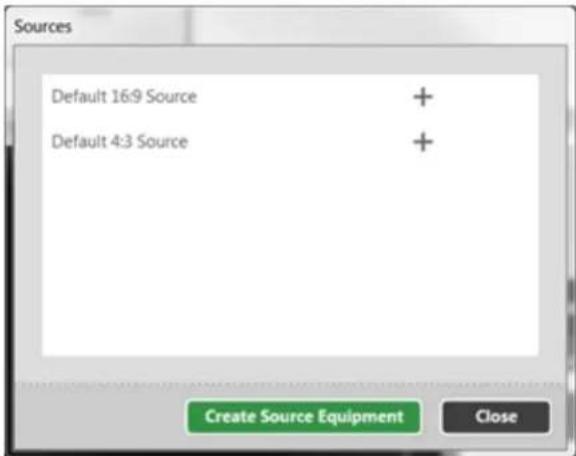
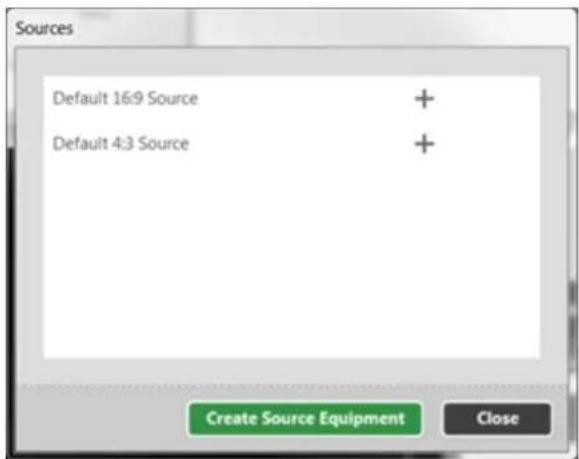
In the pop-up window, choose whether to begin with a default 16:9 source or default 4:3 source (both are modifiable, they just give you a basis from which begin) or click the Create Source Equipment button to specify further. (Any
sources you have previously defined from this PC also appear in this list.)

text_image
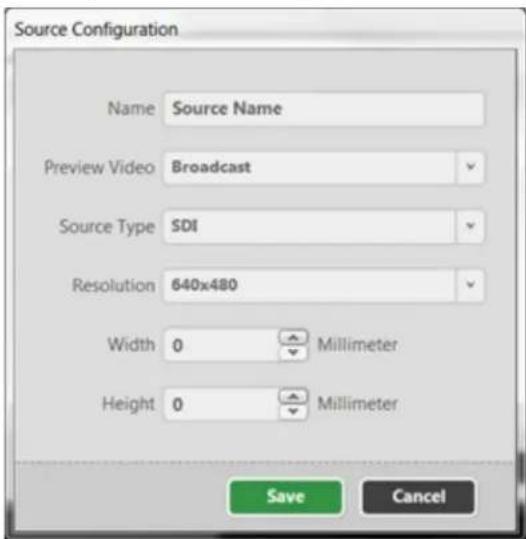
Sources Default 16:9 Source + Default 4:3 Source + Create Source Equipment Close- If you chose Create Source Equipment, a window asks you some details about your input device. See "Creating Source Equipment Profiles" on page 58 for more details. The more specific you can be here, the more tailored your experience in the video wall can be. Source type and resolution are particularly useful in this context.
After you have entered this information and clicked Save, you return to the window above, with the two default choices plus your newly-specified configuration. When you click Save from the Source Configuration window, you are saving the source as a template so you will not have to re-enter the information repeatedly
for any other matching sources.
text_image
Source Configuration Name Source Name Preview Video Broadcast Source Type SDI Resolution 640x480 Width 0 Millimeter Height 0 Millimeter Save Cancel- After saving the source configuration, click the plus button next to the source wish to use.
text_image
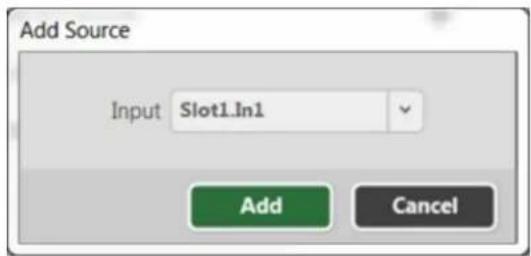
Sources Default 16:9 Source + Default 4:3 Source + Create Source Equipment Close- Another pop-up window gives you a list of input slots, to choose which slot t ciate with this source profile. (If you are connected to a CORIOmaster, it checks the device to see which ports are inputs. If you are not connected to a COR master, it gives you a list of 16 slots, each with two inputs. If you specify a which turns out not to be an input when you do connect to the device, you
prompted to correct this at that point.)
text_image
Add Source Input Slot1.In1 Add Cancel-
When you have finished specifying source profiles, close the Sources pop-up window and return to the now-specified source list.
-
Now that your input is specified and appears in the Sources bar, click the appropriate Sources rectangle and drag it onto your video wall canvas. It appears on the video wall, and a line for that source appears under the Sources heading in the Displays & Sources pane. You can rename the source on the video wall to identify it from other sources, which can aid in understanding what source is being displayed at any given time.
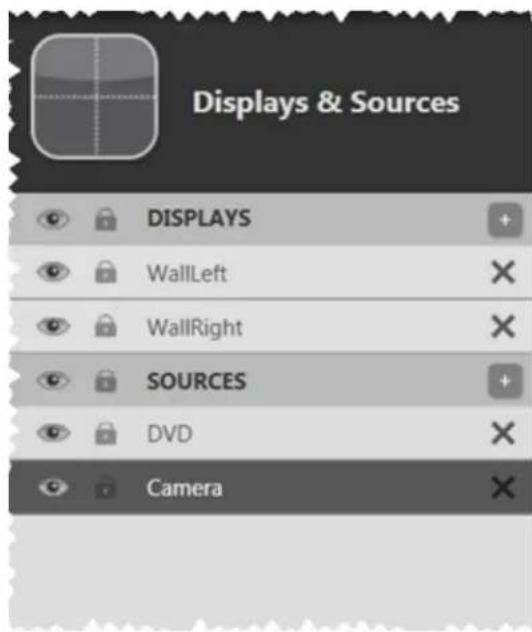
text_image
Displays & Sources DISPLAYS WallLeft WallRight SOURCES DVD CameraIf you are in Immediate mode, the image will appear on the specified output. If you are in Synchronized mode, the image will not appear on the physical display specified until you click the Take button. (See "Immediate vs Synchronized" on page 193 for details.)
Windows
When a source is added to the video wall (which may also be referred to as the Canva becomes a Window. Initially, the settings of the source are used to create the Window.
Windows are not sources, but Windows contain sources along with other data. Windows can change sources. For example, using Transitions, the source can change from Slot1.input1 to Slot1.input2. However, the dimensions and placement of the Window may not change.

Note: The equipment file you create can be saved and shared with other configurations you edit on that PC. The file is not copied to the CORIOmaster but you can share the file to any other PCs that need access to the same equipment in order to avoid setting up the same devices repeatedly. The .xml data file is located in My Documents\CORIOgrapher\Equipment\Sources.
Configuring Displays and Windows (Sources)
When a display or window appears in the Displays & Sources list, you can access further details about that item by:
• double-clicking the line,
- double-clicking the item in the canvas, or
- clicking on the 📄 in the top corner of the item in the canvas (top left for Displays; top right for Windows).
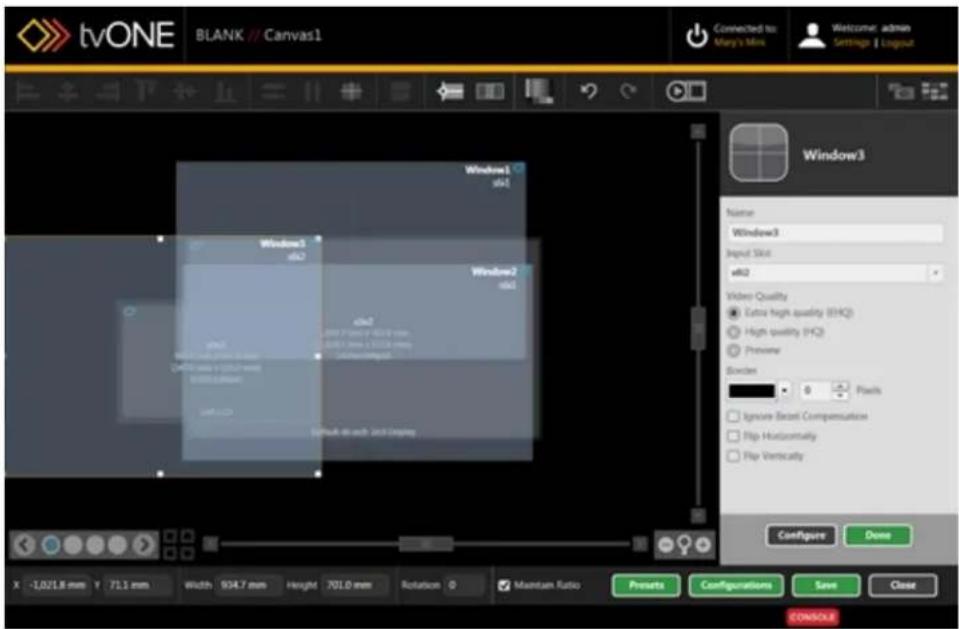
text_image
tvONE BLANK // Canvas1 Connected to Mary's files Welcome admin Settings & Layout Window3 Name Window3 Input Slot a02 Video Quality Extra high quality (EHQ) High quality (HQ) Preview Border 8 Pixels Ignore Secret Compensation Flip Horizontally Flip Vertically Configure Done x -1.0218 mm y 71.1 mm Width 934.7 mm Height 701.0 mm Rotation 0 Maintain Ratio Presets Configurations Save Close CONSOLEFrom this right-hand pane, you can edit a window name, change the associated input on the CORIOmaster, configure a border of any color and any number of pixels, choose the video quality of that window, flip the image horizontally or vertically, and set the configuration to ignore any bezel compensation. You can do further customization by clicking the Configure button at the bottom of the pane.
For an output, you can edit an output's name, change the associated output slot on the CORIO-master, adjust the resolution of the output, and modify the gamma values. You can do further customization by clicking the Configure button at the bottom of the pane.
"Configuring Windows" on page 53
"Configuring Displays" on the facing page
Configuring Displays
When you have double-clicked a Display item in the Displays & Sources pane, you get a pane from which you can make some changes.

text_image
BVONE BLANK // Canvas1 Connected to: Mary's Mix Welcome: admin Settings: Logout Display Properties Name x2n1 Output Slot x2n1 Resolution 1820x100000 Gamma Red 1.00 Green 1.00 Blue 1.00 Reset Gamma Values Configure Done X -684.6 mm Y -111.9 mm Width 543.0 mm Height 363.0 mm Rotation 0 Maintain Ratio Presets Configurations Save Close CONTROLEFrom this pane, you can edit an output's name, change the associated output slot on the master, adjust the resolution of the output, and modify the gamma values.

Note: The information you entered when you set up your display is can edit these settings if something has changed in your configuration. "Creating Display Equipment Profiles" on page 55.
shown here. Y See
If you click the Configure button at the bottom of the pane, you can access the Display Configuration.

text_image
tvONE Display Configuration // Slot3.Out1 Connected to Hays' Min Welcome admin Settings | LayoutDisplay Configuration
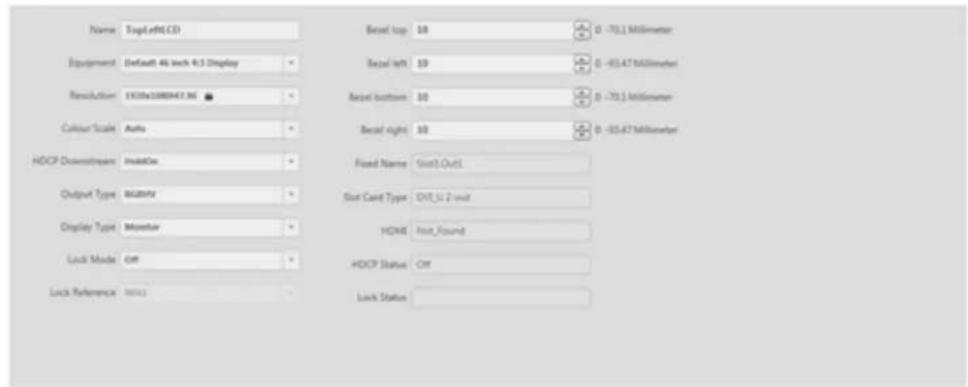
text_image
Name: TopLeRLED Equipment: Default 4K inch 4.5 Display ResultAction: 1930be1088047.36 Colour Scale: Active HDCP Downstream: ActiveOn Output Type: 86200V Display Type: Monitor Lock Mode: Off Lock Reference: None1 Reset top: 10 Reset left: 10 Reset bottom: 10 Reset right: 10 Fixed Name: StartOut1 Slot Card Type: Off_12-2-root HCMS: Host_Found HDCP Status: Off Lock Status:
text_image
DISCK COMMANDFrom the Display Configuration window, you can again "Display - Renaming Output Displays" on page 115 or resolution, but you can also specify Equipment, change the Color "Genlock/Framelock" on page 71 Source, enable "HDCP" on page 73, identify the output type, set the display type, "Display - Defining Bezel" on page 109, and view other settings.
Scale, identify a
Configuring Windows
When you have double-clicked a Window item in the Displays & Sources pane, you get a pane from which you can make some changes.
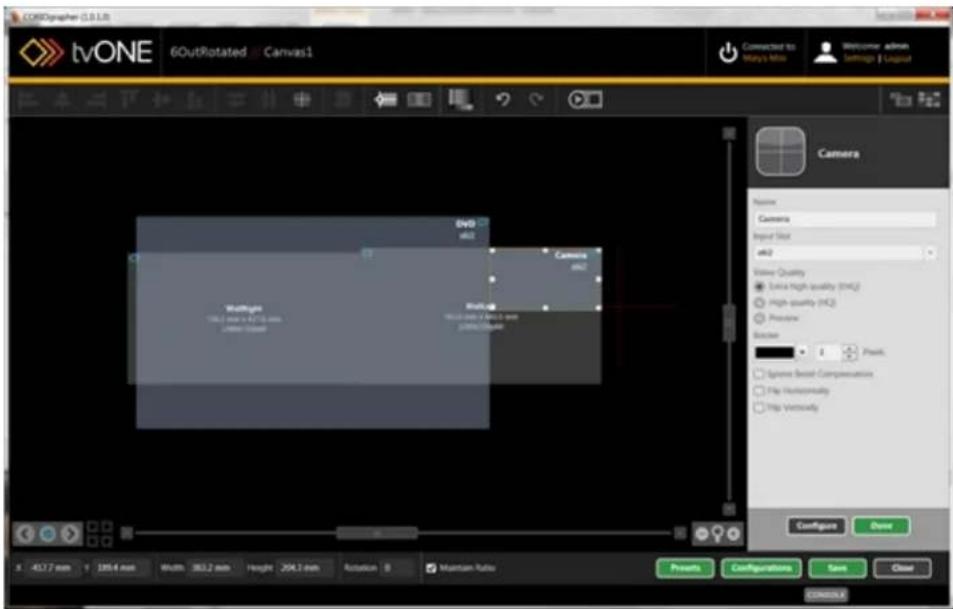
text_image
tvONE 6OutRotated...Canvas1 Connected to Mya's Mix Welcome admin Settings | Logulat Camera Name Camera Input Size m2 View Quality Extra high quality (M4) High quality (M2) Preview Browse Point: Synnex Board Composition File Horizontally Hip Venuically Configure Done 50.7 mm 185.4 mm Width: 363.2 mm Height: 204.1 mm Rotation: 0 Mountain Radius Presets Configurations Save Close COMMENTSFor an input, you can make various changes:
- Rename input windows ("Source - Renaming Windows or Inputs" on page 139)
- Change the input ("Source - Changing Input Slot" on page 127)
- Adjust the video quality of the window ("Source - Adjust Video Quality" on page 148)
- Add a window border to the input ("Source - Adjusting a Window Border" on page 124)
- Add any of several transition effects including Fade Through Black, Horizontal Shrink, Vertical Shrink and Spin ("About Transitions" on page 208)
- Ignore bezel compensation ("Source - Ignore Bezel Compensation" on page 138)
- Flip the window horizontally ("Source - Flip Horizontally or Vertically" on page 137)
- Flip the window vertically ("Source - Flip Vertically" on page 1)
If you click the Configure button at the bottom of the pane, you can access the Source Configuration.

text_image
tvONE Source Configuration // Slot3.1n1 Source Configuration Name: a301 Preview Video: Broadcast Equipment Top input crop: 0 Source Type: DVI (HDMI) Left input crop: 0 X-Phase Bottom input crop: 0 Colour Scale: Active Right input crop: 0 Brightness: 0 Status: OK Contrast: 100 Fixed Name: Slot3.2n1 Source Loss Color: Blue Slot Card Type: OVE, U 2 = - HDCF Enabled Resolution: 640x480p60 HDCF: Off EIDD-Filename: L3-L editFrom the Source Configuration window, you can again configure settings for the window:
- Rename input windows ("Source - Renaming Windows or Inputs" on page 139)
- Specify equipment ("Source - Specify Equipment" on page 144)
- Define source type ("Source - Defining Source Type" on page 1)
- Modify color scale ("Source - Color Scale" on page 129)
- Adjust brightness and contrast ("Source - Adjusting Brightness and Contrast" on page 125)
- Define a color to show in the event that there is no source signal ("Source - Defining Source Loss Window Color" on page 133)
- Enable HDCP settings ("Source - Enable HDCP" on page 135)
- Choose from a selection of preview video types ("Source - Set Preview Video" on page 141)
- Crop inputs to remove lines or rows from the edge of the image ("Source - Cropping inputs" on page 131)
Creating Display Equipment Profiles
If you have certain equipment that you use regularly, you can set each display up as a equipment, which is essentially a saved "template" of common details for that display - disp type, output type, physical size and bezel size. You can store the profile for each piece ment, so when you create new configurations, you don't have to set up all the same de and over. If you have one projector that you tend to use frequently and three types of your video wall, you can set each one up as an item of equipment, and when you buil video wall you simply select the appropriate piece of equipment to avoid having to config the details each time you set up a new configuration.
The equipment file is kept on your PC, not on the CORIOmaster, but you can transfer the another PC if you want to use it in more than one location. The file is saved to your \Documents\CORIOgrapher\Equipment\Displays and the filename is the display's name in CORIOgrapher, with the extension .xml.
To create a display equipment profile:
- Click the plus button next to Displays in the Displays & Sources pane.
text_image
Displays & Sources DISPLAYS SOURCES WINDOW USAGE Video Wall Window Usage 0% System Usage - EHQ 0/4 System Usage - HQ 0/8 System Usage - Preview 0/16 Take Revert- A pop-up bar will show all recognized unassigned output slots, if you are actively connected to a CORIOmaster. If you are not actively connected or if all display slots are
already assigned (even in other video walls), nothing will appear in the Displays pane.

text_image
DISPLAYS Add Display Close Default 46 inch 16:9 Display s2n3 s2n3 WINDOW USAGE Video Wall Window Usage 7% System Usage - EHO 0/4 System Usage - HQ 0/8 System Usage - Preview 0/16 Take Reset X Y Width Height Rotation Maintain Rate Presets Configurations Save Close CONSOLE- Click the Add Display button to open a pop-up window.

text_image
Displays Default 46 inch 16:9 Display + Default 46 inch 4:3 Display + Dell LCD + / × Create Display Equipment CloseIn this pop-up window, click the Create Display Equipment button.
- A window pops up asking you to enter details about your output device. The more specific you can be here, the fewer details you will need to enter in the Configuration
window each time you use the equipment.
text_image
Display Configuration Name Dell LCD Display Type Monitor Output Type RGBHV Resolution 1920x1080i60 Width 547 Millimeter Height 325 Millimeter Bezel top 18 Millimeter Bezel right 18 Millimeter Bezel bottom 18 Millimeter Bezel left 18 Millimeter Save CancelAfter you have entered this information, click Save to return to the Displays window. shows the default choices plus your newly-specified configuration.
-
If you want to create another Equipment profile, click the Create Display Equipment ton again, and enter the information for the second piece of display equipment. Repe these steps as many times as you need until your equipment details are saved.
-
When you have finished creating display profiles, close the Displays pop-up window if you do not wish to create a display in your video wall right now. (If you do, follow steps in "Adding Displays" on page 38).
Creating Source Equipment Profiles
If you have certain equipment that you use regularly, you can set each source up as a piece equipment, which is essentially a saved "template" of common details for that window - preferred preview video type, source type, input resolution, and physical size. You can store the profile for each piece of equipment, so when you create new configurations, you don't have to set up all the same details over and over. If you have one projector that you tend to use frequently and three types of display on your video wall, you can set each one up as an item equipment, and when you build your video wall you simply select the appropriate piece of equipment to avoid having to configure the details each time you set up a new configuration.
The equipment file is kept on your PC, not on the CORIOmaster, but you can transfer the file another PC if you want to use it in more than one location. The file is saved to your user-Documents\CORIOgrapher\Equipment\Sources and the filename is the source's name in CORIO-grapher, with the extension .xml.
To create a source equipment profile:
- Click the plus button next to Sources in the Displays & Sources pane.

text_image
Displays & Sources DISPLAYS SOURCES WINDOW USAGE Video Wall Window Usage 0% System Usage - EHQ 0/4 System Usage - HQ 0/8 System Usage - Preview 0/16 Take Revert- A pop-up bar will show all recognized input slots, if you are actively connected to CORIOmaster.

text_image
SOURCES Add Source Close s6i1 s6i2 WINDOW USAGE Video Wall Window Usage 0% System Usage - EHQ 0/4 System Usage - HQ 0/8 System Usage - Preview 0/16 Take Revert X Y Width Height Rotation Maintain Ratio Presets CONSOLE- Click the Add Source button to open a pop-up window.
text_image
Sources Default 16:9 Source + Default 4:3 Source + Create Source Equipment CloseIn this pop-up window, click the Create Source Equipment button.
- A window pops up asking you to enter details about your input device. The more specific you can be here, the fewer details you will need to enter in the Configuration window each time you use the equipment.

text_image
Source Configuration Name Source Name Preview Video Broadcast Source Type SDI Resolution 640x480 Width 0 Millimeter Height 0 Millimeter Save CancelAfter you have entered this information, click Save to return to the Sources window. It shows the default choices plus your newly-specified configuration.
- If you want to create another Equipment profile, click the Create Source Equipment button again, and enter the information for the second piece of source equipment. Repeat these steps as many times as you need until your equipment details are saved.
- When you have finished creating source profiles, close the Sources pop-up window if you do not wish to create a window in your video wall right now. (If you do, follow steps in "Adding Displays" on page 38).
Displays and Sources pane
When you are editing a video wall in the Editor window, you can use the Displays & Sources pane to add your inputs and outputs. See "Adding Sources" on page 44 and "Adding Displays" on page 38 for instructions.
In addition to the editing that can be done in the video wall itself, the line in the Displays & Sources pane allows you to lock an item by clicking the lock icon (prevent it from being moved on the video wall), hide an item by clicking the eye icon (this is helpful if you want to reach the window behind it), edit its information by double-clicking the line, or delete it by clicking the X. See "Configuring Displays and Windows (Sources)" on page 50 for more information.
Priority
Once your displays and windows are added to the video wall, you can move them around as needed by clicking and dragging the item up or down the list in the pane. The video wall is out of layers, with the top display in the Displays & Sources pane being at the back; the bottom window of the Displays & Sources pane being at the front.
Visibility
If you want to work with a layer behind the top layer, you can use the eye icon on the side ( ) to hide that layer while you work with the bottom layer. Each input and output has its visibility setting so you can toggle them as needed to work in the video wall.
Lock
If you have configured an item or multiple items on your video wall and don't want to risk the moving or being changed, you can lock those items to prevent accidental modification. The lock icon is on the side pane ( ) next to the eye icon and is unique to each input and out
Edit
You can edit the information for a display or window by double-clicking the line for that item. This will open a window of information that you can modify as you wish.
Delete
If you decide you don't want to have a certain display or window on your video wall after all, can delete the item by clicking the X ( ) at the far right of the line. If you change your mi can add it back using the plus button to the right of the header bar that says Displays or So
Working in the Video Wall
The video wall, in the Editor window, is the main black area where you can move and your windows and displays to build a virtual representation of your physical video wall.
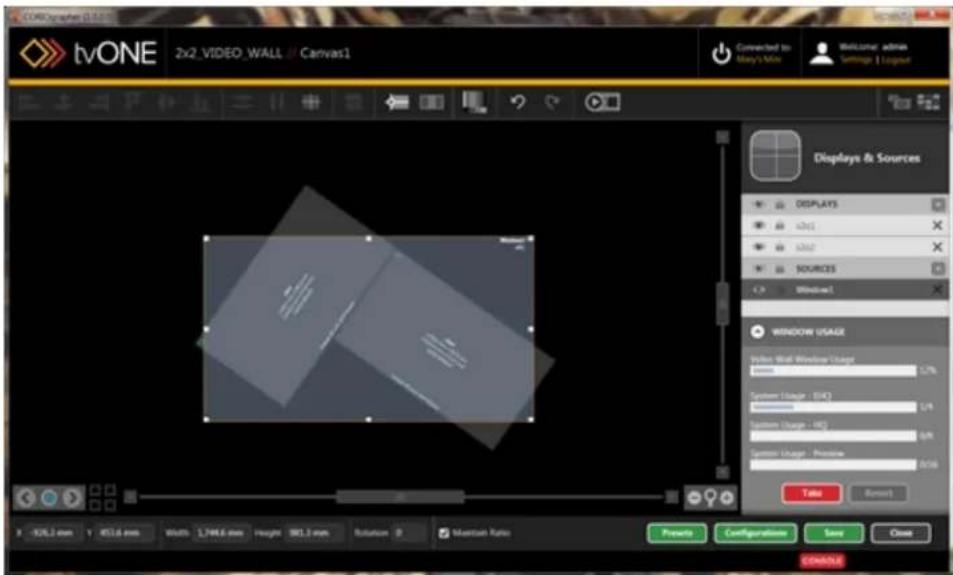
text_image
CoreGraph 2.0.x2 tvONE 2x2_VIDEO_WALL / Canvas1 Connected to Mary's Mix Welcome admin Settings | LogPage Displays & Sources DISPLAYS sxt1 sxt2 SOURCES Window1 WINDOW USAGE Water Wall Window Usage Power Windows Usage System Usage (SIC) System Usage (HC) System Usage (RS) System Usage (RS) Balance OK Cancel X: XOL3 mm Y: X51.6 mm Width 1,744.6 mm Height 981.3 mm Rotation 0 Mountain Ratio Properties Configuration Save Close CONTINUEFor information on adding windows and outputs to the video wall and using the visibility a locking features, see the instructions on using the "Displays and Sources pane" on the previous page
In addition to being able to hide layers and lock layers, the video wall itself has extensive tonality. You can drag-and-drop all input and output layers to your preferred location, and prefer to use grid co-ordinates, you can use the X and Y fields in the bottom left to de screen position for the selected item. The width and height are also modifiable from the controls at the bottom of the window.
The Video Wall canvas itself can be navigated by using the elevator bars at the bottomof the canvas to move around. The magnifying glass icon will automatically fit to zoom, w
the plus and minus on each side will zoom in and out. You can also zoom using the button along with scrolling the mouse wheel.
Video Wall
Video Wall - Editor / Dashboard .Buttons..66....
Moving between Video Walls 67
Renaming Video Wall..69....
Genlock/Framelock 71
HDCP .73
Video Wall - Editor / Dashboard Buttons
If you are logged in as an Administrator or Power User, at the far right of the button bar, you see two buttons that allow you to toggle between the Video Wall Editor and the Dashboard.

text_image
Welcome: admin Settings | LogoutThe leftmost button takes you to the Video Wall Editor, where you can arrange your inputs and outputs into the desired configuration.
Once a canvas is saved as you like it, click the rightmost button to go to the Dashboard to able to choose between your saved canvases, choose presets, and redefine source inputs as needed. The Dashboard allows you to switch presets in a live environment, and change window inputs on-the-fly.
Moving between Video Walls
When you are working in the Editor with video walls, a CORIOmaster has four video walls configuration; a CORIOmaster mini used to only have one video wall per configuration, but early 2015, firmware version M307 increased this to four per configuration. You can swap between them in the Editor or from the Video Wall Overview page.
To move between video walls:
- In the Editor, at the bottom left of the page (above the X and Y coordinates), there four dots between two arrows.

text_image
< < > X Y WidthThe four squares on the right are the Video Wall Overview button. If you click the Video Wall Overview button, the Video Wall Overview page will open. You can see preview of the video walls available in this configuration. Click one of the video wall views to go to the Editor with that video wall loaded, or edit the name of it here
video walls are named "Canvas1" through "Canvas4" by default.

text_image
tvONE 6 ROTATED DISPLAYS // Video Wall Overview Video Wall Overview Canvas1 Canvas2 Canvas3 Canvas4 Video Wall Names Configuration Name Name: 6 ROTATED DISPLAYS Video Wall 1 Name: Canvas1 Video Wall 2 Name: Canvas2 Video Wall 3 Name: Canvas3 Video Wall 4 Name: Canvas4 Back CONTAINLERenaming Video Wall
When you are working in the Editor with video walls, in addition to renaming sources and displays, you can rename the entire video wall to a more memorable name.
To rename your video wall:
- In the Editor, at the bottom left of the page (above the X and Y coordinates), click Video Wall Overview button.

text_image
UI control panel with navigation buttons and input fields for X, Y, Width settings- In the Video Wall Overview page, you will see the canvases (video walls) available in configuration.

text_image
tvONE 6 ROTATED DISPLAYS @ Video Wall Overview Video Wall Overview Canvas1 Canvas2 Canvas3 Canvas4 Video Wall Names Configuration Name Name: 4 ROTATED DISPLAYS Video Wall 1 Name: Canvas1 Video Wall 2 Name: Canvas2 Video Wall 3 Name: Canvas3 Video Wall 4 Name: Canvas4 Back CREATE- In the right-hand pane, you can change the Configuration Name or the video wall n. Type your desired name into the appropriate field. The name must be a maximum o
characters, start with a letter, not contain any spaces, and be alphanumeric (underscore is also allowed).
- Press Return or Enter to save the new name.
Genlock/Framelock
For each output, you can configure Genlock or Framelock, on the "Slot Status" on page 179 page. You can also configure a Genlock or Framelock for a specific output by going to 1 Configure settings for that output. See "Display - Lock Mode (Genlock, Framelock)" on page 107 for more information.
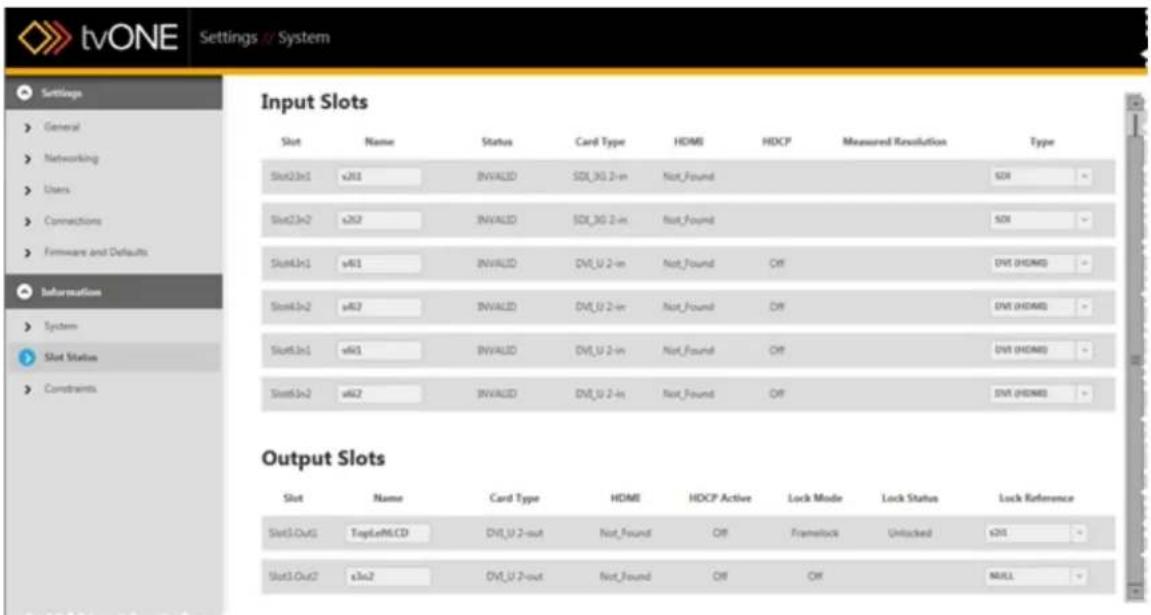
text_image
tvONE Settings // System Settings General Networking Users Connections Firmware and Defaults Information System Slot Status Constraints Input Slots Slot Name Status Card Type HDMI HDCP Measured Resolution Type Slot23n1 v201 INVALID SDK_3G 2-in Not_Found SDR Slot23n2 v262 INVALID SDK_3G 2-in Not_Found SDR Slot43n1 v401 INVALID DVI_U 2-in Not_Found Off DV1 (HDMI) Slot43n2 v402 INVALID DVI_U 2-in Not_Found Off DV1 (HDMI) Slot63n1 v401 INVALID DVI_U 2-in Not_Found Off DV1 (HDMI) Slot63n2 v402 INVALID DVI_U 2-in Not_Found Off DV1 (HDMI) Output Slots Slot Name Card Type HDMI HDCP Active Lock Mode Lock Status Lock Reference Slot1Out1 TopLotMCD DVI_U 2-out Not_Found Off Framework Unlocked s201 Slot3Out2 s3n2 DVI_U 2-out Not_Found Off OK NULLThe Lock Mode for each Output is Off by default. To start Genlock or Framelock, select appropriate input from the drop-down list under Lock Reference. Repeat this for all outputs you wish to Genlock or Framelock.
What is Genlock?
Each output will normally free run at the chosen output resolution. In many situations, though you may want to have these outputs co-timed (such as when each output is a part of a wall). Genlock permits the width, height and frame rate of an output to be locked to main input. Once you configure your inputs and outputs with the same resolution settings, you can lock them from this screen. (You may need to configure the second input or output on t card to the same resolution, even if it is not being used, for Genlock to be available.)
What is Framelock?
Distinct from Genlock, Framelock uses the frame rate to lock images together. Framelock permits both the output and input to be set to a user-defined resolution and frame rate must exactly match each other. (60 and 59.94 are not close enough for Framelock.) As w
Genlock, the second output on the same card needs to be set to the same resolution and fran rate.
SD-SDI input cards cannot be used as reference signals at some resolutions - see "Troubleshooting Framelock or Genlock with SDI Input Modules" on page 316 for more information.
HDCP
The dual-link Integrated DVI (Dimplts and outputs on a CORIOmaster are fully compliant with HDCP (High-bandwidth Digital Content Protection). This can, however, cause serious operational issues.
HDCP settings can be adjusted in the configuration page for each input or output.
On each DVI Input you have a checkbox to enable HDCP communications with the source. tvONE strongly recommend that you disable HDCP when you are connecting to a computer has HDCP capability but will not be playing out protected material. Otherwise the channel ' become encrypted and limit system functionality. For instructions on configuring HDCP for a source, see "Source - Enable HDCP" on page 135
On Outputs you can configure the HDCP Downstream setting to HoldOn, KeepOff, or FollowSources. KeepOff disables HDCP key transfer and is recommended for non-compliant displays. HoldOn is used for compliant monitors and projectors. FollowSources turns HDCP on off depending on the settings of the input. For instructions on configuring HDCP Downstream a display, see Display - Configure HDCP.

Note: For correct operation with an HDCP source, ALL outputs connected to that source must be HDCP Compliant. In the case of the CORIOmaster, if one or more windows used on a video wall comes from an HDCP-encrypted source then all outputs linked to the video wall must be HDCP compliant. If not, then no output image will occur.

Note: In the event that you want to use YC or CV analog video, a card with U DVI (DVI-U) ports is available from tvONE. These DVI-U ports can use adapters (available from tvONE) to attach composite video or analog signals to the DVI-U connector.
^1 Beginning with firmware version M307, CORIOmaster and CORIOmaster mini units were redesigned to use DVI-I cards by default. Prior to this date, DVI-U connectors were default. your CORIOmaster has DVI-I cards, be sure to use appropriate (M307 or later) firmware.
Video Wall Navigation
Video Wall- Editing Object Location...76....
Video Wall - Editing Object Rotation 77
Video Wall - Editing Object..Size..78....
Video Wall - Preview Mode 79
Video Wall Aids - Align Projector 80
Video Wall Aids - Align Projector - Gamma 82
Video Wall Aids - Align Projector ....SCurve..84....
Video Wall Aids - Align Projector - Black _Level _Boost _87_
Video Wall Aids - Align Projector - Reset Edge...Blending...89
Video Wall Aids - Test Pattern 91
Video Wall Aids - Alignment 93
Video Wall Aids - Distribution 94
Video Wall Aids - Move Object to Center 95
Video Wall Aids - Resize Objects 96
Video Wall Aids - Snap to Objects 97
Video Wall Aids - Undo and Redo 98
Video Wall- Editing Object Location
When you select a window or display in the video wall by clicking on it, some text fields belc the video wall will auto-populate the window or display's saved settings. Size, rotation, and loca- tion on the video wall can be edited here.

text_image
X 38.6 mm Y 286.4 mm Width 1,018.3 mm Height 572.8 mm Rotation 0 Maintain RatioThere are three ways to adjust the location of a selected item on the video wall. You can physically move the window by dragging with the left mouse button to the desired location, or for fine tuning, you can select the window and adjust its location using the arrow keys on the keyboard or you can enter the X and Y coordinates for the top left corner of the window. The center of the video wall is 0, 0; the X axis runs horizontally and the Y axis runs vertically with positive values going up and right of the center.
Video Wall - Editing Object Rotation
When you select a window or display in the video wall by clicking on it, some text field the video wall will auto-populate the window or display's saved settings. Size, rotation, and tion on the video wall can be edited here.

text_image
X 38.6 mm Y 286.4 mm Width 1,018.3 mm Height 572.8 mm Rotation 0 Maintain RatioThere are two ways to adjust the rotation of a selected item on the video wall. You ca ically rotate the window with the mouse by control-clicking the bottom right corner and dra ging the window to the proper angle, or you can enter the rotation value, in degrees, in Rotation field below the video wall.
The default, not rotated, is 0; rotated right is 90 (or -270); rotated left is 270 (or -90). accepts values from -359 to 359. If you enter a negative value, it will be converted to positive number for the same angle.
Video Wall - Editing Object Size
When you select a window or display in the video wall by clicking on it, some text fields belc the video wall will auto-populate the window or display's saved settings. Size, rotation, and loca- tion on the video wall can be edited here.

text_image
X 38.6 mm Y 286.4 mm Width 1,018.3 mm Height 572.8 mm Rotation 0 Maintain RatioThe system uses the width and height specified when you configured the equipment. This is the horizontal width and height, in canvas grid points, that the display or window is expected to fill. You can re-size a selected input or output by clicking and dragging a corner of the window or display, or you can type specific values into the width and height text fields. Note the check be for Maintain Ratio - if you wish to keep the aspect ratio consistent, leave this box checked. If wish to widen or narrow the object, uncheck the box.
If you wish to crop a window to remove the edge, see "Source - Cropping inputs" on page 131.
Video Wall - Preview Mode
To help you construct video walls, a number of extra support buttons have been added to top of the video wall.

text_image
tvONE 2PROJECTOR_BLENDED // Canvas1The Preview Mode button, the furthest right of the video wall button pane, is primarily into as an offline tool, which allows you to see your inputs in the designated locations and v configuration you've just built.
When you click the Preview button, the Source windows show a sample video clip, select the Source Configuration ("Source - Set Preview Video" on page 141). The Preview button takes into account any changes such as stretching, clipping, or flipping that may have been done the video signal, although any borders will not appear on the video wall as they are not reflected on the video wall and only appear on the physical display.
While you are in Preview mode, it is not possible to move objects on the video wall. Y toggle between Editor mode and Preview mode, in order to verify changes you make in E mode, but while you are in Preview mode, there are no other functions (other than the C button) available. To return to other functions, click the Preview button again to cancel Preview mode.
Editor mode: Preview mode:
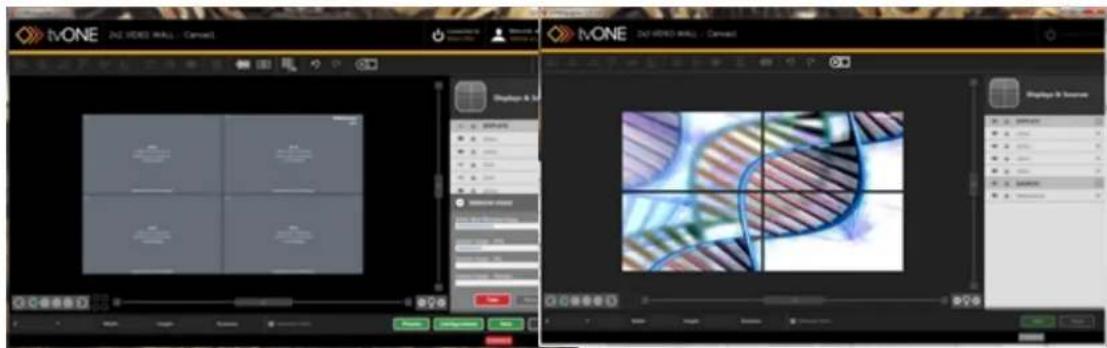
text_image
iVONE iVONE iVONE iVONE iVONE iVONE iVONE iVONE iVONE iVONE iVONE iVONE iVONE iVONE iVONE iVONE iVONE iVONE iVONE iVONE iVONE iVONE iVONE iVONE iVONE iVONEVideo Wall Aids - Align Projector
To help you construct layouts a number of extra support buttons have been added to the top the video wall. The Align Projector button helps you configure edge blending and align projectors accurately so you can project a large image across multiple projectors.

text_image
CoreGraph (3.84.19) tvONE 2PROJECTOR_BLENDED // Canvas1 Connected to Mary's Map Welcome admin Settings | Layout Displays & Sources DISPLAYS v3x1 v3x2 SOURCES VideoSource WINDOW USAGE Window Trial Window Usage 75% System Usage - DHQ 0.0 System Usage - HQ 0.0 System Usage - Preview 0.1% Take Report X Y Width Height Rotation Mounting Area Presets Configurations Save Close CONTROLLERIf your outputs are configured as projectors rather than display screens, you will want to use edge blending and align the projectors so that the image is consistent and clear across multiple projectors. To assist in configuring this, you can use the Align Projector button in the row of buttons above the video wall.
If you click the Align Projector button, you are prompted to select two projectors to configure alignment and Gamma correction, SCurve and Black Level Boost. If you select just one projector, you can adjust the Gamma correction, SCurve and Black Level Boost for that single output.
When you have clicked the Align Projector button and selected two projectors, the projected images show a red and green image that allow you to align them accurately, using fine tuning in the Align Projector pane to nudge the images in the video wall into the right position, so you align the projected images in real time, from this:

natural_image
Simple geometric diagram with a vertical line dividing a rectangle into two parts (no text or symbols)
natural_image
Simple geometric diagram with a vertical red line dividing a blank white rectangle (no text or symbols)to this:
The location of the red guide lines is dependent on how much overlap you indicate on video wall. tvONE recommends that you overlap the projectors enough to allow SCurve adjustments to be effective, but that the overlap be no more than 500 pixels or 50% of the whichever is less. Be sure the window or windows being output to the projectors is EHQ, maximum clarity of the blended area.
From this location, you can also adjust color, SCurve and black level projection. For more ation, see "Edge Blending Tutorial" on page 119.
Video Wall Aids - Align Projector - Gamma
When you are aligning projectors ("Edge Blending Tutorial" on page 119) there are a number of options you can configure, including Gamma correction settings.
- Select ONE projector output (be sure the outputs are defined as projectors - see "Display
- Defining Display Type" on page 111) and click the Align Projector button in the top bar:

text_image
tvONE 2_PROJECTOR_BLENDED // Canvas1 Connected to Blog / Max Welcome admin Settings | LogPage Displays & Sources DISPLAYS cbs1 cbs2 SOURCES ValueSource WINDOW USAGE Video Wall Window Charge 70% System Charge - ISO 5.4 System Charge - ISO 6.8 System Charge - Pressure 1234 OK Cancel X Y Width Height Rotation Mountain Rate Projects Configurations Save Close CONSOX- The Align Projector pane appears in the right hand side of the Video Wall, with various configurable options, including RGB values, SCurve, Black Level Boost, and a button to
reset the edge blending settings.
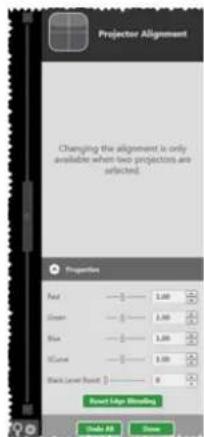
text_image
Projector Alignment Changing the alignment is only available when two projectors are selected. Properties Red —— 1.00 Green —— 1.00 Blue —— 1.00 Black —— 1.00 Black Level Offset 1 —— 0 Round Edge Smoothing OK OK-
Adjust the Red, Green and Blue gamma correction settings up or down to optimize luminance of your projectors. The goal is to have matched the luminance and colors much as possible using the manufacturer's settings initially, but any further discrepancies can be adjusted here.
-
Click the Done button when you have finished configuring the projector, and be sure Save your settings.

Note: It is possible to adjust these settings when you have both projectors selected, however, you will not see desired results as settings are being changed on both projectors simultaneously, which does not resolve any luminance discrepancies between the two projectors. Be sure you are adjusting the gamma for one projector at a time, by only selecting one projector in step 1.
Video Wall Aids - Align Projector - SCurve
When you are aligning projectors ("Edge Blending Tutorial" on page 119) there are a number of options you can configure, including SCurve settings.
- Select two projector outputs (be sure they are defined as projectors - see "Display - Defining Display Type" on page 111) and click the Align Projector button in the top bar:

text_image
Core graphic (TCA-100) tvONE 2PROJECTOR_BLENDED //Canvas1 Connected to: Play / Mini Welcome: admin Settings | Logus Displays & Sources DEPLAYS cbl1 cbl2 SOURCES WaterSource WINDOW USAGE Video Wall Window Charge 70% System Usage - (10) 5.8 System Usage - HC 6.8 System Charge - Pressure 7.34 Value Cancel X Y Width Height Rotation Window Rate Projects Configuration Save Close CONTROL- The Align Projector pane appears in the right hand side of the Video Wall, with various configurable options, including RGB values, SCurve, Black Level Boost, and a button to
reset the edge blending settings.

text_image
Projector Alignment x.hx1 X: -2,371.7 mm Y: -713.8 mm x.hx2 X: 153.8 mm Y: -713.8 mm Properties Red ———— 1.00 Green ———— 1.00 Blue ———— 1.00 SCurve ———— 1.00 Black Level Road ———— 0 Reset Edge Blending Use All Down-
Adjust the SCurve settings up or down to optimize the luminance of your projectors. goal is to have matched the luminance and colors as much as possible using the manufacturer's settings initially, and the SCurve settings adjust the brightness of the blendir edges.
-
Click the Done button when you have finished configuring the projectors, and be sure Save your settings.
SCurve adjusts the brightness of the image at the blending edge, in order to try to matchness at the point of overlap. Two examples below show excessive dimness at the edge of image (left), resulting in a black edge in the center of the image, and correctly-adjusted bness, resulting in a consistency of brightness across the full image (right).

natural_image
Two abstract line diagrams with gradient shading and intersecting lines, no text or symbols present
natural_image
Two side-by-side photos of a smiling child in an orange shirt with arms outstretched, surrounded by green grass (no text or symbols visible)Video Wall Aids - Align Projector - Black Level Boost
When you are aligning projectors ("Edge Blending Tutorial" on page 119) there are a number of options you can configure, including Black Level Boost settings.
- Select two projector outputs (be sure they are defined as projectors - see "Display - Defining Display Type" on page 111) and click the Align Projector button in the top bar:

text_image
tvONE 2PROJECTOR_BLENDED // Canvas1 Connected by: May's Mini Welcome: admin Settings: 1 Layout Displays & Sources DISPLAYS cbl1 cbl2 SOURCES ValueSource WINDOW USAGE Value Wall Window Shape 2% System Shape - ISO 2/4 System Shape - ISO 0/8 System Shape - Preview 0/8 Title Refresh X Y Width Height Rotation Balance Ratio Presets Configurations Save Close CONSOLE- The Align Projector pane appears in the right hand side of the Video Wall, with va configurable options, including RGB values, SCurve, Black Level Boost, and a button to
reset the edge blending settings.
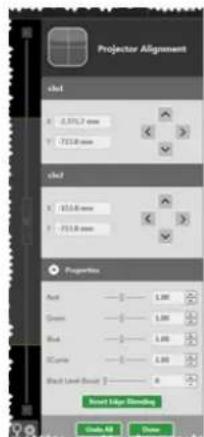
text_image
Projector Alignment cled 0.3757 mm 713.8 mm cled 101.6 mm 713.8 mm Properties Aud — 1.00 Green — 1.00 But — 1.00 SCune — 1.00 Bull Level Bracket 2 — 0 Reset Help Setting Close All Cancel-
Adjust the Black Level Boost settings to optimize the luminance of your projectors. The goal is to have matched the luminance and colors as much as possible using the manufacturer's settings initially, but from here you can adjust the brightness of the black sections of the image on both projectors, to avoid dips, dots, or bright spots. If there is a discrepancy between the black level on the two projectors, be sure to select and adjust one projector at a time; if you adjust settings on both projectors you will not resolve the discrepancy.
-
Click the Done button when you have finished configuring the projectors, and be sure to Save your settings.
Video Wall Aids - Align Projector - Reset Edge Blending
When you are aligning projectors ("Edge Blending Tutorial" on page 119) there are a number of options you can configure, including resetting all edge blending settings.
- Select two projector outputs (be sure they are defined as projectors - see "Display - Defining Display Type" on page 111) and click the Align Projector button in the top bar:

text_image
tvONE 2PROJECTOR_BLENDED // Canvas1 Connected by: May's Mini Welcome: admin Settings: 1 Layout Displays & Sources DISPLAYS cbl1 cbl2 SOURCES ValueSource WINDOW USAGE Value Wall Window Shape 2% System Shape - ISO 2/4 System Shape - ISO 0/8 System Shape - Preview 0/00 Title Refresh X Y Width Height Rotation Balance Ratio Presets Configurations Save Close CONSOLE- The Align Projector pane appears in the right hand side of the Video Wall, with va configurable options, including RGB values, SCurve, Black Level Boost, and a button to
reset the edge blending settings.
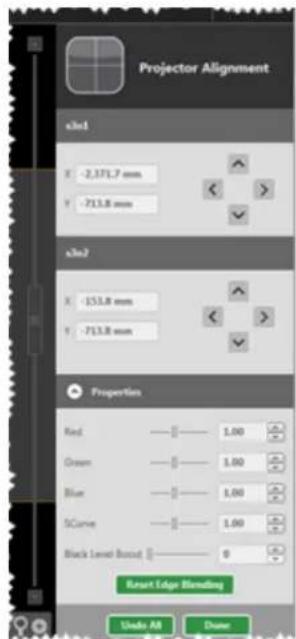
text_image
Projector Alignment x1x1 X: -2.371,7 mm Y: -713,8 mm x2x2 X: -153,8 mm Y: -713,8 mm Properties Red ———— 1.00 Green ———— 1.00 Blue ———— 1.00 SCurve ———— 1.00 Black Level Based ———— 0 Reset Edge Blending Undo All Down-
If you have modified the settings in such a way that you want to undo your changes or reset the projectors to the default setting, press the Reset Edge Blending button.
-
Click the Done button when you have finished configuring the projectors, and be sure to Save your settings.
Video Wall Aids - Test Pattern
To help you construct layouts a number of extra support buttons have been added to the video wall. The Test Pattern button helps you configure your displays by replacing all signals with a test pattern.

text_image
COREgraphic (1.84.300) tvONE 2PROJECTOR_BLENDED // Canvas1 Connected to: Lay's Move Welcome admin Settings | Legend Displays & Sources DISPLAYS s1x1 s1x2 SOURCES VideoSource WINDOW USAGE Video Wall Window Usage 100% System Usage - UO 1.0 System Usage - HQ 0.0 System Usage - Survey 0.1% Take Present Width Height Resolution Max/Max Ratio Prevent Configurations Save Close CONTROLWhen you click the Test Pattern button, all input signals are replaced with a default test. Any outputs on that Canvas that are configured to use an input will display the following

natural_image
Color swatch bar with six solid color blocks (yellow, cyan, green, magenta, red, blue, black) in descending order from yellow to black.With this image showing, you can fine-tune your colors and vertical alignment of displays. See "Display - Adjusting Color Scale" on page 100 or "Display - Changing Gamma Values" on page 102 for details on tuning the color settings of the display.
Video Wall Aids - Alignment
To make alignment of objects easier, a set of buttons are available to help you adjust tv more items to align a certain aspect.
There are six buttons - three for horizontal alignment (left, center, and right) and three for alignment (top, middle, and bottom). Each button aligns the appropriate part of the item to you from having to do careful measurements.
To use the buttons, first select the item you want the others to line up with. Then hold Control key and select any other items that you wish to align with the first. When all it selected, release the Control key and click the Align button. Each item will retain its previ position for the other axis but change alignment so the relevant edges (or centers, for cen /middle alignment) are aligned.
Horizontal Alignment
The three horizontal alignment buttons - Align Left, Align Center, Align Right.

text_image
tvONE 2PROJECTOR_BLENDED // Canvas1Vertical Alignment
The three vertical alignment buttons - Align Top, Align Middle, Align Bottom.

text_image
tvONE 2PROJECTOR_BLENDED // Canvas1Video Wall Aids - Distribution
To make alignment of objects easier, a pair of buttons are available to help you adjust two or more same-sized objects to create equal spacing.
Distribute Horizontally Distribute Vertically

text_image
tvONE 2_PROJECTOR_BLENDED // Canvas1 tvONE 2_PROJECTOR_BLENDED // Canvas1If you want three windows where the height difference between the top of the first and second is the same as the height difference between the top of the second and third, you would use Distribute Vertically button. Similarly, the Distribute Horizontally button separates three windows equidistant from each other on the X axis.
To use the button, hold down the Control key and select the three items that you wish to distribute. The distribute button will move the middle item to be exactly halfway between the outer items, so make sure the outer two items are in the correct position. When all items are selected, release the Control key and click the Distribute Vertically or Distribute Horizontally button. The outer items will stay put and the middle item will retain its previous position in the other axis but change alignment so it is exactly halfway between the other two items.
Video Wall Aids - Move Object to Center
To help you construct video walls a number of extra support buttons have been added to top of the video wall.

text_image
tvONE 2PROJECTOR_BLENDED // Canvas1The ninth button, Move objects to center, moves any selected windows to the exact center the video wall. It calculates the center point of the window (both horizontally and vertically) puts the center point of the window or display at the center of the video wall.
To use the button, select the item that you wish to center. If you wish to center multiple hold down the Control button in order to select multiple items (or use the Center button repeatedly for each window - the result is the same). After selecting the item or items, a Center button and the item or items will relocate to the center of the video wall, under cross-hairs.
If you have moved multiple items, be aware that the lowest item in the list on the right topmost layer; the items higher in the list are layered behind.

Note: The window or display reference point is calculated from the top left corner, so the (X,Y) coordinates when centered on the video wall will not be (0,0) but will offset relative to the top left corner of the window or display.
Video Wall Aids - Resize Objects
To help you construct video walls a number of extra support buttons have been added to the top of the video wall.

text_image
tvONE 2PROJECTOR_BLENDED // Canvas1The resize button is provided to easily copy dimensions from one object to others. The resulting objects may not be the same size in actual (inches/millimeters) measurement, but this is to take bezel into account. (Two displays of the same size and resolution may appear to be different sizes due to bezel; a display with lower resolution may also appear a different size from a high resolution display.)
To resize objects, use the Resize button. To use the button, hold down the Control key and select the item that you wish others to match. Then select the other item(s) that you wish to match the size of the first. When all items are selected, release the Control key and click the Resize button. The subsequent items will adjust dimensions to match the first, while retaining the same center point on the video wall.
Video Wall Aids - Snap to Objects
To help you construct video walls a number of extra support buttons have been added to top of the video wall.

text_image
tvONE 2PROJECTOR_BLENDED // Canvas1The eleventh button, Snap to Objects, works differently from the other buttons. If you toggle Snap to Objects button on, you will see it highlighted brighter than the surrounding buttons this feature is enabled, then the items will automatically snap to the edges of other objects simplify the process of alignment. The image above shows the Snap to Objects button gray disabled; the image below shows the button bright and enabled.

text_image
tvONE 2PROJECTOR_BLENDED // Canvas1To use the button, simply click the Snap to Objects button so that it is brighter than the surrounding buttons. While the feature is enabled and you move an object on the video when it approaches the edge of another object, it will gravitate towards that edge in an to align. (This will not work if you are moving a group of objects.)
If you don't like this feature and wish to do your alignment manually, be sure the Snap button is disabled. You may find that you want to disable this feature as you are fine-tur placement of your windows and displays. In manual mode (with Snap to Objects disabled), can use the arrow keys to nudge windows and displays around the video wall.
Video Wall Aids - Undo and Redo
To help you construct video walls a number of extra support buttons have been added to the top of the video wall.

text_image
tvONE 2PROJECTOR_BLENDED // Canvas1The undo and redo buttons work the same as they do in any program. As is standard, you can use Control-Z and Control-Y as keyboard versions of these buttons.
The Undo button (or Control-Z) will step backwards through changes you've made, until it reaches the last saved state. If there are no changes available to undo, the arrow will be dark gray, indicating unavailability. You can undo changes back to the last saved state (saved either by clicking Save or Take).
The Redo button (or Control-Y) will step forwards again through changes you've made, if you've used the Undo button too many times and want to redo the changes. If you use the Undo but to step back and then make a new change, the Redo feature will no longer be available and be dark gray.
Display Configuration
Display - Adjusting Color Scale 100
Display - Changing Gamma Values 102
Display - Changing Output...Slot...104.....
Display - Changing Resolution 105
Display - Lock Mode (Genlock, Framelock) 107
Display - Defining Bezel 109
Display - Defining Display .Type..111....
Display - Defining Output Type 113
Display - Renaming Output Displays 115
Display - Specify Equipment 117
Edge Blending Tutorial 119
Display - Adjusting Color Scale
When you have added displays to your video wall, you may find that you want to configure the color scale for an individual display. (Color scale can be adjusted on each input as well - for instructions, see "Source - Color Scale" on page 129.) To configure outputs for color scale, follow these steps:
-
In the video wall, double-click the item you would like to modify, or double-click the line for that output in the Displays & Sources pane.
-
On the right-hand pane, you will see some basic information about the display. You can rename the display, change output slot, or adjust resolution. If you are connected to a CORIOmaster, you can also set gamma values. There is also a Configure button to access further settings - click the Configure button.

text_image
Display Properties Name s2s1 Output Skit s2s1 Resolution L280x730p40 Gamma Red — 1.00 Green — 1.00 Blue — 1.00 Reset Gamma Values Configure Done- On the Display Configuration page that appears, there are a variety of customization options.
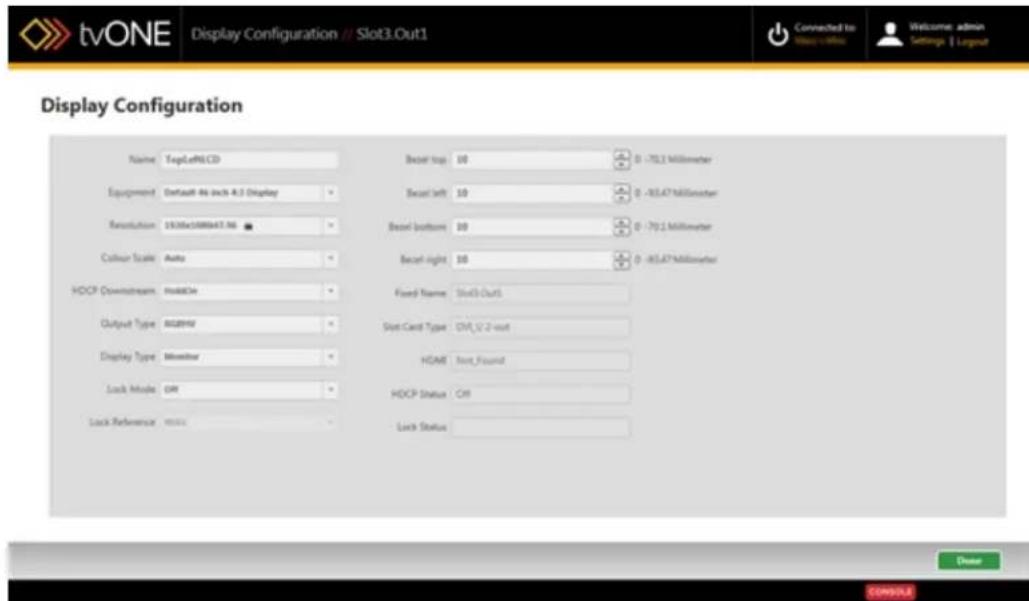
text_image
tvONE Display Configuration // Slot3.Out1 Connected to Hosay 4-000 Welcome admin Settings | Layout Display Configuration Name TopLe6.CD Equipment Default: No Inch A.3 Display Resolution 15328x1000x47.96 Colvin Scale Auto HDCP Downstream HoldEx Output Type 8028WV Display Type Monitor Lock Mode GW Lock Reference mscs Reset top 10 0 -70.2 Millimeter Reset left 10 0 -80.47 Millimeter Reset bottom 10 0 -70.2 Millimeter Reset right 10 0 -80.47 Millimeter Fixed Name Slot3-Out1 Slot Card Type GV_2.2-out HDAC Text Found HDCP Status Off Lock Status Done CONDUTo configure the color scale, choose your preferred option from the drop-down menu next to the words Colour Scale. Choices include Auto (which auto-senses as best it Black, YUV, RGB, YUV_601, or YUV_709.
- Click the Done button to keep your data, and be sure to click Save to keep your figuration up to date.
Display - Changing Gamma Values
When you have added outputs to your video wall, you may find that you want to change the Gamma settings for a given output. To do this, follow these steps:
-
In the video wall, double-click the item you would like to modify, or double-click the line for that output in the Displays & Sources pane.
-
On the right-hand pane, you will see some basic information about the display. You can rename the display, change output slot, or adjust resolution. If you are connected to a CORIOmaster, you can also set gamma values.

text_image
Display Properties Name s2s1 Output Skit s2s1 Resolution 1.280x720p60 Gamma Red 1.00 Green 1.00 Blue 1.00 Reset Gamma Values Configure Done- To modify the Gamma, be sure you are connected to the CORIOmaster as Gamma cannot be set if you are not actively connected. If the option is minimized, it looks like this:

text_image
Gamma Configure DoneIn that case, click the down arrow button to expand the Gamma settings.
- In the Gamma settings area, there are three sliders with accompanying text boxes and arrows; one each for red, green, and blue. Adjust each slider as you wish. Drag the slider for large changes and use the arrows to nudge for minor changes, or if you have a
specific numerical value in mind, type it into the text box. Each scale defaults to a 1.00, with a functional range of 0.30 to 2.00.
-
If you have changed the values and wish to reset all Gamma values to 1.00, press green Reset Gamma Values button, which will return all three settings to the default
-
Click the Done button to keep your data, and be sure to click Save to keep your figuration up to date.

Caution: Note that if you subsequently change the Equipment in the Display Configuration page, the Gamma values will reset to default. tvONE recommends that you configure the Gamma values last, after you have made all other configurations to the display.
Display - Changing Output Slot
When you have added outputs to your video wall, you may find that you want to change the that is assigned to a given output. To do this, follow these steps:
-
In the video wall, double-click the item you would like to modify, or double-click the line for that output in the Displays & Sources pane.
-
On the right-hand pane, you will see some basic information about the display. You can rename the display, change output slot, or adjust resolution. If you are connected to a CORIOmaster, you can also set gamma values.

text_image
Display Properties Name x2x1 Output Slot x2x1 Resolution L280x720y40 Gamma Red 1.00 Green 1.00 Blue 1.00 Reset Gamma Values Configure Done-
To change the output slot, choose the appropriate slot from the drop-down list under Output Slot. If your CORIOgrapher is actively connected to a CORIOmaster, the list will show any unassigned outputs available. Note that you cannot assign two different displays to the same physical slot. Verify that the slot you want has not been assigned to a different video wall.
-
Click the Done button to keep your data, and be sure to click Save to keep your configuration up to date.
Display - Changing Resolution
When you have added outputs to your video wall, you may find that you want to change resolution of a given output. There are various ways to do this, depending on where you the application:
From Video Wall
-
In the video wall, double-click the item you would like to modify, or double-click the for that output in the Displays & Sources pane.
-
On the right-hand pane, you will see some basic information about the display. You rename the display, change output slot, or adjust resolution. If you are connected to CORIOmaster, you can also set gamma values.
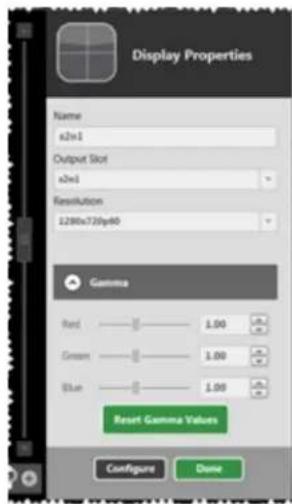
text_image
Display Properties Name x2x1 Output Slot x2x1 Resolution 1230x730y40 Gamma Red 1.00 GB Green 1.00 GB Blue 1.00 GB Reset Gamma Values Configure Done-
To change the resolution, choose the appropriate line from the drop-down list under solution.
-
Click the Done button to keep your data, and be sure to click Save to keep your figuration up to date.
From Display Configuration page
- On the Display Configuration page that appears when you click Configure in the Disp & Sources pane, there are a variety of customization options.

text_image
tvONE Display Configuration // Slot3.Out1 Connected to Welcome: admin Settings: 1 Layout Display Configuration Name: ExpLot6CD Equipment: Default 46 inch 4.3 Display Resolution: 1920ac5888x47.96 Colour Scale: Auto HDCF Download: InstallOn Output Type: RGBHV Display Type: Monitor Lock Mode: Off Lock Reference: None Reset top: 10 Reset left: 10 Reset bottom: 10 Reset right: 10 Fixed Name: Slot3.Out1 Slot Card Type: Off_12-2-out HOME: Not_Found HDCF Status: Off Lock Status: Browse COMMERIn the first column, choose the appropriate line from the drop-down list under Resolution.
- Click the Done button to keep your data, and be sure to click Save to keep your configuration up to date.
Display - Lock Mode (Genlock, Framelock)
When you have added displays to your video wall, you may find that you want to config Genlock or Framelock for an individual display. (To configure Genlock or Framelock for all displays at once, you can set it up via the Slot Status page in Settings - see "Slot Status" on page 179 and "Genlock/Framelock" on page 71.) To configure Genlock or Framelock for one display, follow these steps:
-
In the video wall, double-click the item you would like to modify, or double-click the for that output in the Displays & Sources pane.
-
On the right-hand pane, you will see some basic information about the display. You rename the display, change output slot, or adjust resolution. If you are connected to CORIOmaster, you can also set gamma values. There is also a Configure button to a further settings - click the Configure button.

text_image
Display Properties Name x2x1 Output Slot x2x1 Resolution L290xC730p40 Gamma Red — 1.00 Green — 1.00 Blue — 1.00 Reset Gamma Values Configure Done- On the Display Configuration page that appears, there are a variety of customization options.

text_image
tvONE Display Configuration // Slot3.Out1 Connected to Welcome: admin Settings: 1 Layout Display Configuration Name: ExpLot6CD Equipment: Default 46 inch 4.3 Display Resolution: 1920ac5888x47.96 Colour Scale: Auto HDCF Download: InstallOn Output Type: RGBHV Display Type: Monitor Lock Mode: Off Lock Reference: None Reset top: 10 Reset left: 10 Reset bottom: 10 Reset right: 10 Fixed Name: Slot3.Out1 Slot Card Type: Off_12-2-out HOME: Not_Found HDCF Status: Off Lock Status: Browse COMMERTo set up a Genlock or Framelock source, go to the Lock Mode drop-down menu. By default, it is set to Off but if you click the menu, you can select Framelock or Genlock.
-
If you have enabled Lock Mode, the option below it, Lock Reference, becomes available. Click this drop-down menu to select a configured input. Depending on the resolution of the source and output, you may see a triangular yellow icon and an alert to caution you that Framelock or Genlock is not available.
-
Click the Done button to keep your data, and be sure to click Save to keep your configuration up to date.
What is Genlock?
Each output will normally free run at the chosen output resolution. In many situations, though, you may want to have these outputs co-timed (such as when each output is a part of a video wall). Genlock permits the width, height and frame rate of an output to be locked to match an input.
What is Framelock?
Distinct from Genlock, Framelock permits both the output to be set to a user-defined resolution which must exactly match the frame rate of the background source.
Display - Defining Bezel
When you have added displays to your video wall, you may find that you want to accou bezel. To do this, follow these steps:
-
In the video wall, double-click the item you would like to modify, or double-click the for that output in the Displays & Sources pane.
-
On the right-hand pane, you will see some basic information about the display. You rename the window, change output slot, or adjust resolution. If you are connected to CORIOmaster, you can also set gamma values. There is also a Configure button to a further settings - click the Configure button.
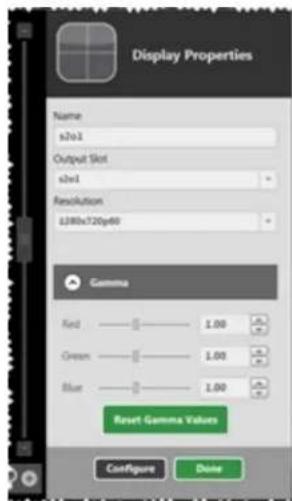
text_image
Display Properties Name s1s1 Output Skit s1s1 Resolution L380x720p40 Gamma Red ———— 1.00 μm Green ———— 1.00 μm Blue ———— 1.00 μm Reset Gamma Values Configure Done- On the Display Configuration page that appears, there are a variety of customization options.

text_image
tvONE Display Configuration // Slot3.Out1 Connected to Welcome: admin Settings: 1 Layout Display Configuration Name: ExpLot6CD Equipment: Default 46 inch 4.3 Display Resolution: 1920ac5888x47.96 Colour Scale: Auto HDCF Download: InstallOn Output Type: RGBHV Display Type: Monitor Lock Mode: Off Lock Reference: None Reset top: 10 Reset left: 10 Reset bottom: 10 Reset right: 10 Fixed Name: Slot3.Out1 Slot Card Type: Off_12-2-out HOME: Not_Found HDCF Status: Off Lock Status: Browse COMMERTo account for a bezel, adjust the Bezel top, Bezel left, Bezel bottom and Bezel right boxes up or down to indicate the size of the bezel in millimeters or inches. The number the right shows the minimum and maximum bezel sizes possible (these sizes are a factor of the screen size - larger displays can have larger bezels).
- Click the Done button to keep your data, and be sure to click Save to keep your configuration up to date.
Display - Defining Display Type
When you have added displays to your video wall, you may find that you want to define type of display it is. To do this, follow these steps:
-
In the video wall, double-click the item you would like to modify, or double-click the for that output in the Displays & Sources pane.
-
On the right-hand pane, you will see some basic information about the display. You rename the display, change output slot, or adjust resolution. If you are connected to CORIOmaster, you can also set gamma values. There is also a Configure button to a further settings - click the Configure button.

text_image
Display Properties Name s1s1 Output Skit s1s1 Resolution L380x720p40 Gamma Red ———— 1.00 μm Green ———— 1.00 μm Blue ———— 1.00 μm Reset Gamma Values Configure Done- On the Display Configuration page that appears, there are a variety of customization options.

text_image
tvONE Display Configuration // Slot3.Out1 Connected to Welcome: admin Settings: 1 Layout Display Configuration Name: ExpLot6CD Equipment: Default 46 inch 4.3 Display Resolution: 1920e588847.96 Colour Scale: Auto HDCF Download: InstallOn Output Type: RGBHV Display Type: Monitor Lock Mode: Off Lock Reference: None Reset top: 10 Reset left: 10 Reset bottom: 10 Reset right: 10 Fixed Name: Slot3.Out1 Slot Card Type: Off_12-2-out HOME: Not_Found HDCF Status: Off Lock Status: Browse COMMERIn the first column, the last item is a drop-down list labeled Display Type. If you click the drop-down menu, it shows a list of types of displays, such as Monitor, Projector, and None (if you wish to specify that the output is not used). If you had previously configured the play from the Equipment list, it may be pre-configured, but you may want to verify or configure it manually.
- Click the Done button to keep your data, and be sure to click Save to keep your configuration up to date.
Display - Defining Output Type
When you have added displays to your video wall, you may find that you want to define type of output connector it uses. To do this, follow these steps:
-
In the video wall, double-click the item you would like to modify, or double-click the for that output in the Displays & Sources pane.
-
On the right-hand pane, you will see some basic information about the display. You rename the display, change output slot, or adjust resolution. If you are connected to CORIOmaster, you can also set gamma values. There is also a Configure button to a further settings - click the Configure button.

text_image
Display Properties Name s1s1 Output Skit s1s1 Resolution L380x720p40 Gamma Red ———— 1.00 μm Green ———— 1.00 μm Blue ———— 1.00 μm Reset Gamma Values Configure Done- On the Display Configuration page that appears, there are a variety of customization options.

text_image
tvONE Display Configuration // Slot3.Out1 Connected to Welcome: admin Settings: 1 Layout Display Configuration Name: ExpLot6CD Equipment: Default 46 inch 4.3 Display Resolution: 1920ac5888x47.96 Colour Scale: Auto HDCF Download: InstallOn Output Type: RGBHV Display Type: Monitor Lock Mode: Off Lock Reference: None Reset top: 10 Reset left: 10 Reset bottom: 10 Reset right: 10 Fixed Name: Slot3.Out1 Slot Card Type: Off_12-2-out HOME: Not_Found HDCF Status: Off Lock Status: Browse COMMERIn the first column, one of the last items is a drop-down list labeled Output Type. If you click the drop-down menu, it shows a list of types of outputs that may be used, such as RGBHV, RGBS, RGsB, and YCbCr/YPbPr. If you had previously configured the display from the Equipment list, it may be pre-configured, but you may want to verify or configure it manually.
- Click the Done button to keep your data, and be sure to click Save to keep your configuration up to date.
Display - Renaming Output Displays
When you have added outputs to your video wall, you may find that you want to give a name that is meaningful to you. There are various ways to do this, depending on whe are in the application:
From Video Wall
-
In the video wall, double-click the item you would like to modify, or double-click the for that output in the Displays & Sources pane.
-
On the right-hand pane, you will see some basic information about the display. You rename the display, change output slot, or adjust resolution. If you are connected to CORIOmaster, you can also set gamma values.

text_image
Display Properties Name x2x1 Output Slot x2x1 Resolution 1230x730y40 Gamma Red 1.00 GB Green 1.00 GB Blue 1.00 GB Reset Gamma Values Configure Done-
To rename the output, click into the Name field and type a new name. The name up to 19 alphanumeric characters (no spaces).
-
Press Return or Enter to commit the change.
-
Click the Done button to keep your data, and be sure to click Save to keep your figuration up to date.
From Display Configuration page
- On the Display Configuration page that appears when you click Configure in the Disp & Sources pane, there are a variety of customization options.

text_image
tvONE Display Configuration // Slot3.Out1 Connected to Welcome: admin Settings: 1 Layout Display Configuration Name: ExpLot6CD Equipment: Default 46 inch 4.3 Display Resolution: 1920ac5888x47.96 Colour Scale: Auto HDCF Download: InstallOn Output Type: RGBHV Display Type: Monitor Lock Mode: Off Lock Reference: None Reset top: 10 Reset left: 10 Reset bottom: 10 Reset right: 10 Fixed Name: Slot3.Out1 Slot Card Type: Off_12-2-out HOME: Not_Found HDCF Status: Off Lock Status: Browse COMMERIn the first column, click into the Name field and type a new name. The name can be 19 alphanumeric characters (no spaces).
- Press Return or Enter to commit the change.
- Click the Done button to keep your data, and be sure to click Save to keep your configuration up to date.
Display - Specify Equipment
When you have added displays to your video wall, you may find that you want to allocate the equipment or display type you previously defined. (To learn how to create Equipment profiles, see "Creating Display Equipment Profiles" on page 55.) To allocate or re-allocate a pre-defined piece of equipment to a display, follow these steps:
-
In the video wall, double-click the item you would like to modify, or double-click the for that output in the Displays & Sources pane.
-
On the right-hand pane, you will see some basic information about the display. You rename the display, change output slot, or adjust resolution. If you are connected to CORIOmaster, you can also set gamma values. There is also a Configure button to a further settings - click the Configure button.

text_image
Display Properties Name s2e1 Output Slot s2e1 Resolution L280x720p40 Gamma Red 1.00 Green 1.00 Blue 1.00 Reset Gamma Values Configure Done- On the Display Configuration page that appears, there are a variety of customization options.
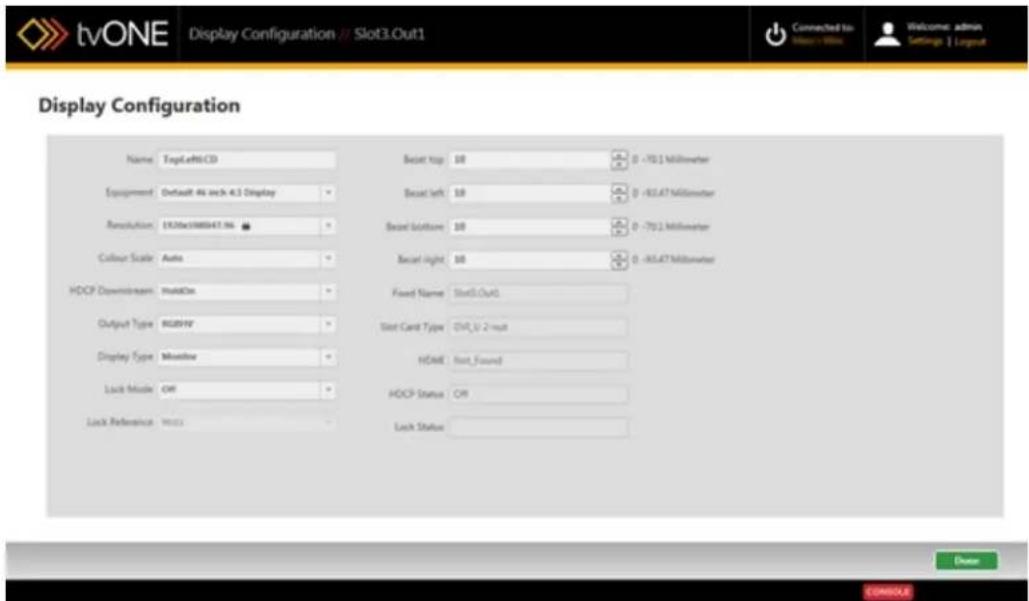
text_image
tvONE Display Configuration // Slot3.Out1 Connected to myv - WiHo Welcome: admin Settings | Layout Display Configuration Name: TopLeftCD Equipment: Default 4x inch 4.3 Display Resolution: 1520ac188847.96 Column Scale: Auto HDCP Downstream: MainOut Output Type: RGBHV Display Type: Monitor Lock Mode: Off Lock Reference: None Reset top: 10 Reset left: 10 Reset bottom: 10 Reset light: 10 Fixed Name: Slot3.OutG Slot Card Type: Off_0_2-mut HOME: Not_Found HDCP Status: Off Lock Status: Choose COMSULETo allocate a given piece of equipment to this display, choose your preferred option from the drop-down menu next to the word Equipment. Choices include any unallocated equipment you have defined plus the default equipment settings. Once you choose the item you want, any settings that were specified in that equipment file (such as bezel or output type) are auto-populated on this Display Configuration page for your convenience.
- Click the Done button to keep your data, and be sure to click Save to keep your configuration up to date.

Note: Note that any changes you make to the equipment configuration here - changing the resolution, for example - will NOT be saved to the equipment file and will be a local change only. If you want to change the default values for the equipment, modify the Display Equipment file itself. For instructions, see "Creating Display Equipment Profiles" on page 55.
Edge blending is a method whereby two or more video/data projectors are used together with part of their images overlapping, thereby creating a wider (or taller) display more suitable features showing wide-screen video images. The term "edge blending" relates to the fact that the overlap needs to be carefully handled to prevent the overlap causing blurriness or image thickness problems. Follow the instructions here to set up two projectors using the Align Project button available in the CORIOgrapher software.
When you have configured Edge Blending, be sure to avoid moving the two projectors as configuration is specific to a physical arrangement - if the two projectors are moved even slightly, the blending will need to be reconfigured.
In this arrangement, we are assuming that the two projectors are installed to be parallel to other and perpendicular to the screen, and as level with each other as possible. Ideally you to have approximately 15% of the viewable image overlapping.

flowchart
graph TD
    A["Screen"] --> B["Projector 1"]
    A --> C["Projector 1"]
    B --> D["Overlap"]
    C --> D
    D --> E["15-30%"]
The resulting screen shows a combination of both images:
| Left Projector | 15% Overlap | Right Projector |
As much as possible, use the projectors' own settings to match hue, position and brightness before using the CORIOgrapher software to fine-tune the configuration.
Start with the 2 PROJECTOR BLENDED template and save it to your CORIOmaster:
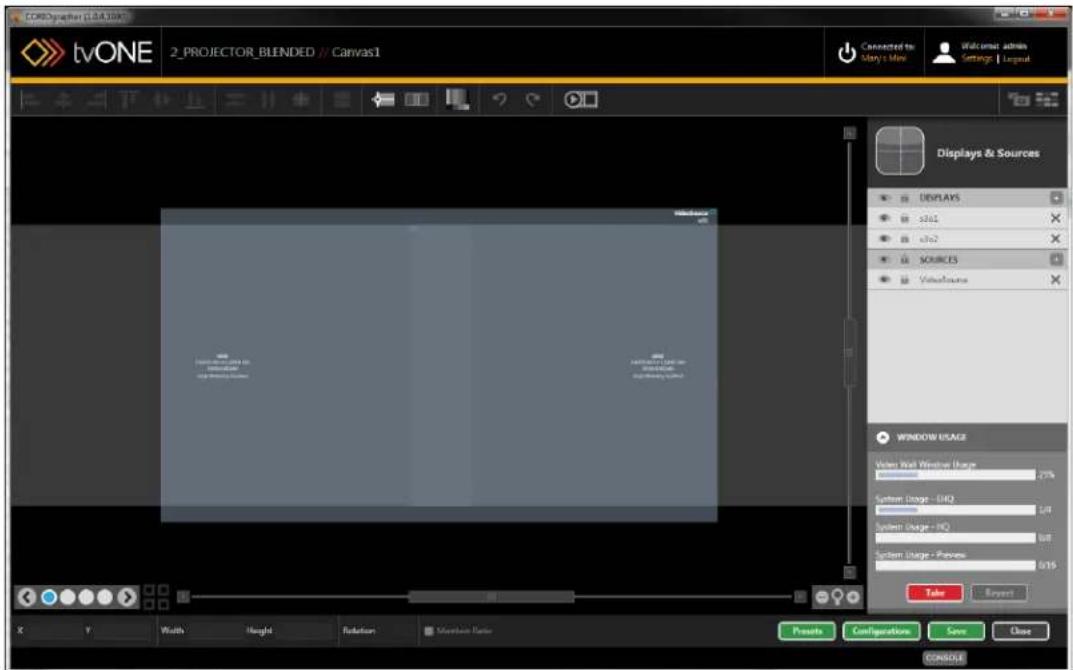
text_image
CoreGraph (CoreLTR) tvONE 2PROJECTOR_BLENDED // Canvas1 Connected to Story's Mix Welcome: admin Settings | Layout Displays & Sources DISPLAYS s361 s762 SOURCES Veechbase WINDOW USAGE Water Wall Passive Usage 40% System Usage - EIQ 5.0 System Usage - NO 6.0 System Usage - Passive 6.15 Take Export X Y Width Height Rotation Marker Rate Prevent Configuration Save Close CANDERMake sure both projectors are configured as projectors in CORIOgrapher ("Display - Defining Display Type" on page 111).
When you select both projectors (press Control while clicking to select multiple items) and click the Align Projector button, a Projector Alignment pane appears on the far right of the Video
Wall:

text_image
Projector Alignment offset 0.375,0 mm 713,0 mm offset 0.375,0 mm 713,0 mm Properties Red 1.00 Green 1.00 Black 1.00 White 1.00 Black Cloud Based 0 Reset User Binding Study ID ChangeMeanwhile, the software sends an Edge Blending test image to each of your projectors, wi and green vertical lines:

natural_image
Simple geometric diagram with a vertical line dividing a rectangle into two parts (no text or symbols)
natural_image
Blank white rectangle with a thin red vertical line on the left edge (no text or symbols)To blend the image accurately, adjust the alignment of each output - both physically moving projectors, and in the Projector Alignment pane. First, use the up and down arrows to adj Y axis - line up the top and bottom horizontal lines until both images are vertically even use the left and right arrows to adjust the X axis - horizontally align the two outputs such red line of one projector is exactly aligned with the green line of the other projector, an screen shows two parallel yellow lines (formed by the red line of one projector and the line of another) in the section where the images overlap:
At this point, your image is now correctly aligned, but the blend between the two images adjusting. Ideally, both projectors will be identical with matching outputs, but if you find that projector has different hues, you can adjust the Gammas for each projector individually. See
"Display - Changing Gamma Values" on page 102 for details, or use the Align Projector button with only one projector selected.
If both projectors have matching outputs, you can use the Properties section of the Projector Alignment tab to fine-tune the overlapping section of the image.
Red, Green and Blue adjust the colors for both projectors at once, just as they do for individual outputs.
SCurve adjusts the brightness of the image at the blending edge, in order to try to match brightness at the point of overlap. Two examples below show excessive dimness at the edge of the image (left), resulting in a black edge in the center of the image, and correctly-adjusted brightness, resulting in a consistency of brightness across the full image (right).

natural_image
Two side-by-side photos showing a smiling child with arms outstretched in grass, no text or symbols present.The last control, Black Level Boost, can raise the black level to match the lighting in the room.
Once you have configured both projectors to optimally blend and align the images, click the Done button at the bottom right corner of the Projector Alignment pane. Be sure to save your configuration by pressing the Save button at the bottom of the Video Wall.
Source Configuration
Source - Adjusting a Window .Border...124....
Source - Adjusting Brightness and Contrast 125
Source - Changing Input .Slot .127....
Source - Color Scale 129
Source - Cropping inputs 131
Source - Defining Source Loss Window...Color...133
Source - Enable HDCP 135
Source - Flip Horizontally or Vertically 137
Source - Ignore Bezel Compensation 138
Source - Renaming Windows or Inputs 139
Source - Set Preview Video 141
Source - Specify Equipment 144
Source - Verify Configuration Details 146
Source - Adjust Video Quality 148
Source - Transition - Fade Through...Black.... 150
Source - Transition - Horizontal Shrink 151
Source - Transition - Vertical .Shrink 152
Source - Transition - Spin 153
Source - Adjusting a Window Border
When you have added inputs to your video wall, you may find that you want to add a border given window, of any desired thickness or color. To do this, follow these steps:
- In the video wall, double-click the window in the video wall or double-click the window name in the Displays & Sources pane.
- On the right-hand pane, you will see some basic information about the window. You can rename the window, change input slot, add a border, ignore the system's compensation for a display bezel, or flip the image horizontally and/or vertically. If you are connected to a CORIOmaster, you can also set video quality.
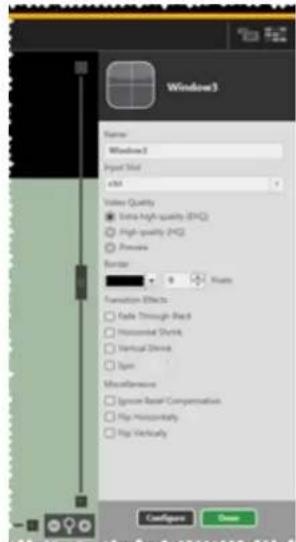
text_image
Window3 Name: Windows 2 Input Slot Edit Video Quality Extra High-quality (H1Q) High quality (H2Q) Shroom Border ■ Visible Formation Effects ■ Fade Through-Back ■ Horizontal Shrink ■ Vertical Shrink ■ Span Miscellaneous ■ Symmetrical Basal Compensation ■ Hip Horizontally ■ Hip Vertically ConfigPage Cancel-
To add a border, select the color from the drop-down list or click Advanced for more options. (The default border color is black.) In the box to the right of the color-picker, type in the number of pixels you would like the border to be or use the arrows to increase decrease the number. (All sides have equal border; default border size is one pixel.)
-
Click the Done button to keep your data, and be sure to click Save to keep your configuration up to date.

Note: It is recommended that if you are using the rotation feature on a window, maintain at least a one-pixel border in order to maintain optimal video quality.
Source - Adjusting Brightness and Contrast
When you have added inputs to your video wall, you may find that you want to adjust ness and contrast on an window. To do this, follow these steps:
-
In the video wall, double-click the window in the video wall or double-click the wind name in the Displays & Sources pane.
-
On the right-hand pane, you will see some basic information about the window. You rename the window, change input slot, add a border, ignore the system's compensation for a display bezel, or flip the image horizontally and/or vertically. If you are connect a CORIOmaster, you can also set video quality. There is also a Configure button to further settings - click the Configure button.

text_image
Window3 Name Window3 Input Size x86 Video Quality ■ Extra High quality (H4Q) ○ High quality (H4Q) ○ Preview Border 0 Pixels Transition Effects □ Fade Through Back □ Horizontal Stroke □ Vertical Stroke □ Spac Miscellaneous □ Ignore Reset Comparison □ Flip Unusually □ Flip Vertically ConfigMenu Down- On the Source Configuration page that appears, there are a variety of customization options.
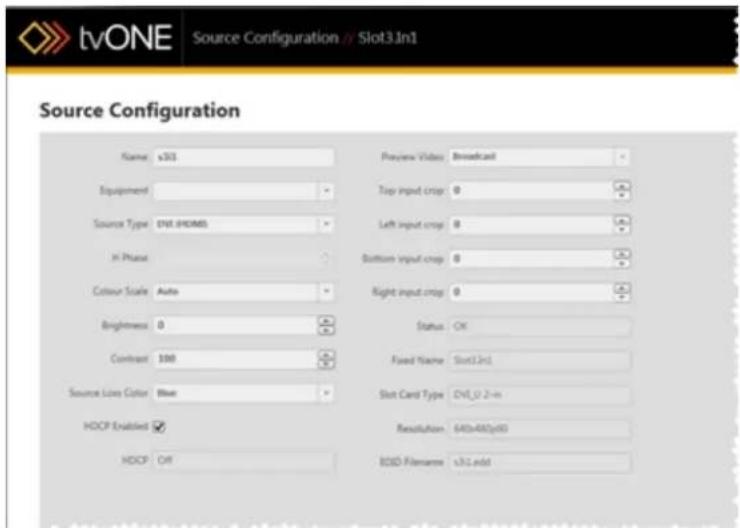
text_image
tvONE Source Configuration // Slot3.1n1 Source Configuration Name v301 Preview Video Broadcast Equipment Top input crop 0 Source Type ENS.GHAMS Left input crop 0 K-Phase Bottom input crop 0 Colour Scale Auto Right input crop 0 Brightness 0 Status OK Contrast 100 Fixed Name Slot3.1n1 Source Line Color Blue Slot Card Type DVI_U 2-m HOPD Enabled Resolution: 640x480y60 HOPD Off BOND Parameters v301 addIn the first column are two text fields labeled Brightness and Contrast. Each has arrows to increment up or down on the right. Adjust the brightness and contrast for your source as you wish.
The default value for brightness is 0 and the available range is -30 to 30. For contrast, 1 default value is 100 and the available range is 30 to 130.
- Click the Done button to keep your data, and be sure to click Save to keep your configuration up to date.
Source - Changing Input Slot
When you have added windows to your video wall, you may find that you want to change slot or source that is assigned to a given window. To do this, there are various methods of your choice of these steps:
From Displays & Sources pane
-
In the video wall, double-click the window in the video wall or double-click the wind name in the Displays & Sources pane.
-
On the right-hand pane, you will see some basic information about the window. You rename the window, change input slot, add a border, ignore the system's compensation for a display bezel, or flip the image horizontally and/or vertically. If you are connect a CORIOmaster, you can also set video quality.

text_image
Windows3 Name Windows3 Input Size A48 Video Quality Extra High quality (H1Q) High quality (H2) Preview Border Flucts Transition Effects Fade Through-Back Homestead Shape Vertical Struts Type Hypertension Symmit Based Compensation Play Homogeneity Play Horizontal ConfigPage Show-
To change the input source for this window, choose the appropriate input from the down list under Input Slot.
-
Click the Done button to keep your data, and be sure to click Save to keep your figuration up to date.
From Window Source in Dashboard
- While connected to a CORIOmaster, click the Dashboard icon in the top right corner the video wall.
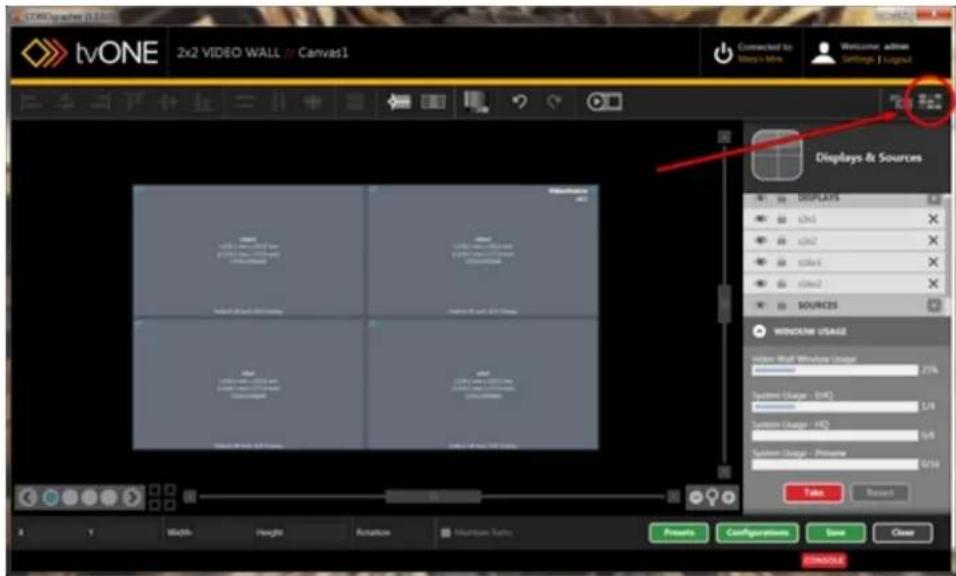
text_image
tvONE 2x2 VIDEO WALL / Canvas1 Connected to Many's mini Welcome admin Settings: Logus3 Displays & Sources DISPLAYS c2x1 c2x2 c2x3 c2x4 c2x5 c2x6 SOURCES WINDOWS USAGE Windows Wall Wireless Usage 7.7% System Usage - (14) System Usage - AID System Usage - Password Take Reset Width Height Rotation Mountain Yoles Press Configuration Save Close CREATE- In the Dashboard window, you can switch between source inputs for a given window, on-the-fly. Next to each window, all available inputs are shown as buttons. The currently-used input is shown in blue; an available input is shown in gray. If you are in Synchroniz mode (see "Immediate vs Synchronized" on page 193 for an explanation of the difference between the two modes), you can select a new input but it will not become the active input until you click Take. Until you click Take, the queued input button is black.

text_image
SOURCE INPUTS Immediate Synchronized Windows5 s#1 s#2 Windows1 s#1 s#2Source - Color Scale
When you have added inputs to your video wall, you may find that you want to change scale on an individual window. (Color scale can be adjusted on each output as well - for tions, see "Display - Adjusting Color Scale" on page 100.) To configure windows for color scale, follow these steps:
-
In the video wall, double-click the window in the video wall or double-click the wind name in the Displays & Sources pane.
-
On the right-hand pane, you will see some basic information about the window. You rename the window, change input slot, add a border, ignore the system's compensation for a display bezel, or flip the image horizontally and/or vertically. If you are connect a CORIOmaster, you can also set video quality. There is also a Configure button to further settings - click the Configure button.

text_image
Windows3 Name Windows2 Input Slot Edit Video Quality Extra high-quality (HYQ) High quality (HYQ) Preview Balance 0 Pixels Proposition Effects Fade Through Black Horizontal Shock Vertical Shock Upm Miscellaneous Ignore Break Compensation Flip Incontinuously Flip Untervously ConfigPage Show- On the Source Configuration page that appears, there are a variety of customization options.

text_image
tvONE Source Configuration // Slot3.1n1 Source Configuration Name v301 Preview Video Broadcast Equipment Top input crop 0 Source Type ENS.GHAMS Left input crop 0 In Phase Bottom input crop 0 Colour Scale Auto Right input crop 0 Brightness 0 Status OK Contrast 100 Fixed Name Slot1.2n1 Source Line Color Blue Slot Card Type DVI_U 2-n HOPD Enabled Resolution: 640x480y60 HOPD Off BOND Parameters v3.1 addIn the first column, a drop-down list labeled Colour Scale allows you to select your preferred setting. Choices include Auto (the default), Black, YUV, RGB, YUV_601 and YUV_709.
- Click the Done button to keep your data, and be sure to click Save to keep your configuration up to date.
Source - Cropping inputs
When you are adding inputs to your video wall, you may find that a video source does clean edges. To help this, the inputs can be lightly cropped to remove the edge pixels and lines. To do this, follow these steps:
-
In the video wall, double-click the window in the video wall or double-click the wind name in the Displays & Sources pane.
-
On the right-hand pane, you will see some basic information about the window. You rename the window, change input slot, add a border, ignore the system's compensation for a display bezel, or flip the image horizontally and/or vertically. If you are connect a CORIOmaster, you can also set video quality. There is also a Configure button to further settings - click the Configure button.

text_image
Window3 Name Window3 Input Size x88 Video Quality Extra-high quality (HYQ) High quality (HYQ) Preview Balance 0 Pixels Transition Effects Fade Through Black Horizoner Shock Vertical Shock Spin Miscellaneous Ignore Reset Compensation Play Horizontally Play Vertically ConfigPage Save- On the Source Configuration page that appears, there are a variety of customization options.

text_image
tvONE Source Configuration // Slot3.1n1 Source Configuration Name v301 Preview Video Broadcast Equipment Top input crop 0 Source Type DVI DOCUMENT Left input crop 0 H Phase Bottom input crop 0 Colour Scale Auto Right input crop 0 Brightness 0 Status OK Contrast 100 Fixed Name Slot3.1n1 Source Line Color Blue Slot Card Type DVI_U 2-n HOCP Enabled Resolution 640x480y60 HOCP Off BIOS Filancers v3.1 addIn the second column, you can set the input crop individually for each of the four sides. Type the number of pixels you would like cropped from each side, or use the arrow buttons to increase and decrease the number.
- Click the Done button to keep your data, and be sure to click Save to keep your configuration up to date.

Note: The cropping adjustment is tied to the physical connection to the unit. Cropping the input source will be reflected in any window where this source is applied on the video wall.
Source - Defining Source Loss Window Color
If a video source is lost when feeding a window, a color will be displayed in the windc tion. The default color is blue but you may change the color. To do this, follow these s
-
In the video wall, double-click the window in the video wall or double-click the wind name in the Displays & Sources pane.
-
On the right-hand pane, you will see some basic information about the window. You rename the window, change input slot, add a border, ignore the system's compensation for a display bezel, or flip the image horizontally and/or vertically. If you are connect a CORIOmaster, you can also set video quality. There is also a Configure button to further settings - click the Configure button.

text_image
Window3 Name Window3 Input Size x86 Video Quality ■ Extra High quality (H4Q) ○ High quality (H4Q) ○ Preview Border 0 Origin Transition Effects □ Fade Through Back □ Horizontal Stroke □ Vertical Stroke □ Spac Miscellaneous □ Ignore Reset Comparison □ Flip Unusually □ Flip Vertically ConfigPage Down- On the Source Configuration page that appears, there are a variety of customization options.

text_image
tvONE Source Configuration // Slot3.1n1 Source Configuration Name v301 Preview Video Broadcast Equipment Top input crop 0 Source Type ENS.0HOMS Left input crop 0 In Phase Bottom input crop 0 Colour Scale Auto Right input crop 0 Brightness 0 Status OK Contrast 100 Fixed Name Slot1.2n1 Source Line Color Blue Slot Card Type DVI_U 2-n HOPD Enabled Resolution: 640x480y60 HOPD Off BOND Parameters v31 addIn the first column is a drop-down list labeled Source Loss Color. The default value is blue, but it can be adjusted to black, red, green, yellow, blue, magenta, cyan, or white.
- Click the Done button to keep your data, and be sure to click Save to keep your configuration up to date.
Source - Enable HDCP
When you are adding inputs to your video wall, you may find that you need to disable general information on HDCP and reasons why you may need to disable it, see "HDCP" c page 73). To do this, follow these steps:
-
In the video wall, double-click the window in the video wall or double-click the wind name in the Displays & Sources pane.
-
On the right-hand pane, you will see some basic information about the window. You rename the window, change input slot, add a border, define a transition, ignore the tem's compensation for a display bezel, or flip the image horizontally and/or vertically. you are connected to a CORIOmaster, you can also set video quality. There is also figure button to access further settings - click the Configure button.

text_image
Window3 Name Window3 Input Size x88 Video Quality Extra-high quality (HYQ) High quality (HYQ) Preview Balance 0 Pixels Transition Effects Fade Through Black Horizoner Shock Vertical Shock Spin Miscellaneous Ignore Reset Compensation Play Horizontally Play Vertically ConfigPage Save- On the Source Configuration page that appears, there are a variety of customization options.

text_image
tvONE Source Configuration // Slot3.1n1 Source Configuration Name v301 Preview Video Broadcast Equipment Top input crop 0 Source Type ENS.04HOMS Left input crop 0 In Phase Bottom input crop 0 Colour Scale Auto Right input crop 0 Brightness 0 Status OK Contrast 100 Fixed Name Slot1.2n1 Source Line Color Blue Slot Card Type DVI_U 2-n HOPD Enabled Resolution: 640x480y60 HOPD Off BOND Parameters v31 addIn the first column, you can check or uncheck the box labeled HDCP Enabled. Below that is a read-only field that tells you the current status of HDCP on that source.
- Click the Done button to keep your data, and be sure to click Save to keep your configuration up to date.
Source - Flip Horizontally or Vertically
When you have added inputs to your video wall, you may find that you want to flip the image on either or both axes. This works with both still images and video, and horizontal produces a mirror image, while vertical flipping shows the image upside-down. To do this, follow these steps:
-
In the video wall, double-click the window in the video wall or double-click the wind name in the Displays & Sources pane.
-
On the right-hand pane, you will see some basic information about the window. You rename the window, change input slot, add a border, ignore the system's compensation for a display bezel, or flip the image horizontally and/or vertically. If you are connect a CORIOmaster, you can also set video quality.

text_image
Window3 Name Window3 Input Size x88 Video Quality Extra-high quality (HYQ) High quality (HYQ) Preview Balance 0 Pixels Transition Effects Fade Through Black Horizoner Shock Vertical Shock Spin Miscellaneous Ignore Reset Compensation Play Horizontally Play Vertically ConfigPage Save-
To flip the image horizontally, check the Flip Horizontally checkbox. To flip the image tically, check the Flip Vertically checkbox.
-
Click the Done button to keep your data, and be sure to click Save to keep your figuration up to date.
Source - Ignore Bezel Compensation
When you have added windows and displays to your video wall, you may find that you want to ignore the bezel compensation.
If you have multiple displays adjacent to each other, you normally tell the CORIOgrapher what size the bezel is on each display and the CORIOgrapher then adjusts the output image so that the appropriate number of pixels are not shown, in order to maintain the effect of one large display. If you wish to ignore the bezel, the system puts the next row of pixels on the next display, even though it isn't spatially adjacent, which avoids losing any rows but creates a jagged effect, which may result in a loss of visual continuity in extreme cases.
To configure the system to ignore the bezel, follow these steps:
-
In the video wall, double-click the window in the video wall or double-click the window name in the Displays& Sources pane.
-
On the right-hand pane, you will see some basic information about the window. You can rename the window, change input slot, add a border, ignore the system's compensation for a display bezel, or flip the image horizontally and/or vertically. If you are connected to a CORIOmaster, you can also set video quality.

text_image
Window3 Name Window3 Input Size ACM Video Quality Extra High quality (EPC) High quality (EPC) Preview Border Points Transaction Effects Fade Through Back Intracancel/Shower Vertical Shower Spin Miscellaneous Ignore Bevel Compensation Hip Minimally Hip Vertically ConfigMenu Save-
To Ignore Bezel Compensation, place a check mark in the appropriate box.
-
Click the Done button to keep your data, and be sure to click Save to keep your configuration up to date.
Source - Renaming Windows or Inputs
When you have added inputs to your video wall, you may find that you want to give e window a name that is meaningful to you. Alternatively, you may want to name the inputs are being used for windows.
Renaming Windows
-
In the video wall, double-click the window in the video wall or double-click the wind name in the Displays & Sources pane.
-
On the right-hand pane, you will see some basic information about the window. You rename the window, change input slot, add a border, ignore the system's compensation for a display bezel, or flip the image horizontally and/or vertically. If you are connect a CORIOmaster, you can also set video quality.

text_image
Windows3 Name Windows3 Input Size A48 Video Quality Extra High quality (H1Q) High quality (H2) Preview Border Flucts Transition Effects Fade Through-Back Homestead Shape Vertical Struts Type Hypertension Symmit Based Compensation Play Homogeneity Play Horizontal ConfigPage Show-
To rename the window, click into the Name field and type a new name. The name up to 19 alphanumeric characters (no spaces).
-
Press Return or Enter to commit the change.
-
Click the Done button to keep your data, and be sure to click Save to keep your figuration up to date.
Renaming Sources
- On the Source Configuration page that appears when you click Configure in the Disp & Sources pane, there are a variety of customization options.

text_image
tvONE Source Configuration // Slot3.1n1 Source Configuration Name v301 Preview Video Broadcast Equipment Top input crop 0 Source Type ENS.GHAMS Left input crop 0 K-Phase Bottom input crop 0 Colour Scale Auto Right input crop 0 Brightness 0 Status OK Contrast 100 Fixed Name Slot1.2n1 Source Line Color Blue Slot Card Type DVI_U 2-n HOPD Enabled Resolution: 640x480y60 HOPD Off BOND Parameters v3.1 addIn the first column, click into the Name field and type a new name. The name can be 19 alphanumeric characters (no spaces). This changes the name of the slot source, as opposed to the window.
-
Press Return or Enter to commit the change.
-
Click the Done button to keep your data, and be sure to click Save to keep your con- figuration up to date.
Windows vs Sources
When a source is added to the video wall (which may also be referred to as the Canvas), it becomes a Window. Initially, the settings of the source are used to create the Window.
Windows are not sources, but windows contain sources along with other data. Windows can change sources. For example, using Transitions, the source can change from Slot1.input1 to Slot1.input2. However, the dimensions and placement of the window may not change.
Source - Set Preview Video
When you have added windows to your video wall, you may find that you want to config which of several sample videos will show when you use the Preview feature in the video. To do this, follow these steps:
-
In the video wall, double-click the window in the video wall or double-click the wind name in the Displays& Sources pane.
-
On the right-hand pane, you will see some basic information about the window. You rename the window, change input slot, add a border, ignore the system's compensation for a display bezel, or flip the image horizontally and/or vertically. If you are connect a CORIOmaster, you can also set video quality. There is also a Configure button to further settings - click the Configure button.

text_image
Window3 Name Window3 Input Size x88 Video Quality Extra-high quality (HYQ) High quality (HYQ) Preview Balance 0 Pixels Transition Effects Fade Through Black Horizoner Shock Vertical Shock Spin Miscellaneous Ignore Reset Compensation Play Horizontally Play Vertically ConfigPage Save- On the Source Configuration page that appears, there are a variety of customization options.
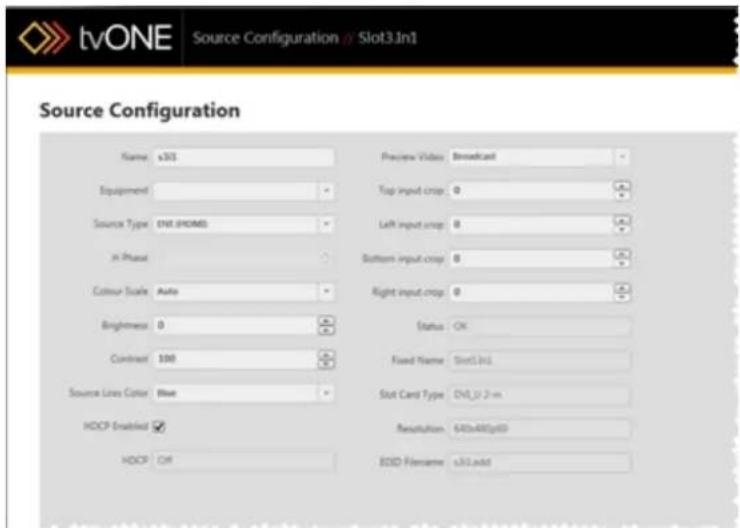
text_image
tvONE Source Configuration / Slot3.In1 Source Configuration Name v301 Preview Video Broadcast Equipment Top input crop 0 Source Type ENS (HOMS) Left input crop 0 In Phase Bottom input crop 0 Colour Scale Auto Right input crop 0 Brightness 0 Status OK Contract 100 Fixed Name Slot3.In1 Source Lines Color Blue Slot Card Type DVLU 2-m HDCP Enabled Resolution 640x480p60 HDCP Off BDD P名称 v31addIn the second column, the option Preview Video gives a drop-down list of options - Broadcast, House of Worship, Live Event, Medical, or Sports. These don't have to be your own specific uses, but the video shown when you use "Video Wall - Preview Mode" on page 79 will be topical to the item selected here.
- Click the Done button to keep your data, and be sure to click Save to keep your configuration up to date.
Broadcast

text_image
WELCOMEHouse of Worship

natural_image
Silhouette of a person with raised arms against a sunset sky and pine trees (no text or symbols)Live Event

natural_image
Stage lighting setup with multiple spotlights and colorful spotlights against a dark background (no text or symbols visible)Medical

natural_image
Abstract illustration of DNA double helix structures with no text or symbolsSports

natural_image
Aerial view of a large stadium with multiple tiered seating and a central green field (no visible text or signage)Source - Specify Equipment
When you are adding Sources and Displays to your video wall, you may find that you have go an input in your video wall that you want to associate with a piece of equipment you have already defined from that PC (see "Creating Source Equipment Profiles" on page 58). To do this, follow these steps:
-
In the video wall, double-click the window in the video wall or double-click the window name in the Displays& Sources pane.
-
On the right-hand pane, you will see some basic information about the window. You can rename the window, change input slot, add a border, ignore the system's compensation for a display bezel, or flip the image horizontally and/or vertically. If you are connected to a CORIOmaster, you can also set video quality. There is also a Configure button to access further settings - click the Configure button.

text_image
Windows3 Options Windows3 Output Size Edit Video Quality Extra high quality (EHA) High quality (H2) Preview Border 0 Pixels Transaction Effects Fade Through Black Unassisted Stroke Vertical Stroke Spin Miscellaneous Ignore Back Compensation Hip Incontinently Hip Intensity CostaPane Down- On the Source Configuration page that appears, there are a variety of customization options.
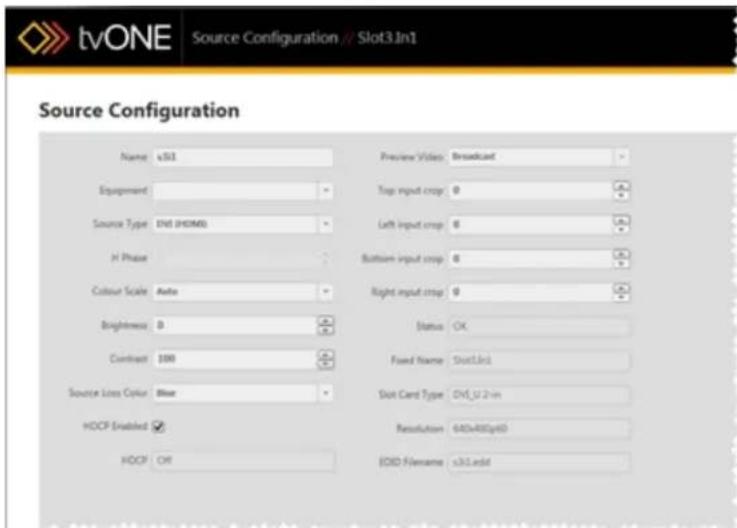
text_image
tvONE Source Configuration // Slot3.In1 Source Configuration Name s501 Preview Video Broadcast Equipment Top input crop 0 A Source Type ENS (HORM) Left input crop 6 A H Phase Bottom input crop 8 C Colour Scale Auto Right input crop 0 C Brightness B Status OK Contrast 100 Fixed Name Slot3.In1 Source Loss Color Blue Slot Card Type DVI_U2-in HOCP Enabled Resolution 640x480pt60 HOCP OK EDITD Filename s31.addIn the first column, the second item is a drop-down list labeled Equipment. If you drop-down menu, it shows all available equipment that you have defined, and the opt Off if you don't want anything associated with this input. If you had previously config a certain input from this PC, you should be able to see it and select it in this list. (If you can't see the equipment here, you may need to set it up from this mix to "Creating Source Equipment Profiles" on page 58 for instructions.)
- Click the Done button to keep your data, and be sure to click Save to keep your figuration up to date.
Source - Verify Configuration Details
When you have added windows to your video wall, you may find that you want to check on some read-only data such as the status of a window, the fixed name, the slot card type, the detected resolution, or the EDID filename. These fields cannot be modified, but the information may be of use to you. To find this information, follow these steps:
-
In the video wall, double-click the window in the video wall or double-click the window name in the Displays & Sources pane.
-
On the right-hand pane, you will see some basic information about the window. You can rename the window, change input slot, add a border, ignore the system's compensation for a display bezel, or flip the image horizontally and/or vertically. If you are connected to a CORIOmaster, you can also set video quality. There is also a Configure button to access further settings - click the Configure button.

text_image
Windows3 Options Windows3 Output Size Edit Video Quality Extra high quality (EHA) High quality (H2) Preview Border 0 Pixels Transaction Effects Fade Through Black Unassisted Stroke Vertical Stroke Spin Miscellaneous Ignore Back Compensation Hip Incontinently Hip Intensity CostaPane Down- On the Source Configuration page that appears, there are a variety of customization options.

text_image
tvONE Source Configuration // Slot3.In1 Source Configuration Name s501 Preview Video Broadcast Equipment Top input crop 0 A Source Type ENS (HORM) Left input crop 6 A H Phase Bottom input crop 8 C Colour Scale Auto Right input crop 0 C Brightness B Status OK Contrast 100 Fixed Name Slot3.In1 Source Loss Color Blue Slot Card Type DVI_U2-in HOCP Enabled Resolution 640x480pt60 HOCP OK EDITD Filename s31.addAt the end of the second column, grayed out to indicate that they are not editable several pieces of information you may find useful.
- Status shows the availability of the input source. OK indicates a valid input source INVALID indicates no source or an invalid source.
- Fixed Name shows the inbuilt name for the source - you may rename the soul but this indicates which slot the window is attached to and which input on the card.
- Slot Card Type tells you what type of card is in the slot, by defining the col and how many are on the card.
- Resolution indicates the native resolution the system has negotiated with the source.
-
EDID Filename gives the name of the EDID file associated with that given input connector.
-
Click the Done button to exit the Source Configuration window and return to the Vi Wall.
Source - Adjust Video Quality
When you have added inputs to your video wall, you may find that you want to adjust the video quality of a window, particularly as the number of Extra High Quality windows is limited. To do this, follow these steps:
-
Make sure that you are connected to a CORIOmaster as you edit the configuration. The video quality cannot be set unless the system knows what resources it has available, so this is a feature that cannot be configured offline.
-
In the video wall, double-click the window in the video wall or double-click the window name in the Displays & Sources pane.
-
On the right-hand pane, you will see some basic information about the window. You can rename the window, change input slot, add a border, ignore the system's compensation for a display bezel, or flip the image horizontally and/or vertically. If you are connected to a CORIOmaster, you can also set video quality.

text_image
Windows3 Name Windows3 Input Size 4KB Video Quality ■ Save high quality (IHC) ○ High quality (IHC) ○ Preview Border ■ 0 Pixels Transition Effects □ Fade Through-Back □ Horizontal Stroke □ Vertical Stroke □ Split Miscellaneous □ Ignore Reset Compensation □ Pop Incontinently □ Pop Vertically ConfigPage Done-
To change the image quality, choose the appropriate radio button from the three available: EHQ (Extra High Quality), HQ (High Quality), and Preview. Be aware that if you leave the default window name, the window number may change, and the order of windows will shift, depending on the video quality selected for each window.
-
Click the Done button to keep your data, and be sure to click Save to keep your configuration up to date.
-
Check the Window Usage meter below the Displays & Sources to make sure you are comfortable with the way you are budgeting your video quality usage.

bar
WINDOW USAGE | Category | Value (%) | |---|---| | Video Wall Window Usage | 31 | | System Usage - EHQ | 0/4 | | System Usage - HQ | 1/8 | | System Usage - Preview | 1/16 | Take | Revert
Note: In the video wall, you can tell the quality of a window by its shading. An high quality window has a bluish tinge; a high quality window has a greenish tinge and a preview window has a yellowish tinge.

Note: If you change the quality of a window, its window number label will change. Be sure to decide on the quality early in the process, before you name windows.
Source - Transition - Fade Through Black
When you have added windows to your video wall, you may find that you want to use a transition in order to present the window dynamically. One option is to have a source within a wind appear by fading from black. To do this, follow these steps:
-
In the video wall, double-click the window in the video wall or double-click the window name in the Displays & Sources pane.
-
On the right-hand pane, you will see some basic information about the window. You can rename the window, change input slot, add a border, ignore the system's compensation for a display bezel, or flip the image horizontally and/or vertically. If you are connected to a CORIOmaster, you can also set video quality. You can also configure transitions.
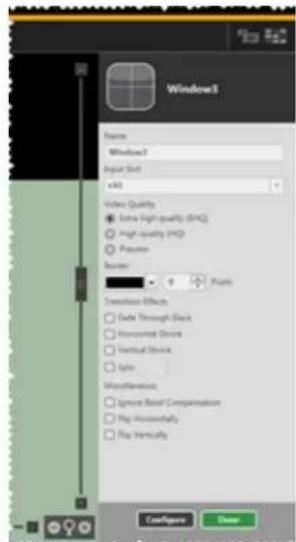
text_image
Windows3 Frames Windows3 Input Slot vkt Video Quality Extra High quality (EHC) High quality (H2) Preview Balance Points Transition Effects Fade Through Black Homocord Steve Vertical Steve Spin Miscellaneous Ignore Resort Comparison Hip Incontinually Play Vertically Configure Down-
To have this input appear after fading through black, check the box next to Fade Through Black.
-
Click the Done button to keep your data, and be sure to click Save to keep your configuration up to date.
After configuring this Transition, when you change from another Preset to this one, the source within the window specified will fade in from black. This effect refers only to the source signal; any border will not be included in the fade.
Once one or more Transitions are specified for as many windows as you wish to configure, save the video wall as a Preset. You can then move from one Preset to another, and the transitions will make the process a dynamic one.
See "Basic Transition Tutorial" on page 209 for a walkthrough.
Source - Transition - Horizontal Shrink
When you have added windows to your video wall, you may find that you want to use ition in order to present the window dynamically. One option is to have a source within narrow horizontally until it is just a single vertical line, then expand to normal, displaying t source (if the source was changed). To do this, follow these steps:
-
In the video wall, double-click the window in the video wall or double-click the wind name in the Displays & Sources pane.
-
On the right-hand pane, you will see some basic information about the window. You rename the window, change input slot, add a border, ignore the system's compensation for a display bezel, or flip the image horizontally and/or vertically. If you are connect a CORIOmaster, you can also set video quality. You can also configure transitions.

text_image
Window3 Name Window3 Input Shot x80 Video Quality Extra high quality (HYQ) High quality (HYQ) Shiny Window 0 Pixels Transition Effects Fade Through Black Hamburger Shock Vertical Shock Spin Miscellaneous Ignise Snap Compensation Play Horizontally Play Vertically ConfigPage Save-
To have this source appear after shrinking and re-expanding horizontally, check the bc next to Horizontal Shrink
-
Click the Done button to keep your data, and be sure to click Save to keep your figuration up to date.
After configuring this Transition, when you change from another Preset to this one, the win specified will narrow to a central vertical line, then return to normal width with the new content.
Once one or more Transitions are specified for as many windows as you wish to configure the canvas as a Preset. You can then move from one Preset to another, and the transition make the process a dynamic one.
See "Basic Transition Tutorial" on page 209 for a walkthrough.
Source - Transition - Vertical Shrink
When you have added windows to your video wall, you may find that you want to use a transition in order to present the source within the window dynamically. One option is to have a window shorten vertically until it is just a single horizontal line, then expand to normal, displaying the new source (if the source was changed). To do this, follow these steps:
-
In the video wall, double-click the window in the video wall or double-click the window name in the Displays & Sources pane.
-
On the right-hand pane, you will see some basic information about the window. You can rename the window, change input slot, add a border, ignore the system's compensation for a display bezel, or flip the image horizontally and/or vertically. If you are connected to a CORIOmaster, you can also set video quality. You can also configure transitions.
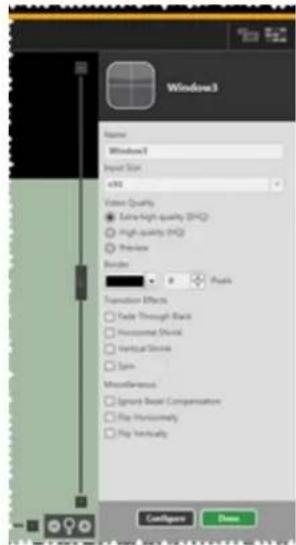
text_image
Window3 Name Window3 Input Size eV Video Quality Extra High quality (EHO) High quality (HQ) Preview Border 0 Pixels Transaction Effects Fade Through Back Horizontally Short Vertical Stroke Spin Miscellaneous Spread Real Compensation Flip Horizontally Flip Vertically ConfigPage Down-
To have this input appear after shrinking and re-expanding vertically, check the box next to Vertical Shrink.
-
Click the Done button to keep your data, and be sure to click Save to keep your configuration up to date.
After configuring this Transition, when you change from another Preset to this one, the window specified will narrow to a central horizontal line, then return to normal height with the new window content.
Once one or more Transitions are specified for as many windows as you wish to configure, save the canvas as a Preset. You can then move from one Preset to another, and the transitions will make the process a dynamic one.
See "Basic Transition Tutorial" on page 209 for a walkthrough.
Source - Transition - Spin
When you have added windows to your video wall, you may find that you want to use ition in order to present the source within the window dynamically. One option is to have window spin clockwise or counter-clockwise a certain number of times, then return to the p configured alignment, displaying the new source (if the source was changed). To do this, for these steps:
-
In the video wall, double-click the window in the video wall or double-click the wind name in the Displays & Sources pane.
-
On the right-hand pane, you will see some basic information about the window. You rename the window, change input slot, add a border, ignore the system's compensation for a display bezel, or flip the image horizontally and/or vertically. If you are connect a CORIOmaster, you can also set video quality. You can also configure transitions.
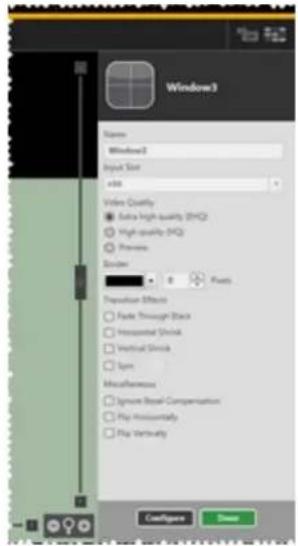
text_image
Window3 Name Window2 Input Size v8 Video Quality Extra High-quality (HYQ) High-quality (HYQ) Preview Balance 0 Pixels Proposition Effects Fade Through Black Unsupervised Stroke Vertical Stroke Upm Miscellaneous Ignore Basal Compensation Play Inassembly Play Untervouty ConfigPage Show-
To have this input spin around its center point clockwise or counter-clockwise, check box next to Spin.
-
Once the Spin box is checked, the rotation counter becomes active. The window can spin up to seven times in either direction (positive spin is clockwise; negative spin is counter-clockwise). At the end of the spin, the window will return to the alignment specified in the video wall.
Spins must all be entered as whole numbers. The defined number of spins occur with original source, then the source changes, and the defined number of spins occur again with the new source. For example, if you choose two spins, the image will rotate 7 degrees, change input if relevant, and then rotate 720 degrees again, for a total of spins.
- Click the Done button to keep your data, and be sure to click Save to keep your configuration up to date.
After configuring this Transition, when you change from another Preset to this one, the window specified will rotate about its central point in the direction specified and for the number of rotations specified, then return to original alignment with the new window content.
Once one or more Transitions are specified for as many windows as you wish to configure, save the canvas as a Preset. You can then move from one Preset to another, and the transitions will make the process a dynamic one.
See "Basic Transition Tutorial" on page 209 for a walkthrough.
Settings
Console 156
Connections .157
Constraints .159
Firmware and Defaults - Current Firmware 161
Firmware and Defaults - Reset to Factory..Defaults..162....
Firmware and Defaults - Update Firmware 164
General - Default Units...166....
General - Device Name 168
General - Log Size 170
General - Window Configuration 172
Networking .174
Users 176
Changing Passwords 177
Slot Status 179
System 182
Timeout 183
Console
Under normal use, you do not need to worry about the Console button at the bottom of the CORIOgrapher window. If there has been an error, the console button will turn red.
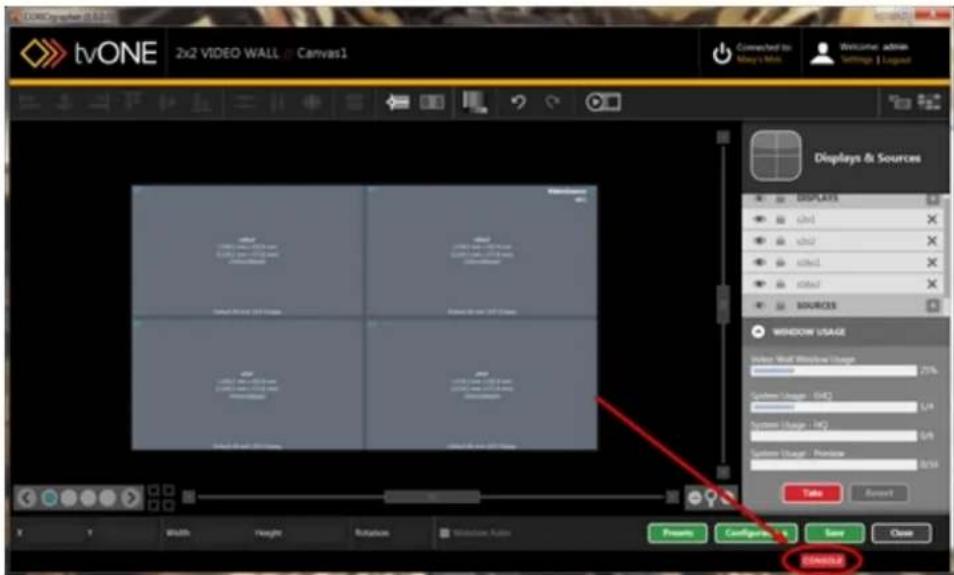
text_image
tvONE 2x2 VIDEO WALL Canvas1 Connected to: May's Min. Welcome admin Settings | Logulat Displays & Sources DISPLAYS ch1 ch2 ch3 ch4 SOURCES WINDOW USAGE Video Work Window Usage 7.5% System Usage - HC 7.4% System Usage - LC 7.3% System Usage - Review 8.0% Take Cancel TOM132However, if a communication fault should occur, you can refer to the Console data to investigate what may be causing a problem.
The Console screen lists all the commands sent to the unit and information returned. Each line of commands sent to the CORIOmaster is prefixed by a greater-than sign ">". Each line of responses received from the CORIOmaster is prefixed by a less-than sign "<". After the direction indicator, a date/time stamp is used at the start of each line to help establish when commands are sent. The most recent command is shown at the bottom.
You can also send individual commands from the command line at the bottom. The data is stored - by default, the maximum 10,000 lines are saved, but you can set this to a smaller number in the General tab of Settings (see "General - Log Size" on page 170 for more information) if you wish to do so. You can export the data into a .txt file by clicking the Export to button and choosing a location. This may be helpful in the event of an issue where a log rep can be saved immediately after the symptom occurs and the text file sent to tvONE for review by a support agent. A complete log from startup can also be used to duplicate actions on other CORIOmaster units.
Connections
From the Settings window, you can make various changes to the CORIOmaster, including defining the source and display inputs and outputs.
The Connections pane of Settings gives an overview of all configured sources and displays indicates which input or output they are assigned to.
- While connected to a CORIOmaster, click the Settings button in the top right corner.
text_image
Welcome: admin Settings | Logout- Choose the Connections option under Settings on the left.

text_image
tvONE Settings // Connections Settings General Networking Users Connections Firmware and Defaults Information System Slot Status Constraints Connections Canvas1 Sources VideoSource Slot s6i1 Displays s2o1 Slot s2o1 s2o2 Slot s2o2 Canvas2 Sources No inputs have been defined for this video wall.In the right-hand pane, you see each video wall that you have defined. Under each wall, your Sources and Displays are listed. (Any given window or display is only available in one video wall.) To the right of each source or display is the slot and connector for the associated input or output.
-
To change which input or output is associated with a given source or display, click drop-down menu and choose the appropriate slot. The drop-down list will automatically populate with the relevant options. For additional information on how the slots are labelled, see "Input and Output Naming Convention" on page 23.
-
Click the Save button at the bottom of the list of Canvases (Video walls) to save this information.
Constraints
From the Settings window, you can make various changes to the CORIOmaster, and you can gather some system information.
- While connected to a CORIOmaster, click the Settings button in the top right corner.

text_image
Welcome: admin Settings | Logout- Choose the Constraints option under Information on the left. In the right-hand pane, see several lines of information about the system's capabilities.
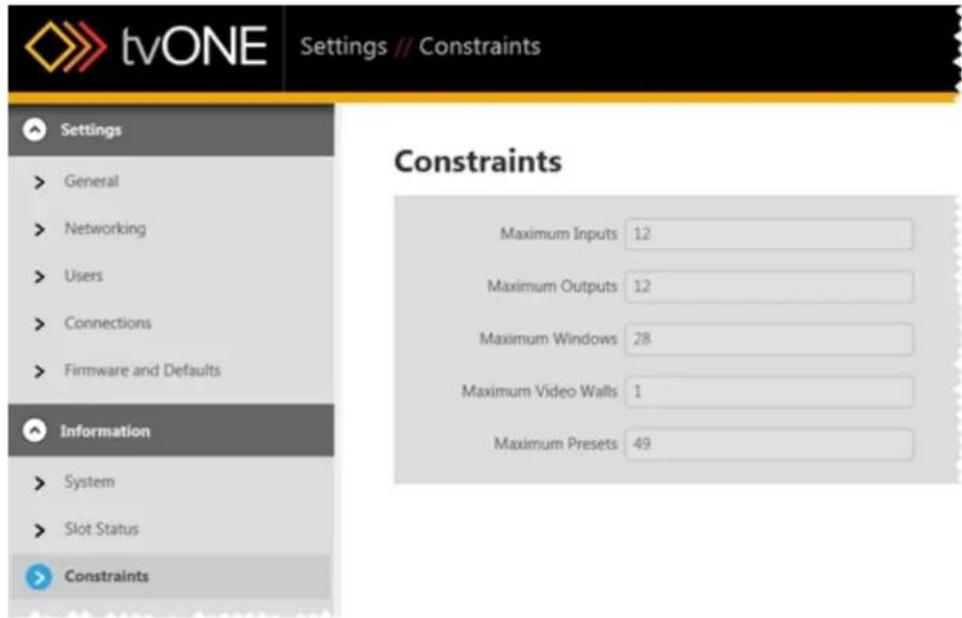
text_image
tvONE Settings // Constraints Settings > General > Networking > Users > Connections > Firmware and Defaults Information > System > Slot Status > Constraints Constraints Maximum Inputs 12 Maximum Outputs 12 Maximum Windows 28 Maximum Video Walls 1 Maximum Presets 49- On the top line is the maximum number of inputs available on the CORIOmaste you are currently connected to. In this case, "Inputs" means cards, not connectors keep in mind that most cards have two connectors and some have four, so the maximum actual number of input signals is dependent on what combination of cards you install.
- The second line lists the maximum number of outputs available on the CORIO-master you are currently connected to. (Note that the sum of maximum inputs a maximum outputs is more than the number of slots on the machine - if you
maximum number of either inputs or outputs, the number of the other is limited by available slots.)
- The third line lists the maximum number of windows available on the CORIOmaster you are currently connected to. This number is constrained by processing power and only lists the maximum number of low-quality windows - higher quality windows will limit the total number available.
- The fourth line lists the maximum number of video walls that can be created in the current configuration on the CORIOmaster you are currently connected to.
- The fifth line lists the maximum number of presets that are available in the current configuration on the CORIOmaster you are currently connected to.
Each of these fields is read-only.
Firmware and Defaults - Current Firmware
From the Settings window, you can make various changes to the CORIOmaster, including checking the firmware version, updating the firmware, and resetting the unit to factory default settings.
To check the status of the current firmware:
- While connected to a CORIOmaster, click the Settings button in the top right corner.

text_image
Welcome: admin Settings | Logout- Choose the Firmware and Defaults option under Settings on the left.
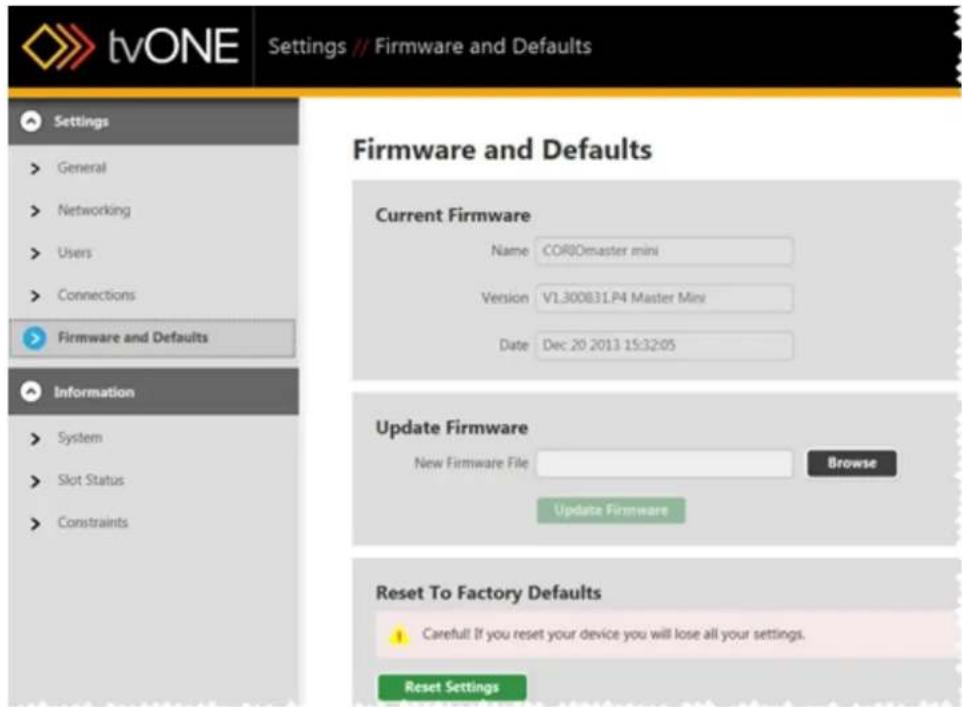
text_image
tvONE Settings // Firmware and Defaults Settings General Networking Users Connections Firmware and Defaults Information System Slot Status Constraints Firmware and Defaults Current Firmware Name COROmaster mini Version V1.300B31.P4 Master Mini Date Dec 20 2013 15:32:05 Update Firmware New Firmware File Browse Update Firmware Reset To Factory Defaults Carefull If you reset your device you will lose all your settings. Reset SettingsIn the right-hand pane, the top section shows information about your current firmware the name, version details, and the build date of the software.
This data is read-only and cannot be modified.
Firmware and Defaults - Reset to Factory Defaults
From the Settings window, you can make various changes to the CORIOmaster, including checking the firmware version, updating the firmware, and resetting the unit to factory default settings.
To restore the CORIOmaster to original default settings:
- While connected to a CORIOmaster, click the Settings button in the top right corner.
text_image
Welcome: admin Settings | Logout- Choose the Firmware and Defaults option under Settings on the left.

text_image
tvONE Settings // Firmware and Defaults Settings General Networking Users Connections Firmware and Defaults Information System Slot Status Constraints Firmware and Defaults Current Firmware Name CORIOmaster mini Version V1.300B31.P4 Master Mini Date Dec 20 2013 15:32:05 Update Firmware New Firmware File Browse Update Firmware Reset To Factory Defaults Careful! If you reset your device you will lose all your settings. Reset SettingsIn the right-hand pane, the bottom section (Reset to Factory Defaults) allows you to reset the device to its original settings. If you do this, all configuration data you have made and saved will be lost. Be sure to back up any configurations you wish to retain onto your
local PC as the CORIOmaster will be completely erased and returned to out-of-box settings. If you are comfortable proceeding, click the Reset Settings button.
- A pop-up window will ask you to confirm your choice. If you click yes, the settings CORIOmaster will be wiped and returned to default and the CORIOgrapher software wi restart.

Caution: If you reset your CORIOmaster to factory defaults, you will lose any configuration information you have created. If you are not sure you wish to lose the sure you have all data backed up.
Firmware and Defaults - Update Firmware
From the Settings window, you can make various changes to the CORIOmaster, including checking the firmware version, updating the firmware, and resetting the unit to factory default settings.

Caution: Keep in mind that when you update the firmware, the current running configuration on the CORIOmaster will be deleted. All previous saved configurations should still be available, but for best practice, be sure to save the configurations locally to your PC as a backup.
To update the firmware:
- While connected to a CORIOmaster, click the Settings button in the top right corner.

text_image
Welcome: admin Settings | Logout- Choose the Firmware and Defaults option under Settings on the left.
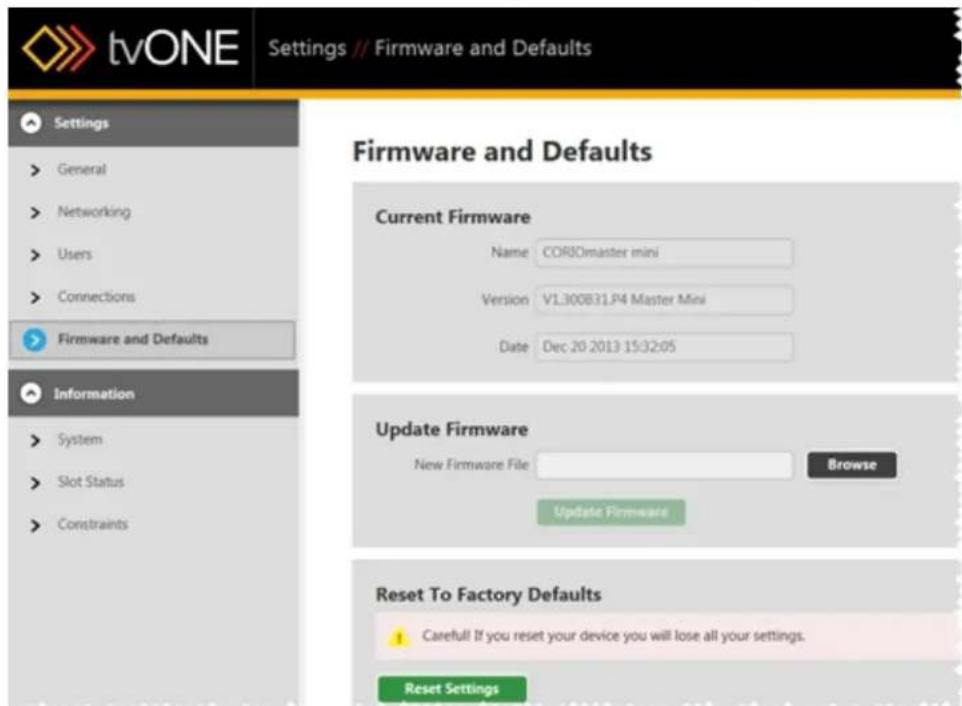
text_image
tvONE Settings // Firmware and Defaults Settings General Networking Users Connections Firmware and Defaults Information System Slot Status Constraints Firmware and Defaults Current Firmware Name: CORIOmaster mini Version: VL300B31.P4 Master Mini Date: Dec 20 2013 15:32:05 Update Firmware New Firmware File Browse Update Firmware Reset To Factory Defaults Careful If you reset your device you will lose all your settings. Reset SettingsIn the right-hand pane, the top section shows the current firmware version. The second section is labeled Update Firmware. Click the Browse button to navigate the new .zip firmware file stored locally or type the path into the text box.
- Select the appropriate .zip file and the path will populate in the New Firmware File box.
- Click the Update Firmware button to begin the firmware update. The CORIOmaster transfers the .DAT file to its internal memory. Once the file is transferred, you will be log out of the CORIOmaster and returned to the Getting Started screen. If you are in the subnet and usually see the unit in Device Discovery, it should appear there again, w square-bracketed prefix to notify you what stage of the upgrade is in progress. Initially says "[Unpacking Update]", then it moves to "[Applying Update"]. After the update is applied, the unit restarts, and then appears in Device Discovery as available for connection. You are not able to log in to the device until it has completed the update
- After the firmware update and subsequent unit restart, be sure to check and, if necessary copy your backed-up configurations back to the CORIOmaster. For instructions, see "Loading an Existing Configuration" on page 29.
General - Default Units
From the Settings window, you can make various changes to the CORIOmaster, including changing the default units.
- While connected to a CORIOmaster, click the Settings button in the top right corner.

text_image
Welcome: admin Settings | Logout- Choose the General option under Settings on the left.
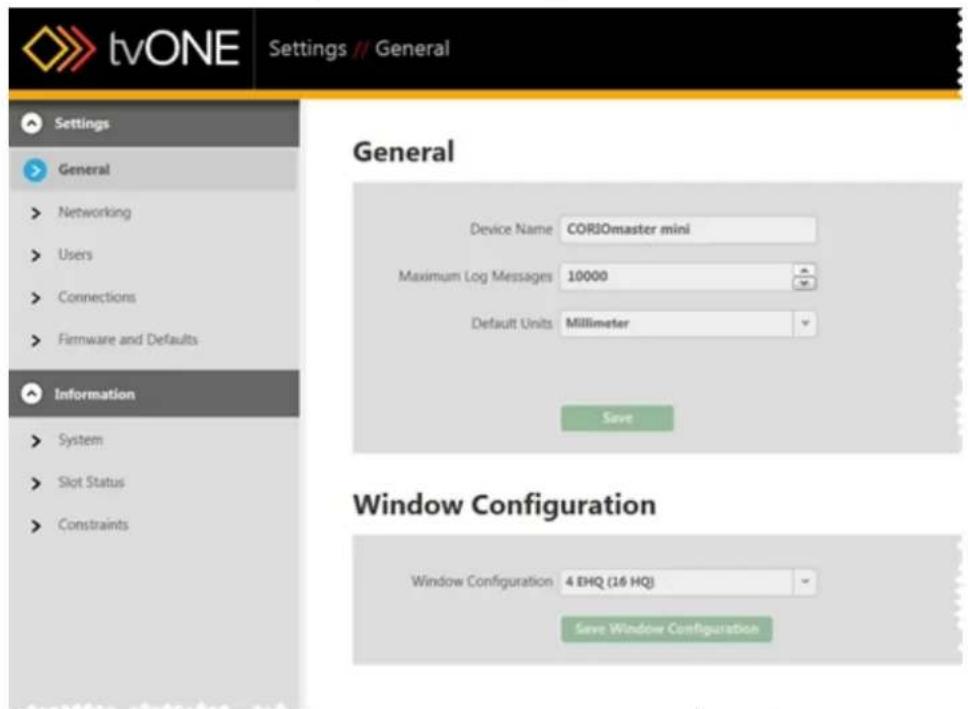
text_image
tvONE Settings // General Settings General > Networking > Users > Connections > Firmware and Defaults Information > System > Slot Status > Constraints General Device Name CORIOmaster mini Maximum Log Messages 10000 Default Units Millimeter Save Window Configuration Window Configuration 4 IHQ (16 HQ) Save Window ConfigurationIn the right-hand pane, you see various options that allow you to rename the device, change the size of the log, set default units and set window configuration.
- In the third line, Default Units, choose your preferred units (inches or millimeters) from the drop-down menu. Unless you choose millimeters, the default value is inches. The units you choose determine how the system measures displays, bezels and video wall size.
Fractions of an inch must be converted to decimal before entering into the system. 4. Click the Save button to save this information.
General - Device Name
From the Settings window, you can make various changes to the CORIOmaster, including renaming the device. This is the name that is displayed in Device Discovery on the Getting Started page.
- While connected to a CORIOmaster, click the Settings button in the top right corner.

text_image
Welcome: admin Settings | Logout- Choose the General option under Settings on the left.
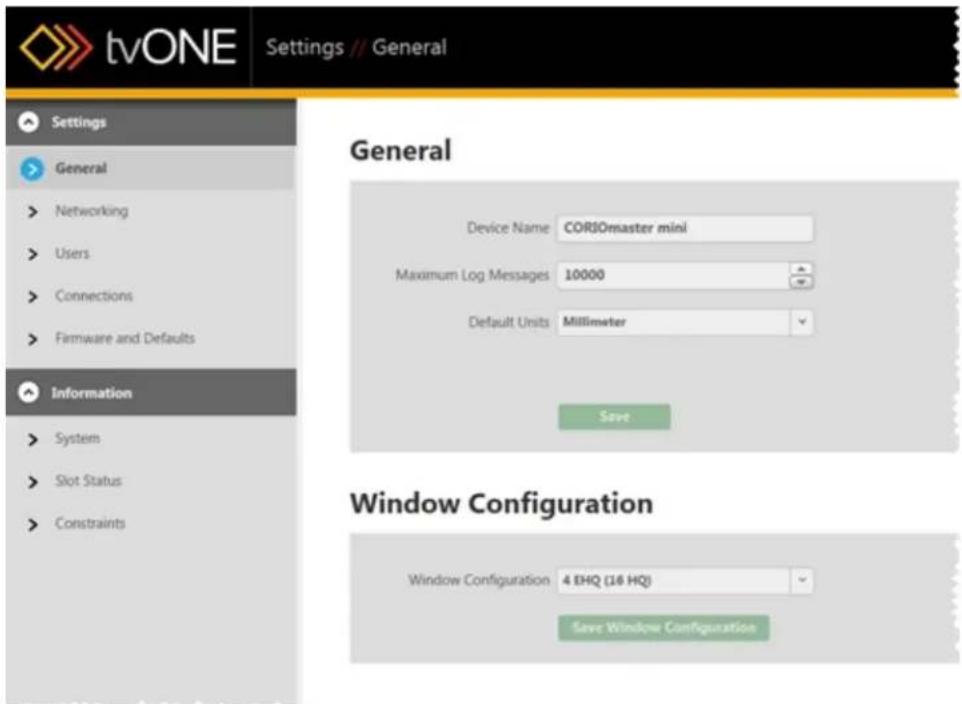
text_image
tvONE Settings // General Settings General Networking Users Connections Firmware and Defaults Information System Slot Status Constraints General Device Name COR30master mini Maximum Log Messages 10000 Default Units Millimeter Save Window Configuration Window Configuration 4 EHQ (16 HQ) Save Window ConfigurationIn the right-hand pane, you will see various options that allow you to rename the device, change the size of the log, set default units and set window configuration.
- In the top line, Device Name, type your preferred name into the text box. The device name can be a maximum of 32 characters including letters, numbers, punctuation and
spaces.
- Click the Save button to save this information.
General - Log Size
From the Settings window, you can make various changes to the CORIOmaster, including adjusting the number of cached log messages from the "Console" on page 156. By default, no
log is actively saved, but if you choose to export a log from the Console, you can set the si the file that is cached awaiting export. Once the maximum length log is cached, new lines are still added, and the oldest lines are purged.
- While connected to a CORIOmaster, click the Settings button in the top right corner.

text_image
Welcome: admin Settings | Logout- Choose the General option under Settings on the left.

text_image
tvONE Settings // General Settings General > Networking > Users > Connections > Firmware and Defaults Information > System > Slot Status > Constraints General Device Name: CORIOmaster mini Maximum Log Messages: 10000 Default Units: Millimeter Save Window Configuration Window Configuration: 4 EHQ (16 HQ) Save Window ConfigurationIn the right-hand pane, you will see various options that allow you to rename the device, change the size of the log, set default units and set window configuration.
- In the second line, Maximum Log Messages, type your preferred log size into the text or use the arrows to increase or decrease the number in the box. The maximum log 10,000 message lines.
- Click the Save button to save this information.
- If you wish to export a log, click the Console button to open the console window select the Export to File button.
General - Window Configuration
Each CORIOmaster or CORIOmaster mini has certain physical limitations, based on configuration of unit, regarding how much processing power is available. As you might expect, an Extra High Quality window requires far more processing power than a Preview Quality window.
As such, there are some choices you can make regarding how you want the resources divided. You can choose to have fewer windows but each of them being higher quality, as you might want if you're doing one big picture on a video wall. On the other hand, you could have many High Quality windows, such as if you're doing a video wall with a different video on each screen. We provide you with three options, representing both ends of this scale and the middle, and let you choose how to allocate your resources. To do so:
- While connected to a CORIOmaster, click the Settings button in the top right corner.
text_image
Welcome: admin Settings | Logout- Choose the General option under Settings on the left.

text_image
tvONE Settings // General Settings General Device Name CORIOmaster mini Maximum Log Messages 10000 Default Units Millimeter Information System Slot Status Constraints Window Configuration Window Configuration 4 EHQ (16 HQ) Save Window ConfigurationIn the right-hand pane, you will see various options that allow you to rename the d change the size of the log, set default units and set window configuration.
-
In the bottom line, Window Configuration, choose your preferred configuration from the drop-down menu. The software will identify what your CORIOmaster is capable of and present you with three relevant options that allow you to maximize Extra High Quality dows, maximize number of High Quality windows, or an option in between.
-
Click the Save Window Configuration button to save this information. Be aware that the CORIOmaster will restart after you save these settings.
Networking
From the Settings window, you can make various changes to the CORIOmaster, including adjusting the network settings.
- While connected to a CORIOmaster, click the Settings button in the top right corner.
text_image
Welcome: admin Settings | Logout- Choose the Networking option under Settings on the left.
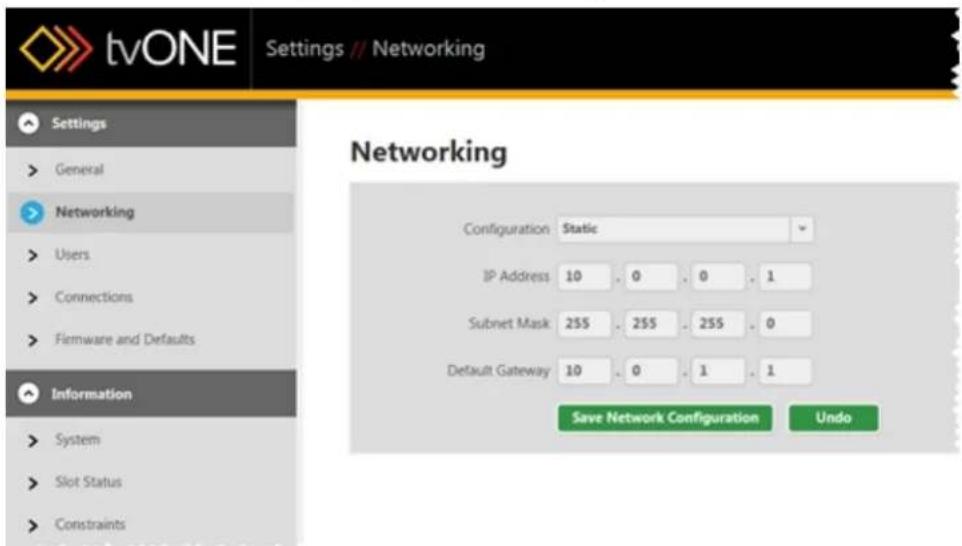
text_image
tvONE Settings // Networking Settings > General > Networking > Users > Connections > Firmware and Defaults Information > System > Slot Status > Constraints Networking Configuration Static IP Address 10 0 0 1 Subnet Mask 255 255 255 0 Default Gateway 10 0 1 1 Save Network Configuration UndoIn the right-hand pane, you see various options that allow you to choose a static or dynamic IP address as well as configure subnet mask and gateway details.
- On the top line, Configuration, choose from the drop-down whether you will be using a Static IP address or if the address will be configured by DHCP. (If you choose DHCP, neither IP Address nor Subnet Mask will be configurable.)
-
If you chose Static:
-
In the second field, enter the appropriate IP Address - one text box per octet.
- In the third field, enter the appropriate Subnet Mask - one text box per octet.
-
In the fourth field, enter the appropriate Default Gateway - one text box per octet.
-
Click the Save Network Configuration button to save this information.
-
Due to the constraints of networking settings, in order to make the new settings act the CORIOmaster will need to restart.
For more detail on configuring this setting, see "Configure Connection via Ethernet" on page 16 and "Configure Connection via Serial" on page 21. You can also use the tvONE CORIOdiscover application.
Users
The CORIOgrapher has multiple user roles in order to streamline privileges.
Administrators can do everything including resetting passwords.
Power Users can use the dashboard, switch between presets, manage video source associations, and use the video wall editor.
Basic Users can use the dashboard, switch between presets, and manage video source associations.
Guest users have very limited access and no password.
When a user creates a password, the password is stored securely on the device, and is not displayed during transmission over the API. Only the administrator can reset another user's password. See "Changing Passwords" on the facing page for details.

Caution: Be sure, when you load a different saved active configuration on the CORlOmaster, that you know the administrator login information. If the administrator login details are changed from the default and you are not aware of this, you may find yourself unable to access the unit.
For more details, you may wish to see "Administrator Setup Information" on page 14, "Logout" on page 22, "Changing Passwords" on the facing page, and "Timeout" on page 183
Changing Passwords
There are three types of account (Administrator, Power User, and Basic User). Only Administrators can change passwords for other users. Any user can set or change their own pa but only Administrators have the ability to make changes to other users' accounts.
When a user creates a password, the password is stored securely on the device, and is displayed over the API. Only the administrator can reset a basic or power user's password.
Passwords must be between 6 and 32 characters and any combination of alphabetic, numer and punctuation characters.
Administrator Tools
The first time an administrator logs in to the CORIOmaster, the unit will notify you that the first boot for the device. It will remind you to change the default password. (This alert w continue until you have saved settings to the device or restored a saved configuration to CORIOmaster.)
To change other users' passwords, follow these steps:
- While connected to a CORIOmaster, click the Settings button in the top right corner.

text_image
Welcome: admin Settings | Logout- Choose the Users option under Settings on the left.

text_image
tvONE Settings // Users Settings General Networking Users Connections Firmware and Defaults Information Systems Slot Status Constraints Users Administrator Username admin Enable timeout User Role Administrator minutes New Password Set Timeout Confirm Password Update User User 1 Username user1 Enable timeout 5 minutes User Role PowerUser Set TimeoutIn the right-hand pane, you will see various options that allow you to change username, password and timeout details for individual users (see "Timeout" on page 183).
- Find the user whose password you wish to change. In the fields below that user's user-name, type the new password in the New Password field, retype the same text in the Confirm Password field, and click the Update User button.

Caution: Be sure, when you load a different saved active configuration on the CORIOmaster, that you know the administrator login information. If the administrator login details are changed from the default and you are not aware of this, you may find yourself unable to access the unit.
For more details, you may wish to see "Administrator Setup Information" on page 14, "Logout" on page 22, "Users" on page 176, and "Timeout" on page 183
Slot Status
From the Settings window, you can make various changes to the CORIOmaster, and you can gather some system information.
- While connected to a CORIOmaster, click the Settings button in the top right corner.
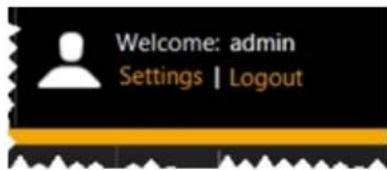
text_image
Welcome: admin Settings | Logout- Choose the Slot Status option under Information on the left.
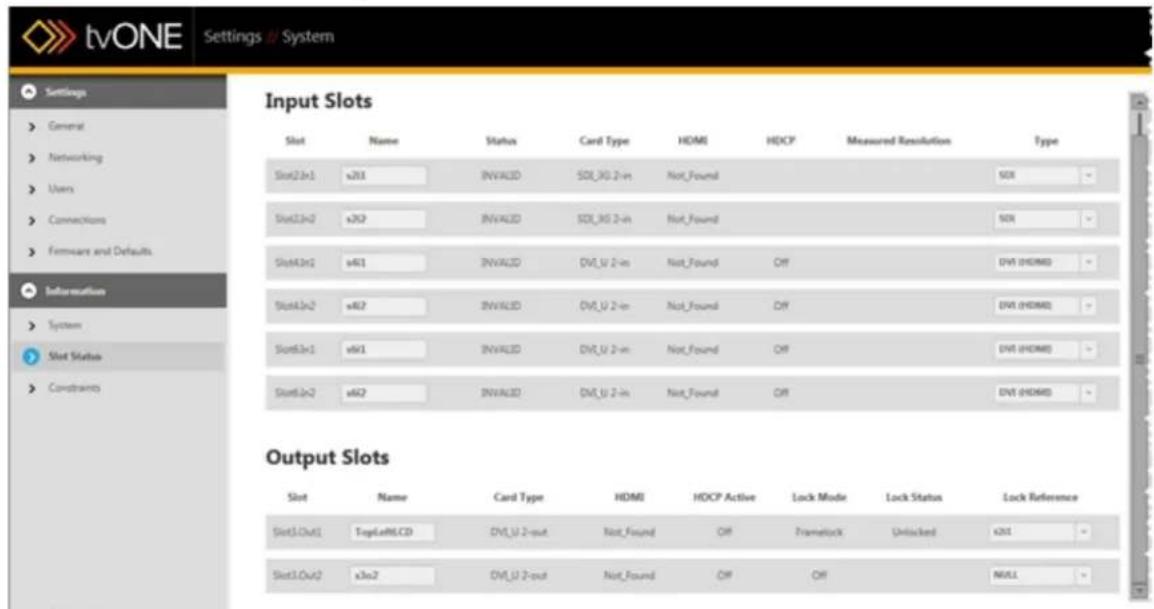
text_image
tvONE Settings / System Settings General Networking Users Connections Formware and Defaults Information System Slot Status Constraints Input Slots Slot Name Status Card Type HDMI HDCP Measured Resolution Type Slot2in1 x3X1 INVALID SDK_XG 2-in Not_Found NOR Slot2in2 x3X2 INVALID SDK_XG 2-in Not_Found NOR Slot4in1 x4X1 INVALID DVU_2-in Not_Found Off DVI (HDMI) Slot4in2 x4X2 INVALID DVU_2-in Not_Found Off DVI (HDMI) Slot6in1 x6X1 INVALID DVU_2-in Not_Found Off DVI (HDMI) Slot6in2 x6X2 INVALID DVU_2-in Not_Found Off DVI (HDMI) Output Slots Slot Name Card Type HDMI HDCP Active Lock Mode Lock Status Lock Reference Slot1.Out1 TopLeMCCD DVU_2-out Not_Found Off FrameLock Unlocked KST Slot1.Out2 x3x2 DVU_2-out Not_Found Off Off NULLIn the right-hand pane, you see a table of information on the Input slots and another of information on the Output slots:
- The Input Slot table lists the identified input cards and slots on your CORIOmas and gives some details about each slot:
| Title Value Information | |
| Slot Read-only | As identified by the system"Input and Output N ing Convention" on page 23 details |
| Name Editable Customizable input name - this is the source being named, not the window. The name can be up to 19 alphanumeric characters with no spaces. The window name is modifiable from the Video WallSource - Renaming Windows or Inputs" on page 139 | ||
| Status Read-only | Input status - this will return INVALID if there is no source or an invalid source. If it returns OK, you have a valid input source attached to the port. | |
| Card Type Read-only | This field returns the card type as detected by the sys-tem. | |
| HDMI Read-only | Returns Found or Not_Found, depending on the detec-ted HDMI status. | |
| HDCP Read-only | Returns Off if HDCP is not enabled, and On if HDCP is enabled. This option is not available for SDI input cards. | |
| Measured Resolution | Read-only | Returns the resolution of the input as detected by the system. |
| Type Drop-down | You can choose the input type from a drop-down menu offering a variety of inputs such as DVI (HDMI), RGBHV, RGsB, CV (Composite), and others. | |
- The Output Slot table lists the identified output cards and slots on your CORIO-master and gives some details about each slot:
| Title | Value | Information |
| Slot | Read-only | The name of the display as identified by the system - see "Input and Output Naming Convention" on page 23 details on the window name, as opposed to display name. |
| Name | Editable | Customizable output name - by default, the abbreviation for the slot and output numbers, but you can rename this to be something more memorable such as "Projector" or "Display1". The name can be up to 19 alphanumeric characters with no spaces. This name is also modifiable in the Video Wall (see "Display - Renaming Output Displays" on page 115). |
| Status | Read-only | Output status - this will return INVALID or UNKNOWN if the system can't assess the output properly. If it returns OK, you have a valid output attached to the port. |
| Card Type | Read-only | This field returns the card type as detected by the system. |
| HDMI | Read-only | Returns Found or Not_Found, depending on the HDMI status. detected |
| HDCP Active | Read-only | Returns Off if HDCP is not enabled, and On if HDCP is enabled. |
| Genlock | Read-only | Tells you whether Genlock is off or on. Related to the next column, Genlock Source. (If source is NULL, Genlock will by definition be Off.) |
| Genlock Source | Drop-down | You can choose the input slot you would like to this output. "See Genlock/Framelock" on page 71 for an explanation of this feature. to Genlock |
Any modifiable settings on the Slot Status page are updated live, as you exit the field, s is no Save button.
System
From the Settings window, you can make various changes to the CORIOmaster, and you can gather some system information.
- While connected to a CORIOmaster, click the Settings button in the top right corner.

text_image
Welcome: admin Settings | Logout-
Choose the System option under Information on the left. In the right-hand pane, you see several lines of information about the system:
-
On the top line is the model name of the CORIOmaster you are currently connected to.
- The second line lists the model number of the CORIOmaster you are currently connected to.
- The third line lists the serial number of the CORIOmaster you are currently connected to.
- The fourth line gives the application version number of this CORIOgrapher software.
Each of these fields is read-only.
Timeout
By default, any connection to a CORIOmaster will need to stay active or it will be discor after five minutes. This will not affect active connections that have at least one command the unit in a five-minute window.
If you wish to stay connected while idle for more than five minutes, an administrator will change the settings on a per-user basis.
- While connected to a CORIOmaster, click the Settings button in the top right corner.

text_image
Welcome: admin Settings | Logout- Choose the Users option under Settings on the left.
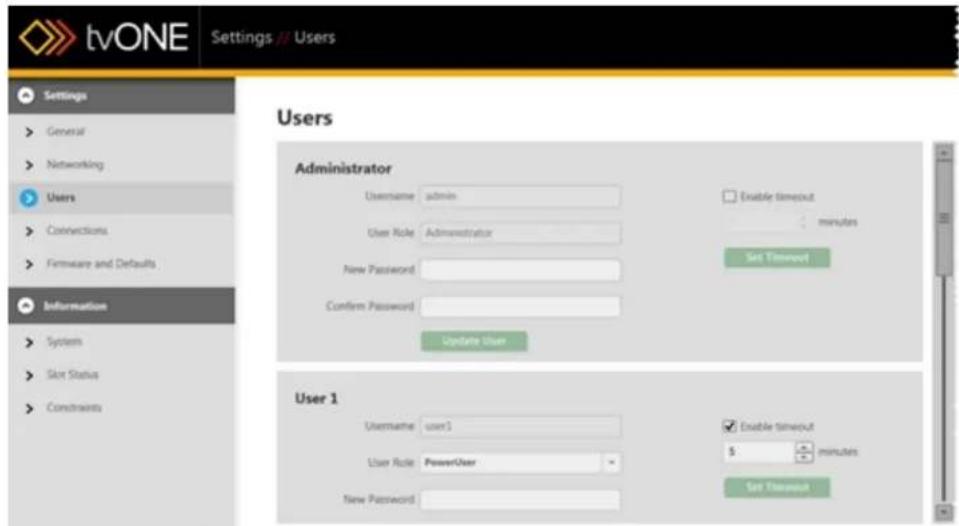
text_image
tvONE Settings // Users Settings General Networking Users Connections Firmware and Defaults Information Systems Slot Status Constraints Users Administrator Username admin User Role Administrator New Password Confirm Password Update User Enable timeout minutes Set Timeout User 1 Username user1 User Role PowerUser New Password Enable timeout 5 minutes Set TimeoutIn the right-hand pane, you see various options that allow you to change username, word and timeout details for individual users.
-
Find the user whose timeout period you wish to change. To the right of that user's name, uncheck the Enable timeout field if you wish the user to be able to stay lo indefinitely.
-
If you wish to keep the timeout option enabled but adjust the timeout period, type appropriate number of minutes into the field (or use the arrows to adjust the existing ber up or down).
-
Click the Set Timeout button to save your changes. If you are making changes to the account you are currently logged in from, you will need to log out and log in again for settings to take effect. (If the unit times out before you log out, the changes will be lost and you will need to configure the change again.)
For more details, you may wish to see "Administrator Setup Information" on page 14, "Logout" on page 22, "Changing Passwords" on page 177, and "Users" on page 176

Note: Administrator accounts also default to time out after five minutes, but you may want to increase this or disable timeout, particularly if you are going to update the firmware on a unit. To update firmware, make sure the Administrator timeout is either disabled or a minimum of fifteen (15) minutes.
Canvases
About Video Walls 186
Moving between Video Walls 187
About Video Walls
A CORIOmaster has four video walls per configuration; a CORIOmaster mini used to only have one video wall per configuration, but in early 2015 a firmware update increased this to four per configuration. You can see your video wall selection in the bottom left corner of the Video Wall Editor.

text_image
< < > X Y WidthEach canvas is a video wall, with configurable inputs and outputs. You can save multiple Presets on each canvas.
When you go to the Dashboard, each canvas is available as a separate entity, with its own presets per canvas. You can change presets and inputs on-the-fly in a live environment on a pe canvas basis.

text_image
tvONE Preset: Dashboard1 Canvas2 Dashboard Connect1 Connect2 Connect3 Connect4 CARES 1.0.0 PRESets Connect1 Offset Offset Preset Minset Set1 Set2 Set3 Set4 SOURCE INPUTS Source1 Source2 Source1 Source2 Source1 Source2 Source1 Source2 Source1 Source2 Source1 Source2 Source1 Source2 Source1 Source2 Source1 Source2 Source1 Source2 Source1 Source2 Source1 Source2 Source1 Source2 Source1 Source2 Source1 Source2 Source1 Source2 Source1 Source2 Source1If your CORIOmaster mini only has one canvas, you can upgrade its firmware to version M307 o later, which supports multiple canvases. To download the appropriate update, see http://www.tvone.com/firmware-updates.
Moving between Video Walls
When you are working in the Editor with video walls, a CORIOmaster has four video walls configuration; a CORIOmaster mini used to only have one video wall per configuration, but early 2015, firmware version M307 increased this to four per configuration. You can swap between them in the Editor or from the Video Wall Overview page.
To move between video walls:
- In the Editor, at the bottom left of the page (above the X and Y coordinates), there four dots between two arrows.
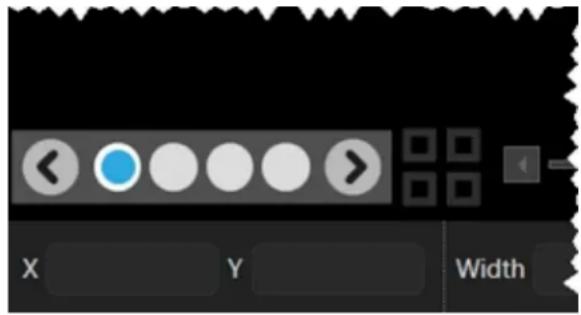
text_image
< < > X Y WidthThe four squares on the right are the Video Wall Overview button. If you click the Video Wall Overview button, the Video Wall Overview page will open. You can see preview of the video walls available in this configuration. Click one of the video wall views to go to the Editor with that video wall loaded, or edit the name of it here
video walls are named "Canvas1" through "Canvas4" by default.
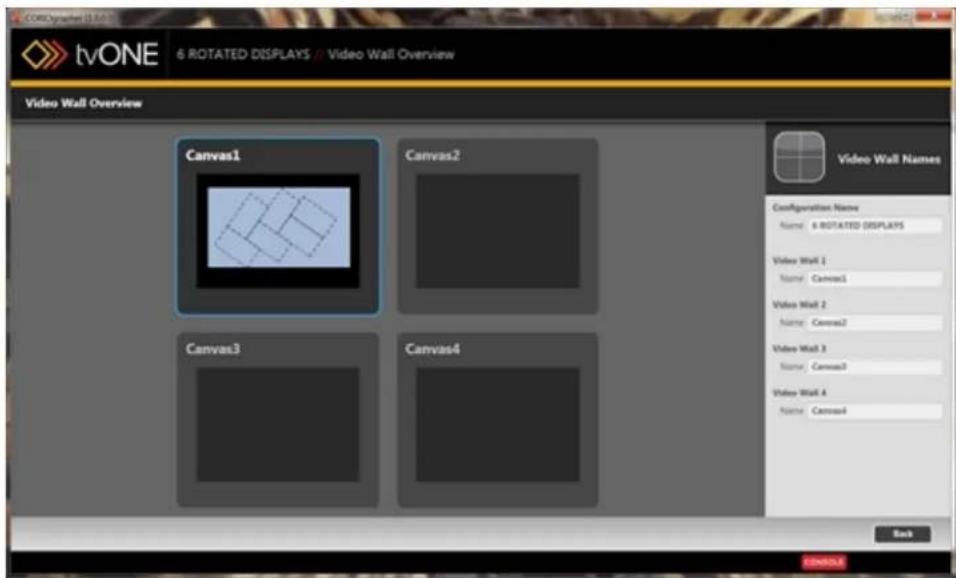
text_image
tvONE 6 ROTATED DISPLAYS // Video Wall Overview Video Wall Overview Canvas1 Canvas2 Canvas3 Canvas4 Video Wall Names Configuration Name Name: 6 ROTATED DISPLAYS Video Wall 1 Name: Canvas1 Video Wall 2 Name: Canvas2 Video Wall 3 Name: Canvas3 Video Wall 4 Name: Canvas4 Back CONTAINLEDashboard
About the Dashboard 190
Getting to the Dashboard 191
Immediate vs Synchronized..193....
Switching Presets in the Dashboard 195
Switching Sources in the Dashboard...196
Cut All to Black 197
Change Source Inputs On-The-Fly 198
About the Dashboard
When you have configured several video walls that you will want to use, you want to be able use them in real time, and potentially switch between them rapidly.
The Dashboard, available to all users except guest users, allows you to use your video walls and presets in a live setting. From the dashboard, you can choose which of the four video walls you want to use, and the presets that are associated with these video walls.
Within each video wall (canvas), you can store multiple presets (up to 49 total). From the Dashboard, you can see each preset as a button, and all the video source inputs associated with the video wall. You can cut to black, or swap on the fly between them.
Getting to the Dashboard
The Dashboard, where the configured video walls can be enabled, is available to administra power users, and basic users. In the case of a basic user, the Dashboard is the default connecting to a CORIOmaster.
For administrators and power users, the default view after connecting to a CORIOmaster isVideo Wall Editor. For these users, the Dashboard can be accessed via the button in the

text_image
tvONE 2x2 VIDEO WALL Canvas1 Connected to Blay's Mix Webcenter admin Settings [Logic] Displays & Sources DISPLAYS sv1 sv2 sv3 sv4 sv5 SOURCES WINDOW USAGE Video Wall Window Change Frequency: 2.0% System Usage (OK) Frequency: 1.8 System Usage (HD) Frequency: 0.8 System Usage (Preview) 0.16 Take Reset 5 7 Width Height Acceleration Temperature Scale Prepaits Configurations Save Close ON/OFFLEAfter using the Dashboard button from the Video Wall Editor, or after logging in if you a administrator or power user, you get the Dashboard.
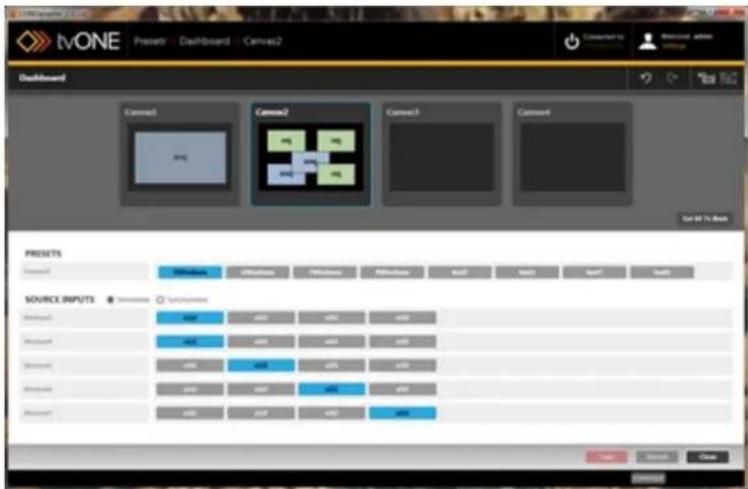
text_image
tvONE Presets - Dashboard - Canvas2 Dashboard Connect1 Connect2 Connect3 Connect4 Catal to Web PRESSETS Source Source INPUTS Source1 Source2 Source3 Source4 Source5 Source6 Source7 Source8 Source9 Source10 Source11 Source12 Source13 Source14 Source15 Source16 Source17 Source18 Source19 Source20 Source21 Source22 Source23 Source24 Source25 Source26 Source27 Source28 Source29 Source30 Source31 Source32 Source33 Source34 Source35 Source36 Source37 Source38 Source39 Source40 Source41 Source42 Source43 Source44 Source45 Source46 Source47 Source48 Source49 Source50 Source51 Source52 Source53 Source54 Source55 Source56 Source57 Source58 Source59 Source60 Source61 Source62 Source63 Source64 Source65 Source66 Source67 Source68 Source69 Source70 Source71 Source72 Source73 Source74 Source75 Source76 Source77 Source78 Source79 Source80Immediate vs Synchronized
There are two modes in which the Dashboard functions - Immediate and Synchronized.
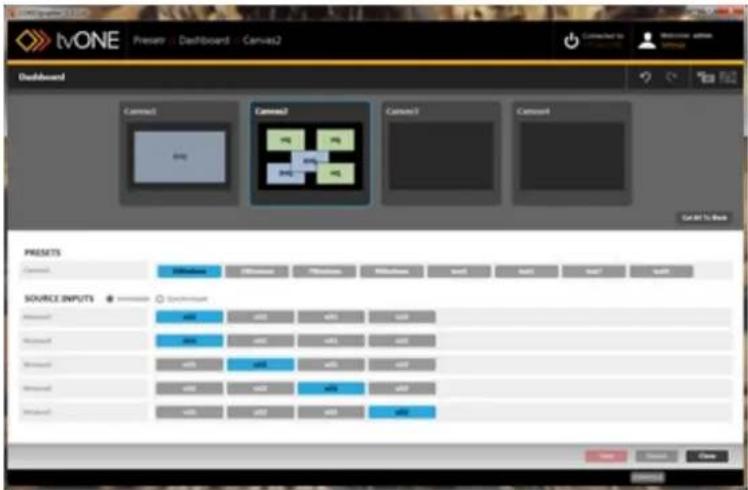
text_image
TiVONE Presen - Dashboard - Canvas2 Dashboard Connect Connect1 Connect2 Connect3 Connect4 Select To Back PRESSETS Connect Source INPUTS Source: Connect Source1 Source2 Source3 Source4 Source5 Source6 Source7 Source8 Source9 Source10 Source11 Source12 Source13 Source14 Source15 Source16 Source17 Source18 Source19 Source20 Source21 Source22 Source23 Source24 Source25 Source26 Source27 Source28 Source29 Source30 Source31 Source32 Source33 Source34 Source35 Source36 Source37 Source38 Source39 Source40 Source41 Source42 Source43 Source44 Source45 Source46 Source47 Source48 Source49 Source50 Source51 Source52 Source53 Source54 Source55 Source56 Source57 Source58 Source59 Source60 Source61 Source62 Source63 Source64 Source65 Source66 Source67 Source68 Source69 Source70 Source71 Source72 Source73 Source74 Source75 Source76 Source77 Source78 Source79 Source80
text_image
SOURCE INPUTS Immediate Synchronized Windows5 s611 s62 Windows1 s612 s62In Immediate mode, any action you take is committed individually by the CORIOgrapher software. Each step is live as soon as it has been committed. This mode requires that the be actively connected to a CORIOmaster system.
In Synchronized mode, actions are only committed when you initiate a "Take". You can quote up a number of changes and commit them all at once by making multiple changes before pressing Take. The software only has to be connected to the CORIOmaster when the Take button is pressed - any previous configuration changes can be made while disconnected from the unit, if you wish to do so. (The CORIOmaster will accept any commands, but if the assesses that the incoming commands will cause degraded performance, it will warn you of with an alert message.)
Button
Example Meaning
Color
Gray Option that is not currently selected
Blue
The
currently live selection
Black
s1i1
SYNCHRONIZED ONLY - the queued - but not yet live - option (Turns blue after you click Take button)
Switching Presets in the Dashboard
When you are in the Dashboard, you can change between your various configured settings the-fly, in a live environment.
The simplest swaps that can be done are to change the inputs from one source to anot If you want to actively change the arrangement of your windows on the fly, you need to saved each arrangement as a preset within that canvas (video wall). When you are in the board in your live environment, you can swap between video walls, and within each video (canvas), you can swap between presets.

text_image
tvONE Presetry - Dashboard - Canvas2 Dashboard Canvas1 Canvas2 Canvas3 Canvas4 Set up to Next PRESets Canvas1 Transitions Transitions Transitions SHP SHP1 SHP2 SHP3 SOURCE INPUTS Transitions Transitions Transitions Transitions Transitions Transitions Transitions Transitions Transitions Transitions Transitions Transitions Transitions Transitions Transitions Transitions Transitions Transitions Transitions Transitions Transitions Transitions Transitions Transitions Transitions Transitions Transitions Transitions Transitions Transitions Transitions Transitions Transitions TransitionsIf you are in Immediate mode, any different preset you choose will instantly be displayed through the CORIOmaster on your displays. If you are in Synchronized mode, you can choose the new preset and modify input sources, then click the Take button to enable the modifi and display your changes through the CORIOmaster on your displays.
Switching Sources in the Dashboard
When you are in the Dashboard, you can change between your various configured settings on-the-fly, in a live environment.
The simplest swaps that can be done are to change the inputs from one source to another.
When you are in the Dashboard in your live environment, you can swap between canvases, and within each canvas, you can swap between presets, if applicable, and change which input goes to which window.

text_image
TiVONE Presetry - Dashboard - Canvas2 Dashboard Canvas1 Canvas2 Canvas3 Canvas4 Catal to: Source INPUTS SOURCE INPUTS Source INPUTS Source INPUTS Source INPUTS Source INPUTS Source INPUTS Source INPUTS Source INPUTS Source INPUTS Source INPUTS Source INPUTS Source INPUTS Source INPUTS Source INPUTS Source INPUTS Source INPUTS Source INPUTS Source INPUTS Source INPUTS Source INPUTS Source INPUTS Source INPUTS Source INPUTS Source INPUTS Source INPUTS Source INPUTS Catal to: Source : CloseIf you are in Immediate mode, any different input you choose will instantly be displayed through the CORIOmaster on your displays. If you are in Synchronized mode, you can modify input sources, then click the Take button to enable the modifications and display your changes through the CORIOmaster on your displays.
Cut All to Black
When you are in the Dashboard, you can change between your various configured settings the-fly, in a live environment.
In addition to changing inputs and swapping between presets, there is a button, labeled "C To Black", that allows you to simultaneously cut all inputs.

text_image
tvONE Preset - Dashboard - Canvas2 Dashboard Connect1 Connect2 Connect3 Connect4 Go Go To But PRESets Connect1 Source: https://www.tvONE/ SOURCE: https://www.tvONE/ Source1 Source2 Source3 Source4 Source5 Source6 Source7 Source8 Source9 Source10 Source11 Source12 Source13 Source14 Source15 Source16 Source17 Source18 Source19 Source20 Source21 Source22 Source23 Source24 Source25 Source26 Source27 Source28 Source29 Source30 Source31 Source32 Source33 Source34 Source35 Source36 Source37 Source38 Source39 Source40 Source41 Source42 Source43 Source44 Source45 Source46 Source47 Source48 Source49 Source50 Source51 Source52 Source53 Source54 Source55 Source56 Source57 Source58 Source59 Source60 Source61 Source62 Source63 Source64 Source65 Source66 Source67 Source68 Source69 Source70 Source71 Source72 Source73 Source74 Source75 Source76 Source77 Source78 Source79 Source80When you have cut all to black, if you choose to cut video in again, you simply change Dashboard settings by selecting the new preset and/or input choices you want, and click T if you are in Synchronized mode.
Change Source Inputs On-The-Fly
- While connected to a CORIOmaster, click the Dashboard icon in the top right corner of the video wall.

text_image
tvONE 2x2 VIDEO WALL Canvas1 Connected to Mary's Mini Welcome admin Settings | Layout Displays & Sources DISPLAYS c0x1 c0x2 c0x3 c0x4 SOURCES WINDOW USAGE Video Wall: Window Charge 7.5% System Charge - ISO 5.4% System Charge - MP 5.8% System Usage - Pressure 9/16 Take Recent X Y Width Height Rotation Maximum Rate Priority Configurations Save Close COMPLETE- In the Dashboard window, you can switch between source inputs for a given window, on-the-fly. Next to each window, all available inputs are shown as buttons. The currently-used input is shown in blue; an available input is shown in gray. If you are in Synchroniz mode (see "Immediate vs Synchronized" on page 193 for an explanation of the difference between the two modes), you can select a new input but it will not become the active input until you click Take. Until you click Take, the queued input button is black. In Immediate mode, there is no black button as there are no queued changes; all changes are immediate.

text_image
SOURCE INPUTS Immediate Synchronized Windows5 s61 s62 Windows1 s61 s62Presets
About Presets 200
Save Preset 201
Edit Preset 204
About Presets
What is a Preset?
A preset, at its simplest, is a saved video wall. Configure a video wall with the physical arrangement of displays that you wish, and set up the first arrangement of windows - you can then set this as a Preset. Rearrange the windows and save again as another Preset. When you have multiple Presets saved, you can access them from the Dashboard and flip between Presets on-the-fly in your live environment. Define a duration and the windows can move smoothly from one location, angle, and size to another as you transition between Presets.
Why would I use Presets?
Presets are useful if, for example, you want to do a presentation and swap between several pre configured arrangements of windows on your displays. In this example, your first preset may be a single large camera input shown across all displays, then your second preset may be a split-screen between a presentation slide and the original camera image. You can configure all the different window arrangements and transitions beforehand, save them as Presets, then use the Dashboard to swap between the saved Presets in real time.
Save Preset
When you have a video wall set up just as you want it, you can save the entire thing To save as a preset:
-
If you are in Synchronized mode, click the red Take button to commit any changes you've made.
-
Click the Presets button in the bottom right corner of the Editor.

text_image
CorelGraph 2.0 2_PROJECTOR_BLENDED - Blended_Projectors Connected to: Maps Mini Welcome admin Settings | Logout VideoSource s61 s2e1 509.0 mm x 291.0 mm 1,280x7,20p60 Edge Blending Enabled s2e2 509.0 mm x 291.0 mm 1,280x7,20p60 Edge Blending Enabled PC In s62 Properties Configurations Save Close DISPLAYS SODLS SOURCES VIDELINES PC-In WINDOW USAGE Water: What Window Usage Dimensions: 1.0% System Usage: VMO Parameters: 1.0% System Usage: H: Device: 1.0% System Usage: Pressure GND523- In the pop-up window, type the name for this preset. If you have moved any wind to want to use the animated transitions feature, specify a duration for the windows to re to their new locations. (For more information on the transitions feature, see "About Trans- itions" on page 208.) Names cannot have spaces, but underscores (_) are acceptable.
Click the Add Preset button.
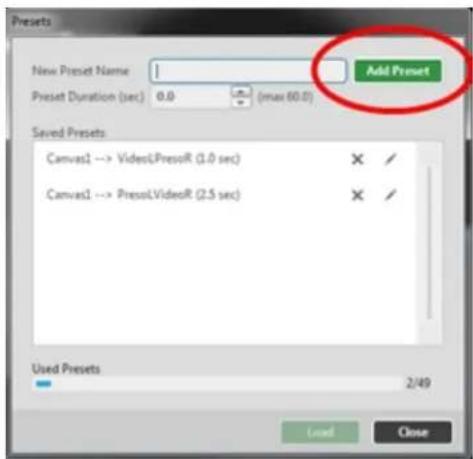
text_image
Presets New Preset Name Preset Duration (sec) 0.0 (max 60.0) Add Preset Saved Presets Canvas1 --> VideoLPressoR (1.0 sec) X / Canvas1 --> PressLVideoR (2.5 sec) X / Used Presets 2/49 Load Close-
The preset will appear in the list of presets in the window, and the number of Used Presets will increase by one, out of your maximum of 49.
-
Click the Close button to return to the Video Wall Editor window.
Now that the preset has been saved, when you go to the Dashboard, you will see that preset appear, along with any others, as a button in the Presets section.

text_image
tvONE Presatr - Dashboard - Canvas2 Dashboard Connect Connect Connect Connect Set to 10% Box PRESITS Source INPUTS Source INPUTS Source INPUTS Source INPUTS Source INPUTS Source INPUTS Source INPUTS Source INPUTS Source INPUTS Source INPUTS Source INPUTS Source INPUTS Source INPUTS Source INPUTS Source INPUTS Source INPUTS Source INPUTS Source INPUTS Source INPUTS Source INPUTS Source INPUTS Source INPUTS Source INPUTS Source INPUTS Source INPUTS Source INPUT S Source INPUT S Source INPUT S Source INPUT S Source INPUT S Source INPUT S Source INPUT S Source INPUT S Source INPUT S Source INPUT S Source INPUT S Source INPUT S Source INPUT S Source INPUT S Source INPUT S Source INPUT S Source INPUT S Source INPUT S Source INPUT S Source INPUT S Source INPUT S Source INPUT S Source INPUT S Source INPUT S Source INPUT S Source INPUTS
Note: A preset cannot be saved if the displays and sources have not been appropriately allocated. If you are trying to save a preset and it does not appear the list when you click the Add button, try using the Save button in the video w connections are not appropriately allocated, an alert message appears saying "Not all of your inputs and outputs are correctly connected to physical slots on the CORIOmaster. Would you like to assign the connections now?". Once you resolve these issues, you should be able to save the preset successfully.
Edit Preset
If you want to modify an existing Preset, follow these steps.
- In the bottom right corner of the video wall, select the Presets button.

text_image
tvONE 2PROJECTOR_BLENDED - Blended_Projectors Connected to: Mary's Mix Browse: admin Settings: C:\engout Displays & Sources DISPLAYS s2o1 s2o2 509.0 mm x 291.0 mm L280x720p60 Edge Blending Enabled s2o1 s2o2 509.0 mm x 291.0 mm L280x720p60 Edge Blending Enabled PC_In s6i2 WINDOWS USAGE Video Staff Window Usage username: 1.0% System Usage: 0.0% username: 1.0% System Usage: 0.0% System Usage: Status: 1.0% Timer Reset Presets Configurations Save Close Width Height Rotation Mountain Grid- In the pop-up window, choose the Preset you want to modify from the list, and load it.
- If you only wish to modify the name or duration of the preset, use the pencil icon ( ) to edit the name in the window, then click Close to close the window.
- If you wish to delete the preset, use X the X icon ( ) to remove the line of the preset you want to delete, then click Close to close the window.
- If you wish to modify any other aspect, select the line for the Preset and click to open it in the video wall.
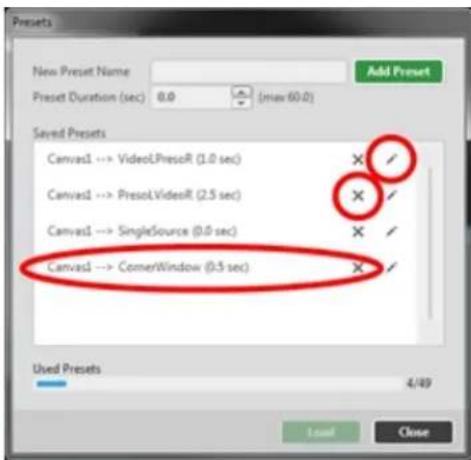
text_image
Presets New Preset Name Add Preset Preset Duration (sec) 0.0 (max 60.0) Saved Presets Canvas1 --> VideoLPresoR (1.0 sec) X ✓ Canvas1 --> PresoLVideoR (2.5 sec) X ✓ Canvas1 --> SingleSource (0.0 sec) X ✓ Canvas1 --> CornerWindow (0.5 sec) X ✓ Used Presets 4/49 Load Close-
Once the preset has opened in the video wall, make edits as you wish.
-
To save changes, click the Presets button again, and in the bottom left corner, click the green button labeled Save Preset (your preset).
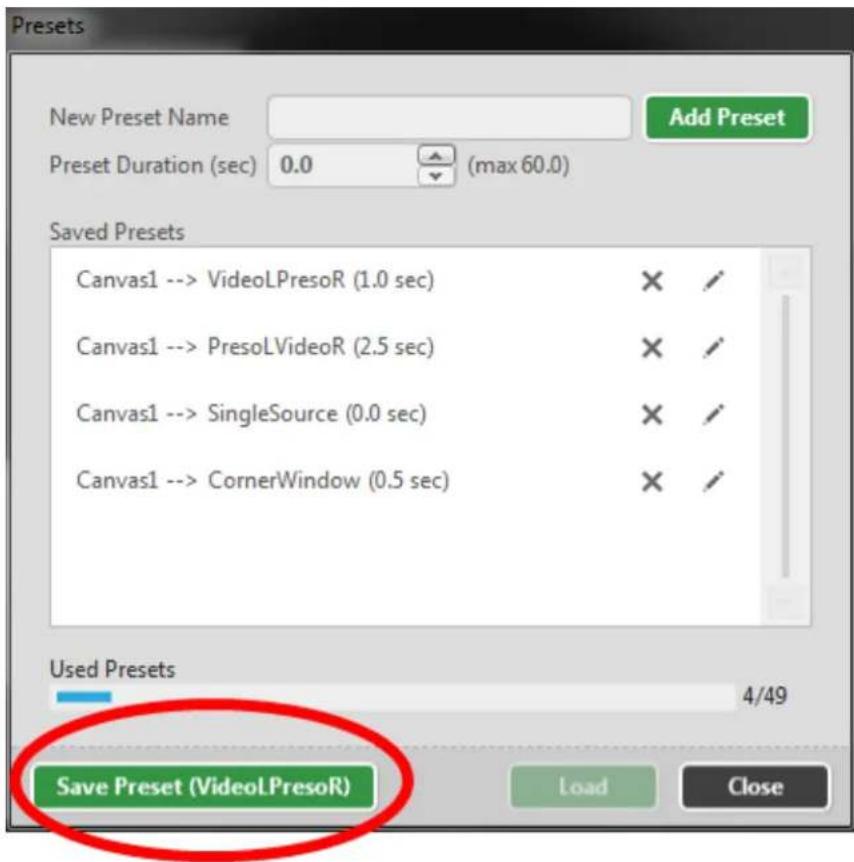
text_image
Presets New Preset Name Add Preset Preset Duration (sec) 0.0 (max 60.0) Saved Presets Canvas1 --> VideoLPresoR (1.0 sec) X ✓ Canvas1 --> PresoLVideoR (2.5 sec) X ✓ Canvas1 --> SingleSource (0.0 sec) X ✓ Canvas1 --> CornerWindow (0.5 sec) X ✓ Used Presets 4/49 Save Preset (VideoLPresoR) Load Close
Note: If you have opened a preset from the Dashboard and then modified it, the Save Preset (x) button may not function as expected. If you plan to edit a Preset, please open it from the Presets window as described above.
Transitions
About Transitions 208
Basic Transition Tutorial 209
About Transitions
Beginning with CORIOgrapher version 1.0.5, Transition Effects have been introduced which allow you to configure windows to move dynamically when transitioning from one Preset to another. It is now possible to use any combination of the following animated transitions on individual Windows:
- Fade Through Black, where the previous window fades to black and the new window appears from black. See "Source - Transition - Fade Through Black" on page 150 for instructions.
- Horizontal Shrink and Expand, where the previous window narrows horizontally into a vertical line, then expands horizontally with the new window. See "Source - Transition - Horizontal Shrink" on page 151 for instructions.
- Vertical Shrink and Expand, where the previous window shortens vertically into a horizontal line, then expands vertically with the new window. See "Source - Transition - Vertical Shrink" on page 152 for instructions.
- Spin, where the image rotates around its center point either right or left up to seven times, changing to the new window halfway through the process. See "Source - Transition - Spin" on page 153 for instructions.
These can be also used in combination with each other. Once the transitions are defined for all Windows desired (to a maximum of 14), save the canvas as a Preset. In future, when you load Preset, the specified transitions will be used to switch from the existing Windows to the new Windows.
In addition to the window-specific transitions, Window movement is now animated.
If you have one Preset saved and resize, move, and/or rotate Windows on the Video Wall and save the new locations/sizes as another Preset, when you transition from the first Preset to the second, the windows will smoothly move (and rotate, if rotation is defined in either Preset) by the most direct path to the new locations, rather than simply disappearing and reappearing in their new locations.
Control the speed of this movement by defining the duration of the transition when you save the Preset. If the duration is set to 0.0, the transition will be instantaneous (same as previous behavior). The duration can be configured up to 60.0 seconds. See "Save Preset" on page 201 for instructions.
Basic Transition Tutorial
Follow the instructions here to set up two presets so that a window rotates and moves from side of the screen to another. This qualifies as movement - within a window, you can also configure transitions. This may not be precisely the arrangement you need to use, but this example may give you ideas regarding how you want to use preset-based transitions.
In this example, we are starting with a blank canvas and setting it up with one big disp contains one small window at an angle:
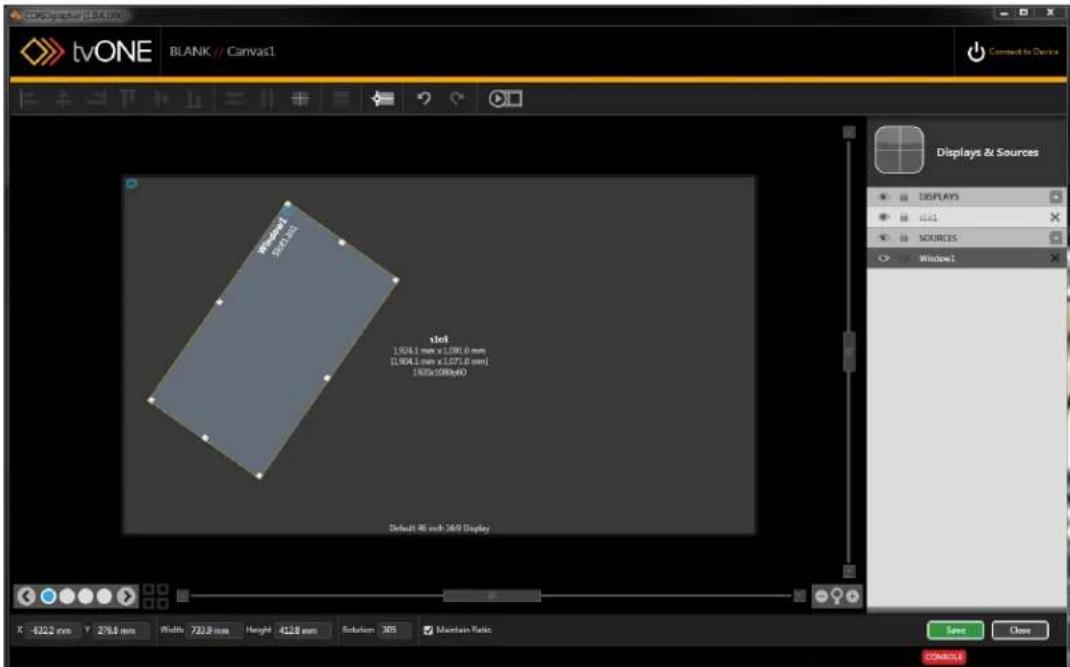
text_image
tvoONE BLANK // Canvas1 Windows 2001.m slot 1.924.5 mm x 1.071.0 mm [1.924.5 mm x 1.071.0 mm] [1.924.5/100x40] Default: 46 inch 360 Display Displays & Sources DISPLAYS ISSI SOURCES Window1 X: -622.2 mm Y: 278.8 mm Width: 723.9 mm Height: 412.8 mm Rotation: 365 Maintain Ratio Save Close CONTROLSClick Connect to Device in the top right corner and connect to your target CORIOmaster. authenticating, you receive an alert that your current configuration is not saved to the COR master. Click OK on the alert and allocate sources and displays if needed. Once the Video Editor loads, click Save to save the currently loaded video wall to the CORIOmaster as a
uration.
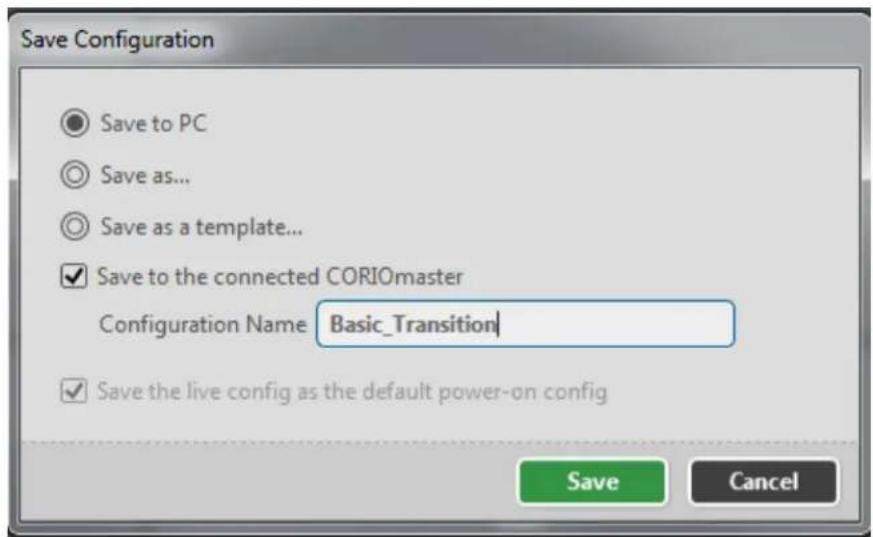
text_image
Save Configuration Save to PC Save as... Save as a template... ✓ Save to the connected CORIOmaster Configuration Name Basic_Transition ✓ Save the live config as the default power-on config Save CancelNow that it's a saved Configuration, save the current Video Wall as a Preset by clicking the Presets button and entering a Preset name in the new window. Click Add Preset. As this is an initial Preset, we are not configuring a duration as it's not transitioning from an earlier config-
uration to this one.
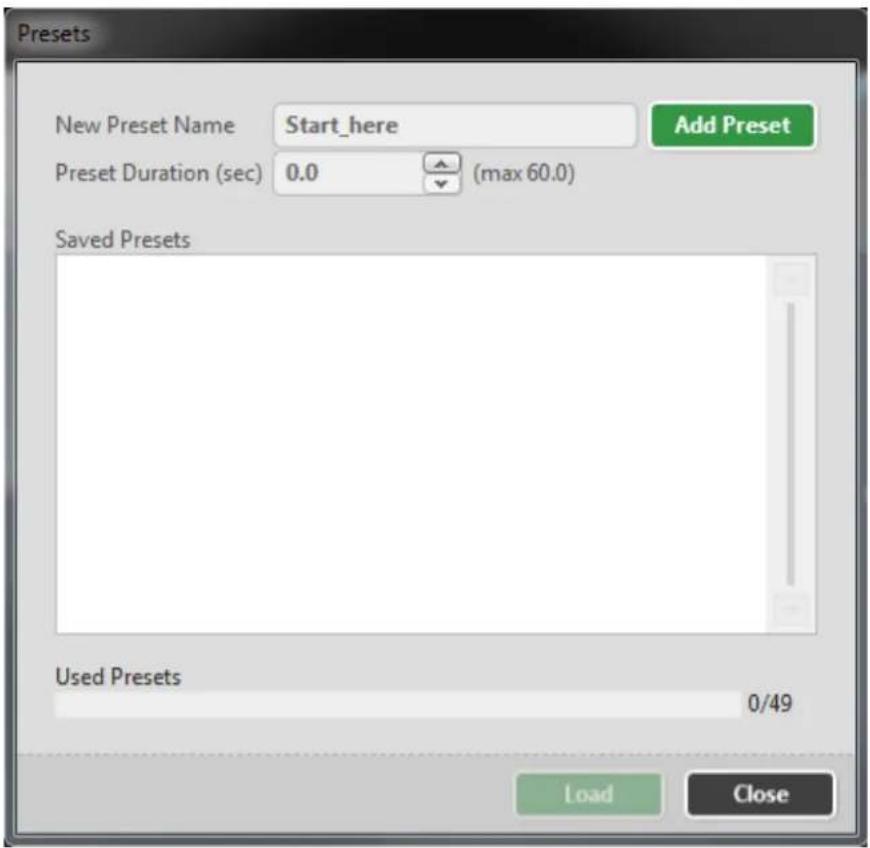
text_image
Presets New Preset Name Start_here Add Preset Preset Duration (sec) 0.0 (max 60.0) Saved Presets Used Presets 0/49 Load CloseOnce this preset has been saved, it appears in the "Saved Presets" box, listed (in this case) as "Canvas1 --> Start_here (0.0sec)". Click the Close button to return to the Video Wall.
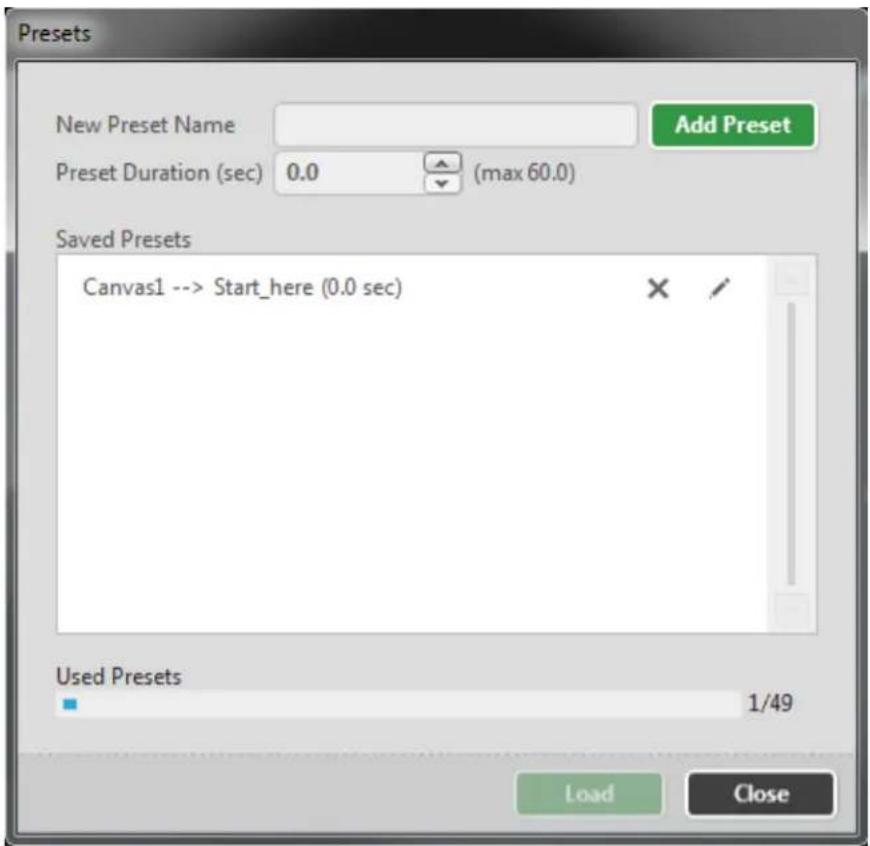
text_image
Presets New Preset Name Add Preset Preset Duration (sec) 0.0 (max 60.0) Saved Presets Canvas1 --> Start_here (0.0 sec) Used Presets 1/49 Load CloseWith the initial configuration defined, we can define our second state (movement) in the Video Wall. In this example, we will be moving the display to the right side of the screen and revers the angle. Drag the Display to its new location and angle, or type new values into the X, Y and
Rotation fields.

text_image
tvONE Basic_Transition // Canvas1 Connected to Clay's Mix Welcome: admits Settings | Legend Displays & Sources DISPLAYS sbl SOURCES Window1 sbl 1.9041 mm x 1.991.0 mm [1.9041 mm x 1.971.0 mm] 1920x108@p60 Windows1 L21 Default 46 inch 305 Display Window USAGE Window Wall Window Usage 25% System Usage - SBD 1.4 System Usage - FQ 0.8 System Usage - Preview 0.15 Take Reset X 2622 mm Y 276.8 mm Width 723.9 mm Height 4128 mm Solution 15 Maintain Ratio Prevent Configurations Save Close SCHEDULEIf desired, use this opportunity to change the source input slot ("Source - Changing Input Slot" on page 127). If you do this, the video source will change halfway through the movement. You also add source change transitions such as fade through black, horizontal or vertical shrink,
spin, but in this example, we will keep the movement straightforward.

text_image
Windows3 Name Windows3 Input Slot x80 Video Quality Extra high quality (EHO) High quality (H2) Preview Rendez 0 Pixels Transition Effects Fade Through Black Maintained Stroke Vertical Shock Spin Miscellaneous Ignore Real Compensation Pop Incontinently Pop Un mentionally ConfigPage MenuSave the current setup as a new Preset: Click the Presets button, enter a new Preset na specify how long you would like the transition to take, and click the Add Preset button.

text_image
Presets New Preset Name Add Preset Preset Duration (sec) 0.0 (max 60.0) Saved Presets Canvas1 --> Start_here (0.0 sec) × ✓ Canvas1 --> Step_1-To_Right (1.0 sec) × ✓ Used Presets 2/49 Load CloseClick the Save button to save the entire Configuration again, and the transition is now rea be tested. Be sure the input and output are connected appropriately, and switch to Dashbo
view. Select the first Preset. (If you are in Synchronized mode, click the Take button as well.)
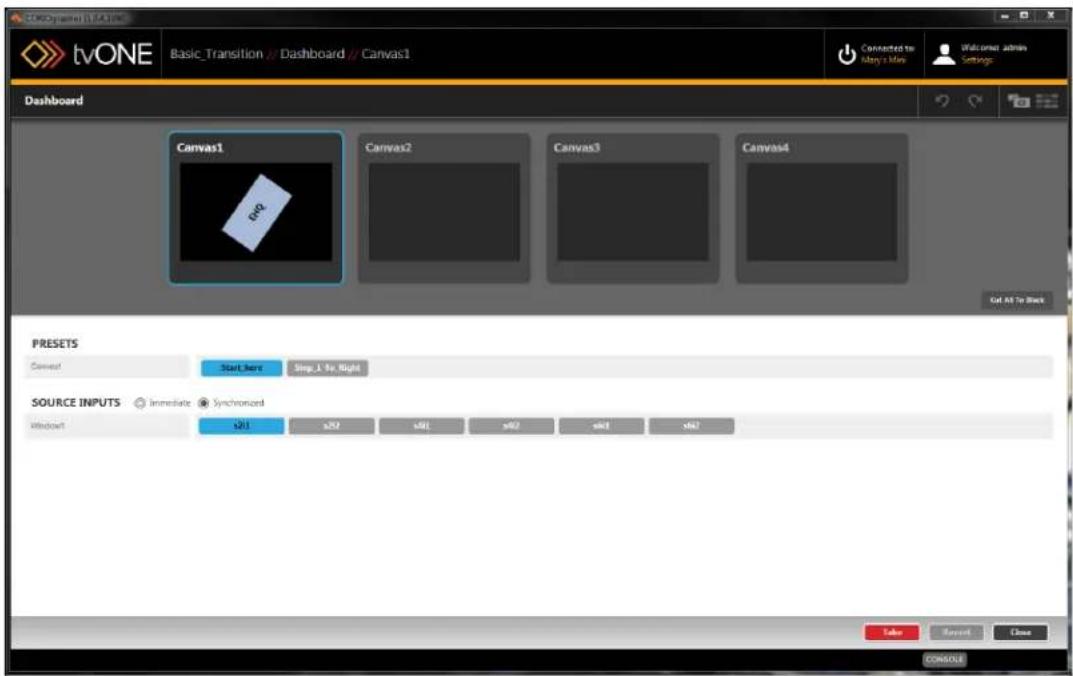
text_image
tvONE Basic_Transition / Dashboard / Canvas1 Connected to Stay a Time Welcome admin Settings Dashboard Canvas1 Canvas2 Canvas3 Canvas4 Go As To Back PRESETS Canvas1 Start here Step 1 To Right SOURCE INPUTS Immediate Synchronized Window1 x81 x92 x81 x82 x81 x82 Sales Current Close CONSOLEObserve the live display, and click the second Preset button. (If you are in Synchronized mode, click the Take button as well.) You will see the window move from the first position to the second position, and rotate as needed. If you would like to speed up or slow down the transition, you can edit the duration of the second preset ("Edit Preset" on page 204) accordingly. If you would like to combine other transition effects, you can add fading ("Source - Transition - Fade Through Black" on page 150), shrinking ("Source - Transition - Horizontal Shrink" on page 151 or "Source - Transition - Vertical Shrink" on page 152) and spinning ("Source - Transition - Spin" on page 153).
Resolution Editor
Resolution Editor 219
Resolution Editor Overview 222
Resolution Editor Constraints..223....
Accessing Resolution Editor from CORIOdiscover 224
Accessing Resolution Editor from the Command...Line...277.....
Command Line Resolutions 303
Resolution Editor
Beginning with version 2.0.0, the CORIOdiscover application includes a Resolution Editor.
- Start the CORIOdiscover application:

- Select the target device (the one you want to have the Custom Resolution) and pre-Resolution Editor button.
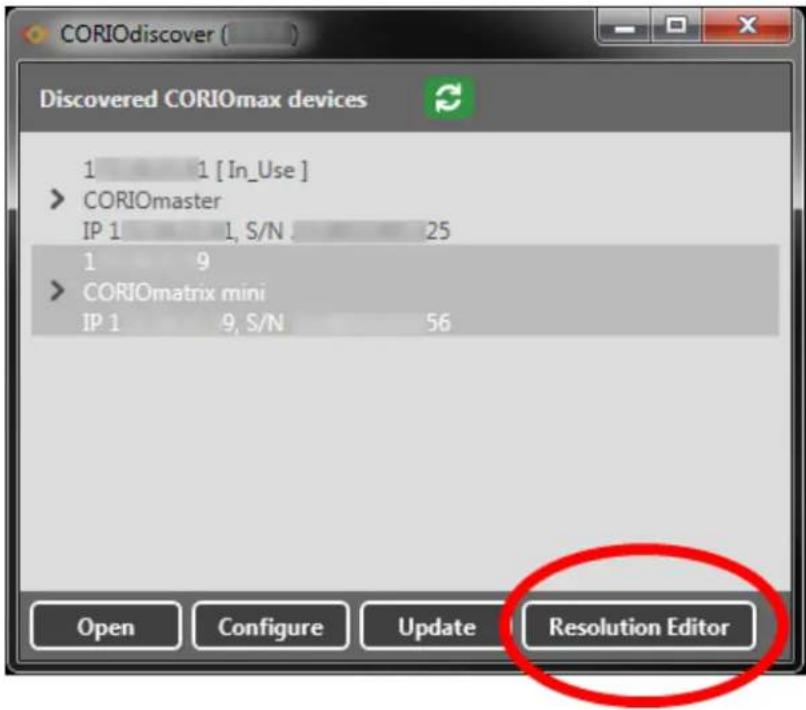
text_image
CORIOdiscover ( ) Discovered CORIOmax devices 1 1 [In_Use] > CORIOmaster IP 1 1, S/N 25 1 9 > CORIOmatrix mini IP 1 9, S/N 56 Open Configure Update Resolution Editor- Enter the Administrator username and password for the unit:
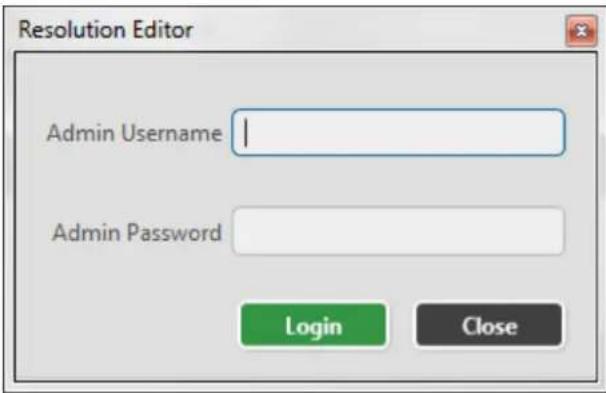
text_image
Resolution Editor Admin Username Admin Password Login Close- Once you have successfully logged in you see the Resolution Editor main window:
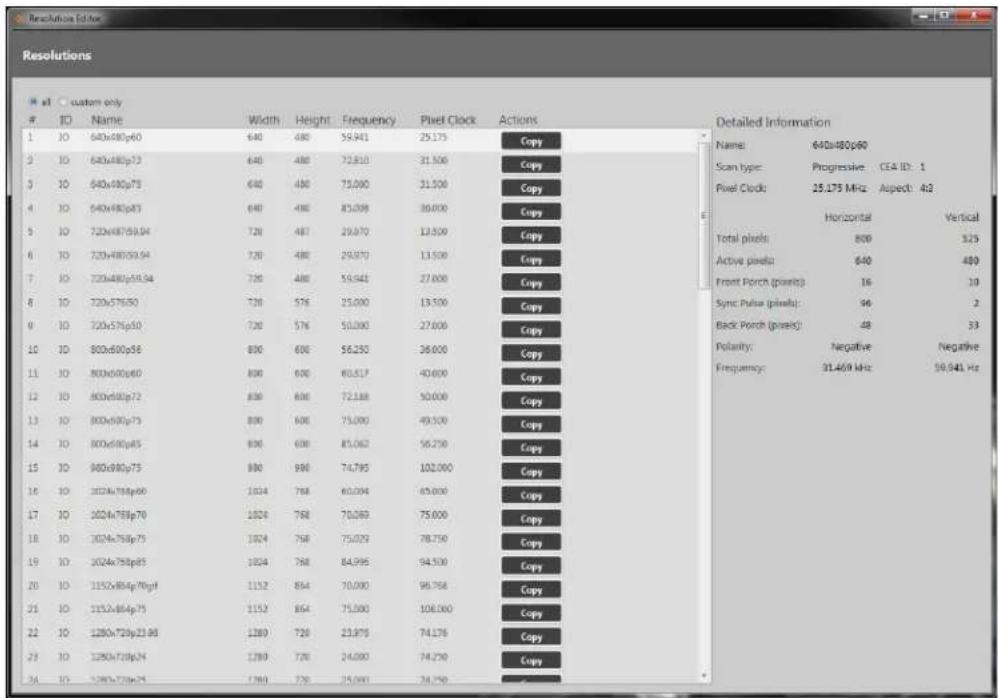
text_image
Resolutionscustom only
ID Name Width Height Frequency Pixel Clock Actions Detailed Information 1 IO 640x80p60 640 480 59,941 25,175 Copy 2 IO 640x80p12 640 480 72,810 31,500 Copy 3 IO 640x80p75 640 480 75,090 31,500 Copy 4 IO 640x80p83 640 480 83,098 30,000 Copy 5 IO 720x8759.94 720 487 29,970 13,500 Copy 6 IO 720x8059.94 720 480 29,970 13,500 Copy 7 IO 720x80p59.94 720 480 59,941 27,000 Copy 8 IO 720x5759.90 720 576 25,000 13,500 Copy 9 IO 720x57p610 720 576 50,000 27,000 Copy 10 IO 800x600p58 800 600 56,250 26,000 Copy 11 IO 800x60p60 800 600 60,517 40,000 Copy 12 IO 800x60p72 800 600 72,168 50,000 Copy 13 IO 800x60p73 800 600 75,090 49,500 Copy 14 IO 800x60p45 800 600 85,062 56,250 Copy 15 IO 840x98p75 880 980 74,795 102,060 Copy 16 IO 1224x788p66 1324 768 60,094 65,830 Copy 17 IO 1224x788p76 1324 768 70,069 75,069 Copy 18 IO 1224x788p75 1324 768 75,029 78,759 Copy 19 IO 1224x788p85 1324 768 84,996 94,536 Copy 20 IO 1152x854p79cgf 1152 864 70,999 96,768 Copy 21 IO 1152x854p75 1152 864 75,999 106,969 Copy 22 IO 1280x729p23.9d 1289 729 23,876 74,176 Copy 23 IO 1280x729p24 1289 729 24,999 74,259 Copy 24 IO 1280x729p25 1289 729 25,999 74,259 Copy- By default the Resolution Editor shows all resolutions, both built-in and custom. Scroll to the bottom of the list or select the Custom Only radio button to see the Custom Res-
olutions:

text_image
Resolution Editor Resolutions all custom onlyIO Name
1 IO 640x480p60Note that built-in resolutions only have a Copy option, while Custom Resolutions have Copy, Edit and Reset buttons.

text_image
71 IO 1920x1200p50cvt-rb 1920 1200 49.974 127.750 72 IO 1920x1200p60cvt-rb 1920 1200 59.950 154.000 1000 IO 1920x1080p60 1920 1080 60.000 148.500 1001 IO Empty1001 0 0 0.000 0.000 Copy Copy Copy Edit Reset Copy Edit ResetFor more details, see "Accessing Resolution Editor from CORIOdiscover" on page 224.
Resolution Editor Overview
The CORIOmax series (CORIOmaster, CORIOmaster mini, CORIOmatrix and CORIOmatrix mini) supports a vast majority of standard video resolutions, both broadcast and computing, as well as certain non-standard resolutions. These include the more commonly used resolutions from the following standards:
- CEA-861-D
- VESA CVT
• VESA GTF
• VESA DMT
In addition, you can add up to ten further Custom Resolutions either from the CORIOdiscover software (see "Resolution Editor" on page 219) or via command line (see "Command Line - Resolutions" on page 309).
Resolution Editor Constraints
Custom Resolution support and the CORIOdiscover Resolution Editor is available from firmware version M306/M307 onwards.
Custom Resolutions cannot be used with SDI input or outputs.
The unit can save a maximum of ten Custom Resolutions.
The Custom Resolutions are definable within the following constraints:
- all numeric values are in pixels unless otherwise stated.
- all numeric values are positive integers or zero.
• string values may not contain spaces. - string values may only be valid printable ASCII characters.
- string values are limited in the number of characters they may contain.
Custom Resolutions do not support:
- borders (any required border values must be included in the front and back porches).
- the pixel clock is limited to the following range:
• 13.5MHz to 162MHz - The value for the Active Video must not be zero.
Interlaced Custom Resolutions require that:
- the vertical front and back porches are twice the even field.
- the vertical sync pulse is twice the even value.
The CEA identifier information option (CEAID) does not affect the Custom Resolution - it is for providing attached equipment with information on the resolution. Only set this value whe defining a Custom Resolution that complies with the CEA profile for that value.

Note: The unit might not display an image if the CEAID is non-zero. Resolution does not conform to the CEA format for that value.
and the Cust
If you are using the command line, Custom Resolutions become persistent after using the System.SaveAllSettings() operation.
Accessing Resolution Editor from CORIOdiscover
Listing Resolutions from CORIOdiscover Resolution Editor
To list the available built-in and Custom Resolutions from CORIOdiscover, access the main Resolution Editor window. From this window, you can see a list of all built-in and custom resolutions.
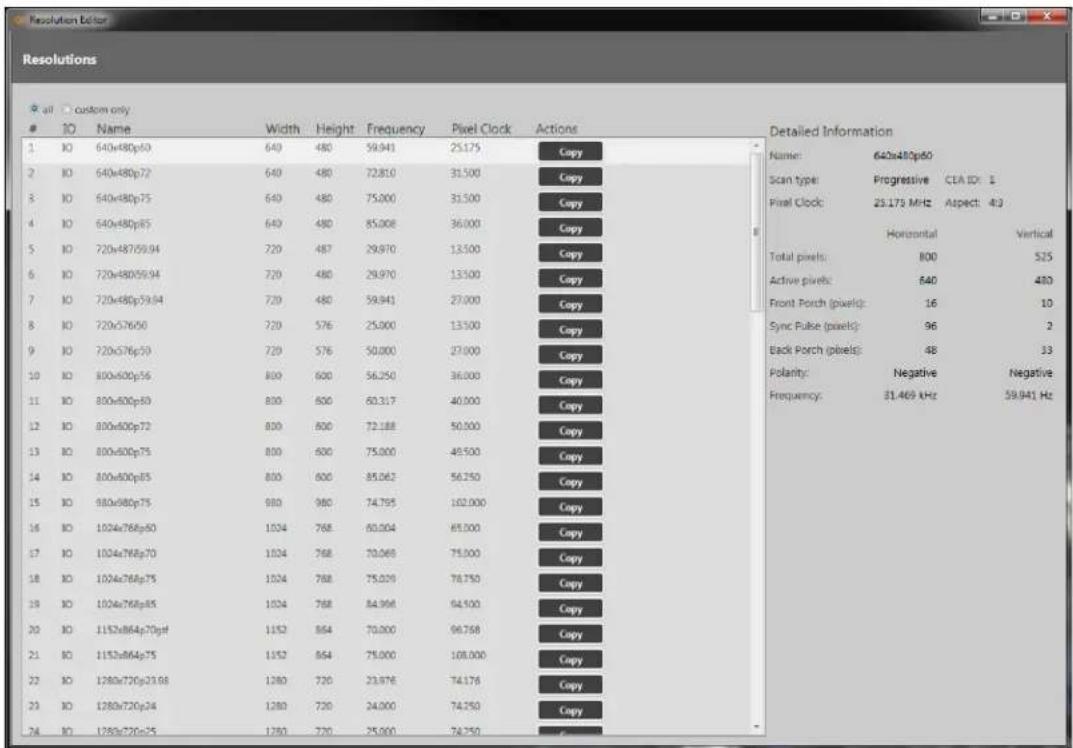
text_image
Resolutions all custom onlyIO Name Width Height Frequency Pixel Clock Actions
1 IO 640x480p50 640 480 59.943 25.175 Copy 2 IO 640x480p72 640 480 72.810 31.500 Copy 3 IO 640x480p75 640 480 75.000 31.500 Copy 4 IO 640x480p85 640 480 85.008 36.000 Copy 5 IO 720x487/59.94 720 487 29.970 13.500 Copy 6 IO 720x480/59.94 720 480 29.970 13.500 Copy 7 IO 720x480p39.94 720 480 59.943 27.000 Copy 8 IO 720x576/50 720 576 25.000 13.500 Copy 9 IO 720x576p50 720 576 50.000 27.000 Copy 10 IO 800x600p56 800 600 56.250 36.000 Copy 11 IO 800x600p50 800 600 60.317 40.000 Copy 12 IO 800x600p72 800 600 72.188 50.500 Copy 13 IO 800x600p75 800 600 75.000 49.500 Copy 14 IO 800x600p85 800 600 85.062 56.250 Copy 15 IO 980x980p75 980 980 74.795 162.935 Copy 16 IO 1024x768p60 1024 768 60.334 65.334 Copy 17 IO 1024x768p75 1024 768 73.333 75.333 Copy 18 IO 1024x768p75 1024 768 75.333 78.333 Copy 19 IO 1024x768p85 1024 768 84.333 94.333 Copy 20 IO 1152x864p79q#f 1152 864 73.333 96.333 Copy 21 IO 1152x864p75 1152 864 75.333 108.333 Copy 22 IO 1280x720p23.98 1280 720 23.976 74.176 Copy 23 IO 1280x720p24 1280 720 24.999 74.259 Copy 24 IO 1280x720p25 1280 720 25.999 74.259 Copy Detailed Information Name: 642x48/ep60 Scan type: Progressive CEA ID: I Pixel Clock: 23.173 MHz Aspect: 4:2 Horizontal Vertical Total pixels: 18:O Negative Negative Active pixels: 6:O Negative Positive Front Porch (pixels): 16 Positive Sync Pulse (pixels): - Negative Positive Back Porch (pixels): - Negative Negative Positive Polarity: - Negative Negative Positive Frequency: - - - - - - - - - - - - - - - - - - - - - - - - - - - - - - - - - - - - - - - - - - - - - - - - - - - - - - - - - - - - - - - - - - - - - - - - - - - - Total pixels: Negative Negative Negative Positive Continuous pixels: Positive Vertical Pixel Clock: Horizontal Vertical Front Porch (pixels): Positive Vertical Sync Pulse (pixels): Positive Vertical Back Porch (pixels): Positive Vertical Polarity: Negative Negative Negative Positive VerticalBy default the Resolution Editor shows all resolutions, both built-in and custom. Scroll to the bottom of the list or select the Custom Only radio button to see the Custom Resolutions:

text_image
Resolution Editor Resolutions all custom onlyIO Name
1 IO 640x480p60For each resolution, you can see the resolution number, Name, Width, Height, Frequency, and Pixel Clock. This information should be sufficient for you to identify the specific resolution you are looking for.
If you want more details of a given resolution, click on that line and the Detailed Inform pane on the right will list all available properties of the resolution including the name of ution, the Scan Type, Pixel Clock, and both Horizontal and Vertical values for Total pixels, Active pixels, Front and Back Porch, Sync Pulse, Polarity and Frequency.
Creating a Custom Resolution From a Built-In Resolution
The simplest way to create a Custom Resolution is to base it on an existing resolution, and change only the parameters that vary.
- Select the existing resolution that most closely matches your desired resolution and press the Copy button:

text_image
ResolutionsID Name Width Height Frequency Pixel Clock Actions Detailed Information
56 10 2900x1080p60x4 1989 1970 59.934 146.250 Copy 57 10 2900x720p60x4 1989 720 59.856 111.750 Copy 58 10 2900x1080p47.96 1989 1980 23.876 74.126 Copy 59 10 2900x1080p48 1989 1980 24.000 74.250 Copy 60 10 2900x1080p50 1989 1980 25.000 74.250 Copy 61 10 2900x1080p59.94 1989 1980 29.970 74.176 Copy 62 10 2900x1080p60 1989 1980 30.000 74.250 Copy 63 10 2900x1080p23.38 1989 1980 22.876 74.176 Copy 64 10 2900x1080p24 1989 1980 24.000 74.250 Copy 65 10 2900x1080p25 1989 1980 25.000 74.250 Copy 66 10 2900x1080p29.97 1989 1980 26.970 74.176 Copy 67 10 2900x1080p30 1989 1980 30.200 74.250 Copy 68 10 2900x1080p50 1989 1980 50.000 148.560 Copy 69 10 2900x1080p53.34 1989 1980 53.343 148.352 Copy 70 10 2900x1080p60 1989 1980 60.000 148.560 Copy 71 10 2900x1280p55x4x4b 1989 1280 48.878 127.750 Copy 72 10 2900x1280p46x4x4b 1989 1280 56.953 154.063 Copy © © © © © © © © © © © © © © © © © © © © © © © © © © © © © © © © © © © © © © © © © © © © © © © © © © © © © © © © © © © © © © © © © © © © © © © © © © © © © © © © © © © © © © © © © © © © © © © © © © © © ©© ©©©©©©©©©©©©©©©©©©©©©©©©©©©©©©©©©©©©©©©©©©©©©©©©©©©©©©©©©©©©©©©©©©©©©©©©©©©©©©©©©©©©©©©©©©©©©©©©©©©©©°C©©©©©©©©©©©©©©©©©©©©©©©©©©©©©©©©©©©©©©©©©©©©©©©°C©°C©°C©°C©°C©°C©°C©°C©°C©°C©°C©°C©°C©°C©°C@°C@°C@°C@°C@°C@°C@°C@°C@°C@°C@°C@°C@°C@°C@°C@°C@°C@°C@°C@°C@°C@°C@°C@°C@°C@°C@°C@°C@°C@°C@°C@°C@°C@%€€€€€€€€€€€€€€€€€€€€€€€€€€€€€€€€€€€€€€€€€€€€€€€€€€€€€€€€€€€€€€€€€€€€€€€€€€€€€€€€€€€€€€€€€€€€€€€€€€€€ € € € € € € € € € € € € € € € € € € € € € € € € € € € € € € € € € € € € € € € € € € € € € € € € € € € € € € € € € € € € € € € € € € € € € € € € € € € € € € € € € € € € € € € € € € € € € € € € € € € € – Name: Empty!oo Scan type: Progressive CEA ID: O Pixel Clock: @.oooo MHz Aspect: #3 Horizontal Vertical Total pixels: O o Active pixels: O o Front Perch (pixels): O o Sync Pulse (pixels): O o Back Perch (pixels): O o Polarity: Negative Negative Frequency: @.oooo kHz @.oooo Hz Copy Copy Copy Copy Copy Copy Copy Copy Copy Copy Copy Copy Copy Copy Copy Copy Copy Copy Copy Copy Copy Copy Copy Copy Copy Copy Copy Copy Copy Copy Copy Copy Copy Copy Copy Copy Copy Copy Copy Copy Copy Copy Copy Copy Copy Copy Copy Copy Copy Copy Copy Copy Copy Copy Copy Copy Copy Copy Copy Copy Copy Copy Copy Copy Copy Copy Copy Copy Copy Copy Copy Copy Copy Copy Copy Copy Copy Copy Copy Copy Copy Copy Copy Copy Copy Copy Copy Copy Copy Copy Copy Copy Copy Copy Copy Copy Copy Copy Copy Copy Copy copy copy copy copy copy copy copy copy copy copy copy copy copy copy copy copy copy copy copy copy copy copy copy copy copy copy copy copy copy copy copy copy copy copy copy copy copy copy copy copy copy copy copy copy copy copy copy copy copy copy copy copy copy copy copy copy copy copy copy copy copy copy copy copy copy copy copy copy copy copy copy copy copy copy copy copy copy copy copy copy copy copy copy copy copy copy copy copy copy copy copy copy copy copy copy copy copy copy copy copy copies or copies or copies or copies or copies or copies or copies or copies or copies or copies or copies or copies or copies or copies or copies or copies or copies or copies or copies or copies or copies or copies or copies or copies or copies or copies or copies or copies or copies or copies or copies or copies or copies or copies or copies or copies or copies or copies or copies or copies or copies or copies or copies or copies or copies or copies or copies or copies or copies or copies or copies/oz Copy Edit Reset Copy Edit Reset Copy Edit Reset Copy Edit Reset Copy Edit Reset Copy Edit Reset Copy Edit Reset Copy Edit Reset Copy Edit Reset Copy Edit Reset Copy Edit Reset Copy Edit Reset- In the resulting Edit Resolution window, enter a meaningful name for your Custom Resolution and change the other fields as required. (If you are going to use your Custom Resolution with CORIOgrapher, be sure to read the notes regarding naming at "Editing Name Property from CORIOdiscover Resolution Editor" on page 240.)

text_image
Edit Custom Resolution Edit Custom Resolution 1000 Standard: Manually create a custom resolution Options: - Manually enter values for required custom resolution. - For interlaced values set double the Even field for Vertical - Front Porch, Back Porch, and Sync Pulse. - Enter required First Clock, Horizontal, or Vertical Frequency. - Set Factor to 100 if you are using a Video Optimized Frequency. NOTES: - Manually editing a resolution will not update the name automatically. - Press the X in the Name box to clear and auto-generate the name. The current value result in an unsupported resolution. FirstClock: Unsupported (valid range is 133 to 16/MHz) Name: Empty1000 Scan types: Progressive CEA IDs 0 Post Clock (MHz) 8.000 Aspect 4.3 ° Horizontal Vertical Total pixels: 0 0 Active pixels: 0 64 Front Porch (pixels): 0 0 Sync Pulse (pixels): 0 0 Back Porch (pixels): 0 0 Polarity: Negative * Negative * Frequency: 0.000 0.000 Update CancelFor more information on the individual fields, see the individual topics in the rest of section.
- When you have finished configuring the fields, click the Update button and the new tom Resolution will be placed in the next available (empty) Custom Resolution.
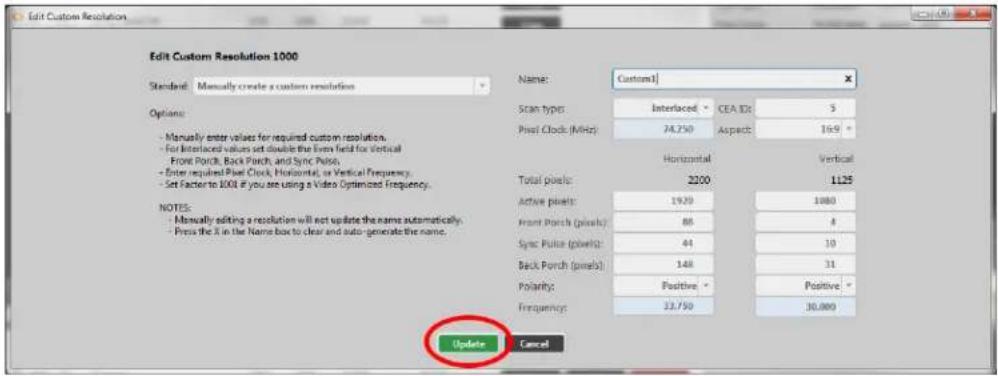
text_image
Edit Custom Resolution Edit Custom Resolution 1000 Standard: Manually create a custom resolution Options: - Manually enter values for required custom resolution. - For Interlaced values set double the Even field for Vertical - Front Porch, Back Porch, and Sync Pulse. - Enter required Pixel Clock, Horizontal, or Vertical Frequency. - Set Factor to 1000 if you see using a Video Optimized Frequency. NOTES: - Manually editing a resolution will not update the name automatically. - Press the X in the Name box to clear and auto-generate the name. Name: Custom1 Scan types: Interlaced: CEA IDS 5 Pixel Clock (MHz): 24.750 Aspects: 16.9 ° Horizontal Vertical Total pixels: 2000 1125 Active pixels: 19.20 1080 Front Porch (pixels): 88 4 Sync Pulse (pixels): 44 10 Back Porch (pixels): 148 31 Polarity: Positive Positive * Frequency: 33.750 30.000 Update CancelCreating a Custom Resolution From a Standard
If you want to create a Custom Resolution based on a video standard, such as CVT, follow the steps:
- Select an empty Custom Resolution, and click the Edit button.

text_image
Resolutionsall custom only
ID Name Width Height Frequency Pixel Clock Actions Detailed Information
50 ID 1880x1080p60x47 1880 1000 50,934 146,230 Copy 57 ID 1880x720p60x47 1820 720 59,856 111,750 Copy 58 ID 1880x1080p47.96 1820 1080 23,876 74,176 Copy 59 ID 1880x1080p48 1820 1080 24,000 74,250 Copy 60 ID 1880x1080p50 1820 1080 25,000 74,250 Copy 61 ID 1880x1080p59.94 1820 1080 29,970 74,176 Copy 62 ID 1880x1080p60 1820 1080 30,000 74,250 Copy 63 ID 1880x1080p79.98 1820 1080 29,976 74,176 Copy 64 ID 1880x1080p24 1820 1080 24,000 74,250 Copy 65 ID 1880x1080p25 1820 1080 25,000 74,250 Copy 66 ID 1880x1080p29.97 1820 1080 26,970 74,176 Copy 67 ID 1880x1080p30 1820 1080 30,000 74,250 Copy 68 ID 1880x1080p59 1820 1080 50,000 148,560 Copy 69 ID 1880x1080p59.94 1820 1080 59,940 148,352 Copy 70 ID 1880x1080p60 1820 1080 60,000 148,560 Copy 71 ID 1880x1290p59x4x4b 1820 1290 49,974 127,730 Copy 72 ID 1880x1290p66x4x4b 1820 1290 59,950 154,966 Copy 1/1/2 ID Empty/3/3/4 # # (A) (A) 1/2/3 ID Custom# # # (B) (C) (D) 1/3/4 ID Empty/3/3/4 # # (E) (F) (G) 1/4/5 ID Empty/3/3/4 # # (H) (I) (J) 1/5/6 ID Empty/3/3/4 # # (I) (J) 1/6/7 ID Empty/3/3/4 # # (K) (L) (M) 1/7/8 ID Empty/3/3/4 # # (L) (N) 1/8/9 ID Empty/3/3/4 # # (O) (P) (Q) Total pixels: Empty/3/3/4 Active pixels: Progressive CEA ID: 9 Front Porch (pixels): Sync Pulse (pixels): Rock Perch (pixels): Polarity: Negative Negative Frequency: 6.666 kHz - 6.666 Hz- In the resulting Edit Resolution window, choose the appropriate Standard from the dro down list of options.

text_image
Edit Custom Resolution 1000 Standard: Manually create a custom resolution Options: Manually create a custom resolution CVT v1.2 Standard (VESA Coordinated Video Timing) CVT v1.2 Reduced Blanking (VESA Coordinated Video Timing) - Manager DMT 1.0x11 (VESA Display Monitor Timing) - Turbo CTA-861-D (Consumer Electronics Association) Front clock, back clock, and sync reset. - Enter required Post Clock, Horizontal, or Vertical Frequency. - Set Factor to 100 if you are using a Video Optimized Frequency. NOTE: - Manually editing a resolution will not update the name automatically. The current values result in an unsupported resolution. PostClock: Unsupported (valid range is E13 to 16MHz) Name: Empty 1000 Scan type: Progressive CEA ID: 0 Pixel Clock (MHz): 0.00 Factor: 1000 ° Horizontal Vertical Total pixels: 0 0 Active pixels: 0 0 Front Porch (pixels): 0 0 Sync Pulse (pixels): 0 0 Back Porch (pixels): 0 0 Polarity: N N Frequency: 0.000 Null Update Cancel- Choose the appropriate Resolution from the drop-down list of options.
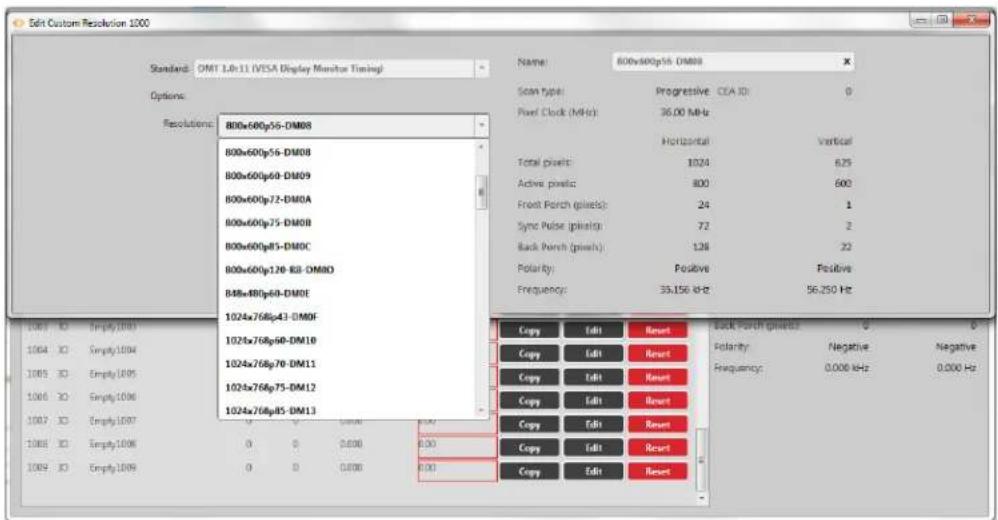
text_image
Edit Custom Resolution 1000 Standard: OMT LB-11 (VISA Display Monitor Timing) Options: Resolutions: 800x600p56-DM08 800x600p54-DM08 800x600p60-DM09 800x600p72-DM0A 800x600p75-DM0B 800x600p85-DM0C 800x600p120-RB-DM0D 848x480p60-DM0E 1024x768p43-DM0F 1024x768p60-DM10 1024x768p70-DM11 1024x768p75-DM12 1024x768p85-DM13 Copy Edit Reset Copy Edit Reset Copy Edit Reset Copy Edit Reset Copy Edit Reset Copy Edit Reset Copy Edit Reset Copy Edit Reset Copy Edit Reset Copy Edit Reset Copy Edit Reset Copy Edit Reset Copy Edit Reset Copy Edit Reset Copy Edit Reset Copy Edit Reset Copy Edit Reset Copy Edit Reset Copy Edit Reset Copy Edit Reset Copy Edit Reset Copy Edit Reset Copy Edit Reset Copy Edit Reset Copy Edit Reset Copy Edit Reset Copy Edit Reset Copy Edit Reset Copy Edit Reset Copy Edit Reset Copy Edit Reset Copy Edit Reset Copy Edit Reset Copy Edit Reset Copy Error Scan type: Progressive CEA ID: 0 Pixel Clock (MHz): 36.00 MHz Horizontal Vertical Total pixels: 1024 625 Active pixels: 800 600 Front Perch (pixels): 24 1 Sync Pulse (pixels): 72 2 Back Perch (pixels): 126 22 Polarity: Positive Positive Frequency: 35.156 kHz 56.250 Hz Back Perch (pixels): 0 0 Polarity: Negative Negative Frequency: 0.000 kHz 0.000 Hz-
Enter a meaningful name for your Custom Resolution and change the other fields as required. (If you are going to use your Custom Resolution with CORIOgrapher, be sure read the notes regarding naming at "Editing Name Property from CORIOdiscover Resolution Editor" on page 240.) For more information on the individual fields, see elsewhere in this manual.
-
When you have finished configuring the fields, click the Update button and the Custom Resolution will be saved in the Custom Resolution slot you chose in step 1.
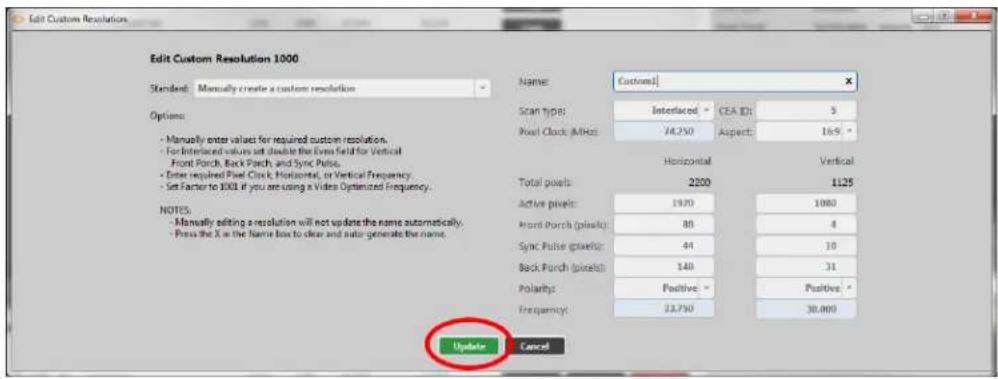
text_image
Edit Custom Resolution Edit Custom Resolution 1000 Standard: Manually create a custom resolution Options: - Manually enter value for required custom resolution. - For Interlaced values set double the Even field for Vertical Front Pitch, Back Pitch, and Sync Pulse. - Enter required Pixel Clock, Horizontal, or Vertical Frequency. - Set Factor to 1000 if you are using a Video Optimized Frequency. NOTES: - Manually editing a resolution will not update the name automatically. - Focus the X in the Name box to clear and auto generate the name. Name: Custom| Scan type: Interlaced CEA ID: 5 Pixel Clock (MHz) 74.250 Aspect: 169 ° Horizontal Vertical Total pixels: 2200 1125 Active pixels: 1920 1080 Front Pitch (pixels): 80 4 Sync Pulse (pixels): 44 10 Back Pitch (pixels): 148 31 Polarity: Positive: Frequency: 22.750 30.000 Update CancelCreating a Custom Resolution From Scratch
If you want to create a Custom Resolution that isn't based on a standard or an existing resolution, follow these steps.
- Select an empty Custom Resolution, and click the Edit button.

text_image
ResolutionsIO Name Width Height Frequency Pixel Clock Actions
56 IO 1920x1080p40vxt 1920 1950 25.934 146.230 Copy 57 IO 1920x720p88vxt 1920 730 58.858 111.750 Copy 58 IO 1920x1080p47.96 1920 1980 23.976 74.176 Copy 59 IO 1920x1080p48 1920 1980 24.000 74.250 Copy 60 IO 1920x1080p50 1920 1980 25.000 74.250 Copy 61 IO 1920x1080p59.94 1920 1980 26.970 74.176 Copy 62 IO 1920x1080p60 1920 1980 30.000 74.250 Copy 63 IO 1920x1080p73.98 1920 1980 23.976 74.176 Copy 64 IO 1920x1080p24 1920 1980 24.000 74.250 Copy 65 IO 1920x1080p23 1920 1980 25.000 74.250 Copy 66 IO 1920x1080p29.87 1920 1980 28.870 74.176 Copy 67 IO 1920x1080p30 1920 1980 30.000 74.250 Copy 68 IO 1920x1080p50 1920 1980 50.000 148.560 Copy 69 IO 1920x1080p59.94 1920 1980 55.940 148.352 Copy 70 IO 1920x1080p60 1920 1980 60.000 148.560 Copy 71 IO 1920x1296p53ccx-rb 1920 1280 48.974 127.750 Copy 72 IO 1920x1296p66ccx-rb 1920 1280 58.950 154.060 Copy 1935 IO Empty433A # 3 A=4 A=5 A=6 Copy Edit Reset 1,034 IO Custom-1 0 8 A=4 A=5 A=6 Copy Edit Reset 1,032 IO Empty433A 0 8 A=4 A=5 A=6 Copy Edit Reset 1,034 IO Empty433A 6 8 A=4 A=5 A=6 Copy Edit Reset 1,034 IO Empty433A 0 8 A=4 A=5 A=6 Copy Edit Reset 1,035 IO Empty433A 6 8 A=4 A=5 A=6 Copy Edit Reset Detailed Information Name: Empty1,000 Scan type: Progressive CEA ID: O Pixel Clock: 0.000 MHz Aspect: A3 Horizontal Vertical Total pixels: 0 D Active pixels: 0 D Front Porch (pixels): D Sync Pulse (pixels): D Back Porch (pixels): D Polarity: Negative Negative Frequency: 0.000 kHz 0.00D Hz- In the resulting Edit Resolution window, be sure that Manually create a custom resolution is selected from the Standard drop-down list.

text_image
Edit Custom Resolution 1000 Standard: Manually create a custom resolution Options: Manually create a custom resolution CVT v1.2 Standard (VESA Coordinated Video Timing) CVT v1.2 Reduced Banking (VESA Coordinated Video Timing) - Menur DMT 10x11 (VESA Display Monitor Timing) - To int CLA-861-D Consumer Electronics Association) Front button, back button, and sync mode. - Enter required Post Clock, Horizontal, or Vertical Frequency. - Set factor to 1000 if you are using a Video Optimized Frequency. NOTE: - Manually adding a resolution will not update the name automatically. The current value result in an unsupervised resolution PostClock: Unsupported (valid range is 33.5 to 62MHz) Name: Empty1000 Scan type: Progressive CEA ID: 0 Post Clock (MHz) 0.90 Factor: 1000 ° Horizontal Vertical Total pixels: 0 0 Active pixels: 0 0 Front Porch (pixels): 0 0 Sync Pulse (pixels): 0 0 Back Porch (pixels): 0 0 Polarity: N - N * Frequency: 0.000 NaN Update Cancel- Enter a meaningful name for your Custom Resolution and change the other fields to match your requirements. (If you are going to use your Custom Resolution with CORIO-grapher, be sure to read the notes regarding naming at "Editing Name Property from CORIOdiscover Resolution Editor" on page 240.)
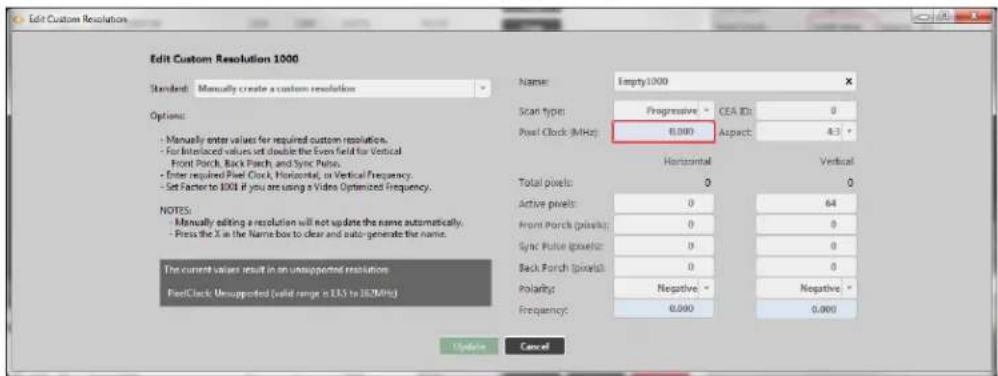
text_image
Edit Custom Resolution Edit Custom Resolution 1000 Standard: Manually create a custom resolution Options: - Manually enter values for required custom resolution. - For Intellectual values set double the Even field for Vertical - Front Porch, Back Porch, and Sync Pulse. - Enter required Pixel Clock, Horizontal, or Vertical Frequency. - Set Factor to 100 if you are using a Video Optimized Frequency. NOTES: - Manually editing a resolution will not update the name automatically. - Press the X in the Name box to clear and auto-generate the name. The current values result in an unsupported resolution. PixelClock: Unsupported (valid range is 13.5 to 28.0MHz) Name: Empty1000 Scan type: Progressive CEA ID: 0 Pixel Clock (MHz) 0.000 Aspect: 4.3 Horizontal Vertical Total pixels: 0 0 Active pixels: 0 64 Front Porch (pixels): 0 0 Sync Pulse (pixels): 0 0 Back Porch (pixels): 0 0 Polarisy: Negative - Negative - Frequency: 0.000 0.000 Update CancelFor more information on the individual fields, see elsewhere in this manual. Note that some fields must be updated to appropriate values before you can save the resolution.
- When you have finished configuring the fields, click the Update button and the Custom Resolution will be saved in the Custom Resolution slot you chose in step 1.

text_image
Edit Custom Resolution Edit Custom Resolution 1000 Standard: Manually create a custom resolution Options: - Manually enter values for required custom resolution. - For interlaced values set double the Even field for Vertical Front Porch, Back Porch, and Sync Pulse. - Enter required Pixel Clock, Horizontal, or Vertical Frequency. - Set Factor to 100 if you are using a Video Optimized Frequency. NOTES: - Manually editing a resolution will not update the name automatically. - Press the X in the Name box to clear and auto-generate the name. Name: Custom1 Scan types: Interlaced CEA ID: 3 Pixel Clock (MHz): 24.750 Aspect: 16.9 Horizontal Vertical Total pixels: 2200 1125 Active pixels: 19.70 1880 Front Porch (pixels): 88 4 Sync Pulse (pixels): 44 10 Back Porch (pixels): 148 31 Polarity: Positive Positive * Frequency: 23.750 30.000 Update CancelEditing an existing Custom Resolution
To edit an existing Custom Resolution:
- Select the Custom Resolution and press the Edit button:

text_image
Resolutions at custom onlyID Name Width Height Frequency Pixel Clock Actions Detailed Information
30 10 1920x120p60x4 1989 1070 59.054 146.250 Copy 57 10 1920x720p60x4 1929 720 59.856 111.750 Copy 58 10 1920x120p47x6 1928 1080 23.979 74.176 Copy 59 10 1920x120p48 1929 1080 24.000 74.250 Copy 60 10 1920x120p50 1929 1080 25.000 74.250 Copy 61 10 1920x120p59.94 1929 1080 29.970 74.176 Copy 62 10 1920x120p60 1929 1080 30.000 74.250 Copy 63 10 1920x120p53.38 1929 1080 33.876 74.136 Copy 64 10 1920x120p24 1929 1080 24.000 74.250 Copy 65 10 1920x120p25 1929 1080 25.000 74.250 Copy 66 10 1920x120p29.87 1929 1080 29.870 74.276 Copy 67 10 1920x120p30 1929 1080 30.200 74.250 Copy 68 10 1920x120p53 1929 1080 50.300 148.560 Copy 69 10 1920x120p53.34 1929 1080 53.843 148.352 Copy 70 10 1920x120p63 1929 1080 63.363 148.563 Copy 71 10 1920x120p53x4-xb 1929 1283 48.874 127.753 Copy 72 10 1920x120p63x4-xb 1929 1283 53.853 154.063 Copy Copy Edit Reset Copy East Reset Copy Edit Reset Copy East Reset Copy Edit Reset Copy East Reset Copy East Reset Copy East Reset- In the resulting Edit Resolution window, change the fields as required. (If you are going to use your Custom Resolution with CORIOgrapher, be sure to read the notes regarding naming at "Editing Name Property from CORIOdiscover Resolution Editor" on page 240.)

text_image
Edit Custom Resolution Edit Custom Resolution 1000 Standard: Manually create a custom resolution Options: - Manually enter values for required custom resolution. - For Intellectual values set double the Even field for Vertical - Front Porch, Back Porch, and Sync Puls. - Enter required/Post Clock, Horizontal, or Vertical Frequency. - Set Factor to 100 if you are using a Video Optimized Frequency. NOTES: - Manually editing a resolution will not update the name automatically. Press the X in the Name box to clear and auto-generate the name. The current value result in an unsupported resolution. PostClock: Unsupported (valid range is 133 to 16/MHz) Name: Empty1000 Scan types: Progressive CEA ID: 0 Post Clock (MHz): 8.000 Aspect: 4.3 ° Horizontal Vertical Total pixels: 0 0 Active pixels: 0 64 Front Porch (pixels): 0 0 Sync Pulse (pixels): 0 0 Back Porch (pixels): 0 0 Polarity: Negative - Negative * Frequency: 0.000 0.000 Update CancelFor more information on the individual fields, see elsewhere in this manual.
- When you have finished configuring the fields, click the Update button and the Custom Resolution will be saved in the same Custom Resolution slot you chose in step 1.
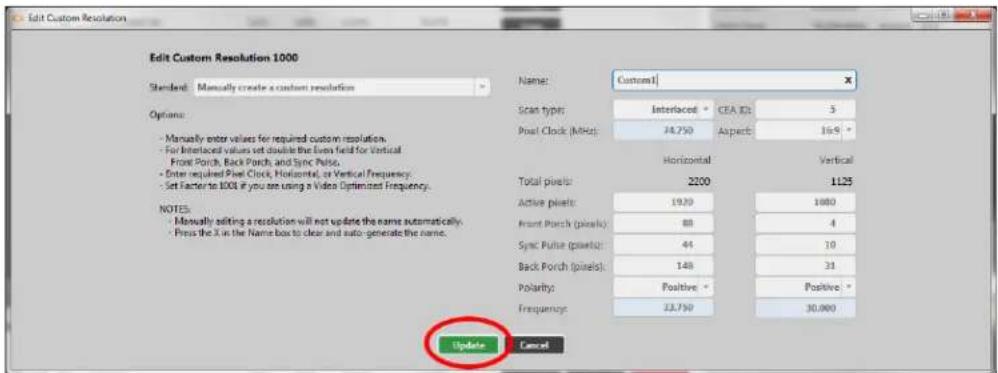
text_image
Edit Custom Resolution Edit Custom Resolution 1000 Standard: Manually create a custom resolution Options: - Manually enter values for required custom resolution. - For Interlaced values set double the Even field for Vertical - Front Porch, Back Porch, and Sync Pulse. - Enter required Post Clock, Horizontal, or Vertical Frequency. - Set Factor to 100 if you are using a Video Optimized Frequency. NOTES: - Manually editing a resolution will not update the name automatically. - Press the X in the Name box to clear and auto-generate the name. Name: Custom1 Scan types: Interlaced: CEA ID: 3 Post Clock (MHz): 24.750 Aspects: 16.9 ° Horizontal Vertical Total pixels: 2200 1125 Active pixels: 19.29 1080 Front Porch (pixels): 88 4 Sync Pulse (pixels): 44 10 Back Porch (pixels): 148 31 Polarity: Positive * Positive * Frequency: 22.750 30.000 Update Cancel
Note: If the Custom Resolution is active on an output, your changes will take effect immediately after you press the Update button, with the exception of the Name. If you change the Name attribute of a Custom Resolution that you have already set to an output, the output will revert to the default built-in resolution for that output. continue using the same Custom Resolution with that output, re-apply it to the output.
Clearing or Deleting an existing Custom Resolution
Custom Resolutions can only be modified; they cannot be created or deleted. If you wish to remove saved details, Reset the Custom Resolution to default settings. This is equivalent to deleting, but the slot is still available for future use.
To clear a Custom Resolution:
- Select the Custom Resolution and press the Reset button.

text_image
ResolutionsID Name Width Height Frequency Pixel Clock Actions Detailed Information
50 10 1920x100p60cst 1980 1000 59.354 146.250 Copy 57 10 1920x725p60cst 1900 720 59.856 111.750 Copy 58 10 1920x108047.96 1920 1080 23.976 74.176 Copy 59 10 1920x108048 1920 1080 24.000 74.250 Copy 60 10 1920x108050 1920 1080 25.000 74.250 Copy 61 10 1920x108059.94 1920 1080 29.970 74.176 Copy 62 10 1920x108060 1920 1080 30.000 74.250 Copy 63 10 1920x1080p24.38 1920 1080 29.976 74.176 Copy 64 10 1920x1080p24 1920 1080 24.000 74.250 Copy 65 10 1920x1080p25 1920 1080 25.000 74.250 Copy 66 10 1920x1080p29.97 1920 1080 26.970 74.176 Copy 67 10 1920x1080p33 1920 1080 30.290 74.250 Copy 68 10 1920x1080p33 1920 1080 50.000 148.560 Copy 69 10 1920x1080p59.94 1920 1080 59.940 148.352 Copy 70 10 1920x1080p63 1920 1080 60.360 148.560 Copy 71 10 1920x1280p55a4-ctb 1920 1280 49.978 127.250 Copy 72 10 1920x1280p65a4-ctb 1920 1280 59.856 154.366 Copy 3:35: - Empty(3): # # # (3): (3): (3): (3): (3): (3): (3): (3): (3): (3): (3): (3): (3): (3): (3): (3): (3): (3): (3): (3): (3): (3): (3): (3): (3): (3): (3): (3): (3): (3): (3): (3): (3): (3): 1:35: - Empty(3): # # # (3): (3): (3): (3): (3): (3): (3): (3): (3): (3): (3): (3): (3): (3): (3): (3): (3): (3): (3): (3): (3): (3): (3): (3): (3): (3): (3): (3): (3): 1:35: - Empty(3): #- A pop-up window appears, asking you to verify that you want to erase all the data resolution. Click Yes, if you do wish to clear the Custom Resolution.
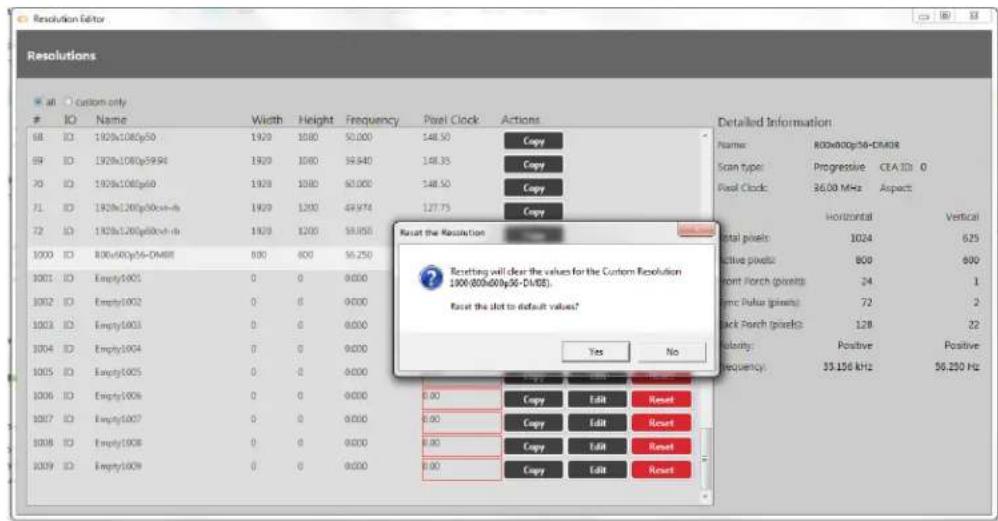
text_image
Resolution Editor Resolutions all Custom onlyIO Name Width Height Frequency Pixel Clock Actions
68 ID 1920x1080p50 1920 1080 50.000 148.50 Copy 69 ID 1920x1080p59.94 1920 1080 59.940 148.35 Copy 70 ID 1920x1080p60 1920 1080 60.000 148.50 Copy 71 ID 1920x1080p60x-rb 1920 1200 49.974 127.75 Copy 72 ID 1920x1200p60x-rb 1920 1200 59.958 1000 ID 800x600p76-DM8E 800 600 56.250 1001 ID Empty1001 0 0 9.000 1002 ID Empty1002 0 0 9.000 1003 ID Empty1003 0 0 9.000 1004 ID Empty1004 0 0 9.000 1005 ID Empty1005 0 0 9.000 1006 ID Empty1006 0 0 9.000 1007 ID Empty1007 0 0 9.000 1008 ID Empty1908 0 0 9.000 1009 ID Empty1909 0 0 9.000 Detailed Information Name: 800x600p76-DM8E Scan type: Progressive CEA ID: O Pixel Clock: 36.69 MHz Aspect: Horizontal Vertical Total pixels: 1024 625 Active pixels: 808 699 Front Porch pixels: 24 1 Sync Pulse pixels: 72 2 Back Porch pixels: 128 22 Volatity: Positive Positive Frequency: 55.156 kHz 56.250 Hz- In the Resolution Editor, that Custom Resolution now appears empty, with values reset default.

Note: If you clear a Custom Resolution that you have already set to output will revert to the default built-in resolution for that output.
an output, th
Listing Resolution Properties from CORIOdiscover Resolution Editor
The Detailed Information pane is on the far right of the Resolution Editor window. This pane displays information about the highlighted resolution.
Built-in resolution details are read-only; custom resolution details can be edited.
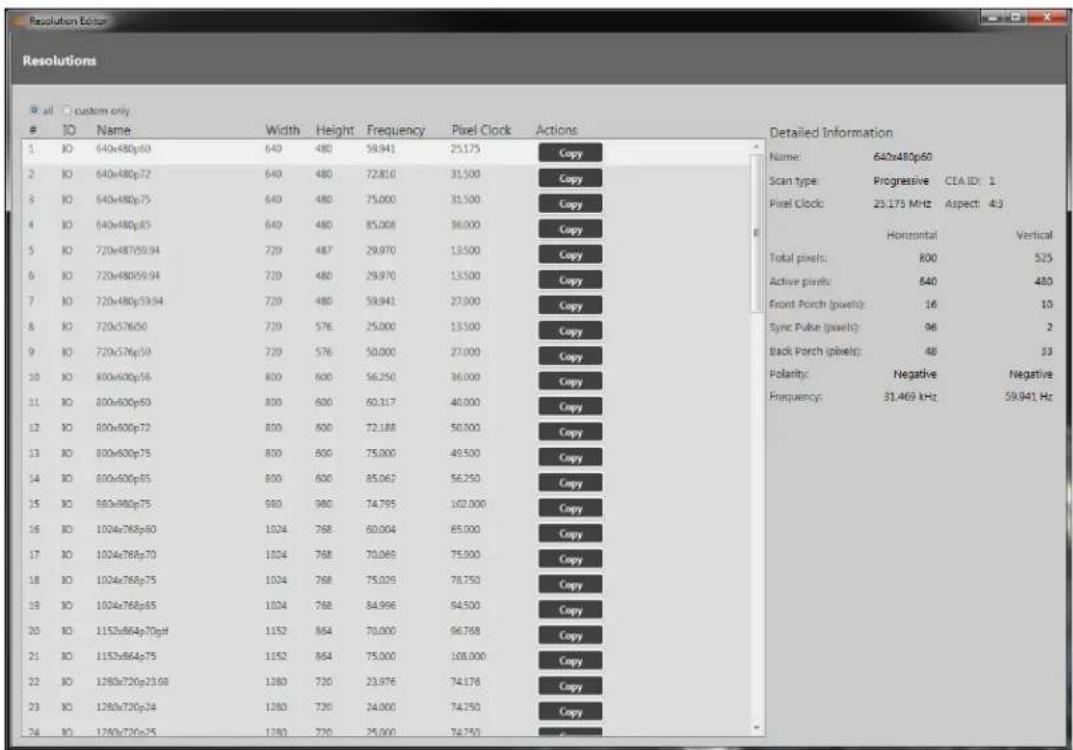
text_image
Resolutionsall custom only
IO Name Width Height Frequency Pixel Clock Actions
1 IO 640x480p60 640 480 59.941 25.175 Copy 2 IO 640x480p72 640 480 72.810 31.500 Copy 3 IO 640x480p75 640 480 75.000 31.500 Copy 4 IO 640x480p85 640 480 85.008 36.000 Copy 5 IO 720x48709.94 720 487 29.970 13.500 Copy 6 IO 720x480x59.94 720 480 29.970 13.500 Copy 7 IO 720x480p39.94 720 480 59.941 27.000 Copy 8 IO 720x57650 720 576 25.000 13.500 Copy 9 IO 720x576p50 720 576 50.000 27.000 Copy 10 IO 800x600p56 800 600 56.250 36.000 Copy 11 IO 800x600p60 800 600 60.317 40.000 Copy 12 IO 800x600p72 800 600 72.188 50.500 Copy 13 IO 800x600p75 800 600 75.000 49.500 Copy 14 IO 800x600p85 800 600 85.062 56.250 Copy 15 IO 980x980p75 980 980 74.795 102.000 Copy 16 IO 1024x768p60 1024 768 60.004 65.500 Copy 17 IO 1024x768p70 1024 768 70.069 75.500 Copy 18 IO 1024x768p75 1024 768 75.029 78.750 Copy 19 IO 1024x768p85 1024 768 84.996 94.500 Copy 20 IO 1152x864p70g#f 1152 864 70.000 96.768 Copy 21 IO 1152x864p75 1152 864 75.000 108.000 Copy 22 IO 1280x720p23.98 1280 720 23.976 74.176 Copy 23 IO 1280x720p24 1280 720 24.999 74.259 Copy 24 IO 1280x720p25 1280 720 25.999 74.259 Copy Detailed Information Name: 640x480p60 Scan type: Progressive CEA ID: 1 Pixel Clock: 23.175 MHz Aspect: 4:3 Horizontal Vertical Total pixels: 80D - - - - - - Active pixels: - - - - - - Front Porch (pixels): - - - - - - Sync Pulse (pixels): - - - - - - Back Porch (pixels): - - - - - - Polarity: Negative Negative Frequency: - - - - - - 31.469 kHz - - - - - - - Negative - - - - - - - Negative - - - - - - - Negative - - - - - - - Negative - - - - - - - Negative - - - - - - - Negative - - - - - - - Negative - - - - - - - Negative - - - - - - - Negative - - - - - - - Negative - - - - - - - Negative - - - - - - - Negative - - - - - - - Negative - - - - Negative - - - - - Negative - - - - Negative - - - - Negative - - - - Negative - - - - Negative - - - - Negative - - - - Negative - - - Negative - - - Negative - - Negative - - Negative - - Negative - - Negative - - Negative - - Negative - - Negative - - Negative - - Negative - - Negative - - Negative - - Negative - - Negative - - Negative - - Negative - - Negative - - Negative - - Negative - - Negative - - Negative - - Negative - - Negative - - Negative - - Negative - - Positive / Horizontal Vertical Total pixels: Total pixels: Total pixels: Total pixels: Total pixels: Total pixels: Total pixels: Total pixels: Total pixels: Total pixels: Total pixels: Total pixels: Total pixels: Total pixels: Total pixels: Total pixels: Total pixels: Total pixels: Total pixels: Total pixels: Total pixels: Total pixels: Total pixels: Total pixels: Total pixels: Total pixels: Total pixels: Total pixels: Total pixels: Total pixels: Total pixels: Total pixels: Total pixels: Total pixels: Total cells : Horizontal Vertical Total pixels: Horizontal Vertical Active pixels: Active pixels: Active pixels: Active pixels: Active pixels: Active pixels: Active pixels: Active pixels: Active pixels: Active pixels: Active pixels: Active pixels: Active pixels: Active pixels: Active pixels: Active pixels: Active pixels: Active pixels: Active pixels: Active pixels: Active pixels: Active pixels: Active pixels: Active pixels: Active pixels: Active pixels: Active pixels: Active pixels: Active pixels: Active pixels: Active pixels: Active pixels: Active pixels: Active pixels: Active cells : Horizontal Vertical Total pixels: Horizontal Vertical Active pixels: Active pixels: Active pixels: Active pixels: Active pixels: Active pixels: Active pixels: Active pixels: Active pixels: Active pixels: Active pixels: Active pixels: Active pixels: Active pixels: Active pixels: Active pixels: Active pixels: Active pixels: Active pixels: Active cells : Horizontal Vertical Total pixels: Horizontal Vertical Active pixels: Active pixels: Active pixels: Active pixels: Active pixels: Active pixels: Active pixels: Active pixels: Active pixels: Active pixels: Active cells : Horizontal Vertical Total pixels: Horizontal Vertical Active pixels: Active pixels: Active pixels: Active pixels: Active pixels: Active pixels: Active cells : Horizontal Vertical Total pixels: Horizontal Vertical Active pixels: Active pixels: Active pixels: Active cells : Horizontal Vertical Front Porch (pixels): Front Porch (pixels): Front Porch (pixels): Front Porch (pixels): Front Porch (pixels): Front Porch (pixels): Front Porch (pixels): Front Porch (pixels): Front Porch (pixels): Front Porch (pixels): Front Porch (pixels): Front Porch (pixels): Front Porch (pixels): Front Porch (pixels): Front Porch (pixels): Front Porch (pixels): Front Porch (pixels): Front Porch (plus): Front Porch (plus): Front Porch (plus): Front Porch (plus): Front Porch (plus): Front Porch (plus): Front Porch (plus): Front Porch (plus): Front Porch (plus): Front Porch (plus): Front Porch (plus): Front Porch (plus): Front Porch (plus): Front Porch (plus): Front Porch (plus): Front Porch (plus): Front Porch (plus): Front Porc / Horizontal Vertical / Vertical / Vertical / Vertical / Vertical / Vertical / Vertical / Vertical / Vertical / Vertical / Vertical / Vertical / Vertical / Vertical / Vertical / Vertical / Vertical / Vertical / Vertical / Vertical / Vertical / Vertical / Vertical / Vertical / Vertical / Vertical / Vertical / Vertical / Vertical / Vertical / Vertical / Vertical / Vertical / Vertical / Vertical / Vertical / Vertical / Vertical / Vertical / Vertical / Vertical / Vertical / Vertical / Vertical / Vertical / Vertical / Vertical / Vertical / Vertical / Vertical / VerticalIn this pane, you can view information including the name of the resolution, the Scan Type, Pixel Clock, and both Horizontal and Vertical values for Total pixels, Active pixels, Front and Back Porch, Sync Pulse, Polarity and Frequency.
Editing Resolution Properties from CORIOdiscover Resolution Editor
Various details specific to a resolution are saved on a per-resolution basis. You can edit s for Custom Resolutions. Each property is covered separately.
Editing Name Property from CORIOdiscover Resolution Editor
Learn how to set a name for a Custom Resolution via the Resolution Editor in CORIOdiscover.
Description
Lists the user-readable name for this resolution. Set up the name as something meaningful for you, within the limitations of the permissible characters. (See Note below.)
In stru ct ion s
- From the Resolution Editor window, scroll to the Custom Resolutions section and press the Edit button next to the Custom Resolution you want to rename.

text_image
Resolutions10 Custom only
ID Name Width Height Frequency Post Clock Actions Detailed Information 56 10 1920x1080p64v4 1800 1700 50,934 146,230 Copy 57 10 1920x170p66v4 1820 720 58,658 111,730 Copy 58 10 1920x1080p47.96 1920 1080 23,978 74,176 Copy 59 10 1920x1080p48 1920 1080 24,000 74,250 Copy 60 10 1920x1080p50 1920 1080 25,000 74,250 Copy 61 10 1920x1080p59.94 1920 1080 26,970 74,176 Copy 62 10 1920x1080p60 1920 1080 30,000 74,250 Copy 63 10 1920x1080p73.88 1920 1080 29,976 74,176 Copy 64 10 1920x1080p24 1920 1080 24,000 74,250 Copy 65 10 1920x1080p23 1920 1080 25,000 74,250 Copy 66 10 1920x1080p29.97 1920 1080 26,970 74,176 Copy 67 10 1920x1080p30 1920 1080 30,000 74,250 Copy 68 10 1920x1080p50 1920 1080 50,000 148,560 Copy 69 10 1920x1080p59.94 1920 1080 55,940 148,352 Copy 70 10 1920x1080p60 1920 1080 60,060 148,560 Copy 71 10 1920x1280p55v4-vn 1920 1280 48,974 127,730 Copy 72 10 1920x1280p66v4-vn 1920 1280 59,856 154,666 Copy 1.## ## ### # # # # # # # # # # # # # # # # # # # # # # # # # # # # # # # # # # # # # # # # # # # # # # # # # # # # # # # # # # # ### ## ## ## ## ## ## ## ## ## ## ## ## ## ## ## ## ## ## ## ## ## ## ## ## ## ## ## ## ## ## ## ## ## ## ## ## ## ## ## ## ##
## ## ## ## ## ## ## ## ## ## ## ## ## ## ## ## ## ## ## ## ## ## ## ## ## ## ## ## ## ## ## ## ## ## ## ##
## ## ## ## ## ## ## ## ## ## ## ## ## ## ## ## ## ## ## ## ## ## ## ## ## ##
## ## ## ## ## ## ## ## ## ## ## ## ## ## ## ##
## ### ### ### ###
### ### ###
### ###
### ###
### ###
### ###
### ###
### ###
### ###
### ###
### ###
### ###
### ###
### ###
### ###
### ###
### ###
### ###
### ###
### ###
### ###
### ###
### ###
### ###
### ###
### ###
### ###
### #### #### #### #### #### #### #### #### #### #### #### #### ###- In the new window, you can edit various properties of the Custom Resolution. In the top right corner, you can edit the Name field. Be sure to read the notes below regarding valid
characters.
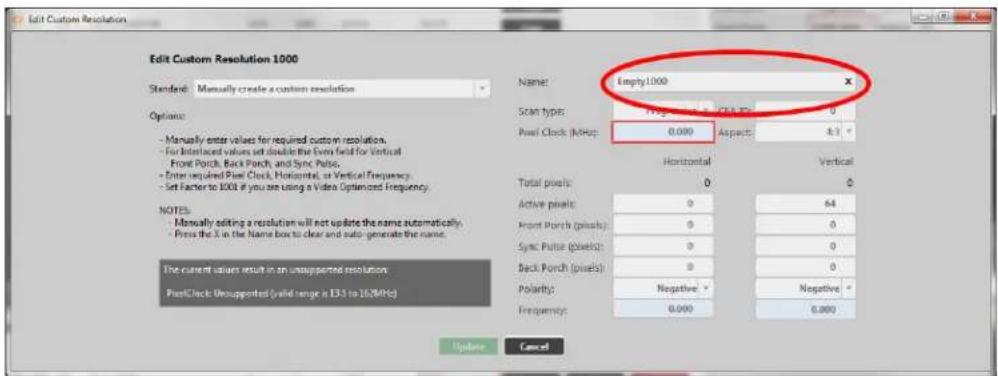
text_image
Edit Custom Resolution Edit Custom Resolution 1000 Standard: Manually create a custom resolution Options: - Manually enter values for required custom resolution. - For intersected values set double the Even field for Vertical Front Porch, Back Porch, and Sync Pulse. - Enter required Post Clock, Horizontal, as Vertical Frequency. - Set Factor to 1000 if you are using a Video Optimized Frequency. NOTES: - Manually editing a resolution will not update the name automatically. - Press the X in the Name box to clear and auto-generate the name. The current value result in an unsupported resolution. PostClock: Unsupported (valid range is E33 to 162MHz) Name: Empty1000 Scan types: 0.000 Pawl Clock (MHz): 0.000 Aspects: 4.3 Horizontal Vertical Total pixels: 0 Active pixels: 0 64 Front Porch (pixels): 0 0 Sync Pulse (pixels): 0 0 Back Porch (pixels): 0 0 Polarity: Negative - Negative * Frequency: 0.000 0.000 Update Cancel- When you have modified the Name as desired, click the Update button at the bottom of the window to commit changes and return to the Resolution Editor.

text_image
Edit Custom Resolution Edit Custom Resolution 1000 Standard: Manually create a custom resolution Options: - Manually enter values for required custom resolution. - For Interlaced values set double the Even field for Vertical Front Porch, Back Porch, and Sync Pulse. - Enter required Post Clock, Horizontal, or Vertical Frequency. - Set Factor to 100 if you are using a Video Optimized Frequency. NOTES: - Manually editing a resolution will not update the name automatically. - Press the X in the Name box to clear and auto-generate the name. Name: Custom1 Scan types: Interlaced * CEA ID: 3 Post Clock (MHz): 24.750 Aspects: 16.9 * Horizontal Vertical Total pixels: 2200 1125 Active pixels: 19.29 1000 Front Porch (pixels): 88 4 Sync Pulse (pixels): 44 10 Back Porch (pixels): 148 31 Polarity: Positive * Positive * Frequency: 22.750 30.900 Update CancelDefault
The default Name is the string NNNNpt where NNNN is the number of the Custom Resolution. Note that Resolution1000 is "Empty1000", Resolution1001 is "Empty1001", Resolution1009 is "Empty1009" and so forth.
Notes
The Name attribute has the following limitations:
- must be no more than 23 characters
- only valid printable ASCII characters may be used
- must have no spaces (underscore is valid)
The system does not check for duplicate names - if more than one Custom Resolution has the same name, when you set a Custom Resolution of that name to an output, unexpected behavior may result.
If you change the Name attribute of a Custom Resolution that you have already set to an output,
the output will revert to the default built-in resolution for that output. To continue using the same Custom Resolution with that output, re-apply it to the output.
It is possible to set a Custom Resolution that has not been configured to an output. This is in tional.
If you wish to use a Custom Resolution with CORIOgrapher the Name must conform to the following format:
[width]x[height][scantype][rate][optional]
where:
[width] width in pixels num
[height] height in pixels num
x the letter x x
[scantype] either i for interlaced or p for progressive. i or p
[rate] the frame rate (this must be at least one character and may not contain a period if relevant)
[optional] any optional text null or string
。
For example, the following are valid Name formats for use with CORIOgrapher:
1280x720i40055D
- 1280x720p6test
1280x720p59.94
- 1280x720i50
- 280x72i30

Caution: If you use CORIOgrapher with a Name that does not conform to the format described above, you may experience unexpected consequences.
Editing Aspect Ratio Property from CORIOdiscover Resolution Editor
Learn how to set the Aspect ratio for a Custom Resolution via the Resolution Editor in CORIOdiscover. This is used on the CORIOmaster and CORIOmaster mini to assist in signal conversi when an input and output have different aspect ratio.
Descript ion
Lists the Aspect ratio for this Custom Resolution in the form width:height (in units of equal size).
In struct ions
- From the Resolution Editor window, scroll to the Custom Resolutions section and press the Edit button next to the Custom Resolution you want to edit.

text_image
Resolutions all custom onlyIO Name Width Height Frequency Pixel Clock Actions
30 IO 1920x1080p40x4 1920 1920 56.954 146.250 Copy 57 IO 1920x720p46x4 1920 720 59.856 111.750 Copy 58 IO 1920x1080p47.96 1920 1920 23.976 74.176 Copy 59 IO 1920x1080p48 1920 1920 24.000 74.250 Copy 60 IO 1920x1080p50 1920 1920 25.000 74.250 Copy 61 IO 1920x1080p59.54 1920 1920 25.970 74.176 Copy 62 IO 1920x1080p60 1920 1920 30.000 74.250 Copy 63 IO 1920x1080p73.38 1920 1920 23.976 74.176 Copy 64 IO 1920x1080p74 1920 1920 24.000 74.250 Copy 65 IO 1920x1080p75 1920 1920 23.000 74.250 Copy 66 IO 1920x1080p79.97 1920 1920 26.970 74.176 Copy 67 IO 1920x1080p80 1920 1920 30.000 74.250 Copy 68 IO 1920x1080p81 1920 1920 50.000 74.850 Copy 69 IO 1920x1080p83.94 1920 1920 53.940 74.855 Copy 70 IO 1920x1080p86 1920 1920 60.000 74.855 Copy 71 IO 1920x1280p10c4-ds 1920 1280 68.974 73.750 Copy 72 IO 1920x1280p6c4-ds 1920 1280 58.950 74.485 Copy COM IO SampleID: R F A B C D E F G E H I J K L M N O P Q R S T U V W X Y Z X X X X X X X X X X X X X X X X X X X X X X X X X X X X X X X X X X X X X X X X X X X X X X X X X X X X X X X X X X X X X X X X X X X X X X X X X X X X X X X IOO IO SampleID: R F A B C D E F G E H I J K L M N O P Q R S T U V W X Y Z X X X X X X X X X X X X X X X X X X X X X X X X X X X X X X X X IOO IO SampleID: R F A B C D E F G E H I J K L M N O P Q R S T U V W X Y Z X X X X X X Y Z IOO IO SampleID: R F A B C D E F G E H I J K L M N O P Q R S T U V W X Y Z IOO IO SampleID: R F A B C D E F G E H I J K L M N O P Q R S T U V W X Y Z IOO IO SampleID: R F A B C D E F G E H I J K L M N O P Q R S T U V W X Y Z IOO IO SampleID: R F A B C D E F G E H I J K L M N N O P Q R S T U V W X Y Z IOO IO SampleID: R F A B C D E F G E H I J K L M N O P Q R S T U V W X Y Z IOO IO SampleID: R F A B C D E F G E H I J K L M N O P Q R S T U V W X Y Z IOO IO SampleID: R F A B C D E E F G E H I J K L M N O P Q R S T U V W X Y Z IOO IO SampleID: R F A B C D E F G E H I J K L M N O P Q R S T U V W X Y Z IOO IO SampleID: R F A B C D E F G E H I J K L M N O P Q R S T U V W X Y Z IOO IO ExampleID: R F A B C D E F G E H I J K L M N O P Q R S T U V W X Y Z IOO IO ExampleID: R F A B C D E F G E H I J K L M N O P Q R S T U V W X Y Z IOO IO ExampleID: R F A B C D E F G E H I J K L M N O P Q R S T U VWXYZ IOO IO ExampleID: R F A B C D E F G E H I J K L M N O P Q R S T U V WXYZ IOO IO ExampleID: R F A B C D E F G E H I J K L M N O P Q R S T U V WXYZ IOO IO ExampleID: R F A B C D E F G E H I J K L M N O P Q R S T U V WXYZ IOO IO ExampleID: R F A B C D E F G E H I J K L M N N O P Q R S T U V WXYZ IOO IO ExampleID: R F A B C D E F G E H I J K L M N O P Q R S T U V WXYZ IOO IO ExampleID: R F A B C D E F G E H I J K L M N O P Q R S T U V WXYZ IOO IO ExampleID: R F A B C D E E F G E H I J K L M N O P Q R S T U V WXYZ IOO IO ExampleID: R F A B C D E F G E H I J K L M N O P Q R S T U V WXYZ IOO IO ExampleID: R F A B C D E F G E H I J K L M N O P Q R S T U V WXYZ IOO IO SampleID: R F A B C D E F G E H I J K L M N O P Q R S T U V WXYZ IOO IO SampleID: R F A B C D E F G E H I J K L M N O P Q R S T U V WXYZ IOO IO SampleID: R F A B C D E F G E H I J K L M N O P Q R S T U VWXYZ IOO IO SampleID: R F A B C D E F G E H I J K L M N O P Q R S T U V WXYZ IOO IO SampleID: R F A B C D E F G E H I J K L M N O P Q R S T U V WXYZ IOO IO SampleID: R F A B C D E F G E H I J K L M N N O P Q R S T U V WXYZ IOO IO SampleID: R F A B C D E F G E H I J K L M N O P Q R S T U V WXYZ IOO IO SampleID: R F A B C D E F G E H I J K L M N O P Q R S T U V WXYZ IOO IO SampleID: R F A B C D E E F G E H I J K L M N O P Q R S T U V WXYZ IOO IO SampleID: R F A B C D E F G E H I J K L M N O P Q R S T U V WXYZ IOO IO SampleID: R F A B C D E F G E H I J K L M N O P Q R S T U V WXYZ IOO IO ExampleID: R F A B C D E F G E H I J K L M N O P Q R S T U V WXYZ IOO IO ExampleID: R F A B C D E F G E H I J K L M N O P Q R S T U VWXYZ IOO IO ExampleID: R F A B C D E F G E H I J K L M N O P Q R S T U V WXYZ IOO IO ExampleID: R F A B C D E F G E H I J K L M N O P QR S T U V WXYZ IOO IO ExampleID: R F A B C D E F G E H I J K L M N O P Q R S T U V WXYZ IOO IO ExampleID: R F A B C D E F G E H I J K L M N O P Q R S T U V WXYZ IOO IO ExampleID: R F A B C D E F G E H IJ K L M N O P Q R S T U V WXYZ IOO IO ExampleID: R F A B C D E F G E H IJ K L M N O P Q R S T U V WXYZ IOO IO ExampleID: R F A B C D E F G E H IJ K L M N O P Q R S T U V WXYZ IOO IO ExampleID: R F A B/C D E F G E H IJ K L M N O P Q R S T U V WXYZ IOO IO ExampleID: R F A B/C D E F G E H IJ K L M N O P Q R S T U V WXYZ IOO IO ExampleID: R F A B/C D E F G E H IJ K L M N O P Q R S T U V WXYZ IOO NO ExampleID: R F A B/C D E F G E H IJ K L M N O P Q R S T U V WXYZ IOO NO ExampleID: R F A B/C D E F G E H IJ K L M N O P Q R S T U V WXYZ IOO NO ExampleID: R F A B/C D E F G E H IJ K L M N O P Q R S T UVWXYZ IOO NO ExampleID: R F A B/C D E F G E H IJ K L M N O P Q R S T UVWXYZ IOO NO ExampleID: R F A B/C D E F G E H IJ K L M N O P Q R S T UVWXYZ IOO NO ExampleID: R F A B/C D E F G E H IJ K L M N o p o r o r o r o r o r o r o r o r o r o r o r o r o r o r o r o r o r o r o r o r o r o r o r o r o r o r o r o r o r o r o r o r o r o r o r o r o r o r o r o r o r o r o r o r o r o r o r o r o r o r o t u v w x y z x y z x y z x y z x y z x y z x y z x y z x y z x y z x y z x y z x y z x y z x y z x y z x y z x y z x y z x y z x y z x y z x y z x y z x y z x y z x y z x y z x y z x y z x y z x y z x y z x y z y z x y z x y z x y z x y z x y z x y z x y z x y z x y z x y z x y z x y z x y z x y z x y z x y z x y z x y z x y z x y z x y z x y z x y z x y z x y z x y z x y z x y z x y z x y z x y z x y z x s- In the new window, you can edit various properties of the Custom Resolution. In the top right corner, you can choose an option from the Aspect drop-down menu.
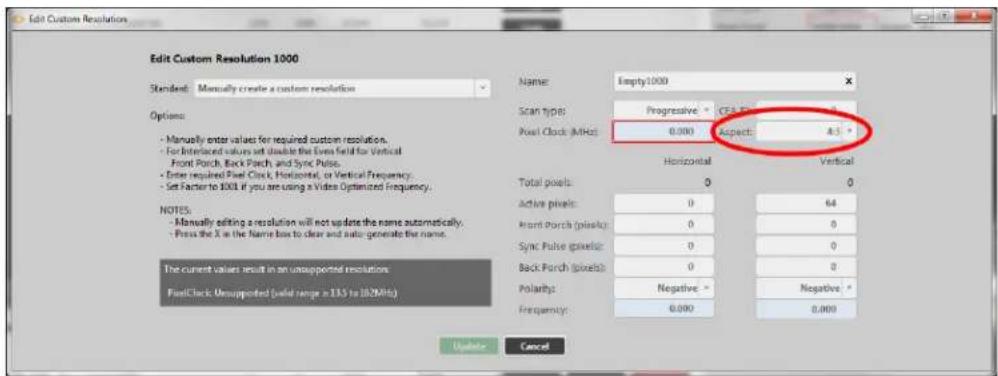
text_image
Edit Custom Resolution Edit Custom Resolution 1000 Standard: Manually create a custom resolution Options: - Manually enter values for required custom resolution. - For Interlaced values set double the Even field for Vertical - Front Porch, Back Porch, and Sync Pulse. - Enter required Steel Clock, Horizontal, or Vertical Frequency. - Set Factor to 1000 if you are using a Video Optimized Frequency. NOTES: - Manually editing a resolution will not update the name automatically. - Press the X in the Name box to clear and rotate generate the name. The current values result in an unsupported resolution. FuelClock, Unsupported (valid range ≥135 to 182MHz) Name: Empty1000 Scan type: Progressive - CEA Box Pixel Clock (MHz): 0.000 Aspect: 4.5 ° Horizontal Vertical Total pixels: 0 0 Active pixels: 0 64 Front Porch (pixels): 0 0 Sync Pulse (pixels): 0 0 Back Porch (pixels): 0 0 Polarity: Negative - Negative * Frequency: 0.000 0.000 Update Cancel- When you have modified the Aspect as desired, click the Update button at the bottom of the window to commit changes and return to the Resolution Editor.
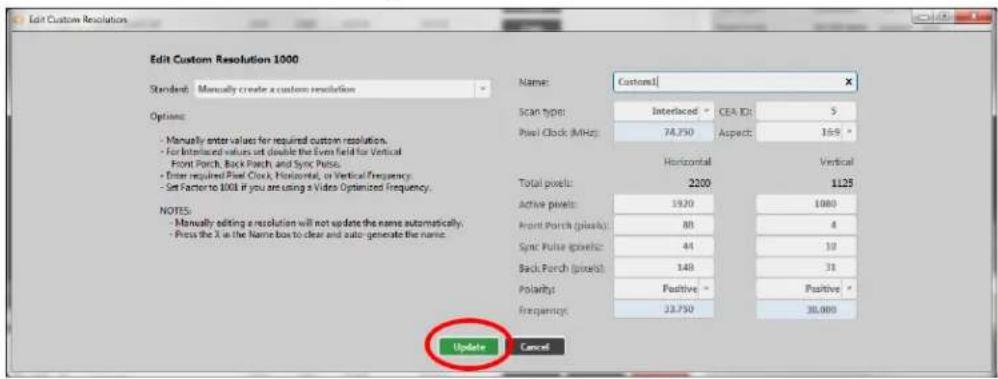
text_image
Edit Custom Resolution Edit Custom Resolution 1000 Standard: Manually create a custom resolution Options: - Manually enter values for required custom resolution. - For integrated values set double the Even field for Vertical - Front Porch, Back Porch, and Sync Pulse. - Enter required Pixel Clock, Horizontal, or Vertical Frequency. - Set Factor to 1000 if you are using a Video Optimized Frequency. NOTES: - Manually editing a resolution will not update the name automatically. - Press the X is the Name box to clear and auto generate the name. Name: Custom1 Scan type: Interlaced: CEA ID: 5 Pixel Clock (MHz): 74.750 Aspect: 169 ° Horizontal Vertical Total pixels: 2200 1125 Active pixels: 1920 1080 Front Porch (pixels): 88 4 Sync Pulse pixels: 44 10 Back Porch (pixels): 148 31 Polarity: Positive: Positive ° Frequency: 33.750 30.000 Update CancelDefault
4:3
Notes
Valid available Aspect ratios are:
• 16:9
• 4:3
5:4
16:10
• 5:3
• 1:1
• 16:6
The system cannot accept any other aspect ratios.
Aspect ratios are used on the CORIOmaster and CORIOmaster mini only, not on CORIOmaster. CORIOmaster mini.
Editing Pixel Clock Property from CORIOdiscover Resolution Editor
Learn how to set the Pixel Clock for a Custom Resolution via the Resolution Editor in CORIOdiscover.
Descript ion
The Pixel Clock value is the speed of the Pixel Clock in pixels per second.
The minimum and maximum values are dependent on the following:
p = h * v * f
where:
p Pixels per second
h Horizontal total pixels
v Vertical total pixels
f Frame rate in frames per second
For example, for 1920x1080p60, h=2200, v=1125, and f=60. This gives p = 2200 * 1125 * 60 = 148.5MHz
(Note that h and v are TOTAL pixels, not visible pixels - these numbers are greater than the visible resolution.)
In stru ction s
- From the Resolution Editor window, scroll to the Custom Resolutions section and press the Edit button next to the Custom Resolution you want to edit.

text_image
Resolutionsall custom only
IO Name Width Height Frequency Pixel Clock Actions
30 IO 1920x1080p60vct 1988 1990 56.94 146.250 Copy 57 IO 1920x720p60vct 1928 720 58.858 111.750 Copy 58 IO 1920x1080p47.96 1928 1980 25.976 74.176 Copy 59 IO 1920x1080p48 1928 1980 24.000 74.250 Copy 60 IO 1920x1080p50 1928 1980 25.000 74.250 Copy 61 IO 1920x1080p59.94 1928 1980 26.970 74.176 Copy 62 IO 1920x1080p60 1928 1980 30.000 74.250 Copy 63 IO 1920x1080p23.48 1928 1980 25.976 74.176 Copy 64 IO 1920x1080p24 1928 1980 24.000 74.250 Copy 65 IO 1920x1080p25 1928 1980 25.000 74.250 Copy 66 IO 1920x1080p29.37 1928 1980 25.970 74.176 Copy 67 IO 1920x1080p30 1928 1980 30.000 74.250 Copy 68 IO 1920x1080p30 1928 1980 50.000 148.560 Copy 69 IO 1920x1080p39.34 1928 1980 55.940 148.352 Copy 70 IO 1920x1080p40 1928 1980 60.000 148.560 Copy 71 IO 1920x1200p50vxtvds 1928 1:300 48.974 327.750 Copy 72 IO 1920x1200p40vxtvds 1928 1:300 58.950 354.060 Copy 3:3:3:3:3:3:3:3:3:3:3:3:3:3:3:3:3:3:3:3:3:3:3:3:3:3:3:3:3:3:3:3:3:3:3:3:3:3:3:3:3:3:3:3:3:3:3:3:3:3:3: 3:3:3:3:3:3:3:3:3:3:3:3:3:3:3:3:3:3:3:3:3:3:3:3:3:3:3:3:3:3:3: 4:4:4:4:4:4:4:4:4:4:4:4:4:4:4:4:4:4:4:4:4:4:4:4:4:4:4:4:4:4: 5:5:5:5:5:5:5:5:5:5:5:5:5:5:5:5:5:5:5:5:5: 6:6:6:6:6:6:6:6:6:6:6:6:6:6:6: 7:7:7:7:7:7:7:7:7:7:7:7:7:7: 8:8:8:8:8:8:8:8:8:8:8:8:8:8: 9;9;10;11;12;13;14;15;16;17;18;19;20;21;22;23;24;25;26;27;28;29;30;31;32;33;34;35;36;37;38;39;40;41;42;43;44;45;46;47;48;49;50;51;52;53;54;55;56;57;58;59;60; 6 6 6 6 6 6 6 6 6 6 6 6 6 6 6 6 6 6 6 6 6 6 6 6 6 6 6 6 6 6 6 6 6 6 6 6 6 6 6 6 6 6 6 6 6 6 6 6 6 6 6- In the new window, you can edit various properties of the Custom Resolution. In the upper right section, you can type a number into the Pixel Clock option.
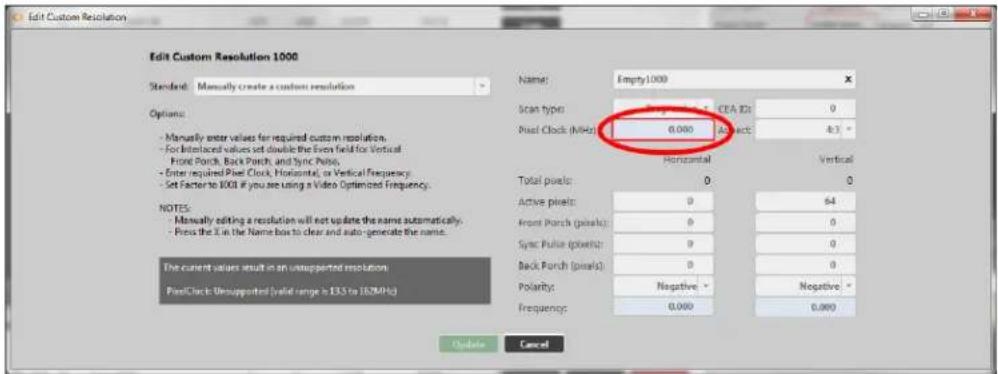
text_image
Edit Custom Resolution Edit Custom Resolution 1000 Standard Manually create a custom resolution Options: - Manually enter values for required custom resolution. - For Interlaced values set double the Even field for Vertical - Front Porch, Back Porch, and Sync Pulse. - Enter required Pixel Clock, Horizontal, or Vertical Frequency. - Set Factor to E00 if you see using a Video Optimized Frequency. NOTES: - Manually editing a resolution will not update the name automatically. - Press the X in the Name box to clear and auto generate the name. The current values result in an unsupported resolution PixelClock: Unsupported (valid range is 133 to 162MHz) Name: Empty1000 Scan type: CEA ID: 0 Pixel Clock (MHz): 0.000 Abit: 4.3 ° Horizontal Vertical Total pixels: 0 0 Active pixels: 0 64 Front Porch (pixels): 0 0 Sync Pulse (pixels): 0 0 Back Porch (pixels): 0 0 Polarity: Negative - Negative * Frequency: 0.000 0.000 Update Cancel- When you have modified the Aspect as desired, click the Update button at the bottom of the window to commit changes and return to the Resolution Editor.
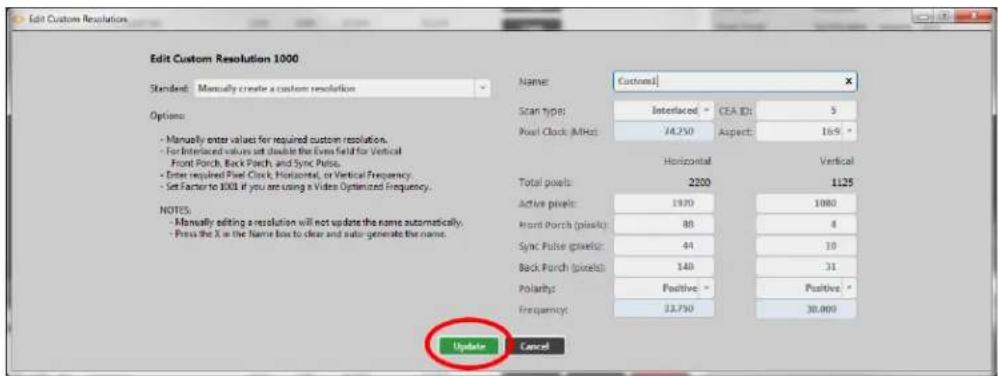
text_image
Edit Custom Resolution Edit Custom Resolution 1000 Standard: Manually create a custom resolution Options: - Manually enter values for required custom resolution. - For Interlaced values set double the Even field for Vertical - Front Porch, Back Porch, and Sync Pulse. - Enter required Pixel Clock, Horizontal, or Vertical Frequency. - Set Factor to 1000 if you are using a Video Optimized Frequency. NOTES: - Manually editing a resolution will not update the name automatically. - Focus the X in the Name box to clear and audio generate the name. Name: Customs Scan type: Interlaced: CEA ID: 5 Pixel Clock (MHz): 74.250 Aspect: 169 ° Horizontal Vertical Total pixels: 2200 1125 Active pixels: 1920 1080 Front Porch (pixels): 88 4 Sync Pulse (pixels): 44 10 Back Porch (pixels): 140 31 Polarity: Positive: Positive: Frequency: 22.750 30.000 Update CancelDefau It
0
(You cannot save a new Custom Resolution until the default value has been changed to a number in the valid range.)
Not es
The valid range for the Pixel Clock is 13.5MHz to 162MHz. As the value in pixels is a function of resolution (including frame rate), the minimum and maximum value in Pixel Clock varies with the resolution.
For example:
The minimum Pixel Clock at 640x480p60 is 800 * 525 * 59.94 = 25.175MHz (Note that p60 is nomenclature - the rate is actually 59.94MHz)
The maximum Pixel Clock at 1600x1200p60 is 2160 * 1250 * 60 = 162MHz
To calculate the Vertical Front Porch, Vertical Sync Pulse and Vertical Back Porch for an interlaced resolution, double the value of the even field. Interlacing standards are designed this way in order to present the values in a similar format to Progressive values.
In the CORIOdiscover Resolution Editor, the Horizontal Frequency and Vertical Frequency read-only fields are derived from the Pixel Clock value.
Editing Scan type Property from CORIOdiscover Resolution Editor
Learn how to set the Scan type for a Custom Resolution via the Resolution Editor in CO cover as either Interlaced or Progressive.
Description
The Scan type state of this Custom Resolution has two options:
p Progressive scan mode
i Interlaced scan mode
In stru ction s
- From the Resolution Editor window, scroll to the Custom Resolutions section and press the Edit button next to the Custom Resolution you want to edit.

text_image
Resolutions# custom only
IO Name Width Height Frequency Pixel Clock Actions
76 IO 1920x1080p60xt 1920 1920 1920 1920 1920 1920 1920 1920 1920 1920 1920 1920 1920 1920 1920 1920 1920 1920 1920 1920 1925 57 IO 1920x720p86xt 1920 1920 1920 1920 1920 1920 1920 1920 1920 1920 1920 1920 1920 1920 1920 1920 1920 58 IO 1920x1080p47.96 1920 1920 1920 1920 1920 1920 1920 1920 1920 1920 1920 59 IO 1920x1080p48 1920 1920 1920 1920 1920 1920 1920 1920 60 IO 1920x1080p50 1920 1920 1920 1920 1920 1920 1920 61 IO 1920x1080p58.54 1920 1920 1920 1920 1920 1920 62 IO 1920x1080p63 1920 1920 1920 1920 1920 63 IO 1920x1080p73.58 1920 1920 1920 1920 64 IO 1820x1080p74 1920 1920 1920 1920 65 IO 1820x1080p75 1920 1920 1920 66 IO 1820x1080p76.57 1920 67 IO 1820x1080p77.58 68 IO 1820x1080p78.59 69 IO 1820x1080p79.60 70 IO 1820x1080p86.63 71 IO 1820x1280p56xt-db 72 IO 1820x1280p64xt-db 73 IO 74 IO 75 IO 76 IO 77 IO 78 IO 79 IO 80 IO 81 IO 82 IO 83 IO 84 IO 85 IO 86 IO 87 IO 88 IO 89 IO 90 IO 91 IO 92 IO 93 IO 94 IO 95 IO 96 IO 97 IO 98 IO 99 IO 100 IO Total pixels: Empty/Red: Vertical Active pixels: Progressive: CEA ID: O: Negative Front Porch (pixels): Open: Open: Open: Open: Open: Open: Open: Open: Open: Open: Open: Open: Open: Open: Open: Open: Open: Open: Open: Open: Open: Open: Open: Open: Open: Open: Open: Open: Open: Open: Open: Open: Open: Open: Open: Open: Open: Open: Open: Open: Open: Open: Open: Open: Open: Open: Open: Open: Open: Open: Open: Total pixels: Empty/Red: Vertical Active pixels: Progressive: CEA ID: O: Negative Front Porch (pixels): Open: Open: Open: Open: Open: Open: Open: Open: Open: Open: Open: Open: Open: Open: Open: Open: Open: Open: Open: Open: Open: Open: Open: Open: Open: Open: Open: Open: Open: Open: Open: Open: Open: Sync Pulse (pixels): Open: Open: Open: Open: Open: Open: Open: Open: Open: Open: Open: Open: Open: Open: Open: Open: Open: Open: Open: Open: Open: Back Porch (pixels): Open: Open: Open: Open: Open: Open: Open: Open: Open: Open: Open: Open: Open: Open: Open: Polarity: Negative: Negative: Frequency: - - - - - - - - - - - - - - - - - - - - - - - - - - - - - - - - - - - - - - - - - - - - - - - - - - - - - - - - - - - - - - - - - - - - - - Copy Edit Reset Copy Edit Reset Copy Edit Reset Copy Edit Reset Copy Edit Reset Copy Edit Reset Copy Edit Reset- In the new window, you can edit various properties of the Custom Resolution. In the top right corner, you can choose an option from the Scan type drop-down menu.

text_image
Edit Custom Resolution Edit Custom Resolution 1000 Standard: Manually create a custom resolution Options: - Manually enter values for required custom resolution. - For Interleaved values let double the Even field for Vertical - Front Porch, Back Porch, and Sync Pulse. - Enter required Pixel Clock, Horizontal, or Vertical Frequency. - Set Faster to 1000 if you are using a Video Optimized Frequency. NOTES: - Manually editing a resolution will not update the name automatically. - Press the X in the Name box to clear and auto generate the name. The current values result in an unsupported resolution. PixelClock: Unsupported (valid range in 135 to 382MHz) Name: Empty(1000) Scan type: Progressive - Cross ID: 0 Pixel Clock (MHz): 4.500 Aspect: 4.5 ° Horizontal Vertical Total pixels: 0 0 Active pixels: 0 64 Front Porch (pixels): 0 0 Sync Pulse (pixels): 0 0 Back Porch (pixels): 0 0 Polarity: Negative - Negative * Frequency: 0.000 0.000 Update Cancel- When you have modified the Scan type as desired, click the Update button at the bottom of the window to commit changes and return to the Resolution Editor.

text_image
Edit Custom Resolution Edit Custom Resolution 1000 Standard: Manually create a custom resolution Options: - Manually enter values for required custom resolution. - For integrated values set double the Even field for Vertical - Front Porch, Back Porch and Sync Pulse. - Enter required Pixel Clock, Horizontal, or Vertical Frequency. - Set Factor to 1000 if you are using a Video Optimized Frequency. NOTES: - Manually editing a resolution will not update the name automatically. - Press the X is the Name box to clear and auto generate the name. Name: Customs[×] Scan type: Interlaced * CEA ID: 5 Pixel Clock (MHz): 74.750 Aspect: 169 * Horizontal Vertical Total pixels: 2200 1125 Active pixels: 1920 1080 Front Porch (pixels): 88 4 Sync Pulse pixels: 44 19 Back Porch (pixels): 148 31 Polarity Positive * Positive * Frequency: 33.750 30.000 Update CancelDefault
Progressive (p)
Notes
Only Progressive (p) or interlaced (i) are valid options.
Editing Horizontal Active Pixels Property from CORIOdiscover Resolution Editor
Learn how to set the Horizontal Active pixels for a Custom Resolution via the Resolution Editor in CORIOdiscover.
Description
The Horizontal Active video is the width of the displayed image in pixels.
For example, for a Custom Resolution of 1024x768 this value would be 1024.
In stru ction s
- From the Resolution Editor window, scroll to the Custom Resolutions section and press the Edit button next to the Custom Resolution you want to edit.
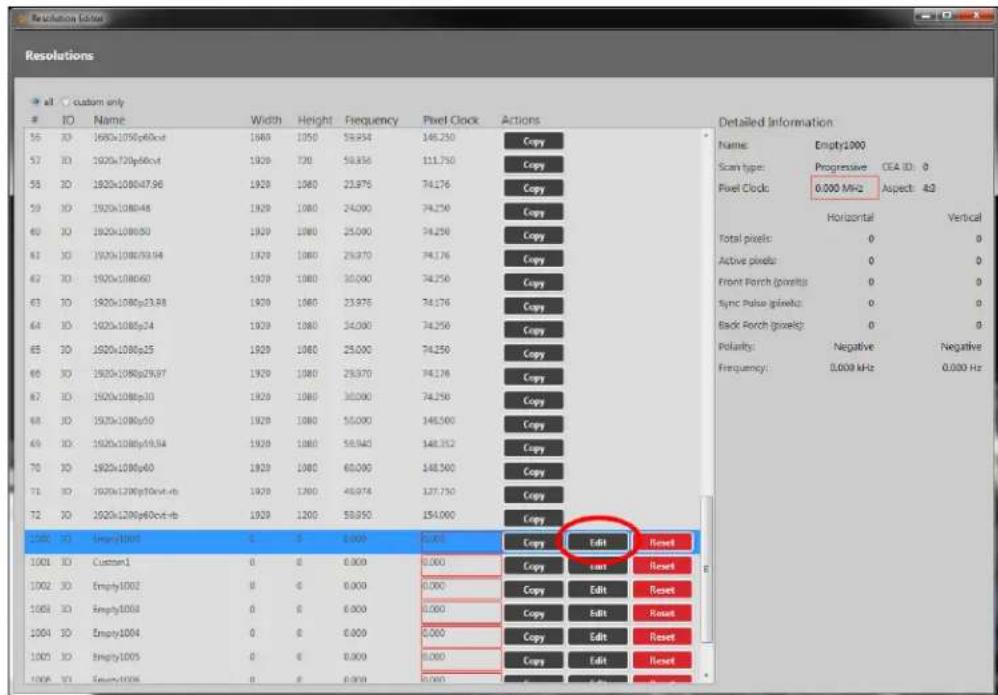
text_image
Resolutionsalt custom only
IO Name Width Height Frequency Pixel Clock Actions
55 30 1692x1080p60cxt 1688 1050 58.854 146.250 Copy 57 30 1622x120p66cxt 1920 720 58.856 111.750 Copy 58 30 1920x1080p47.96 1920 1080 23.976 74.176 Copy 59 30 1920x1080p48 1920 1080 24.000 74.250 Copy 60 30 1920x1080p50 1920 1080 25.000 74.250 Copy 61 30 1920x1080p59.94 1920 1080 25.970 74.176 Copy 62 30 1920x1080p60 1920 1080 30.000 74.250 Copy 63 30 1920x1080p23.88 1920 1080 23.976 74.176 Copy 64 30 1920x1080p24 1920 1080 34.000 74.250 Copy 65 30 1920x1080p25 1920 1080 25.000 74.250 Copy 66 30 1920x1080p29.97 1920 1080 25.970 74.176 Copy 67 30 1920x1080p30 1920 1080 30.000 74.250 Copy 68 30 1920x1080p31 1920 1080 31.555 74.258 Copy 69 30 1920x1080p32 1920 1080 32.555 74.258 Copy 70 30 1920x128p6fccxt-rc 1920 1380 45.974 137.750 Copy 71 30 1920x128p6fccxt-rc b 1920 1280 58.955 154.655 Copy 72 30 1920x128p6fccxt-rc b 128E 3D Empty/1BOUT C B B B B B B B B B B B B B B B B B B B B B B B B B B B B B B B B B B B B B B B B B B B B B B B B B B B B B B B B B B B B B B B B B B B B B B B B B B B B B B B B B B B B 128E 3D Empty/1BOUT C E E E E E E E E E E E E E E E E E E E E E E E E E E E E E E E E E E E E E E E E E E E E E E E E E E E E E E E E E E E E E E E E E E E 128E 3D Empty/1BOUT C E E E E E E E E E E E E E E E E E E E E E E E E E E E E E E E E E E E E 128E 3D Empty/1BOUT C E E E E E E E E E E E E E E E E E E E E 128E 3D Empty/1BOUT C E E E E E E E E E A S P O T C D A S P O T C D A S P O T C D A S P O T C D A S P O T C D A S P O T C D A S P O T C D A S P O T C D A S P O T C D A S P O T C D A S P O T C D A S P O T C D A S P O T C D A S P O T C D A S P O T C D A A S P O T C D A S P O T C D A S P O T C D A S P O T C D A S P O T C D A S P O T C D A S P O T C D A S P O T C D A S P O T C D A S P O T C D A S P O T C D A S P O T C D A S P O T C D A S P O T C D A N V I N V I N V I N V I N V I N V I N V I N V I N V I N V I N V I N V I N V I N V I N V I N V I N V I N V I N V I N V I N V I N V I N V I N V I N V I N V I N V I N V I N V I N V I N V I N V I N V I N V IN V I N V I N V I N V I N V I N V I N V I N V I N V I N V I N V I N V I N V I N V I N V I N V I N V I N V I N V I N V I N V I N V I N V I N V I N V I N V I N V I N V I N V I N V I N V I N V I N V I NV I N V I N V I N V I N V I N V I N V I N V I N V I N V I N V I N V I N V I N V I N V I N V I N V I N V I N V I N V I N V I N V I N V I N V I N V I N V I N V I N V I N V I N V I N V I N V I N V I N VI U R U R U R U R U R U R U R U R U R U R U R U R U R U R U R U R U R U R U R U R U R U R U R U R U R U R U R U R U R U R U R U R U R U R U R U R U R U R U R U R U R U R U R U R U R U R U R U R U R U R U F A S P O T C D A S P O T C D A S P O T C D A S P O T C D A S P O T C D A S P O T C D A S P O T C D A S P O T C D A S P O T C D A S P O T C D A S P O T C D A S P O T C D A S P O T C D A S P O T C D A s p o t c e r i n a l e r e f f o r i n g : Negative - Negative - Negative - Negative - Negative - Negative - Negative - Negative - Negative - Negative - Negative - Negative - Negative - Negative - Negative - Negative - Negative - Negative - Negative - Negative - Negative - Negative - Negative - Negative - Negative - Negative - Negative - Negative - Negative - Negative - Negative - Negative - Negative - Negative - Negative - Negative - Negative - Negative - Negative - Negative - Negative - Negative - Negative - Negative - Negative - Negative - Negative - Negative - Negative - Negative - Negative- In the new window, you can edit various properties of the Custom Resolution. In the column of the right-hand section, you can type a number into the Active pixels field under
the Horizontal heading.

text_image
Edit Custom Resolution Edit Custom Resolution 1000 Standard: Manually create a custom resolution Options: - Manually enter values for required custom resolution. - For Interlaced values set double the Even field for Vertical - Front Porch, Back Porch, and Sync Pulse. - Enter required Front Clock, Horizontal, or Vertical Frequency. - Set Factor to 1000 if you are using a Video Optimized Frequency. NOTES: - Manually editing a resolution will not update the name automatically. - Press the X is the Name box to clear and auto-generate the name. The current values result in an unsupported resolution. PostClock: Unsupported (valid range is 135 to 162MHz) Name: Empty1000 Scan type: Progressive: CEA ID: 0 Pulse Clock (MHz): 0.000 Aspect: 4.3 ° Horizontal Vertical Total pixels: 0 0 Active pixels: 0 64 Front Porch (pixels): 0 0 Sync Pulse pixels: 0 0 Back Porch (pixels): 0 0 Polarities: Negative: Negative * Frequency: 0.000 0.000 Update Cancel- When you have modified the Active pixels as desired, click the Update button at the bottom of the window to commit changes and return to the Resolution Editor.
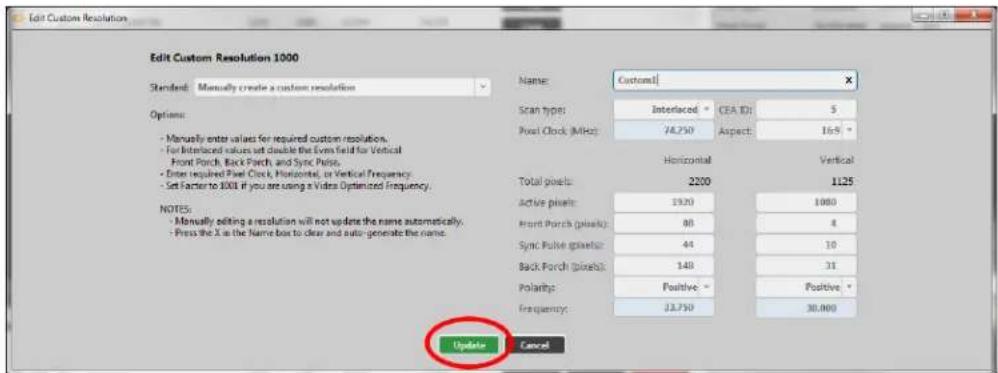
text_image
Edit Custom Resolution Edit Custom Resolution 1000 Standard: Manually create a custom resolution Options: - Manually enter values for required custom resolutions. - For Interface values set double the Even field for Vertical - Front Porch, Back Porch, and Sync Porch. - Enter required Post Clock, Horizontal, or Vertical Frequency. - Set Factor to 1000 if you are using a Video Optimized Frequency. NOTES: - Manually editing a resolution will not update the name automatically. - Press the X in the Name box to clear and auto generate the name. Name: Custom1 Scan type: Interlaced: CEA ID: 5 Post Clock (MHz): 74.250 Aspect: 16.9 ° Horizontal Vertical Total pixels: 2200 1125 Active pixels: 1920 1080 Front Porch (pixels): 88 4 Sync Pulse pixels: 44 10 Back Porch (pixels): 148 31 Polarity: Positive - Positive - Frequency: 33.750 30.000 Update CancelDefault
0
Notes
The valid range of values is 64 to 1920.
For a valid Custom Resolution, you must configure this property to a value within the valid range
In the CORIOdiscover Resolution Editor, the Pixel Clock is not affected by any changes to the Horizontal Active pixels. However, the Horizontal Frequency and Vertical Frequency read-only fields vary based on Horizontal Active pixels changes.
Editing Horizontal Front Porch Property from CORIOdiscover Resolution Editor
Learn how to set the Horizontal Front Porch for a Custom Resolution via the Resolution Editor in CORIOdiscover.
Description
The Horizontal Front Porch is the gap between the end of the Active Video and the start of the Horizontal Sync Pulse, in pixels.
In stru ction s
- From the Resolution Editor window, scroll to the Custom Resolutions section and press the Edit button next to the Custom Resolution you want to edit.

text_image
Resolutions all custom onlyIO Name Width Height Frequency Pixel Clock Actions
30 IO 1920x1080p40x4 1920 1920 56.954 146.250 Copy 57 IO 1920x720p40x4 1920 720 59.855 111.750 Copy 58 IO 1920x1080p47.96 1920 1920 23.975 74.176 Copy 59 IO 1920x1080p48 1920 1920 24.000 74.250 Copy 60 IO 1920x1080p50 1920 1920 25.000 74.250 Copy 61 IO 1920x1080p59.54 1920 1920 25.970 74.176 Copy 62 IO 1920x1080p60 1920 1920 30.000 74.250 Copy 63 IO 1920x1080p23.38 1920 1920 23.975 74.176 Copy 64 IO 1920x1080p24 1920 1920 24.000 74.250 Copy 65 IO 1920x1080p25 1920 1920 23.000 74.250 Copy 66 IO 1920x1080p29.97 1920 1920 26.970 74.176 Copy 67 IO 1920x1080p30 1920 1920 33.000 74.250 Copy 68 IO 1920x1080p31 1920 1920 53.080 348.560 Copy 69 IO 1920x1080p39.94 1920 1920 53.940 348.352 Copy 70 IO 1920x1080p60 1920 1920 63.080 348.560 Copy 71 IO 1920x1280p10cnd-ds 1920 1280 48.974 337.750 Copy 72 IO 1920x1280p6cnd-ds 1920 1280 53.950 354.080 Copy COM IO SampleID: R F A B C D E F G E H I J K L M N O P Q R S T U V W X Y Z X X X X X X X X X X X X X X X X X X X X X X X X X X X X X X X X X X X X X X X X X X X X X X X X X X X X X X X X X X X X X X X X X X X X X X X X X X X X X X X X X X X X X X X X X X X X IOO IO SampleID: R F A B C D E F G E H I J K L M N O P Q R S T U V W X Y Z X X X X X X X Y Z Z U V W X Y Z X Y Z Y Z Y Z Y Z Y Z Y Z Y Z Y Z Y Z Y Z Y Z Y Z Y Z Y Z Y Z Y Z Y Z Y Z Y Z Y Z Y Z Y Z Y Z Y Z Y Z Y Z Y Z Y Z Y Z Y Z Y Z Y Z Y Z Y Z Y Z Y Z Y Z Y Z Y Z Y Z Y Z Y Z Y Z Y Z Y Z Y Z Y Z Y Z Y Z Y Z Y IOO IO SampleID: R F A B C D E F G E H I J K L M N O P Q R S T U V W X Y Z X Y Z Y Z Y Z Y Z Y Z Y Z Y Z Y Z Y Z Y Z Y Z Y Z Y Z Y Z Y Z Y Z Y Z Y Z Y Z Y Z Y Z Y Z Y Z Y Z Y Z Y Z Y Z Y Z Y Z Y Z Y Z Y Z IOO IO SampleID: R F A B C D E F G E H I J K L M N O P Q R S T U V W X Y Z X Y Z Y Z Y Z Y Z Y Z Y Z Y Z Y Z Y Z Y Z Y Z Y Z Y Z Y Z Y Z Y Z Y Z Y Z IOO IO SampleID: R F A B C D E F G E H I J K L M N O P Q R S T U V W X Y Z X Y Z Y Z Y Z Y Z Y Z Y Z Y Z YZ U V W X Y Z X Y ZY U V WX U V WX U V WX U V WX U V WX U V WX U V WX U V WX U V WX U V WX U V WX U V WX U V WX U V WX U V WX U V WX U V WX U V WX U V WX U V WX U V WX U V WX U V WX U V WX U V WX U V W IOO IO SampleID: R F A B C D E F G E H I J K L M N O P Q R S T U V W X Y Z X Y ZY U V WX U V WX U V WX U V WX U V WX U V WX U V WX U V WX U V WX U V WX U V WX U V WX U V WX U V WX U V W IOO IO SampleID: R F A B C D E F G E H I J K L M N O P Q R S T U V W X YZ X YZ A IOO IO SampleID: R F A B C D E F G E H I J K L M N O P Q R S T U V W X YZ A IOO IO SampleID: R F A B C D E F G E H I J K L M N O P Q R S T U V W X YZ A IOO IO SampleID: R F A B C D E F G E H I J K L M N O P Q R S T U V W XY A IOO IO SampleID: R F A B C D E F G E H I J K L M N O P Q R S T U V W XY A IOO IO SampleID: R F A B C D E F G E H I J K L M N O P Q R S T U V W XY A IOO IO SampleID: R F A B C D E F G E H I J K L M N O PQ R S T U V W XY A IOO IO SampleID: R F A B C D E F G E H I J K L M N O PQ R S T U V W XY A IOO IO SampleID: R F A B C D E F G E H I J K L M N O PQ R S T U V W XY A IOO IO SampleID: R F A B C D E F G E H II J K L M N O PQ R S T U V W XY A IOO IO SampleID: R F A B C D E F G E H II J K L M N O PQ R S T U V W XY A IOO IO SampleID: R F A B C D E F G E H II J K L M N O PQ R S T U V WXU A IOO IO SampleID: R F A B C D E F G E H II J K L M N O PQ R S T U V WXU A IOO IO SampleID: R F A B C D E F G E H II J K L M N O PQ R S T U V WXU A IOO IO SampleID: R F A B C D E F G E H II J K L M N O P Q R S T U V WXU A IOO IO SampleID: R F A B C D E F G E H II J K L M N O P Q R S T U V WXU A IOO IO SampleID: R F A B C D E F G E H II J K L M N O P Q R S T U V WXU A IOO IO SampleID: R F A B C D E F G E H III J K L M N O P Q R S T U V WXU A IOO IO SampleID: R F A B C D E F G E H III J K L M N O P Q R S T U V WXU A IOO IO SampleID: R F A B C D E F G E H III J K L M N O P Q R S T U V WXU A IOO IO SampleID: R F A/B C D E F G E H III J K L M N O P Q R S T U V WXU A IOO IO SampleID: R F A B C D E F G E H III J K L M N O P Q R S T U V WXU A IOO IO SampleID: R F A B C D E F G E H III J K L M N O P Q R S T U V WXU A IOo IO SampleID: R F A B C D E F G E H III J K L M N O P Q R S T U V WXU A IOo IO SampleID: R F A B C D E F G E H III J K L M N O P Q R S T U V WXU A IOo IO SampleID: R F A B C D E F G E H III J K L M N O P Q R S T USVWWWWWWWWWWWWWWWWWWWWWWWWWWWWWWWWWWWWWWWWWWWWWWWWWWWWWWWWWWWWWWWWWWWWWWWWWWWWWWWWWWWWWWWWWWWWWWWWWWWWWWWWWWWWWWWWWWWWWWWWWWWWWWWWWWWWWWWWWWWWWWWWWWWWWWWWWWWWWWWWWWWWWWWWWWWWWWWWWWWWWWWWWWWWWWWWWWWWWWWWWWWWWWWWWWWWWWWWWWWWWWWWWWWWWWWWWWWWWWWWWWWWWWWWWWWWWWWWWWWWWWWWWWWWWWWWWWWWWWWWWWWWWWww WWWWWWWWWWWWWWWWWWWWWWWWWWWWWWWWWWWWWWWWWWWWWWWWWWWWWWWWWWWWWWww WWww WWww WWww WWww WWww WWww WWww WWww WWww WWww WWww WWww WWww WWww WWww WWww WWww WWww WWww WWww WWww WWww WWww WWww WWww WWww WWww WWww WWww WWww WWww WWww WWww WWww WWww WWww WWww WWww WWww WWww WWww WWww WWww WWww WWww WWww WWww WWww WWww WWww PW- In the new window, you can edit various properties of the Custom Resolution. In the column of the right-hand section, you can type a number into the Front Porch (pixel
field under the Horizontal heading.

text_image
Edit Custom Resolution Edit Custom Resolution 1000 Standard: Manually create a custom resolution Options: - Manually enter values for required custom resolution. - For Interlaced values set double the Even field for Vertical - Front Porch, Back Porch, and Sync Pulse. - Enter required Front Clock, Horizontal, or Vertical Frequency. - Set Factor to 1000 if you are using a Video Optimized Frequency. NOTES: - Manually editing a resolution will not update the name automatically. - Press the X is the Name box to clear and auto generate the name. The current values result in an unsupported resolution. PostClock: Unsupported (valid range is 135 to 162MHz) Name: Empty1000 Scan type: Progressive: CEA ID: 0 Pixel Clock (MHz) 0.000 Aspect: 4.3 ° Horizontal Vertical Total pixels: 0 0 Active pixels: 64 Front Porch (pixels): 0 0 Sync Pulse pixels: 0 0 Back Porch (pixels): 0 0 Polarizing: Negative: Negative * Frequency: 0.000 0.000 Update Cancel- When you have modified the Front Porch as desired, click the Update button at the bottom of the window to commit changes and return to the Resolution Editor.

text_image
Edit Custom Resolution Edit Custom Resolution 1000 Standard: Manually create a custom resolution Options: - Manually enter values for required custom resolutions. - For Interface values set double the Even field for Vertical - Front Porch, Back Porch, and Sync Porch. - Enter required Pixel Clock, Horizontal, or Vertical Frequency. - Set Factor to 1000 if you are using a Video Optimized Frequency. NOTES: - Manually editing a resolution will not update the name automatically. - Press the X in the Name box to clear and auto generate the name. Name: Custom1 Scan types: Interlaced: CEA ID: 5 Pixel Clock (MHz): 74.250 Aspect: 169 ° Horizontal Vertical Total pixels: 2200 1125 Active pixels: 1920 1080 Front Porch (pixels): 80 4 Sync Pulse pixels: 44 10 Back Porch (pixels): 148 31 Polarity: Positive: Positive Frequency: 33.750 30.000 Update CancelDefau It
0
Not es
The valid range of values is 1 to 2000.
For a valid Custom Resolution, you must configure this property to a value within the valid range
In the CORIOdiscover Resolution Editor, the Pixel Clockis not affected by any changes to the Horizontal Front Porch. However, the Horizontal Frequency and Vertical Frequency read-only fields vary based on Horizontal Front Porch changes.
Editing Horizontal Sync Pulse Property from CORIOdiscover Resolution Editor
Learn how to set the Horizontal Sync Pulse for a Custom Resolution via the Resolution Editor in CORIOdiscover.
Description
The Horizontal Sync Pulse identifies the start of each row of pixels (line of video) in the Custom Resolution.
In stru ction s
- From the Resolution Editor window, scroll to the Custom Resolutions section and press the Edit button next to the Custom Resolution you want to edit.

text_image
Resolutions all custom onlyID Name Width Height Frequency Pixel Clock Actions
30 ID 1920x1080p60x4 1920 1920 59.974 146.230 Copy 57 ID 1920x720p60x4 1920 720 59.855 111.750 Copy 58 ID 1920x1080p47.96 1920 1080 23.976 74.176 Copy 59 ID 1920x1080p48 1920 1080 24.000 74.250 Copy 60 ID 1920x1080p50 1920 1080 25.000 74.250 Copy 61 ID 1920x1080p59.54 1920 1080 26.970 74.176 Copy 62 ID 1920x1080p60 1920 1080 30.000 74.250 Copy 63 ID 1920x1080p23.38 1920 1080 23.976 74.176 Copy 64 ID 1920x1080p24 1920 1080 24.000 74.250 Copy 65 ID 1920x1080p25 1920 1080 25.000 74.250 Copy 66 ID 1920x1080p29.97 1920 1080 26.970 74.176 Copy 67 ID 1920x1080p30 1920 1080 30.000 74.250 Copy 68 ID 1920x1080p31 1920 1080 50.000 148.560 Copy 69 ID 1920x1080p39.34 1920 1080 53.945 148.352 Copy 70 ID 1920x1080p60 1920 1080 60.000 148.560 Copy 71 ID 1920x1280p16c4-ds 1920 1280 66.974 137.750 Copy 72 ID 1920x1280p66c4-ds 1920 1280 58.950 154.685 Copy CODE ID SampleID: B F A, B, C, D, E, F, G, H, I, J, K, L, M, N, O, P, Q, R, S, T, U, V, W, X, Y, Z, AA, AB, AC, AD, AE, AF, AG, AH, AI, AJ, AK, AL, AM, AN, AO, AP, AQ, AR, AS, AT, AU, AV, AW, AX, AXB, AXC, AXD, AXE, AXF, AXG, AXH, AXI, AXJ, AXK, AXL, AXM, AXN, AXO, AXP, AXQ, AXR, AXS, AXT, AXU, AXV, AXW, AXX, AXY, AXZ, AXZA, AXZB, AXZC, AXZD, AXZE, AXZF, AXZG, AXZH, AXZI, AXZJ, AXZK, AXZL, AXZM, AXZN, AXZO, AXZP, AXZQ, AXZR, AXZS, AXZT, AXZU Name: Empty1.00 Scan type: Progressive CEA ID: O Pixel Clock: 8.000 MHz Aspect: A3 Horizontal Vertical Total pixels: B O Active pixels: O O Front Porch (pixels): B O Sync Pulse (pixels): O O Back Porch (pixels): O O Potency: Negative Negative Frequency: 8.009 MHz 8.033 Hz- In the new window, you can edit various properties of the Custom Resolution. In the column of the right-hand section, you can type a number into the Sync Pulse (pixels) field
under the Horizontal heading.

text_image
Edit Custom Resolution Edit Custom Resolution 1000 Standard: Manually create a custom resolution Options: - Manually enter values for required custom resolution. - For interleaved values set double the Even field for Vertical - Front Porch, Back Porch, and Sync Pulse. - Enter required Front Clock, Horizontal, or Vertical Frequency. - Sort Factor to 1000 if you are using a Video Optimized Frequency. NOTES: - Manually editing a resolution will not update the name automatically. - Press the X is the Name box to clear and auto generate the name. The current values result in an unsupported resolution. PostClock: Unsupported (valid range is 135 to 162MHz) Name: Empty1000 Scan type: Progressive CEA ID: 0 Pixel Clock (MHz) 0.000 Aspect: 4.3 ° Horizontal Vertical Total pixels: 0 0 Active pixels: 0 64 Front Porch (pixels): 0 0 Sync Pulse pixels: 0 0 Back Porch (pixels): 0 0 Polarities: Negative - Negative * Frequency: 0.000 0.000 Update Cancel- When you have modified the Sync Pulse as desired, click the Update button at the bottom of the window to commit changes and return to the Resolution Editor.
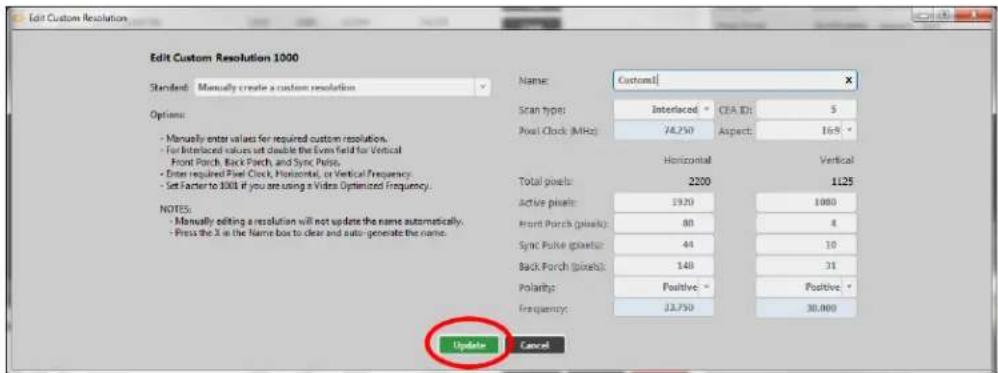
text_image
Edit Custom Resolution Edit Custom Resolution 1000 Standard: Manually create a custom resolution Options: - Manually enter values for required custom resolution. - For Interface values set double the Even field for Vertical - Front Porch, Back Porch, and Sync Porch. - Enter required Post Clock, Horizontal, or Vertical Frequency. - Set Factor to 300 if you are using a Video Optimized Frequency. NOTES: - Manually editing a resolution will not update the name automatically. - Press the X in the Name box to clear and auto generate the name. Name: Custom1 Scan type: Interlaced: CEA ID: 5 Post Clock (MHz): 74.250 Aspect: 16.9 ° Horizontal Vertical Total pixels: 2200 1125 Active pixels: 1920 1080 Front Porch (pixels): 80 4 Sync Pulse pixels: 44 10 Back Porch (pixels): 148 31 Polarity: Positive: Positive Frequency: 33.750 30.000 Update CancelDefau It
0
Notes
The valid range of values is 8 to 500.
For a valid Custom Resolution, you must configure this property to a value within the valid range
In the CORIOdiscover Resolution Editor, the Pixel Clockis not affected by any changes to the Horizontal Sync Pulse. However, the Horizontal Frequency and Vertical Frequency read-only fields vary based on Horizontal Sync Pulse changes.
Editing Horizontal Back Porch Property from CORIOdiscover Resolution Editor
Learn how to set the timing interval for the Horizontal Back Porch for a Custom Resolution via the Resolution Editor in CORIOdiscover.
Description
The Horizontal Back Porch is the gap between the end of the Horizontal Sync Pulse and the beginning of the Active Video, in pixels.
In struct ion s
- From the Resolution Editor window, scroll to the Custom Resolutions section and press the Edit button next to the Custom Resolution you want to edit.

text_image
Resolutions all custom onlyIO Name Width Height Frequency Pixel Clock Actions
30 IO 1920x1080p40x4 1920 1920 56.954 146.250 Copy 57 IO 1920x720p40x4 1920 720 59.855 111.750 Copy 58 IO 1920x1080p47.96 1920 1920 23.975 74.176 Copy 59 IO 1920x1080p48 1920 1920 24.000 74.250 Copy 60 IO 1920x1080p50 1920 1920 25.000 74.250 Copy 61 IO 1920x1080p59.54 1920 1920 25.970 74.176 Copy 62 IO 1920x1080p60 1920 1920 30.000 74.250 Copy 63 IO 1920x1080p23.38 1920 1920 23.975 74.176 Copy 64 IO 1920x1080p24 1920 1920 24.000 74.250 Copy 65 IO 1920x1080p25 1920 1920 23.000 74.250 Copy 66 IO 1920x1080p29.97 1920 1920 26.970 74.176 Copy 67 IO 1920x1080p30 1920 1920 33.000 74.250 Copy 68 IO 1920x1080p31 1920 1920 53.080 348.560 Copy 69 IO 1920x1080p39.94 1920 1920 53.940 348.352 Copy 70 IO 1920x1080p60 1920 1920 63.080 348.560 Copy 71 IO 1920x1280p10cnd-ds 1920 1280 48.974 337.750 Copy 72 IO 1920x1280p6cnd-ds 1920 1280 53.950 354.080 Copy COM IO SampleID: R F A B C D E F G E H I J K L M N O P Q R S T U V W X Y Z X X X X X X X X X X X X X X X X X X X X X X X X X X X X X X X X X X X X X X X X X X X X X X X X X X X X X X X X X X X X X X X X X X X X X X X X X X X X X X X X X X X X X X X X X X X X IOO IO SampleID: R F A B C D E F G E H I J K L M N O P Q R S T U V W X Y Z X X X X X X X Y Z IOO IO SampleID: R F A B C D E F G E H I J K L M N O P Q R S T U V W X Y Z X Y Z Y Z Y Z Y Z Y Z Y Z Y Z Y Z Y Z Y Z Y Z Y Z Y Z Y Z Y Z Y Z Y Z Y Z Y Z Y Z Y Z Y Z Y Z Y Z Y Z Y Z Y Z Y Z Y Z Y Z Y Z Y Z Y Z Y Z Y Z Y Z Y Z Y Z Y Z Y Z Y Z Y Z Y Z Y Z Y Z Y Z Y Z Y Z Y Z Y Z Y IOO IO SampleID: R F A B C D E F G E H I J K L M N O P Q R S T U V W X Y Z X Y Z Y Z Y Z Y Z Y Z Y Z Y Z Y Z Y Z Y Z Y Z Y Z Y Z Y Z Y Z Y Z Y Z Y Z Y Z Y Z Y Z Y Z Y Z Y Z Y Z Y Z Y Z Y Z Y Z Y Z Y Z- In the new window, you can edit various properties of the Custom Resolution. In the column of the right-hand section, you can type a number into the Back Porch (pixel
field under the Horizontal heading.
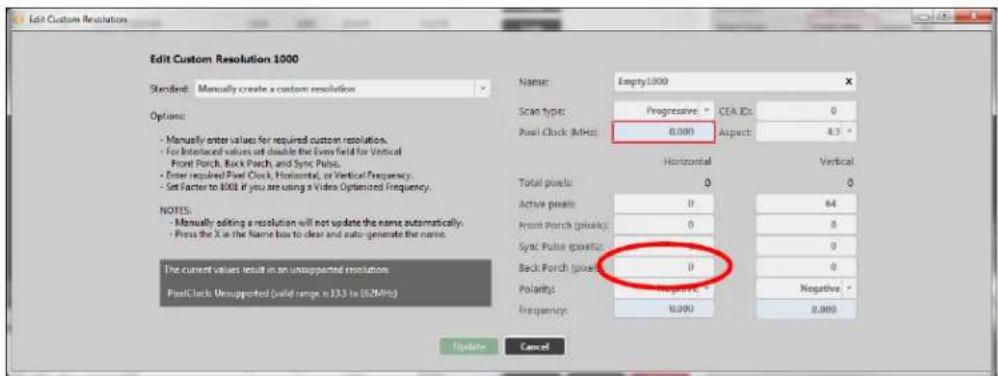
text_image
Edit Custom Resolution Edit Custom Resolution 1000 Standard: Manually create a custom resolution Options: - Manually enter values for required custom resolution. - For Interlaced values set double the Even field for Vertical - Front Porch, Back Porch, and Sync Pulse. - Enter required Front Clock, Horizontal, or Vertical Frequency. - Set Factor to 1000 if you are using a Video Optimized Frequency. NOTES: - Manually editing a resolution will not update the name automatically. - Press the X is the Name box to clear and auto generate the name. The current values result in an unsupported resolution. PostClock: Unsupported (valid range is 135 to 162MHz) Name: Empty1000 Scan type: Progressive: CEA ID: 0 Pixel Clock (MHz): 0.000 Aspect: 4.3 ° Horizontal Vertical Total pixels: 0 0 Active pixels: 0 64 Front Porch (pixels): 0 8 Sync Pulse pixels: 0 0 Back Porch (pixels): 0 0 Polarities: Negative 0 Frequency: 0.000 0.000 Update Cancel- When you have modified the Back Porch as desired, click the Update button at the bottom of the window to commit changes and return to the Resolution Editor.
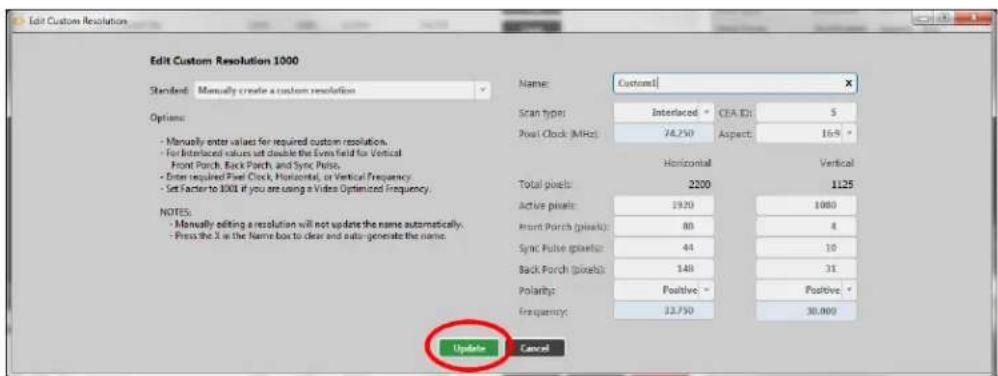
text_image
Edit Custom Resolution Edit Custom Resolution 1000 Standard: Manually create a custom resolution Options: - Manually enter values for required custom resolutions. - For Interface values set double the Even field for Vertical - Front Porch, Back Porch, and Sync Puls. - Enter required Pinel Clock, Horizontal, or Vertical Frequency. - Set Factor to 2001 if you are using a Video Optimized Frequency. NOTES: - Manually editing a resolution will not update the name automatically. - Press the X in the Name box to clear and auto generate the name. Name: Custom1 Scan type: Interlaced: CEA ID: 5 Pixel Clock (MHz): 74.750 Aspect: 16% Horizontal Vertical Total pixels: 2200 1125 Active pixels: 1920 1080 Front Porch (pixels): 80 4 Sync Pulse pixels: 44 10 Back Porch (pixels): 148 31 Polarity: Positive: Positive Frequency: 33.750 30.000 Update CancelDefau It
0
Not es
The valid range of values is 1 to 2000.
For a valid Custom Resolution, you must configure this property to a value within the valid range
In the CORIOdiscover Resolution Editor, the Pixel Clockis not affected by any changes to the Horizontal Back Porch. However, the Horizontal Frequency and Vertical Frequency read-only fields vary based on Horizontal Back Porch changes.
Editing Horizontal Sync Polarity Property from CORIOdiscover Resolution Editor
Learn how to set the Horizontal Synchronization Polarity for a Custom Resolution via the Resolution Editor in CORIOdiscover.
Description
The Horizontal Sync Pulse is a single short pulse which identifies the start of each row of pixels (line of video) in the Custom Resolution. It can be either Positive or Negative. This value is the Horizontal Sync Polarity.
In stru ction s
- From the Resolution Editor window, scroll to the Custom Resolutions section and press the Edit button next to the Custom Resolution you want to edit.
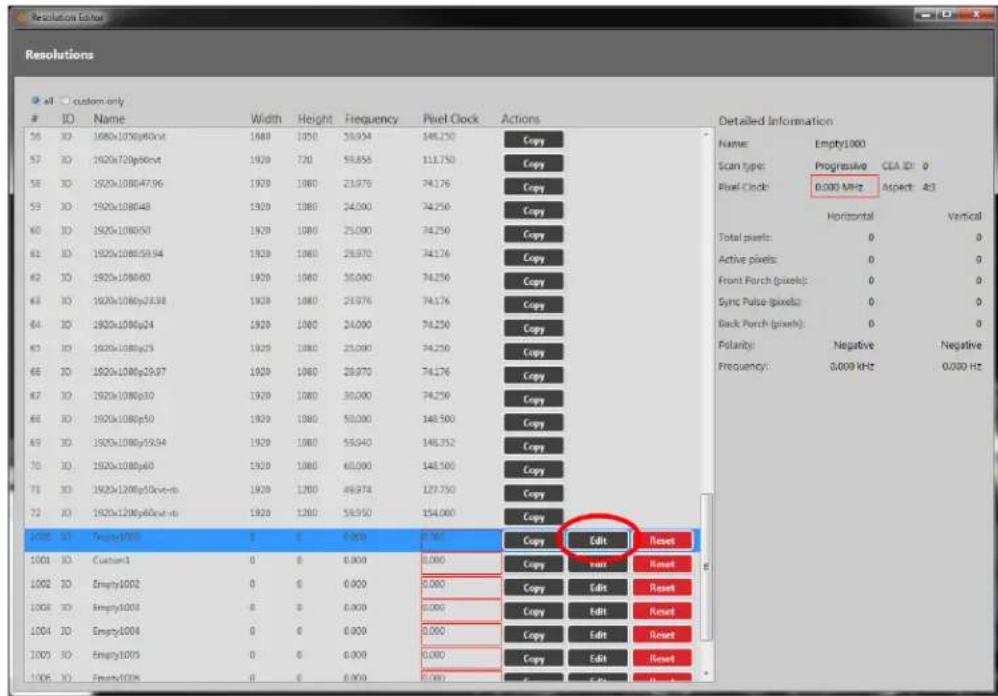
text_image
ResolutionsID Name Width Height Frequency Pixel Clock Actions
56 30 1980x1080p40v4 1980 1950 58.924 148.250 Copy 57 30 1920x720p66v4 1920 720 58.856 111.750 Copy 58 30 1920x108047.96 1920 1980 23.978 74.176 Copy 59 30 1920x108048 1920 1980 24.000 74.250 Copy 60 30 1920x108050 1920 1980 25.000 74.250 Copy 61 30 1920x108059.94 1920 1980 26.970 74.176 Copy 62 30 1920x108060 1920 1980 26.000 74.250 Copy 63 30 1920x1080p23.98 1920 1980 25.976 74.176 Copy 64 30 1920x1080p24 1920 1980 24.000 74.250 Copy 65 30 1920x1080p25 1920 1980 25.000 74.250 Copy 66 30 1920x1080p29.87 1920 1980 26.970 74.176 Copy 67 30 1920x1080p30 1920 1980 30.000 74.250 Copy 68 30 1920x1080p30 1920 1980 50.000 148.500 Copy 69 30 1920x1080p39.94 1920 1980 55.943 148.352 Copy 70 30 1920x1080p60 1920 1980 60.000 148.500 Copy 71 30 1920x1280p15cct-rc 1920 1283 49.974 127.753 Copy 72 30 1920x1280p46cct-rc 1920 1283 58.953 154.666 Copy 1085 3D Empty(3)B B B B B B B B B B B B B B B B B B B B B B B B B B B B B B B B B B B B B B B B B B B B B B B B B B B B B B B B B B B B B B B B B B B B B B B B B B B B B B B B B B B B B B B B B B B B B B B B B B 1086 3D Empty(3)B E E E E E E E E E E E E E E E E E E E E E E E E E E E E E E E E E E E E E E E E E E E E E E E E E E E E E E E E E E E E E E E E E E E E E E E E E E 1087 3D Empty(3)B F F F F F F F F F F F F F F F F F F F F F F F F F F F F F F F F F F F F F F F F F F F F F F F F F F F F F F F F F F F F F F F F F F F F F F F F F F F F F F F F 1088 3D Empty(3)B G G G G G G G G G G G G G G G G G G G G G G G G G G G G G G G G G G G G G G G G G G G G G G G G G G G G G G G G G G G G G G G G G G G G G G G G G G G G G G G G G G G G G G G Copy Edit Reset Copy Reset Reset Copy Edit Reset Copy Edit Reset Copy Edit Reset Copy Edit Reset Copy Edit Reset Copy Edit Reset Copy Edit Reset Copy Edit Reset Copy Edit Reset Copy Edit Reset Copy Edit Reset Copy Edit Reset Copy Edit Reset Copy Edit Reset Copy Edit Reset Copy Edit Reset Copy Edit Reset Copy Edit Reset Copy Edit Reset Copy Edit Reset Copy Edit Reset Copy Edit Reset Copy Edit Reset Copy Edit Reset Copy Edit Reset Copy Print Copy Print Copy Print Copy Print Copy Print Copy Print Copy Print Copy Print Copy Print Copy Print Copy Print Copy Print Copy Print Copy Print Copy Print Copy Print Copy Print Copy Print Copy Print Copy Print Copy Print Copy Print Copy Print Copy Print Copy Print Copy Print Copy Print Copy Print Copy Print Copy Print Copy Print Copy Print Copy Print Copy Print Copy Print Copy Print Copy Print Copy Print Copy Print Copy Print Copy Print Copy Print Copy Print Copy Print Copy Print Copy Print Copy Print Copy Print Copy Print Copy Print Copy Print copy copy copy copy copy copy copy copy copy copy copy copy copy copy copy copy copy copy copy copy copy copy copy copy copy copy copy copy copy copy copy copy copy copy copy copy copy copy copy copy copy copy copy copy copy copy copy copy copy copy copy copy copy copy copy copy copy copy copy copy copy copy copy copy copy copy copy copy copy copy copy copy copy copy copy copy copy copy copy copy copy copy copy copy copy copy copy copy copy copy copy copy copy copy copy copy copy copy copy copy copies Copy Edit Reset Copy Edit Reset Copy Edit Reset Copy Edit Reset Copy Edit Reset Copy Edit Reset Copy Edit Reset Copy Edit Reset Copy Edit Reset Copy Edit Reset Copy Edit Reset Copy Edit Reset Copy Edit Reset Copy Edit Reset Copy Edit Reset Copy Edit Reset Copy Edit Reset Copy Edit Reset Copy Edit Reset Copy Edit Reset Copy Edit Reset Copy Edit Reset Copy Edit Reset Copy Edit Reset Copy Edit Press- In the new window, you can edit various properties of the Custom Resolution. In the column of the right-hand section, you can choose Positive or Negative from the drop-
down Polarity list under the Horizontal heading.

text_image
Edit Custom Resolution Edit Custom Resolution 1000 Standard: Manually create a custom resolution Options: - Manually enter values for required custom resolution. - For Interlaced values set double the Even field for Vertical - Front Porch, Back Porch, and Sync Pulse. - Enter required Front Clock, Horizontal, or Vertical Frequency. - Set Factor to 1000 if you are using a Video Optimized Frequency. NOTES: - Manually editing a resolution will not update the name automatically. - Press the X is the Name box to clear and auto generate the name. The current values result in an unsupported resolution. PostClock: Unsupported (valid range is 135 to 162MHz) Name: Empty1000 Scan type: Progressive: CEA ID: 0 Pixel Clock (MHz): 0.000 Aspect: 4.3 ° Horizontal Vertical Total pixels: 0 0 Active pixels: 0 64 Front Porch (pixels): 0 8 Sync Pulse pixels: 0 0 Back Porch (pixels): 0 0 Polarities: Negative - Negative * Frequency: 0.000 Update Cancel- When you have modified the Horizontal Sync Polarity as desired, click the Update button at the bottom of the window to commit changes and return to the Resolution Editor.

text_image
Edit Custom Resolution Edit Custom Resolution 1000 Standard: Manually create a custom resolution Options: - Manually enter values for required custom resolutions. - For Interface values set double the Even field for Vertical - Front Porch, Back Porch, and Sync Porch. - Enter required Pixel Clock, Horizontal, or Vertical Frequency. - Set Facture to 1000 if you are using a Video Optimized Frequency. NOTES: - Manually editing a resolution will not update the name automatically. - Press the X in the Name box to clear and auto generate the name. Name: Custom1 Scan types: Interlaced: CEA ID: 5 Pixel Clock (MHz): 74.250 Aspect: 169 ° Horizontal Vertical Total pixels: 2200 1125 Active pixels: 1920 1080 Front Porch (pixels): 80 4 Sync Pulse pixels: 44 10 Back Porch (pixels): 148 31 Polarity: Positive: Positive Frequency: 33.750 30.000 Update CancelDefault
N
Notes
In the CORIOdiscover Resolution Editor, the Pixel Clockis not affected by any changes to the Horizontal Sync Polarity. However, the Horizontal Frequency and Vertical Frequency read-only fields vary based on Horizontal Sync Polarity changes.
Editing Vertical Active Pixels Property from CORIOdiscover Resolution Editor
Learn how to set the Vertical Active pixels for a Custom Resolution via the Resolution Editor in CORIOdiscover.
Description
The Vertical Active video is the height of the displayed image in pixels.
For example, for a Custom Resolution of 1024x768 this value would be 768.
In struct ion s
- From the Resolution Editor window, scroll to the Custom Resolutions section and press the Edit button next to the Custom Resolution you want to edit.

text_image
Resolutionsalt custom only
IO Name Width Height Frequency Pixel Clock Actions
55 30 1692x1080p60cxt 1688 1050 58.854 146.250 Copy 57 30 1620x120p66cxt 1920 720 58.856 111.750 Copy 58 30 1920x1080p47.96 1920 1080 23.976 74.176 Copy 59 30 1920x1080p48 1920 1080 24.000 74.250 Copy 60 30 1920x1080p50 1920 1080 25.000 74.250 Copy 61 30 1920x1080p59.94 1920 1080 25.970 74.176 Copy 62 30 1920x1080p60 1920 1080 30.000 74.250 Copy 63 30 1920x1080p23.88 1920 1080 23.976 74.176 Copy 64 30 1920x1080p24 1920 1080 34.000 74.250 Copy 65 30 1920x1080p25 1920 1080 25.000 74.250 Copy 66 30 1920x1080p29.97 1920 1080 25.970 74.176 Copy 67 30 1920x1080p30 1920 1080 30.000 74.250 Copy 68 30 1920x1080p30 1920 1080 55.000 148.560 Copy 69 30 1920x1080p38.94 1920 1080 58.943 148.352 Copy 70 30 1920x128p66o xo xo xo xo xo xo xo xo xo xo xo xo xo xo xo xo xo xo xo xo xo xo xo xo xo xo xo xo xo xo xo xo xo xo xo xo xo xo xo xo xo xo xo xo xo xo xo xo xo xo 71 30 1920x128p6f6cxt-xb 1920 1380 45.974 137.750 Copy 72 30 1920x128p6f6cxt-xb 1920 1280 58.950 154.068 Copy 128E 3D Empty(3D) C B D E F G H I J K L M N O P R S T U V W X Y Z Y A X B X C X D X E X F G H I J K L M N O P R S T U V X Y Z X A X B X C X D X E X F G H I J K L M N O P R S T U V X Y Z X A X B X C X D X E X F G H I J K L M N O P R S T U V X Y Z X A X B X C XD X E X F G H I J K L M N O P R S T U V X Y Z X A X B X C XD X E X F G H I J K L M N O P R S T U V X Y Z X A X B X C XD X E X F G H I J K L M N O P R S T U V X Y Z X A X B X C XD X E X F G H I J K I M N O P R S T U V X Y Z X A X B X C XD X E X F G H I J K L M N O P R S T U V X Y Z X A X B X C XD X E X F G H I J K L M N O P R S T U V X Y Z X A X B X C XD X E X F G H I J K L M N O P R S T U VX Y Z X A X B X C XD X E X F G H I J K L M N O P R S T U VX Y Z X A X B X C XD X E X F G H I J K L M N O P R S T U VX Y Z X A X B X C XD X E X F G H I J K L M N O P R S T U VX Y Z X A X B X C XO 128E 3D Empty(3D) C B D E F G H I J K L M N O P R S T U VX Y Z X A X B X C XD X E X F G H I J K L M N O P R S T U VX Y Z X A X B X C XD X E X F G H I J K L M N O P R S T U VX Y Z X A X B X C XD 128E 3D Empty(3D) C B D E F G H I J K L M N O P R S T U VX Y Z X A X B X C XD X E X F G H I J K L M N O P R S T U VX Y Z X A X B X C XD 128E 3D Empty(3D) C B D E F G H I J K L M N O P R S T U VX Y Z X A X B X C W I J K L M N O P R S T U VX Y Z X A X B W I J K L M N O P R S T U VX Y Z X A X B W I J K L M N O P R S T U VX Y Z X A X B W I J K L M N O P R S T U VX Y Z X A X B W I J K L M N O P R S T U VX Y Z X A X B W I J K L M N O P R S T U VX 128E 3D Empty(3D) C B D E F G H I J K L M N O P R S T U VX Y Z X A X B W I J K L M N O P R S T U VX Y Z X A X B W I J K L M N O P R S T U VX Y Z X A X B W I J K L M N O P R S T U VX Y Z X A X B W I J K L M N O P R S T U VX YZ 128E 3D Empty(3D) C B D E F G H I J K L M N O P R S T U VX Y Z X A X B W I J K L M N O P R S T U VX Y Z X A X B W I J K L M N O P R S T U VX Y Z X A X B W I J K L M N O P R S T U VX YZ 128E 3D Empty(3D) C B D E F G H i j k l m m m m m m m m m m m m m m m m m m m m m m m m m m m m m m m m m m m m m m m m m m m m m m m m m m m m m m m m m m m m m m m m m m m m m m m m m m m m m m m m m m m m m m m m m m m m m m m m m m m m n 128E 3D Empty(3D) C B D E F G H i j k l m m m m m m m m m m m m m m m m m m m m m m m m m m m m m m m m m m m m m m m m m m m m m m m m m m m m m m m m m m m n 128E 3D Empty(3D) C B D E F G H i j k l l n n n n n n n n n n n n n n n n n n n n n n n n n n n n n n n n n n n n n n n n n n n n n n n n n n n n n n n n n n n n n n n n n n n n n n n n n n n n n n n n n n n n n n n n n A b c d e d i o f t h e r i o f t u a r i o f t h e r i o f t h e r i o f t h e r i o f t h e r i o f t h e r i o f t h e r i o f t h e r i o f t h e r i o f t h e r i o f t h e r i o f t h e r i o f t h e r i o f t h e r i o f t h e r i o f t h e r t a s t S c t a r t y p l o r s t e: Progressive CEA ID: O P i l e l C l o c: \( \begin{array}{l} { \begin{array}{l} { \begin{array}{l} { \begin{array}{l} { \begin{array}{l} { \begin{array}{l} { \begin{array}{l} { \begin{array}{l} { \begin{array}{l} { \begin{array}{l} { \begin{array}{l} { \begin{array}{l} { \begin{array}{l} { \begin{matrix} { \begin{matrix} { \begin{matrix} { \begin{matrix} { \begin{matrix} { \begin{matrix} { \begin{matrix} { \begin{matrix} { \begin{matrix} { \begin{matrix} { \begin{matrix} { \begin{matrix} { \begin{matrix} { \begin{matrix} { \begin{matrix} { \begin{matrix} { \begin{matrix} { \end{matrix}\end{matrix}}\end{matrix}\end{matrix}}\end{matrix}\end{matrix}}\end{matrix}}\end{matrix}}\end{matrix}}\end{array} }\end{array} }\end{array} }\end{array} }\end{array} }\end{array}\) Total pixels: Positive Vertical Active pixels: Positive Vertical Front Porch (pixels): Positive Vertical Sync Pulse (pixels): Positive Vertical Back Porch (pixels): Positive Vertical Polarity: Negative Negative Negative Frequency: \( \begin{array}{l} { \begin{array}{l} { \begin{array}{l} { \begin{array}{l} { \begin{array}{l} { \begin{array}{l} { \begin{array}{l} { \begin{array}{l} { \begin{array}{l} { \begin{array}{l} { \begin{array}{l} { \begin{array}{l} { \end{array}\end{array}\end{array}}\end{array}}\end{array}}\end{array}\end{array}}\end{array} }\end{array} }\end{array}\) Polarity: Negative Negative Negative Frequency: \( \begin{array}{l} { \begin{array}{l} { \begin{array}{l} { \begin{array}{l} { \begin{array}{l} { \begin{array}{l} { \begin{array}{l} { \begin{array}{l} { \begin{array}{l} { \begin{array}{l} { \begin{array}{l} { \end{array}\end{array}\end{matrix}}\end{array}}\end{array}}\end{array}}\end{array}}\end{array} }\end{array}\) C o p l y s o w a l l l l l l l l l l l l l l l l l l l l l l l l l l l l l l l l l l l l l l l l l l l l l l l l l l l l l l l l l l l l l l l l l l l l l l l l l l l l l l l l l l l l l l l l l l l l l l l l l l l lllllllllllllllllllllllllllllllllllllllllllllllllllllllllllllllllllllllllllllllllllllllllllllllllllllllllllllllllllllllllllllllllllllllllllllllllllllllllllllllllllllllllllllllllllllllllllllllllllllllll ll ll ll ll ll ll ll ll ll ll ll ll ll ll ll ll ll ll ll ll ll ll ll ll ll ll ll ll ll ll ll ll ll ll ll ll ll ll ll ll ll ll ll ll ll ll ll ll ll ll ll ll ll ll ll ll ll ll ll ll ll ll ll ll ll ll ll ll ll ll ll ll ll ll ll ll ll ll ll ll ll ll ll ll ll ll ll ll ll ll ll ll ll ll ll ll ll ll ll ll ss- In the new window, you can edit various properties of the Custom Resolution. In the column of the right-hand section, you can type a number into the Active pixels field under
the Vertical heading.
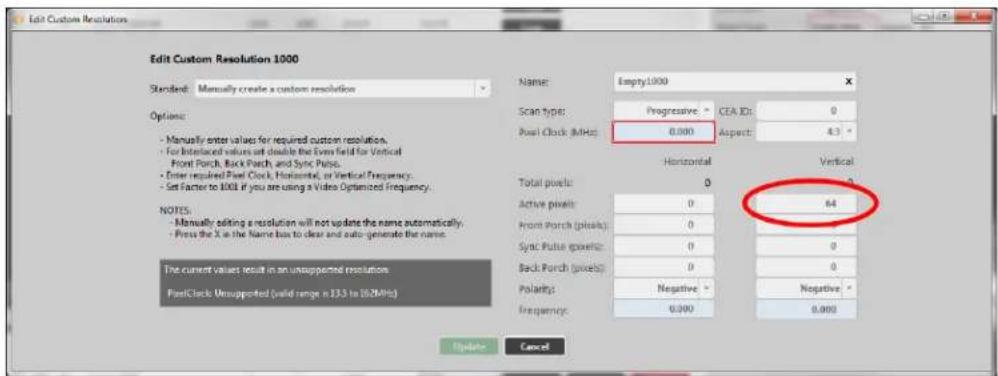
text_image
Edit Custom Resolution Edit Custom Resolution 1000 Standard: Manually create a custom resolution Options: - Manually enter values for required custom resolution. - For Interlaced values set double the Even field for Vertical - Front Porch, Back Porch, and Sync Pulse. - Enter required Post Clock, Horizontal, or Vertical Frequency. - Set Factor to 1000 if you are using a Video Optimized Frequency. NOTES: - Manually editing a resolution will not update the name automatically. - Press the X is the Name box to clear and auto-generate the name. The current values result in an unsupported resolution. PostClock: Unsupported (valid range is 135 to 162MHz) Name: Empty1000 Scan type: Progressive: CEA ID: 0 Post Clock (MHz) 0.000 Aspect: 4.3 ° Horizontal Vertical Total pixels: 0 Active pixels: 0 64 Front Porch (pixels): 0 Sync Pulse pixels: 0 0 Back Porch (pixels): 0 0 Polarities: Negative - Negative * Frequency: 0.000 0.000 Update Cancel- When you have modified the Active pixels as desired, click the Update button at the bottom of the window to commit changes and return to the Resolution Editor.

text_image
Edit Custom Resolution Edit Custom Resolution 1000 Standard: Manually create a custom resolution Options: - Manually enter values for required custom resolutions. - For Interface values set double the Even field for Vertical - Front Porch, Back Porch, and Sync Porch. - Enter required Pixel Clock, Horizontal, or Vertical Frequency. - Set Factor to 1000 if you are using a Video Optimized Frequency. NOTES: - Manually editing a resolution will not update the name automatically. - Press the X in the Name box to clear and auto generate the name. Name: Custom1 Scan type: Interlaced: CEA ID: 5 Pixel Clock (MHz): 74.250 Aspect: 169 ° Horizontal Vertical Total pixels: 2200 1125 Active pixels: 1920 1080 Front Porch (pixels): 80 4 Sync Pulse pixels: 44 10 Back Porch (pixels): 148 31 Polarity: Positive: Positive Frequency: 33.750 30.000 Update CancelDefault
0
Notes
The valid range of values is 64 to 1200.
For a valid Custom Resolution, you must configure this property to a value within the valid range
In the CORIOdiscover Resolution Editor, the Pixel Clock is not affected by any changes to the Vertical Active pixels. However, the Vertical Frequency read-only field varies based on Vertical Active pixels changes.
Editing Vertical Front Porch Property from CORIOdiscover Resolution Editor
Learn how to set the Vertical Front Porch for a Custom Resolution via the Resolution Edi CORIOdiscover.
Description
The Vertical Front Porch is the gap between the end of the Active Video and the start of the Vertical Sync Pulse, in pixels.
In stru ct ion s
- From the Resolution Editor window, scroll to the Custom Resolutions section and press the Edit button next to the Custom Resolution you want to edit.

text_image
Resolutions all custom onlyID Name Width Height Frequency Pixel Clock Actions
30 ID 1920x1080p60x4 1920 1920 59.974 146.230 Copy 57 ID 1920x720p60x4 1920 720 59.855 111.750 Copy 58 ID 1920x1080p47.96 1920 1080 23.976 74.176 Copy 59 ID 1920x1080p48 1920 1080 24.000 74.250 Copy 60 ID 1920x1080p50 1920 1080 25.000 74.250 Copy 61 ID 1920x1080p59.54 1920 1080 26.970 74.176 Copy 62 ID 1920x1080p60 1920 1080 30.000 74.250 Copy 63 ID 1920x1080p23.38 1920 1080 23.976 74.176 Copy 64 ID 1920x1080p24 1920 1080 24.000 74.250 Copy 65 ID 1920x1080p25 1920 1080 25.000 74.250 Copy 66 ID 1920x1080p29.97 1920 1080 26.970 74.176 Copy 67 ID 1920x1080p30 1920 1080 30.000 74.250 Copy 68 ID 1920x1080p31 1920 1080 50.000 148.560 Copy 69 ID 1920x1080p39.34 1920 1080 53.945 148.352 Copy 70 ID 1920x1080p60 1920 1080 60.000 148.560 Copy 71 ID 1920x1280p16c4-ds 1920 1280 66.974 137.750 Copy 72 ID 1920x1280p66c4-ds 1920 1280 58.950 154.685 Copy CODE ID SampleID: B F A, B, C, D, E, F, G, H, I, J, K, L, M, N, O, P, Q, R, S, T, U, V, W, X, Y, Z, AA, AB, AC, AD, AE, AF, AG, AH, AI, AJ, AK, AL, AM, AN, AO, AP, AQ, AR, AS, AT, AU, AV, AW, AX, AXB, AXC, AXD, AXE, AXF, AXG, AXH, AXI, AXJ, AXK, AXL, AXM, AXN, AXO, AXP, AXQ, AXR, AXS, AXT, AXU, AXV, AXW, AXX, AXY, AXZ, AXZA, AXZB, AXZC, AXZD, AXZE, AXZF, AXZG, AXZH, AXZI, AXZJ, AXZK, AXZL, AXZM, AXZN, AXZO, AXZP, AXZQ, AXZR, AXZS, AXZT, AXZU Name: Empty1.00 Scan type: Progressive CEA ID: O Pixel Clock: 8.000 MHz Aspect: A3 Horizontal Vertical Total pixels: B O Active pixels: O O Front Porch (pixels): B O Sync Pulse (pixels): O O Back Porch (pixels): O O Potency: Negative Negative Frequency: 8.009 MHz 8.033 Hz- In the new window, you can edit various properties of the Custom Resolution. In the column of the right-hand section, you can type a number into the Front Porch (pixel
field under the Vertical heading.

text_image
Edit Custom Resolution Edit Custom Resolution 1000 Standard: Manually create a custom resolution Options: - Manually enter values for required custom resolution. - For Interlaced values set double the Even field for Vertical - Front Porch, Back Porch, and Sync Pulse. - Enter required Front Clock, Horizontal, or Vertical Frequency. - Set Factor to 1000 if you are using a Video Optimized Frequency. NOTES: - Manually editing a resolution will not update the name automatically. - Press the X is the Name box to clear and auto-generate the name. The current values result in an unsupported resolution. PostClock: Unsupported (valid range is 135 to 162MHz) Name: Empty1000 Scan type: Progressive: CEA ID: 0 Pixel Clock (MHz): 0.000 Aspect: 4.3 ° Horizontal Vertical Total pixels: 0 0 Active pixels: 0 Front Porch (pixels): 0 0 Sync Pulse pixels: 0 Back Porch (pixels): 0 0 Polarities: Negative - Negative * Frequency: 0.000 0.000 Update Cancel- When you have modified the Front Porch as desired, click the Update button at the bottom of the window to commit changes and return to the Resolution Editor.

text_image
Edit Custom Resolution Edit Custom Resolution 1000 Standard: Manually create a custom resolution Options: - Manually enter values for required custom resolution. - For Interface values set double the Even field for Vertical - Front Porch, Back Porch, and Sync Puls. - Enter required Pixel Clock, Horizontal, or Vertical Frequency. - Set Factor to 100 if you are using a Video Optimized Frequency. NOTES: - Manually editing a resolution will not update the name automatically. - Press the X in the Name box to clear and auto generate the name. Name: Custom1 Scan type: Interlaced: CEA ID: 5 Pixel Clock (MHz): 74.250 Aspect: 169 ° Horizontal Vertical Total pixels: 2200 1125 Active pixels: 1920 1080 Front Porch (pixels): 80 4 Sync Pulse pixels: 44 10 Back Porch (pixels): 148 31 Polarity: Positive: Positive Frequency: 33.750 30.000 Update CancelDefau It
0
Not es
The valid range of values is 1 to 2000.
For a valid Custom Resolution, you must configure this property to a value within the valid range
To calculate the Vertical Front Porch, Vertical Sync Pulse and Vertical Back Porch for an interlaced resolution, double the value of the even field. Interlacing standards are in order to present the values in a similar format to Progressive values.
Interlaced Custom Resolutions require that the Vertical Front Porch is twice the even field.
For example, a Vertical Front Porch of 6 gives:
Odd field: 3.5
Even field: 3
In the CORIOdiscover Resolution Editor, the Pixel Clockis not affected by any changes to the Vertical Front Porch. However, the Vertical Frequency read-only field varies based on Vertical Front Porch changes.
Editing Vertical Sync Pulse Property from CORIOdiscover Resolution Editor
Learn how to set the Vertical Sync Pulse for a Custom Resolution via the Resolution Editor in CORIOdiscover.
Description
The Vertical Sync Pulse identifies the start of each frame of video in the Custom Resolution.
Note that for Interlaced Custom Resolutions both odd and even frames will have a Vertical Sync Pulse.
In st ruction s
- From the Resolution Editor window, scroll to the Custom Resolutions section and press the Edit button next to the Custom Resolution you want to edit.

text_image
Resolutions R at custom onlyID Name Width Height Frequency Pixel Clock Actions
56 10 2680x1090p66x4 1989 1000 59.854 146.250 Copy 57 10 2680x1090p66x4 1929 700 59.856 113.750 Copy 58 10 2680x1090p67.96 1929 1000 23.878 74.176 Copy 59 10 2680x1090p48 1929 1000 24.000 74.250 Copy 60 10 2680x1090p50 1929 1000 25.000 74.250 Copy 61 10 2680x1090p53.94 1929 1000 25.970 74.176 Copy 62 10 2680x1090p60 1929 1000 30.000 74.250 Copy 63 10 2680x1090p23.98 1929 1000 25.978 74.176 Copy 64 10 2680x1090p24 1929 1000 24.000 74.250 Copy 65 10 2680x1090p25 1929 1000 25.000 74.250 Copy 66 10 2680x1090p29.97 1929 1000 25.970 74.176 Copy 67 10 2680x1090p30 1929 1000 30.000 74.250 Copy 68 10 2680x1090p36 1929 1000 50.000 148.560 Copy 69 10 2680x1090p59.94 1929 1000 59.840 148.352 Copy 70 10 2680x1090p69 1929 1000 60.000 148.560 Copy 71 10 2680x1280p55x4.mb 1929 1280 48.878 127.733 Copy 72 10 2680x1280p48x4.mb 1929 1280 59.853 154.063 Copy 1:3:3:3:3:3:3:3:3:3:3:3:3:3:3:3:3:3:3:3:3:3:3:3:3:3:3:3:3:3:3:3:3:3:3:3:3:3:3:3:3:3:3:3:3:3:3:3:3:3:3: Detailed Information Name Empty1:XXX Scan type: Progressive CEA ID: O Pixel Clock: 6,00 MHz Aspect: Aa: Horizontal Vertical Total pixels: O Active pixels: O Front Porch (pixels): O Sync Pulse (pixels): O Back Porch (pixels): O Polarity: Negative Negative Frequency: 6,666 kHz 6,666 Hz Copy Edit Reset Copy Edit Reset Copy Edit Reset Copy Edit Reset Copy Edit Reset- In the new window, you can edit various properties of the Custom Resolution. In the right column of the right-hand section, you can type a number into the Sync Pulse (pixels) field
under the Vertical heading.
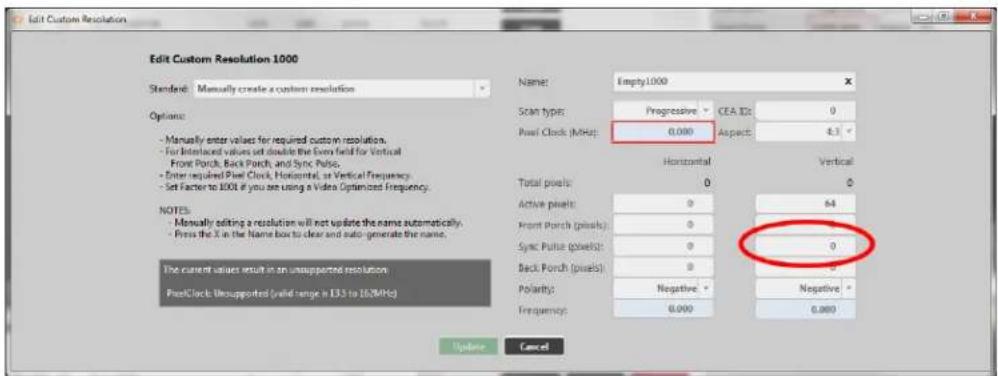
text_image
Edit Custom Resolution Edit Custom Resolution 1000 Standard: Manually create a custom resolution Options: - Manually enter values for required custom resolution. - For Intellectual values set double the Even field for Vertical Front Porch, Back Porch, and Sync Pulse. - Enter required Post Clock, Horizontal, as Vertical Frequency. - Set Factor to 1000 if you are using a Video Optimized Frequency. NOTES: - Manually editing a resolution will not update the name automatically. - Press the X in the Name box to clear and auto-generate the name. The current value result in an unsupported resolution PostClock: Unsupported (valid range is L33 to 162MHz) Name: Empty1000 Scan types: Progressive CEA ID: 0 Plew Clock (MHz): 0.000 Aspect: 4.3 Horizontal Vertical Total pixels: 0 0 Active pixels: 0 64 Front Porch (pixels): 0 Sync Pulse (pixels): 0 0 Back Porch (pixels): 0 0 Polarity: Negative - Negative * Frequency: 0.000 0.000 Update Cancel- When you have modified the Sync Pulse as desired, click the Update button at the bottom of the window to commit changes and return to the Resolution Editor.
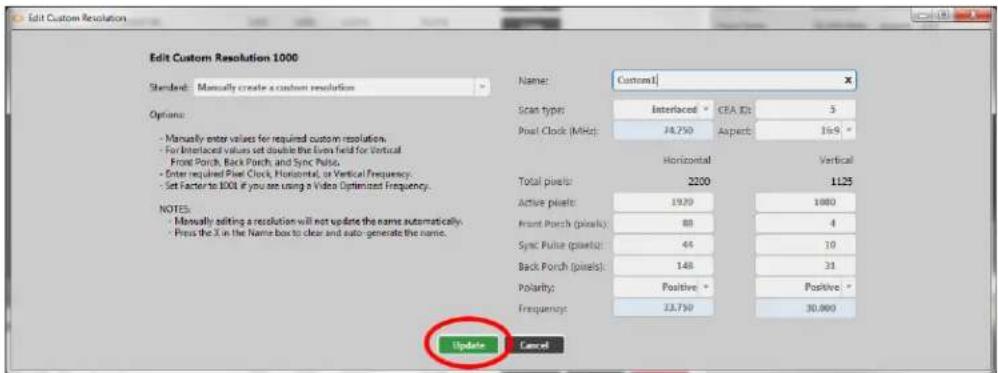
text_image
Edit Custom Resolution Edit Custom Resolution 1000 Standard: Manually create a custom resolution Options: - Manually enter values for required custom resolution. - For Interlaced values set double the Even field for Vertical Front Porch, Back Porch, and Sync Pulse. - Enter required Post Clock, Horizontal, or Vertical Frequency. - Set Factor to 100 if you are using a Video Optimized Frequency. NOTES: - Manually editing a resolution will not update the name automatically. - Press the X in the Name box to clear and auto-generate the name. Name: Custom1 Scan types: Interlaced CEA ID: 3 Post Clock (MHz): 24.750 Aspect: 15.9 ° Horizontal Vertical Total pixels: 2200 1125 Active pixels: 19.29 1000 Front Porch (pixels): 88 4 Sync Pulse (pixels): 44 10 Back Porch (pixels): 148 31 Polarity: Positive * Positive * Frequency: 23.750 30.000 Update CancelDefault
0
Notes
The valid range of values is 1 to 100.
For a valid Custom Resolution, you must configure this property to a value within the valid
To calculate the Vertical Front Porch, Vertical Sync Pulse and Vertical Back Porch for an interlaced resolution, double the value of the even field. Interlacing standards are designed this in order to present the values in a similar format to Progressive values.
Interlaced Custom Resolutions require that the Vertical Sync Pulse is twice the even field.
For example, a Vertical Sync Pulse of 10 gives:
Odd field: 5
Even field: 5
In the CORIOdiscover Resolution Editor, the Pixel Clock is not affected by any changes to the Vertical Sync Pulse. However, the Vertical Frequency read-only field varies based on Vertical Sync Pulse changes.
Editing Vertical Back Porch Property from CORIOdiscover Resolution Editor
Learn how to set the timing interval for the Vertical Back Porch for a Custom Resolution via the Resolution Editor in CORIOdiscover.
Descript ion
The Vertical Back Porch is the gap between the end of the Vertical Sync Pulse and the beginning of the Active Video, in pixels.
In stru ction s
- From the Resolution Editor window, scroll to the Custom Resolutions section and press the Edit button next to the Custom Resolution you want to edit.

text_image
Resolutions all custom onlyIO Name Width Height Frequency Pixel Clock Actions
30 IO 1920x1080p40x4 1920 1920 56.954 146.250 Copy 57 IO 1920x720p46x4 1920 720 59.856 111.750 Copy 58 IO 1920x1080p47.96 1920 1920 23.976 74.176 Copy 59 IO 1920x1080p48 1920 1920 24.000 74.250 Copy 60 IO 1920x1080p50 1920 1920 25.000 74.250 Copy 61 IO 1920x1080p59.54 1920 1920 25.970 74.176 Copy 62 IO 1920x1080p60 1920 1920 30.000 74.250 Copy 63 IO 1920x1080p73.38 1920 1920 23.976 74.176 Copy 64 IO 1920x1080p74 1920 1920 24.000 74.250 Copy 65 IO 1920x1080p75 1920 1920 23.000 74.250 Copy 66 IO 1920x1080p79.97 1920 1920 26.970 74.176 Copy 67 IO 1920x1080p80 1920 1920 30.000 74.250 Copy 68 IO 1920x1080p81 1920 1920 50.000 74.850 Copy 69 IO 1920x1080p83.94 1920 1920 53.940 74.855 Copy 70 IO 1920x1080p86 1920 1920 60.000 74.855 Copy 71 IO 1920x1280p10c4-ds 1920 1280 68.974 73.750 Copy 72 IO 1920x1280p6c4-ds 1920 1280 58.950 74.485 Copy COM IO SampleID: R F A B C D E F G E H I J K L M N O P Q R S T U V W X Y Z X X X X X X X X X X X X X X X X X X X X X X X X X X X X X X X X X X X X X X X X X X X X X X X X X X X X X X X X X X X X X X X X X X X X X X X X X X X X X X X X X X X X X X X X X X X X X X X X X X X X IOO IO SampleID: R F A B C D E F G E H I J K L M N O P Q R S T U V W X Y Z X X X X X X X Y Z Z U V W X Y Z U V W Y Z U V W Y Z U V W Y Z U V W Y Z U V W Y Z U V W Y Z U V W Y Z U V W Y Z U V W Y Z U V W Y Z U V W Y Z U V W Y Z U V W Y Z U V W Y Z U V W Y Z U V W Y Z U V W Y Z U V W Y Z U V W Y Z U V W Y Z U V IOO IO SampleID: R F A B C D E F G E H I J K L M N O P Q R S T U V W X Y Z U V W Y Z U V W Y Z U V W Y Z U V W Y Z U V W Y Z U V W Y Z U V W Y Z U V W Y Z U V W Y Z U V W Y Z U V W Y Z U V W Y Z U V W Y Z U V W Y Z U V W Y Z U V W Y Z U V W Y Z U V W Y Z U V W IOO IO SampleID: R F A B C D E F G E H I J K L M N O P Q R S T U V W X Y Z U V W Y Z U V W Y Z U V W Y Z U V W Y Z U V W Y Z U V W Y Z U V W Y Z U V W Y Z U V W Y Z U V W Y Z U V W Y Z U V W IOO IO SampleID: R F A B C D E F G E H I J K L M N O P Q R S T U V W X Y Z U V WY ZU V WX Y Z U V WY ZU V WX Y Z U V WY ZU V WX Y Z U V WY ZU V WX Y Z U V WY ZU V WX Y Z U V WY ZU V WX Y Z U IOO IO SampleID: R F A B C D E F G E H I J K L M N O P Q R S T U V WX Y Z U V WY ZU V WX YZU VWYZU VWYZU VWYZU VWYZU VWYZU VWYZU VWYZU VWYZU VWYZU IOO IO SampleID: R F A B C D E F G E H I J K L M N O P Q R S T U V WX YZU VWYZU VWYZU VWYZU VWYZU VWYZU VWYZU VWYZU VWYZU IOO IO SampleID: R F A B C D E F G E H I J K L M N O P Q R S T U V WX YZU VWYZU VWYZU VWYZU VWYZUVWYZU IOO IO SampleID: R F A B C D E F G E H I J K L M N O P Q R S T U V WX YZU VWYZU VWYZU VWYZU VWYZU VWYZU VWYZU IOO IO SampleID: R F A B C D E F G E H I J K L M N O P Q R S T U V WX YZU VWYZU VWYZU VWYZU VWYZUVWYZU IOO IO Sample ID: R F A B C D E F G E H I J K L M N O P Q R S T U V WX YZU VWYZU VWYZU VWYZU VWYZU IOO IO SampleID: R F A B C D E F G E H I J K L M N O P Q R S T U V WX YZU VWYZU VWYZU VWYZUVWYZU IOO IO SampleID: R F A B C D E F G E H I J K L M N O P Q R S T U V WX YZU VWYZU VWYZUVWYZU IOO IO SampleID: R F A B C D E F G E H I J K L M N O P Q R S T U V WX YZU VWYZUVWYZU IOO IO SampleID: R F A B C D E F G E H I J K L M N O P Q R S T U V WX YZU VWYZUVWYZU IOO IO SampleID: R F A B C D E F G E H I J K L M N O P Q R S T U V WX YZU VWYzU IOO IO SampleID: R F A B C D E F G E H I J K L M N O P Q R S T U V WX YZU VWYzU IOO IO SampleID: R F A B C D E F G E H I J K L M N O P Q R S T U V WX YZU VWYzU IOO IO SampleID: R F A B C D E E F G E H I J K L M N O P Q R S T U V WX YZU VWYzU IOO IO SampleID: R F A B C D E F G E H I J K L M N O P Q R S T U V WX YZU VWYzU IOO IO SampleID: R F A B C D E F G E H I J K L M N O P Q R s t u v v v v v v v v v v v v v v v v v v v v v v v v v v v v v v v v v v v v v v v v v v v v v v v v v v v v v v v v v v v v v v v v v v v v v v v v v v v v v v v v v v v v v v v v v v v v v v v v v- In the new window, you can edit various properties of the Custom Resolution. In the column of the right-hand section, you can type a number into the Back Porch (pixel
field under the Vertical heading.
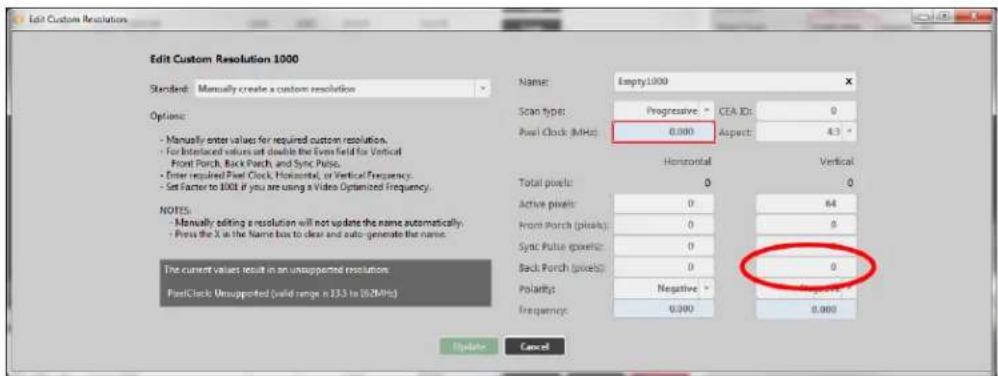
text_image
Edit Custom Resolution Edit Custom Resolution 1000 Standard: Manually create a custom resolution Options: - Manually enter values for required custom resolution. - For Interlaced values set double the Even field for Vertical - Front Porch, Back Porch, and Sync Pulse. - Enter required Front Clock, Horizontal, or Vertical Frequency. - Set Factor to 1000 if you are using a Video Optimized Frequency. NOTES: - Manually editing a resolution will not update the name automatically. - Press the X is the Name box to clear and auto-generate the name. The current values result in an unsupported resolution. PostClock: Unsupported (valid range is 135 to 162MHz) Name: Empty1000 Scan type: Progressive: CEA ID: 0 Pixel Clock (MHz) 0.000 Aspect: 4.3 ° Horizontal Vertical Total pixels: 0 0 Active pixels: 0 64 Front Porch (pixels): 0 8 Sync Pulse pixels: 0 Back Porch (pixels): 0 0 Polarbits: Negative - Negative Frequency: 0.000 0.000 Update Cancel- When you have modified the Back Porch as desired, click the Update button at the bottom of the window to commit changes and return to the Resolution Editor.
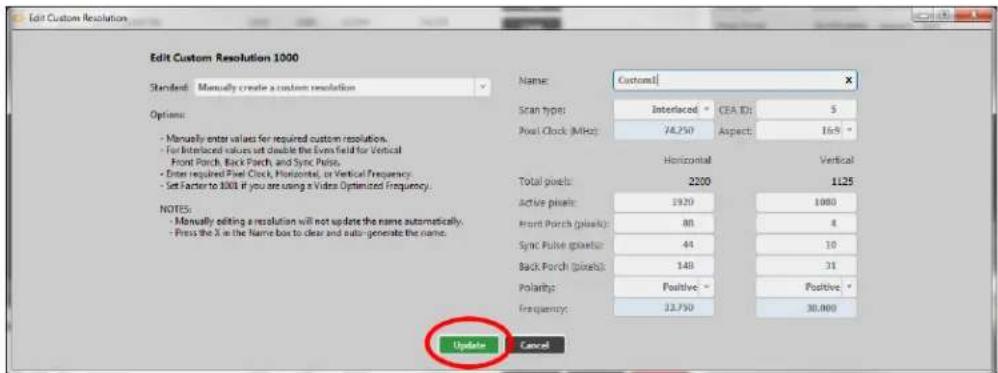
text_image
Edit Custom Resolution Edit Custom Resolution 1000 Standard: Manually create a custom resolution Options: - Manually enter values for required custom resolutions. - For Interface values set double the Even field for Vertical - Front Porch, Back Porch, and Sync Puls. - Enter required Pixel Clock, Horizontal, or Vertical Frequency. - Set Factor to 300 if you are using a Video Optimized Frequency. NOTES: - Manually editing a resolution will not update the name automatically. - Press the X in the Name box to clear and auto generate the name. Name: Custom1 Scan type: Interlaced: CEA ID: 5 Pixel Clock (MHz): 74.250 Aspect: 169 ° Horizontal Vertical Total pixels: 2200 1125 Active pixels: 1920 1080 Front Porch (pixels): 80 4 Sync Pulse pixels: 44 10 Back Porch (pixels): 148 31 Polarity: Positive: Positive Frequency: 33.750 30.000 Update CancelDefau It
0
Not es
The valid range of values is 1 to 100.
For a valid Custom Resolution, you must configure this property to a value within the valid range
To calculate the Vertical Front Porch, Vertical Sync Pulse and Vertical Back Porch for an interlaced resolution, double the value of the even field. Interlacing standards are in order to present the values in a similar format to Progressive values.
Interlaced Custom Resolutions require that the Vertical Back Porch is twice the even field.
For example, a Vertical Back Porch of 69 gives:
Odd field: 34
Even field: 34.5
In the CORIOdiscover Resolution Editor, the Pixel Clockis not affected by any changes to the Vertical Back Porch. However, the Vertical Frequency read-only field varies based on Vertical Back Porch changes.
Editing Vertical Sync Polarity Property from CORIOdiscover Resolution Editor
Learn how to set the Vertical Synchronization Polarity for a Custom Resolution via the Resolution Editor in CORIOdiscover.
Description
The Vertical Sync Pulse separates the video fields in the Custom Resolution. It can be either Positive or Negative. This value is the Vertical Sync Polarity.
In st ruction s
- From the Resolution Editor window, scroll to the Custom Resolutions section and press the Edit button next to the Custom Resolution you want to edit.

text_image
Resolutionsall ① custom only
ID Name Width Height Frequency Pixel Clock Actions Detailed Information
56 IO 1990x1080p40x4 1980 1000 59.934 146.230 Copy 57 IO 1990x720p60x4 1920 720 59.856 111.750 Copy 58 IO 1990x1080p47.96 1920 1080 23.976 74.176 Copy 59 IO 1990x1080p48 1920 1080 24.000 74.250 Copy 60 IO 1990x1080p50 1920 1080 25.000 74.250 Copy 61 IO 1990x1080p59.94 1920 1080 29.970 74.176 Copy 62 IO 1990x1080p60 1920 1080 30.000 74.250 Copy 63 IO 1990x1080p73.38 1920 1080 32.976 74.176 Copy 64 IO 1990x1080p24 1920 1080 24.000 74.250 Copy 65 IO 1990x1080p25 1920 1080 25.000 74.250 Copy 66 IO 1990x1080p28.97 1920 1080 28.870 74.176 Copy 67 IO 1990x1080p30 1920 1080 30.000 74.250 Copy 68 IO 1990x1080p36 1920 1080 32.976 148.560 Copy 69 IO 1990x1080p39.94 1920 1080 53.843 148.352 Copy 70 IO 1990x1080p46 1920 1080 63.266 148.560 Copy 71 IO 1990x1280p55x4x4x4b 1920 1280 48.974 127.733 Copy 72 IO 1990x1280p66x4x4x4c 1920 1280 53.353 154.066 Copy TOTAL OP TOTAL OP Copy Edit Reset Copy Edit Reset Copy Edit Reset Copy Edit Reset Copy Edit Reset Copy Edit Reset- In the new window, you can edit various properties of the Custom Resolution. In the right column of the right-hand section, you can choose Positive or Negative from the drop-
down Polarity list under the Vertical heading.

text_image
Edit Custom Resolution Edit Custom Resolution 1000 Standard: Manually create a custom resolution Options: - Manually enter values for required custom resolution. - For Intellectual values set double the Even field for Vertical Front Porch, Back Porch, and Sync Pulse. - Enter required Post Clock, Horizontal, as Vertical Frequency. - Set Factor to I/O if you see using a Video Optimized Frequency. NOTES: - Manually editing a resolution will not update the name automatically. - Press the X in the Name box to clear and auto generate the name. The current value result in an unsupported resolution. PostClock: Unsupported (valid range is 133 to 162MHz) Name: Empty1000 Scan types: Progressive CEA ID: 0 Plew Clock (MHz): 0.000 Aspect: 4.3 ° Horizontal Vertical Total pixels: 0 0 Active pixels: 0 64 Front Porch (pixels): 0 0 Sync Pulse (pixels): 0 0 Back Porch (pixels): 0 Polarity: Negative - Negative - Frequency: 0.000- When you have modified the Vertical Sync Polarity as desired, click the Update button at the bottom of the window to commit changes and return to the Resolution Editor.
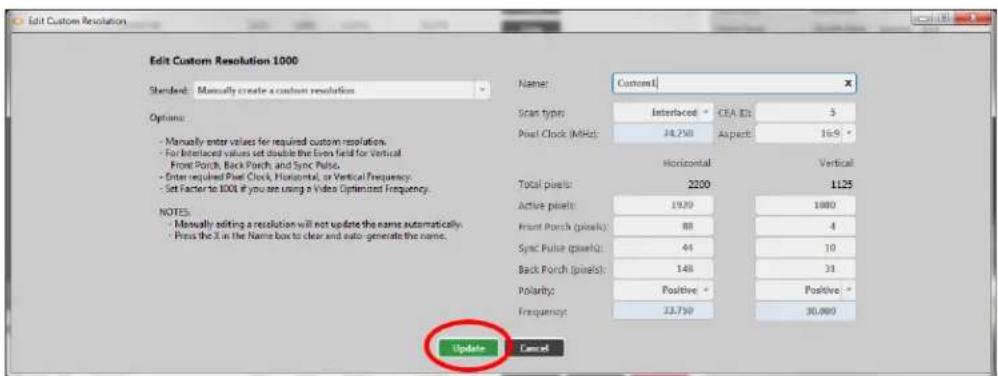
text_image
Edit Custom Resolution Edit Custom Resolution 1000 Standard: Manually create a custom resolution Name: Custom1 Scan types: Interlaced * CEA ID: 3 Post Clock (MHz): 24.250 Aspects: 16.9 * Horizontal Vertical Total pixels: 2200 1125 Active pixels: 1920 1000 Front Porch (pixels): 88 4 Sync Pulse (pixels): 44 10 Back Porch (pixels): 148 31 Polarity: Positive * Positive * Frequency: 33.750 30.000 Update CancelDefault
N
Notes
In the CORIOdiscover Resolution Editor, the Pixel Clock is not affected by any changes to the Vertical Sync Polarity. However, the Vertical Frequency read-only field varies based on Vertical Sync Polarity changes.
Editing CEA ID Property from CORIOdiscover Resolution Editor
Learn how to setthe CEAID (Consumer Electronics Association Digital Television Profile, as defined in CEA-861-D) for a Custom Resolution via the Resolution Editor in CORIOdiscover.
Description
This attribute is to be used only when creating a Custom Resolution as defined in CEA-861-D.
Instru ction s
- From the Resolution Editor window, scroll to the Custom Resolutions section and press the Edit button next to the Custom Resolution you want to edit.

text_image
ResolutionsIO Name Width Height Frequency Pixel Clock Actions
56 IO 1920x1200p68c4 1920 1920 50,974 146,230 Copy 57 IO 1920x120p68c4 1920 720 50,858 111,750 Copy 58 IO 1920x108047.96 1920 1080 23,978 74,176 Copy 59 IO 1920x108048 1920 1080 24,000 74,250 Copy 60 IO 1920x108050 1920 1080 25,000 74,250 Copy 61 IO 1920x108059.94 1920 1080 26,970 74,176 Copy 62 IO 1920x108060 1920 1080 30,000 74,250 Copy 63 IO 1920x1080p23.38 1920 1080 29,976 74,176 Copy 64 IO 1920x1080p24 1920 1080 24,000 74,250 Copy 65 IO 1920x1080p23 1920 1080 25,000 74,250 Copy 66 IO 1920x1080p29.97 1920 1080 25,970 74,176 Copy 67 IO 1920x1080p30 1920 1080 30,000 74,250 Copy 68 IO 1920x1080p31 1920 1080 50,000 148,560 Copy 69 IO 1920x1080p39.94 1920 1080 59,940 148,352 Copy 70 IO [ ] [ ] [ ] [ ] [ ] [ ] [ ] [ ] [ ] [ ] [ ] [ ] [ ] [ ] [ ] [ ] [ ] [ ] [ ] [ ] [ ] [ ] [ ] [ ] [ ] [ ] [ ] [ ] [ ] [ ] [ ] [ ] [ ] [ ] [Copy] Edit Reset Copy Print Reset Copy Edit Reset Copy Edit Reset Copy Edit Reset Copy Edit Reset Copy Edit Reset Copy Edit Reset- In the new window, you can edit various properties of the Custom Resolution. In the right corner, you can type a value into the CEA ID field.
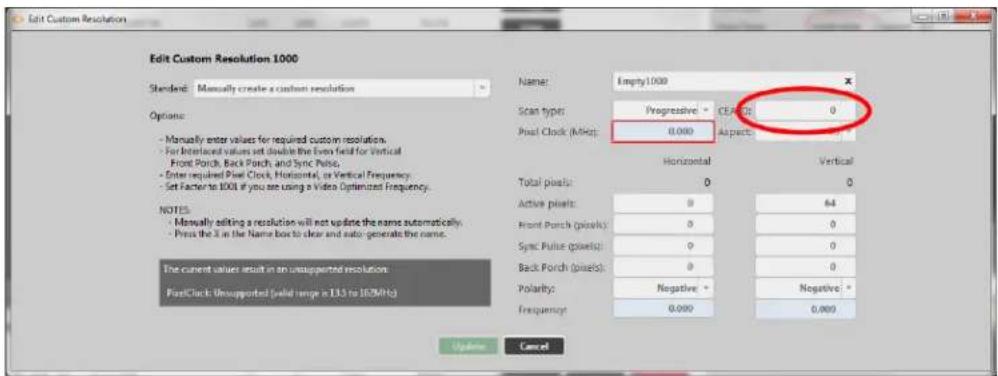
text_image
Edit Custom Resolution Edit Custom Resolution 1000 Standard: Manually create a custom resolution Options: - Manually enter values for required custom resolution. - For Intellectual values set double the Even field for Vertical - Front Porch, Back Porch, and Sync Puls. - Enter required Post Clock, Horizontal, or Vertical Frequency. - Set Factor to 100 if you are using a Video Optimized Frequency. NOTES: - Manually asking a resolution will not update the name automatically. - Press the 3 in the Name box to clear and auto-generate the name. The current values result in an unsupported resolution. PostClock: Unsupported (valid range = 135 to 160MHz) Name: Empty1000 Scan types: Progressive - CEANS 0 Post Clock (MHz): 0.000 Aspects: Horizontal Vertical Total pixels: 0 0 Active pixels: 0 64 Front Porch (pixels): 0 0 Sync Pulse (pixels): 0 0 Back Porch (pixels): 0 0 Polarity: Negative + Negative * Frequency: 0.000 0.000 Update Cancel- When you have modified the CEA ID as desired, click the Update button at the bottom of the window to commit changes and return to the Resolution Editor.

text_image
Edit Custom Resolution Edit Custom Resolution 1000 Standard: Manually create a custom resolution Options: - Manually enter values for required custom resolution. - For Interlaced values set double the Even field for Vertical - Front Porch, Back Porch, and Sync Pulse. - Enter required Post Clock, Horizontal, or Vertical Frequency. - Set Factors to 1000 if you are using a Video Optimized Frequency. NOTES: - Manually editing a resolution will not update the name automatically. - Press the X in the Name box to clear and auto-generate the name. Name: Custom1 Scan type: Interlaced: CEA ID: 5 Pixel Clock (MHz): 24.250 Aspects: 169 ° Horizontal Vertical Total pixels: 2100 1125 Active pixels: 1920 1880 Front Porch (pixels): 88 4 Sync Pulse (pixels): 44 10 Back Porch (pixels): 148 31 Polarity: Positive - Positive * Frequency: 33.750 10.000 Update CancelDefault
0
Notes
This field value must be 0 or a value specified in the CEA Standard Profile, as defined 861-D.
The CEA identifier information option does not affect the Custom Resolution. It is there stri for providing attached equipment with information on the resolution. When defining a Custom Resolution, only set this value if you are configuring it to comply with the CEA Profile for value.

Caution: If the value of CEA ID is not 0 and the Custom Resolution does not conform to the CEA Profile for that value, the result is undefined and behavior is expected.
Accessing Resolution Editor from the Command Line
Using Command Line Interface for Resolution Editing
If you are not confident with the command line interface, please use the GUI provided; how if you are comfortable with the command line and wish to use it instead of the user into there are a set of commands that can be used to configure the unit.
To use the command line interface, you need to connect to the unit via either serial or using a terminal emulator. The unit confirms the connection by providing a carat at the start of the line.
Log in by using the command login (
(admin, adminpw) and pressing Enter or Return. If the login is successful, the unit will cor that you have logged in and you can begin using commands.
If you are not confident with these steps, it is recommended that you use the software to face provided by tvONE. Virtually every task that can be done via command line is also able in the software.
Listing Resolutions from Command Line
If you are not confident with the command line interface, please use the GUI provided; however, if you are comfortable with the command line and wish to use it instead of the user interface, relevant commands are outlined in this and subsequent sections.
The Resolutions command (in the Resources menu) contains ten Custom Resolutions. Each resolution can be tailored to your exact requirements from the command line by configuring the relevant attributes, outlined below.

flowchart
graph TD
    A["root"] --> B["..."]
    A --> C["Resources"]
    A --> D["..."]
    C --> E["Resolutions"]
    E --> F["..."]
    E --> G["Resolution1000"]
    E --> H["Resolution1001"]
    E --> I["..."]
    E --> J["Resolution1009"]
    G --> K["Name"]
    G --> L["AspectRatio"]
    G --> M["..."]
    G --> N["Origin"]
Com man d
Resources.Resolutions
Descript ion
Custom Resolutions are accessed from the Resources menu, under the Resolutions option.
All the built-in and Custom Resolutions configurations may be viewed from this menu; Custom Resolutions can also be modified here.
Built-in Resolutions are numbered sequentially from 1; Custom Resolutions are numbered sequentially from 1000 - the ten Custom Resolution slots available are Resolution1000 to Resolution1009 inclusive.
Example
Resources.Resolutions.Resolution1
Resources.Resolutions.Resolution2
... Resources.Resolutions.Resolution1000 ... Resources.Resolutions.Resolution1009
Listing Resolution Properties from Command Line
Various details specific to a resolution are saved on a per-resolution basis. You can view settings for built-in resolutions; you can view and edit settings for Custom Resolutions.
Com man d
Resources.Resolutions.Resolution1
Descript ion
List the attributes of this resolution.
Example
For a default resolution:
Resources.Resolutions.Resolution1
Resources.Resolutions.Resolution1.Name = 640x480p60
Resources.Resolutions.Resolution1.Aspect = 4:3
Resources.Resolutions.Resolution1.CanFramelock = No
Resources.Resolutions.Resolution1.PixelClock = 25175000
Resources.Resolutions.Resolution1.ScanType = p
Resources.Resolutions.Resolution1.HActive = 640
Resources.Resolutions.Resolution1.HFrontPorch = 16
Resources.Resolutions.Resolution1.HSyncPulse = 96
Resources.Resolutions.Resolution1.HBackPorch = 48
Resources.Resolutions.Resolution1.VActive = 480
Resources.Resolutions.Resolution1.VFrontPorch = 10
Resources.Resolutions.Resolution1.VSyncPulse = 2
Resources.Resolutions.Resolution1.VBackPorch = 33
Resources.Resolutions.Resolution1.HSyncPolarity = N
Resources.Resolutions.Resolution1.VSyncPolarity = N
Resources.Resolutions.Resolution1.CEAID = 1
Resources.Resolutions.Resolution1.Origin = tvONE
!Done Resources.Resolutions.Resolution1
For a Custom Resolution:
Resources.Resolutions.Resolution1000
Resources.Resolutions.Resolution1000.Name = MyResolution
Resources.Resolutions.Resolution1000.Aspect = 4:3
Resources.Resolutions.Resolution1000.PixelClock = 111750000
Resources.Resolutions.Resolution1000.ScanType = p
Resources.Resolutions.Resolution1000.HActive = 1920
Resources.Resolutions.Resolution1000.HFrontPorch = 96
Resources.Resolutions.Resolution1000.HSyncPulse = 192
Resources.Resolutions.Resolution1000.HBackPorch = 288
Resources.Resolutions.Resolution1000.VActive = 720
Resources.Resolutions.Resolution1000.VFrontPorch = 3
Resources.Resolutions.Resolution1000.VSyncPulse = 10
Resources.Resolutions.Resolution1000.VBackPorch = 15
Resources.Resolutions.Resolution1000.HSyncPolarity = N
Resources.Resolutions.Resolution1000.VSyncPolarity = P
Resources.Resolutions.Resolution1000.CEAID = 0
Resources.Resolutions.Resolution1000.Origin = Example
!Done Resources.Resolutions.Resolution1000
Notes
Custom Resolutions can only be modified; they cannot be created or deleted. If you wish remove saved details, Reset the Custom Resolution to default settings. This is equivalent to deleting, but the slot is still available for future use.
If a Custom Resolution is being used on an output and you change an Attribute (other than Name), the resolution will be reapplied on the output and the connection to the output de will be renegotiated. If you change the Name Attribute, the output will revert to the default built-in resolution.
You can configure a Custom Resolution by copying the values from a similar built-in or Cut Resolution and modifying as needed. See "Creating a Custom Resolution From a Built-In Resolution" on page 226.
Once you have configured a Custom Resolution, use System.SaveAllSettings() to ensure that your changes are persistent and not lost after powering off.

Caution: It is possible to apply an invalid Custom Resolution to an output.
Editing Resolution Properties from Command Line
Various details specific to a resolution are saved on a per-resolution basis. You can edit s for Custom Resolutions. Each property is covered separately.
Editing Name Property from Command Line
Learn how to set a name for a Custom Resolution via the command line.
Com man d
Resources.Resolutions.Resolution1000.Name
Description
Lists the user-readable name for this resolution. Set up the name as something meaningful for you, within the limitations of the permissible characters. (See Note below.)
Example
Resources.Resolutions.Resolution1000.Name = NewCustomResolution
Resources.Resolutions.Resolution1000.Name = NewCustomResolution
!Done Resources.Resolutions.Resolution1000.Name = NewCustomResolution
Defau It
The default Name is the stringNNNptwhereNNN is the number of the Custom Resolution. Note that Resolution1000 is "Empty1000", Resolution1001 is "Empty1001", Resolution1009 is "Empty1009" and so forth.
Resources.Resolutions.Resolution1000.Name
Resources.Resolutions.Resolution1000.Name = Empty1000
!Done Resources.Resolutions.Resolution1000.Name
Notes
The Name attribute has the following limitations:
- must be no more than 23 characters
- only valid printable ASCII characters may be used
- must have no spaces (underscore is valid)
The system does not check for duplicate names - if more than one Custom Resolution has the same name, when you set a Custom Resolution of that name to an output, unexpected behavior may result.
If you change the Name attribute of a Custom Resolution that you have already set to an output,
the output will revert to the default built-in resolution for that output. To continue using the same Custom Resolution with that output, re-apply it to the output.
It is possible to set a Custom Resolution that has not been configured to an output. This is in tional.
If you wish to use a Custom Resolution with CORIOgrapher the Name must conform to the following format:
[width]x[height][scantype][rate][optional]
where:
[width] width in pixels num
[height] height in pixels num
× the letter x ×
[scantype] either i for interlaced or p for progressive. i or p
[rate] the frame rate (this must be at least one character and mayncontain a period if relevant)
[optional] any optional text null or string
•
For example, the following are valid Name formats for use with CORIOgrapher:
1280x720i40055D
- 1280x720p6test
• 1280x720p59.94
- 1280x720i50
280x72i30

Caution: If you use CORIOgrapher with a Name that does not conform to the format described above, you may experience unexpected consequences.
Editing Aspect Property from Command Line
Learn how to set the Aspect ratio for a Custom Resolution via the command line. This is used on the CORIOmaster and CORIOmaster mini to assist in signal conversion when an input and output have different aspect ratio.
Com mand
Resources.Resolutions.Resolution1000.Aspect
Description
Lists the Aspect ratio for this Custom Resolution in the form width:height (in units of equal size).
Example
Resources.Resolutions.Resolution1000.Aspect = 16:6
Resources.Resolutions.Resolution1000.Aspect = 16:6
!Done Resources.Resolutions.Resolution1000.Aspect = 16:6
Default
4:3
Notes
Valid available Aspect ratios are:
• 16:9
• 4:3
5:4
• 16:10
5:3
• 1:1
• 16:6
The system cannot accept any other aspect ratios.
Aspect ratios are used on the CORIOmaster and CORIOmaster mini only, not on CORIOmaster or CORIOmaster mini.
Listing Framelock Properties from Command Line
Learn how to view the Can Framelock attribute for a Custom Resolution via the command line. Can Framelock is a read-only attribute indicating whether this Custom Resolution is suitable for use with the Framelock feature.
Com man d
Resources.Resolutions.Resolution1000.CanFramelock
Descript ion
This attribute indicates whether a Custom Resolution may be used with the Framelock mechanism.
Yes The Custom Resolution is compatible with the Framelock mechanism and may be used as either an Input output to Framelock.
No The Custom Resolution is not compatible with the Framelock feature.
Example
Resources.Resolutions.Resolution1000.CanFramelock
Resources.Resolutions.Resolution1000.CanFramelock = No
!Done Resources.Resolutions.Resolution1000.CanFramelock
Not e
An Input to Framelock is the source that is to be used as the Framelock reference.
An Output to Framelock is to be locked to the reference input.
Currently this is always "No".
This property is not available in the CORIOdiscover Resolution Editor.
Editing Pixel Clock Property from Command Line
Learn how to set the Pixel Clock for a Custom Resolution via the command line.
Command
Resources.Resolutions.Resolution1000.PixelClock
Descript ion
The Pixel Clock value is the speed of the Pixel Clock in pixels per second.
The minimum and maximum values are dependent on the following:
p = h * v * f
where:
p Pixels per second
h Horizontal total pixels
v Vertical total pixels
f Frame rate in frames
For example, for 1920x1080p60, h=2200, v=1125, and f=60. This gives p = 2200 * 1125 * 60 = 148.5MHz
Example
Resources.Resolutions.Resolution1000.PixelClock = 148500000
Resources.Resolutions.Resolution1000.PixelClock = 148500000
!Done Resources.Resolutions.Resolution1000.PixelClock = 148500000
Default
0
Notes
The valid range for the Pixel Clock is 13.5MHz to 162MHz. As the value in pixels is a function of resolution (including frame rate), the minimum and maximum value in Pixel Clock varies with the resolution.
For example:
The minimum Pixel Clock at 640x480p60 is 800 * 525 * 59.94 = 25.175MHz (Note that p60 is nomenclature - the rate is actually 59.94MHz)
The maximum Pixel Clock at 1600x1200p60 is 2160 * 1250 * 60 = 162MHz
To calculate the Vertical Front Porch, Vertical Sync Pulse and Vertical Back Porch for an interlaced resolution, double the value of the even field. Interlacing standards are designed this in order to present the values in a similar format to Progressive values.
In the CORIOdiscover Resolution Editor, the Horizontal Frequency and Vertical Frequency read-only fields are derived from the Pixel Clock value.
Editing Scan Type Property from Command Line
Learn how to set the Scan Type for a Custom Resolution via the command line as either Interlaced or Progressive.
Command
Resources.Resolutions.Resolution1000.ScanType
Description
The Scan Type state of this Custom Resolution has two options:
p Progressive scan mode
i Interlaced scan mode
Example
Resources.Resolutions.Resolution1000.ScanType = i
Resources.Resolutions.Resolution1000.ScanType = i
!Done Resources.Resolutions.Resolution1000.ScanType = i
Defau It
Progressive (p)
Notes
Only Progressive (p) or interlaced (i) are valid options.
Editing Horizontal Active Pixels Property from Command Line
Learn how to set the Horizontal Active pixels for a Custom Resolution via the command line.
Com man d
Resources.Resolutions.Resolution1000.HActive
Description
The Horizontal Active video is the width of the displayed image in pixels.
For example, for a Custom Resolution of 1024x768 this value would be 1024.
Example
Resources.Resolutions.Resolution1000.HActive = 1024
Resources.Resolutions.Resolution1000.HActive = 1024
!Done Resources.Resolutions.Resolution1000.HActive = 1024
Default
0
Not es
The valid range of values is 64 to 1920.
For a valid Custom Resolution, you must configure this property to a value within the valid
In the CORIOdiscover Resolution Editor, the Pixel Clock is not affected by any changes to the Horizontal Active pixels. However, the Horizontal Frequency and Vertical Frequency read-only fields vary based on Horizontal Active pixels changes.
Editing Horizontal Front Porch Property from Command Line
Learn how to set the Horizontal Front Porch for a Custom Resolution via the command line.
Com mand
Resources.Resolutions.Resolution1000.HFrontPorch
Description
The Horizontal Front Porch is the gap between the end of the Active Video and the start of the Horizontal Sync Pulse, in pixels.
Example
Resources.Resolutions.Resolution1000.HFrontPorch = 96
Resources.Resolutions.Resolution1000.HFrontPorch = 96
!Done Resources.Resolutions.Resolution1000.HFrontPorch = 96
Default
0
Notes
The valid range of values is 1 to 2000.
For a valid Custom Resolution, you must configure this property to a value within the valid range
In the CORIOdiscover Resolution Editor, the Pixel Clockis not affected by any changes to the Horizontal Front Porch. However, the Horizontal Frequency and Vertical Frequency read-only fields vary based on Horizontal Front Porch changes.
Editing Horizontal Sync Pulse Property from Command Line
Learn how to set the Horizontal Sync Pulse for a Custom Resolution via the command line.
Com man d
Resources.Resolutions.Resolution1000.HSyncPulse
Description
The Horizontal Sync Pulse identifies the start of each row of pixels (line of video) in the Custom Resolution.
Example
Resources.Resolutions.Resolution1000.HSyncPulse = 8
Resources.Resolutions.Resolution1000.HSyncPulse = 8
!Done Resources.Resolutions.Resolution1000.HSyncPulse = 8
Default
0
Not es
The valid range of values is 8 to 500.
For a valid Custom Resolution, you must configure this property to a value within the valid
In the CORIOdiscover Resolution Editor, the Pixel Clock is not affected by any changes to the Horizontal Sync Pulse. However, the Horizontal Frequency and Vertical Frequency read-only fields vary based on Horizontal Sync Pulse changes.
Editing Horizontal Back Porch Property from Command Line
Learn how to set the timing interval for the Horizontal Back Porch for a Custom Resolution via the command line.
Com mand
Resources.Resolutions.Resolution1000.HBackPorch
Description
The Horizontal Back Porch is the gap between end of the Horizontal Sync Pulse and the beginning of the Active Video in pixels.
Example
Resources.Resolutions.Resolution1000.HBackPorch = 288
Resources.Resolutions.Resolution1000.HBackPorch = 288
!Done Resources.Resolutions.Resolution1000.HBackPorch = 288
Default
0
Notes
The valid range of values is 1 to 2000.
For a valid Custom Resolution, you must configure this property to a value within the valid range
In the CORIOdiscover Resolution Editor, the Pixel Clock is not affected by any changes to the
Horizontal Back Porch. However, the Horizontal Frequency and Vertical Frequency read-only fields vary based on Horizontal Back Porch changes.
Editing Horizontal Sync Polarity Property from Command Line
Learn how to set the Horizontal Synchronization Polarity for a Custom Resolution via the command line.
Com man d
Resources.Resolutions.Resolution1000.HSyncPolarity
Description
The Horizontal Sync Pulse is a single short pulse which identifies the start of each row of pixels (line of video) in the Custom Resolution. It can be either Positive or Negative. This value is the Horizontal Sync Polarity.
Example
Resources.Resolutions.Resolution1000.HSyncPolarity = N
Resources.Resolutions.Resolution1000.HSyncPolarity = N
!Done Resources.Resolutions.Resolution1000.HSyncPolarity = N
Default
N
Not es
Only the case-insensitive values N (or n) for Negative and P (or p) for Positive polarity will be accepted.
In the CORIOdiscover Resolution Editor, the Pixel Clockis not affected by any changes to the Horizontal Sync Polarity. However, the Horizontal Frequency and Vertical Frequency read-only fields vary based on Horizontal Sync Polarity changes.
Editing Vertical Active Pixels Property from Command Line
Learn how to set the Vertical Active pixels for a Custom Resolution via the command line.
Com man d
Resources.Resolutions.Resolution1000.VActive
Description
The Vertical Active video is the height of the displayed image in pixels (lines).
For example, for a Custom Resolution of 1024x768 this value would be 768.
Example
Resources.Resolutions.Resolution1000.VActive = 768
Resources.Resolutions.Resolution1000.VActive = 768
!Done Resources.Resolutions.Resolution1000.VActive = 768
Defau It
0
Not es
The valid range of values is 64 to 1200.
For a valid Custom Resolution, you must configure this property to a value within the valid range
In the CORIOdiscover Resolution Editor, the Pixel Clock is not affected by any changes to the
Vertical Active pixels. However, the Vertical Frequency read-only field varies based on Vertical
Active pixels changes.
Editing Vertical Front Porch Property from Command Line
Learn how to set the Vertical Front Porch for a Custom Resolution via the command line
Com man d
Resources.Resolutions.Resolution1000.VFrontPorch
Description
The Vertical Front Porch is the gap between the end of the Active Video and the start of the Vertical Sync Pulse, in pixels.
Example
Resources.Resolutions.Resolution1000.VFrontPorch = 3
Resources.Resolutions.Resolution1000.VFrontPorch = 3
!Done Resources.Resolutions.Resolution1000.VFrontPorch = 3
Defau It
0
Not es
The valid range of values is 1 to 100.
For a valid Custom Resolution, you must configure this property to a value within the valid
To calculate the Vertical Front Porch, Vertical Sync Pulse and Vertical Back Porch for an interlaced resolution, double the value of the even field. Interlacing standards are designed this in order to present the values in a similar format to Progressive values.
Interlaced Custom Resolutions require that the Vertical Front Porch is twice the even field.
For example, a Vertical Front Porch of 6 gives:
Odd field: 3.5
Even field: 3
In the CORIOdiscover Resolution Editor, the Pixel Clockis not affected by any changes to the Vertical Front Porch. However, the Vertical Frequency read-only field varies based on Vertical Front Porch changes.
Editing Vertical Sync Pulse Property from Command Line
Learn how to set the Vertical Sync Pulse for a Custom Resolution via the command line.
Com man d
Resources.Resolutions.Resolution1000.VSyncPulse
Description
The Vertical Sync Pulse identifies the start of each frame of video in the Custom Resolution.
Note that for Interlaced Custom Resolutions both odd and even frames will have a Vertical Sync Pulse.
Example
Resources.Resolutions.Resolution1000.VSyncPulse = 2
Resources.Resolutions.Resolution1000.VSyncPulse = 2
!Done Resources.Resolutions.Resolution1000.VSyncPulse = 2
Defau It
0
Not es
The valid range of values is 1 to 100.
For a valid Custom Resolution, you must configure this property to a value within the valid range
To calculate the Vertical Front Porch, Vertical Sync Pulse and Vertical Back Porch for an interlaced resolution, double the value of the even field. Interlacing standards are designed this way in order to present the values in a similar format to Progressive values.
Interlaced Custom Resolutions require that the Vertical Sync Pulse is twice the even field.
For example, a Vertical Sync Pulse of 10 gives:
Odd field: 5
Even field: 5
In the CORIOdiscover Resolution Editor, the Pixel Clock is not affected by any changes to the Vertical Sync Pulse. However, the Vertical Frequency read-only field varies based on Vertical Sync Pulse changes.
Editing Vertical Back Porch Property from Command Line
Learn how to set the timing interval for the Vertical Back Porch for a Custom Resolution via the command line.
Com man d
Resources.Resolutions.Resolution1000.VBackPorch
Descript ion
The Vertical Back Porch is the gap between end of the Vertical Sync Pulse and the beginning of the Active Video in pixels.
Example
Resources.Resolutions.Resolution1000.VBackPorch = 15
Resources.Resolutions.Resolution1000.VBackPorch = 15
!Done Resources.Resolutions.Resolution1000.VBackPorch = 15
Defau It
0
Not es
The valid range of values is 1 to 100.
For a valid Custom Resolution, you must configure this property to a value within the valid
To calculate the Vertical Front Porch, Vertical Sync Pulse and Vertical Back Porch for an interlaced resolution, double the value of the even field. Interlacing standards are designed this in order to present the values in a similar format to Progressive values.
Interlaced Custom Resolutions require that the Vertical Back Porch is twice the even field.
For example, a Vertical Back Porch of 69 gives:
Odd field: 34
Even field: 34.5
In the CORIOdiscover Resolution Editor, the Pixel Clock is not affected by any changes to the Vertical Back Porch. However, the Vertical Frequency read-only field varies based on Vertical Back Porch changes.
Editing Vertical Sync Polarity Property from Command Line
Learn how to set the Vertical Synchronization Polarity for a Custom Resolution via the command line.
Com man d
Resources.Resolutions.Resolution1000.VSyncPolarity
Description
The Vertical Sync Pulseseparates the video fields in the Custom Resolution. It can be either Positive or Negative. This value is the Vertical Sync Polarity.
Example
Resources.Resolutions.Resolution1000.VSyncPolarity = N
Resources.Resolutions.Resolution1000.VSyncPolarity = N
!Done Resources.Resolutions.Resolution1000.VSyncPolarity = N
Defau It
N
Not es
Only the case-insensitive values N (or n) for Negative and P (or p) for Positive polarity will be accepted.
In the CORIOdiscover Resolution Editor, the Pixel Clock is not affected by any changes to the Vertical Sync Polarity. However, the Vertical Frequency read-only field varies based on Vertical Sync Polarity changes.
Editing CEAID Property from Command Line
Learn how to set the CEAID (Consumer Electronics Association Digital Television Profile, as defined in CEA-861-D) for a Custom Resolution via the command line.
Com man d
Resources.Resolutions.Resolution1000.CEAID
Description
This attribute is to be used only when creating a Custom Resolution as defined in CEA-86
Exam ple
Resources.Resolutions.Resolution1000.CEAID = 0
Resources.Resolutions.Resolution1000.CEAID = 0
!Done Resources.Resolutions.Resolution1000.CEAID = 0
Defau It
0
Not es
This field value must be 0 or a value specified in the CEA Standard Profile, as defined 861-D.
The CEA identifier information option does not affect the Custom Resolution. It is there strict for providing attached equipment with information on the resolution. When defining a Custom Resolution, only set this value if you are configuring it to comply with the CEA Profile for value.

Caution: If the value of CEAID is not 0 and the Custom Resolution does not conform to the CEA Profile for that value, the result is undefined and behavior expected.
Editing Origin Property from Command Line
Learn how to set the Origin for a Custom Resolution via the command line, to provide a string identifying the origin of the Custom Resolution.
Com man d
Resources.Resolutions.Resolution1000.Origin
Descript ion
Set the user-readable Origin property to something meaningful for you, within the limitations of the permissible characters. For example, if you create a Custom Resolution from the CVT list, it may be useful to have "CVT" in this field; for a CEA Standard Profile it may be useful to have "CEA".
Example
Resources.Resolutions.Resolution1000.Origin = Example
Resources.Resolutions.Resolution1000.Origin = Example
!Done Resources.Resolutions.Resolution1000.Origin = Exam
Default
The default Origin is an empty, zero-length string:
Resources.Resolutions.Resolution1000.Origin
Resources.Resolutions.Resolution1000.Origin =
!Done Resources.Resolutions.Resolution1000.Origin
Notes
The Origin attribute has the following limitations:
- must be no more than 19 characters
- only valid printable ASCII characters may be used
- must have no spaces (underscore is valid)
This property is not available in the CORIOdiscover Resolution Editor.
Command Line Resolutions
List Usable Resolutions by Name
Get a list of the usable resolutions for a given slot.
Command
Slots.Slot1.Module_Resolutions()
(In this case, Slot 1 is used as an example - any valid slot number can be used in th
Descript ion
List all the usable resolutions.
Example
Slots.Slot16.Module_Resolutions()
640x480p60;4:3;
640x480p72;4:3;
+ * *
1920x1200p50cvt-rb;16:10;
1920x1200p60cvt-rb;16:10;
MyResolution;16:6
!Done Slots.Slot16.Module_Resolutions()
Default
A list of all the built-in resolutions.
Notes
These resolutions are for use with input or output modules.
List Resolutions by Index
Get a list of the output resolutions by index (resolution name)
Comm and
Slots.Slot16.Resolutions
(In this case, Slot 16 is used as an example - any valid slot number can be used in that co
Descript ion
List all the resolutions.
Example
Slots.Slot16.Resolutions
Slots.Slot16.Resolutions.Resolution1 = <...>
Slots.Slot16.Resolutions.Resolution2 = <...>
...
Slots.Slot16.Resolutions.Resolution71 = <...>
Slots.Slot16.Resolutions.Resolution72 = <...>
Slots.Slot16.Resolutions.Resolution1000 = <...>
Slots.Slot16.Resolutions.Resolution1001 = <...>
...
Slots.Slot16.Resolutions.Resolution1009 = <...>
!Done Slots.Slot16.Resolutions
Default
A list of all the resolutions.
Notes
For use with output modules only.
Read Output Resolution
Read which resolution is currently set for an output.
Com man d
Slots.Slot16.Out1.Resolution
(In this case, Slot 16 and Out 1 are used as an example - any valid slot number and can be used in that context.)
Description
Reads the resolution currently set for an output.
Exam ple
Slots.Slot16.out1.Resolution
Slots.Slot16.out1.Resolution = NewCustomResolution
!Done Slots.Slot16.out1.Resolution
Defau It
1280x720p60
Not es
If the properties of the Custom Resolution are changed, then the resolution will be reapplied to the output and the connection to the output device will be renegotiated.
If the Name of a Custom Resolution is changed, then the output will return to its default and you will need set the output to the new Custom Resolution Name.
If more than one Custom Resolution has the same name, when you set a Custom Resolution that name to an output, unexpected behavior may result.
Custom Resolutions cannot be applied to an SDI output.
Specific Resolutions by Index
Get information on a specific output resolution by index (resolution name).
Command
Slots.Slot16.Resolutions.Resolution1000
(In this case, Slot 16 and Resolution 1000 are used as an example - any valid slot number and resolution number can be used in that context.)
Description
Lists the following attributes of the specified Resolution:
- Name
- Aspect
- CanFramLock ("Can Framelock")
Example
For a built-in resolution:
Slots.Slot16.Resolutions.Resolution1
Slots.Slot16.Resolutions.Resolution1.Name = 640x480p60
Slots.Slot16.Resolutions.Resolution1.Aspect = 4:3
Slots.Slot16.Resolutions.Resolution1.CanFramelock = No
!Done Slots.Slot16.Resolutions.Resolution1
For a Custom Resolution:
Slots.Slot16.Resolutions.Resolution1000
Slots.Slot16.Resolutions.Resolution1000.Name = MyResolution
Slots.Slot16.Resolutions.Resolution1000.Aspect = 4:3
Slots.Slot16.Resolutions.Resolution1000.CanFramelock = No
!Done Slots.Slot16.Resolutions.Resolution1000
Defau It
The configuration of the specified resolution.
Notes
For use with output modules only.
Set Output Resolution
Set which resolution an output will use.
Command
Slots.Slot16.Out1.Resolution = 1280x720p60
(In this case, Slot 16, Out 1, and 1280x720p60 are used as an example - any valid slot output number, and resolution can be used in that context.)
Descript ion
Sets the resolution to be used for an output.
Example
Slots.Slot16.out1.Resolution = Empty1
Slots.Slot16.out1.Resolution = Empty1
!Done Slots.Slot16.out1.Resolution = Empty1
Default
1280x720p60
Notes
If the properties of the Custom Resolution are changed, then the resolution will be reapplied to the output and the connection to the output device will be renegotiated.
If the Name of a Custom Resolution is changed, then the output will return to its default and you will need set the output to the new Custom Resolution Name.
If more than one Custom Resolution has the same name, when you set a Custom Resolution that name to an output, unexpected behavior may result.
Custom Resolutions cannot be applied to an SDI output.
Read Input Resolution
Read the reported resolution for an input.
Command
Slots.Slot1.In1.Set_Resolution or Slots.Slot1.In1.Measured_Resolution
(In this case, Slot 1 and In 1 are used as an example - any valid slot number and input num be used in that context.)
Descript ion
Reads the currently detected resolution on an input.
Example
Slots.Slot1.In1.Set_Resolution
Slots.Slot1.In1.Set_Resolution = NewCustomResolution
!Done Slots.Slot1.In1.Set_Resolution
or
Slots.Slot1.In1.Measured_Resolution
Slots.Slot1.In1.Measured_Resolution = NewCustomResolution
!Done Slots.Slot1.In1.Measured_Resolution
Default
n/a - the behavior is to show the name of the detected resolution or nothing if no signal is detected.
Notes
Set_Resolution and Measured_Resolution are duplicate commands and produce identical results.
If a Custom Resolution and a built-in resolution are both within the selection tolerance, the Custom Resolution will be selected.
Custom Resolutions cannot be detected on an SDI input.
Command Line - Resolutions
Resolutions are used in the Slot menu for both inputs and outputs. However, it is only possible to set a Resolution on an output. Input Resolutions are read-only - the values are set by the incoming video signal.
Note that when detecting input resolutions, if both a Custom Resolution and a built-in Resc are within the selection tolerance, then the Custom Resolution will be selected.
Use Custom Resolution on an Output
The Resolution used by an output is set using the Resolution attribute - see "Set Output Resolution" on page 307.
The steps involved in using a Custom Resolution on an output are:
- Set up a Custom Resolution with appropriate details for the output you wish to use.
- Connect a display that supports the signal as described in your Custom Resolution.
- Set the Custom Resolution for the desired slot and output.
Exam ple
Slots.Slot16.out1.Resolution = MyResolution
Slots.Slot16.out1.Resolution = MyResolution
!Done Slots.Slot16.out1.Resolution = MyResolution
Use Custom Resolution on an Input
The Resolution of an input is detected automatically. If a Custom Resolution and a built-in ution are both within the selection tolerance, the Custom Resolution will be selected.
The steps involved in using a Custom Resolution on an input are:
- Set up a Custom Resolution with appropriate details for the source you wish to use.
- Connect the source that has the matching signal as described in your Custom Resolution
- Check that the Custom Resolution is detected correctly with either the Measured_Resolution or Set_Resolution as described in "Read Input Resolution" on page 308.
Example
Slots.Slot1.In1.Measured_Resolution
Slots.Slot1.In1.Measured_Resolution = MyResolution
!Done Slots.Slot1.In1.Measured_Resolution
Troubleshooting
Troubleshooting Connection Issues 314
Troubleshooting Crash During Login 315
Troubleshooting Framelock or Genlock with SDI Input Modules. 316
Troubleshooting License Issues 317
Troubleshooting No Preview Video Clips When Using Preview Icon 318
Updating Firmware of Existing Units 319
Troubleshooting Connection Issues
If your CORIOmaster has been configured but is not appearing in the Connect to a Device pane either under a Group or the Discovered CORIOmaster Devices heading, follow the steps here to troubleshoot the connection. Test the connection again after each step to see if the issue has been resolved.
-
Ensure that the CORIOmaster is turned on and the LED on the front panel of the machine is green.
-
Physically turn the CORIOmaster off and on again, wait till the front panel LED is green again.
-
Click the Refresh button at the bottom of the pane, to ensure that all available devices are discovered.
-
If connecting via Ethernet, verify the physical connection between the CORIOmaster and the network (and between the PC and the network). Be sure that both devices are on the same network and subnet. If connecting via serial cable, verify the physical connection between the CORIOmaster and the PC.
-
Verify that the CORIOmaster is running firmware version M307 or later. If it is not, you will need to upgrade the firmware. See "Updating Firmware of Existing Units" on page 319.
-
If the device still fails to appear, connect to the CORIOmaster using a serial cable and click the Connect via Serial to a CORIOmaster... option in the Connect to a Device pane. Follow the steps for initial configuration as described in "Configure Connection via Serial" on page 21
Troubleshooting Crash During Login
In some cases, if you are using a serial connection to your CORIOmaster with a USB-to-R adapter, CORIOgrapher may crash during connection. This is most likely to happen when you have changed settings and restarted the unit and are attempting to connect again.
If this happens, you receive an alert:

text_image
Connect to Serial Device CORIOgrapher CORIOgrapher has stopped working A problem caused the program to stop working correctly. Windows will close the program and notify you if a solution is available. Close programThis occurs when the USB-to-serial adapter crashes because the unit is not yet fully booted the time of the login attempt. If you experience this issue, make sure you wait until the front of the unit is green before you connect.
Troubleshooting Framelock or Genlock with SDI Input Modules
If you are trying to use Framelock or Genlock with an SDI module as a reference input, be aware that some resolutions are not able to be locked properly. We recommend that you try a different resolution if possible.
The only two SD-SDI input resolutions, 720x487i59.94 and 720x576i50, cannot be used as reference signals for Framelock or Genlock. Other SDI inputs and any SDI outputs are unaffected.
Troubleshooting License Issues
Your license key is located on a sticker on the outside of the CORIOgrapher installation of protective sleeve. The key is a 25-digit hexadecimal code broken into five groups of five
If you have any problems with your license code not being accepted by the CORIOgrapher ware, please contact tvONE Support with your invoice number and they can assist you in resolving the issue.
Troubleshooting No Preview Video Clips When Using Preview Icon
If you are in the Video Wall editor and the Preview windows do not show the video as expected
- Check the PC that CORIOgrapher is installed on to ensure that Windows Media Player has been installed. If it has not been installed, install it free from the Microsoft Windows website.
- Launch the Windows Media Player - until the first time Windows Media Player is launched, the file types are not correctly associated and the Preview function will not work.
These steps should resolve any issues with Preview not showing the video as expected. If the issue persists, proceed with more general troubleshooting including using Windows Task Manager to check resource utilization and the Event Log to check for errors.
Updating Firmware of Existing Units
If your CORIOmaster did not ship with firmware version M307 or later, you will need to use the firmware before the unit can be used with the most recent version of the CORIOgraphic ware. This update must be done through RS-232 and Ethernet connections.
For units that are running firmware version M300 or later, any subsequent firmware updates be administered easily via the CORIOdiscover or CORIOgrapher applications. (See "Firmware and Defaults - Update Firmware" on page 164 for details.)
The instructions below are relevant for any CORIOmaster units running firmware prior to vers M300.
Backing Up Settings
To back up your existing settings to internal memory:
-
Connect via RS-232 or Ethernet using the control UI or a terminal emulator of your Be aware that the CORIOmaster defaults to port 10001. If using RS-232, default baud is 115200.
-
In the command line, type System.BackupToSDCard() The unit returns !Done System.BackupToSDCard which indicates that the command has been accepted but not yet completed. The system then displays feedback showing data backing up to the internal memory. When the backup is complete, the display shows Backup:Complete.
Updating Firmware
To obtain new firmware, go to http://www.tvone.com/firmware-updates and search for your product. Download the .zip file which contains two files, the firmware (.dat file) and a PLSBOOT file.
The CORIOmaster has been designed to update both software and firmware even more easy once the unit is updated to use the CORIOgrapher. To get the CORIOmaster to that point more update is required. After powering up the unit and logging in using the RS-232 port new firmware is uploaded from a PC connected via the unit's rear USB connector, as follows
Con nect in g a PC to the CORIOm ax and Tran sferring Files
-
Connect a PC to the CORIOmaster unit via the unit's rear USB port. If this is the the PC has been connected, the PC may request drivers for the Serial Emulator. If are not available, cancel the driver installation. The PC locates an external drive called TVONE, which is the internal SD card on the CORIOmax.
-
In order to update the firmware, you need to drop two files into the root directory drive. a) The first file is a PLSBOOT file which is a 12-character long file that defines which firmware files to load. (The PLSBOOT file can also be directly edited on the drive if sary.) b) The second is the firmware file, which contains all the sub-files required to load the
system. There can be any number of firmware files in the directory; the PLSBOOT file will tell the system which to use during startup. The name of the firmware file varies depending on the model of the unit and version of firmware. The CORIOmaster firmware files are named Mxxx_M00.dat (where Mxxx is the version number of the firmware).
- Verify that you have copied both the new firmware file and PLSBOOT file into the root directory of the TVONE drive.
Running the Firm ware Update
- After transferring the new firmware and PLSBOOT files, eject the TVONE drive safely, disconnect the USB cable and return to the RS-232 control.
- From the command line, type Coriomax.software update()
The reply shows that the PLSBOOT has been found and that it is loading the Mxxx_XXX.dat file. The process checks the file for integrity and starts erasing the flash files, deleting and replacing the contents. When the process is complete, a message appears stating Update successful followed by an automatic system reboot.
If the update fails at any stage, a command prompt appears: TVONE>
If this happens, start the update process again at Connecting a PC to the CORIOmaster and Transferring Files above.
Restoring Backed-Up Settings
To restore your settings from backed-up memory:
- Connect via RS-232 or Ethernet using the control UI or a terminal emulator, as in the first step of Backing Up Settings.
- In the command line, type System.RestoreBackup()
The unit returns !Done System.RestoreBackup which indicates that the command
has been accepted but not yet completed. The unit then displays feedback showing data restoring from the internal memory.
When the restore is complete, the display shows Restore:Complete.
- Reboot the unit to initiate the restored settings.