ThinkCentre M57p 6397 - Desktop computer LENOVO - Free user manual and instructions
Find the device manual for free ThinkCentre M57p 6397 LENOVO in PDF.

| Product type | Desktop computer |
| Brand | Lenovo |
| Model | ThinkCentre M57p 6397 |
| Dimensions (W x D x H) | 400 mm x 180 mm x 400 mm |
| Weight | Approximately 10 kg |
| Power supply | 220-240 V, 50/60 Hz, 280 W |
| Processor | Intel Core 2 Duo (frequency varies by configuration) |
| RAM memory | 2 GB DDR2 (expandable) |
| Hard drive | 250 GB SATA |
| Operating system | Windows Vista or Windows 7 (depending on version) |
| Front connectors | 2 USB 2.0 ports, microphone and headphone jacks |
| Rear connectors | 4 USB 2.0 ports, VGA, RJ45 Ethernet, audio ports |
| Main functions | Office work, Internet browsing, light multimedia |
| Maintenance and cleaning | Dust regularly with a soft, dry cloth. Avoid liquids. |
| Security | Kensington lock, BIOS password, anti-theft protection |
| Spare parts | Available from Lenovo and authorized resellers (power supply, fan, hard drive) |
| Repairability | Estimated repairability index: 7/10 (easy access to internal components) |
| General information | Robust professional computer, designed for intensive business use. |
Frequently Asked Questions - ThinkCentre M57p 6397 LENOVO
User questions about ThinkCentre M57p 6397 LENOVO
0 question about this device. Answer the ones you know or ask your own.
Ask a new question about this device
Download the instructions for your Desktop computer in PDF format for free! Find your manual ThinkCentre M57p 6397 - LENOVO and take your electronic device back in hand. On this page are published all the documents necessary for the use of your device. ThinkCentre M57p 6397 by LENOVO.
USER MANUAL ThinkCentre M57p 6397 LENOVO
ThinkCentre Hardware Maintenance Manual
natural_image
Close-up of a printed circuit board with visible traces, pads, and electronic components (no readable text or symbols)Machine Types 6393, 6394, 6395, 6396, 6397
ThinkCentre
Hardware Maintenance Manual
Note: Before using this information and the product it supports, be sure to read the information under "Notices," on page 165.
Seventh Edition (March 2009)
© Copyright Lenovo 2005, 2008. All rights reserved.
LENOVO products, data, computer software, and services have been developed exclusively at private expense and are sold to governmental entities as commercial items as defined by 48 C.F.R. 2.101 with limited and restricted rights to use, reproduction and disclosure.
LIMITED AND RESTRICTED RIGHTS NOTICE: If products, data, computer software, or services are delivered pursuant a General Services Administration "GSA" contract, use, reproduction, or disclosure is subject to restrictions set forth in Contract No. GS-35F-05925.
Contents
Chapter 1. About this manual ..... 1
Important Safety Information. . . . . . . . . . 1
Important information about replacing RoHS compliant FRUs . . . . . . . . . . . . . . 2
Chapter 2. Safety information ..... 3
General safety. 3
Electrical safety 3
Safety inspection guide. . . . . . . . . . . . . 5
Handling electrostatic discharge-sensitive devices . . 6
Grounding requirements 6
Safety notices (multi-lingual translations) ..... 7
Chapter 3. General information ..... 37
The ThinkVantage Productivity Center program . . 37
Additional information resources ..... 37
Specifications. 38
Chapter 4. General Checkout ..... 39
Checking for power problems . . . . . . . . 39
Problem determination tips . . . . . . . . . . 40
Chapter 5. Diagnostics ..... 43
PC-Doctor for Windows . . . . . . . . . . . 43
PC-Doctor for Windows PE . . . . . . . . . . 43
Running diagnostics from the Rescue and Recovery workspace . . . . . . . . . . . 43
PC-Doctor for DOS. 44
Creating a diagnostic CD image ..... 44
Creating diagnostic diskettes ..... 44
Running diagnostics from the CD or diskettes. . 45
Navigating through the diagnostics programs . . 45
Running tests. 45
Viewing the test log . . . . . . . . . . . . 47
Chapter 6. Using the Setup Utility . . . 49
Starting the Setup Utility program. . . . . . . 49
Viewing and changing settings . . . . . . . . 49
Using passwords 49
Password considerations . . . . . . . . . 49
User Password . . . . . . . . . . . . . . 50
Administrator Password . . . . . . . . . 50
Setting, changing, and deleting a password. . . 50
Selecting a startup device. . . . . . . . . . . . 50
Selecting a temporary startup device . . . . . 50
Selecting or changing the startup device sequence 51
Advanced settings . . . . . . . . . . . . . 51
Exiting from the Setup Utility program . . . . . 51
Chapter 7. Symptom-to-FRU Index . . . 53
Hard disk drive boot error . . . . . . . . . . 53
Diagnostic error codes. . . . . . . . . . . . 54
Beep symptoms . . . . . . . . . . . . . . . . 74
POST error codes 75
Miscellaneous error messages ..... 77
Undetermined problems . . . . . . . . . . . 78
Chapter 8. Replacing FRUs ..... 79
Locations 80
Connectors on the front of the computer. . . . 80
Connectors on the rear of the computer . . . . 81
Locating components . . . . . . . . . . . 82
System board locations . . . . . . . . . . 83
Opening the cover . . . . . . . . . . . . . . . 84
Replacing the CMOS battery. 85
Replacing the microprocessor . . . . . . . . . 86
Replacing the system board . . . . . . . . . . 89
Replacing a hard disk drive . . . . . . . . . 90
Replacing an optical drive . . . . . . . . . . . 92
Replacing a memory module . . . . . . . . . 94
Replacing the modem . . . . . . . . . . . . 95
Replacing the Express card assembly . . . . . . 97
Replacing the Media Card Reader. . . . . . . 98
Replacing the system fan assembly ..... 100
Completing the FRU replacement ..... 102
Chapter 9. FRU lists ..... 105
Machine Type 6393 . . . . . . . . . . . . . . 105
Machine Type 6394 . . . . . . . . . . . . . 115
Machine Type 6395 . . . . . . . . . . . . . . 125
Machine Type 6396 . . . . . . . . . . . . . 140
Machine Type 6397 . . . . . . . . . . . . . 150
Chapter 10. Additional Service
Information ..... 161
Security features . . . . . . . . . . . . . . 161
Hardware controlled Passwords . . . . . . 161
Operating system password ..... 161
Vital product data. . . . . . . . . . . . 161
BIOS levels . . . . . . . . . . . . . . . . 161
Updating (flashing) BIOS from a CD-ROM or
diskette 162
Recovering from a POST/BIOS update failure . . 162
Power management . . . . . . . . . . . . 163
Automatic configuration and power interface (ACPI) BIOS. 163
Automatic Power-On features . . . . . . 163
Appendix. Notices ..... 165
Television output notice . . . . . . . . . . . 166
Trademarks . . . . . . . . . . . . . . . 166
Chapter 1. About this manual
This manual contains service and reference information for ThinkCentre ^® computers listed on the cover. It is intended only for trained servicers who are familiarwithLenovo ^® computerproducts.
Before servicing a Lenovo product, be sure to read the Safety Information. See Chapter 2, "Safety information," on page 3
This manual includes a complete Field Replaceable Unit (FRU) part number listing for each machine type listed on the cover. If you have internet access, FRU part numbers are also available at: http://www.lenovo.com/support
ImportantSafetyInformation
Be sure to read all caution and danger statements in this book before performing any of the instructions.
Important information about replacing RoHS compliant FRUs
RoHS, The Restriction of Hazardous Substances in Electrical and Electronic Equipment Directive (2002/95/EC) is a European Union legal requirement affecting the global electronics industry. RoHS requirements must be implemented on Lenovo products placed on the market and sold in the European Union after June 2006. Products on the market before June 2006 are not required to have RoHS compliant parts. If the parts are not compliant originally, replacement parts can also be noncompliant, but in all cases, if the parts are compliant, the replacement parts must also be compliant.
Note: RoHS and non-RoHS FRU part numbers with the same fit and function are identified with unique FRU part numbers.
Lenovo plans to transition to RoHS compliance well before the implementation date and expects its suppliers to be ready to support Lenovo's requirements and schedule in the EU. Products sold in 2005, will contain some RoHS compliant FRUs. The following statement pertains to these products and any product Lenovo produces containing RoHS compliant parts.
RoHS compliant ThinkCentre parts have unique FRU part numbers. Before or after June, 2006, failed RoHS compliant parts must always be replaced using RoHS compliant FRUs, so only the FRUs identified as compliant in the system HMM or direct substitutions for those FRUs can be used.
| Products marketed before June 2006 | Products marketed after June 2006 | ||
| Currentororiginal part | Replacement FRU | Current or original part | ReplacementFRU |
| Non-RoHS | Can be Non-RoHS | Must be RoHS | Must be RoHS |
| Non-RoHS | Can be RoHS | ||
| Non-RoHS | Can sub to RoHS | ||
| RoHSMustbeRoHS | |||
Note: A direct substitution is a part with a different FRU part number that is automatically shipped by the distribution center at the time of order.
Chapter 2. Safety information
This chapter contains the safety information that you need to be familiar with before servicing a computer.
Generalsafety
Follow these rules to ensure general safety:
- Observe good housekeeping in the area of the machines during and after maintenance.
-
When lifting any heavy object:
-
Ensure you can stand safely without slipping.
- Distribute the weight of the object equally between your feet.
- Use a slow lifting force. Never move suddenly or twist when you attempt to lift.
-
Lift by standing or by pushing up with your leg muscles; this action removes the strain from the muscles in your back. Do not attempt to lift any objects that weigh more than 16 kg (35 lb) or objects that you think are too heavy for you.
-
Do not perform any action that causes hazards to the customer, or that makes the equipment unsafe.
- Before you start the machine, ensure that other service representatives and the customer's personnel are not in a hazardous position.
- Place removed covers and other parts in a safe place, away from all personnel, while you are servicing the machine.
- Keep your tool case away from walk areas so that other people will not trip over it.
- Do not wear loose clothing that can be trapped in the moving parts of a machine. Ensure that your sleeves are fastened or rolled up above your elbows. If your hair is long, fasten it.
- Insert the ends of your necktie or scarf inside clothing or fasten it with a nonconductive clip, approximately 8 centimeters (3 inches) from the end.
- Do not wear jewelry, chains, metal-frame eyeglasses, or metal fasteners for your clothing.
Remember: Metal objects are good electrical conductors.
- Wear safety glasses when you are: hammering, drilling soldering, cutting wire, attaching springs, using solvents, or working in any other conditions that might be hazardous to your eyes.
- After service, reinstall all safety shields, guards, labels, and ground wires. Replace any safety device that is worn or defective.
- Reinstall all covers correctly before returning the machine to the customer.
Electricalsafety

CAUTION:
Electrical current from power, telephone, and communication cables can be hazardous. To avoid personal injury or equipment damage, disconnect the attached power cords, telecommunication systems, networks, and modems before you open the server/workstation covers, unless instructed otherwise in the installation and configuration procedures.
Observe the following rules when working on electrical equipment.
Important: Use only approved tools and test equipment. Some hand tools have handles covered with a soft material that does not insulate you when working with live electrical currents.
Many customers have, near their equipment, rubber floor mats that contain small conductive fibers to decrease electrostatic discharges. Do not use this type of mat to protect yourself from electrical shock.
- Find the room emergency power-off (EPO) switch, disconnecting switch, or electrical outlet. If an electrical accident occurs, you can then operate the switch or unplug the power cord quickly.
- Do not work alone under hazardous conditions or near equipment that has hazardous voltages.
-
Disconnect all power before:
-
Performing a mechanical inspection
- Working near power supplies
-
Removing or installing Field Replaceable Units
-
Before you start to work on the machine, unplug the power cord. If you cannot unplug it, ask the customer to power-off the wall box that supplies power to the machine and to lock the wall box in the off position.
- If you need to work on a machine that has exposed electrical circuits, observe the following precautions:
- Ensure that another person, familiar with the power-off controls, is near you.
Remember: Another person must be there to switch off the power, if necessary.
- Use only one hand when working with powered-on electrical equipment; keep the other hand in your pocket or behind your back.
Remember: There must be a complete circuit to cause electrical shock. By observing the above rule, you may prevent a current from passing through yourbody.
- When using testers, set the controls correctly and use the approved probe leads and accessories for that tester.
- Stand on suitable rubber mats (obtained locally, if necessary) to insulate you from grounds such as metal floor strips and machine frames.
Observe the special safety precautions when you work with very high voltages; these instructions are in the safety sections of maintenance information. Use extreme care when measuring high voltages.
- Regularly inspect and maintain your electrical hand tools for safe operational condition.
- Do not use worn or broken tools and testers.
-
Never assume that power has been disconnected from a circuit. First, check that it has been powered-off.
-
Always look carefully for possible hazards in your work area. Examples of these hazards are moist floors, nongrounded power extension cables, power surges, and missing safety grounds.
- Do not touch live electrical circuits with the reflective surface of a plastic dental mirror. The surface is conductive; such touching can cause personal injury and machinedamage.
- Do not service the following parts with the power on when they are removed from their normal operating places in a machine:
- Power supply units
-Pumps - Blowers and fans
-Motorgenerators
and similar units. (This practice ensures correct grounding of the units.)
• If an electrical accident occurs:
- Use caution; do not become a victim yourself.
- Switch off power.
- Send another person to get medical aid.
Safetyinspectionguide
The intent of this inspection guide is to assist you in identifying potentially unsafe conditions on these products. Each machine, as it was designed and built, had required safety items installed to protect users and service personnel from injury. This guide addresses only those items. However, good judgment should be used to identify potential safety hazards due to attachment of features or options not covered by this inspection guide.
If any unsafe conditions are present, you must determine how serious the apparent hazard could be and whether you can continue without first correcting the problem.
Consider these conditions and the safety hazards they present:
- Electrical hazards, especially primary power (primary voltage on the frame can cause serious or fatal electrical shock).
- Explosive hazards, such as a damaged CRT face or bulging capacitor
- Mechanical hazards, such as loose or missing hardware
The guide consists of a series of steps presented in a checklist. Begin the checks with the power off, and the power cord disconnected.
Checklist:
- Check exterior covers for damage (loose, broken, or sharp edges).
- Power-off the computer. Disconnect the power cord.
- Check the power cord for:
a. A third-wire ground connector in good condition. Use a meter to measure third-wire ground continuity for 0.1 ohm or less between the external ground pin and frame ground.
b. The power cord should be the appropriate type as specified in the parts listings.
c. Insulation must not be frayed or worn.
-
Open the cover.
-
Check for any obvious alterations. Use good judgment as to the safety of any alterations.
- Check inside the unit for any obvious unsafe conditions, such as metal filings, contamination, water or other liquids, or signs of fire or smoke damage.
- Check for worn, frayed, or pinched cables.
- Check that the power-supply cover fasteners (screws or rivets) have not been removedortamperedwith.
Handling electrostatic discharge-sensitive devices
Any computer part containing transistors or integrated circuits (ICs) should be considered sensitive to electrostatic discharge (ESD). ESD damage can occur when there is a difference in charge between objects. Protect against ESD damage by equalizing the charge so that the machine, the part, the work mat, and the person handling the part are all at the same charge.
Notes:
- Use product-specific ESD procedures when they exceed the requirements noted here.
- Make sure that the ESD protective devices you use have been certified (ISO 9000) as fully effective.
When handling ESD-sensitive parts:
- Keep the parts in protective packages until they are inserted into the product.
- Avoid contact with other people while handling the part.
- Wear a grounded wrist strap against your skin to eliminate static on your body.
- Prevent the part from touching your clothing. Most clothing is insulative and retains a charge even when you are wearing a wrist strap.
- Use the black side of a grounded work mat to provide a static-free work surface. The mat is especially useful when handling ESD-sensitive devices.
- Select a grounding system, such as those listed below, to provide protection that meets the specific service requirement.
Note: The use of a grounding system is desirable but not required to protect againstESDdamage.
- Attach the ESD ground clip to any frame ground, ground braid, or green-wire ground.
- Use an ESD common ground or reference point when working on a double-insulated or battery-operated system. You can use coax or connector-outside shells on these systems.
- Use the round ground-prong of the ac plug on ac-operated computers.
Groundingrequirements
Electrical grounding of the computer is required for operator safety and correct system function. Proper grounding of the electrical outlet can be verified by a certifiedelectrician.
Safety notices (multi-lingual translations)
The caution and danger safety notices in this section are provided in the following languages:
•English
•Arabic
•Brazilian/Portuguese
- Chinese (simplified)
- Chinese (traditional)
•French
•German
•Hebrew
•Italian
•Korean
•Spanish


DANGER
Electrical current from power, telephone and communication cables is hazardous.
To avoid a shock hazard:
- Do not connect or disconnect any cables or perform installation, maintenance, or reconfiguration of this product during an electrical storm.
- Connect all power cords to a properly wired and grounded electrical outlet.
- Connect to properly wired outlets any equipment that will be attached to this product.
- When possible, use one hand only to connect or disconnect signal cables.
- Never turn on any equipment when there is evidence of fire, water, or structural damage.
- Disconnect the attached power cords, telecommunications systems, networks, and modems before you open the device covers, unless instructed otherwise in the installation and configuration procedures.
- Connect and disconnect cables as described in the following tables when installing, moving, or opening covers on this product or attached devices.
| To Connect | To Disconnect |
| 1. Turn everything OFF.2. First, attach all cables to devices.3. Attach signal cables to connectors.4. Attach power cords to outlet.5. Turn device ON. | 1. Turn everything OFF.2. First, remove power cords from outlet.3. Remove signal cables from connectors.4. Remove all cables from devices. |

CAUTION:
When replacing the lithium battery, use only Part Number 33F8354 or an equivalent type battery recommended by the manufacturer. If your system has a module containing a lithium battery, replace it only with the same module type made by the same manufacturer. The battery contains lithium and can explode if not properly used, handled, or disposed of.
Donot:
- Throw or immerse into water
• Heat to more than 100°C (212°F)
• Repair or disassemble
Dispose of the battery as required by local ordinances or regulations.

CAUTION:
When laser products (such as CD-ROMs, DVD-ROM drives, fiber optic devices, or transmitters) are installed, note the following:
- Do not remove the covers. Removing the covers of the laser product could result in exposure to hazardous laser radiation. There are no serviceable parts insidethedevice.
- Use of controls or adjustments or performance of procedures other than those specified herein might result in hazardous radiation exposure.

DANGER: Some laser products contain an embedded Class 3A or Class 3B laser diode. Note the following:
Laser radiation when open. Do not stare into the beam, do not view directly with optical instruments, and avoid direct exposure to the beam.


≥18 kg (37 lbs)

≥32 kg (70.5 lbs)

≥55 kg (121.2 lbs)
CAUTION:
Use safe practices when lifting.


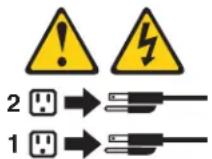
CAUTION:
The power control button on the device and the power switch on the power supply do not turn off the electrical current supplied to the device. The device also might have more than one power cord. To remove all electrical current from the device, ensure that all power cords are disconnected from the power source.
Chapter 3. General information
This chapter provides general information that applies to all machine types supported by this publication.
The ThinkVantage Productivity Center program
UsetheThinkVantage ^® Productivity Center program for general information about the use, operation, and maintenance of the computer. The ThinkVantage Productivity Center program also contains information to help solve problems and get repair service or other technical assistance. The ThinkVantage Productivity Center program is preinstalled on most ThinkCentre products.
Additional information resources
If you have Internet access, the most up-to-date information for the computer is available from the World Wide Web.
You can find the following information:
- Customer Replaceable Unit (CRU) removal and installation instructions
•Publications
- Troubleshooting information
- Parts information
• Downloads and drivers
- Links to other useful sources of information
To access this information, point your browser to http://www.lenovo.com/support/.
Specifications
This section lists the physical specifications for your computer.
Dimensions
Width: 275 mm (10.83 in.)
Height: 81 mm (3.19 in.)
Depth: 242 mm (9.53 in.)
Weight
Note: The weight does not include the power supply or any external cables.
Minimum configuration as shipped: 3.27 kg (7.2 lbs)
Maximum configuration: 3.72 kg (8.2 lbs)
Environment
Airtemperature:
Operating at 0 - 3000 ft (914.4 m): 10° to 35°C (50° to 95°F)
Non-operating: -40° to 60°C (-40° to 140°F)
Maximum altitude: 3000 ft (914.4 m)
Note: The maximum altitude, 3000 ft. (914.4 m), is the maximum altitude at which the specified air
temperatures apply. At higher altitudes, the maximum air temperatures are lower than those specified.
Humidity(non-condensing):
Operating: 10% to 80%
Non-operating:10%to90%
Electricalinput
Inputvoltage:
Lowrange:
Minimum: 100 V ac
Maximum: 127 V ac
Input frequency range: 50/60 Hz
Highrange:
Minimum: 200 V ac
Maximum: 240 V ac
Input frequency range: 50/60 Hz
Input kilovolt-amperes (kVA) (approximate):
Minimum configuration as shipped: 0.05 kVA (all machine types)
Maximumconfiguration:
0.12 kVA (Machine Types 6393, 6394, 6395, 6396, 6397)
Note: Power consumption and heat output vary depending on the number and type of optional features
installed and the power-management optional features in use.
Chapter 4. General Checkout
Attention
The drives in the computer you are servicing might have been rearranged or the drive startup sequence changed. Be extremely careful during write operations such as copying, saving, or formatting. Data or programs can be overwritten if you select an incorrect drive.
General error messages appear if a problem or conflict is found by an application program, the operating system, or both. For an explanation of these messages, refer to the information supplied with that software package.
Before replacing any FRUs, ensure that the latest level of BIOS is installed on the system. A down-level BIOS might cause false errors and unnecessary replacement of the system board. For more information on how to determine and obtain the latest level BIOS, see "BIOS levels" on page 161.
Use the following procedure to help determine the cause of the problem:
- Power-off the computer and all external devices.
- Check all cables and power cords.
- Set all display controls to the middle position.
- Power-on all external devices.
-
Power-on the computer.
-
Look for displayed error codes
- Listen for beep codes
- Look for readable instructions or a main menu on the display.
If you did not receive the correct response, proceed to step 6.
If you do receive the correct response, run the diagnostics. .See "Running diagnostics from the CD or diskettes" on page 45.
-
Look at the following conditions and follow the instructions:
-
If you hear beep codes during POST, go to "Beep symptoms" on page 74.
- If the computer displays a POST error, go to "POST error codes" on page 75.
- If the computer hangs and no error is displayed, go to "Checking for power problems."
Checking for power problems
If the computer does not turn on when the power switch is pressed, use the following procedure to help troubleshoot.
-
Press the power switch to turn on the computer. Check the power indicator LED next to the power switch.
-
If the LED is illuminated (on), the computer power is OK. Attempt to run the diagnostics. See "Running diagnostics from the CD or diskettes" on page45.
-
If the LED is not illuminated (off), go to step 2
-
Check the status of the power indicator LED on the AC/DC power adapter.
-
If the LED is illuminated (on), go to step 7 on page 40.
-
If the LED is not illuminated (off), go to the next step 3 on page 40.
-
Verify that the power cord is properly connected to an AC power outlet.
- Verify that you are using a good AC power outlet. Plug another device into the outlet or contact the power company or supplier to verify that the outlet is working correctly.
- Check the power cord continuity.
- Replace the AC/DC power adapter.
- Verify that the power cord from the AC/DC power adapter to the computer is properly connected. See "Connectors on the rear of the computer" on page 81
- Open the cover. See "Opening the cover" on page 84.
- Check the Power switch/LED assembly connector on the system board. See "System board locations" on page 83. Reseat the cable from the Power switch/LED assembly to the system board.
- Replace the power switch/LED assembly.
- Replace the system board. See "Replacing the system board" on page 89.
Problem determination tips
Due to the variety of hardware and software combinations that can be encountered, use the following information to assist you in problem determination. If possible, have this information available when requesting assistance from Service Support and Engineering functions.
• Machine type and model
- Processor or hard disk upgrades
- Failure symptom
- Do diagnostics indicate a failure?
- What, when, where, single, or multiple systems?
- Is the failure repeatable?
- Has this configuration ever worked?
- If it has been working, what changes were made prior to it failing?
- Is this the original reported failure?
• Diagnostics version
- Type and version level
•Hardwareconfiguration
- Print (print screen) configuration currently in use
-BIOSlevel
•Operatingsystemsoftware
- Type and version level
Note: To eliminate confusion, identical systems are considered identical only if they:
- Are the exact machine type and models
- Have the same BIOS level
- Have the same adapters/attachments in the same locations
- Have the same address jumpers/terminators/cabling
- Have the same software versions and levels
- Have the same Diagnostic Diskettes (version)
- Have the same configuration options set in the system
- Have the same setup for the operating system control files
Comparing the configuration and software set-up between “working and non-working” systems will often lead to problem resolution.
Chapter5.Diagnostics
Diagnostic programs are used to test hardware components of your computer and report operating-system-controlled settings that can cause hardware failures. There are two diagnostic programs preinstalled on your computer to help you diagnose problems:
- PC-Doctor for Windows (used when diagnosing problems while running the Windowsoperatingsystem)
- PC-Doctor for Windows PE (used when your Windows operating system will not start)
Notes:
- You can also download the latest version of the PC-Doctor for Windows and PC-Doctor for DOS diagnostic programs from http://www.lenovo.com/support/.
- If you are unable to isolate and repair the problem yourself by running the applicable version of PC-Doctor, click the Save Button in the PC-Doctor-log-file display. You will need to have all problem-related log files available when you speak to a Lenovo technical support representative.
PC-DoctorforWindows
PC-Doctor for Windows is a diagnostic program that works through the Windows operating system. The PC-Doctor for Windows diagnostic program enables you to view symptoms and solutions for computer problems, access the Lenovo troubleshooting center, update system drivers, and review system information.
To run PC-Doctor for Windows, open the Start menu from the Windows desktop, select All Programs, select PC-Doctor for Windows, and click PC-Doctor for Windows. Follow the instructions on the screen. For additional information about running the diagnostic program, refer to the PC-Doctor for Windows help system.
If you still suspect a problem after PC-Doctor for Windows runs successfully, run PC-Doctor for DOS or PC-Doctor for Windows PE to help you diagnose the computerproblem.
PC Doctor for Windows also has problem determination aids that determine software and usage problems.
PC-Doctor for Windows PE
The PC-Doctor for Windows PE diagnostic program is part of the Rescue and Recovery ^™ workspace on each Lenovo computer. Use PC-Doctor for Windows PE, if you are unable to start the Windows operating system or if PC-Doctor for Windows has not been successful in isolating a possible problem.
Running diagnostics from the Rescue and Recovery workspace
You can run the PC-Doctor for Windows PE diagnostic program from the Rescue and Recovery workspace. To run diagnostics from the Rescue and Recovery workspace, use the following procedure:
- Shut down the operating system and turn off the computer.
- Repeatedly press and release the F11 key as you turn on the computer.
- When you hear beeps or see a logo screen, stop pressing the F11 key. The Rescue and Recovery workspace opens.
- From the Rescue and Recovery workspace, select Diagnose hardware.
- The diagnostic program opens automatically. Select the diagnostic test you want to run. Press the F1 key for additional help.
- Follow the instructions on the screen.
Note: Rescue media includes PC-Doctor for Windows PE. For more information about rescue media, see the User Guide for the computer.
PC-DoctorforDOS
Use PC-Doctor for DOS, if you are unable to start the Windows operating system or if PC-Doctor for Windows has not been successful in isolating a possible problem. You can run PC-Doctor for DOS from a diagnostic CD image or diagnostic diskettes that have been created.
Note: It is important to create a diagnostic CD image or diagnostic diskettes in case PC-Doctor for Windows PE cannot be run from the Rescue and Recoveryworkspace.
Creating a diagnostic CD image
To create a diagnostic CD image, download a self-starting bootable CD image (known as an .iso image) of the diagnostic program from http://www.lenovo.com/support/. After you download the image, you can create the CD using any CD burning software.
If the computer does not have a CD burner or you do not have Internet access, see "Creating diagnostic diskettes."
Creatingdiagnosticdiskettes
To create diagnostic diskettes, download the PC-Doctor for DOS diagnostic program from http://www.lenovo.com/support/ onto two blank, formatted diskettes.
If you do not have Internet access, create the diagnostic diskettes using the following procedure:
Note: You will need a diskette drive on the computer or a USB diskette drive to completethisprocedure.
- Shut down the operating system and turn off the computer.
- If you are using a USB diskette drive, plug it into the computer.
- Repeatedly press and release the F11 key as you turn on the computer.
- When you hear beeps or see a logo screen, stop pressing the F11 key. The Rescue and Recovery workspace opens.
Note: For some models, press the Esc key to enter Rescue and Recovery.
-
From the Rescue and Recovery workspace, select Create diagnostic disks.
-
Follow the instructions on the screen.
-
When prompted, insert a blank, formatted diskette into the diskette drive and continue to follow the instructions on the screen.
- When the operation is complete, remove the diskette and click Quit.
- Insert another blank, formatted diskette into the diskette drive and continue to follow the instructions on the screen.
- When the operation is complete, remove the diskette and click Quit.
Running diagnostics from the CD or diskettes
To run diagnostics from the diagnostic CD image or diagnostic diskettes that you created, use the following procedure:
- Make sure the computer is turned off.
- If you are running diagnostics from diskettes using a USB diskette drive, plug in the USB device.
- Insert the CD into the optical drive or the first diagnostic diskette into the diskettedrive.
- Restart the computer.
Note: If the diagnostic program does not start, you might not have your optical drive or diskette drive set as a startable device. See "Selecting a startup device" on page 50 for instructions on how to change the startup device.
- When the diagnostics program opens, follow the instructions on the screen.
Note: If you are running diagnostics from a diskette, when prompted, remove the first diskette and insert the second diskette.
-
When the program finishes, be sure to remove the CD or diskette from the drive.
-
Select the diagnostic test you want to run. Press the F1 key for additional help.
Navigating through the diagnostics programs
Use the cursor movement keys to navigate within the menus.
- The Enter key is used to select a menu item.
- The Esc key is used to back up to the previous menu.
• For online help select F1.
Runningtests
There are four ways to run the diagnostic tests.
-
Using the cursor movement keys, highlight Run Normal Test or Run Quick Test from the Diagnostics menu and then press Enter.
This automatically runs a pre-defined group of tests from each test category. Run Normal Test runs a more extensive set of tests than does Run Quick Test and takes longer to complete. -
Press F5 to automatically run all selected tests in all categories.
- From within a test category, press Ctrl-Enter to automatically run only the selected tests in that category.
- Using the cursor movement keys, highlight a single test within a test category, and then press Enter. This runs only that test.
Press Esc at any time to stop the testing process.
Test results (N/A, PASSED, FAILED, ABORTED) are displayed in the field beside the test description and in the test log. See "Viewing the test log" on page 47.
To select one or more tests, use the following procedure.
- Open the corresponding test category.
- Using the cursor movement keys, highlight the desired test.
- Press the space bar.
A selected test is marked by >>. Pressing the space bar again de-selects a test and removes the >>.
- Repeat steps 2 and 3 above to select all desired tests.
Testresults
Diagnostics test results produce the following error code format:
| Function Code | Failure Type | DeviceID | Date | ChkDigits | Text |
- Function Code:
Represents the feature or function within the PC. - Failure Type:
Represents the type of error encountered.
•DeviceID:
Contains the component's unit-ID which corresponds to either a fixed disk drive, removable media drive, processor, specific RIMM, or a device on the PCI bus.
•Date:
Contains the date when the diagnostic test was run. The date is retrieved from CMOS and displayed using the YYYYMMDD format.
- ChkDigits:
Contains a 2-digit check-digit value to ensure the following:
– Diagnostics were run on the specified date.
– Diagnostics were run on the specified computer.
- The diagnostic error code is recorded correctly.
Text:
Descriptionoftheerror.
Note: See "Diagnostic error codes" on page 54 for error code listings.
Quick and Full erase - hard drive
The diagnostics program offers two hard drive format utilities:
- Quick Erase Hard Drive
• Full Erase Hard Drive
The Quick Erase Hard Drive provides a DOS utility that performs the following:
- Destroys the Master Boot Record (MBR) on the hard drive.
- Destroys all copies of the FAT Table on all partitions (both the master and backup).
- Destroys the partition table.
- Provides messages that warn the user that this is a non-recoverable process.
The Full Erase Hard Drive provides a DOS utility that performs the following:
• Performs all the steps in Quick Erase.
- Provides a DOS utility that writes random data to all sectors of the hard drive.
- Provides an estimate of time to completion along with a visual representation of completionstatus.
- Provides messages that warn the user about non-recoverable process.
Important: Make sure that all data is backed up before using the Quick or Full Erase functions.
To select the Quick Erase or Full Erase Hard Drive utility, use the following procedure:
- Select the UTILITY option on the toolbar and press Enter.
- Select either the QUICK ERASE or FULL ERASE HARD DISK option and followtheinstructions.
Viewing the test log
Errors reported by the diagnostic test will be displayed by the program as a failed test.
To view details of a failure or to view a list of test results, use the following procedure from any test category screen:
- Press F3 to activate the log file.
- Press F3 again to save the file to diskette or press F2 to print the file.
Chapter 6. Using the Setup Utility
The Setup Utility program is used to view and change the configuration settings of the computer, regardless of which operating system you are using. However, the operating-system settings might override any similar settings in the Setup Utility program.
Starting the Setup Utility program
To start the Setup Utility program, do the following:
- If the computer is already on when you start this procedure, shut down the operating system and turn off the computer.
- Press and hold the F1 key then turn on the computer. When you hear multiple beeps, release the F1 key.
Notes:
a. If you are using a USB keyboard and the Setup Utility program does not display using this method, repeatedly press and release the F1 key rather than leaving it pressed when turning on the computer.
b. If a user password or an administrator password has been set, the Setup Utility program menu is not displayed until you type your password. For more information, see "Using passwords."
The Setup Utility might start automatically when POST detects that hardware has been removed or new hardware has been installed in the computer.
Viewing and changing settings
The Setup Utility program menu lists items that identify system configuration topics. To view or change settings, see "Starting the Setup Utility program."
When working with the Setup Utility program menu, you must use the keyboard. The keys used to perform various tasks are displayed at the bottom of each screen.
Using passwords
By using the Setup Utility program, you can set passwords to prevent unauthorized persons from gaining access to the computer and data. See "Starting the Setup Utility program." The following types of passwords are available:
- User Password
- AdministratorPassword
You do not have to set any passwords to use the computer. However, if you decide to set any passwords, read the following sections.
Passwordconsiderations
A password can be any combination of up to twelve characters (a-z and 0-9) and symbols. For security reasons, it is a good idea to use a strong password that cannot be easily compromised. Passwords should adhere to the following rules:
• Have at least eight characters in length
- Contain at least one alphabetic character and one numeric character
- Setup Utility program and hard disk drive passwords are not case sensitive
• Not be your name or your user name - Not be a common word or a common name
- Be significantly different from your previous password
UserPassword
When a User Password is set, the computer cannot be used until a valid password is typed from the keyboard.
AdministratorPassword
When an Administrator Password is set, it deters unauthorized persons from changing configuration settings. If you are responsible for maintaining the settings of several computers, you might want to set an Administrator Password.
After you set an Administrator Password, a password prompt is displayed each time you try to access the Setup Utility program.
If both the user and administrator passwords are set, you can type either password. However, to change any configuration settings, you must use your administratorpassword.
Setting, changing, and deleting a password
To set, change, or delete a password, do the following:
Note: A password can be any combination of up to twelve characters (A-Z, a-z, and 0-9). For more information, see "Password considerations" on page 49.
-
Start the Setup Utility program (see "Starting the Setup Utility program" or page49).
-
From the Setup Utility program menu, select Security.
-
Select Set Passwords. Read the information displayed on the right side of the screen.
Selecting a startup device
If the computer does not start up (boot) from a device such as the CD-ROM, diskette, or hard disk as expected, use one of the following procedures to select a startupdevice.
Selecting a temporary startup device
Use this procedure to startup from any boot device.
Note: Not all CDs, hard disks, and diskettes are bootable.
- Turn off the computer.
- Press and hold the F12 key then turn on the computer. When the Startup Device Menu appears, release the F12 key.
Note: If you are using a USB keyboard and the Startup Device Menu does not display using this method, repeatedly press and release the F12 key rather than leaving it pressed when turning on the computer.
- Select the desired startup device from the Startup Device Menu and press Enter to begin.
Note: Selecting a startup device from the Startup Device menu does not permanently change the startup sequence.
Selecting or changing the startup device sequence
To view or permanently change the configured startup device sequence, do the following:
- Start the Setup Utility program (see "Starting the Setup Utility program" or page49).
- Select Startup.
- Select Startup Sequence. See the information displayed on the right side of the screen.
- Select the devices for the Primary Startup Sequence, the Automatic Startup Sequence, and the Error Startup Sequence.
- Select Exit from the Setup Utility menu and then Save Settings or Save and exit the Setup Utility.
If you have changed these settings and want to return to the default settings, select Load Default Settings on the Exit menu.
Advancedsettings
On some computer models the Advanced settings menu includes a setting to Enable/Disable HyperThreading. This feature works only with HyperThreading-aware operating systems, such as Microsoft Windows XP and WindowsVista ^™ . The default setting for HyperThreading is Enabled. However, if you select Set Defaults and are using an operating system other than Windows XP or Windows Vista, the computer performance might be degraded. Therefore, you should always set HyperThreading to Disabled unless you are sure your operating system supports HyperThreading.
Exiting from the Setup Utility program
When you finish viewing or changing settings, press Esc to return to the Setup Utility program menu (you might have to press Esc several times). If you want to save the new settings, select Save & Exit Setup before you exit. Otherwise, your changes will not be saved.
Chapter 7. Symptom-to-FRU Index
The Symptom-to-FRU index lists error symptoms and possible causes. The most likely cause is listed first. Always begin with Chapter 4, "General Checkout," on page 39. This index can also be used to help you decide which FRUs to have available when servicing a computer. If you are unable to correct the problem using this index, go to "Undetermined problems" on page 78.
Notes:
- If you have both an error message and an incorrect audio response, diagnose the error messagefirst.
- If you cannot run the diagnostic tests or you get a diagnostic error code when running a test, but did receive a POST error message, diagnose the POST error message first.
- If you did not receive any error message, look for a description of your error symptoms in the first part of this index.
Hard disk drive boot error
A hard disk drive boot error (error codes 1962 and I999030X) can have the followingcauses.
| ErrorFRU/Action | |
| The start-up drive is not in the boot sequenceinconfiguration. | Check the configuration and ensure the start-up drive is in the boot sequence. |
| No operating system installed on the boot drive. | Install an operating system on the boot drive. |
| The boot sector on the start-up drive is corrupted. | The drive must be formatted, do the following:1. Attempt to back-up the data on the failing hard disk drive.2. Using the operating systems programs, format the hard disk drive. |
| The drive is defective. | Replace the hard disk drive. |
Diagnosticerrorcodes
Refer to the following diagnostic error codes when using the diagnostic tests. See "Running tests" on page 45 for the specific type for information about the Diagnosticprograms.
In the following index, X can represent any number.
| Diagnostic Error Code | FRU/Action |
| 000-000-XXXBIOSTestPassed | Noaction |
| 000-002-XXXBIOSTimeout | 1. Flash the system. See "Updating (flashing) BIOS from a CD-ROM or diskette" on page 1622. System board |
| 000-024-XXXBIOS Addressing test failure | 1. Flash the system. See "Updating (flashing) BIOS from a CD-ROM or diskette" on page 1622. System board |
| 000-025-XXXBIOS Checksum Value error | 1. Flash the system. See "Updating (flashing) BIOS from a CD-ROM or diskette" on page 1622. System board |
| 000-026-XXXFLASHdataerror | 1. Flash the system. See "Updating (flashing) BIOS from a CD-ROM or diskette" on page 1622. System board |
| 000-027-XXXBIOSConfiguration/Setuperror | 1. Run Setup2. Flash the system. See "Updating (flashing) BIOS from a CD-ROM or diskette" on page 1623. System board |
| 000-034-XXXBIOS Buffer Allocation failure | 1. Reboot the system2. Flash the system. See "Updating (flashing) BIOS from a CD-ROM or diskette" on page 1623. Run memory test4. System board |
| 000-035-XXXBIOS Reset Condition detected | 1. Flash the system. See "Updating (flashing) BIOS from a CD-ROM or diskette" on page 1622. System board |
| 000-036-XXXBIOSRegistererror | 1. Flash the system. See "Updating (flashing) BIOS from a CD-ROM or diskette" on page 1622. System board |
| 000-038-XXXBIOSExtensionfailure | 1. Flash the system. See "Updating (flashing) BIOS from a CD-ROM or diskette" on page 1622. Adapter card3. System board |
| 000-039-XXXBIOS DMI data error | 1. Flash the system. See "Updating (flashing) BIOS from a CD-ROM or diskette" on page 1622. System board |
| 000-195-XXXBIOS Test aborted by user | InformationonlyRe-start the test, if necessary |
| 000-196-XXXBIOS test halt, error threshold exceeded | 1. Press F3 to review the log file2. Re-start the test to reset the log file |
| 000-197-XXXBIOStestwarning | 1. Make sure the component that is called out is connected and/or enabled. See Chapter 6, "Using the Setup Utility," on page492. Re-run test3. Replace the component that is called out inwarningstatement4. Replace the component under test |
| 000-198-XXXBIOStestaborted | 1. Make sure the component that is called out is connected and/or enabled. See Chapter 6, "Using the Setup Utility," on page492. Flash the system and retest. See "Updating (flashing) BIOS from a CD-ROM or diskette" on page 1623. Go to "Undetermined problems" on page 78 |
| 000-199-XXXBIOS test failed, cause unknown | 1. Go to "Undetermined problems" on page 782. Flash the system and re-test3. Replace component under function test |
| 000-250-XXXBIOSAPMfailure | 1. Flash the system. See "Updating (flashing) BIOS from a CD-ROM or diskette" on page 1622. System board |
| 000-270-XXXBIOSACPIfailure | 1. Flash the system. See "Updating (flashing) BIOS from a CD-ROM or diskette" on page 1622. System board |
| 001-000-XXXSystemTestPassed | Noaction |
| 001-00X-XXXSystemError | Systemboard |
| 001-01X-XXXSystemError | Systemboard |
| 001-024-XXXSystem Addressing test failure | Systemboard |
| 001-025-XXXSystem Checksum Value error | 1. Flash the system. See "Updating (flashing) BIOS from a CD-ROM or diskette" on page 1622. System board |
| 001-026-XXXSystem FLASH data error | 1. Flash the system. See "Updating (flashing) BIOS from a CD-ROM or diskette" on page 1622. System board |
| 001-027-XXXSystem Configuration/Setup error | 1. Run Setup2. Flash the system. See "Updating (flashing) BIOS from a CD-ROM or diskette" on page 1623. System board |
| 001-032-XXXSystem Device Controller failure | Systemboard |
| 001-034-XXXSystem Device Buffer Allocation failure | 1. Reboot the system2. Flash the system. See "Updating (flashing) BIOS from a CD-ROM or diskette" on page 1623. Run memory test4. System board |
| 001-035-XXXSystem Device Reset condition detected | Systemboard |
| 001-036-XXXSystemRegistererror | Systemboard |
| 001-038-XXXSystemExtensionfailure | 1. Adapter card2. System board |
| 001-039-XXXSystem DMI data structure error | 1. Flash the system. See "Updating (flashing) BIOS from a CD-ROM or diskette" on page 1622. System board |
| 001-040-XXXSystemIRQfailure | 1. Power-off/on system and re-test2. System board |
| 001-041-XXXSystemDMAfailure | 1. Power-off/on system and re-test2. System board |
| 001-195-XXXSystem Test aborted by user | InformationonlyRe-start the test, if necessary |
| 001-196-XXXSystem test halt, error threshold exceeded | 1. Press F3 to review the log file2. Re-start the test to reset the log file |
| 001-197-XXXSystemtestwarning | 1. Make sure the component that is called out is connected and/or enabled. SeeChapter 6, "Using the Setup Utility," on page492. Re-run test3. Replace the component that is called out inwarningstatement4. Replace the component under test |
| 001-198-XXXSystemtestaborted | 1. If a component is called out, make sure it is connected and/or enabled. SeeChapter 6, "Using the Setup Utility," on page492. Flash the system and retest. See"Updating (flashing) BIOS from a CD-ROM or diskette" on page 1623. Go to "Undetermined problems" on page 78 |
| 001-199-XXXSystem test failed, cause unknown | 1. Go to "Undetermined problems" on page 782. Flash the system and re-test3. Replace component under function test |
| 001-250-XXXSystemECCerror | Systemboard |
| 001-254-XXX001-255-XXX001-256-XXX001-257-XXXSystemDMAerror | Systemboard |
| 001-260-XXX001-264-XXXSystemIRQerror | Systemboard |
| 001-268-XXXSystemIRQ1failure | 1. Device on IRQ12. System board |
| 001-269-XXXSystemIRQ2failure | 1. Device on IRQ22. System board |
| 001-270-XXXSystemIRQ3failure | 1. Device on IRQ32. System board |
| 001-271-XXXSystemIRQ4failure | 1. Device on IRQ42. System board |
| 001-272-XXXSystemIRQ5failure | 1. Device on IRQ52. System board |
| 001-273-XXXSystemIRQ6(diskettedrive)failure | 1. Diskette Cable2. Diskette drive3. System board |
| 001-274-XXXSystemIRQ7failure | 1. Device on IRQ72. System board |
| 001-275-XXXSystemIRQ8failure | 1. Device on IRQ82. System board |
| 001-276-XXXSystemIRQ9failure | 1. Device on IRQ92. System board |
| 001-277-XXXSystemIRQ10failure | 1. Device on IRQ102. System board |
| 001-278-XXXSystemIRQ11failure | 1. Device on IRQ112. System board |
| 001-279-XXXSystemIRQ12failure | 1. Device on IRQ122. System board |
| 001-280-XXXSystemIRQ13failure | 1. Device on IRQ132. System board |
| 001-281-XXXSystemIRQ14(hard disk drive) failure | 1. Hard disk drive cable2. Hard disk drive3. System board |
| 001-282-XXXSystemIRQ15failure | 1. Device on IRQ152. System board |
| 001-286-XXX001-287-XXX001-288-XXXSystemTimerfailure | Systemboard |
| 001-292-XXXSystemCMOSRAMerror | 1. Run Setup and re-test2. System board |
| 001-293-XXXSystemCMOSBattery | 1. CMOS Battery2. System board |
| 001-298-XXXSystem RTC date/time update failure | 1. Flash the system. See "Updating (flashing) BIOS from a CD-ROM or diskette" on page 1622. System board |
| 001-299-XXXSystem RTC periodic interrupt failure | Systemboard |
| 001-300-XXXSystem RTC Alarm failure | Systemboard |
| 001-301-XXXSystem RTC Century byte error | 1. Flash the system. See "Updating (flashing) BIOS from a CD-ROM or diskette" on page 1622. System board |
| 005-000-XXXVideoTestPassed | Noaction |
| 005-00X-XXXVideoerror | 1. Video card, if installed2. System board |
| 005-010-XXX005-011-XXX005-012-XXX005-013-XXXVideoSignalfailure | 1. Video card, if installed2. System board |
| 005-016-XXXVideoSimplePatterntestfailure | 1. Video Ram2. Video card, if installed3. System board |
| 005-024-XXXVideo Addressing test failure | 1. Video card, if installed2. System board |
| 005-025-XXXVideo Checksum Value error | 1. Video card, if installed2. System board |
| 005-027-XXXVideo Configuration/Setup error | 1. Run Setup2. Video drivers update3. Video card, if installed4. System board |
| 005-031-XXXVideo Device Cable failure | 1. Video cable2. Monitor3. Video card, if installed4. System board |
| 005-032-XXXVideo Device Controller failure | 1. Video card, if installed2. System board |
| 005-036-XXXVideoRegistererror | 1. Video card, if installed2. System board |
| 005-038-XXXSystem BIOS extension failure | 1. Video card, if installed2. System board |
| 005-040-XXXVideoIRQfailure | 1. Video card, if installed2. System board |
| 005-195-XXXVideo Test aborted by user | InformationonlyRe-start the test, if necessary |
| 005-196-XXXVideo test halt, error threshold exceeded | 1. Press F3 to review the log file2. Re-start the test to reset the log file |
| 005-197-XXXVideotestwarning | 1. Make sure the component that is called out is connected and/or enabled. SeeChapter 6,"Using the Setup Utility," on page492. Re-run test3. Replace the component called out in warningstatement4. Replace the component under test |
| 005-198-XXXVideotestaborted | 1. If a component is called out, make sure it is connected and/or enabled. SeeChapter 6, "Using the Setup Utility," on page492. Flash the system and re-test. See"Updating (flashing) BIOS from a CD-ROM or diskette" on page 1623. Go to "Undetermined problems" on page78 |
| 005-199-XXXVideo test failed, cause unknown | 1. Go to "Undetermined problems" on page782. Flash the system and re-test. See"Updating (flashing) BIOS from a CD-ROM or diskette" on page 1623. Replace component under function test |
| 005-2XX-XXX005-3XX-XXXVideosubsystemerror | 1. Video card, if installed2. System board |
| 006-000-XXXDiskette interface Test Passed | Noaction |
| 006-0XX-XXXDisketteinterfaceerror | 1. Diskette drive Cable2. Diskette drive3. System board |
| 006-195-XXXDiskette interface Test aborted by user | InformationonlyRe-start the test, if necessary |
| 006-196-XXXDiskette interface test halt, error threshold exceeded | 1. Press F3 to review the log file2. Re-start the test to reset the log file |
| 006-197-XXXDiskette interface test warning | 1. If a component is called out, make sure it is connected and/or enabled2. Re-run test3. Replace the component that is called out inwarningstatement4. Replace the component under test |
| 006-198-XXXDiskette interface test aborted | 1. If a component is called out, make sure it is connected and/or enabled2. Flash the system and re-test. See"Updating (flashing) BIOS from a CD-ROM or diskette" on page 1623. Go to "Undetermined problems" on page78 |
| 006-199-XXXDiskette interface test failed, cause unknown | 1. Go to "Undetermined problems" on page782. Flash the system and re-test3. Replace component under function test |
| 006-25X-XXXDisketteinterfaceError | 1. Diskette drive cable2. Diskette drive3. System board |
| 015-000-XXXUSB port Interface Test Passed | Noaction |
| 015-001-XXXUSBportPresence | 1.Remove USB device(s) and re-test2. System board |
| 015-002-XXXUSBportTimeout | 1.Remove USB device(s) and re-test2. System board |
| 015-015-XXXUSB port External Loopback failure | 1.Remove USB device(s) and re-test2. System board |
| 015-027-XXXUSB port Configuration/Setup error | 1. Flash the system. See "Updating (flashing) BIOS from a CD-ROM or diskette" on page 1622. System board |
| 015-032-XXXUSB port Device Controller failure | Systemboard |
| 015-034-XXXUSBportbuffer allocationfailure | 1. Reboot the system2. Flash the system and re-test. See "Updating (flashing) BIOS from a CD-ROM or diskette" on page 1623. Run memory test4. System board |
| 015-035-XXXUSB port Reset condition detected | 1. Remove USB device(s) and re-test2. System board |
| 015-036-XXXUSB port Register error | Systemboard |
| 015-040-XXXUSB port IRQ failure | 1. Run setup and check for conflicts2. Flash the system. See "Updating (flashing) BIOS from a CD-ROM or diskette" on page 1623. System board |
| 015-195-XXXUSB port Test aborted by user | InformationonlyRe-start the test, if necessary |
| 015-196-XXXUSB port test halt, error threshold exceeded | 1. Press F3 to review the log file2. Re-start the test to reset the log file |
| 015-197-XXXUSB port test warning | 1. Make sure the component that is called out is connected and/or enabled. See Chapter 6, "Using the Setup Utility," on page492. Re-run test3. Replace the component that is called out inwarningstatement4. Replace the component under test |
| 015-198-XXXUSB port test aborted | 1. If a component is called out, make sure it is connected and/or enabled. See Chapter 6, "Using the Setup Utility," on page492. Flash the system and re-test. See "Updating (flashing) BIOS from a CD-ROM or diskette" on page 1623. Go to "Undetermined problems" on page /8 |
| 015-199-XXXUSB port test failed, cause unknown | 1. Go to "Undetermined problems" on page /82. Flash the system and re-test. See "Updating (flashing) BIOS from a CD-ROM or diskette" on page 1623. Replace component under function test |
| 018-000-XXXPCI Card Test Passed | Noaction |
| 018-0XX-XXXPCICardFailure | 1. Riser card, if installed2. System board |
| 018-195-XXXPCI Card Test aborted by user | 1. PCI card2. Information onlyRe-start the test, if necessary |
| 018-196-XXXPCI Card test halt, error threshold exceeded | 1. Press F3 to review the log file2. Re-start the test to reset the log file |
| 018-197-XXXPCI Card test warning | 1. Make sure the component that is called out is connected and/or enabled. See Chapter 6, "Using the Setup Utility," on page492. Re-run test3. Replace the component that is called out inwarningstatement4. Replace the component under test |
| 018-198-XXXPCI Card test aborted | 1. If a component is called out, make sure it is connected and/or enabled. See Chapter 6, "Using the Setup Utility," on page492. Flash the system and re-test. See "Updating (flashing) BIOS from a CD-ROM or diskette" on page 1623. Go to "Undetermined problems" on page /8 |
| 018-199-XXXPCI Card test failed, cause unknown | 1. Go to "Undetermined problems" on page /82. Flash the system and re-test. See "Updating (flashing) BIOS from a CD-ROM or diskette" on page 1623. Replace component under function test |
| 018-250-XXXPCI Card Services error | 1. PCI card2. Riser card, if installed3. System board |
| 020-000-XXXPCI Interface Test Passed | Noaction |
| 020-0XX-XXXPCIInterfaceerror | 1. PCI card2. Riser card, if installed3. System board |
| 020-195-XXXPCI Test aborted by user | InformationonlyRe-start the test, if necessary |
| 020-196-XXXPCI test halt, error threshold exceeded | 1. Press F3 to review the log file2. Re-start the test to reset the log file |
| 020-197-XXXPCItestwarning | 1. Make sure the component that is called out is connected and/or enabled. See Chapter 6, "Using the Setup Utility," on page492. Re-run test3. Replace the component that is called out inwarningstatement4. Replace the component under test |
| 020-198-XXXPCItestaborted | 1. If a component is called out, make sure it is connected and/or enabled. See Chapter 6, "Using the Setup Utility," on page492. Flash the system and re-test. See "Updating (flashing) BIOS from a CD-ROM or diskette" on page 1623. Go to "Undetermined problems" on page 78 |
| 020-199-XXXPCI test failed, cause unknown | 1. Go to "Undetermined problems" on page 782. Flash the system and re-test. See "Updating (flashing) BIOS from a CD-ROM or diskette" on page 1623. Replace component under function test |
| 020-262-XXXPCIsystemerror | 1. PCI card2. Riser card, if installed3. System board |
| 025-000-XXXIDE interface Test Passed | Noaction |
| 025-00X-XXX025-01X-XXXIDEinterfacefailure | 1. IDE signal cable2. Check power supply voltages3. Reseat IDE signal cable4. IDE device5. System board |
| 025-027-XXXIDE interface Configuration/Setup error | 1. IDE signal cable2. Flash the system. See "Updating (flashing) BIOS from a CD-ROM or diskette" on page 1623. Reseat IDE signal cable4. IDE device5. System board |
| 025-02X-XXX025-03X-XXX025-04X-XXXIDEInterfacefailure | 1. IDE signal cable2. Check AC/DC power adapter3. Reseat IDE signal cable4. IDE device5. System board |
| 025-195-XXXIDE interface Test aborted by user | InformationonlyRe-start the test, if necessary |
| 025-196-XXXIDE interface test halt, error threshold exceeded | 1. Press F3 to review the log file2. Re-start the test to reset the log file |
| 025-197-XXXIDE interface test warning | 1. Make sure the component that is called out is connected and/or enabled. See Chapter 6, "Using the Setup Utility," on page492. Re-run test3. Replace the component that is called out inwarningstatement4. Replace the component under test |
| 025-198-XXXIDE interface test aborted | 1. If a component is called out, make sure it is connected and/or enabled. See Chapter 6, "Using the Setup Utility," on page492. Flash the system and re-test. See "Updating (flashing) BIOS from a CD-ROM or diskette" on page 1623. Go to "Undetermined problems" on page 78 |
| 025-199-XXXIDE interface test failed, cause unknown | 1. Go to "Undetermined problems" on page 782. Flash the system and re-test. See "Updating (flashing) BIOS from a CD-ROM or diskette" on page 1623. Replace component under function test |
| 030-000-XXXSCSI interface Test Passed | Noaction |
| 030-00X-XXX030-01X-XXXSCSIinterfacefailure | 1. SCSI signal cable2. Check AC/DC power adapter3. SCSI device4. SCSI adapter card, if installed5. System board |
| 030-027-XXXSCSI interface Configuration/Setup error | 1. SCSI signal cable2. Flash the system. See "Updating (flashing) BIOS from a CD-ROM or diskette" on page 1623. SCSI device4. SCSI adapter card, if installed5. System board |
| 030-03X-XXX030-04X-XXXSCSlinterfaceerror | 1. SCSI signal cable2. Check AC/DC power adapter3. SCSI device4. SCSI adapter card, if installed5. System board |
| 030-195-XXXSCSI interface Test aborted by user | InformationonlyRe-start the test, if necessary |
| 030-196-XXXSCSI interface test halt, error threshold exceeded | 1. Press F3 to review the log file2. Re-start the test to reset the log file |
| 030-197-XXXSCSI interface test warning | 1. Make sure the component that is called out is connected and/or enabled. See Chapter 6, "Using the Setup Utility," on page492. Re-run test3. Replace the component that is called out inwarningstatement4. Replace the component under test |
| 030-198-XXXSCSI interface test aborted | 1. If a component is called out, make sure it is connected and/or enabled. See Chapter 6, "Using the Setup Utility," on page492. Flash the system and re-test. See "Updating (flashing) BIOS from a CD-ROM or diskette" on page 1623. Go to "Undetermined problems" on page 78 |
| 030-199-XXXSCSI interface test failed, cause unknown | 1. Go to "Undetermined problems" on page 782. Flash the system and re-test. See "Updating (flashing) BIOS from a CD-ROM or diskette" on page 1623. Replace component under function test |
| 035-000-XXXRAID interface Test Passed | Noaction |
| 035-0XX-XXXRAIDinterfaceFailure | 1. RAID signal cable2. RAID device3. RAID adapter card, if installed4. System board |
| 035-195-XXXRAID interface Test aborted by user | InformationonlyRe-start the test, if necessary |
| 035-196-XXXRAID interface test halt, error threshold exceeded | 1. Press F3 to review the log file2. Re-start the test to reset the log file |
| 035-197-XXXRAID interface test warning | 1. Make sure the component that is called out is connected and/or enabled. See Chapter 6, "Using the Setup Utility," on page492. Re-run test3. Replace the component that is called out inwarningstatement4. Replace the component under test |
| 035-198-XXXRAID interface test aborted | 1. If a component is called out, make sure it is connected and/or enabled. See Chapter 6, "Using the Setup Utility," on page492. Flash the system and re-test. See "Updating (flashing) BIOS from a CD-ROM or diskette" on page 1623. Go to "Undetermined problems" on page /8 |
| 035-199-XXXRAID interface test failed, cause unknown | 1. See "Undetermined problems" on page /82. Flash the system and re-test. See "Updating (flashing) BIOS from a CD-ROM or diskette" on page 1623. Replace component under function test |
| 071-000-XXXAudio port Interface Test Passed | Noaction |
| 071-00X-XXX071-01X-XXX071-02X-XXXAudioporterror | 1. Run Setup2. Flash the system. See "Updating (flashing) BIOS from a CD-ROM or diskette" on page 1623. System board |
| 071-03X-XXXAudioportfailure | 1.Speakers2.Microphone3. Audio card, if installed4. System board |
| 071-04X-XXXAudioportfailure | 1. Run Setup2. Audio card, if installed3. System board |
| 071-195-XXXAudio port Test aborted by user | InformationonlyRe-start the test, if necessary |
| 071-196-XXXAudio port test halt, error threshold exceeded | 1. Press F3 to review the log file2. Re-start the test to reset the log file |
| 071-197-XXXAudio port test warning | 1. Make sure the component that is called out is connected and/or enabled. See Chapter 6, "Using the Setup Utility," on page492. Re-run test3. Replace the component that is called out inwarningstatement4. Replace the component under test |
| 071-198-XXXAudio port test aborted | 1. If a component is called out, make sure it is connected and/or enabled. See Chapter 6, "Using the Setup Utility," on page492. Flash the system and re-test. See "Updating (flashing) BIOS from a CD-ROM or diskette" on page 1623. Go to "Undetermined problems" on page 78 |
| 071-199-XXXAudio port test failed, cause unknown | 1. See "Undetermined problems" on page 782. Flash the system and re-test. See "Updating (flashing) BIOS from a CD-ROM or diskette" on page 1623. Replace component under function test |
| 071-25X-XXXAudioportfailure | 1.Speakers2. Audio card, if installed3. System board |
| 080-000-XXXGame Port interface Test Passed | Noaction |
| 080-XXX-XXXGame Port interface Error | 1. Remove the game port device and re-testthesystem |
| 080-195-XXXGame Port interface Test aborted by user | InformationonlyRe-start the test, if necessary |
| 080-196-XXXGame Port interface test halt, error threshold exceeded | 1. Press F3 to review the log file2. Re-start the test to reset the log file |
| 080-197-XXXGame Port interface test warning | 1. Make sure the component that is called out is connected and/or enabled. See Chapter 6, "Using the Setup Utility," on page492. Re-run test3. Replace the component that is called out inwarningstatement4. Replace the component under test |
| 080-198-XXXGame Port interface test aborted | 1. If a component is called out, make sure it is connected and/or enabled. See Chapter 6, "Using the Setup Utility," on page492. Flash the system and re-test. See "Updating (flashing) BIOS from a CD-ROM or diskette" on page 1623. Go to "Undetermined problems" on page /8 |
| 080-199-XXXGame Port interface test failed, cause unknown | 1. See "Undetermined problems" on page /82. Flash the system and re-test. See "Updating (flashing) BIOS from a CD-ROM or diskette" on page 1623. Replace component under function test |
| 086-000-XXXMouse Port interface Test Passed | Noaction |
| 086-001-XXXMouse Port interface Presence | 1.Mouse2. System board |
| 086-032-XXXMouse Port interface Device controller failure | 1.Mouse2. System board |
| 086-035-XXXMouse Port interface Reset | 1.Mouse2. System board |
| 086-040-XXXMouse Port interface IRQ failure | 1. Run Setup2.Mouse3. System board |
| 086-195-XXXMouse Port interface Test aborted by user | InformationonlyRe-start the test, if necessary |
| 086-196-XXXMouse Port interface test halt, error thresholdexceeded | 1. Press F3 to review the log file2. Re-start the test to reset the log file |
| 086-197-XXXMouse Port interface test warning | 1. Make sure the component that is called out is connected and/or enabled. See Chapter 6, "Using the Setup Utility," on page492. Re-run test3. Replace the component that is called out inwarningstatement4. Replace the component under test |
| 086-198-XXXMouse Port interface test aborted | 1. If a component is called out, make sure it is connected and/or enabled. See Chapter 6, "Using the Setup Utility," on page492. Flash the system and re-test. See "Updating (flashing) BIOS from a CD-ROM or diskette" on page 1623. Go to "Undetermined problems" on page /8 |
| 086-199-XXXMouse Port interface test failed, cause unknown | 1. See "Undetermined problems" on page 782. Flash the system and re-test. See "Updating (flashing) BIOS from a CD-ROM or diskette" on page 1623. Replace component under function test |
| 089-000-XXXMicroprocessorTestPassed | Noaction |
| 089-XXX-XXXMicroprocessorfailure | 1.Microprocessor(s)2. System board |
| 089-195-XXXMicroprocessor Test aborted by user | InformationonlyRe-start the test, if necessary |
| 089-196-XXXMicroprocessor test halt, error threshold exceeded | 1. Press F3 to review the log file2. Re-start the test to reset the log file |
| 089-197-XXXMicroprocessortestwarning | 1. Make sure the component that is called out is connected and/or enabled. See Chapter 6, "Using the Setup Utility," on page492. Re-run test3. Replace the component that is called out inwarningstatement4. Replace the component under test |
| 089-198-XXXMicroprocessortestaborted | 1. Flash the system. See "Updating (flashing) BIOS from a CD-ROM or diskette" on page 1622. Go to "Undetermined problems" on page 78 |
| 089-199-XXXMicroprocessor test failed, cause unknown | 1. See "Undetermined problems" on page 782. Flash the system and re-test. See "Updating (flashing) BIOS from a CD-ROM or diskette" on page 1623. Replace component under function test |
| 170-000-XXXVoltage Sensor(s) Test Passed | Noaction |
| 170-0XX-XXXVoltageSensor(s)failure | 1. Flash system2. System board |
| 170-195-XXXVoltage Sensor(s) Test aborted by user | InformationonlyRe-start the test, if necessary |
| 170-196-XXXVoltage Sensor(s) test halt, error threshold exceeded | 1. Press F3 to review the log file2. Re-start the test to reset the log file |
| 170-197-XXXVoltage Sensor(s) test warning | 1. Make sure the component that is called out is connected and/or enabled. See Chapter 6, "Using the Setup Utility," on page492. Re-run test3. Replace the component that is called out inwarningstatement4. Replace the component under test |
| 170-198-XXXVoltage Sensor(s) test aborted | 1. If a component is called out, make sure it is connected and/or enabled. See Chapter 6, "Using the Setup Utility," on page492. Flash the system and re-test. See "Updating (flashing) BIOS from a CD-ROM or diskette" on page 1623. Go to "Undetermined problems" on page 78 |
| 170-199-XXXVoltage Sensor(s) test failed, cause unknown | 1. See "Undetermined problems" on page 782. Flash the system and re-test. See "Updating (flashing) BIOS from a CD-ROM or diskette" on page 1623. Replace component under function test |
| 170-250-XXX170-251-XXXVoltage Sensor(s) Voltage limit error | 1. AC/DC power adapter2. System board |
| 170-254-XXXVoltage Sensor(s) Voltage Regulator Module error | 1. Voltage Regulator Module (VRM)2.Microprocessor3. System board |
| 175-000-XXXThermal Sensor(s) Test Passed | Noaction |
| 175-0XX-XXXThermalSensor(s)failure | 1. Flash system2. System board |
| 175-195-XXXThermal Sensor(s) Test aborted by user | InformationonlyRe-start the test, if necessary |
| 175-196-XXXThermal Sensor(s) test halt, error threshold exceeded | 1. Press F3 to review the log file2. Re-start the test to reset the log file |
| 175-197-XXXThermal Sensor(s) test warning | 1. Make sure the component that is called out is connected and/or enabled. See Chapter 6, "Using the Setup Utility," on page492. Re-run test3. Replace the component that is called out inwarningstatement4. Replace the component under test |
| 175-198-XXXThermal Sensor(s) test aborted | 1. If a component is called out, make sure it is connected and/or enabled2. Flash the system and re-test. See "Updating (flashing) BIOS from a CD-ROM or diskette" on page 1623. Go to "Undetermined problems" on page 78 |
| 175-199-XXXThermal Sensor(s) test failed, cause unknown | 1. See "Undetermined problems" on page 782. Flash the system and re-test. See "Updating (flashing) BIOS from a CD-ROM or diskette" on page 1623. Replace component under function test |
| 175-250-XXX175-251-XXXThermal Sensor(s) limit error | 1. Check fans2. Check AC/DC power adapter voltages3.Microprocessor4. System board |
| 185-000-XXXAsset Security Test Passed | Noaction |
| 185-XXX-XXXAssetSecurityfailure | 1. Flash system2. System board |
| 185-278-XXXAsset Security Chassis Intrusion | 1. Assure Asset Security Enabled2. C2 Cover Switch3. System board |
| 201-000-XXXSystem Memory Test Passed | Noaction |
| 201-XXX-XXXSystemMemoryerror | 1. Replace the memory module called out bythetest2. System board |
| 202-000-XXXSystem Cache Test Passed | Noaction |
| 202-XXX-XXXSystemCacheerror | 1. Cache, if removable2. System board3.Microprocessor |
| 206-000-XXXDiskette Drive Test Passed | Noaction |
| 206-XXX-XXXDisketteDriveerror | 1. Diskette Drive Cable2. Check AC/DC power adapter voltages3. Diskette drive4. System board |
| 215-000-XXXCD-ROM Drive Test Passed | Noaction |
| 215-XXX-XXXCD-ROMDriveerror | 1. CD-ROM Drive Cable2. Check AC/DC power adapter voltages3. CD-ROM drive4. System board |
| 217-000-XXXHard Disk Drive Test Passed | Noaction |
| 217-25X-XXX217-26X-XXXHard Disk Drive (IDE) error | 1. Hard Disk Drive Cable2. Check AC/DC power adapter voltages3. Reseat the hard disk drive cable4. Hard Disk drive (IDE)5. System board |
| 217-28X-XXX217-29X-XXXHard Disk Drive (SCSI) error | 1. Hard Disk Drive Cable2. Check AC/DC power adapter voltages3. Reseat the hard disk drive cable4. Hard Disk drive (SCSI)5. SCSI adapter card6. System board |
| 220-000-XXXHi-Capacity Cartridge Drive Test Passed | Noaction |
| 220-XXX-XXXHi-Capacity Cartridge Drive error | 1. Remove the Hi-Capacity Cartridge Drive and re-test the system |
| 301-XXX-XXXKeyboarderror | 1. Keyboard2. Check and test mouse3. System board |
| 301-000-XXXKeyboardTestPassed | Noaction |
| 302-000-XXXMouseTestPassed | Noaction |
| 302-XXX-XXXMouseerror | 1. Mouse2. Check and test Keyboard3. System board |
| 303-000-XXXJoystickTestPassed | Noaction |
| 303-XXX-XXXJoystickerror | Remove the Joystick and re-test the system |
| 305-000-XXXMonitor DDC Test Passed | Noaction |
| 305-250-XXXMonitor DDC self test failure | 1. Run Setup to enable DDC2. Cable3. Monitor4. Video card5. System board |
| 415-000-XXXModemTestPassed | Noaction |
| 415-XXX-XXXModemerror | Remove the Modem and re-test the system |
Beepsymptoms
Beep symptoms are tones or a series of tones separated by pauses (intervals without sound) during POST.
The following tables describes beep symptoms.
| BeepSymptomFRU/Action | |
| 1, 2, or 3 beeps | Reseat the memory modules. If the error persists, replace the memory modules one at a time until the failing module is determined. |
| 4, 5, 6, or 7 beeps9, 10, or 11 beeps | Before replacing the system board, remove any optional adapters (Express card, Modem card, Media reader) and retry. If the problem persists, replace the system board.Otherwise, reinstall the optional adapters one at a time until the failing adapter is determined. |
| 8 beeps | Replace the system board. |
POSTerrorcodes
Each time you power-on the system, it performs a series of tests that check the operation of the system and some options. This series of tests is called the Power-On Self-Test, or POST. POST does the following operations.
- Checks some basic system-board operations
- Checks the memory operation
• Starts the video operation
• Verifies that the boot drive is working
If the POST detects a problem, an error message appears on the screen. A single problem can cause several error messages to appear. When you correct the cause of the first error message, the other error messages probably will not appear on the screen the next time you turn on the system.
| POST Error Message | Description/Action |
| CMOS battery failed | The CMOS battery is no longer functional.Replacethebattery. |
| CMOS checksum error - defaults loaded | Checksum of CMOS is incorrect.The computer loads the default configuration settings. This error might indicate that CMOS has become corrupt due to a weak CMOS battery. |
| CPU at nnnn | nnnn is the running speed of the microprocessor. |
| Press Esc to skip memory test | Pressing Esc skips the full memory test |
| HARD DISK INSTALL FAILURE | Cannot find or initialize the hard disk drive controller or the drive.Make sure the hard disk drive is correctly installed.If no hard disk drives are installed, make sure the hard disk drive selection in Setup is settoNONE. |
| Keyboard error or no keyboard present | Cannot initialize the keyboard.Make sure the keyboard is properly connected to the computer and that no keys are held pressed during POST.To purposely configure the computer without a keyboard, set the error halt condition in Setup to HALT ON ALL, BUT KEYBOARD. The BIOS then ignores the missing keyboard during POST. |
| Memory Test: | This message displays during a full memory test, counting down the memory areas being tested. |
| Memory test fail | If POST detects an error during memory testing, additional information appears. This information gives specifics about the type and location of the memory error. |
| Press TAB to show POST screen | Pressing the TAB key permits the user to toggle between the default POST display screen and a custom POST display screen. |
| Error: Non-System disk or disk errorReplace and press any key when ready | The BIOS was unable to find a suitable boot device.Make sure the boot drive is properly connected to the computer.Make sure you have bootable media. |
Miscellaneoususerrormessages
| Message/SymptomFRU/Action | |
| Changing display colors | Display/Monitor |
| Computer will not power-off. See "Checking for power problems" on page 39 | 1. Power Switch2. System Board3. Riser card, if installed |
| Computer will not PXE from server | 1. Ensure that network is in startup sequence as first device or first device afterdiskette2. Ensure that network adapter is enabled forPXE3. Network adapter (Advise network administrator of new MAC address) |
| Computer will not perform a Wake On LAN® (ifapplicable) | 1. Check power supply and signal cable connections to network adapter2. Ensure that the operating system settings are set to enable Wake on LAN®3. Ensure Wake On LAN feature is enabled in Setup/Configuration (see "Starting the Setup Utility program" on page 49)4. Ensure network administrator is using correctMACaddress5. Ensure no interrupt or I/O address conflicts6. Network adapter (advise network administrator of new MAC address) |
| Dead computer. See "Checking for power problems" on page 39 | 1. AC/DC Power Adapter2. System Board |
| Diskette drive in-use light remains on or does not light when drive is active. | 1. Diskette Drive2. System Board3. Diskette Drive Cable |
| Flashing cursor with an otherwise blank display. | 1. System Board2. Primary Hard Disk Drive3. Hard Disk Drive Cable |
| Incorrect memory size during POST | 1. Run the Memory tests2. Memory Module3. System Board |
| "Insert a Diskette" icon appears with a known-good diagnostics diskette in the first 3.5-inchdiskettedrive. | 1. System Board2. Diskette Drive Cable3. Network Adapter |
| Intensity or color varies from left to right of characters and color bars | 1. Display2. Video adapter (if present)3. System Board |
| No power or fan not running | 1. See "Checking for power problems" on page39. |
| Non-system disk or disk error-type message with a known-good diagnostic diskette. | 1. Diskette Drive2. System Board3. Diskette Drive Cable |
| Other display symptoms not listed above (including blank or illegible display) | 1. Display2. System Board |
| Power-on indicator or hard disk drive in-use light not on, but computer works correctly | 1. Power switch/LED assembly2. System Board |
| Printerproblems | 1.Printer2. System Board |
| Program loads from the hard disk with a known-good diagnostics diskette in the first 3.5-inchdiskettedrive | 1. Run Setup and check Startup sequence.2. Diskette Drive3. Diskette Drive Cable4. System Board5. AC/DC power adapter |
| PXE computer cannot access programs from its own hard disk. | Replace the hard disk drive |
| PXE computer does not PXE from server | 1. Check startup sequence2. Check the network adapter LED status |
| Some or all keys on the keyboard do not work | 1. Keyboard2. Keyboard Cable3. SystemBoard |
Undeterminedproblems
- Turn off the computer.
- Remove or disconnect the following components (if installed) one at a time.
a. External devices (modem, printer, or mouse)
b. Any adapters
c. Memory modules
d. Extended video memory
e. External Cache
f. External Cache RAM
g. Hard disk drive
h. Diskette drive
- Turn on the power to re-test the system.
- Repeat steps 1 through 3 until you find the failing device or adapter.
If all devices and adapters have been removed, and the problem continues, replace thesystemboard.
Chapter 8. Replacing FRUs
This chapter provides step-by-step instructions for replacing major FRUs.
Important
Before you replace any FRU, read Chapter 2, "Safety information," on page 3 These precautions and guidelines will help you work safely.
FRU replacements are to be done by trained service technicians only.
Locations
This section provides illustrations to help locate the various connectors, controls, and components of the computer.
Connectors on the front of the computer
Note: Not all computer models will have the following controls and connections.
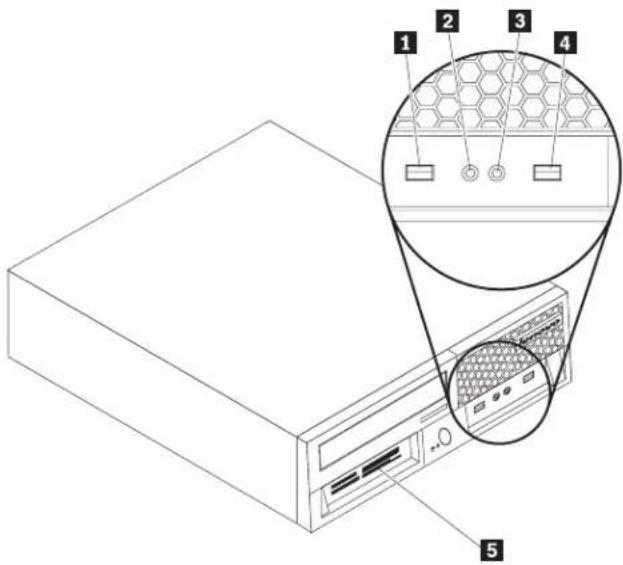
text_image
Technical diagram of a server rack with labeled components and an inset showing a hexagonal mesh structure.1 USB connector
2 Microphone connector
3 Headphone connector
4 USB connector
5 Media card reader
Connectors on the rear of the computer
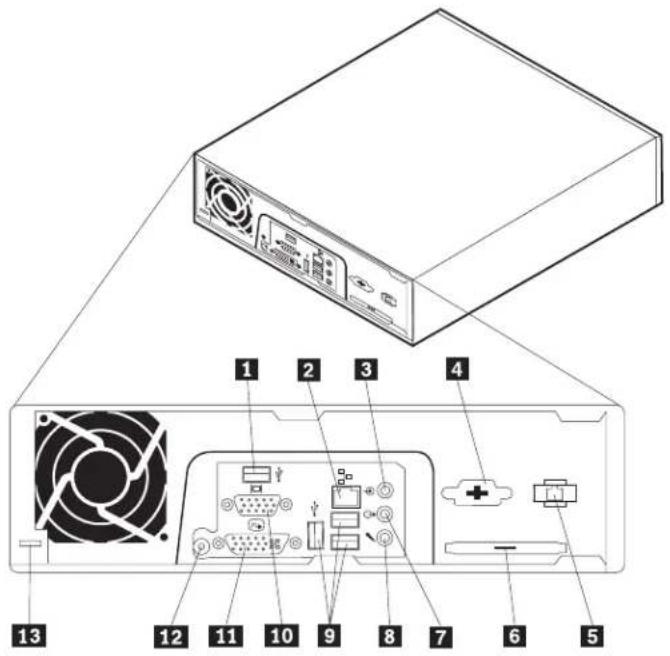
text_image
Diagram of a computer drive showing labeled components including fan, ports, and power connections1 USB connector
2 Ethernet connector
3 Audio line in connector
4 Serial connector
5 RJ11 modem connector
6 ExpressCard (PCIe x 1) connector
7 Audio line out connector
8 Microphone connector
9 USB connectors (3)
10 Video graphics array (VGA) monitor connector
11 Digital video interface (DVI) monitor connector
12 Power adapter connector
13 Cable lock latch
Locatingcomponents
This section shows the location of the various components in the computer.

text_image
Labeled diagram of a computer tower internal structure showing numbered components for identification1 Front Audio/USB assembly
2 Hard disk drive
3 System fan assembly
4 Optical drive
5 AC/DC Power Adapter
6 Express Card assembly
7 System board
8 Microprocessor
9 Heat sink
10 Side cover
11 Memory modules
12 Internal speaker
13 Media Card Reader
Systemboardlocations
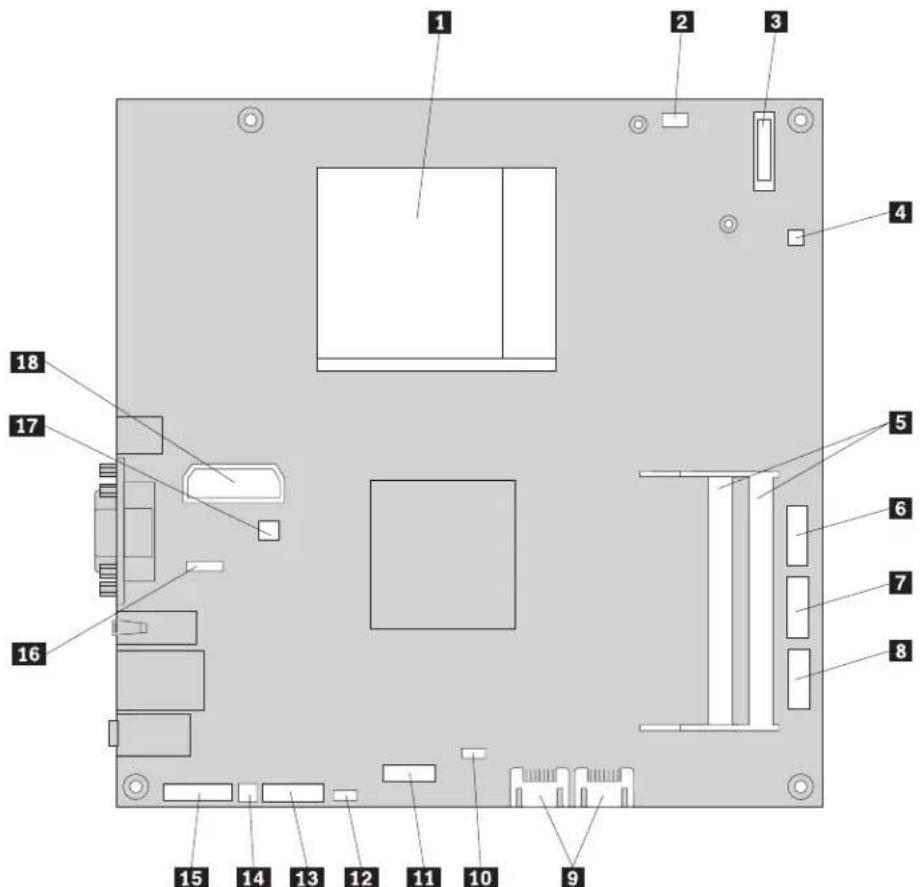
text_image
Labeled diagram of a computer motherboard with numbered components for identification1 Microprocessor and heat sink
2 Modem daughter card (MDC) connector
3 Battery
4 Thermal sense cable connector
5 Memory connectors (2)
6 Serial (COM) connector
7 Front panel connector
8 Front USB connector
9 SATA IDE connectors (2)
10 ExpressCard USB connector
11 ExpressCard PCIe connector
12 Clear CMOS/Recovery jumper
13 Media card reader connector
14 Internal speaker connector
15 Front audio connector
16 Rear USB connector
17 Fan connector
18 Internal power distribution connector
Openingthecover
Important

Turn off the computer and wait 3 to 5 minutes to let the computer cool before opening the computer cover.
This section provides instructions on how to open the computer cover.
-
Remove any media (diskettes, CDs, or tapes) from the drives, shut down your operating system, and turn off all attached devices and the computer.
-
Unplug all power cords from electrical outlets.
-
Disconnect the cables attached to the computer. This includes power cords, input/output (I/O) cables, and any other cables that are connected to the computer. See "Connectors on the front of the computer" on page 80 and "Connectors on the rear of the computer" on page 81.
-
Remove any locking devices, such as a cable lock that secures the computer cover.
-
Press the cover-release button on the side of the cover and pivot the computer coveroutward.

natural_image
Line drawing of a computer tower with ventilation fan and control panel (no text or symbols)- If the computer cover is to be removed, disconnect all the cables from the systemboard.
Replacing the CMOS battery
This procedure describes how to remove and replace the CMOS battery.
If the CMOS battery fails, the date, time, and configuration information (including passwords) are lost. An error message is displayed when you turn on the computer.
Important
Refer to "Safety notices (multi-lingual translations)" on page 7 for information about replacing and disposing of the battery.
CAUTION:
When replacing the lithium battery, use only Part Number 33F8354 or an equivalent type battery recommended by the manufacturer.
- Open the computer cover. See "Opening the cover" on page 84.
- Locate the battery. See "System board locations" on page 83.
- Remove the old battery.

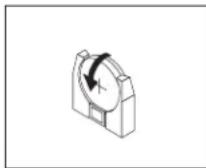
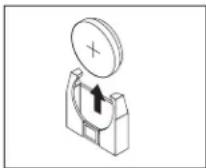
- Install the new battery.
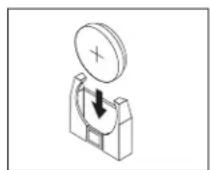

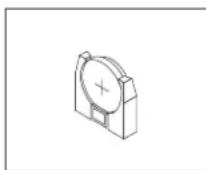
- Close the computer cover, and connect all the cables. See "Completing the FRU replacement" on page 102.
Note: When the computer is turned on for the first time after battery replacement, an error message might be displayed. This is normal after replacing the battery.
- Turn on the computer and all attached devices.
- Use the Setup Utility program to set the date and time and any passwords. See Chapter 6, "Using the Setup Utility," on page 49.
Replacingthemicroprocessor
This section provides instructions on how to replace the microprocessor.
- Open the computer cover. See "Opening the cover" on page 84.
-
Locate the microprocessor. See "System board locations" on page 83.
-
Remove the four screws securing the heat sink to the retention module on the system board and lift the heat sink off the system board.

natural_image
Isometric technical diagram of a computer motherboard with heat sink and connectors (no text or labels)-
Disengage the microprocessor from the system board socket by pivoting the small handle upward until it is in the vertical position.
-
Lift the microprocessor straight up and out of the socket.

natural_image
Line drawing of a hand pressing a square component on a base (no text or symbols)Notes:
a. Your microprocessor and socket might look different than the one illustrated.
b. Note the orientation of the microprocessor in the socket. Look for the small triangle on one corner of the microprocessor. This is important when reinstalling the microprocessor on the system board.
c. Do not drop anything onto the microprocessor socket while it is exposed. The socket pins must be kept as clean as possible.
-
When installing the microprocessor make sure that the small handle is in the vertical position.
-
Holding the new microprocessor 1 with your fingers, remove the protective cover 2 that protects the microprocessor contacts.

natural_image
Isometric diagram of two stacked square components with labeled parts (1 and 2), no text or symbols present.- Holding the microprocessor with your fingers, position the microprocessor so that the triangle 1 is properly aligned with the socket.
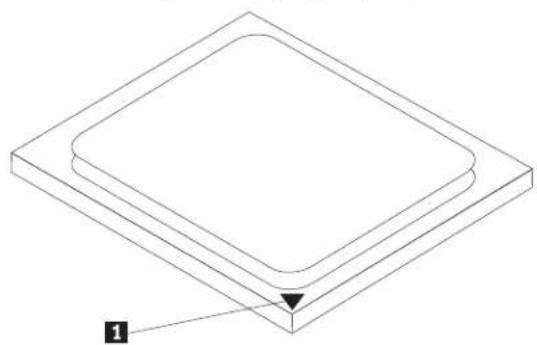
natural_image
Isometric diagram of a square plate with a labeled arrow pointing to one corner (no text or symbols present)- Lower the microprocessor straight down into the socket.
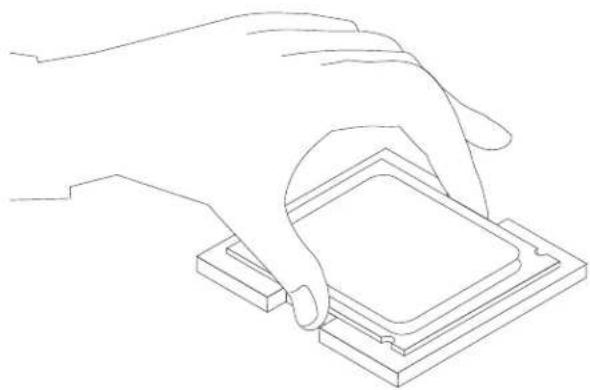
natural_image
Line drawing of a hand pressing a square component on a base (no text or symbols)Note: Install the black protective cover that was removed from the new microprocessor onto the defective microprocessor after the installation iscomplete.
-
Secure the microprocessor in the socket by pivoting the small handle downward. Be sure to lock it into position.
-
Position the heat sink on the retention module so that the four screws are aligned with the posts on the system board. Tighten the four screws to secure the heat sink to the system board.
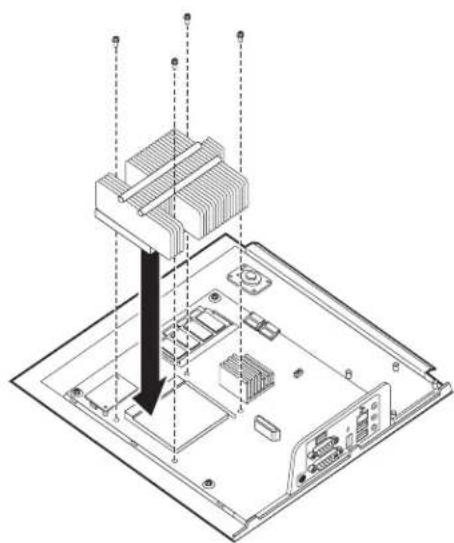
natural_image
Isometric technical diagram of a computer motherboard with heat exchangers and connectors (no text or labels)- Go to "Completing the FRU replacement" on page 102
Replacing the system board
This section provides instructions on how to replace the system board.
- Open the computer cover. See "Opening the cover" on page 84.
- Take note of the location of all cable connections on the system board and disconnect all cables. See "System board locations" on page 83.
-
Remove the screws that secure the system board to the cover.
-
Lift the system board off of the cover.
-
Remove the memory modules from the failing system board and install them in the same location on the new system board.
-
If the system board has a modem daughter card installed, remove it from the failing system board and install it on the new system board. See "Replacing the modem" on page 95.
-
Remove the heat sink and microprocessor from the failing system board and install them on the new system board. See "Replacing the microprocessor" on page86.
Note: You might have to install a new retention module on the new system board.
-
Position the new system board in the chassis so that the screw holes are aligned with the mounting studs.
-
Install and tighten the screws that secure the system board to the chassis.
-
Reconnect all cables to the system board. See "System board locations" on page 83
-
Go to "Completing the FRU replacement" on page 102
Replacing a hard disk drive
This section provides instructions on how to replace the hard disk drive.
Important
When a new hard disk drive is installed, a set of Product Recovery discs might be required. The set of Product Recovery discs enable the contents of the hard disk to be restored to the same state as when the computer was originally shipped from the factory. For more information on recovering factory-installed software, refer to "Recovering Software" in the User Guide.
To replace the hard disk drive:
- Open the computer cover. See "Opening the cover" on page 84.
- Disconnect the power cable from the optical drive.
- Place your finger on the tab located on the front of the hard disk drive and push upward. Then press inward on the side tabs and pivot the hard disk drive upward to remove.
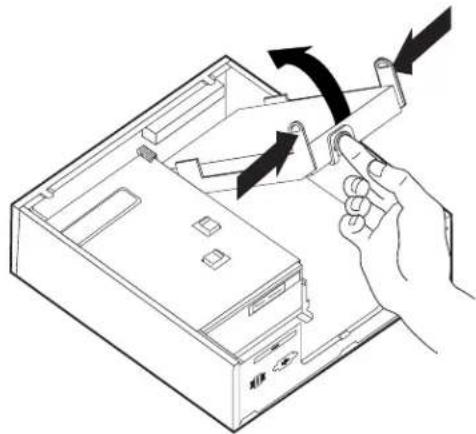
natural_image
Line drawing of a hand inserting a device into a computer case with arrows indicating motion (no text or symbols)- Remove the failing hard disk drive from the chassis.
- Disconnect the signal and power cables from the hard disk drive.
-
Remove the hard disk drive from the plastic bracket by flexing the sides of the bracket enough to slide it free of the hard disk drive.
-
To install the new hard disk drive into the plastic bracket 1, flex the bracket and align the pins on the bracket with the holes in the hard disk drive. Do not touch the circuit board 2 on the bottom of the hard disk drive.

natural_image
3D diagram of a mechanical component with labeled parts and directional arrows indicating rotation (no text or symbols present)-
Connect the signal and power cables to the rear of the new hard disk drive.
-
Slide the new hard disk drive into the drive bay until it snaps into position.
-
Reconnect the power cable to the optical drive.
-
Go to "Completing the FRU replacement" on page 102
Replacing an optical drive
This section provides instructions on how to replace an optical drive.
- Open the computer cover. See "Opening the cover" on page 84
- Remove the front bezel by releasing the two tabs and pivoting the bezel forward to remove completely.
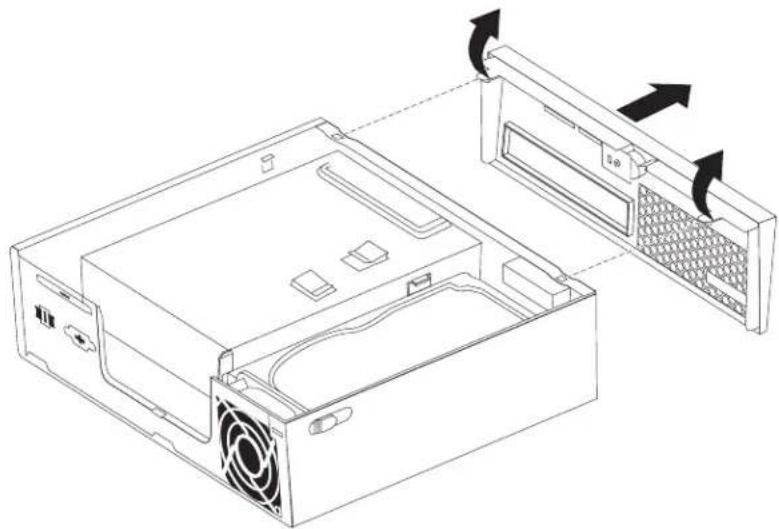
natural_image
Line drawing of a computer tower case with ventilation slots and a rack-mounted unit (no text or symbols)- Disconnect the signal and power cables from the rear of the optical drive.
- Press the blue release button and remove the optical drive out the front of the computer.
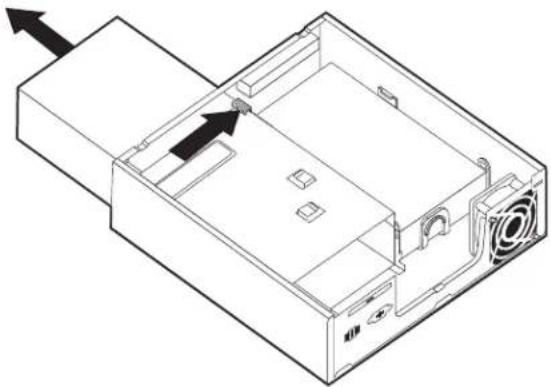
natural_image
Isometric line drawing of a computer drive chassis with ventilation slots and an external box (no text or symbols)- Remove the retainer bracket from the failing drive and install it on the new opticaldrive.
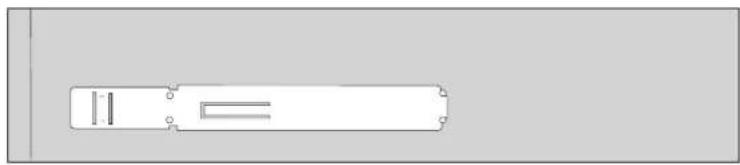
natural_image
Simple line drawing of a rectangular object with internal lines and mounting holes, no text or symbols present.- Slide the new optical drive into the drive bay until it snaps into position.
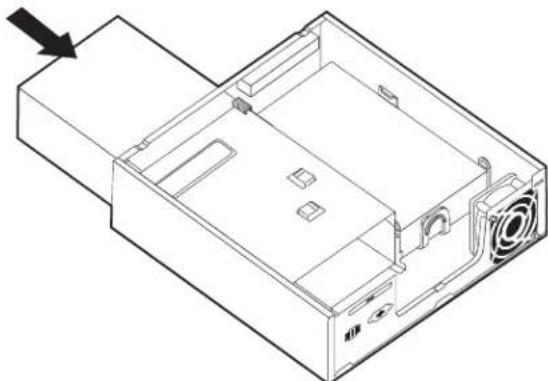
natural_image
Isometric line drawing of a computer drive casing with ventilation slots and an arrow indicating direction (no text or symbols)-
Connect the signal and power cables to the drive.
-
Replace the front bezel.
-
Go to "Completing the FRU replacement" on page 102
Replacing a memory module
This section provides instructions on how to replace a memory module.
- Open the computer cover. See "Opening the cover" on page 84
-
Locate the memory connector. See "System board locations" on page 83.
-
Remove the memory module being replaced by opening the retaining clips as shown.

natural_image
Diagram of a rectangular device with four slots and bidirectional arrows indicating rotation (no text or symbols)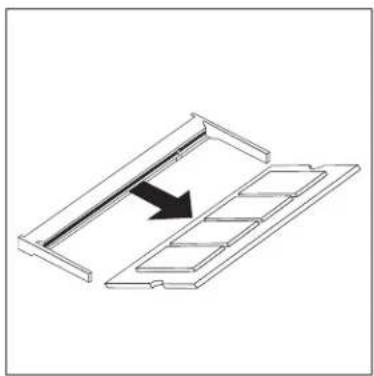
natural_image
Diagram of a mechanical component with an arrow indicating direction, no text or symbols present- Insert the notched end 2 of the memory module into the socket 1. Press the memory module firmly, and pivot the memory module until it snaps into place. Make sure that the memory module is firmly fixed in the connector and does notmoveasily.
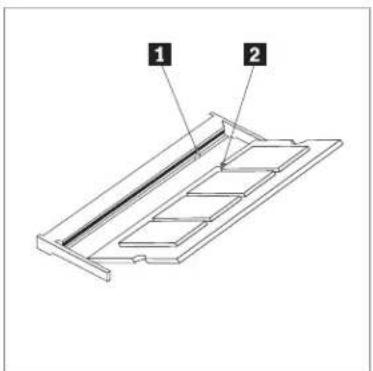
text_image
1 2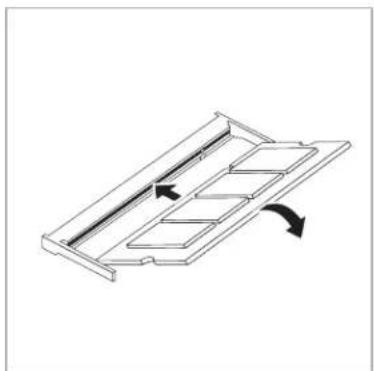
natural_image
Diagram of a mechanical component with internal channels and directional arrows indicating movement (no text or symbols)- Go to "Completing the FRU replacement" on page 102.
Replacingthemodem
This section provides instructions on how to replace the modem.
-
Open the computer cover. See "Opening the cover" on page 84.
-
Locate the MDC connector. See "System board locations" on page 83. The modem card 1 will be connected to the MDC connector.
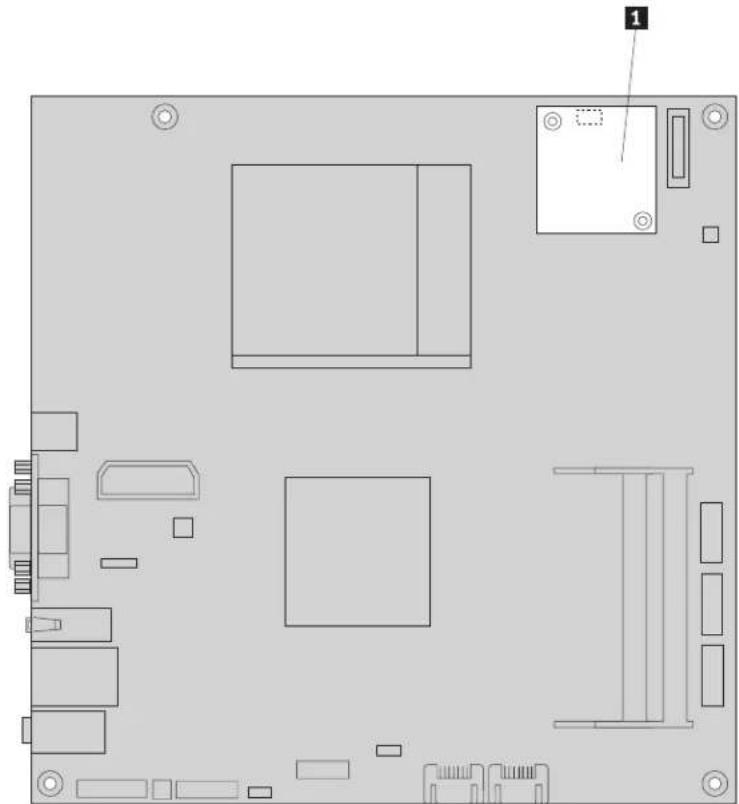
natural_image
Top-down schematic of a computer motherboard showing key components and connectors (no text or labels)-
Remove the two screws that secure the modem card to the system board.
-
Disconnect the modem card from the system board.
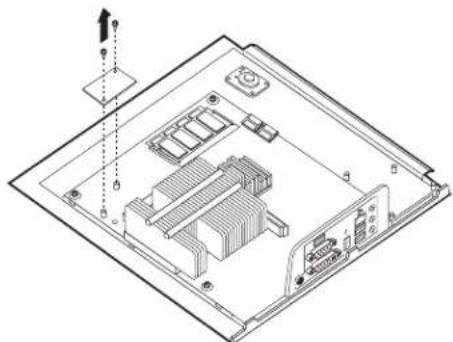
natural_image
Isometric technical diagram of an internal computer or hardware unit with no visible text, numbers, or symbols.-
Disconnect the RJ11 modem cable from the modem card.
-
Connect the RJ11 modem cable to the new modem card.
- Install the new modem card to the MDC connector on the system board by aligning the holes in the modem card with the pins in the system board.
- Install the two screws to secure the modem card to the system board.
- Go to "Completing the FRU replacement" on page 102.
Replacing the Express card assembly
This section provides instructions on how to replace the Express card assembly.
- Open the computer cover. See "Opening the cover" on page 84
- Locate the Express card assembly. See "Locating components" on page 82
- Disconnect the cable connected to the Express card.
- Remove the four screws that secure the Express card assembly to the Chassis.
- Remove the Express card assembly from the system board.

natural_image
Isometric technical diagram of an electronic device with labeled components and wiring (no text or symbols present)- Install the new Express card assembly into the chassis by aligning the holes in the Express card assembly with the pins in the chassis.
- Install the four screws to secure the Express card assembly to the chassis.
- Reconnect the cable to the Express card assembly.
- Go to "Completing the FRU replacement" on page 102
Replacing the Media Card Reader
This section provides instructions on how to replace the Media Card Reader.
-
Open the computer cover. See "Opening the cover" on page 84.
-
Locate the Media Card Reader. See "Locating components" on page 82
-
Disconnect the Media Card Reader cable connected to the system board. See "System board locations" on page 83
-
Remove the screw that secures the Media Card Reader to the Chassis.
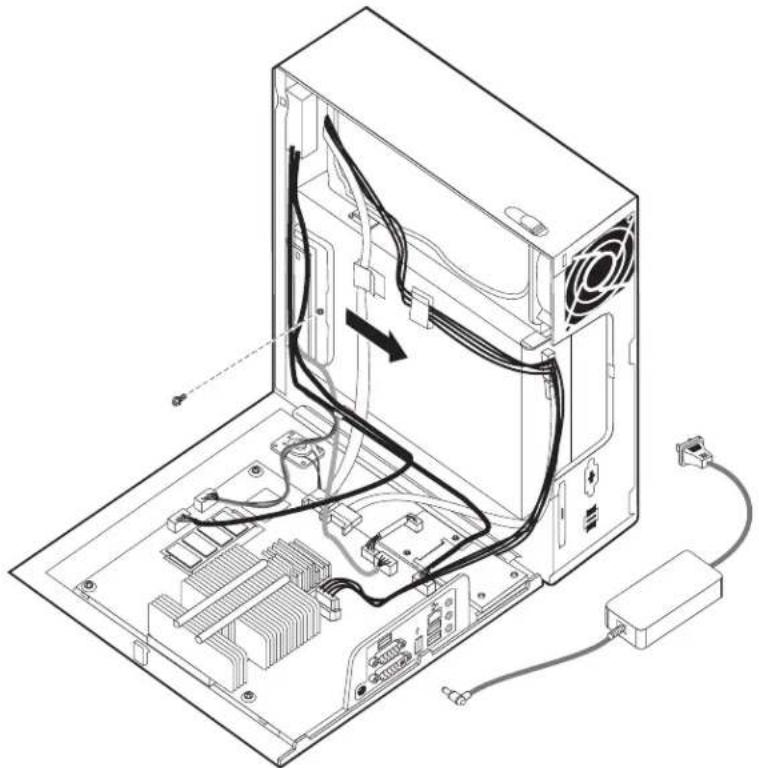
natural_image
Isometric line drawing of a computer tower with visible CPU socket, RAM slots, and cable connections (no text or labels)-
Remove the Media Card Reader from the chassis.
-
Install the new Media Card Reader into the chassis and align the screw-hole in the Media Card Reader with the hole in the chassis.
- Install the screw to secure the Media Card Reader to the chassis.
- Connect the Media Card Reader cable to the system board.
- Go to "Completing the FRU replacement" on page 102
Replacing the system fan assembly
This section provides instructions on how to replace the system fan assembly.
Note: When you receive your new system fan assembly, you will receive new rubbermounts.
- Open the computer cover. See "Opening the cover" on page 84.
- Locate the system fan connector. See "System board locations" on page 83
- Disconnect the system fan assembly cable from the system board. See "System board locations" on page 83.
- You might have to remove the hard disk drive to gain access to the system fan. See "Replacing a hard disk drive" on page 90
- Remove the two rubber mounts from the system fan assembly that connect to the chassis by breaking them or cutting them with a pair of scissors. Once this has been done, remove the rubber mounts from the rear of the chassis.
- Pull the system fan assembly outward from the chassis. Then lift the system fan assembly out of the chassis.
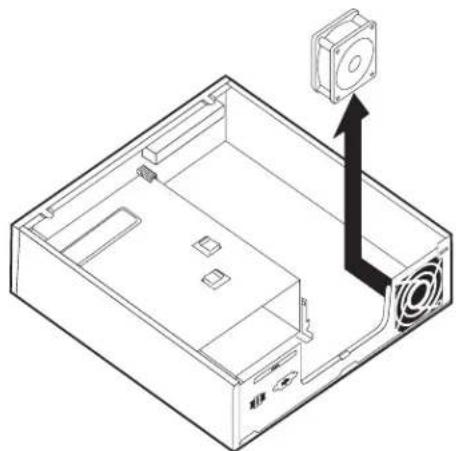
natural_image
Isometric line drawing of a computer case with an external camera and ventilation slots (no text or symbols)- When installing your new system fan assembly, use the new rubber mounts that come with the new system fan.
- Install the two short rubber mounts in the new system fan assembly as shown.
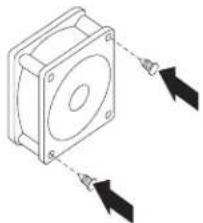
natural_image
Diagram of a mechanical component with two arrows indicating direction (no text or symbols)-
Install the two long rubber mounts into the rear of the chassis as shown. Push the mounts through the holes of the chassis. If necessary, pull the mounts through the holes from inside the chassis.
-
To install the new system fan assembly into the chassis, align the open holes in the system fan assembly with the long rubber mounts in the chassis. Pull the rubber mounts through the holes in the system fan assembly until the system fan is in place.

natural_image
Technical line drawing of a computer drive casing with an inset showing a hand operating the button (no text or symbols present)-
Once the system fan assembly is secure, you should remove the extra rubber forthemounts.
-
Connect the system fan assembly cable to the system fan connector on the systemboard.
-
Replace the hard disk drive, if it was removed.
-
Go to "Completing the FRU replacement" on page 102
Completing the FRU replacement
After replacing the parts, you need to close the cover and reconnect cables, including telephone lines and power cords. Also, depending on the part that was replaced, you might need to confirm the updated information in the Setup Utility program. See Chapter 6, "Using the Setup Utility," on page 49.
This section provides instructions on how to complete the parts replacement.
-
Ensure that all components have been reassembled correctly and that no tools or loose screws are left inside the computer. See "Locating components" on page 82 for the location of various components.
-
Make sure that the cables are routed correctly before closing the computer cover.

natural_image
Isometric line drawing of a computer tower internal structure with visible CPU, RAM, and power connections (no text or labels)Important
Correctly route all power supply cables to avoid interference when closing the computer cover. Keep cables clear of the hinges and sides of the computerchassis.
- Position the computer cover on the chassis so that the rail guide on the bottom of the cover engages the rail. Then, push the computer cover closed until it snapsintoposition.

natural_image
Line drawing of a computer tower case with ventilation slots and control panel (no text or symbols)-
If a cover lock is installed, lock the cover.
-
Reconnect the external cables and power cords to the computer. See "Connectors on the rear of the computer" on page 81.
-
To update your configuration, see Chapter 6, "Using the Setup Utility," on page 49.
Chapter 9. FRU lists
Attention: Read "Important information about replacing RoHS compliant FRUs" on page 2 before replacing any FRUs.
Note: In the following tables, a CRU (Customer Replaceable Unit) is identified as either "1", "2", or "N" in the CRU column. "N" means that the part is not a CRU, "1" means that the part is a Self-service CRU, and "2" means that the part is an Optional-service CRU.
MachineType6393

text_image
Labeled diagram of a computer tower internal structure showing numbered components for identification.| Item # | 6393 FRUs | FRU# | CRU |
| 1 | Front audio/USB card and cable (included in Cables kit 41R8510) (all models) | 41R8510 | N |
| 2 | Hard disk drive, 80 GB 7200rpm SATA (models 12Q 14C 14V 11S 11D 11Y) | 40Y9034 | 2 |
| 2 | Hard disk drive, 160 GB 7200rpm SATA (models 15S 15D 15Y 15Q 15C 16Q 17S 17Y18S18Y) | 40Y9035 | 2 |
| 2 | Hard disk drive, 25 GB 7200rpm SATA (models 13B 13H) | 40Y9036 | 2 |
| 2 | Hard disk drive, 320 GB 7200rpm SATA (models) | 87H4891 | 2 |
| 2 | Hard disk drive, 500 GB 7200rpm SATA (models) | 41X5582 | 2 |
| 2 | Hard disk drive, 750 GB 7200rpm SATA (models) | 43C3671 | 2 |
| 2 | Hard disk drive, 1TB 7200rpm SATA (models CTO) | 45C5973 | 2 |
| 3 | System fan (all models) | 41R8511 | 2 |
| 4 | DVD-ROM Drive - 16x/48x - SATA (models 12Q 14C 14V 11S 11D 11Y 15S 15D 15Y 15Q 15C 16Q 17S 17Y) | 41N33252 | |
| 4 | DVD-ROM Drive - DVD-RW/CD-RW Rambo 8 (SATA) Matrix (models) | 43C1042 | 2 |
| 4 | DVD-ROM Drive - DVD-ROM/CD-RW Combo Drive - 48x/32x/48x/16x - SATA Matrix (models 13B 13H 18S 18Y) | 42Y93532 | |
| 5 | Power Adapter, 120W AC/DC (models 12Q 14C 14V 11S 11D 11Y 13B 13H 15S 15D 15Y 15Q 15C 16Q 17S 17Y 18S 18Y) | 41A97321 | |
| 5 | Power Adapter, 120W power adapter (models 12Q 14C 14V 11S 11D 11Y 13B 13H 15S 15D 15Y 15Q 15C 16Q 17S 17Y 18S 18Y) | 41A97471 | |
| 6 | Express Card Assembly (all models) | 41R8570 | N |
| 7 | System board, Mini-ITX Intel (Q35, ICH9DO) (models) | 45C5971 | N |
| 7 | System board, nonAMT-Mini-ITX Intel (Q35, ICH9DO) (models 12Q 14C 14V 11S 11D 11Y 13B 13H 15S 15D 15Y 15Q 15C 16Q 17S 17Y 18S 18Y) | 45C7463 | N |
| 7 | System board, AMT-Mini-ITX Intel (Q35, ICH9DO) (models) | 45R5358 | N |
| 7 | System board, nonAMT-Mini-ITX Intel (Q35, ICH9DO) (models 12Q 14C 14V 11S 11D 11Y 13B 13H 15S 15D 15Y 15Q 15C 16Q 17S 17Y 18S.18Y) | 45R5357 | N |
| 7 | System board, Mini-ITX Intel (Q35, ICH9DO) (models) | 46R3849 | N |
| 7 | System board, non-AMT Mini-ITX Intel (Q35, ICH9DO) (models 12Q 14C 14V 11S 11D 11Y 13B 13H 15S 15D 15Y 15Q 15C 16Q 17S 17Y 18S 18Y) | 46R3848 | N |
| 8 | Microprocessor, Intel Conroe E6750 (Core2 Duo) 2.66GHz, G-0 Stepping, 65nm, 1333MHz FSB, 4MB L2 (models) | 45C6898 | N |
| 8 | Microprocessor, Intel Conroe E6550 (Core2 Duo) 2.33GHz, G-0 Stepping, 65nm, 1333MHz FSB, 4MB L2 (models) | 45C6899 | N |
| 8 | Microprocessor, Intel Conroe E4500 (Core2 Duo) 2.20GHz, M-0 Stepping, 65nm, 800MHz FSB, 2MB L2 (models 15S 15D 15Y 15Q 15C) | 45C6900 | N |
| 8 | Microprocessor, Intel Conroe E2160 (Pentium D) 1.8GHz, M-0 Stepping, 65nm, 800MHz FSB, 1MB L2 (models 14C 14V) | 45C6901 | N |
| 8 | Microprocessor, Intel Conroe-L 440 (Celeron) 2.0GHz, A-1 Stepping, 65nm, 800MHz FSB, 512KB L2 (models 11S 11D 11Y 12Q 13B 13H) | 45C6902 | N |
| 8 | Microprocessor, Intel Wolfdale E8400 (Core2 Duo) 3.0GHz, C-0 Stepping, 45nm, 1333MHz FSB, 6MB L2 (models) | 45C8499 | N |
| 8 | Microprocessor, Intel Wolfdale E8200 (Core2 Duo) 2.66GHz, C-0 Stepping, 45nm, 1333MHz FSB, 6MB L2 (models) | 45C8531 | N |
| 8 | Microprocessor, E7200, 2.53GHz, 1066MHz FSB, 3MB L2 (models 18S 18Y) | 46R4261 | N |
| 8 | Microprocessor, E2200, 2.20GHz, 800MHz FSB, 1MB L2 (models 16Q 17S 17Y) | 46R4260 | N |
| 9 | Heat sink Intel (all models) | 41R8545 | 2 |
| 10 | Kit, Shell (all models) | 41R8563 | N |
| 11 | Memory module, 512MB DDR2 PC2-5300 (667MHz) SoDIMM (models 12Q 14C 14V17S17Y) | 43C38142 | |
| 11 | Memory module, 1GB DDR2 PC2-5300 (667MHz) SoDIMM (models 11S 11D 11Y 13B 13H 15S 15D 15Y 15Q 15C 16Q 18S 18Y) | 43C38152 | |
| 11 | Memory module, 2GB DDR2 PC2-5300 (667MHz) SoDIMM (models) | 43C6489 | 2 |
| 12 | Internal speaker (all models) | 41R8517 | 2 |
| 13 | Media card reader (all models) | 41R8568 | N |
The FRUs listed in the following tables are not illustrated.
| 6393 FRUs | FRU# | CRU |
| Hard Disk Drive tray (all models) | 41R8518 | 2 |
| Shield Kit (all models) | 41R8543 | N |
| Cable, C2 Swtich/Housing assembly (all models) | 41R8544 | N |
| Cable, Serial (all models) | 41R8548 | N |
| USB Cable (all models) | 41R8560 | N |
| PWR/LED Cable Assembly (all models) | 41R8555 | N |
| 6393 Keyboards (USB Preferred Pro) | FRU# | CRU |
| US English (models 12Q 15Q 16Q) | 41A5289 | 1 |
| Arabic(models) | 41A5290 | 1 |
| Arabic/French (models) | 41A5291 | 1 |
| Belgian/French (models) | 41A5292 | 1 |
| Belgian/UK (models) | 41A5293 | 1 |
| Brazilian (models) | 41A5294 | 1 |
| Bulgarian (models) | 41A5295 | 1 |
| Hong Kong/Taiwan (models) | 41A5296 | 1 |
| Czech (models) | 41A5297 | 1 |
| Danish (models) | 41A5298 | 1 |
| Dutch (models) | 41A5299 | 1 |
| French (models) | 41A5300 | 1 |
| French Canadian 445 (models) | 41A5301 | 1 |
| French Canadian 58 (models) | 41A5302 | 1 |
| German (models) | 41A5303 | 1 |
| Greek (models) | 41A5304 | 1 |
| Greek/US (models) | 41A5305 | 1 |
| Hebrew (models) | 41A5306 | 1 |
| Hungarian (models) | 41A5307 | 1 |
| Iceland (models) | 41A5308 | 1 |
| Italian (models) | 41A5309 | 1 |
| Japanese (models) | 41A5310 | 1 |
| Korean (models) | 41A5311 | 1 |
| LA Spanish (models) | 41A5312 | 1 |
| Norwegian (models) | 41A5313 | 1 |
| Polish (models) | 41A5314 | 1 |
| Portuguese (models) | 41A5315 | 1 |
| Romanian 446 (models) | 41A5316 | 1 |
| Romanian 096 (models) | 41A5317 | 1 |
| Russian/Cyrillic(models) | 41A5318 | 1 |
| Serbian/Cyrillic (models) | 41A5319 | 1 |
| Slovak (models) | 41A5320 | 1 |
| Spanish (models 11S 11D 11Y 15S 15D 15Y 17S 17Y 18S 18Y) | 41A5321 | 1 |
| Swedish/Finn (models) | 41A5322 | 1 |
| Swiss (models) | 41A5323 | 1 |
| Thailand (models) | 41A5324 | 1 |
| Turkish 440 (models) | 41A5325 | 1 |
| Turkish 179 (models) | 41A5326 | 1 |
| UK English (models) | 41A5327 | 1 |
| US Euro (models) | 41A5328 | 1 |
| Slovenian (models) | 41A5329 | 1 |
| 6393 Keyboard (USB Preferred Pro Fingerprint Keyboard) | FRU# | CRU |
| US (models) | 41A5248 | 1 |
| Arabic (models) | 41A5249 | 1 |
| Arabic/French (models) | 41A5250 | 1 |
| Belgian/French (models) | 41A5251 | 1 |
| Belgian/UK (models) | 41A5252 | 1 |
| Brazil/Portuguese (models) | 41A5253 | 1 |
| Bulgarian (models) | 41A5254 | 1 |
| Chinese/US (models) | 41A5255 | 1 |
| Czech (models) | 41A5256 | 1 |
| Danish (models) | 41A5257 | 1 |
| Dutch (models) | 41A5258 | 1 |
| French (models) | 41A5259 | 1 |
| French Canadian 445 (models) | 41A5260 | 1 |
| French Canadian 58 (models) | 41A5261 | 1 |
| German (models) | 41A5262 | 1 |
| Greek (models) | 41A5263 | 1 |
| Greek/US (models) | 41A5264 | 1 |
| Hebrew (models) | 41A5265 | 1 |
| Hungarian (models) | 41A5266 | 1 |
| Iceland (models) | 41A5267 | 1 |
| Italian (models) | 41A5268 | 1 |
| Japanese (models) | 41A5269 | 1 |
| Korean (models) | 41A5270 | 1 |
| LA Spanish (models) | 41A5271 | |
| Norwegian (models) | 41A5272 | 1 |
| Polish (models) | 41A5273 | 1 |
| Portugese (models) | 41A5274 | 1 |
| Romanian 446 (models) | 41A5276 | 1 |
| Romanian 96 (models) | 41A5275 | 1 |
| Russian/Cyrilic (models) | 41A5277 | 1 |
| Serbian/Cyrilic (models) | 41A5278 | 1 |
| Slovak (models) | 41A5279 | 1 |
| Spanish (models) | 41A5280 | 1 |
| Swedish/Finn (models) | 41A5281 | 1 |
| Swiss, F/G (models) | 41A5282 | 1 |
| Thailand (models) | 41A5283 | 1 |
| Turkish 179 (models) | 41A5284 | 1 |
| Turkish 440 (models) | 41A5285 | 1 |
| UK (models) | 41A5286 | 1 |
| US Euro(models) | 41A5287 | 1 |
| Slovenian (models) | 41A5288 | 1 |
| 6393 mice | FRU# | CRU |
| Optical Wheel Mouse (400DPI, USB) (models 12Q 14C 14V 11S 11D 11Y 13B 13H 15S 15D 15Y 15Q 15C 16Q 17S 17Y 18S 18Y) | 41U30131 | |
| Optical Wheel Mouse (400DPI, USB) (models 12Q 14C 14V 11S 11D 11Y 13B 13H 15S 15D 15Y 15Q 15C 16Q 17S 17Y 18S 18Y) | 41U30301 | |
| ScrollPoint Optical Mouse (800DPI, USB) (models ) | 41U3019 | 1 |
| 6393 Adapters and miscellaneous FRUs | FRU# | CRU |
| Modem Daughter Card (MDC 1.5) Kit (models) | 39T0495 | 2 |
| Modem Daughter Card (MDC 1.5) Kit Internal cable/RJ11 (models) | 41R8522 | 2 |
| Lenovo Branded speakers - 2 piece--primary (models) | 41A5331 | 1 |
| Lenovo Branded speakers - 2 piece--secondary (models) | 41A5334 | 1 |
| Speaker power brick (models) | 89P8571 | 1 |
| Thermal Grease Syringe (models) | 91P8835 | N |
| Vertical PC stand (VPC) for Blue 4.5L chassis (models) | 41R4770 | 2 |
| 6393 Power Cords | FRU# | CRU |
| Power cord - US/Canada (models 11S 11D 15S 15D 18S 17S) | 42T5004 | 1 |
| Power cord - Japan (models) | 42T5011 | 1 |
| Power cord - Argentina (models 11Y 15Y 17Y 18Y) | 42T5017 | 1 |
| Power cord - Brazil (models) | 42T5174 | 1 |
| Power cord - Europe (Germany) (models) | 42T5029 | 1 |
| Power cord - UK (models) | 42T5035 | 1 |
| Power cord - Denmark (models) | 42T5041 | 1 |
| Power cord - Switzerland (models) | 42T5044 | 1 |
| Power cord - Italy (models) | 42T5047 | 1 |
| Power cord - Australia / New Zealand (models) | 42T5050 | 1 |
| Power cord - South Africa (models) | 42T5056 | 1 |
| Power cord - Israel (models) | 42T5062 | 1 |
| Power cord - China (PRC) (models 14C 15C) | 42T5065 | 1 |
| Power cord - Taiwan (models) | 42T5071 | 1 |
| Power cord - Korea (models) | 42T5077 | 1 |
| Power cord - India (models 12Q 15Q 16Q) | 42T5083 | 1 |
| Power cord - Thailand (models) | 42T4406 | 1 |
| Power cord - US/Canada--optional second source (models 11S 11D 15S 15D 18S 17S) | 42T5089 | 1 |
| Power cord - Japan-optional second source (models) | 42T5096 | 1 |
| Power cord - Argentina -optional second source (models 11Y 15Y 17Y 18Y) | 42T5102 | 1 |
| Power cord - Brazil (new type) -optional second source (models) | 42T5177 | 1 |
| Power cord - Europe (Germany) -optional second source (models) | 42T5114 | 1 |
| Power cord - UK -optional second source (models) | 42T5120 | 1 |
| Power cord - Denmark -optional second source (models) | 42T5126 | 1 |
| Power cord - Switzerland -optional second source (models) | 42T5129 | 1 |
| Power cord - Italy -optional second source (models) | 42T5132 | 1 |
| Power cord - Australia/New Zealand -optional second source (models) | 42T5135 | 1 |
| Power cord - South Africa -optional second source (models) | 42T5141 | 1 |
| Power cord - Israel -optional second source (models) | 42T5147 | 1 |
| Power cord - China (PRC) -optional second source (models 14C 15C) | 42T5150 | 1 |
| Power cord - Taiwan-optional second source (models) | 42T5156 | 1 |
| Power cord - Korea-optional second source (models) | 42T5162 | 1 |
| Power cord - India-optional second source (models 12Q 15Q 16Q) | 42T5168 | 1 |
| Power cord - Thailand-optional second source (models) | 42T4400 | 1 |
| 6393 Windows XP Home Recovery CDs | FRU# | CRU |
| US/UK/AP/TH (models) | 45R6005 | 1 |
| FR/CF (models) | 45R6006 | 1 |
| GR (models) | 45R6007 | 1 |
| IT (models) | 45R6010 | 1 |
| BR (models) | 45R6009 | 1 |
| SP/LA (models) | 45R6008 | 1 |
| DK (models) | 45R6014 | 1 |
| NL (models) | 45R6015 | 1 |
| AE (models) | 45R6020 | 1 |
| SV (models) | 45R6013 | 1 |
| HE (models) | 45R6018 | 1 |
| FI (models) | 45R6017 | 1 |
| NO (models) | 45R6012 | 1 |
| PL (models) | 45R6019 | 1 |
| PO (models) | 45R6030 | 1 |
| RU (models) | 45R6021 | 1 |
| RE (models) | 45R6029 | 1 |
| HU (models) | 45R6023 | 1 |
| CZ (models) | 45R6016 | 1 |
| TR (models) | 45R6022 | 1 |
| GK (models) | 45R6024 | 1 |
| Japanese (models) | 45R6011 | 1 |
| Simplified Chinese (models) | 45R6025 | 1 |
| Taiwan-TC (models) | 45R6026 | 1 |
| Hong Kong-TC (models) | 45R6027 | 1 |
| Korea(models)45R60281 |
| 6393 Windows XP Pro Recovery CDs | FRU# | CRU |
| US/UK/AP/TH (models) | 45R5979 | 1 |
| FR/CF (models) | 45R5980 | 1 |
| GR (models) | 45R5981 | 1 |
| IT (models) | 45R5984 | 1 |
| BR (models) | 45R5983 | 1 |
| SP/LA (models) | 45R5982 | 1 |
| DK (models) | 45R5988 | 1 |
| NL (models) | 45R5989 | 1 |
| AE (models) | 45R5994 | 1 |
| SV (Swedish) (models) | 45R5987 | 1 |
| HE (models) | 45R5992 | 1 |
| FI (models) | 45R5991 | 1 |
| NO (models) | 45R5986 | 1 |
| PL (models) | 45R5993 | 1 |
| PO (models) | 45R6004 | 1 |
| RU (models) | 45R5995 | 1 |
| RE (models) | 45R6003 | 1 |
| HU (models) | 45R5997 | 1 |
| CZ (models) | 45R5990 | 1 |
| TR (models) | 45R5996 | 1 |
| GK (models) | 45R5998 | 1 |
| Japanese (models) | 45R5985 | 1 |
| Simplified Chinese (models) | 45R5999 | 1 |
| Taiwan-TC (models) | 45R6000 | 1 |
| Hong Kong-TC (models) | 45R6001 | 1 |
| Korea (models) | 45R6002 | 1 |
| Multilingual 1 XP-P -- EN, NL, FR, GR, IT (models) | 45R5977 | 1 |
| Multilingual 2 XP-P -- EN, DK, FI, NO, SV (models) | 45R5978 | 1 |
| 6393 Vista Home Basic 32 Recovery DVDs | FRU# | CRU |
| English (models 13H) | 46R7098 | 1 |
| Russian English (models) | 46R7099 | 1 |
| French (models) | 46R7100 | 1 |
| German (models) | 46R7101 | 1 |
| Spanish (models) | 46R7102 | 1 |
| Brazilian (models) | 46R7103 | 1 |
| Italian (models) | 46R7104 | 1 |
| Japanese (models) | 46R7105 | 1 |
| Norwegian (models) | 46R7106 | 1 |
| Swedish (models) | 46R1086 | 1 |
| Danish (models) | 46R7107 | 1 |
| Dutch (models) | 46R1088 | 1 |
| Czech (models) | 46R1089 | 1 |
| Finnish (models) | 46R1090 | 1 |
| Polish (models) | 46R1091 | 1 |
| Russian (models) | 46R7108 | 1 |
| Turkish (models) | 46R1093 | 1 |
| Hungarian (models) | 46R1094 | 1 |
| Greek (models) | 46R1095 | 1 |
| Simplified Chinese (models) | 46R7109 | 1 |
| Taiwan (models) | 46R7110 | 1 |
| HongKong (models) | 46R7111 | 1 |
| Korea (models) | 46R1099 | 1 |
| Slovenian (models) | 46R1100 | 1 |
| Hebrew (models) | 46R1101 | 1 |
| Portuguese (models) | 46R1102 | 1 |
| Arabic Localized (models) | 46R1103 | 1 |
| Slovakia(models)46R11041 |
| 6393 Vista Business 32 Recovery DVDs | FRU# | CRU |
| English (models 15Q) | 46R7070 | 1 |
| Russian (models) | 46R7071 | 1 |
| French (models) | 46R7072 | 1 |
| German (models) | 46R7073 | 1 |
| Spanish (models 15S 15D 15Y 17S 17Y 18S 18Y) | 46R7074 | 1 |
| Brazilian (models) | 46R7075 | 1 |
| Italian (models) | 46R7076 | 1 |
| Japanese (models) | 46R7077 | 1 |
| Norwegian (models) | 46R7078 | 1 |
| Swedish (models) | 46R1028 | 1 |
| Danish (models) | 46R7079 | 1 |
| Dutch (models) | 46R1030 | 1 |
| Czech (models) | 46R1031 | 1 |
| Finnish (models) | 46R1032 | 1 |
| Polish (models) | 46R1033 | 1 |
| Russian (models) | 46R7080 | 1 |
| Turkish (models) | 46R1035 | 1 |
| Hungarian (models) | 46R1036 | 1 |
| Greek (models) | 46R1037 | 1 |
| Simplified Chinese (models 15C) | 46R7081 | 1 |
| Trad Chinese (models) | 46R7082 | 1 |
| Trad Chinese (models) | 46R7083 | 1 |
| Korean (models) | 46R1041 | 1 |
| Slovenian (models) | 46R1042 | 1 |
| Romanian (models) | 46R1043 | 1 |
| Portuguese (models) | 46R1044 | 1 |
| Serbian - Latin (models) | 46R1045 | 1 |
| Slovakian (models) | 46R1046 | 1 |
| Arabic Localized (models) | 46R1047 | 1 |
| Hebrew (models) | 46R1048 | 1 |
| 6393 Vista Ultimate 32 Recovery DVDs | FRU# | CRU |
| English (models) | 46R7112 | 1 |
| Russian (models) | 46R7113 | 1 |
| French (models) | 46R7114 | 1 |
| German (models) | 46R7115 | 1 |
| Spanish (models) | 46R7116 | 1 |
| Brazilian (models) | 46R7117 | 1 |
| Italian (models) | 46R7118 | 1 |
| Japanese (models) | 46R7119 | 1 |
| Norwegian (models) | 46R7120 | 1 |
| Swedish (models) | 46R1114 | 1 |
| Danish (models) | 46R7121 | 1 |
| Dutch (models) | 46R1116 | 1 |
| Czech (models) | 46R1117 | 1 |
| Finnish (models) | 46R1118 | 1 |
| Polish (models) | 46R1119 | 1 |
| Russian (models) | 46R7122 | 1 |
| Turkish (models) | 46R1121 | 1 |
| Hungarian (models) | 46R1122 | 1 |
| Greek (models) | 46R1123 | 1 |
| Simplified Chinese (models) | 46R7123 | 1 |
| Trad Chinese (models) | 46R7124 | 1 |
| Trad Chinese (models) | 46R7125 | 1 |
| Korean (models) | 46R1127 | 1 |
| Slovenian (models) | 46R1128 | 1 |
| Hebrew (models) | 46R1129 | 1 |
| Portuguese (models) | 46R1130 | 1 |
| Slovakian (models) | 46R1131 | 1 |
| Arabic Localized (models) | 46R1132 | 1 |
| 6393 Vista Business 64 Recovery DVDs | FRU# | CRU |
| English (models) | 46R7084 | 1 |
| Russian English (models) | 46R7085 | 1 |
| French (models) | 46R7086 | 1 |
| German (models) | 46R7087 | 1 |
| Spanish (models) | 46R7088 | 1 |
| Brazilian (models) | 46R7089 | 1 |
| Italian (models) | 46R7090 | 1 |
| Japanese (models) | 46R7091 | 1 |
| Norwegian (models) | 46R7092 | 1 |
| Swedish (models) | 46R1058 | 1 |
| Danish (models) | 46R7093 | 1 |
| Dutch (models) | 46R1060 | 1 |
| Czech (models) | 46R1061 | 1 |
| Finnish (models) | 46R1062 | 1 |
| Polish (models) | 46R1063 | 1 |
| Russian (models) | 46R7094 | 1 |
| Turkish (models) | 46R1065 | 1 |
| Hungarian (models) | 46R1066 | 1 |
| Greek (models) | 46R1067 | 1 |
| Simplified Chinese (models) | 46R7095 | 1 |
| Taiwan (models) | 46R7096 | 1 |
| HongKong (models) | 46R7097 | 1 |
| Korea (models) | 46R1071 | 1 |
| Slovenian (models) | 46R1072 | 1 |
| Arabic Localized (models) | 46R1073 | 1 |
| Hebrew (models) | 46R1074 | 1 |
| Portuguese (models) | 46R1075 | 1 |
| Slovakian (models) | 46R1076 | 1 |
MachineType6394

text_image
Labeled diagram of an open computer tower showing internal components and cable connections| Item # | 6394 FRUs | FRU# | CRU |
| 1 | Front audio/USB card and cable (included in Cables kit 41R8510) ( models) | 41R8510 | N |
| 2 | Hard disk drive, 80 GB 7200rpm SATA (models) | 40Y9034 | 2 |
| 2 | Hard disk drive, 160 GB 7200rpm SATA (models) | 40Y9035 | 2 |
| 2 | Hard disk drive, 25 GB 7200rpm SATA (models) | 40Y9036 | 2 |
| 2 | Hard disk drive, 320 GB 7200rpm SATA (models) | 87H4891 | 2 |
| 2 | Hard disk drive, 500 GB 7200rpm SATA (models) | 41X5582 | 2 |
| 2 | Hard disk drive, 750 GB 7200rpm SATA (models) | 43C3671 | 2 |
| 2 | Hard disk drive, 1TB 7200rpm SATA (models CTO) | 45C5973 | 2 |
| 3 | System fan (models) | 41R8511 | 2 |
| 4 | DVD-ROM Drive - 16x/48x - SATA (models) | 41N3325 | 2 |
| 4 | DVD-ROM Drive - DVD-RW/CD-RW Rambo 8 (SATA) Matrix (models) | 43C1042 | 2 |
| 4 | DVD-ROM Drive - DVD-ROM/CD-RW Combo Drive - 48x/32x/48x/16x - SATA Matrix(models) | 42Y93532 | |
| 5 | Power Adapter, 120W AC/DC (models) | 41A9732 | 1 |
| 5 | Power Adapter, 120W power adapter (models) | 41A9747 | 1 |
| 6 | Express Card Assembly (models) | 41R8570 | N |
| 7 | System board, Mini-ITX Intel (Q35, ICH9DO) (models) | 45C5971 | N |
| 7 | System board, nonAMT-Mini-ITX Intel (Q35, ICH9DO) (models) | 45C7463 | N |
| 7 | System board, AMT-Mini-ITX Intel (Q35, ICH9DO) (models) | 45R5358 | N |
| 7 | System board, nonAMT-Mini-ITX Intel (Q35, ICH9DO) (models) | 45R5357 | N |
| 7 | System board, Mini-ITX Intel (Q35, ICH9DO) (models) | 46R3849 | N |
| 7 | System board, non-AMT Mini-ITX Intel (Q35, ICH9DO) (models) | 46R3848 | N |
| 8 | Microprocessor, Intel Conroe E6750 (Core2 Duo) 2.66GHz, G-0 Stepping, 65nm, 1333MHZ FSB, 4MB L2 (models) | 45C6898N | |
| 8 | Microprocessor, Intel Conroe E6550 (Core2 Duo) 2.33GHz, G-0 Stepping, 65nm, 1333MHz FSB, 4MB L2 (models) | 45C6899N | |
| 8 | Microprocessor, Intel Conroe E4500 (Core2 Duo) 2.20GHz, M-0 Stepping, 65nm, 800MHz FSB, 2MB L2 (models) | 45C6900N | |
| 8 | Microprocessor, Intel Conroe E2160 (Pentium D) 1.8GHz, M-0 Stepping, 65nm, 800MHz FSB, 1MB L2 (models) | 45C6901N | |
| 8 | Microprocessor, Intel Conroe-L 440 (Celeron) 2.0GHz, A-1 Stepping, 65nm, 800MHz FSB, 512KB L2 (models) | 45C6902N | |
| 8 | Microprocessor, Intel Wolfdale E8400 (Core2 Duo) 3.0GHz, C-0 Stepping, 45nm, 1333MHz FSB, 6MB L2 (models) | 45C8499N | |
| 8 | Microprocessor, Intel Wolfdale E8200 (Core2 Duo) 2.66GHz, C-0 Stepping, 45nm, 1333MHz FSB, 6MB L2 (models) | 45C8531N | |
| 8 | Microprocessor, E7200, 2.53GHz, 1066MHz FSB, 3MB L2 (models) | 46R4261 | N |
| 8 | Microprocessor, E2200, 2.20GHz, 800MHz FSB, 1MB L2 (models) | 46R4260 | N |
| 9 | Heat sink Intel (models) | 41R8545 | 2 |
| 10 | Kit, shell (models) | 41R8563 | N |
| 11 | Memory module, 512MB DDR2 PC2-5300 (667MHz) SoDIMM (models) | 43C3814 | 2 |
| 11 | Memory module, 1GB DDR2 PC2-5300 (667MHz) SoDIMM (models) | 43C3815 | 2 |
| 11 | Memory module, 2GB DDR2 PC2-5300 (667MHz) SoDIMM (models) | 43C6489 | 2 |
| 12 | Internal speaker (models) | 41R8517 | 2 |
| 13 | Media card reader (models) | 41R8568 | N |
The FRUs listed in the following tables are not illustrated.
| 6394 FRUs | FRU# | CRU |
| Hard Disk Drive tray (models) | 41R8518 | 2 |
| Shield Kit (all models) | 41R8543 | N |
| Cable, C2 Swtich/Housing assembly (models) | 41R8544 | N |
| Cable, Serial (models) | 41R8548 | N |
| USB Cable (models) | 41R8560 | N |
| PWR/LED Cable Assembly (models) | 41R8555 | N |
| 6394 Keyboards (USB Preferred Pro) | FRU# | CRU |
| US English (models) | 41A5289 | 1 |
| Arabic (models) | 41A5290 | 1 |
| Arabic/French (models) | 41A5291 | 1 |
| Belgian/French (models) | 41A5292 | 1 |
| Belgian/UK (models) | 41A5293 | 1 |
| Brazilian (models) | 41A5294 | 1 |
| Bulgarian (models) | 41A5295 | 1 |
| Hong Kong/Taiwan (models) | 41A5296 | 1 |
| Czech (models) | 41A5297 | 1 |
| Danish (models) | 41A5298 | 1 |
| Dutch (models) | 41A5299 | 1 |
| French (models) | 41A5300 | 1 |
| French Canadian 445 (models) | 41A5301 | 1 |
| French Canadian 58 (models) | 41A5302 | 1 |
| German (models) | 41A5303 | 1 |
| Greek (models) | 41A5304 | 1 |
| Greek/US (models) | 41A5305 | 1 |
| Hebrew (models) | 41A5306 | 1 |
| Hungarian (models) | 41A5307 | 1 |
| Iceland (models) | 41A5308 | 1 |
| Italian (models) | 41A5309 | 1 |
| Japanese (models) | 41A5310 | 1 |
| Korean (models) | 41A5311 | 1 |
| LA Spanish (models) | 41A5312 | 1 |
| Norwegian (models) | 41A5313 | 1 |
| Polish (models) | 41A5314 | 1 |
| Portuguese (models) | 41A5315 | 1 |
| Romanian 446 (models) | 41A5316 | 1 |
| Romanian 096 (models) | 41A5317 | 1 |
| Russian/Cyrillic (models) | 41A5318 | 1 |
| Serbian/Cyrillic (models) | 41A5319 | 1 |
| Slovak (models) | 41A5320 | 1 |
| Spanish (models ) | 41A5321 | 1 |
| Swedish/Finn (models) | 41A5322 | 1 |
| Swiss (models) | 41A5323 | 1 |
| Thailand (models) | 41A5324 | 1 |
| Turkish 440 (models) | 41A5325 | 1 |
| Turkish 179 (models) | 41A5326 | 1 |
| UK English (models) | 41A5327 | 1 |
| US Euro (models) | 41A5328 | 1 |
| Slovenian (models) | 41A5329 | 1 |
| 6394 Keyboard (USB Preferred Pro Fingerprint Keyboard) | FRU# | CRU |
| US (models) | 41A5248 | 1 |
| Arabic (models) | 41A5249 | 1 |
| Arabic/French (models) | 41A5250 | 1 |
| Belgian/French (models) | 41A5251 | 1 |
| Belgian/UK (models) | 41A5252 | 1 |
| Brazil/Portuguese (models) | 41A5253 | 1 |
| Bulgarian (models) | 41A5254 | 1 |
| Chinese/US (models) | 41A5255 | 1 |
| Czech (models) | 41A5256 | 1 |
| Danish (models) | 41A5257 | 1 |
| Dutch (models) | 41A5258 | 1 |
| French (models) | 41A5259 | 1 |
| French Canadian 445 (models) | 41A5260 | 1 |
| French Canadian 58 (models) | 41A5261 | 1 |
| German (models) | 41A5262 | 1 |
| Greek (models) | 41A5263 | 1 |
| Greek/US (models) | 41A5264 | 1 |
| Hebrew (models) | 41A5265 | 1 |
| Hungarian (models) | 41A5266 | 1 |
| Iceland (models) | 41A5267 | 1 |
| Italian (models) | 41A5268 | 1 |
| Japanese (models) | 41A5269 | 1 |
| Korean (models) | 41A5270 | 1 |
| LA Spanish (models) | 41A5271 | |
| Norwegian (models) | 41A5272 | 1 |
| Polish (models) | 41A5273 | 1 |
| Portugese (models) | 41A5274 | 1 |
| Romanian 446 (models) | 41A5276 | 1 |
| Romanian 96 (models) | 41A5275 | 1 |
| Russian/Cyrilic (models) | 41A5277 | 1 |
| Serbian/Cyrilic (models) | 41A5278 | 1 |
| Slovak (models) | 41A5279 | 1 |
| Spanish (models) | 41A5280 | 1 |
| Swedish/Finn (models) | 41A5281 | 1 |
| Swiss, F/G (models) | 41A5282 | 1 |
| Thailand (models) | 41A5283 | 1 |
| Turkish 179 (models) | 41A5284 | 1 |
| Turkish 440 (models) | 41A5285 | 1 |
| UK (models) | 41A5286 | 1 |
| US Euro (models) | 41A5287 | 1 |
| Slovenian (models) | 41A5288 | 1 |
| 6394 mice | FRU# | CRU |
| Optical Wheel Mouse (400DPI, USB) (models) | 41U3013 | 1 |
| Optical Wheel Mouse (400DPI, USB) (models) | 41U3030 | 1 |
| ScrollPoint Optical Mouse (800DPI, USB) (models) | 41U3019 | 1 |
| 6394 Adapters and miscellaneous FRUs | FRU# | CRU |
| Modem Daughter Card (MDC 1.5) Kit (models) | 39T0495 | 2 |
| Modem Daughter Card (MDC 1.5) Kit Internal cable/RJ11 (models) | 41R8522 | 2 |
| Lenovo Branded speakers - 2 piece--primary (models) | 41A5331 | 1 |
| Lenovo Branded speakers - 2 piece--secondary (models) | 41A5334 | 1 |
| Speaker power brick (models) | 89P8571 | 1 |
| Thermal Grease Syringe (models) | 91P8835 | N |
| Vertical PC stand (VPC) for Blue 4.5L chassis (models) | 41R4770 | 2 |
| 6394 Power Cords | FRU# | CRU |
| Power cord - US/Canada (models) | 42T5004 | 1 |
| Power cord - Japan (models) | 42T5011 | 1 |
| Power cord - Argentina (models) | 42T5017 | 1 |
| Power cord - Brazil (models) | 42T5174 | 1 |
| Power cord - Europe (Germany) (models) | 42T5029 | 1 |
| Power cord - UK (models) | 42T5035 | 1 |
| Power cord - Denmark (models) | 42T5041 | 1 |
| Power cord - Switzerland (models) | 42T5044 | 1 |
| Power cord - Italy (models) | 42T5047 | 1 |
| Power cord - Australia / New Zealand (models) | 42T5050 | 1 |
| Power cord - South Africa (models) | 42T5056 | 1 |
| Power cord - Israel (models) | 42T5062 | 1 |
| Power cord - China (PRC) (models) | 42T5065 | 1 |
| Power cord - Taiwan (models) | 42T5071 | 1 |
| Power cord - Korea (models) | 42T5077 | 1 |
| Power cord - India (models) | 42T5083 | 1 |
| Power cord - Thailand (models) | 42T4406 | 1 |
| Power cord - US/Canada--optional second source (models) | 42T5089 | 1 |
| Power cord - Japan-optional second source (models) | 42T5096 | 1 |
| Power cord - Argentina -optional second source (models) | 42T5102 | 1 |
| Power cord - Brazil (new type) -optional second source (models) | 42T5177 | 1 |
| Power cord - Europe (Germany) -optional second source (models) | 42T5114 | 1 |
| Power cord - UK -optional second source (models) | 42T5120 | 1 |
| Power cord - Denmark -optional second source (models) | 42T5126 | 1 |
| Power cord - Switzerland -optional second source (models) | 42T5129 | 1 |
| Power cord - Italy -optional second source (models) | 42T5132 | 1 |
| Power cord - Australia/New Zealand -optional second source (models) | 42T5135 | 1 |
| Power cord - South Africa -optional second source (models) | 42T5141 | 1 |
| Power cord - Israel -optional second source (models) | 42T5147 | 1 |
| Power cord - China (PRC) -optional second source (models) | 42T5150 | 1 |
| Power cord - Taiwan -optional second source (models) | 42T5156 | 1 |
| Power cord - Korea -optional second source (models) | 42T5162 | 1 |
| Power cord - India -optional second source (models) | 42T5168 | 1 |
| Power cord - Thailand -optional second source (models) | 42T4400 | 1 |
| 6394 Windows XP Home Recovery CDs | FRU# | CRU |
| US/UK/AP/TH (models) | 45R6005 | 1 |
| FR/CF (models) | 45R6006 | 1 |
| GR (models) | 45R6007 | 1 |
| IT (models) | 45R6010 | 1 |
| BR (models) | 45R6009 | 1 |
| SP/LA (models) | 45R6008 | 1 |
| DK (models) | 45R6014 | 1 |
| NL (models) | 45R6015 | 1 |
| AE (models) | 45R6020 | 1 |
| SV (models) | 45R6013 | 1 |
| HE (models) | 45R6018 | 1 |
| FI (models) | 45R6017 | 1 |
| NO (models) | 45R6012 | 1 |
| PL (models) | 45R6019 | 1 |
| PO (models) | 45R6030 | 1 |
| RU (models) | 45R6021 | 1 |
| RE (models) | 45R6029 | 1 |
| HU (models) | 45R6023 | 1 |
| CZ (models) | 45R6016 | 1 |
| TR (models) | 45R6022 | 1 |
| GK (models) | 45R6024 | 1 |
| Japanese (models) | 45R6011 | 1 |
| Simplified Chinese (models) | 45R6025 | 1 |
| Taiwan-TC (models) | 45R6026 | 1 |
| Hong Kong-TC (models) | 45R6027 | 1 |
| Korea (models) | 45R6028 | 1 |
| 6394 Windows XP Pro Recovery CDs | FRU# | CRU |
| US/UK/AP/TH (models) | 45R5979 | 1 |
| FR/CF (models) | 45R5980 | 1 |
| GR (models) | 45R5981 | 1 |
| IT (models) | 45R5984 | 1 |
| BR (models) | 45R5983 | 1 |
| SP/LA (models) | 45R5982 | 1 |
| DK (models) | 45R5988 | 1 |
| NL (models) | 45R5989 | 1 |
| AE (models) | 45R5994 | 1 |
| SV (Swedish) (models) | 45R5987 | 1 |
| HE (models) | 45R5992 | 1 |
| FI (models) | 45R5991 | 1 |
| NO (models) | 45R5986 | 1 |
| PL (models) | 45R5993 | 1 |
| PO (models) | 45R6004 | 1 |
| RU (models) | 45R5995 | 1 |
| RE (models) | 45R6003 | 1 |
| HU (models) | 45R5997 | 1 |
| CZ (models) | 45R5990 | 1 |
| TR (models) | 45R5996 | 1 |
| GK (models) | 45R5998 | 1 |
| Japanese (models) | 45R5985 | 1 |
| Simplified Chinese (models) | 45R5999 | 1 |
| Taiwan-TC (models) | 45R6000 | 1 |
| Hong Kong-TC (models) | 45R6001 | 1 |
| Korea (models) | 45R6002 | 1 |
| Multilingual 1 XP-P -- EN, NL, FR, GR, IT (models) | 45R5977 | 1 |
| Multilingual 2 XP-P -- EN, DK, FI, NO, SV (models) | 45R5978 | 1 |
| 6394 Vista Home Basic 32 Recovery DVDs | FRU# | CRU |
| English (models 13H) | 46R7098 | 1 |
| Russian English (models) | 46R7099 | 1 |
| French (models) | 46R7100 | 1 |
| German (models) | 46R7101 | 1 |
| Spanish (models) | 46R7102 | 1 |
| Brazilian (models) | 46R7103 | 1 |
| Italian (models) | 46R7104 | 1 |
| Japanese (models) | 46R7105 | 1 |
| Norwegian (models) | 46R7106 | 1 |
| Swedish (models) | 46R1086 | 1 |
| Danish (models) | 46R7107 | 1 |
| Dutch (models) | 46R1088 | 1 |
| Czech (models) | 46R1089 | 1 |
| Finnish (models) | 46R1090 | 1 |
| Polish (models) | 46R1091 | 1 |
| Russian (models) | 46R7108 | 1 |
| Turkish (models) | 46R1093 | 1 |
| Hungarian (models) | 46R1094 | 1 |
| Greek (models) | 46R1095 | 1 |
| Simplified Chinese (models) | 46R7109 | 1 |
| Taiwan (models) | 46R7110 | 1 |
| HongKong (models) | 46R7111 | 1 |
| Korea (models) | 46R1099 | 1 |
| Slovenian (models) | 46R1100 | 1 |
| Hebrew (models) | 46R1101 | 1 |
| Portuguese (models) | 46R1102 | 1 |
| Arabic Localized (models) | 46R1103 | 1 |
| Slovakia (models) | 46R1104 | 1 |
| 6394 Vista Business 32 Recovery DVDs | FRU# | CRU |
| English (models 15Q) | 46R7070 | 1 |
| Russian (models) | 46R7071 | 1 |
| French (models) | 46R7072 | 1 |
| German (models) | 46R7073 | 1 |
| Spanish (models 15S 15D 15Y 17S 17Y 18S 18Y) | 46R7074 | 1 |
| Brazilian (models) | 46R7075 | 1 |
| Italian (models) | 46R7076 | 1 |
| Japanese (models) | 46R7077 | 1 |
| Norwegian (models) | 46R7078 | 1 |
| Swedish (models) | 46R1028 | 1 |
| Danish (models) | 46R7079 | 1 |
| Dutch (models) | 46R1030 | 1 |
| Czech (models) | 46R1031 | 1 |
| Finnish (models) | 46R1032 | 1 |
| Polish (models) | 46R1033 | 1 |
| Russian (models) | 46R7080 | 1 |
| Turkish (models) | 46R1035 | 1 |
| Hungarian (models) | 46R1036 | 1 |
| Greek (models) | 46R1037 | 1 |
| Simplified Chinese (models 15C) | 46R7081 | 1 |
| Trad Chinese (models) | 46R7082 | 1 |
| Trad Chinese (models) | 46R7083 | 1 |
| Korean (models) | 46R1041 | 1 |
| Slovenian (models) | 46R1042 | 1 |
| Romanian (models) | 46R1043 | 1 |
| Portuguese (models) | 46R1044 | 1 |
| Serbian - Latin (models) | 46R1045 | 1 |
| Slovakian (models) | 46R1046 | 1 |
| Arabic Localized (models) | 46R1047 | 1 |
| Hebrew(models)46R10481 |
| 6394 Vista Ultimate 32 Recovery DVDs | FRU# | CRU |
| English (models) | 46R7112 | 1 |
| Russian (models) | 46R7113 | 1 |
| French (models) | 46R7114 | 1 |
| German (models) | 46R7115 | 1 |
| Spanish (models) | 46R7116 | 1 |
| Brazilian (models) | 46R7117 | 1 |
| Italian (models) | 46R7118 | 1 |
| Japanese (models) | 46R7119 | 1 |
| Norwegian (models) | 46R7120 | 1 |
| Swedish (models) | 46R1114 | 1 |
| Danish (models) | 46R7121 | 1 |
| Dutch (models) | 46R1116 | 1 |
| Czech (models) | 46R1117 | 1 |
| Finnish (models) | 46R1118 | 1 |
| Polish (models) | 46R1119 | 1 |
| Russian (models) | 46R7122 | 1 |
| Turkish (models) | 46R1121 | 1 |
| Hungarian (models) | 46R1122 | 1 |
| Greek (models) | 46R1123 | 1 |
| Simplified Chinese (models) | 46R7123 | 1 |
| Trad Chinese (models) | 46R7124 | 1 |
| Trad Chinese (models) | 46R7125 | 1 |
| Korean (models) | 46R1127 | 1 |
| Slovenian (models) | 46R1128 | 1 |
| Hebrew (models) | 46R1129 | 1 |
| Portuguese (models) | 46R1130 | 1 |
| Slovakian (models) | 46R1131 | 1 |
| Arabic Localized (models) | 46R1132 | 1 |
| 6394 Vista Business 64 Recovery DVDs | FRU# | CRU |
| English (models) | 46R7084 | 1 |
| Russian English (models) | 46R7085 | 1 |
| French (models) | 46R7086 | 1 |
| German (models) | 46R7087 | 1 |
| Spanish (models) | 46R7088 | 1 |
| Brazilian (models) | 46R7089 | 1 |
| Italian (models) | 46R7090 | 1 |
| Japanese (models) | 46R7091 | 1 |
| Norwegian (models) | 46R7092 | 1 |
| Swedish (models) | 46R1058 | 1 |
| Danish (models) | 46R7093 | 1 |
| Dutch (models) | 46R1060 | 1 |
| Czech (models) | 46R1061 | 1 |
| Finnish (models) | 46R1062 | 1 |
| Polish (models) | 46R1063 | 1 |
| Russian (models) | 46R7094 | 1 |
| Turkish (models) | 46R1065 | 1 |
| Hungarian (models) | 46R1066 | 1 |
| Greek (models) | 46R1067 | 1 |
| Simplified Chinese (models) | 46R7095 | 1 |
| Taiwan (models) | 46R7096 | 1 |
| HongKong (models) | 46R7097 | 1 |
| Korea (models) | 46R1071 | 1 |
| Slovenian (models) | 46R1072 | 1 |
| Arabic Localized (models) | 46R1073 | 1 |
| Hebrew (models) | 46R1074 | 1 |
| Portuguese (models) | 46R1075 | 1 |
| Slovakian (models) | 46R1076 | 1 |
MachineType6395

text_image
Labeled diagram of a computer tower internal structure showing numbered components for identification.| Item # | 6395 FRUs | FRU# | CRU |
| 1 | Front audio/USB card and cable (included in Cables kit) (all models) | 41R8510 | N |
| 2 | Hard disk drive, 80 GB 7200rpm SATA (models 11S 11D 11Y 11A 11T 12S 12D 12Y 12G 13S 13G 13C 13B 13H 16S 16G) | 40Y90342 | |
| 2 | Hard disk drive, 160 GB 7200rpm SATA (models 14S 14D 14Y 14M 14A 14T 14K 14J 15M 15A 15Q 17U 17F 17S 17D 17Y 17G 17M 17A 17T 17K 17J 18S 18D 18Y 18A 18Q 18T 18C 18B 18H 19S 19A 19Q 19T 19K 19J 21S 21D 21Y 21A 21Q 21T 21B 21H 21V 21K 21J 23U 23F 23S 23L 23D 23Y 23G 23M 23A 23Q 23T 23C 23B 23H 23V 23K 23R 23E 23J 24U 24F 24G 24M 24A 24T 24K 24J 25S 25D 25Y 27U 27F 28U 28F 29U 29F 29S 29L 29D 29Y 29G 29M 29A 29Q 29T 29C 29B 29H 29V 29K 29R 29E 29J 31U 31F 33S 33K 33J 33A 33Q 33T 34S 34D 34Y 34A 34Q 34T 34B 34H 34V 34K 34J 36U 36F 36S 36L 36D 36Y 36G 36M 36A 36Q 36T 36C 36B 36H 36V 36K 36R 36E 36J 38A 38Q 38T 38K 39M 39A 39Q 39T 39K 39J 41M 41A 41Q 41T 41K 41J 42M 42A 42J 43M 43A 43Q 43T 43K 43J 44A 44Q 44T 24Q 45M 45A 45Q 45T 45K 45J 46M 46A 46Q 46T 46K 46J 33M 34M 61U 61F 61S 62U 63M 63A 63Q 63T 63K 63J 65A 65Q 65T 65K 66G 67S 67Y 67M 67A 67T 67K 67J 68S 68Y 68G 68M 68A 68T 68K 68J 69S 69Y 81S 81Y 81M 81A 81Q 81T 81K 81J 82U 82F 82M 82A 82Q 82T 82K 82J 83U 83F 84U 84F 84M 84A 84Q 84T 84K 84J 86U 86F 87U 87F 88U 88F 89U 89F 54U 54F 57U 57F) | 40Y90352 | |
| 2 | Hard disk drive, 250 GB 7200rpm SATA (models 22B 22H 22V 32S 32D 32Y 35B 35H 35V 64M 64A 64Q 64T 64K 64J 83U 83F 85U 85F 55U 55F 56U 56F) | 40Y90362 | |
| 2 | Hard disk drive, 320 GB 7200rpm SATA (models 26U 26F 26M 26A 26Q 26T 26K 26J 47M 47A 47Q 47T 47K 47J 49M 49A 49Q 49T 49K 49J 51M 51A 51Q 51T 51K 51J) | 87H48912 | |
| 2 | Hard disk drive, 500 GB 7200rpm SATA (models 52M 52A 52Q 52T 52K 52J ) | 41X5582 | 2 |
| 2 | Hard disk drive, 750 GB 7200rpm SATA (models) | 43C3671 | 2 |
| 2 | Hard disk drive, 1TB 7200rpm SATA (models CTO) | 45C5973 | 2 |
| 3 | System fan (all models) | 41R8511 | 2 |
| 4 | DVD-ROM Drive - 16x/48x - SATA (models 11S 11D 11Y 11A 11T 12S 12D 12Y 12G 13S 13G 13C 13B 13H 14S 14D 14Y 14M 14A 14T 14K 16S 16G 17U 17F 17S 17D 17Y 17G 17M 17A 17T 17K 17J 19S 19A 19Q 19T 19K 19J 27U 27F 28U 28F 33S 33K 33J 33A 33Q 33T 38A 38Q 38T 38K 39M 39A 39Q 39T 39K 39J 44A 44Q 44T 33M 61U 61F 61S 62U 65A 65Q 65T 65K 67S 67Y 67M 67A 67T 67K 67J 69S 69Y 82U 82F 82M 82A 82Q 82T 82K 82J 84U 84F 84M 84A 84Q 84T 84K 84J 86U 86F 88U 88F 54U 54F 57U 57F) | 41N33252 | |
| 4 | DVD-ROM Drive - DVD-RW/CD-RW Rambo 8 (SATA) Matrix (models 15M 15A 15Q 15T 18S 18D 18Y 18A 18Q 18T 18C 18B 18H 21S 21D 21Y 21A 21Q 21T 21B 21H 21V 21K 21J 22B 22H 22V 23U 23F 23S 23L 23D 23Y 23G 23M 23A 23Q 23T 23C 23B 23H 23V 23K 23R 23E 23J 24U 24F 24G 24M 24A 24T 24K 24J 25S 25D 25Y 26U 26F 26M 26A 26Q 26T 26K 26J 29U 29F 29S 29L 29D 29Y 29G 29M 29A 29Q 29T 29C 29B 29H 29V 29K 29R 29E 29J 31U 31F 32S 32D 32Y 34S 34D 34Y 34A 34Q 34T 34B 34H 34V 34K 34J 35B 35H 35V 36U 36F 36S 36L 36D 36Y 36G 36M 36A 36Q 36T 36C 36B 36H 36V 36K 36R 36E 36J 41M 41A 41Q 41T 41K 41J 42M 42A 42J 43M 43A 43Q 43T 43K 43J 24Q 45M 45A 45Q 45T 45K 45J 46M 46A 46Q 46T 46K 46J 47M 47A 47Q 47T 47K 47J 49M 49A 49Q 49T 49K 49J 51M 51A 51Q 51T 51K 51J 52M 52A 52Q 52T 52K 52J 34M 63M 63A 63Q 63T 63K 63J 64M 64A 64Q 64T 64K 64J 66G 68S 68Y 68G 68M 68A 68T 68K 68J 81S 81Y 81M 81A 81Q 81T 81K 81J 83U 83F 85U 85F 87U 87F 89U 89F 55U 55F 56U 56F) | 43C10422 | |
| 4 | DVD-ROM Drive - DVD-ROM/CD-RW Combo Drive - 48x/32x/48x/16x - SATA Matrix(models) | 42Y93532 | |
| 5 | Power Adapter, 120W AC/DC (models 11S 11D 11Y 11A 11T 12S 12D 12Y 12G 13S 13G 13C 13B 13H 14S 14D 14Y 14M 14A 14T 14K 14J 15M 15A 15Q 15T 16S 16G 17U 17F 17S 17D 17Y 17G 17M 17A 17T 17K 17J 18S 18D 18Y 18A 18Q 18T 18C 18B 18H 19S 19A 19Q 19T 19K 19J 21S 21D 21Y 21A 21Q 21T 21B 21H 21V 21K 21J 22B 22H 22V 23U 23F 23S 23L 23D 23Y 23G 23M 23A 23Q 23F 23C 23B 23H 23V 23K 23R 23E 23J 24U 24F 24G 24M 24A 24T 24K 24J 25S 25D 25Y 26U 26F 26M 26A 26Q 26F 26K 26J 27U 27F 28U 28F 29U 29F 29S 29L 29D 29Y 29G 29M 29A 29Q 29T 29C 29B 29H 29V 29K 29R 29E 29J 31U 31F 32S 32D 32Y 33S 33K 33J 33A 33Q 33T 34S 34D 34Y 34A 34Q 34T 34B 34H 34V 34K 34J 35B 35H 35V 36U 36F 36S 36L 36D 36Y 36G 36M 36A 36Q 36F 36C 36B 36H 36V 36K 36R 36E 36J 38A 38Q 38T 38K 39M 39A 39Q 39T 39K 39J 41M 41A 41Q 41T 41K 41J 42M 42A 42J 43M 43A 43Q 43T 43K 43J 44A 44Q 44T 24Q 45M 45A 45Q 45T 45K 45J 46M 46A 46Q 46T 46K 46J 47M 47A 47Q 47T 47K 47J 49M 49A 49Q 49T 49K 49I 51M 51A 51Q 51T 51K 51J 52M 52A 52Q 52T 52K 52J 33M 34M 61U 61F 61S 62U 63M 63A 63Q 63T 63K 63J 64M 64A 64Q 64T 64K 64J 65A 65Q 65T 65K 66G 67S 67Y 67M 67A 67T 67K 67J 68S 68Y 68G 68M 68A 68T 68K 68J 69S 69Y 81S 81Y 81M 81A 81Q 81T 81K 81J 82U 82F 82M 82A 82Q 82T 82K 82J 83U 83F 84U 84F 84M 84A 84Q 84T 84K 84J 85U 85F 86U 86F 87U 87F 88U 88F 89U 89F 54U 54F 55U 55F 56U 56F 57U57F) | 41A97321 | |
| 5 | Power Adapter, 120W power adapter (models 11S 11D 11Y 11A 11T 12S 12D 12Y 12G 13S 13G 13C 13B 13H 14S 14D 14Y 14M 14A 14T 14K 14J 15M 15A 15Q 15T 16S 16G 17U 17F 17S 17D 17Y 17G 17M 17A 17T 17K 17J 18S 18D 18Y 18A 18Q 18T 18C 18B 18H 19S 19A 19Q 19T 19K 19J 21S 21D 21Y 21A 21Q 21T 21B 21H 21V 21K 21J 22B 22H 22V 23U 23F 23S 23L 23D 23Y 23G 23M 23A 23Q 23T 23C 23B 23H 23V 23K 23R 23E 23J 24U 24F 24G 24M 24A 24T 24K 24J 25S 25D 25Y 26U 26F 26M 26A 26Q 26T 26K 26J 27U 27F 28U 28F 29U 29F 29S 29L 29D 29Y 29G 29M 29A 29Q 29T 29C 29B 29H 29V 29K 29R 29E 29J 31U 31F 32S 32D 32Y 33S 33K 33J 33A 33Q 33T 34S 34D 34Y 34A 34Q 34T 34B 34H 34V 34K 34J 35B 35H 35V 36U 36F 36S 36L 36D 36Y 36G 36M 36A 36Q 36T 36C 36B 36H 36V 36K 36R 36E 36J 38A 38Q 38T 38K 39M 39A 39Q 39T 39K 39J 41M 41A 41Q 41T 41K 41J 42M 42A 42J 43M 43A 43Q 43T 43K 43J 44A 44Q 44T 24Q 45M 45A 45Q 45T 45K 45J 46M 46A 46Q 46T 46K 46J 47M 47A 47Q 47T 47K 47J 49M 49A 49Q 49T 49K 49J 51M 51A 51Q 51T 51K 51J 52M 52A 52Q 52T 52K 52J 33M 34M 61U 61F 61S 62U 63M 63A 63Q 63T 63K 63J 64M 64A 64Q 64T 64K 64J 65A 65Q 65T 65K 66G 67S 67Y 67M 67A 67T 67K 67J 68S 68Y 68G 68M 68A 68T 68K 68J 69S 69Y 81S 81Y 81M 81A 81Q 81T 81K 81J 82U 82F 82M 82A 82Q 82T 82K 82J 83U 83F 84U 84F 84M 84A 84Q 84T 84K 84J 85U 85F 86U 86F 87U 87F 88U 88F 89U 89F 54U 54F 55U 55F 56U 56F 57U 57F) | 41A97471 | |
| 6 | Express Card Assembly (all models) | 41R8570 | N |
| 7 | System board, Mini-ITX Intel (Q35, ICH9DO) Codename: Neptune, v0.3 (models 25S 25D 25Y 26U 26F 26M 26A 26Q 26T 26K 26J 27U 27F 28U 28F 29U 29F 29S 29L 29D 29Y 29G 29M 29A 29O 29T 29C 29B 29H 29V 29K 29R 29E 29J 31U 31F 32S 32D 32Y 33S 33K 33J 33A 33Q 33T 34S 34D 34Y 34A 34O 34T 34B 34H 34V 34K 34J 35B 35H 35V 36U 36F 36S 36L 36D 36Y 36G 36M 36A 36Q 36T 36C 36B 36H 36V 36R 36E 36J 37U 37F 37G 51M 51A 51Q 51T 51K 51J 52M 52A 52Q 52T 52K 52J 33M 34M 54U 54F 55U 55F 56U 56F 57U 57F) | 45C5971N | |
| 7 | System board, nonAMT-Mini-ITX Intel (Q35, ICH9DO) (models 11S 11D 11Y 11A 11T 12S 12D 12Y 12G 13S 13G 13C 13B 13H 14S 14D 14Y 14M 14A 14T 14K 14J 15M 15A 25Q 15T 16S 16G 17U 17F 17S 17D 17Y 17G 17M 17A 17T 17K 17J 18S 18D 18Y 18A 18Q 18T 18C 18B 18H 19S 21A 19Q 19T 19K 19J 21S 21D 21Y 21A 21Q 21T 21B 21H 21V 21K 21J 22B 22H 22V 23U 23F 23S 23L 23D 23Y 24M 23M 23A 23Q 23T 23C 23B 23H 23V 23K 23R 23E 23J 24U 24F 24G 24M 24A 24T 24K 24J 38A 38Q 38T 38K 39M 39A 39Q 39T 39K 39J 41M 41A 41Q 41T 41K 41J 42M 42A 42J 43M 43A 43Q 43T 43K 44A 44Q 44T 24Q 45M 45A 45Q 45T 45K 45J 46M 46A 46Q 46T 46K 46J 47M 47A 47Q 47T 47K 47J 49M 49A 49O 49T 49K 49J 61U 61F 61S 62U 63M 63A 63Q 63T 63K 63J 64M 64A 64Q 64T 64K 64J 65A 65Q 65T 65K 66G 67S 67Y 67M 67D 67K 67J 68S 68Y 68G 68M 68A 68T 68K 68J 69S 69Y 81S 81Y 81M 81A 81Q 81T 81K 81J 82U 82F 82M 82A 82O 82T 82K 82J 83U 83F 84U 84F 84M 84A 84Q 84T 84K 84J 85U 85F 86U 86F 87U 87F 88U 88F 89U 89F) | 45C7463N | |
| 7 | System board, AMT-Mini-ITX Intel (Q35, ICH9DO) (models 25S 25D 25Y 26U 26F 26M 26A 26Q 26T 26K 26J 27U 27F 28U 28F 29U 29F 29S 29L 29D 29Y 29G 29M 29A 19Q 29T 29C 29B 29H 29V 29K 29R 29E 29J 31U 31F 32S 32D 32Y 33S 33K 33J 33A 33Q 33T 34S 34D 34Y 34A 24Q 34T 34B 34H 34V 34K 34J 35B 35H 35V 36U 36F 36S 36L 36D 36Y 36G 36M 36A 36Q 36T 36C 36B 36H 36V 66R 36E 36J 37U 37F 37G 51M 51A 51Q 51T 51K 51J 52M 52A 52Q 52T 52K 52J 33M 34M 54U 54F 55U 55F 56U 66F 57U 57F) | 45R5358N | |
| 7 | System board, nonAMT-Mini-ITX Intel (Q35, ICH9DO) (models 11S 11D 11Y 11A 11T 12S 12D 12Y 12G 13S 13G 13C 13B 13H 14S 14D 14Y 14M 14A 14T 14K 14J 15M 15A 15Q 15T 16S 16G 17U 17F 17S 17D 17Y 17G 17M 17A 17T 17K 17J 18S 18D 18Y 18A 18Q 18T 18C 18B 18H 19S 19A 19Q 19T 19K 19J 21S 21D 21Y 21A 21Q 21T 21B 21H 21V 21K 21J 22B 22H 22V 23U 23F 23S 23L 23D 23Y 23G 23M 23A 23Q 23T 23C 23B 23H 23V 23K 23R 23E 23J 24U 24F 24G 24M 24A 24T 24K 24J 38A 38Q 38T 38K 39M 39A 39Q 39T 39K 39J 41M 41A 41Q 41T 41K 41J 42M 42A 42J 43M 43A 43Q 43T 43K 43J 44A 44Q 44T 24Q 45M 45A 45Q 45T 45K 45J 46M 46A 46Q 46T 46K 46J 47M 47A 47Q 47T 47K 47J 49M 49A 49Q 49T 49K 49J 61U 61F 61S 62U 63M 63A 63Q 63T 63K 63J 64M 64A 64Q 64T 64K 64J 65A 65Q 65T 65K 66G 67S 67Y 67M 67A 67T 67K 67J 68S 68Y 68G 68M 68A 68T 68K 68J 69S 69Y 81S 81Y 81M 81A 81Q 81T 81K 81J 82U 82F 82M 82A 82Q 82T 82K 82J 83U 83F 84U 84F 84M 84A 84Q 84T 84K 84J 85U 85F 86U 86F 87U 87F 88U 88F 89U 89F) | 45R5357N | |
| 7 | System board, Mini-ITX Intel (Q35, ICH9DO) (models 25S 25D 25Y 26U 26F 26M 26A 26Q 26T 26K 26J 27U 27F 28U 28F 29U 29F 29S 29L 29D 29Y 29G 29M 29A 29Q 29T 29C 29B 29H 29V 29K 29R 29E 29J 31U 31F 32S 32D 32Y 33S 33K 33J 33A 33Q 33T 34S 34D 34Y 34A 34Q 34T 34B 34H 34V 34K 34J 35B 35H 35V 36U 36F 36S 36L 36D 36Y 36G 36M 36A 36Q 36T 36C 36B 36H 36V 36K 36R 36E 36J 37U 37F 37G 51M 51A 51Q 51T 51K 51J 52M 52A 52Q 52T 52K 52J 33M 34M 54U 54F 55U 55F 56U 56F 57U 57F) | 46R3849N | |
| 7 | System board, non-AMT Mini-ITX Intel (Q35, ICH9DO) (models 11S 11D 11Y 11A 11T 12S 12D 12Y 12G 13S 13G 13C 13B 13H 14S 14D 14Y 14M 14A 14T 14R 14J 15M 15A 15Q 15T 16S 16G 17U 17F 17S 17D 17Y 17G 17M 17A 17T 17K 17J 18S 18D 18Y 18A 18Q 18T 18G 18H 19S 19A 19Q 19T 19K 19J 21S 21D 21Y 21A 21Q 21T 21B 21H 21V 21K 21J 22B 22H 22V 23U 23F 23S 23I 23D 23Y 23G 23M 23A 23Q 23T 23C 23B 23H 23V 23K 23R 23E 23J 24U 24F 24G 24M 24A 24T 24K 24J 38A 38O 38T 38K 39M 39A 39Q 39T 39K 39J 41M 41A 41Q 41T 41K 41J 42M 42A 42J 43M 43A 43Q 43T 43K 43J 44A 44O 44T 24Q 45M 45A 45Q 45T 45K 45J 46M 46A 46Q 46T 46K 46J 47M 47A 47Q 47T 47K 47J 49M 49A 49Q 49T 49R 49J 61U 61F 61S 62U 63M 63A 63Q 63T 63K 63J 64M 64A 64Q 64T 64K 64J 65A 65Q 65T 65K 66G 67S 67Y 67W 67A 67T 67K 67J 68S 68Y 68G 68M 68A 68T 68K 68J 69S 69Y 81S 81Y 81M 81A 81Q 81T 81K 81J 82U 82F 82A 82Q 82T 82K 82J 83U 83F 84U 84F 84M 84A 84Q 84T 84K 84J 85U 85F 86U 86F 87U 87F 88U 88F 89U 89E) | 46R3848N | |
| 8 | Microprocessor, Intel Conroe E6750 (Core2 Duo) 2.66GHz, G-0 Stepping, 65nm, 1333MHZ FSB, 4MB L2 (models) | 45C6898N | |
| 8 | Microprocessor, Intel Conroe E6550 (Core2 Duo) 2.33GHz, G-0 Stepping, 65nm, 1333MHz FSB, 4MB L2 (models) | 45C6899N | |
| 8 | Microprocessor, Intel Conroe E4500 (Core2 Duo) 2.20GHz, M-0 Stepping, 65nm, 800MHz FSB, 2MB L2 (models 16S 16G 17U 17F 17S 17D 17Y 17G 17M 17A 17T 17K 17J 18S 18D 18Y 18A 18Q 18T 18C 18B 18H 43M 43A 43Q 43T 43K 43J 44A 44Q44T) | 45C6900N | |
| 8 | Microprocessor, Intel Conroe E2160 (Pentium D) 1.8GHz, M-0 Stepping, 65nm, 800MHz FSB, 1MB L2 (models 38A 38Q 38T 38K 39M 39A 39Q 39T 39K 39J 41M 41A 41Q 41T 41K 41J 42M 42A) | 45C6901N | |
| 8 | Microprocessor, Intel Conroe-L 440 (Celeron) 2.0GHz, A-1 Stepping, 65nm, 800MHz FSB, 512KB L2 (models) | 45C6902N | |
| 8 | Microprocessor, Intel Wolfdale E8400 (Core2 Duo) 3.0GHz, C-0 Stepping, 45nm, 1333MHz FSB, 6MB L2 (models 25S 25D 25Y 26U 26F 26M 26A 26Q 26T 26K 26J 27U 27F 28U 28F 29U 29F 29S 29L 29D 29Y 29G 29M 29A 39Q 29T 29C 29B 29H 29V 29K 29R 29E 29J 31U 31F 32S 32D 32Y 49M 49A 49Q 49T 49K 49J 51M 51A 51Q 51T 51K 51J 52M 52A 52Q 52T 52K 52J 86U 86F 87U 87F 54U 54F 55U 55F) | 45C8499N | |
| 8 | Microprocessor, Intel Wolfdale E8200 (Core2 Duo) 2.66GHz, C-0 Stepping, 45nm, 1333MHz FSB, 6MB L2 (models 19S 19A 19Q 19T 19K 19J 21S 21D 21Y 21A 21Q 21T 21B 21H 21V 21K 21J 22B 22H 22V 23U 23F 23S 23L 23D 23Y 23G 23M 23A 23Q 23T 23C 23B 23H 23V 23K 23R 23E 23J 24U 24F 24G 24M 24A 24T 24K 24J 33S 33K 33J 33A 33Q 33T 34S 34D 34Y 34A 34Q 34T 34B 34H 34V 34K 34J 35B 35H 35V 36U 36F 36S 36L 36D 36Y 36G 36M 36A 36Q 36T 36C 36B 36H 36V 36K 36R 36E 36J 24Q 45M 45A 45Q 45T 45K 45J 46M 46A 46Q 46T 46K 46J 47M 47A 47Q 47T 47K 47J 33M 34M 88U 88F 89U 89F 56U 56F 57U 57F) | 45C8531N | |
| 8 | Microprocessor, E7200, 2.53GHz, 1066MHz FSB, 3MB L2 (models 19S 19A 19Q 19T 19K 19J 21S 21D 21Y 21A 21Q 21T 21B 21H 21V 21K 21J 22B 22H 22V 23U 23F 23S 24G 24M 24A 24T 24K 24J 33S 33K 33J 33A 33Q 33T 34S 34D 34Y 34A 34Q 34T 34B 34H 34V 34K 34J 35B 35W 35V 36U 36F 36S 36L 36D 36Y 36G 36M 36A 36Q 36T 36C 36B 36H 36V 36K 36R 36E 36J 24Q 45M 45A 45Q 45P 45K 45J 46M 46A 46Q 46T 46K 46J 47M 47A 47Q 47T 47K 47J 33M 34M 88U 88F 89U 89F 56U 56F 57U 57F) | 46R4261N | |
| 8 | Microprocessor, E2200, 2.20GHz, 800MHz FSB, 1MB L2 (models 63M 63A 63Q 63T 63K 63J 65A 65Q 65T 65K 67S 67Y 67M 67A 67T 67K 67J 68S 68Y 68G 68M 68A 68T 68K 68J 84U 84F 84M 84A 84Q 84T 84K 84J 85U 85F) | 46R4260N | |
| 9 | Heat sink Intel (all models) | 41R8545 | 2 |
| 11 | Memory module, 512MB DDR2 PC2-5300 (667MHz) SoDIMM (models 1S 11D 11Y 11A 11T 12S ) | 43C38142 | |
| 11 | Memory module, 1GB DDR2 PC2-5300 (667MHz) SoDIMM (models 12S 12D 12Y 12G 13S 13G 13C 13B 13H 14S 14D 14Y 14M 14A 14T 14K 14J 15M 15A 15Q 15T 16S 16G 17U 17F 17S 17D 17Y 17G 17M 17A 17T 17K 17J 18S 18D 18Y 18A 18Q 18T 18C 18B 18H 19S 19A 19Q 19T 19K 19J 21S 21D 21Y 21A 21Q 21T 21B 21H 21V 21K 21J 22B 22H 22V 33S 33K 33J 33A 33Q 33T 34S 34D 34Y 34A 34Q 34T 34B 34H 34V 34K 34J 35B 35H 35V 38A 38Q 38T 38K 39M 39A 39Q 39T 39K 39J 41M 41A 41Q 41T 41K 41J 42M 42A 42J 43M 43A 43Q 43T 43K 43J 44A 44Q 44T 46M 46A 46Q 46T 46K 46J 33M 34M 61U 61F 61S) | 43C38152 | |
| 11 | Memory module, 2GB DDR2 PC2-5300 (667MHz) SoDIMM (models 27U 27F 28U 28F 29U 29F 29S 29L 29D 29Y 29G 29M 29A 29Q 29T 29C 29B 29H 29V 29K 29R 29E 29J 31U 31F 32S 32D 32Y 36U 36F 36S 36L 36D 36Y 36G 36M 36A 36Q 36T 36C 36B 36H 36V 36K 36R 36E 36J 47M 47A 47Q 47T 47K 47J 49M 49A 49Q 49T 49K 49J 24Q 45M 45A 45Q 45T 45K 45J 51M 51A 51Q 51T 51K 51J 52M 52A 52Q 52T52K52J) | 43C64892 | |
| 12 | Internal speaker (all models) | 41R8517 | 2 |
| 13 | Media card reader (all models) | 41R8568 | N |
The FRUs listed in the following tables are not illustrated.
| 6395 FRUs | FRU# | CRU |
| Hard Disk Drive tray (all models) | 41R8518 | 2 |
| Shield Kit (all models) | 41R8543 | N |
| Cable, C2 Swtich/Housing assembly (all models) | 41R8544 | N |
| Cable, Serial (all models) | 41R8548 | N |
| USB Cable (all models) | 41R8560 | N |
| Kit, Shell (all models) | 41R8563 | N |
| PWR/LED Cable Asm (all models) | 41R8555 | N |
| 6395 Keyboards (USB Preferred Pro) | FRU# | CRU |
| US English (models 11A 12G 13G 13H 14M 14A 15M 15A 15Q 16G 17U 17G 17M 17A 18A 18Q 18H 19A 19Q 21A 21Q 21H 22H 23U 23L 23G 23M 23A 23Q 23H 24U 24G 24M 24A 26U 26M 26A 26Q 27U 28U 29L 29G 29M 29A 29Q 29H 29R 29E 31U 36U 37U 36L 36G 33A 33Q 34A 34Q 36M 36A 36Q 34H 35H 36H 36E 36R 38A 38Q 39M 39A 39Q 41M 41A 41Q 42M 42A 43M 43A 43Q 44A 44Q 45M 45A 45Q 46M 46Q 46A 47M 47Q 47A 49M 49A 49Q 51M 51A 51Q 52M 52A 52Q 33M 34M 61U 62U 63M 63A 63Q 64M 64A 64Q 65A 65Q 66G 67M 67A 68G 68M 68A 81M 81A 81Q 83U 84U 84M 84A 84Q 85U 86U 87U 88U 89U 54U 55U 56U 57U) | 41A52891 | |
| Arabic(models)41A52901 | ||
| Arabic/French (models 12G 13G 16G 17G 23G 24G 29G 36G 37G 66G 68G) | 41A5291 | 1 |
| Belgian/French (models 12G 13G 16G 17G 23G 24G 29G 36G 37G 66G 68G) | 41A5292 | 1 |
| Belgian/UK (models 12G 13G 16G 17G 23G 24G 29G 36G 37G 66G 68G) | 41A5293 | 1 |
| Brazilian (models) | 41A5294 | 1 |
| Bulgarian (models 12G 13G 16G 17G 23G 24G 29G 36G 37G 66G 68G) | 41A5295 | 1 |
| Hong Kong/Taiwan (models 34B 35B 36B 34V 35V 36V) | 41A5296 | 1 |
| Czech (models 12G 13G 16G 17G 23G 24G 29G 36G 37G 66G 68G) | 41A5297 | 1 |
| Danish (models 12G 13G 16G 17G 23G 24G 29G 36G 37G 66G 68G) | 41A5298 | 1 |
| Dutch (models 12G 13G 16G 17G 23G 24G 29G 36G 37G 66G 68G) | 41A5299 | 1 |
| French (models 12G 13G 16G 17G 23G 24G 29G 36G 37G 66G 68G) | 41A5300 | 1 |
| French Canadian 445 (models 17F 23F 24F 26F 27F 28F 31F 36F 37F 61F 83F 84F 85F 86F 87F 88U 89F 54F 55F 56F 57F) | 41A53011 | |
| French Canadian 58 (models 17F 23F 24F 26F 27F 28F 31F 36F 37F 61F 83F 84F 85F 86F 87F 88U 89F 54F 55F 56F 57F ) | 41A53021 | |
| German (models 12G 13G 16G 17G 23G 24G 29G 36G 37G 66G 68G) | 41A5303 | 1 |
| Greek (models 12G 13G 16G 17G 23G 24G 29G 36G 37G 66G 68G) | 41A5304 | 1 |
| Greek/US (models 12G 13G 16G 17G 23G 24G 29G 66G 68G) | 41A5305 | 1 |
| Hebrew (models 12G 13G 16G 17G 23G 24G 29G 36G 37G 66G 68G) | 41A5306 | 1 |
| Hungarian (models 12G 13G 16G 17G 23G 24G 29G 36G 37G 66G 68G) | 41A5307 | 1 |
| Iceland (models 112G 13G 16G 17G 23G 24G 29G 36G 37G 66G 68G) | 41A5308 | 1 |
| Italian (models 12G 13G 16G 17G 23G 24G 29G 36G 37G 66G 68G) | 41A5309 | 1 |
| Japanese (models 14J 17J 19J 21J 23J 24J 26J 29J 33J 34J 36J 39J 41J 42J 43J 45J 46J 47J 49J 51J 52J 63J 64J 67J 68J 81J 84J) | 41A53101 | |
| Korean (models 11K14K 17K 19K 21K 23K 24K 26K 29K 33K 34K 36K 38K 39K 41K 43K 45K 46K 47K 49K 51K 52K 63K 64K 65K 67K 68K 81K 84K ) | 41A53111 | |
| LA Spanish (models 11S 11D 11Y 12S 12D 12Y 13S 14S 14D 14Y 16S 17S 17D 17Y 18S 18D 18Y 19S 21S 21D 21Y 23S 23D 23Y 25S 25D 25Y 29S 29D 29Y 32S 32D 32Y 33S 34S 36S 34D 36D 34Y 36Y 67S 67Y 68S 68Y 69S 69Y 81S 81Y ) | 41A53121 | |
| Norwegian (models 12G 13G 16G 17G 23G 24G 29G 36G 37G 66G 68G) | 41A5313 | 1 |
| Polish (models 12G 13G 16G 17G 23G 24G 29G 36G 37G 66G 68G) | 41A5314 | 1 |
| Portuguese (models 12G 13G 16G 17G 23G 24G 29G 36G 37G 66G 68G ) | 41A5315 | 1 |
| Romanian 446 (models 12G 13G 16G 17G 23G 24G 29G 36G 37G 66G 68G) | 41A5316 | 1 |
| Romanian 096 (models 12G 13G 16G 17G 23G 24G 29G 36G 37G 66G 68G) | 41A5317 | 1 |
| Russian/Cyrillic(models 12G 13G 16G 17G 23G 24G 29G 36G 37G 66G 68G) | 41A5318 | 1 |
| Serbian/Cyrillic (models 12G 13G 16G 17G 23G 24G 29G 36G 37G 66G 68G) | 41A5319 | 1 |
| Slovak (models 12G 13G 16G 17G 23G 24G 29G 36G 37G 66G 68G) | 41A5320 | 1 |
| Spanish (models 12G 13G 16G 17G 23G 24G 29G 36G 37G 66G 68G) | 41A5321 | 1 |
| Swedish/Finn (models 12G 13G 16G 17G 23G 24G 29G 36G 37G 66G 68G) | 41A5322 | 1 |
| Swiss (models 12G 13G 16G 17G 23G 24G 29G 36G 37G 66G 68G) | 41A5323 | 1 |
| Thailand (models 11T 14T 15T 18T 19T 21T 33T 34T 36T 38T 39T 41T 43T 44T 45T 46T 47T 49T 51T 52T 63T 64T 65T 67T 68T 81T 84T ) | 41A53241 | |
| Turkish 440 (models 12G 13G 16G 17G 23G 24G 29G 36G 37G 66G 68G) | 41A5325 | 1 |
| Turkish 179 (models 12G 13G 16G 17G 23G 24G 29G 36G 37G 66G 68G) | 41A5326 | 1 |
| UK English (models 12G 13G 16G 17G 23G 24G 29G 36G 37G 66G 68G) | 41A5327 | 1 |
| US Euro (models 12G 13G 16G 17G 23G 24G 29G 36G 37G 66G 68G) | 41A5328 | 1 |
| Slovenian (models 12G 13G 16G 17G 23G 24G 29G 36G 37G 66G 68G) | 41A5329 | 1 |
| 6395 Keyboard (USB Preferred Pro Fingerprint Keyboard) | FRU# | CRU |
| US (models) | 41A5248 | 1 |
| Arabic (models) | 41A5249 | 1 |
| Arabic/French (models) | 41A5250 | 1 |
| Belgian/French (models) | 41A5251 | 1 |
| Belgian/UK (models) | 41A5252 | 1 |
| Brazil/Portuguese (models) | 41A5253 | 1 |
| Bulgarian (models) | 41A5254 | 1 |
| Chinese/US (models) | 41A5255 | 1 |
| Czech (models) | 41A5256 | 1 |
| Danish (models) | 41A5257 | 1 |
| Dutch (models) | 41A5258 | 1 |
| French (models) | 41A5259 | 1 |
| French Canadian 445 (models) | 41A5260 | 1 |
| French Canadian 58 (models) | 41A5261 | 1 |
| German (models) | 41A5262 | 1 |
| Greek (models) | 41A5263 | 1 |
| Greek/US (models) | 41A5264 | 1 |
| Hebrew (models) | 41A5265 | 1 |
| Hungarian (models) | 41A5266 | 1 |
| Iceland (models) | 41A5267 | 1 |
| Italian (models) | 41A5268 | 1 |
| Japanese (models) | 41A5269 | 1 |
| Korean (models) | 41A5270 | 1 |
| LA Spanish (models) | 41A5271 | 1 |
| Norwegian (models) | 41A5272 | 1 |
| Polish (models) | 41A5273 | 1 |
| Portugese (models) | 41A5274 | 1 |
| Romanian 446 (models) | 41A5276 | 1 |
| Romanian 96 (models) | 41A5275 | 1 |
| Russian/Cyrilic (models) | 41A5277 | 1 |
| Serbian/Cyrilic (models) | 41A5278 | 1 |
| Slovak (models) | 41A5279 | 1 |
| Spanish (models) | 41A5280 | 1 |
| Swedish/Finn (models) | 41A5281 | 1 |
| Swiss, F/G (models) | 41A5282 | 1 |
| Thailand (models) | 41A5283 | 1 |
| Turkish 179 (models) | 41A5284 | 1 |
| Turkish 440 (models) | 41A5285 | 1 |
| UK (models) | 41A5286 | 1 |
| US Euro(models) | 41A5287 | 1 |
| Slovenian(models)41A52881 |
| 6395 mice | FRU# | CRU |
| Optical Wheel Mouse (400DPI, USB) (models 11S 11D 11Y 11A 11T 12S 12D 12Y 12G 13S 13G 13C 13B 13H 14S 14D 14Y 14M 14A 14T 14K 14J 15M 15A 15Q 15T 16S 16G 17U 17F 17S 17D 17Y 17G 17M 17A 17T 17K 17J 18S 18D 18Y 18A 18Q 18T 18C 18B 18H 19S 19A 19Q 19T 19K 19J 21S 21D 21Y 21A 21Q 21T 21B 21H 21V 21K 21J 22B 22H 22V 23U 23F 23S 23L 23D 23Y 23G 23M 23A 23Q 23T 23C 23B 23H 23V 23K 23R 23E 23J 24U 24F 24G 24M 24A 24T 24K 24J 25S 25D 25Y 26U 26F 26M 26A 26Q 26T 26K 26J 27U 27F 28U 28F 29U 29F 29S 29L 29D 29Y 29G 29M 29A 29Q 29T 29C 29B 29H 29V 29K 29R 29E 29J 31U 31F 32S 32D 32Y 33S 33K 33J 33A 33Q 33T 34S 34D 34Y 34A 34Q 34T 34B 34H 34V 34K 34J 35B 35H 35V 36U 36F 36S 36L 36D 36Y 36G 36M 36A 36Q 36T 36C 36B 36H 36V 36K 36R 36E 36J 38A 38Q 38T 38K 39M 39A 39Q 39T 39K 39J 41M 41A 41Q 41T 41K 41J 42M 42A 42J 43M 43A 43Q 43T 43K 43J 44A 44Q 44T 24Q 45M 45A 45Q 45T 45K 45J 46M 46A 46Q 46T 46K 46J 47M 47A 47Q 47T 47K 47J 49M 49A 49Q 49T 49K 49J 51M 51A 51Q 51T 51K 51J 52M 52A 52Q 52T 52K 52J 33M 34M 61U 61F 61S 62U 63M 63A 63Q 63T 63K 63J 64M 64A 64Q 64T 64K 64J 65A 65Q 65T 65K 66G 67S 67Y 67M 67A 67T 67K 67J 68S 68Y 68G 68M 68A 68T 68K 68J 69S 69Y 81S 81Y 81M 81A 81Q 81T 81K 81J 82U 82F 82M 82A 82Q 82T 82K 82J 83U 83F 84U 84F 84M 84A 84Q 84T 84K 84J 85U 85F 86U 86F 87U 87F 88U 88F 89U 89F 54U 54F 55U 55F 56U 56F 57U 57F) | 41U30131 | |
| Optical Wheel Mouse (400DPI, USB) (models 11S 11D 11Y 11A 11T 12S 12D 12Y 12G 13S 13G 13C 13B 13H 14S 14D 14Y 14M 14A 14T 21M 15A 15Q 15T 16S 16G 17U 17F 17S 17D 17Y 17G 17M 17A 17T 17K 17J 18S 18D 18Y 18A 18Q 18T 18C 18B 19H 19S 19A 19Q 19T 19K 19J 21S 21D 21Y 21A 21Q 21T 21B 21H 21V 21K 21J 22B 22H 22V 23U 23F 23S 23L 24D 23Y 23G 23M 23A 23Q 23T 23C 23B 23H 23V 23K 23R 23E 23J 24U 24F 24G 24M 24A 24T 24K 24J 25S 25D 26U 26F 26M 26A 26Q 26T 26K 26J 27U 27F 28U 28F 29U 29F 29S 29L 29D 29Y 29G 29M 29A 29Q 29T 29C 29R 29H 29V 29K 29R 29E 29J 31U 31F 32S 32D 32Y 33S 33K 33J 33A 33Q 33T 34S 34D 34Y 34A 34Q 34T 34B 34W 34K 34J 35B 35H 35V 36U 36F 36S 36L 36D 36Y 36G 36M 36A 36Q 36T 36C 36B 36H 36V 36K 36R 36E 36J 38G 38T 38K 39M 39A 39Q 39T 39K 39J 41M 41A 41Q 41T 41K 41J 42M 42A 42J 43M 43A 43Q 43T 43K 43J 44A 44O 44T 24Q 45M 45A 45Q 45T 45K 45J 46M 46A 46Q 46T 46K 46J 47M 47A 47Q 47T 47K 47J 49M 49A 49Q 49T 49Q 49J 51M 51A 51Q 51T 51K 51J 52M 52A 52Q 52T 52K 52J 33M 34M 61U 61F 61S 62U 63M 63A 63Q 63T 63K 63I 64M 64A 64Q 64T 64K 64J 65A 65Q 65T 65K 66G 67S 67Y 67M 67A 67T 67K 67J 68S 68Y 68G 68M 68A 68T 68W 68J 69S 69Y 81S 81Y 81M 81A 81Q 81T 81K 81J 82U 82F 82M 82A 82Q 82T 82K 82J 83U 83F 84U 84F 84M 84N 84Q 84T 84K 84J 85U 85F 86U 86F 87U 87F 88U 88F 89U 89F 54U 54F 55U 55F 56U 56F 57U 57F) | 41U30301 | |
| ScrollPoint Optical Mouse (800DPI, USB) (models ) | 41U3019 | 1 |
| 6395 Adapters and miscellaneous FRUs | FRU# | CRU |
| Modem Daughter Card (MDC 1.5) Kit (models) | 39T0495 | 2 |
| Modem Daughter Card (MDC 1.5) Kit Internal cable/RJ11 (models) | 41R8522 | 2 |
| Lenovo Branded speakers - 2 piece--primary (models) | 41A5331 | 1 |
| Lenovo Branded speakers - 2 piece--secondary (models) | 41A5334 | 1 |
| Speaker power brick (models) | 89P8571 | 1 |
| Thermal Grease Syringe (models) | 91P8835 | N |
| Vertical PC stand (VPC) for Blue 4.5L chassis (models) | 41R4770 | 2 |
| 6395 Power Cords | FRU# | CRU |
| Power cord - US/Canada (models 11S 11D 12S 12D 13S 14S 14D 16S 17S 17D 18S 18D 19S 21S 21D 23S 23D 25S 25D 29S 29D 32S 32D 23L 29L 11A 11T 14A 14T 15A 15T 17A 17T 18A 18T 19A 19T 21A 21T 23A 23T 24A 24T 26A 26T 29A 29T 17U 17F 23U 23F 26U 26F 27U 27F 28U 28F 29U 29F 31U 31F 36U 37U 36F 37F 33S 34S 36S 34D 36D 33A 34A 36A 33T 34T 36T 38A 39A 41A 42A 43A 44A 45A 46A 47A 49A 51A 52A 38T 39T 41T 43T 44T 45T 46T 47T 49T 51T 52T 61U 61F 61S 62U 63A 64A 65A 67S 67A 68S 69S 82U 82F 83U 83F 84U 84F 84A 85U 85F 86U 86F 87U 87F 88U 88F 89U 89F 54U 54F 55U 55F 56U 56F 57U 57F) | 42T50041 | |
| Power cord - Japan (models 14J 15J 17J 19J 21J 23J 24J 26J 36E 34J 33J 36J 39J 41J 42J 43J 45J 46J 47J 49J 51J 52J 63J 64J 67J 68J 82J 84J) | 42T5011 | 1 |
| Power cord - Argentina (models 23L 29L 11Y 12Y 14Y 17Y 18Y 21Y 23Y 25Y 29Y 32Y 36L 34Y36Y) | 42T50171 | |
| Power cord - Brazil (models) | 42T5174 | 1 |
| Power cord - Europe (Germany) (models 11A 14A 15A 17A 18A 19A 21A 23A 24A 26A 29A 33A 34A 36A 38A 39A 41A 42A 43A 44A 45A 46A 47A 49A 51A 52A 63A 64A 65A 67A 68A 81A 84A) | 42T50291 | |
| Power cord - UK (models 11A 14A 15A 17A 18A 19A 21A 23A 24A 26A 29A 12G 13G 16G 17G 23G 24G 29G 33A 34A 36A 38A 39A 41A 42A 43A 44A 45A 46A 47A 49A 51A 52A 63A 64A 65A 67A 68A 81A 84A) | 42T50351 | |
| Power cord - Denmark (models 12G 13G 16G 17G 23G 24G 29G 36G 37G) | 42T5041 | 1 |
| Power cord - Switzerland (models 12G 13G 16G 17G 23G 24G 29G 36G 37G 66G 68G) | 42T5044 | 1 |
| Power cord - Italy (models 23L 29L 11Y 12Y 14Y 17Y 18Y 21Y 23Y 25Y 29Y 32Y 11S 12S 13S 14S 16S 17S 18S 19S 21S 23S 25S 29S 32S 33S 34S 36S 34Y 36Y 67S 67Y 68S 68Y 69S 69Y81S81Y) | 42T50471 | |
| Power cord - Australia / New Zealand (models 14M 15M 17M 23M 24M 26M 29M 36M 39M 41M 42M 43M 45M 46M 47M 49M 51M 52M 33M 34M 63M 64M 67M 68M 81M 82M 84M) | 42T50501 | |
| Power cord - South Africa (models 14M 15M 17M 23M 24M 26M 29M 11A 14A 15A 17A 18A 19A 21A 23A 24A 26A 29A 12G 13G 16G 17G 23G 24G 29G 36G 37G 36M 39M 41M 42M 43M 45M 46M 47M 49M 51M 52M 33M 34M 38A 39A 41A 42A 43A 44A 45A 46A 47A 49A 51A 52A 63M 63A 64M 64A 65A 66G 67M 67A 68M 81M 81A 82M 84M) | 42T50561 | |
| Power cord - Israel (models 12G 13G 16G 17G 23G 24G 29G 36G 37G) | 42T5062 | 1 |
| Power cord - China (PRC) (models 13C 18C 23C 29C 36C) | 42T5065 | 1 |
| Power cord - Taiwan (models 21V 22V 23V 29V 34V 35V 36V ) | 42T5071 | 1 |
| Power cord - Korea (models 14K 17K 19K 21K 23K 24K 26K 29K 33K 34K 36K 36R 38K 39K 41K 43K 45K 46K 47K 49K 51K 52K 63K 64K 65K 67K 68K 82K 84K) | 42T50771 | |
| Power cord - India (models 33Q 34Q 36Q 19Q 21Q 23Q 26Q 29Q 63Q 64Q 65Q 81Q 82Q 84Q) | 42T50831 | |
| Power cord - Thailand (models 63T 64T 65T 67T 68T 81T 82T 84T) | 42T4406 | 1 |
| Power cord - US/Canada--optional second source (models 11S 11D 12S 12D 13S 14S 14D 16S 17S 17D 18S 18D 19S 21S 21D 23S 23D 25S 25D 29S 29D 32S 32D 23L 29L 11A 11T 14A 14T 15A 15T 17A 17T 18A 18T 19A 19T 21A 21T 23A 23T 24A 24T 26A 26T 29A 29T 17U 17F 23U 23F 26U 26F 27U 27F 28U 28F 29U 29F 31U 31F 36U 37U 36F 37F 33S 34S 36S 34D 36D 33A 34A 36A 33T 34T 36T 38A 39A 41A 42A 43A 44A 45A 46A 47A 49A 51A 52A 38T 39T 41T 43T 44T 45T 46T 47T 49T 51T 52T 61U 61F 61S 62U 63A 64A 65A 67S 67A 68S 69S 82U 82F 83U 83F 84U 84F 84A 85U 85F 86U 86F 87U 87F 88U 88F 89U 89F 54U 54F 55U 55F 56U 56F 57U 57F) | 42T50891 | |
| Power cord - Japan-optional second source (models 14J 15J 17J 19J 21J 23J 24J 26J 36E 34J 33J 36J 39J 41J 42J 43J 45J 46J 47J 49J 51J 52J 63J 64J 67J 68J 82J 84J) | 42T50961 | |
| Power cord - Argentina -optional second source (models 23L 29L 11Y 12Y 14Y 17Y 18Y 21Y 23Y 25Y 29Y 32Y 36L 34Y 36Y) | 42T51021 | |
| Power cord - Brazil (new type) -optional second source (models) | 42T5177 | 1 |
| Power cord - Europe (Germany) -optional second source (models 11A 14A 15A 17A 18A 19A 21A 23A 24A 26A 29A 33A 34A 36A 38A 39A 41A 42A 43A 44A 45A 46A 47A 49A 51A 52A 63A 64A 65A 67A 68A 81A 84A ) | 42T51141 | |
| Power cord - UK -optional second source (models 11A 14A 15A 17A 18A 19A 21A 23A 24A 26A 29A 12G 13G 16G 17G 23G 24G 29G 33A 34A 36A 38A 39A 41A 42A 43A 44A 45A 46A 47A 49A 51A 52A 63A 64A 65A 67A 68A 81A 84A) | 42T51201 | |
| Power cord - Denmark -optional second source (models 12G 13G 16G 17G 23G 24G 29G 36G37G) | 42T51261 | |
| Power cord - Switzerland -optional second source (models 12G 13G 16G 17G 23G 24G 29G 36G 37G 66G 68G ) | 42T51291 | |
| Power cord - Italy -optional second source (models 23L 29L 11Y 12Y 14Y 17Y 18Y 21Y 23Y 25Y 29Y 32Y 11S 12S 13S 14S 16S 17S 18S 19S 21S 23S 25S 29S 32S 33S 34S 36S 34Y 36Y 67S 67Y 68S 68Y 69S 69Y 81S 81Y) | 42T51321 | |
| Power cord - Australia/New Zealand -optional second source (models 14M 15M 17M 23M 24M 26M 29M 36M 39M 41M 42M 43M 45M 46M 47M 49M 51M 52M 33M 34M 63M 64M 67M 68M 81M 82M 84M) | 42T51351 | |
| Power cord - South Africa -optional second source (models 14M 15M 17M 23M 24M 26M 29M 11A 14A 15A 17A 18A 19A 21A 23A 24A 26A 29A 12G 13G 16G 17G 23G 24G 29G 36G 37G 36M 39M 41M 42M 43M 45M 46M 47M 49M 51M 52M 33M 34M 38A 39A 41A 42A 43A 44A 45A 46A 47A 49A 51A 52A 63M 63A 64M 64A 65A 66G 67M 67A 68M 81M 81A82M84M) | 42T51411 | |
| Power cord - Israel -optional second source (models 12G 13G 16G 17G 23G 24G 29G 36G 37G) | 42T51471 | |
| Power cord - China (PRC) -optional second source (models 13C 18C 23C 29C 36C) | 42T5150 | 1 |
| Power cord - Taiwan-optional second source (models 21V 22V 23V 29V 34V 35V 36V) | 42T5156 | 1 |
| Power cord - Korea-optional second source (models 14K 17K 19K 21K 23K 24K 26K 29K 33K 34K 36K 36R 38K 39K 41K 43K 45K 46K 47K 49K 51K 52K 63K 64K 65K 67K 68K 82K 84K) | 42T51621 | |
| Power cord - India-optional second source (models 33Q 34Q 36Q 19Q 21Q 23Q 26Q 29Q 63Q 64Q 65Q 81Q 82Q 84Q) | 42T51681 | |
| Power cord - Thailand-optional second source (models 63T 64T 65T 67T 68T 81T 82T 84T ) | 42T4400 | 1 |
| 6395 Windows XP Home Recovery CDs | FRU# | CRU |
| US/UK/AP/TH (models) | 45R6005 | 1 |
| FR/CF (models) | 45R6006 | 1 |
| GR (models) | 45R6007 | 1 |
| IT (models) | 45R6010 | 1 |
| BR (models) | 45R6009 | 1 |
| SP/LA (models) | 45R6008 | 1 |
| DK (models) | 45R6014 | 1 |
| NL (models) | 45R6015 | 1 |
| AE (models) | 45R6020 | 1 |
| SV (models) | 45R6013 | 1 |
| HE (models) | 45R6018 | 1 |
| FI (models) | 45R6017 | 1 |
| NO (models) | 45R6012 | 1 |
| PL (models) | 45R6019 | 1 |
| PO (models) | 45R6030 | 1 |
| RU (models) | 45R6021 | 1 |
| RE (models) | 45R6029 | 1 |
| HU (models) | 45R6023 | 1 |
| CZ (models) | 45R6016 | 1 |
| TR (models) | 45R6022 | 1 |
| GK (models) | 45R6024 | 1 |
| Japanese (models) | 45R6011 | 1 |
| Simplified Chinese (models) | 45R6025 | 1 |
| Taiwan-TC (models) | 45R6026 | 1 |
| Hong Kong-TC (models) | 45R6027 | 1 |
| Korea (models) | 45R6028 | 1 |
| 6395 Windows XP Pro Recovery CDs | FRU# | CRU |
| US/UK/AP/TH (models 39M 39A 39Q 41M 41A 41Q 43M 43A 43Q 45M 45A 45Q 63M 63A 63Q 82U 82M 82A 82Q 83U 84U 84M 84A 84Q 85U 86U 87U 88U 89U 54U 55U 56U 57U) | 45R59791 | |
| FR/CF (models 82F 83F 84F 85F 86F 87F 88F 89F 54F 55F 57F 56F) | 45R5980 | 1 |
| GR (models) | 45R5981 | 1 |
| IT (models) | 45R5984 | 1 |
| BR (models) | 45R5983 | 1 |
| SP/LA (models) | 45R5982 | 1 |
| DK (models) | 45R5988 | 1 |
| NL (models) | 45R5989 | 1 |
| AE (models) | 45R5994 | 1 |
| SV (Swedish) (models) | 45R5987 | 1 |
| HE (models) | 45R5992 | 1 |
| FI (models) | 45R5991 | 1 |
| NO (models) | 45R5986 | 1 |
| PL (models) | 45R5993 | 1 |
| PO (models) | 45R6004 | 1 |
| RU (models) | 45R5995 | 1 |
| RE (models) | 45R6003 | 1 |
| HU (models) | 45R5997 | 1 |
| CZ (models) | 45R5990 | 1 |
| TR (models) | 45R5996 | 1 |
| GK (models) | 45R5998 | 1 |
| Japanese (models 39J 41J 43J 45J 63J 82J 84J) | 45R5985 | 1 |
| Simplified Chinese (models) | 45R5999 | 1 |
| Taiwan-TC (models) | 45R6000 | 1 |
| Hong Kong-TC (models) | 45R6001 | 1 |
| Korea (models 39K 41K 43K 45K 63K 82K 84K) | 45R6002 | 1 |
| Multilingual 1 XP-P -- EN, NL, FR, GR, IT (models) | 45R5977 | 1 |
| Multilingual 2 XP-P -- EN, DK, FI, NO, SV (models) | 45R5978 | 1 |
| 6395 Vista Home Basic 32 Recovery DVDs | FRU# | CRU |
| English (models 13H) | 46R7098 | 1 |
| Russian English (models) | 46R7099 | 1 |
| French (models) | 46R7100 | 1 |
| German (models) | 46R7101 | 1 |
| Spanish (models) | 46R7102 | 1 |
| Brazilian (models) | 46R7103 | 1 |
| Italian (models) | 46R7104 | 1 |
| Japanese (models) | 46R7105 | 1 |
| Norwegian (models) | 46R7106 | 1 |
| Swedish (models) | 46R1086 | 1 |
| Danish (models) | 46R7107 | 1 |
| Dutch (models) | 46R1088 | 1 |
| Czech (models) | 46R1089 | 1 |
| Finnish (models) | 46R1090 | 1 |
| Polish (models) | 46R1091 | 1 |
| Russian (models) | 46R7108 | 1 |
| Turkish (models) | 46R1093 | 1 |
| Hungarian (models) | 46R1094 | 1 |
| Greek (models) | 46R1095 | 1 |
| Simplified Chinese (models) | 46R7109 | 1 |
| Taiwan (models) | 46R7110 | 1 |
| HongKong (models) | 46R7111 | 1 |
| Korea (models) | 46R1099 | 1 |
| Slovenian (models) | 46R1100 | 1 |
| Hebrew (models) | 46R1101 | 1 |
| Portuguese (models) | 46R1102 | 1 |
| Arabic Localized (models) | 46R1103 | 1 |
| Slovakia(models)46R11041 |
| 6395 Vista Business 32 Recovery DVDs | FRU# | CRU |
| English (models 15Q) | 46R7070 | 1 |
| Russian (models) | 46R7071 | 1 |
| French (models) | 46R7072 | 1 |
| German (models) | 46R7073 | 1 |
| Spanish (models 15S 15D 15Y 17S 17Y 18S 18Y) | 46R7074 | 1 |
| Brazilian (models) | 46R7075 | 1 |
| Italian (models) | 46R7076 | 1 |
| Japanese (models) | 46R7077 | 1 |
| Norwegian (models) | 46R7078 | 1 |
| Swedish (models) | 46R1028 | 1 |
| Danish (models) | 46R7079 | 1 |
| Dutch (models) | 46R1030 | 1 |
| Czech (models) | 46R1031 | 1 |
| Finnish (models) | 46R1032 | 1 |
| Polish (models) | 46R1033 | 1 |
| Russian (models) | 46R7080 | 1 |
| Turkish (models) | 46R1035 | 1 |
| Hungarian (models) | 46R1036 | 1 |
| Greek (models) | 46R1037 | 1 |
| Simplified Chinese (models 15C) | 46R7081 | 1 |
| Trad Chinese (models) | 46R7082 | 1 |
| Trad Chinese (models) | 46R7083 | 1 |
| Korean (models) | 46R1041 | 1 |
| Slovenian (models) | 46R1042 | 1 |
| Romanian (models) | 46R1043 | 1 |
| Portuguese (models) | 46R1044 | 1 |
| Serbian - Latin (models) | 46R1045 | 1 |
| Slovakian (models) | 46R1046 | 1 |
| Arabic Localized (models) | 46R1047 | 1 |
| Hebrew (models)46R10481 |
| 6395 Vista Ultimate 32 Recovery DVDs | FRU# | CRU |
| English (models) | 46R7112 | 1 |
| Russian (models) | 46R7113 | 1 |
| French (models) | 46R7114 | 1 |
| German (models) | 46R7115 | 1 |
| Spanish (models) | 46R7116 | 1 |
| Brazilian (models) | 46R7117 | 1 |
| Italian (models) | 46R7118 | 1 |
| Japanese (models) | 46R7119 | 1 |
| Norwegian (models) | 46R7120 | 1 |
| Swedish (models) | 46R1114 | 1 |
| Danish (models) | 46R7121 | 1 |
| Dutch (models) | 46R1116 | 1 |
| Czech (models) | 46R1117 | 1 |
| Finnish (models) | 46R1118 | 1 |
| Polish (models) | 46R1119 | 1 |
| Russian (models) | 46R7122 | 1 |
| Turkish (models) | 46R1121 | 1 |
| Hungarian (models) | 46R1122 | 1 |
| Greek (models) | 46R1123 | 1 |
| Simplified Chinese (models) | 46R7123 | 1 |
| Trad Chinese (models) | 46R7124 | 1 |
| Trad Chinese (models) | 46R7125 | 1 |
| Korean (models) | 46R1127 | 1 |
| Slovenian (models) | 46R1128 | 1 |
| Hebrew (models) | 46R1129 | 1 |
| Portuguese (models) | 46R1130 | 1 |
| Slovakian (models) | 46R1131 | 1 |
| Arabic Localized (models) | 46R1132 | 1 |
| 6395 Vista Business 64 Recovery DVDs | FRU# | CRU |
| English (models) | 46R7084 | 1 |
| Russian English (models) | 46R7085 | 1 |
| French (models) | 46R7086 | 1 |
| German (models) | 46R7087 | 1 |
| Spanish (models) | 46R7088 | 1 |
| Brazilian (models) | 46R7089 | 1 |
| Italian (models) | 46R7090 | 1 |
| Japanese (models) | 46R7091 | 1 |
| Norwegian (models) | 46R7092 | 1 |
| Swedish (models) | 46R1058 | 1 |
| Danish (models) | 46R7093 | 1 |
| Dutch (models) | 46R1060 | 1 |
| Czech (models) | 46R1061 | 1 |
| Finnish (models) | 46R1062 | 1 |
| Polish (models) | 46R1063 | 1 |
| Russian (models) | 46R7094 | 1 |
| Turkish (models) | 46R1065 | 1 |
| Hungarian (models) | 46R1066 | 1 |
| Greek (models) | 46R1067 | 1 |
| Simplified Chinese (models) | 46R7095 | 1 |
| Taiwan (models) | 46R7096 | 1 |
| HongKong (models) | 46R7097 | 1 |
| Korea (models) | 46R1071 | 1 |
| Slovenian (models) | 46R1072 | 1 |
| Arabic Localized (models) | 46R1073 | 1 |
| Hebrew (models) | 46R1074 | 1 |
| Portuguese (models) | 46R1075 | 1 |
| Slovakian (models) | 46R1076 | 1 |
MachineType6396
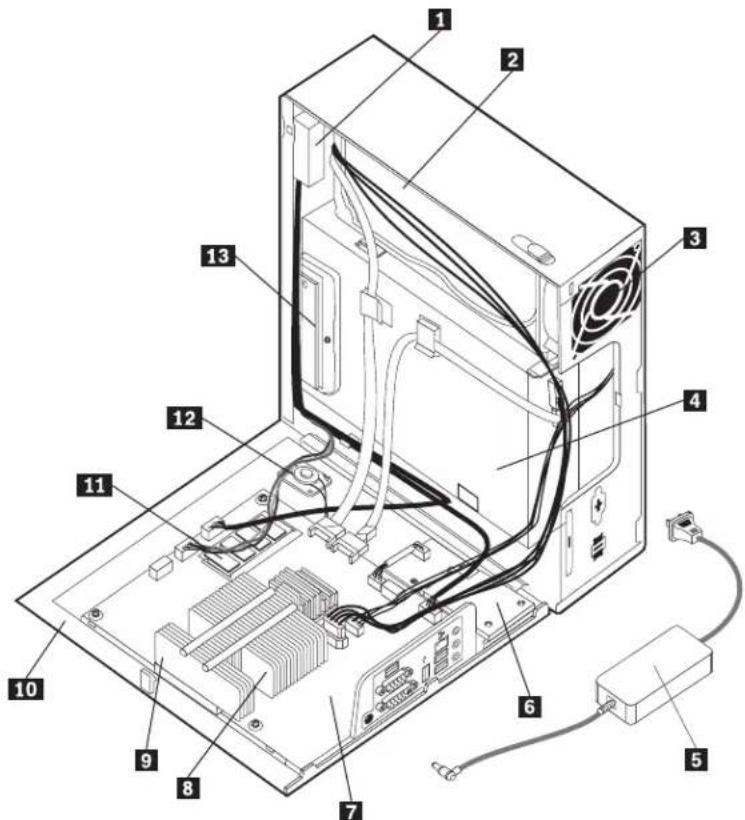
text_image
Labeled diagram of a computer tower internal structure showing numbered components for identification.| Item # | 6396 FRUs | FRU# | CRU |
| 1 | Front audio/USB card and cable (included in Cables kit 41R8510) (models) | 41R8510 | N |
| 2 | Hard disk drive, 80 GB 7200rpm SATA (models) | 40Y9034 | 2 |
| 2 | Hard disk drive, 160 GB 7200rpm SATA (models) | 40Y9035 | 2 |
| 2 | Hard disk drive, 25 GB 7200rpm SATA (models) | 40Y9036 | 2 |
| 2 | Hard disk drive, 320 GB 7200rpm SATA (models ) | 87H4891 | 2 |
| 2 | Hard disk drive, 500 GB 7200rpm SATA (models) | 41X5582 | 2 |
| 2 | Hard disk drive, 750 GB 7200rpm SATA (models) | 43C3671 | 2 |
| 2 | Hard disk drive, 1TB 7200rpm SATA (models CTO) | 45C5973 | 2 |
| 3 | System fan (models) | 41R8511 | 2 |
| 4 | DVD-ROM Drive - 16x/48x - SATA (models) | 41N3325 | 2 |
| 4 | DVD-ROM Drive - DVD-RW/CD-RW Rambo 8 (SATA) Matrix (models) | 43C1042 | 2 |
| 4 | DVD-ROM Drive - DVD-ROM/CD-RW Combo Drive - 48x/32x/48x/16x - SATA Matrix(models) | 42Y93532 | |
| 5 | Power Adapter, 120W AC/DC (models) | 41A9732 | 1 |
| 5 | Power Adapter, 120W power adapter (models) | 41A9747 | 1 |
| 6 | Express Card Assembly (models) | 41R8570 | N |
| 7 | System board, Mini-ITX Intel (Q35, ICH9DO) Codename: Neptune, v0.3 (models) | 45C5971 | N |
| 7 | System board, nonAMT-Mini-ITX Intel (Q35, ICH9DO) (models) | 45C7463 | N |
| 7 | System board, AMT-Mini-ITX Intel (Q35, ICH9DO) (models) | 45R5358 | N |
| 7 | System board, nonAMT-Mini-ITX Intel (Q35, ICH9DO) (models) | 45R5357 | N |
| 7 | System board, Mini-ITX Intel (Q35, ICH9DO) (models) | 46R3849 | N |
| 7 | System board, non-AMT Mini-ITX Intel (Q35, ICH9DO) (models) | 46R3848 | N |
| 8 | Microprocessor, Intel Conroe E6750 (Core2 Duo) 2.66GHz, G-0 Stepping, 65nm, 1333MHZ FSB, 4MB L2 (models) | 45C6898N | |
| 8 | Microprocessor, Intel Conroe E6550 (Core2 Duo) 2.33GHz, G-0 Stepping, 65nm, 1333MHz FSB, 4MB L2 (models) | 45C6899N | |
| 8 | Microprocessor, Intel Conroe E4500 (Core2 Duo) 2.20GHz, M-0 Stepping, 65nm, 800MHz FSB, 2MB L2 (models) | 45C6900N | |
| 8 | Microprocessor, Intel Conroe E2160 (Pentium D) 1.8GHz, M-0 Stepping, 65nm, 800MHz FSB, 1MB L2 (models) | 45C6901N | |
| 8 | Microprocessor, Intel Conroe-L 440 (Celeron) 2.0GHz, A-1 Stepping, 65nm, 800MHz FSB, 512KB L2 (models) | 45C6902N | |
| 8 | Microprocessor, Intel Wolfdale E8400 (Core2 Duo) 3.0GHz, C-0 Stepping, 45nm, 1333MHz FSB, 6MB L2 (models) | 45C8499N | |
| 8 | Microprocessor, Intel Wolfdale E8200 (Core2 Duo) 2.66GHz, C-0 Stepping, 45nm, 1333MHz FSB, 6MB L2 (models) | 45C8531N | |
| 8 | Microprocessor, E7200, 2.53GHz, 1066MHz FSB, 3MB L2 (models) | 46R4261 | N |
| 8 | Microprocessor, E2200, 2.20GHz, 800MHz FSB, 1MB L2 (models) | 46R4260 | N |
| 9 | Heat sink Intel (models) | 41R8545 | 2 |
| 11 | Memory module, 512MB DDR2 PC2-5300 (667MHz) SoDIMM (models) | 43C3814 | 2 |
| 11 | Memory module, 1GB DDR2 PC2-5300 (667MHz) SoDIMM (models) | 43C3815 | 2 |
| 11 | Memory module, 2GB DDR2 PC2-5300 (667MHz) SoDIMM (models) | 43C6489 | 2 |
| 12 | Internal speaker (models) | 41R8517 | 2 |
| 13 | Media card reader (models) | 41R8568 | N |
The FRUs listed in the following tables are not illustrated.
| 6396 FRUs | FRU# | CRU |
| Hard Disk Drive tray (models) | 41R8518 | 2 |
| Shield Kit (models) | 41R8543 | N |
| Cable, C2 Swtich/Housing assembly (models) | 41R8544 | N |
| Cable, Serial (models) | 41R8548 | N |
| USB Cable (models) | 41R8560 | N |
| Kit, Shell (models) | 41R8563 | N |
| 6396 Keyboards (USB Preferred Pro) | FRU# | CRU |
| US English (models) | 41A5289 | 1 |
| Arabic(models) | 41A5290 | 1 |
| Arabic/French (models) | 41A5291 | 1 |
| Belgian/French (models) | 41A5292 | 1 |
| Belgian/UK (models) | 41A5293 | 1 |
| Brazilian (models) | 41A5294 | 1 |
| Bulgarian (models) | 41A5295 | 1 |
| Hong Kong/Taiwan (models) | 41A5296 | 1 |
| Czech (models) | 41A5297 | 1 |
| Danish (models) | 41A5298 | 1 |
| Dutch (models) | 41A5299 | 1 |
| French (models) | 41A5300 | 1 |
| French Canadian 445 (models) | 41A5301 | 1 |
| French Canadian 58 (models) | 41A5302 | 1 |
| German (models) | 41A5303 | 1 |
| Greek (models) | 41A5304 | 1 |
| Greek/US (models) | 41A5305 | 1 |
| Hebrew (models) | 41A5306 | 1 |
| Hungarian (models) | 41A5307 | 1 |
| Iceland (models) | 41A5308 | 1 |
| Italian (models) | 41A5309 | 1 |
| Japanese (models) | 41A5310 | 1 |
| Korean (models) | 41A5311 | 1 |
| LA Spanish (models) | 41A5312 | 1 |
| Norwegian (models) | 41A5313 | 1 |
| Polish (models) | 41A5314 | 1 |
| Portuguese (models) | 41A5315 | 1 |
| Romanian 446 (models) | 41A5316 | 1 |
| Romanian 096 (models) | 41A5317 | 1 |
| Russian/Cyrillic (models) | 41A5318 | 1 |
| Serbian/Cyrillic (models) | 41A5319 | 1 |
| Slovak (models) | 41A5320 | 1 |
| Spanish (models ) | 41A5321 | 1 |
| Swedish/Finn (models) | 41A5322 | 1 |
| Swiss (models) | 41A5323 | 1 |
| Thailand (models) | 41A5324 | 1 |
| Turkish 440 (models) | 41A5325 | 1 |
| Turkish 179 (models) | 41A5326 | 1 |
| UK English (models) | 41A5327 | 1 |
| US Euro (models) | 41A5328 | 1 |
| Slovenian (models) | 41A5329 | 1 |
| 6396 Keyboard (USB Preferred Pro Fingerprint Keyboard) | FRU# | CRU |
| US (models) | 41A5248 | 1 |
| Arabic (models) | 41A5249 | 1 |
| Arabic/French (models) | 41A5250 | 1 |
| Belgian/French (models) | 41A5251 | 1 |
| Belgian/UK (models) | 41A5252 | 1 |
| Brazil/Portuguese (models) | 41A5253 | 1 |
| Bulgarian (models) | 41A5254 | 1 |
| Chinese/US (models) | 41A5255 | 1 |
| Czech (models) | 41A5256 | 1 |
| Danish (models) | 41A5257 | 1 |
| Dutch (models) | 41A5258 | 1 |
| French (models) | 41A5259 | 1 |
| French Canadian 445 (models) | 41A5260 | 1 |
| French Canadian 58 (models) | 41A5261 | 1 |
| German (models) | 41A5262 | 1 |
| Greek (models) | 41A5263 | 1 |
| Greek/US (models) | 41A5264 | 1 |
| Hebrew (models) | 41A5265 | 1 |
| Hungarian (models) | 41A5266 | 1 |
| Iceland (models) | 41A5267 | 1 |
| Italian (models) | 41A5268 | 1 |
| Japanese (models) | 41A5269 | 1 |
| Korean (models) | 41A5270 | 1 |
| LA Spanish (models) | 41A5271 | |
| Norwegian (models) | 41A5272 | 1 |
| Polish (models) | 41A5273 | 1 |
| Portugese (models) | 41A5274 | 1 |
| Romanian 446 (models) | 41A5276 | 1 |
| Romanian 96 (models) | 41A5275 | 1 |
| Russian/Cyrilic (models) | 41A5277 | 1 |
| Serbian/Cyrilic (models) | 41A5278 | 1 |
| Slovak (models) | 41A5279 | 1 |
| Spanish (models) | 41A5280 | 1 |
| Swedish/Finn (models) | 41A5281 | 1 |
| Swiss, F/G (models) | 41A5282 | 1 |
| Thailand (models) | 41A5283 | 1 |
| Turkish 179 (models) | 41A5284 | 1 |
| Turkish 440 (models) | 41A5285 | 1 |
| UK (models) | 41A5286 | 1 |
| US Euro (models) | 41A5287 | 1 |
| Slovenian (models) | 41A5288 | 1 |
| 6396 mice | FRU# | CRU |
| Optical Wheel Mouse (400DPI, USB) (models) | 41U3013 | 1 |
| Optical Wheel Mouse (400DPI, USB) (models) | 41U3030 | 1 |
| ScrollPoint Optical Mouse (800DPI, USB) (models) | 41U3019 | 1 |
| 6396 Adapters and miscellaneous FRUs | FRU# | CRU |
| Modem Daughter Card (MDC 1.5) Kit (models) | 39T0495 | 2 |
| Modem Daughter Card (MDC 1.5) Kit Internal cable/RJ11 (models) | 41R8522 | 2 |
| Lenovo Branded speakers - 2 piece--primary (models) | 41A5331 | 1 |
| Lenovo Branded speakers - 2 piece--secondary (models) | 41A5334 | 1 |
| Speaker power brick (models) | 89P8571 | 1 |
| Thermal Grease Syringe (models) | 91P8835 | N |
| Vertical PC stand (VPC) for Blue 4.5L chassis (models) | 41R4770 | 2 |
| PWR/LED Cable Assembly (models) | 41R8555 | N |
| 6396 Power Cords | FRU# | CRU |
| Power cord - US/Canada (models) | 42T5004 | 1 |
| Power cord - Japan (models) | 42T5011 | 1 |
| Power cord - Argentina (models) | 42T5017 | 1 |
| Power cord - Brazil (models) | 42T5174 | 1 |
| Power cord - Europe (Germany) (models) | 42T5029 | 1 |
| Power cord - UK (models) | 42T5035 | 1 |
| Power cord - Denmark (models) | 42T5041 | 1 |
| Power cord - Switzerland (models) | 42T5044 | 1 |
| Power cord - Italy (models) | 42T5047 | 1 |
| Power cord - Australia / New Zealand (models) | 42T5050 | 1 |
| Power cord - South Africa (models) | 42T5056 | 1 |
| Power cord - Israel (models) | 42T5062 | 1 |
| Power cord - China (PRC) (models) | 42T5065 | 1 |
| Power cord - Taiwan (models) | 42T5071 | 1 |
| Power cord - Korea (models) | 42T5077 | 1 |
| Power cord - India (models) | 42T5083 | 1 |
| Power cord - Thailand (models) | 42T4406 | 1 |
| Power cord - US/Canada--optional second source (models) | 42T5089 | 1 |
| Power cord - Japan-optional second source (models) | 42T5096 | 1 |
| Power cord - Argentina -optional second source (models) | 42T5102 | 1 |
| Power cord - Brazil (new type) -optional second source (models) | 42T5177 | 1 |
| Power cord - Europe (Germany) -optional second source (models) | 42T5114 | 1 |
| Power cord - UK -optional second source (models) | 42T5120 | 1 |
| Power cord - Denmark -optional second source (models) | 42T5126 | 1 |
| Power cord - Switzerland -optional second source (models) | 42T5129 | 1 |
| Power cord - Italy -optional second source (models ) | 42T5132 | 1 |
| Power cord - Australia/New Zealand -optional second source (models) | 42T5135 | 1 |
| Power cord - South Africa -optional second source (models) | 42T5141 | 1 |
| Power cord - Israel -optional second source (models) | 42T5147 | 1 |
| Power cord - China (PRC) -optional second source (models) | 42T5150 | 1 |
| Power cord - Taiwan -optional second source (models) | 42T5156 | 1 |
| Power cord - Korea -optional second source (models) | 42T5162 | 1 |
| Power cord - India -optional second source (models) | 42T5168 | 1 |
| Power cord - Thailand -optional second source (models) | 42T4400 | 1 |
| 6396 Windows XP Home Recovery CDs | FRU# | CRU |
| US/UK/AP/TH (models) | 45R6005 | 1 |
| FR/CF (models) | 45R6006 | 1 |
| GR (models) | 45R6007 | 1 |
| IT (models) | 45R6010 | 1 |
| BR (models) | 45R6009 | 1 |
| SP/LA (models) | 45R6008 | 1 |
| DK (models) | 45R6014 | 1 |
| NL (models) | 45R6015 | 1 |
| AE (models) | 45R6020 | 1 |
| SV (models) | 45R6013 | 1 |
| HE (models) | 45R6018 | 1 |
| FI (models) | 45R6017 | 1 |
| NO (models) | 45R6012 | 1 |
| PL (models) | 45R6019 | 1 |
| PO (models) | 45R6030 | 1 |
| RU (models) | 45R6021 | 1 |
| RE (models) | 45R6029 | 1 |
| HU (models) | 45R6023 | 1 |
| CZ (models) | 45R6016 | 1 |
| TR (models) | 45R6022 | 1 |
| GK (models) | 45R6024 | 1 |
| Japanese (models) | 45R6011 | 1 |
| Simplified Chinese (models) | 45R6025 | 1 |
| Taiwan-TC (models) | 45R6026 | 1 |
| Hong Kong-TC (models) | 45R6027 | 1 |
| Korea (models) | 45R6028 | 1 |
| 6396 Windows XP Pro Recovery CDs | FRU# | CRU |
| US/UK/AP/TH (models) | 45R5979 | 1 |
| FR/CF (models) | 45R5980 | 1 |
| GR (models) | 45R5981 | 1 |
| IT (models) | 45R5984 | 1 |
| BR (models) | 45R5983 | 1 |
| SP/LA (models) | 45R5982 | 1 |
| DK (models) | 45R5988 | 1 |
| NL (models) | 45R5989 | 1 |
| AE (models) | 45R5994 | 1 |
| SV (Swedish) (models) | 45R5987 | 1 |
| HE (models) | 45R5992 | 1 |
| FI (models) | 45R5991 | 1 |
| NO (models) | 45R5986 | 1 |
| PL (models) | 45R5993 | 1 |
| PO (models) | 45R6004 | 1 |
| RU (models) | 45R5995 | 1 |
| RE (models) | 45R6003 | 1 |
| HU (models) | 45R5997 | 1 |
| CZ (models) | 45R5990 | 1 |
| TR (models) | 45R5996 | 1 |
| GK (models) | 45R5998 | 1 |
| Japanese (models) | 45R5985 | 1 |
| Simplified Chinese (models) | 45R5999 | 1 |
| Taiwan-TC (models) | 45R6000 | 1 |
| Hong Kong-TC (models) | 45R6001 | 1 |
| Korea (models) | 45R6002 | 1 |
| Multilingual 1 XP-P -- EN, NL, FR, GR, IT (models) | 45R5977 | 1 |
| Multilingual 2 XP-P -- EN, DK, FI, NO, SV (models) | 45R5978 | 1 |
| 6396 Vista Home Basic 32 Recovery DVDs | FRU# | CRU |
| English (models 13H) | 46R7098 | 1 |
| Russian English (models) | 46R7099 | 1 |
| French (models) | 46R7100 | 1 |
| German (models) | 46R7101 | 1 |
| Spanish (models) | 46R7102 | 1 |
| Brazilian (models) | 46R7103 | 1 |
| Italian (models) | 46R7104 | 1 |
| Japanese (models) | 46R7105 | 1 |
| Norwegian (models) | 46R7106 | 1 |
| Swedish (models) | 46R1086 | 1 |
| Danish (models) | 46R7107 | 1 |
| Dutch (models) | 46R1088 | 1 |
| Czech (models) | 46R1089 | 1 |
| Finnish (models) | 46R1090 | 1 |
| Polish (models) | 46R1091 | 1 |
| Russian (models) | 46R7108 | 1 |
| Turkish (models) | 46R1093 | 1 |
| Hungarian (models) | 46R1094 | 1 |
| Greek (models) | 46R1095 | 1 |
| Simplified Chinese (models) | 46R7109 | 1 |
| Taiwan (models) | 46R7110 | 1 |
| HongKong (models) | 46R7111 | 1 |
| Korea (models) | 46R1099 | 1 |
| Slovenian (models) | 46R1100 | 1 |
| Hebrew (models) | 46R1101 | 1 |
| Portuguese (models) | 46R1102 | 1 |
| Arabic Localized (models) | 46R1103 | 1 |
| Slovakia (models) | 46R1104 | 1 |
| 6396 Vista Business 32 Recovery DVDs | FRU# | CRU |
| English (models 15Q) | 46R7070 | 1 |
| Russian (models) | 46R7071 | 1 |
| French (models) | 46R7072 | 1 |
| German (models) | 46R7073 | 1 |
| Spanish (models 15S 15D 15Y 17S 17Y 18S 18Y) | 46R7074 | 1 |
| Brazilian (models) | 46R7075 | 1 |
| Italian (models) | 46R7076 | 1 |
| Japanese (models) | 46R7077 | 1 |
| Norwegian (models) | 46R7078 | 1 |
| Swedish (models) | 46R1028 | 1 |
| Danish (models) | 46R7079 | 1 |
| Dutch (models) | 46R1030 | 1 |
| Czech (models) | 46R1031 | 1 |
| Finnish (models) | 46R1032 | 1 |
| Polish (models) | 46R1033 | 1 |
| Russian (models) | 46R7080 | 1 |
| Turkish (models) | 46R1035 | 1 |
| Hungarian (models) | 46R1036 | 1 |
| Greek (models) | 46R1037 | 1 |
| Simplified Chinese (models 15C) | 46R7081 | 1 |
| Trad Chinese (models) | 46R7082 | 1 |
| Trad Chinese (models) | 46R7083 | 1 |
| Korean (models) | 46R1041 | 1 |
| Slovenian (models) | 46R1042 | 1 |
| Romanian (models) | 46R1043 | 1 |
| Portuguese (models) | 46R1044 | 1 |
| Serbian - Latin (models) | 46R1045 | 1 |
| Slovakian (models) | 46R1046 | 1 |
| Arabic Localized (models) | 46R1047 | 1 |
| Hebrew(models)46R10481 |
| 6396 Vista Ultimate 32 Recovery DVDs | FRU# | CRU |
| English (models) | 46R7112 | 1 |
| Russian (models) | 46R7113 | 1 |
| French (models) | 46R7114 | 1 |
| German (models) | 46R7115 | 1 |
| Spanish (models) | 46R7116 | 1 |
| Brazilian (models) | 46R7117 | 1 |
| Italian (models) | 46R7118 | 1 |
| Japanese (models) | 46R7119 | 1 |
| Norwegian (models) | 46R7120 | 1 |
| Swedish (models) | 46R1114 | 1 |
| Danish (models) | 46R7121 | 1 |
| Dutch (models) | 46R1116 | 1 |
| Czech (models) | 46R1117 | 1 |
| Finnish (models) | 46R1118 | 1 |
| Polish (models) | 46R1119 | 1 |
| Russian (models) | 46R7122 | 1 |
| Turkish (models) | 46R1121 | 1 |
| Hungarian (models) | 46R1122 | 1 |
| Greek (models) | 46R1123 | 1 |
| Simplified Chinese (models) | 46R7123 | 1 |
| Trad Chinese (models) | 46R7124 | 1 |
| Trad Chinese (models) | 46R7125 | 1 |
| Korean (models) | 46R1127 | 1 |
| Slovenian (models) | 46R1128 | 1 |
| Hebrew (models) | 46R1129 | 1 |
| Portuguese (models) | 46R1130 | 1 |
| Slovakian (models) | 46R1131 | 1 |
| Arabic Localized (models) | 46R1132 | 1 |
| 6396 Vista Business 64 Recovery DVDs | FRU# | CRU |
| English (models) | 46R7084 | 1 |
| Russian English (models) | 46R7085 | 1 |
| French (models) | 46R7086 | 1 |
| German (models) | 46R7087 | 1 |
| Spanish (models) | 46R7088 | 1 |
| Brazilian (models) | 46R7089 | 1 |
| Italian (models) | 46R7090 | 1 |
| Japanese (models) | 46R7091 | 1 |
| Norwegian (models) | 46R7092 | 1 |
| Swedish (models) | 46R1058 | 1 |
| Danish (models) | 46R7093 | 1 |
| Dutch (models) | 46R1060 | 1 |
| Czech (models) | 46R1061 | 1 |
| Finnish (models) | 46R1062 | 1 |
| Polish (models) | 46R1063 | 1 |
| Russian (models) | 46R7094 | 1 |
| Turkish (models) | 46R1065 | 1 |
| Hungarian (models) | 46R1066 | 1 |
| Greek (models) | 46R1067 | 1 |
| Simplified Chinese (models) | 46R7095 | 1 |
| Taiwan (models) | 46R7096 | 1 |
| HongKong (models) | 46R7097 | 1 |
| Korea (models) | 46R1071 | 1 |
| Slovenian (models) | 46R1072 | 1 |
| Arabic Localized (models) | 46R1073 | 1 |
| Hebrew (models) | 46R1074 | 1 |
| Portuguese (models) | 46R1075 | 1 |
| Slovakian (models) | 46R1076 | 1 |
MachineType6397

text_image
Labeled diagram of a computer tower internal structure showing numbered components for identification.| Item # | 6397 FRUs | FRU# | CRU |
| 1 | Front audio/USB card and cable (included in Cables kit 41R8510) (all models) | 41R8510 | N |
| 2 | Hard disk drive, 80 GB 7200rpm SATA (models) | 40Y9034 | 2 |
| 2 | Hard disk drive, 160 GB 7200rpm SATA (models 11U 11F 11S 11L 11D 11Y 11G 11M 11A 11Q 11T 11C 11B 11H 11V 11K 11R 11E 11J) | 40Y90352 | |
| 2 | Hard disk drive, 25 GB 7200rpm SATA (models) | 40Y9036 | 2 |
| 2 | Hard disk drive, 320 GB 7200rpm SATA (models ) | 87H4891 | 2 |
| 2 | Hard disk drive, 500 GB 7200rpm SATA (models) | 41X5582 | 2 |
| 2 | Hard disk drive, 750 GB 7200rpm SATA (models) | 43C3671 | 2 |
| 2 | Hard disk drive, 1TB 7200rpm SATA (models CTO) | 45C5973 | 2 |
| 3 | System fan (all models) | 41R8511 | 2 |
| 4 | DVD-ROM Drive - 16x/48x - SATA (models 11U 11F 11S 11L 11D 11Y 11G 11M 11A 11Q 11T 11C 11B 11H 11V 11K 11R 11E 11J) | 41N3325 | 2 |
| 4 | DVD-ROM Drive - DVD-RW/CD-RW Rambo 8 (SATA) Matrix (models) | 43C1042 | 2 |
| 4 | DVD-ROM Drive - DVD-ROM/CD-RW Combo Drive - 48x/32x/48x/16x - SATA Matrix(models) | 42Y93532 | |
| 5 | Power Adapter, 120W AC/DC (models 11U 11F 11S 11L 11D 11Y 11G 11M 11A 11Q 11T 11C 11B 11H 11V 11K 11R 11E 11J) | 41A9732 | 1 |
| 5 | Power Adapter, 120W power adapter (models) | 41A9747 | 1 |
| 6 | Express Card Assembly (all models) | 41R8570 | N |
| 7 | System board, Mini-ITX Intel (Q35, ICH9DO) Codename: Neptune, v0.3 (models 11U 11F 11S 11L 11D 11Y 11G 11M 11A 11Q 11T 11C 11B 11H 11V 11K 11R 11E 11J) | 45C5971N | |
| 7 | System board, nonAMT-Mini-ITX Intel (Q35, ICH9DO) (models) | 45C7463 | N |
| 7 | System board, AMT-Mini-ITX Intel (Q35, ICH9DO) (models 11U 11F 11S 11L 11D 11Y 11G 11M 11A 11Q 11T 11C 11B 11H 11V 11K 11R 11E 11J) | 45R5358N | |
| 7 | System board, nonAMT-Mini-ITX Intel (Q35, ICH9DO) (models) | 45R5357 | N |
| 7 | System board, Mini-ITX Intel (Q35, ICH9DO) (models 11U 11F 11S 11L 11D 11Y 11G 11M 11A 11Q 11T 11C 11B 11H 11V 11K 11R 11E 11J) | 46R3849N | |
| 7 | System board, non-AMT Mini-ITX Intel (Q35, ICH9DO) (models) | 46R3848 | N |
| 8 | Microprocessor, Intel Conroe E6750 (Core2 Duo) 2.66GHz, G-0 Stepping, 65nm, 1333MHZ FSB, 4MB L2 (models) | 45C6898N | |
| 8 | Microprocessor, Intel Conroe E6550 (Core2 Duo) 2.33GHz, G-0 Stepping, 65nm, 1333MHz FSB, 4MB L2 (models) | 45C6899N | |
| 8 | Microprocessor, Intel Conroe E4500 (Core2 Duo) 2.20GHz, M-0 Stepping, 65nm, 800MHz FSB, 2MB L2 (models) | 45C6900N | |
| 8 | Microprocessor, Intel Conroe E2160 (Pentium D) 1.8GHz, M-0 Stepping, 65nm, 800MHz FSB, 1MB L2 (models) | 45C6901N | |
| 8 | Microprocessor, Intel Conroe-L 440 (Celeron) 2.0GHz, A-1 Stepping, 65nm, 800MHz FSB, 512KB L2 (models) | 45C6902N | |
| 8 | Microprocessor, Intel Wolfdale E8400 (Core2 Duo) 3.0GHz, C-0 Stepping, 45nm, 1333MHz FSB, 6MB L2 (models) | 45C8499N | |
| 8 | Microprocessor, Intel Wolfdale E8200 (Core2 Duo) 2.66GHz, C-0 Stepping, 45nm, 1333MHz FSB, 6MB L2 (models 11U 11F 11S 11L 11D 11Y 11G 11M 11A 11Q 11T 11C 11B 11H 11V 11K 11R 11E 11J) | 45C8531N | |
| 8 | Microprocessor, E7200, 2.53GHz, 1066MHz FSB, 3MB L2 (models) | 46R4261 | N |
| 8 | Microprocessor, E2200, 2.20GHz, 800MHz FSB, 1MB L2 (models) | 46R4260 | N |
| 9 | Heat sink Intel (all models) | 41R8545 | 2 |
| 11 | Memory module, 512MB DDR2 PC2-5300 (667MHz) SoDIMM (all models) | 43C3814 | 2 |
| 11 | Memory module, 1GB DDR2 PC2-5300 (667MHz) SoDIMM (models) | 43C3815 | 2 |
| 11 | Memory module, 2GB DDR2 PC2-5300 (667MHz) SoDIMM (models 11U 11F 11S 11L 11D 11Y 11G 11M 11A 11Q 11T 11C 11B 11H 11V 11K 11R 11E 11J) | 43C6489 | 2 |
| 12 | Internal speaker (all models) | 41R8517 | 2 |
| 13 | Media card reader (all models) | 41R8568 | N |
The FRUs listed in the following tables are not illustrated.
| 6397 FRUs | FRU# | CRU |
| Hard Disk Drive tray (all models) | 41R8518 | 2 |
| Shield Kit (all models) | 41R8543 | N |
| Cable, C2 Swtich/Housing assembly (all models) | 41R8544 | N |
| Cable, Serial (all models) | 41R8548 | N |
| USB Cable (all models) | 41R8560 | N |
| Kit, Shell (all models) | 41R8563 | N |
| PWR/LED Cable Assembly (all models) | 41R8555 | N |
| 6397 Keyboards (USB Preferred Pro) | FRU# | CRU |
| US English (models 11U 11G 11M 11A 11Q 11H 11R 11E) | 41A5289 | 1 |
| Arabic(models)41A52901 | ||
| Arabic/French (models 11G) | 41A5291 | 1 |
| Belgian/French (models 11G) | 41A5292 | 1 |
| Belgian/UK (models 11G) | 41A5293 | 1 |
| Brazilian (models) | 41A5294 | 1 |
| Bulgarian (models 11G) | 41A5295 | 1 |
| Hong Kong/Taiwan (models 11B 11V) | 41A5296 | 1 |
| Czech (models 11G ) | 41A5297 | 1 |
| Danish (models 11G) | 41A5298 | 1 |
| Dutch (models 11G ) | 41A5299 | 1 |
| French (models 11G) | 41A5300 | 1 |
| French Canadian 445 (models 11F) | 41A5301 | 1 |
| French Canadian 58 (models 11F) | 41A5302 | 1 |
| German (models 11G) | 41A5303 | 1 |
| Greek (models 11G ) | 41A5304 | 1 |
| Greek/US (models 11G ) | 41A5305 | 1 |
| Hebrew (models 11G) | 41A5306 | 1 |
| Hungarian (models 11G) | 41A5307 | 1 |
| Iceland (models 11G) | 41A5308 | 1 |
| Italian (models 11G) | 41A5309 | 1 |
| Japanese (models 11K) | 41A5310 | 1 |
| Korean (models 11J) | 41A5311 | 1 |
| LA Spanish (models 11S 11D 11Y) | 41A5312 | 1 |
| Norwegian (models 11G) | 41A5313 | 1 |
| Polish (models 11G) | 41A5314 | 1 |
| Portuguese (models 11G) | 41A5315 | 1 |
| Romanian 446 (models 11G) | 41A5316 | 1 |
| Romanian 096 (models 11G) | 41A5317 | 1 |
| Russian/Cyrillic (models 11G) | 41A5318 | 1 |
| Serbian/Cyrillic (models 11G) | 41A5319 | 1 |
| Slovak (models 11G) | 41A5320 | 1 |
| Spanish (models 11G) | 41A5321 | 1 |
| Swedish/Finn (models 11G) | 41A5322 | 1 |
| Swiss (models 11G) | 41A5323 | 1 |
| Thailand (models 11T) | 41A5324 | 1 |
| Turkish 440 (models 11G) | 41A5325 | 1 |
| Turkish 179 (models 11G) | 41A5326 | 1 |
| UK English (models 11G) | 41A5327 | 1 |
| US Euro (models 11G) | 41A5328 | 1 |
| Slovenian (models 11G) | 41A5329 | 1 |
| 6397 Keyboard (USB Preferred Pro Fingerprint Keyboard) | FRU# | CRU |
| US (models) | 41A5248 | 1 |
| Arabic (models) | 41A5249 | 1 |
| Arabic/French (models) | 41A5250 | 1 |
| Belgian/French (models) | 41A5251 | 1 |
| Belgian/UK (models) | 41A5252 | 1 |
| Brazil/Portuguese (models) | 41A5253 | 1 |
| Bulgarian (models) | 41A5254 | 1 |
| Chinese/US (models) | 41A5255 | 1 |
| Czech (models) | 41A5256 | 1 |
| Danish (models) | 41A5257 | 1 |
| Dutch (models) | 41A5258 | 1 |
| French (models) | 41A5259 | 1 |
| French Canadian 445 (models) | 41A5260 | 1 |
| French Canadian 58 (models) | 41A5261 | 1 |
| German (models) | 41A5262 | 1 |
| Greek (models) | 41A5263 | 1 |
| Greek/US (models) | 41A5264 | 1 |
| Hebrew (models) | 41A5265 | 1 |
| Hungarian (models) | 41A5266 | 1 |
| Iceland (models) | 41A5267 | 1 |
| Italian (models) | 41A5268 | 1 |
| Japanese (models) | 41A5269 | 1 |
| Korean (models) | 41A5270 | 1 |
| LA Spanish (models) | 41A5271 | |
| Norwegian (models) | 41A5272 | 1 |
| Polish (models) | 41A5273 | 1 |
| Portugese (models) | 41A5274 | 1 |
| Romanian 446 (models) | 41A5276 | 1 |
| Romanian 96 (models) | 41A5275 | 1 |
| Russian/Cyrilic (models) | 41A5277 | 1 |
| Serbian/Cyrilic (models) | 41A5278 | 1 |
| Slovak (models) | 41A5279 | 1 |
| Spanish (models) | 41A5280 | 1 |
| Swedish/Finn (models) | 41A5281 | 1 |
| Swiss, F/G (models) | 41A5282 | 1 |
| Thailand (models) | 41A5283 | 1 |
| Turkish 179 (models) | 41A5284 | 1 |
| Turkish 440 (models) | 41A5285 | 1 |
| UK (models) | 41A5286 | 1 |
| US Euro(models) | 41A5287 | 1 |
| Slovenian(models)41A52881 |
| 6397 mice | FRU# | CRU |
| Optical Wheel Mouse (400DPI, USB) (models 11U 11F 11S 11L 11D 11Y 11G 11M 11A 11Q 11T 11C 11B 11H 11V 11K 11R 11E 11J) | 41U30131 | |
| Optical Wheel Mouse (400DPI, USB) (models 11U 11F 11S 11L 11D 11Y 11G 11M 11A 11Q 11T 11C 11B 11H 11V 11K 11R 11E 11J) | 41U20301 | |
| ScrollPoint Optical Mouse (800DPI, USB) (models) | 41U3019 | 1 |
| 6397 Adapters and miscellaneous FRUs | FRU# | CRU |
| Modem Daughter Card (MDC 1.5) Kit (models) | 39T0495 | 2 |
| Modem Daughter Card (MDC 1.5) Kit Internal cable/RJ11 (models) | 41R8522 | 2 |
| Lenovo Branded speakers - 2 piece--primary (models) | 41A5331 | 1 |
| Lenovo Branded speakers - 2 piece--secondary (models) | 41A5334 | 1 |
| Speaker power brick (models) | 89P8571 | 1 |
| Thermal Grease Syringe (models) | 91P8835 | N |
| Vertical PC stand (VPC) for Blue 4.5L chassis (models) | 41R4770 | 2 |
| 6397 Power Cords | FRU# | CRU |
| Power cord - US/Canada (models 11U 11F 11S 11D 11L 11A 11T) | 42T5004 | 1 |
| Power cord - Japan (models 11J) | 42T5011 | 1 |
| Power cord - Argentina (models 11Y 11L) | 42T5017 | 1 |
| Power cord - Brazil (models) | 42T5174 | 1 |
| Power cord - Europe (Germany) (models 11A) | 42T5029 | 1 |
| Power cord - UK (models 11G 11A) | 42T5035 | 1 |
| Power cord - Denmark (models 11G) | 42T5041 | 1 |
| Power cord - Switzerland (models 11G) | 42T5044 | 1 |
| Power cord - Italy (models 11S 11Y 11L 11G) | 42T5047 | 1 |
| Power cord - Australia / New Zealand (models 11M) | 42T5050 | 1 |
| Power cord - South Africa (models 11M ) | 42T5056 | 1 |
| Power cord - Israel (models 11G) | 42T5062 | 1 |
| Power cord - China (PRC) (models 11C) | 42T5065 | 1 |
| Power cord - Taiwan (models 11V) | 42T5071 | 1 |
| Power cord - Korea (models 11K) | 42T5077 | 1 |
| Power cord - India (models 11Q) | 42T5083 | 1 |
| Power cord - Thailand (models) | 42T4406 | 1 |
| Power cord - US/Canada--optional second source (models 11U 11F 11S 11D 11L 11A 11T ) | 42T5089 | 1 |
| Power cord - Japan-optional second source (models 11J) | 42T5096 | 1 |
| Power cord - Argentina -optional second source (models 11Y 11L) | 42T5102 | 1 |
| Power cord - Brazil (new type) -optional second source (models) | 42T5177 | 1 |
| Power cord - Europe (Germany) -optional second source (models 11A) | 42T5114 | 1 |
| Power cord - UK -optional second source (models 11G 11A) | 42T5120 | 1 |
| Power cord - Denmark -optional second source (models 11G ) | 42T5126 | 1 |
| Power cord - Switzerland -optional second source (models 11G) | 42T5129 | 1 |
| Power cord - Italy -optional second source (models 11S 11Y 11L 11G) | 42T5132 | 1 |
| Power cord - Australia/New Zealand -optional second source (models 11M) | 42T5135 | 1 |
| Power cord - South Africa -optional second source (models 11M) | 42T5141 | 1 |
| Power cord - Israel -optional second source (models 11G) | 42T5147 | 1 |
| Power cord - China (PRC) -optional second source (models 11C) | 42T5150 | 1 |
| Power cord - Taiwan -optional second source (models 11V) | 42T5156 | 1 |
| Power cord - Korea -optional second source (models 11K) | 42T5162 | 1 |
| Power cord - India -optional second source (models 11Q) | 42T5168 | 1 |
| Power cord - Thailand -optional second source (models) | 42T4400 | 1 |
| 6397 Windows XP Home Recovery CDs | FRU# | CRU |
| US/UK/AP/TH (models) | 45R6005 | 1 |
| FR/CF (models) | 45R6006 | 1 |
| GR (models) | 45R6007 | 1 |
| IT (models) | 45R6010 | 1 |
| BR (models) | 45R6009 | 1 |
| SP/LA (models) | 45R6008 | 1 |
| DK (models) | 45R6014 | 1 |
| NL (models) | 45R6015 | 1 |
| AE (models) | 45R6020 | 1 |
| SV (models) | 45R6013 | 1 |
| HE (models) | 45R6018 | 1 |
| FI (models) | 45R6017 | 1 |
| NO (models) | 45R6012 | 1 |
| PL (models) | 45R6019 | 1 |
| PO (models) | 45R6030 | 1 |
| RU (models) | 45R6021 | 1 |
| RE (models) | 45R6029 | 1 |
| HU (models) | 45R6023 | 1 |
| CZ (models) | 45R6016 | 1 |
| TR (models) | 45R6022 | 1 |
| GK (models) | 45R6024 | 1 |
| Japanese (models) | 45R6011 | 1 |
| Simplified Chinese (models) | 45R6025 | 1 |
| Taiwan-TC (models) | 45R6026 | 1 |
| Hong Kong-TC (models) | 45R6027 | 1 |
| Korea (models) | 45R6028 | 1 |
| 6397 Windows XP Pro Recovery CDs | FRU# | CRU |
| US/UK/AP/TH (models) | 45R5979 | 1 |
| FR/CF (models) | 45R5980 | 1 |
| GR (models) | 45R5981 | 1 |
| IT (models) | 45R5984 | 1 |
| BR (models) | 45R5983 | 1 |
| SP/LA (models) | 45R5982 | 1 |
| DK (models) | 45R5988 | 1 |
| NL (models) | 45R5989 | 1 |
| AE (models) | 45R5994 | 1 |
| SV (Swedish) (models) | 45R5987 | 1 |
| HE (models) | 45R5992 | 1 |
| FI (models) | 45R5991 | 1 |
| NO (models) | 45R5986 | 1 |
| PL (models) | 45R5993 | 1 |
| PO (models) | 45R6004 | 1 |
| RU (models) | 45R5995 | 1 |
| RE (models) | 45R6003 | 1 |
| HU (models) | 45R5997 | 1 |
| CZ (models) | 45R5990 | 1 |
| TR (models) | 45R5996 | 1 |
| GK (models) | 45R5998 | 1 |
| Japanese (models) | 45R5985 | 1 |
| Simplified Chinese (models) | 45R5999 | 1 |
| Taiwan-TC (models) | 45R6000 | 1 |
| Hong Kong-TC (models) | 45R6001 | 1 |
| Korea (models) | 45R6002 | 1 |
| Multilingual 1 XP-P -- EN, NL, FR, GR, IT (models) | 45R5977 | 1 |
| Multilingual 2 XP-P -- EN, DK, FI, NO, SV (models) | 45R5978 | 1 |
| 6397 Vista Home Basic 32 Recovery DVDs | FRU# | CRU |
| English (models 13H) | 46R7098 | 1 |
| Russian English (models) | 46R7099 | 1 |
| French (models) | 46R7100 | 1 |
| German (models) | 46R7101 | 1 |
| Spanish (models) | 46R7102 | 1 |
| Brazilian (models) | 46R7103 | 1 |
| Italian (models) | 46R7104 | 1 |
| Japanese (models) | 46R7105 | 1 |
| Norwegian (models) | 46R7106 | 1 |
| Swedish (models) | 46R1086 | 1 |
| Danish (models) | 46R7107 | 1 |
| Dutch (models) | 46R1088 | 1 |
| Czech (models) | 46R1089 | 1 |
| Finnish (models) | 46R1090 | 1 |
| Polish (models) | 46R1091 | 1 |
| Russian (models) | 46R7108 | 1 |
| Turkish (models) | 46R1093 | 1 |
| Hungarian (models) | 46R1094 | 1 |
| Greek (models) | 46R1095 | 1 |
| Simplified Chinese (models) | 46R7109 | 1 |
| Taiwan (models) | 46R7110 | 1 |
| HongKong (models) | 46R7111 | 1 |
| Korea (models) | 46R1099 | 1 |
| Slovenian (models) | 46R1100 | 1 |
| Hebrew (models) | 46R1101 | 1 |
| Portuguese (models) | 46R1102 | 1 |
| Arabic Localized (models) | 46R1103 | 1 |
| Slovakia (models) | 46R1104 | 1 |
| 6397 Vista Business 32 Recovery DVDs | FRU# | CRU |
| English (models 15Q) | 46R7070 | 1 |
| Russian (models) | 46R7071 | 1 |
| French (models) | 46R7072 | 1 |
| German (models) | 46R7073 | 1 |
| Spanish (models 15S 15D 15Y 17S 17Y 18S 18Y) | 46R7074 | 1 |
| Brazilian (models) | 46R7075 | 1 |
| Italian (models) | 46R7076 | 1 |
| Japanese (models) | 46R7077 | 1 |
| Norwegian (models) | 46R7078 | 1 |
| Swedish (models) | 46R1028 | 1 |
| Danish (models) | 46R7079 | 1 |
| Dutch (models) | 46R1030 | 1 |
| Czech (models) | 46R1031 | 1 |
| Finnish (models) | 46R1032 | 1 |
| Polish (models) | 46R1033 | 1 |
| Russian (models) | 46R7080 | 1 |
| Turkish (models) | 46R1035 | 1 |
| Hungarian (models) | 46R1036 | 1 |
| Greek (models) | 46R1037 | 1 |
| Simplified Chinese (models 15C) | 46R7081 | 1 |
| Trad Chinese (models) | 46R7082 | 1 |
| Trad Chinese (models) | 46R7083 | 1 |
| Korean (models) | 46R1041 | 1 |
| Slovenian (models) | 46R1042 | 1 |
| Romanian (models) | 46R1043 | 1 |
| Portuguese (models) | 46R1044 | 1 |
| Serbian - Latin (models) | 46R1045 | 1 |
| Slovakian (models) | 46R1046 | 1 |
| Arabic Localized (models) | 46R1047 | 1 |
| Hebrew(models)46R10481 |
| 6397 Vista Ultimate 32 Recovery DVDs | FRU# | CRU |
| English (models) | 46R7112 | 1 |
| Russian (models) | 46R7113 | 1 |
| French (models) | 46R7114 | 1 |
| German (models) | 46R7115 | 1 |
| Spanish (models) | 46R7116 | 1 |
| Brazilian (models) | 46R7117 | 1 |
| Italian (models) | 46R7118 | 1 |
| Japanese (models) | 46R7119 | 1 |
| Norwegian (models) | 46R7120 | 1 |
| Swedish (models) | 46R1114 | 1 |
| Danish (models) | 46R7121 | 1 |
| Dutch (models) | 46R1116 | 1 |
| Czech (models) | 46R1117 | 1 |
| Finnish (models) | 46R1118 | 1 |
| Polish (models) | 46R1119 | 1 |
| Russian (models) | 46R7122 | 1 |
| Turkish (models) | 46R1121 | 1 |
| Hungarian (models) | 46R1122 | 1 |
| Greek (models) | 46R1123 | 1 |
| Simplified Chinese (models) | 46R7123 | 1 |
| Trad Chinese (models) | 46R7124 | 1 |
| Trad Chinese (models) | 46R7125 | 1 |
| Korean (models) | 46R1127 | 1 |
| Slovenian (models) | 46R1128 | 1 |
| Hebrew (models) | 46R1129 | 1 |
| Portuguese (models) | 46R1130 | 1 |
| Slovakian (models) | 46R1131 | 1 |
| Arabic Localized (models) | 46R1132 | 1 |
| 6397 Vista Business 64 Recovery DVDs | FRU# | CRU |
| English (models) | 46R7084 | 1 |
| Russian English (models) | 46R7085 | 1 |
| French (models) | 46R7086 | 1 |
| German (models) | 46R7087 | 1 |
| Spanish (models) | 46R7088 | 1 |
| Brazilian (models) | 46R7089 | 1 |
| Italian (models) | 46R7090 | 1 |
| Japanese (models) | 46R7091 | 1 |
| Norwegian (models) | 46R7092 | 1 |
| Swedish (models) | 46R1058 | 1 |
| Danish (models) | 46R7093 | 1 |
| Dutch (models) | 46R1060 | 1 |
| Czech (models) | 46R1061 | 1 |
| Finnish (models) | 46R1062 | 1 |
| Polish (models) | 46R1063 | 1 |
| Russian (models) | 46R7094 | 1 |
| Turkish (models) | 46R1065 | 1 |
| Hungarian (models) | 46R1066 | 1 |
| Greek (models) | 46R1067 | 1 |
| Simplified Chinese (models) | 46R7095 | 1 |
| Taiwan (models) | 46R7096 | 1 |
| HongKong (models) | 46R7097 | 1 |
| Korea (models) | 46R1071 | 1 |
| Slovenian (models) | 46R1072 | 1 |
| Arabic Localized (models) | 46R1073 | 1 |
| Hebrew (models) | 46R1074 | 1 |
| Portuguese (models) | 46R1075 | 1 |
| Slovakian (models) | 46R1076 | 1 |
Chapter 10. Additional Service Information
This chapter provides additional information that the service representative might find helpful.
Securityfeatures
Security features in this section include the following:
- Passwords
• Vital Product Data
• Management Information Format (MIF)
HardwarecontrolledPasswords
Hardware controlled passwords are set using the Setup Utility program. For more information about passwords, see "Using passwords" on page 49
Operatingsystempassword
An operating system password is very similar to a power-on password and denies access to the computer by an unauthorized user when the password is activated. The computer is unusable until the password is entered and recognized by the computer.
Vitalproductdata
Each computer has a unique Vital Product Data (VPD) code stored in the nonvolatile memory on the system board. After you replace the system board, the VPD must be updated. To update the VPD, see "Updating (flashing) BIOS from a CD-ROM or diskette" on page 162.
BIOSlevels
An incorrect level of BIOS can cause false errors and unnecessary FRU replacement. Use the following information to determine the current level of BIOS installed in the computer, the latest BIOS available for the computer, and where to obtain the latest level of BIOS.
• To determine the current Level of BIOS:
- Start the Setup Utility.
- Select System Information on the Main setup screen.
- Sources for obtaining the latest level BIOS available
- Lenovo support web site:
http://www.lenovo.com/support/ - Lenovo Customer Support Center
- Levels 1 and 2 Support
To update (flash) the BIOS, see "Updating (flashing) BIOS from a CD-ROM or diskette" on page 162
Updating (flashing) BIOS from a CD-ROM or diskette
This section describes how to update (flash) the BIOS using a CD-ROM or diskette. system program updates are available at http://www.lenovo.com/support on the World Wide Web.
-
To update (flash) the BIOS:
-
If using a CD-ROM, make sure the computer is turned on. Insert the system program update (flash) CD-ROM into the optical drive. The update begins.
-
If using a diskette, make sure the computer is turned off. Insert the system program update (flash) diskette and turn on the computer. The update begins.
-
When you are prompted to select a language, press the number on your keyboard that corresponds to the language and then press Enter.
- When prompted to change the serial number, press Y.
- Type the seven-character serial number of your computer and then press Enter.
- When prompted to change the machine type/model, press Y.
- Type the seven-character machine type/model of your computer and then press Enter.
- Follow the instructions on the screen to complete the update.
Recovering from a POST/BIOS update failure
Attention
If an interruption occurs during a POST/BIOS update (flash update), the computer might not restart correctly. If this occurs, perform the following procedure commonly called Boot-block Recovery.
Note: If your computer has no internal diskette drive, an optional USB diskette drive must be connected to use the BIOS flash diskette.
- Turn off the computer and any attached devices, such as printers, monitors, and external drives.
-
Unplug all power cords from electrical outlets, and open the computer cover. See "Opening the cover" on page 84
-
Locate the Clear CMOS/Recovery jumper on the system board. See "System board locations" on page 83.
-
Remove any cables that impede access to the Clear CMOS/Recovery jumper.
-
Move the jumper from the standard position (pins 1 and 2) to pins 2 and 3.
-
Insert the POST/BIOS update (flash) diskette in the diskette drive.
-
Close the computer cover and reconnect any cables that were disconnected.
-
Reconnect the power cords for the computer and monitor to electrical outlets.
-
Turn on the computer and the monitor.
-
The recovery session will take two to three minutes. During this time, you will hear a series of beeps. After the update session is completed, the series of beeps ends. There will be no video, and the system will automatically turn off.
-
Open the computer cover, and move the Clear CMOS/Recovery jumper back to the original positions (pins 1 and 2).
-
Remove the POST/BIOS flash diskette from the diskette drive.
-
Close the computer cover and reconnect any cables that were disconnected.
-
Turn on the computer to restart the operating system.
Powermanagement
Power management reduces the power consumption of certain components of the computer such as the system power supply, processor, hard disk drives, and some monitors.
Automatic configuration and power interface (ACPI) BIOS
Being an ACPI BIOS system, the operating system is allowed to control the power management features of the computer and the setting for Advanced Power Management (APM) BIOS mode is ignored. Not all operating systems support ACPI BIOSmode.
AutomaticPower-Onfeatures
The Automatic Power-On features within the Power Management menu allow you to enable and disable features that turn on the computer automatically.
- RTC resume: You can specify a date and time at which the computer will be turned on automatically. This can be either a single event or a daily event.
- Wake on LAN: If the computer has a properly configured token-ring or Ethernet LAN adapter card that is Wake on LAN-enabled and there is remote network management software, you can use the Wake on LAN feature. When you set Wake on LAN to Enabled, the computer will turn on when it receives a specific signal from another computer on the local area network (LAN).
Appendix.Notices
Lenovo may not offer the products, services, or features discussed in this document in all countries. Consult your local Lenovo representative for information on the products and services currently available in your area. Any reference to a Lenovo product, program, or service is not intended to state or imply that only that Lenovo product, program, or service may be used. Any functionally equivalent product, program, or service that does not infringe any Lenovo intellectual property right may be used instead. However, it is the user's responsibility to evaluate and verify the operation of any other product, program, orservice.
Lenovo may have patents or pending patent applications covering subject matter described in this document. The furnishing of this document does not give you any license to these patents. You can send license inquiries, in writing, to:
Lenovo (United States), Inc.
1009 Think Place - Building One
Morrisville, NC27560
U.S.A.
Attention: Lenovo Director of Licensing
LENOVO PROVIDES THIS PUBLICATION "AS IS" WITHOUT WARRANTY OF ANY KIND, EITHER EXPRESS OR IMPLIED, INCLUDING, BUT NOT LIMITED TO, THE IMPLIED WARRANTIES OF NON-INFRINGEMENT, MERCHANTABILITY OR FITNESS FOR A PARTICULAR PURPOSE. Some jurisdictions do not allow disclaimer of express or implied warranties in certain transactions, therefore, this statement may not apply to you.
This information could include technical inaccuracies or typographical errors. Changes are periodically made to the information herein; these changes will be incorporated in new editions of the publication. Lenovo may make improvements and/or changes in the product(s) and/or the program(s) described in this publication at any time without notice.
The products described in this document are not intended for use in implantation or other life support applications where malfunction may result in injury or death to persons. The information contained in this document does not affect or change Lenovo product specifications or warranties. Nothing in this document shall operate as an express or implied license or indemnity under the intellectual property rights of Lenovo or third parties. All information contained in this document was obtained in specific environments and is presented as an illustration. The result obtained in other operating environments may vary.
Lenovo may use or distribute any of the information you supply in any way it believes appropriate without incurring any obligation to you.
Any references in this publication to non-Lenovo Web sites are provided for convenience only and do not in any manner serve as an endorsement of those Web sites. The materials at those Web sites are not part of the materials for this Lenovo product, and use of those Web sites is at your own risk.
Any performance data contained herein was determined in a controlled environment. Therefore, the result obtained in other operating environments may
vary significantly. Some measurements may have been made on development-level systems and there is no guarantee that these measurements will be the same on generally available systems. Furthermore, some measurements may have been estimated through extrapolation. Actual results may vary. Users of this document should verify the applicable data for their specific environment.
Televisionoutputnotice
The following notice applies to models that have the factory-installed television-outputfeature.
This product incorporates copyright protection technology that is protected by method claims of certain U.S. patents and other intellectual property rights owned by Macrovision Corporation and other rights owners. Use of this copyright protection technology must be authorized by Macrovision Corporation, and is intended for home and other limited viewing uses only unless otherwise authorized by Macrovision Corporation. Reverse engineering or disassembly is prohibited.
Trademarks
The following terms are trademarks of Lenovo in the United States, other countries, or both:
Lenovo
ThinkCentre
RescueandRecovery
The following terms are trademarks of International Business Machines Corporation in the United States, other countries, or both:
IBM (used under license)
WakeonLAN
Intel, Core, and Pentium are trademarks of Intel Corporation in the United States, other countries, or both.
Microsoft, Windows, and Windows Vista are trademarks of the Microsoft group of companies.
Other company, product, or service names may be trademarks or service marks of others.
lenovo®
PartNumber:45C6891
PrintedinUSA
(1P) P/N:45C6891