All-in-One Z272SDT-BA160T - All-in-one computer ASUS - Free user manual and instructions
Find the device manual for free All-in-One Z272SDT-BA160T ASUS in PDF.

User questions about All-in-One Z272SDT-BA160T ASUS
0 question about this device. Answer the ones you know or ask your own.
Ask a new question about this device
Download the instructions for your All-in-one computer in PDF format for free! Find your manual All-in-One Z272SDT-BA160T - ASUS and take your electronic device back in hand. On this page are published all the documents necessary for the use of your device. All-in-One Z272SDT-BA160T by ASUS.
USER MANUAL All-in-One Z272SDT-BA160T ASUS
natural_image
Line drawing of a flat-screen computer monitor with a stand (no text or symbols)Z272SD
E14369
First Edition
August 2018
COPYRIGHT INFORMATION
No part of this manual, including the products and software described in it, may be reproduced, transmitted, transcribed, stored in a retrieval system, or translated into any language in any form or by any means, except documentation kept by the purchaser for backup purposes, without the express written permission of ASUSTeK COMPUTER INC. ("ASUS").
ASUS PROVIDES THIS MANUAL "AS IS" WITHOUT WARRANTY OF ANY KIND, EITHER EXPRESS OR IMPLIED, INCLUDING BUT NOT LIMITED TO THE IMPLIED WARRANTIES OR CONDITIONS OF MERCHANTABILITY OR FITNESS FOR A PARTICULAR PURPOSE. IN NO EVENT SHALL ASUS, ITS DIRECTORS, OFFICERS, EMPLOYEES OR AGENTS BE LIABLE FOR ANY INDIRECT, SPECIAL, INCIDENTAL, OR CONSEQUENTIAL DAMAGES (INCLUDING DAMAGES FOR LOSS OF PROFITS, LOSS OF BUSINESS, LOSS OF USE OR DATA, INTERRUPTION OF BUSINESS AND THE LIKE), EVEN IF ASUS HAS BEEN ADVISED OF THE POSSIBILITY OF SUCH DAMAGES ARISING FROM ANY DEFECT OR ERROR IN THIS MANUAL OR PRODUCT.
Products and corporate names appearing in this manual may or may not be registered trademarks or copyrights of their respective companies, and are used only for identification or explanation and to the owners' benefit, without intent to infringe.
SPECIFICATIONS AND INFORMATION CONTAINED IN THIS MANUAL ARE FURNISHED FOR INFORMATIONAL USE ONLY, AND ARE SUBJECT TO CHANGE AT ANY TIME WITHOUT NOTICE, AND SHOULD NOT BE CONSTRUED AS A COMMITMENT BY ASUS. ASUS ASSUMES NO RESPONSIBILITY OR LIABILITY FOR ANY ERRORS OR INACCURACIES THAT MAY APPEAR IN THIS MANUAL, INCLUDING THE PRODUCTS AND SOFTWARE DESCRIBED IN IT.
Copyright © 2018 ASUSTeK COMPUTER INC. All Rights Reserved.
LIMITATION OF LIABILITY
Circumstances may arise where because of a default on ASUS' part or other liability, you are entitled to recover damages from ASUS. In each such instance, regardless of the basis on which you are entitled to claim damages from ASUS, ASUS is liable for no more than damages for bodily injury (including death) and damage to real property and tangible personal property; or any other actual and direct damages resulted from omission or failure of performing legal duties under this Warranty Statement, up to the listed contract price of each product.
ASUS will only be responsible for or indemnify you for loss, damages or claims based in contract, tort or infringement under this Warranty Statement.
This limit also applies to ASUS' suppliers and its reseller. It is the maximum for which ASUS, its suppliers, and your reseller are collectively responsible.
UNDER NO CIRCUMSTANCES IS ASUS LIABLE FOR ANY OF THE FOLLOWING: (1) THIRD-PARTY CLAIMS AGAINST YOU FOR DAMAGES; (2) LOSS OF, OR DAMAGE TO, YOUR RECORDS OR DATA; OR (3) SPECIAL, INCIDENTAL, OR INDIRECT DAMAGES OR FOR ANY ECONOMIC CONSEQUENTIAL DAMAGES (INCLUDING LOST PROFITS OR SAVINGS), EVEN IF ASUS, ITS SUPPLIERS OR YOUR RESELLER IS INFORMED OF THEIR POSSIBILITY.
SERVICE AND SUPPORT
Visit our multi-language web site at https://www.asus.com/support
Contents
About this manual....6
Conventions used in this manual ....7
Typography....7
Icons 8
Safety information....9
Setting up your system....9
Care during use 9
Sound Pressure Warning....11
Adapter....11
DC Fan Warning....11
Package contents ....12
Chapter 1: Hardware Setup
Front view....13
Right view....16
Rear view 17
Top view....20
Chapter 2: Using your ASUS All-in-One PC
Positioning your ASUS All-in-One PC 21
Setting up your ASUS All-in-One PC....24
Connecting a wired keyboard and mouse 24
Connecting the wireless keyboard and mouse (on selected models) ..... 25
Powering on the system....26
Using the touch screen (on selected models)....28
Using touch screen panel gestures (on selected models)....29
Using the wireless charger (on selected models) 32
Chapter 3: Working with Windows® 10
Starting for the first time....33
Start menu 34
Launching the Start menu 35
Opening programs from the Start menu....35
Windows® apps ....36
Working with Windows ^® apps....37
Customizing Windows® apps 37
Task view....40
Snap feature ....41
Snap hotspots....41
Action Center 43
Other keyboard shortcuts 44
Connecting to wireless networks 46
Wi-Fi....46
Bluetooth 47
Connecting to wired networks....48
Configuring a dynamic IP/PPPoE network connection ....48
Configuring a static IP network connection 49
Turning your ASUS All-in-One PC off....50
Putting your ASUS All-in-One PC to sleep 51
Chapter 4: Recovering your system
Entering the BIOS Setup....53
Quickly enter the BIOS....53
Recovering your system....54
Performing a recovery option....55
Appendices
Notices....57
Federal Communication Commission Interference Statement....57
RF exposure warning....58
Radio Frequency (RF) Exposure Information....60
Wireless Operation Channel for Different Domains....60
CE Mark Warning....60
REACH....62
Global Environmental Regulation Compliance and Declaration 62
ASUS Recycling/Takeback Services....62
Coating Notice....63
Prevention of Hearing Loss 63
ENERGY STAR complied product 64
About this manual
This manual provides information about the hardware and software features of your ASUS All-in-One PC, organized through the following chapters:
Chapter 1: Hardware Setup
This chapter details the hardware components of your ASUS All-in-One PC.
Chapter 2: Using your ASUS All-in-One PC
This chapter provides you with information on using your ASUS All-in-One PC.
Chapter 3: Working with Windows® 10
This chapter provides an overview of using Windows ^® 10 in your ASUS All-in-One PC.
Chapter 4: Recovering your system
This chapter provides recovery options for your ASUS All-in-One PC.
Appendices
This section includes notices and safety statements for your ASUS All-in-One PC.
Conventions used in this manual
To highlight key information in this manual, some texts are presented as follows:
IMPORTANT! This message contains vital information that must be followed to complete a task.
NOTE: This message contains additional information and tips that can help complete tasks.
WARNING! This message contains important information that must be followed to keep you safe while performing tasks and prevent damage to your device's data and components.
Typography
Bold = This indicates a menu or an item that must be selected.
Italic = This indicates sections that you can refer to in this manual.
Icons
The icons below indicate the devices you can use for completing a series of tasks or procedures on your ASUS All-in-One PC.

= Use the touch screen panel (on selected models).
= Use the mouse.
= Use the keyboard.
All illustrations and screenshots in this manual are for reference only. Actual product specifications and software screen images may vary with territories. Visit the ASUS website at www.asus.com for the latest information.
Safety information
Your ASUS All-in-One PC is designed and tested to meet the latest standards of safety for information technology equipment. However, to ensure your safety, it is important that you read the following safety instructions.
Setting up your system
- Read and follow all instructions in the documentation before you operate your system.
- Do not use this product near water or a heated source such as a radiator.
- Be cautious while moving the system to prevent injuries.
- Set up the system on a stable surface.
- Openings on the chassis are for ventilation. Do not block or cover these openings. Ensure that you leave plenty of space around the system for ventilation. Never insert objects of any kind into the ventilation openings.
- Use this product in environments with ambient temperatures between 0°C and 40°C.
- If you use an extension cord, ensure that the total ampere rating of the devices plugged into the extension cord does not exceed its ampere rating.
Care during use
- Do not walk on the power cord or allow anything to rest on it.
-
Do not spill water or any other liquids on your system.
-
When the system is turned off, a small amount of electrical current still remains in the product. Always unplug all power, modem, and network cables from the power outlets before cleaning the system.
-
The touch screen requires periodic cleaning to perform at optimal touch sensitivity. Keep the screen clean from foreign objects or excessive dust accumulation. To clean the screen:
-
Turn off the system and disconnect the power cord from the wall.
- Spray a small amount of household glass cleaner on the supplied cleaning cloth and gently wipe the surface of the screen.
-
Do not spray the cleaner directly on the screen.
-
Do not use an abrasive cleaner or a coarse cloth when cleaning the screen.
-
If you encounter the following technical problems with the product, unplug the power cord and contact a qualified service technician or your retailer.
-
The power cord or plug is damaged.
- Liquid has been spilled into the system.
- The system does not function properly even if you follow the operating instructions.
- The system was dropped or the cabinet is damaged.
- The system performance changes.
Sound Pressure Warning
Excessive sound pressure from earphones or headphones can cause hearing loss or permanent damage to hearing. Increasing the volume and equalizer beyond default levels increases the output voltage and sound pressure produced by the earphones or headphones.
Adapter
- Adapter specifications
- Input voltage: 100–240Vac
- Input frequency: 50–60Hz
- Rating output voltage: 19.5Vdc
- It is recommended that the power socket is in close proximity to the ASUS All-in-One PC.
DC Fan Warning
Please note that the DC fan is a moving part and can cause harm when used improperly. Keep away from the fan when using the product.
Package contents
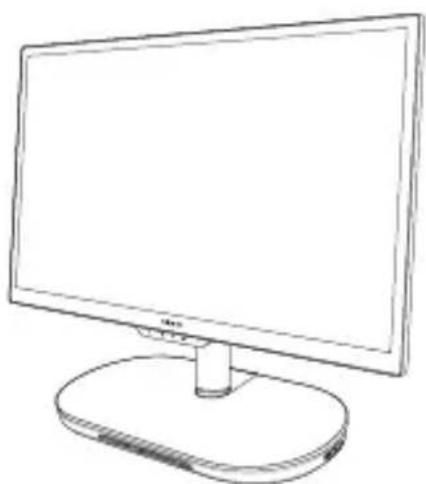
natural_image
Line drawing of a flat-screen computer monitor with a stand (no text or symbols)
natural_image
Simple line drawing of a flexible cable or connector (no text or symbols)Power cord

natural_image
Simple line drawing of a cable with a rectangular connector attached (no text or symbols)ASUS Zen AiO PC AC power adapter
natural_image
Line drawing of a standard computer keyboard (no text or symbols)Keyboard (optional) Mouse
(optional)

KBM USB receiver dongle (for wireless KBM only)

Warranty card
NOTE:
• If any of the items is damaged or missing, contact your retailer.
- The ASUS All-in-One PC illustration is for reference only. Actual product specifications may vary with models.
- The keyboard, mouse, and power supply illustrations are for reference only. Actual product specifications may vary with territories.
Chapter 1: Hardware Setup
Front view

text_image
1 2 3 4 5 6 7 8 9 ASUS Zen AiO1
LCD display
The LCD display panel provides excellent viewing features for photos, videos, and other multimedia files.
On selected models, multi-touch is supported. You can operate your ASUS All-in-One PC using touch gestures.
2
Array microphones
The array microphones feature echo canceling, noise suppression, and beam forming functions for better voice recognition and audio recording.
3
IR Camera
The built-in camera supports facial recognition when using Windows Hello.
NOTE:
- When you sign in with Windows Hello, the set up screen will be in black and white color.
- The red IR LED blinks in the process while data is being read before you sign in with Windows Hello facial recognition.
4
Camera
The built-in camera allows you to take pictures or record videos using your ASUS All-in-One PC.
5
Camera indicator
The camera indicator lights up when the built-in camera is in use.
6
Air vent
The air vent allows air to enter your ASUS All-in-One PC.
IMPORTANT! For optimum air flow, ensure that the air vents are free from obstructions.
7
Power indicator
This LED power indicator lights up when the ASUS All-in-One PC is turned on.
8
Wireless charger indicator (on selected models)
This wireless charger indicator displays the different status of the wireless charger.
| Status Description | |
| Off No device detected | |
| Orange A device is charging | |
| Orange (blinking) Foreign metal object detected | |
| White | Device is fully charged (only for selected brands/models) |
NOTE: This LED is only enabled on selected models.
9
Memory card reader
This ASUS All-in-One PC has a built-in memory card reader slot that supports SD cards.
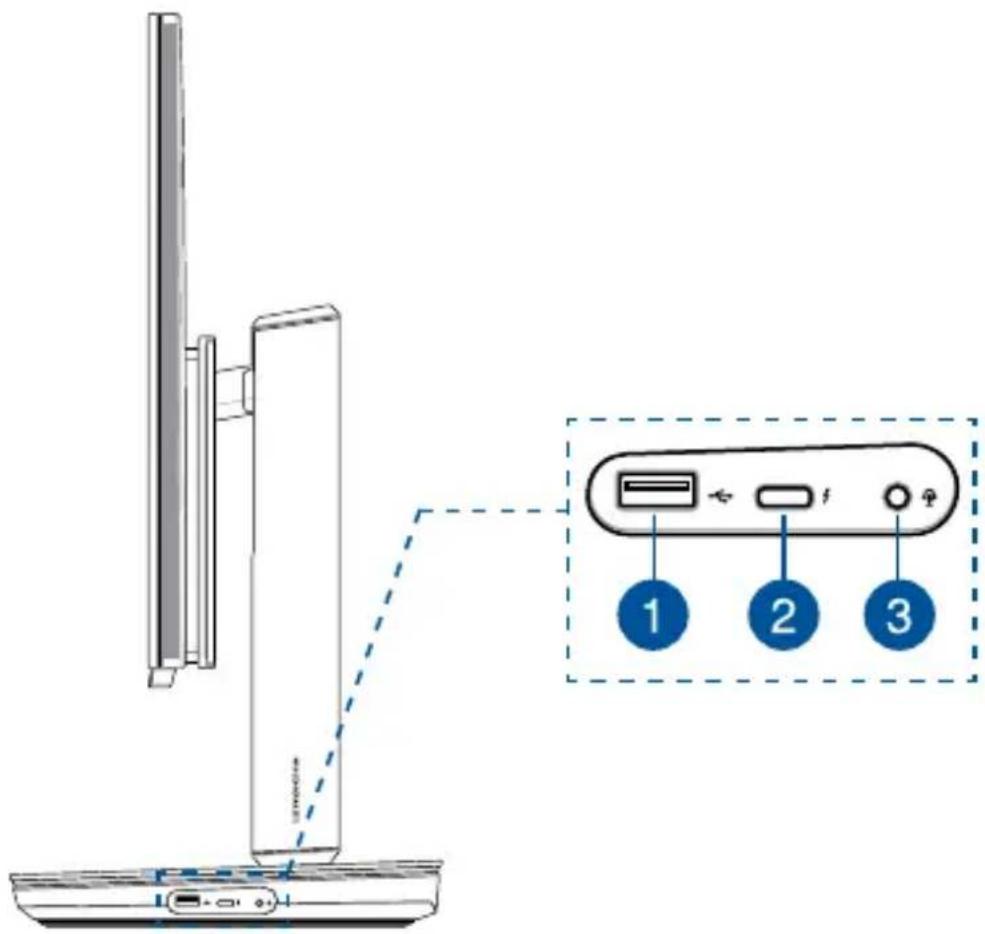
Right view
text_image
Diagram showing a device with labeled ports and a zoomed-in view of the internal component, including numbered labels 1, 2, and 3.
USB 2.0 port
The USB (Universal Serial Bus) port is compatible with USB 2.0 or USB 1.1 devices such as keyboards, pointing devices, flash disk drives, external HDDs, speakers, cameras and printers.

USB 3.1 Gen 2 Type-C™ port
This USB Type-C™ (Universal Serial Bus) port provides a transfer rate of up to 10 Gbit/s.

Headphone/Headset/Microphone jack
This port allows you to connect amplified speakers or headphones. You can also use this port to connect your headset or an external microphone.
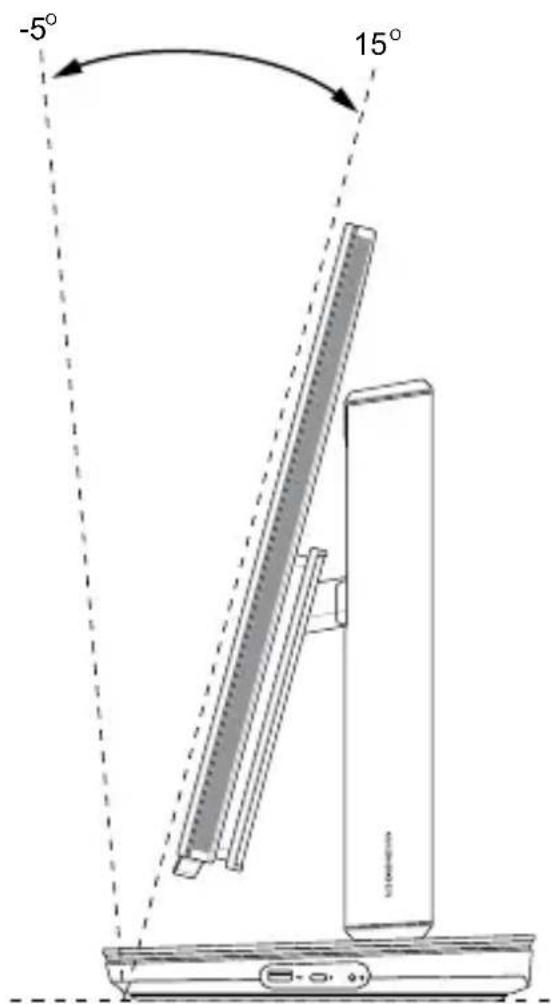
Rear view
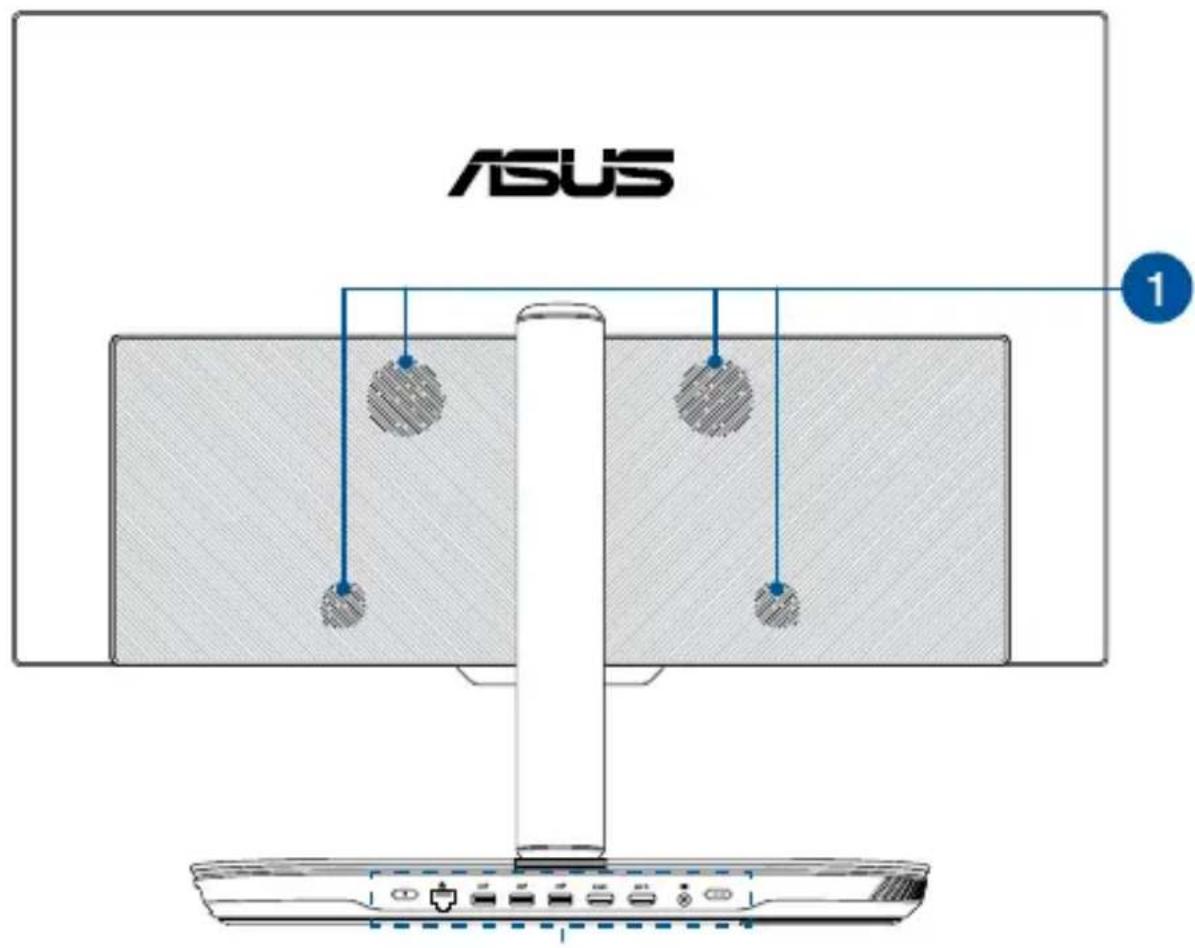
text_image
ASUS 1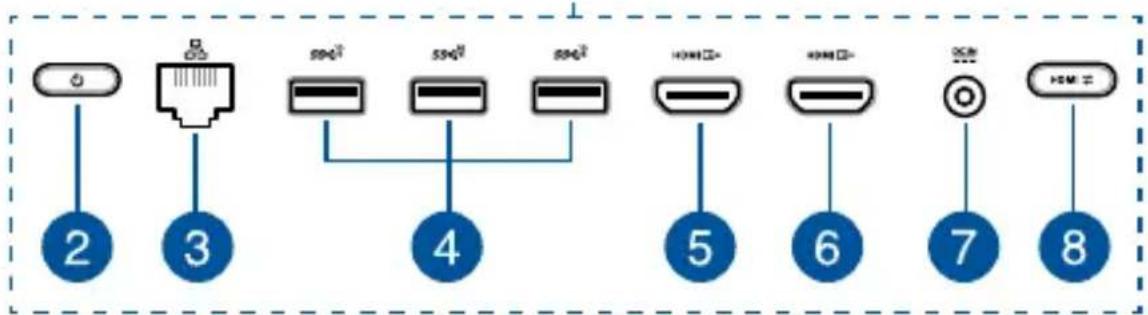
flowchart
graph TD
    A["2"] --> B["3"]
    B --> C["4"]
    C --> D["5"]
    D --> E["6"]
    E --> F["7"]
    F --> G["8"]
    H["600"] --> I["500"]
    J["500"] --> K["600"]
    L["600"] --> M["700"]
    N["700"] --> O["800"]

Harmon Kardon audio speakers
The built-in Harmon Kardon audio speakers allow you to hear audio straight from the ASUS All-in-One PC. Audio features are software-controlled.
2
Power button
Press this button to turn on your ASUS All-in-One PC.
3
LAN port
The eight-pin RJ-45 LAN port supports a standard Ethernet cable for connection to a local network.
4
USB 3.1 Gen 2 ports
These USB 3.1 Gen 2 (Universal Serial Bus) ports provide a transfer rate of up to 10 Gbit/s.
5
HDMI output port
This port allows you to connect your ASUS All-in-One PC to another HDMI-compatible device for file sharing or extending your display monitor.
6
HDMI input port
This port allows you to use your ASUS All-in-One PC as an external display.
7
Power input
The bundled power adapter converts AC power to DC power for use with this jack. Power supplied through this jack supplies power to the ASUS All-in-One PC. To prevent damage to the ASUS All-in-One PC, always use the bundled power adapter.
WARNING! The power adapter may become warm or hot when in use. Do not cover the adapter and keep it away from your body.
8
Display mode switch button
This button allows you to switch between All-in-One PC mode and external display mode.
NOTE: This function is only available when the HDMI input port is connected and the All-in-One PC is turned on.
Top view

natural_image
Pure diagram of a device with two circular components and a labeled point (1), no text or symbols present.
Wireless Charger (on selected models)
The wireless charger allows you to charge Qi compatible devices by placing the device on the wireless charger.
Chapter 2: Using your ASUS All-in-One PC
Positioning your ASUS All-in-One PC
- Place your ASUS All-in-One PC on a flat surface such as a table or desk.
IMPORTANT! Use both hands when adjusting your ASUS All-in-One PC.
- Adjust the display to a position you are comfortable with by doing the following:
- Adjust the height of the display by sliding it up or down.
IMPORTANT! The display can be adjusted to a maximum height of 85mm.
CAUTION! DO NOT place your hands in the height-adjustment track when adjusting the display height, doing so may cause injuries.

text_image
85mm 85mm- Rotate the display to the right or left.
Important! The display can only be rotated 45^ to either side.

- Tilt the display to an angle between -5^ to 15^ .
Important! Avoid adjusting the display to an angle beyond the recommended values or you may risk damaging the ASUS All-in-One PC.
text_image
-5° 15°Setting up your ASUS All-in-One PC
NOTE: The illustrations in this section are for reference only. The appearance of your ASUS All-in-One PC may vary depending on model.
Connecting a wired keyboard and mouse
Connect the keyboard and the mouse to the USB ports on the rear panel.
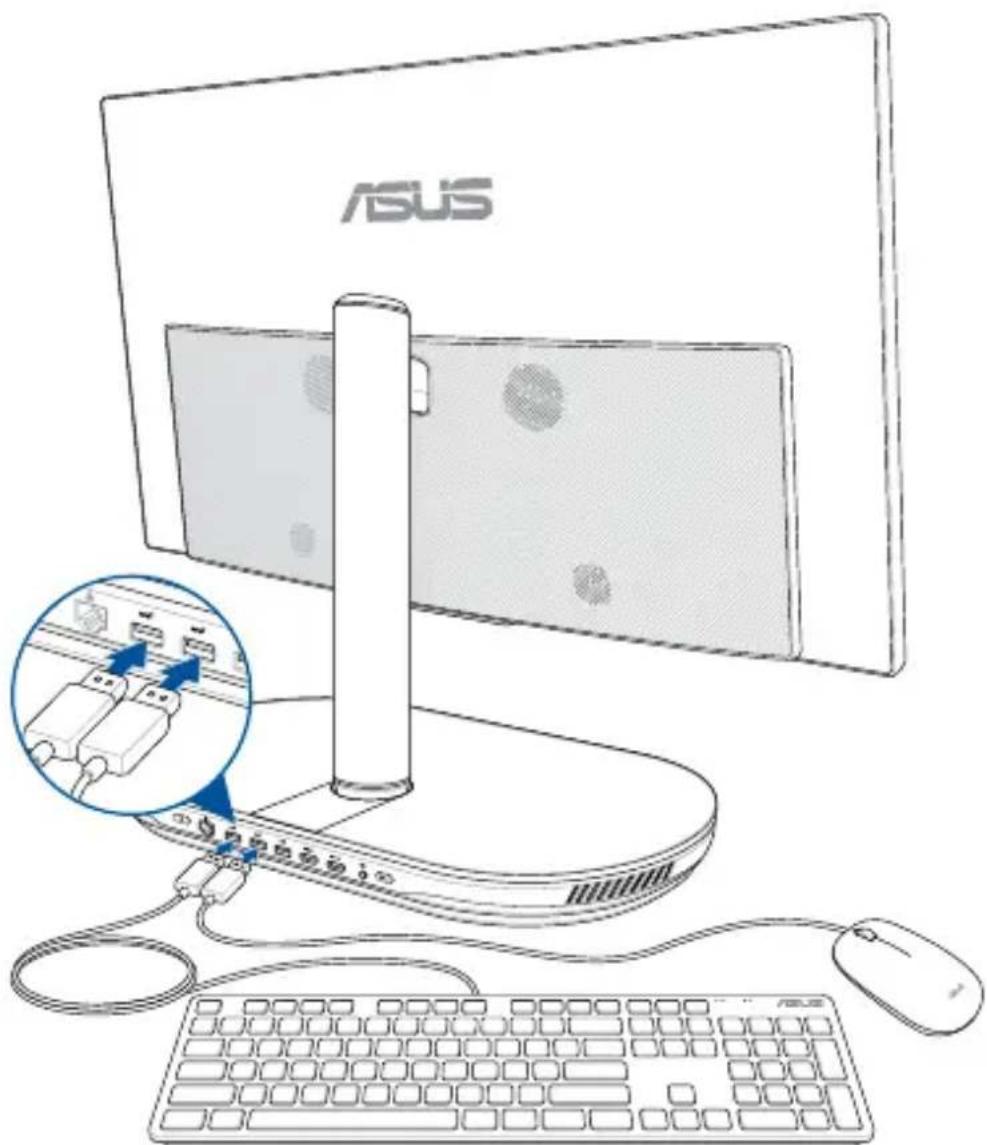
text_image
ASUSConnecting the wireless keyboard and mouse (on selected models)
- Install batteries into the wireless keyboard and mouse.
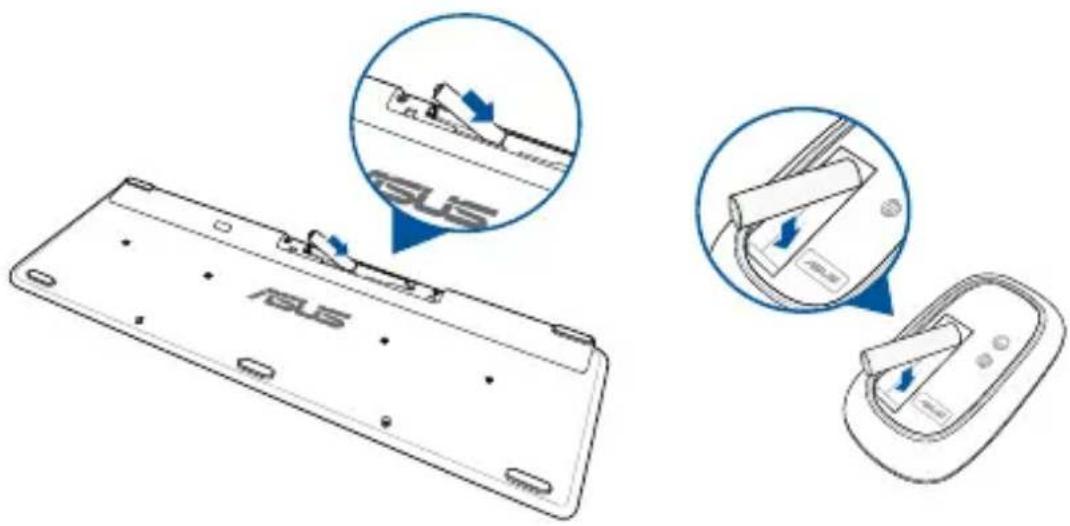
text_image
ASUS ASUS- Connect the wireless dongle for keyboard and mouse to the USB ports to automatically pair both devices to your ASUS All-in-One PC.

natural_image
Diagram of a computer monitor with ports and cables, highlighting a blue magnified view of the internal components (no text or symbols present)- You can begin using the wireless keyboard and mouse.
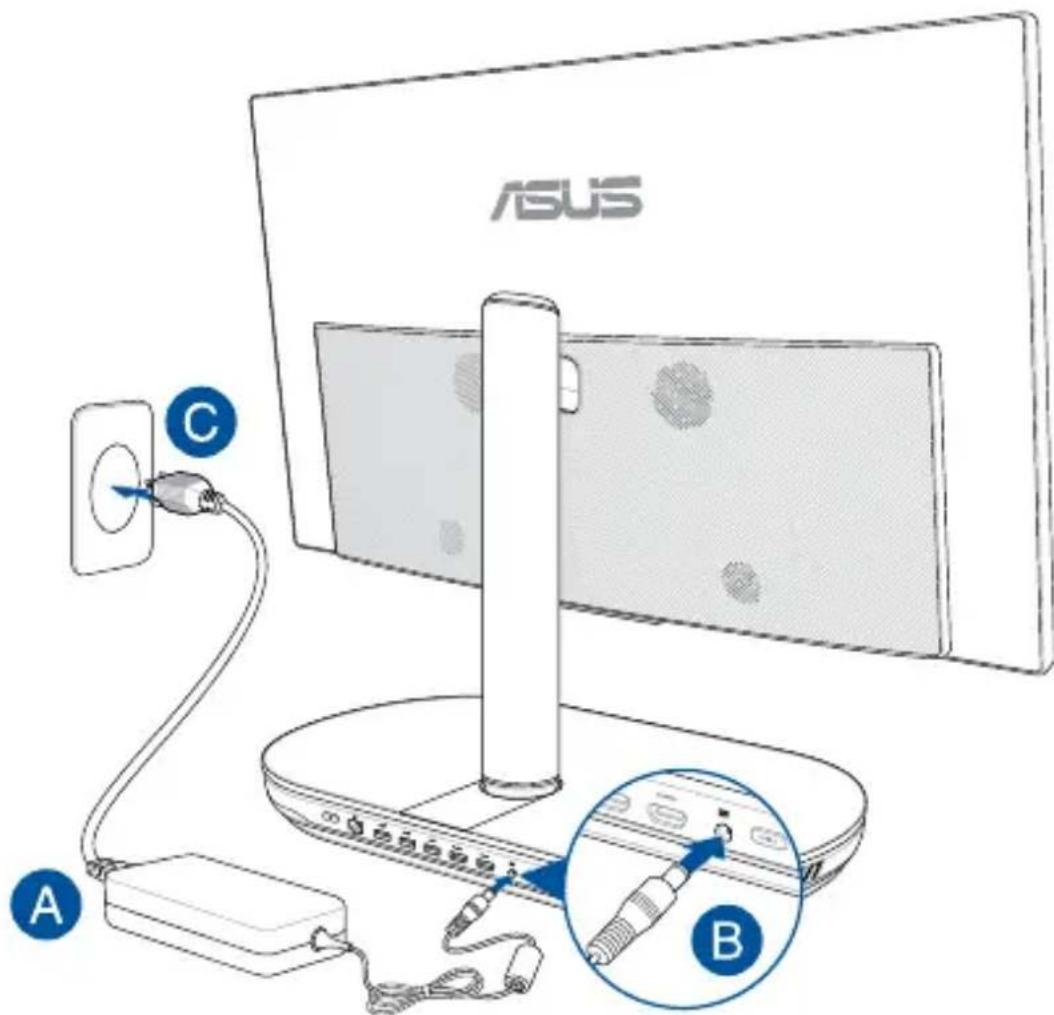
Powering on the system
A. Connect the AC power cord to the AC/DC adapter.
B. Connect the DC power connector into your ASUS All-in-One PC's power (DC) input.
C. Plug the AC power adapter into a 100V\~240V power source.
D. Press the power button.
text_image
ASUS A B C
natural_image
Line drawing of a computer monitor with an attached stand and a magnified inset showing a cable or cable attachment (no text or symbols)NOTE: For details on turning off your ASUS All-in-One PC, refer to the section Turning your ASUS All-in-One PC off in Working with Windows®10.
Using the touch screen (on selected models)
The LCD screen panel of your ASUS All-in-One PC provides excellent viewing features for photos, videos, and other multimedia files on your PC.

natural_image
Line drawing of a hand pointing at a computer monitor (no text or symbols)NOTE: The illustration above is for reference only. The appearance of your ASUS All-in-One PC may vary depending on model.
Using touch screen panel gestures (on selected models)
NOTE: The following screenshots are for reference only. The touch screen panel's appearance may vary depending on model.
The gestures allow you to launch programs and access the settings of your ASUS All-in-One PC. The functions can be activated by using the hand gestures on your ASUS All-in-One PC's touch screen panel.
Left edge swipe Right edge swipe

text_image
Hand interacting with a tablet displaying a photo and app interface, showing Chinese text and iconsSwipe from the left edge of the screen to launch Task view.
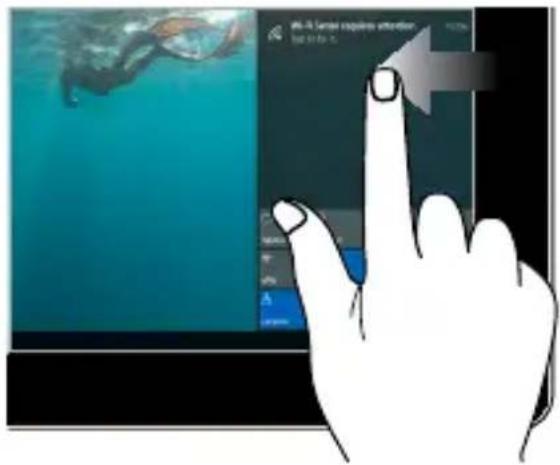
text_image
AI-3 Langer requires attention to be in theSwipe from the right edge of the screen to launch Action Center.
Tap/Double-tap Press and hold

natural_image
Hand pressing a finger icon on a tablet screen with a blue background (no text or symbols visible)- Tap an app to select it.
• Double-tap an app to launch it.

text_image
Form Edit Add Apply tools Show code Remove personal contact Send to: Finish Finish Finish Finish FinishPress and hold to open the right-click menu.
Zoom in Zoom out
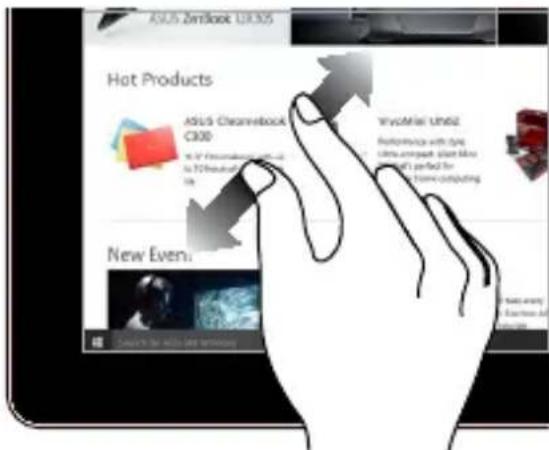
text_image
ASUS Zintlook UK35 Hot Products ASUS Cleansetlook C300 New Even WvocMile Un62 Features with 5pc Ultra compact store mini I'm perfect for home computing Search for Wvoc UK 3500000Spread apart your two fingers on the touch screen panel.
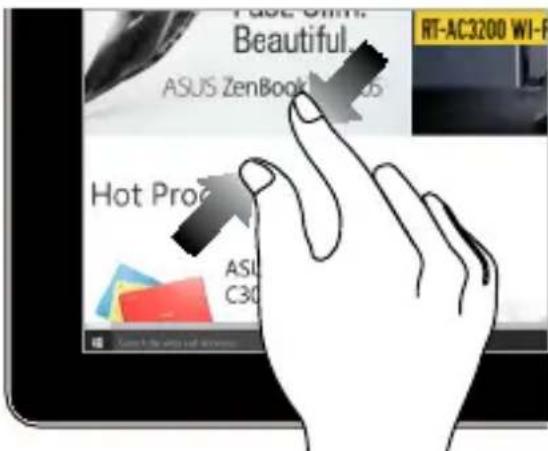
text_image
Page 6th Beautiful ASUS ZenBook RT-AC3200 WI-F Hot Pro ASU C30Bring together your two fingers on the touch screen panel.
Finger slide Drag

text_image
ASUS 23dbook U3305 Hot Products ASUS 23 C300 6.7" Production is on to 12 hours all day before to New EventSlide your finger to scroll up and down and slide your finger to pan the screen left or right.

text_image
File Access Form Set/Options Mouse Connecting Web Citation Windows & Track File Express Settings File of Express Play and Express Mouse Playing iOS- Drag to create a selection box around multiple items.
- Drag and drop an item to move it to a new location.
Using the wireless charger (on selected models)
Place a Qi compatible device on the wireless charger to charge your device. Ensure to align the wireless charger with your device and take note of the wireless charger indicator, for more information on the wireless charger indicator statuses, please refer to the Hardware Setup section.

natural_image
Simple line drawing of a smartphone connected to a circular device (no text or symbols)Chapter 3:
Working with Windows® 10
Starting for the first time
When you start your ASUS All-in-One PC for the first time, a series of screens appear to guide you in configuring your Windows® 10 operating system.
To start your ASUS All-in-One PC for the first time:
- Press the power button on your ASUS All-in-One PC. Wait for a few minutes until the setup screen appears.
- From the setup screen, pick your region and a language to use on your ASUS All-in-One PC.
-
Carefully read the License Terms. Select I accept.
-
Follow the onscreen instructions to configure the following basic items:
-
Personalize
- Get online
- Settings
-
Your account
-
After configuring the basic items, Windows® 10 proceeds to install your apps and preferred settings. Ensure that your ASUS All-in-One PC is kept powered on during the setup process.
-
Once the setup process is complete, the Desktop appears.
NOTE: The screenshots in this chapter are for reference only.
Start menu
The Start menu is the main gateway to your ASUS All-in-One PC's programs, Windows® apps, folders, and settings.
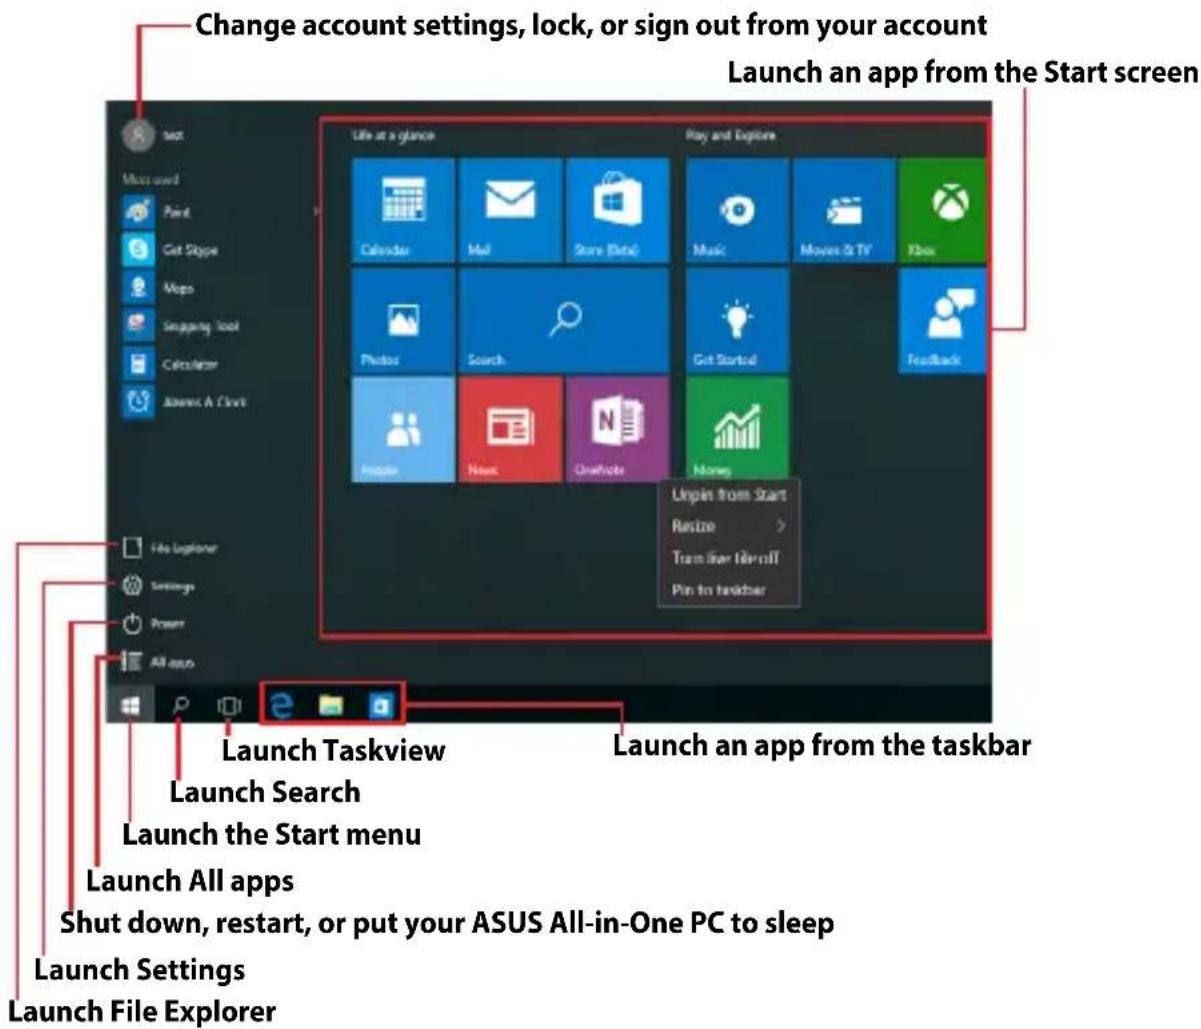
text_image
Change account settings, lock, or sign out from your account Launch an app from the Start screen Start Move used Print Get Slope Maps Snapshot Tool Calculator James A Chris File at a glance Play and Explore Calendar Mail Store Data Music Movies & TV Ibox Photo Search Get Started Feedback Mouse New Graphics Money Unpin from Start Resize Trans Star Here off Pin to taskbar File Explorer Settings Power All apps Launch Taskview Launch Search Launch the Start menu Launch All apps Shut down, restart, or put your ASUS All-in-One PC to sleep Launch Settings Launch File ExplorerYou can use the Start menu to do these common activities:
• Start programs or Windows® apps
- Open commonly used programs or Windows® apps
- Adjust ASUS All-in-One PC settings
• Get help with the Windows operating system
• Turn off your ASUS All-in-One PC
• Log off from Windows or switch to a different user account
Launching the Start menu

Tap the Start button in the lower-left corner of your desktop.

Position your mouse pointer over the Start button in the lower-left corner of your desktop then click it.

Press the Windows logo key your keyboard.
Opening programs from the Start menu
One of the most common uses of the Start menu is opening programs installed on your ASUS All-in-One PC.

Tap the program to launch it.

Position your mouse pointer over the program then click to launch it.

Use the arrow keys to browse through the programs.
Press enter to launch it.
NOTE: Select All apps at the bottom of the left pane to display a full list of programs and folders on your ASUS All-in-One PC in alphabetical order.
Windows® apps
These are apps pinned on the right pane of the Start menu and displayed in tiled-format for easy access.
NOTE: Some Windows® apps require signing in to your Microsoft account before they are fully launched.
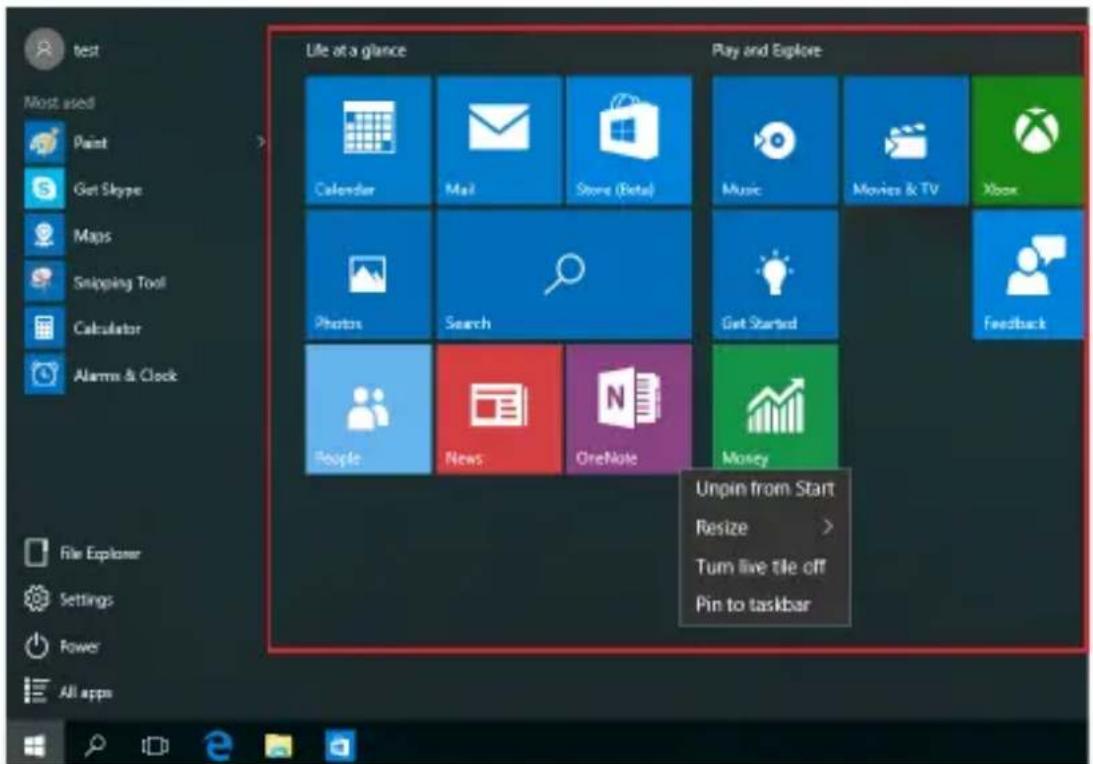
text_image
test Most used Paint Get Skype Maps Snipping Tool Calculator Alarms & Clock File Explorer Settings Power All apps Life at a glance Play and Explore Calendar Mail Store (Beta) Music Movies & TV Xbox Photos Search Get Started Feedback People News OneNote Money Unpin from Start Resize > Turn live tile off Pin to taskbarWorking with Windows® apps
Use your ASUS All-in-One PC's touch screen, mouse, or keyboard to launch, customize, and close apps.
Launching Windows® apps from the Start menu

Tap the app to launch it.

Position your mouse pointer over the app then click to launch it.

Use the arrow keys to browse through the apps. Press
to launch an app.
Customizing Windows® apps
You can move, resize, unpin, or pin apps to the taskbar from the Start menu using the following steps:
Moving apps

Press and hold the app, then drag and drop it to a new location.

Position your mouse pointer over the app, then drag and drop the app to a new location.
Resizing apps

Press and hold the app, then tap and select an app tile size.

Position your mouse pointer over the app and right-click it, then click Resize and select an app tile size.

Use the arrow keys to navigate to the app. Press then select Resize and select an app tile size.

Unpinning apps

Press and hold the app, then tap the icon.

Position your mouse pointer over the app and right-click it, then click Unpin from Start.

Use the arrow keys to navigate to the app. Press then select Unpin from Start.

Pinning apps to the taskbar

Press and hold the app, then tap Pin to taskbar.

Position your mouse pointer over the app and right-click it, then click Pin to taskbar.

Use the arrow keys to navigate to the app. Press then select Pin to taskbar.

Pinning more apps to the Start menu

From All apps, press and hold the app you want to add to the Start menu, then tap Pin to Start.

From All apps, position your mouse pointer over the app you want to add to the Start menu and right-click it, then click Pin to Start.

From All apps, press on the app that you want to add to the Start menu, then select Pin to Start.
Task view
Quickly switch between opened apps and programs using the task view feature, you can also use task view to switch between desktops.
text_image
Get Started Store Status File Explorer Get Started Store Status File Explorer Get Started Store Status File Explorer Get Started Store Status File Explorer Get Started Store Status File Explorer Get Started Store Status File Explorer Get Started Store Status File Explorer Get Started Store Status File Explorer Get Started Store Status File Explorer Get Started Store Status File Explorer Get Started Store Status File Explorer Get Started Store Status File Explorer Go to the home Go to the local Go to the city Go to the city Go to the city Go to the city Go to the city Go to the city Go to the city Go to the city Go to the city Go to the city Go to the city Go to the city Go to the city Go to the city Go to the city Go to the city Go to the city Go to the city Go to the city Go to the city Go to the urban area Go to the urban area Go to the urban area Go to the urban area Go to the urban area Go to the urban area Go to the urban area Go to the urban area Go to the urban area Go to the urban area Go to the urban area Go to the urban area Go to the urban area Go to the urban area Go to the urban area Go to the urban area Go to the urban area Go to 100% (1) Go to 100% (2) Go to 100% (3) Go to 100% (4) Go to 100% (5) Go to 100% (6) Go to 100% (7) Go to 100% (8) Go to 100% (9) Go to 100% (10) Go to 100% (11) Go to 100% (12) Go to 100% (13) Go to 100% (14) Go to 100% (15) Go to 100% (16) Go to 100% (17) Go to 100% (18) Go to 100% (19) Go to 100% (20) Go to 100% (21) Go to 100% (22) Go to 100% (23) Go to 100% (24) Go to 100% (25) Go to 100% (26) Go to 100% (27) Go to 100% (28) Go to 100% (29) Go to 100% (30) Go to 100% (31) Go to 100% (32) Go to 100% (33) Go to 100% (34) Go to 100% (35) Go to 100% (36) Go to 100% (37) Go to 100% (38) Go to 100% (39) Go to 100% (40) Go to 100% (41) Go to 100% (42) Go to 100% (43) Go to 100% (44) Go to 100% (45) Go to 100% (46) Go to 100% (47) Go to 100% (48) Go to 100% (49) Go to 100% (50) Go to 100% (51) Go to 100% (52) Go to 100% (53) Go to 100% (54) Go to 100% (55) Go to 100% (56) Go to 100% (57) Go to 100% (58) Go to 100% (59) Go to 100% (60) Go to 100% (61) Go to 100% (62) Go to 100% (63) Go to 100% (64) Go to 100% (65) Go to 100% (66) Go to 100% (67) Go to 100% (68) Go to 100% (69) Go to 100% (70) Go to 100% (71) Go to 100% (72) Go to 100% (73) Go to 100% (74) Go to 100% (75) Go to 100% (76) Go to 100% (77) Go to 100% (78) Go to 100% (79) Go to 100% (80) Go to 100% (81) Go to 100% (82) Go to 100% (83) Go to 100% (84) Go to 100% (85) Go to 100% (86) Go to 100% (87) Go to 100% (88) Go to 100% (89) Go to 100% (90) Go to 100% (91) Go to 100% (92) Go to 100% (93) Go to 100% (94) Go to 100% (95) Go to 100% (96) Go to 100% (97) Go to 100% (98) Go to 1.2.2.2.2.2.2.2.2.2.2.2.2.2.2.2.2.2.2.2.2.2.2.2.2.2.2.2.2.2.2.2.2.2.2.2.2.2.2.2.2.2.2.2.2.2.2.2.2.2.2.3Launching task view

Tap the icon on the taskbar or swipe form the left edge of the screen.

Position your mouse pointer over the icon on the taskbar and click it.

Press your keyboard.
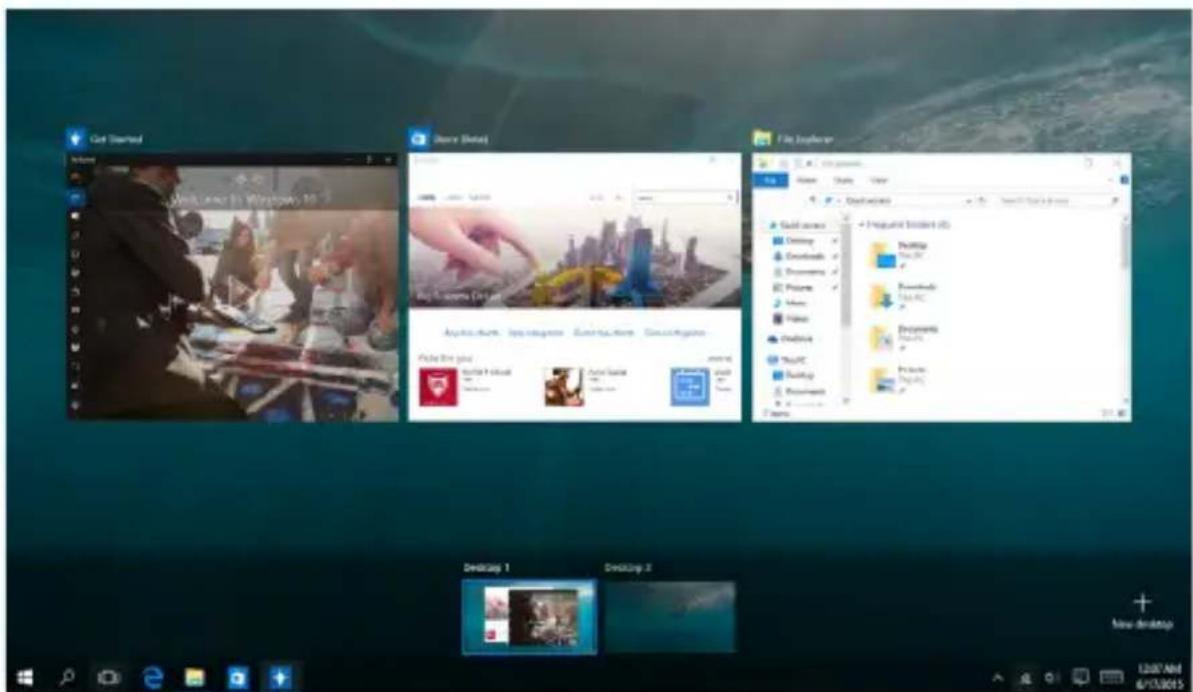
Snap feature
The Snap feature displays apps side-by-side, allowing you to work or switch between apps.

text_image
Go Started Welcome to Windows 10 Home Apps Games Search Big Business Deluxe Calendar Welcome This clean and modern calendar is perfect for life's events. Get Started OneDrive The PC 22 hours Share View Quick access Desktop Downloads Documents Functions Music Surface OneDrive The PC Frequency folders (%) Desktop Think PC Downloads Think PC Documents Think PC Routset Think PC Mask Think PC Video Think PCSnap hotspots
You can drag and drop apps to these hotspots to snap them into place.

natural_image
Underwater scene of a diver swimming near the seabed, with no visible text or symbolsUsing Snap


- Launch the app you wish to snap.
- Drag the title bar of your app and drop the app to the edge of the screen to snap.
- Launch another app and repeat the above steps to snap another app.

- Launch the app you wish to snap.
- Press and hold the
key, then use the arrow
keys to snap the app. - Launch another app and repeat the above steps to snap another app.

Action Center
Action Center consolidates notifications from apps and presents a single place where you can interact with them. It also has a really useful Quick Actions section at the bottom.

text_image
Action centers Settings Get Insider builds Insider build settings need attractor Wi-Fi Wi-Fi Sense requires attention. Step to for it Next step Motion mode Convert None All settings VTV Bluetooth 100% Digital fans Location 1208.A68 6/17/2015Launching Action Center

Click the icon on the taskbar or swipe from the right edge of the screen.

Position your mouse pointer over the icon on the taskbar and click it.

Press on your keyboard.
Other keyboard shortcuts
Using the keyboard, you can also use the following shortcuts to help you launch applications and navigate Windows® 10.

Launches Start menu

Launches Action Center
Launches the desktop

Launches the File Explorer
Opens the Share panel

Launches Settings

Launches Connect panel

Activates the Lock screen
Minimizes all currently active windows
text_image
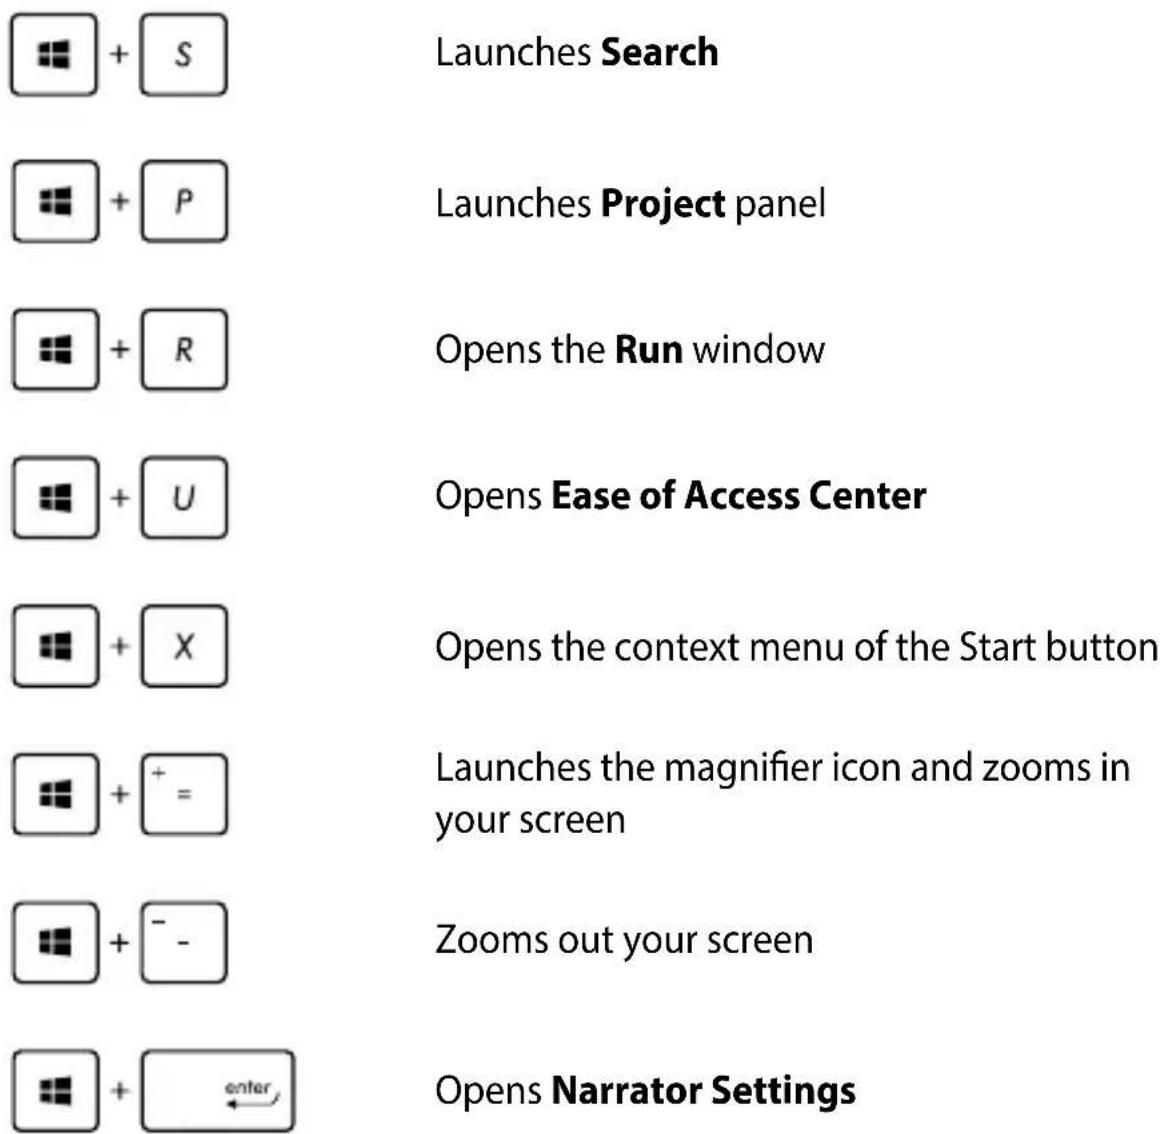
Launches Search Launches Project panel Opens the Run window Opens Ease of Access Center Opens the context menu of the Start button Launches the magnifier icon and zooms in your screen Zooms out your screen Opens Narrator SettingsConnecting to wireless networks
Wi-Fi
Access emails, surf the Internet, and share applications via social networking sites using your ASUS All-in-One PC's Wi-Fi connection.
Connecting Wi-Fi
Connect your ASUS All-in-One PC to a Wi-Fi network by using the following steps:

or

-
Select the icon from the taskbar.
-
Select the icon to enable Wi-Fi.
-
Select an access point from the list of available Wi-Fi connections.
-
Select Connect to start the network connection.
NOTE: You may be prompted to enter a security key to activate the Wi-Fi connection.
Bluetooth
Use Bluetooth to facilitate wireless data transfers with other Bluetooth-enabled devices.
Pairing with other Bluetooth-enabled devices
You need to pair your ASUS All-in-One PC with other Bluetooth-enabled devices to enable data transfers. Connect your devices by using the following steps:

or

-
Launch Settings from the Start menu.
-
Select Devices, then select Bluetooth to search for Bluetooth-enabled devices.
-
Select a device from the list. Compare the passcode on your ASUS All-in-One PC with the passcode sent to your chosen device. If they are the same, select Yes to successfully pair your ASUS All-in-One PC with the device.
NOTE: For some bluetooth-enabled devices, you may be prompted to key in the passcode of your ASUS All-in-One PC.
Connecting to wired networks
You can also connect to wired networks, such as local area networks and broadband Internet connection, using your ASUS All-in-One PC's LAN port.
NOTE: Contact your Internet Service Provider (ISP) for details or your network administrator for assistance in setting up your Internet connection.
To configure your settings, refer to the following procedures.
IMPORTANT! Ensure that a network cable is connected between your ASUS All-in-One PC's LAN port and a local area network before performing the following actions.
Configuring a dynamic IP/PPPoE network connection

or

- Launch Settings.
- Select Network & Internet.
- Select Ethernet > Network and Sharing Center.
- Select your LAN then select Properties.
- Select Internet Protocol Version 4(TCP/IPv4) then select Properties.
- Select Obtain an IP address automatically then select OK.
NOTE: Proceed to the next steps if you are using PPPoE connection.
- Return to the Network and Sharing Center window then select Set up a new connection or network.
- Select Connect to the Internet then select Next.
- Select Broadband (PPPoE).
- Type your User name, Password, and Connection name then select Connect.
- Select Close to finish the configuration.
- Select 📄 on the taskbar then select the connection you just created.
- Type your user name and password then select Connect to start connecting to the Internet.
Configuring a static IP network connection

text_image
or- Repeat steps 1 to 5 under Configuring a dynamic IP/PPPoE network connection.
- Select Use the following IP address.
- Type the IP address, Subnet mask and Default gateway from your service provider.
- If needed, you can also type the preferred DNS server address and alternate DNS server address then select OK.
Turning your ASUS All-in-One PC off
You can turn off your ASUS All-in-One PC by doing either of the following procedures:

or

- Launch the Start menu, then select
Shut down to do a normal shutdown.

Power
• From the log-in screen, select

Shut down.

- Press to launch Shut Down
Windows. Select Shut Down from the drop-down list then select OK.
- If your ASUS All-in-One PC is unresponsive, press and hold the power button for at least four (4) seconds until your ASUS All-in-One PC turns off.
Putting your ASUS All-in-One PC to sleep
To put your ASUS All-in-One PC to Sleep mode:

or

- Launch the Start menu, then select

Sleep to put your ASUS All-in-One PC to sleep.
• From the log-in screen, select


Press to launch Shut Down Windows.
Select Sleep from the drop-down list then select OK.
NOTE: You can also put your ASUS All-in-One PC to Sleep mode by pressing the power button once.
Chapter 4: Recovering your system
Entering the BIOS Setup
BIOS (Basic Input and Output System) stores system hardware settings that are needed for system startup in the ASUS All-in-One PC.
In normal circumstances, the default BIOS settings apply to most conditions to ensure optimal performance. Do not change the default BIOS settings except in the following circumstances:
- An error message appears on the screen during the system bootup and requests you to run the BIOS Setup.
- You have installed a new system component that requires further BIOS settings or update.
WARNING! Inappropriate BIOS settings may result to instability or boot failure. We strongly recommend that you change the BIOS settings only with the help of a trained service personnel.
Quickly enter the BIOS
To access the BIOS:
- When your ASUS All-in-One PC is off, press the power button for at least four (4) seconds to access the BIOS directly.
- Press the power button to turn on your ASUS All-in-One PC then press
or during POST.
NOTE: POST (Power-On Self-Test) is a series of software controlled diagnostic tests that run when you turn on your ASUS All-in-One PC.
Recovering your system
Using recovery options on your ASUS All-in-One PC allows you to restore the system to its original state or simply refresh its settings to help improve performance.
IMPORTANT!
- Backup all your data files before doing any recovery option on your ASUS All-in-One PC.
- Note down important customized settings such as network settings, user names, and passwords to avoid data loss.
- Ensure that your ASUS All-in-One PC is plugged in to a power source before resetting your system.
Windows® 10 allows you to do any of the following recovery options:
- Keep my files - This option allows you refresh your ASUS All-in-One PC without affecting personal files (photos, music, videos, documents).
Using this option, you can restore your ASUS All-in-One PC to its default settings and delete other installed apps.
- Remove everything - This option resets your ASUS All-in-One PC to its factory settings. You must backup your data before doing this option.
- Go back to an earlier build - This option allows you to go back to an earlier build. Use this option if this build is not working for you.
- Advanced startup - Using this option allows you to perform other advanced recovery options on your ASUS All-in-One PC such as:
- Using a USB drive, network connection or Windows recovery DVD to startup your ASUS All-in-One PC.
- Using Troubleshoot to enable any of these advanced recovery options: System Restore, System Image Recovery, Startup Repair, Command Prompt, UEFI Firmware Settings, and Startup Settings.
Performing a recovery option
Refer to the following steps if you want to access and use any of the available recovery options for your ASUS All-in-One PC.
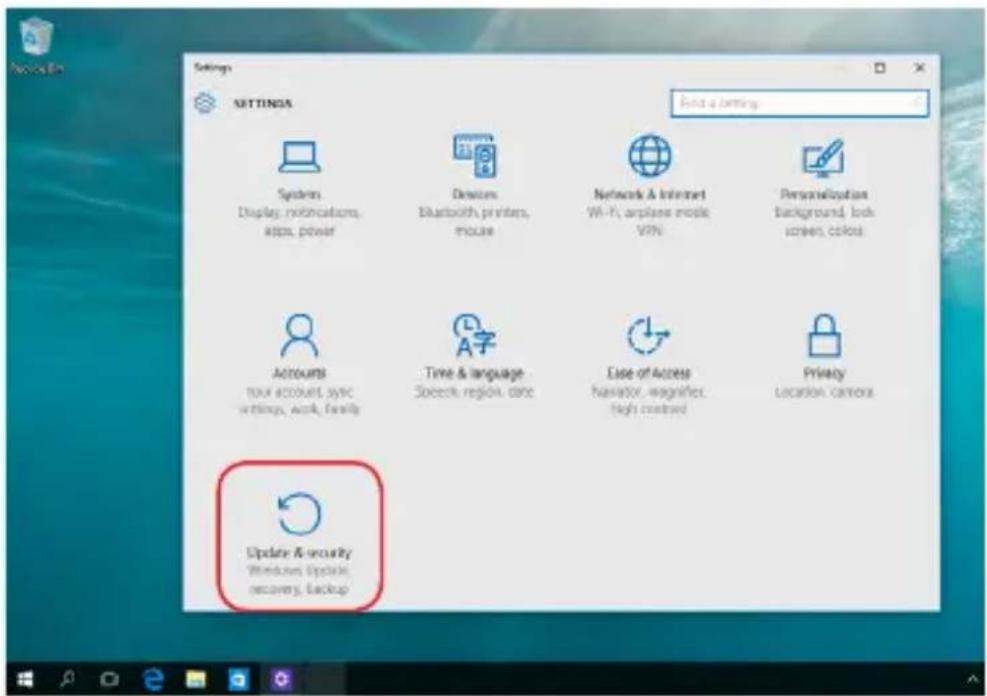
- Launch Settings and select Update and security.
text_image
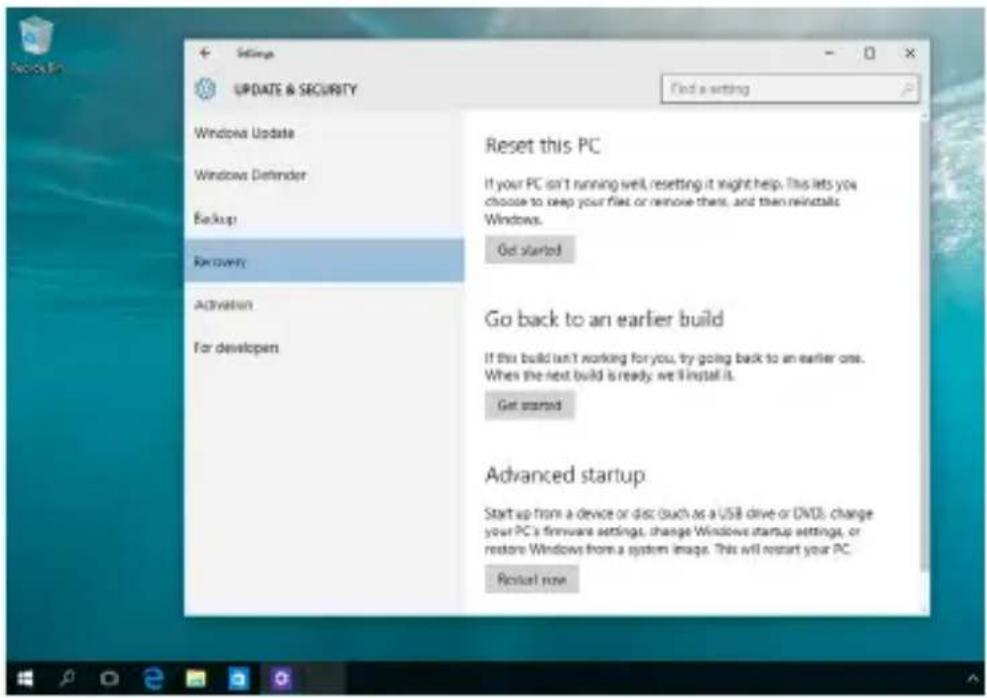
Settings SETTINGS Enter a security Systems Display: notifications, apps, power Devices Bluetooth, printers, mouse Network & Internet Wi-Fi, airplane mode, VPN Personalization Background, lock screen, colors Accounts tax account sync settings, work, family Time & language Speech region, once Ease of Access Navigator, wagering, high context Privacy location camera Update & security Windows Update, recovery, Backup- Under the Update and security option, select Recovery then select the recovery option you would like to perform.
text_image
Settings UPDATE & SECURITY Windows Update Windows Defender Backup Recovery: Activation For developen Reset this PC If your PC isn't running well, resetting it might help. This lets you choose to keep your file or remove them, and then reinstalls Windows. Go started Go back to an earlier build If this build isn't working for you, try going back to an earlier one. When the next build is ready, we I install it. Get started Advanced startup Start up from a device or disc (such as a USB drive or DVD), change your PC's firmware settings, change Windows startup settings, or restore Windows from a system image. This will restart your PC. Ricustal nowAppendices
Notices
Federal Communication Commission Interference Statement
This equipment has been tested and found to comply with the limits for a Class B digital device, pursuant to Part 15 of the FCC Rules. These limits are designed to provide reasonable protection against harmful interference in a residential installation. This equipment generates, uses and can radiate radio frequency energy and, if not installed and used in accordance with the instructions, may cause harmful interference to radio communications. However, there is no guarantee that interference will not occur in a particular installation. If this equipment does cause harmful interference to radio or television reception, which can be determined by turning the equipment off and on, the user is encouraged to try to correct the interference by one or more of the following measures:
• Reorient or relocate the receiving antenna.
- Increase the separation between the equipment and receiver.
- Connect the equipment into an outlet on a circuit different from that to which the receiver is connected.
- Consult the dealer or an experienced radio/TV technician for help.
FCC Caution: Any changes or modifications not expressly approved by the party responsible for compliance could void the user's authority to operate this equipment.
This device complies with Part 15 of the FCC Rules. Operation is subject to the following two conditions: (1) This device may not cause harmful interference, and (2) this device must accept any interference received, including interference that may cause undesired operation.
This device is restricted to indoor use when operated in the 5.15 to 5.25 GHz frequency range.
RF exposure warning
This equipment must be installed and operated in accordance with provided instructions and the antenna(s) used for this transmitter must be installed to provide a separation distance of at least 20 cm from all persons and must not be co-located or operating in conjunction with any other antenna or transmitter. End-users and installers must be provided with antenna installation instructions and transmitter operating conditions for satisfying RF exposure compliance.
IMPORTANT! Outdoor operations in the 5.15\~5.25 GHz band is prohibited. This device has no Ad-hoc capability for 5250\~5350 and 5470\~5725 MHz.
CAUTION: Any changes or modifications not expressly approved by the guarantee of this device could void the user's authority to operate the equipment.
Compliance Statement of Innovation, Science and Economic Development Canada (ISED)
This device complies with Innovation, Science and Economic Development Canada licence exempt RSS standard(s). Operation is subject to the following two conditions: (1) this device may not cause interference, and (2) this device must accept any interference, including interference that may cause undesired operation of the device.
Operation in the band 5150–5250 MHz is only for indoor use to reduce the potential for harmful interference to co-channel mobile satellite systems.
CAN ICES-3(B)/NMB-3(B)
Radio Frequency (RF) Exposure Information
The radiated output power of the wireless device is below the Industry Canada (IC) radio frequency exposure limits. The wireless device should be used in such a manner such that the potential for human contact during normal operation is minimized.
This device has also been evaluated and shown compliant with the IC RF Exposure limits under mobile exposure conditions (antennas are greater than 20cm from a person's body).
Wireless Operation Channel for Different Domains
N. America 2.412-2.462 GHz Ch01 through CH11
Japan 2.412-2.484 GHz Ch01 through Ch14
Europe ETSI 2.412-2.472 GHz Ch01 through Ch13
CE Mark Warning
This is a Class B product, in a domestic environment, this product may cause radio interference, in which case the user may be required to take adequate measures.

The WiFi Operating in the band 5150-5350MHz shall be restricted to indoor use for countries listed in the table below:
| AT BE BG CZ DK EE FR | ||||||
| DE IS IE IT EL ES CY | ||||||
| LV | LI | LT | LU | HU | MT | NL |
| NO PL PT RO SI SK TR | ||||||
| FI SE CH UK HR | ||||||
NO DISASSEMBLY
The warranty does not apply to the products that have been disassembled by users
Lithium-Ion Battery Warning
CAUTION: Danger of explosion if battery is incorrectly replaced. Replace only with the same or equivalent type recommended by the manufacturer. Dispose of used batteries according to the manufacturer's instructions.
No Exposure to Liquids
DO NOT expose to or use near liquids, rain, or moisture. This product is not waterproof or oil-proof.

This symbol of the crossed out wheeled bin indicates that the product (electrical, electronic equipment, and mercury-containing button cell battery) should not be placed in municipal waste. Check local regulations for disposal of electronic products.

DO NOT throw the battery in municipal waste. The symbol of the crossed out wheeled bin indicates that the battery should not be placed in municipal waste.

Complying with the REACH (Registration, Evaluation, Authorization, and Restriction of Chemicals) regulatory framework, we publish the chemical substances in our products at ASUS REACH website at http://csr.asus.com/english/REACH.htm.
Global Environmental Regulation Compliance and Declaration
ASUS follows the green design concept to design and manufacture our products, and makes sure that each stage of the product life cycle of ASUS product is in line with global environmental regulations. In addition, ASUS disclose the relevant information based on regulation requirements.
Please refer to http://csr.asus.com/english/Compliance.htm for information disclosure based on regulation requirements ASUS is complied with:
Japan JIS-C-0950 Material Declarations
EU REACH SVHC
Korea RoHS
ASUS Recycling/Takeback Services
ASUS recycling and takeback programs come from our commitment to the highest standards for protecting our environment. We believe in providing solutions for you to be able to responsibly recycle our products, batteries, other components as well as the packaging materials. Please go to http://csr.asus.com/english/Takeback.htm for detailed recycling information in different regions.
India RoHS
This product complies with the “India E-waste (Management and Handling) Rule 2011” and prohibits use of lead, mercury, hexavalent chromium, polybrominated biphenyls (PBBs) and polybrominated diphenyl ethers (PBDEs) in concentrations exceeding 0.1% by weight in homogenous materials and 0.01% by weight in homogenous materials for cadmium, except for the exemptions listed in Schedule-II of the Rule.
Coating Notice
IMPORTANT! To provide electrical insulation and maintain electrical safety, a coating is applied to insulate the device except on the areas where the I/O ports are located.
Prevention of Hearing Loss
To prevent possible hearing damage, do not listen at high volume levels for long periods.

text_image
Warning symbol with triangular triangle containing a stylized 'e' and sound waves inside, indicating sound or audio hazard.
ENERGY STAR complied product

text_image
ENERGY ENERGY STARENERGY STAR is a joint program of the U.S. Environmental Protection Agency and the U.S. Department of Energy helping us all save money and protect the environment through energy efficient products and practices.
All ASUS products with the ENERGY STAR logo comply with the ENERGY STAR standard, and the power management feature is enabled by
default. The monitor and computer are automatically set to sleep after 10 and 30 minutes of user inactivity. To wake your computer, click the mouse or press any key on the keyboard.
Please visit http://www.energystar.gov/powermanagement for detail information on power management and its benefits to the environment. In addition, please visit http://www.energystar.gov for detail information on the ENERGY STAR joint program.
NOTE: ENERGY STAR is NOT supported on FreeDOS and Linux-based products.
| Manufacturer ASUSTek COMPUTER INC. | |
| Address, City 4F No. 150, LI-TE RD | , PEITOU, TAIPEI 112, TAIWAN |
| Telephone Number +886-2-2894-3447 | |
| Authorized Representative in Europe | ASUS COMPUTER GmbH |
| Address, City HARKORT STR. 21-23, 40880 RATINGEN | |
| Country GERMANY | |