HQPZO13ST - Pizza oven Magic Chef - Free user manual and instructions
Find the device manual for free HQPZO13ST Magic Chef in PDF.

User questions about HQPZO13ST Magic Chef
0 question about this device. Answer the ones you know or ask your own.
Ask a new question about this device
Download the instructions for your Pizza oven in PDF format for free! Find your manual HQPZO13ST - Magic Chef and take your electronic device back in hand. On this page are published all the documents necessary for the use of your device. HQPZO13ST by Magic Chef.
USER MANUAL HQPZO13ST Magic Chef
text_image
Magic Chef®12-Inch Pizza Oven
User's Manual

natural_image
Line drawing of a Magic Chef toaster oven with control knobs and a grater (no text or symbols on the device itself)Model HQPZO13ST, HQPZO13B, HQPZO13R
PLEASE READ THIS MANUAL CAREFULLY BEFORE USING YOUR PIZZA OVEN AND KEEP IT FOR FUTURE REFERENCE.

text_image
Magic Chef®PRODUCT REGISTRATION
Thank you for purchasing a Magic Chef® product. The first step to protect your new product is to complete the product registration on our website: www.mcappliance.com/register. The benefits of registering your product include the following:
- Registering your product will allow us to contact you regarding a safety notification or product update.
- Registering your product will allow for more efficient warranty service processing when warranty service is required.
- Registering your product could act as your proof of purchase in the event of insurance loss.
Once again, thank you for purchasing a Magic Chef product.
CONTENTS
PRODUCT REGISTRATION 2
PRECAUTIONS 4
IMPORTANT SAFETY INSTRUCTIONS.... 5
SPECIFICATIONS....7
PARTS AND FEATURES 8
ASSEMBLY....9
OPERATION INSTRUCTIONS.... 10
CARE AND MAINTENANCE....13
TROUBLESHOOTING....14
LIMITED WARRANTY 15
PRECAUTIONS
EXPLANATION OF SYMBOLS
WARNING
Hazards or unsafe practices which COULD result in severe personal injury or death.
CAUTION
Hazards or unsafe practices which COULD result in minor personal injury.
THIS PRODUCT IS INTENDED FOR HOUSEHOLD USE ONLY
⚠ WARNING: Read and understand all safety precautions. Failure to follow all instructions described in this user manual may result in electric shock, fire and/or serious personal injury. The warnings, cautions and instructions discussed in this user manual cannot cover all possible conditions and situations that may occur.
ELECTRIC POWER
If an electric circuit is overloaded with other appliances, the Pizza Oven may not operate properly. The Pizza Oven should be operated on a separate electrical circuit from other operating appliances.
POLARIZED PLUG
The Pizza Oven has a polarized plug (one blade is wider than the other). To reduce the risk of electric shock, this plug is intended to fit into a polarized outlet only one way. If the plug does not fit fully into the outlet, reverse the plug. If it still does not fit, contact a qualified electrician. DO NOT attempt to modify the plug in any way. If the plug fits loosely into the AC outlet or if the AC outlet feels warm, DO NOT use that outlet. operating appliances.
CAUTION: A short power supply cord is provided to reduce the risk of becoming entangled in or tripping over a longer cord. An extension cord is not recommended for use with this product, but if necessary, the marked electrical rating must be at least as great as that of the product. Arrange the extension cord so that it will not drape over the countertop or tabletop where it can be tripped over or pulled.
IMPORTANT SAFETY INSTRUCTIONS
⚠ WARNING: To reduce the risk of fire, electric shock, or serious personal injury, please read and save all instructions before using the Pizza Oven.
When using this or any other electrical appliance, basic safety precautions should be observed, including the following:
- READ ALL INSTRUCTIONS BEFORE USE.
- Before using the appliance for the first time, check if the voltage of the appliance corresponds to the voltage in your home.
- ALWAYS assemble the appliance completely before plugging the unit into an electrical outlet. DO NOT begin operating this appliance until it is properly assembled.
- ALWAYS ensure the appliance is unplugged from the electrical outlet, has cooled down completely, and all parts have stopped before assembling, disassembling, relocating or cleaning the unit. Unplug the unit from the electrical outlet when not in use.
- The temperature of accessible surfaces may be hot when the appliance is operating.
- DO NOT touch hot surfaces. ALWAYS use the handles or control knobs. ALWAYS wear protective, insulated oven gloves when inserting or removing items from the hot oven.
- ALWAYS ensure the baking rack is securely locked in place before operating the product. NEVER try to remove or force the baking rack open while the appliance is operating.
- DO NOT expose or immerse the base, power cord or plug of this appliance in water or any other liquid.
- DO NOT place on or near a hot gas or electric burner, or in or near a heated oven.
- For adequate air circulation, leave approximately 4 inches of open space all around the exterior of this appliance while it is in use.
- A fire may occur if the oven is covered or touches flammable materials, including curtains, draperies, walls, and the like, when in operation. DO NOT place any item on top of the appliance during operation.
- Ensure that the appliance and its power cord do not come into contact with hot surfaces.
- DO NOT leave the appliance unattended while it is in use. ALWAYS unplug the appliance from the electrical outlet when not in use.
- Close supervision is necessary when any appliance is used near incapacitated persons, children or pets.
- Keep the appliance out of the reach of children and pets. This appliance is not intended for use by children or incapacitated persons.
- Avoid contact with internal parts during operation. Keep hair, hands, fingers or any other body part from coming into contact with the internal components while the appliance is operating.
- Keep utensils away from the internal assembly while operating the appliance. A scraper or spatula may be used but only when the appliance is not in operation.
- Oversized foods or metal utensils must not be inserted into the oven as they may create a fire hazard or risk of electric shock.
- The use of attachments or accessories not recommended or sold by the manufacturer may result in fire, electric shock or injury.
-
Extreme caution should be exercised when using cookware or bakeware constructed of anything other than ovenproof metal or glass. DO NOT place any of the following materials in the oven: cardboard, plastic, paper, or anything similar.
-
Ensure that nothing touches the top and bottom heating elements of the oven.
- Extreme caution must be used when moving the drip pan containing hot oil or other hot liquids.
- Use extreme caution when removing the crumb tray, baking rack or disposing of hot grease and other hot liquids.
- DO NOT cover any part of the pizza oven with metal foil, including the crumb tray. This may cause the oven to overheat.
- To disconnect the appliance from the electrical outlet, ensure the appliance is OFF, by verifying that the timer control knob is turned to the OFF position, and then pull directly on the plug. DO NOT pull on the power cord.
- DO NOT put any stress on the power cord where it connects to the appliance, as the power cord could fray and break.
- DO NOT plug or unplug the appliance into or from the electrical outlet with a wet hand.
- DO NOT operate the appliance if it has a damaged or cut power cord or plug, if the wires are exposed, if the unit malfunctions, if the unit is dropped or damaged, or if the pizza oven housing is dropped in or exposed to water.
- DO NOT clean the inside of the oven with metal scouring pads, as pieces of the pad can break off and touch electrical parts, thereby creating a risk of electric shock.
- DO NOT store any materials other than the manufacturer's recommended accessories in this oven when it is not in use.
- This appliance has no user serviceable parts. DO NOT attempt to examine or repair this appliance yourself. Only qualified service personnel should perform any servicing.
- DO NOT use the appliance with a damaged electrical outlet.
- Return the appliance to an authorized service center for examination, repair or adjustment.
- DO NOT use this appliance for purposes other than its intended use.
- This appliance is intended for household use only. DO NOT use the appliance outdoors or for any other purpose.
- ALWAYS place the appliance on a level and stable surface.
SAVE THESE INSTRUCTIONS FOR FUTURE REFERENCE
SAFETY WARNINGS
Although the appliance is easy to operate, the warnings below must be followed for your safety:
• DO NOT immerse the cord, plug, or any portion of the base unit in water or any other liquid.
• DO NOT use the appliance on an unstable surface.
• DO NOT place the appliance near a heat source.
• DO NOT unplug the appliance by pulling on the power supply cord.
• The appliance must be unplugged and cooled down completely before any cleaning or maintenance duties.
• If the appliance appears to be faulty, it must be unplugged.
SPECIFICATIONS

text_image
Figure 1 Magic Chef 6.6" 14.0" 19.3"| Product Dimensions 19.3” x 6.6” x 14.0” [W x H x D] | |
| Net Weight 4.5 Lbs. | |
| Capacity Up to 12 Inches | |
| Voltage Rating 120V AC, 60 Hz | |
| Power Rating 1300 Watts |
PRODUCT COMPONENTS
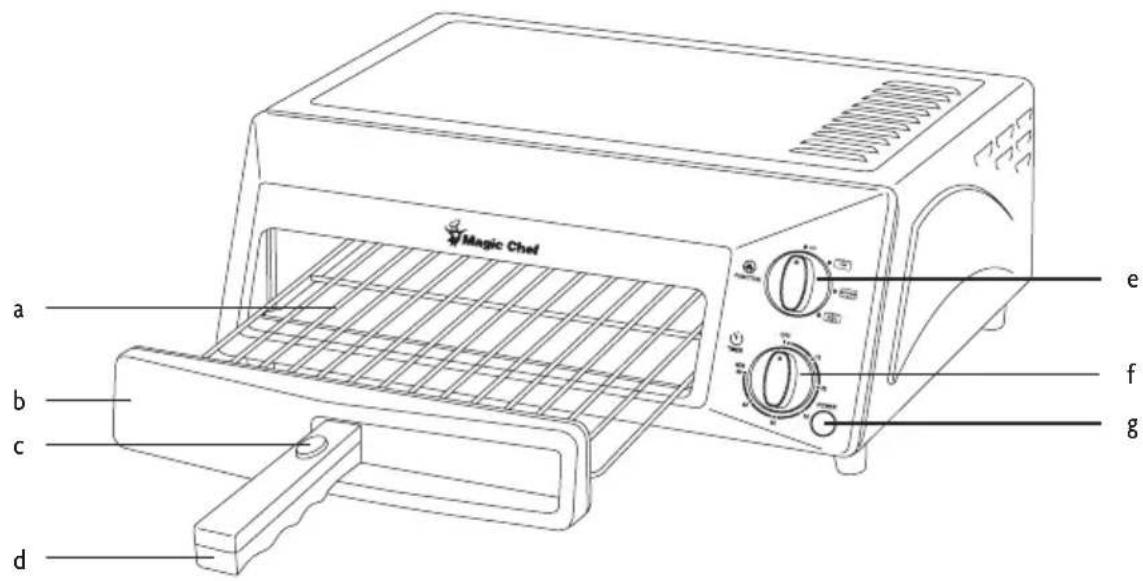
Figure 2
text_image
Magic Chef a b c d e f g
text_image
h i j ka. Removable baking rack with chrome wire rack (1)
b. Baking rack face panel (1)
c. Handle release button (1)
d. Folding baking rack handle (1)
e. Heating element control knob (1)
f. Timer control knob (1)
g. Power indicator light (1)
h. Stainless steel heating element (4)
i. Skid-resistant foot (4)
j. Hinged crumb tray (1)
- Remove the product from its packaging materials. No assembly is required as the unit is preassembled.
- The baking rack handle folds into the baking rack face panel when not in use for convenient storage. To unfold the handle for use, pull the right end of the handle out and away from the pizza oven until it is perpendicular with the oven and locked in place.
- Before the first use, thoroughly wash the baking rack with a warm, soapy cloth. Gently rinse the parts and dry them thoroughly. Using a damp cloth, wipe the inner surface of the crumb tray and dry it thoroughly.
▲ NOTE: DO NOT immerse the baking rack face panel or the pizza oven in water or any other liquids.
- Reinsert the crumb tray and baking rack into the pizza oven. Ensure the hinged crumb tray is locked into place with the pizza oven housing. Place the oven on a flat, dry surface away from the countertop edge and plug the unit into a 120V AC electrical outlet.
OPERATION INSTRUCTIONS
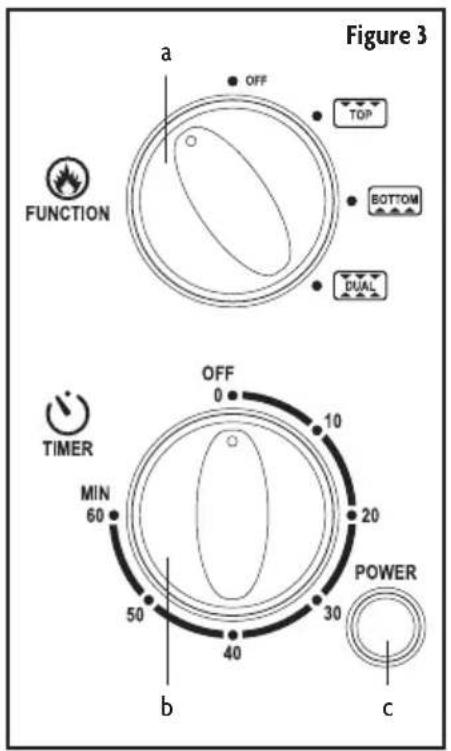
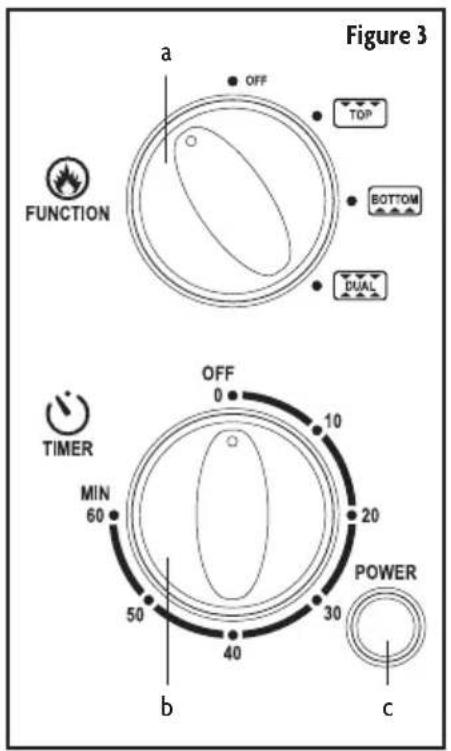
CONTROL PANEL
a. Heating element controls: OFF, TOP ( ), BOTTOM ( ,
DUAL ( )
b. Timer controls: 0-60 min. timer with 10 min. increments
c. Power indicator light
BEFORE USE
Before the first use, it is recommended to run the pizza oven without a pizza at its highest temperature setting to allow any manufacturing residue to burn off. This will also remove any traces of odor initially present. Allow the oven to heat for approximately 10 to 15 minutes by turning the heating element control knob to DUAL (DUAL) and setting the timer to 10 to 15 minutes via the timer control knob.
▲ NOTE: Initial operation of the pizza oven may result in minimal smell and smoke. This is normal due to the burning of protective manufacturing residue applied to the heating elements.
text_image
Figure 3 a OFF TOP BOTTOM DUAL FUNCTION TIME 0 10 20 30 40 50 60 b cOPERATION
CAUTION: Whenever operating the pizza oven, allow a minimum of 4 inches of open space around the exterior of the oven for proper air circulation. NEVER operate the oven without the baking rack installed. To reduce the risk of personal injury or burns, avoid touching the hot surfaces of the oven during operation.
- To turn the pizza oven ON, rotate the timer control knob clockwise to select the desired time. The knob must past the 10 minute marker in order to activate the oven. For cooking times less than 10 minutes, simply turn the timer knob past the 10 minute marker, and then counterclockwise to the desired time. Once the set time has expired, the timer will ring to indicate the end of the programmed time and the unit will stop heating. The maximum setting for the timer is 60 minutes.
- The power indicator light will be illuminated whenever the pizza oven is heating.
NOTE: The exterior of the pizza oven will produce heat during use and may become hot. DO NOT touch hot surfaces. ALWAYS use the handles or control knobs. ALWAYS wear protective, insulated oven gloves when inserting or removing items from the hot oven. - To turn the oven OFF, rotate the timer control knob counterclockwise to OFF/0.
▲ NOTE: ALWAYS use extreme care when removing the baking rack, crumb tray or any hot container from the pizza oven. ALWAYS use the handle of the baking rack and an insulated oven mitt when removing hot items from the oven. -
To bake a pizza, preheat the pizza oven for approximately 3 minutes by setting the heating element control knob to DUAL ( [DUAL] ), and then turning the timer control knob to the desired time.
NOTE: Remember to activate the pizza oven by turning the timer control knob past the 10 minute marker. For cooking times less than 10 minutes, first turn the timer knob past the 10 minute marker, and then counterclockwise to the desired time. -
Remove the pizza from its packaging, including the cardboard disk. If necessary, place the pizza on an ovenproof cookware or bakeware.
NOTE: The pizza oven can accommodate pizzas up to 12 inches in diameter. Ensure proper fitment when using an ovenproof cookware or bakeware. DO NOT cover any part of the pizza oven with metal foil, including the crumb tray; oversized pizzas or metal utensils must not be inserted into the oven.
-
After preheating, pull the baking rack partially out of the pizza oven and carefully place the pizza onto the wire rack. Use caution as the baking rack and oven exterior will be hot. Guide the baking rack back into the oven using its handle.
-
Refer to the "Pizza Cooking Chart" on p. 12 for approximate cooking times. If applicable, use the directions included with the pizza in conjunction with the below chart. Set the timer for the halfway point of the suggested cooking time for the type of pizza listed. For instance, if the below chart indicates to cook for 18 to 24 minutes, set the timer to 9 minutes. When the time expires, use the handle to carefully pull the baking rack partially out of the oven. Rotate the pizza using a spatula, fork or tongs. Then carefully guide the baking rack back into the oven and set the timer for the remaining time.
NOTE: At the end of the baking time, select TOP (TOP) on the heating element control knob for well-done cheese and toppings. For a crispier crust, select BOTTOM (BOTTOM) on the heating element control knob.
- When the timer goes off, check to see if the pizza is cooked thoroughly. If additional baking time is needed, simply reset the timer to the desired time.
NOTE: All pizzas will cook differently; bake until the crust is golden brown and the cheese is melted.
-
When the pizza appears to be done, turn the timer to OFF/0 if the timer has not already expired.
-
Carefully pull the baking rack out of the oven using its handle, and then slide the pizza onto a pizza pan. Set the hot baking rack onto a heat resistant surface.
-
Allow the pizza to cool for approximately 3 to 5 minutes and then cut into serving pieces.
-
Allow the pizza oven to cool down completely before cleaning and storing.
HELPFUL TIPS
-
To reheat pizza slices, allow the pizza oven to preheat for approximately 3 minutes with the heating element control knob set to DUAL (DUAL).
-
After preheating, turn the heating element control knob to TOP ( ) and place the pizza slices onto the center of the baking rack. Set the timer for 6 to 12 minutes.
-
Use the shorter of the two cooking times when reheating thin crust or single topping pizza, and the longer cooking time when reheating thicker crusts or multiple toppings.
-
For best results, check the pizza after 6 minutes.
PIZZA COOKING CHART
The following cooking times are for baking 12-inch pizzas. The times are approximate. Use the shorter cooking times for single topping pizzas and the longer cooking times for pizzas with extra toppings or vegetable toppings. When the cheese has melted and begins bubbling, the pizza is done.
At the end of the cooking time, turn the heating element control knob to BOTTOM (BOTTOM) for a crispier crust. For well-done toppings, turn the control knob to TOP (Next), reset the timer by turning it beyond the 10 minute marker and then counterclockwise to 1 or 2 minutes. Cook the pizza as desired. To avoid overcooking the pizza, DO NOT leave the oven unattended.
▲ NOTE: During first use with each type of pizza, start with the shorter baking time in the indicated range. Then open the oven and check the pizza. Extend the time as needed to bake the pizza the way you like it. Make a note of the entire baking duration, and thereafter, use that time as a guide to bake pizza in the future.
| Type of Pizza | Approximate Cooking Time |
| Regular Crust 18 to 26 minutes | |
| Rising Crust 25 to 35 minutes | |
| Thin Crust 13 to 21 minutes | |
Cooking times will vary depending on the household voltage. The higher the voltage, the shorter the cooking time, while the lower the voltage, the longer the cooking time.
| Type of Pizza Preparation and Cooking Time | |
| Frozen Pizza Cook for 10 to 20 minutes or as indicated on the package. It is recommended to remove the pizza from the freezer approximately 10 minutes before placing into the pizza oven. Place the pizza onto an ovenproof pizza tray or the baking rack. | |
| Pizza Mix Follow the instructions on the box. Place the pizza onto an ovenproof pizza tray or the baking rack to bake. Cook for 18 to 25 minutes. | |
| Scratch Pizza Follow the recipe instructions. Place the pizza onto an ovenproof pizza tray and then onto the baking rack. Follow the cooking time listed in the instructions. |
CARE AND MAINTENANCE
CLEANING
⚠ WARNING: To avoid the risk of electric shock, ALWAYS ensure the pizza oven is unplugged from the electrical outlet before assembling, relocating, cleaning or storing.
The pizza oven should be cleaned regularly for optimal performance. Regular cleaning will also reduce the risk of fire hazard and electric shock. Before cleaning the pizza oven, check to see that the timer control knob is in the OFF/0 position, and then unplug the oven from the electrical outlet. Allow the pizza oven to cool completely before cleaning.
▲ NOTE: DO NOT use the dishwasher to clean any of the accessories which are included with the pizza oven.
a. Exterior Surface: Occasionally wipe the outside of the pizza oven with a damp cloth and dry thoroughly. NEVER immerse the oven in water or any other liquids. DO NOT use steel wool scouring pads or abrasive cleaners on the exterior surface of the pizza oven.
▲ NOTE: DO NOT immerse the base of the unit in water or any other liquid. The base contains the electrical components of the appliance. The lifespan of the product depends on how well it is cleaned and maintained after every use. ALWAYS follow the care and maintenance instructions. NEVER use any abrasive cleaning products on the appliance to maintain its original finish.
b. Baking Rack: Wash the baking rack with a hot, soapy cloth. Rinse and dry thoroughly. If necessary, clean the wire portion of the rack with a nylon mesh pad to remove any food residue. The baking rack face panel may be wiped with a damp cloth and wiped dry with a soft cloth or towel. DO NOT immerse the baking rack face panel or its handle in water or any other liquids, as the water or liquid may enter the interior of the panel and become trapped inside.
NOTE: Dry thoroughly before reinserting the baking rack into the oven. NEVER operate the pizza oven with the oven door open.
To fold the baking rack handle in for compact storage, press the handle release button and turn the handle in towards the pizza oven.
c. Crumb Tray: To prevent the kitchen countertop from being damaged, the pizza oven should be operated with the crumb tray installed and cleaned of excess food. To open the crumb tray for cleaning, tip the pizza oven backwards and then hold the oven so that it is in an upright position. Pull down on the crumb tray knob located on the underside of the pizza oven and then swivel the tray towards you.
While holding the pizza oven in an upright position, wipe the crumb tray and the interior of the pizza oven with a damp, soapy cloth. If necessary, use a nylon mesh pad to remove stubborn stains.
▲ NOTE: DO NOT use steel wool scouring pads or abrasive cleaners on the crumb tray.
Dry the crumb tray and pizza oven thoroughly and return the tray to its closed position. While pushing down on the knob, insert the crumb tray back into the oven.
d. Heating Elements: DO NOT wipe the heating elements as they are self-cleaning.
MAINTENANCE AND STORAGE
• Reassemble the product before placing it into storage.
• Store the product in a cool, dry place.
TROUBLESHOOTING
| Problem Possible Causes Solutions | ||
| Will not operate or turn on. | - No power- Timer control knob activation- Damages due to shipping damage or improper installation | - Check if the pizza oven is plugged in.- Check the fuse/circuit breaker in the home.- Turn the timer control knob past the 10 minute marker. For cooking times less than 10 minutes, first turn the timer knob past the 10 minute marker, and then counterclock wise to the desired time.- See “Warranty Conditions” on p. 15 of this user manual. |
| Will not cook pizza evenly. | - Selecting the correct heat setting for the type of pizza used- Distribution of pizza ingredients | - If the bottom of the pizza is cooked and the top is not or vice versa, the selected heat setting may be incorrect for the type of pizza used. Refer to the cooking chart on back of the pizza or this user manual for recommended cooking guidelines. The majority of pizzas should be cooked using the dual setting for at least part of the cooking time.- It is also possible that the ingredients on the pizza are not distributed evenly. If so, allow the pizza to cook slightly and then redistribute the ingredients with a fork. This will allow the pizza to cook more evenly. |
| Nothing happens when trying to brown the top or crisp the crust for additional minutes. | - Timer has expired.- Timer control knob activation | - Rotate the timer control knob beyond the 10 minute marker when setting the timer for the additional minutes. When selecting a setting of ten minutes or less, you must ALWAYS rotate the dial beyond the 10 minute marker and then back to the desired time. |
| When cooking rising crust pizza, sometimes the crust seems doughy or it does not rise very much. | - Did not follow recommended cooking settings- Type of pizza ingredients used | - Follow the recommended cooking settings: cook 9 to 12-inch pizzas for approximately 10 to 12 minutes first using the heat setting BOTTOM (BOTTOM) and then another 10 to 12 minutes on the heating setting DUAL (DUAL).- The yeast in the pizza crust may no longer be fully active. The height and consistency of a rising crust are dependent upon the conditions of the yeast. Freshness, freezer temperatures, packaging, and original dough quality are all contributing factors. Generally, more consistent results may be secured by nationally branded pizzas, as they tend to abide by more rigorous packaging and quality standards than many regional/grocery store pizzas. |

text_image
Magic Chef®LIMITED WARRANTY
MC Appliance Corporation warrants each new Pizza Oven to be free from defects in material and workmanship, and agrees to remedy any such defect or to furnish a new part(s), at the company's option, for any part(s) of the unit that has failed during the warranty period. Parts and labor expenses are covered on this unit for a period of one year from the date of purchase. A copy of the dated sales receipt/invoice is required to receive warranty service, replacement or refund.
This warranty covers appliances in use within the contiguous United States, Alaska, Hawaii and Puerto Rico. This warranty does not cover the following:
• Damages due to shipping damage or improper installation.
• Damages due to misuse or abuse.
• Content losses due to failure of the unit.
• Repairs performed by unauthorized service agents.
• Service calls that do not involve defects in material and workmanship such as instructions on proper use of the product or improper installation.
• Replacement or resetting of house fuses or circuit breakers.
- Failure of this product if used for other purposes than its intended purpose.
• Disposal costs for any failed unit not returned to our factory.
• Any delivery/installation costs incurred as the result of a unit that fails to perform as specified.
• Expenses for travel and transportation for product service if your appliance is located in a remote area where service by an authorized service technician is not available.
- The removal and reinstallation of your appliance if it is installed in an inaccessible location or is not installed in accordance with published installation instructions.
• Refunds for non repairable products are limited to the price paid for the unit per the sales receipt.
- This warranty is non transferable. This warranty applies only to the original purchaser and does not extend to any subsequent owner(s).
Limitations of Remedies and Exclusions:
Product repair in accordance with the terms herein, is your sole and exclusive remedy under this limited warranty. Any and all implied warranties including merchantability and fitness for a particular purpose are hereby limited to one year or the shortest period allowed by law. MC Appliance Corporation is not liable for incidental or consequential damages and no representative or person is authorized to assume for us any other liability in connection with the sale of this product. Under no circumstances is the consumer permitted to return this unit to the factory without the prior written consent of MC Appliance Corporation.
Some states prohibit the exclusion or limitation of incidental or consequential damages, or limitations on implied warranties. This warranty gives you specific legal rights, and you may also have other rights which vary from state to state.
| Model | Parts | Labor | Type of Service | |
| HQPZO13ST | One Year | One Year | Carry In | |
| HQPZO13B | One Year | One Year | Carry In | |
| HQPZO13R | One Year | One Year | Carry In |
For Service or Assistance please call 888-775-0202 or visit us on the web at www.mcappliance.com to request warranty service or order parts.

text_image
Magic Chef®CNA International, Inc. d/b/a MC Appliance Corporation. All rights reserved. Magic Chef® logo is a registered trademark of CNA International, Inc.
www.mcappliance.com Printed in China

text_image
Magic Chef®natural_image
Line drawing of a Magic Chef toaster oven with control knobs and a grater (no text or symbols on the device itself)Modelo HQPZO13ST, HQPZO13B, HQPZO13R
LEA ESTE MANUAL ANTES DE UTILIZAR SU HORNO PARA PIZZA Y GUÁRDELO PARA FUTURA REFERENCIA.

text_image
Magic Chef®▲ NOTA: Initial operation of the pizza oven may result in minimal smell and smoke. This is normal due to the burning of protective manufacturing residue applied to the heating elements.