15722 - Tablet MONOPRICE - Free user manual and instructions
Find the device manual for free 15722 MONOPRICE in PDF.

User questions about 15722 MONOPRICE
0 question about this device. Answer the ones you know or ask your own.
Ask a new question about this device
Download the instructions for your Tablet in PDF format for free! Find your manual 15722 - MONOPRICE and take your electronic device back in hand. On this page are published all the documents necessary for the use of your device. 15722 by MONOPRICE.
USER MANUAL 15722 MONOPRICE
natural_image
Technical line drawing of a mechanical support frame with two vertical supports and a horizontal beam (no text or symbols)Sit-Stand Dual-Motor Height Adjustable Desk Frame, Electric
P/N 15722 | Black
P/N 21590 | White
P/N 21591 | Gray
User's Manual
CONTENTS
SAFETY WARNINGS AND GUIDELINES....3
INTRODUCTION....4
CUSTOMER SERVICE....4
PACKAGE CONTENTS 4
RECOMMENDED TOOLS 6
CONTROL PANEL OVERVIEW 6
ASSEMBLY 7
SYSTEM RESET 11
OPERATION....12
Movement....12
Memory 12
Timed Reminder 12
Screensaver Mode....13
Power Saving Mode....13
TECHNICAL SUPPORT 13
TROUBLESHOOTING....14
REGULATORY COMPLIANCE....15
Notice for FCC 15
SAFETY WARNINGS AND GUIDELINES
Please read this entire manual before using this device, paying extra attention to these safety warnings and guidelines. Please keep this manual in a safe place for future reference.
- This device is intended for indoor use only. Do not expose this device to water or moisture of any kind.
- Do not touch the device, the power cord, or any other connected cables with wet hands.
- Prior to operation, check the unit and power cord for physical damage. Do not use if physical damage has occurred.
- Before plugging the unit into a power outlet, ensure that the outlet provides the same type and level of power required by the device.
- This device uses a grounded power cord and requires a ground connection for safe operation. Ensure that the power source has a proper ground connection. Do not modify the plug or use a "cheater" plug to bypass the ground connection.
- Take care to prevent damage to the power cord. Do not allow it to become crimped, pinched, walked on, or become tangled with other cords. Ensure that the power cord does not present a tripping hazard.
- Never unplug the unit by pulling on the power cord. Always grasp the connector head or adapter body.
- This product contains small parts that could be a choking hazard, if swallowed. Keep these parts away from children.
- This product is not intended for use by young children without adult supervision.
- Do not place or install this device in an area where it can be exposed to excessive amounts of dust, humidity, oil, smoke, or combustible vapors.
- Clean using a soft, dry cloth only. Do not use chemical cleaners, solvents, or detergents. For stubborn deposits, moisten the cloth with warm water.
- This device has no user serviceable parts. Do not attempt to open, service, or modify this device.
INTRODUCTION
Boost your productivity with increased workplace comfort and improved health with this sleek, modern sit-stand desk. Raised and lowered using a fast, quiet, and powerful dual-motor automatic lifting system, this height adjustable desk frame lets you work from a sitting position and change to a standing position whenever you want. The extended height means that even very tall people can find a perfect sitting or standing position. Our desk frame is designed to support desktops ranging from 43" all the way up to 87" in width, to fit into any space and accommodate wide desktops.
CUSTOMER SERVICE
The Monoprice Customer Service department is dedicated to ensuring that your ordering, purchasing, and delivery experience is second to none. If you have any problem with your order, please give us an opportunity to make it right. You can contact a Monoprice Customer Service representative through the Live Chat link on our website www.monoprice.com during normal business hours (Mon-Fri: 5am-7pm PT, Sat-Sun: 9am-6pm PT) or via email at support@monoprice.com
PACKAGE CONTENTS
Please take an inventory of the package contents to ensure you have all the items listed below. If anything is missing or damaged, please contact Monoprice Customer Service for a replacement.

text_image
1x Telescopic Frame (A) | 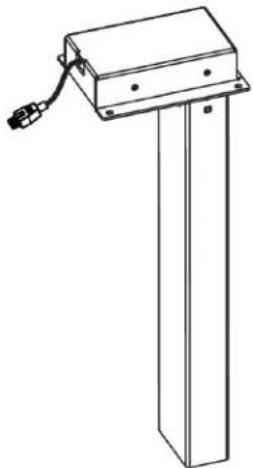 |  | |
| 1x Control Unit (B) | |||
 | |||
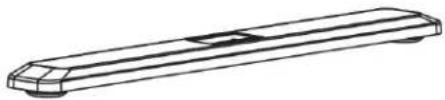
| 2x Upper Supports (C) | |||
 | |||
| 2x Base Supports (D) | 1x Lifting Column (E) | 1x Lifting Column (F) | |
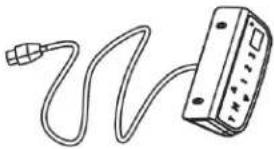 |  | ||
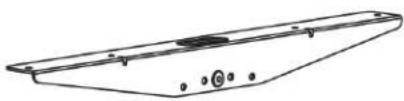
| 1x Control Panel (G) | 1x Power Cord (H) | ||
 |  |  | |
| 2x Extension Cords (I) | 20x Screws (S-A) | 8x Screws (S-B) | |
 |  |  |  |
| 2x Screws (S-C) | 1x Allen Key (S-D) | 3x Cable Clips (S-E) | 8x Rubber Pads (S-F) |
RECOMMENDED TOOLS
The following common tools are recommended for assembly. These tools are not included.
 ⊕ ⊕ | 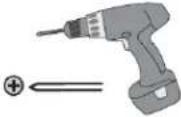 |  |
| #2 Phillips Screwdriver | Powered Screwdriver with #2 Phillips Screwdriver Bit | Carpenter's Level |
CONTROL PANEL OVERVIEW
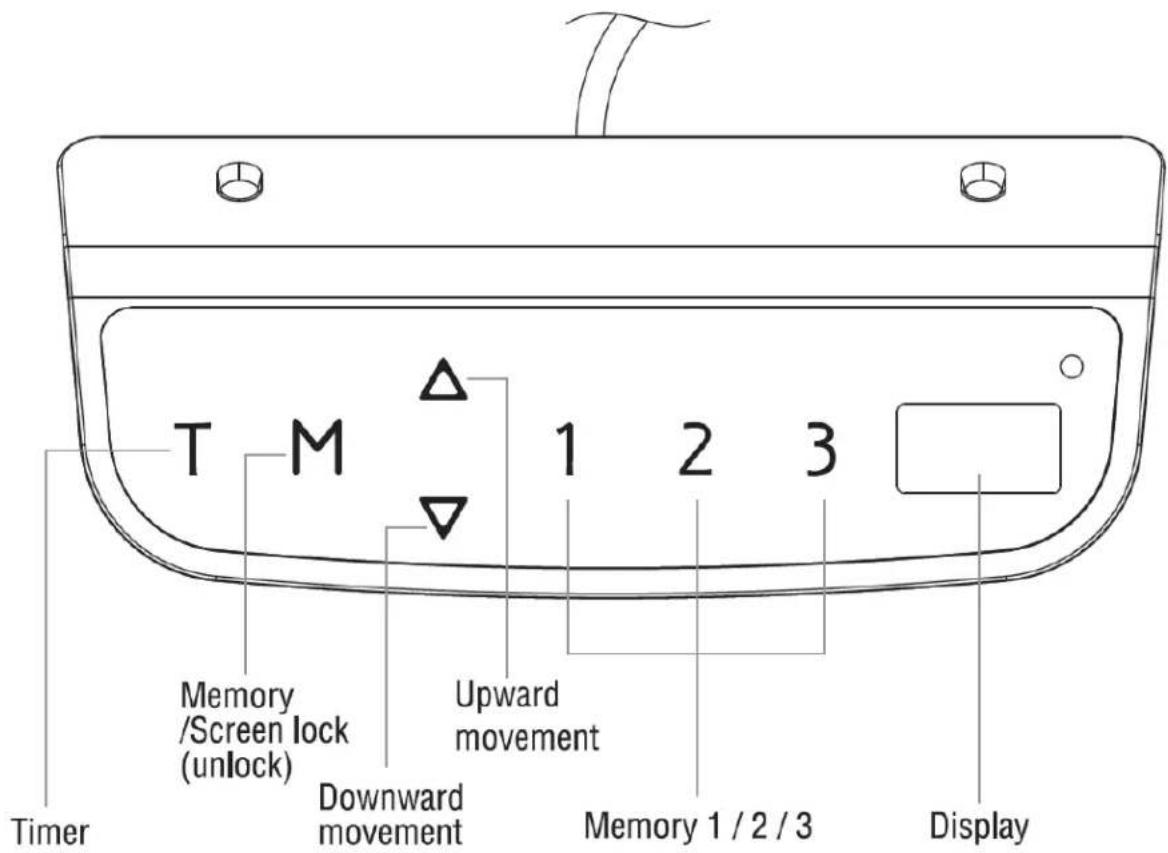
text_image
Timer Memory /Screen lock (unlock) Downward movement Upward movement 1 2 3 Memory 1 / 2 / 3 DisplayASSEMBLY
Perform the following steps to assemble the sit-stand desk. Note that a desktop is not included with this kit. This allows you to get a desktop of the appropriate size for your needs. Two people are required for some assembly steps. Do not over tighten screws.
-
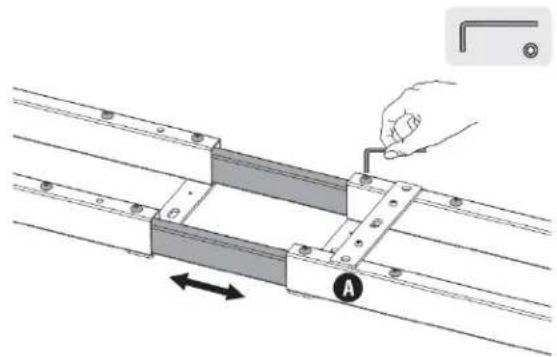
Place the Telescopic Frame (A) on the floor or other flat surface with the screws facing up.
-
Using the included Allen Key (S-D), loosen the eight screws near the center of the frame.
-
Expand the frame to a length appropriate for your desktop (not included). Depending on the length of your desktop, it is advised to leave 4-8" of desktop overhang at each end.
-
Using the included Allen Key (S-D), tighten the eight screws.
-
Using a #2 Phillips Screwdriver (not included), remove the four screws from the control unit supports.
-
Place the Control Unit (B) on the supports as shown, then reinstall the screws to secure it to the Telescopic Frame (A).
natural_image
Technical diagram of a mechanical assembly with a hand pin and directional arrow, no text or symbols present
natural_image
Technical line drawing of a mechanical assembly with a hand holding a screwdriver and a magnified inset showing a component (no text or symbols)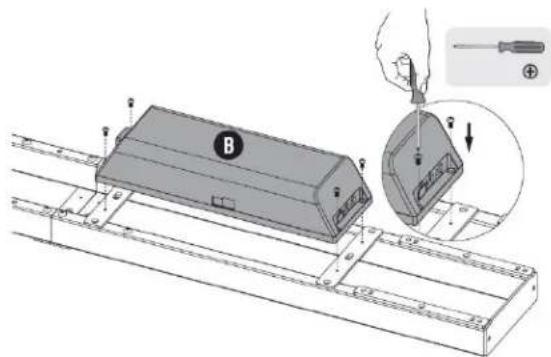
text_image
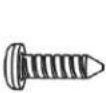
Technical diagram showing a mechanical assembly with labeled component B and a magnified inset of a screwdriver tool.- Using the included Allen Key (S-D) and 4x Screws (S-A), attach the Upper Supports (C) to the ends of the Telescopic Frame (A), as shown in the images below.

text_image
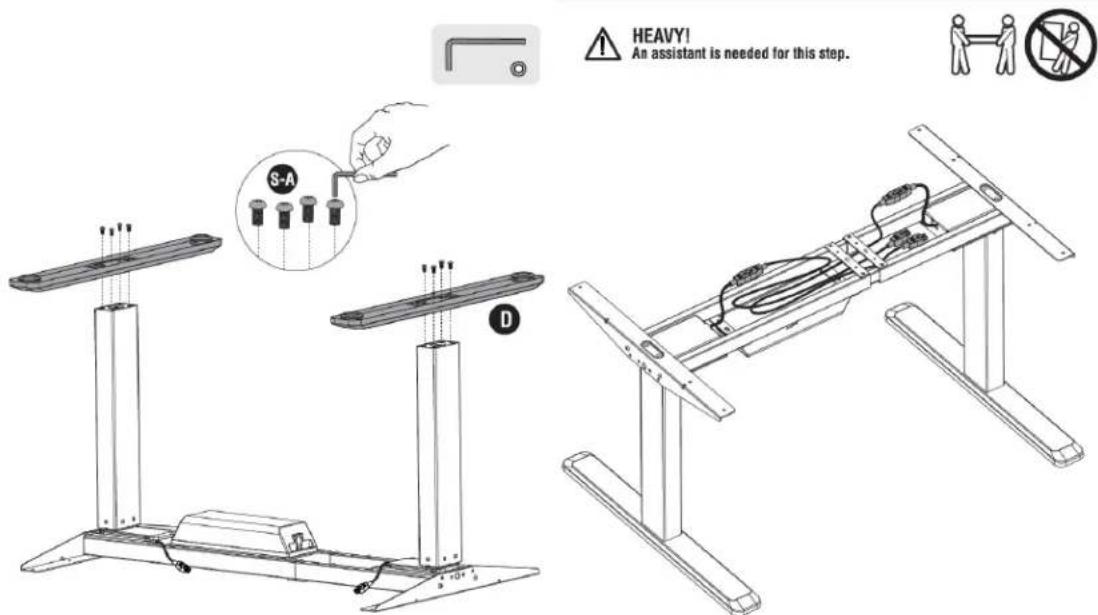
Technical diagram showing assembly of a mechanical component with labeled parts S-A and C, including directional arrows and structural details.- Using the included Allen Key (S-D) and 8x Screws (S-A), attach the Lifting Columns (E and F) to the Telescopic Frame (A).

text_image
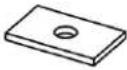
Technical diagram showing two assembly steps with a hand inserting a component labeled 'S-A' to a base structure.- Attach the Base Supports (D) to the Lifting Columns (E and F) using the included Allen Key (S-D) and 8x Screws (S-A), as shown in the image below and to the left.
text_image
HEAVY! An assistant is needed for this step. S-A D-
With the help of your assistant, flip the desk assembly over so that it rests on the Base Supports (B), as shown in the image above and to the right.
-
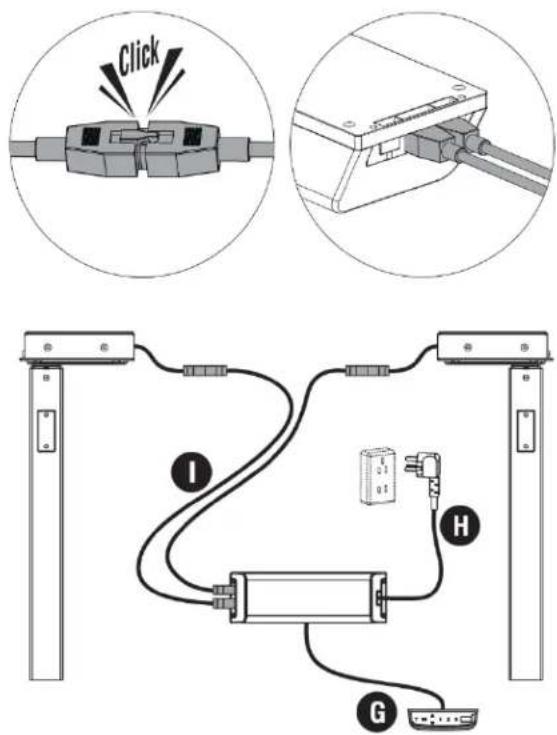
Connect one end of one of the Extension Cords (I) into the lead on one of the Lifting Columns (E or F), then plug the other end into the Control Unit (B). Repeat using the second Extension Cord (I) and the other Lifting Column (E or F).
-
Plug the Control Panel (G) into the side of the Control Unit (B).
-
Plug the Power Cord (H) into the Control Unit (B), then plug the other end into a nearby AC power outlet.
text_image
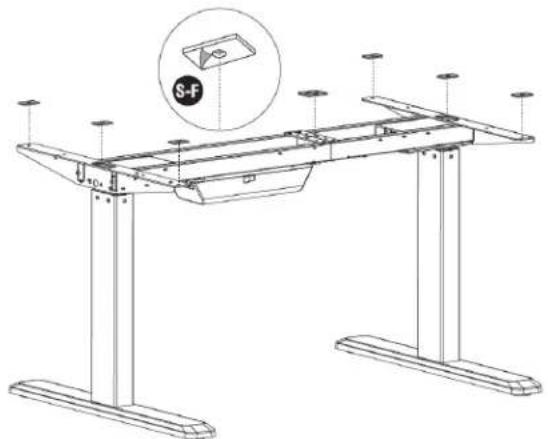
Click I H G- Remove the protective film from the Rubber Pads (S-F), then stick them to the Telescopic Frame (A).
natural_image
Technical line drawing of a mechanical support frame with mounting legs and a circular inset showing a S-F component (no text or symbols)-
With the help of your assistant, place your desktop on the Telescopic Frame (A) and Upper Supports (C). Ensure that the desktop is straight and evenly supported.
-
Using 8x Screws (S-B) and your powered screwdriver with #2 Phillips bit (not included), attach the desktop to the Upper Supports (C).
-
Each of the individual feet can be adjusted up or down to fine tune the level. Use a carpenter's level (not included) to ensure that the desktop is level on both its length and width and adjust the feet accordingly.

text_image
HEAVY! An assistant is needed for this step. S-B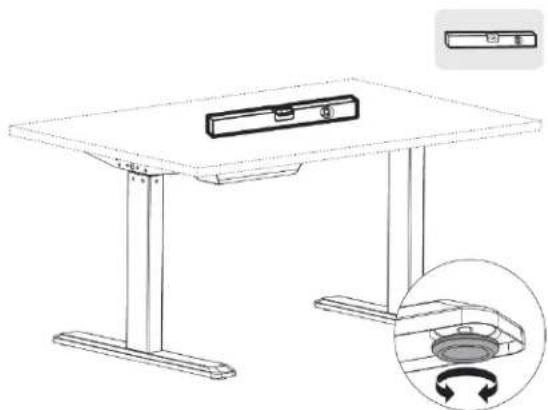
natural_image
Line drawing of a modern office desk with a monitor and base, showing an inset close-up of the interior space (no text or symbols)-
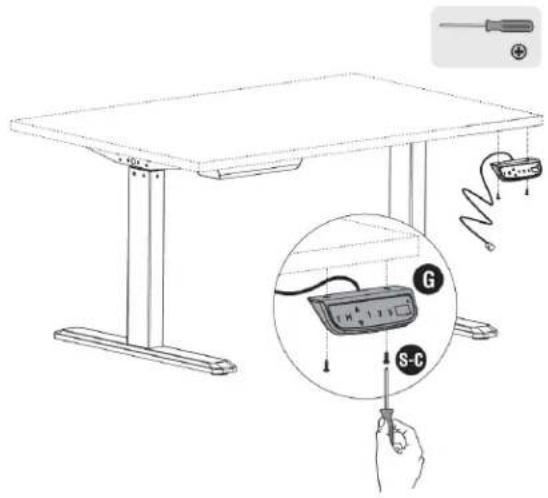
Using 2x Screws (S-C) and a #2 Phillips screwdriver (not included), attach the Control Panel (G) to the underside of your desktop. Do not overtighten the screws
-
Remove the protective film from 3x Cable Clips (S-E), then attach them to the underside of the desktop. Next feed the cable lead from the Control Panel (G) into each of the Cable Clips (S-E) and close each clip.
text_image
Technical diagram showing a table setup with a magnified view of a test device labeled S-C and G, plus a pencil and screwdriver.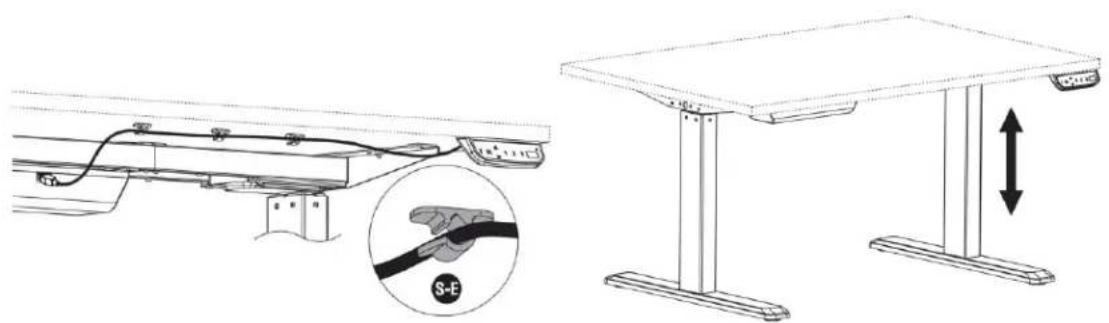
natural_image
Technical line drawing of a table with an inset showing a cable being inserted into a bracket (no text or symbols present)Congratulations, your desk is fully assembled and ready for use!
SYSTEM RESET
When it is used for the first time or after certain faults have occurred, the system needs to be reset so that it accurately displays the desktop height. Perform the following steps to reset the unit.
-
Upon power on, the system will beep and the current height will be displayed on the Control Panel (G) Display.
-
Press and hold the ▽ button on the Control Panel (G) until the desk is in the fully down position, then release the button.
-
Press and hold the ▽ button for 5 seconds. The display will show RST, then the display will show 65.0, which is the desktop height in centimeters.
OPERATION
Movement
- Press and hold the △ or ▽ button until the desktop reaches the desired height.
Memory
- The system can remember three different desktop height settings.
• To store a position, press the M button. The Display will show S-. - Within 5 seconds, press either the 1, 2, or 3 buttons to store the setting.
- Press the 1, 2, or 3 buttons to recall the stored height setting.
- After recalling a stored height setting, the desktop will automatically move to the saved height. Press any button other than the T button to stop the automatic movement.
Timed Reminder
- The system has a timer, which you can use to remind yourself of the need to change your working position.
- The timer can be set from 0.5 \~ 2.0 hours, in 0.5 hour increments.
- To set the timer, press the T button. The display will flash 0.5h. Then press the T button repeatedly to increment the time on the display to the desired length of time.
- Once the desired length of time is displayed, wait for the display to stop flashing and the LED in the upper right corner to illuminate, indicating that the timer has been successfully set.
- When time is up, the system will beep to remind you that it is time to change your working position. The timer will then be automatically cancelled.
- To cancel a timed reminder, press the T button 5 times until the current height is shown on the Display and the LED in the upper right corner turns off.
Screensaver Mode
- To prevent accidental operation, you can put the system in screensaver mode by pressing and holding the M button for 3 seconds. The display will show ---.
- While in screensaver mode, momentarily pressing any of the buttons will have no effect.
- Press and hold the M button for 3 seconds to exit screensaver mode and allow further operation.
Power Saving Mode
- After 10 minutes of inactivity, the system will automatically enter power saving mode, which is functionally the same as screensaver mode.
- While in power saving mode, momentarily pressing any of the buttons will have no effect.
- Press and hold the M button for 3 seconds to exit power saving mode and allow further operation.
TECHNICAL SUPPORT
Monoprice is pleased to provide free, live, online technical support to assist you with any questions you may have about installation, setup, troubleshooting, or product recommendations. If you ever need assistance with your new product, please come online to talk to one of our friendly and knowledgeable Tech Support Associates. Technical support is available through the online chat button on our website www.monoprice.com during regular business hours, 7 days a week. You can also get assistance through email by sending a message to tech@monoprice.com
TROUBLESHOOTING
Q1: When moving upwards, the desk stops moving then drops 1 cm.
A1: Ensure that the total load on the desk (including the weight of the desktop itself) does not exceed 176 lbs. (80 kg). Remove the excess weight and ensure that there are no obstructions to upward movement. Perform a System Reset.
Q2: When moving downwards, the desk stops moving then raises 1 cm.
A2: Ensure that there are no obstacles to prevent the desk from freely moving downwards. Perform a System Reset.
When an error occurs, the Display will show one of the following codes:
ER1: The downward movement has caused the desktop to reach the minimum height before it thinks it should or the overcurrent protection circuit has been triggered three times. Remove any obstacles and perform a System Reset to clear the error.
ER2: The system has overheated and needs time to cool down. The error code will clear automatically when operation can be resumed.
ER3: There is a motor cable connection problem. Check that all electrical connections are secure.
ER4: The two legs are at different heights. Perform a System Reset to clear the error.
ER5: The motor has a fault.
HOT: The system has been operated continuously for more than 2 minutes and has overheated. The system will return to normal operation after 18 minutes have elapsed. Do not unplug the desk during the cool down time.
REGULATORY COMPLIANCE
Notice for FCC

This device complies with Part 15 of the FCC rules. Operation is subject to the following two conditions: (1) this device may not cause harmful interference, and (2) this device must accept any interference received, including interference that may cause undesired operation.
Modifying the equipment without Monoprice's authorization may result in the equipment no longer complying with FCC requirements for Class B digital devices. In that event, your right to use the equipment may be limited by FCC regulations, and you may be required to correct any interference to radio or television communications at your own expense.
This equipment has been tested and found to comply with the limits for a Class B digital device, pursuant to Part 15 of the FCC Rules. These limits are designed to provide reasonable protection against harmful interference in a residential installation. This equipment generates, uses and can radiate radio frequency energy and, if not installed and used in accordance with the instructions, may cause harmful interference to radio communications. However, there is no guarantee that interference will not occur in a particular installation. If this equipment does cause harmful interference to radio or television reception, which can be determined by turning the equipment off and on, the user is encouraged to try to correct the interference by one or more of the following measures:
- Reorient or relocate the receiving antenna.
- Increase the separation between the equipment and receiver.
- Connect the equipment into an outlet on a circuit different from that to which the receiver is connected.
- Consult the dealer or an experienced radio/TV technician for help.