INS-SIGNMGR - Unspecified INFOCUS - Free user manual and instructions
Find the device manual for free INS-SIGNMGR INFOCUS in PDF.

User questions about INS-SIGNMGR INFOCUS
0 question about this device. Answer the ones you know or ask your own.
Ask a new question about this device
Download the instructions for your Unspecified in PDF format for free! Find your manual INS-SIGNMGR - INFOCUS and take your electronic device back in hand. On this page are published all the documents necessary for the use of your device. INS-SIGNMGR by INFOCUS.
USER MANUAL INS-SIGNMGR INFOCUS
DigiEasel Sign Manager
Software Guide

text_image
InFocus Sign Manager File View Help OUR Products mondopad INFOCUS Innovation ABOUT InFocus RECENT News & Reviews EDUCATION LIVE Connect VISIT Online StoreContents
Signage Mode....2
Signage Content Best Practices....4
Install Sign Manager 5
To preview an HTML5 digital sign 7
Convert an HTML5 file to a digital sign....8
Display the digital sign....10
Signage Mode
HTML5 content that can be run in a browser can also be securely imported and displayed on a DigiEasel monitor. Several HTML5 and JavaScript custom API/extensions are included with DigiEasel monitors which allow for enhanced control and customization of the sign.
Develop HTML5 content for digital signage
This section is designed for proficient HTML5 developers.
File Structure
The sign must have a designated landing, or home page. This home page is specified in the Sign Manager application. The monitor looks for this file and displays it as the home page when the sign is displayed.
Available extensions/API definitions
The following are a list of JavaScript functions that you can use to enhance your interactive sign content:
To add a "Home" Floating Button to the page:
This API displays a "home" floating button on the page at the given page position. This button can be dragged around the page and snaps to the edges of the screen. When the button is tapped, the sign player will replace the current page with the home page.
SignageInterface.showHomeFloatingButton(position)
Parameters:
position – The initial display position of the button. Valid positions are 'top', 'left', 'bottom', 'right'
Example Usage:
SignageInterface.showHomeFloatingButton('right')
To add a "Back" Floating Button to the page: This API displays a "back" floating button on the page at the given page position. This button can be dragged around the page and snaps to the edges of the screen. When the button is tapped, the sign player will replace the current page with the page that was previously displayed, if applicable (much like the "back" button in a web browser).
SignageInterface.showBackFloatingButton(position)
Parameters:
position – The initial display position of the button. Valid positions are 'top', 'left', 'bottom', 'right'
Example Usage:
SignageInterface.showBackFloatingButton('right')
Popup Window
This API can be used to open an external link in a pop up browser.
SignageInterface.contentClick(url);
Parameters:
url – This parameter defines URL of the content you want to open
Example Usage:
SignageInterface.contentClick('http://www.engadget.com/');
Video
To ensure optimum compatibility, only use WEBM or MP4 videos. The WEBM format is the recommended format. Only use the MP4 format when WEBM videos display incorrectly on DigiEasel.
In addition, a custom data-signage-video attribute can be added to any HTML video element to display custom controls and enable full screen video behavior.
Supported formats:
• video/webm (recommended)
- video/mp4
NOTE: Although DigiEasel monitors support MP4 playback, Sign Manager does not currently support previewing MP4 files.
There are several ways to configure a video for use in the Sign Player.
Option 1:
data-signage-video attribute and controls attribute included in the video element.
Example:
This video will display custom playback controls. The video will also toggle between the play and pause state when any part of the video frame is tapped.
Option 2:
data-signage-video attribute included in the video element.
Example:
This video will not display any controls, but tapping on any part of the video frame will toggle between the play and the pause state. This is a convenience to the HTML author so that custom JavaScript does not have to be written to control video playback.
Option 3:
No inclusion of the custom data-signage-video attribute in the video element.
Example:
This video will not display any controls and by default will not play back when it is tapped. The HTML author will have to write custom JavaScript to enable video playback.
Signage Content Best Practices
The DigiEasel is a 1080p device. In portrait mode, the pixel dimensions are 1080W x 1920H. The sign content should be no larger than these dimensions, unless the content is intended to allow scrolling. To review portrait and landscape samples demonstrating how to fit these screen dimensions, navigate to the sample files in the Sign Manager Installation > Examples > PortraitFitDimensions and Installation > Examples > LandscapeFitDimensions folders.
If your sign contains any HTML video elements, consider including the data-signage-video attribute on the video element (See the Video section on page 2 for more information). This attribute allows a user to play or pause the video by tapping anywhere on the video box and simplifies your JavaScript code.
When including an HTML video element in your content that has a controls attribute, always specify an explicit height and width using either the height and width attributes or the CSS height and width properties. If you do not do this, the video controls may not display correctly.
The Sign Player automatically includes a third-party library in your content called FastClick that provides a more responsive tapping experience. In some cases (particularly with some scrollable elements), this might produce undesired side-effects. If certain gestures are not working on your sign content, you can disable the FastClick feature by adding a “noFastClick” class to the body element of your HTML:
<body class="noFastClick">
Use "touchstart" events rather than "click" events when possible to improve tapping performance. Even with the improved tapping performance offered by the FastClick library integration, certain HTML elements still respond better to tapping if touchstart is used.
Be mindful of how you implement animations in your sign content. JavaScript animations can be slow, so you may experience smoother animations if you use CSS3 animations instead. For example, the following CSS styles illustrate how an image “ticker” can be implemented that scrolls an image to the left of the screen:
#tickerElement {
    -webkit-animation: ticker 20s infinite;
}

@-webkit-keyframes ticker {
    100% {
    -webkit-transform: translate3d(-700px, 0px, 0px);
    -webkit-animation-timing-function: ease-in;
    }
}
Alternatively, if your sign content contains a complex, non-interactive animation, consider creating a video of the animation and embedding it into the sign content.
Install Sign Manager
1) Download the Sign Manager application from www.infocus.com/support onto a Windows PC/laptop.
2) Navigate to and double-click the Sign-Manager-64-bit.exe file.
3) If a User Account Control window displays, click Yes.
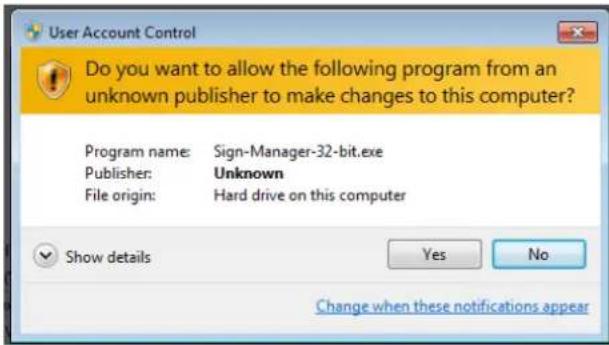
text_image
User Account Control Do you want to allow the following program from an unknown publisher to make changes to this computer? Program name: Sign-Manager-32-bit.exe Publisher: Unknown File origin: Hard drive on this computer Show details Yes No Change when these notifications appear4) Verify that the check box for Sign Manager is checked and click Next.

text_image
InFocus Sign Manager Setup Choose Components Choose which features of InFocus Sign Manager you want to install. Check the components you want to install and uncheck the components you don't want to install. Click Next to continue. Select components to install: Sign Manager Description Position your mouse over a component to see its description. Space required: 178.7MB Nullsoft Install System v2.46-7 Next > Cancel5) Browse to a preferred destination folder, or accept the default location and click Next.

text_image
InFocus Sign Manager Setup Choose Install Location Choose the folder in which to install InFocus Sign Manager. Setup will install InFocus Sign Manager in the following folder. To install in a different folder, click Browse and select another folder. Click Next to continue. Destination Folder S:\Program Files\InFocus\Sign Manager Browse... Space required: 178.7MB Space available: 100.8GB Nullsoft Install System v2.46-7 < Back Next > Cancel6) Click Install.

text_image
InFocus Sign Manager Setup Choose Start Menu Folder Choose a Start Menu folder for the InFocus Sign Manager shortcuts. Select the Start Menu folder in which you would like to create the program's shortcuts. You can also enter a name to create a new folder. InFocus Sign Manager Accessories Administrative Tools DAEMON Tools Lite EditPad Lite Games Maintenance Oracle VM VirtualBox Guest Additions Quick License Manager Startup Tablet PC Visual Studio 2013 Do not create shortcuts Nullsoft Install System v2.46-7 < Back Install Cancel7) When installation is complete, click Close.

text_image
InFocus Sign Manager Setup Installation Complete Setup was completed successfully. Completed Show details Nullsoft Install System v2.46-7 < Back Close CancelTo preview an HTML5 digital sign
1) Open the InFocus Sign Manager application by double-clicking the Sign Manager desktop shortcut or by navigating from the Start menu to All Programs > InFocus > Sign Manager.
2) Navigate to the folder containing your HTML5 sign content. If the file is zipped, extract all of the files first.
3) Then drag the index.html (or home.html file) onto the Sign Manager window.
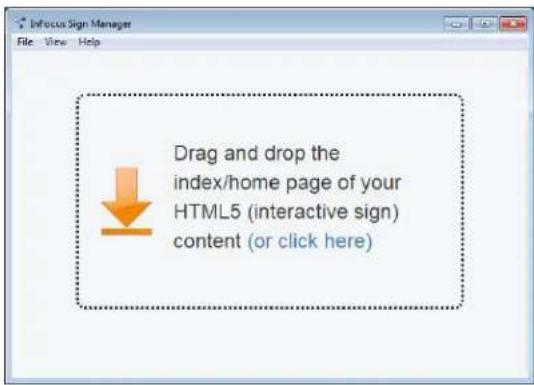
text_image
Drag and drop the index/home page of your HTML5 (interactive sign) content (or click here)4) The InFocus Sign Manager displays the content.
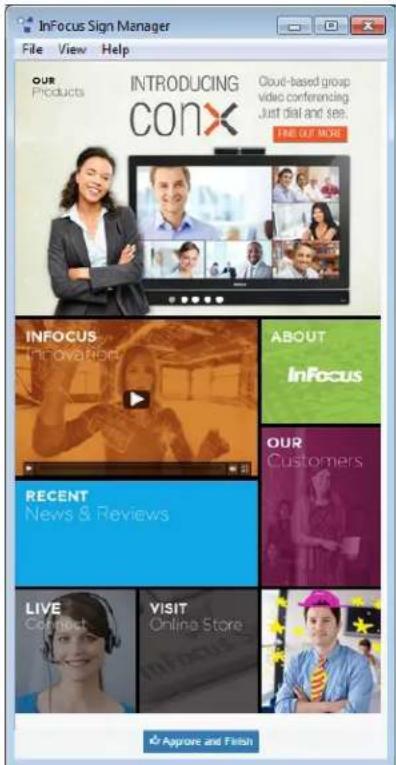
text_image
InFocus Sign Manager File View Help OUR Products INTRODUCING CONX Cloud-based group video conferencing Just dial and see. FIRE OUT MORE INFOCUS Innovations ABOUT InFocus RECENT News & Reviews OUR Customers LIVE Connect VISIT Online Store Approve and Finish5) If you wish to convert this file for use on an InFocus DigiEasel product, go step 5 of the following section, Convert an HTML5 file to a digital sign.
Convert an HTML5 file to a digital sign
In order to convert an HTML5 file to a digital sign for use on a DigiEasel monitor, the Sign Manager application must be used. This application uses a special private key to create a certificate for each digital sign. The DigiEasel monitor will only display digital signs that have a valid certificate. This helps ensure that a digital sign displayed on the monitor has not been altered for malicious intent.
1) Open the InFocus Sign Manager application by double-clicking the Sign Manager desktop shortcut or by navigating from the Start menu to All Programs > InFocus > Sign Manager.
2) Navigate to the folder containing your HTML5 sign content. If the file is zipped, extract all of the files first.
3) Then drag the index.html (or home.html file) onto the Sign Manager window.

text_image
Drag and drop the index/home page of your HTML5 (interactive sign) content (or click here)4) The InFocus Sign Manager displays the content.

text_image
InFocus Sign Manager File View Help OUR Products INTRODUCING CONX Cloud-based group video conferencing Just dial and see. FIND OUT MORE INFOCUS Innovations ABOUT InFocus RECENT News & Reviews OUR Customers LIVE Connect VISIT Online Store Applore and Finish5) To change the orientation, click View in the top menu bar and then click Change Orientation.
6) Click the Approve and Finish button at the bottom of the page.
7) Browse to the folder where you want to save the digital sign zip file.
8) Click Save.
9) If you have not activated the Sign Manager before, you will be prompted to enter the activation key which came with your purchase. This is a one-time process.
10) You can now copy the saved digital sign zip file to a USB thumb drive for importing into the DigiEasel monitor.
Display the digital sign
1) Insert the USB thumb drive containing the digital sign zip file into an available USB A slot on the monitor.
2) On the monitor, tap More.
3) Tap Setting. Switch to Signage should be highlighted.
4) Tap Switch.
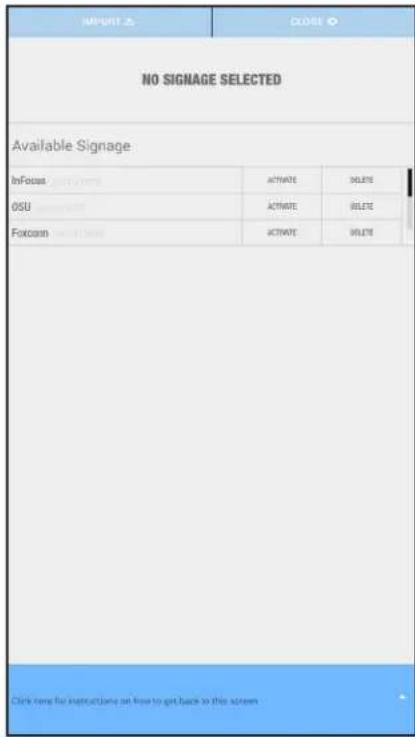
text_image
IMPORT ▲ CLOSE ◎ NO SIGNAGE SELECTED Available Signage InFocus OSU Foxconn CREATE ACTIVATE ACTIVATE ACTIVATE DELETE DELETE SELECT Click here for instructions on how to get back to this screen5) Tap Import. The monitor scans for certified signage zip files.
6) When the monitor locates and displays the certified signage zip files, tap the check box next to the desired signage zip file and then tap Import. An "Import Successful" message displays.
7) Tap Close to return to the Settings menu. Refer to the monitor user documentation at www.infocus.com/support for more information.