HDUS11SNDX - Dupliqueur de disque dur Addonics - Free user manual and instructions
Find the device manual for free HDUS11SNDX Addonics in PDF.

| Product Type | Hard Drive Duplicator |
| Brand | Addonics |
| Model | HDUS11SNDX |
| Dimensions (W x D x H) | Approx. 150 x 100 x 50 mm |
| Weight | Approx. 500 g |
| Power Supply | 12V DC, 2A (external adapter) |
| Supported Drive Types | 2.5 inch and 3.5 inch SATA HDD/SSD |
| Interface | USB 3.0 (for connection to PC, if applicable) |
| Standalone Cloning | Yes, one-button operation without PC |
| Maximum Drive Capacity | Up to 16 TB (depending on file system) |
| Clone Speed | Up to 12 GB/min (USB 3.0) |
| LED Indicators | Power, Source, Target, Status |
| Operating Temperature | 5°C to 40°C |
| Storage Temperature | -20°C to 60°C |
| Compliance | CE, FCC |
| Package Contents | Duplicator, power adapter, USB cable, user manual |
| Maintenance & Cleaning | Wipe with dry cloth; avoid liquids |
| Safety Precautions | Use only provided power adapter; keep away from water |
| Spare Parts & Repairability | No user-serviceable parts; contact support for repairs |
| Warranty | 1 year limited warranty |
Frequently Asked Questions - HDUS11SNDX Addonics
User questions about HDUS11SNDX Addonics
0 question about this device. Answer the ones you know or ask your own.
Ask a new question about this device
Download the instructions for your Dupliqueur de disque dur in PDF format for free! Find your manual HDUS11SNDX - Addonics and take your electronic device back in hand. On this page are published all the documents necessary for the use of your device. HDUS11SNDX by Addonics.
USER MANUAL HDUS11SNDX Addonics
natural_image
Exterior view of a black server rack unit with multiple drive bays and a digital display (no visible text or symbols)1:11 HDD Duplicator
(HDUS11SNDX)
www.addonics.com
Technical Support
If you need any assistance to get your unit functioning properly, please have your product information ready and contact Addonics Technical Support at:
Hours: 8:30 am - 6:00 pm PST
Phone: 408-453-6212
Email: http://www.addonics.com/support/query/
Table Of Contents
Basic Instructions ...... Page 3
Functions ...... Page 4
Copy HDD Page 5
Compare HDD Page 5
PreScan Source ...... Page 6
ReScan Bus Page 7
Source Size ...... Page 7
Overwrite Page 8
Setup Page 9
Advanced Setup Page 12
Basic Troubleshooting Page 15
Error Messages List Page 16
Firmware Update Procedure ...... Page 17
Basic Instructions
I. Installing Drive into the HDD Duplicator
For installing a hard drive on the various enclosures that come with the HDD duplicator, refer to the bundled enclosure installation guides.
Step 1
Once the hard drive is installed on the drive enclosure, slide in the Source drive into the drive bay. Push down the handle and using the key provided, turn the key lock to the Lock position. This will secure the drive and turn on the power to the hard drive.
Step 2
Slide in the Target drive into the drive bay. Push down the handle and using the key provided, turn the key lock to the Lock position. This will secure the drive and turn on the power to the hard drive.
II. Connecting the Power Cable and Powering On
a. Connect the power cord provided from the wall outlet to the back of the tower.
b. A main power switch is located at the back of the tower. Turn the switch on. Another auxiliary switch is located on the front of the tower.
c. Push the auxiliary switch button to turn on the HDD duplicator.
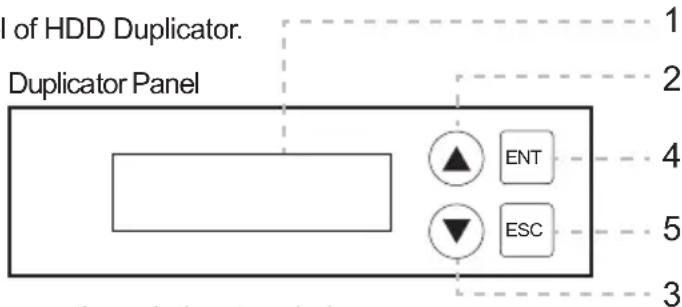
III. The Duplicator Panel
There are four buttons and an LCD on the panel of HDD Duplicator. 1
1 – LCD shows a function or a message.
2 – it is used to scroll up function menus.
3 – it is used to scroll down function menus.
4 – it is used to execute a function.
5 – it is used to cancel a function.
text_image
I of HDD Duplicator. Duplicator Panel 1 2 4 5 3IV. Duplicating a drive
When the duplicator powers on, it initializes and goes through the steps below
Shows the firmware version
HD Duplicator 1-1 Ver:
Initialize SDRAM's status..
Initialize SDRAM
Detect Drives' status.
Detect Drives
Shows the first function:
1.Copy HD
Copy HDD copies data directly from the source hard disk to the target hard disk.
Press ENT button to begin copy. The system will auto-detect the hard disks and show the following info on the LCD.
Copy-36MBs 0%
235.7GB 1:48
The LCD will show the following info during the copying process: remaining time, completed percentage. The copy speed, capacity and time will vary depending on the source hard disk. Once the copying process is complete the LCD will display the following results.
Copy HD
OK:
Functions
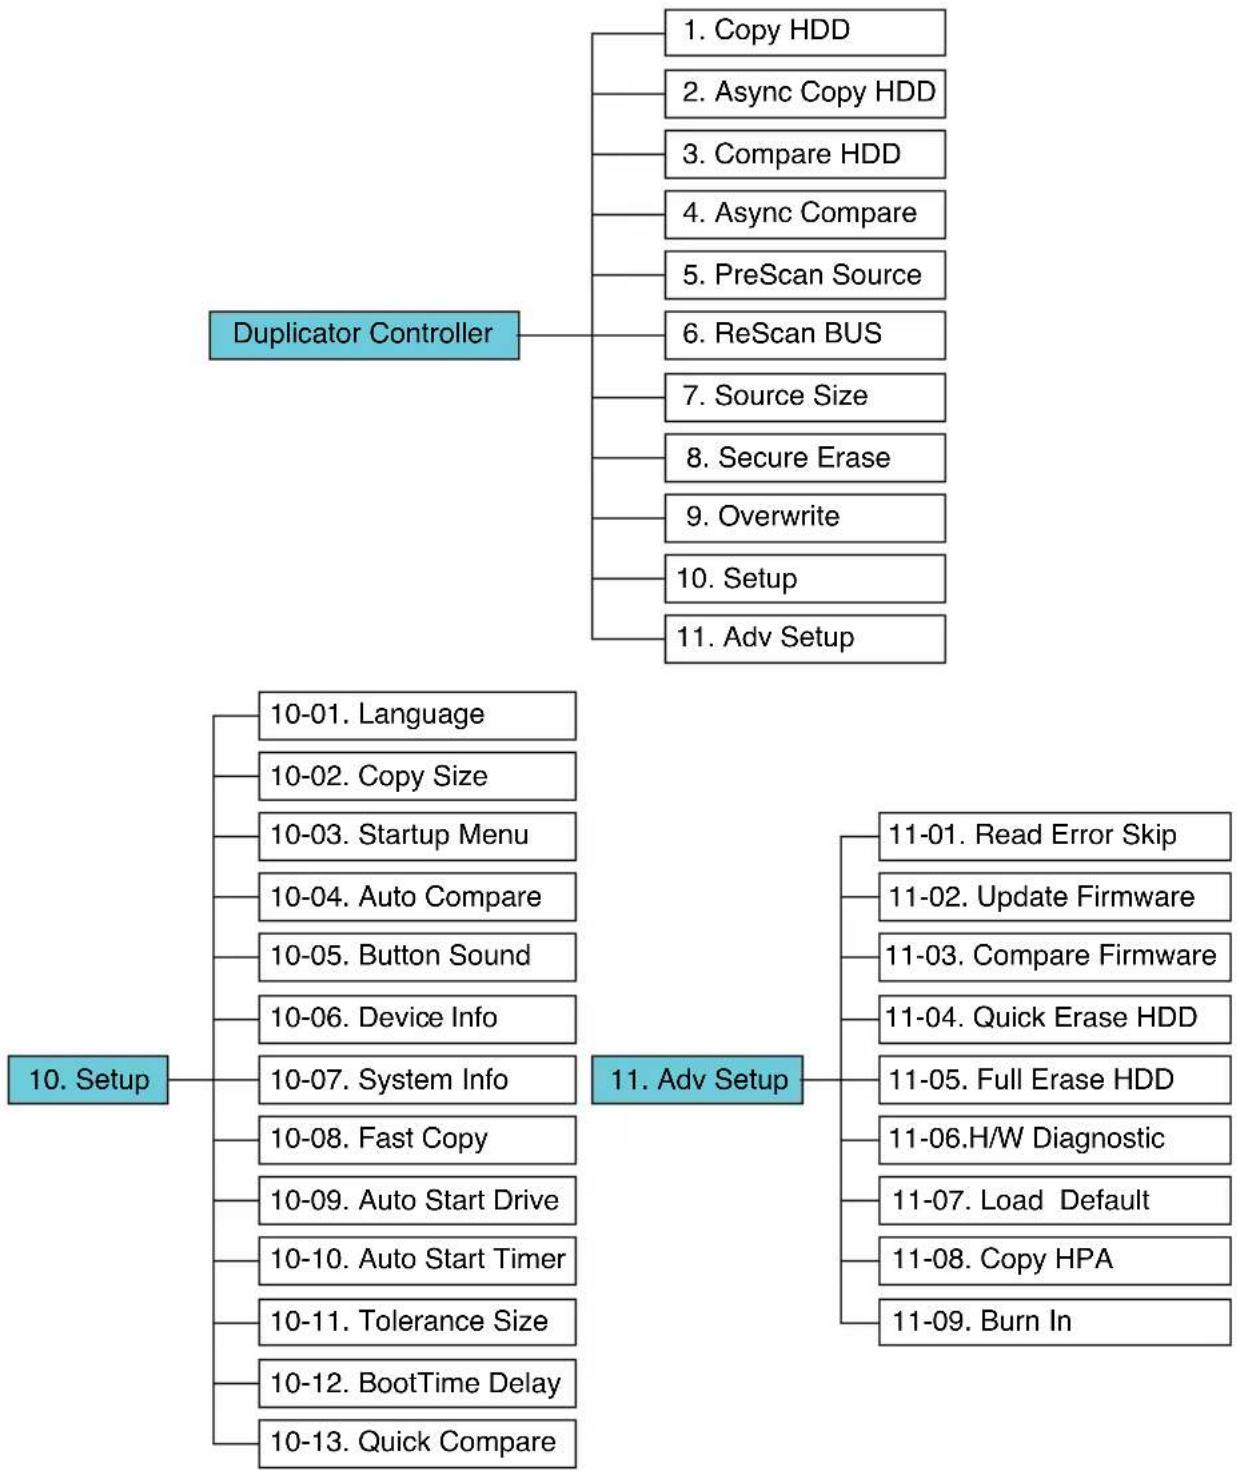
The copy controller has11 functions in total, with the 1th (Adv Setup) being a hidden system function that only appears when the ESCkey is pressed for 2 seconds until there is a beep. These are shown below.
flowchart
graph TD
    A["Duplicator Controller"] --> B["1. Copy HDD"]
    A --> C["2. Async Copy HDD"]
    A --> D["3. Compare HDD"]
    A --> E["4. Async Compare"]
    A --> F["5. PreScan Source"]
    A --> G["6. ReScan BUS"]
    A --> H["7. Source Size"]
    A --> I["8. Secure Erase"]
    A --> J["9. Overwrite"]
    A --> K["10. Setup"]
    A --> L["11. Adv Setup"]

    M["10. Setup"] --> N["10-01. Language"]
    M --> O["10-02. Copy Size"]
    M --> P["10-03. Startup Menu"]
    M --> Q["10-04. Auto Compare"]
    M --> R["10-05. Button Sound"]
    M --> S["10-06. Device Info"]
    M --> T["10-07. System Info"]
    M --> U["10-08. Fast Copy"]
    M --> V["10-09. Auto Start Drive"]
    M --> W["10-10. Auto Start Timer"]
    M --> X["10-11. Tolerance Size"]
    M --> Y["10-12. BootTime Delay"]
    M --> Z["10-13. Quick Compare"]

    AA["11. Adv Setup"] --> AB["11-01. Read Error Skip"]
    AA --> AC["11-02. Update Firmware"]
    AA --> AD["11-03. Compare Firmware"]
    AA --> AE["11-04. Quick Erase HDD"]
    AA --> AF["11-05. Full Erase HDD"]
    AA --> AG["11-06.H/W Diagnostic"]
    AA --> AH["11-07. Load Default"]
    AA --> AI["11-08. Copy HPA"]
    AA --> AJ["11-09. Burn In"]
Copy HDD
Copy HDD copies data directly from the source hard disk the target hard disk. Please make sure that the capacity of the target hard disk is equal larger than the source hard disk.
Choose option 1 from the menu:
- Copy HDD
HDD:11 232.9GB
Press ENT to begin copy. The system will auto-detect the hard disksand show the following copying info on the LCD.
Copy-36MB/s 0%
232.9GB 00:00:00
The LCD will show the following info during the copy process: elapsed time, completed percentage. The copy speed, capacity and time will depend on the source hard disk. Once the copying process is complete the LCD will display following results.
CopyHDD
OK: 11 Fail: 0
Async Copy HDD
This option is used to specify the size of the source for simplifying further copying operations.
Choose option 2 from the menu:
- Async 6py HDD
HDD:10 232.9GB
Press ENT. Before the start of the reproduction, if the console detects that a hard drive capacity is less than source, then the LCD will show the corresponding channel number.
8
Space Not Enough
And then automatically copies. The LCD will display following info.
Acpy-36MB/s 0%
232.9GB 00:00:00
If the replication process to continue to add additional hard disk device, LCD will only show the last completed percentage.
Once the copying process is complete LCD will display the following results.
Async Copy HDD
OK: 11 Fäl: 0
Compare
Compare HDD is used to seetlife data on a source Ina disk is identical to the target hard disk after the Copy HD operation.
Choose option 3 from the menu:
- Compare HDD
HDD: 11 232.9GB
Press ENT to begin the comparison. The CD will display the following info.
Comp-23MB/s 0%
232.9GB 00:00:00
Once the comparison is complete the LCD will display the following info as well as the amount of data on the source hard disk.
Compare OK:11
Fail: 0 Di 0
Async Compare
Compare HDD is used to see if the data on a source hard disk is identical to the target hard disk after the Copy HDD operation. While compare process is on-going, allows you to plug-in additional target drives and comparison will automatically start for the added target drive.
Choose option 4 from the meu:
Press ENT
- Async Compare
HDD: 11 232.9GB
to begin the async comparison. The LCD will display the following info.
ACmp-23MB/s 0%
232.9GB 00:00:00
If the comparison process continues to add additional hard disk device, LCD will only show the last completed percentage.
Once the copying process is complete the LCD will display the following results.
Compare OK:11
Fail: 0 Di 0
PreScan Source
PreScan HDD is used to check if the source hard disk can be accessed properly. It also tests the read speed.
Choose option 5 from the menu:
Press ENT
- PreScan Source
HDD : 11 232.9GB
to begin scan. The CD will display the following info
Scan-90MB/s 1%
230.6GB00:00:27
Once the scan is complete the LCD will display the corresponding results
PreSan OK!
ReScan Bus
ReScan Bus allows swapping the source or target in and out without having to reboot the system.
Choose option 6 from the menu:
- ReScan BUS
Press ENT to re-scan hardware. The LCD will display the following info.
Re-Scan BUS NOW? Yes
When the scan is complete the CD will display the following info.
Bus re-san OK
Source Size
Source Size is used to show the capacity of the source. Choose option 7 from the menu:
- Source Size
Press ENT and the LCD will show the following info.
HDD:Hitachi Size232.9GB
Then press ENT and the LCD will show the data's size info.
HDD:Hitachi Data:200.9GB
Secure Erase
Secure Erase is used to put the data of the hard disk it will erase all of HDD of duplicator (included SourceHDD).
Choose option 8 from the menu:
- Secure Erase
Press ENT to accession. By default it is set to No. Use the Up and Down arrow keys to choose Yes.
Wipe all data. Continue? No
Press ENT and the LCD will show the following info.
Overwrite
Overwrite is used to overwrite the data of the hard disk, it will erase a HDDs connected to the duplicator (including SourceHDD). There are 3 sub-options: One pass, 3 pass and 7 pass.
Choose option 9 from the menu:
- Overwrite
Press ENT to access option. By default it is One pass Use the Uprad Down arrow keys to chose other options.
9-01. Overwrite One pass
Press ENT to access option. By default it is set to No. Use the Upnd Down arrow keys to choose Yes.
Wipe al data. Continue? No
Press ENT and the LCD will show the following info.
In Process Elapsed 01:00
Setup
Setup allows various system settings to be changed. There are 12 sub-options: Language, Copy Size, Startup Menu, Auto Compare, Button Sound, Device Info, System Info, Fast Copy, Auto Start Drive, Auto Start Timer, Tolerance Size and Boot Time Delay.
Choose option 8 from the menu:
- Setup
Language
This option is used to select the system's language support. By default this is set to English. Press ENT to change the Language settings.
Language English
Copy Size
This option is used to specify the size of the source hard disk for simplifying further copying operations.
10-02. Setup
Copy Size
Press ENT and the LCD will display a detaild list of options as shown below
Copy Size
100%\~1% (*MB)
Use the Up and Down arrow keys to chose different copy sizes. The system will their corresponding percentages of the user can specify the amount to copy from the source hard disk. Press ENT to con rm and save the changes.
Startup Menu
This option allows you to set an option other than "Setup" to be displayed as the first available option on the menu every time you start the system.
10-03. Setup
Startup Menu
Press ENT then use the Up and Down row keysto choose other options. By default the rst menu option is CopyHDD.
Startup Menu
- Copy HDD
Auto Compare
This option automatically compares the source hard disk with the target hard disk after a copy operation is completed.
10-04. Setup
Auto Compare
Press ENT to accession. By default it is set to O . Use the Up and Down arrow keys to choose On.
Auto Compare
0
Button Sound
This option is used to control the sound of abutton when you press it.
10-05. Setup
Button Sound
Press ENT and the LCD will display the following info. Use the Up and Down arrow keys to choose whether button sound is on or o .
Butt on Sound
On
Device Info
This option is used to display the details of all hard disks connected to the copy controller.
10-06. Setup
Device Info
Press ENT and the LCD will display each hard disk' information in order as shown below.
0 Source CH: 0
Hitachi 232.9GB
System Info
This option displays system information.
10-07. Setup
System Info
Fast Copy
This option displays Fast Copy. Fast Copy only copies data on the source drive to the target drives. Currently only supports FAT, FAT32, NTFS, HFS, Ext2 and Ext3 partitions.
10-08. Setup
Fast Copy
Press ENT and the LCD will display the following info. Use the Up and Down arrow keysto choose whether fast copy is on or o . (This function currently only effective in FAT, FAT32, NTFSIFS, Ext2 and Ext3 partitions.)
Fast Copy
On
Auto Start Drive
This option is used to display to copy automation once you insert HDD on target port.
10-09. Setup
Auto Start Drive
Press ENT to enter the following gure. The default is 0. Use the Up and Down arrow keys to choose 1-11.
Auto Start Drive
0
Auto Start Timer
This option is used to set the period of time when the duplicator starts copying automatically once you insert HDD on target port. Default is set at OFF, use the arrows to choose time.
10-10. Setup
Auto Start Timer
Press ENT to enter the following help and Down arrow keys to choose 5 Sec-50 Sec.
Auto Start Timer 0
Tolerance Size
This option is used to set the tolerance in terms of percentage difference between the source and target capacity. This is to ensure that when the target drive is smaller than the source drive, the duplication process will not start.
10-11. Setup Tolerance Size
Press ENT to enter the following gure. The default is Up and Down arrow keys to choose 1MB\~100MB of source.
Tolerance Size 1MB
BootTime Delay
This option is used to to set boot delay time.
10-12. Setup BootTime Delay
Press ENT to enter the following gure. The default is 5 sec. Use Up and Down arrow keys to choose 0\~99 sec.
BootTime Delay 5 sec
Quick Compare
This option is used to set the size of each comparison unit.
10-13. Setup Quick Compare
Press ENT to enter the following gure. The default is O. Use the Up and Down arrow keys to choose 1 Byte/1K/0K/100K/1MB/10MB/100 Mbytes. (In order to improve the accuracy of pure data can maintain the default settings.)
Quick Compare O
Adv Setup
Adv Seuromoreadvancedsystem settings.
To access thioption, hold down theESC key fortwo seconds until it appears.
- Adv Setup
Read Error Skip
This function sets the system to ignore any errors during the copying process. Normally if there is an error during copying a warning is displayed in the LCD. By using this function, users can also copy aHDD with errors.
11-01. Adv Setup Read Error Skip
Press ENT to enter the following screen. Bydefault this option is set to OFF. Use the and down buttons to enable or disable this option.
Read Error Skip 0
Update Firmware
This function is used to update the system's rmware. Download the latest version of the rmware from the Internet at www.addonics.com. For the complete instructions, visit the rmware update webpage or view the instructions found later in this manual.
11-02. Adv Setup Update Firmware
Compare Firmware
This function is used to compare the current system rmware version with the new version the user is upgrading to. This ensures that the unloaded rmware is the latest version. The message "Last update F/W" indicates that it is the latest version.

flowchart
graph LR
    A["11-03.Adv Setup CompareFirmware"] --> B["Searching F/W... Please Wait ..."]
    B --> C["Last update F/W OK!"]
Quick Erase HDD
This function is used to quickly erase data on the HDD. Please backup any important data before using this function.
11-04. Adv Setup Quick Eras HDD
Press ENT to enter the following screen. Use the Up and Down butns to select the HDD to erase.
Quick EraseHDD ALL/TargetCH:*
Press ENT again and the LCD will prompt you to con rm the erase operation.
All data will be lost, Erase? No
Full Erase HDD
This function is used to full erase a data on the HDD. Please backup any important data before using this function.
11-05. Adv Setup Full Erase HDD
Press ENT to enter the following screen. Use the Up and Down buttons to select the HDD to erase.
Quick Erase HDD ALL/Target CH:*
Press ENT again and the LCD will prompt you to con rm the erase operation.
All data will be lost, Erase? No
H/W Diagnostic
Press ENT to enter the following screen. This function is used to check that the system is operating normally.
11-06. Adv Setup H/W Diagnostic
Press ENT again to enter the following screen. The LCD will cycle through the test categories as they are performed. The CD display is tested rst, the control panel is tested next (requires manual operation), then followed by the system's internal diagnostics hardware connection test then the RAM and SDFlash test. All test results are down on the LCD. This is a simple way to verify that the system is operating normally.
Press ENT and the system will begin the tests as shown below.

flowchart
graph LR
    A["LCD Test Start"] --> B["Button Test ?"]
    B --> C["SDRAM Test: 8192Kbytes OK"]
    D["Test IDE 0/1 OK"] --> E["FlashTest: OK"]
    E --> F["Test nished"]
Once the system diagnostics have been completed the "Test finished" message will appear on the LCD.
Load Default
Press ESC to return to the main menu then use theENT button to select. This function resets a settings to their factory default. This function helps the system recover from errors caused by an illegal operation.
11-07.Adv Setup Load Default
Press ENT to enter the following screen. Use the Up and Down buttons to con trto factory defaults.
Load Default Con g? Yes
If Load Default OK, this will be displayed on the LCD as shown below.
Load Default Ok
Copy HPA
If this function is set to "ON", the system will completely copy the data in a source HDD's host protected area.
11-08. Adv Setup Copy HPA
The default is "OFF." Use the ENT, Up and Down buttons to change this to "On".
Burn In
This function is used to burn test the system reliability.
11-09. Adv Setup Burn In
Press ENT to enter the following screen.
Burn In Mode Copy & Compare
Use the Up and Down buttons to choose Compare, AsCopy & Cmp and Async Compare, then press ENT to con rm.
Basic Troubleshooting
LCD
If the LCD blank after the device is turned on, check that the power cable is properly connected and that the power supply is on.
Error Message
When the system is running a copy operation or hardware diagnostics, if the operation is manually terminated by pressing ESC an error message will be shown by the LCD. This may lead to an illegal operation and cause the device to stop reminding. If this happens, the device must be restarted.
Hard Disk
If unable to read the hard disk please check that the data and power cables are properly connected.
Keys
If pressing the keys on the front panel produces no response from the system, the keys may have malfunctioned. Please check the contropanel to see if the wiring has come loose.
Firmware Upgrade
The device can be updated to new versions of rmware through CD/DVD-ROM. If unable to update the hardware, check down software was added correctly. A failed rmware upgrade may cause the duplicator to become inoperable. If the system is working normally, do not attempt this operation. If the system is already experiencing problems, please contact your distributor for repairs.
Startup/Shutdown
Do not suddenly turn o the power while the system is performing an operation. After shutting down normally, wat a moment (usually around 2 seconds) before starting the system again so it can run its self-diagnostics.
About Copy HPA
The HPA (HdsProtected Area) is a biden data regioned in ATA/ATAPI-4. This area is not usually accessible to software. The SATADD Duplicate Controller supports the copying of data from this hidden area.
Drive is locked (cannot be initialized after the SECURE ERASE or OVERWRITE)
- Place drive in the source slot
- Execute "PreScan" function for 1 minute
- Press "ESC" key until you see "User Abort" on the LCD screen
- Now remove the drive from the duplicator and connect it to your system, the HDD should be recognized and be able to initialize again
Firmware Update Procedure
(Requires one hard drive containing the rmware le):
- Create a 50MB HDD partition with FAT/FAT32 or NTFS les system on any SATA hard drive
- Download the rmware and unzip the le to .BIN le format
- Copy the .BIN le onto the 50 MB partition of the HDD
- Insert this drive to the Source slot of the duplicator. For subsystem, connect the drive to the Source SATA port
- Select "Firmware Update" function under the "Setup" or "Advanced Setup" menu and press ENT to do the update. To access the "Advanced Setup", hold onto the ESC button for 5 seconds. The new option will appear
- Once completed, it will reboot and show you the new rmware version
Notes:
SECURE ERASE - HDD duplicator sends a WIPE command to the hard drive. This command IIs 00 string to entire HDD
OVERWRITE - There are three options: One pass, 3 passes and 7 passes 5220.22-M. The duplicator writes a string of pattern over the entire disk one time, three times or seven times. (5220.22-M is the DoD standard for drive sanitization)
Please note that some drives may become locked and cannot be initialized after the SECURE ERASE or OVERWRITE. Should this happen, use the following procedures to unlock the drive:
- Place drive in the source slot
- Execute "PreScan" function for 1 minute
- Press "ESC" key until you see "User Abort" on the LCD screen
- Now remove the drive from the duplicator and connect it to your system, the HDD should be recognized and be able to initialize again
CONTACT US
www.addonics.com
Phone: 408-573-8580
Fax: 408-573-8588
Email: http://www.addonics.com/sales/query/