JU-AV0312-S1 - Video Capture Card Siig - Free user manual and instructions
Find the device manual for free JU-AV0312-S1 Siig in PDF.

User questions about JU-AV0312-S1 Siig
0 question about this device. Answer the ones you know or ask your own.
Ask a new question about this device
Download the instructions for your Video Capture Card in PDF format for free! Find your manual JU-AV0312-S1 - Siig and take your electronic device back in hand. On this page are published all the documents necessary for the use of your device. JU-AV0312-S1 by Siig.
USER MANUAL JU-AV0312-S1 Siig
natural_image
Simple line drawing of a circular object with a horizontal line, resembling a stylized globe or icon (no text or symbols)USB 2.0 HD Video Capture Slim Box - Multi-Input Installation Guide
Introduction
The USB 2.0 HD Video Capture Slim Box - Multi-Input lets you easily capture multiple video output source (HDMI, Composite, S-Video) to your PC, Mac or Android tablet / smartphone.
Key Features and Benefits
-
Easily capture and save videos from any HDMI/ or AV In video source such as DVD players, media players, or Set-top boxes
• Built-in high performance H.264 hardware encoder chip
• Supports up to 1080p HDMI input and 480p AV input for video capture
• Supports VivaCAP app for video capture on Android OS tablets -
Bundled with CyberLink PowerDirector and Media Espresso authoring tools for PC to improve usability and provide quicker operation
• Capture up to 1080p@ 30fps
• Capture Format - hardware compressed MPEG-4 (H.264/AVC) - Recording video @ H.264AVC and audio @ H.264 AAC
- Portable design, easy to carry and store
System Requirements
• PC or Mac computer with an available USB port
• 2.4GHz Dual Core CPU with 2GB RAM
- Graphics Card with DirectX 9.0c
• Sound card compatible with AC97
- Windows ^ 10 (32-/64-bit) / 8.1 (32-/64-bit) / 8 (32-/64-bit) / 7 (32-/64-bit)
- Mac ^ OS X v10.9 or later
- Android 4.2 or later
Package Contents
- USB 2.0 HD Video Capture Slim Box - Multi-Input
- Mini USB Cable to USB Type A cable
• A/V fan-out cable - Mini USB to USB Type A + Micro USB Y cable
- Software CD
- Installation guide
Layout
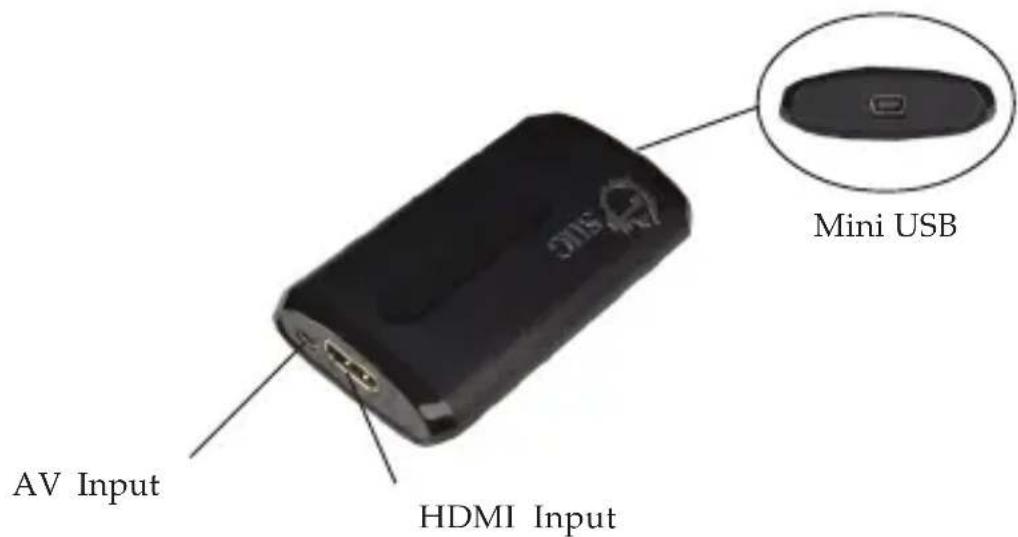
text_image
AV Input HDMI Input Mini USBFigure 1: USB 2.0 HD Video Capture Slim Box - Multi-Input
• AV Input: Connects to the included A/V fan-out cable for Composite or S-video source
- HDMI Input: Connects to the HDMI source by HDMI cable (HDMI cable not included)
- Mini USB: Connects to PC or MAC by the included Mini USB Cable to USB Type A cable or most Android tablets or smartphones by Mini USB to USB Type A + Micro USB Y cable

text_image
Micro USB 1 cable Mini USB connector Audio L/R S-Video Video InFigure 2: A/V fan-out cable

natural_image
Black USB cable with two connectors, no text or symbols visibleFigure 3: Mini USB to USB Type A + Micro USB Y cable
natural_image
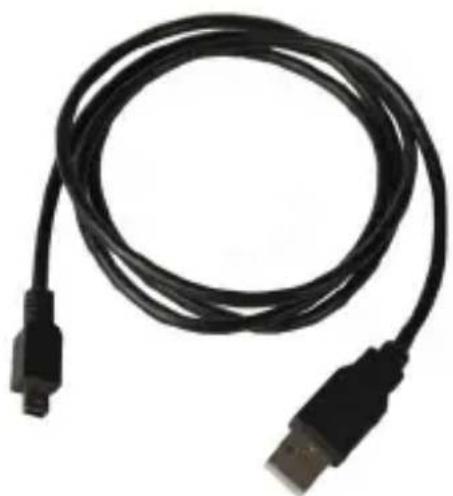
Black USB cable with two connectors, no text or symbols visibleFigure 4: Mini USB Cable to USB Type A cable
Hardware Installation
- Connect the Mini USB connector of the included Mini USB Cable to the Capture Box.
- Connect the other end USB Type A/ Micro USB to an available USB port of your computer/ Android tablets or smartphones.
- Connect your video source to HDMI, Composite or S-Video.
Note: 1. When using the Composite or S-video connection, it's required to connect Audio L/R to hear the sound.
2. When using Android tablets or smartphones for recording, the USB power connection is required.
Windows Driver Installation
Before installing the driver, please make sure your Windows has the latest updates from Microsoft Windows update.
- After Hardware Installation, insert the driver CD.
- The installation window will show automatically, select Run Autorun.exe.
If not, browse the CD manually.
- Select Quick Installation, then click Yes at the "User Account Control".

text_image
Quick Installation .Net Framework 3.5 SP1 for Win8 / Win8.1 Manual Browse CD CyberLink PowerDirector 10 CyberLink MediaEspresso 6.5 Quick Uninstallation ExitFigure 5
- At the "Quick Installer", select Typical Installation and click Install.
- Click Start to initiate the driver installation.
- At "Select Setup Language", choose your desired language and click OK.
- Follow the on-screen steps to install VivaStation software.
- At "Quick Installer", select Yes, I want to restart my computer now. Then, click Finish to re-boot.
To Verify Windows Installation
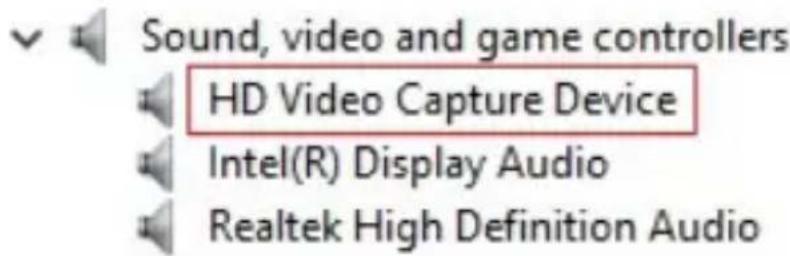
- Right click Computer or My Computer on the desktop, then click Manage.
- Click Device Manager, and expand Sound, video and game controllers.
- HD Video Capture Device should be displayed. See Figure 6.
text_image
Sound, video and game controllers HD Video Capture Device Intel(R) Display Audio Realtek High Definition AudioFigure 6
VivaStation Configuration
After a successful driver installation, VivaStation icon will be created on the Windows Desktop.
Launch VivaStation, then select the capture device and source input.
After setting, you could see a tool bar as below:

text_image
1 2 3 4 5 6 7 8 9 10Figure 7: Tool bar
- Record: Record the video to your computer, press again to stop recording
- SnapShot: Captures the video source to an image on your computer
- Display Ratio: Choose an available display ratio from the list
- Volume Down: Turn down the volume
- Volume Up: Turn up the volume
- Mute: Turns off the volume, press again to turn the volume back on
-
Playback: Access to the folder of the recorded files
-
Schedule Record: Allows you to set the recording time (start time and end time)
-
Source Input: Selects the video source you're going to capture (Composite, S-Video or HDMI)
-
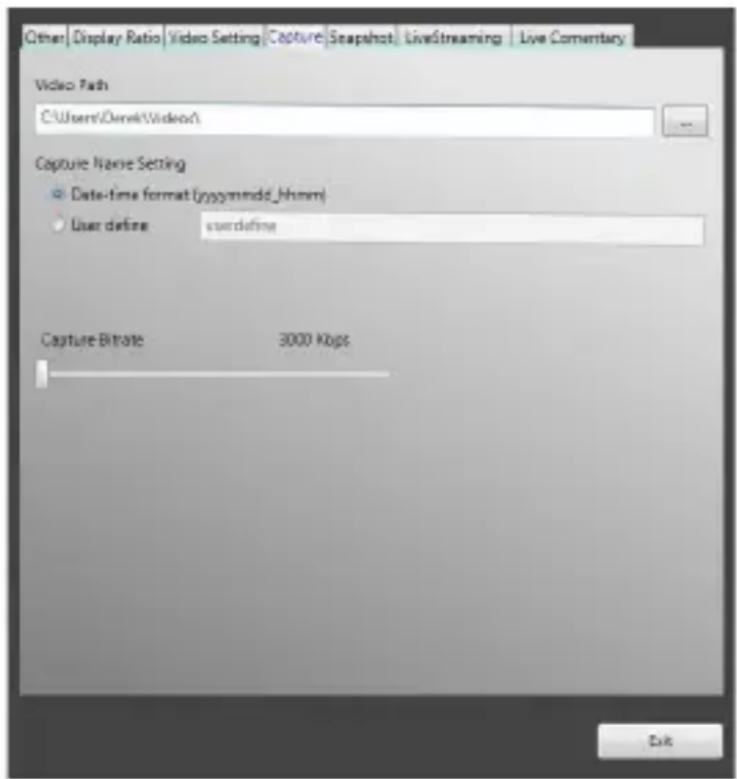
Setup: A more complex interface to adjust some settings of 1-9 above. Adding settings such as frames per second, and the path where the recording files are saved.
text_image
Other | Display Ratio | Video Setting | Capture | Snapshot | LiveStreaming | Live Commentary Video Path C:\Users\Derek\Video\ Capture Name Setting Date-time format (ppysymmdd_jhhmm) User define: overdefine Capture Bitrate 3000 Kbps ExitFigure 8
For comprehensive VivaStation user's manual, go to Manual \ VivaStation on the software CD.
Mac Driver Installation
- After Hardware Installation, insert the driver CD.
- Select the Driver CD icon on the Desktop and browse iCAP folder.
- Run iCAP_xxx.pkg, and a pop-up window (Install iCAP) will show.
- At Install iCAP, click Continue in Introduction.
- At Installation Type, click Install.
- Key in username and password, then select Install software.
- A pop-up window shows, click Continue Installation.
- After a successful installation, click Restart to finish.
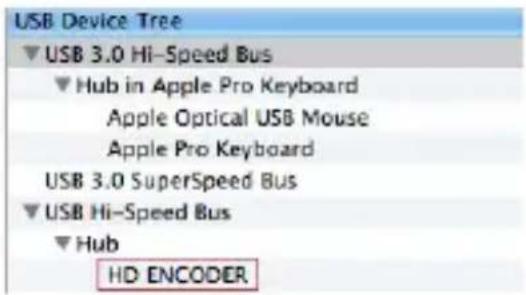
To Verify Mac Installation
- Click from the top menu bar.
- Click About this Mac, More Info..., and System Report...
- Under Hardware/USB, the HD ENCODER should be displayed.
text_image
USB Device Tree ▼USB 3.0 Hi-Speed Bus ▼Hub in Apple Pro Keyboard Apple Optical USB Mouse Apple Pro Keyboard USB 3.0 SuperSpeed Bus ▼USB Hi-Speed Bus ▼Hub HD ENCODERFigure 9
Launch iCAP
- iCAP icon
After a successful driver installation, the iCAP icon will be created.
Click Go from the top menu bar and select Applications. Then you could see iCAP.app icon in the list.
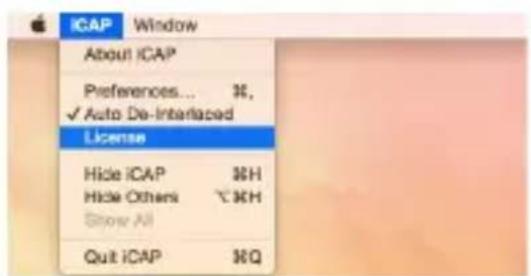
- License Key
When starting iCAP for the first time, you will need to enter the License Key.
Launch iCAP and select iCAP icon from the top menu bar. Go to License to key it in. (You can find the license key on the CD sleeve.)
text_image
ICAP Window About iCAP Preferences... 36, ✓ Auto De-Interlaced License Hide iCAP 36H Hide Others 70KH Show All Quit iCAP 36QFigure 10
- Select iCAP icon from the top menu and click Preferences for setting.
- Select the input source you're going to capture. Then choose the quality, size, format and so on. See Figure 11.

text_image
Preferences Input Source : Video Quality : Output Size : Extension : CVSS High Original m2ts (Movie) S-Video Medium 720 .ts (QuickTime) Component Low 480/570 HDMI Brightness : Contrast : Hua : Saturation : DefaultFigure 11
- After setting, press the Rec button on the lower left corner to start recording and press again to stop recording.
- The path for the recording files Finder \ All my files \ Movies
Note: To display the video format of .m2ts, it's required to download mplayerX additionally.
Android Driver Installation
Go to Play Store to download and install VivaCAP.
VivaCAP Configuration
Note: While recording, device charging is disabled. Please make sure your Android tablet / smartphone is fully charged before recording.
- Launch VivaCAP, then go to select the input source, the quality and size you're going to capture. See Figure 12.

text_image
Device Settings Video Source HDMI Quality CVBS &-Video Output Size HDMI Colors: Brightness 128 Contrast 128 Hue 128 Saturation 129 Default SaveFigure 12
-
Finish setting, and touch Save.
-
Return back to previous page then touch Device for connecting the capturing video.
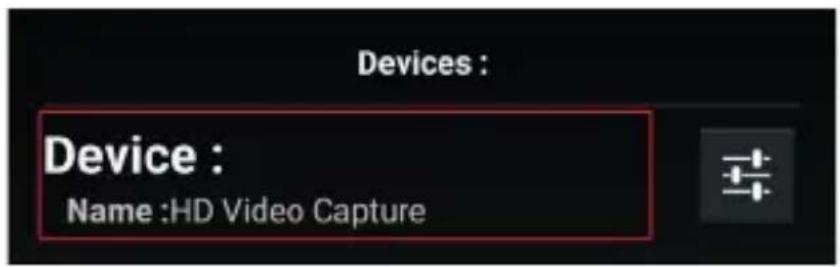
text_image
Devices : Device : Name :HD Video CaptureFigure 13
- After identification, the input source will show on the screen.
- Touch the screen, and the recording icon will show.
- Touch the red button to start recording, and touch it again to stop recording.
• The path for the recording files:
In Recorded Videos folder. Click it for playing or deleting.
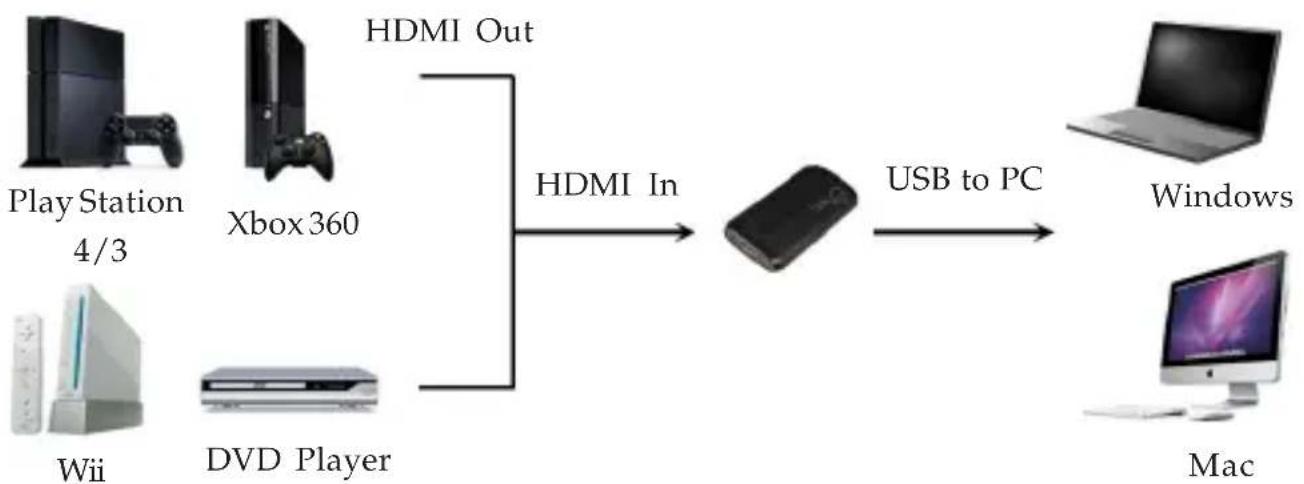
Application
- HDMI Input
Capture video from HDMI source
flowchart
graph LR
    A["Play Station 4/3"] -->|HDMI Out| B["DVD Player"]
    C["Xbox 360"] -->|HDMI In| D["Device"]
    E["Wii"] -->|HDMI Out| D
    F["Mac"] -->|USB to PC| G["Windows"]
Figure 14
• Composite / S-video Input
Capture video from Composite / S-video source

flowchart
graph LR
    A["Analog Out"] --> B["Composite S-video In"]
    B --> C["Connect the input source by A/V fan-out cable"]
    C --> D["USB to PC"]
    D --> E["Windows"]
    F["DVD Player"] --> G["DV"]
    H["Set-top box"] --> I["DV"]
    J["Mac"] --> K["Mac"]
Figure 15
- Optional Application
Capture while playing games / watching over TV (* An additional HDMI splitter is required)

flowchart
graph TD
    A["Play Station 4/3"] -->|HDMI In| B["2-Port HDMI Splitter (Not included)"]
    C["DVD Player"] -->|HDMI In| B
    D["Mac"] -->|Windows| E["TV with HDMI input"]
    B --> F["Computer"]
    B --> G["Video Device"]
Figure 16
Troubleshooting
Q1: If the capture box is not recognized:
A: Verify whether the driver is installed properly.
A: Plug the capture box into other USB ports.
Q2: If the capture box does not work properly:
A: Check your sound card is operating properly. Reinstall the soundcard drivers if necessary.
Q3: If the driver is not installed successfully:
A: Check whether the Windows version is the latest. If not, go to Windows update for updating first and re-run installation.
A: Uninstall and re-run the Hardware and Software installation.
Blank Page
Technical Support and Warranty
QUESTIONS? SIIG's Online Support has answers! Simply visit our web site at www.siig.com and click Support. Our online support database is updated daily with new drivers and solutions. Answers to your questions could be just a few clicks away. You can also submit questions online and a technical support analysts will promptly respond.
SIIG offers a 2-year manufacturer warranty with this product. This warranty covers the original purchaser and guarantees the product to be free of any defects in materials or workmanship for two (2) years from the date of purchase of the product.
SIIG will, at our discretion, repair or replace (with an identical product or product having similar features and functionality) the product if defective in materials or workmanship. This warranty gives you specific legal rights, and you may also have other rights which vary from state to state. Please see our web site for more warranty details.
If you encounter any problems with this product, please follow the procedures below.
A) If it is within the store's return policy period, please return the product to the store where you purchased from.
B) If your purchase has passed the store's return policy period, please follow the steps below to have the product repaired or replaced.
Step 1: Submit your RMA request.
Go to www.siig.com, click Support, then RMA to submit a request to SIIG RMA or fax a request to 510-657-5962. Your RMA request will be processed, if the product is determined to be defective, an RMA number will be issued.
Step 2: After obtaining an RMA number, ship the product.
- Properly pack the product for shipping. All accessories that came with the original package must be included.
- Clearly write your RMA number on the top of the returned package. SIIG will refuse to accept any shipping package, and will not be responsible for a product returned without an RMA number posted on the outside of the shipping carton.
- You are responsible for the cost of shipping to SIIG. Ship the product to the following address:
SIIG, Inc.
6078 Stewart Avenue
Fremont, CA 94538-3152, USA
RMA #:
- SIIG will ship the repaired or replaced product via Ground in the U.S. and International Economy outside of the U.S. at no cost to the customer.
Founded in 1985, SIIG, Inc. is a leading manufacturer of IT connectivity solutions (including Serial ATA and Ultra ATA Controllers, FireWire, USB, and legacy I/O adapters) that bridge the connection between Desktop/Notebook systems and external peripherals. SIIG continues to grow by adding A/V and Digital Signage connectivity solutions to our extensive portfolio. SIIG products offer comprehensive user manuals, many user-friendly features, and are backed by an extensive manufacturer warranty. High quality control standards are evident by the overall ease of installation and compatibility of our products, as well as one of the lowest defective return rates in the industry. SIIG products can be found in computer retail stores, mail order catalogs, through major distributors, system integrators, and VARs in the Americas and the UK, and through e-commerce sites.
PRODUCT NAME
USB 2.0 HD Video Capture Slim Box - Multi-Input
FCC RULES: TESTED TO COMPLY WITH FCC PART 15, CLASS B OPERATING ENVIRONMENT: FOR HOME OR OFFICE USE
FCC COMPLIANCE STATEMENT:
This device complies with part 15 of the FCC Rules. Operation is subject to the following two conditions: (1) This device may not cause harmful interference, and (2) this device must accept any interference received, including interference that may cause undesired operation.
THE PARTY RESPONSIBLE FOR PRODUCT COMPLIANCE
SIIG, Inc.
6078 Stewart Avenue
Fremont, CA 94538-3152, USA
Phone: 510-657-8688
USB 2.0 HD Video Capture Slim Box - Multi-Input is a trademark of SIIG, Inc. SIIG and the SIIG logo are registered trademarks of SIIG, Inc. Microsoft and Windows are registered trademarks of Microsoft Corporation. All other names used in this publication are for identification only and may be trademarks of their respective owners.