Home Control Door/Window Contact 9809 - Door/window sensor DEVOLO - Free user manual and instructions
Find the device manual for free Home Control Door/Window Contact 9809 DEVOLO in PDF.

User questions about Home Control Door/Window Contact 9809 DEVOLO
0 question about this device. Answer the ones you know or ask your own.
Ask a new question about this device
Download the instructions for your Door/window sensor in PDF format for free! Find your manual Home Control Door/Window Contact 9809 - DEVOLO and take your electronic device back in hand. On this page are published all the documents necessary for the use of your device. Home Control Door/Window Contact 9809 by DEVOLO.
USER MANUAL Home Control Door/Window Contact 9809 DEVOLO
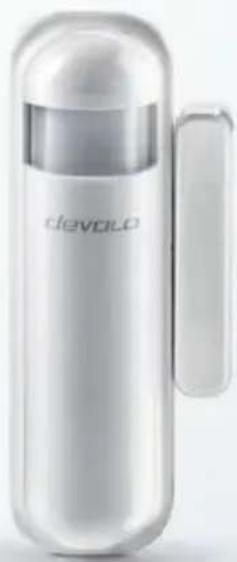
Home Control Door/Window Contact
natural_image
Exterior view of a modern office building (no signage)fi rst steps
2
Thank you for placing your trust in this devolo product.
Carefully read all instructions before setting up the device and store the instructions for later reference.
Icons

Very important note. Failure to observe this note may result in damage.

Important note that should be observed.
Background information and configuration tips for your device.
Intended use
Use the Home Control Door/Window Contact as described in these instructions and in the Home Control online help to prevent damage and injuries.

Except for occasional battery replacement, the Home Control Door/Window Contact is completely maintenance-free. The device contains no user-serviceable parts!
CE conformity

When used as intended, the product conforms to the basic requirements of the directives 2014/53/EU, 2014/35/EU and the other relevant provisions of the Radio and Telecommunications Terminal Equipment Act (FTEG) and is designed for use in the EU, Switzerland and Norway. A printout of the CE declaration is included.
devolo Home Control
Home Control (also known as home automation) refers to the specific control of electrically operated indoor household devices. The Home Control system by devolo uses the Z-Wave™ wireless standard.
A Home Control system requires a Z-Wave™-compatible control unit such as the Home Control Central Unit from devolo. Use its Home Control portal to coordinate the Home Control Door/Window Contact and all other Home Control devices. You can access the Home Control Central Unit through the my devolo app and at www.mydevolo.com in a browser.
For more information about setting up the Home Control Central Unit, please refer to the installation guide and/or Home Control online help.
Accessing the Home Control Central Unit via the my devolo app (for smartphone/tablet)
Open the my devolo app ↩ Home Control and select your Home Control Central Unit.
Accessing the Home Control Central Unit via web browser (PC/laptop)
At www.mydevolo.com Home Control select your Home Control Central Unit.
For more information on the control and configuration of all devolo Home Control devices, as well as application examples, please refer to the Home Control online help.

text_image
Central Unit coordinates Door/Window Contact reports an open windowThe Home Control Door/Window Contact
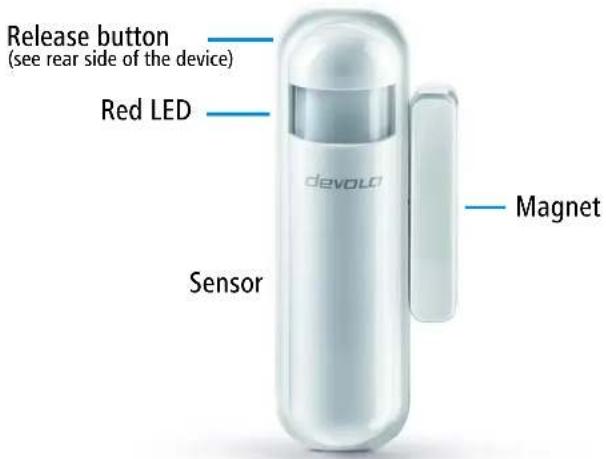
The Home Control Door/Window Contact consists of a contact and a magnet. It sends information on the open or closed state of a door or window. It also cooperates with other Home Control devices. For example, an open window can automatically shut off the heat radiator in the same room. In addition, the integrated light and temperature sensors can act as initiators for the light controls. Furthermore, the Home Control Door/Window Contact is equipped with an integrated LED and a release button.
text_image
Release button (see rear side of the device) Red LED devold Magnet SensorFor more detailed descriptions of the Home Control Door/Window Contact functions, refer to the Home Control online help.
Batteries

Always keep batteries away from open flame and high temperatures. Avoid direct sunlight and heat radiation!
Always remove all batteries from battery-operated devices that are only in storage and are not in use. Old batteries can leak and damage the device!
Do not use rechargeable batteries!
When inserting the battery, make sure the polarity is correct. Using the battery incorrectly can damage the device!

The Home Control Door/Window Contact requires a commercially available CR123(A) lithium battery. For information on replacing the battery, please refer to the Home Control online help.
Registering the Home Control Door/Window Contact on the control unit (e.g. devolo Home Control Central Unit)

Only use the Home Control Door/Window Contact indoors.
Avoid placing the Home Control Door/Window Contact in direct sunlight or radiant heat!
① Without installing it, place the Home Control Door/Window Contact near the location where you would like it to be (such as a door or window ledge).
② When you plug in the Home Control Central Unit from devolo, follow the description in the section devolo Home Control on page 3 to call up your Home Control Central Unit and select Devices Add device devolo Home Control Door/Window Contact. Follow the instructions in the Home Control portal for logging into your Home Control Central Unit.
Installing the Home Control Door/Window Contact
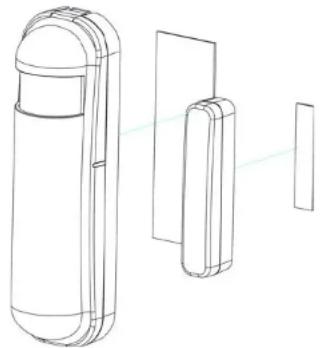
When installing the Home Control Door/Window Contact (sensor and magnet), one component is mounted to the moving part (window or door) and the other to the stationary part (frame). The magnet can be installed on the right or left, vertically with respect to the sensor. Determine the best installation position for your case.

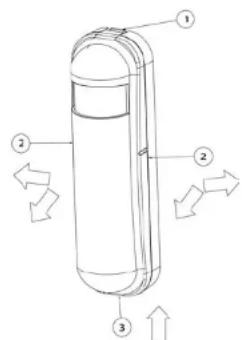
Install the Home Control Door/Window Contact on a flat and level surface so that the black release button on the rear of the sensor is depressed when the device is installed.
③ Before permanently fastening the Home Control Door/Window Contact at the desired location, test various positions to ensure that the magnet triggers the sensor. The distance between the sensor and magnet must be < 2 cm.
④ If the LED flashes red when the window or door is opened or closed, the position of the sensor is optimal.
8
⑤ If using the double-sided tape to fasten the Home Control Door/Window Contact, adhere the wider tape strip to the back of the sensor in the middle (below the release button) and attach the sensor to the desired location, for example, on the window or door.
natural_image
Technical line drawing of a mobile phone module with front, side, and back views (no text or symbols)⑥ Then adhere the narrow tape strip to the back of the magnet in the middle and fasten this at a distance of < 2 cm from and centred with respect to the sensor, e.g. on the window frame or door frame.

The notches on the magnet and of the sensor should line up with one another.
or
⑦ If you use screws to attach the Home Control Door/Window Contact, take apart the upper and lower housing components of the sensor by pressing the tab down ① in order to release the housing components (from top to bottom, ② and ③).
text_image
Technical diagram of a cylindrical device with numbered components and directional arrows indicating flow or movement.Take apart the upper and lower housing parts of the magnet, starting at the groove provided for this purpose at the lower end of the magnet.

If installing to a wall using screws, make sure that no gas, water or power lines in the wall get damaged. There is a danger of electric shock!
☐ Based on the template on the lower housing component of the sensor, drill holes at the desired installation location on the window or door, and then attach the lower component using screws.
☐ Based on the template on the lower housing component of the magnet, drill holes into the window frame or door frame and then attach the lower component of the magnet using screws. Position the magnet in the middle, at a distance < 2 cm from the sensor.

The notches on the magnet and of the sensor should line up with one another.
To close the sensor housing, first insert the lower end of the upper housing component of the sensor into the corresponding groove ③ in the lower housing component of the sensor and then press the entire upper housing component, (from bottom to top, ③ and ②) onto the lower component until it clicks into place.
To close the magnet housing, insert the upper housing component of the magnet until it clicks into place onto the lower housing component of the magnet. This completes the installation of the Home Control Door/Window Contact.
From now on, you can take electronic control conveniently using the Home Control portal of the Home Control Central Unit.
For more information on how to control and configure all devolo Home Control devices, as well as for application examples, please refer to the Home Control online help.
Service and warranty
Warranty: 3 years
If your devolo device is found to be defective during initial installation or within the warranty period, please contact the vendor who sold you the product. The vendor will take care of the repair or warranty claim for you. The complete warranty conditions can be found at www.devolo.com/warranty.
| Great Britain 0203 024 18 | 38 (national rate) support@devolo.co.uk | |
| Sweden 0077 1400 480 (national rate) support@devolo.se | ||
| Finland 972 519 125 (national rate) support@devolo.fi | ||
| Norway 81 500 174 (national rate) support@devolo.com | ||
| Denmark 070 136 001 (national rate) support@devolo.dk | ||
| Other countries +49 241 70 | 525 18 (international rate) support@devolo.com | |
Disposal
Neither the Home Control Door/Window Contact nor the battery may be disposed of with the household waste. Instead, you can return these at no charge at your municipal collection point or at the retailer (e.g. supermarket, specialist shop).
devolo
devolo AG
Charlottenburger Allee 60
52068 Aachen – Germany
www.devolo.com