EXT-HDMI1.3-CAT6-8X - Distribution AV Gefen - Free user manual and instructions
Find the device manual for free EXT-HDMI1.3-CAT6-8X Gefen in PDF.

| Product Type | HDMI 1.3 over Cat6 Distribution Amplifier (1x8) |
| Video Support | HDMI 1.3, up to 1080p Full HD, 3D ready |
| Audio Support | Multi-channel digital audio (Dolby TrueHD, DTS-HD Master Audio) |
| Maximum Distance | Up to 100 meters (330 feet) using Cat6 cable at 1080p |
| Number of Inputs | 1 HDMI input |
| Number of Outputs | 8 HDMI outputs via Cat6 (requires receivers) |
| Connector Types | HDMI (Type A) input, RJ-45 output ports |
| Power Supply | External AC adapter (5V DC, 2A typical) |
| Power Consumption | <10W |
| Dimensions (W x D x H) | 17.5 x 5.5 x 1.75 inches (44.5 x 14 x 4.4 cm) |
| Weight | 2.5 lbs (1.13 kg) |
| Compliance | HDCP 1.2 compliant |
| EDID Management | Built-in EDID emulation for reliable display detection |
| IR Control | IR remote extender support (via included IR receiver) |
| Operating Temperature | 32°F to 104°F (0°C to 40°C) |
| Storage Temperature | -4°F to 140°F (-20°C to 60°C) |
| Humidity | 10% to 85% RH (non-condensing) |
| Housing | Metal chassis, rack-mountable with included brackets |
| Maintenance | Clean with a soft dry cloth; avoid liquids |
| Safety | Do not expose to rain or moisture; use only supplied power adapter |
| Spare Parts & Repairability | No user-serviceable parts; contact Gefen support for repairs |
| Warranty | Limited 1-year warranty |
Frequently Asked Questions - EXT-HDMI1.3-CAT6-8X Gefen
User questions about EXT-HDMI1.3-CAT6-8X Gefen
0 question about this device. Answer the ones you know or ask your own.
Ask a new question about this device
Download the instructions for your Distribution AV in PDF format for free! Find your manual EXT-HDMI1.3-CAT6-8X - Gefen and take your electronic device back in hand. On this page are published all the documents necessary for the use of your device. EXT-HDMI1.3-CAT6-8X by Gefen.
USER MANUAL EXT-HDMI1.3-CAT6-8X Gefen
Technical Support Hours:
8:00 AM to 5:00 PM Monday through Friday, Pacific Time
Write To:
Gefen, LLC.
c/o Customer Service
20600 Nordhoff St
Chatsworth, CA 91311
www.gefen.com
support@gefen.com
Notice
Gefen, LLC reserves the right to make changes in the hard ware, packaging and any accompanying doc u men ta tion without prior written notice.
& CAT6 Extender for HDMI is a trademark of Gefen, LLC
HDMI, the HDMI logo, and High-Definition Multimedia Interface are trademarks or registered trademarks of HDMI Licensing in the United States and other countries.
1 Intr oduction
2 Operation Notes
3 Features
4 Sender Unit Layout - Front
5 Sender Unit Description
6 Sender Unit Layout - Back
7 Sender Unit Description
8 Receiver Unit La y out - Front
9 Receiver Unit Descriptio n
10 Receiver Unit Layout - Back
11 Receiver Unit Descriptio n
12 IR Remote Descriptio n
13 IR Remote Installation
14 IR RemoteConfiguration
15 Connecting And Operating The 8x CA T6 Extender For HDMI
16 Using an 8x8 Matrix
17 Using an 8x8 Matrix with RS-232 Control
18 Connection Without an 8x8 Matrix (Stand-alone Mode)
19 Using The Optional RMT-8IR Remote Unit
20 Using g Stand-alone Mode
21 Equalizing the Signal (Matrix and Stand-alone Mode)
22 Controlling the Receiver Unit with RS-232 (Matrix Mode)
23 DIP Switch Configuration
25 RS-232 Serial Control Interface
26 RS-232 Serial Functions - Sender Unit
26 EDID Mana gement
28 IP Configuration
31 General Functions
37 RS-232 Serial Commands - Sender Unt
37 Commands
40 RS-232 Serial Functions - Receiver Unt
40 EDID Mana gement
43 General Functions
49 RS-232 Serial Commands - Receiver Unit
49 Commands
51 IP Control
51 View MatrixS tatus
52 IP Configuration
53 Backup / Restore
54 Power Management
55 Network Cable Wiring Diagram
56 Firmware Updat
58 Specifications
59 Warranty
60 Licensing
Congratulations on your purchase of the 8x CAT6 Extender for HDMI. Your complete satisfaction is very important to us.
Gefen
Gefen delivers innovative, progressive computer and electronics add-on solutions that harness integration, extension, distribution and conversion technologies. Gefen's reliable, plug-and-play products supplement cross-platform computer systems, professional audio/video environments and HDTV systems of all sizes with hard-working solutions that are easy to implement and simple to operate.
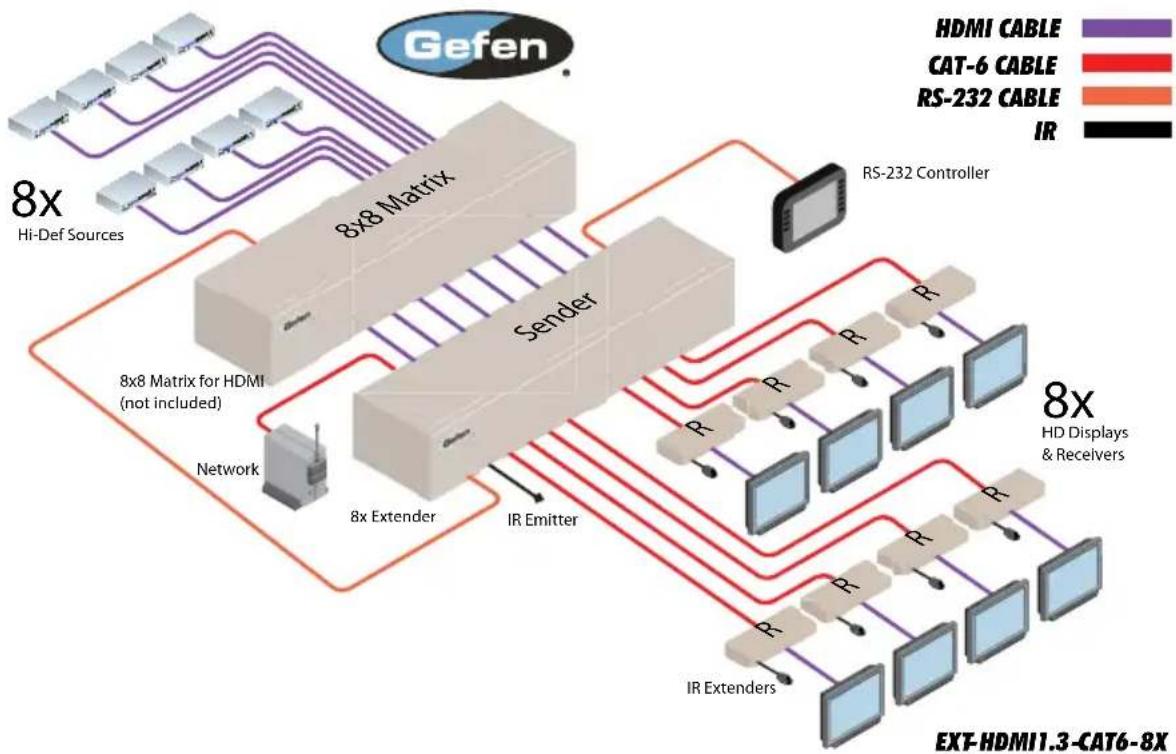
The Gefen 8x CAT6 Extender for HDMI
The Gefen 8x CAT6 Extender for HDMI sends eight independent HDMI 1.3 signals, with Deep Color support, over a single CAT-6a cable to distances up to 200 feet (60 meters).
The Gefen 8xC AT6 Extender for HDMI supports HDMI 1.3 features such as 1080p Full HD and multichannel audio formats including Dolby TrueHD and DTS-HD Master Audio.
The Gefen 8xC AT6 Extender for HDMI digital transmission method insures 100% signal integrity over this single cable extension solution.
With IR Back Channel and RS-232 support, control of the 8x8 Matrix and Hi-Def sources, at any of the 8 individual zones, is at your fingertips. Each Receiver unit allows control for Matrix switching and sending IR commands back to the source located up to 200 feet (60 meters) away. The 8x CAT6 Extenderf or HDMI adds IP Control to the connected Gefen 8x8 Matrix for convenient access to switching and routing of the connected sources using a web browser.
How It Works
The Gefen 8xC AT6 Extender for HDMI can be connected in two ways :
1) Matrix Mode: As aControl and Extender system for any Gefen 8x8 Matrix unit. Extend up to 8 of the Gefen 8x8 Matrix outputs up to 200 feet (60 meters) away with IR, RS-232, or IP Control at any of the remote locations. Also supports the IR Back Channel for remote control of the extended Hidef sources.
2) Stand-alone Mode: As a stand-alone Extender system. Connect up to 8 Hi Def sources to any of the available inputs. Simply extend the connected Hi Def sources up to 200 feet (60 meters) with IR Back Channel.
READ THESE NOTES BEFORE INSTALLING OR OPERATING THE 8X CAT6 EXTENDER FOR HDMI
• CAT-6a cables can be used up to 200 feet (60 meters).
- Shielded (STP) CAT-6a is recommended. However, unshielded (UTP) CAT-6a is acceptable.
NOTE: Shielded cable has an advantage by providing immunity to Electromagnetic Interference (EMI), cell phones and AC motors.
Supported HDMI 1.3 Features
• 225 MHz to 12 bit YUV 444 @ 1080p)
- Deep Color
• Dolby TrueHD and DTS-HD Master Audio
- Lip-Sync
• CEC Pass-Through
Features
- Extends HDMI 1.3 at 1080p up to 200 feet (60 m)
- Extends DVI at 1920x1200 up to 200 feet (60 m) when using a passive HDMI-to-DVI adapter.
• 3DTV Pass-Through
• Color Space Conversion - IR Remofentrol
• Built-in IR Extender and IR Back Channel
• RS-232 serial control
• IP Control (Sender unitf eature)
• Audio and video are transmitted di digitally for zero signal loss
• Supports multichannel digital audio formats including Dolby TrueHD and DTS-HD Master Audio
• Metal enclosure provides better RF shielding g
• Compensation for cable skew - Maintains settings on Power-On state
Package Includes
(1) 8x CAT6 Extender Sender Unit
(8) 8x CAT6 Extender Receiver Units
(8) 1 ft. HDMI Cables (M-M)
(1) RS-232 Serial Cable (M-F)
(1) 24V DC Power Supply
(8) 5V DC Locking PowerSupplies
(1) Set of Rack Ears (Sender Unit Only)
(1) User Manual
Front

text_image
Gefen 8x CAT6 Extender for HDMI STBY IS Power 1 2 3Front
1 Standby Button
Sets the 8x CAT6 Extenderfor HDMI into Standby Mode.
2 IR Sensor
Receives signals from the IR Remote Control.
3 Power Indicator
This LED will turn bright red once the locking power supply has been properly connected.
Back

text_image
EXT HDMI 1.3-CATE-8XS Baidu Inc. 1 2 RS.232 In IP Control RS.232 Out 3 4 5 6 7 8 INT Blaster CATS Out In 1 IR Blaster CATS Out In 2 IR Blaster CATS Out In 3 IP Blaster CATS Out In 4 IR Blaster CATS Out In 5 IR Blaster CATS Out In 6 IN 7 IN 8 EXT IN BAY DCBack
1 RS-232 Serial Port (Input)
The 8x8 Matrix may be switched remotely using serial communications with any office computer or a control automation device by connecting to this port. See page 25 for details.
2 IP Control
Connect to this port to control the 8x8 HDMI Matrix using IP Control. See page 51 for more information.
3 RS-232 Serial Port (Output)
Connects to the RS-232 control device. The 8x8 may be switched remotely using this port. See page 25 for details.
4 IR Blaster (8)
Used to connect the IR Blaster to the Source device.
5 CAT-6 Output Jack (8)
Connects the Sender unit to the Receiver unit using CAT-6.
6 Locking HDMI Port (8)
Connect a Hi-Def source to this HDMI port.
7 IR Extender Port
Used to extend the IR Sensor range of the Sender unit.
8 24V DC Power Connector
Connects the included 24V DC power supply to this receptacle.
Front
text_image
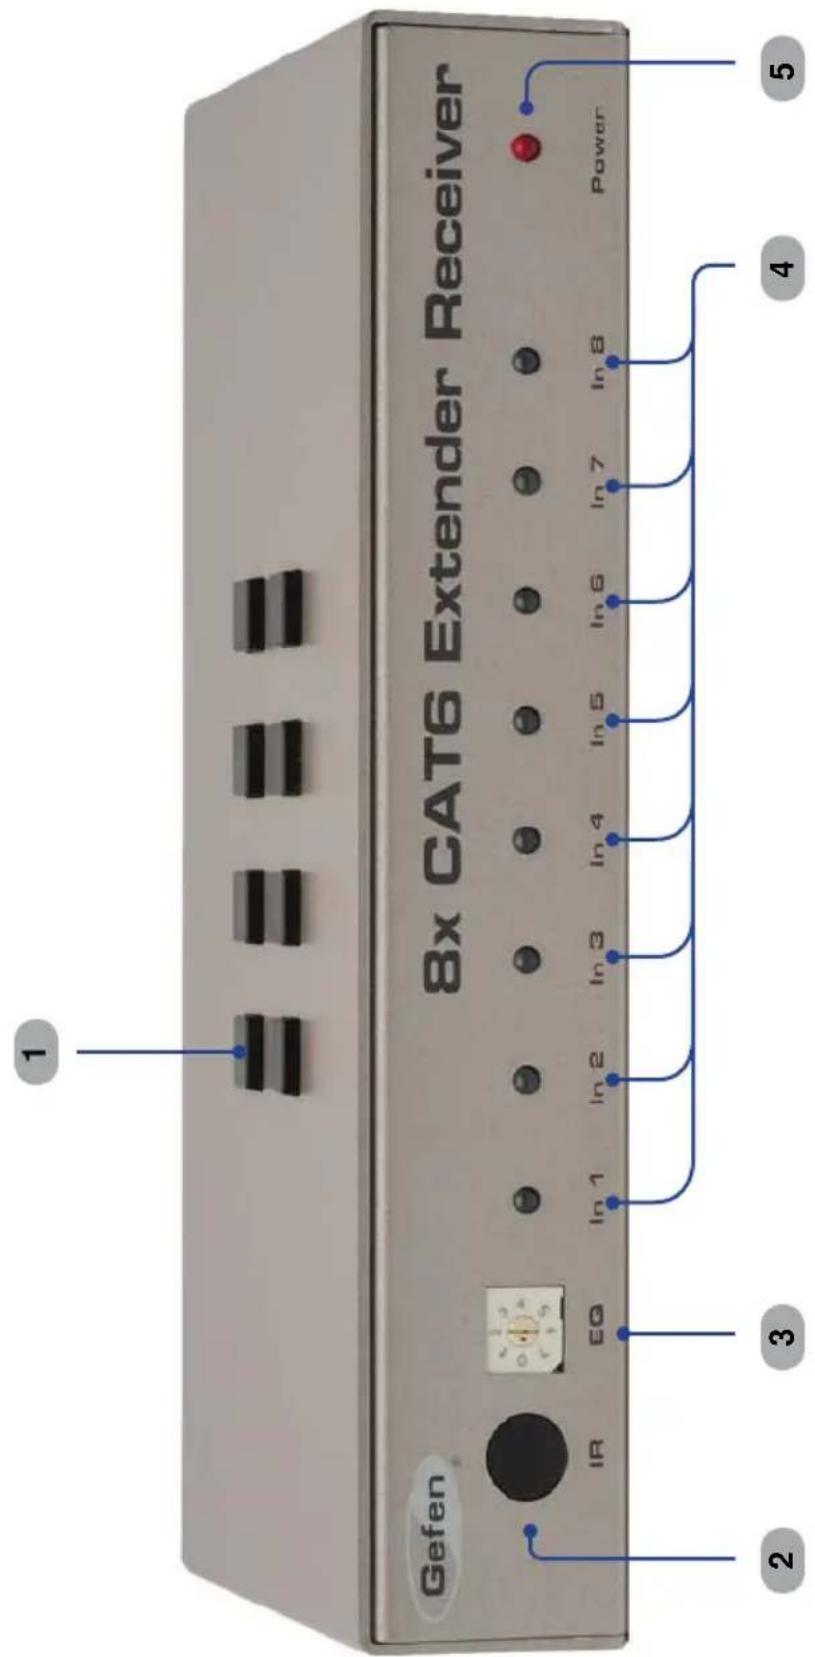
Gefen 8x CAT6 Extender Receiver IR EQ In 1 In 2 In 3 In 4 In 5 In 6 In 7 In 8 Power 2 3 4 5Front
1 Control Buttons (1 - 8)
When connected to any 8x8 Matrix for HDMI, these remote buttons on the Receiver unit can switch between the 8 Hi-Def inputs connected to the 8x8 Matrix for HDMI.
2 IR Sensor
Control the Receiver unit by pointing the IR Remote Control to the IR Sensor.
3 EQ Trimpo
Used to equalize the signal to compensate for distance and skew variations found in various brands of CAT-6 cable.
4 Input Indicators (HDMI In 1 - HDMI In 8)
Displays the current input of the 8x8 Matrix.
5 Power Indicator
This LED will turn bright red once the power supply has been properly connected.
6 IR Extender Port
Used to extend the IR Sensor range of the Receiver unit.
7 CAT-6 In Connector
Connect the CAT-6 cable from the Sender unit to the RJ-4 5 connector.
8 HDMI ①u
Connect the HDMI cable from the HDTV display to the HDMI Out.
9 RS-232 Input
Connects a controlling device to this port.
10 5V DC Locking Power Connector r
Connects the included 5V DC Locking Power Supply to this receptacle.
Back
text_image
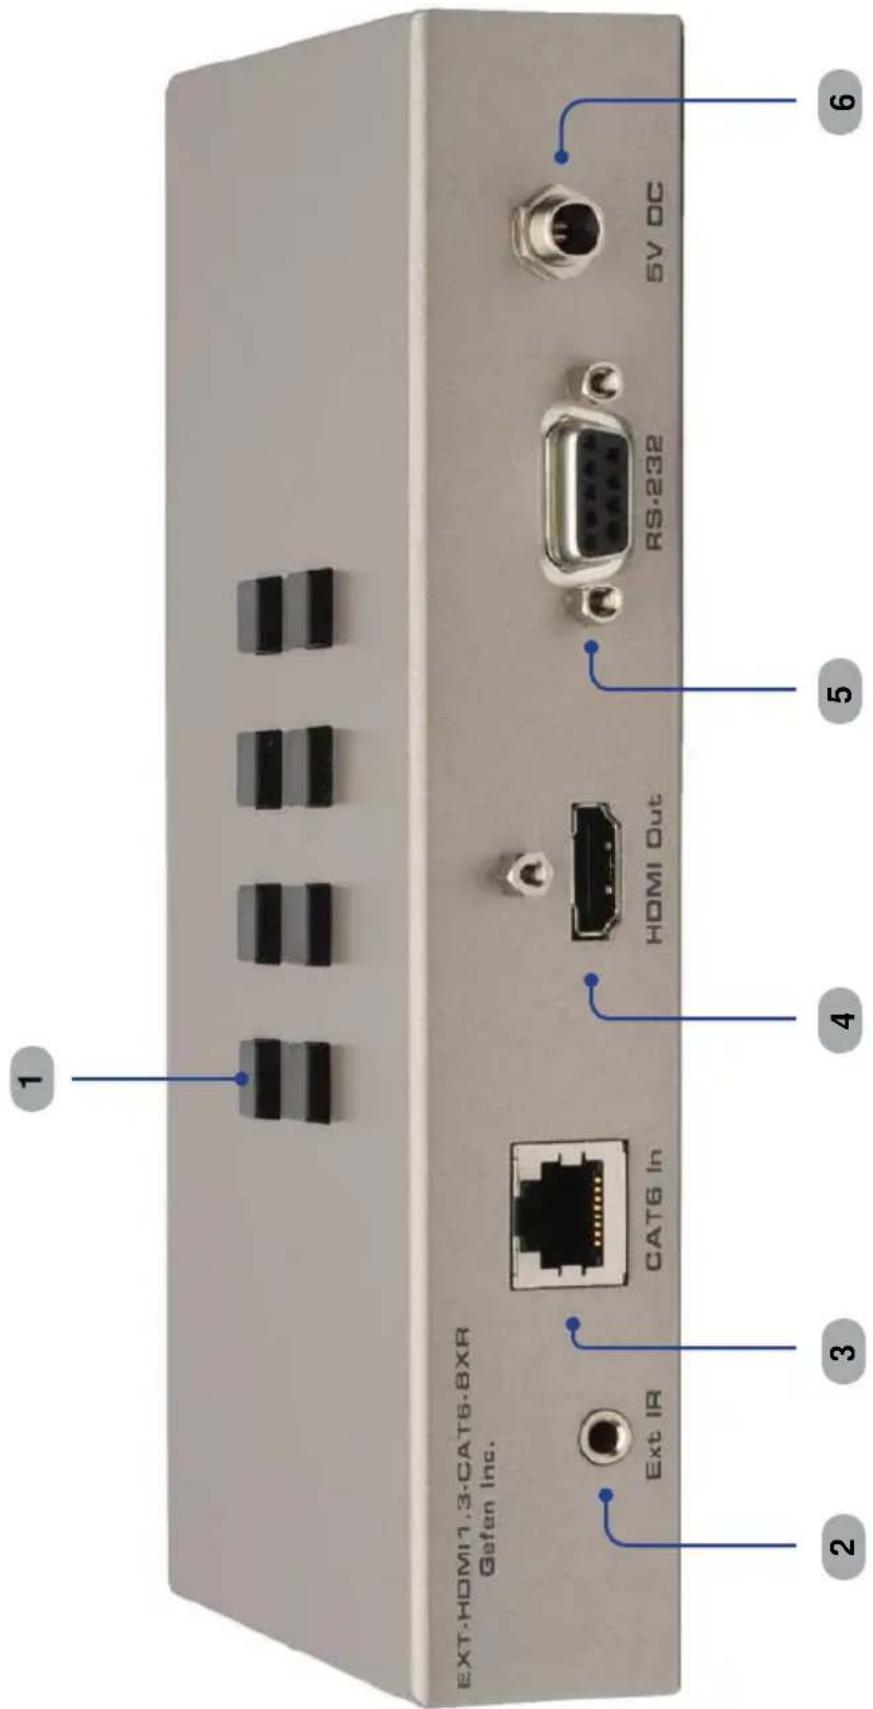
EXT-HDMI1.3-CAT6-BXR Gefen Inc. Ext IR CAT6 In HDMI Out RS-232 5V DC 1 2 3 4 5 6Back
1 Control Buttons (1 - 8)
When connected to any 8x8 Matrix for HDMI, these remote buttons on the Receiver unit can switch between the 8 Hi-Def inputs connected to the 8x8 Matrix for HDMI.
2 IR Extender Port
Used to extend the IR Sensor range of the Receiver unit.
3 CAT-6 In Connector
Connect the CAT-6 cable from the Sender unit to the RJ-45 connector.
4 HDMI ①u
Connect the HDMI cable from the HDTV display to the HDMI Out.
5 RS-232 Input
Connects a controlling device to this port.
6 5V DC Locking Power Connecto r
Connects the included 5V DC Locking Power Supply to this receptacle.
RMT-8IR Remote (Optional)
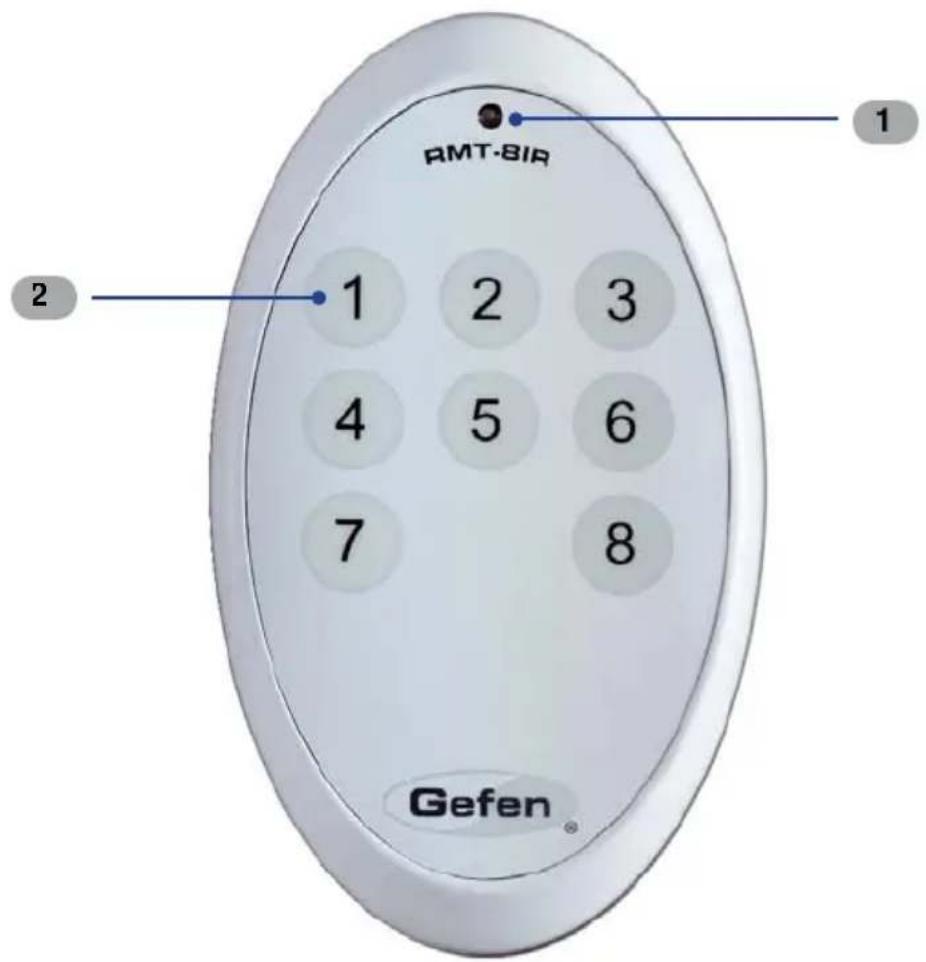
text_image
RMT-BIR 1 2 1 2 3 4 5 6 7 8 Gefen1 Activity Indicato
This LED will be activated momentarily each time a button is pressed.
2 Input Source Selection Buttons (1 - 8)
These buttons are used to select which input source is routed to the HDTV y. displa
Installing the RMT-8IR Battery
- Remove the battery cover on the back of the IR Remote Control unit.
- Insert the included battery y into the open battery slot. The positive (+) side of the battery should be facing up.
- Replace the battery cover.
The Remote Control unit ships with two batteries. One battery is required for operation and the other battery is a spare.

natural_image
Close-up of a medical imaging device showing two circular components with internal structures, no visible text or symbols.Battery Slot
Setting the IR Remote Channel on the RMT-8IR
In the event that IR commands from other remote controls conflict with the supplied RMT-8IR Remote, changing the remote IR channel will fix this issue. The RMT-8IR Remote has a bank of DIP switches for setting the Remote IR channel.
The DIP Switch bank on the RMT-8IR is located underneath the battery cover.

natural_image
Close-up of a medical imaging device showing circular components and a control panel (no visible text or symbols)Remote Channel 1: Default

RemoteChannel 2:

Remote Channel 3

Remote Channel 4:

1 2
Left: Picture of the opened rear battery compartment of the RMT-8IR remote showing the exposed DIP Switch bank between the battery chambers.
The IR channel selected on the RMT-8 IR Remote must match the IR channel assigned to the 8x CAT6 Extender for HDMI. For example, if you set both DIP switches on the remote to the down position (IR channel 1), you must set the 8x CAT6 Extender for HDMI to use IR channel 1.
Please refer to page 36 and 47 on how to change the IR channel on the 8x CAT6 Extender for HDMI.
How to Connect the 8x CAT6 Extender for HDMI (Matrix Mode)
- Using any 8x8 Matrix for HDMI as a source, connect an HDMI cable from HDMI Out 1 on the 8x8 Matrix to HDMI In 1 on the 8x CAT6 Extender for HDMI Sender unit. To ensure correct operation of the 8x CAT6 Extender with the 8x8 Matrix, make sure all connections are made: Connect HDMI Out 2 on the 8x8 Matrix to HDMI In 2 on the Extender, and so on.
- Connect the HDMI Out on the 8x CAT6 Extender Receiver unit to the display with a user-supplied HDMI cable.
- Using one CAT-6 cable, connectCAT6 Out 1 on the Sender unit to CAT6 In on the Receiver unit.
- Connect additional Receiver units as described above.
- Connect the 5V DC locking power supplies to each Receiver unit. Do not overtighten the locking connectors. Plug the power cord into an available wall outlet.
- Connect the 24V DC power supply to the 8x CAT6 Extender Sender unit and plug the power cord into an available wall outlet.
flowchart
graph TD
    A["Hi-Def Sources"] --> B["8x8 Matrix"]
    B --> C["8x8 Extended"]
    C --> D["8x8 Matrix for HDMI (not included)"]
    D --> E["Network"]
    E --> F["8x8 Extended"]
    F --> G["IR Extenders"]
    G --> H["RS-232 Controller"]
    H --> I["8x HD Displays & Receivers"]
    I --> J["EXT-HDMI1.3-CAT6-8X"]
    style A fill:#f9f,stroke:#333
    style B fill:#ccf,stroke:#333
    style C fill:#cfc,stroke:#333
    style D fill:#fcc,stroke:#333
    style E fill:#cff,stroke:#333
    style F fill:#ffc,stroke:#333
    style G fill:#cfc,stroke:#333
    style H fill:#fcc,stroke:#333
    style I fill:#ffc,stroke:#333
    style J fill:#fcc,stroke:#333
How to Operate the 8x CAT6 Extender for HDMI (using an 8x8 Matrix)
The front panel of each Receiver unit for the 8x CAT6 Extender for HDMI contains a set of LED indicators which corresponds to an input (source) on the 8x8 Matrix device. A blue LED indicates which input has been routed from the 8x8 Matrix. On the top of each Receiver unit there are a set of 8 push-buttons which are used to control the switching of the 8x8 Matrix.
Example 1: Routing Input (source) 3 to Output (display) 4.
- Connect an HDMI cable from HDMI Out 4 on the 8x8 Matrix to HDMI In 4 on the 8x CAT6 Extender for HDMI Sender unit.
- Connect an 8x CAT6 Extender Receiver unit to Display 4.
- Press button 3 on the top of the Receiver unit. Button 3 is shown below. The In 3 LED will turn bright blue, indicating that Input 3 on the 8x8 Matrix has been routed to Display 4 (Zone 4).

text_image
HDMI cable To Display 4 Button 3 CAT-6 from Out 4 on Extender Gefen 8x CAT6 Extender Receiver In 1 In 2 In 3 In 4 In 5 In 6 In 7 In 8 Power In 3Example: HDMI input 3 is routed to HDMI Out 4 (a sample of the 8x8 Matrix display panel is shown below). The image shown on Display 4 will be the HDMI source (3), on the 8x8 Matrix input connected to Output D.

text_image
OUTPUT: ABCDEFGH INPUT: 12335678 H DMI In 3How to Connect the 8x CAT6 Extender for HDMI with RS-232 control to the 8x8 Matrix for HDMI and to the controlled device
- Follow steps 1 - 6 on How to Connect the 8x CAT6 Extenderfor HDMI (see page 11).
- Connect an RS-232 cable from the RS-232 serial port on the controlling device to the RS-232 In port on the rear of the 8x CAT6 Extender for HDMI Sender unit.
- Connect another RS-232 serial cable from the RS-232 Out port on the rear of the 8x CAT Extender Sender unit to the RS-232 port on the rear of the 8x8 Matrix.
NOTE: Please refer to page 25 for details on configuring RS-232 control.
Example 1: Routing Input (source) 3 to O output (display) 1 using the 8x8 Matrix.
Make sure a Receiver unit is connected to CAT6 Out 1 on the Sender unit. Use the controlling device to send the following command:
r 1 3
The LED for In 3 will turn bright blue and the source from the 8x8 Matrix (In 3) will be displayed on the HDTV display connected to this Receiver unit. See page 25 for details on routing using RS-232.
How to Connect the 8x CAT6 Extender for HDMI (Stand-alone Mode)
The 8x CAT6 Extenderfor HDMI is dependent upon an external 8x8 Matrix to manage all the zone switching. When used as a stand-alone, without the 8x8 Matrix attached, the product functions as a one-to-one extender for each HDMI unit. Eight parallel extenders are used.
- Connect an HDMI cable from the source device to HDMI In 1 on the back of the Sender unit.
- Connect the Display to the 8x CAT6 Extender Receiver unit with a user-supplied HDMI cable.
- Using a single CAT-6 cable, connectCAT6 Out 1 on the Sender unit to the CAT6 In on the Receiver unit.
- If additional Receiver units will be used, complete these connections at this time, as described above.
- Connect the 5V DC locking power supplies to each Receiver unit. Do not overtighten the locking connectors. Plug the power cord into an available wall outlet.
- Connect the 24V DC power supply to the 8x CAT6 Extender for HDMI and plug the power cord into an available wall outlet.
Routing Sources using the Optional RMT-8IR Remote Unit (Matrix Mode)
There are a total of 8 buttons on the RMT-8IR remote, which represent each of the 8 buttons on the Receiver unit.
Example 1: Route the source connected to HDMI In 3 (from the 8x8 Matrix) on the Sender unit to the display connected to HDMI Out 2.
Point the Remote at the Receiver unit connected to Display 2, then press button 3 on the RMT-8IR.
Table of IR Remote Commands for the Optional RMT-8IR Remote Unit
| RMT-8 IR Button | Source |
| 1 | 1 |
| 2 | 2 |
| 3 | 3 |
| 4 | 4 |
| 5 | 5 |
| 6 | 6 |
| 7 | 7 |
| 8 | 8 |
The RMT-8IR remote control unit will allow the selection of any input (source) on the 8x8 Matrix unit can be will be routed to any of eight Receiver units. Use the information in the table above when routing the desired input to a display.
How to Operate the 8x CAT6 Extender for HDMI (Stand-alone Mode)
When the 8x CAT6 Extenderfor HDMI is used without an 8x8 Matrix, it can only be used as an HDMI extender.
The LED on the front panel will show which HDMI is active on the Sender unit.
Example: Connect a CAT-6 cable to CAT6 Out 7 and CAT6 In, between the Sender unit and Receiver unit.

text_image
HDMI cable To Display CAT-6 Out 7 from Extender Gefen 8x CAT6 Extender Receiver In 1 In 2 In 3 In 4 In 5 In 6 In 7 In 8 Power In 7How to Equalize the 8x CAT6 Extender for HDMI (Matrix Mode / Stand-alone Mode)
The 8x CAT6 Extenderfor HDMI Receiver unit has an equalization trimpot to compensate for variances that can be found in different CAT-6a cable brands. If there is no output video or if output video contains artifacts and/or video noise, use the steps below to adjust the EQ trimpot.

text_image
Gefen 8x CAT6 Extender Receiver in 1 EQ In 2 In 3 In 4 In 5 In 6 In 7 In 8 Power EQ trimpot- Insert a small flat-head screwdriver into the trimpot on the front panel of the Receiver unit.
- The ☑ trimpot can be set to one of eight different positions. Turn the trimpot clockwise until it clicks into the next position. Continue adjusting the trimpot until the signal shows best results.
Controlling the Receiver Unit using RS-232 (Matrix Mode)
- Prepare the Receiver unit by connecting an RS-232 cable from the computer or other controlling device to the RS-232 serial port on the back of the Receiver unit (see page 6 - 7).
- Configure the controller using the RS-232 settings on page 25.

text_image
RS-232 cable (from control device) HDMI cable (to Display 4) CAT-6 cable (from Output 4 onSender unit, Gefen 8x CAT6 Extender Receiver In 3 PowerExample 1: Route input 3 on the 8x8 Matrix to Output 4 on the 8x CAT6 Extender for HDMI.
Use the RS-232 controller to send the following command:
r3
The blue LED for In 3 will turn bright blue and the source from Input 4 on the 8x8 Matrix will be displayed. See page 25 for details on routing using RS-232.
DIP Switch Location (Matrix Mode / Stand-alone Mode)
On the bottom of each Receiver unit, there are four (4) DIP switches. Each DIP switch performs a different function.
Before modifying DIP switch settings, disconnect the power from the Receiver unit. After the DIP switches have been configured, reconnect the power.
Receiver Unit (bottom)

text_image
DIP Switch Bank ON SAB
text_image
ON OFF 1 2 3 4NOTE: By default, all DIP switches are in the OFF position
Default settings for DIP switches
| DIP Switch | Position |
| 1 | OFF |
| 2 | OFF |
| 3 | OFF |
| 4 | OFF |
DIP Switches
(Matrix Mode / Stand-alone Mode)
DIP 1 - EDID Management
• OFF - Local EDID
When Local EDID mode is used, the EDID will be assembled by copying all video and audio features of the connected device. Deep Color support will be manually controlled: If Deep Color is supported by the display(s) DIP 2 should be set to the ON position (see DIP 2 - Deep Color, below). By default, the unit is shipped with DIP 1 in the OFF position.
• ON - Pass-through EDID
Allows all video and audio features of the connected devices to be passed to the source device without control over Deep Color.
DIP 2 - Deep Color
• OFF - Disables Deep Color support
Disables Deep Color in the EDID. Deep Color management is only available when Local EDID is being used (DIP 1 = OFF).
• ON - Enables Deep Color support
Enables Deep Color support. In Pass-through EDID Mode, setting DIP 2 = ON has no effect since all EDID information is passed through.
DIP 3 / DIP 4 - IR Remote Channel
The IR channel assigned to the IR RemoteControl must match the IR channel assigned to the 8x CAT6 Extender for HDMI Receiver unit. The factory setting (default) for DIP 3 and DIP 4 are in the OFF position.
| DIP3 | DIP 4 IR | Channel |
| OFF | OFF | 1 |
| ON | OFF | 2 |
| OFF | ON | 3 |
| ON | ON | 4 |
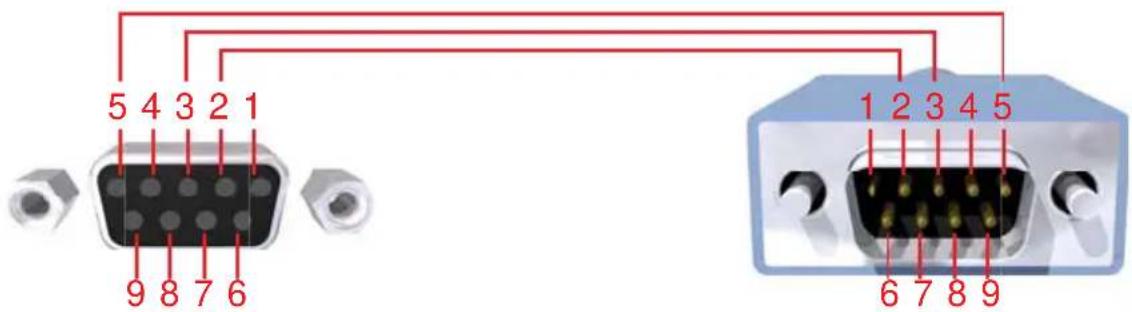
text_image
5 4 3 2 1 9 8 7 6 1 2 3 4 5 6 7 8 9Only Pins 2 (RX), 3 (TX), and 5 (Ground) are used on the RS-232 serial interface
Binary Table
| ASCII | Corresponding RMT-8IR Button | Binary |
| 1 | 1 | 0011 0001 |
| 2 | 2 | 0011 00 10 |
| 3 | 3 | 0011 00 11 |
| 4 | 4 | 0011 0 100 |
| 5 | 5 | 0011 0 101 |
| 6 | 6 | 0011 0 110 |
| 7 | 7 | 0011 0 11' |
| 8 | 8 | 0011 1000 |
RS-232 Settings
Bits per second 19200
Data bits 8
Parity None
Stop bits ....1
Flow Control None
Functions Syntax
The syntax for each function is always the same:
Character as the start flag → Function name → Space (_) as function name end flag → Parameter 1 → Space → Parameter n → Carriage Return (\r) →
Sample:
FunctionName_param1_param2_param3_param4...\r
Syntax is NOT case sensitive.
EDID Managemeni
| Function | Description |
| #EDIDD STOLO | Read downstr eam EDID and stores into a Local EDID |
| #LOEDIDTOLC | Load EDID file using serial port to one of the local memories |
| #PRLOEDID Print | s the Local EDID |
| #PRDSEDID | Read downstream EDID and sends to serial port |
#EDIDDSTOLO Function
The #EDIDDSTOLO function reads the downstream EDID and stores it to a Local EDID.
Syntax.
EDIDDSTOLO param1 param2 param3...param9
Parameters.
| param1 | A | downs[rea6] | displa |
| param2 - param9 | Input | list |
[1
No tes:
Set param2 to a value of zero (0) to store the downstream EDID in all eight HDMI inputs.
#LOEDIDTOLO Function
The #LOEDIDTOLO function loads the specified EDID file to a specified local input via RS -232.
Syntax.
LOEDIDTOLO param1 param2 param3
Parameters.
param 1
Input
[1
param2
EDID
size
| Value | Meaning |
| 1 | 128 byte EDID |
| 2 | 256 byte EDID |
#PRLOEDID Function
The #PRLOEDID function reads the local EDID of a specified input and spools it to the serial port.
Syntax.
PRLOEDID param1
Parameters
param1 Input
[1 - 8]
#PRDSEDID Function
The #PRDSEDID function reads the downstream EDID and sends it to the serial port.
Syntax.
PRDSEDID param1
Parameters.
param 1
A
downs[treash]
displa
IP Configuration - Sender Unit
| Function | Description |
| #SIPADD | Specifies a new IP address |
| #SNETMASK | Specifies a new net mask |
| #SGATEWAY | Specifies the new gateway |
| #SPORT | Specifies a new port |
| #PRWEBADD Displa ys IP configuration and release details | |
| #FADEFAULT | Reset Matrix to default settings |
#SIPADD Function
The #SIPADD function specifies a new IP address.
Syntax.
SIPADD param1 param2 param3 param4
Parameters.
| param 1 | IP | address | [0 | |
| param 2 | IP address | [0 - 255] | ||
| param 3 | IP | address | ||
| param4 | IP | address | [0 |
Notes:
A reboot is required after using this function.
#SNETMASK Function
The #SNETMASK function specifies a new net mask.
Syntax :
SNETMASK param1 param2 param3 param4
Parameters
| param1 | IP | address | [0 | |
| param2 | IP address | [0 - 255] | ||
| param3 | IP | address | ||
| param4 | IP | address | [0 |
Notes.
A reboot is required after using this function.
#SGATEWAY Function
Specifies the new IP gateway.
Syntax :
SGATEWAY param1 param2 param3 param4
Parameters
| param1 | Gateway address | [0 - 255] |
| param2 | Gateway | address |
| param3 | Gateway | address |
| param4 | Gateway address | [0 - 255] |
Notes.
A reboot is required after using this function.
#SPORT Function
Specifies a new port.
Syntax.
SPORT param1
Parameters.
param 1
Port
[0
Notes :
A reboot is required after using this function.
#PRWEBADD Function
Prints the current IP configuration on the screen.
Syntax.
PRWEBADD
Parameters :
None
#FADEFAULT Function
The #FADEFAULT function will erase all local memory EDID banks, reset default routing, and clear all IP settings.
Syntax.
FADEFAULT
Parameters
None
General Functions
| Function | Description |
| #ACTIVEBOLO | Enables the boot loader |
| #BLASTER | Sets the Receiver unit blaster mode |
| #BRIDGEM En | able direct communication with Matrix |
| #CTARGET | Set Matrix route command type |
| #HPDMODE | Set input HPDs |
| #LOCKPOWER To ggles the lock power state | |
| #MASKOUT Blanks selected outputs | |
| #REBOOT | Sets local and IP configurations to default settings |
| #RMTIRADD | Set the remote IR channel |
#ACTIVEBOLO Function
The #ACTIVEBOLO function enables the boot loader.
Syntax.
ACTIVEBOLO
Parameters:
None
Notes:
This command must be typed twice in order to activate the boot loader.
#BLASTER Function
The #BLASTER function sets the Receiver Unit blaster mode.
Syntax.
BLASTER param1 param2
Parameters.
param 1
Receiver
[1
param2
Mode
| Value | Meaning |
| 0 | Disable |
| 1 | Follow video |
| 2 | Individual routing |
#BRIDGEM Function
The #BRIDG EMfunction allows direct communication to the Matrix by disabling communication through the Sender Unit. When enabled, the Sender Unit “listens” to the data being received and waits for this function to be executed.
Syntax.
BRIDGEM param1
Parameters:
param 1
State
[0
1
| Value | Meaning |
| 0 | Disable |
| 1 | Enable |
#CTARGET Function
The #CTARGET function defines how to send routing commands to the Matrix.
Syntax.
CTARGET param1
Parameters.
param 1
Type
[0
2
| Value | Meaning |
| 0 | ‘1’ route input 1 to output 1‘2’ route input 2 to output 1‘3’ route input 3 to output 1‘4’ route input 4 to output 1‘5’ route input 1 to output 2‘6’ route input 2 to output 2‘7’ route input 3 to output 2‘8’ route input 4 to output 2‘9’ route input 1 to output 3‘A’ route input 2 to output 3‘B’ route input 3 to output 3‘C’ route input 4 to output 3‘D’ route input 1 to output 4‘E’ route input 2 to output 4‘F’ route input 3 to output 4‘G route input 4 to output 4 |
| 1 | XYX = Output (A - H)Y = Input (1 - 8) |
| 2 | rX YX = OutputY = Input |
#HPDMODE Function
The #HPDMODE function sets HPD to low (OFF) or high (ON) on the HDMI inputs.
Syntax.
HPDMODE param1 param2
Parameters.
param 1
Inputs
[1
param2
HPD
state
| Value | Meaning |
| 0 | HPD Off |
| 1 | HPD On |
No tes.
If param i is set to a value of zero (0), then all eight inputs are affected.
#LOCKPOWER Function
The #LOCKPOWER enables/disables the power lock state. Enabling this feature will store the 5 V status for each input prior to shutting the unit down. This preserves the 5 V state when the unit is restarted.
Syntax.
LOCKPOWER param1
Parameters :
param 1
State
[0
1]
| Value | Meaning |
| 0 | Disable Power Lock |
| 1 | Enable Power Lock |
#MASKOUT Function
The #MASKOUT function allows blanking of selected outputs.
Syntax.
MASKOUT param1 param2
Parameters :
param 1
Output
[1
8]
param2
Masking state [0 - 1]
| Value | Meaning |
| 0 | Unmask |
| 1 | Mask |
Notes.
The current masking state will be lost if the unit is rebooted or power is lost.
#REBOOT Function
The #REBOOT function performs a hardware reset on the Receiver Unit.
Syntax.
REBOOT param1 55
Parameters :
param 1
Receiver
[1
8]
Notes:
The number 55 must be appended to the end of the function.
Example: #reboot 2 55 reboots Receiver Unit 2.
#RMTIRADD Function
The #RMTIRADD function sets the IR channel for the Matrix.
Syntax.
RMTIRADD param1
Parameters
param1 IR channel [0 - 3]
| Value | Meaning |
| 0 | IR channel 1 |
| 1 | IR channel 2 |
| 2 | IR channel 3 |
| 3 | IR channel 4 |
Command Syntax
Simplified syntax was used for command implementation for faster operation with the device. The commands are not case-sensitive.
Commands
| Command | Description |
| F | +5 V for Fiber Optic Extender Status |
| M | Routes a single input to all outputs |
| R | Routing command |
| S | Route a single input to all outputs |
Fiber Optic Extender Status F0 Command
The F0 command returns the state of pin 18 on the HDMI inputs.
Syntax.
f
Parameters:
None
Notes :
"High" is returned if +5 V is present on HDMI input. "Low" is returned if +0 V is present on HDMI input. Setting param1 to a value of 0 will return the state of pin 18 of all HDMI inputs.
Using parameters with the F Command
Permits disabling / enabling of +5 V for Fiber Optic Extenders.
Syntax.
f param1 param2
Parameters:
param 1
HDMI input [1 - 8]
param 2
State
| Value | Meaning |
| 0 | Disable |
| 1 | Enable |
MCommand
The M command displays the current routing status of the matrix.
Syntax.
m
Parameters.
None
R Command
The R command allows specific routing of inputs and outputs when controlling the 8x CAT6 for HDMI Sender unit.
Syntax.
r param1 param2
Parameters :
param 1
HDMI Output [1 - 8]
param2
HDMI Input [1 - 8]
Example: r2 routes Input 2 on the 8x8 Matrix to the selected Receiver unit.
S Command
The S command routes a single input to all outputs.
Syntax.
s param1
Parameters.
param 1
HDMI Input [1 - 8]
No tes.
Example: r2 routes Input 2 on the 8x8 Matrix to the selected Receiver unit.
Functions Syntax
The syntax for each function is always the same:
Character as the start flag → Function name → Space ( _ ) as function name end flag → Parameter 1 → Space → Parameter n → Carriage Return ( \r ) →
Sample:
FunctionName_param1_param2_param3_param4...\r
Syntax is NOT case sensitive.
EDID Management - Receiver Unit
| Function | Description |
| #EDIDD STOLO | Read downstream EDID and stores into a Local EDID |
| #EDIDMODE | Set EDID mode |
| #LOEDIDTOLC | Load EDIDfile using serial port to one of the local memories |
| #PRLOEDID Print | s the Local EDID |
| #PRDSEDID | Read downstream EDID and sends to serial port |
#EDIDDSTOLO Function
The #EDIDDSTOLO function reads the downstream EDID and stores it to a Local EDID.
Syntax.
EDIDDSTOLO
Parameters
No ne
#EDIDMODE Function
The #EDIDMODE function sets the EDID mode.
Syntax.
EDIDMODE param1
Parameters.
param 1
EDID
Mode
[0
| Value | Meaning |
| 0 | Local |
| 1 | Pass through |
Notes.
This function only works after the hardware interface has been disabled. See page 44f or details.
#LOEDIDTOLO Function
The #LOEDIDTOLO function loads the specified EDID file to a specified local input via RS -232.
Syntax.
LOEDIDTOLO param1 param2 param3
Parameters.
param 1
Input
[1
param2
EDID
size
| Value | Meaning |
| 1 | 128 byte EDID |
| 2 | 256 byte EDID |
#PRLOEDID Function
The #PRLOEDID function reads the local EDID and spools it to the serial port.
Syntax.
PRLOEDID
Parameters
None
#PRDSEDID Function
The #PRDSEDID function reads the downstream EDID and sends it to the serial port.
Syntax.
PRDSEDID
Parameters
None
General Functions
| Function | Description |
| #ACTIVEBOLO | Enables the boot loader |
| #BLASTER | Sets the blaster mode |
| #DEEPCOLOR | Sets the deep color mode |
| #EQUIZE | Sets the equalizer level |
| #FADEFAULT | Reset to factory defaults |
| #HPDMODE | Set input HPDs |
| #MASKOUT Blanks selected outputs | |
| #RMTIRADD | Sets the Remote IR channel |
| #STATUS | Get system status |
| #USERIN | Enables the user interface |
#ACTIVEBOLO Function
The #ACTIVEBOLOf unction enables the boot loader.
Syntax:
ACTIVEBOLO
Parameters:
None
Notes.
This command must be typed twice in order to activate the boot loader.
#BLASTER Function
The #BLASTER function sets the Receiver Unit blaster mode.
Syntax.
BLASTER param1 param2
Parameters.
param 1
Receiver
[1
param2
Mode
| Value | Meaning |
| 0 | Disable |
| 1 | Follow video |
| 2 | Individual routing |
#DEEPCOLOR Function
The #DEEPCOLOR function sets 12-bit Deep Color mode.
Syntax.
DEEPCOLOR param1
Parameters.
param 1
Mode
[0
| Value | Meaning |
| 0 | Disable Deep Color |
| 1 | Enable Deep Color |
#EQUILIZE Function
The #EQUIZE function sets equalizer level on the Receiver Unit.
Syntax.
EQUILIZE param1
Parameters:
param 1
Equalizer
level
[0
Notes.
This function only works after the hardware interface has been disabled. See page 44 for details.
#FADEFAULT Function
The #FADEFAULT function will erase all local memory EDID banks, reset default routing, and clear all IP settings.
Syntax.
FADEFAULT
Parameters.
No ne
#HPDMODE Function
The #HPDMODE function sets HPD to low (OFF) or high (ON) on the HDMI inputs.
Syntax.
HPDMODE param1 param2
Parameters.
param 1
State
[0
4
| Value | Meaning |
| 0 | Follow sink |
| 1 | Toggle sink |
| 2 | Force low |
| 3 | Force high |
| 4 Force to | ggle |
#MASKOUT Function
The #MAS KO UT function allows blanking of selected outputs.
Syntax.
MASKOUT param1 param2
Parameters.
param 1
Output
[1
8]
param2
Masking state [0 - 1]
| Value | Meaning |
| 0 | Unmask |
| 1 | Mask |
No tes.
The current masking state will be lost if the unit is rebooted or power is lost.
#RMTIRADD Function
The #RMTIRADD function sets the IR channel for the Matrix.
Syntax.
RMTIRADD param1
Parameters :
param1 IR channel [0 - 3]
| Value | Meaning |
| 0 | IR channel 1 |
| 1 | IR channel 2 |
| 2 | IR channel 3 |
| 3 | IR channel 4 |
#STATUS Function
The #STATUS function gets the system status.
Syntax.
STATUS
Parameters.
None
#USERIN Function
The #USERIN function sets the user hardware interface.
Syntax.
USERIN param1 param2
Parameters
| param1 | Mode | [0 | - | 2 | |
| param2 | Inter | tace | [0 | - |
| Value (Mode) | Meaning |
| 0 | LEDs |
| 1 | IR detect |
| 2 | Switches |
| Value (Interface) | Meaning |
| 0 | Enable |
| 1 | Disable |
Command Syntax
Simplified syntax was used for command implementation for faster operation with the device. The commands are not case-sensitive.
Commands
| Command | Description |
| L | Routes the IR blaster |
| M | Routes a single input to all outputs |
| Ri | Routing command |
L Command
The L command routes the IR blaster.
Syntax.
1 param1
Parameters:
param 1 Input
[1 - 8]
M Command
The M command displays the current routing state.
Syntax.
m
Parameters:
None
R Command
The R command routes the Receiver Unit to a specific input.
Syntax.
r param1
Parameter is.
param 1
HDMI Input [1 - 8]
Example: r 4 routes the Receiver Unit to Input 4.
The Gefen 8x CAT6 Extenderfor HDMI supports IP-based control using an integrated Web interface. To access thistfeature, an IP address, subnet, gateway, and port number need to be set on the 8x CAT6 Extender for HDMI (Default IP: 192.168.0.70 Subnet: 255.255.255.0 Gateway: 192.168.0.1 Port: 80). Consult the network administrator to obtain the proper IP address and settings for this product to properly communicate on the network.
The IP control setting can be configured via the RS-232 control interface. Once this has been accomplished, access to the Web Interface is possible.
Simply type the IP address that was assigned to the product in a web browser to access the Web Interface. It should look like the image below.
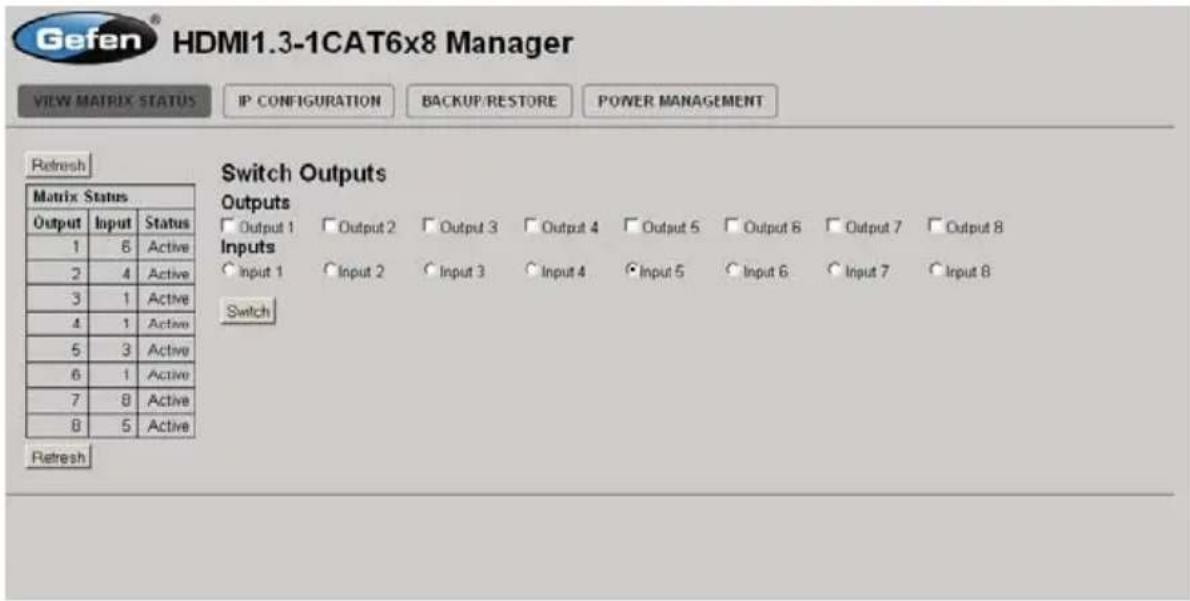
text_image
Gefen® HDMI1.3-1CAT6x8 Manager VIEW MATRIX STATUS IP CONFIGURATION BACKUP/RESTORE POWER MANAGEMENT Refresh Matrix Status Output Input Status 1 6 Active 2 4 Active 3 1 Active 4 1 Active 5 3 Active 6 1 Active 7 8 Active 8 5 Active Switch Outputs Outputs Output 1 Output 2 Output 3 Output 4 Output 5 Output 6 Output 7 Output 8 Inputs Input 1 Input 2 Input 3 Input 4 Input 5 Input 6 Input 7 Input 8 Switch RefreshVIEW MATRIX STATUS
The VIEW MATRIX STATUS page will display the current status and can also be used to create routes.
To create a new route, follow the steps below:
- Select which outputs will display the source by clicking on each check box.
- Select the radio button of the input that will be routed to each output.
- Click the Switch button to update the new routing configuration.
This page will automatically refresh every minute. However, at anytime the Refresh button can be pressed to refresh the status of the Matrix.
IP CONFIGURATION
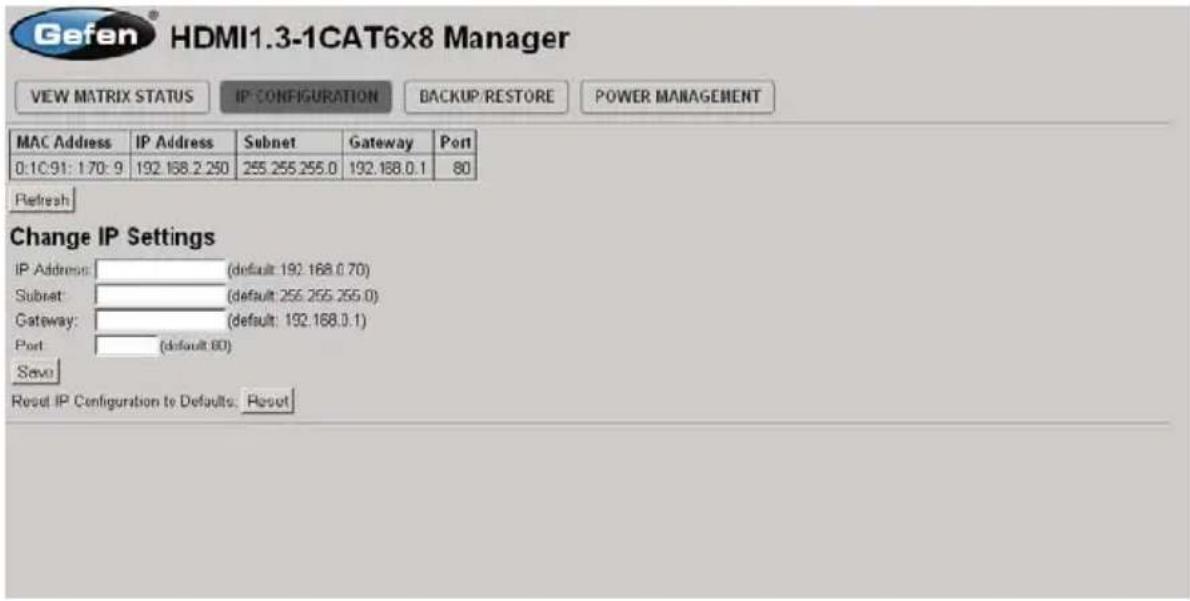
text_image
Gefen® HDMI1.3-1CAT6x8 Manager VIEW MATRIX STATUS IP CONFIGURATION BACKUP/RESTORE POWER MANAGEMENT MAC Address IP Address Subnet Gateway Port 0:10:91: 170:9 192.168.2.250 255.255.255.0 192.168.0.1 80 Refresh Change IP Settings IP Address: (default: 192.168.0.70) Subset: (default: 255.255.255.0) Gateway: (default: 192.168.0.1) Port (default: 60) Save Reset IP Configuration to Defaults: ResetThe IP CONFIGURATION page is used to set the IP settings that will be used to access the Web interface. The following items can be configured from this menu.
• IP Address(Default: 192.168.0.70)
- Subnet (Default: 255.255.255.0)
• Gateway (192.168.0.1)
- Port (Default: 80)
To change these settings follow the steps below.
- Enter the desired network in formation into the fields provided.
- Press the "Save" button to initiate the change(s).
Note: After this command is complete the VIEW MATRIX STATUS page will be displayed. Settings made on this page will not take effect until the unit is restarted: Disconnect power from the unit and reconnect power for changes to take effect.
At anytime, the Reset button can be pressed to return the IP settings to their defaults.
BACKUP / RESTORE
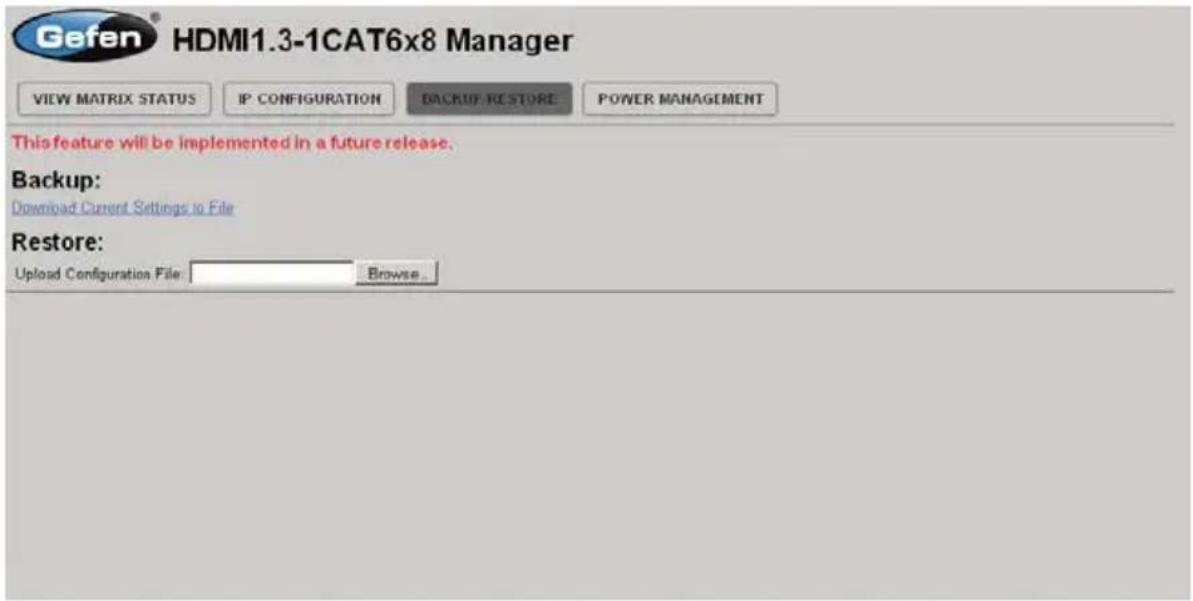
text_image
Gefen® HDMI1.3-1CAT6x8 Manager VIEW MATRIX STATUS IP CONFIGURATION BACKUP RESTORE POWER MANAGEMENT This feature will be implemented in a future release. Backup: Download Current Settings to File Restore: Upload Configuration File Browse...The Backup/Restore page is used to backup and restore complete setup configurations.
Note: This feature will be implemented in a future release.
POWER MANAGEMENT

text_image
Gefen HDMI1.3-1CAT6x8 Manager VIEW MATRIX STATUS IP CONFIGURATION BACKUP/RESTORE POWER MANAGEMENT Warning: Use caution when applying power to inputs. It may damage your equipment. Power Status - Lock State:OFF Input 1 2 3 4 5 6 7 8 Power 0v 0v 0v 0v 0v 0v 0v 0v Refresh 5V to Inputs Input 1 ○5v Off ○5v On Input 2 ○5v Off ○5v On Input 3 ○5v Off ○5v On Input 4 ○5v Off ○5v On Input 5 ○5v Off ○5v On Input 6 ○5v Off ○5v On Input 7 ○5v Off ○5v On Input 8 ○5v Off ○5v On Update Power Lock State Update Power Lock State ○ Off ○ OnThe POWER MANAGEMENT page is used to set optional +5V power on an input to power specific optional devices. The current status of this feature for each input can be viewed on this page. To set this feature for each input follow the steps below.
- Select the +5V option, either "On" or "Off" for each desired input.
- Click on the "Update" button to initiate the change(s).
Note: After this command is complete the VIEW MATRIX STATUS page will be displayed.
This page will automatically refresh every minute, however, at anytime the "Refresh" button can be pressed to refresh the status of the matrix.
natural_image
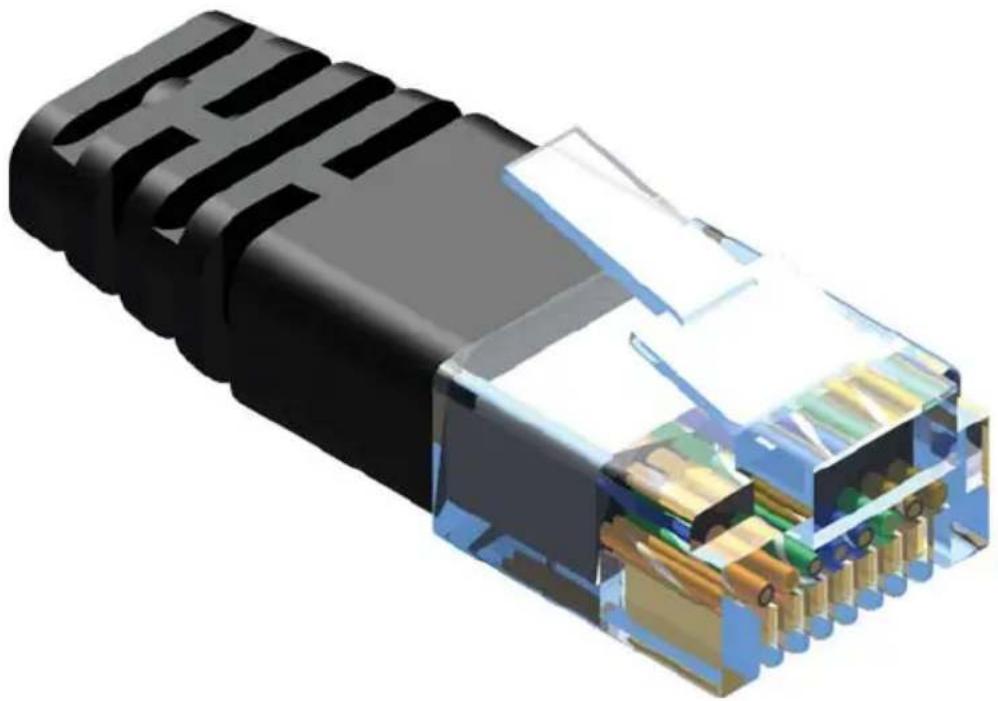
3D cutaway illustration of a black USB connector showing internal structure and terminal connections (no text or symbols)Gefen recommends the TIA/EIA-568-B wiring option. Please adhere to the table below when field-terminating the CAT-6 cabletor use with Gefen products.
| Pin Color | |
| 1 | Orange / White |
| 2 | Orange |
| 3 | Green / White |
| 4 | Blue |
| 5 | Blue/ White |
| 6 | Green |
| 7 | Brown / White |
| 8 | Brown |
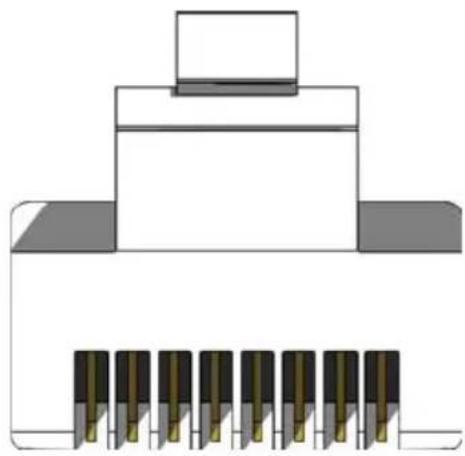
natural_image
Pure electrical connector diagram without any text, numbers, or symbolsCAT-6 cabling comes in stranded and solid core types. Geten recommends using solid core cabling.
It is recommended to use one continuous run from one end to the other. Connecting through a patch is not recommended.
Firmware Update Procedure
To begin the update procedure, the unit's Boot Loader must be activated. To activate the Boot Loader, follow the procedure outlined below:
- Connect an RS-232 cable from the computer to the RS-232 port on the 8x CAT6 Extender for HDMI.
- Run the terminal emulation program (e.g. Windows® Hyperterminal) and make sure the terminal settings are as follows
a. Baud rate = 1 9200
b. Stop bits = 1
c. Data bits = 8
d. Flow control = None
-
Power the sender unit.
-
Type the command: #ACTIVEBOLO\r
-
Re-type the command: #AC TIVEBOLO\r
-
Once the Boot Loader is activated, a message similar to the following should appear in the terminal program
8x HDMI CAT-6 Extender Boot Loading
Download new program ---- 1
Cancel 2
- Press [1] on the computer key board to begin downloading the program to temporary memory.
Waiting for the file to be sent ... (press 'a' to abort)
-
Under Transfer, select "Send" and upload the firmware file (e.g. CHDMIDCAT6x8_e_x_x.bin).
-
Repeat steps 4 - 7.
-
Under Transfer, select "Send" and upload the firmware file (e.g. SHDMIDCAT6x8_e_x_x.bin).
-
Connect the RS-232 cable to the Receiver unit.
- Repeat steps 4 - 7 and upload RHDMIDCAT6x8_e_x_x.bin.
- Repeat step 11 - 13 for each Receiver unit.
Video Amplifier Bandwidth 225 MHz
Input Video Signal....1.2 V p-p
Input DDC Signal....5V p-p (TTL)
Maximum Video Resolution....1080p/1920x1200
HDMI Connector.....Type A 19-pin
Link Connector....RJ-45 Shielded
Power Indicator (Sender / Receiver)......LED (red)
Source Indicators (Receiver)......LED (blue)
RS-232 Interface (Sender)....1x DB9 serial (F), 1x DB9 serial (M)
RS-232 Interface (Receiver)....1x DB9 serial (M)
Power Supply....24V DC (Sender), 5V DC (Receiver)
Power Consumption (Sender)....60 W(max.)
Power Consumption (Receiver)....10 W (max.)
Operating Temperature 0 - 40°C
Sender Dimensions....17.1" W x 3.5" H x 4.5" D
Receiver Dimensions....7.5" W x 1.3" H x 3.5" D
Shipping Weight....16 lbs
Certifications......UL (power supply), RoHS, CE
Gefen warrants the equipment it manufactures to be free from defects in material and workmanship.
It equipment fails because of such defects and Gefen is notified within two (2) years from the date of shipment, Gefen will, at its option, repair or replace the equipment, provided that the equipment has not been subjected to mechanical, electrical, or other abuse or modifications. Equipment that fails under conditions other than those covered will be repaired at the current price of parts and labor in effect at the time of repair. Such repairs are warranted for ninety (90) days from the day of reshipment to the Buyer.
This warranty is in lieu of all other warranties expressed or implied, including without limitation, any implied warranty or merchantability or fitness for any particular purpose, all of which are expressly disclaimed.
- Proof of sale may be required in order to claim warranty.
- Customers outside the US are responsible for shipping charges to and from Gefen.
- Copper cables are limited to a 30 day warranty and cables must be in their original condition.
The information in this manual has been carefully checked and is believed to be accurate. However, Gefen assumes no responsibility for any inaccuracies that may be contained in this manual. In no event will Gefen be liable for direct, indirect, special, incidental, or consequential damages resulting from any defect or omission in this manual, even if advised of the possibility of such damages. The technical information contained herein regarding the features and specifications is subject to change without notice.
For the latest warranty coverage information, please visit Gefen's Warranty web page at http://www.gefen.com/kvm/aboutus/warranty.jsp
PRODUCT REGISTRATION
Please register your product online byvisiting Gefen's web site at http://www.gefen.com/kvm/Registry/Registration.jsp
lwIP is licenced under the BSD licence:
Copyright (c) 2001-2004 Swedish Institute of Computer Science.
All rights reserved.
Redistribution and use in source and binary forms, with or without modification, are permitted provided that the following conditions are met:
- Redistributions of source code must retain the above copyright notice, this list of conditions and the following disclaimer.
- Redistributions in binary form must reproduce the above copyright notice, this list of conditions and the following disclaimer in the documentation and/or other materials provided with the distribution.
- The name of the author may not be used to endorse or promote products derived from this software without specific prior written permission.
THIS SOFTWARE IS PROVIDED BY THE AUTH OR ``AS IS'' AND ANY EXPRESS OR IMPLIED WARRANTIES, INCLUDING, BUT NOT LIMITED TO, THE IMPLIED WARRANTIES OF MERCHANTABILITY AND FITNESS FOR A PARTICULAR PURPOSE ARE DISCLAIMED. IN NO EVENT SHALL THE AUTHOR BE LIABLE FOR ANY DIRECT, INDIRECT, INCIDENTAL, SPECIAL, EXEMPLARY, OR CONSEQUENTIAL DAMAGES (INCLUDING, BUT NOT LIMITED TO, PROCUREMENT OF SUBSTITUTE GOODS OR SERVICES; LOSS OF USE, DATA, OR PROFITS; OR BUSINESS INTERRUPTION) HOWEVER CAUSED AND ON ANY THEORY OF LIABILITY, WHETHER IN CONTRACT, STRICT LIABILITY, OR TORT (INCLUDING NEGLIGENCE OR OTHERWISE) ARISING IN ANY WAYOUT OF THE USE OF THIS SOFTWARE, EVEN IF ADVISED OF THE POSSIBILITY OF SUCH DAMAGE.

text_image
* M A - H D M I 1. 3 - C A T 6 - 8 X *Rev B5
20600 Nordhoff St., Chatsworth CA 91311
1-800-545-6900 818-772-9100 fax: 818-772-9120
www.gefen.com support@gefen.com