32493 - Câble Lindy - Free user manual and instructions
Find the device manual for free 32493 Lindy in PDF.

User questions about 32493 Lindy
0 question about this device. Answer the ones you know or ask your own.
Ask a new question about this device
Download the instructions for your Câble in PDF format for free! Find your manual 32493 - Lindy and take your electronic device back in hand. On this page are published all the documents necessary for the use of your device. 32493 by Lindy.
USER MANUAL 32493 Lindy
This Equipment has been tested and found to comply with the limits for a Class A digital device, pursuant to part 15 of the FCC Rules. These limits are designed to provide reasonable protection against harmful interference when the equipment is operated in a commercial environment. This equipment generates, uses, and can radiate radio frequency energy and, if not installed and used in accordance with the instruction manual, may cause harmful interference to radio communications. Operation of this equipment in a residential area is likely to cause harmful interference in which case the user will be required to correct the interference at his own expense.
This device complies with Part 15 of the FCC Rules. Operation is subject to the following two conditions: (1) this device may not cause harmful interference, and (2) this device must accept any interference received; including interference that may cause undesired operation.
CE Mark Warning

This equipment complies with the requirements relating to electromagnetic compatibility, EN 55022 Class A for ITE, the essential protection requirement of Council Directive 89/336/EEC on the approximation of the laws of the Member States relating to electromagnetic compatibility.
Company has an on-going policy of upgrading its products and it may be possible that information in this document is not up-to-date. Please check with your local distributors for the latest information. No part of this document can be copied or reproduced in any form without written consent from the company.
Trademarks:
All trade names and trademarks are the properties of their respective companies. Copyright © 2005, All Rights Reserved.
TABLE OF CONTENTS
OVERVIEW 5
UNPACKING INFORMATION ....5
INTRODUCTION TO THE GIGABIT SOHO NAS....6
Key Features....7
Front Panel 8
Power Button 8
LEDs Definition 8
Rear Panel....9
Reset to Default Button....9
LAN Port....9
Power Adapter Socket....9
INSTALLATION GUIDE ...... 10
HARDWARE INSTALLATION....10
Install a Hard Disk Drive for the Device....10
Connect this device to your Local Area Network (LAN)....12
Connect this device to your USB devices.... 12
Power on the device 13
SOFTWARE INSTALLATION....14
Installing the PNMD 14
Installing the EZIP Backup....16
MAKING CONNECTION WITH THE DEVICE....18
Before You Start....18
IP Protocol Setup....18
Windows 98/Me:....19
Windows 2000: 21
Windows XP: 23
Connecting the device with PNMD 25
To access to folders in the device....29
MANAGEMENT GUIDE...... 31
STARTING THE GRAPHIC USER INTERFACE (GUI)....31
USING THE GRAPHIC USER INTERFACE (GUI) 33
Understanding the GUI 33
Management items list.... 34
STATUS....35
Items.... 35
Information....35
Disk 36
Folder- Folder Configuration.... 36
To Configure Folder Properties....36
To Add a New Folder....40
To Delete a Folder 41
Disk-HD Configuration 42
NETWORK......44
Host- Host Name Setting 44
IP Address- IP address Setting 44
To Enable DHCP Client ....44
To Configure the IP Addresses for the Device 45
Jumbo Mode 45
SYSTEM......46
Administrator- Superuser Password Setting 46
Time- System Time Setting 47
User- User Configuration 48
To Configure a User....48
To Add a New User....49
To delete a user....50
Group- Group Configuration 51
To add a new group....51
To delete a group 52
To configure a group....53
OPTION....54
FTP- FTP Configuration 54
Security IP- IP Filter Setting 55
Security MAC- MAC Filter Setting....56
File Download- File Download Configuration 57
MAINTENANCE....58
Upload/ Download Configuration 58
Backup the Device Configuration Status: 58
Reload the Device Configuration Status: 59
Firmware Upgrade 59
Restart the System....59
Reset to Factory Default....60
Character Set & UPNP & Printer 60
WEB SERVER....61
Web Server 61
Administration WEB 61
Web Server Configuration 61
USB 62
Detail 62
Disk Setup....62
USB Storage information 62
To Format Your USB Storage device 63
Mount/ Dismount Your USB Storage to the Device....63
Printer Setup....64
Procedures to setup the printer....64
Clean Printer Job Queue 67
APPENDIX......68
USING EZIP BACKUP TO BACK UP YOUR FILES....68
TROUBLE SHOOTING....70
PRODUCT SPECIFICATION....72
Overview
Thank you for purchasing the product. Read this chapter to know about your Gigabit SOHO NAS.
Unpacking information
Before getting started, please verify that your package includes the following items:
-
One Gigabit SOHO NAS (Hard Disk not Included)
-
One Power adapter and one AC power cable.
-
One Quick Installation Guide
-
One utility/ Manual CD
-
HD Fastening screw x 4
Introduction to the Gigabit SOHO NAS
Easily back-up your data and share them, this Gigabit SOHO NAS is a compact, economical NAS (Network Attached Storage), providing an excellent data storage and sharing solution for your small business, SOHO (Small Office or Home Office) or personal requirement
The device embeds FTP server Web Server and Printer server. The FTP server allows users to backup and share files with FTP client. The Web server provides an easy way to share files by web site. The embedded printer server also brings you terrific convenience on sharing your printer.
User-friendly and high compatibility, The device equips 2* USB ports for your USB storage devices and USB interface printer. With connection to USB storage, the device shares your data in a more flexible way. The device is compatible with Windows95/ 98/ 98SE/ ME/ XP/ 2000/NT4.0. The setup procedures and management interface are simple and user-friendly.

flowchart
graph TD
    A["Internet"] --> B["ADSL/Cable Modem"]
    B --> C["IP Sharing Router/Switch"]
    C --> D["USB Storage"]
    C --> E["USB Printer"]
    C --> F["Wireless Access Point"]
    C --> G["Computer"]
    C --> H["Computer"]
    C --> I["Computer"]
Key Features
| Supports CIFS/SMB for Microsoft Network which allow remote users to retrieve files easily using "My Neighborhood" | Supports USB memory stick (pen drive), USB Hard Disk |
| WEB-based User Interface (UI) for easy configuration | Embeds USB printer server |
| Supports ATA/ATAPI-6 HD | Supports user name & password for 50 sets. |
| Supports all 3.5" IDE HD up to 400GB with EXT3 file format. | Supports access management for 100 folders |
| Built-in Samba server | Provides PNMD for user-friendly setup. |
| Embeds FTP server for FTP clients to transfer files conveniently. | Supports static IP & DHCP client network environment. |
| Embeds Web server for Web site construction. | Supports Unicode for multiple-language characters. |
| Supports Reading/writing for connected USB storage with EXT3, FAT32 file format. | Compatible with Windows 95 /98 /98SE /ME /XP /2000 /NT4.0/Linux/MAC OS |
| Support firmware update over the Graphic User Interface (GUI) | Supports group access management. |
| Supports five currently connected Samba users and five currently connected FTP users. (It can be extended to 32 if the HD is formatted with enabling SWAP, please see HD Format) | Auto-detection for newly installed USB Storage |
| Provides Password security for management & HD Access | Complies with FCC, CE, and VCCI Class A certification. |
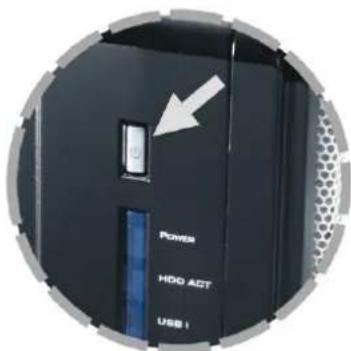
Front Panel
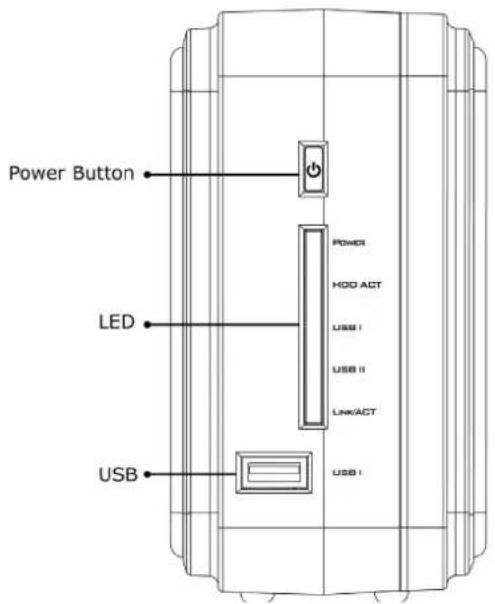
text_image
Power Button LED USB Power HDD ACT USB I USB II LINKACT USB IPower Button
To activate the device, press this Power button for 2 seconds after connecting the device to an appropriate power outlet with the provided power cord.
To power off, press the button for two seconds until Power LED starts to blink.
LEDs Definition
| LED Status | |||
| Power | Steady Green Power onBlinking Green System starting\ closingOff | Power | off |
| HDD ACT Blinking Amber Data transmitting(IDE Interface) | |||
| Link/ACT Green Valid connection on LAN port at 1000Mbps | |||
Rear Panel
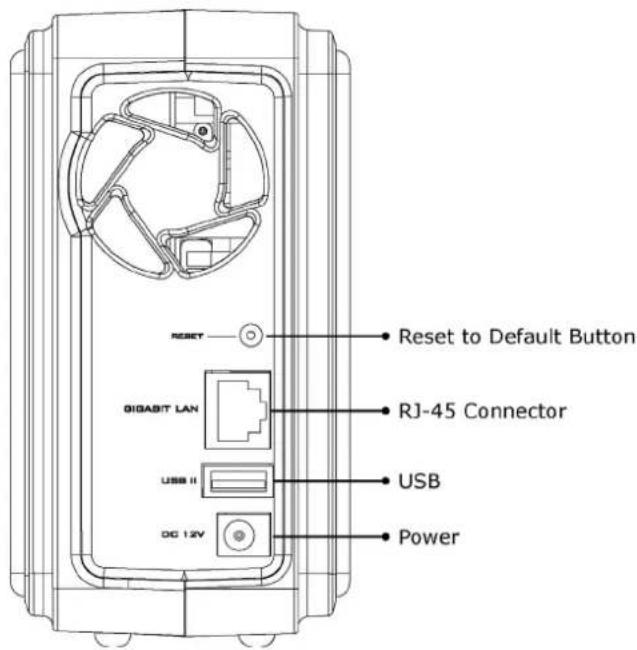
text_image
RESET Reset to Default Button DIGABIT LAN RJ-45 Connector USB USB II DC 12V PowerReset to Default Button
Press and hold the Reset Default Button for 4 seconds to reset all configurations to factory default settings.
Note:
- All configurations that are done by users will be removed from the device.
- The device also supports restoring factory default settings by software. To get instruction restoring factory default parameters, see" Reset to Factory Default"
LAN Port
Connect the port with RJ-45 cable to your switch or IP sharing router.
Note:
To get instruction connecting the device to your LAN, refer to "Making Connection with the Device".
Power Adapter Socket
The socket for connecting the power adapter
Installation Guide
Hardware Installation
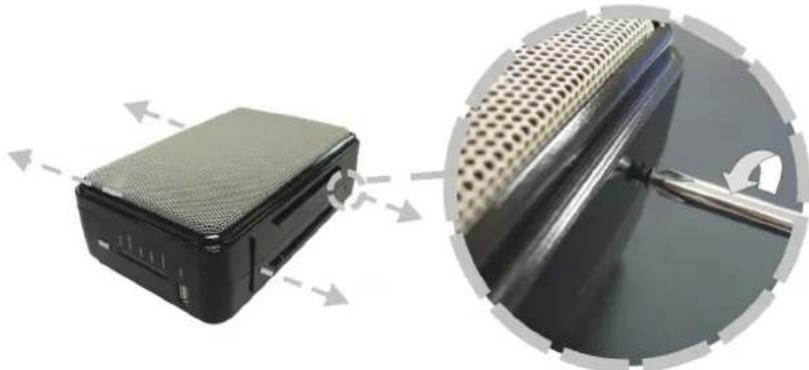
Install a Hard Disk Drive for the Device
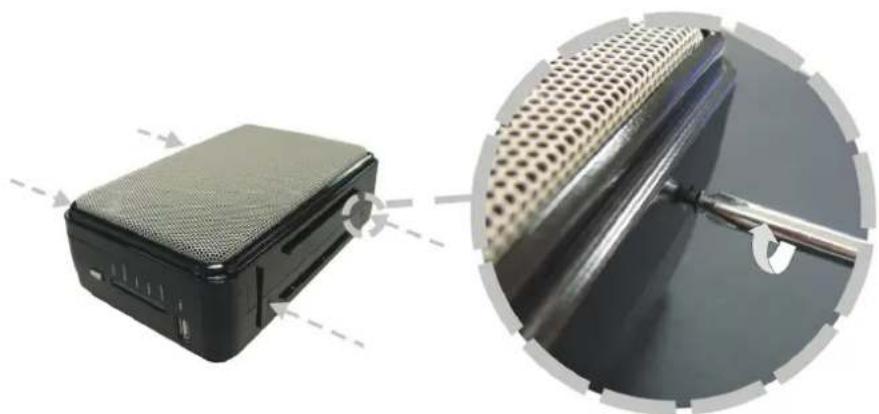
- Lie the device down as the following picture. Please make sure that the device is oriented correctly.

natural_image
Two electronic devices with visible ports and a close-up inset showing internal structure (no text or symbols)- Unscrew the screws on both the top and bottom side of the device.
natural_image
Close-up of a black electronic device with mesh insulation and a close-up view of its internal structure (no text or symbols visible)- Remove the top case from the bottom evenly.

natural_image
Cross-sectional diagram of a device showing internal components and directional arrows (no text or symbols)- Please make sure that the HD jumper should be located for Master operation mode.
Note: The jumper locations differ from each HD; for the correct Jumper settings, please refer to the instruction that came with your Hard Disk.
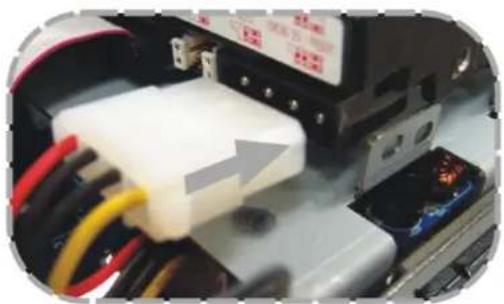
- Insert the IDE connector into the IDE socket on the Hard Drive. Make sure the pin 1 on the cable is connected to pin 1 on the HD socket. Pin 1 is the red or pink strip on the edge of an IDE cable. The IDE cable connector is designed to fit the shape of most HD connectors in one way.
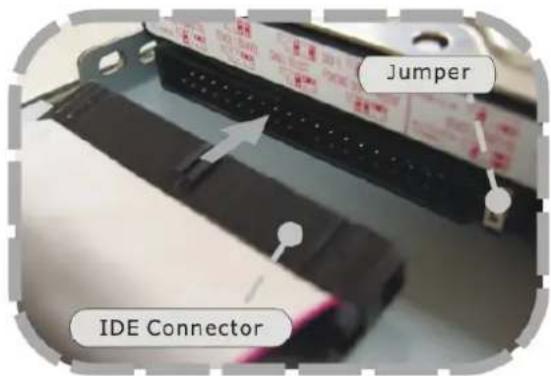
text_image
Jumper IDE Connector- Insert the power connector into the power socket of your hard disk. The power cable is designed to go in one way, please check the shape for correct installation.
natural_image
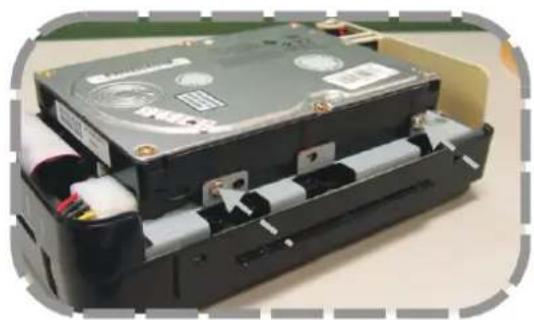
Close-up of electronic equipment with visible wiring and a white plastic component, no text or symbols present.- Secure your hard disk with the included screws in the package.
natural_image
Exterior view of a black hard drive with visible internal components and connectors (no text or symbols)- Place the top cover back on to the device and screw the cover on.
natural_image
Close-up of a black electronic device with mesh grille and a close-up view of its internal structure (no text or symbols visible)Connect this device to your Local Area Network (LAN)
-
Connect one end of a RJ-45 cable to the LAN port on the device.
-
Connect the other end of the cable to your IP sharing router or switch

natural_image
Two photos showing a network switch with yellow cables inserted into the internal socket and connected to a network interface (no text or symbols visible)Connect this device to your USB devices
The device equips two USB ports that allow users to connect the device to a USB storage device and a USB printer.
- Find the USB cable that came with your USB storage or USB printer. Insert the USB Type A end of the cable to the device, the other end to your USB storage or USB Printer.
Note: The Type A end of the USB cable is usually the end that connects to your computer.

flowchart
graph TD
    A["USB Storage"] --> B["USB Printer"]
    C["Image 1"] --> D["USB Storage"]
    E["Image 2"] --> F["USB Printer"]
- Insert the other end to your USB storage or USB printer.
Power on the device
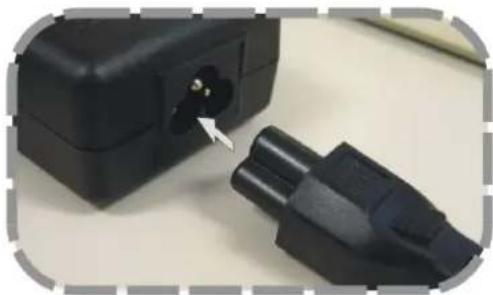
- Connect the included power cord with the power adapter
natural_image
Close-up of a black electrical plug with a small connector, showing a pin and cable attachment (no text or symbols visible)- Connect the connector end to the device and the plug to an outlet.

natural_image
Close-up of a black audio jack connected to a white electrical outlet socket, with a close-up view showing the plug inserted (no text or symbols visible)- Push the power button to power on.
text_image
POWER HDD ACT USB 1Installing the PNMD
This PNMD program helps users to get accessed to those NAS in your LAN. Please follow the instructions to install the software.
- Insert the CD-Rom that came with this product to your CD-Rom drive. The main menu pops up automatically. Click the "Install PNMD" button to start installation.

text_image
Install Menu Install EZIP Backup Install PNMD ExitNote: If the auto-run program is not activated, please click on "My Computer"→ your CD-Rom Drive then click the InstallMenu icon to start the main menu.
- Click "Next" on the welcome window.
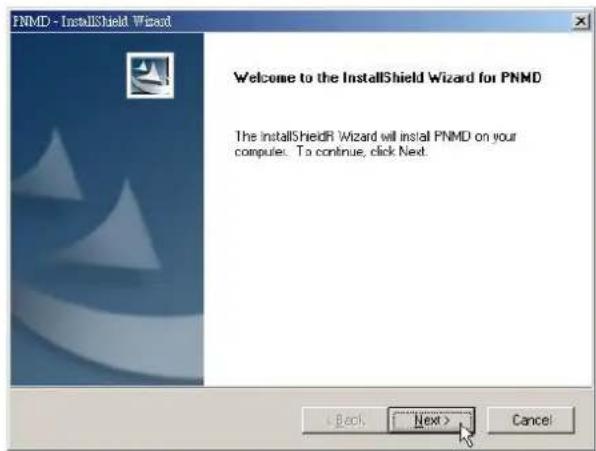
text_image
PNMD - InstallShield Wizard Welcome to the InstallShield Wizard for PNMD The InstallShield Wizard will install PNMD on your computer. To continue, click Next.- Fill your User Name and Company name in their respective blanks.
Select if you want this software to be used by anyone who uses this computer or yourself only. Click Next to proceed.
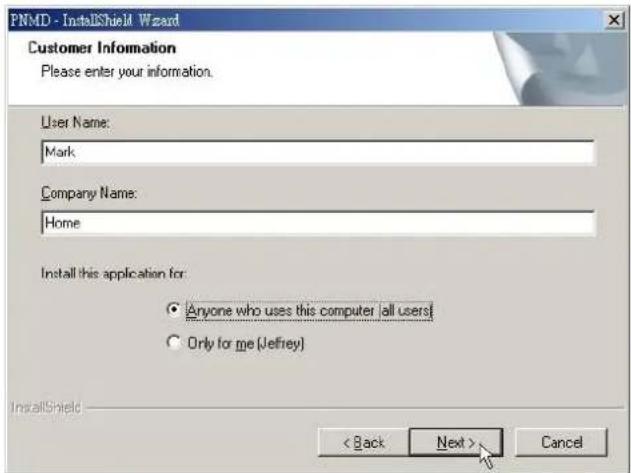
text_image
PNMD - InstallShield Wizard Customer Information Please enter your information. User Name: Mark Company Name: Home Install this application for: Anyone who uses this computer all users Only for me (Jeffrey) InstallShield < Back Next > Cancel- Choose the destination folder for this software and click "Next" to start installation. You may click Browse to change the location.

text_image
PNMD - InstallShield Wizard Choose Destination Location Select folder where setup will install files. Setup will install PNMD in the following folder. To install to this folder, click Next. To install to a different folder, click Browse and select another folder. Destination Folder C:\Program Files\NAS Utility\PNMD\ Browse... InstallShield < Back Next > Cancel- Click "Finish" to complete the software installation.
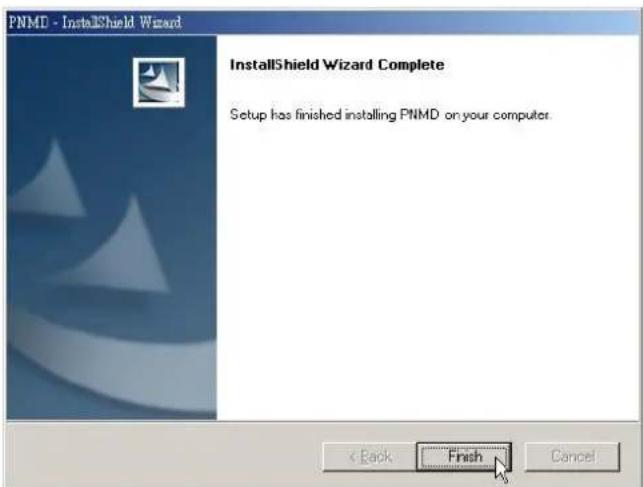
text_image
PNMD - InstallShield Wizard InstallShield Wizard Complete Setup has finished installing PNMD on your computer. < Back Finish Cancel- After successful installation, the shortcut shows on your windows desktop.

Note: For instructions using the software, please refer to chapter "Making Connection with the Device".
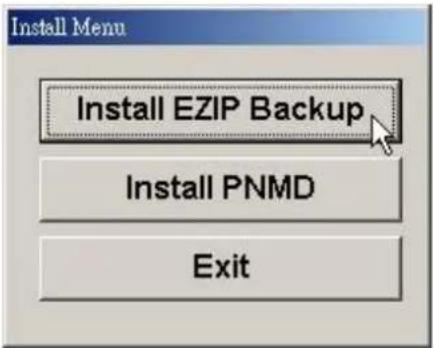
Installing the EZIP Backup
This EZIP Backup helps users to backup files on your computer to NAS. Please follow the instructions below to install the software.
- Insert the CD-Rom that came with this product to your CD-Rom drive. The main menu pops up automatically. Click the "Install EZIP Backup" button to start installation.
text_image
Install Menu Install EZIP Backup Install PNMD ExitNote: If the auto-run program is not activated, please click on "My Computer"→ your CD-Rom Drive then click the InstallMenu icon to start the main menu.
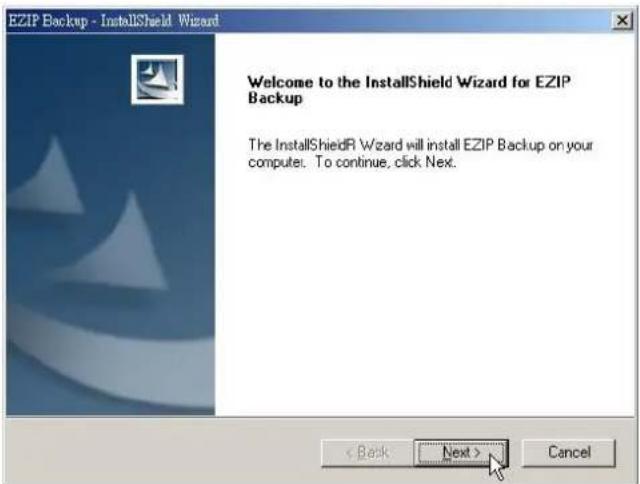
- Click "Next" on the welcome window.
text_image
EZIP Backup - InstallShield Wizard Welcome to the InstallShield Wizard for EZIP Backup The InstallShield® Wizard will install EZIP Backup on your computer. To continue, click Next. < Back Next > Cancel- Fill your User Name and Company name in their respective blanks.
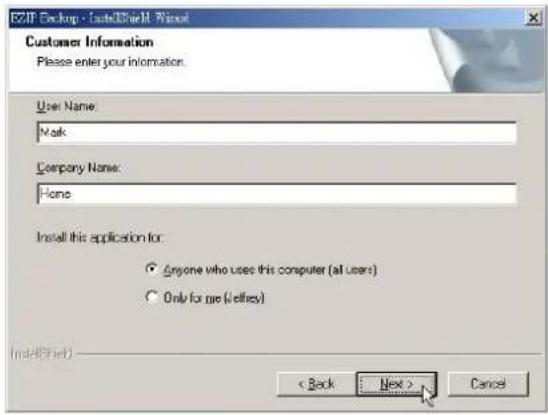
Select if you want this software to be used by anyone who uses this computer or yourself only. Click Next to proceed.
text_image
E2IP Backup - InstallShield Wizard Customer Information Please enter your information. User Name: Mark Company Name: Home Install this application for: ● Anyone who uses this computer (all users) ○ Only for me (Jeffrey) < Back Next > Cancel- Choose the destination folder for this software and click "Next" to start installation. You may click Browse to change the location.
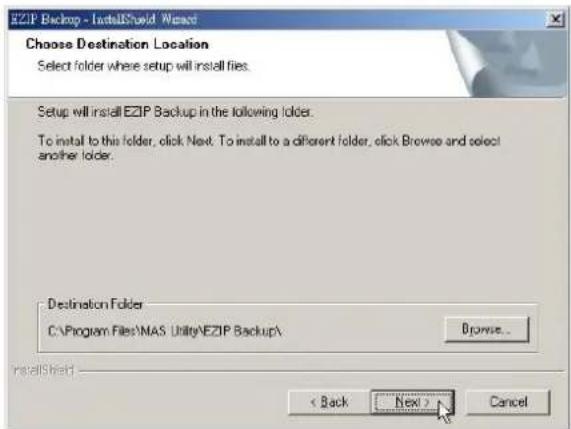
text_image
EZIP Backup - InstallShield Wizard Choose Destination Location Select folder where setup will install files. Setup will install EZIP Backup in the following folder. To install to this folder, click Next. To install to a different folder, click Browse and select another folder. Destination Folder C:\Program Files\MAS Utility\EZIP Backup\ Browse... InstallShield < Back Next > Cancel- Click "Finish" to complete the software installation.
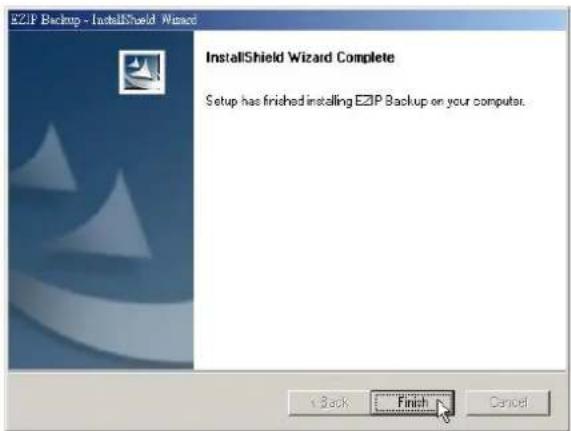
text_image
E2IP Backup - InstallShield Wizard InstallShield Wizard Complete Setup has finished installing E2IP Backup on your computer. < Back Finish Cancel- After successful installation, the desktop.

shortcut shows on your windows
Note: For instructions using the software, please refer to chapter " Using EZIP
Backup to backup your files" in Appendix.
Making Connection with the Device
Before You Start
IP Protocol Setup
Configuring the network protocols
For users to launch the device easily, we provide the convenient PNMD software, which detects this device automatically in your LAN.
To function the PNMD correctly, please make sure that your PC DOES NOT obtain IP address automatically or the PNMD will not be able to initialize the setup procedure according to your network settings.
Note: If you have accessed the device and enabled the DHCP function for the device. You are allowed to use the PNMD without specifying static IP address for your computer. Please note that you should connect your PC and the device to a router with DHCP server.
The following chapter indicates how to configure an IP address for your PC. Users that have had a specified IP, please skip this chapter to "Connect the device with PNMD" to proceed.
How to configure the TCP/IP network protocol of your PC
Before the following IP protocol settings, you have to get an IP address in advance. If you don't have any IP address or you are not going to access the device via our PNMD, please choose an IP between 192.168.1.2\~255 as your IP address. Please DO NOT choose 192.168.1.1 for the IP address (192.168.1.1) has been set as the default IP for this device.
Note:
- The default network setting of the device:
IP address: 192.168.1.1
Subnet Mask: 255.255.255.0
DHCP Client: Disabled
- In the following TCP/IP configuration guide, the IP address "192.168.1.2" is assumed to be your IP address.
How to configure the TCP/IP network protocol
Windows 98/Me:
- Click on Start→ Settings→ Control Panel→ Network.
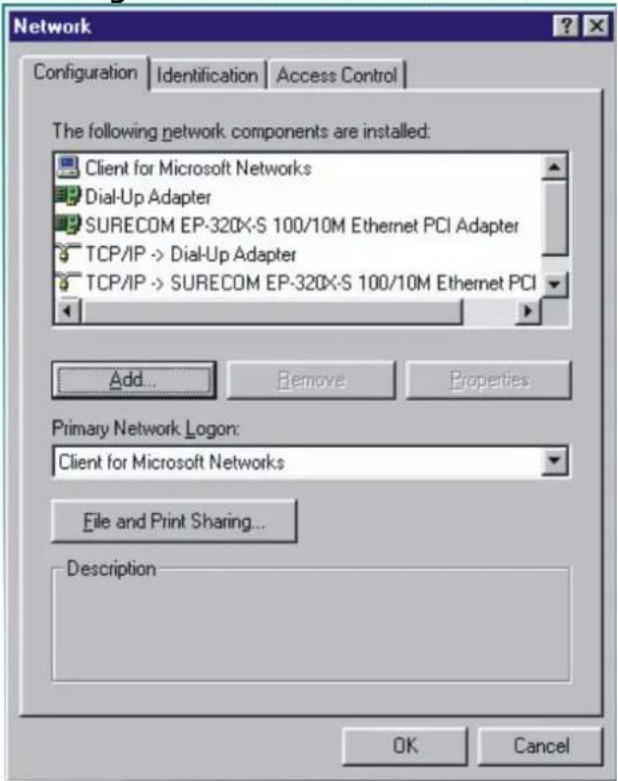
text_image
Network Configuration Identification Access Control The following network components are installed: Client for Microsoft Networks Dial-Up Adapter SURECOM EP-320X-S 100/10M Ethernet PCI Adapter TCP/IP -> Dial-Up Adapter TCP/IP -> SURECOM EP-320X-S 100/10M Ethernet PCI Add... Remove Properties Primary Network Logon: Client for Microsoft Networks File and Print Sharing... Description OK Cancel- Click "TCP/IP → (Your Ethernet Adaptor)" then click the "Properties" button.
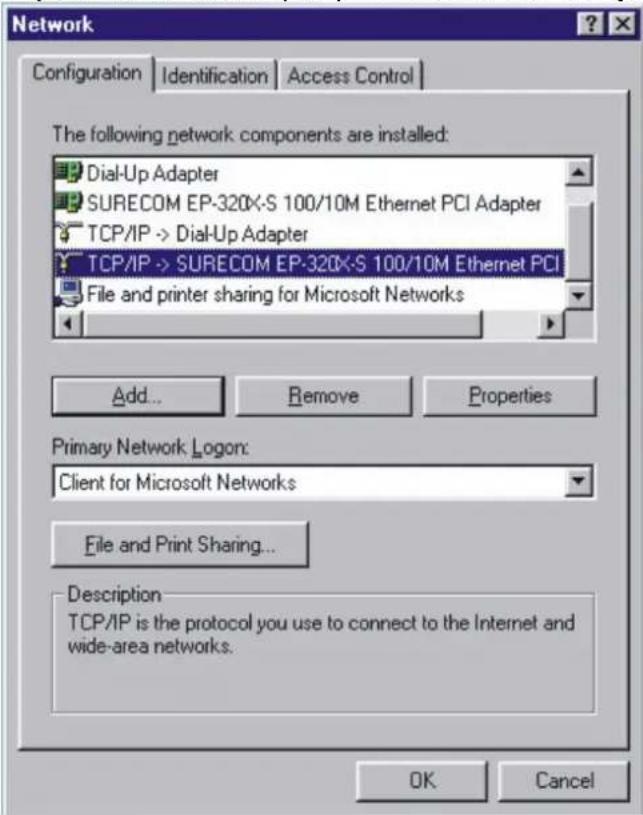
text_image
Network Configuration | Identification | Access Control | The following network components are installed: Dial-Up Adapter SURECOM EP-320X-S 100/10M Ethernet PCI Adapter TCP/IP -> Dial-Up Adapter TCP/IP -> SURECOM EP-320X-S 100/10M Ethernet PCI File and printer sharing for Microsoft Networks Add... Remove Properties Primary Network Logon: Client for Microsoft Networks File and Print Sharing... Description TCP/IP is the protocol you use to connect to the Internet and wide-area networks. OK Cancel- Click the "IP Address" tab and click on "Specify an IP Address".

text_image
TCP/IP Properties Bindings Advanced NetsBIOS DNS Configuration Gateway WINS Configuration IP Address An IP address can be automatically assigned to this computer. If your network does not automatically assign IP addresses, ask your network administrator for an address, and then type it in the space below. Obtain an IP address automatically Specify an IP address: IP Address: . . . . Subnet Mask: . . . . OK Cancel- Fill in the IP address. State the subnet mask to be 255.255.255.0.
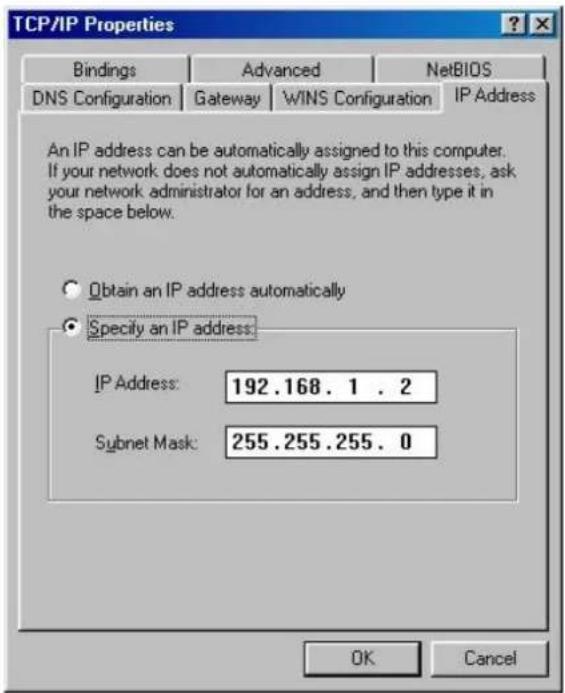
text_image
TCP/IP Properties Bindings Advanced NetsBIOS DNS Configuration Gateway WINS Configuration IP Address An IP address can be automatically assigned to this computer. If your network does not automatically assign IP addresses, ask your network administrator for an address, and then type it in the space below. Obtain an IP address automatically Specify an IP address: IP Address: 192.168.1.2 Subnet Mask: 255.255.255.0 OK Cancel- Click OK and OK. Now, the system may ask for your Windows disc, follow the steps then restart your computer.
How to configure the TCP/IP network protocol
Windows 2000:
1. Click on Start→Settings→Network and dial-up connections.
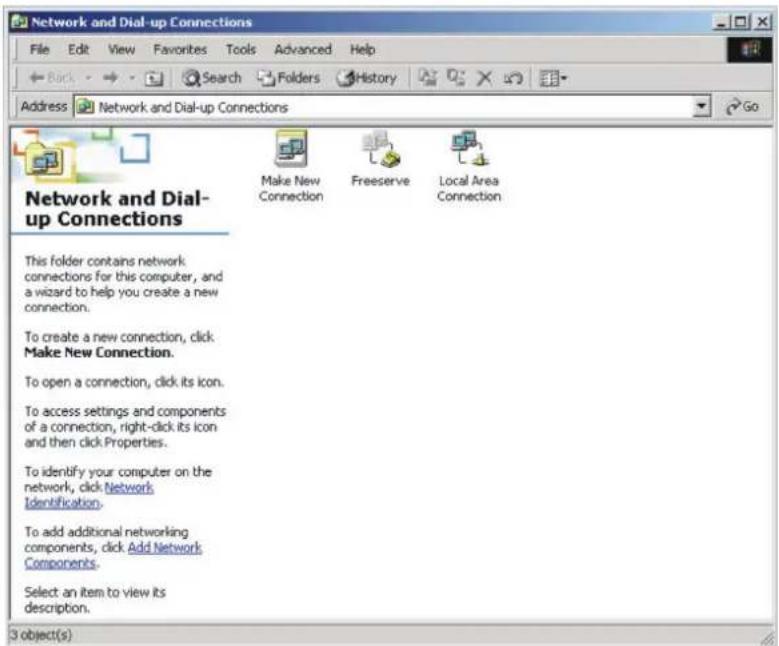
text_image
Network and Dial-up Connections File Edit View Favorites Tools Advanced Help Back Search Folders History Address Network and Dial-up Connections Make New Connection Freeserve Local Area Connection Network and Dial-up Connections This folder contains network connections for this computer, and a wizard to help you create a new connection. To create a new connection, click Make New Connection. To open a connection, click its icon. To access settings and components of a connection, right-click its icon and then click Properties. To identify your computer on the network, click Network Identification. To add additional networking components, click Add Network Components. Select an item to view its description. 3 object(s)2. Choose Local Area Connection and click Properties.

text_image
Local Area Connection Status General Connection Status: Connected Duration: 00:02:50 Speed: 100.0 Mbps Activity Sent — Received Packets: 165 | 11 Properties Disable Close- Click on Internet protocol (TCP/IP) then click Properties.
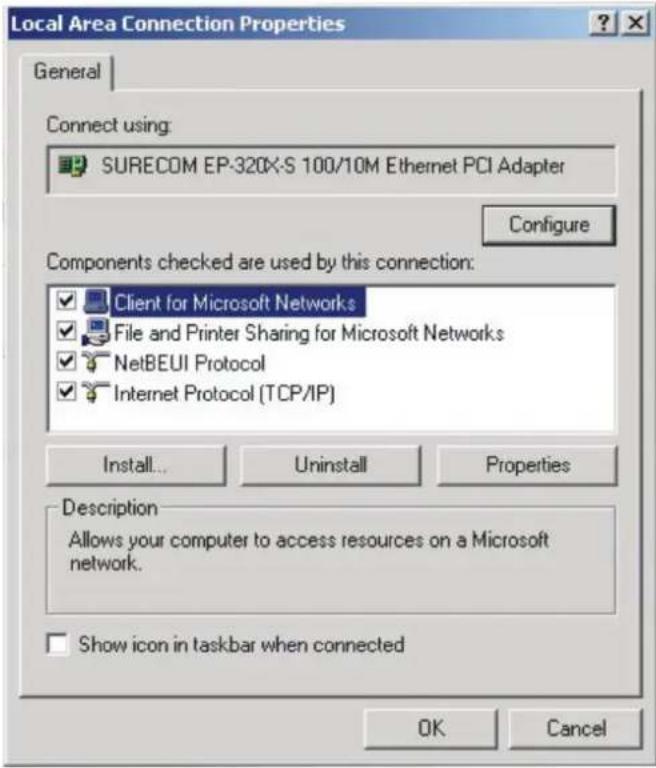
text_image
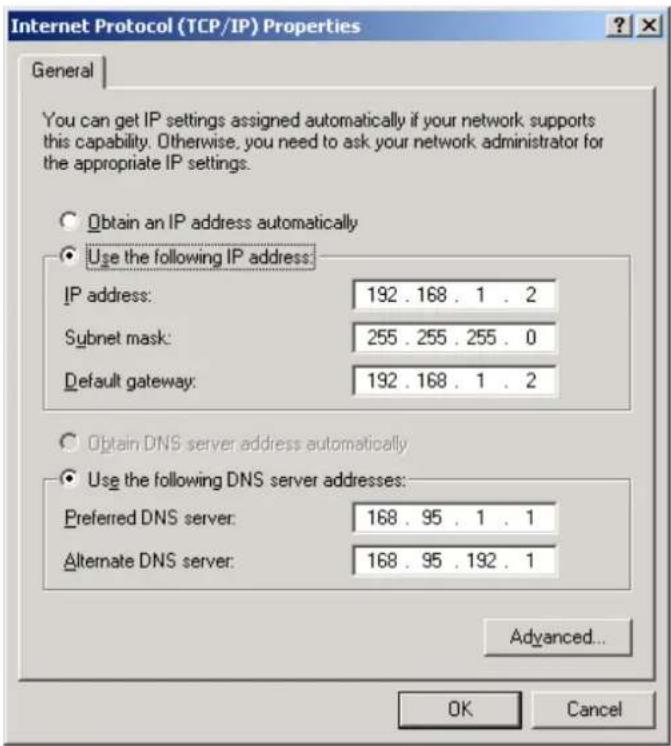
Local Area Connection Properties General Connect using: SURECOM EP-320X-S 100/10M Ethernet PCI Adapter Configure Components checked are used by this connection: Client for Microsoft Networks File and Printer Sharing for Microsoft Networks NetBEUI Protocol Internet Protocol (TCP/IP) Install... Uninstall Properties Description Allows your computer to access resources on a Microsoft network. Show icon in taskbar when connected OK Cancel- Select "Use the following IP address".
State the subnet mask to be 255.255.255.0.
Click OK and OK then restart your computer.
text_image
Internet Protocol (TCP/IP) Properties General You can get IP settings assigned automatically if your network supports this capability. Otherwise, you need to ask your network administrator for the appropriate IP settings. Obtain an IP address automatically Use the following IP address: IP address: 192 . 168 . 1 . 2 Subnet mask: 255 . 255 . 255 . 0 Default gateway: 192 . 168 . 1 . 2 Obtain DNS server address automatically Use the following DNS server addresses: Preferred DNS server: 168 . 95 . 1 . 1 Alternate DNS server: 168 . 95 . 192 . 1 Advanced... OK CancelHow to configure the TCP/IP network protocol
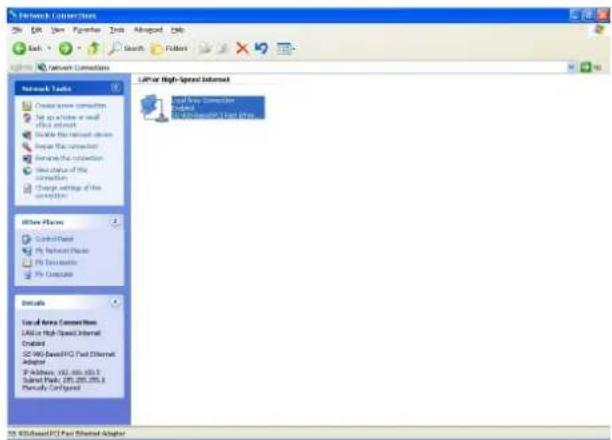
Windows XP:
- If you are in Classic Start menu view, click Start→Settings→Control Panel→Network Connections.
If you are in Start menu view, click Start→Control Panel→Network Connections.
- Double click "Local Area Connection"
text_image
Network Connection DR View Parameters Data Advanced Help Search Follow Network Connections Network Tools Create new connections Set up active or off open network Make the network device Make the connection Remove the connection Use status of the connection Charge settings of the connection Active Files Control Point PI Network Phone PI Security PI Computer Details Use of Area Connections LAN or High Speed Internet Created SC 000-Standard FCS Fast Ethernet Adapter IP Address: 162.888.453.3 Submit Packet: 295.285.285.3 Partially Configated LIP or High-Speed Internet Local Networks Connection Sized Local Network Fast Path- Choose Internet Protocol (TCP/IP) then click Properties and 'Use the following IP Address'.
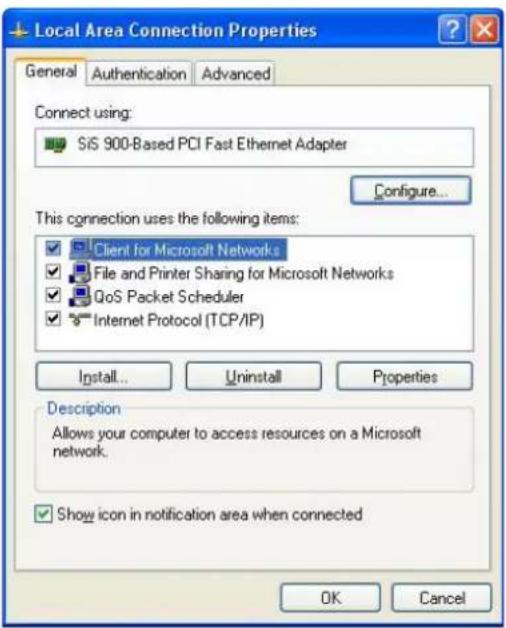
text_image
Local Area Connection Properties General Authentication Advanced Connect using: SiS 900-Based PCI Fast Ethernet Adapter Configure... This connection uses the following items: Client for Microsoft Networks File and Printer Sharing for Microsoft Networks QoS Packet Scheduler Internet Protocol (TCP/IP) Install... Uninstall Properties Description Allows your computer to access resources on a Microsoft network. Show icon in notification area when connected OK Cancel- Fill in the IP Address. The subnet mask is entered automatically on Windows XP. Click OK.
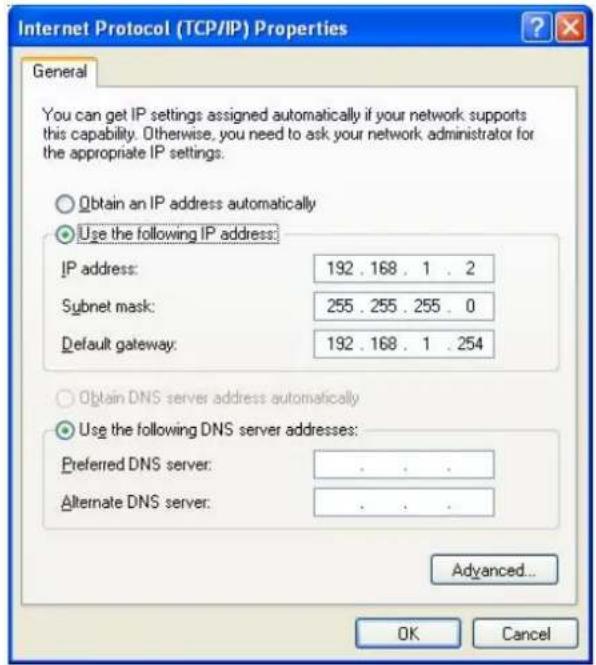
text_image
Internet Protocol (TCP/IP) Properties General You can get IP settings assigned automatically if your network supports this capability. Otherwise, you need to ask your network administrator for the appropriate IP settings. Obtain an IP address automatically Use the following IP address: IP address: 192 . 168 . 1 . 2 Subnet mask: 255 . 255 . 255 . 0 Default gateway: 192 . 168 . 1 . 254 Obtain DNS server address automatically Use the following DNS server addresses: Preferred DNS server: . Alternate DNS server: . Advanced... OK CancelThe IP setting of your PC is completed now. Please refer to the following guide to proceed.
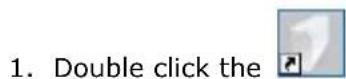
Connecting the device with PNMD
- Double click the shortcut on your desktop. The PNMD begins scanning NAS in your LAN. The welcome window pops up. Please click "Next" to proceed.
Note: This window pops up only when there is no device detected. It guides users to attach cables for the device. If the PNMD detects this product successfully, the window is not going to appear. Please skip to step 4 to continue.
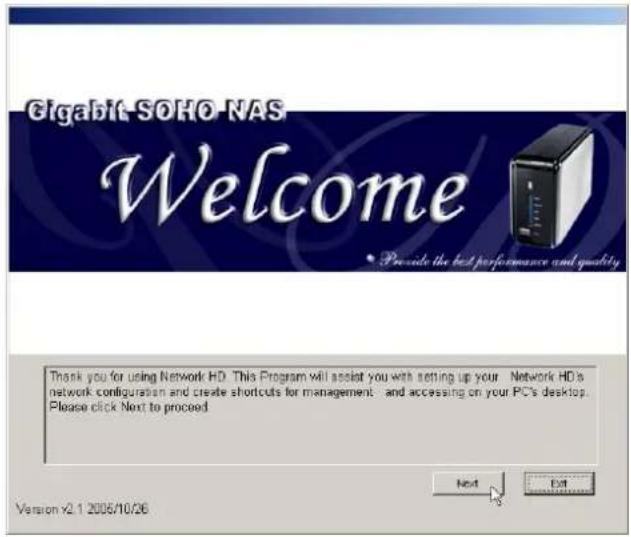
text_image
Cigabit SOHO NAS Welcome • Provide the best performance and quality Thank you for using Network HD. This Program will assist you with setting up your . Network HD's network configuration and create shortcuts for management - and accessing on your PC's desktop. Please click Next to proceed. Next Exit Version v2.1 2006/10/26- Connect the power adapter and press the power button to power on the device. Click "Next".
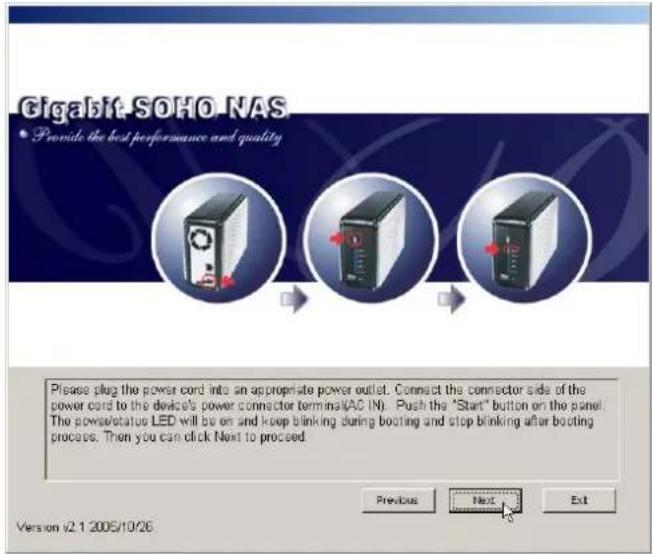
text_image
Gigabit SOHO NAS • Provide the best performance and quality Please plug the power cord into an appropriate power outlet. Connect the connector side of the power cord to the device's power connector terminal(AC IN). Push the "Start" button on the panel. The power/rotator LED will be on and keep blinking during booting and stop blinking after booting process. Then you can click Next to proceed. Previous Next Exit Version i2.1 2005/10/26- Connect the LAN port to your switch or IP sharing router. The PNMD scanning the device again.

text_image
Gigabit SOHO NAS • Provide the best performance and quality Connect your PC and Network HD to your network device(Switch or HUB). The Ethernet LED will be on once Network HD is connected to network(as the picture shown above). Then you can click Next to proceed. Previous Next Cash Version 0.1 2006/10/25- After scanning, the menu shows the NAS in your LAN. You may click the
Rescan NAS
button to search for NAS in your LAN again.

text_image
I-Drive Host Name HD Model Name P Address HD Capacity Subset Mask HD Available Size Default Gateway HD Available % If you can not find your NAS, please check again and click "Rescan NAS" button. Firstly select the NAS you want. Then you can do this to your NAS. click "Open Share" to view all shares. click "Open WEB UI" to open management WBB. click "Configure" or "Next" to configure network setting. Rescan NAS Configure Exit Version 2.1 2005/10/26- The window shows the connection status of the NAS in your LAN. You may click on each NAS to get detailed information of each NAS. Select the NAS that you
are going to connect to and click the Configure button.
Note: The device cannot detect your hard drive if your hard drive is not formatted as EXT3 format. It shows no capacity on this widow. To format your HD, please refer to "HD Format" after accessing the device.
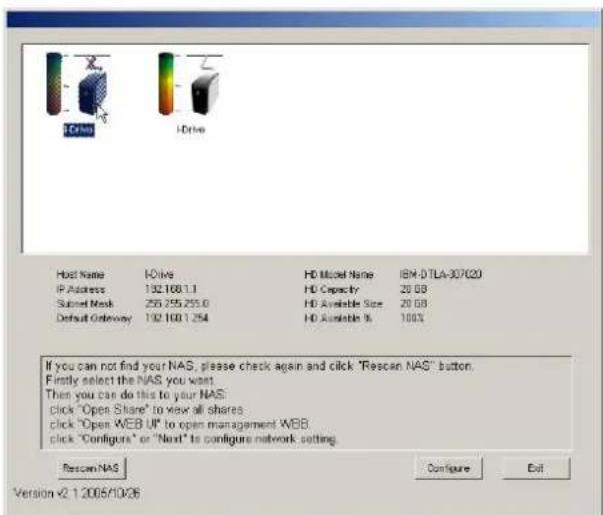
text_image
Host Name HD Drive HD Model Name IBM-DTLA-307C20 IP Address 192.168.1.1 HD Capacity 20 GB Subnet Mask 255.255.255.0 HD Available Size 20 GB Default Gateway 192.168.1.254 HD Available % 100% If you can not find your NAS, please check again and click "Rescan NAS" button. Firstly select the NAS you want. Then you can do this to your NAS: click "Open Share" to view all shares: click "Open WEB UI" to open management WEB. click "Configure" or "Next" is configure network setting. Rescan NAS Configure Exit Version V2.1.2006/10/06- You may select "Auto assign IP Address", which allows the PNMD to assign IP addresses for the device, or select "Use the IP Address as below", fill in IP address for this device. Enter the username and password and click OK.
Note:
The default username/ password are admin/ admin. To get information modifying the username and password, see "Administrator- Superuser Password Setting"

text_image
Auto assign IP Address Used the IP Address as below : IP ADDRESS : 10 . 10 . 7 .182 NETMASK : 255.255. 0 . 0 Default GateWay : 10 . 10 . 7 .254 The default username and password for NAS are "admin" and "admin" User Name : admin Password : ***** OK Cancel-
After successful IP address setting, the PNMD rescans NAS in your LAN automatically.
-
Select your NAS. You may:
-
Click the Open Share button to access to folders in the NAS or
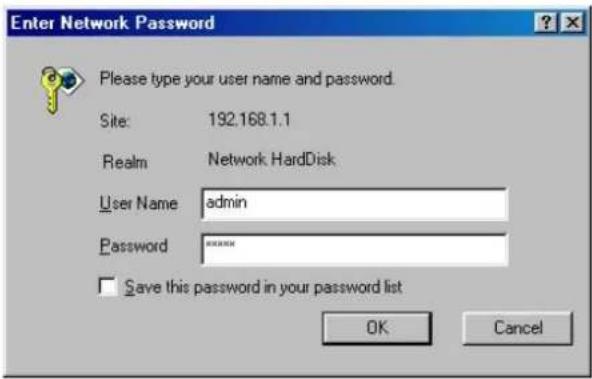
- Click the Open VWEB UI button. Fill in the username and password and click OK to open the GUI interface.
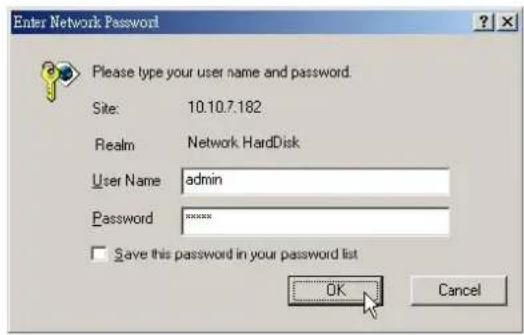
text_image
Enter Network Password Please type your user name and password. Site: 10.10.7.182 Realm Network HardDisk User Name admin Password ****** Save this password in your password list OK CancelNote: To get instructions using the GUI, please see "Using the Graphic User Interface (GUI)"
To access to folders in the device
Double click the shortcut on your desktop to start the PNMD. The PNMD
window pops up. Select your NAS and click the Open Share button.
The device provides three default accounts for users. The account names are also their default password respectively.
All: The account is allowed to Read/Write all the folders in the device as default.
Power & Guest: The account is allowed to read all folders in the device.
Note:
-
As default, the "Share" folder is created automatically and it can be read/write by all users.
-
You can change the authorities of the three predefined users for getting accessed to each folder. To change their authorities, please see "To Configure Folder Properties"
-
To add or configure a account, please see "To Configure a User"
-
Users that would like to use another set of username/ password after getting accessed to any folder please log off your operation system and log on again.

text_image
Network-HD (192.168.1.1) File Edit View Favorites Tools Help Address: 1\52.168.1.1 Network Tasks Add a network place View network connections Set up a home or small office network. View maingroup computers Other Places Workgroup My Computer My Documents Shared Documents Printers and Boxes Details Share web Printers and Boxes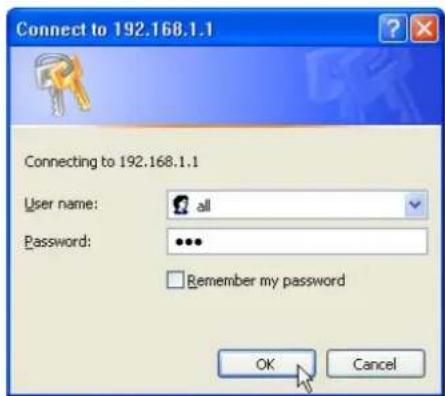
text_image
Connect to 192.168.1.1 Connecting to 192.168.1.1 User name: all Password: ••• Remember my password OK CancelTip:
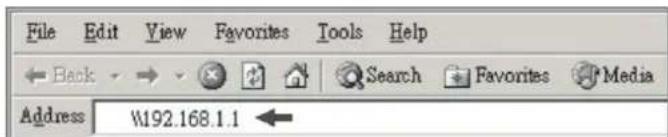
You can also access to folders with a web browser. The following procedures use assumptions below:
The device's IP address: 192.168.1.1
Your computer's network setting:
IP address: 192.168.1.2
Subnet mask: 255.255.255.0
Default Gateway: 192.168.1.2
-
Open a web browser.
-
Fill 2 backslashes and the device's IP address in the address bar and press
text_image
File Edit View Favorites Tools Help Back Search Favorites Media Address \192.168.1.1Note: You should have your computer and the device configured in a LAN. For information about configuring the network settings, see "Making connection with the device"
Management Guide
Read this chapter to understand the management interface of the device and how to manage the device.
Starting the Graphic User Interface (GUI)
The Graphic User Interface (GUI) is the management interface of this device. Most parameters and settings are configured over the GUI.
To get access to the GUI,
Note: To get instruction installing the PNMD, please see "Installing the PNMD"
-
The PNMD window pops up. Select your NAS and click the Open VWEB UI button.
-
When the "Enter Network Password" window pops up, enter a user name and password.
text_image
Enter Network Password Please type your user name and password. Site: 192.168.1.1 Realm Network HardDisk User Name admin Password ****** Save this password in your password list OK Cancel- Click OK. The GUI Opens.
Note:
-
The default user name and password is admin/ admin. To change the username/password, please refer to "Administrator- Superuser Password Setting."
-
Both the User Name and Password are case sensitive and alphanumeric.
Tip:
You can also start the GUI with a web browser. The following procedures use assumptions below:
The device's IP address: 192.168.1.1
Your computer's network setting:
IP address: 192.168.1.2
Subnet mask: 255.255.255.0
Default Gateway: 192.168.1.2
-
Open a web browser.
-
Enter the device's IP address in the address bar and press

text_image
File Edit View Favorites Tools Help Back → Search Favorites Media Address http://192.168.1.1Note: You should have your computer and the device configured in a LAN. For information about configuring the network settings, see "Making connection with the device"
-
When the "Enter Network Password" windows pops up, enter a user name and password.
-
Click OK. The GUI opens.
Using the Graphic User Interface (GUI)
This section provides an introduction to the GUI.
Understanding the GUI
The GUI is consisted of the following components,
- Configuration categories: Located on the left side of each page. Lists the configuration categories on this device. To get access to each category, click on the button that you are going to configure.
- Configuration items: Located on the right side of each page. Shows the items that can be configured. You can click on the tabs that listed above to access to each sub-categories.
Note: For detail information about configuring each item, please refer to the management instruction for each configuration category.
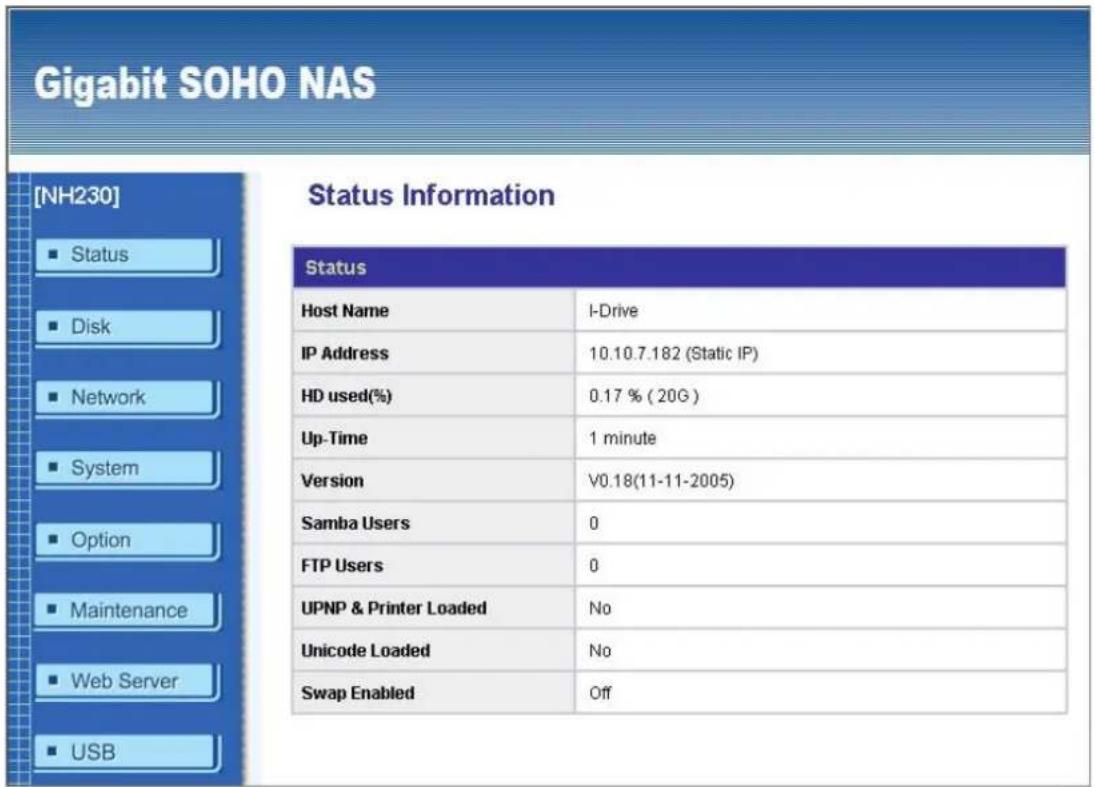
text_image
Gigabit SOHO NAS [NH230] Status Information Status Host Name I-Drive IP Address 10.10.7.182 (Static IP) HD used(%) 0.17 % ( 20G ) Up-Time 1 minute Version V0.18(11-11-2005) Samba Users 0 FTP Users 0 UPNP & Printer Loaded No Unicode Loaded No Swap Enabled Off USBManagement items list
The following table lists the information and items that you can configure with the GUI. For detail instruction, please refer to the following chapter.
| Category | Sub-category | Information |
| Status Status | Shows | the status information of this device including Host name, IP address, HD used percentage, system up-time, firmware version, Swap status, current Samba users and FTP users. |
| Disk | Folder To add | a new folder, delete a folder, change folder-access authentication and set up folder properties. |
| Disk To format the connected IDE interface hard disk in EXT3 Format and enable/disable Swap. | ||
| Network Host | To change the device's host name, Work group name and description. | |
| IP address | To configure the network settings for the device including IP address, Subnet Mask, Gateway, DNS server, DHCP enable/ disable and Jumbo mode selecting. | |
| System Administrator To change the Superuser name and password. | ||
| Time | To set up the system time zone, synchronize time and assign a timeserver for the device. | |
| User | To add a new user, delete a user, setup user authorities and change user properties. | |
| Group | To make users in groups. Add users to groups or delete users from groups. | |
| Option FTP Change FTP properties including Maximum unit number, Port number, Timeout setting and enable/disable anonymous access. | ||
| Security IP | To configure the allowed or denied IP addresses for getting access to the device. | |
| Security MAC | To configure the allowed or denied MAC addresses for getting access to the device. | |
| File Download | To add, delete download tasks or change download task properties. | |
| Maintenance | Maintenance | Provides device maintenance including backup the status of your configuration to the device, firmware upgrade, system restart and reset factory default. |
| Web Server | Web Server | To change the Web server prosperities. |
| USB | Detail | Shows the USB device information that currently connected to the device. |
| Disk Setup | To setup the USB device properties that connected to the device. | |
| Printer Setup | To enable/ disable the printer server functionality and change printer names. | |
| Clean Printer | To remove all printer jobs that waiting for printing. | |
Status
The Status page shows the following information of the device. To open the Status page, click the Status on the configuration categories list.
Items Information
Host name The identification of this device.
IP-address The IP address of the device
HD used (%) The usage percentage of HD (Total amount of HD)
Up-time The estimate time that you power the device on
Version The firmware version of the device.
Samba Users The number of members who is currently using the device by Samba
FTP Users The number of members who is currently using the device by FTP client
UPNP & Printer Loaded Check if the file for triggering UPNP and Printer server is loaded.
Unicode Loaded Check if the file for enabling Unicode is loaded to the device.
Swap Enabled Check if the connected IDE interface HD is formatted with a partition for Swap function.
Note: This page shows the device information only. To do more configurations about each item, please refer to their instruction respectively in the following chapters.
Status Information
| Status | |
| Host Name | I-Drive |
| IP Address | 10.10.7.182 (Static IP) |
| HD used(%) | 0.17 % (20G) |
| Up-Time | 3 hour 32 minute |
| Version | V0.18(11-11-2005) |
| Samba Users | 0 |
| FTP Users | 0 |
| UPNP & Printer Loaded | No |
| Unicode Loaded | No |
| Swap Enabled | Off |
Disk
The Disk page allows users to:
- Change the properties of folders.
- Format the hard disk connected to the device with IDE connector.
To open the Disk page, click the "Disk" on the configuration categories list
Folder- Folder Configuration
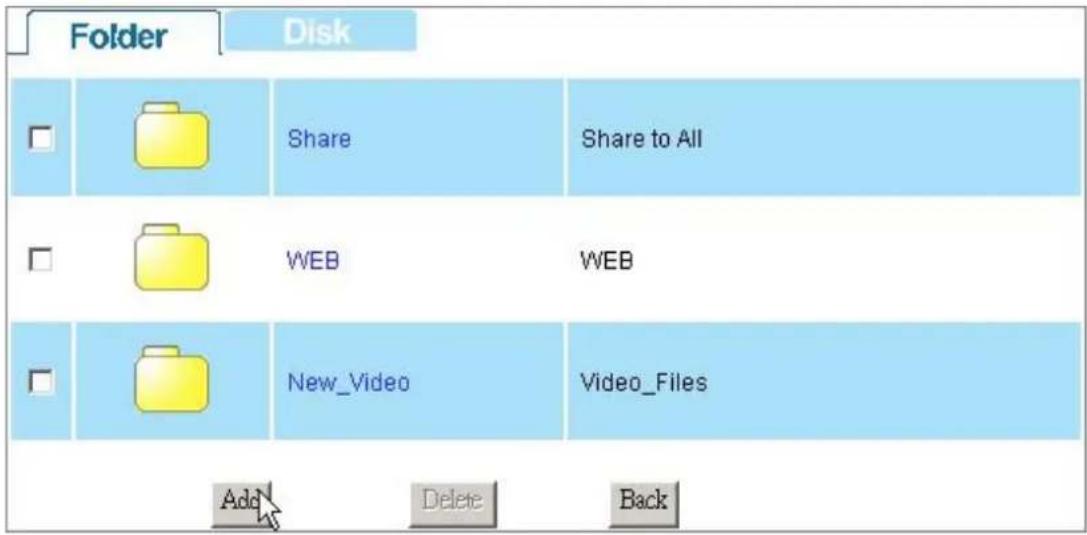
The folder configuration allows users to add folders, delete folders and change folder properties.
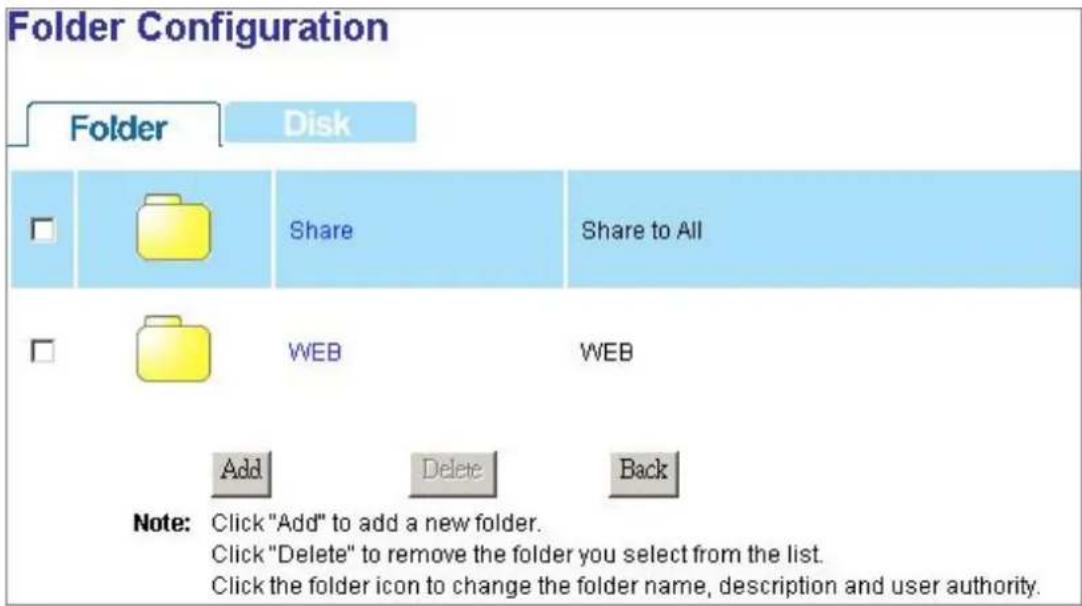
text_image
Folder Configuration Folder Disk Share Share to All WEB WEB Add Delete Back Note: Click "Add" to add a new folder. Click "Delete" to remove the folder you select from the list. Click the folder icon to change the folder name, description and user authority.To Configure Folder Properties
Click on the folder that you are going to configure.

text_image
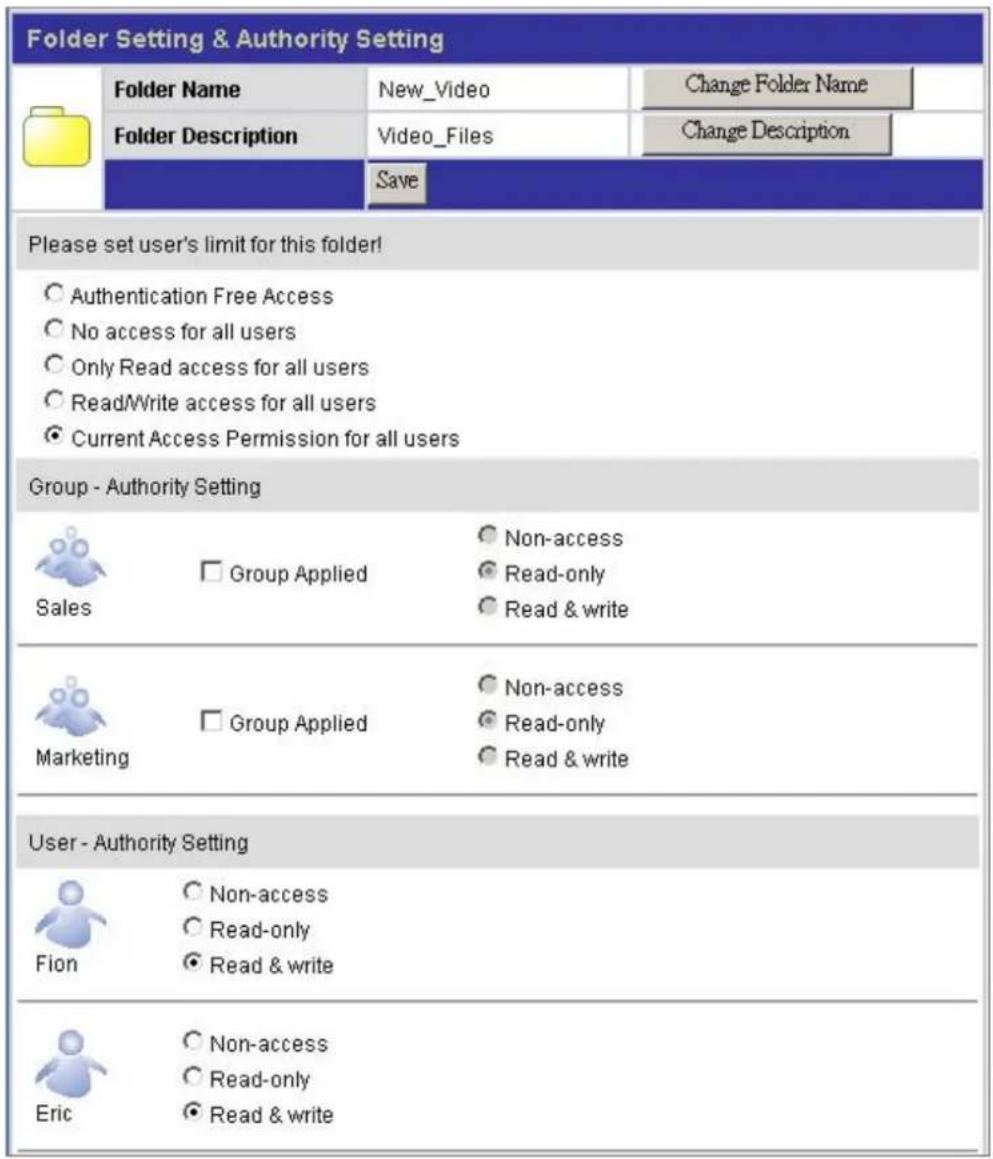
Video Video_FilesThe folder configuration page shows up. This page allows users to:
- Change Folder Name/ Folder Description.
- Add or remove authorized users or groups for this folder.
• Change folder-accessing authority level for users and groups.
| Folder Setting & Authority Setting | |||
| Folder Name | Video | Change Folder Name | |
| Folder Description | Video_Files | Change Description | |
| Save | |||
| Please set user's limit for this folder! | |||
| ○Authentication Free Access ○No access for all users ○Only Read access for all users ○Read/Write access for all users ●Current Access Permission for all users | |||
| Group - Authority Setting | |||
| Sales | ✓ Group Applied | ○ Non-access ● Read-only ○ Read & write | |
| Marketing | ✓ Group Applied | ○ Non-access ● Read-only ○ Read & write | |
| User - Authority Setting | |||
| all | ○ Non-access ○ Read-only ○ Read & write | ||
| power | ○ Non-access ○ Read-only ○ Read & write | ||
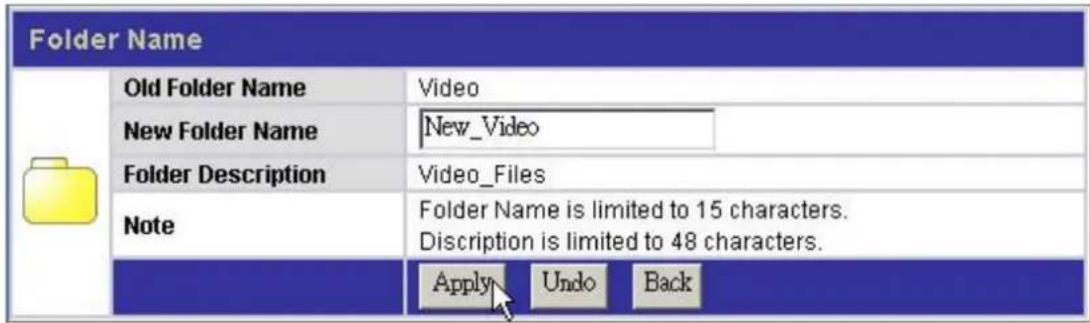
To change the folder name/ folder description
- Click on "Change Folder Name" or "Change Description" icon. The Folder Name/ Folder Description Setting page shows up.
| Video | Change Folder Name |
| Video_Files | Change Description |
- Fill in the new name or new description for the folder and click "Apply".
Note:
- Folder Name (0\~15 characters): The name for the folder.
• Description (0\~48 characters): A note for the folder.
• Both folder name and description are alphanumeric. - Blank character is not allowed for folder name and description.
text_image
Folder Name Old Folder Name Video New Folder Name New_Video Folder Description Video_Files Note Folder Name is limited to 15 characters. Discription is limited to 48 characters. Apply Undo Back- The folder name/description is replaced successfully. You may click "Change" to do more configurations for this folder or click "Back" to return to folder list.

text_image
Folder Configuration Folder Name New_Video Description Video_Files Change BackConfigure folder-accessing authority level for users and groups.
- Configure the access-permission rules for all users by pre-defined levels. Select one level and click "Save" to apply this authority for all users. The pre-defined levels use the following access permission rules:
| Pre-defined Levels Access Authority | |
| Authentication Free Access: | No authentication. Everyone is allowed to get access to this folder without username and password. |
| No access for all users: | No accessing. No user is allowed to get access to this folder. |
| Only Read access for all users: | All users are allowed to read in this folder.Modification in this folder is not allowed. |
| Read/ Write access for all users: | All users are allowed to read and write this folder. |
| Current Access Permission for all users: | The folder uses user-defined authority settings. The access permissions in “Group-Authority Setting” and “User-Authority Setting” will be applied to this folder. |
| Please set user's limit for this folder! |
| ○ Authentication Free Access○ No access for all users○ Only Read access for all users○ Read/Write access for all users○ Current Access Permission for all users |
- Configure the access-permission rules by groups and users:
Note: Before starting, you have to click "Current Access Permission for all users" in the "Please set user's limit for this folder".
By Group: Mark the checkbox to select an authorized group. Select an access-permission rule for this group and click "Save" to apply.
By User: Select an access authority for each user. Click "Save" to apply.
| Group - Authority Setting | ||
 Sales Sales | ☑ Group Applied | ○ Non-access○ Read-only○ Read & write |
 Marketing Marketing | ☑ Group Applied | ○ Non-access○ Read-only○ Read & write |
| User - Authority Setting | ||
 Fion Fion | ○ Non-access○ Read-only○ Read & write | |
 Eric Eric | ○ Non-access○ Read-only○ Read & write | |
Tips: To do an efficient access-authority configuration, please refer to the following recommend procedures:
Step1. Select a Pre-defined authority level for all users. (Ex, Click "No Access for all users" to configure all users as "Non-access" for this folder.
Step2. Click "Current Access Permission for all users" to allow configuration by groups or users.
Step3. Specify the users that have different authorities. (Ex, Click "Read & Write" for "Fion" and Click "Read-Only" for "Eric").
Step4. Click Save to apply. (Ex, Click "Save" to allow "Fion" to Read/Write this folder and "Eric" to read this folder. Other users are not allowed to access this folder.)
To Add a New Folder
- Click the "Add" button on folder list.
text_image
Folder Disk Share Share to All WEB WEB New_Video Video_Files Add Delete Back- Specify a folder name and description for the newly added folder. Click "Apply" to enable.
Note:
- Folder Name (0\~15 characters): The name for the folder.
• Description (0\~48 characters): A note for the folder.
• Both folder name and description are alphanumeric. - Blank character is not allowed for folder name and description.

text_image
Folder added Folder Name Video Description Video_Files Note Folder Name is limited to 15 characters. Discription is limited to 48 characters. Apply Undo Back- Setup the folder properties and click "Save" to apply.
Note: For detail folder configuration, see "To configure folder properties"
text_image
Folder Setting & Authority Setting Folder Name New_Video Change Folder Name Folder Description Video_Files Change Description Save Please set user's limit for this folder! Authentication Free Access No access for all users Only Read access for all users Read/Write access for all users Current Access Permission for all users Group - Authority Setting Sales Group Applied Non-access Read-only Read & write Marketing Group Applied Non-access Read-only Read & write User - Authority Setting Fion Non-access Read-only Read & write Eric Non-access Read-only Read & writeTo Delete a Folder
- Mark the check box of the folder that you are going to delete.
- Click Delete to delete the folder.
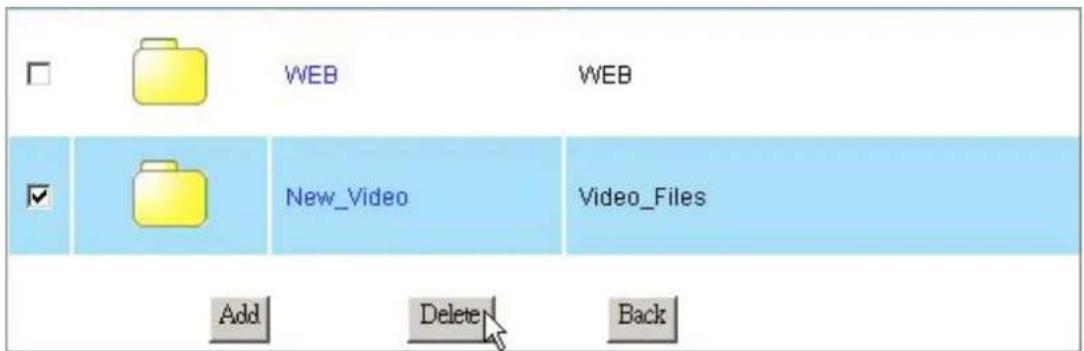
text_image
WEB WEB New_Video Video_Files Add Delete BackDisk-HD Configuration
To format your hard disk in EXT3 format:
- Mark the "Swap enable" check box or leave it blank. The Swap function allows the device to transform the HD space as virtual memory while there is not sufficient virtual memory for performing efficient operation.
Note:
- While the HD is formatted with Swap enabled, a 512 MB partition is reserved for operating the Swap function.
-
If you enable the SWAP function for the device, the system allowed the maximum 32 concurrently connected users. If not, the system allowed 5 users to be connected at the same time.
-
Click "Yes" to execute HD Format.
Caution:
All files within the hard disk will be erased while HD Format is executed!!
Note:
- The Hard Disk will be formatted as EXT3 format.
- The HD Format function supports the hard disk that connected to the device with IDE connector only. To format your hard disk in USB interface, see "To Format Your USB Storage"
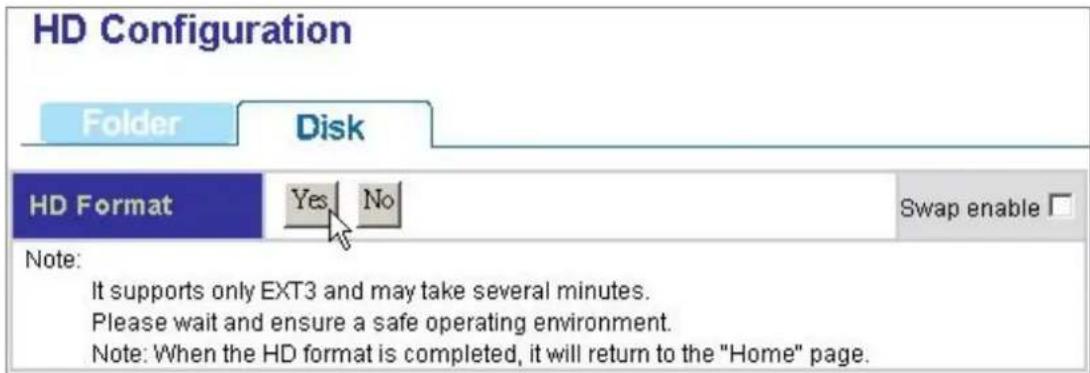
text_image
HD Configuration Folder Disk HD Format Yes No Swap enable Note: It supports only EXT3 and may take several minutes. Please wait and ensure a safe operating environment. Note: When the HD format is completed, it will return to the "Home" page.- After confirmation for HD formatting, the system starts formatting the hard disk. It may take several minutes according to the storage size of your hard disk. Please wait and DO NOT execute other configuration for this device while formatting.

bar
Format HD | Category | Value (%) | |---|---| | This may take up to a few minutes. Please wait for the system to reload the page. Do not close this window. | 0% | | 100% | |Network
The Network page allows users to:
- Configure general device information
- Configure the network setting for the device.
To open the Network page, click the Network on the configuration categories list.
Host- Host Name Setting
Host Name (1\~15 characters):
Workgroup (1\~15 characters):
Define the user-defined device name.
Defines the workgroup name for the device which is going to be shown on "Network Neighborhood"
Description (1\~48 characters):
Define a note for the device.

text_image
Host Name Setting Host IP Address Host Name Setting Host Name I-Drive Work Group WorkGroup Description Note 1. Host Name & Work group are limited to 15 characters. Discription is limited to 48 characters. 2. Space character, control character and '''' are not allowed. Apply Undo BackIP Address- IP address Setting
To Enable DHCP Client
Click "Enable" to enact this device as a DHCP client and click "Disable" to disqualify.
Note: To get more information for enabling the DHCP server or not to, please see "IP Protocol Setup".
| DHCP Enable | Manual IP Setting | Auto IP Setting |
To Configure the IP Addresses for the Device
The IP Address Setting contains parameters of the device network setting. To modify, fill in each blanks and click "Apply" to execute.
IP Address: Specifies the device IP
Subnet Mask: Defines the Subnet Mask
Gateway: Defines the default gateway
DNS Server: Defines the DNS server
Jumbo Mode
The device supports Jumbo frame for obtaining a more efficient network. You may choose 4000 or 7000 as the size of a packet.
To select Jumbo modes, choose a mode from the drop list and click Apply to execute.
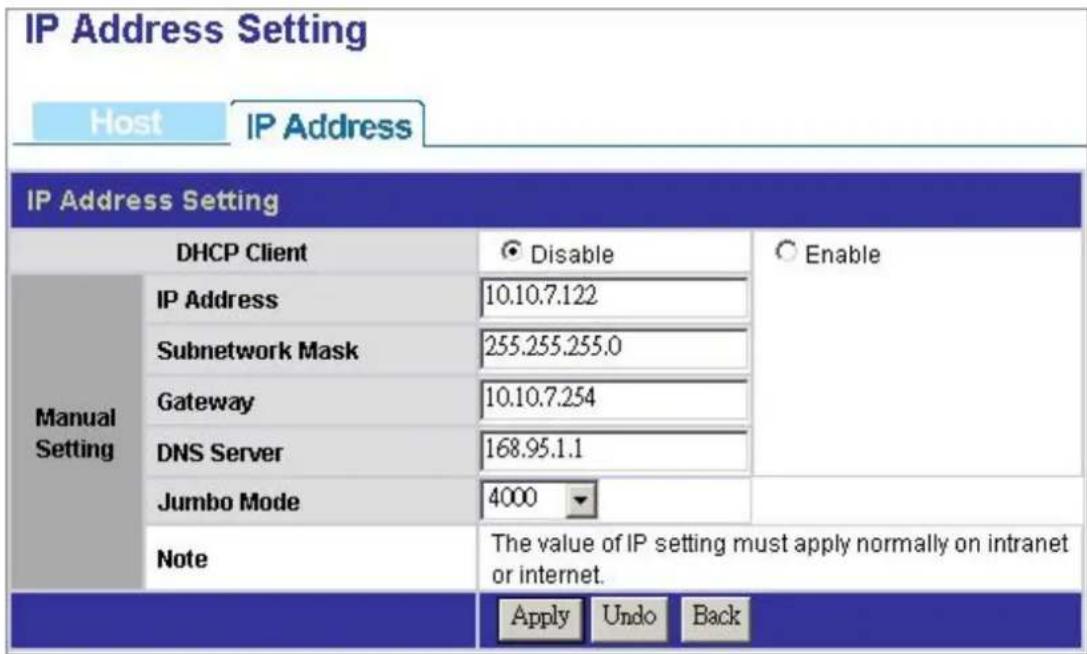
text_image
IP Address Setting Host IP Address IP Address Setting DHCP Client Disable Enable IP Address 10.10.7.122 Subnetwork Mask 255.255.255.0 Gateway 10.10.7.254 DNS Server 168.95.1.1 Jumbo Mode 4000 Note The value of IP setting must apply normally on intranet or internet. Apply Undo BackSystem
The System page allows users to:
- Configuring Superuser name and password.
- Synchronize system time
- Add, delete and configure a user
- Add, delete and configure a group
To open the System page, click the System on the configuration categories list.
Administrator- Superuser Password Setting
This page provides Superuser ID and password configuration, which are used for getting access to the Graphic User Interface.
To modify the Superuser ID and password:
- Define a Superuser Name(4\~16 characters) in the Superuser ID box
- Fill in the original Superuser password (4\~16 characters) in the Old Password box.
- Define a new password (4\~16 characters) in the New Password box.
- Fill in the newly defined password (4\~16 characters) in the Confirm Password box.
- Click "Apply" to execute the new Superuser name and password.
Note:
- The default Superuser ID and password are admin/ admin.
- The Superuser ID and password are both case-sensitive and alphanumeric.
- To enforce the security, it is recommended to change the Superuser ID and password periodically.

text_image
Superuser Password Setting Administrator Time User Group Superuser Setting Apply Cancel Back Superuser ID admin Old Password ***** New Password ***** Confirm Password ***** Note Please provide superuser name and password from 4 to 16 characters. Periodically change the superuser name and password to ensure security.Time- System Time Setting
The Time page provides time synchronizing function. You can synchronize the time by applying the time on your computer to the device or by connecting to a time server.
To configure the device time:
- Select the time zone that corresponds to your region from the Time Zone drop list.
- To apply the time on your computer to the device, select "Local Time" and click "Time Sync" button
- To synchronize the time from a time server, select "Time Server", fill in a time server address in the Time Server box and click "Time Sync" to execute.
- Click "Save" to apply your configuration or click "Back" to abort.
Note: the synchronized time will be applied by next reboot. To reboot the device, please see "Restart the System"

text_image
System Time Setting Administrator Time User Group System Time Setting Save Back Time Zone Taiwan Local Time Mon Mar 21 08:15:45 CET 2005 Time Sync Time Server ntpl.fau.de Clicking Time sync will restart the network daemon such as SAMBA and FTPUser- User Configuration
The User page allows users to:
- Add users
- Delete users
- Modify user properties
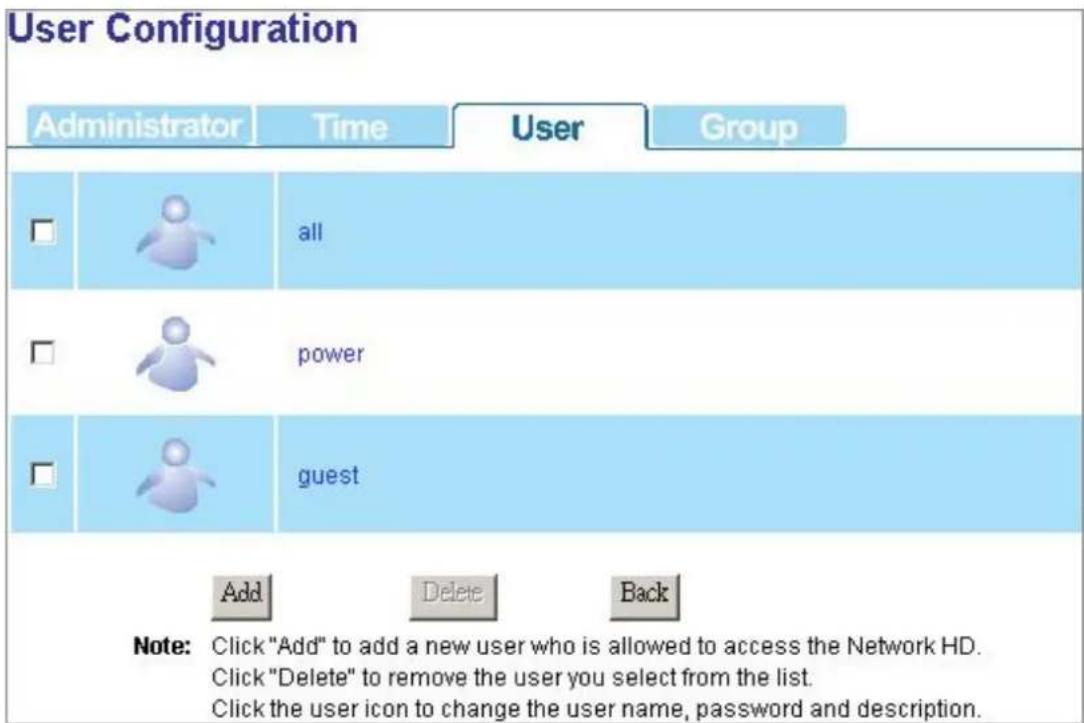
text_image
User Configuration Administrator Time User Group □ all □ power □ guest Add Delete Back Note: Click "Add" to add a new user who is allowed to access the Network HD. Click "Delete" to remove the user you select from the list. Click the user icon to change the user name, password and description.To Configure a User
- Move the cursor onto the icon of the user that you are going to configure.

text_image
Joe- You can change the user's properties by modifying the settings on each item.
User Name
(4\~16 characters):
New password
(4\~16 characters):
Confirm Password
(4\~16 characters):
User Description
(0\~47 characters)
FTP Access
Specify a name for the newly added user.
Enter a username for the new user
Enter the new password again to confirm the password
Fill in a description as a note for the user
Click "Yes" to allow this user to access the device with FTP client. Click "No" to deny FTP access.
Note: The username and password for accessing the FTP server are the same with the one that configured above.

text_image
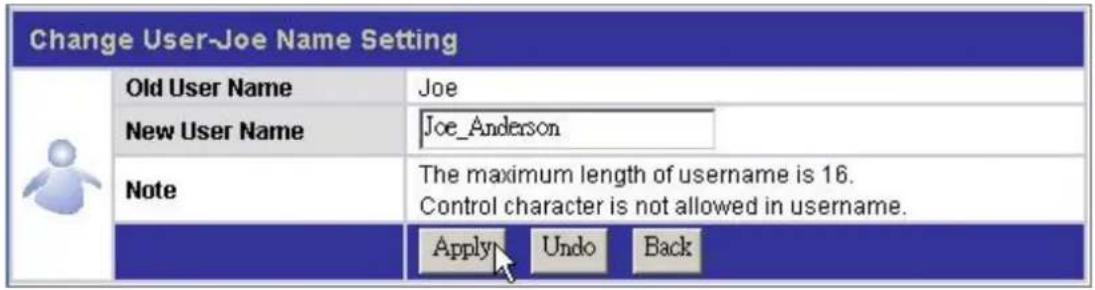
User-"Joe" Setting User Name Joe Change Name New Password **** Confirm Password **** User Description Joe FTP Access Yes No Note The maximum length of password is 16. Control character is not allowed in username. The maximum length of description is 48. Apply Undo Back- To change the user name, click the "Change Name button". The change username page shows up. Fill in the new user name in the "New User Name" box. Click "Apply" to execute.
text_image
Change User-Joe Name Setting Old User Name Joe New User Name Joe_Anderson Note The maximum length of username is 16. Control character is not allowed in username. Apply Undo BackTo Add a New User
- Click the "Add" button on the user list

text_image
Joe Add Delete Back- Define the user properties.
Note: For more information about each item, see "To Configure a User"
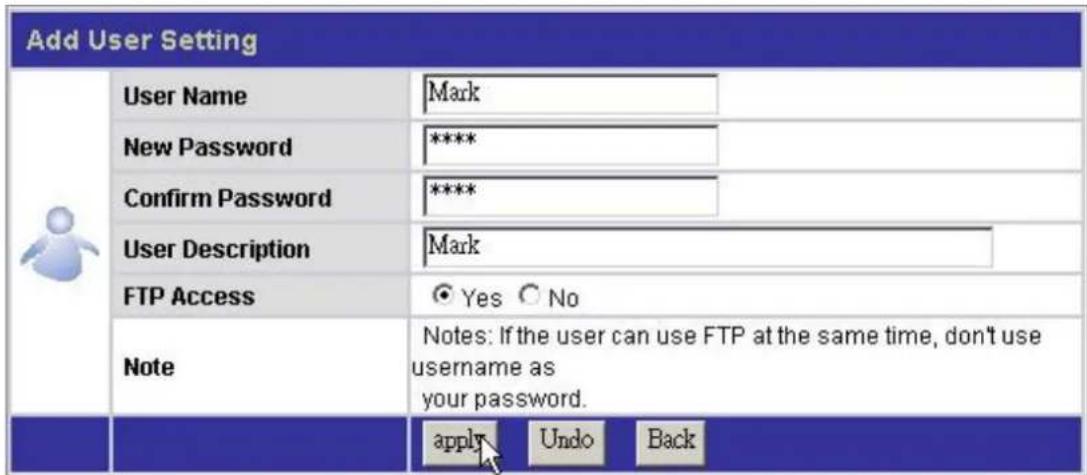
text_image
Add User Setting User Name Mark New Password ***** Confirm Password ***** User Description Mark FTP Access Yes No Note Notes: If the user can use FTP at the same time, don't use username as your password. apply Undo Back- Click "apply" to add the new user.
To delete a user
- Select the user that you are going to remove from the device. Mark the check box of the user.
- Click the "Delete" button to remove the user.

text_image
Joe Add Delete BackGroup- Group Configuration
The Group page allows users to:
- Add groups
- Delete groups
- Modify group properties

text_image
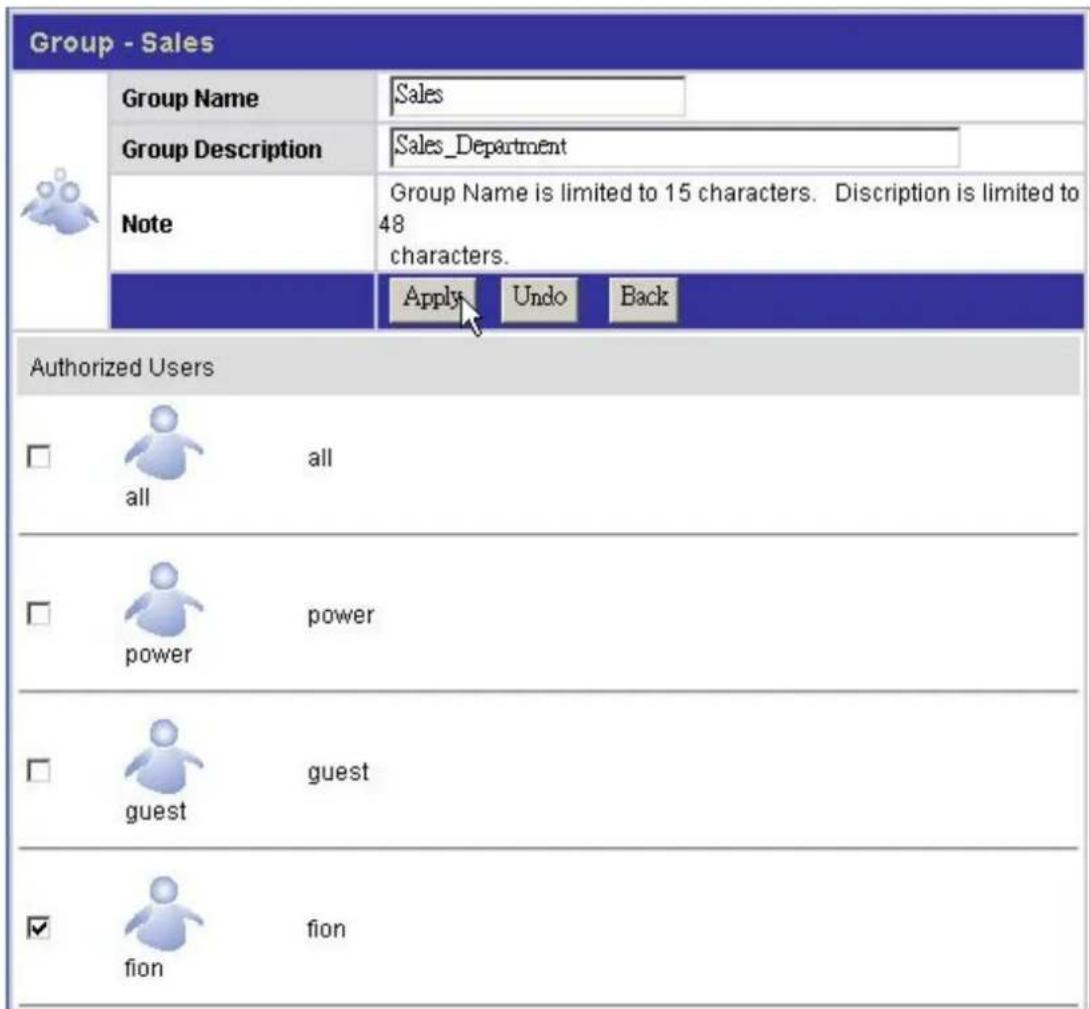
Group Configuration Administrator Time User Group Sales Sales_Department Add Delete Back Note: Click "Add" to add a new group. Click "Delete" to remove the group you select from the list. Click the group icon to change the group name, description and user.To add a new group
- Click "Add" button.

text_image
Sales Sales_Department Add Delete Back- Configure the properties for this group.
Group Name Enter a group name as the group ID.
(0\~15 characters) (Note: The group name must be started with an alphabet)
Group Description Fill in description as a note for the group
(0\~48 characters)
Authorized Users Select group members by marking the check boxes.

text_image
Add New Group Group Name Market Group Description Market_Department Note Group Name is limited to 15 characters. Discription is limited to 48 characters. Apply Undo Back Authorized Users all power power guest guest fion fion- Click "Apply" to add the new group, click "Undo" to reload previous configuration and click "Back" to return to group list.
To delete a group
- Mark the check box of the group that you are going to delete.
- Click "Delete" to remove the group or click "Back" to return to group list.

text_image
Marketing Marketing_Dept Add Delete BackTo configure a group
- Click the icon of the group to configure.
| Sales | Sales_Department |
- Modify the properties for the group. Click "Apply" to execute the modification, click 'Undo' to reload previous configuration or click "Back" to return to group list.
Note: For more information about the items, please see "To Add a New Group".
text_image
Group - Sales Group Name Sales Group Description Sales_Department Note Group Name is limited to 15 characters. Discription is limited to 48 characters. Apply Undo Back Authorized Users all power power guest guest fion fionOption
The Option page allows users to:
- Configure FTP settings.
- Ensure the device security by IP and MAC filter.
- Download files with this device.
To open the Option page, click Option on the configuration categories list
FTP- FTP Configuration
The device embeds a FTP server that allows users to access this device by FTP client. To setup the FTP server properties, please refer to the following table and click "Apply" to execute your settings.
| Port Number: | The Port number of the FTP server. Please fill in a number from 1 to 65535. |
| Time out: The allowed time that keeps the FTP server connected with a FTP client. The FTP server terminates the connection if the client fails to response during the specified Time Out period. | |
| Allow Anonymous: Allow FTP client to connect with the device without username/ password authentication. | |
Note: Please DO NOT use the number 80 as the Port Number. As default, port 80 is the Administration Port for the device. To get more information about the Administration Port, please refer to "Administration WEB"

text_image
FTP Configuration FTP Security IP Security MAC File Download FTP Setting Port Number 21 Timeout 15 Minutes Allow Anonymous Yes No Note 1. The maximum number of unit is up to 5 when SWAP disable. If you enable SWAP function, the maximum number will fix to 32 2. The port number is between 1 and 65535. Apply Undo BackSecurity IP- IP Filter Setting
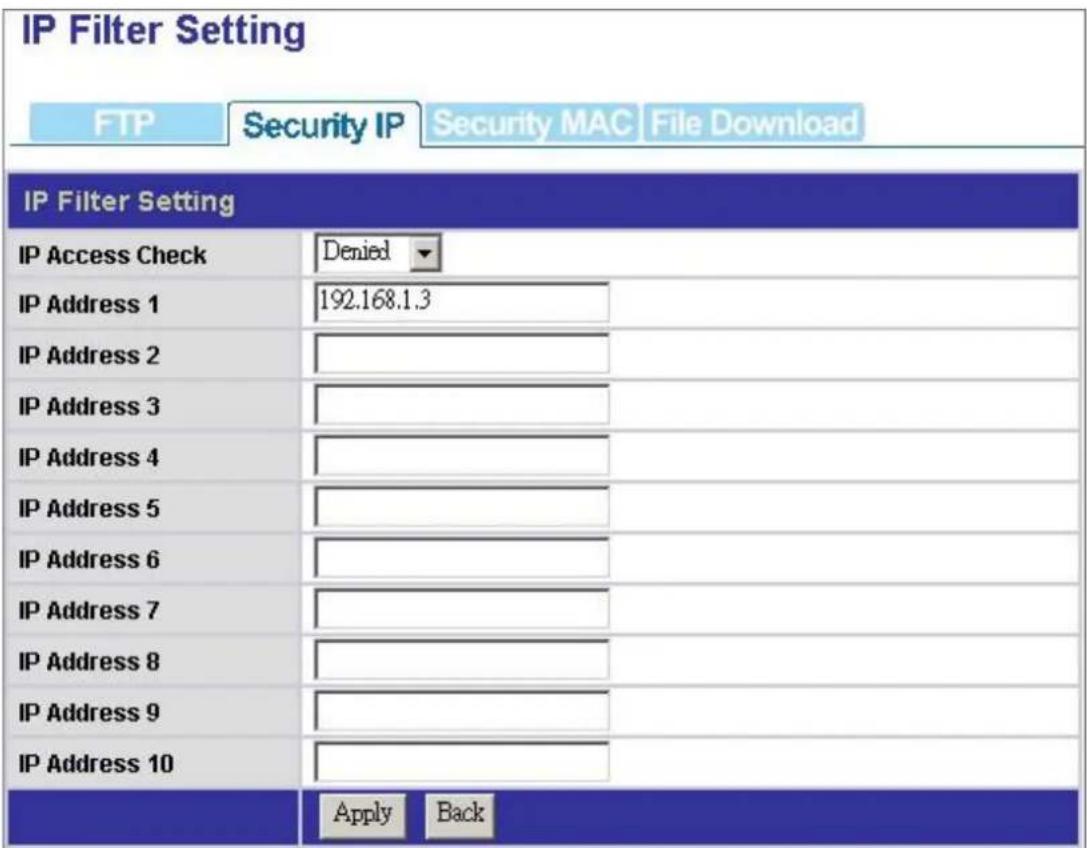
The Security IP function provides access management by IP address filtering. There are three modes for the IP filter.
- Disable: Disable the IP Filer function. All IP addresses are allowed to access the device.
- Allowed: Setup the IP addresses that are allowed to access the device. Only the configured IP addresses have the right to access the device.
- Denied: Setup the IP addresses that are denied to access the device. The IP addresses that are configured are not allowed to access the device.
Tip:
For example, to prevent the IP address "192.168.1.3" from connecting with the device:
- Select "Denied" From the "IP Access Check" drop list.
- Fill the IP address "192.168.1.3" in the IP Address 1 box.
- Click "Apply" to execute your configuration.
text_image
IP Filter Setting FTP Security IP Security MAC File Download IP Filter Setting IP Access Check Denied IP Address 1 192.168.1.3 IP Address 2 IP Address 3 IP Address 4 IP Address 5 IP Address 6 IP Address 7 IP Address 8 IP Address 9 IP Address 10 Apply BackSecurity MAC- MAC Filter Setting
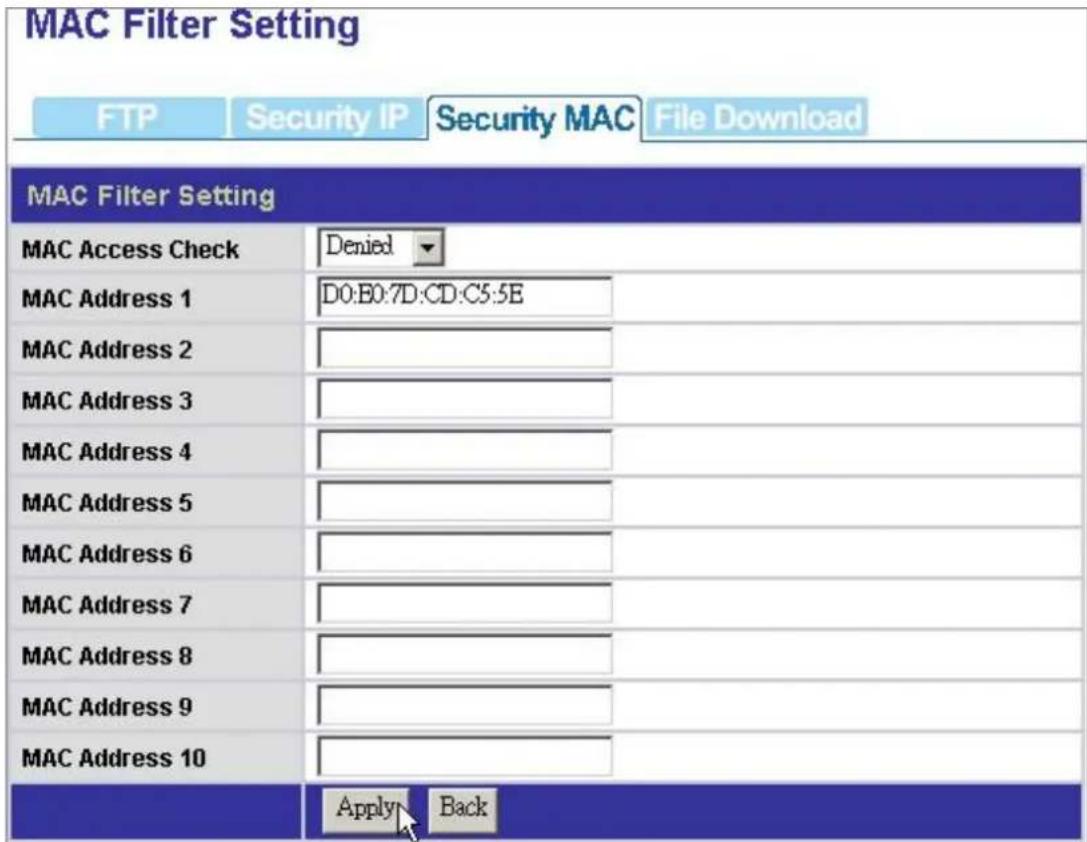
The Security MAC function provides access management by MAC address filtering. There are three modes for the MAC filter.
- Disable: Disable the MAC Filer function. All MAC addresses are allowed to access the device.
- Allowed: Setup the MAC addresses that are allowed to access the device. Only the configured MAC addresses have the right to access the device.
- Denied: Setup the MAC addresses that are denied to access the device. The MAC addresses that are configured are not allowed to access the device.
Tip:
For example, to prevent the MAC address "D0:E0:7D:CD:C5:5E" from connecting to the device:
- Select "Denied" From the "MAC Access Check" drop list.
- Fill the MAC address "D0:E0:7D:CD:C5:5E" in the MAC Address 1 box.
- Click "Apply" to execute your configuration.
text_image
MAC Filter Setting FTP Security IP Security MAC File Download MAC Filter Setting MAC Access Check Denied MAC Address 1 D0:B0:7D:CD:C5:5E MAC Address 2 MAC Address 3 MAC Address 4 MAC Address 5 MAC Address 6 MAC Address 7 MAC Address 8 MAC Address 9 MAC Address 10 Apply BackFile Download- File Download Configuration
The File Download page allows users to download files with this device.
Note: Before using this function, you should load the "ntx_libra.tgz" first.
To get information for installing the "ntx_libra.tgz" file, please see "Character Set & UP&P and Printer"
The instruction below uses the following assumptions:
The address for downloading:
http://www.(example).com/downloads/sample_file
The authorized account name: peter
Password:12345
The target folder where the downloaded data is going to be placed: Share
Note: The download address, account name and password are made up for the example. There is no such an address and account.
To start a download task
- Fill the address you get for downloading files in the "Address" box. (ex, enter the address http://www.(example).com/downloads/sample_file to the "Address" box)
- Enter an account name and password in the "Account" and "Password" box respectively. (Ex, enter "peter" in the "Account" box and "12345" in the "Password" box.
- Select a folder to place the downloaded data in "Save Path" drop list. (Ex, Select the folder Share from the drop list.)
- Click Apply to perform file download.
- To cancel or terminate a download task, click the "Del" button to erase the download information then click "Apply" to execute.
- You may also click the "Status" button to check the download information.

text_image
File Download Configuration FTP Security IP Security MAC File Download Address Account Password Save Path Del http://www.(example).com/doc peer 12345 Share Del TestUPNP Del Notice The download setting for the software that restrict input with maximum values are ten from network. Apply Status BackMaintenance
The Maintenance page allows users to:
- Backup/ download the configuration status of the device.
- Select Code Page for the device.
- Upgrade the device firmware.
- Restart the system
- Reset factory default.
- Apply UP&P and Printer server function to the device.
To open the Maintenance page, click the Maintenance on the configuration categories list.
Upload/ Download Configuration
The Upload/ Download configuration column allows users to backup and download the configuration status of the device.
Backup the Device Configuration Status:
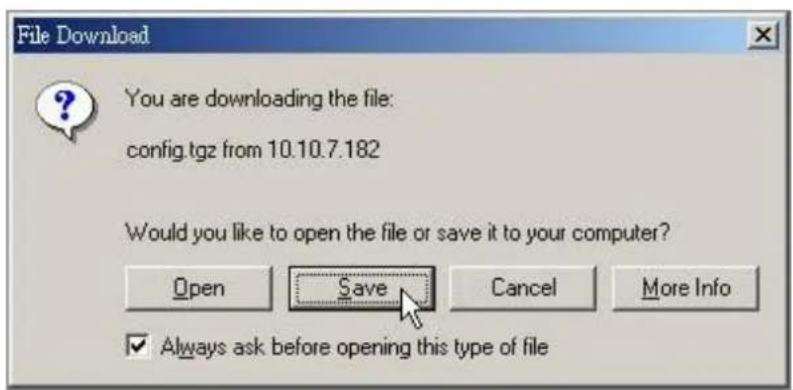
- Click the Download button.
- The File Download dialogue window pops up, click "Save".
text_image
File Download You are downloading the file: config.tgz from 10.10.7.182 Would you like to open the file or save it to your computer? Open Save Cancel More Info ✓ Always ask before opening this type of file- Specify a folder to place the downloaded data and click "Save". Click "Close" to complete.
Reload the Device Configuration Status:
- Click "Browse" and locate the file that you backup before.
Note: To know how to backup the configuration status, see "Backup the Configuration Status"
- Click "Upload" to execute.
- The system restarts automatically to reload your previous configuration.
Config Upload or Download

text_image
Upload D:\Config backup\config.tgz Browse... DownloadFirmware Upgrade
To upgrade the firmware, click the "Browse" button to locate the firmware. Click the "Update" button to perform firmware upgrade.
Note: To get new firmware of the device, please contact your distributor for more information.

text_image
Firmware Upgrade Update Browse...Restart the System
This column allows users to restart the system. To perform system restarting, click the "Start Restarting" button.

text_image
Restart the System Start RestartingReset to Factory Default
To restore the factory default configuration for the device, click the "Start Resetting" button to execute.
Note:
- All the user-defined configurations will be erased and replaced as factory default setting.
- We recommend users to backup the configuration status before restoring factory default. To get more information for backup your configuration, see "Backup the Device Configuration Status"
Reset to Factory Default

Character Set & UPNP & Printer
To enable the Unicode, UPNP and printer server function for the device, you have to install the "ntx_libra.tgz" file to the device before any configuration.
To install the file,
- Insert the included CD and click the "Browse" button.
Note: The Install Menu may auto run. Click "EXIT" to close it. - Select your CD-Rom drive. Double click on the "Character Set & UPNP & Printer" folder. Select the "ntx_libra.tgz" file and click "Open" to browse the file.
- Click "Apply" to perform installation.
- It takes a few seconds to perform installing, please wait upon installation.
Note:
- The Unicode and UPNP function is activated after loading the file.
- To use the device as a printer server, please refer to "Printer Setup" for more instruction.
Character Set& UPNP & Printer Apply r Set & UPNP & Printer\ntx_libra.tgz Browse...
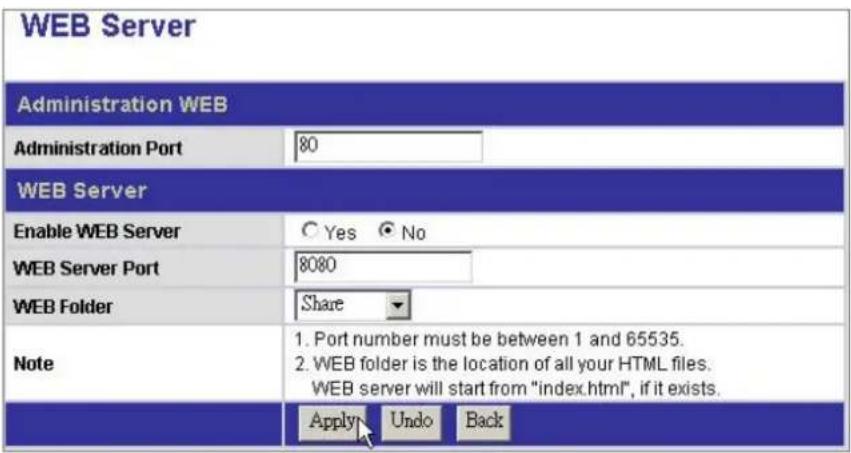
Web Server
Administration WEB
The Administration port is the port for accessing the Web-based management interface.
To modify the Administration Port, enter a port number from 1 to 65535 then click Apply to save your configuration.
Note: The Port 80 is configured as the default Administrator WEB Server Port.
Web Server Configuration
The device embeds a WEB server that allows users to construct a Website.
To activate the WEB server,
- Click "Yes" to enable.
- Specify a port number from 1\~65535.
- Specify a "WEB Folder" where you place your HTML files.
Note:
- The WEB server support HTML format only.
- As default, the Port 80 can't be setup as the Web Server Port for "80" has been configured as the Administration port.
- We also provide a Website template for you to build-up a Website and enjoy the WEB server properties easily. To use the template, insert the included CD, copy the data in the folder "WEB Template". Paste those data in the folder that you configured as the "WEB Folder"
text_image
WEB Server Administration WEB Administration Port 80 WEB Server Enable WEB Server Yes No WEB Server Port 8080 WEB Folder Share Note 1. Port number must be between 1 and 65535. 2. WEB folder is the location of all your HTML files. WEB server will start from "index.html", if it exists. Apply Undo BackDetail
The Detail page shows the information of the connected USB devices:
USB Class: The USB device type.
Manufacturer: The manufacturer of the connected USB device
Device Name: Name of the connected USB device.
USB 2.0/ 1.1: The USB standard supported by the connected USB device.
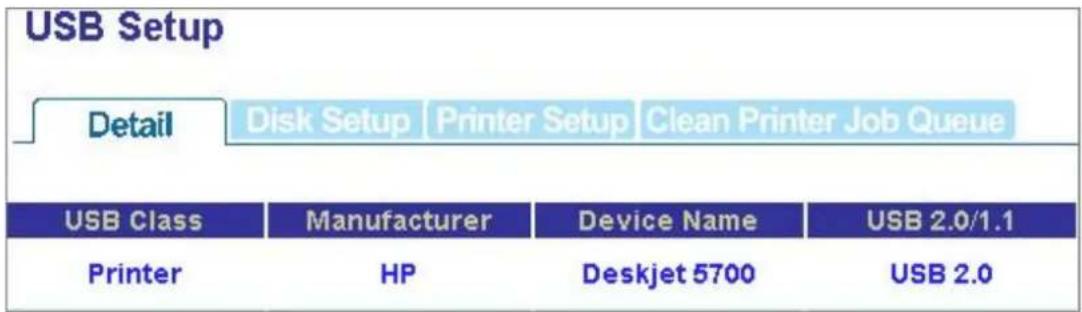
text_image
USB Setup Detail Disk Setup Printer Setup Clean Printer Job Queue USB Class Manufacturer Device Name USB 2.0/1.1 Printer HP Deskjet 5700 USB 2.0Disk Setup
The Disk Setup page allows users to:
- Get information about the connected USB storage.
- Format the connected USB storage device.
- Mount the USB storage to the device.
USB Storage information
| Name (1~16 characters): | Define a name for the USB storage device. Note: The name is also the folder name after mounting the USB storage to the device. For more information to mount the device, please see" Mount/ Dismount Your USB Storage to the Device" |
| Description: | The partition order of the USB storage device. Note: 1. The device recognizes the first four partitions of your USB storage only. We recommend users not to format the USB storage for more than 4 partitions. 2. The device support one connected USB storagedevice. Only one USB storage device can be recognized while there are two USB storage device connected simultaneously. |
| File Type: | The format of the file type of the connected USB storage device. |
| Size: | The space of the connected USB storage device. |
| USB Device1 | ||||||
| Name | Description | File Type | Size | |||
| Partition 1 | FAT16 | 125MB | ||||
| Apply | Advanced | Back | ||||
| Note | 1.Plaese input the mount name with USB device by distict partition and file type.The mount name can't accept blank word and special word when click space bar.If user click the Apply button will been done, then distict partition are umount and mount.User who hold the blank word in text box of mount name shall be clean all information by umount.2.The characters that involve a~z A~Z 0~9 0 || { }^_=@!#$ &+-"`" and "!”" are allowed. | |||||
To Format Your USB Storage device
- Click the "Advanced" button.
- Select the device that you are going to format from the drop list.
- Click "Yes" to perform formatting.
- The system starts formatting. It may take several minutes according to the size of your USB storage device. Please wait and DO NOT execute other configuration for this device while formatting.
| Advanced Setting | |
| Device Select | Device 1 |
| USB HD Format | Yes No |
| Note | If you focus on HD format item immediately, then hard disk will be format for a few minutes. When HD Format will be processed, it no accepts any operating to Apply one again. The other item that Mount device is focused and key the "Mount Name" before click apply button to connect mount samba or USB device strictly. |
Mount/ Dismount Your USB Storage to the Device
Please refer to the following procedures to mount your USB storage to the device:
-
Connect your USB storage to the USB port on the device.
-
Open the GUI. Click Disk→ Disk Setup.
-
Enter a name for the USB storage in the "Name" box and click "Apply"
-
The device is mounted. The system creates a folder for the USB storage.
-
To remove the USB storage from the device, click Disk→Disk Setup in GUI.
Erase the name in the "Name" box and click "Apply". The device is dismounted and ready to be removed now.
Printer Setup
Procedures to setup the printer
Note: The device supports one connected USB printer only. Printer Connections on both the USB ports may led the printer functioned unsuccessfully.
-
Connect the USB cable of your printer to the device. Power on your printer.
-
Open the GUI and click "Maintenance". Install the printer server file to the device in the "UP&P and Printer" column.
Note: To get information for installing the printer server file, please see "UP&P and Printer"
- Click USB→ Detail, you can see the information of your printer.

text_image
USB Setup Detail Disk Setup Printer Setup Clean Printer Job Queue USB Class Manufacturer Device Name USB 2.0/1.1 Printer HP Deskjet 5700 USB 2.0- Click Printer Setup, Click "Yes" in the "Printer enable" column and click "Apply"
Note: After finishing the four steps above, the printer server function is activated. To setup the computers that are going to use the printer, please follow the instructions from step 5.
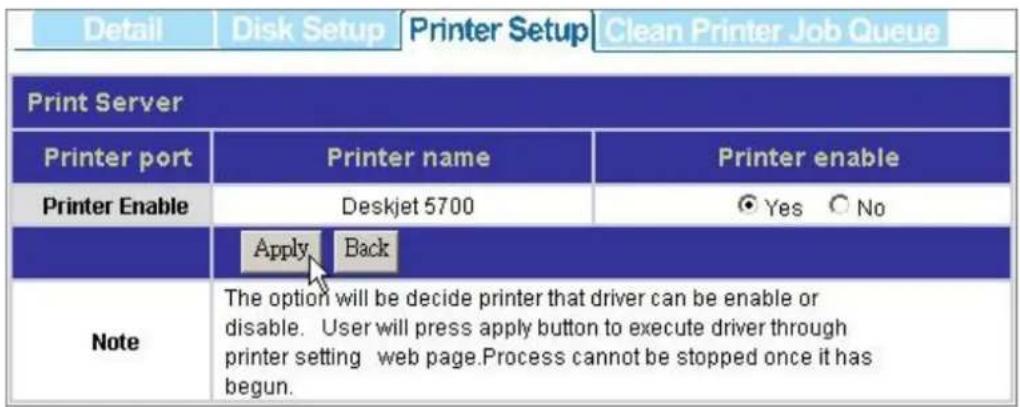
text_image
Detail Disk Setup Printer Setup Clean Printer Job Queue Print Server Printer port Printer name Printer enable Printer Enable Deskjet 5700 Yes No Apply Back Note The option will be decide printer that driver can be enable or disable. User will press apply button to execute driver through printer setting web page.Process cannot be stopped once it has begun.- Double click the shortcut on your desktop to start the PNMD. The PNMD
window pops up. Select your NAS and click the Open Share button.
- You can find a printer icon. Double click on this icon to proceed.
- The system asks for installing the driver for the printer. Click "Yes" on the warning dialogue windows to proceed.

text_image
Connect to Printer You are about to connect to a printer on I-DRIVE, which will automatically install a print driver on your machine. Printer drivers may contain viruses or scripts that can be harmful to your computer. It is important to be certain that the computer sharing this printer is trustworthy. Would you like to continue? Yes No- Insert your CD that came with your printer. Click the "Have Disk Button"
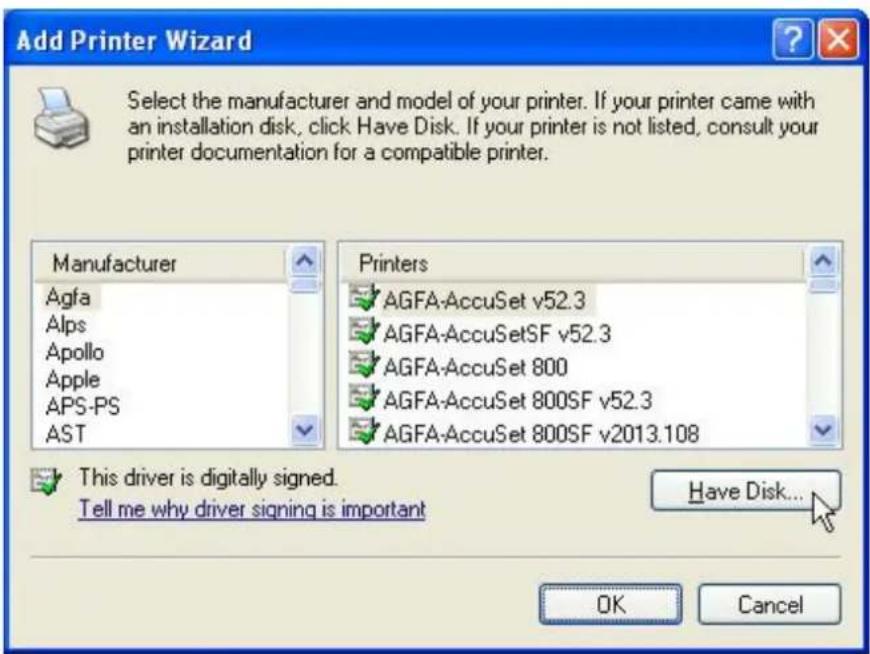
text_image
Add Printer Wizard Select the manufacturer and model of your printer. If your printer came with an installation disk, click Have Disk. If your printer is not listed, consult your printer documentation for a compatible printer. Manufacturer Agfa Alps Apollo Apple APS-PS AST Printers AGFA-AccuSet v52.3 AGFA-AccuSetSF v52.3 AGFA-AccuSet 800 AGFA-AccuSet 800SF v52.3 AGFA-AccuSet 800SF v2013.108 This driver is digitally signed. Tell me why driver signing is important Have Disk... OK Cancel- Browse to the driver in your CD. Click "Open" to browse the driver.
Tip: The correct driver is usually the file with the product name in "*.inf" format.

text_image
Locate File Look in: HPPP (D:) Applications chs cht common deu enu esm fra hbr ita kor nld program files ptb temp util Windows autorun.inf hpf5700p.inf hpf5700q.inf hpf5700u.inf My Recent Documents Desktop My Documents My Computer My Network File name: hpf5700p.inf Files of type: Setup Information (*.inf) Open Cancel- Click the "OK" button to start driver installation.

text_image
Add Printer Wizard Select the manufacturer and model of your printer. If your printer came with an installation disk, click Have Disk. If your printer is not listed, consult your printer documentation for a compatible printer. Printers HP Deskjet 5700 Series This driver is digitally signed. Tell me why driver signing is important Have Disk... OK Cancel11. The printer is ready for use now.
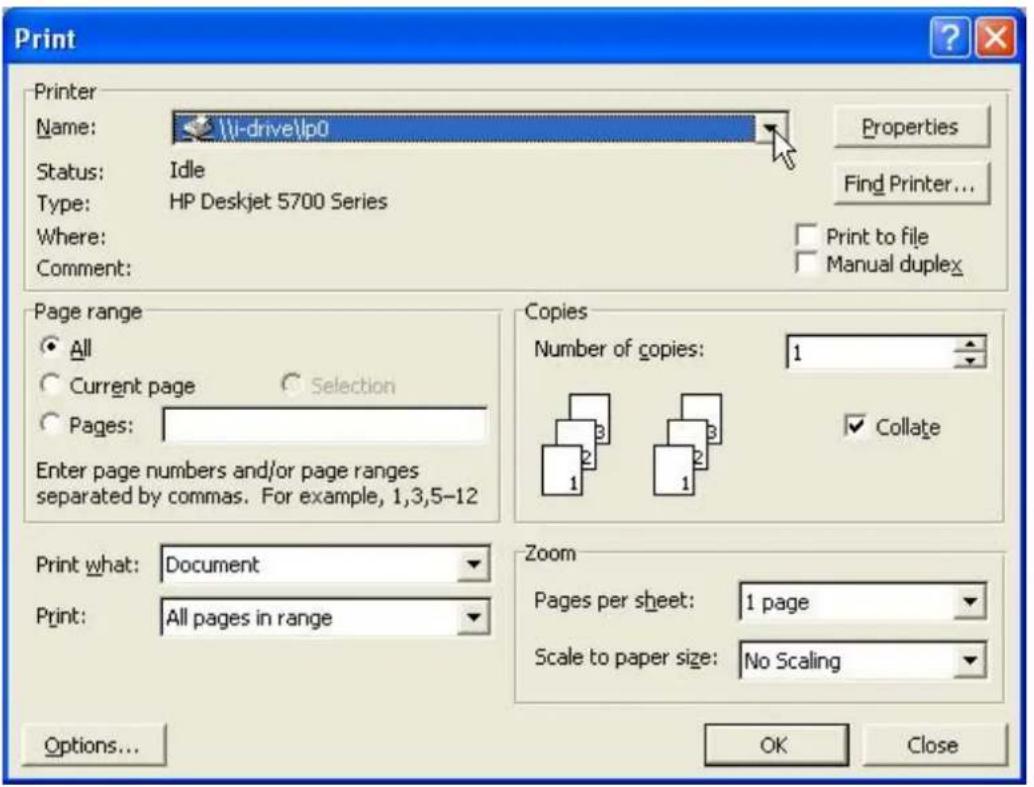
text_image
Print Printer Name: \i-drive\lp0 Status: Idle Type: HP Deskjet 5700 Series Where: Comment: Properties Find Printer... Print to file Manual duplex Page range All Current page Selection Pages: Enter page numbers and/or page ranges separated by commas. For example, 1,3,5-12 Copies Number of copies: 1 Collate Print what: Document Print: All pages in range Zoom Pages per sheet: 1 page Scale to paper size: No Scaling Options... OK CloseClean Printer Job Queue
The Clean Printer Job Queue allows users to clean the pending print jobs that wait for printing.
To perform cleaning printer job queue, click the "Execute" button and click "Yes" to confirm.
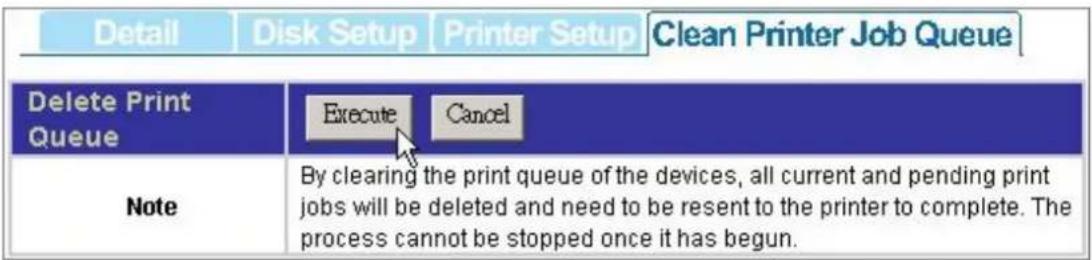
text_image
Detail | Disk Setup | Printer Setup | Clean Printer Job Queue Delete Print Queue Execute Cancel Note By clearing the print queue of the devices, all current and pending print jobs will be deleted and need to be resent to the printer to complete. The process cannot be stopped once it has begun.Appendix
Using EZIP Backup to back up your files
This program helps users to backup the files on you computer to your NAS. Those back-upped files are going to be compressed as *.zip format in your NAS.
- Double click the shortcut on your desktop.
- Click the icon on system tray. The "EZIP Backup" window pops-up. You
may click the button to close this program or click the button to minimize this window to system tray.
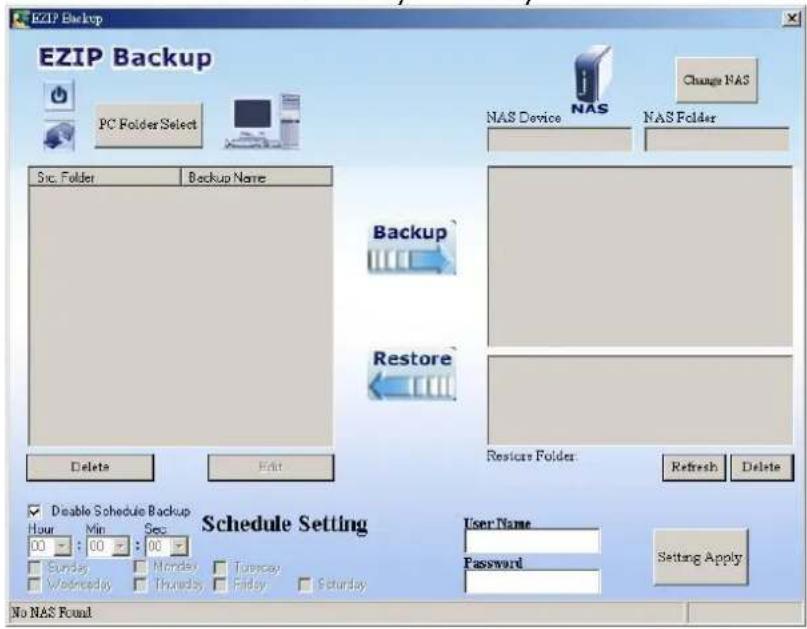
text_image
EZIP Backup EZIP Backup PC Folder Select Src. Folder Backup Name Backup Restore Delete Edit NAS Device NAS Folder Change NAS Restore Folder: Refresh Delete Disable Schedule Backup Schedule Setting User Name Password Setting Apply No NAS Found- Click "PC Folder Select" button. Browse a folder that you are going to backup and click OK. The folder that you selected shows on the list.
| Src. Folder | Backup Name |
| D:\Working Table | Working Table |
- Click the "Change NAS" button to select a NAS. Select a NAS in the NAS device drop list. Select a destination folder for locating the back-upped files.
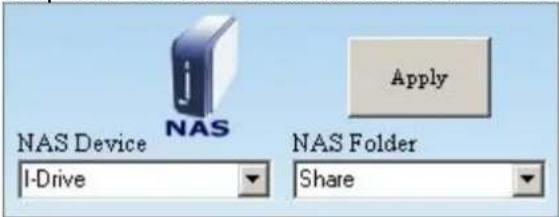
text_image
NAS Device I-Drive Apply NAS Folder Share- Fill in a user name and password for accessing this folder. Select the time that you are going to execute backup. Click "Setting Apply".
Note: You may also mark the "Disable Schedule Backup" checkbox to disable EZIP Backup to backup your files by schedule.

text_image
Disable Schedule Backup Schedule Setting User Name Password Setting Apply Hour Min Sec 00 : 00 : 00 Sunday Monday Tuesday Wednesday Thursday Friday Saturday- Click the "Apply" button on the up-right corner of the window.

- Click the button to start backup.
To restore a back-upped file to your PC, select the file on the list and click

to perform restoring.
1. How to shut down the device properly? Ans.
To shut down the System properly, press the Power button on the front panel for two seconds until Power LED blinks then go off.
2. The PNMD can't configure My Network setting. Ans.
☐ Make sure that your RJ-45 cable is connected with the device and your PC/Switch.
☐ Check if the LINK/ACT LED illuminates.
□ Check the power of the device, your PC and Switch. Make sure that it's on.
☐ Check your PC's IP address, make sure that it has a static IP or connects with a router with DHCP client. For instruction about the IP setting, Please refer to the "IP Protocol Setup" Chapter.
☐ Reboot the system with Web-based UI or press the Reset Default Button to restore the factory default setting and reboot.
3. The device can't find my IDE interface HD Ans.
☐ Verify that your Jumper on your HD is configured as Master Different Hard Disk has different jumper settings; please refer to the manual that came with your Hard Disk for more information.
☐ The HD is unformatted. Please format it with our HD Format tool.
☐ The partition format of HD is not EXT3, ex. NTFS. Please format it with the provided Format tool.
☐ The HD maybe broken. Please change another HD and try again.
4. I use Device as a Web/ FTP server, but the users that outside the LAN can't access it. Ans.
☐ For WAN users to get access to the FTP or WEB server, you should link the device to a router with appropriate configuration. Please make sure that:
- The NAT functionality is enabled in your router.
- In the port-mapping session, the "Internal Host IP" should be configured as the IP address of this Device and the value of "Port" should be corresponded to the port number of the WEB server or FTP server you configured.
(Ex, If the IP address of your device is 10.10.7.251, the port number of your FTP is configured as 21 and the port for Web Server is as 8888, you should add or modify a port mapping record, set the Internal Host IP address as 10.10.7.251, the Port as 21. then add or modify another port mapping record, set the Internal Host IP address as 10.10.7.251 and the Port as 8888) - Before allowing the device to communicate with Internet, we strongly recommend users to add a Firewall device to secure your network from being invading.
5. I can't access this device.
Ans.
□ Check the LINK/ACT LED of Device illuminates.
☐ Reboot the system with Web-based UI or press the Default Button to restore the Factory default setting and reboot.
☐ Maybe there are too many concurrently connected users. The system blocks the upcoming users after meeting the maximum allowed number. If you enable the SWAP function for the device, a maximum 32 users are allowed. If not, the system allowed 5 concurrent connected users. To get instruction enabling the SWAP function, please see "HD Format".
6. I have accessed the HD, but I can't access to the folders.
Ans.
□ Verify you have the correct username and password.
☐ If you have accessed to any folder in the HD and would like to use another set of username/ password for different authority, please log off your operation system and log on again.
☐ To see the folders of the connected USB storage device, you have to mount it to the NAS first. To get instruction mounting your USB storage device, please see "Mount/ dismount your USB storage to the device".
7. There are unrecognizable characters as the file name.
Ans.
☐ Verify if the Unicode file is loaded to the device successfully
☐ To get instruction loading the file, please see "Character Set & UPNP & Printer"
8. I have followed the procedures to setup the printer and it just doesn't
work.
Ans,
☐ Check if you power your printer on.
☐ Verify that the cables are connected correctly
☐ Make sure that you enactive the printer server functionality, you can refer to "Printer setup" for more information
☐ You may select an incompatible printer driver. Click Start→ Setup→ Control Panel. Double click the printer icon. Remove this printer and install a different driver and try again.
☐ The device supports one connected USB printer only. Printer Connections on both the USB ports may led the printer functioned unsuccessfully.
Product Specification
Standard
IEEE 802.3, IEEE 802.3u, IEEE 802.3ab
Support Protocol
TCP/IP, HTTP, SMB, FTP, EXT3
Support concurrently connected Users
Samba: Five Users / FTP: Five Users
(Allow 32 users with SWAP enabled)
Interface
One 10/100/1000 Mbps RJ-45 Ethernet port
One Default Button
Connection speed
10/100/1000 Mbps
Support Hard Diskette
One removable 3.5" external HD (ATA)
Diagnostic LEDs
Power(Green), HDD ACT(Amber) USB I(Green), USB II(Green), LINK/ACT(Green),
Dimensions
220(L)x 132(W)x 60(H) mm
Operating Temperature
Operating - 0\~40°C; Storing - -10\~65°C
Power Supply
DC 12V 3A External power adapter
Certification
FCC, CE, VCCI Class A
61NB-02300+207/C