HP-5001K - Network adapter Edimax - Free user manual and instructions
Find the device manual for free HP-5001K Edimax in PDF.

User questions about HP-5001K Edimax
0 question about this device. Answer the ones you know or ask your own.
Ask a new question about this device
Download the instructions for your Network adapter in PDF format for free! Find your manual HP-5001K - Edimax and take your electronic device back in hand. On this page are published all the documents necessary for the use of your device. HP-5001K by Edimax.
USER MANUAL HP-5001K Edimax
500Mbps Powerline Ethernet Adapter
HP-5001
User Manual
Version 1.0 / March, 2011

text_image
EDiMAX NETWORKING PEOPLE TOGETHER HP-5001 500Mbps Powerline Ethernet Adapter Power Ethernet PLCCopyright
Copyright © Edimax Technology Co., Ltd. all rights reserved. No part of this publicaon may be reproduced, transmied, transcribed, stored in a retrieval system, or translated into any language or computer language, in any form or by any means, electronic, mechanical, magnec, opcal, chemical, manual or otherwise, without the prior written permission from Edimax Technology Co., Ltd.
Edimax Technology Co., Ltd. makes no representaons or warranes, either expressed or implied, with respect to the contents hereof and specially disclaims any warranes, merchantability, or tness for any parcular purpose. Any soware described in this manual is sold or licensed as is. Should the programs prove defecve following their purchase, the buyer (and not this company, its distributor, or its dealer) assumes the enre cost of all necessary servicing, repair, and any incidental or consequential damages resulting from any defect in the soware. Edimax Technology Co., Ltd. reserves the right to revise this publicaon and to make changes from me to me in the contents hereof without the obligaon to nofy any person of such revision or changes.
The product you have purchased and the setup screen may appear slightly dierent from those shown in this QIG. For more informaon about this product, please refer to the user manual on the CD-ROM. The soware and specicaons are subject to change without noce. Please visit our website www.edimax.com for updates. All brand and product names menoned in this manual are trademarks and/or registered trademarks of their respective holders.
Contents
Chapter 1: Introducon ....3
1.1 Product Features....3
1.2 Applicaon .... 3
1.3 Compatibility....3
1.4 System Requirements .... 4
Chapter 2: Adapter ....5
2.1 Ethernet Port....5
2.2 Buons....5
2.3 LEDs....6
Chapter 3: Utility Soware Installaon ....7
Chapter 4: Using the Utility Soware....14
4.1 Main Tab 14
4.2 Privacy Tab 15
4.3 Diagnoscs Tab 16
4.4 About Tab....17
Chapter 5: Security (Group) Buon....18
5.1 Forming a HomePlug AV Logical Network....18
5.2 Joining a Network ....18
5.3 Leaving a Network ....19
Chapter 1: Introduction
1.1 Product Features
● Data rates up to 500Mbps
● Easy plug-and-play setup
● Works with routers, computers, and other network devices
● Consumes less than 1W of power in power saving mode
● Transmits network data via exisng electrical wires (no external cabling required)
1.2 Application
● High-denion (HD) and standard-denion (SD) video distribuon
● Broadband Internet sharing
- Internet Protocol Television (IPTV) and Voice over Internet Protocol (VoIP) applicaons
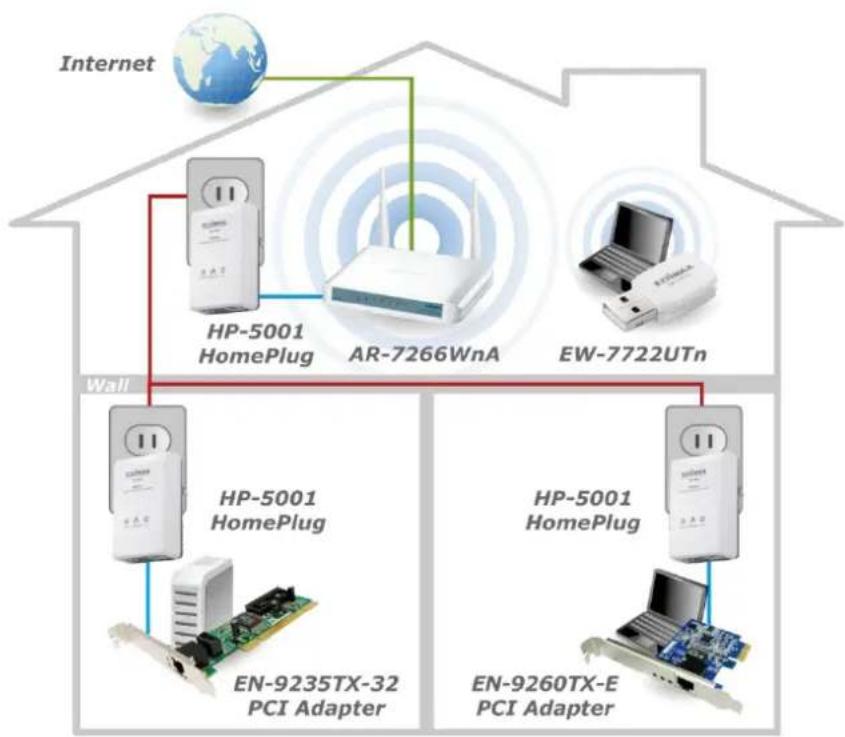
flowchart
graph TD
    A["Internet"] --> B["HP-5001 HomePlug"]
    A --> C["AR-7266WnA"]
    A --> D["EW-7722UTn"]
    B --> E["Wall"]
    C --> E
    D --> E
    E --> F["HP-5001 HomePlug"]
    E --> G["EN-9235TX-32 PCI Adapter"]
    E --> H["HP-5001 HomePlug"]
    E --> I["EN-9260TX-E PCI Adapter"]
1.3 Compatibility
200Mbps and 500Mbps powerline devices (HomePlug AV standard) are incompatible and cannot be used with 14Mbps and 85Mbps powerline devices (HomePlug 1.0 and 1.1 standards).
1.4 System Requirements
| Operang System | Ulity can support Windows 2000/XP/Vista/7 |
| CPU | Intel Penum III 2.0GHz (or higher) |
| RAM | 128MB (at least) |
| Free Disk Space | 20MB (at least) |
| Network Interface | Fast Ethernet (100Mbps) network interface and an Ethernet cable |
Chapter 2: Adapter

text_image
EOIMAX NATIONAL EQUATORIANT HP-5001 500Mbps Power Ethanol Adapter Power Ethernet/ PLC2.1 Ethernet Port
You can connect the HP-5001 to a router, a computer, or any network device via this Ethernet port.
2.2 Buttons
| Reset | Press and hold the reset buon for 3 seconds to restore the powerline adapter to factory defaults. |
| Security (Group) | Press and hold the “Security (Group)” buon for more than 10 seconds to randomize the adapter’s NMK value; or press and hold the “Security (Group)” buon for 3 seconds to add the powerline adapter to the exisng AV logical network (AVLN). |
2.3 LEDs
| Ethernet Port | Green | On | Ethernet conncon established |
| Flashing | Network acvity | ||
| O | No Ethernet conncon | ||
| Power | Green | On | Powered on |
| Flashing | ● In power saving mode● Device reseng● Synchronizing password | ||
| O | Powered o | ||
| PLC | Green/Orange/Red | On | Green: PHY RATE > 80MbpsOrange: 40Mbps < PHY RATE < 80MbpsRed: PHY RATE < 40Mbps |
| O | Not in a powerline network |
Chapter 3: Utility Software Installation
Step 1 Before installing the ulity soware, make sure that no other powerline ulity is installed on your computer. If any other ulity soware is installed, uninstall it and reboot the computer.
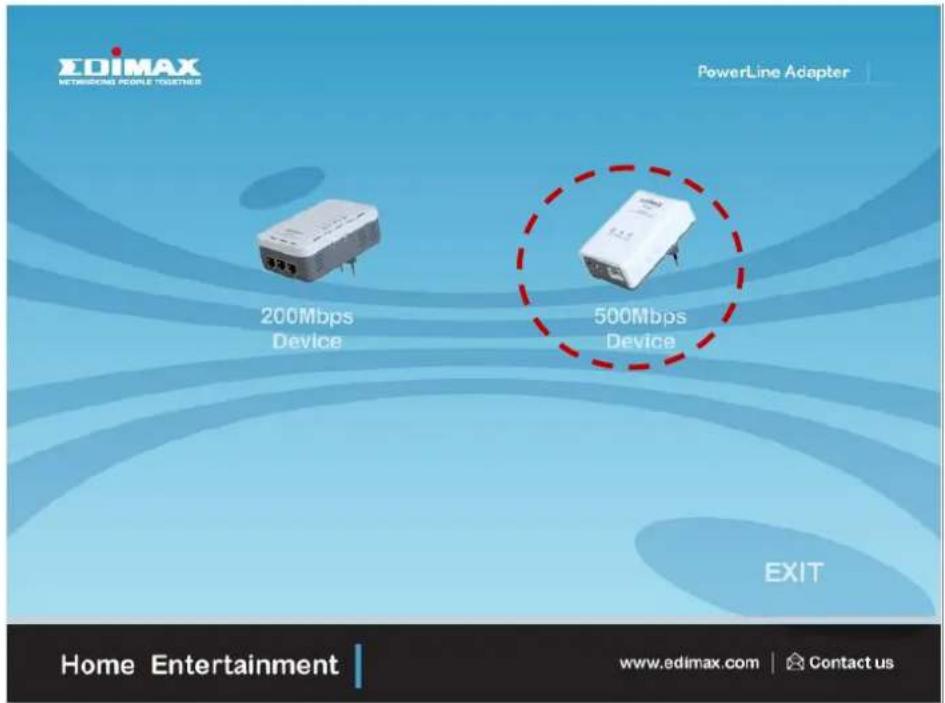
Step 2 Insert the CD into your CD-ROM drive. When the following image appears, click "500Mbps Device".
text_image
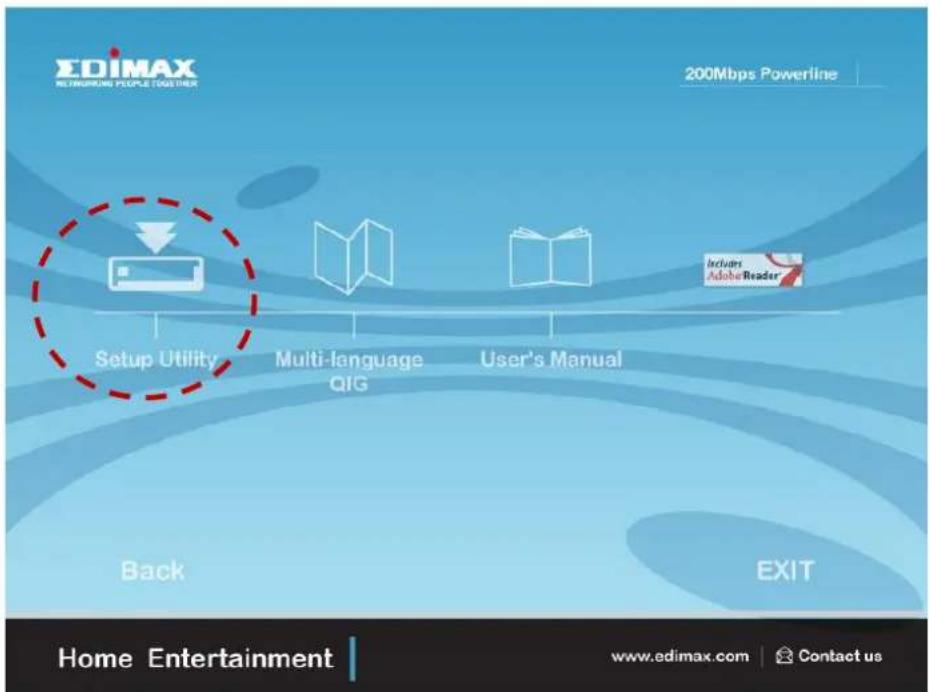
EDIMAX NETWORKING PEOPLE TOGETHER PowerLine Adapter 200Mbps Device 500Mbps Device EXIT Home Entertainment www.edimax.com | Contact usStep 3 Then click "Setup Ulity".
text_image
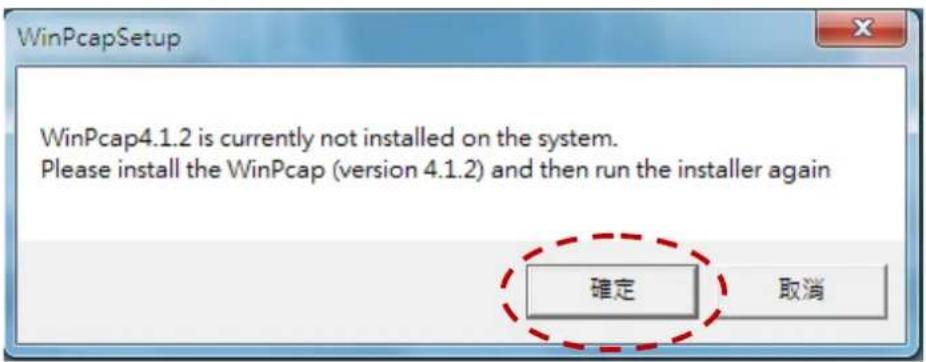
SDIMAX NEWMOKING PEOPLE TOGETHER 200Mbps Powerline Setup Utility Multi-language QIG User's Manual Back EXIT Home Entertainment www.edimax.com | Contact usNote : You will get the following image, if your computer did not install WinPcap4.1.2 before. Please click "Apply" to install WinPcap4.1.2.
text_image
WinPcapSetup WinPcap4.1.2 is currently not installed on the system. Please install the WinPcap (version 4.1.2) and then run the installer again 確定 取消
text_image
WinPcap 4.1.2 Setup WinPcap 4.1.2 Installer Welcome to the WinPcap 4.1.2 Installation Wizard This product is brought to you by CACE TECHNOLOGIES Packet Capturing and Network Analysis Solutions Nullsoft Install System v2.46 Next > Cancel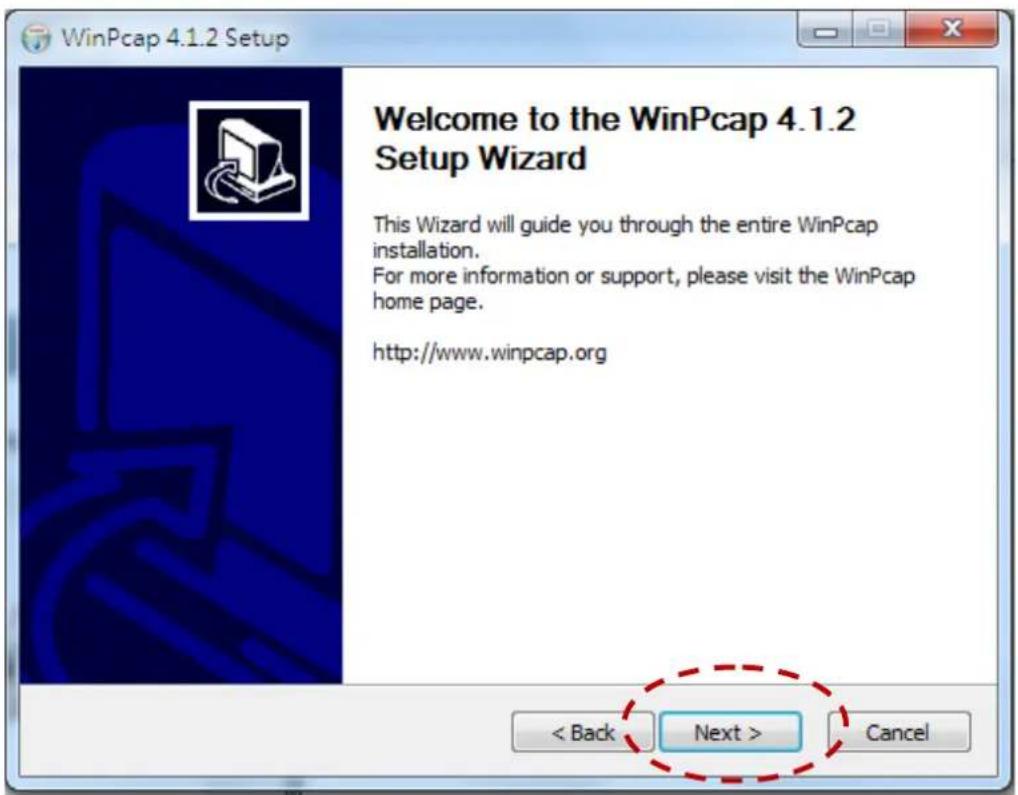
text_image
WinPcap 4.1.2 Setup Welcome to the WinPcap 4.1.2 Setup Wizard This Wizard will guide you through the entire WinPcap installation. For more information or support, please visit the WinPcap home page. http://www.winpcap.org < Back Next > Cancel
text_image
WinPcap 4.1.2 Setup License Agreement Please review the license terms before installing WinPcap 4.1.2. Press Page Down to see the rest of the agreement. Copyright (c) 1999 - 2005 NetGroup, Politecnico di Torino (Italy). Copyright (c) 2005 - 2010 CACE Technologies, Davis (California). All rights reserved. Redistribution and use in source and binary forms, with or without modification, are permitted provided that the following conditions are met: 1. Redistributions of source code must retain the above copyright notice, this list of conditions and the following disclaimer. 2. Redistributions in binary form must reproduce the above copyright notice, this list of conditions and the following disclaimer in the documentation and/or other materials If you accept the terms of the agreement, click I Agree to continue. You must accept the agreement to install WinPcap 4.1.2. Nullsoft Install System v2.46 < Back .I Agree Cancel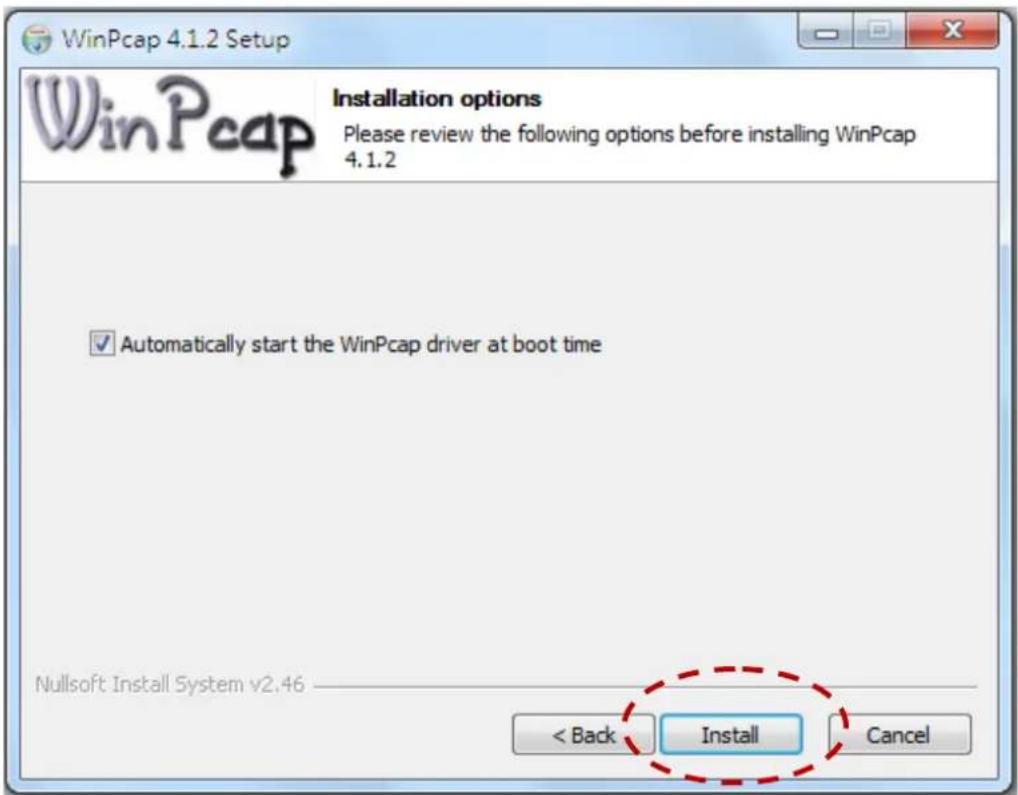
text_image
WinPcap 4.1.2 Setup Installation options Please review the following options before installing WinPcap 4.1.2 ✓ Automatically start the WinPcap driver at boot time Nullsoft Install System v2.46 < Back Install Cancel
text_image
WinPcap 4.1.2 Setup Completing the WinPcap 4.1.2 Setup Wizard WinPcap 4.1.2 has been installed on your computer. Click Finish to close this wizard. < Back Finish CancelStep 4 When the setup wizard appears, click "Next" to connue.

text_image
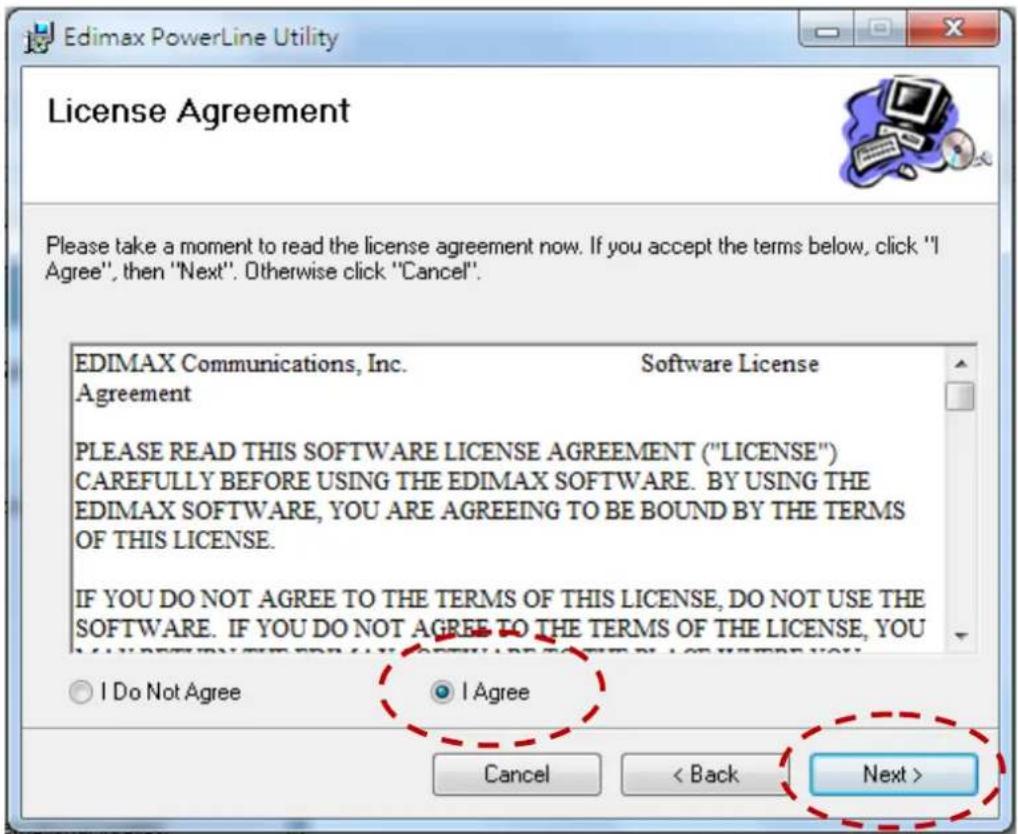
Welcome to the Edimax PowerLine Utility Setup Wizard The installer will guide you through the steps required to install Edimax PowerLine Utility on your computer. WARNING: This computer program is protected by copyright law and international treaties. Unauthorized duplication or distribution of this program, or any portion of it, may result in severe civil or criminal penalties, and will be prosecuted to the maximum extent possible under the law. Cancel < Back Next >Step 5 Select where you want to install the ulity soware, and then click "Next".
text_image
Edimax PowerLine Utility License Agreement Please take a moment to read the license agreement now. If you accept the terms below, click "I Agree", then "Next". Otherwise click "Cancel". EDIMAX Communications, Inc. Software License Agreement PLEASE READ THIS SOFTWARE LICENSE AGREEMENT ("LICENSE") CAREFULLY BEFORE USING THE EDIMAX SOFTWARE. BY USING THE EDIMAX SOFTWARE, YOU ARE AGREEING TO BE BOUND BY THE TERMS OF THIS LICENSE. IF YOU DO NOT AGREE TO THE TERMS OF THIS LICENSE, DO NOT USE THE SOFTWARE. IF YOU DO NOT AGREE TO THE TERMS OF THE LICENSE, YOU I Do Not Agree I Agree Cancel < Back Next >
text_image
Edimax PowerLine Utility Select Installation Folder The installer will install Edimax PowerLine Utility to the following folder. To install in this folder, click "Next". To install to a different folder, enter it below or click "Browse". Folder: C:\Program Files\Edimax PowerLine Utility\ Browse... Disk Cost... Install Edimax PowerLine Utility for yourself, or for anyone who uses this computer: Everyone Just me Cancel < Back Next >
text_image
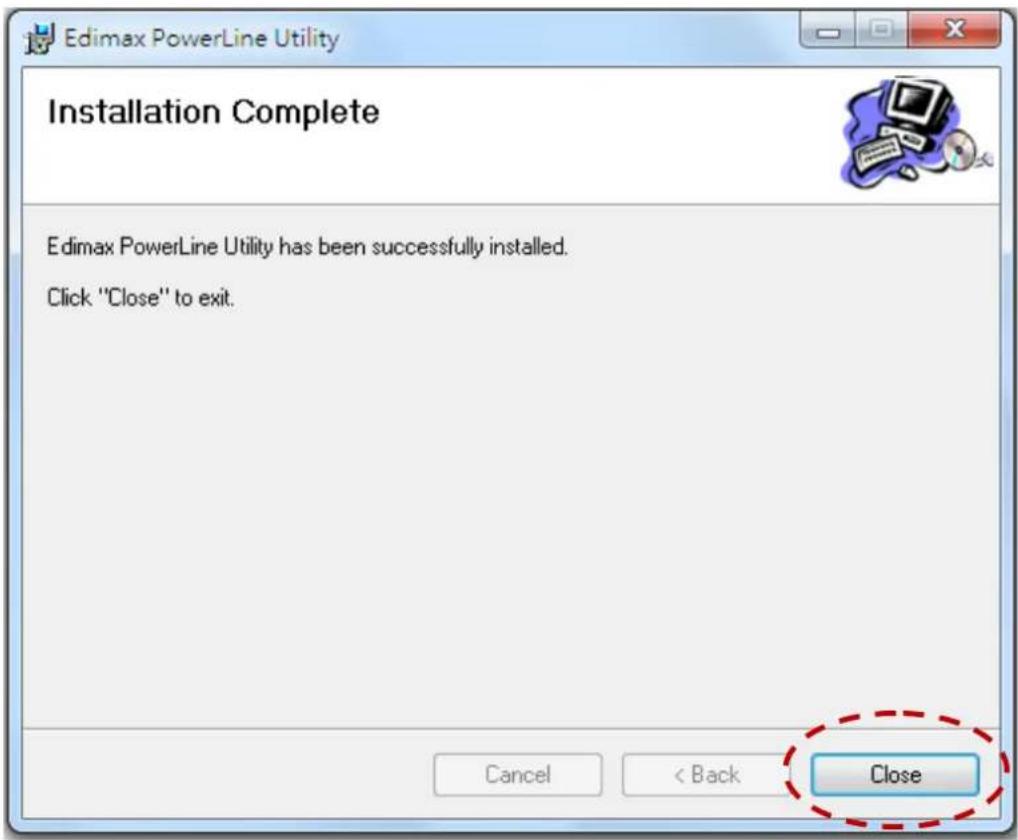
Edimax PowerLine Utility Confirm Installation The installer is ready to install Edimax PowerLine Utility on your computer. Click "Next" to start the installation. Cancel < Back Next >Step 6 Aer the installaon is complete, click "Close".
text_image
Edimax PowerLine Utility Installation Complete Edimax PowerLine Utility has been successfully installed. Click "Close" to exit. Cancel < Back CloseStep 7 An icon will appear on your desktop. Click the icon to open the ulity soware.

Note: You can manage all the connected powerline adapters with the ulity soware. However, installing the ulity soware is oponal.
Chapter 4: Using the Utility Software
4.1 Main Tab
The “Main” tab provides a list of powerline adapters connected to the computer. The upper panel displays local powerline adapters. The lower panel displays remote powerline adapters in the network.

text_image
Edimax PowerLine Utility Main | Privacy | Diagnostics | About | Local Device(s) on your computer: Device Type MAC Address Powerline device 00:1E:E3:00:26:C6 HomePlug Adapter NOT DETECTED Connect Upgrade Firmware 0 Powerline Devices detected: Network Type: Private Autoscan On Device Name Password Quality Rate(Mbps) MAC Address Device 3 125.00 00:1E:E3:00:26:C9 Device 2 92.00 00:1E:E3:00:26:CA Device 1 98.00 00:1E:E3:00:26:CD Device 5 120.00 00:1E:E3:00:26:CE EDIMAX NETWORKING PEOPLE TOGETHER Rename Enter Password Add Scan Close| Connect | Click “Connect” and the ulity soware will scan for other local powerline adapters. |
| Rename | Select a device and click “Rename” to rename the device. |
| Enter Password | By default, this column is blank. Select a device and click “Enter Password” to set up a password for the device. |
| Add | This buon is used to add a remote powerline adapter to the exisng network. |
| Scan | Click “Scan” and the ulity soware will perform an immediate scan of other remote powerline adapters. By default, the ulity automacally scans every few seconds. |
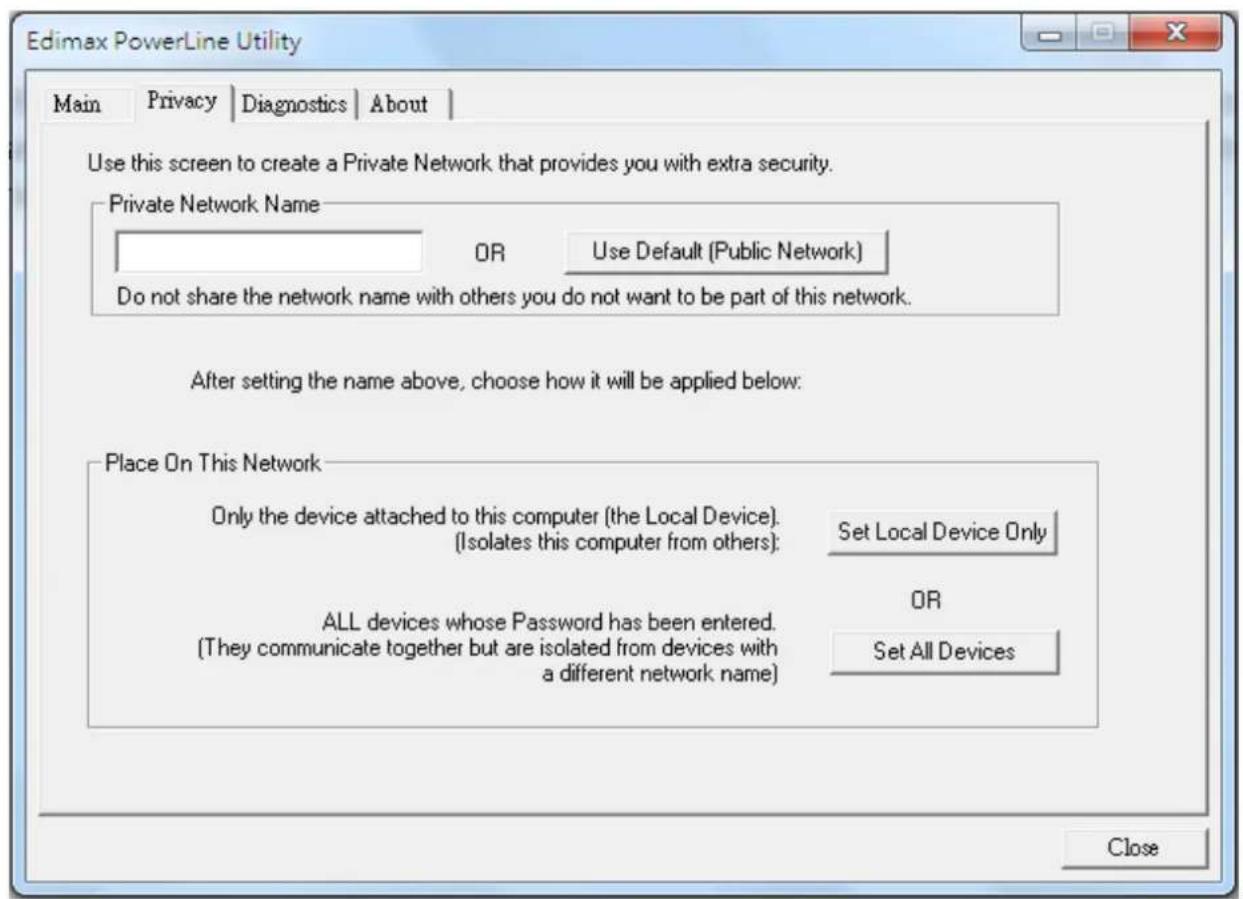
4.2 Privacy Tab
In the “Privacy” tab, you can create a private network by changing the default network name and congregate its security sengs. If the network name is modified to anything other than the default, the network type in the “Main” tab will be changed to “Private”.
text_image
Edimax PowerLine Utility Main | Privacy | Diagnostics | About | Use this screen to create a Private Network that provides you with extra security. Private Network Name OR Use Default (Public Network) Do not share the network name with others you do not want to be part of this network. After setting the name above, choose how it will be applied below: Place On This Network Only the device attached to this computer (the Local Device). (Isolates this computer from others): Set Local Device Only ALL devices whose Password has been entered. (They communicate together but are isolated from devices with a different network name) OR Set All Devices Close| Set Local Device Only | This buon is used to change the network name and password of the local device. |
| Set All Devices | This buon is used to change the logical network of all devices that appear in the “Main” tab. |
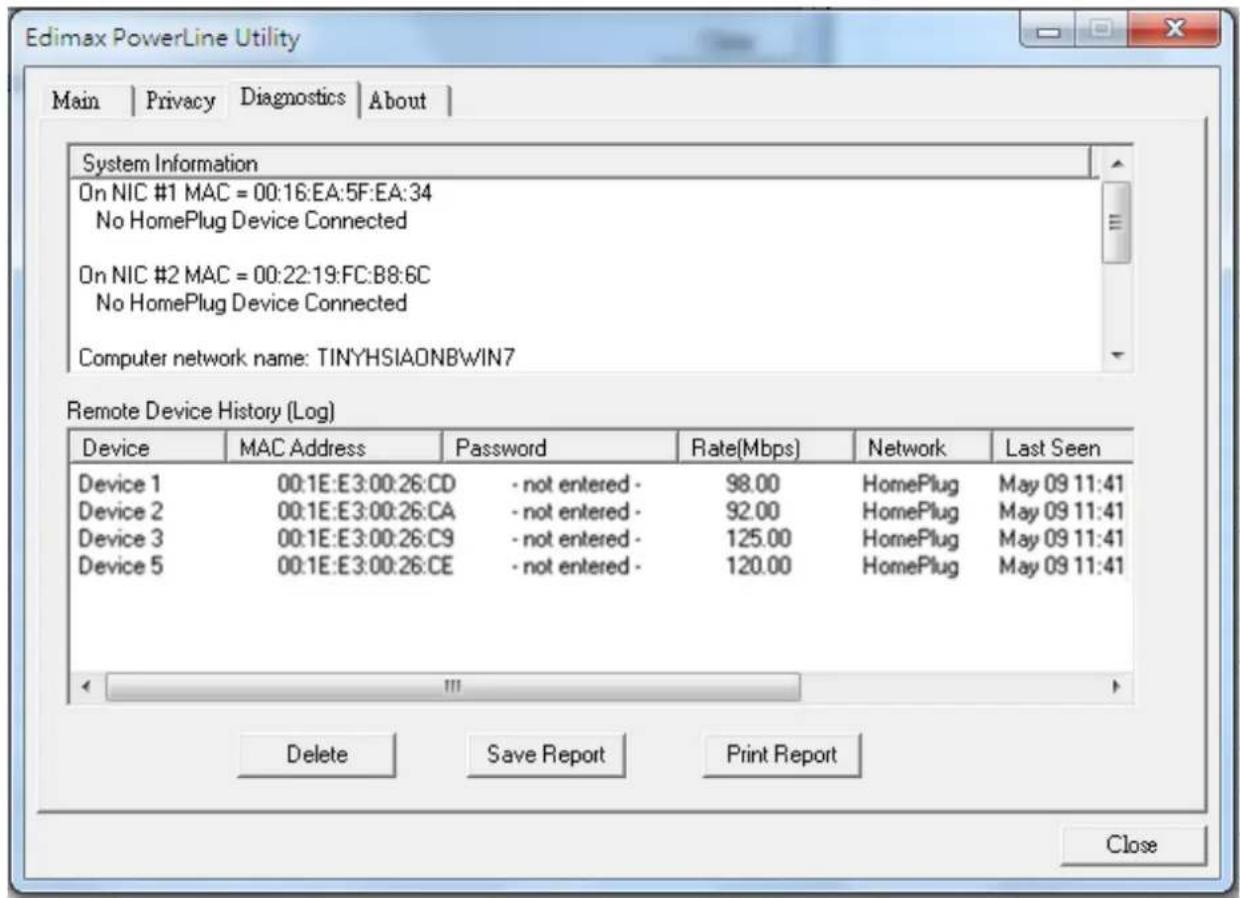
4.3 Diagnostics Tab
text_image
Edimax PowerLine Utility Main | Privacy | Diagnostics | About | System Information On NIC #1 MAC = 00:16:EA:5F:EA:34 No HomePlug Device Connected On NIC #2 MAC = 00:22:19:FC:B8:6C No HomePlug Device Connected Computer network name: TINYHSIAONBWIN7 Remote Device History (Log) Device MAC Address Password Rate(Mbps) Network Last Seen Device 1 00:1E:E3:00:26:CD -not entered 98.00 HomePlug May 09 11:41 Device 2 00:1E:E3:00:26:CA -not entered 92.00 HomePlug May 09 11:41 Device 3 00:1E:E3:00:26:C9 -not entered 125.00 HomePlug May 09 11:41 Device 5 00:1E:E3:00:26:CE -not entered 120.00 HomePlug May 09 11:41 << Delete Save Report.Print Report CloseThe "Diagnoscs" tab displays the system informaon and history of all remote devices.
The upper panel displays technical data concerning the soware and hardware on the host computer and the lower panel displays the history of all remote devices.
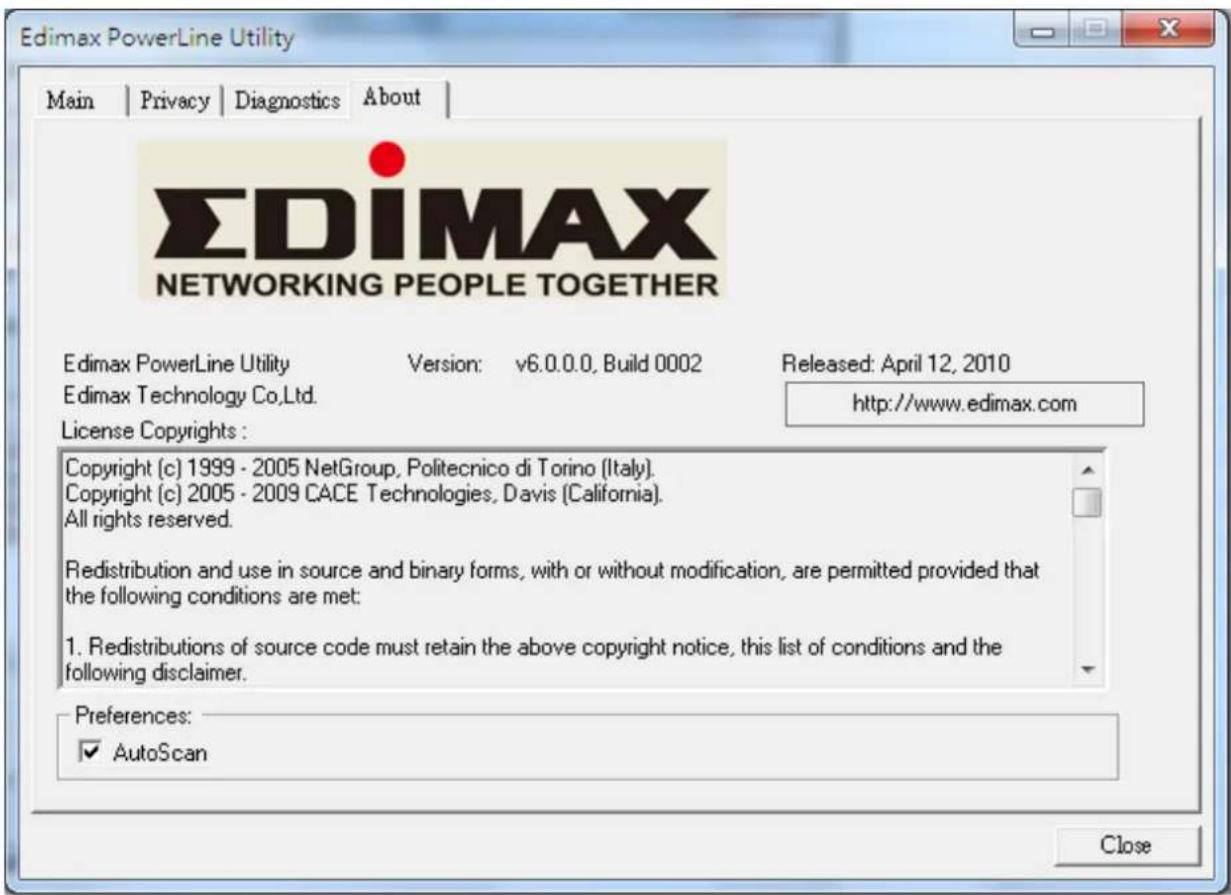
4.4 About Tab
The “About” tab contains some basic informaon about the soware. You can also enable or disable the autoscan funcon under “Preferences”.
text_image
Edimax PowerLine Utility Main | Privacy | Diagnostics | About | EDIMAX NETWORKING PEOPLE TOGETHER Edimax PowerLine Utility Version: v6.0.0.0, Build 0002 Released: April 12, 2010 Edimax Technology Co.,Ltd. License Copyrights : Copyright (c) 1999 - 2005 NetGroup, Politecnico di Torino (Italy). Copyright (c) 2005 - 2009 CACE Technologies, Davis (California). All rights reserved. Redistribution and use in source and binary forms, with or without modification, are permitted provided that the following conditions are met: 1. Redistributions of source code must retain the above copyright notice, this list of conditions and the following disclaimer. Preferences: ✓ AutoScan CloseChapter 5: Security Button
This secon demonstrates how to add or remove devices from a HomePlug AVLN with the “Security (Group)” buon. The “Power” LED indicates the operaon status and result.
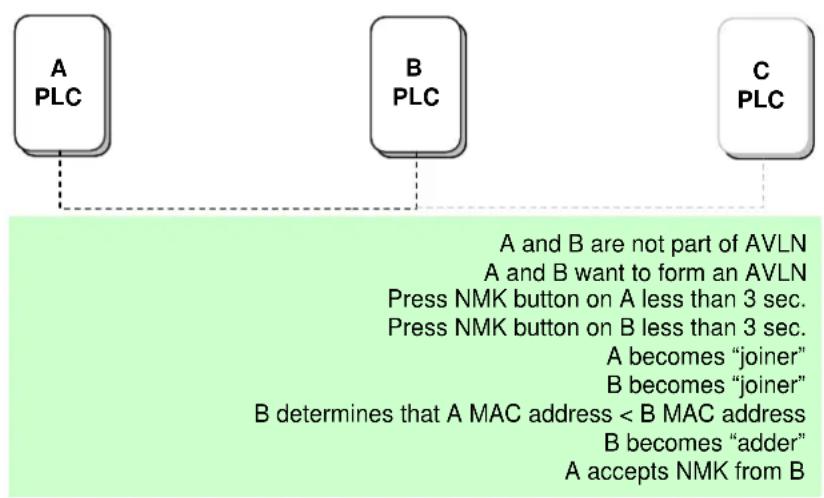
5.1 Forming a HomePlug AV Logical Network
When two devices with dierent NMK values are connected to the same powerline and you want them to form a logical network, follow the following procedures:
Step 1 Press the “Security (Group)” buon on device A for less than 3 seconds.
Step 2 Press the “Security (Group)” buon on device B for less than 3 seconds. This should be done within 1 minute.
Step 3 Wait for the conneccon to complete.
The “Power” LED on both devices will blink evenly at 1-second intervals until the operaon succeeds or fails. If the conneccon succeeds, it will illuminate steadily. If an error occurs, the power LED on the adder will blink unevenly until the “Security” buon on the adder is pressed again or the joiner is reset.
flowchart
graph TD
    A["A PLC"] --> B["B PLC"]
    B --> C["C PLC"]
    style A fill:#f9f,stroke:#333
    style B fill:#f9f,stroke:#333
    style C fill:#f9f,stroke:#333
5.2 Joining a Network
If you want to add a new device to an existing network, follow the following procedures:
Step 1 Press the "Security" buon on the new device for at least 3 seconds.
Step 2 Press the “Security” buon on any device in the network for less than 3 seconds. This should be done within 1 minute.
Step 3 Wait for the conneccon to complete.
The “Power” LED on both devices will blink evenly at 1-second intervals until the operaon succeeds or fails. If the conncon succeeds, it will illuminate steadily. If an error occurs, the power LED on the adder will blink unevenly until the “Security” buon on the adder is pressed again or the joiner is reset.

flowchart
graph TD
    A["A PLC"] --> B["B PLC"]
    B --> C["C PLC"]
    style A fill:#f9f,stroke:#333
    style B fill:#f9f,stroke:#333
    style C fill:#f9f,stroke:#333
    note1["A and B form an AVLN\nC wants to join the AVLN\nPress NMK button on B less than 3 sec.\nPress NMK button on C less than 3 sec.\nB becomes "adder"\nC becomes "joiner"\nC accepts NMK from B"] -.-> note1
    note2["A and B form an AVLN\nC wants to join the AVLN\nPress NMK button on B less than 3 sec.\nPress NMK button on C less than 3 sec.\nB becomes "adder"\nC becomes "joiner"\nC accepts NMK from B"] -.-> note2
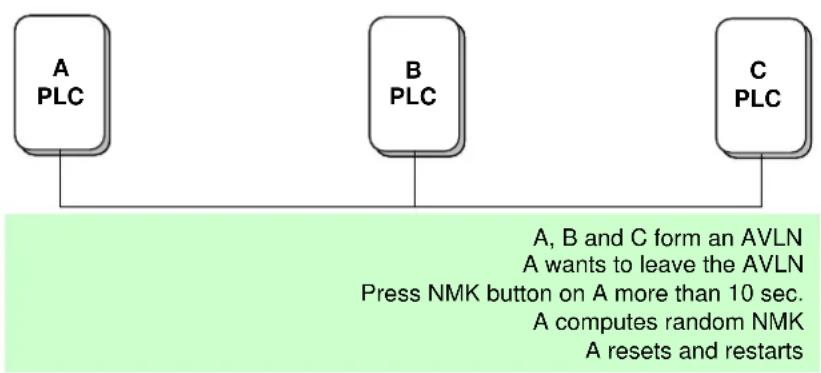
5.3 Leaving a Network
If you want to remove a device from an existing network, follow the following procedures:
Step 1 Press the “Security” buon on the device to be removed for at least 10 seconds.
Step 2 Wait for the device to reset.
The “Power” LED on the device to be removed will momentarily exguish. It will start to blink aer it has restarted. Then it will illuminate steadily if no error occurs. You can then disconnect the device.
flowchart
graph TD
    A["A PLC"] --> B["B PLC"]
    B --> C["C PLC"]
    note1["Press NMK button on A more than 10 sec."]
    note2["A computes random NMK"]
    note3["A resets and restarts"]
    note1 --> note1
    note2 --> note2
    note3 --> note3
    note1 --> note1
    note2 --> note2
    note3 --> note3
    note1 --> note1
    note2 --> note2
    note3 --> note3
    note1 --> note1
    note2 --> note2
    note3 --> note3
    note1 --> note1
    note2 --> note2
    note3 --> note3
Federal Communication Commission Interference Statement
This equipment has been tested and found to comply with the limits for a Class B digital device, pursuant to Part 15 of FCC Rules. These limits are designed to provide reasonable protecon against harmful interference in a residential installaon. This equipment generates, uses, and can radiate radio frequency energy and, if not installed and used in accordance with the instrucons, may cause harmful interference to radio communicaons. However, there is no guarantee that interference will not occur in a particular installaon. If this equipment does cause harmful interference to radio or television recepon, which can be determined by turning the equipment o and on, the user is encouraged to try to correct the interference by one or more of the following measures:
- Reorient or relocate the receiving antenna.
- Increase the separaon between the equipment and receiver.
- Connect the equipment into an outlet on a circuit dierent from that to which the receiver is connected.
- Consult the dealer or an experienced radio technician for help.
FCC Cauon
This device and its antenna must not be co-located or operang in conjuncon with any other antenna or transmier. This device complies with Part 15 of the FCC Rules. Operaon is subject to the following two conditions: (1) this device may not cause harmful interference, and (2) this device must accept any interference received, including interference that may cause undesired operaon. Any changes or modicaons not expressly approved by the party responsible for compliance could void the authority to operate equipment.
Federal Communicaons Commission (FCC) Radiaon Exposure Statement
This equipment complies with FCC radiaon exposure set forth for an uncontrolled environment. In order to avoid the possibility of exceeding the FCC radio frequency exposure limits, human proximity to the antenna shall not be less than 2.5cm (1 inch) during normal operaon.
Federal Communicaons Commission (FCC) RF Exposure Requirements
SAR compliance has been established in the laptop computer(s) conguraons with PCMCIA slot on the side near the center, as tested in the applicaon for cercaon, and can be used in laptop computer(s) with substanally similar physical dimensions, construcon, and electrical and RF characteriscs. Use in other devices such as PDAs or lap pads is not authorized. This transmier is restricted for use with the specic antenna tested in the applicaon for cercaon. The antenna(s) used for this transmier must not be co-located or operang in conjuncon with any other antenna or transmier.
R&TTE Compliance Statement
This equipment complies with all the requirements of DIRECTIVE 1999/5/EC OF THE EUROPEAN PARLIAMENT AND THE COUNCIL of March 9, 1999 on radio equipment and telecommunicaon terminal equipment and the mutual recognition of their conformity (R&TTE). The R&TTE Directive repeals and replaces in the directive 98/13/EEC (Telecommunicaons Terminal Equipment and Satellite Earth Staon Equipment) As of April 8, 2000.
Safety
This equipment is designed with the utmost care for the safety of those who install and use it. However, special aenon must be paid to the dangers of electric shock and stac electricity when working with electrical equipment. All guidelines of this and of the computer manufacture must therefore be allowed at all mes to ensure the safe use of the equipment.
EU Countries Intended for Use
The ETSI version of this device is intended for home and oce use in Austria, Belgium, Bulgaria, Cyprus, Czech, Denmark, Estonia, Finland, France, Germany, Greece, Hungary, Ireland, Italy, Latvia, Lithuania, Luxembourg, Malta, Netherlands, Poland, Portugal, Romania, Slovakia, Slovenia, Spain, Sweden, Turkey, and United Kingdom. The ETSI version of this device is also authorized for use in EFTA member states: Iceland, Liechtenstein, Norway, and Switzerland.
EU Countries Not Intended for Use
None

text_image
EDIMAX NETWORKING PEOPLE TOGETHEREDIMAX Technology Co., Ltd.
www.edimax.com