AC-M1000 - NAS Edimax - Free user manual and instructions
Find the device manual for free AC-M1000 Edimax in PDF.

User questions about AC-M1000 Edimax
0 question about this device. Answer the ones you know or ask your own.
Ask a new question about this device
Download the instructions for your NAS in PDF format for free! Find your manual AC-M1000 - Edimax and take your electronic device back in hand. On this page are published all the documents necessary for the use of your device. AC-M1000 by Edimax.
USER MANUAL AC-M1000 Edimax
ΣDIMAX NETWORKING PEOPLE TOGETHER
AC-M3000 / AC-M1000
Network Access Controller
User's Manual

natural_image
Exterior view of a black EDIMAX networking device with multiple Ethernet ports and network ports (no readable text or symbols beyond branding)The product you have purchased and the setup screen may appear slightly different from those shown in this QIG. For more detailed information about this product, please refer to the User's Manual on the CD-ROM.
Software and specifications subject to change without notice. Please visit our web site for the update.
All rights reserved. Trademarks or registered trademarks are the property of their respective holders
Table of Contents
1. Before You Start ....3
1.1 Preface ....3
1.2 Document Convention....3
2. System Overview ....4
2.1 Introduction of Edimax AC-M3000....4
2.2 System Concept ....4
2.3 Specification 5
2.3.1 Hardware Specification....5
2.3.2 Technical Specification ....5
2.3.3 Comparison of AC-M3000 and AC-M1000....7
3. Base Installation 8
3.1 Hardware Installation....8
3.1.1 System Requirements....8
3.1.2 Package Contents....8
3.1.3 Panel Function Descriptions....9
3.1.4 Installation Steps....10
3.2 Software Configuration....11
3.2.1 Quick Configuration 11
3.2.2 User Login Portal Page 19
4. Web Interface Configuration....21
4.1 System Configuration ....22
4.1.1 Configuration Wizard....22
4.1.2 System Information....23
4.1.3 WAN1 Configuration....25
4.1.4 WAN2 & Failover....28
4.1.5 LAN Port Roles....30
4.1.6 Controlled Configuration....31
4.1.7 Uncontrolled Configuration....33
4.2 User Authentication ....36
4.2.1 Authentication Configuration 36
4.2.2 Black List Configuration....54
4.2.3 Policy Configuration....56
4.2.4 Additional Configuration....61
4.3 AP Management....80
4.3.1 AP List 80
4.3.2 AP Discovery....91
4.3.3 Manual Configuration....94
4.3.4 Template Settings....95
4.3.5 Firmware Management....97
4.3.6 AP Upgrade....98
4.4 Network Configuration....99
4.4.1 Network Address Translation....99
4.4.2 Privilege List....102
4.4.3 Monitor IP List....103
4.4.4 Walled Garden List 104
4.4.5 Proxy Server Properties 105
4.4.6 Dynamic DNS....107
4.4.7 IP Mobility 107
4.4.8 VPN Termination....107
4.5 Utilities....109
4.5.1 Change Password....109
4.5.2 Backup/Restore Settings....110
4.5.3 Firmware Upgrade....111
4.5.4 Restart....112
4.6 Status....113
4.6.1 System Status....113
4.6.2 Interface Status....115
4.6.3 Current Users....117
4.6.4 Traffic History....118
4.6.5 Notification Configuration....119
4.7 Help....121
- Appendix A - Console Interface....122
- Appendix B - Network Configuration on PC 125
- Appendix C - IPSec VPN 130
- Appendix D -Proxy Setting for Hotspot....135
- Appendix E -Proxy Setting for Enterprise ....140
- Appendix F -Disclaimer for On-Demand Users ....146
- Appendix G—DHCP Relay ....155
1. Before You Start
1.1 Preface
This manual is for Hotspot owners, SMBs, or administrators in enterprises to set up network environment using Edimax AC-M3000/AC-M1000. It contains step by step procedures and graphic examples to guide MIS staff or individuals with slight network system knowledge to complete the installation.
Note: this manual is applicable to both AC-M3000 and AC-M1000. For a reference of differences between AC-M3000 and AC-M1000, please see 2.3.3 – Comparison between AC-M3000 and AC-M1000.
1.2 Document Convention
- For any caution or warning that requires special attention of readers, a highlight box with the eye-catching italic font is used as below:
Warning: For security purposes, you should immediately change the Administrator's password.

Indicates that clicking this button will return to the homepage of this section.

Indicates that clicking this button will return to the previous page.

Apply

Clear
Indicates that clicking this button will apply all of your settings.
Indicates that clicking this button will clear all inputs before clicking Apply button.
2. System Overview
2.1 Introduction of Edimax AC-M3000
Edimax AC-M3000 is a Network Access Controller, specially designed for the small scaled wireless and wired network management and access control. The major functional areas include user management, access control, AP management, and security management.
2.2 System Concept
Edimax AC-M3000 dedicates to user authentication, authorization and management. The user account information is stored in the local database or specified external databases server. User authentication is processed via the SSL encrypted web interface. This interface is compatible to most desktop devices and palm computers. The following figure is an example of Edimax AC-M3000 set to control a part of the company's intranet. The whole managed network includes the users in LAN and WLAN..
2.3 Specification
2.3.1 Hardware Specification
- General
Form Factor: Mini-desktop
Dimensions (W x D x H): 243 mm x 150 mm x 45.5 mm
Weight: 1.4 Kg
Operating Temperature: 0 \~ 45 °C
Storage Temperature: 0 \~ 65 °C
Power: 110\~220 VAC, 50/60 Hz
Ethernet Interfaces: 10 x Fast Ethernet (10/100 Mbps)
- Connectors & Display
WAN Ports: 2 x 10BASE-T/100BASE-TX RJ-45
LAN Ports: 8 x 10BASE-T/100BASE-TX RJ-45
Console Port: 1 x RJ-11
LED Indicators: 1 x Power, 1 x Status, 2 x WAN, 8 x LAN
2.3.2 Technical Specification
- Networking
Supports Router, NAT mode
Supports Static IP, DHCP, PPPoE on WAN interface
Configurable LAN ports authentication
Supports IP Plug and Play (IP PnP)
Built-in DHCP server and supports DHCP relay
Supports NAT:
-
IP/Port Destination Redirection
-
DMZ Server Mapping
-
Virtual Server Mapping
Supports static route
Supports SMTP redirection
Supports Walled Garden (free surfing zone)
Supports MAC Address Pass-Through
Supports HTTP Proxy
- Security
Supports data encryption: WEP (64/128-bit), WPA, WPA2
Supports authentication: WPA-PSK, WPA2-PSK, IEEE 802.1x (EAP-MD5, EAP-TLS, CHAP, PEAP)
Supports VPN Pass-through (IPSec and PPTP)
Supports DoS attack protection
Supports user Black List
Allows user identity plus MAC address authentication for local accounts
- User Management
Supports up to 120 concurrent users for AC-M3000 (50 concurrent users for AC-M1000)
Provides 500 local accounts for AC-M3000 (250 local accounts for AC-M1000)
Provides 2000 on-demand accounts
Simultaneous support for multiple authentication methods (Local and On-demand accounts, POP3(S),
LDAP, RADIUS, NT Domain)
Role-based and policy-based access control (per-role assignments based on Firewall policies, Routing,
Login Schedule, Bandwidth)
Customizable login and logout portal page
User Session Management:
- SSL protected login portal page
- Supports multiple logins with one single account
- Session idle timer
- Session/account expiration control
- Friendly notification email to provide a hyperlink to login portal page
- Windows domain transparent login
- Configurable login time frame
- AP Management
Supports up to 12 (4 for AC-M1000) IEEE 802.11b/g APs (EW-7206APg)
Centralized remote management via HTTP/SNMP interface
Automatic discovery of managed APs and list of managed APs
Allows administrators to add and delete APs from the AP list
Allows administrators to enable or disable managed APs
Provides MAC Access Control List of client stations for each managed AP
Locally maintained configuration profiles of managed APs
Single UI for upgrading and restoring managed APs' firmware
System status monitoring of managed APs and associated client stations
Automatic recovery of APs in case of system failure
System alarms and status reports on managed APs
• Monitoring and Reporting
Status monitoring of on-line users
IP-based monitoring of network devices
WAN connection failure alert
Syslog support for diagnosing and troubleshooting
User traffic history logging
• Accounting and Billing
Support for RADIUS accounting, RADIUS VSA (Vendor Specific Attributes)
Built-in billing profiles for on-demand accounts
Enables session expiration control for on-demand accounts by time (hour) and data volume (MB)
Provides billing report on screen for on-demand accounts
Detailed per-user traffic history based on time and data volume for both local and on-demand accounts
Traffic history report in an automatic email to administrator
- System Administration
Multi-lingual, web-based management UI
SSH remote management
Remote firmware upgrade
NTP time synchronization
Backup and restore of system configuration
2.3.3 Comparison of AC-M3000 and AC-M1000
| Capacity and Performance AC-M | 3000 AC-M1000 | |
| Concurrent Users 120 50 | ||
| Local Accounts 500 250 | ||
| On-demand user Accounts 2,000 2,000 | ||
| Managed Access Points(EW-7206APg) | 12 | 4 |
| Monitored 3rd-Party Access Points 40 40 | ||
| VPN Termination Tunnels 120 50 | ||
| VPN 3DES/DES Throughput | 30 Mbps | 20 Mbps |
3. Base Installation
3.1 Hardware Installation
3.1.1 System Requirements
- Standard 10/100BaseT network cables with RJ-45 connectors
- All PCs need to install the TCP/IP network protocol
3.1.2 Package Contents
The standard package of Edimax AC-M3000 includes:
- Edimax AC-M3000 x 1
- CD-ROM x 1
- Quick Installation Guide x 1
• Power Adapter (DC 12V) x 1
• Cross Over Ethernet Cable x 1 - Console Cable x 1
Warning: It is highly recommended to use all the supplies in the package instead of substituting any components by other suppliers to guarantee best performance.
3.1.3 Panel Function Descriptions
Front Panel

text_image
EDIMAX NETWORKING PEOPLE TOGETHER AC-M3000 Network Access Controller Status Power WAN 1 WAN 2 LAN 5 LAN 6 LAN 7 LAN 8 LAN 1 LAN 2 LAN 3 LAN 4• LED: There are four kinds of LED, Power, Status, WAN and LAN, to indicate different status of the system.
- WAN1/WAN2: The two WAN ports are connected to a network which is not managed by the Edimax AC-M3000 system, and this port can be used to connect the ATU-Router of the ADSL, the port of a cable modem, or a switch or a hub on the LAN of a company.
- LAN1\~LAN8: Clients' machines connect to Edimax AC-M3000 via LAN ports. Each LAN port can be configured to one of the two roles, controlled or uncontrolled. The differences of these two roles for a client connected to are:
Clients connected to the controlled port need to be authenticated to access network.
Clients connected to uncontrolled port don't need to be authenticated to access network and can access the web management interface.
Rear Panel
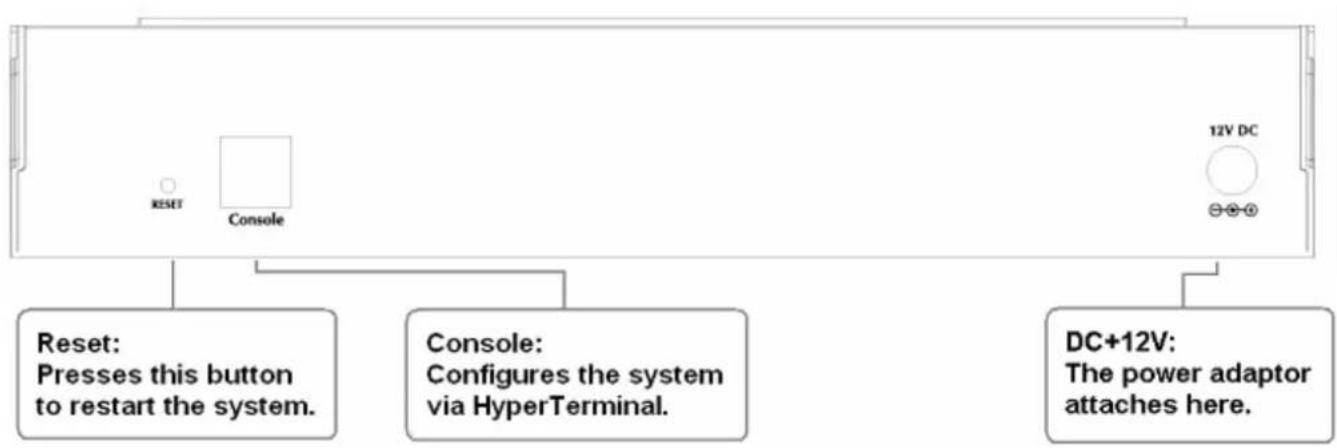
text_image
RESET Console 12V DC Reset: Presses this button to restart the system. Console: Configures the system via HyperTerminal. DC+12V: The power adaptor attaches here.- Reset: Press this button to restart the system.
- Console: The system can be configured via a serial console port. The administrator can use a terminal emulation program such as Microsoft's HyperTerminal to login to the configuration console interface to change admin password or monitor system status, etc.
• DC+12V: The power adapter attaches here.
3.1.4 Installation Steps
Please follow the following steps to install Edimax AC-M3000:

text_image
RESET Console 1 12V DC- Connect the 12V power adapter to the power socket on the rear panel. The Power LED should be on to indicate a proper connection.

text_image
EDIMAX NETWORKING PEOPLE TOGETHER AC-M3000 Network Access Controller WAN 1 WAN 2 LAN 5 LAN 6 LAN 7 LAN 8 Status Power 1 2 1 2 3 4 5 6 7 8 WAN 2 LAN 1 LAN 2 LAN 3 LAN 4 3. 4.- Connect an Ethernet cable to the WAN1 Port on the front panel. Connect the other end of the Ethernet cable to a ADSL modem, a cable modem or a switch/hub of the network. The LED of WAN1 port should be on to indicate a proper connection.
- Connect an Ethernet cable to one of the LAN5\~LAN8 Ports on the front panel. Connect the other end of the Ethernet cable to an administrator's PC. The LED of the connected port should be on to indicate a proper connection. (Note: The default role of these four ports is Uncontrolled Port.)
- Connect an Ethernet cable to one of the LAN1\~LAN4 Ports on the front panel. Connect the other end of the Ethernet cable to a client PC, AP or switch in managed network. The LED of the connected port should be on to indicate a proper connection. (Note: The default role of these four ports is Controlled Port.)
Attention:
- Edimax AC-M3000 supports Auto Sensing MDI/MDIX. You may use either straight through or cross over cable to connect the Ethernet Port.
- Usually a straight cable could be applied when Edimax AC-M3000 connects to an Access Point which supports automatic crossover. If after the AP hardware resets, the Edimax AC-M3000 could not be able to connect to the AP while connecting with a straight cable, the user have to pull out and plug-in the straight cable again. This scenario does NOT occur while using a crossover cable.
After the hardware of Edimax AC-M3000 is installed completely, the system is ready to be configured in the following sections.
3.2 Software Configuration
3.2.1 Quick Configuration
There are two ways to configure the system: using Configuration Wizard or changing the setting by demands manually. The Configuration Wizard has 6 steps providing a simple and easy way to guide you through the setup of Edimax AC-M3000. Follow the procedures and instructions given by the Wizard to enter the required information step by step. After saving and restarting Edimax AC-M3000, it is ready to use. There will be 6 steps as listed below:
- Change Admin's Password
- Choose System's Time Zone
- Set System Information
- Select the Connection Type for WAN Port
- Set Authentication Methods
- Save and Restart Edimax AC-M3000
Please follow the following steps to complete the quick configuration.
- Use the network cable of the 10/100BaseT to connect a PC to the uncontrolled port, and then open a browser (such as Microsoft IE 6.0 or Firefox). Next, enter the gateway IP address as the web management interface's URL, the default gateway IP address is https://192.168.2.254. In the opened webpage, you will see the login page. Enter "admin", the default username and "1234", the default password, in the User Name and Password field. Click Enter to log in.

text_image
EDIMAX NETWORKING PEOPLE TOGETHER Welcome To Administrator Login Page Please Enter Your User Name and Password To Sign In. User Name: admin Password: ***** ENTER CLEARCaution: If you can't get the login screen, the reasons may be: 1. The PC is set incorrectly so that the PC can't obtain the IP address automatically from the LAN port; 2. The IP address and the default gateway are not under the same network segment. Please use default IP address such as 192.168.2.xx in your network and then try it again. For the PC configuration on PC, please refer to 6. Appendix B – Network Configuration on PC.
Edimax AC-M3000 supports three kinds of account interface. You can log in as admin, manager or operator. The default username and password as follows.
Admin: The administrator can access all area of the Edimax AC-M3000.
User Name: admin
Password: 1234
Manager: The manager can access the area under User Authentication to manage the user account, but no permission to change the settings of the profiles of Firewall, Specific Route and Schedule.
User Name: manager
Password: manager
Operator: The operator can only access the area of Create On-demand User to create and print out the new on-demand user accounts.
User Name: operator
Password: operator
- After successfully logging into Edimax AC-M3000, enter the web management interface and see the welcome page. There is a Logout button on the upper right corner to log out the system when finished.

text_image
EDIMAX NETWORKING PEOPLE TOGETHER AC-M3000 System Configuration User Authentication AP Management Network Configuration Utilities Status Logout ? HelpWelcome to System Administration
This Administrative Web Interface allows you to set various networking parameters, to customize network services, to manage user accounts and to monitor user status.
Functions are separated into 6 main categories: System Configuration, User Authentication, AP Management, Network Configuration, Utilities and Status.
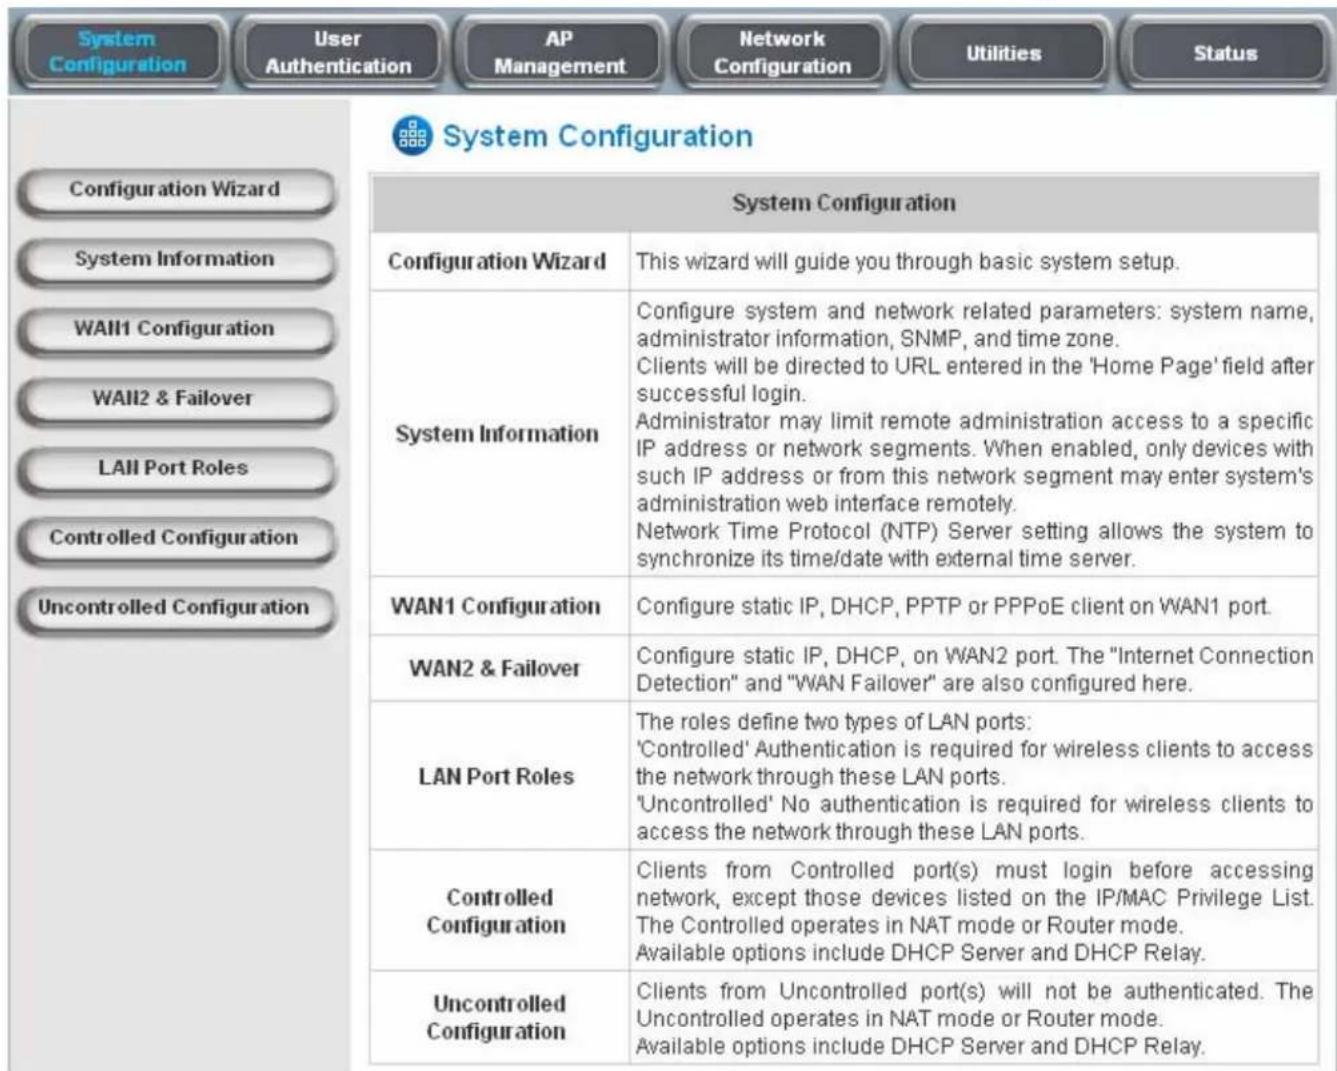
- Then, run the configuration wizard to complete the configuration. Click System Configuration, the System Configuration page will appear.
| System Configuration | |
| Configuration Wizard | This wizard will guide you through basic system setup. |
| Configuration Wizard | |
| System Information | Configure system and network related parameters: system name, administrator information, SNMP, and time zone. Clients will be directed to URL entered in the 'Home Page' field after successful login. Administrator may limit remote administration access to a specific IP address or network segments. When enabled, only devices with such IP address or from this network segment may enter system's administration web interface remotely. Network Time Protocol (NTP) Server setting allows the system to synchronize its time/date with external time server. |
| WAN1 Configuration | Configure static IP, DHCP, PPTP or PPPoE client on WAN1 port. |
| WAN2 & Failover | Configure static IP, DHCP, on WAN2 port. The "Internet Connection Detection" and "WAN Failover" are also configured here. |
| LAN Port Roles | The roles define two types of LAN ports: 'Controlled' Authentication is required for wireless clients to access the network through these LAN ports. 'Uncontrolled' No authentication is required for wireless clients to access the network through these LAN ports. |
| Controlled Configuration | Clients from Controlled port(s) must login before accessing network, except those devices listed on the IP/MAC Privilege List. The Controlled operates in NAT mode or Router mode. Available options include DHCP Server and DHCP Relay. |
| Uncontrolled Configuration | Clients from Uncontrolled port(s) will not be authenticated. The Uncontrolled operates in NAT mode or Router mode. Available options include DHCP Server and DHCP Relay. |
- Then, click on Configuration Wizard and click the Run Wizard to start the wizard.

text_image
System Configuration User Authentication AP Management Network Configuration Utilities Status Configuration Wizard Configuration Wizard AC-M3000 is a Network Access Controller with access control features ideal for hotspot, small and medium business networking. The wizard will guide you through the process of creating a baseline strategy. Please follow the wizard step by step to configure AC-M3000. Run Wizard5. Configuration Wizard
A welcome page that briefly introduces the 6 steps will appear. Click Next to begin.
Configuration Wizard
Welcome to the Setup Wizard. The wizard will guide you through these 6 quick steps. Begin by clicking on Next.
Step 1. Change Admin's Password
Step 2. Choose System's Time Zone
Step 3. Set System Information
Step 4. Select the Connection Type for WAN Port
Step 5. Set Authentication Methods
Step 6. Save and Restart AC-M3000

- Step 1. Change Admin's Password
Enter a new password for the admin account and retype it in the Verify Password field (twenty-character is the maximum and spaces are not allowed).
Click Next to continue.
Step 1. Change Admin's Password
You may change the Admin's account password by entering a new password. Click Next to continue.
New Password: ••••
Verify Password : ••••
Back
Next
Exit
- Step 2. Choose System's Time Zone
Select a proper time zone via the drop-down menu.
Click Next to continue.
Step 2. Choose System's Time Zone
Select the appropriate time zone for the system. Click Next to continue.
(GMT)Greenwich Mean Time: Dublin, Lisbon, London
Back
Next
Exit
- Step 3. Set System Information
Home Page: Enter the URL to where the users should be directed when they are successfully authenticated.
NTP Server: Enter the IP address or the domain name of an external time server for Edimax AC-M3000 to do time synchronization or use the default.
DNS Server: Enter a DNS Server provided by the ISP (Internet Service Provider).
Contact the ISP if the DNS IP Address is unknown.
Click Next to continue.
- Step 4. Select the Connection Type for WAN Port
There are three connection types of WAN1 port supported in the wizard: Static IP Address, Dynamic IP Address and PPPoE Client.
Select a proper Internet connection type and click Next to continue.
Static IP Address: Set WAN Port's Static IP Address
Enter the "IP Address", "Subnet Mask" and "Default Gateway" provided by your ISP or network administrator.
Click Next to continue.
Dynamic IP Address
If this option is selected, Edimax AC-M3000 will get an IP address for WAN1 from an external DHCP server automatically.
Click Next to continue.
Step 3. Set System Information
Enter System Information. Click Next to continue.


Back
Next
Exit
Step 4. Select the Connection Type for WAN Port
Select the connection type for WAN port. Click Next to continue.
Static IP Address
Select it to set static IP address.
Dynamic IP Address
Select it to obtain an IP address automatically. (For most cable modem users.)
○ PPPoE Client
Enter the PPPoE Client's Username and Password. (For most DSL users.)
Back
Next
Exit
Step 4 (Cont). Set WAN Port's Static IP Address
Click Next to continue.
IP Address: 10.30.1.250
Subnet Mask: 255.255.255.0
Default Gateway: 10.30.1.254
Back
Next
Exit
> PPPoE Client: Set PPPoE Client's Information
Enter the "Username" and "Password" provided by the ISP.
Click Next to continue.
Step 4 (Cont). Set PPPoE Client's Information
Enter the PPPoE Client's Username and Password. (For most DSL users.)


- Step 5. Set Authentication Methods
Enter an identified name as the postfix name in the Postfix field (e.g. Local), select a policy to assign to and choose an authentication method.
Click Next to continue. Different information needs be provided for each kind of authentication method respectively:
Step 5. Set Authentication Methods
Select a default User Authentication Method. Click Next to continue.


Local User ◯ LDAP
○ POP3 ○ NT Domain
○ RADIUS
Back
Next
Exit
Local User: Add User
A new user can be added to the local user data base. To add a user here, enter the Username (e.g. test), Password (e.g. test), MAC (optional, to specify a valid MAC address for this user) and assign a policy (or use the default). Click the ADD button to add this user..
Attention: The policy selected in this step is applied to this user only. Per-user policy setting takes over the group policy setting at precious step unless you select None here. Click Next to continue.
Step 5 (Cont). Add User
Click "ADD" button to add Local User. Click Next to continue.

text_image
Username: Password: MAC: Policy None AddBack
Next
Exit
POP3 User: POP3
Enter Domain Name/IP, Server Port of the POP3 server provided by the ISP, and then choose to enable SSL or not. Click Next to continue.
Step 5 (Cont). POP3
Configure POP3 Server information. Click Next to continue.

text_image
POP3 Server: * (Domain Name/IP) Server Port: * (Default: 110) Enable SSLBack
Next
Exit
RADIUS User: RADIUS
Enter the Domain Name/IP of the RADIUS server, Authentication Port, Accounting Port and Secret Key. Then choose to enable the Accounting Service or not, and choose the desired Authentication Method. Click Next to continue.
Step 5 (Cont). RADIUS
Configure RADIUS Server information. Click Next to continue.
RADIUS Server:

Authentication Port:

Accounting Port:

Secret Key:

Accounting Service

Authentication Method

Back
Next
Exit
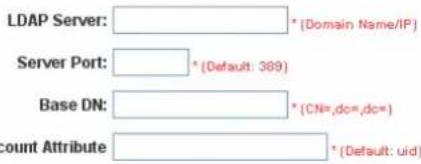
LDAP User: LDAP
Enter the LDAP Server, Server Port, Base DN, and Account Attribute of the LDAP server. Click Next to continue.
Step 5 (Cont). LDAP
Configure LDAP Server information. Click Next to continue.
text_image
LDAP Server: * [Domain Name/IP] Server Port: * [Default: 389] Base DN: * [CN=,dc=,dc=] ount Attribute : * [Default: uid]Back
Next
Exit
©
Caution: During each step of the wizard, if you want to go back to modify the setting, please click the Back button to go back to the previous step.
3.2.2 User Login Portal Page
To login from the login portal page via the controlled port, the user has to be authenticated by the username and password. The administrator also can verify if the configuration of Edimax AC-M3000 has been done properly.
- First, connect a client's device (for example, a PC) to the controlled port of Edimax AC-M3000, and set the device to obtain an IP address automatically. After the client obtains the IP address, open an Internet browser. Try to launch any website and then the default User Login Page will appear. Enter a valid User Name and Password (e.g. test@local for the username and test for the password). Click Submit button.

text_image
EDIMAX NETWORKING PEOPLE TOGETHER User Login Page Welcome To User Login Page. Please Enter Your User Name and Password To Sign In . User Name: Password:- Login succeed page will appear if Edimax AC-M3000 has been installed and configured successfully. Now, clients can access the network or surf on the Internet.

text_image
EDIMAX NETWORKING PEOPLE TOGETHER Hello, test@local Please close this window or click this button to ✓ Logout Thank you. Login time: 2006-9-5 11:49:17- When an on-demand user logs in successfully, the following Login Successfully page will appear. There is an extra line showing "Remaining usage" and a "Redeem" button on the button.
- Remaining usage: Show the remaining time or data volume that the on-demand user can use to surf Internet.

text_image
EDIMAX NETWORKING PEOPLE TOGETHER Hello, YQMH@ondemand Please close this window or click this button to ✓ Logout Thank you!! Remaining Usage: 1 Hour 58 Min 43 Sec Login time: 2006-10-18 13:23:12 ✓ Redeem- Redeem: When the remaining time or data size is insufficient, the client has to pay for adding credit to the counter, and then, the client will get a new username and password. After clicking the Redeem button, a Redeem Page will appear. Please enter the new username and password obtained and click Enter button. The total available time or data size will be shown up after adding credit.

text_image
EDIMAX NETWORKING PEOPLE TOGETHER Redeem Page Welcome To Redeem Page! Please Enter Your User Name and Password To Sign In . User Name: Password: ✓ ENTER ✓ Clear4. Web Interface Configuration
This chapter will guide you through further detailed settings. The following table is the UI and functions of Edimax AC-M3000.
| OPTION | SystemConfiguration | UserAuthentication | APManagement | NetworkConfiguration | Utilities | Status |
| FUNCTION | ConfigurationWizard | AuthenticationConfiguration | AP List | NetworkAddressTranslation | ChangePassword | System Status |
| SystemInformation | Black ListConfiguration | AP Discovery | Privilege List | Backup/RestoreSettings | Interface Status | |
| WAN1Configuration | PolicyConfiguration | ManualConfiguration | Monitor IP List | FirmwareUpgrade | Current Users | |
| WAN2 &Failover | AdditionalConfiguration | TemplateSettings | Walled GardenList | Restart | Traffic History | |
| LAN Port Roles | FirmwareManagement | Proxy ServerProperties | NotificationConfiguration | |||
| ControlledConfiguration | AP Upgrade Dynamic DNS | |||||
| UncontrolledConfiguration | IP | Mobility | ||||
| VPNTermination | ||||||
Caution: After finishing the configuration of the settings, please click Apply and pay attention to see if a restart message appears on the screen. If such message appears, system must be restarted to allow the settings to take effect. All on-line users will be disconnected during restart.
4.1 System Configuration
This section includes the following functions: Configuration Wizard, System Information, WAN1 Configuration, WAN2 & Failover, LAN Port Roles, Controlled Configuration and Uncontrolled Configuration.
text_image
System Configuration User Authentication AP Management Network Configuration Utilities Status Configuration Wizard System Information WAN1 Configuration WAN2 & Failover LAI Port Roles Controlled Configuration Uncontrolled Configuration System Configuration Configuration Wizard This wizard will guide you through basic system setup. System Information Configure system and network related parameters: system name, administrator information, SNMP, and time zone. Clients will be directed to URL entered in the 'Home Page' field after successful login. Administrator may limit remote administration access to a specific IP address or network segments. When enabled, only devices with such IP address or from this network segment may enter system's administration web interface remotely. Network Time Protocol (NTP) Server setting allows the system to synchronize its time/date with external time server. WAN1 Configuration Configure static IP, DHCP, PPTP or PPPoE client on WAN1 port. WAN2 & Failover Configure static IP, DHCP, on WAN2 port. The "Internet Connection Detection" and "WAN Failover" are also configured here. LAN Port Roles The roles define two types of LAN ports: 'Controlled' Authentication is required for wireless clients to access the network through these LAN ports. 'Uncontrolled' No authentication is required for wireless clients to access the network through these LAN ports. Controlled Configuration Clients from Controlled port(s) must login before accessing network, except those devices listed on the IP/MAC Privilege List. The Controlled operates in NAT mode or Router mode. Available options include DHCP Server and DHCP Relay. Uncontrolled Configuration Clients from Uncontrolled port(s) will not be authenticated. The Uncontrolled operates in NAT mode or Router mode. Available options include DHCP Server and DHCP Relay.4.1.1 Configuration Wizard
There are two ways to configure the system: using Configuration Wizard or changing the setting by demands manually. The Configuration Wizard has 6 steps providing a simple and easy way to go through the basic setup of Edimax AC-M3000 and is served as Quick Configuration. Please refer to 3.2.1 Quick Configuration for the introduction and description of Configuration Wizard.
Configuration Wizard
AC-M3000 is a Network Access Controller with access control features ideal for hotspot, small and medium business networking. The wizard will guide you through the process of creating a baseline strategy. Please follow the wizard step by step to configure AC-M3000.
Run Wizard
4.1.2 System Information
Most of the major system information about Edimax AC-M3000 can be set here. Please refer to the following description for each field:
| System Information | |
| System Name | AC-M3000 |
| Device Name | (FQDN for this device) |
| Home Page | EnabledDisabledhttp://www.edimax.com.tw(e.g. http://www.edimax.com.tw/) |
| Access History IP | (e.g. 192.168.2.1) |
| Remote Management IP | 0.0.0.0/0.0.0.0(e.g. 192.168.3.1 or 192.168.3.0/24) |
| SNMP | EnabledDisabled |
| User Logon SSL | EnabledDisabled |
| Time | Device Time:2006/10/17 16:13:48Time Zone:(GMT)Greenwich Mean Time:Dublin,Lisbon,LondonNTP EnableNTP Server 1:tock.usno.navy.mil*(e.g. tock.usno.navy.mil)NTP Server 2:ntp1.fau.deNTP Server 3:clock.cuhk.edu.hkNTP Server 4:ntps1.pads.ufrj.brNTP Server 5:ntp1.cs.mu.OZ.AUSet Device Date and Time |
• System Name: Set the name of the system or use the default.
- Device Name: FQDN (Fully-Qualified Domain Name). This is used as the domain name used in login page. For example, if Device Name=ashop.com, the URL of login page will be https://ashop.com/loginpages/login.shtml.
- Home Page: Enter the website of a Web Server to be the homepage. When users log in successfully, they will be directed to the homepage set. Usually, the homepage is the company's website, such as http://www.yahoo.com. Regardless of the original webpage set in the clients' computers, they will be redirect to this page after login.
- Access History IP: Specify an IP address of the administrator's computer or to get history information of Edimax AC-M3000 with fix format URLs.
Traffic History : https://10.2.3.213/status/history/2005-02-17

text_image
https://10.2.3.213/status/history/2005-02-17 - Microsoft Internet Explorer File Edit View Favorites Tools Help Back Search Favorites Media Address https://10.2.3.213/status/history/2005-02-17 Go Links # #Date TYPE Name IP MAC Packets In Bytes In Packets Out Bytes Out 2005-02-17 18:09:03 +0800 LOGIN aaa@wl300.tw 192.168.30.189 00:0C:F1:28:BF:D8 0 0 0 0On-demand History : https://10.2.3.213/status/ondemand_history/2005-02-17

text_image
https://10.2.3.213/status/ondemand_history/2005-02-17 - Microsoft Internet Explorer File Edit View Favorites Tools Help Back Search Favorites Media Address https://10.2.3.213/status/ondemand_history/2005-02-17 Go Links #Date System Name Type Name IP MAC Packets In Bytes In Packets Out Bytes OutExpirytime Valid 2005-02-17 16:44:19 +0800 QA-W1300-Casper-213 Create_OD_User N7E9 0.0.0.0 00:00:00:00:00:00:00 0 0 0 0 2005-02-17 16:44:57 +0800 QA-W1300-Casper-213 OD_User_Login N7E9 192.168.30.189 00:0C:F1:28:BF:D8 0 0 0 2005-02-17 16:45:22 +0800 QA-W1300-Casper-213 OD_User_Logout N7E9 192.168.30.189 00:0C:F1:28:BF:D8 32 14499 30- Remote Management IP: Set the IP addresses within a range which are able to connect to the web management interface via WAN and/or controlled port. For example, 10.2.3.0/24 means that as long as you are within the IP address range of 10.2.3.0/24, you can reach the administration page of Edimax AC-M3000. If the IP range bit number is omitted, 32 is used to specify a single IP address.
- SNMP: Edimax AC-M3000 supports SNMPv2. If the function is enabled, it is able to assign the Manager IP address and the SNMP community name used to access the management information base (MIB) of the system.
- User Logon SSL: Enable this function to activate https (encryption) or disable this function to activate http (non encryption) user login page.
- Time: Edimax AC-M3000 supports NTP communication protocol to synchronize the system time with remote time servers. Please specify the time zone and IP address of at least one NTP server in the system configuration interface for adjusting the system time automatically. (Universal Time is Greenwich Mean Time, GMT). Time can also be set manually when selecting "Set Device Date and Time". Please enter the date and
time into these fields.

text_image
Time Device Time : 2006/10/17 16:13:48 Time Zone : (GMT)Greenwich Mean Time:Dublin,Lisbon,London NTP Enable NTP Server 1: tock.usno.navy.mil *(e.g. tock.usno.navy.mil) NTP Server 2: ntp1.fau.de NTP Server 3: clock.cuhk.edu.hk NTP Server 4: ntps1.pads.ufrj.br NTP Server 5: ntp1.cs.mu.OZ.AU Set Device Date and Time
text_image
Time Device Time : 2006/10/17 16:31:26 Time Zone : (GMT)Greenwich Mean Time:Dublin,Lisbon,London ○ NTP Enable Set Device Date and Time -- Year -- Month -- Day -- Hour -- Minute -- Second4.1.3 WAN1 Configuration
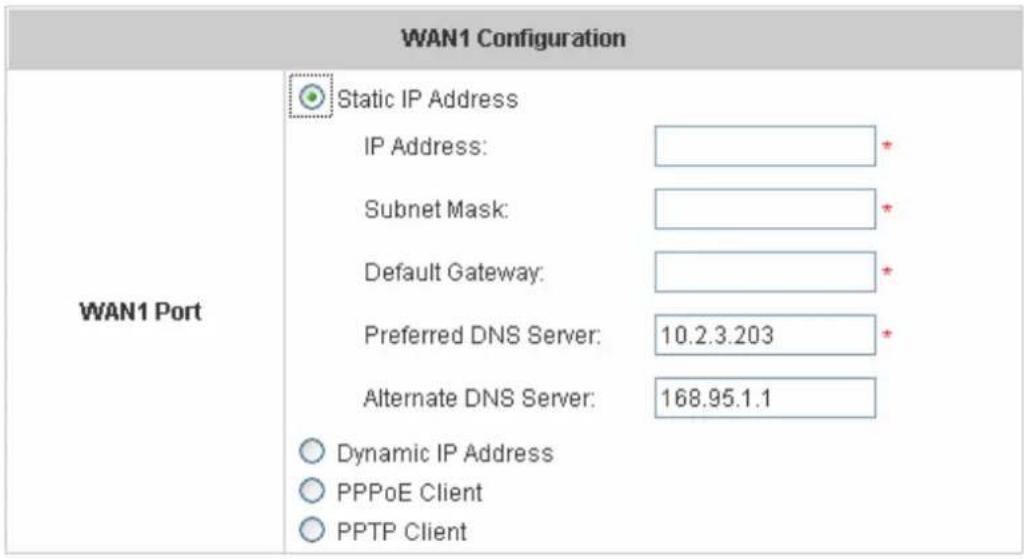
There are 4 connection types for the WAN1 Port: Static IP Address, Dynamic IP Address, PPPoE Client and PPTP Client.
text_image
WAN1 Configuration WAN1 Port Static IP Address IP Address: _________* Subnet Mask: _________* Default Gateway: _________* Preferred DNS Server: 10.2.3.203 Alternate DNS Server: 168.95.1.1 Dynamic IP Address PPPoE Client PPTP Client- Static IP Address: Manually specifying the IP address of the WAN1 Port is applicable for the network environment where the DHCP service is unavailable. The fields with red asterisks are required to be filled in.
IP Address: the IP address of the WAN1 port.
Subnet Mask: the subnet mask of the WAN1 port.
Default Gateway: the gateway of the WAN1 port.
Preferred DNS Server: The primary DNS Server of the WAN1 port.
Alternate DNS Server: The substitute DNS Server of the WAN1 port. This is not required.
- Dynamic IP address: It is only applicable for the network environment where the DHCP Server is available in the network. Click the Renew button to get an IP address.
| WAN1 Configuration | |
| WAN1 Port | Static IP Address Dynamic IP Address Renew PPPoE Client PPTP Client |
- PPPoE Client: This is the common connection type for ADSL. When selecting PPPoE to connect to the network, please enter the Username, Password, MTU and CLAMPMSS. There is a Dial on Demand function under PPPoE. If this function is enabled, a Maximum Idle Time can be set. When the idle time is reached, the system will automatically disconnect itself
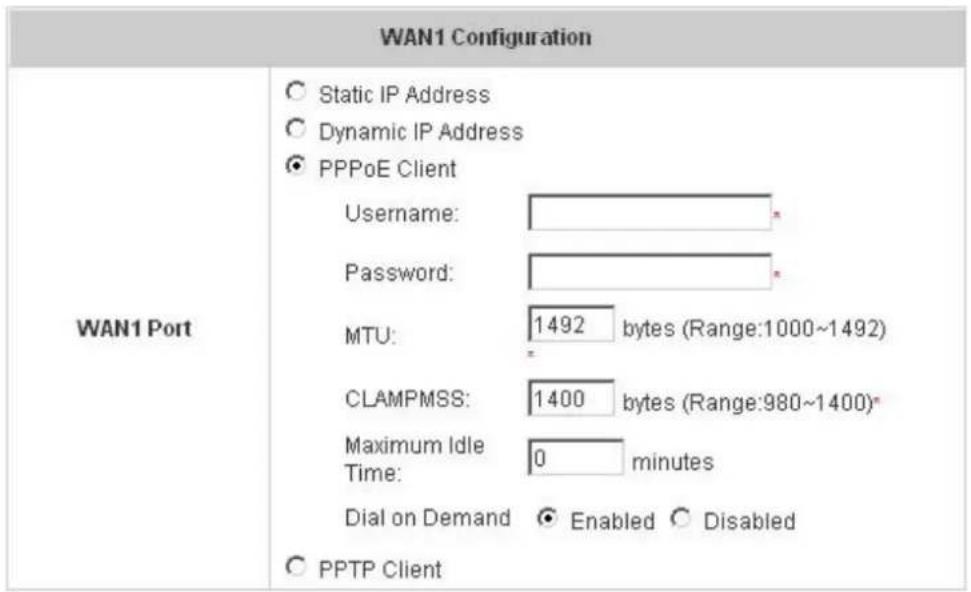
text_image
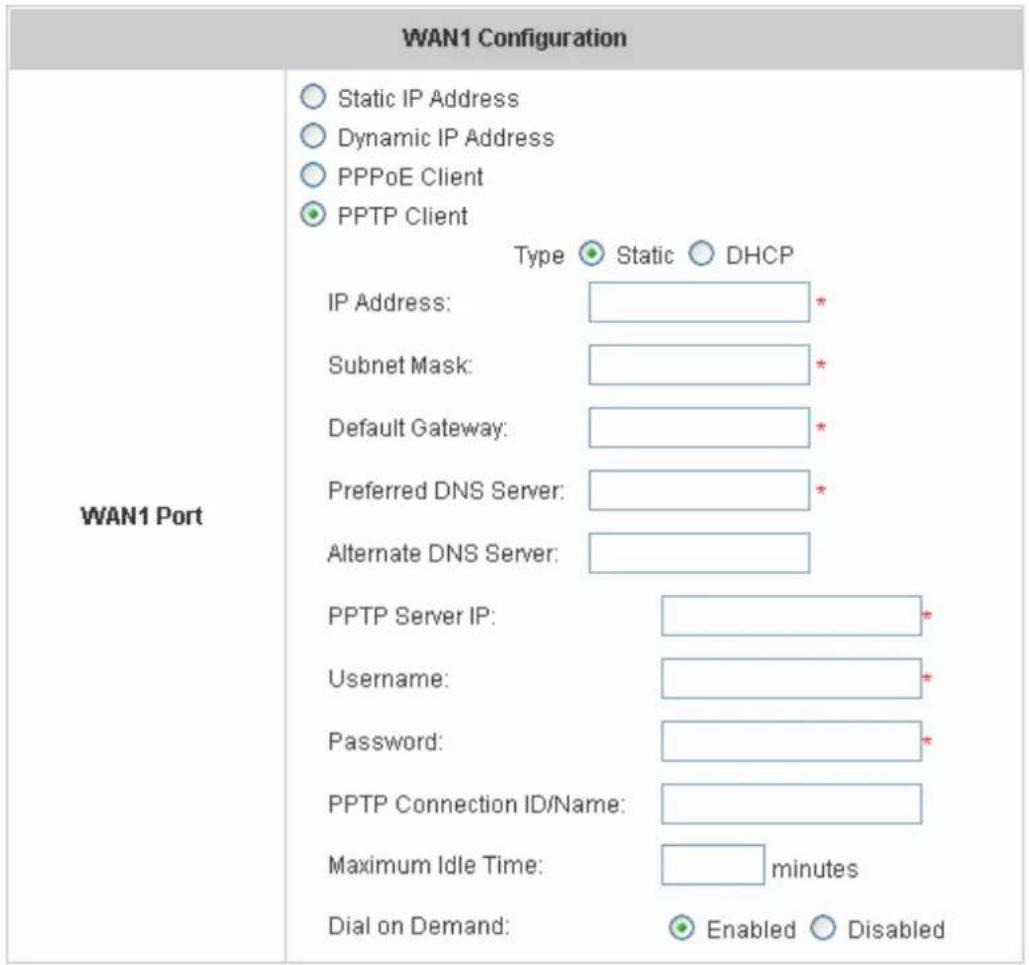
WAN1 Configuration WAN1 Port Static IP Address Dynamic IP Address PPPoE Client Username: Password: MTU: 1492 bytes (Range:1000~1492) CLAMPMSS: 1400 bytes (Range:980~1400)* Maximum Idle Time: 0 minutes Dial on Demand Enabled Disabled PPTP Client- PPTP Client: Point to Point Tunneling Protocol is a service that applies to broadband connection used mainly in Europe and Israel. Select Static to specify the IP address of the PPTP Client manually or select DHCP to get the IP address automatically. The fields with red asterisks are required to be filled in. There is a Dial on Demand function under PPTP. If this function is enabled, a Maximum Idle Time can be set. When the idle time is reached, the system will automatically disconnect itself
text_image
WAN1 Configuration WAN1 Port Static IP Address Dynamic IP Address PPPoE Client PPTP Client Type Static DHCP IP Address: * Subnet Mask: * Default Gateway: * Preferred DNS Server: * Alternate DNS Server: PPTP Server IP: * Username: * Password: * PPTP Connection ID/Name: Maximum Idle Time: minutes Dial on Demand: Enabled Disabled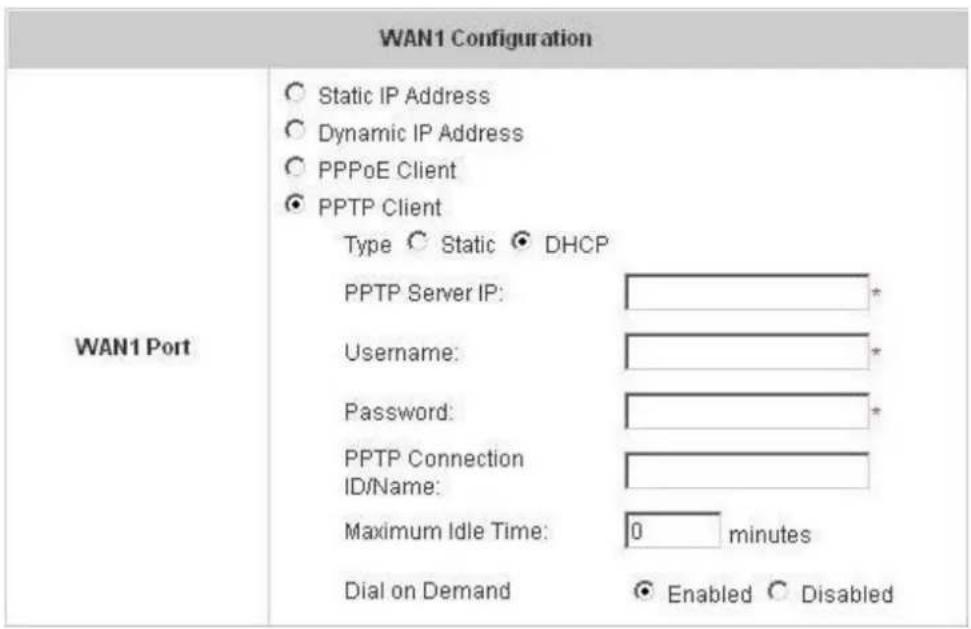
text_image
WAN1 Configuration WAN1 Port Static IP Address Dynamic IP Address PPPoE Client PPTP Client Type Static DHCP PPTP Server IP: Username: Password: PPTP Connection ID/Name: Maximum Idle Time: 0 minutes Dial on Demand Enabled Disabled4.1.4 WAN2 & Failover
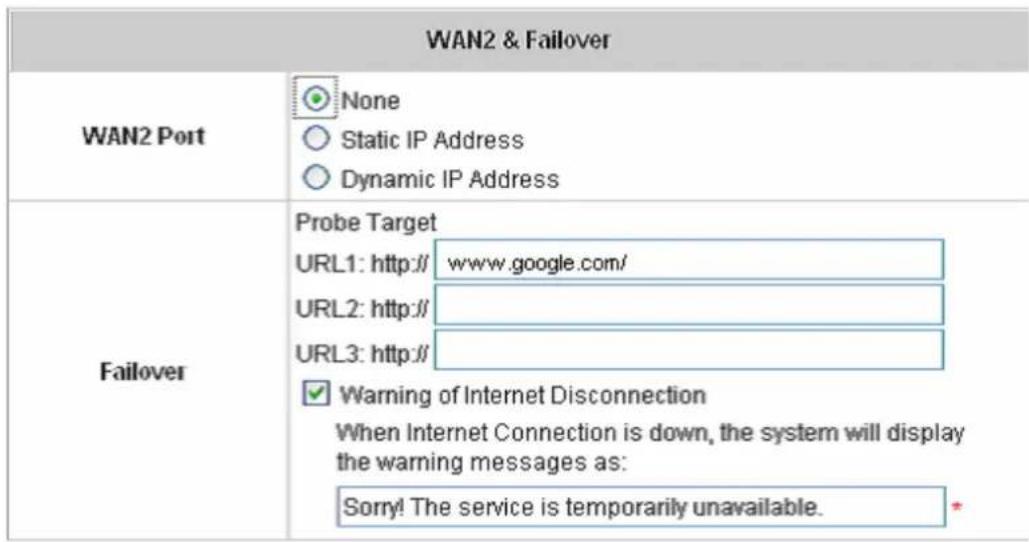
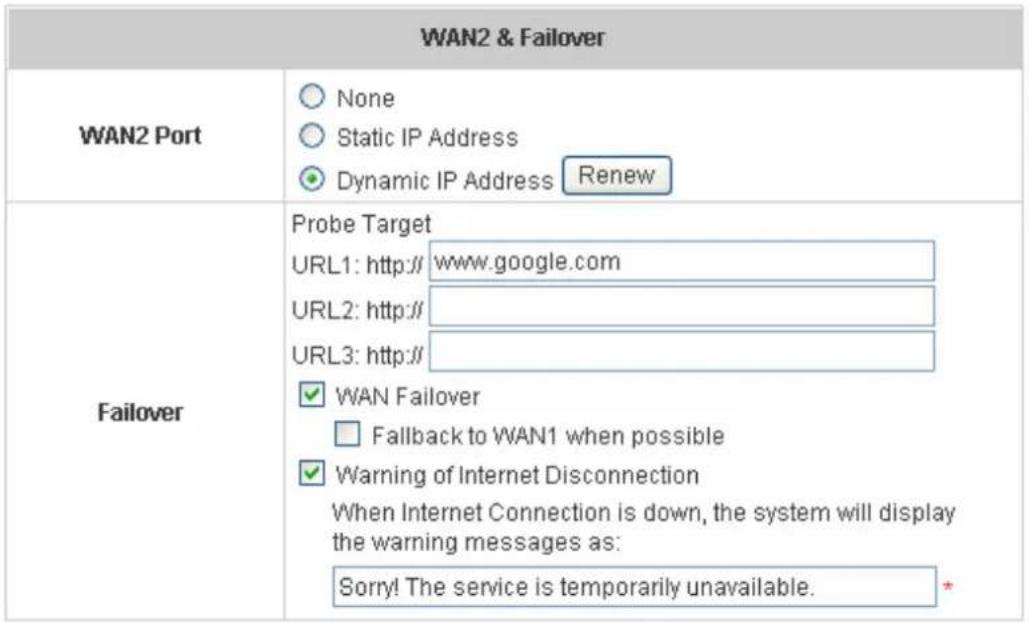
Except selecting None to disable WAN2 port, there are 2 connection types for the WAN2 port: Static IP Address and Dynamic IP Address. The probe target supports up to three URLs. Check “Warning of Internet Disconnection” to work with the WAN Failover function. When Warning of Internet Disconnection is enabled, the system will check the three URLs to detect the WAN ports connection status.
- None: The WAN2 Port is disabled. The probe target of up to three URLs can still be entered. Check "Warning of Internet Disconnection" to detect the WAN1 port connection status.
text_image
WAN2 & Failover WAN2 Port None Static IP Address Dynamic IP Address Probe Target URL1: http:// www.google.com/ URL2: http:// URL3: http:// Warning of Internet Disconnection When Internet Connection is down, the system will display the warning messages as: Sorry! The service is temporarily unavailable.- Static IP Address: Specify the IP Address, Subnet Mask and Default Gateway of WAN2 Port, which should be applicable for the network environment. The probe target supports up to three URLs. Check the “Warning of Internet Disconnection” box to work with the WAN Failover function.
| WAN2 & Failover | |
| WAN2 Port | NoneStatic IP AddressIP Address:Subnet Mask:Default Gateway:Preferred DNS Server:Alternate DNS Server:Dynamic IP AddressProbe TargetURL1: http://www.google.comURL2: http://URL3: http://WAN FailoverFallback to WAN1 when possibleWarning of Internet DisconnectionWhen Internet Connection is down, the system will display the warning messages as:Sorry! The service is temporarily unavailable. |
| Failover | |
If WAN Failover function is enabled, when WAN1 connection fails, the traffic will be routed to WAN2 automatically. If "Fallback to WAN1 when possible" function is enabled, the routed traffic will be back to WAN1 when WAN1 connection is recovered.
- Dynamic IP Address: Select this item when WAN2 Port can obtain an IP address automatically. For example, a DHCP Server is available for WAN2 Port. The probe target supports up to three URLs. Check “Warning of Internet Disconnection” box to work with the WAN Failover function.
text_image
WAN2 & Failover WAN2 Port None Static IP Address Dynamic IP Address Renew Failover Probe Target URL1: http:// www.google.com URL2: http:// URL3: http:// ✓ WAN Failover □ Fallback to WAN1 when possible ✓ Warning of Internet Disconnection When Internet Connection is down, the system will display the warning messages as: Sorry! The service is temporarily unavailable. *For Dynamic IP Address, WAN Failover and Fallback to WAN1 when possible functions also can be enabled like as the functions for Static IP Address. If Warning of Internet Disconnection is enabled, a warning message can be entered to indicate what the system should display when Internet connection is down.
4.1.5 LAN Port Roles
Clients' devices usually connect to Edimax AC-M3000 via LAN ports. Each LAN port can be configured as one of two roles, controlled or uncontrolled. The differences of these two roles for a client connected to are: Clients connecting to the Controlled Port need authentication to access the network; Clients connecting to Uncontrolled Port don't need authentication to access the network and can also access the web management interface.

text_image
LAN Port Role Setting Check the box if the LAN ports need to be controlled. LAN 5 LAN 6 LAN 7 LAN 8 WAN 1 WAN 2 LAN 1 LAN 2 LAN 3 LAN 4 ✓ ✓ ✓ ✓4.1.6 Controlled Configuration
The clients of Controlled Port need authentication before they can access the network. In this section, you can set the related configuration of Controlled Port.
| Controlled Configuration | |
| Controlled | IP PNP Operation Mode IP Address: Subnet Mask: |
| DHCP Server Configuration | Disable DHCP Server Enable DHCP Server Enable DHCP Relay |
- Controlled

text_image
Controlled Configuration Controlled Operation Mode NAT IP Address: 192.168.1.254 Subnet Mask: 255.255.255.0Operation Mode: Choose one of the two modes, NAT mode and Router mode, according to requirements.
IP Address: Enter the desired IP address for the interface of the controlled port.
Subnet Mask: Enter the desired subnet mask for the controlled port.
• DHCP Server Configuration
There are three types of DHCP server methods: Disable DHCP Server, Enable DHCP Server and Enable DHCP Relay.
- Disable DHCP Server: Disable DHCP Server function of Edimax AC-M3000.
| DHCP ServerConfiguration | ● Disable DHCP Server○ Enable DHCP Server○ Enable DHCP Relay |
- Enable DHCP Server: Choose Enable DHCP Sever function and set the appropriate configuration for the built-in DHCP server of Edimax AC-M3000. The fields with red asterisks are required. Please fill in these fields.

text_image
DHCP Server Configuration Disable DHCP Server Enable DHCP Server DHCP Scope Start IP Address: 192.168.1.1 * End IP Address: 192.168.1.100 * Preferred DNS Server: 192.203.230.10 * Alternate DNS Server: Domain Name: Workgroup * WINS Server IP: Lease Time 1 Day Reserved IP Address List Enable DHCP RelayDHCP Scope: Enter the "Start IP Address" and the "End IP Address". Start IP Address means the fist IP address of the DHCP scope. End IP Address means the last IP address of the DHCP scope. These two settings define the IP address range that will be assigned to the clients' of Controlled Port.
Preferred DNS Server: This means the primary DNS server for the DHCP of Controlled Port.
Alternate DNS Server: This means the substitute DNS server for the DHCP of Controlled Port.
Domain Name: This means the domain name of Controlled Port.
WINS Server IP: This means the IP address of the WINS server if used.
Lease Time: This means the time period that IP addresses got from the DHCP server are valid and available.
Reserved IP Address List: For the detail setting of Reserved IP Address List, please click the hyperlink of Reserved IP Address. After clicking, the Reserved IP Address List as shown in the following figure will appear. Enter the related Reserved IP Address, MAC, and Description (not compulsory). When finished, click Apply to complete the setting.
| Reserved IP Address List - Controlled | |||
| Item | Reserved IP Address | MAC | Description |
| 1 | |||
| 2 | |||
| 3 | |||
| 4 | |||
| 5 | |||
| 6 | |||
| 7 | |||
| 8 | |||
| 9 | |||
| 10 | |||
| (Total:40) First Prev Next Last | |||
Enable DHCP Relay: The DHCP Server IP address must be entered when this function is enabled. For more details about DHCP Relay, please see Appendix G—DHCP Relay.
| DHCP ServerConfiguration | ○ Disable DHCP Server○ Enable DHCP Server● Enable DHCP RelayDHCP Server IP |
4.1.7 Uncontrolled Configuration
The clients of Uncontrolled Port don't need authentication before they can access the network. In this section, you can set the related configuration of Uncontrolled Port.
| Uncontrolled Configuration | |
| Uncontrolled | Operation Mode NATIP Address: 192.168.2.254Subnet Mask: 255.255.255.0 |
| DHCP ServerConfiguration | Disable DHCP ServerEnable DHCP ServerEnable DHCP Relay |
- Uncontrolled
| Uncontrolled Configuration | |
| Uncontrolled | Operation Mode NAT |
| IP Address: 192.168.2.254 | |
| Subnet Mask: 255.255.255.0 | |
Operation Mode: Choose one of the two modes, NAT mode and Router mode, according to requirements.
IP Address: Enter the desired IP address for the interface of the controlled port.
Subnet Mask: Enter the desired subnet mask for the controlled port.
• DHCP Server Configuration
There are three types of DHCP server methods: Disable DHCP Server, Enable DHCP Server and Enable DHCP Relay.
- Disable DHCP Server: Disable DHCP Server function of Edimax AC-M3000.
| DHCP ServerConfiguration | ◎ Disable DHCP Server○ Enable DHCP Server○ Enable DHCP Relay |
- Enable DHCP Server: Choose Enable DHCP Sever function and set the appropriate configuration for the built-in DHCP server of Edimax AC-M3000. The fields with red asterisks are required. Please fill in these fields.
| DHCP Server Configuration | Disable DHCP ServerEnable DHCP ServerDHCP ScopeStart IP Address: 192.168.2.1End IP Address: 192.168.2.100Preferred DNS Server: 192.203.230.10Alternate DNS Server:Domain Name: WorkgroupWINS Server IP:Lease Time 1 DayReserved IP Address ListEnable DHCP Relay |
DHCP Scope: Enter the "Start IP Address" and the "End IP Address". Start IP Address means the fist IP address of the DHCP scope. End IP Address means the last IP address of the DHCP scope. These two settings define the IP address range that will be assigned to the clients' of Uncontrolled Port.
Preferred DNS Server: This means the primary DNS server for the DHCP of Uncontrolled Port.
Alternate DNS Server: This means the substitute DNS server for the DHCP of Uncontrolled Port.
Domain Name: This means the domain name of Uncontrolled Port.
WINS Server IP: This means the IP address of the WINS server if used.
Lease Time: This means the time period that IP addresses got from the DHCP server are valid and available.
Reserved IP Address List: For the detail setting of Reserved IP Address List, please click the hyperlink of Reserved IP Address. After clicking, the Reserved IP Address List as shown in the following figure will appear. Enter the related Reserved IP Address, MAC, and Description (not compulsory). When finished, click Apply to complete the setting.
| Reserved IP Address List - Uncontrolled | |||
| Item | Reserved IP Address | MAC | Description |
| 1 | |||
| 2 | |||
| 3 | |||
| 4 | |||
| 5 | |||
| 6 | |||
| 7 | |||
| 8 | |||
| 9 | |||
| 10 | |||
| (Total:40)First Prev Next Last | |||
Enable DHCP Relay: The DHCP Server IP address must be entered when this function is enabled. For more details about DHCP Relay, please see Appendix G—DHCP Relay.
| DHCP ServerConfiguration | ○ Disable DHCP Server○ Enable DHCP Server● Enable DHCP RelayDHCP Server IP | [ ] * |
4.2 User Authentication
This section includes the following functions: Authentication Configuration, Black List Configuration, Policy Configuration, and Additional Configuration.
text_image
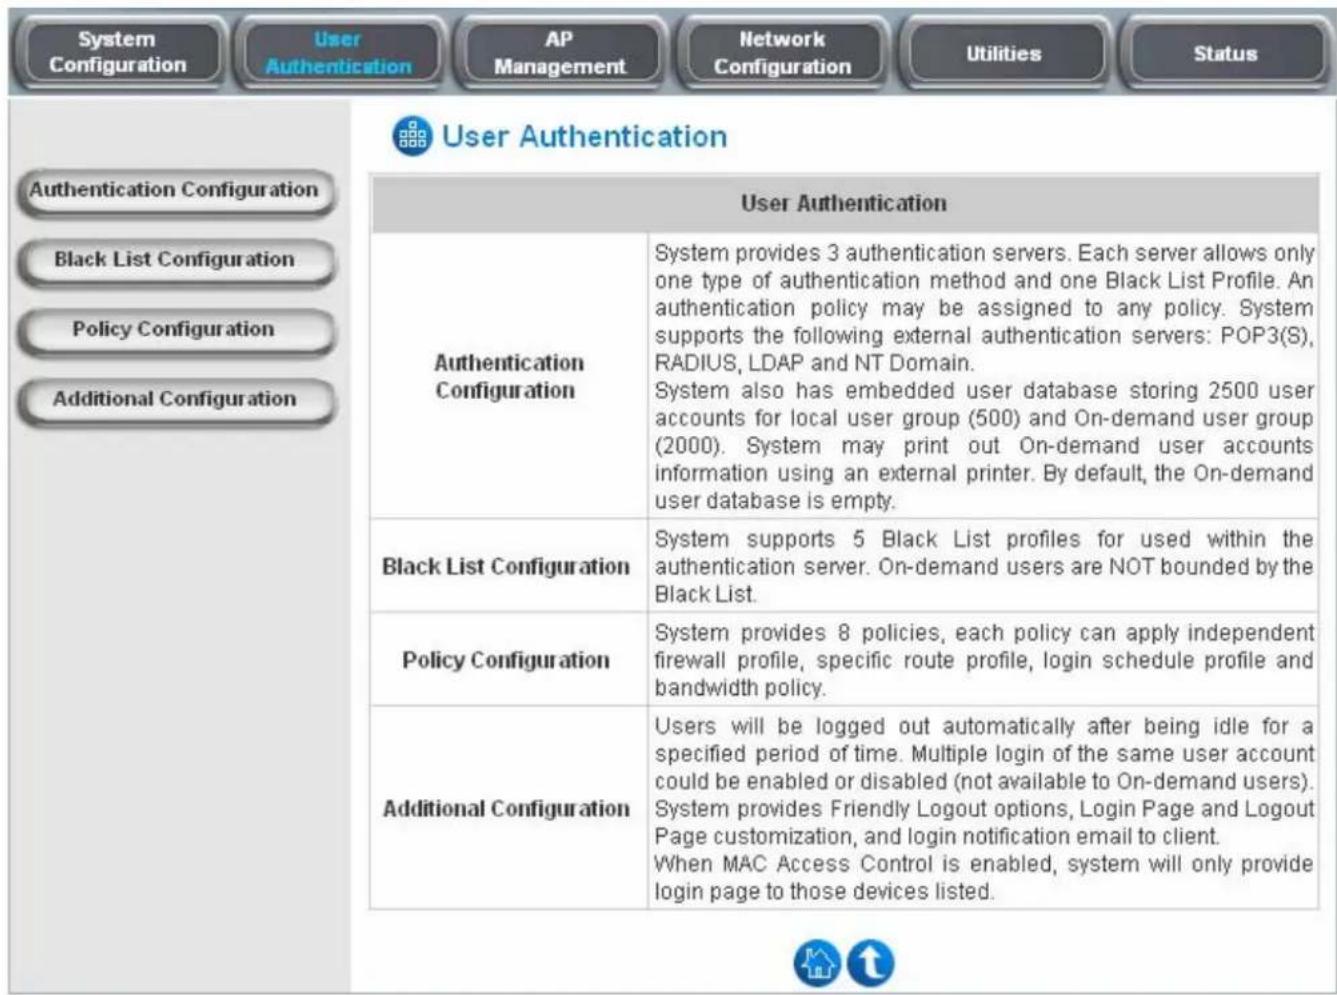
System Configuration User Authentication AP Management Network Configuration Utilities Status User Authentication Authentication Configuration Black List Configuration Policy Configuration Additional Configuration User Authentication Authentication Configuration System provides 3 authentication servers. Each server allows only one type of authentication method and one Black List Profile. An authentication policy may be assigned to any policy. System supports the following external authentication servers: POP3(S), RADIUS, LDAP and NT Domain. System also has embedded user database storing 2500 user accounts for local user group (500) and On-demand user group (2000). System may print out On-demand user accounts information using an external printer. By default, the On-demand user database is empty. Black List Configuration System supports 5 Black List profiles for used within the authentication server. On-demand users are NOT bounded by the Black List. Policy Configuration System provides 8 policies, each policy can apply independent firewall profile, specific route profile, login schedule profile and bandwidth policy. Additional Configuration Users will be logged out automatically after being idle for a specified period of time. Multiple login of the same user account could be enabled or disabled (not available to On-demand users). System provides Friendly Logout options, Login Page and Logout Page customization, and login notification email to client. When MAC Access Control is enabled, system will only provide login page to those devices listed.4.2.1 Authentication Configuration
This function is used to configure the settings of authentication servers. Edimax AC-M3000 supports five types of authentication methods: Local User, POP3, Radius, LDAP, and NTDomain and provides up to three authentication servers and one on-demand user authentication server. Click the server name to set the related configurations for that particular authentication server. Without typing the postfix is allowed to fasten the login process when clients log into the default authentication server
| Authentication Server Configuration | |||||
| Server Name | Auth Method | Postfix | Policy | Default | Enabled |
| Server 1 | LOCAL | Postfix1 | Policy 1 | ||
| Server 2 | LOCAL | Postfix2 | Policy 1 | ||
| Server 3 | LOCAL | Postfix3 | Policy 1 | ||
| On-demand User | ONDEMAND | ondemand | Policy 1 | ||
- Server 1\~3: There are 5 kinds of authentication methods that Edimax AC-M3000 supports: Local User, POP3, RADIUS, LDAP and NTDomain. Click the server name to enter the Authentication Server page.
| Authentication Server - Server 1 | |
| Server Name | Server 1*(Its server name) |
| Server Status | Enabled |
| Postfix | 1*(Its postfix name) |
| Black List | None |
| Authentication Method | Local UserLocal User Setting |
| Policy | Policy A |
Server Name: Set a name for the server using numbers (0 to 9), alphabets (a to z or A to Z), dash (-), underline (_) and dot (.) with a maximum of 40 characters, all other letters are not allowed.
Sever Status: The status shows that the server is enabled or disabled.
Postfix: Set a postfix that is easy to identify (e.g. Local) for the server by using numbers (0 to 9), alphabets (a to z or A to Z), dash (-), underline (_) and dot (.) with a maximum of 40 characters, all other letters are not allowed.
Black List: There are 5 sets of black lists. Select one of them or choose "None". Please refer to 4.2.2 Black List Configuration for more information.
Authentication Method: There are 5 authentication methods that Edimax AC-M3000 supports: Local, POP3, Radius, LDAP and NTDomain. Select the desired authentication method and then click the link next to the drop-down menu for more advanced configuration. For more details, please refer to 4.2.1.1\~5 Authentication Configuration.
Notice: Enabling two or more servers of the same authentication method is not allowed.
Policy: There are 8 policies that can be chosen from to apply to this particular server.
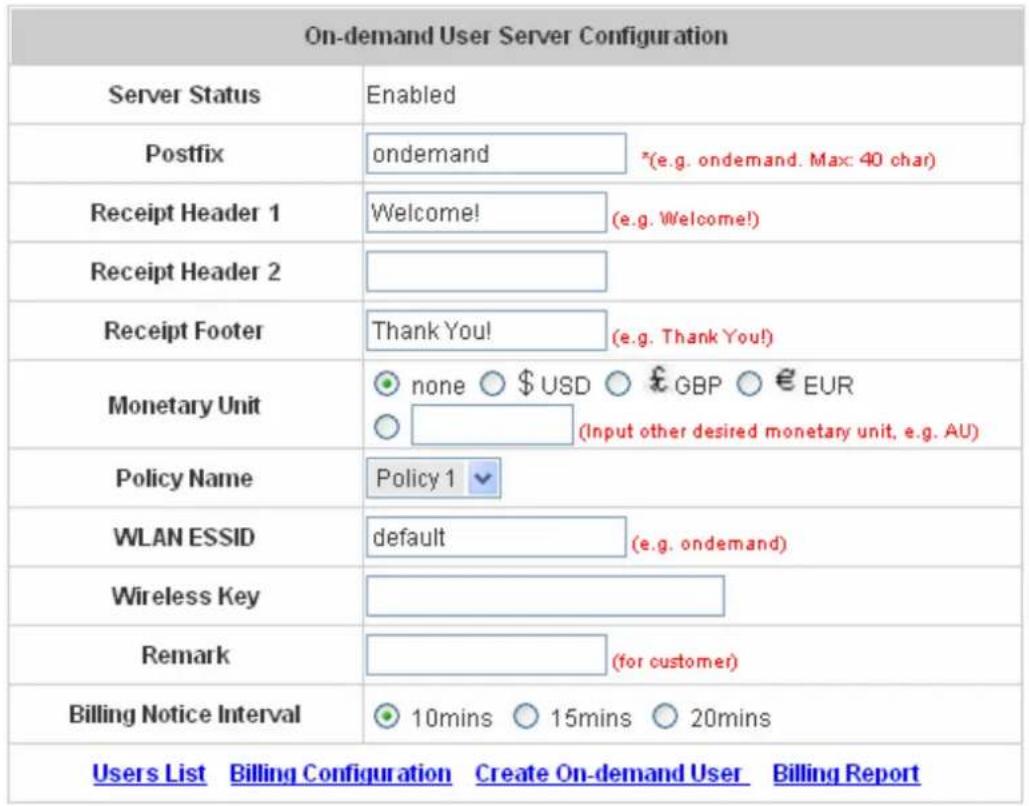
- On-demand User: When the customers need to use wireless Internet service in stores, they have to get printed receipts with usernames and passwords from the store to log in the system for wireless access. There are 2000 On-demand User accounts available.
text_image
On-demand User Server Configuration Server Status Enabled Postfix ondemand *(e.g. ondemand. Max: 40 char) Receipt Header 1 Welcome! (e.g. Welcome!) Receipt Header 2 Thank You! (e.g. Thank You!) Monetary Unit none $USD £GBP EUR (Input other desired monetary unit, e.g. AU) Policy Name Policy 1 WLAN ESSID Usagel default(e.g. ondemand) Wireless Key Remark (for customer) Billing Notice Interval 10mins 15mins 20mins Users List Billing Configuration Create On-demand User Billing ReportServer Status: The status shows that the server is enabled or disabled.
Postfix: Set a postfix that is easy to identify (e.g. Local) for the server by using numbers (0 to 9), alphabets (a to z or A to Z), dash (-), underline (_) and dot (.) with a maximum of 40 characters, all other letters are not allowed.
Receipt Header: There are two fields, Receipt Header 1 and Receipt Header 2, for the receipt's header. Enter receipt header message or use the default.
Receipt Footer: Enter receipt footer message here or use the default.
Monetary Unit: Select or enter the desired monetary unit.
Policy Name: Select a policy for the on-demand user.
WLAN ESSID: Enter the ESSID of APs.
Wireless Key: Enter the Wireless key of APs.
Remark: Enter any additional information that will appear at the bottom of the receipt.
Billing Notice Interval: While an on-demand user is still logged in, the system will update the billing notice of the login successful page by the time interval defined here.
Users List: Click to enter the On-demand Users List page. In the On-demand Users List, detailed information will be shown here.

text_image
Search On-demand Users List Username Password Remain Status Expire Time Delete All DH3P ER4S43FE 2 hour 2 hour 2005/06/02- 17:23:39 Delete 97UU V7B23947 2 hour 2 hour 2005/06/05- 11:45:26 Delete (Total:2) First Previous Next Last➢ Search: Enter a keyword of a username to be searched in the text field and click this button to perform the search. All usernames matching the keyword will be listed.
Username: The login name of the on-demand user.
➢ Password: The login password of the on-demand user.
➢ Remain Time/Volume: The total time/Volume that the user still can use currently.
Status: The status of the on-demand account. Normal indicates that the account is not in-use and not overdue. Online indicates that the account is in-use and not overdue. Expire indicates that the account is overdue and cannot be used.
➢ Expire Time: The expiration time of the account.
➢ Delete All: This will delete all users at once.
➢ Delete: This will delete a specific user individually.
Billing Configuration: Click this to enter the Billing Configuration page. In the Billing Configuration page, the administrator may configure up to 10 billing plans.
| Billing Configuration | ||||||
| Plan | Status | Type | Expired info | Valid Duration | Price | |
| 1 | EnabledDisabled | VolumeTime | Mbyte2hours0mins | 3days0hours | 5days | 20 |
| 2 | EnabledDisabled | VolumeTime | Mbytehoursmins | dayshours | days | |
| 3 | EnabledDisabled | VolumeTime | Mbytehoursmins | dayshours | days | |
| 4 | EnabledDisabled | VolumeTime | Mbytehoursmins | dayshours | days | |
| 5 | EnabledDisabled | VolumeTime | Mbytehoursmins | dayshours | days | |
➢ Status: Select to enable or disable this billing plan.
Type: Set the billing plan by "Volume" (the maximum volume allowed is 9999999 Mbytes) or "Time" (the maximum time allowed is 999 hours and 59 minutes).
Expired info: This is the duration of time that the user needs to activate the account after the generation of the account. If the account is not activated during this duration, the account will self-expire.
Valid Duration: This is the duration of time that the user can use the account after the activation of the account. After this duration, the account will self-expire.
Price: The price charged for this billing plan.
Create On-demand User: Click this to enter the Create On-demand User page.
| Create On-demand User | ||||
| Plan | Type | Price | Status | Function |
| 1 | 2 hrs 0 mins | 20 | Enabled | Create |
| 2 | N/A | N/A | Disabled | Create |
| 3 | N/A | N/A | Disabled | Create |
| 4 | N/A | N/A | Disabled | Create |
| 5 | N/A | N/A | Disabled | Create |
| 6 | N/A | N/A | Disabled | Create |
| 7 | N/A | N/A | Disabled | Create |
| 8 | N/A | N/A | Disabled | Create |
| 9 | N/A | N/A | Disabled | Create |
| 0 | N/A | N/A | Disabled | Create |
Pressing the Create button for the desired plan, an on-demand user will be created, then click Printout to print a receipt which will contain this on-demand user's information. There are 2000 on-demand user accounts available.

Welcome!
| Username | K9WT@ondemand |
| Password | AZESX233 |
| Price | 20 |
| Usage | 2 hrs 0 mins |
| ESSID : default | |
| Valid to use until: 2006/10/20 17:50:24 | |
Thank You!
Printout
Close
Summary report page, the administrator can get a complete report or a report within a particular period.

text_image
Report All From year: -- month: -- day: -- To year: -- month: -- day: -- SearchReport All: Click this to get a complete report including all the on-demand records. This report shows the total expenses and individual accounting of each plan for all plans available.
| Report All | |
| Accounts sold in total | 2 |
| Plan1 | 2 |
| Plan2 | 0 |
| Plan3 | 0 |
| Plan4 | 0 |
| Plan5 | 0 |
| Plan6 | 0 |
| Plan7 | 0 |
| Plan8 | 0 |
| Plan9 | 0 |
| Plan10 | 0 |
| Total income | 40 |
| Income from tickets sold for time users | 40 |
| Income from tickets sold for volume users | 0 |
➢ Search: Select a time period to get a periodical report. The report tells the total expenses and individual accounting of each plan for all plans available for that period of time.
| Report from 2005/06/25 ~ 2005/06/28 | |
| Accounts sold in total | 2 |
| Plan1 | 2 |
| Plan2 | 0 |
| Plan3 | 0 |
| Plan4 | 0 |
| Plan5 | 0 |
| Plan6 | 0 |
| Plan7 | 0 |
| Plan8 | 0 |
| Plan9 | 0 |
| Plan10 | 0 |
| Total income | 40 |
| Income from tickets sold for time users | 40 |
| Income from tickets sold for volume users | 0 |
4.2.1.1 Authentication Method – Local User Setting
Choose Local User in the Authentication Method field, the hyperlink besides the drop-down menu will become to Local User Setting.

text_image
Authentication Server - Server 1 Server Name Server 1 *(Its server name) Server Status Disabled Postfix Postfix1 *(Its postfix name) Black List None Authentication Method Local User Local User Setting Policy Local User POP3 Radius LDAP NTDomainClick the hyperlink of Local User Setting for further configuration.
| Local User Setting | |
| Edit Local User List | |
| Radius Roaming Out | ○ Enable ● Disable |
| 802.1x Authentication | ○ Enable ● Disable |
- Edit Local User List: Click the hyperlink of Edit User Setting to enter the Local User List page.

text_image
Add User Upload User Download User Refresh Search| Users List | ||||
| Username | Password | MAC | Policy | |
| Remark | Del All | |||
| VPN Termination Enabled | ||||
(Total:0) First Previous Next Last
- Add User: Click this to enter the Add User interface. Fill in the necessary information such as "Username", "Password", "MAC" (optional) and "Remark" (optional). Select a desired Policy, check whether to enable
VPN Termination.
| Add User | ||||||
| Item | Username | Password | MAC(XX:XX:XX:XX:XX:XX) | Policy | Remark | VPN Termination |
| 1 | Alice | Policy 1 | in land | |||
| 2 | Bob | 04:03:11:1b:2d:3a | Policy 6 | |||
| 3 | Cathy | Policy 4 | ||||
| 4 | None | |||||
| 5 | None | |||||
| 6 | None | |||||
| 7 | None | |||||
| 8 | None | |||||
| 9 | None | |||||
| 10 | None | |||||
Click Apply to save all the settings after finishing to add users.
User 'Alice' has been added! User 'Bob' has been added! User 'Cathy' has been added!
| Add User | ||||||
| Item | Username | Password | MAC(XXXXXXXXXX) | Policy | Remark | VPN Termination |
| 1 | None | |||||
| 2 | None | |||||
| 3 | None | |||||
| 4 | None | |||||
Upload User: Click this to enter the Upload User interface. Click the Browse button to select the text file for uploading the user accounts. Then click Submit to complete the upload process.
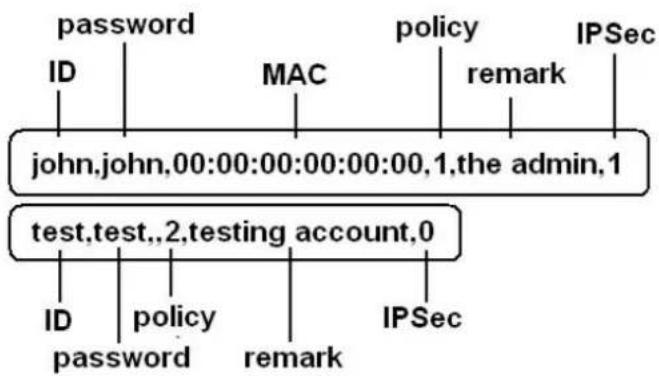
Note: The format of each line is "ID, Password, MAC, Policy, Remark, IPSec" without the quotes. There must be no space between the fields and commas. The MAC field could be omitted but the trailing comma must be retained. When adding user accounts by uploading a file, existing accounts in the embedded database that are also defined in the data file will not be replaced by the new ones. Note: If you want user Enabled VPN Termination, please set IPSec field to 1, or 0 would disable.

text_image
Upload User Account File Name Browse... SubmitThe uploading file should be a text file and the format of each line is "ID, Password, MAC, Policy, Remark, IPSec" without the quotes. There must be no spaces between the fields and commas. The MAC field could be omitted but the trailing comma must be retained. The Group field indicates policy number to use. When adding user accounts by uploading a file, the existing accounts in the embedded database will not be replaced by new ones. If you want user Enable VPN Termination, please set IPSec field to 1 to enable VPN, or 0 to disable VPN.
flowchart
graph TD
    A["password"] --> B["ID"]
    C["MAC"] --> D["john.john.00:00:00:00:00:00,1.the admin,1"]
    E["policy"] --> F["remark"]
    G["IPSec"] --> H["IPSec"]
    I["test.test.,2.testing account,0"] --> J["ID"]
    K["policy"] --> L["password"]
    M["remark"] --> N["IPSec"]
Download User: Click this to enter the Users List page and the system will directly show a list of all created user accounts. Click Download to create a .txt file and then save it on the disk.
| Users List | |||
| Username | Password | MAC | Policy |
| Remark | |||
| VPN Termination Enabled | |||
| Alice | alice | 1 | |
| in land | |||
| 1 | |||
| Bob | 123 | 04:03:11:1b:2d:3a | 6 |
| 0 | |||
| Cathy | asdfasdasdf | 4 | |
| 0 | |||
Download
Refresh: Click this to renew the Users List page.

text_image
Add User Upload User Download User Refresh Search| Users List | ||||
| Username | Password | MAC | Policy | Del All |
| Remark | ||||
| VPN Termination Enabled | ||||
| Alice | alice | Policy 1 | Delete | |
| in land | ||||
| Yes | ||||
| Bob | 123 | 04:03:11:1b:2d:3a | Policy 6 | Delete |
| No | ||||
| Cathy | asdfasdasdf | Policy 4 | Delete | |
| No | ||||
| Allen | al135 | Policy 2 | Delete | |
| Yes | ||||
usernames matching the keyword will be listed.

text_image
Add User Upload User Download User Refresh bob Search| Users List | ||||
| Username | Password | MAC | Policy | Del All |
| Remark | ||||
| VPN Termination Enabled | ||||
| Bob | 123 | 04:03:11:1b:2d:3a | Policy 6 | Delete |
| No | ||||
(Total:1) First Previous Next Last
Del All: This will delete all users at once.
Delete: This will delete a specific user individually.
Edit User: If you want to edit the content of an individual user account, click the username of the desired user account to enter the User Profile page of the particular user, and then modify or add any desired information such as Username, Password, MAC (optional), Policy and Remark (optional). Then check VPN Termination to enable this function or not. Click Apply to complete the modification.
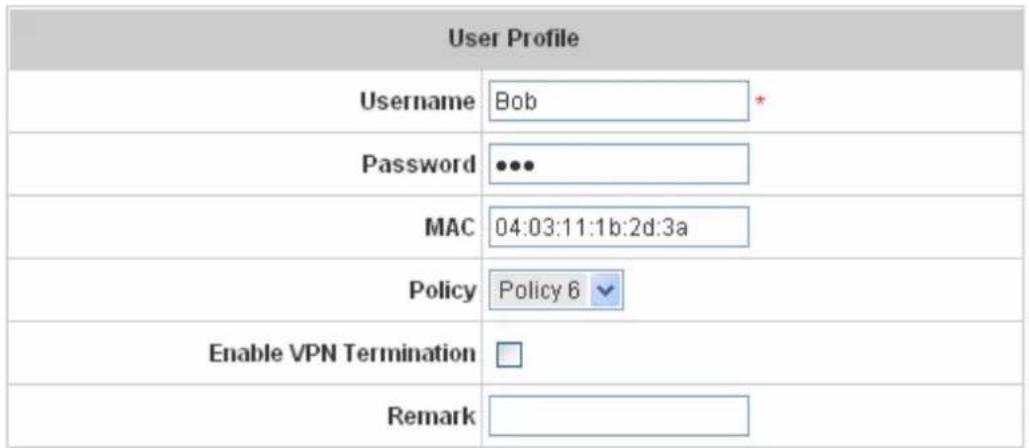
text_image
User Profile Username Bob * Password ••• MAC 04:03:11:1b:2d:3a Policy Policy 6 Enable VPN Termination □ Remark- Radius Roaming Out / 802.1x Authentication: Radius Roaming Out / 802.1x Authentication: These 2 functions can be enabled or disabled by checking the radio buttons. Checking either of them makes the hyperlink of Radius Client List appear.
| Local User Setting | |
| Edit Local User List | |
| Radius Roaming Out | ◎ Enable ○ Disable |
| 802.1x Authentication | ◎ Enable ○ Disable |
| Radius Client List | |
Click the hyperlink of Radius Client List to enter the Radius Client Configuration page. Choose the desired type, Disable, Roaming Out or 802.1x and key in the related data and then click Apply to complete the configurations.
| Radius Client Configuration | ||||
| No. | Type | IP Address | Segment | Secret |
| 1 | Roaming Out | 10.0.0.0 | 255.0.0.0 (I8) | 12345678 |
| 2 | Disable | 255.255.255.255 (I32) | ||
| 3 | Disable | 255.255.255.255 (I32) | ||
| 4 | Disable | 255.255.255.255 (I32) | ||
| 5 | Disable | 255.255.255.255 (I32) | ||
Radius Roaming Out: When Radius Roaming Out is enabled, local users can login from other domains by using their original local user accounts.
802.1x Authentication: 802.1x is a security standard for wired and wireless LANs. It encapsulates EAP (Extensible Authentication Protocol) processes into Ethernet packets instead of using the protocol's native PPP (Point-to-Point Protocol) environment, thus reducing some network overhead. It also puts the bulk of the processing burden upon the client (called a supplicant in 802.1x parlance) and the authentication server (such as a RADIUS), letting the "authenticator" middleman simply pass the packets back and forth.
4.2.1.2 Authentication Method – POP3
Choose POP3 in the Authentication Method field, the hyperlink next to the drop-down menu will become POP3 Setting.
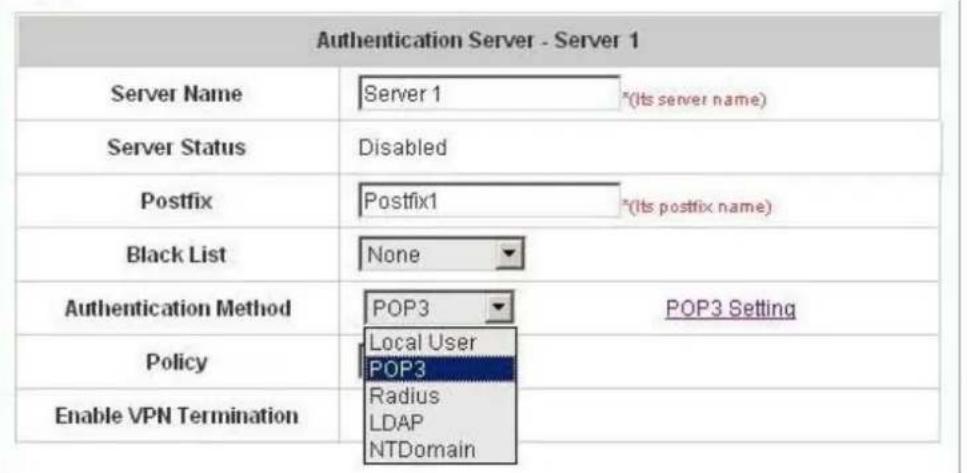
text_image
Authentication Server - Server 1 Server Name Server 1 *(Its server name) Server Status Disabled Postfix Postfix1 *(Its postfix name) Black List None Authentication Method POP3 POP3 Setting Policy Local User POP3 Enable VPN Termination Radius LDAP NTDomainWhen POP3, Radius, LDAP or NTDomain is selected from the drop-down menu, the function of Enable VPN Termination will show up. Check Enable VPN Termination to enable this function. Click the hyperlink of POP3 Setting for further configuration. Enter the related information of the primary server and/or the secondary server (the secondary server is not required). The blanks with red asterisks are necessary information. These settings will become effective immediately after clicking the Apply button.
| Primary POP3 Server | |
| Server IP | *(Domain Name/IP) |
| Port | *(Default: 110) |
| SSL Setting | Enable SSL Connection |
| Secondary POP3 Server | |
| Server IP | |
| Port | |
| SSL Setting | Enable SSL Connection |
• Server IP: Enter the IP address/domain name given by the ISP.
• Port: Enter the Port given by the ISP. The default value is 110.
- Enable SSL Connection: If this function is enabled, the POP3s protocol will be used to encrypt the authentication.
4.2.1.3 Authentication Method – Radius
Choose Radius in the Authentication Method field, the hyperlink next to the drop-down menu will become to Radius Setting.
| Authentication Server - Server 3 | |
| Server Name | Server 3*(Its server name) |
| Server Status | Enabled |
| Postfix | Postfix3*(Its postfix name) |
| Black List | None |
| Authentication Method | Radius Radius Setting |
| Policy | Policy 1 Edit Policy Mapping |
| Enable VPN Termination | |
When POP3, Radius, LDAP or NTDomain is selected from the drop-down menu, the function of Enable VPN Termination will show up. Check Enable VPN Termination to enable this function. Click the hyperlink of Radius Setting for further configuration. Enter the related information of the primary server and/or the secondary server (the secondary server is not required). The blanks with red asterisks are necessary information. These settings will become effective immediately after clicking the Apply button.
| Radius Setting | |
| 802.1x Authentication | EnabledDisabled |
| Trans Full Name | EnabledDisabled |
| NASID | |
| Primary RADIUS Server | |
| Server IP | |
| Authentication Port | (Default: 1812) |
| Accounting Port | (Default: 1813) |
| Secret Key | |
| Accounting Service | EnabledDisabled |
| Authentication Protocol | PAP |
| Secondary RADIUS Server | |
| Server IP | |
| Authentication Port | |
| Accounting Port | |
| Secret Key | |
| Accounting Service | EnabledDisabled |
| Authentication Protocol | CHAP |
- 802.1X Authentication: When enabling this function, the hyperlink of Radius Client List will appear. Click the hyperlink to get into the Radius Client Configuration page for further configuration. In the Radius Client Configuration page, the clients, which are using 802.1X as the authentication method, shall be put into this table. Edimax AC-M3000 will forward the authentication request from these clients to the configured Radius Server.
| Radius Client Configuration | ||||
| No. | Type | IP Address | Segment | Secret |
| 1 | Disable | 255.255.255.255 (I32) | ||
| 2 | Disable | 255.255.255.255 (I32) | ||
| 3 | Disable | 255.255.255.255 (I32) | ||
| 4 | Disable | 255.255.255.255 (I32) | ||
| 5 | Disable | 255.255.255.255 (I32) | ||
| 6 | Disable | 255.255.255.255 (I32) | ||
| 7 | Disable | 255.255.255.255 (I32) | ||
| 8 | Disable | 255.255.255.255 (I32) | ||
| 9 | Disable | 255.255.255.255 (I32) | ||
| 10 | Disable | 255.255.255.255 (I32) | ||
- Trans Full Name: When enabled, both the ID and postfix will be transferred to the RADIUS server for authentication. When disabled, only the ID will be transferred to RADIUS server for authentication.
• NASID: Enter the NASID of the Edimax AC-M3000 for the RADIUS server.
• Server IP: Enter the IP address/domain name of the RADIUS server.
• Authentication Port: Enter the authentication port of the RADIUS server and the default value is 1812.
• Accounting Port: Enter the accounting port of the RADIUS server and the default value is 1813. - Secret Key: Enter the key for encryption and decryption.
• Accounting Service: Choose to enable or disable the accounting service for accounting capabilities.
• Authentication Protocol: There are two methods, CHAP and PAP, for selection. - Edit Policy Mapping: Click the hyperlink of Edit Policy Mapping to enter the Policy Mapping page. Choose to enable or disable policy mapping by RADIUS class attributes.
| Policy Mapping - Server 3 | |||
| Enable Disable | |||
| No. | Class Attribute | Policy | Remark |
| 1 | Policy 1 | ||
| 2 | Policy 1 | ||
| 3 | Policy 1 | ||
| 4 | Policy 1 | ||
| 5 | Policy 1 | ||
| 6 | Policy 1 | ||
| 7 | Policy 1 | ||
| 8 | Policy 1 | ||
• Class Attribute: Class attribute sent from the RADIUS server.
• Policy: Select the mapping policy of this class attribute.
• Remark: Add some description if needed.
4.2.1.4 Authentication Method – LDAP
Choose LDAP in the Authentication Method field, the hyperlink next to the drop-down menu will become to LDAP Setting.
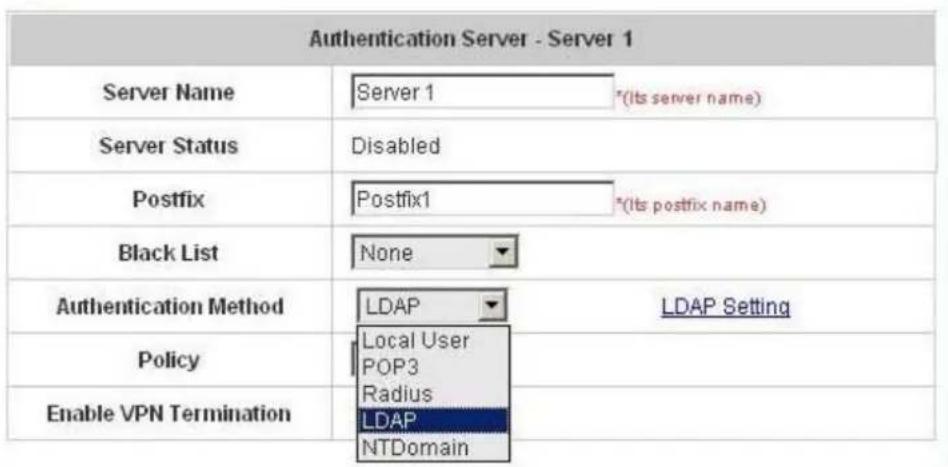
text_image
Authentication Server - Server 1 Server Name Server 1 *(Its server name) Server Status Disabled Postfix Postfix1 *(Its postfix name) Black List None Authentication Method LDAP LDAP Setting Policy Local User POP3 Radius Enable VPN Termination LDAP NTDomainWhen POP3, Radius, LDAP or NTDomain is selected from the drop-down menu, the function of Enable VPN Termination will show up. Check Enable VPN Termination to enable this function. Click the hyperlink of LDAP Setting for further configuration. Enter the related information of the primary server and/or the secondary server (the secondary server is not required). The blanks with red asterisks are necessary information. These settings will become effective immediately after clicking the Apply button.
| Primary LDAP Server | |
| Server IP | "(Domain Name/IP) |
| Port | "(Default: 389) |
| Base DN | "(CN=,do=,do=) |
| Account Attribute | (Default: uid) |
| Secondary LDAP Server | |
| Server IP | |
| Port | |
| Base DN | |
| Account Attribute | |
• Server IP: Enter the IP address/domain name of the LDAP server.
• Port: Enter the Port of the LDAP server, and the default value is 389.
- Base DN: Enter the base DN defined of the LDAP server.
• Account Attribute: Enter the account attribute of the LDAP server.
4.2.1.5 Authentication Method – NTDomain
Choose NTDomain in the Authentication Method field, the hyperlink next to the drop-down menu will become to NTDomain Setting.
| Authentication Server - Server 1 | ||
| Server Name | Server 1 | *(Its server name) |
| Server Status | Disabled | |
| Postfix | Postfix1 | *(Its postfix name) |
| Black List | None | |
| Authentication Method | NTDomain | NT Domain Setting |
| Policy | Local UserPOP3RadiusLDAPNTDomain | |
| Enable VPN Termination | ||
When POP3, Radius, LDAP or NTDomain is selected from the drop-down menu, the function of Enable VPN Termination will show up. Check Enable VPN Termination to enable this function. Click the hyperlink of NT Domain Setting for further configuration. Enter the related information of the primary server and/or the secondary server (the secondary server is not required). The blanks with red asterisks are necessary information. These settings will become effective immediately after clicking the Apply button.
| Domain Controller | |
| Server IP address | |
| Transparent Login | ● Enable ○ Disable |
• Server IP address: Enter the server IP address of the domain controller.
- Transparent Login: If the function is enabled, users will log into Edimax AC-M3000 automatically when they log into the Windows domain and the IP of NT Domain Server should be added into walled garden.
4.2.2 Black List Configuration
The administrator can add, delete, or edit the black list for user access control. Each black list can include 40 users at most. If a user in the black list wants to log into the system, the user's access will be denied. The administrator can use the pull-down menu to select the desired black list to edit adding users into the black list.
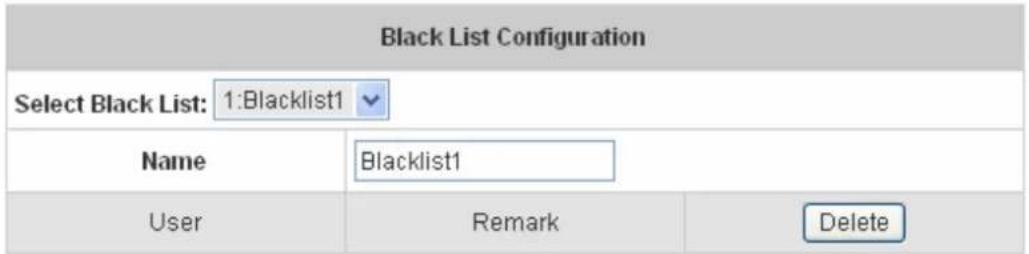
text_image
Black List Configuration Select Black List: 1:Blacklist1 Name Blacklist1 User Remark Delete(Total:0) First Prev Next Last
Add User to List
- Select Black List: There are 5 lists that Edimax AC-M3000 supports to select from.
- Name: Set the name of the black list and it will show in the pull-down menu above.
- Add User to List: Click the hyperlink of Add User to List, the Add Users to Blacklist page will appear for adding users to the selected black list.
| Add Users to Blacklist Blacklist1 | ||
| No | Username | Remark |
| 1 | ||
| 2 | ||
| 3 | ||
| 4 | ||
| 5 | ||
| 6 | ||
| 7 | ||
| 8 | ||
| 9 | ||
| 10 | ||
After entering the usernames in the Username field and the related information in the Remark field (not required).
| Add Users to Blacklist Blacklist1 | ||
| Item | Username | Remark |
| 1 | James | fraud |
| 2 | Junior | |
| 3 | ||
| 4 | ||
| 5 | ||
| 6 | ||
| 7 | ||
| 8 | ||
| 9 | ||
| 10 | ||
Click Apply to save the settings.
User 'James' has been added!
User 'Junior' has been added!

Add Users to Blacklist
| Add Users to Blacklist Blacklist1 | ||
| Item | Username | Remark |
| 1 | ||
| 2 | ||
| 3 | ||
| 4 | ||
| 5 | ||
If the administrator wants to remove a user from the black list, just select the user's "Delete" check box and then click the Delete button to remove that user from the black list.

text_image
Black List Configuration Select Black List: 1:Blacklist1 Name Blacklist1 User Remark Delete James fraud Junior ✓(Total:2) First Prev Next Last
Add User to List
4.2.3 Policy Configuration
Each policy has three profiles, Firewall Profile, Specific Route Profile, and Schedule Profile as well as Bandwidth settings such as Total Bandwidth, Individual Maximum Bandwidth, and Individual Request Bandwidth for that policy.
| Policy Configuration | |
| Select Policy: Policy A | |
| Firewall Profile | Setting |
| Specific Route Profile | Setting |
| Schedule Profile | Setting |
| Total Bandwidth | Unlimited |
| Individual Maximum Bandwidth | Unlimited |
| Individual Request Bandwidth | None |
- Firewall Profile
Click the hyperlink of Setting for Firewall Profile, the Firewall Profile page will appear. Click the numbers of Filter Rule Item to edit individual rules and click Apply to save the settings. The rule status will show on the list. Check Active to enable that rule.
Attention: Filter Rule Item 1 is the highest priority, Filter Rule Item 2 is the second priority, and so on.
| Firewall Profiles | ||||||
| Source Filter Rule Item | Active | Action | Name | Destination | Protocol | MAC |
| 1 | □ | Block | ANY | ALL | ||
| ANY | ||||||
| 2 | □ | Block | ANY | ALL | ||
| ANY | ||||||
| 3 | □ | Block | ANY | ALL | ||
| ANY | ||||||
| 4 | □ | Block | ANY | ALL | ||
| ANY | ||||||
| 5 | □ | Block | ANY | ALL | ||
| ANY | ||||||

text_image
Edit Filter Rule Rule Item: 1 Rule Name: Enable this Rule Action : Block Protocol ALL Source MAC Address: (For Specific MAC Address Filter) Interface IP Subnet Mask Start End Port Port Source ALL 255.255.255.255 (J32) Destination ALL 255.255.255.255 (J32)Rule Item: This is the rule selected.
Rule Name: The rule name can be changed here. The rule name can be set to easily identify, for example:
"from file server", "HTTP request" or "to web", etc.
Enable this Rule: After checking this function, the rule will be enabled.
Action: There are two options, Block and Pass. Block is to prevent packets from passing and Pass is to permit packets passing.
Protocol: There are three protocols to select, TCP, UDP and ICMP, or choose ALL to use all three protocols.
Source MAC Address: The MAC address of the source IP address. This is for specific MAC address filter.
Source/Destination Interface: There are four interfaces to choose, ALL, WAN1, WAN2, Controlled Port and Uncontrolled Port.
Source/Destination IP: Enter the source and destination IP addresses.
Source/Destination Subnet Mask: Enter the source and destination subnet masks.
Source/Destination Start/End Port: Enter the range of source and destination ports.
- Specific Route Profile
Click the hyperlink of Setting for Specific Route Profile, the Specific Default Route and Specific Route Profile page will appear.
Profile Name: Policy Route 1
Specific Default Route
| Enable □ | Default Gateway: IP Address | ||
| Specific Route Profile | |||
| Route Item | Destination | Gateway | |
| IP Address | Subnet Netmask | IP Address | |
| 1 | 255.255.255.255 (I32) | ||
| 2 | 255.255.255.255 (I32) | ||
| 3 | 255.255.255.255 (I32) | ||
| 4 | 255.255.255.255 (I32) | ||
| 5 | 255.255.255.255 (I32) | ||
| 6 | 255.255.255.255 (I32) | ||
| 7 | 255.255.255.255 (I32) | ||
| 8 | 255.255.255.255 (I32) | ||
| 9 | 255.255.255.255 (I32) | ||
| 10 | 255.255.255.255 (I32) | ||
Specific Default Route
Enable: Click to enable the setting of specific default route.
Default Gateway: There are 3 methods of the default gateway that Specific Default Route supports. Select WAN1 Default Gateway to set WAN1 as the default gateway. Select WAN2 Default Gateway to set WAN2 as the default gateway. Select IP Address and enter the IP address of the specific router.
Specific Route Profile
Profile Name: The profile name can be changed here.
Destination IP Address: The destination IP address of the host or the network.
Destination Subnet Netmask: Select a destination subnet netmask of the host or the network.
Gateway IP Address: The IP address of the gateway or the router to the destination.
- Schedule Profile
Click the hyperlink of Setting for Schedule Profile to enter the Schedule Profile list. Select Enable to show the list. This function is used to restrict the time for users to log in. Please enable/disable the desired time slot and click Apply to save the settings. These settings will become effective immediately after clicking the Apply button.
| Login Schedule Profile | |||||||
| HOUR | SUN | MON | TUE | WED | THU | FRI | SAT |
| 00:00~00:59 | ☑ | ☑ | ☑ | ☑ | ☑ | ☑ | ☑ |
| 01:00~01:59 | ☑ | ☑ | ☑ | ☑ | ☑ | ☑ | ☑ |
| 02:00~02:59 | ☑ | ☑ | ☑ | ☑ | ☑ | ☑ | ☑ |
| 03:00~03:59 | ☑ | ☑ | ☑ | ☑ | ☑ | ☑ | ☑ |
| 04:00~04:59 | ☑ | ☑ | ☑ | ☑ | ☑ | ☑ | ☑ |
| 05:00~05:59 | ☑ | ☑ | ☑ | ☑ | ☑ | ☑ | ☑ |
| 06:00~06:59 | ☑ | ☑ | ☑ | ☑ | ☑ | ☑ | ☑ |
| 07:00~07:59 | ☑ | ☑ | ☑ | ☑ | ☑ | ☑ | ☑ |
| 08:00~08:59 | ☑ | ☑ | ☑ | ☑ | ☑ | ☑ | ☑ |
| 09:00~09:59 | ☑ | ☑ | ☑ | ☑ | ☑ | ☑ | ☑ |
| 10:00~10:59 | ☑ | ☑ | ☑ | ☑ | ☑ | ☑ | ☑ |
| 11:00~11:59 | ☑ | ☑ | ☑ | ☑ | ☑ | ☑ | ☑ |
| 12:00~12:59 | ☑ | ☑ | ☑ | ☑ | ☑ | ☑ | ☑ |
| 13:00~13:59 | ☑ | ☑ | ☑ | ☑ | ☑ | ☑ | ☑ |
| 14:00~14:59 | ☑ | ☑ | ☑ | ☑ | ☑ | ☑ | ☑ |
| 15:00~15:59 | ☑ | ☑ | ☑ | ☑ | ☑ | ☑ | ☑ |
| 16:00~16:59 | ☑ | ☑ | ☑ | ☑ | ☑ | ☑ | ☑ |
| 17:00~17:59 | ☑ | ☑ | ☑ | ☑ | ☑ | ☑ | ☑ |
| 18:00~18:59 | ☑ | ☑ | ☑ | ☑ | ☑ | ☑ | ☑ |
| 19:00~19:59 | ☑ | ☑ | ☑ | ☑ | ☑ | ☑ | ☑ |
| 20:00~20:59 | ☑ | ☑ | ☑ | ☑ | ☑ | ☑ | ☑ |
| 21:00~21:59 | ☑ | ☑ | ☑ | ☑ | ☑ | ☑ | ☑ |
| 22:00~22:59 | ☑ | ☑ | ☑ | ☑ | ☑ | ☑ | ☑ |
| 23:00~23:59 | ☑ | ☑ | ☑ | ☑ | ☑ | ☑ | ☑ |
• Total Bandwidth
Select the bandwidth from the drop-down menu. It's the total bandwidth the users under this particular policy need to share.
• Individual Maximum Bandwidth
Select the bandwidth from the drop-down menu. It's the most bandwidth an individual user can obtain under this
particular policy, which cannot exceed the value for Total Bandwidth.
• Individual Request Bandwidth
Select the bandwidth from the drop-down menu. It's the requested bandwidth for a user under this particular policy, which cannot exceed the value for Individual Maximum Bandwidth.
4.2.4 Additional Configuration
| Additional Configuration | |
| User Control | Idle Timer: 10 minutes *(Range: 1-1440)Multiple Login (On-demand and RADIUS authentication do NOT support multiple login.)Friendly Logout |
| Roaming Out Timer | Session Timeout: 120 *(Range: 5-1440)Idle Timeout: 10 *(Range: 1-120)Interim Update: 5 *(Range: 1-120) |
| Upload File | Certificate Login Page Logout Page Login Success Page Login Success Page for On-Demand Logout Success Page |
| Credit Reminder | Volume ○ Enable ● DisableTime ○ Enable ● Disable |
| POP3 Message | Edit Mail Message |
| Enhance User Authentication | Permit MAC Address List |
- User Control: Functions under this section applies for all general users.
Idle Timer: If a user has been idled with no network activities, the system will automatically kick out the user. The logout timer can be set in the range of 1\~1440 minutes, and the default logout time is 10 minutes.
Multiple Login: When enabled, the same account can be logged in by different clients at the same time. (This function doesn't support On-demand users and RADIUS server)
Friendly Logout: When a user logs into the network, a small window will appear to show the user's information and there is a logout button for the logout. If enabled. When the users try to close the small window, there will be a new popup window to confirm the logout in case the users click the logout button by accident.
- Roaming Out Timer
Session Timeout: The time that the user can access the network while roaming. When the time is up, the user will be kicked out automatically.
Idle Timeout: If a user has been idled with no network activities, the system will automatically kick out the user.
Interim Update: The system will update the users' current status and usage according to this time periodically.
- Upload File
- Certificate: The administrator can upload new private key and customer certification. Click the Browse button to select the file for the certificate upload. Then click Submit to complete the upload process.
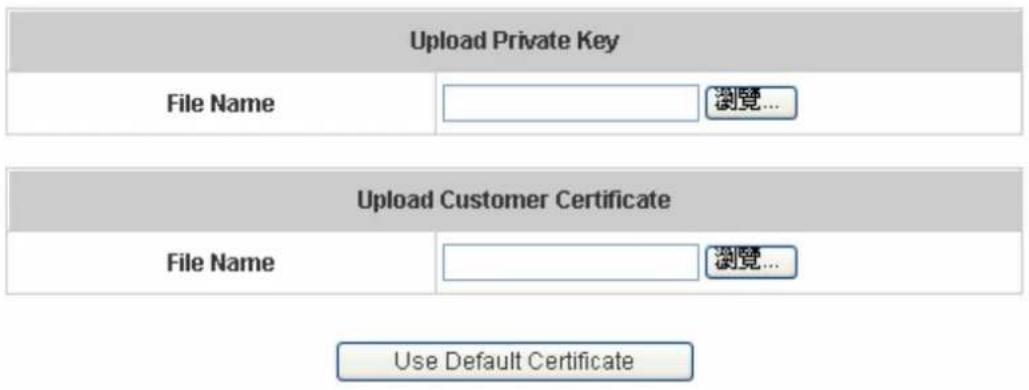
text_image
Upload Private Key File Name 浏览... Upload Customer Certificate File Name 浏览... Use Default CertificateClick Use Default Certificate to use the default certificate and key.
You just overwrote the setting with default KEY & default CA file
- Login Page: The administrator can use the default login page or get the customized login page by setting the template page, uploading the page or downloading from the specific website. After finishing the setting, you can click Preview to see the login page.
a. Choose Default Page to use the default login page.

text_image
Login Page Selection for Users Default Page Template Page Uploaded Page External Page Default Page Setting This is default login page for users. You could click preview link to preview the default login page. Thanks. Previewb. Choose Template Page to make a customized login page here. Click Select to pick up a color and then fill in all of the blanks. Click Preview to see the result first.
Login Page Selection for Users
Default Page
Template Page
○ Uploaded Page
External Page
| Template Page Setting | |
| Color for Title Background | Select (RGB values in hex mode) |
| Color for Title Text | Select (RGB values in hex mode) |
| Color for Page Background | Select (RGB values in hex mode) |
| Color for Page Text | Select (RGB values in hex mode) |
| Title | User Login Page |
| Welcome | Welcome To User Login Page |
| Information | Please Enter Your Name and Password to Sign In |
| Username | Username |
| Password | Password |
| Submit | Submit |
| Clear | Clear |
| Remaining | Remaining |
| Copyright | Copyright (c) |
| Preview | |
c. Choose Uploaded Page and upload a login page. Click the Browse button to select the file to upload. Then click Submit to complete the upload process.

text_image
Login Page Selection for Users Default Page Template Page Uploaded Page External Page Uploaded Page Setting File Name Browse... Submit Existing Image Files: Total Capacity: 512 K Now Used: 0 K Upload Image Files Upload Images Browse... Submit PreviewAfter the upload process is completed, the new login page can be previewed by clicking Preview button at the bottom.
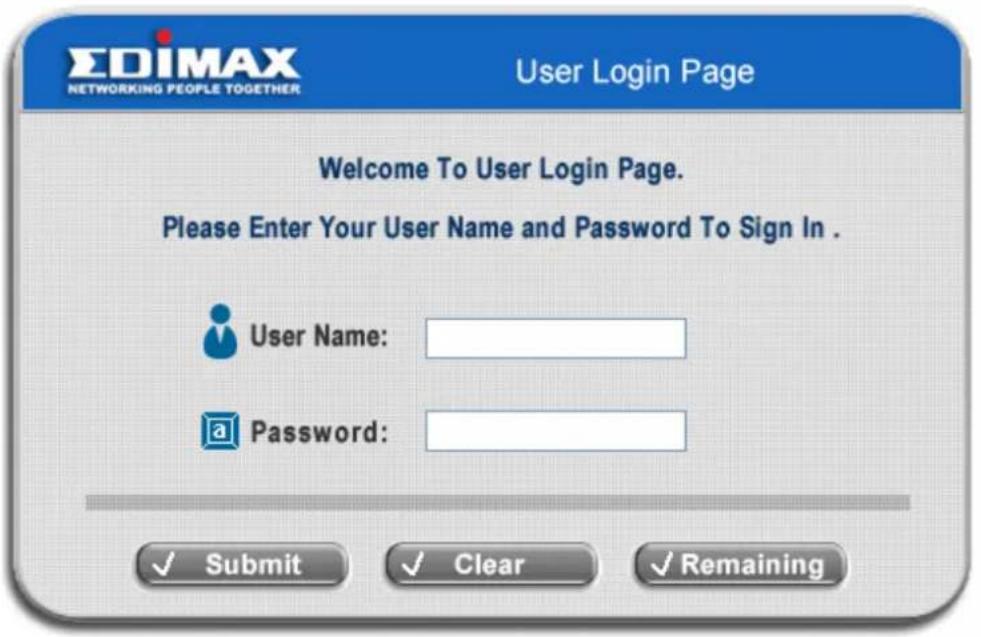
text_image
SDIMAX NETWORKING PEOPLE TOGETHER User Login Page Welcome To User Login Page. Please Enter Your User Name and Password To Sign In . User Name: Password: ✓ Submit ✓ Clear ✓ RemainingThe user-defined login page must include the following HTML codes to provide the necessary fields for username and password.
<form action="userlogin.shtml" method="post" name="Enter">
    <input type="text" name="myusername">
    <input type="password" name="mypassword">
    <input type="submit" name="submit" value="Enter">
    <input type="reset" name="clear" value="Clear">
</form>
If the user-defined login page includes an image file, the image file path in the HTML code must be the image file you will upload.
<img src="images/xx.jpg">
Then, enter or browse the filename of the images to upload in the Upload Images field on the Upload Images Files page and then click Submit. The system will show the used space and the maximum size of the image file of 512K. If the administrator wishes to restore the factory default of the login page, click the Use Default Page button to restore it to default.

text_image
Total Capacity: 512 K Now Used: 0 K Upload Image Files Upload Images Browse... SubmitAfter the image file is uploaded, the file name will show on the "Existing Image Files" field. Check the file and click Delete to delete the file.

text_image
Existing Image Files : 1102474548_732cn.gif □ DeleteIn Edimax AC-M3000, the end user first gets a login page when she/he opens its web browser right after associating with an access point. However, in some situations, the hotspot owners or MIS staff may want to display “terms of use” or announcement information before the login page. Hotspot owners or MIS staff can design a new disclaimer/announcement page and save the page in their local server. After the agreement shown on the page is read, users are asked whether they agree or disagree with the disclaimer. By clicking I agree, users are able to log in. If users choose to decline, they will get a popup window saying they are unable to log in. The basic design is to have the disclaimer and login function in the same page but with the login function hidden until users agree with the disclaimer.
For more details about the codes of the disclaimer, please refer to Appendix F.
If the page is successfully loaded, an upload success page will show up.
Successful!
You just uploaded page:default_login_with_disclaimer.html Preview
"Preview" can be clicked to see the uploaded page.

text_image
We may collect and store the following personal information: e-mail address, physical contact information, credit card numbers and transactional information based on your activities on the Internet service provided by us. If the information you provide cannot be verified, we may ask you to send us additional information (such as your driver license, credit card statement, and/or a recent utility bill or other information confirming your address), or to answer additional questions to help verify your information.) I agree. I disagree. NextClick here to purchase by Credit Card Online.
If a user checks "I agree" and clicks Next, then he/she is prompted to fill in the login name and password.

text_image
EDIMAX NETWORKING PEOPLE TOGETHER User Login Page Welcome To User Login Page. Please Enter Your User Name and Password To Sign In . User Name: Password: ✓ Submit ✓ Clear ✓ RemainingIf a user checks "I disagree" and clicks Next, a window will pop up to tell user that he/she cannot log in

text_image
Service Disclaimer We may collect and store the following personal information: email address, physical contact information, credit card numbers and transactional information based on your activities on the Internet service provided by us. If the information you provide cannot be Microsoft Internet Explorer You disagree with the disclaimer, therefore you will NOT be able to log in. 確定 I agree. I disagree. Nextd. Choose the External Page selection and get the login page from the specific website. Enter the website address in the "External Page Setting" field and then click Apply.

text_image
Login Page Selection for Users Default Page Uploaded Page Template Page External Page
text_image
External Page Setting External URL : http:// PreviewAfter applying the setting, the new login page can be previewed by clicking Preview button at the bottom of this page.
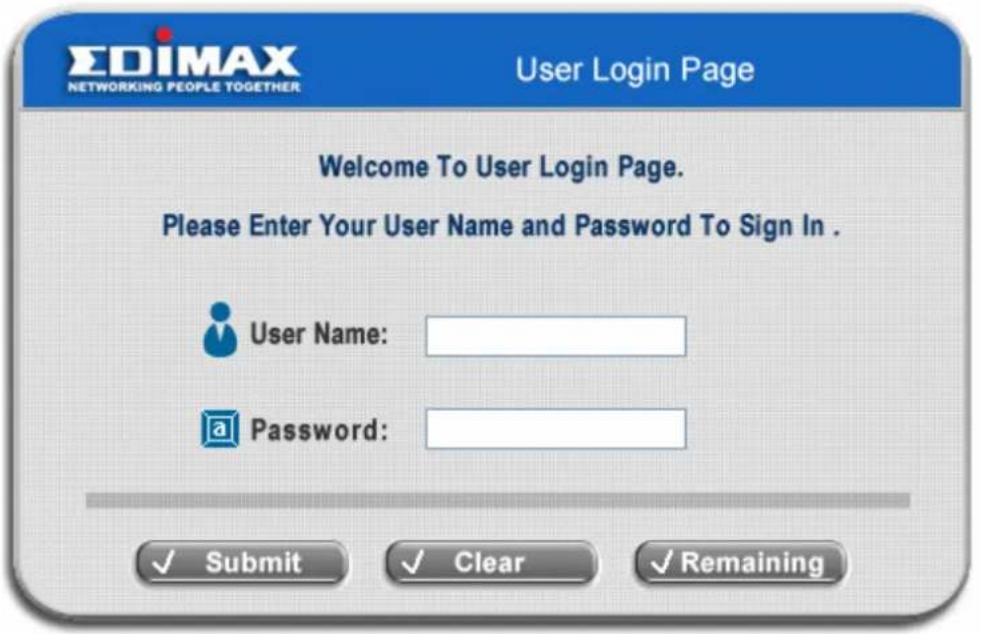
text_image
EDIMAX NETWORKING PEOPLE TOGETHER User Login Page Welcome To User Login Page. Please Enter Your User Name and Password To Sign In . User Name: Password: ✓ Submit ✓ Clear ✓ Remaining- Logout Page: The administrator can apply customized logout page here. The process is similar to that of Login Page.
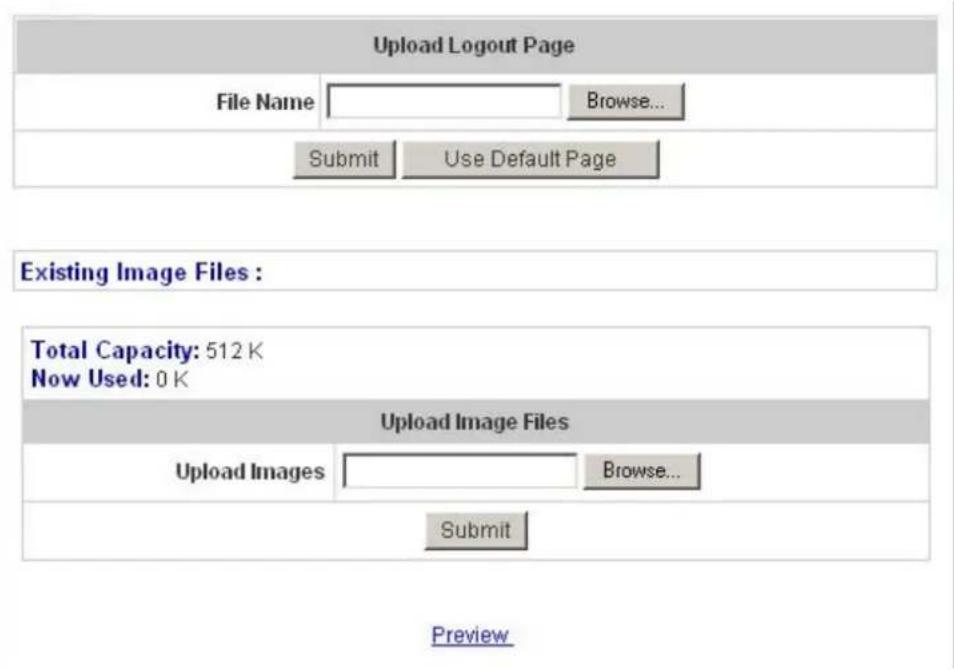
text_image
Upload Logout Page File Name Browse... Submit Use Default Page Existing Image Files : Total Capacity: 512 K Now Used: 0 K Upload Image Files Upload Images Browse... Submit PreviewThe different part is the HTML code of the user-defined logout interface must include the following HTML code that the user can enter the username and password. After the upload is completed, the user-defined login user interface can be previewed by clicking Preview at the bottom of this page. If want to restore the factory default setting of the logout interface, click the "Use Default Page" button.
<form action="userlogout.shtml" method="post" name="Enter">
<input type="text" name="myusername">
<input type="password" name="mypassword">
<input type="submit" name="submit" value="Logout">
<input type="reset" name="clear" value="Clear">
</form>
- Login Success Page: The administrator can use the default login success page or get the customized login success page by setting the template page, uploading the page or using the external website. After finishing the setting, you can click Preview to see the login success page.
a. Choose Default Page to use the default login success page.
| Login Success Page Selection for Users | |
| Default PageUploaded Page | Template PageExternal Page |
| Default Page Setting | |
| This is default login success page for users.You could click preview link to preview the default login success page.Thanks. | |
| Preview | |
b. Choose Template Page to make a customized login success page here. Click Select to pick up a color and then fill in all of the blanks. You can click Preview to see the result first.
Login Success Page Selection for Users
Default Page
Template Page
○ Uploaded Page
○ External Page
| Template Page Setting | |
| Color for Title Background | Select(RGB values in hex mode) |
| Color for Title Text | Select(RGB values in hex mode) |
| Color for Page Background | Select(RGB values in hex mode) |
| Color for Page Text | Select(RGB values in hex mode) |
| Title | Login Succeed Page |
| Welcome | Hello |
| Information | Please click this button to |
| Logout | Logout |
| Information2 | Thank you |
| Login Time | Login Time |
| Preview | |
c. Choose Uploaded Page and you can get the login success page by uploading. Click the Browse button to select the file for the login success page upload. Then click Submit to complete the upload process.

text_image
Login Success Page Selection for Users Default Page Template Page Uploaded Page External Page Uploaded Page Setting File Name Browse... Submit Existing Image Files: Total Capacity: 512 K Now Used: 0 K Upload Image Files Upload Images Browse... Submit PreviewAfter the upload process is completed, the new login success page can be previewed by clicking Preview button at the bottom.
If the user-defined login success page includes an image file, the image file path in the HTML code must be the image file you will upload.
$$ < \text { img src } = " i m a g e s / x x. j p g" > $$
Then, enter or browse the filename of the images to upload in the Upload Images field on the Upload Images Files page and then click Submit. The system will show the used space and the maximum size of the image file of 512K. If the administrator wishes to restore the factory default of the login success page, click the Use Default Page button to restore it to default.

text_image
Total Capacity: 512 K Now Used: 0 K Upload Image Files Upload Images Browse... SubmitAfter the image file is uploaded, the file name will show on the "Existing Image Files" field. Check the file
and click Delete to delete the file.
Existing Image Files : 1102474548_732cn.gif □
Delete
d. Choose the External Page selection and you can get the login success page e from the specific website. Enter the website address in the External Page Setting field and then click Apply. After applying the setting, the new login success page can be previewed by clicking Preview button at the bottom of this page.

text_image
Login Success Page Selection for Users Default Page Template Page Uploaded Page External Page External Page Setting External URL : http:// Preview- Login Success Page for On-Demand: The administrator can use the default login success page for On-Demand or get the customized login success page for On-Demand by setting the template page, uploading the page or using the external website. After finishing the setting, you can click Preview to see the login success page for On-Demand.
a. Choose Default Page to use the default login success page for On-Demand.

text_image
Login Success Page Selection for on-demand Users Default Page Template Page Uploaded Page External Page Default Page Setting This is default login success page for on-demand users. You could click preview link to preview the default login success page. Thanks. Previewb. Choose Template Page to make a customized login success page for On-Demand here. Click Select to pick up a color and then fill in all of the blanks. You can click Preview to see the result first.
Login Success Page Selection for on-demand Users
Default Page
Template Page
○ Uploaded Page
External Page
| Template Page Setting | |
| Color for Title Background | Select (RGB values in hex mode) |
| Color for Title Text | Select (RGB values in hex mode) |
| Color for Page Background | Select (RGB values in hex mode) |
| Color for Page Text | Select (RGB values in hex mode) |
| Title | Login Succeed Page for on-demand |
| Welcome | Welcome |
| Information | Please click this button to |
| Logout | Logout |
| Information2 | Thank you |
| Remaining Usage | Remaining Usage |
| Day | Day |
| Hour | Hour |
| Min | Min |
| Sec | Sec |
| Login Time | Login Time |
| Redeem | Redeem |
| Preview | |
c. Choose Uploaded Page and you can get the Login Success Page Section for On-Demand Users. Click the Browse button to select the file for the login success page for On-Demand. Then click Submit to complete the upload process.
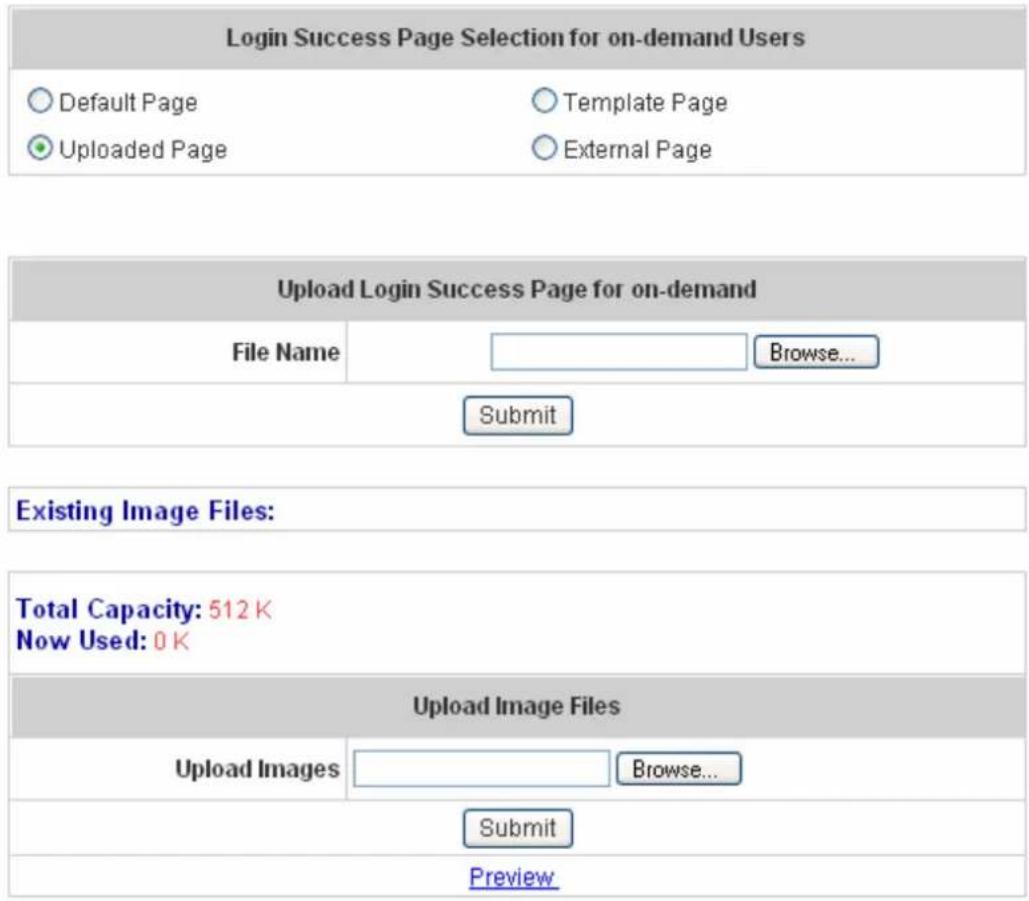
text_image
Login Success Page Selection for on-demand Users Default Page Template Page Uploaded Page External Page Upload Login Success Page for on-demand File Name Browse... Submit Existing Image Files: Total Capacity: 512 K Now Used: 0 K Upload Image Files Upload Images Browse... Submit PreviewAfter the upload process is completed, the new login success page for On-Demand can be previewed by clicking Preview button at the bottom.
If the user-defined login success page for On-Demand includes an image file, the image file path in the HTML code must be the image file you will upload.
$$ < \text { img src } = " i m a g e s / x x. j p g" > $$
Then, enter or browse the filename of the images to upload in the Upload Images field on the Upload Images Files page and then click Submit. The system will show the used space and the maximum size of the image file of 512K. If the administrator wishes to restore the factory default of the login success page for On-Demand, click the Use Default Page button to restore it to default.

text_image
Total Capacity: 512 K Now Used: 0 K Upload Image Files Upload Images Browse... SubmitAfter the image file is uploaded, the file name will show on the "Existing Image Files" field. Check the file
and click Delete to delete the file.
Existing Image Files : 1102474548_732cn.gif
Delete
d. Choose the External Page selection and you can get the login success page for On-Demand from the specific website. Enter the website address in the "External Page Setting" field and then click Apply. After applying the setting, the new login success page for On-Demand can be previewed by clicking Preview button at the bottom of this page.

text_image
Login Success Page Selection for on-demand Users Default Page Template Page Uploaded Page External Page External Page Setting External URL : http:// Preview- Logout Success Page: The administrator can use the default logout success page or get the customized logout success page by setting the template page, uploading the page or using the external website. After finishing the setting, you can click Preview to see the logout success page.
a. Choose Default Page to use the default logout success page.
| Logout Success Page Selection for Users | |
| Default Page | Template Page |
| Uploaded Page | External Page |
| Default Page Setting | |
| This is default logout success page for users. You could click preview link to preview the default logout success page. Thanks. | |
| Preview | |
b. Choose Template Page to make a customized logout success page here. Click Select to pick up a color and then fill in all of the blanks. You can click Preview to see the result first.
| Logout Success Page Selection for Users | |
| Default Page | Template Page |
| Uploaded Page | External Page |
| Template Page Setting | |
| Color for Title Background | Select (RGB values in hex mode) |
| Color for Title Text | Select (RGB values in hex mode) |
| Color for Page Background | Select (RGB values in hex mode) |
| Color for Page Text | Select (RGB values in hex mode) |
| Title | Logout Succeed Page |
| Information | Logout successfully |
| Preview | |
c. Choose Uploaded Page and you can get the logout success page by uploading. Click the Browse button to select the file for the logout success page upload. Then click Submit to complete the upload process.
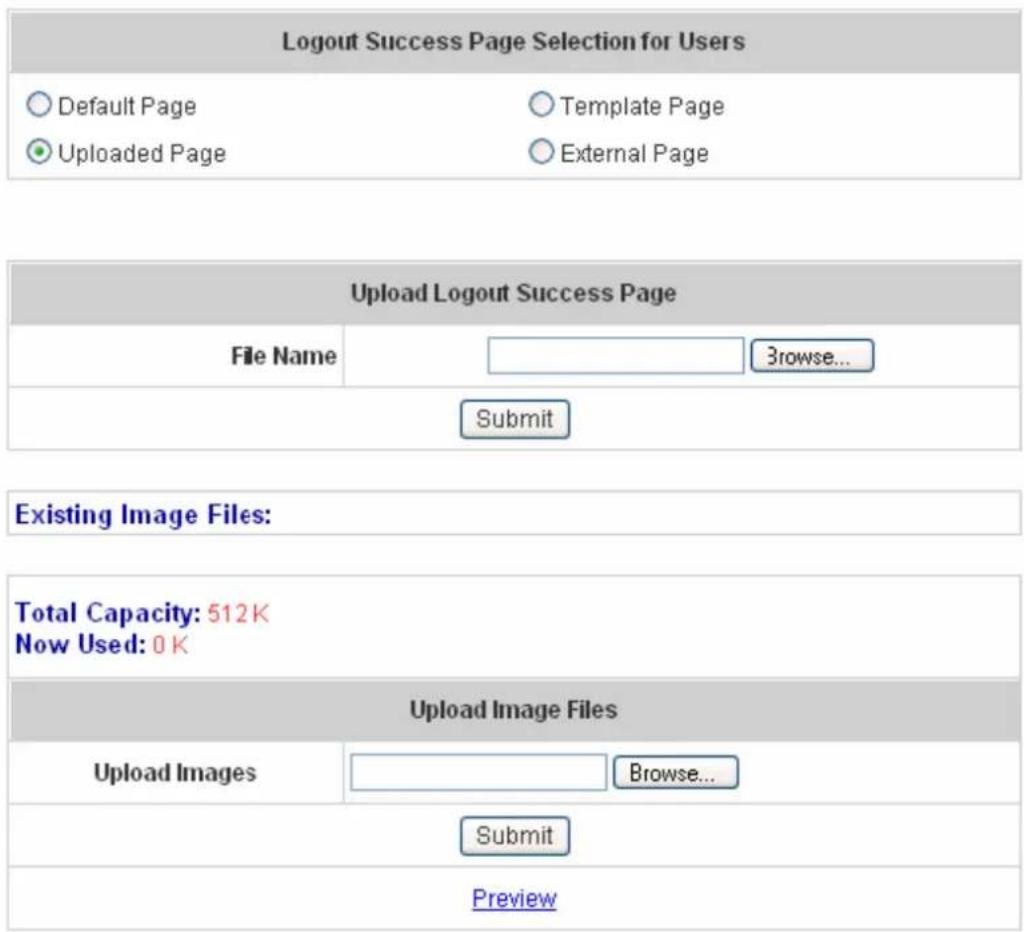
text_image
Logout Success Page Selection for Users Default Page Template Page Uploaded Page External Page Upload Logout Success Page File Name Browse... Submit Existing Image Files: Total Capacity: 512K Now Used: 0 K Upload Image Files Upload Images Browse... Submit PreviewAfter the upload process is completed, the new logout success page can be previewed by clicking Preview button at the bottom.
If the user-defined logout success page includes an image file, the image file path in the HTML code must be the image file you will upload.
$$ < \text { img src } = " i m a g e s / x x. j p g" > $$
Then, enter or browse the filename of the images to upload in the Upload Images field on the Upload Images Files page and then click Submit. The system will show the used space and the maximum size of the image file of 512K. If the administrator wishes to restore the factory default of the login success page, click the Use Default Page button to restore it to default.

text_image
Total Capacity: 512 K Now Used: 0 K Upload Image Files Upload Images Browse... SubmitAfter the image file is uploaded, the file name will show on the "Existing Image Files" field. Check the file and click Delete to delete the file.
Existing Image Files :
1102474548_732cn.gif
Delete
d. Choose the External Page selection and you can get the logout success page from the specific website. Enter the website address in the "External Page Setting" field and then click Apply. After applying the setting, the new logout success page can be previewed by clicking Preview button at the bottom of this page.
Logout Success Page Selection for Users
Default Page
Template Page
○ Uploaded Page
External Page
External Page Setting
External URL : http://
Preview
- Credit Reminder: The administrator can enable this function to remind the on-demand users before their credit run out. There are two kinds of reminder, Volume and Time. The default reminding trigger level for Volume is 1Mbyte and the level for Time is 5 minutes.
| Credit Reminder | Volume ○ Enabled ○ Disable 1 Mbyte *(Range: 1-10; Default: 1) |
| Time ○ Enabled ○ Disable 5 minutes *(Range: 1-30; Default: 5) |
- POP3 Message: If a user tries to retrieve mail from POP3 mail server before login, the users will receive a welcome mail from Edimax AC-M3000. The administrator can edit the content of this welcome mail.
| Text |
- Enhance User Authentication: With this function enabled, only the users with their MAC addresses in this list can log into Edimax AC-M3000. There will only be 40 users allowed in this MAC address list. User authentication is still required for these users. Please click the Permit MAC Address List to fill in these MAC addresses, select Enable, and then click Apply.
| MAC Address Control | |||
| Enabled Disabled | |||
| Item | MAC Address | Item | MAC Address |
| 1 | 2 | ||
| 3 | 4 | ||
| 5 | 6 | ||
| 7 | 8 | ||
| 9 | 10 | ||
| 11 | 12 | ||
| 13 | 14 | ||
| 15 | 16 | ||
| 17 | 18 | ||
| 19 | 20 | ||
(Total:40) First Prev Next Last
Caution: The format of the MAC address is: xx:xx:xx:xx:xx:xx or xx-xx-xx-xx-xx-xx.
4.3 AP Management
This section includes the following functions: AP List, AP Discovery, Manual Configuration, Template Settings, Firmware Management and AP Upgrade.
| AP Management | |
| AP List | The list shows the current AP summary including type, name, IP, MAC and online status. It also provides the operations for each AP on reboot, enable, disable, delete, apply a new template, and to do further examination or detailed configuration. |
| AP Discovery | This discovery function is to detect the unmanaged APs within LANs and assign the desired IPs for the future management. With the AP access information, administrator is able to manually or automatically discover AP on the selected LAN(s). |
| Manual Configuration | Administrators who are familiar with the new AP can set it up manually by filling in the necessary information. There are three templates from the drop-down box that can be chosen. |
| Template Settings | Administrators can edit template settings here. These templates are saved and can be used in "Manual Configuration" and "AP Discovery" sections. |
| Firmware Management | This page lets administrators manage firmwares and shows each firmware's information with operations of download and delete. |
| AP Upgrade | This page shows each AP on name, firmware version and the time previously being upgraded. Administrators can choose a firmware version from the drop-down box to upgrade APs. Several AP upgrades can be processed simultaneously by checking the upgrade boxes. |
4.3.1 AP List
All of the supported APs under the management of Edimax AC-M3000 will be shown in the list. At first the list is empty; administrators can add APs from AP Discovery page (see 4.3.2. AP Discovery for details) or Manual Configuration page (see 4.3.3. Manual Configuration for details)

text_image
AP List □ AP Type AP Name IP Status MAC Reboot Enable Disable Delete Apply Template (Total: 0) First Prev Next LastAfter adding an AP:

text_image
AP List □ AP Type AP Name IP Status MAC □ EW-7206APg NEWDEV-00001 192.168.1.1 Online 00:0E:2E:7C:AA:7A (Enabled) Reboot Enable Disable Delete Apply Template (Total: 1) First Prev Next LastCheck any AP and click the button below to Reboot, Enable, Disable and Delete the checked AP.
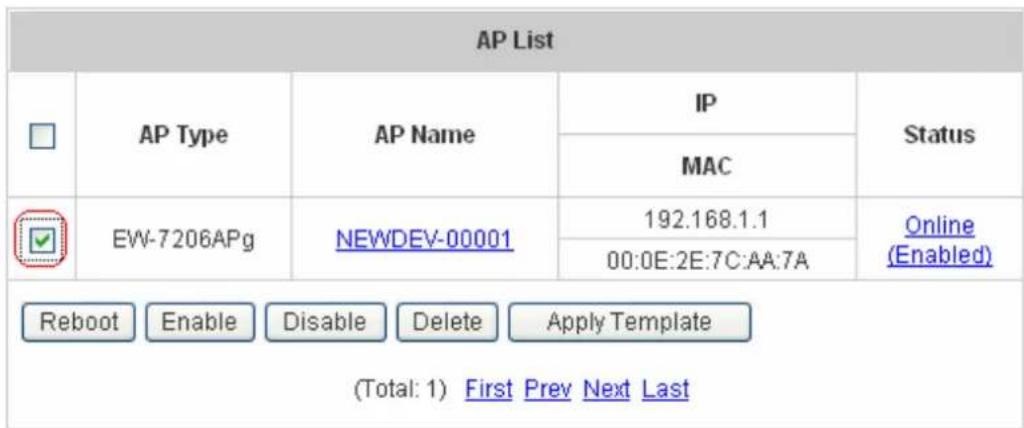
text_image
AP List □ AP Type AP Name IP Status MAC EW-7206APg NEWDEV-00001 192.168.1.1 Online 00:0E:2E:7C:AA:7A (Enabled) Reboot Enable Disable Delete Apply Template (Total: 1) First Prev Next LastClick Apply Template to select one template to apply to the AP.

text_image
TEMPLATE1 Apply Cancel TEMPLATE1 TEMPLATE2 TEMPLATE3 Template: TEMPLATE1 SSID default Channel 11 Transmission Rate Auto Security Disabled- AP Name
Click AP Name and enter the interface about related settings. There four kinds of settings, General Settings, LAN Interface Setting, Wireless Interface Setting and Access Control Setting. Click the hyperlink of each individual setting to have further configurations.
| General Settings | ||
| Setting | Name | NEWDEV-00001 |
| Remark | None | |
| Firmware | 1.23 | |
| LAN Interface Setting | ||
| LAN | IP | 192.168.1.1 |
| Mode | Static IP | |
| Wireless Interface Setting | ||
| Wireless LAN | SSID | default |
| Channel | 11 | |
| Security Type | Disabled | |
| Access Control Setting | ||
| Access Control | Status | Disabled |
| Mode | Allowed | |
| Number of MAC Addresses | 0 | |
➢ General Setting: Click Setting to enter the General Setting interface. Revise the AP Name, Admin
Password and Remark here if desired. Firmware information can also be viewed here.
| General Settings | |
| Name | NEWDEV-00001 |
| Admin Password | 1234 |
| Remark | |
| Firmware | 1.23 |
LAN Setting: Click LAN to enter the LAN Setting interface. Input the data of LAN including IP address, Subnet Mask and Default Gateway of AP.

text_image
LAN Settings IP Address 192.168.2.2 * Subnet Mask 255.255.255.0 * Default Gateway 0.0.0.0 *Wireless LAN: Click Wireless LAN to enter the Wireless interface. The data of Properties and Security need to be filled.
| Wireless | ||
| Properties | SSID | default |
| SSID Broadcast | Enable | |
| Channel | 11 | |
| Transmission Mode | Mixed | |
| Transmission Rate | Auto(Default: Auto; Range: from 1 to 54 Mbps) | |
| CTS Protection | Disable(Default: Disable) | |
| Fragment Threshold | 2346(Default: 2346; Range: from 256 to 2346) | |
| RTS Threshold | 2347(Default: 2347; Range: from 0 to 2347) | |
| Beacon Interval (ms) | 100(Default: 100; Range: from 20 to 1024 msec) | |
| Preamble Type | Long(Default: Long) | |
| IAPP | Enable(Default: Enable) | |
| Security | Security Type | Disable802.1x Authentication |
| WEP | Authentication TypeBoth | |
Properties
- SSID: The SSID is the unique name shared among all devices in a wireless network. The SSID must be the same for all devices in the wireless network. It is case sensitive and has a maximum length of 32 bytes.
- SSID Broadcast: Select this option to enable the SSID to broadcast in your network. When configuring the network, it is suggested to enable this function but disable it when the configuration is complete. With this enabled, someone could easily obtain the SSID information with the site survey software and get unauthorized access to a private network. With this disabled, network security is enhanced and can prevent the SSID from being seen on networked.
- Channel: Select the appropriate channel from the list to correspond with the network settings; for example, 1 to 11 channels are suitable for the North America area.
- Transmission Mode: There are 3 modes to select, 802.11b (2.4G, 1\~11Mbps), 802.11g (2.4G, 54Mbps) and Mix mode (b and g).
-
Transmission Rate: The default is Auto. Available range is from 1 to 54Mbps. The rate of data transmission should be set depending on the speed of the wireless network. Select from a range of transmission speed or keep the default setting, Auto, to make the Access Point automatically use the fastest rate possible.
-
CTS Protection: The default value is Disable. When select “Enable”, a protection mechanism will decrease collision probability when many 802.11g devices exist simultaneously. However, performance of the 802.11g devices may decrease.
- Fragment Threshold: Breaking a packet into smaller units when transmitting over a network medium that cannot support the original size of the packet.
- RTS Threshold: Request To Send. A packet sent when a computer has data to transmit. The computer will wait for a CTS (Clear To Send) message before sending data.
- Beacon Interval (ms): Enter a value between 20 and 1000 msec. The default value is 100 milliseconds. The entered time means how often the beacon signal transmission between the access point and the wireless network.
- Preamble Type: The length of the CRC (Cyclic Redundancy Check) block for communication between the Access Point and roaming wireless adapters. Select either Short Preamble or Long Preamble.
- IAPP: Inter Access-Point Protocol is designed for the enforcement of unique association throughout a ESS (Extended Service Set) and for secure exchange of station's security context between current access point (AP) and new AP during handoff period.
• Block Relay: Select whether to enable this function. - Tx Power Level: Choose which Tx power level desired from the drop-down menu.
Security:
• Security Type: Choose one security type from the drop-down menu.
• WEP: Choose WEP authentication type here.

text_image
Security Security Type Disable ▼ 802.1x Authentication WEP Authentication Type Both Open System Shared Key Both Apply X Clear| Security | Security Type | Disable ✓ 802.1x Authentication | |
| WEP | Authentication Type Both | ||
| 802.1x | Radius Server IP Port Secret | ||
- WEP: WEP uses an encryption key that automatically encrypts outgoing wireless data. On the receiving side, the same encryption key enables the computer to automatically decrypt the information so it can be read. Select Authentication Type (Open System, Shared Key or Both), Key Length (64 bits or 128 bits), Key Index (Key1\~Key4) and then input the Key. Check 802.1x Authentication to enable this function and enter the related data, if necessary.
| Security | Security Type | WEP✓802.1x Authentication |
| WEP | Authentication Type Both Key Length 64 bits Key Format ASCII Key Index Key1 Key1 key01 Key2 key02 Key3 key03 Key4 key04 | |
| 802.1x | Radius Server IP Port Secret |
- WPA: WPA is Wi-Fi's encryption method that protects unauthorized network access by verifying network users through a server. Select 802.1x or WPA-PSK security type and enter the related information below.
| Security | Security Type | WPA | WPA-PSK |
| WPA-PSK TKIP | Passphrase/PSK |
| Security | Security Type | WPA 802.1x |
| 802.1x | Radius Server IP Port 1812 Secret |
- WPA2: Wi-Fi Protected Access version 2. The follow on security method to WPA for Wi-Fi networks that provides stronger data protection and network access control. Select 802.1x or WPA-PSK security type and enter the related information below. WPA2 only can use AES encryption type.
| Security | Security Type | WPA2 | WPA-PSK |
| WPA-PSK AES | Passphrase/PSK | ||
| Passphrase | |||
| Security | Security Type | WPA2 | 802.1x |
| 802.1x | Radius Server | ||
| IP | |||
| Port | 1812 | ||
| Secret | |||
- WPA Mixed: If using TKIP and AES encryption type at the same time is desired, choose this security type. Select 802.1x or WPA-PSK security type and enter the related information below.
| Security | Security Type | WPA2 Mixed ▼ WPA-PSK ▼ |
| WPA-PSK | Passphrase/PSK |
| Security | Security Type | WPA2 Mixed ▼ 802.1x ▼ |
| 802.1x | Radius ServerIP Port 1812Secret |
Access Control: In this function, when the status is Enabled, only these clients which MAC addresses are listed in the list can be allowed to connect Edimax AC-M3000. When Disabled is selected, all clients can connect Edimax AC-M3000. The default is Disabled.

text_image
Access Control Status Enabled Disabled Enabled MAC Address List 1 00:00:00:00:00:00 2 00:00:00:00:00:00 3 00:00:00:00:00:00 4 00:00:00:00:00:00 5 00:00:00:00:00:00 6 00:00:00:00:00:00 7 00:00:00:00:00:00 8 00:00:00:00:00:00 9 00:00:00:00:00:00 10 00:00:00:00:00:00 11 00:00:00:00:00:00 12 00:00:00:00:00:00 13 00:00:00:00:00:00 14 00:00:00:00:00:00 15 00:00:00:00:00:00 16 00:00:00:00:00:00 17 00:00:00:00:00:00 18 00:00:00:00:00:00 19 00:00:00:00:00:00 20- Status
After clicking the hyperlink of Status, the basic information of the AP including AP Name, AP Type, LAN MAC, LAN MAC, Wireless LAN MAC, Up Time, Report Time, SSID, Number of Associated Clients and Remark will be shown. In the below of the AP Status Detail, there are the related detailed information, System Status, LAN Status, Wireless LAN Status, Access Control Status and Associated Client Status.
| AP Status Summary | |
| AP Name | NEWDEV-00001 |
| AP Type | EW-7206APg |
| LAN MAC | 00:0e:2e:7c:aa:7a |
| Wireless LAN MAC | 00:0e:2e:7c:aa:7a |
| Up Time | 0day:14h:47m:10s |
| Report Time | 2006-10-25 03:00:33 |
| SSID | default |
| Number of Associated Clients | 0 |
| Remark | |
| AP Status Detail |
| System Status |
| LAN Status |
| Wireless LAN Status |
| Access Control Status |
| Associated Client Status |
System Status: The table shows the information about AP Name, AP Status and Last Reporting Time.
| System Information | |
| AP Name | NEWDEV-00002 |
| AP Status | Online |
| Last Reporting Time | 2006-06-28 10:27:37 |
➢ LAN Status: The table shows the information about IP Address, Subnet Mask and Gateway.
| LAN Interface | |
| IP Address | 192.168.2.2 |
| Subnet Mask | 255.255.255.0 |
| Gateway | 0.0.0.0 |
Wireless LAN Status: The table shows all of the related wireless information.
| Wireless Interface | |
| Up Time | 0day:15h:45m:48s |
| SSID | default |
| Beacon Interval (ms) | 100 |
| RTS Threshold | 2347 |
| Channel | 11 |
| Transmission Rate | Auto |
| Preamble Type | Long Preamble |
| IAPP | Enabled |
| Security | Disable |
Access Control Status: The table shows the status of MAC of clients under the control of the AP.
| Access Control | |
| Status | Disabled |
| Access Control | |
| Status | Enabled |
| Control List | |
| 00:00:00:00:00:01 | 00:00:00:00:00:02 |
| 00:00:00:00:00:03 | 00:00:00:00:00:04 |
| 00:00:00:00:00:05 | 00:00:00:00:00:06 |
| 00:00:00:00:00:07 | 00:00:00:00:00:08 |
| 00:00:00:00:00:09 | 00:00:00:00:00:10 |
| 00:00:00:00:00:11 | 00:00:00:00:00:12 |
| 00:00:00:00:00:13 | 00:00:00:00:00:14 |
| 00:00:00:00:00:15 | 00:00:00:00:00:16 |
| 00:00:00:00:00:17 | 00:00:00:00:00:18 |
| 00:00:00:00:00:19 | 00:40:96:A1:AF:dd |
Associated Client Status: The table shows the clients connecting to the AP and the related information of the client.
| Client List | |||||||
| No | MAC | User ID | TX Packet (s) | RX Packet (s) | Rate | Power Saving | Expiration countdown |
| 1 | 00:02:8a:f3:aa:a4 | N/A | 2 | 6 | 11 | No | 300 |
4.3.2 AP Discovery
Use this function to detect and manage all the supported APs in the network segments.
| AP Discovery | ||||
| Interface | Uncontrolled □ | Base IP 192.168.2.1 | Pool Size 12 | |
| Controlled □ | Base IP 192.168.1.1 | Pool Size 12 | ||
| AP Access | AP Type | EW-7206APg | Discover | |
| IP Address Range | Start IP | 192.168.2.1 | ||
| End IP | 192.168.2.1 | |||
| ID | admin | |||
| Password | 1234 | |||
| Auto-Discovery | Status | Disabled | Configure | |
| Discovered AP List | |||||
| AP Type | IP Address | Name | Password | Template | Add |
| MAC Address | |||||
| (Total: 0) First Prev Next Last | |||||
• To discover AP manually, please fill in the required data.
Interface: Check Uncontrolled or/and Controlled and enter the Base IP and Pool Size (the discovered APs will be given an IP address among the pool).
AP Access: Input the IP Address Range of the AP to be discovered, (the default is 192.168.2.1/192.168.2.1), ID (the default is admin) and Password (the default is 1234) of the AP.
Then click the Discover button and the APs that match the given settings will show in the Discovered AP List below. If any IP address among the IP range assigned for a specific AP is used, there will be a warning message showing up. Please change the Base IP or Pool Size of the desired Interface to provide available IP addresses
for APs and then click Discover again. For the desired AP, input the desired name and password, select one template to apply, select the check box, and click Add to add the AP to the AP List. (About the template, please see 4.3.4 Template Settings).
| AP Discovery | ||||
| Interface | Uncontrolled ☐ | Base IP 192.168.2.1 | Pool Size 12 | |
| Controlled ☐ | Base IP 192.168.1.1 | Pool Size 12 | ||
| AP Access | AP Type | EW-7206APg | Discover | |
| IP Address Range | Start IP | 192.168.2.1 | ||
| End IP | 192.168.2.1 | |||
| ID | admin | |||
| Password | 1234 | |||
| Auto-Discovery | Status | Disabled | Configure | |
| Unavailable IP range. The following IP addresses have been used. Please change the IP range on Base IP or Pool Size. | ||
| Interface | IP Address | MAC Address |
| Private LAN | 192.168.2.1 | 00:11:6B:30:85:63 |
| AP List | |||||
| MAC Address | Name | IP Address | Password | Template | Add |
| (Total: 0) First Prev Next Last | |||||
When the matched AP is discovered, it will be shown in the AP List below and be given a new IP address as set previously (ex: 192.168.2.2). Check the Add box to add the AP, and it will be listed in the AP List.
| AP Discovery | ||||
| Interface | Uncontrolled ☐ | Base IP 192.168.2.1 | Pool Size 12 | |
| Controlled ☑ | Base IP 192.168.2.2 | Pool Size 12 | ||
| AP Access | AP Type | EW-7206APg | Discover | |
| IP Address Range | Start IP | 192.168.2.1 | ||
| End IP | 192.168.2.1 | |||
| ID | admin | |||
| Password | 1234 | |||
| Auto-Discovery | Status | Disabled | Configure | |
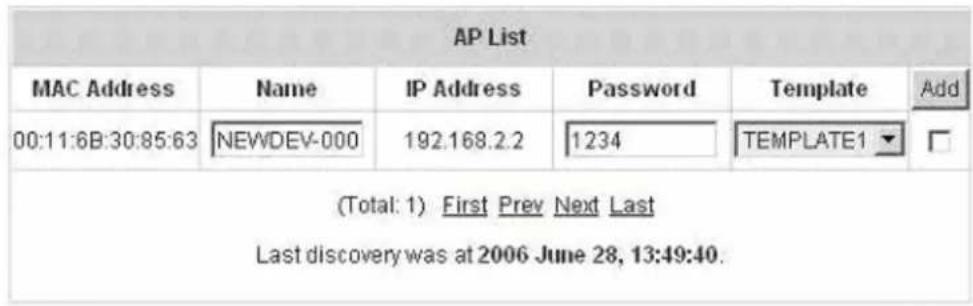
text_image
AP List MAC Address Name IP Address Password Template Add 00:11:6B:30:85:63 NEWDEV-000 192.168.2.2 1234 TEMPLATE1 □ (Total: 1) First Prev Next Last Last discovery was at 2006 June 28, 13:49:40.Click Configuring to go to the related configuration. For the details, please refer to 4.3.1 AP List.

text_image
AP List □ AP Type AP Name IP Status MAC □ EW-7206APg NEWDEV-00001 192.168.1.1 Online 00:0E:2E:7C:AA:7A (Enabled) Reboot Enable Disable Delete Apply Template (Total: 1) First Prev Next Last• Auto-Discovery: Click Configure to enter the Auto-Discovery interface and have further configuration.
| AP Discovery | ||||
| Interface | Uncontrolled ☐ | Base IP 192.168.2.1 | Pool Size 12 | |
| Controlled ☐ | Base IP 192.168.1.1 | Pool Size 12 | ||
| AP Access | AP Type | EV-7206APg | Discover | |
| IP Address Range | Start IP | 192.168.2.1 | ||
| End IP | 192.168.2.1 | |||
| ID | admin | |||
| Password | 1234 | |||
| Auto-Discovery | Status | Disabled | Configure | |
The Interface and AP Access configuration is the same as the settings mentioned above. Click "Configure" button for more Auto-Discovery functions. A selection known as "Interval" can be selected from the drop-down box, and the system will scan periodically according to the its setting (the default value is 10 minutes). If
Auto-Add AP is enabled, a new detected AP will be assigned an available IP address from the IP address range set in Interface and applied with the selected template.
| Auto-Discovery | |||
| Interface | Uncontrolled □ | Base IP 192.168.2.1 | Pool Size 12 |
| Controlled □ | Base IP 192.168.1.1 | Pool Size 12 | |
| AP Access | AP Type | EW-7206APg | |
| IP Address Range Start IP | 192.168.2.1 | ||
| End IP 192.168.2.1 | |||
| ID admin | |||
| Password 1234 | |||
| Auto-Discovery Status Enable Disable Interval 10 minutes ✓ Auto-Add AP Enable Disable Template TEMPLATE1✓ | |||
4.3.3 Manual Configuration
The supported APs can also be added manually. Enter the related information of the AP and select a Template. Click ADD and then the AP will be added to the AP List.
| Manual Configuration | |
| AP Type | EW-7206APg |
| AP Name | |
| Admin Password | 1234 |
| AP IP | |
| AP MAC | |
| Remark | |
| Template | TEMPLATE1 |
4.3.4 Template Settings
Template is a model that can be copied to every AP without having to configure the each AP individually. There are three templates provided. Click Edit to go to configuration.
| Template Settings | ||
| AP Type | EW-7206APg | Edit |
| Template Settings | TEMPLATE1 TEMPLATE1 TEMPLATE2 TEMPLATE3 | |
Except configuring all the template setting, copy the configuration of an AP to the template by selecting a Source AP and revise some settings is also acceptable. Please select None if configuring the whole template from the draft is desired. Enter the Template Name and Template Remark (optional) and click the hyperlink of Template ID to have further configuration.
| Template Edit | |
| Template ID | 1 |
| Template Name | TEMPLATE1 |
| Source AP | None |
| Template Remark | Template 1 |
| Template Remark | NoneNEWDEV-00001 |
After click the hyperlink of Template ID to enter the Template Edit page, revise the configuration for demand such as SSID or Channel. About other functions of Wireless section, please refer to 4.3.1 AP List.
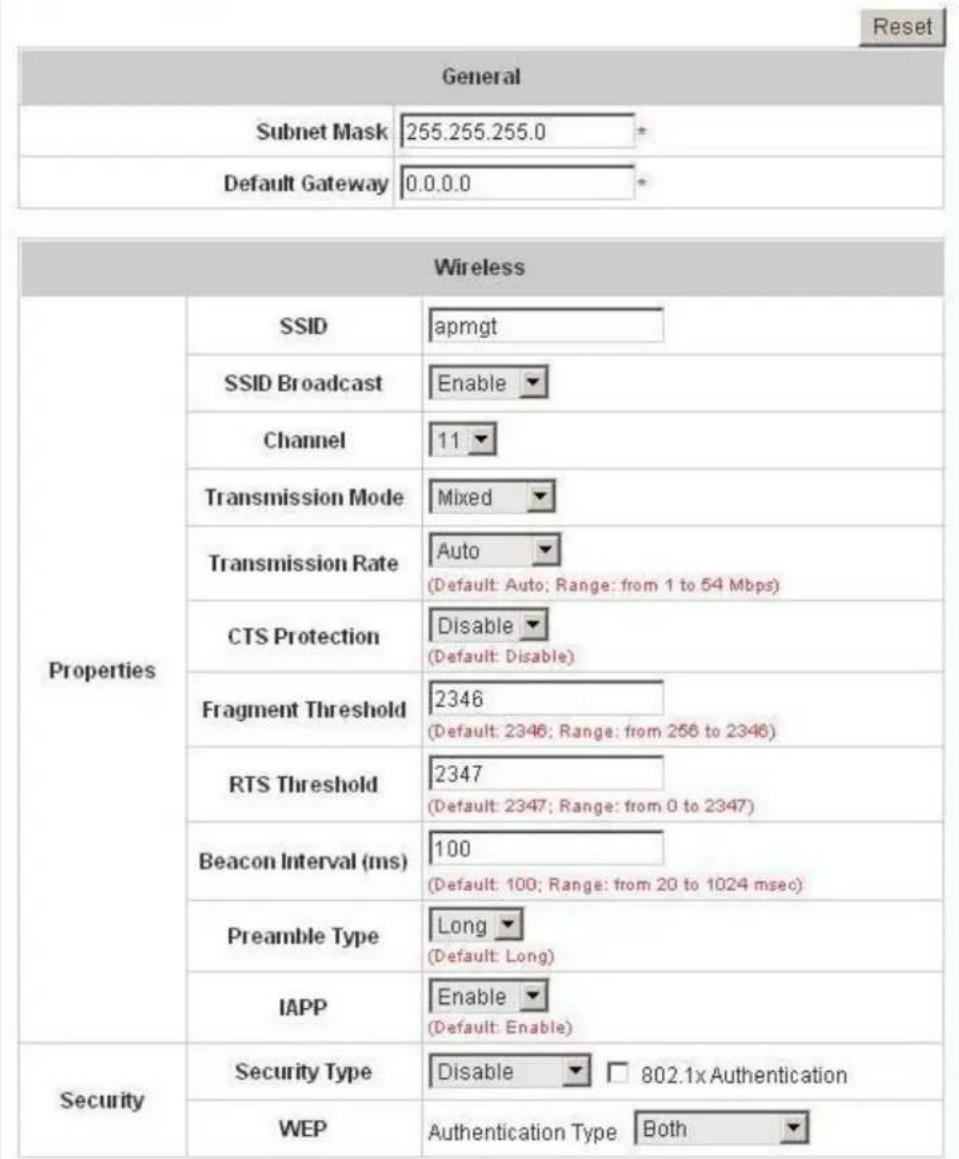
text_image
Reset General Subnet Mask 255.255.255.0 * Default Gateway 0.0.0.0 * Wireless Properties SSID apmgt SSID Broadcast Enable Channel 11 Transmission Mode Mixed Transmission Rate Auto (Default: Auto; Range: from 1 to 54 Mbps) CTS Protection Disable (Default: Disable) Fragment Threshold 2346 (Default: 2346; Range: from 256 to 2346) RTS Threshold 2347 (Default: 2347; Range: from 0 to 2347) Beacon Interval (ms) 100 (Default: 100; Range: from 20 to 1024 msec) Preamble Type Long (Default: Long) IAPP Enable (Default: Enable) Security Security Type Disable □ 802.1x Authentication WEP Authentication Type BothAccess Control function provides to control the clients' devices that are allowed to associate with the APs applied with the desired template setting. Choose Disabled or Enabled this function and enter the desired clients' MAC addresses in the MAC Address List. There are up to 20 MAC addresses available. When this function is enabled, please make sure the MAC Address List is not empty.

text_image
Access Control Status Disabled MAC Address List 1 00:00:00:00:00:00 2 00:00:00:00:00:00 3 00:00:00:00:00:00 4 00:00:00:00:00:00 5 00:00:00:00:00:00 6 00:00:00:00:00:00 7 00:00:00:00:00:00 8 00:00:00:00:00:00 9 00:00:00:00:00:00 10 00:00:00:00:00:00 11 00:00:00:00:00:00 12 00:00:00:00:00:00 13 00:00:00:00:00:00 14 00:00:00:00:00:00 15 00:00:00:00:00:00 16 00:00:00:00:00:00 17 00:00:00:00:00:00 18 00:00:00:00:00:00 19 00:00:00:00:00:00 20 00:00:00:00:00:04.3.5 Firmware Management
In this function, AP's firmware can be uploaded. The current firmware can also be downloaded to the local storage.

text_image
Firmware Upload File Name Browse... Upload Firmware List File Name AP Type Version Size Download Checksum
text_image
File Download Do you want to save this file? Name: a600_firmware.com Type: Unknown File Type, 670 KB From: 10.2.3.112 Save Cancel While files from the Internet can be useful, some files can potentially harm your computer. If you do not trust the source, do not save this file. What's the risk?4.3.6 AP Upgrade
Check the APs which need to be upgraded and select the upgrade version of firmware, and click Apply to upgrade firmware.
| AP List | |||||
| Name | Type | Version | Upgraded Time | New Version | Upgrade |
| NEWDEV-00001 | EW-7206APg | 1.23 | N/A | N/A | □ |
4.4 Network Configuration
This section includes the following functions: Network Address Translation, Privilege List, Monitor IP List, Walled Garden List, Proxy Server Properties and Dynamic DNS, IP Mobility and VPN Termination.
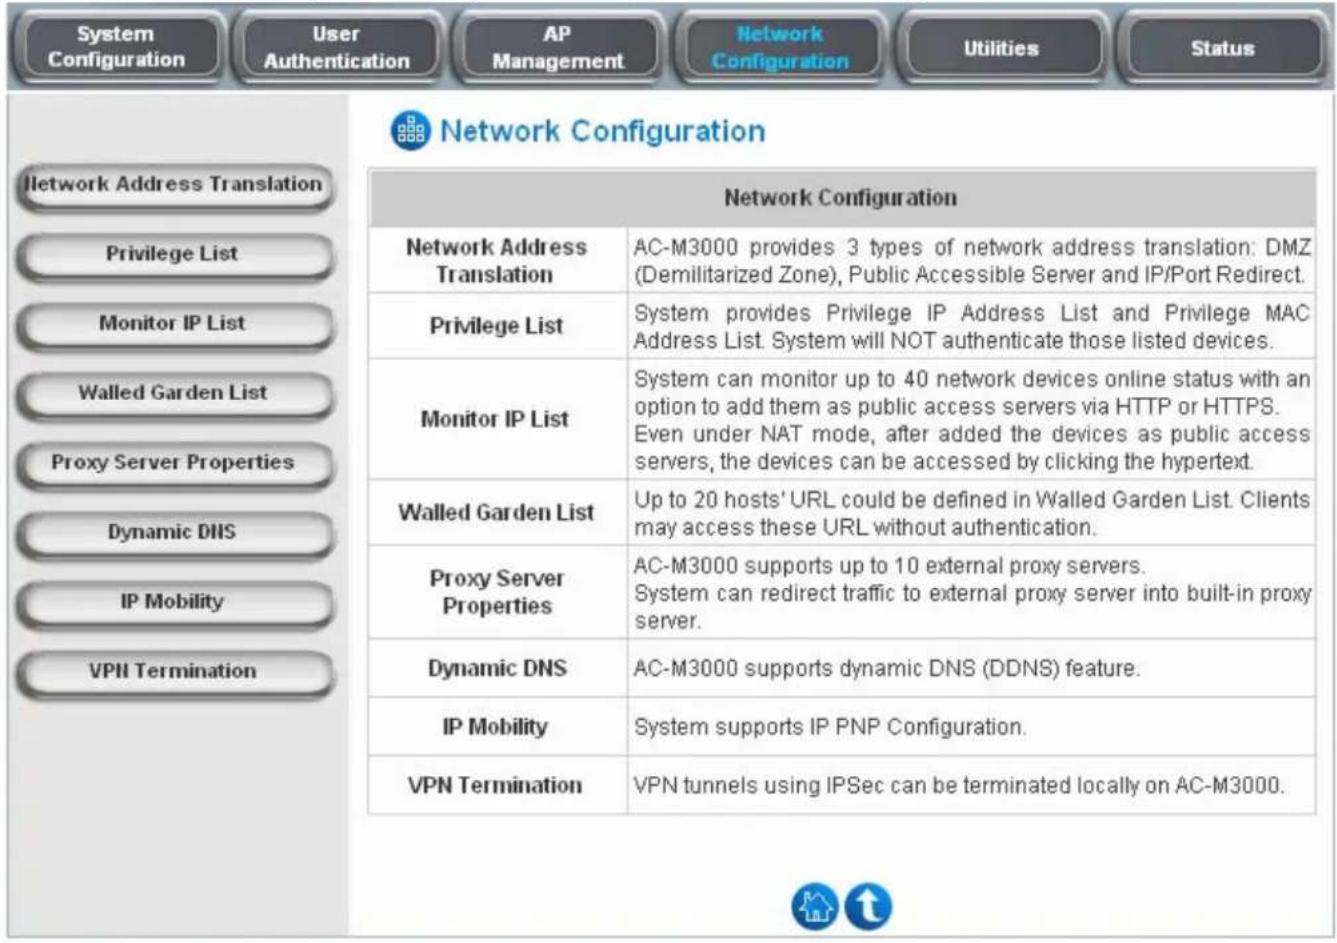
text_image
System Configuration User Authentication AP Management Network Configuration Utilities Status Network Configuration Network Address Translation Privilege List Monitor IP List Walled Garden List Proxy Server Properties Dynamic DNS IP Mobility VPN Termination Network Configuration Network Address Translation AC-M3000 provides 3 types of network address translation: DMZ (Demilitarized Zone), Public Accessible Server and IP/Port Redirect. Privilege List System provides Privilege IP Address List and Privilege MAC Address List. System will NOT authenticate those listed devices. Monitor IP List System can monitor up to 40 network devices online status with an option to add them as public access servers via HTTP or HTTPS. Even under NAT mode, after added the devices as public access servers, the devices can be accessed by clicking the hypertext. Walled Garden List Up to 20 hosts' URL could be defined in Walled Garden List. Clients may access these URL without authentication. Proxy Server Properties AC-M3000 supports up to 10 external proxy servers. System can redirect traffic to external proxy server into built-in proxy server. Dynamic DNS AC-M3000 supports dynamic DNS (DDNS) feature. IP Mobility System supports IP PNP Configuration. VPN Termination VPN tunnels using IPSec can be terminated locally on AC-M3000.4.4.1 Network Address Translation
There are three parts, DMZ (Demilitarized Zone), Public Accessible Server and Port and Redirect, need to be set.
| Network Address Translation |
| DMZ (Demilitarized Zone) |
| Public Accessible Server |
| Port and IP Redirect |
• DMZ (Demilitarized Zone)
In the DMZ functions, the administrator can define mandatory external to internal IP mapping, hence a user on
WAN side network can access the private machine by accessing the external IP. Choose to enable Automatic WAN IP Assignment by checking the Enable check box and enter the Internal IP address. When Automatic WAN IP Address function is enabled, accessing WAN1 will be mapped to access the Internal IP Address. For Static Assignments, enter Internal and External IP Addresses as a set and choose to use WAN1 or WAN2 for the External Interface from the drop-down menu. These settings will become effective immediately after clicking the Apply button.
| Automatic WAN IP Assignment | |||
| Enable | Internal IP Address | External IP Address | External Interface |
| 10.30.1.252 | WAN1 | ||
| Static Assignments | |||
| Item | Internal IP Address | External IP Address | External Interface |
| 1 | WAN1 √ | ||
| 2 | WAN1 √ | ||
| 3 | WAN1 √ | ||
| 4 | WAN1 √ | ||
| 5 | WAN1 √ | ||
| 6 | WAN1 √ | ||
| 7 | WAN1 √ | ||
| 8 | WAN1 √ | ||
| 9 | WAN1 √ | ||
| 10 | WAN1 √ | ||
(Total:40) First Prev Next Last
• Public Accessible Server
In this function, the administrator can set 40 virtual servers at most, so that the computers not belonging to the managed network can access the servers in the managed network via WAN1 port IP of Edimax AC-M3000.
Please enter the External Service Port, Local Server IP Address and Local Server Port. According to the different services provided, the network service can use the TCP protocol or the UDP protocol. In the Enable column, check the desired server to enable. These settings will become effective immediately after clicking the Apply button.
- Port and IP Redirect
In this function, the administrator can set up to 40 sets of the IP address ports for redirection purpose. When users attempt to connect to the port of a Destination IP Address listed here, the connection packet will be converted and redirected to the port of the Translated to Destination IP Address. Please enter the IP Address and Port of Destination, and the IP Address and Port of Translated to Destination. According to the different services provided, choose TCP or UDP protocol. These settings will become effective immediately after clicking Apply.
| Item | Destination | Translated to Destination | Type | ||
| IP Address | Port | IP Address | Port | ||
| 1 | ○ TCP ○ UDP | ||||
| 2 | ○ TCP ○ UDP | ||||
| 3 | ○ TCP ○ UDP | ||||
| 4 | ○ TCP ○ UDP | ||||
| 5 | ○ TCP ○ UDP | ||||
| 6 | ○ TCP ○ UDP | ||||
| 7 | ○ TCP ○ UDP | ||||
| 8 | ○ TCP ○ UDP | ||||
| 9 | ○ TCP ○ UDP | ||||
| 10 | ○ TCP ○ UDP | ||||
| (Total:40) First Prev Next Last | |||||
4.4.2 Privilege List
Edimax AC-M3000 provides two privilege lists, Privilege IP Address List and Privilege MAC Address List. In the Privilege List function, the administrator can add desired IP addresses and MAC addresses in these lists. The IP addresses and MAC addresses in these lists are allowed to access the network without authentication.
| Privilege List |
| Privilege IP Address List |
| Privilege MAC Address List |
• Privilege IP Address List
If there are some clients belonging to the managed server that need to access the network without authentication, enter the IP addresses of these clients in this list. The Remark is optional but useful to keep track. Edimax AC-M3000 provides up to 100 privilege IP addresses. These settings will become effective immediately after clicking Apply.
| Pivilege IP Address List | ||
| Item | Privilege IP Address | Remark |
| 1 | ||
| 2 | ||
| 3 | ||
| 4 | ||
| 5 | ||
Warning: Permitting specific IP addresses to have network access rights without going through standard authentication process at the controlled port may cause security problems.
• Privilege MAC Address List
In addition to the IP addresses, you can also set the clients' MAC addresses in this list, so authentication is not required when they use the network. Edimax AC-M3000 allows 100 privilege MAC addresses at most. If you want to manually create the list, enter the MAC address (the format is xx:xx:xx:xx:xx:xx) as well as the remark (not necessary). These settings will become effective immediately after clicking Apply.
| Privilege MAC Address List | ||
| Item | MAC Address | Remark |
| 1 | ||
| 2 | ||
| 3 | ||
| 4 | ||
| 5 | ||
Warning: Permitting specific MAC addresses to have network access rights without going through standard authentication process at the controlled port may cause security problems.
4.4.3 Monitor IP List
Edimax AC-M3000 will send out a packet periodically to monitor the connection status of the IP addresses on the list. If the monitored IP address does not respond, the system will send an e-mail to notify the administrator that such destination is not reachable. After entering the related information, click Apply and these settings will become
effective immediately.
When the monitored devices have built-in Web servers and connect to the LAN interfaces operating under NAT mode, they can be accessed by the hyperlink of theirs IP addresses. To add the monitored IP addresses as hyperlink accessible mode by clicking Add button in Link column.
| Monitor IP List | |||||||
| Item | Protocol | IP Address | Link | Item | Protocol | IP Address | Link |
| 1 | http | Add | 2 | http | Add | ||
| 3 | http | Add | 4 | http | Add | ||
| 5 | http | Add | 6 | http | Add | ||
| 7 | http | Add | 8 | http | Add | ||
| 9 | http | Add | 10 | http | Add | ||
| 11 | http | Add | 12 | http | Add | ||
| 13 | http | Add | 14 | http | Add | ||
| 15 | http | Add | 16 | http | Add | ||
| 17 | http | Add | 18 | http | Add | ||
| 19 | http | Add | 20 | http | Add | ||
When Monitor button is clicked, Monitor IP Result page will appear. If the entered IP address is unreachable, a red dot under Result field will appear. A green dot indicates that the IP address is reachable and alive..
4.4.4 Walled Garden List
This function provides some free surfing areas that users can access before login and authenticated. Up to 20 addresses or domain names of the websites can be defined in this list. Users without the network access right can still have a chance to experience the actual network service free of charge. Please enter the IP Address or Domain Name of the website in the list and these settings will become effective immediately after clicking Apply.
| Walled Garden List | |||
| Item | Addres | Item | Addres |
| 1 | 2 | ||
| 3 | 4 | ||
| 5 | 6 | ||
| 7 | 8 | ||
| 9 | 10 | ||
| 11 | 12 | ||
| 13 | 14 | ||
| 15 | 16 | ||
| 17 | 18 | ||
| 19 | 20 | ||
Caution: To use the domain name, the Edimax AC-M3000 has to connect to DNS server first or this function will not work.
4.4.5 Proxy Server Properties
Edimax AC-M3000 supports External Proxy Server functions and provides a built-in Internal Proxy Server

- External Proxy Server: Under the Edimax AC-M3000 security management, the system will match the proxy setting of External Proxy Server list to the clients' proxy setting when clients' have proxy setting in their browsers. If there is no matching, the clients will not be able to get the login page and then unable to access the network. If there is a matching, then the clients will be directed to the system first for authentication. After successful authentication, the clients' will be redirected back to the desired proxy servers.
- Internal Proxy Server: Edimax AC-M3000 has a built-in proxy server. If this function is enabled, the clients will be forced to treat Edimax AC-M3000 as the proxy server regardless of the clients' original proxy settings.
For more details about how to set up the proxy servers, please refer to Appendix D and Appendix E.
4.4.6 Dynamic DNS
Edimax AC-M3000 provides a convenient DNS function to translate a domain name to the corresponding IP address of WAN port that helps the administrator memorize and connect to WAN port. If the DHCP is activated at WAN port, this function will also update the newest IP address regularly to the DNS server. These settings will become effective immediately after clicking Apply.

text_image
Dynamic DNS DDNS Enabled Disabled Provider DynDNS.org(Dynamic) Host name Username/E-mail Password/Key• DDNS: Choose to enable or disable this function.
• Provider: Select the DNS provider.
- Host name: The IP address/domain name of the WAN port.
- Username/E-mail: The register ID (username or e-mail) for the DNS provider.
- Password/Key: The register password for the DNS provider.
The fields with red asterisks are necessary to fill in.
4.4.7 IP Mobility
Edimax AC-M3000 supports IP PNP function.
| IP Mobility | |
| IP PNP | Enable |
If this function is enabled, a client can use any reasonable IP address to connect to the system. Regardless of what the IP address at the user end is, the client can still be authenticated through Edimax AC-M3000 and access the network.
4.4.8 VPN Termination
Virtual Private Network, or VPN, a type of technology designed to increase the security of information transferred over the Internet. VPN can work with either wired or wireless networks, as well as with dial-up connections over
POPS. VPN creates a private encrypted tunnel from the end user's computer, through the local wireless network, through the Internet, all the way to the corporate servers and database.
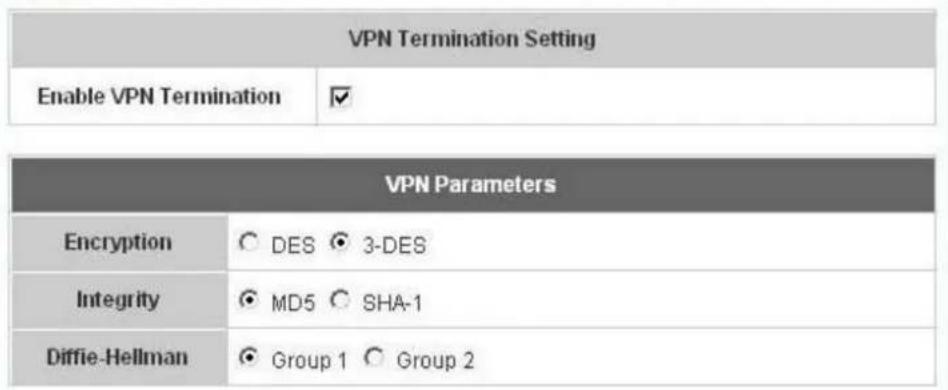
text_image
VPN Termination Setting Enable VPN Termination VPN Parameters Encryption ○ DES ● 3-DES Integrity ● MD5 ○ SHA-1 Diffie-Hellman ● Group 1 ○ Group 2VPN has serveral kinds of protocols and Edimax AC-M3000 supports IPSec. IPSec is a technology provided by Windows 2000 that allows you to create encrypted channels between two servers. IPSec can be used to filter IP traffic and to authenticate servers. If you need to use this function, check Enable VPN Termination and choose the desired parameters. Then click Apply to enable VPN Termination.
In Edimax AC-M3000, there are several functions with VPN or IPSec selection. When you enable them, they will apply the VPN settings you configured here.
For the details of IPSec VPN, please see Appendix C -- IPSec VPN.
4.5 Utilities
This section provides four utilities to customize and maintain the system including Change Password, Backup/Restore Settings, Firmware Upgrade and Restart.
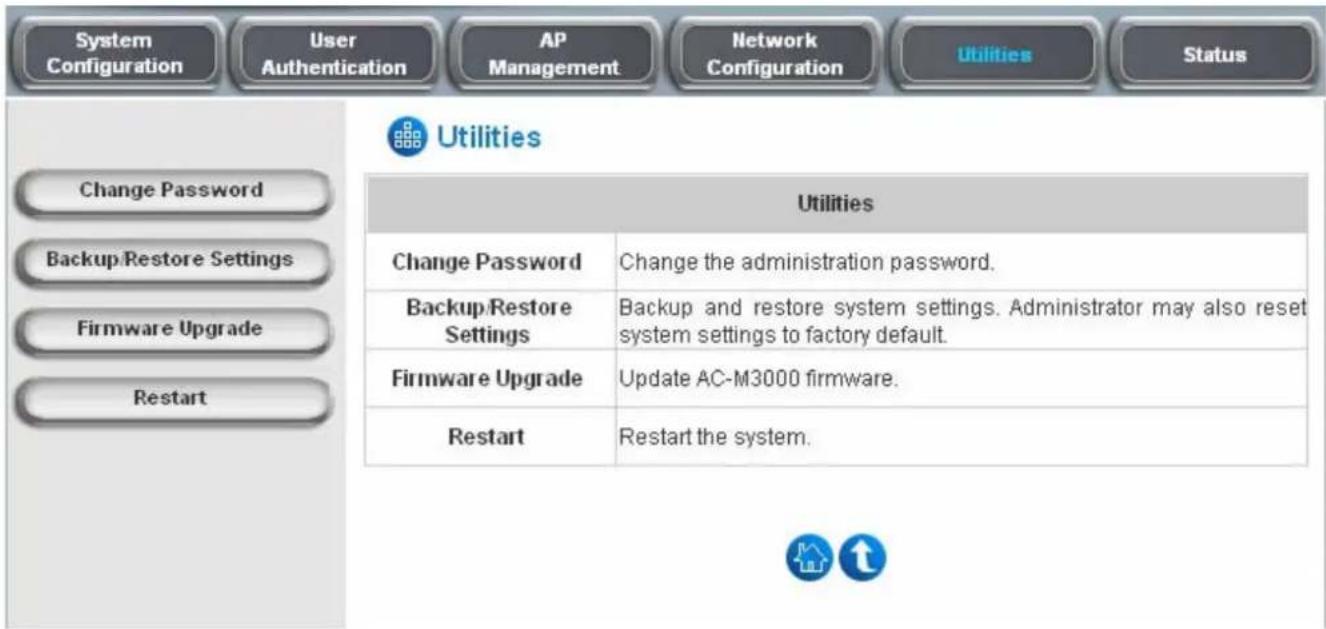
text_image
System Configuration User Authentication AP Management Network Configuration Utilities Status Change Password Backup/Restore Settings Firmware Upgrade Restart Utilities Change Password Change the administration password. Backup/Restore Settings Backup and restore system settings. Administrator may also reset system settings to factory default. Firmware Upgrade Update AC-M3000 firmware. Restart Restart the system.4.5.1 Change Password
Edimax AC-M3000 supports three types of account interface. You can log in as admin, manager or operator. The default usernames and passwords are as follow:
Admin: The administrator can access all configuration pages of the Edimax AC-M3000.
User Name: admin
Password: 1234
Manager: The manager can only access the configuration pages under User Authentication to manage the user accounts, but has no permission to change the settings of the profiles for Firewall, Specific Route and Schedule.
User Name: manager
Password: manager
Operator: The operator can only access the configuration page of Create On-demand User to create and print out the new on-demand user accounts.
User Name: operator
Password: operator
The administrator can change the passwords here. Please enter all the required fields with red asterisks if changing the password is desired. Click Apply to activate this new password.
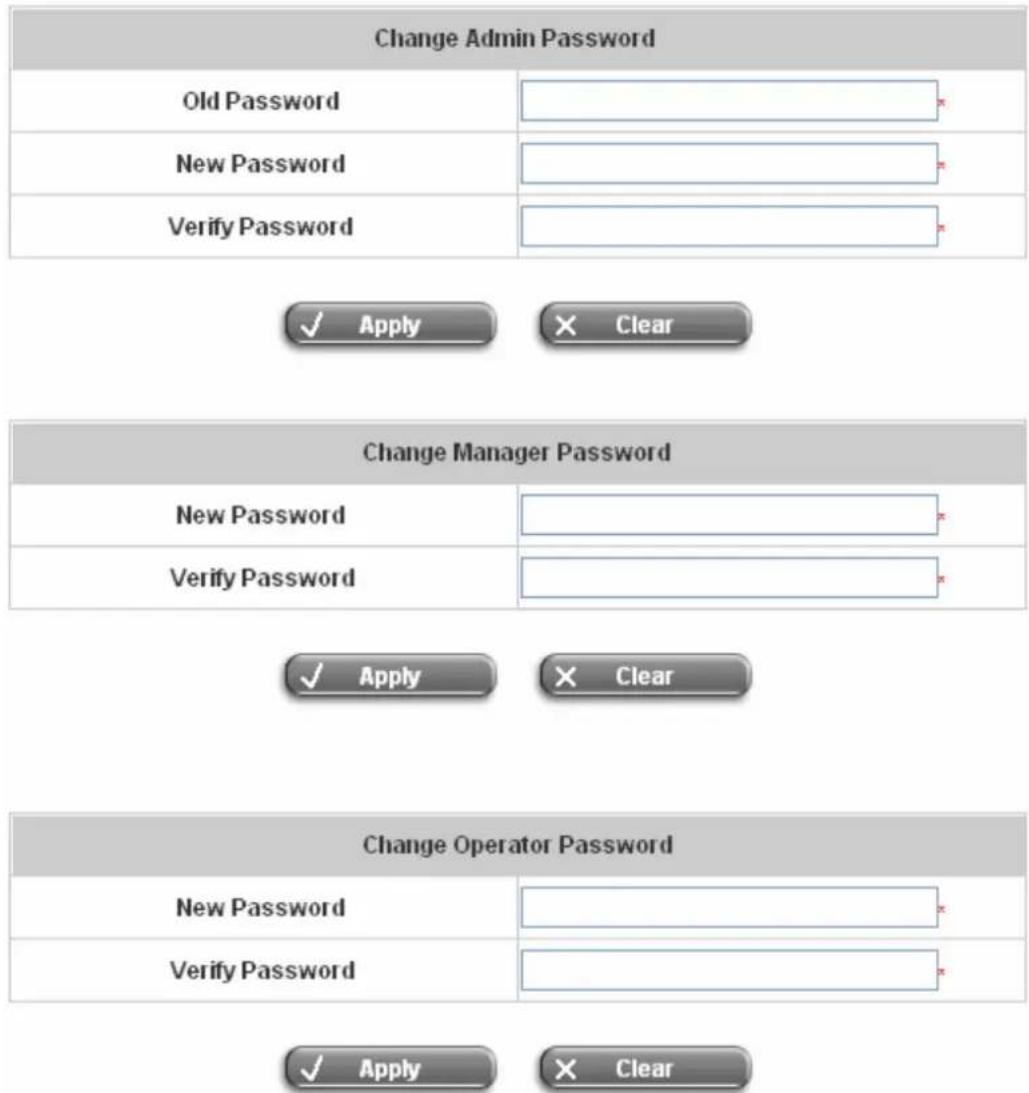
text_image
Change Admin Password Old Password New Password Verify Password ✓ Apply ✗ Clear Change Manager Password New Password Verify Password ✓ Apply ✗ Clear Change Operator Password New Password Verify Password ✓ Apply ✗ ClearCaution: If the administrator's password is lost, the administrator's password still can be changed through the text mode management interface on the serial port, console/printer port.
4.5.2 Backup/Restore Settings
This function is used to backup/restore the settings of Edimax AC-M3000. Also, Edimax AC-M3000 can be reset to the factory default settings here.

text_image
Backup current system settings Backup Restore system settings File Name Browse... Restore Reset to the factory-default settings Reset- Backup current system settings: Click Backup to create a .db database backup file and save it on disk.

text_image
File Download Do you want to open or save this file? Name: 20050303.db Type: Data Base File From: 10.2.3.70 Open Save Cancel ✓ Always ask before opening this type of file While files from the Internet can be useful, some files can potentially harm your computer. If you do not trust the source, do not open or save this file. What's the risk?- Restore system settings: Click Browse to search for a .db database backup file created by Edimax AC-M3000 and click Restore to restore to the same settings at the time the backup file was created.
- Reset to the factory-default settings: Click Reset to load the factory default settings of Edimax AC-M3000.
4.5.3 Firmware Upgrade
The administrator can download the latest firmware from website and upgrade the system here. Click Browse to search for the firmware file and click Apply to go on with the firmware upgrade process. It might take a few minutes before the upgrade process completes and the system needs to be restarted afterwards to make the new firmware effective.
Note: For maintenance issues, we strongly recommend you backup system settings before upgrading firmware.

text_image
Firmware Upgrade Current Version 1.00.B1 File Name Browse...Warning: 1. Firmware upgrade may cause the loss of some of the data. Please refer to the release notes for the limitation before upgrading the firmware. 2. Please restart the system after upgrading the firmware. Do not power on/off the system during the upgrade or the restart process. It may damage the system and cause it to malfunction.
4.5.4 Restart
This function allows the administrator to safely restart Edimax AC-M3000 and the process should take about 100 seconds. Click YES to restart Edimax AC-M3000; click NO to go back to the previous screen. Please don't power off the system until this restart process has finished.
Do you want to Restart AC-M3000?
Caution: The connection of all online users of the system will be disconnected when system is in the process of restarting.
4.6 Status
This section includes System Status, Interface Status, Current Users, Traffic History, and Notification Configuration to provide system status information and online user status.

text_image
System Configuration User Authentication AP Management Network Configuration Utilities Status System Status Interface Status Current Users Traffic History Notification Configuration Status System Status Display current system settings. Interface Status Display WAN 1, WAN 2, Controlled, Uncontrolled configurations and status. Current Users Display online user information including: Username, IP, MAC, packet count, byte count and idle time. Administrator may also kick out any on-line user from here. Traffic History Display detail usage information by day. A minimum of 3 days of history can be logged in the system volatile memory. Notification Configuration There are three email accounts available to be set for receiving Monitor IP report, Traffic History, On-demand User Log, and AP status change. External SYSLOG server can be configured here.4.6.1 System Status
This section provides an overview of the system for the administrator.
| System Status | ||
| Current Firmware Version | 1.00.A1 | |
| System Name | AC-M3000 | |
| Home Page | http://www.edimax.com.tw | |
| Syslog server-Traffic History | N/A:N/A | |
| Syslog server-On demand User log | N/A:N/A | |
| Proxy Server | Disabled | |
| Friendly Logout | Enabled | |
| Warning of Internet Disconnection | Disabled | |
| WAN Failover | Disabled | |
| Management | Remote Management IP | 0.0.0.0/0.0.0.0 |
| SNMP | Disabled | |
| History | Retained Days | 3 days |
| Email To | N/A | |
| N/A | ||
| N/A | ||
| History | Retained Days | 3 days |
| Email To | N/A | |
| N/A | ||
| N/A | ||
| Time | NTP Server | (tock.usno.navy.mil) |
| Date Time | 2006/10/24 08:36:36 +0100 | |
| User | Idle Timer | 10 Min(s) |
| Multiple Login | Disabled | |
| DNS | Preferred DNS Server | 10.2.3.203 |
| Alternate DNS Server | 168.95.1.1 | |
The description of the table is as follows:
| Item | Description | |
| Current Firmware Version | The present firmware version of Edimax AC-M3000 | |
| System Name | The system name. The default is Edimax AC-M3000 | |
| Home Page | The page to which the users are directed after initial login success. | |
| Syslog server-Traffic History | The IP address and port number of the external Syslog Server. N/A means that it is not configured. | |
| Syslog server-On demand User log | The IP address and port number of the external Syslog Server. N/A means that it is not configured. | |
| Proxy Server | Enabled/disabled stands for that the system is currently using the proxy server or not. | |
| Friendly Logout | Enabled/disabled stands for the setting of hiding/displaying an extra confirmation window when users try to close the login successful window . | |
| Warning of Internet Disconnection | Enabled/Disabled stands for the connection at WAN is normal or abnormal and all online users are allowed/disallowed to log in the network. | |
| Management | Remote Management IP | The IP or IPs that is allowed for accessing the management interface. |
| SNMP | Enabled/disabled stands for the current status of the SNMP management function. | |
| History | Retained Days | The maximum number of days for the system to retain the users' information. |
| Email To | The email address that the traffic history information will be sent to. | |
| Time | NTP Server | The network time server that the system is set to align. |
| Date Time | The system time is shown as the local time. | |
| User | Idle Timer | The number of minutes allowed for the users to be inactive. |
| Multiple Login | Enabled/disabled stands for the current setting to allow/disallow multiple logins form the same account. | |
| DNS | Preferred DNS Server | IP address of the preferred DNS Server. |
| Alternate DNS Server | IP address of the alternate DNS Server. | |
4.6.2 Interface Status
This section provides an overview of the interface for the administrator including WAN1, WAN2, Controlled Port and Uncontrolled Port.
| Interface Status | ||
| WAN1 | MAC Address | 00:06:78:AA:BB:CE |
| IP Address | 10.2.3.127 | |
| Subnet Mask | 255.255.255.0 | |
| WAN2 | MAC Address | 00:06:78:AA:BB:CD |
| IP Address | 10.0.2.2 | |
| Subnet Mask | 255.255.0.0 | |
| Controlled | Mode | NAT |
| MAC Address | 00:06:78:AA:BB:CC | |
| IP Address | 192.168.10.254 | |
| Subnet Mask | 255.255.255.0 | |
| Controlled DHCP Server | Status | Enabled |
| WINS IP Address | N/A | |
| Start IP Address | 192.168.10.1 | |
| End IP Address | 192.168.10.100 | |
| Lease Time | 1440 Min(s) | |
| Uncontrolled | Mode | NAT |
| MAC Address | 00:06:78:AA:BB:CC | |
| IP Address | 192.168.2.254 | |
| Subnet Mask | 255.255.255.0 | |
| Uncontrolled DHCP Server | Status | Enabled |
| WINS IP Address | N/A | |
| Start IP Address | 192.168.2.1 | |
| End IP Address | 192.168.2.100 | |
| Lease Time | 1440 Min(s) | |
The description of the table is as follows.
| Item | Description | |
| WAN1 | MAC Address | The MAC address of the WAN1 port. |
| IP Address | The IP address of the WAN1 port. | |
| Subnet Mask | The Subnet Mask of the WAN1 port. | |
| WAN2 | MAC Address | The MAC address of the WAN2 port. |
| IP Address | The IP address of the WAN2 port. | |
| Subnet Mask | The Subnet Mask of the WAN2 port. | |
| Controlled | Mode | The mode of the controlled port. |
| MAC Address | The MAC address of the controlled port. | |
| IP Address | The IP address of the controlled port. | |
| Subnet Mask | The Subnet Mask of the controlled port. | |
| Controlled DHCP Server | Status | Enable/disable stands for status of the DHCP server on the controlled port. |
| WINS IP Address | The WINS server IP. N/A means that it is not configured. | |
| Start IP Address | The start IP address of the DHCP IP range. | |
| End IP address | The end IP address of the DHCP IP range. | |
| Lease Time | Minutes of the lease time of the IP address. | |
| Uncontrolled | Mode | The mode of the uncontrolled port. |
| MAC Address | The MAC address of the uncontrolled port. | |
| IP Address | The IP address of the uncontrolled port. | |
| Subnet Mask | The Subnet Mask of the uncontrolled port. | |
| Uncontrolled DHCP Server | Status | Enable/disable stands for status of the DHCP server on the uncontrolled port |
| WINS IP Address | The WINS server IP. N/A means that it is not configured. | |
| Start IP Address | The start IP address of the DHCP IP range. | |
| End IP address | The end IP Address of the DHCP IP range. | |
| Lease Time | Minutes of the lease time of the IP address. | |
4.6.3 Current Users
In this function, each online user's information including Username, IP, MAC, Pkts In, Bytes In, Pkts Out, Bytes Out, Idle, Source AP and Kick Out can be obtained. Administrator can use this function to force a specific online user to log out. Just click the hyperlink of Kick Out next to the online user's name to logout that particular user. Click Refresh to renew the current users list.
| Current Users List | ||||||
| Item | Username | Pkts In | Bytes In | Idle | Source AP | |
| IP | MAC | Pkts Out | Bytes Out | Kick Out | ||
4.6.4 Traffic History
This function is used to check the history of Edimax AC-M3000. The history of each day will be saved separately in the DRAM for 3 days.
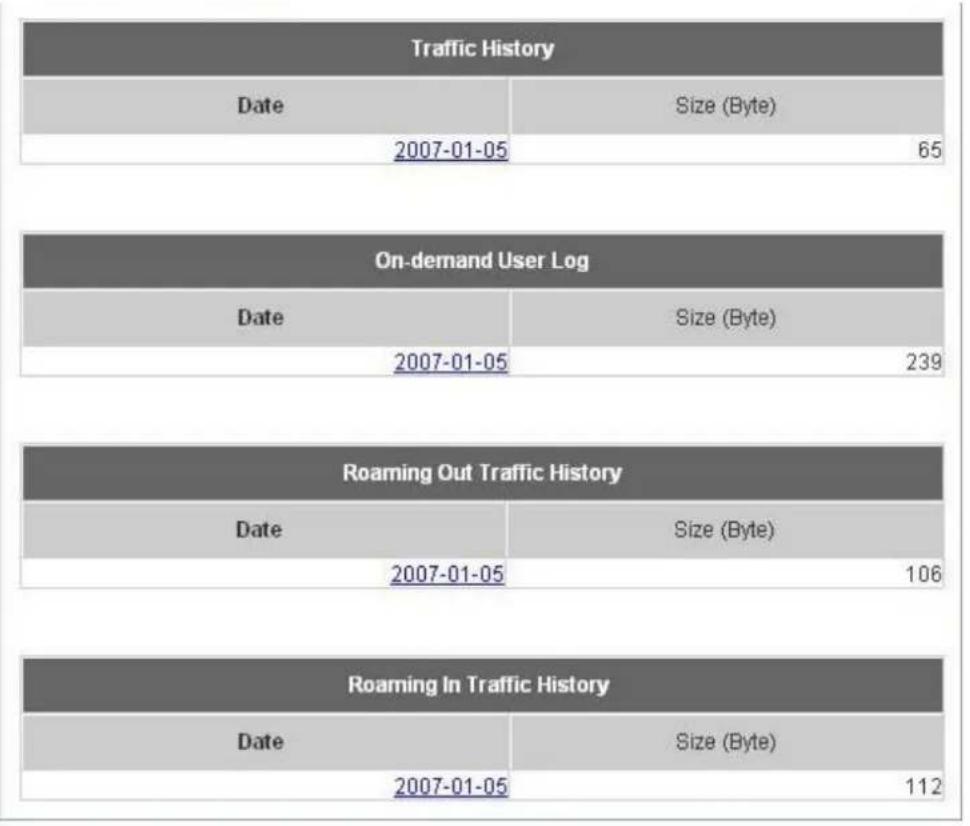
text_image
Traffic History Date Size (Byte) 2007-01-05 65 On-demand User Log Date Size (Byte) 2007-01-05 239 Roaming Out Traffic History Date Size (Byte) 2007-01-05 106 Roaming In Traffic History Date Size (Byte) 2007-01-05 112Caution: Since the history is saved in the DRAM, if you need to restart the system and also keep the history, then please manually copy and save the information before restarting.
If the History Email has been entered under the Notify Configuration page, then the system will automatically send out the history information to that email address.
- Traffic History
As shown in the following figure, each line is a traffic history record consisting of 9 fields, Date, Type, Name, IP, MAC, Pkts In, Bytes In, Pkts Out, and Bytes Out, of user activities.
Traffic History 2005-03-22
| Date | Type | Name | IP | MAC | Pkts In | Bytes In | Pkts Out | Bytes Out | ||
| 2005-03-22 | 19:12:21 | +0800 | LOGIN | user1@local.tw | 192.168.1.143 | 00:D0:C9:42:37:20 | 0 | 0 | 0 | 0 |
| 2005-03-22 | 19:12:24 | +0800 | LOGOUT | user1@local.tw | 192.168.1.143 | 00:D0:C9:42:37:20 | 3 | 252 | 3 | 252 |
| 2005-03-22 | 19:12:29 | +0800 | LOGIN | user2@local.tw | 192.168.1.143 | 00:D0:C9:42:37:20 | 0 | 0 | 0 | 0 |
| 2005-03-22 | 19:12:32 | +0800 | LOGOUT | user2@local.tw | 192.168.1.143 | 00:D0:C9:42:37:20 | 3 | 252 | 3 | 252 |
| 2005-03-22 | 19:13:51 | +0800 | LOGIN | user1@local.tw | 192.168.1.1 | 00:D0:C9:60:01:01 | 0 | 0 | 0 | 0 |
- On-demand User Log
As shown in the following figure, each line is a on-demand user log record consisting of 13 fields, Date, System Name, Type, Name, IP, MAC, Pkts In, Bytes In, Pkts Out, Bytes Out, Expiretime, Validtime and Remark, of user activities.
On-demand User Log 2005-03-22
| Date | System Name | Type | Name | IP | MAC | Pkts In | Bytes In | Pkts Out | Bytes Out | Expiretime | Validtime | Remark |
| 2005-03-2217:55:58+0800 | My Service | Create_OD_User | P4SP | 0.0.0.0 | 00:00:00:00:00:00 | 0 | 0 | 0 | 0 | 2005-03-2517:55:58 | None | 2 hrs 0 mins |
| 2005-03-2217:56:03+0800 | My Service | Create_OD_User | 62H6 | 0.0.0.0 | 00:00:00:00:00:00 | 0 | 0 | 0 | 0 | 2005-03-2517:56:03 | None | 2 hrs 0 mins |
| 2005-03-2217:56:07+0800 | My Service | Create_OD_User | 886D | 0.0.0.0 | 00:00:00:00:00:00 | 0 | 0 | 0 | 0 | 2005-03-2517:56:07 | None | 2 hrs 0 mins |
• Roaming Out Traffic History
As shown in the following figure, each line is a roaming out traffic history record consisting of 14 fields, Date, Type, Name, NSID, NASIP, NASPort, UserMAC, SessionID, SessionTime, Bytes in, Bytes Out, Pkts In, Pkts Out and Message, of user activities.
Roaming Out Traffic History 2005-03-22
| Date | Type | Name | NASID | NASIP | NASPort | UserMAC | sessionID | sessionTime | Bytes In | Bytes Out | Pkts In | Pkts Out | Message |
• Roaming In Traffic History
As shown in the following figure, each line is a roaming in traffic history record consisting of 15 fields, Date, Type, Name, NSID, NASIP, NASPort, UserMAC, UserIP, SessionID, SessionTime, Bytes in, Bytes Out, Pkts In, Pkts Out and Message, of user activities.
Roaming In Traffic History 2005-03-22
| Date | Type | Name | NASID | NASIP | NASPort | UserMAC | UserIP | SessionID | SessionTime | Bytes In | Bytes Out | Pkts In | Pkts Out | Message |
4.6.5 Notification Configuration
The Edimax AC-M3000 will save the traffic history into the internal DRAM. If the administrator wants the system to automatically send out the history to a particular email address, please enter the related information in these fields.
| E-mail Notification Configuration | ||||
| Send To | Monitor IP Report | Traffic History | On-demand User Log | AP Status |
| Interval | 1 Hour | 1 Hour | 1 Hour | N/A |
| Send Test Email | Send | Send | Send | Send |
| Send From | ||||
| SMTP | ||||
| Auth Method | None | |||
| Syslog Configuration | ||
| Traffic History | IP: Port: | |
| On-demand User Log | IP: Port: | |
- Send To: The e-mail address of the person whom the history email is for. This will be the receiver's e-mail. Check which type of report to be sent—Monitor IP Report, Traffic History, On-demand User Log, and AP Status.
• Interval: The time interval to send the e-mail report. Choose a proper number from the drop-down box. - Send Test Email: To test the settings correct or not.
- Send From: The e-mail address of the administrator in charge of the monitoring. This will show up as the sender's e-mail.
• SMTP Server: The IP address of the SMTP server. - Auth Method: The system provides four authentication methods, Plain, Login, CRAM-MD5 and NTLMv1, or "None" to use none of the above. Depending on which authentication method you select, you have to enter the Account Name, Password and Domain.
NTLMv1 is not currently available for general use.
Plain and CRAM-MD5 are standardized authentication mechanisms while Login and NTLMv1 are Microsoft proprietary mechanisms. Only Plain and Login can use the UNIX login password. Netscape uses Plain.
Outlook and Outlook express uses Login as default, although they can be set to use NTLMv1.
Pegasus uses CRAM-MD5 or Login but can not be configured which method to use.
Syslog Configuration: There are 2 parts: Traffic History and On-demand User Log. Enter the IP address and Port to specify which and from where the report should be sent.
4.7 Help
On the screen, the Help button is on the upper right corner.
Click Help to the Online Help window and then click the hyperlink of the items to get the information.
Online Help
Overview
System Configuration
System Information
WAN1 Configuration
WAN2 & Failover
LAN Port Roles
Controlled Configuration
Uncontrolled Configuration
User Authentication
Authentication Configuration
Authentication Server Configuration
Local User Setting
POP3 Configuration
RADIUS Configuration
LDAP Configuration
NT Domain Configuration
On-demand User Server Configuration
5. Appendix A – Console Interface
Via this port to enter the console interface for the administrator to handle the problems and situations occurred during operation.
- To connect the console port of Edimax AC-M3000, you need a console, modem cable and a terminal simulation program, such as the Hyper Terminal.
- If you use Hyper Terminal, please set the parameters as 9600,8,n,1.
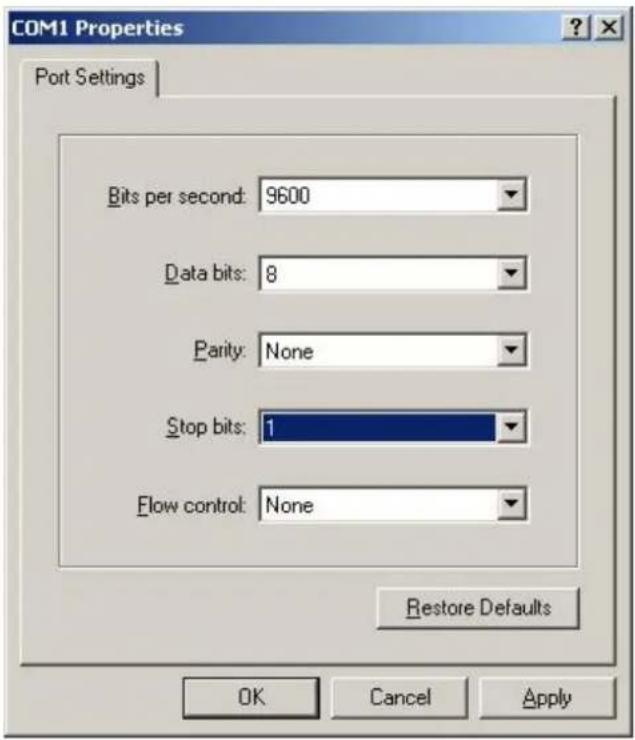
text_image
COM1 Properties Port Settings Bits per second: 9600 Data bits: 8 Parity: None Stop bits: 1 Flow control: None Restore Defaults OK Cancel ApplyCaution: the main console is a menu-driven text interface with dialog boxes. Please use arrow keys on the keyboard to browse the menu and press the Enter key to make selection or confirm what you enter.
- Once the console port of Edimax AC-M3000 is connected properly, the console main screen will appear automatically. If the screen does not appear in the terminal simulation program automatically, please try to press the arrow keys, so that the terminal simulation program will send some messages to the system and the welcome screen or the main menu should appear. If you are still unable to see the welcome screen or the main menu of the console, please check the connection of the cables and the settings of the terminal simulation program.

text_image
AC-M3000 Basic Configuration Please select functions: Utility Utilities for network debugging Password Change admin password Reset Reload factory default Restart Restart AC-M3000 < OK >• Utilities for network debugging
The console interface provides several utilities to assist the Administrator to check the system conditions and to debug any problems. The utilities are described as follow:
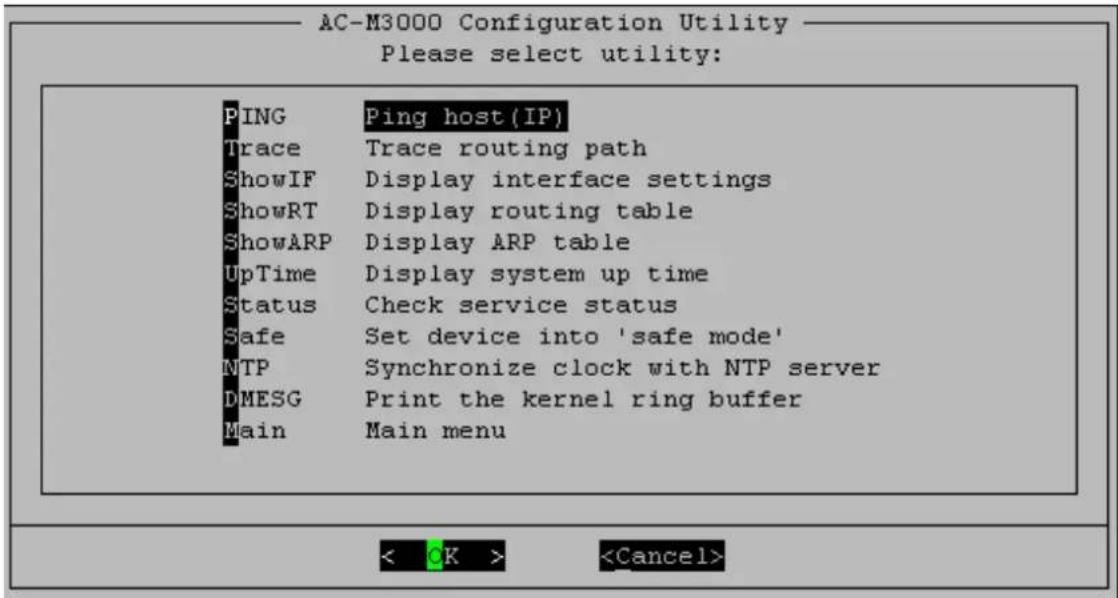
text_image
AC-M3000 Configuration Utility Please select utility: PING Ping host(IP) Trace Trace routing path ShowIF Display interface settings ShowRT Display routing table ShowARP Display ARP table UpTime Display system up time Status Check service status Safe Set device into 'safe mode' NTP Synchronize clock with NTP server DMESG Print the kernel ring buffer Main Main menu➢ Ping host (IP): By sending ICMP echo request to a specified host and wait for the response to test the network status.
➢ Trace routing path: Trace and inquire the routing path to a specific target.
Display interface settings: It displays the information of each network interface setting including the MAC address, IP address, and netmask.
➢ Display the routing table: The internal routing table of the system is displayed, which may help to confirm the Static Route settings.
➢ Display ARP table: The internal ARP table of the system is displayed.
➢ Display system up time: The system live time (time for system being turn on) is displayed.
➢ Check service status: Check and display the status of the system.
Set device into "safe mode": If administrator is unable to use Web Management Interface via the browser for the system failed inexplicitly. Administrator can choose this utility and set Edimax AC-M3000 into safe mode, then administrator can management this device with browser again.
Synchronize clock with NTP server: Immediately synchronize the clock through the NTP protocol and the specified network time server. Since this interface does not support manual setup for its internal clock, therefore we must reset the internal clock through the NTP.
Print the kernel ring buffer: It is used to examine or control the kernel ring buffer. The program helps users to print out their bootup messages instead of copying the messages by hand.
Main menu: Go back to the main menu.
- Change admin password
Besides supporting the use of console management interface through the connection of null modem, the
system also supports the SSH online connection for the setup. When using a null modem to connect to the system console, we do not need to enter administrator's password to enter the console management interface. But connecting the system by SSH, we have to enter the username and password.
The username is “admin” and the default password is also “admin”, which is the same as for the web management interface. You can use this option to change the administrator’s password. Even if you forgot the password and are unable to log in the management interface from the web or the remote end of the SSH, you can still use the null modem to connect the console management interface and set the administrator’s password again.
Caution: Although it does not require a username and password for the connection via the serial port, the same management interface can be accessed via SSH. Therefore, we recommend you to immediately change the Edimax AC-M3000 Admin username and password after logging in the system for the first time.
- Reload factory default
Choosing this option will reset the system configuration to the factory defaults.
- Restart Cipherium Edimax AC-M3000
Choosing this option will restart Edimax AC-M3000.
6. Appendix B – Network Configuration on PC
After Edimax AC-M3000 is installed, the following configurations must be set up on the PC: Internet Connection Setup and TCP/IP Network Setup.
- Internet Connection Setup
If the Internet Connection of this client PC has been configured as use local area network already, you can skip this setup.
◆ Windows XP
- Choose Start > Control Panel > Internet Option.
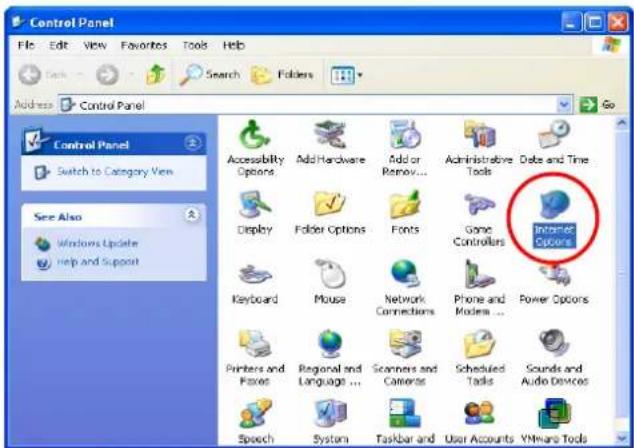
text_image
Control Panel File Edit View Favorites Tools Help Address Control Panel Control Panel Switch to Category View See Also Windows Update Help And Support Accessibility Options Add Hardware Add or Remove... Administrative Tools Date and Time Display Folder Options Fonts Game Controllers Internet Options Keyboard Mouse Network Connections Phone and Modem Power Options Printers and Boxes Regional and Languages Scanners and Cameras Scheduled Tasks Sounds and Audio Devices Speech System Taskbar and User Accounts VMware Tools- Choose the "Connections" label, and then click Setup.
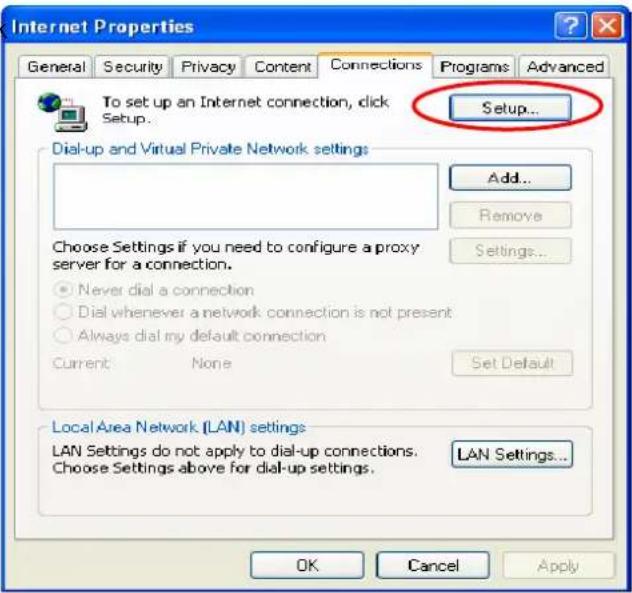
text_image
Internet Properties General Security Privacy Content Connections Programs Advanced To set up an Internet connection, click Setup... Setup... Dial-up and Virtual Private Network settings Add... Remove Choose Settings if you need to configure a proxy server for a connection. Never dial a connection Dial whenever a network connection is not present Always dial my default connection Current None Set Default Local Area Network (LAN) settings LAN Settings do not apply to dial-up connections. LAN Settings... Choose Settings above for dial-up settings. OK Cancel Apply- Click Next when Welcome to the New Connection Wizard screen appears.

text_image
New Connection Wizard Welcome to the New Connection Wizard This wizard helps you: • Connect to the Internet. • Connect to a private network, such as your workplace network. • Set up a home or small office network. To continue, click Next < Back > Next > Cancel- Choose "Connect to the Internet" and then click Next.

text_image
New Connection Wizard Network Connection Type What do you want to do? Connect to the Internet Connect to the Internet so you can browse the Web and read email Connect to the network at my workplace Connect to a business network (using dial-up or VPN) so you can work from home, a field office, or another location. Set up a home or small office network Connect to an existing home or small office network or set up a new one. Set up an advanced connection Connect directly to another computer using your serial, parallel, or infrared port, or set up this computer so that other computers can connect to it. < Back Next > Cancel- Choose "Set up my connection manually" and then click Next.

text_image
New Connection Wizard Getting Ready The wizard is preparing to set up your Internet connection. How do you want to connect to the Internet? Choose from a list of Internet service providers (ISPs) Set up my connection manually For a dial-up connection, you will need your account name, password, and a phone number for your ISP. For a broadband account, you won't need a phone number Use the CD I got from an ISP < Back Next > Cancel- Choose "Connect using a broadband connection that is always on" and then click Next.

text_image
New Connection Wizard Internet Connection How do you want to connect to the Internet? Connect using a dial-up modem This type of connection uses a modem and a regular or ISDN phone line. Connect using a broadband connection that requires a user name and password This is a high-speed connection using either a DSL or cable modem. Your ISP may refer to this type of connection as PFPoE. Connect using a broadband connection that is always on This is a high-speed connection using either a cable modem, DSL or LAN connection. It is always active, and doesn't require you to sign in. < Back Next > Cancel- Finally, click Finish to exit the Connection Wizard. Now, you have completed the setup.

text_image
New Connection Wizard Completing the New Connection Wizard Your broadband connection should already be configured and ready to use. If your connection is not working property, click the following link. Learn more about broadband connections. To close this wizard, click Finish. < Back Finish Cancel- TCP/IP Network Setup
In the default configuration, Edimax AC-M3000 will assign an appropriate IP address to a client PC which uses DHCP to obtain IP address automatically. Windows 95/98/2000/XP configures IP setup to "Obtain an IP address automatically" in default settings.
If you want to check the TCP/IP setup or use a static IP to connect to Edimax AC-M3000 LAN port, please follow the following steps:
◆ Check the TCP/IP Setup of Window XP
-
Select Start > Control Panel > Network Connection.
-
Click the right button of the mouse on the "Local Area Connection" icon and select "Properties"
-
Select "General" label and choose "Internet Protocol (TCP/IP)" and then click Properties. Now, you can choose to use DHCP or specific IP address, please proceed to the following steps.

text_image
Control Panel File Edit View Favorites Tools Help Address Control Panel Control Panel Switch to Category View See Also Windows Update Help and Support Accessibility Options Add Hardware Add or Remove... Administrative Tools Date and Time Display Folder Options Fonts Games Controllers Internet Options Keyboard Mouse Network Connections Phone and Modem Power Options Printers and Frames Regional and Language... Scanners and Cameras Scheduled Tasks Sounds and Audio Devices Speech System Toolbar and User Accounts VMware Tools
text_image
Network Connections File Edit View Favorites Tools Advanced Help Back Search Folders Address Network Connections Go Network Tasks Create a new connection Set up a home or small office networks Disable this network device Prepare this connection Rename this connection View status of this connection Change settings of this connection Other Places Control Panel My Network Places My Documents LAH or High Speed Internet Local Area Connection Enabled AMD PONET Parly PCI Ethem... Disable Status Repair Bridge Connections Create Shortcut Device Rename Properties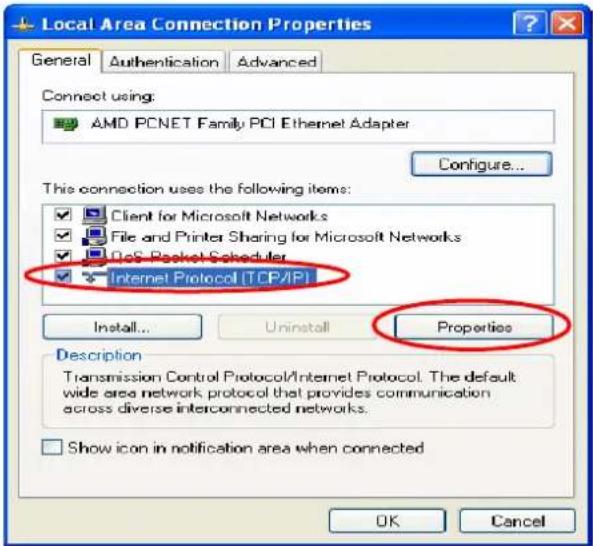
text_image
Local Area Connection Properties General Authentication Advanced Connect using: AMD PCNET Family PCI Ethernet Adapter Configure... This connection uses the following items: ✓ Client for Microsoft Networks ✓ File and Printer Sharing for Microsoft Networks ✓ DoS Packet Scheduler ✓ Internet Protocol (TCP/IP) Install... Uninstall Properties Description Transmission Control Protocol/Internet Protocol. The default wide area network protocol that provides communication across diverse interconnected networks. Show icon in notification area when connected OK Cancel1-2. Using DHCP: If want to use DHCP, please choose "Obtain an IP address automatically" and click OK. This is also the default setting of Windows. Then, reboot the PC to make sure an IP address is obtained from Edimax AC-M3000.

text_image
Internet Protocol (TCP/IP) Properties General Alternate Configuration You can get IP settings assigned automatically if your network supports this capability. Otherwise, you need to ask your network administrator for the appropriate IP settings. Obtain an IP address automatically Use the following IP address: IP address: ... Subnet mask: ... Default gateway: ... Obtain DNS server address automatically Use the following DNS server addresses: Preferred DNS server: ... Alternate DNS server: ... Advanced... OK Cancel2-2. Using Specific IP Address: If want to use specific IP address, you have to ask the network administrator for the information of the Edimax AC-M3000: IP address, Subnet Mask, New gateway and DNS server address.
- Please choose “Use the following IP address” and enter the information given from the network administrator in “IP address”, “Subnet mask” and the “DNS address(es)” and then click OK.
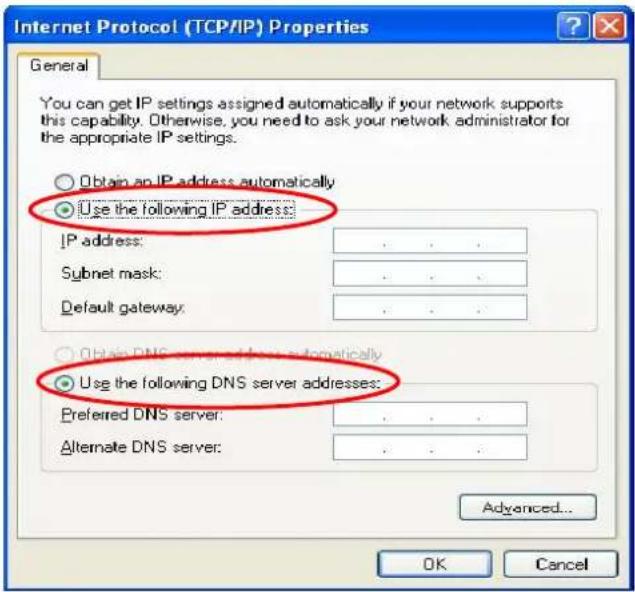
text_image
Internet Protocol (TCP/IP) Properties General You can get IP settings assigned automatically if your network supports this capability. Otherwise, you need to ask your network administrator for the appropriate IP settings. Obtain an IP address automatically Use the following IP address: IP address: .... Subnet mask: .... Default gateway: .... Obtain DNS server automatically Use the following DNS server addresses: Preferred DNS server: .... Alternate DNS server: .... Advanced... OK Cancel7. Appendix C – IPSec VPN
Edimax AC-M3000 has equipped with IPSec VPN feature starts from release version v1.00. To fully utilize the nature supported IPSec VPN by Microsoft Windows XP SP2(with patch) and Windows 2000 operating systems, Edimax AC-M3000 implement IPSec VPN tunneling technology between client's windows devices and Edimax AC-M3000 itself, no matter of through wired or wireless network.
By pushing down ActiveX to the client's Windows device from Edimax AC-M3000, no extra client software to be installed except ActiveX, in which a so-called "clientless" IPSec VPN setting is configured automatically. At the end of this setup, a build-in IPSec VPN feature was enabled to be ready to serve once it is called to be setup.
The design goal is to eliminate the configuration difficulty from IPSec VPN users. At the client side, the IPSec VPN implementation of Edimax AC-M3000 is based on ActiveX and the built-in IPSec VPN client of Windows OS.
1. ActiveX component
The ActiveX is a software component running inside Internet Explorer. The ActiveX component can be checked by the following windows.

text_image
Internet Explorer cannot display the webpage - Windows Internet Explorer Internet Options General Security Privacy Content Connections Programs Advanced Internet programs You can specify which program Windows automatically uses for each Internet service. HTML editor: UltraEdit-32 專菜文字 / 16 適制編輯器 E-mail: Microsoft Outlook Newsgroups: Microsoft Outlook Internet Call: NetMeeting Calendar: Microsoft Outlook Contact List: Microsoft Outlook Default web browser Internet Explorer is the default web browser. Make default Tell me if Internet Explorer is not the default web browser. Manage add-ons Enable or disable browser add-ons installed in your system. Manage add-ons 确定 取消 装用(A) Manage Add-ons Add-ons are programs that extend the capabilities of your web browser. Some add-ons can interfere with the operation of your browser. You can disable, enable, or delete add-ons. Disabling or deleting an add-on might prevent some webpages from working. Show: Add-ons currently loaded in Internet Explorer Name Publisher Status Type File DusSo.com Search Enabled Browser Helper Object Inte32. Internet_Explorer_Service Enabled Browser Helper Object Helper? NewWebController Class Enabled Browser Helper Object WinSC Router Video 40 (Not verified) Router Video Enabled Browser Helper Object rv40.dll Shockwave Flash Object Macromedia, Inc. Enabled ActiveX Control Flash8c SSVHelper Class (Not verified) Sun Microsy... Enabled Browser Helper Object ssv.dll Sun Java 主控台 (Not verified) Sun Microsy... Enabled Browser Extension ssv.dll VPNClient.spec (Not verified) cipheritum Enabled ActiveX Control VPNCI Windows Messenger Enabled Browser Extension XML DOM Document Microsoft Corporation Enabled ActiveX Control mxml Yahoo! Messenger (Not verified) Yahoo! Inc. Enabled Browser Extension YAHO 参考资料 Enabled Browser Extension Select an add-on from the list above to perform the following actions: Settings To disable an add-on, click it and then click Disable. To delete an ActiveX control, click it and then click Delete ActiveX. Enable Disable Download new add-ons for Internet Explorer Learn more about add-ons Delete Click here to delete this add-on Delete ActiveX OKFrom Windows Internet Explorer, click "Manage add-ons" button inside "Programs" page under "Tools" to show the add-ons programs list. You can see VPNClient.ipsec was enabled.
During the first-time login to Edimax AC-M3000, Internet Explorer will ask user to download the ActiveX component of IPSec VPN. This ActiveX component once downloaded will be running paralleled with the "Login Success Page" after the page being brought up successfully. The ActiveX component helps to setup the IPSec VPN tunnel between client's device and the NAC Edimax AC-M3000 controller, and to check the validity of the IPSec VPN tunnel between them. If the connection is down, the ActiveX component will detect the broken link and decompose the IPSec tunnel. Once the IPSec VPN tunnel was built, any packet sent will be encrypted. Without connecting to the original IPSec VPN tunnel, user or client device has no alternative to gain network connection beyond this. The design of Edimax AC-M3000's IPSec VPN feature directly solves possible data security leak problem between client and the controller via either wireless or wired connection without extra hardware or client software installed.
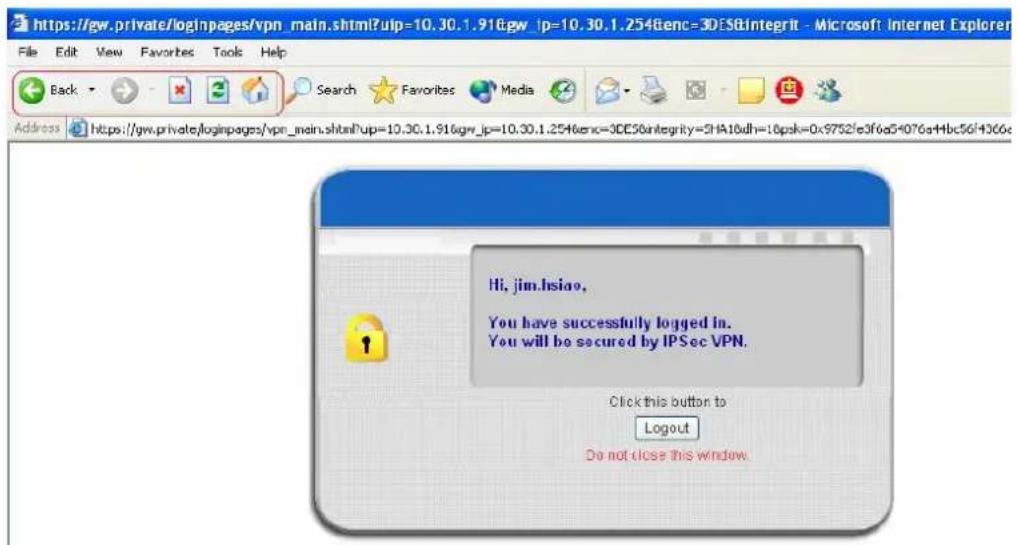
text_image
Hi, jim.hsiao, You have successfully logged in. You will be secured by IPSec VPN. Click this button to Logout Do not close this window.2. Limitations
The limitation of the client side due to ActiveX and Windows OS includes:
a. Internet Connection Firewall of Windows XP or Windows XP SP1 is not compatible with IPSec protocol. It shall be turned off to allow IPSec packets to pass through.
b. Without patch, ICMP (Ping) and PORT command of FTP can not work in Windows XP SP2.
c. The Forced termination (through CTRL+ALT+DEL, Task Manager) of the Internet Explorer will stop the running of ActiveX. It causes IPSec tunnel can't be cleared properly at client's device. A reboot of client's device is needed to clear the IPSec tunnel.
d. The crash of Windows Internet Explorer may cause the same result.
3. Internet Connection Firewall
In Windows XP and Windows XP SP1, the Internet Connection Firewall is not compatible with IPSec. Internet Connection Firewall will drop packets from tunneling of IPSec VPN.

text_image
Ethernet Status General Support Connection Status: Connected Duration: 5 days 04:59:39 Speed: 100.0 Mbps Activity: Sent — Received Packets: 45 | 176,578 Properties Disable Close Ethernet Properties General Authentication Advanced Internet Connection Firewall Protect my computer and network by limiting or preventing access to this computer from the Internet Learn more about Internet Connection Firewall. Internet Connection Sharing Allow other network users to connect through this computer's Internet connection Allow other network users to control or disable the shared Internet connection Learn more about Internet Connection Sharing. Settings... OK CancelSuggestion: Please TURN OFF Internet Connection Firewall feature or upgrade the Windows OS into Windows XP SP2.
4. ICMP and Active Mode FTP
On Windows XP SP2 without patching by KB889527, it will drop ICMP packets from IPSec tunnel. This problem can be fixed by upgrading patch KB889527. Before enabling IPSec VPN function on client device, please access the patch from Microsoft's web at http://support.microsoft.com/default.aspx?scid=kb;en-us;889527.
This patch also fixes the problem of supporting active mode FTP inside IPSec VPN tunnel of Windows XP SP2.
Suggestion: Please UPDATE client's Windows XP SP2 with this patch.
5. The Termination of ActiveX
The ActiveX component for IPSec VPN is running paralleled with the web page of "Login Success". Unless user decides to close the session and to disconnect with NAC Edimax AC-M3000, the following conditions or behaviors of using browser shall be avoided in order to maintain the built IPSec VPN tunnel always alive.

text_image
https://gw.private/loginpages/vpn_main.shtml?uip=10.30.1.918gw_ip=10.30.1.2548enc=3DES&integrit - Microsoft Internet Explorer File Edit View Favorites Tools Help Back Search Favorites Media Address https://gw.private/loginpages/vpn_main.shtml?uip=10.30.1.918gw_ip=10.30.1.2548enc=3DES&integrit=ySHA1&dh=18psk=0x9752fe3f6a54076a44bc56f4366a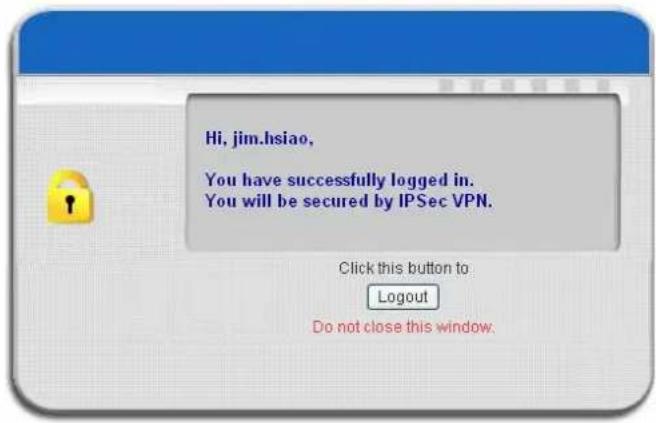
text_image
Hi, jim.hsiao, You have successfully logged in. You will be secured by IPSec VPN. Click this button to Logout Do not close this window.Reasons may cause the Internet Explorer to stop the ActiveX unexpectedly as followings:
a. The crash of Internet Explorer on running ActiveX
Suggestion: Please reboot client's computer, once Windows service is resumed, go through the login process again.
b. Terminate the Internet Explorer Task from Windows Task Manager
Suggestion: Don't terminate this VPN task of Internet Explorer.
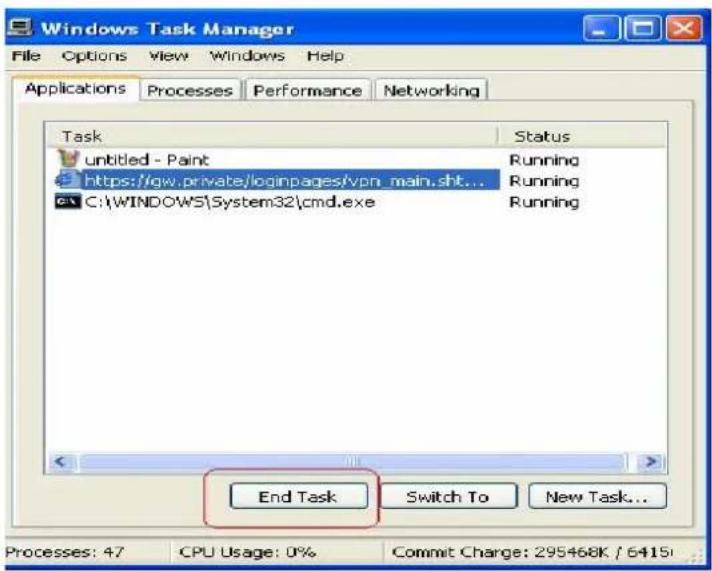
text_image
Windows Task Manager File Options View Windows Help Applications Processes Performance Networking Task Untitled - Paint https://gw.private/loginpages/vpn_main.sht... C:\WINDOWS\System32\cmd.exe Status Running Running Running End Task Switch To New Task... Processes: 47 CPU Usage: 0% Commit Charge: 295468K / 6415c. There are some cases of Windows messages by which Edimax AC-M3000 will hint current user to:
(1) Close the Windows Internet Explorer,
(2) Click "logout" button on "login success" page,
(3) Click "back" or "refresh" of the same Internet Explorer,
(4) Enter new URL in the same Internet Explorer,
(5) Open a URL from the other application (e.g. email of Outlook) that occupies this existing Internet Explorer.

text_image
Hi, jim.hsiao. You have successfully logged in. You will be secured by IPSec VPN. Microsoft Internet Explorer Are you sure you want to navigate away from this page? Are you sure you want to log out? Press OK to continue, or Cancel to stay on the current page. OK CancelThat shall all cause the termination of IPSec VPN tunneling if user chooses to click "Yes". The user has to log in again to regain the network access.
Suggestion: Click "Cancel" if you do not intend to stop the IPSec VPN connection yet.
6. Non-supported OS and Browser
In current version, Windows Internet Explorer is the only browser supported by Edimax AC-M3000.Windows XP and Windows 2000 are the only two supported OS along with this release.
8. Appendix D -Proxy Setting for Hotspot
HotSpot is a place such as a coffee shop, hotel, or a public area where provides Wi-Fi service for mobile and temporary users. HotSpot is usually implemented without complicated network architecture and using some proxy servers provided by Internet Service Providers.
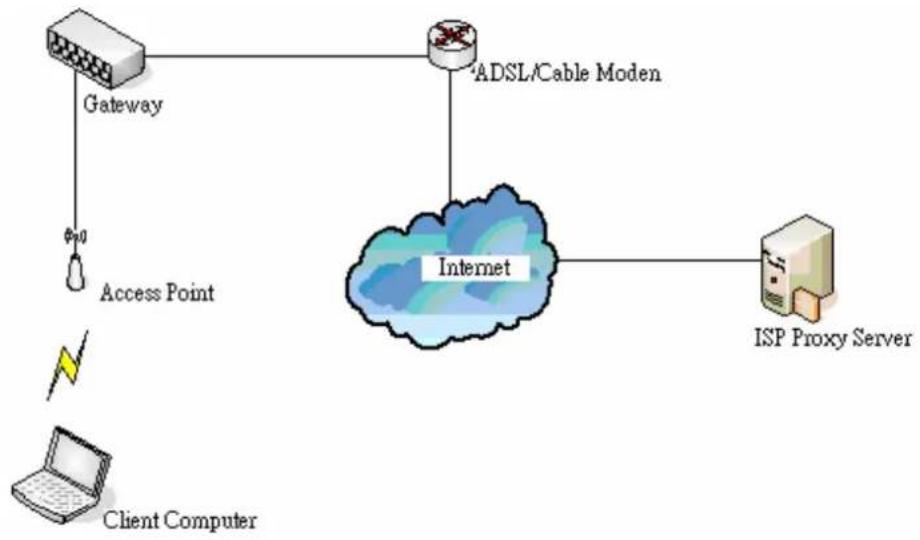
flowchart
graph TD
    A["Gateway"] --> B["ADSL/Cable Moden"]
    B --> C["Internet"]
    C --> D["ISP Proxy Server"]
    E["Client Computer"] --> F["Access Point"]
    F --> A
In Hotspots, users usually enable their proxy setting of the browsers such as IE and Firefox. Therefore, so we need to set some proxy configuration in the Gateway need to be set. Please follow the steps to complete the proxy configuration :
- Login Gateway by using "admin".
- Click the Network Configuration from top menu and the homepage of the Network Configuration will appear.
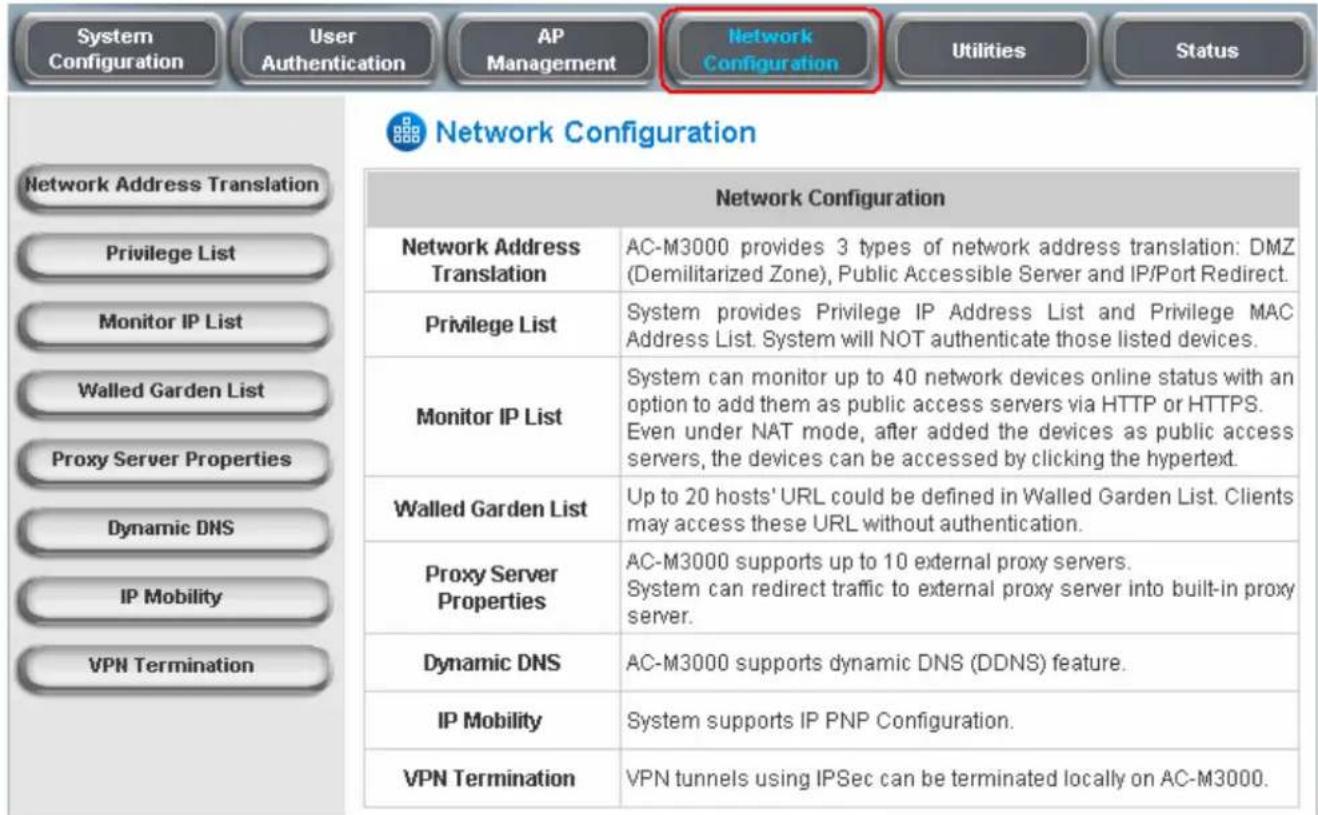
text_image
System Configuration User Authentication AP Management Network Configuration Utilities Status Network Configuration Network Address Translation Privilege List Monitor IP List Walled Garden List Proxy Server Properties Dynamic DNS IP Mobility VPN Termination Network Configuration Network Address Translation AC-M3000 provides 3 types of network address translation: DMZ (Demilitarized Zone), Public Accessible Server and IP/Port Redirect. Privilege List System provides Privilege IP Address List and Privilege MAC Address List. System will NOT authenticate those listed devices. Monitor IP List System can monitor up to 40 network devices online status with an option to add them as public access servers via HTTP or HTTPS. Even under NAT mode, after added the devices as public access servers, the devices can be accessed by clicking the hypertext. Walled Garden List Up to 20 hosts' URL could be defined in Walled Garden List. Clients may access these URL without authentication. Proxy Server Properties AC-M3000 supports up to 10 external proxy servers. System can redirect traffic to external proxy server into built-in proxy server. Dynamic DNS AC-M3000 supports dynamic DNS (DDNS) feature. IP Mobility System supports IP PNP Configuration. VPN Termination VPN tunnels using IPSec can be terminated locally on AC-M3000.- Click the Proxy Server Properties from left menu and the homepage of the Proxy Server Properties will appear.
| External Proxy Server | ||
| Item | Server IP | Port |
| 1 | ||
| 2 | ||
| 3 | ||
| 4 | ||
| 5 | ||
| 6 | ||
| 7 | ||
| 8 | ||
| 9 | ||
| 10 | ||
| Internal Proxy Server | |
| Built-in Proxy Server | Enabled Disabled |
- Add the ISP's proxy Server IP and Port into External Proxy Server Setting.
| External Proxy Server | ||
| Item | Server IP | Port |
| 1 | 10.2.3.203 | 6588 |
| 2 | ||
| 3 | ||
| 4 | ||
| 5 | ||
| 6 | ||
| 7 | ||
| 8 | ||
| 9 | ||
| 10 | ||
| Internal Proxy Server | ||
| Built-in Proxy Server | Enabled Disabled | |
- Enable Built-in Proxy Server in Internal Proxy Server Setting.
| External Proxy Server | ||
| Item | Server IP | Port |
| 1 | 10.2.3.203 | 6588 |
| 2 | ||
| 3 | ||
| 4 | ||
| 5 | ||
| 6 | ||
| 7 | ||
| 8 | ||
| 9 | ||
| 10 | ||
- Click Apply to save the settings.
9. Appendix E –Proxy Setting for Enterprise
Enterprises usually isolate their intranet and internet by using more elaborated network architecture. Many enterprises have their own proxy server which is usually at intranet or DMZ under the firewall protection.
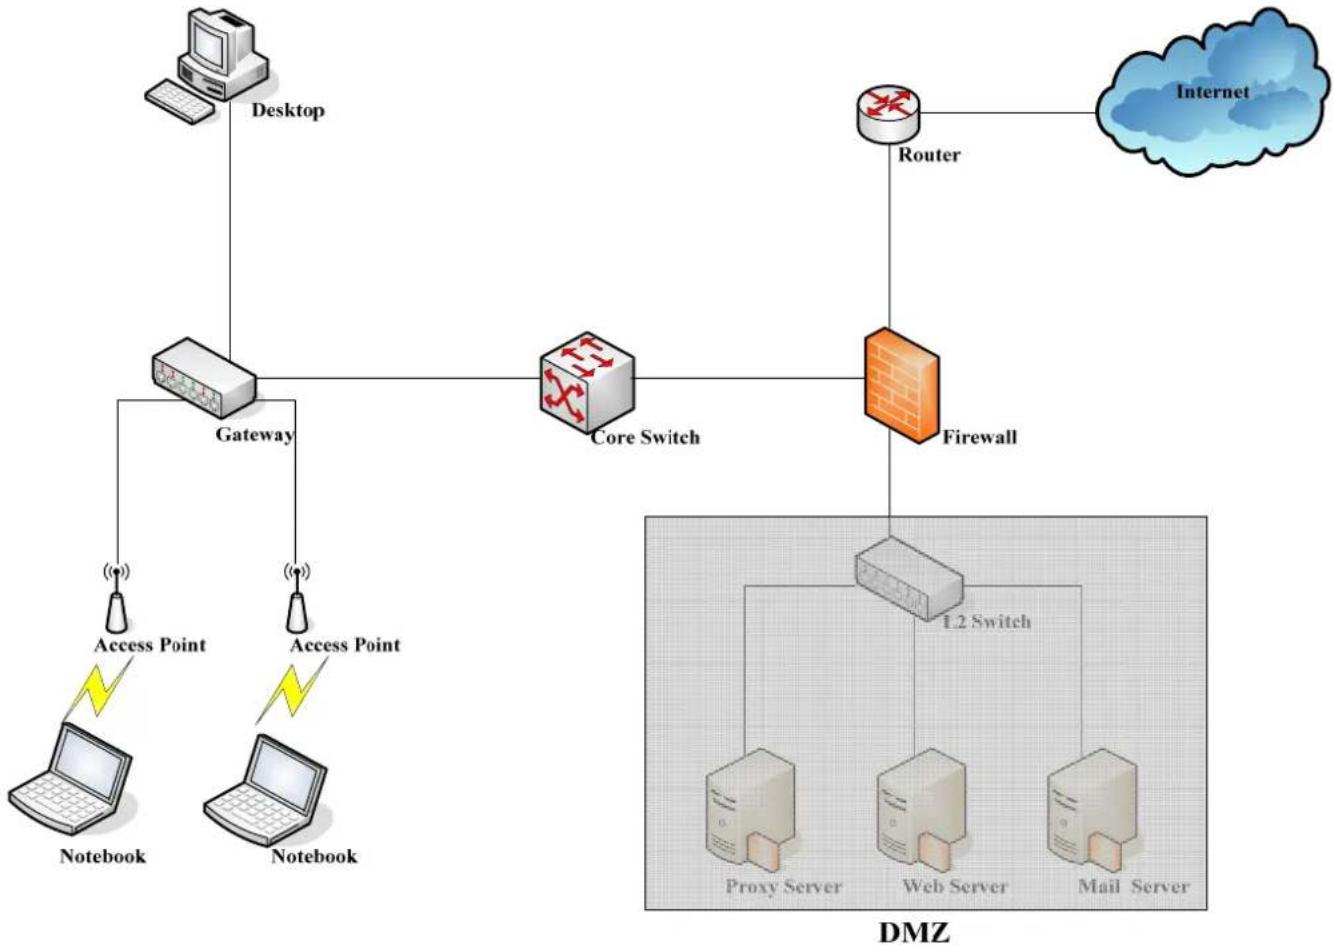
flowchart
graph TD
    A["Desktop"] --> B["Gateway"]
    B --> C["Core Switch"]
    C --> D["Firewall"]
    D --> E["Internet"]
    B --> F["Access Point"]
    B --> G["Access Point"]
    F --> H["Notebook"]
    G --> I["Notebook"]
    D --> J["1.2 Switch"]
    J --> K["Proxy Server"]
    J --> L["Web Server"]
    J --> M["Mail Server"]
In enterprises, network managers or MIS staff may often ask their users to enable their proxy setting of the browsers such as IE and Firefox to reduce the internet access loading. Therefore some proxy configurations in the Gateway need to be set.
Caution: Some enterprises will automatically redirect packets to proxy server by using core switch or Layer 7 devices. By the way, the clients don't need to enable their browsers' proxy settings, and administrators don't need to set any proxy configuration in the Gateway.
Please follow the steps to complete the proxy configuration :
■ Gateway setting
- Login Gateway by using "admin".
- Click the Network Configuration from top menu and the homepage of the Network Configuration will appear.

text_image
System Configuration User Authentication AP Management Network Configuration Utilities Status Network Configuration Network Address Translation Privilege List Monitor IP List Walled Garden List Proxy Server Properties Dynamic DNS IP Mobility VPN Termination Network Configuration Network Address Translation AC-M3000 provides 3 types of network address translation: DMZ (Demilitarized Zone), Public Accessible Server and IP/Port Redirect. Privilege List System provides Privilege IP Address List and Privilege MAC Address List. System will NOT authenticate those listed devices. Monitor IP List System can monitor up to 40 network devices online status with an option to add them as public access servers via HTTP or HTTPS. Even under NAT mode, after added the devices as public access servers, the devices can be accessed by clicking the hypertext. Walled Garden List Up to 20 hosts' URL could be defined in Walled Garden List. Clients may access these URL without authentication. Proxy Server Properties AC-M3000 supports up to 10 external proxy servers. System can redirect traffic to external proxy server into built-in proxy server. Dynamic DNS AC-M3000 supports dynamic DNS (DDNS) feature. IP Mobility System supports IP PNP Configuration. VPN Termination VPN tunnels using IPSec can be terminated locally on AC-M3000.- Click the Proxy Server Properties from left menu and the homepage of the Proxy Server Properties will appear.
| External Proxy Server | ||
| Item | Server IP | Port |
| 1 | ||
| 2 | ||
| 3 | ||
| 4 | ||
| 5 | ||
| 6 | ||
| 7 | ||
| 8 | ||
| 9 | ||
| 10 | ||
| Internal Proxy Server | |
| Built-in Proxy Server | Enabled Disabled |
- Add your proxy Server IP and Port into External Proxy Server Setting.
| External Proxy Server | ||
| Item | Server IP | Port |
| 1 | 10.2.3.203 | 6588 |
| 2 | ||
| 3 | ||
| 4 | ||
| 5 | ||
| 6 | ||
| 7 | ||
| 8 | ||
| 9 | ||
| 10 | ||
| Internal Proxy Server | ||
| Built-in Proxy Server | Enabled Disabled | |
- Disable Built-in Proxy Server in Internal Proxy Server Setting.
| External Proxy Server | ||
| Item | Server IP | Port |
| 1 | 10.2.3.203 | 6588 |
| 2 | ||
| 3 | ||
| 4 | ||
| 5 | ||
| 6 | ||
| 7 | ||
| 8 | ||
| 9 | ||
| 10 | ||
6. Click Apply to save the settings.
Warning: If your proxy server is disabled, it will make the user authentication operation abnormal. When users open the browser, the login page won't appear because the proxy server is down. Please make sure your proxy server is always available.
■ Client setting
It is necessary for clients to add default gateway IP address into proxy exception information so the user login successful page can show up normally.
- Use command "ipconfig" to get Default Gateway IP Address.

text_image
Microsoft Windows XP [版本 5.1.2600] (C) Copyright 1985-2001 Microsoft Corp. C:\Documents and Settings\duke.hung>ipconfig Windows IP Configuration Ethernet adapter 區域連線: Connection-specific DNS Suffix . : sohouare.com IP Address. . . . . . . . . . . . : 192.168.1.92 Subnet Mask . . . . . . . . . . . : 255.255.255.0 Default Gateway . . . . . . . . . . : 192.168.1.254 Ethernet adapter 無線網路連線: Media State . . . . . . . . . . : Media disconnected- Open browser to add default gateway IP address (e.g. 192.168.1.254) and logout page IP address "1.1.1.1" into proxy exception information.
- For I.E

text_image
Proxy Settings Servers Type Proxy address to use Port HTTP: 10.2.3.208 : 6588 Secure: 10.2.3.208 : 6588 ETP: 10.2.3.208 : 6588 Socks: ✓ Use the same proxy server for all protocols Exceptions Do not use proxy server for addresses beginning with: 192.168.1.254,1.1.1.1 Use semicolons ( ; ) to separate entries. OK Cancel- For firefox

text_image
Connection Settings Configure Proxies to Access the Internet Direct connection to the Internet Auto-detect proxy settings for this network Manual proxy configuration: HTTP Proxy: 10.2.3.203 Port: 6588 Use this proxy server for all protocols SSL Proxy: 10.2.3.203 Port: 6588 FTP Proxy: 10.2.3.203 Port: 6588 Gopher Proxy: 10.2.3.203 Port: 6588 SOCKS Host: 10.2.3.203 Port: 6588 No Proxy for: 192.168.1.254,1.1.1.1 Example: .mozilla.org, .net.nz, 192.168.1.0/24 Automatic proxy configuration URL: Reload OK Cancel Help10. Appendix F –Disclaimer for On-Demand Users
In Edimax AC-M3000, the end user first gets a login page when she/he opens its web browser right after associating with an access point. However, in some situations, the hotspot owners or MIS staff may want to display “terms of use” or announcement information before the login page. Hotspot owners or MIS staff can design a new disclaimer/announcement page and save the page in their local server. After the agreement shown on the page is read, users are asked whether they agree or disagree with the disclaimer. By clicking “I agree,” users are able to log in. If users choose to decline, they will get a popup window saying they are unable to log in. The basic design is to have the disclaimer and login function in the same page but with the login function hidden until users agree with the disclaimer.
Here the codes are supplied. Please note that the blue part is for the login feature, the red part is the disclaimer, and the green part can be modified freely by administrators to suit the situation better. Now the default is set to "I disagree" with the disclaimer. Administrators can change the purple part to set "agree" as the default or set no default. These codes should be saved in local storage with a name followed by .html, such as login_with_disclaimer.html.
<html>
<head>
<META HTTP-EQUIV="Pragma" CONTENT="no-cache">
<meta http-equiv="Content-Type" content="text/html; charset=utf-8">
<META HTTP-EQUIV="Cache-Control" CONTENT="no-cache">
<link href="../include/style.css" rel="stylesheet" type="text/css">
<title>Login</title>

<script language="javascript1.2">
var pham = document.cookie;
var disableButton=false;

function getCookie(name)
{
    name += "="; // append '=' to name string
    var i = 0; // index of first name=value pair
    while (i < pham.length) {
    var offset = i + name.length; // end of section to compare name string
    if (pham.substring(i, offset) == name) { // if string matches
    var endstr = pham.indexOf(", offset); // end of name=value pair
    if (endstr == -1) endstr = pham.length;
    }
}
return unescape(pham.substring(offset, endstr));
// return cookie value section
    }
    i = pham.indexOf(" ", i) + 1; // move i to next name=value pair
    if (i == 0) break; // no more values in cookie string
    }
    return null; // cookie not found
}

function CodeCookie(str)
{
    var strRtn = "";
for (var i=str.length-1;i>=0;i--)
{
    strRtn+=str.charCodeAt(i);
    if (i) strRtn+"a";
}
return strRtn;
}
function DecodeCookie(str)
{
    var strArr;
    var strRtn = "";
strArr=str.split("a");

for(var i=strArr.length-1;i>=0;i--)
strRtn+=String.fromCharCode(eval(strArr[i]));
return strRtn;

function MM_swapImgRestore() { //v3.0
    var i,x,a=document.MM_sr; for(i=0;a&&i<a.length&&(x=a[i])&&x.oSrc;i++) x.src=x.oSrc;
}

function MM_preloadImages() { //v3.0
    var d=document; if(d.images){ if(Id.MM_p) d.MM_p=new Array();
var i,j=d.MM_p.length,a=MM_preloadImages.arguments; for(i=0;i<a.length;i++)
if (a[i].indexOf("#")!=0){ d.MM_p[j]=new Image; d.MM_p[j++.src=a[i];}}
}

function MM_findObj(n,d) { //v4.01
    var p,i,x; if(!d)d=document; if((p=n.indexOf("?"))>0&&parent.frames.length) {
    d=parent.frames[n.substring(p+1)].document; n=n.substring(0,p);}
    if(!(x=d[n])&&d.all)x=d.all[n]; for (i=0;!x&&i<d.forms.length;i++) x=d.forms[i][n];
    for(i=0;!x&&d.layers&&i<d.layers.length;i++) x=MM_findObj(n,d.layers[i].document);
    if(!x && d.getElementById) x=d.getElementById(n); return x;
    }

function MM_swapImage() { //v3.0
    var i,j=0,x,a=MM_swapImage.arguments; document.MM_sr=new Array; for(i=0;i<(a.length-2);i+=3)
    if ((x=MM_findObj(a[i]))!=null){document.MM_sr[j++] = x; if(!x.oSrc)x.oSrc=x.src;x.src=a[i+2];}
    }

    function init(form)
    {
    id = getCokie("username");
    if(id != "" && id != null)
    {
    form.myusername.value = id;
    }

    disclaimer.style.display =";
    login.style.display = 'none';

    }
    function Before_Submit(form)
    {
    if(form.myusername.value == "")
    {
    alert("Please enter username.");
    form.myusername.focus();
    form.myusername.select();
    disableButton=false;

    return false;
    }
if(form.mypassword.value == "" )
{
    alert("Please enter password.");
    form.mypassword.focus();
    form.mypassword.select();
    disableButton=false;

    return false;
}

if(disablButton==true)
{
alert("The system is now logging you in, please wait a moment.");
    return false;
}
e l s e
{
    disableButton=true;
    return true;
}
return true;
}
function reminder_onclick(form)
{
    Reminder.myusername.value = form.myusername.value;
    Reminder.mypassword.value = form.mypassword.value;
    Reminder.submit();
}
function cancel_onclick(form)
{
    form.reset();
}

function check_agree(form)
{
if(form.selection[1].checked == true)
{
    alert("You disagree with the disclaimer, therefore you will NOT be able to log in.");
    return false;
}
disclaimer.style.display='none';
login.style.display=";

return true;
}

</script>

</head>
<body style="font-family: Arial" bgcolor="#FFFFFF"
onload="init(Enter);MM_preloadImages('./images/submit0.gif','../images/clear0.gif','../images/remaining0.gif')">
  <ilayer width=&{marquee_width}; height=&{marquee_height}; name="cmarquee01">
    <layer name="cmarquee02" width=&{marquee_width}; height=&{marquee_height};></layer>
  </ilayer>

<form action="userlogin.shtml" method="post" name="Enter">

<table name="disclaimer" id="disclaimer" width="460" height="430" border="0" align="center"
background="../images/agreement.gif">
  <tr>
    <td height="50" align="center" valign="middle"><div align="center" class="style5">Service Disclaimer</div></td>
  </tr>
  <tr>
    <td height="260" align="center" valign="middle"><table width="370" height="260" border="0" align="center">
    <tr>
    <td>
    <textarea name="textarea" cols="50" rows="15" align="center" readonly>
We may collect and store the following personal information:
e-mail address, physical contact information, credit card numbers and transactional information based on your activities on the Internet service provided by us.
If the information you provide cannot be verified, we may ask you to send us additional information (such as your driver license, credit card statement, and/or a recent utility bill or other information confirming your address), or to answer additional questions to help verify your information.)
Our primary purpose in collecting personal information is to provide you with a safe, smooth, efficient, and customized experience. You agree that we may use your personal information to: provide the services and customer support you request; resolve disputes, collect fees, and troubleshoot problems; prevent potentially prohibited or
illegal activities; customize, measure, and improve our services and the site's content and layout; compare information for accuracy, and verify it with third parties.
We may disclose personal information to respond to legal requirements, enforce our policies, respond to claims that an activity violates the rights of others, or protect anyone's rights, property, or safety.
We may also share your personal information with:
members of our corporate family to help detect and prevent potentially illegal acts; service providers under contract who help with our business operations; (such as fraud investigations and bill collection) other third parties to whom you explicitly ask us to send your information; (or about whom you are otherwise explicitly notified and consent to when using a specific service) law enforcement or other governmental officials, in response to a verified request relating to a criminal investigation or alleged illegal activity; (In such events we will disclose name, city, state, telephone number, email address, User ID history, and fraud complaints)
xxxxx participants under confidentiality agreement, as we in our sole discretion believe necessary or appropriate in connection with an investigation of fraud, intellectual property infringement, piracy, or other unlawful activity; (In such events we will disclose name, street address, city, state, zip code, country, phone number, email, and company name.) and other business entities, should we plan to merge with, or be acquired by that business entity. (Should such a combination occur, we will require that the new combined entity follow this privacy policy with respect to your personal information. If your personal information will be used contrary to this policy, you will receive prior notice.)
Without limiting the above, in an effort to respect your privacy and our ability to keep the community free from bad actors, we will not otherwise disclose your personal information to law enforcement, other government officials, or other third parties without a subpoena, court order or substantially similar legal procedure, except when we believe in good faith that the disclosure of information is necessary to prevent imminent physical harm or financial loss or to report suspected illegal activity.
Your password is the key to your account. Do not disclose your password to anyone. Your information is stored on our servers. We treat data as an asset that must be protected and use lots of tools (encryption, passwords, physical security, etc.) to protect your personal information against unauthorized access and disclosure. However, as you probably know, third parties may unlawfully intercept or access transmissions or private communications, and other users may abuse or misuse your personal information that they collect from the site. Therefore, although we work very hard to protect your privacy, we do not promise, and you should not expect, that your personal information or private communications will always remain private.
By agreeing above, I hereby authorize xxxxx to process my service charge(s) by way of my credit card.
</textarea>
</td>
</tr>
</table></td>
</tr>
<tr>
<td height="40"><table width="170" height="20" border="0" align="center" cellpadding="2">
<tr>
<td align="left"><input name="selection" value="1" type="radio"></td>
<td><span class="style4">I agree.</span></td>
</tr>
<tr>
<td align="left"><input name="selection" value="2" checked type="radio"></td>
<td><span class="style4">I disagree.</span></td>
</tr>
</table></td>
</tr>
<tr>
<td height="30"><table width="110" height="20" border="0" align="center" cellpadding="2">
<tr>
<td width="45" align="center" valign="middle"><input name="next_button" type="button" value="Next" onclick="javascript:check_agree(Enter)"></td>
</tr>
</table></td>
</tr>
<tr>
<td height="20"> </td>
</tr>
</table>
<div align="center">
<table name="login" id="login" width="497" height="328" border="0" align="center" cellpadding="2" cellspacing="0" background="../images/userlogin.gif">
<tr>
<td height="146" colspan="2"> </td>
</tr>
<tr>
<td width="43%" height="53"> </td>
<td><input type="text" name="myusername" size="20"></td>
</tr>
<tr>
<td height="42"> </td>
<td><input type="password" name="mypassword" size="20"></td>
</tr>
<tr>
    <td colspan="2">
    <div align="center">
    <a onclick="javascript:if(Before_Submit(Enter)){Enter.submit();}" onMouseOut="MM_swapImgRestore()" onMouseOver="MM_swapImage('Image3',";../images/submit0.gif',1)">
    <img src="../images/submit.gif" name="Image3" width="124" height="38" border="0">
    < / a >
    <a onclick="cancel_onclick(Enter)" onMouseOut="MM_swapImgRestore()" onMouseOver="MM_swapImage('Image5',";../images/clear0.gif',1)">
    <img src="../images/clear1.gif" name="Image5" width="124" height="38" border="0">
    < / a >
    <a onclick="javascript:if(Before_Submit(Enter)){reminder_onclick(Enter);}"
    onMouseOut="MM_swapImgRestore()" onMouseOver="MM_swapImage('Image4',";../images/remaining0.gif',1)">
    <img src="../images/remaining.gif" name="Image4" width="124" height="38" border="0">
    < / a >
    < / d i v >
    </td>
    </tr>
</table>

<table>
<tr>
    <td width="100%">
    <font color="#808080" size="2"><script language="JavaScript">if( creditcardenable == "Enabled" ) document.write("<a href Lindloginpages/credit_agree.shtml">Click here to purchase by Credit Card Online.<a>");</script></font>
    </td>
    </tr>
</div>
</form>
<form action="reminder.shtml" method="post" name="Reminder">
<input type=hidden name=myusername value="">
<input type=hidden name=mypassword value="">
</form>
<br>
<div align="center">
<table>
<tr>
<td width="100%">
<font color="#808080" size="2"><script language="JavaScript">document.write(copyright);</script></font></td>
</tr>
</table>
</div>
</body>
</html>
11. Appendix G—DHCP Relay
AC-M3000 supports DHCP Relay defined according to RFC 3046. For scaling reasons, it is advantageous to set up an external DHCP server other than having the internal DHCP server implemented in AC-M3000 to assign an IP. When forwarding client-originated DHCP packets to a DHCP server, a new option called the "Relay Agent Information option" is inserted by the DHCP relay agent. External DHCP servers that recognize the Relay Agent Information option may use the information to implement IP address or other parameter assignment policies. The external DHCP server then echoes the option back to the relay agent in server-to-client replies, and the relay agent strips the option before forwarding the reply to the client.
A graphic example of connecting 2 gateways with an external DHCP server:
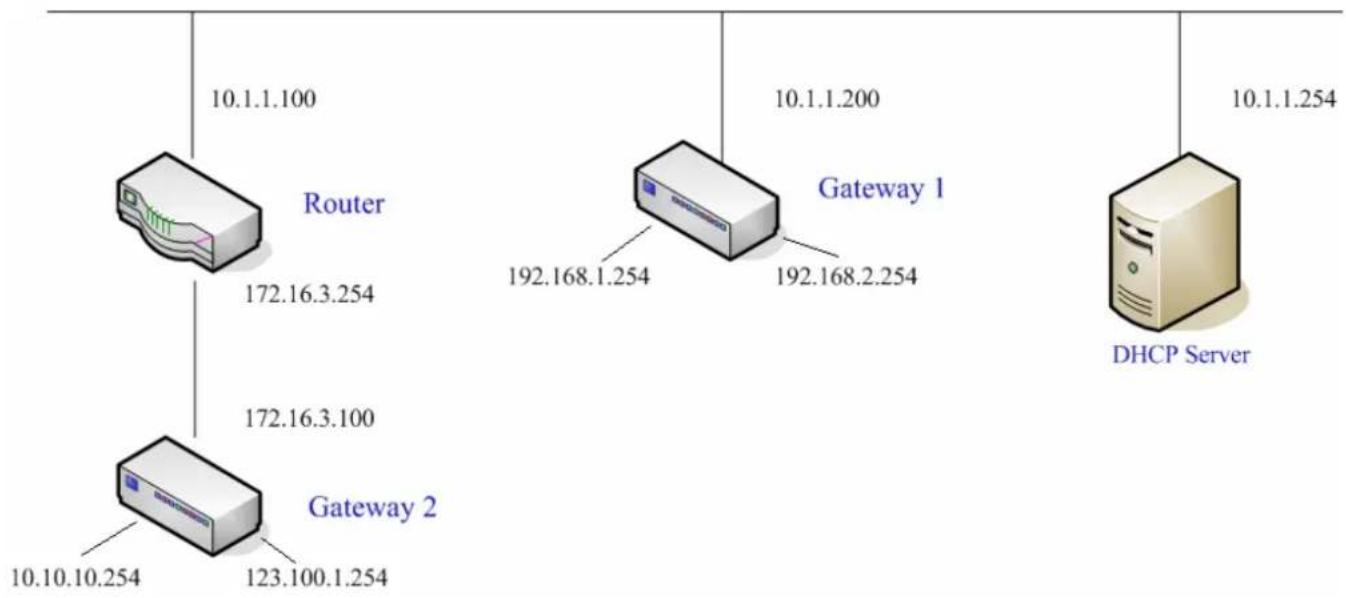
flowchart
graph TD
    A["Router"] -->|10.1.1.100| B["Gateway 2"]
    A -->|172.16.3.254| C["Gateway 2"]
    A -->|172.16.3.100| D["Gateway 2"]
    A -->|10.10.10.254| E["Gateway 2"]
    A -->|192.168.1.254| F["Gateway 1"]
    A -->|192.168.2.254| G["Gateway 1"]
    A -->|10.1.1.200| H["DHCP Server"]
    A -->|10.1.1.254| I["DHCP Server"]
Please note that the Router and Gateway 1 connected to the DHCP Server have to be under the same network segment as DHCP Server.
When a client requests IP address from Gateway 1 Public LAN through the build-in DHCP relay agent of AC-M3000, the DHCP server will receive a DHCP REQUEST packet with Option 82 (a code defined in RFC 3046). Also a Circuit ID will be sent by AC-M3000 when DHCP relay is enabled to define where the packet is sent from, and this Circuit ID should have a format of MAC_IP, such as 00:E0:22:DF:AC:DF_192.168.1.254. Therefore, when the external DHCP server gets the request packet, it knows where to reply to and which IP to assign.
Here is an example of configuration file of the DHCP server:
class "g1_public_lan" {
    match if option agent.circuit-id = "00:90:0B:07:60:91_192.168.1.254";
}

class "g1_private_lan" {
    match if option agent.circuit-id = "00:90:0B:07:60:92_192.168.2.254";
}

class "g2_public_lan" {
    match if option agent.circuit-id = "00:12:43:AD:32:F2_10.10.10.254";
}

class "g2_private_lan" {
    match if option agent.circuit-id = "00:12:43:AD:32:F2_123.100.1.254";
}

subnet 0.0.0.0 netmask 0.0.0.0 {

    option domain-name-servers 168.95.1.1;

    pool {
    allow members of "g1 public lan";
    range 192.168.1.30 192.168.1.50;
    option routers 192.168.1.254;
    option subnet-mask 255.255.255.0;
    }

    pool {
    allow members of "g1_private_lan";
    range 192.168.2.30 192.168.2.50;
    option routers 192.168.2.254;
    option subnet-mask 255.255.255.0;
    }
From the file, client that connects to AC-M3000 sends out a DHCP request. DHCP relay function in AC-M3000 is enabled and sending a Circuit ID 00:90:0B:07:60:91_192.168.1.254 to the external DHCP server. When DHCP server gets the Circuit ID, it recognizes that the request is sent from g1_public_lan and thus assigns the client a DNS server of 169.95.1.1, an IP that can be in the range of 192.168.1.30 and 192.168.1.50, a default gateway of 192.168.1.254, and a subnet-mask of 255.255.255.0.